RDE220 - Vacuum Cleaner CENTURION - Free user manual and instructions
Find the device manual for free RDE220 CENTURION in PDF.


| Product Type | Robotic Vacuum Cleaner with Docking Station |
| Model | RDE220 |
| Power Supply (Adaptor) | DC 30V, 1000mA |
| Battery Type | Rechargeable (removable) |
| Charging Time | 6–7 hours for full charge |
| Working Time Options | Max (60 min or until battery low), M (40 min), S (20 min) |
| Cleaning Patterns | Random, Spiral, Along Wall, Z-Type (auto sequence or single mode via remote) |
| Mopping Function | Yes (with dusting paper holder); not for carpet |
| Side Brushes | 2 removable, cleanable, replaceable |
| Sensors | Anti-cliff (3 adjustable), bumper, back sensor switch (removable) |
| Remote Control | Requires 2 AAA batteries; buttons: AUTO, FORWARD, LEFT, RIGHT, STOP, BACKWARD, VACUUM, DOCKING, SPIRAL, RANDOM, ALONG WALL, Z TYPE |
| Docking Station | Yes, with LCD display for time/schedule setting |
| Schedule Programming | Yes (daily, weekdays, weekends, etc.) |
| Dust Bin Capacity | Internal dustbin with filter (replace every 3 months) |
| Safety Features | Auto stop when lifted; stop when wheels jam; anti-cliff sensors |
| Included Accessories | Cleaner, rechargeable battery, dusting paper holder, dusting paper (3), side brushes (2), adaptor, remote control, operation manual, dust bin filter, docking station, mounting bracket & screws |
Frequently Asked Questions - RDE220 CENTURION
User questions about RDE220 CENTURION
0 question about this device. Answer the ones you know or ask your own.
Ask a new question about this device
Download the instructions for your Vacuum Cleaner in PDF format for free! Find your manual RDE220 - CENTURION and take your electronic device back in hand. On this page are published all the documents necessary for the use of your device. RDE220 by CENTURION.
USER MANUAL RDE220 CENTURION
Bruksanvisning(Swedish/English)

natural_image
Line drawing of a vacuum cleaner with a mounted device and circular base (no text or symbols)RDE220
INNEHÅLL
SÄKERHET SW-2
natural_image
Line drawing of a robotic vacuum cleaner with control panel and buttons (no text or symbols)
natural_image
Simple line drawing of a rectangular battery with a curved cable above it (no text or symbols)
natural_image
Simple line drawing of a rectangular electronic component or tray (no text or symbols)


natural_image
Line drawing of a mobile phone receiver with grid-patterned casing (no text or symbols)
natural_image
Line drawing of a mechanical component with a curved body and internal slots (no text or symbols)
natural_image
Line drawing of a robotic device with a black arrow pointing to the center (no text or symbols)Figur 16

natural_image
Line drawing of a hand using a tool to adjust or install a circular device component (no text or symbols)natural_image
Line drawing of a hand using a device to press or adjust a component, with an arrow indicating the press direction (no text or symbols present)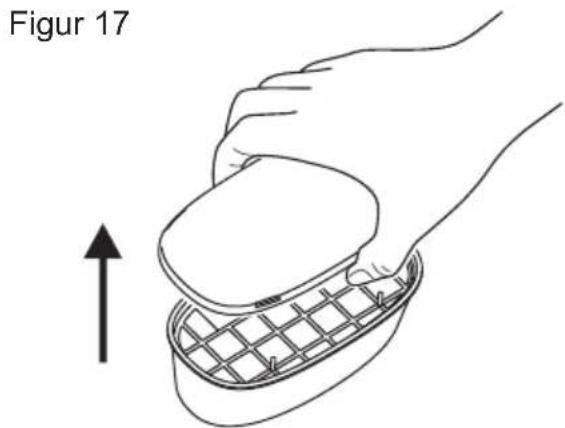
natural_image
Line drawing of a hand holding a circular object over a grid-patterned surface, with an upward arrow indicating motion (no text or symbols)Figur 18
natural_image
Line drawing of hands holding a grid-patterned object inside a container (no text or symbols)
natural_image
Line drawing of hands holding a grid-patterned device with an arrow indicating upward motion (no text or symbols)
MAINTENANCE AND CLEANING
Figur 20

natural_image
Line drawing of a kitchen sink with faucet and bowl (no text or symbols)Figur 21

natural_image
Line drawing of a hand using a tool to cut a circular object (no text or symbols)Figur 22

natural_image
Illustration of a hand opening a grid-patterned plastic container with an arrow indicating downward motion (no text or symbols)
natural_image
Line drawing of a hand holding a small object over a grid-patterned surface, with a downward arrow indicating motion (no text or symbols)Figur 23

natural_image
Line drawing of a mechanical device with a conical top component and control panel (no text or symbols)OBS!!
*Safety Precautions
* Battery Precautions
SPECIAL FEATURES EN-3
MAJOR COMPONENTS AND ATTACHMENTS ---- EN-4
Rv10 OVERVIEW EN-5
MAJOR COMPONENTS OF DOCKING STATION ---- EN-6
CONTROL PANEL & REMOTE CONTROL ---- EN-7
CONTROL PANEL OF DOCKING STATION ---- EN-9
INSTALLATION GUIDE EN-10
* Install The Docking Station
* Installing and Removing Side Brush
* Installing Dusting Paper
* Mounting and Dismounting Battery
RECHARGING BATTERY EN-15
* Preparation for Operation
* Basic Operation
•Manual work
•Schedule work
-Stop operation
•Safety Devices
ADJUSTMENT OF ANTI-CLIFF SENSORS ---- EN-17
CLEANING AND MAINTENANCE EN-18
* Maintenance Method
* Cleaning Dust Bin
* Cleaning Intake
* Cleaning Side Brushes
* Remove Removable Back Sensor Switch
TROUBLESHOOTING EN-22
SAFETY ADVISORY
Please read through the safety instructions in this Operation Manual before operating this product and keep this manual handy for your future reference. Observe the basic safety rules to prevent any occurrence of accident.
Safety Precautions
- Read the Operation Manual before operation.
- The unit is for indoor only.
- Keep the vacuum away from water, Water may damage the unit.
- Before operating the vacuum remove any loose articles on the floor such as clothes, paper, loose cables and extension cords as well as making sure to lift curtains and drapes off the floor to avoid any possible accident.
- Never stand on the vacuum.
- Never use the vacuum to clean lighted cigarette butts or hot ashes.
- Never use the vacuum to clean combustible or highly volatile liquids.
- Make sure exit doors leading outdoors are closed.
- During operation, care should be taken to avoid the heat vent from becoming clogged during operation. This could damage the vacuum.
- If the cleaner is damaged or not functioned normally, never use it regardless the causes.
- The power should be turned off and the battery be removed if the unit will not be used for a long period of time.
Battery Precautions
- The battery is rechargeable. Use only the adaptor equipped with the unit. The adaptor must not be used other than the unit.
- Use only the battery supplied with your vacuum.
- Do not use the battery if the cable or plug is damaged.
- Never touch the adaptor, plug or cable with wet hands.
- If the vacuum requires cleaning, unplug the unit and take out the battery.
- Before disposing of the unit, the battery must be taken out of the unit.
- Please switch off the unit before taking out the battery.
- Please recycle and dispose the waste battery properly.
SPECIAL FEATURES
First of all, it is our pleasure that you have made a wise choice to own this RV10
Robotic Vacuum Cleaner with Docking Station.
It's an epochal revolutionary automatic vacuum cleaner with professionally designed remote control and dusting paper make it best suitable for cleaning the house floor, including wood floor, tile, synthetic plastic tile and ceramic tile. RV10 Robotic
Vacuum Cleaner is definitely an automatic housing helper. Once the RV10 Robotic
Vacuum Cleaner starts working, it runs in four courses of movement, random --> spiral --> along the wall --> spiral--> "Z" type--> spiral and finally returns to random. Its movements can cover most part of the room.
The side brushes are excellent for sweeping the dust and hair into the dust bin.
After finishing one round of the program, the unit will run the four courses of movement repeatedly and work continuously until the battery is running low or the preset clean time is done. These movements ensure a thorough cleaning of the room. With the remote control, the unit can also run in single mode of random, spiral, along the wall and Z-type by pushing a button on the remote control (refer to P.8) for your desire.
With the docking station, when the battery is running low or the preset schedule is done, the unit is programmed to return to the docking station for charging.

flowchart
graph LR
    A["Random"] --> B["Spiral"]
    B --> C["Along the wall"]
    C --> D["Spiral Spiral"]
    D --> E[""Z" Type"]
MAJOR COMPONENTS AND ATTACHMENTS
- Cleaner x1
- Rechargeable battery x1
- Dusting paper holder x1
- Dusting paper x3
- Side brush x2
- Adaptor x1 (d.c. 30V 1000mA)
- Remote control x1
- Operation Manual x1
- Dust bin filter x1
- Docking station x1

natural_image
Line drawing of a robotic vacuum cleaner with labeled parts (no text or symbols)
natural_image
Simple line drawing of a rectangular battery with a curved cable above it (no text or symbols)
natural_image
Simple line drawing of a rectangular frame with two side connectors (no text or symbols)



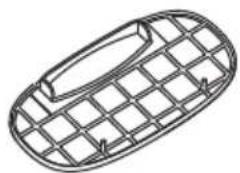
natural_image
Line drawing of a mobile phone receiver with grid-patterned casing (no text or symbols)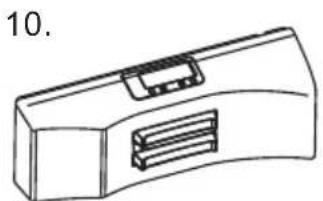
natural_image
Line drawing of a mechanical device with a curved body and internal compartments (no text or symbols)

MAJOR COMPONENTS OF DOCKING STATION
- Docking station x1
- Mounting Bracket x1
- Pair of Screws x2

3.
CONTROL PANEL & REMOTE CONTROL
CONTROL PANEL

- Power Indication Lamp
| Color of the lamp | Indication |
| Green | Power on with Sufficient battery |
| Red | Abnormal / Unit being lifted up |
| Green flashing | Unit is in charging mode |
| Red flashing | Battery low, Charging required |
Table 1
- The Selection button "FUNCTION"
| Sequence of “FUNCTION” button pressed | Lamp of “TIME” indicates | Function presented |
| 1^st Press | “MAX” with red on | Maximum work time (60 minutes or until battery low) with docking function on. (Note1) |
| 2^nd Press | “M” with yellow on | 40-minute work time with docking function on. |
| 3^rd Press | “S” with green on | 20-minute work time with docking function on. |
| 4^th Press | “Max” with red flashing. | Maximum work time (60 minutes or until battery low) with docking function off.(Note2) |
| 5^th Press | “M” with yellow flashing. | 40-minute work time with docking function off. |
| 6^th Press | “S” with green flashing | 20-minute work time with docking function off. |
| 7^th Press | No lamp lighted | Stop |
Table 2
Note1: Docking function on: The unit will return to the docking station to charge the battery.
Note2: The unit will not return to the docking station after work.
CONTROL PANEL & REMOTE CONTROL
3. MOP
Press "Vacuum" once on the remote control and the MOP light will be on to indicate the unit is working with mopping mode only (without vacuum and sweeper.) Press "Vacuum" again to reactive the vacuum and sweeper.
REMOTE CONTROL

- 2 "AAA" batteries required.
- Function of buttons:
| Key Pressed | Action |
| AUTO | Please refer to Table 2 for Pressing “AUTO” button. |
| FORWARD | Move forward with vacuum on and will stop when bumper encounter any obstacle or by pressing “STOP” button. |
| LEFT | Turn left . Pressing and holding the button makes it turn left continuously. |
| RIGHT | Turn right . Pressing and holding the button makes it turn right continuously. |
| STOP | Stop the unit immediately. |
| BACKWARD | The unit going backward for 20 cm.The unit doesn't have the back anti-cliff sensor to prevent it from falling from stairs when moving backward. |
| VACUUM | Switch the vacuum power or to turn off vacuum and sweeper (with mop function on only). |
| DOCKING | Search the docking station for charging. |
| SPIRAL | Move in spiral pattern with vacuum on until the bumper encounter an obstacle or stairs, then the unit will continue operate in “AUTO” mode with 60 minutes working time or until battery low. |
| RANDOM | Operate in the random mode continuously with 60 minutes working time or until the battery low. |
| ALONG THE WALL | Operates unit in the along-the-wall mode continuously with 60 minutes working time or until the battery low. |
| Z TYPE | Operates unit in the “Z” type mode continuously with 60 minutes working time or until the battery low. |
CONTROL PANEL OF DOCKING STATION

Functions of buttons:
- "Set": Press "Set" to switch between setting the present time and the working schedule.
A. Set present time:
Press "Set" once, "SET CLK" will flash.
Press "Select" to switch among time setting modes of Hour, Minute, and Week.
Press “+” and “-” for adjustment of the digits.
B. Set working schedule:
Press "SET" twice, "√" on the left side of the screen will flash.
Press "Select" to switch among "Hour" / "Minute" / "Week" to do the setting. If there's no time setting been done before, the screen will show "--:--", press "+" and "-" to adjust the digits.
*** With "√" shown on the LCD display indicates the working schedule is completed.
- “+”: Press “+” for adjustment purpose.
- “-”: Press “-” for adjustment purpose.
Format of schedules:
a. Work everyday (Su-Sa).
b. Five days a week (Mo-Fr).
c. Six days a week (Mo-Sa).
d. Two days a week (Su and Sa).
e. Once a week.
* When the unit is successfully docked at the docking station, the battery indicator on LCD display of the docking station will flash and the power indication lamp on the vacuum will flash too, indicates the unit is in charging status.
INSTALLATION GUIDE
Install The Docking Station
- Tear off the adhesive tape from the back of the docking station mounting bracket in Fig. 1. Affix the mounting bracket to the wall, and keep both sides of the wall which docking station mounted are free of obstacle. The distance to the left and to the right of the docking station should be at least 100 ~cm and 30 ~cm In Fig. 2.
- Take off the docking station from the mounting bracket then plug in the DC jack and store the excess cord in the back of the docking station.
- It is best to secure the docking station to the wall with the screws enclosed.

INSTALLATION GUIDE
Proof Test
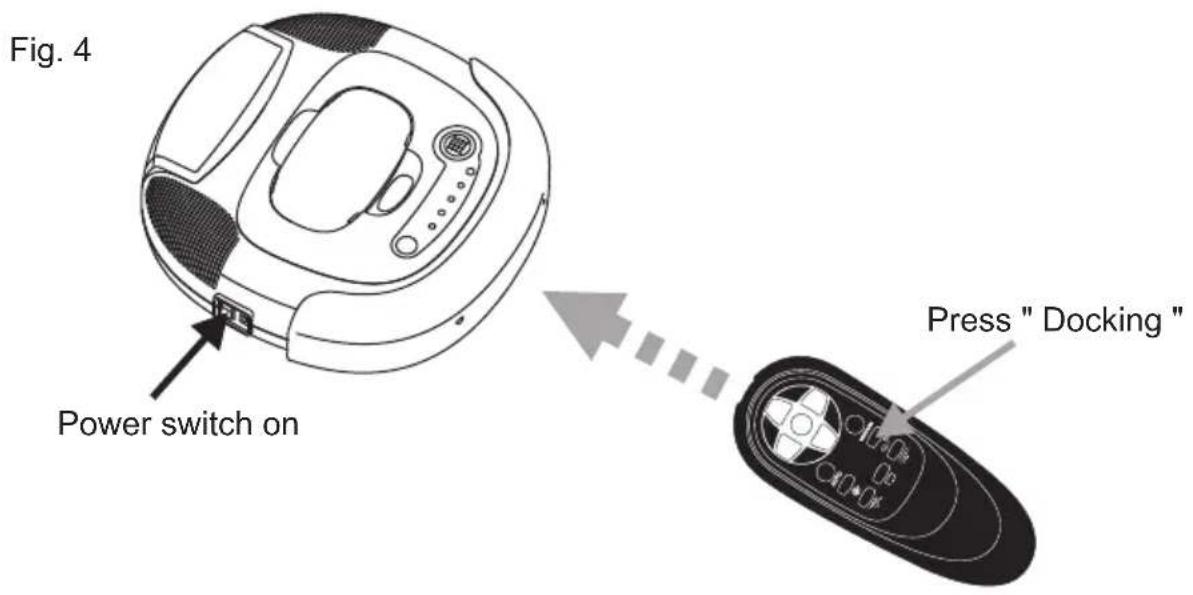
Please try either one of the following two methods to test the installation of docking station, if the vacuum cleaner cannot go back to the docking station and charge unsuccessfully, then please adjust the docking station to the proper height.
-
Test by the unit, press down the selection button, do not release, and turn on the power switch of the unit, when the unit begins to move, release the selection button. The unit will switch the mode to return to the Docking Station for charging. Please refer Fig.3.
-
Test by the remote control, turn on the power switch of the unit, press the button "Docking" on the remote control, the unit will go back to the docking station for recharging. Please refer Fig.4.

INSTALLATION GUIDE
Installing and Removing Side Brush
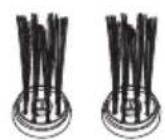
To install: Put the brushes directly onto the holder and spread the brush bristle evenly, then press on the cap to fix it.(Fig. 5)
To remove: Hold the brush hair and pull upward to remove the brush.(Fig. 6)

Fig. 5 Fig. 6
NOTE:
When cleaning on the carpet, please remove the side brushes to prevent from being worn-out.
INSTALLATION GUIDE
Installing Dusting Paper
- Remove the dusting paper holder following the instruction shown in Fig. 7.
- Flat the dusting paper and put it one floor or table. Then place the holder (the side with 4 stoppers face up) on the paper at the midpoint as shown in Fig. 8.
- Remove 4 stoppers from the holder, fold the hem of dusting paper on two sides back to the holder, and place back 4 stoppers on top of the paper then press firmly to fix the paper onto holder (Fig. 9).
- Then place the dusting paper holder to the bottom of unit by aiming one bolt of holder at the hole (near the big wheel) on cleaner, click the holder on the cleaner, and then do it again for the other side. (Fig. 10)
NOTE:
- Do not use mopping function on the carpet. At the same time you should remove the side brushes to prevent it from damaging the brushes.
- If you don't need to use mopping function, please remove the dusting paper holder from the cleaner (follow the instructions shown in Fig. 7) before you turn it on for cleaning.

Fig. 7
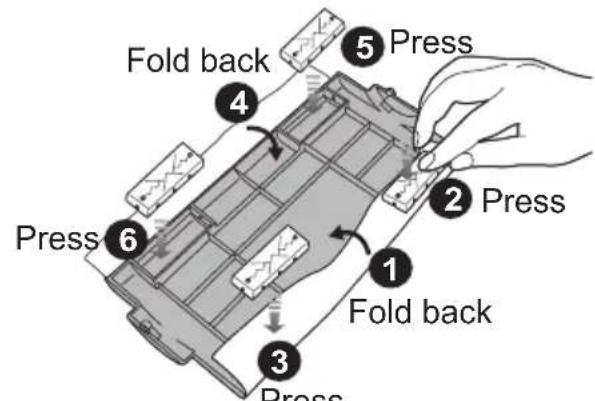

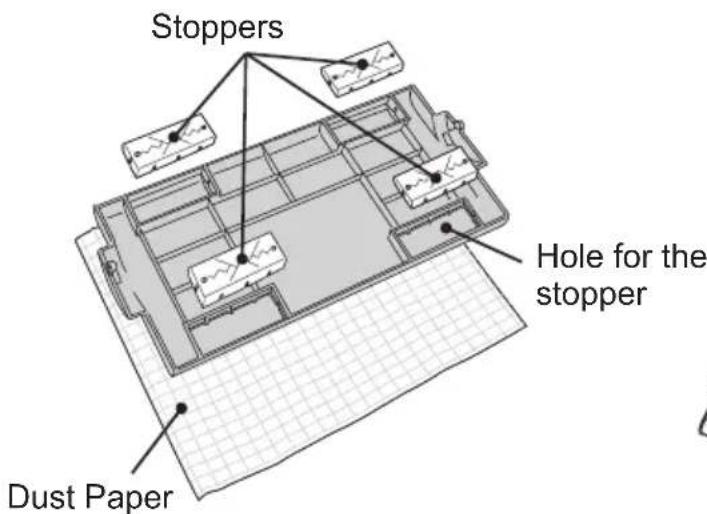
Fig. 8

natural_image
Technical diagram of an electronic device showing internal components and a labeled section (Fig. 1), with no readable text or symbols beyond the label.Press the two bolts on the dusting paper holder into the two holes on the bottom of the cleaner.
INSTALLATION GUIDE
Mounting and Dismounting Battery
- Before inserting or removing the battery, Turn off the power switch.
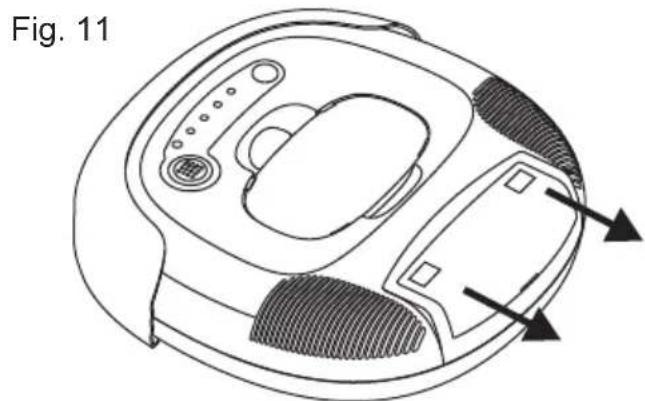
- Push out the battery cover in the direction of the arrows as shown in Fig. 11.
- Insert the battery plug into the socket and let the metal piece (on the battery) press on the button (on the bottom of the battery compartment) as shown in Fig. 12.
- Place the battery in the battery compartment and close the battery cover. Make sure the cover is snapped into the slot.
natural_image
Technical line drawing of a robotic device with labeled components and directional arrows (no text or symbols beyond label)
RECHARGING BATTERY
-
Before charging, please check if the battery is properly mounted and turn on the power switch.
-
Two ways to charge the battery:
A. Make sure the docking station is installed properly, place the unit to the docking station as shown in fig.13, make sure the contact points at the back of the unit are contacted with the contact plate at the docking station.
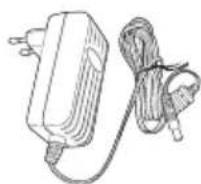
B. Plug the d.c. end of the adaptor into d.c. jack at the side of the unit first, and then plug the a.c end of the adaptor into the a.c. power outlet on the wall. (Please connect the adaptor to the unit first before connecting to the a.c power outlet.) Please refer Fig.14.
Fig. 13

natural_image
Line drawing of a robotic vacuum cleaner with a close-up view of its internal components (no text or symbols)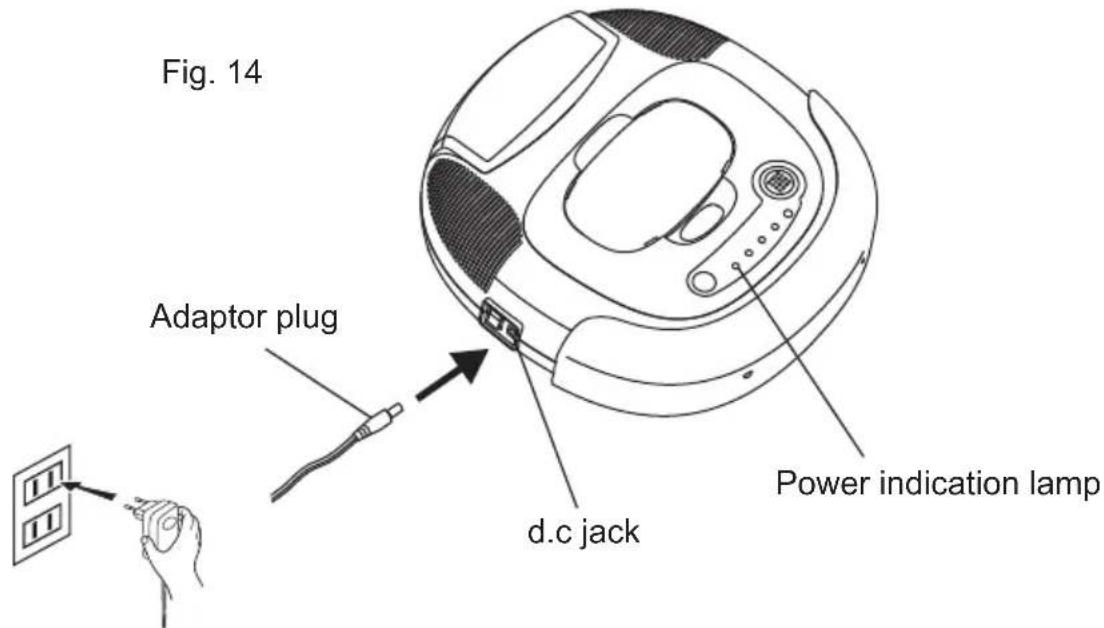
-
For a new battery or the battery has been idled over 3 months, the battery should be charged fully before operation. It takes at most 6\~7 hours to fully charge the battery.
-
During the charging state, the power indication lamp on the control panel will flash green.
-
The power indication lamp will stay green when the battery is fully charged.
GENERAL OPERATION
Preparation for Operation
- Install the docking station, side brushes and battery according to the manual.
- Turn on the power switch on the side of the unit, and charge the battery fully prior to the first operation.
- To ensure the best efficiency of the unit, first is to remove clothes, paper, cable, extension cable scattered on the floor, roll up the curtains and drapes if any to avert the possible accident.
Basic Operation
Manual work:
- Press the "AUTO" on the remote control or press "FUNCTION" on the unit ("FUNCTION" will work only when the unit is not contacted with the docking station) to select the work time: "Max "(exhausted) - " M "(about 40 minutes) or " S " (about 20 minutes). Please refer to Table 2 on page 7.
- After 2 seconds, the unit will begin cleaning automatically.
- After the work is completed, the unit will emit a buzz of warning and stop or return to the docking station depending on the function selected (please refer to table 1). If the power indication lamp turn to Red flashing (battery low) at the same time, the unit will emit a buzz every minute till you turn off power switch, battery exhausted or returned to the docking station.
Schedule work:
- Set up the schedule according to the manual of CONTROL PANEL OF DOCKING STATION. (Please refer to page 9.)
- The unit will work according to the schedule set.
Stop operation:
- To stop the operation of the unit immediately, you can turn off the power switch on the right of the unit, lift the unit off the floor, the unit will stop after 3 seconds, or press the "STOP" on the remote control.
- If you want the unit continue to work, place the unit on the floor and press "AUTO" button on the remote control.
Safety Devices:
- The unit will STOP when lifted up from the floor for 3 seconds.
- The unit will STOP when wheels jammed for more than 10 seconds.
3 Adjustable anti-cliff sensors(please refer to P.17). The windows are adjustable according to the height of the stairs and the color of the floor. The windows have four stages:"3" "2" "1" "0". The factory setting is "1". The smaller the number is, the shorter distance can be detected.
Owner can adjust the windows if necessary. The scale of all windows must be the same to ensure the unit to function normally.
4 Removable back sensor switch is to restrain the mobility of the unit in case the machine is stuck, and it can be removed from or plugged onto the base according to the condition of the environment.
Recommend removing the switch if the difference of the floor surface to be cleaned is more than 1.5cm.
ADJUSTMENT OF ANTI-CLIFF SENSORS
There are three “Anti-Cliff” sensors at the bottom of RV10 to prevent the unit from falling down stairs. If the distance between the stair and the ground is shorter than usual, please adjust all windows of “Anti-cliff” sensors to “” or “2” or “1” or “0” position to prevent the cleaner from falling down stairs. Please test it before it starts to clean.
*ATTENTION: If the color of the floor is dark (ex. Black), it means that reflectivity of the floor is bad, at this time, you have to open the window to a larger scale.
Please refer to the criteria of adjustment for adjusting the windows.

MAINTENANCE AND CLEANING
Maintenance Method
The operation and maintenance of the cleaner is very simple. Clean the dust and dirt left in the dustbin and on the filter. It is not necessary to clean the intake and the side brushes every time.
Cleaning Dust Bin
- Press the ejection button as the arrow shown in Fig.15.
- Release the dustbin from the grip slot and take out the dustbin as shown in Fig.16.
- Open the upper cover of the dustbin as shown in Fig.17.
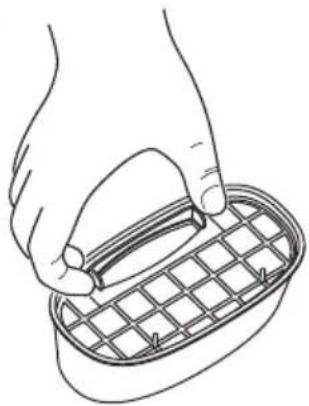
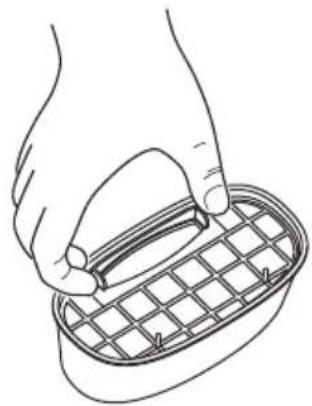
- Lift up and take out the filter as shown in Fig.18.
- Throw away the dust and dirt from the dustbin as shown in Fig.19.
- Rinse the dustbin with tap water as shown in Fig.20, it is not necessary to wash every time.
- Clean the filter with toothbrush as shown in Fig.21. The filter should change every 3 months, if use frequently. If the filter is broken, replace a new one immediately. A broken filter may cause damage to the unit.
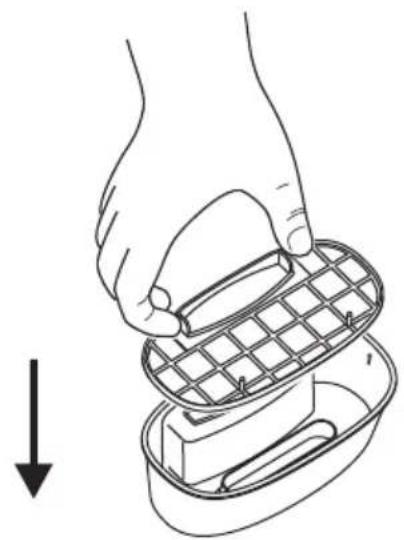
- Dry thoroughly, replace the filter and the dustbin lid as shown in Fig.22.
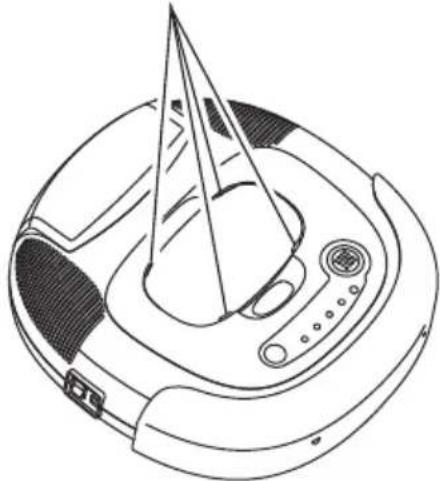
- Replace the dust bin and ensure it is fastened on the lock bolts as shown in Fig.23.
Fig. 15

natural_image
Line drawing of a robotic device with a black arrow pointing to the center (no text or symbols)Fig. 16

natural_image
Line drawing of a hand holding a circular device with a knife inserted (no text or symbols)Grip slot for the dust bin

natural_image
Line drawing of a hand using a device to press or adjust a component, with an arrow indicating the press direction (no text or symbols present)Fig. 17

natural_image
Line drawing of a hand holding a small object over a grid-patterned surface, with an upward arrow indicating motion (no text or symbols)Fig. 18
natural_image
Line drawing of a hand holding a grid-patterned object inside a rounded rectangular container (no text or symbols)
natural_image
Illustration of hands holding a grid-patterned device with an upward arrow indicating motion (no text or symbols)
MAINTENANCE AND CLEANING
Fig. 20

natural_image
Line drawing of a kitchen sink with faucet and drain (no text or symbols)Fig. 21

natural_image
Line drawing of a hand using a tool to cut a circular object with a textured handle (no text or symbols)Fig. 22
natural_image
Illustration of a hand holding a grid-patterned object over an open container, with a downward arrow indicating action (no text or symbols)
natural_image
Line drawing of a hand holding a small object over a grid-patterned surface, with a downward arrow indicating motion (no text or symbols)Fig. 23

Dust bin lock bolt
natural_image
Line drawing of a mechanical device with a conical component and circular base (no text or symbols)ATTENTION!!
Before starting the cleaner, please be sure to install the dust bin filter properly first in case any damage occurs.
MAINTENANCE AND CLEANING
Cleaning Intake
To ensure the efficiency and constant airflow of the cleaner, periodically remove the dust and dirt that will accumulate around the intake. To do this you should:
- Turn off the power of the cleaner.
- Clean up the dust on the intake Fig.24.
Intake Valve
Fig. 24

natural_image
Top-down schematic of a device casing with internal components and wiring (no text or symbols)Cleaning Side Brushes
- After being used for a period of time, the brushes need to be replaced for working more effectively.
- Turn off the power, place bottom of the cleaner upward on a flat surface. Hold the brush bristle and pull upward to remove the brush as shown in Fig. 25.
- The side brushes can be rinsed and if they become crooked, you can soak them in hot water to make them recover to the original shape. Install the brushes back after cleaning.
Remove Removable Back Sensor Switch
*Pull up the switch as shown in Fig.26.

Fig. 26
Fig. 25
TROUBLESHOOTING
| PROBLEM | POSSIBLE CAUSE | SOLUTION | |
| 1 | Red LED flashes after turn on the power switch. | Low battery. | Charge the unit. |
| 2 | Turn on the power switch with no indication lamp on. | 1.Battery is not installed correctly.2.Very low battery. | 1.Install the battery according to the manual.2.Charge the battery according to the manual. |
| 3 | The unit moves only in circular motion. | The wire between wheel set and the unit is loosened. | Contact the service dept. for repair. |
| 4 | Remote control doesn't work. | 1.The batteries for the remote control are exhausted.2.The “AAA” batteries are not installed correctly or not installed. | 1.Change a new set of batteries.2.Re-install the batteries correctly. |
| 5 | Can't use remote to control the unit while it is in docking station. | The power switch of the unit is not on. | Turn on the power switch. |
| 6 | Vacuum on but can not collect the dirt or hair | 1.The dustbin is full.2.The filter is not installed correct. | 1.Clean the dustbin.2.Re-install the filter correctly. |
| 7 | The unit is moving backward constantly | 1.Bumper is stuck.2.The anti-cliff sensors are covered with dirt.3.The adjustable windows are opened too small. | 1.Push the bumper and release it.2.Clean the lens with Q-tip3.Re-adjust the windows to suitable position. |
| 8 | The unit being stuck on the edge of the rug. | The dust paper holder can't pass the rug. | Remove the dust paper holder. |
| 9 | The unit cannot pass through the higher surface of the floor. | Removable back sensor switch bounds the mobility. | Remove the sensor switch. |
※ If the solution can not solve the problem, Please contact to your local dealer for service.

This symbol on the product or in the instructions means that your electrical and electronic equipment should be disposed at the end of its life separately from your household waste. There are separate collection systems for recycling in the EU.
For more information, please contact the local authority or your retailer where you purchased the product.
- INNEHÅLL
- SÄKERHET SW-2
- MAINTENANCE AND CLEANING
- OBS!!
- SPECIAL FEATURES EN-3
- MAJOR COMPONENTS AND ATTACHMENTS ---- EN-4
- Rv10 OVERVIEW EN-5
- MAJOR COMPONENTS OF DOCKING STATION ---- EN-6
- CONTROL PANEL & REMOTE CONTROL ---- EN-7
- CONTROL PANEL OF DOCKING STATION ---- EN-9
- INSTALLATION GUIDE EN-10
- RECHARGING BATTERY EN-15
- ADJUSTMENT OF ANTI-CLIFF SENSORS ---- EN-17
- CLEANING AND MAINTENANCE EN-18
- TROUBLESHOOTING EN-22
- SAFETY ADVISORY
- Safety Precautions
- Battery Precautions
- SPECIAL FEATURES
- MAJOR COMPONENTS AND ATTACHMENTS
- MAJOR COMPONENTS OF DOCKING STATION
- CONTROL PANEL & REMOTE CONTROL
- MOP
- CONTROL PANEL OF DOCKING STATION
- Functions of buttons:
- Format of schedules:
- INSTALLATION GUIDE
- Install The Docking Station
- Proof Test
- Installing and Removing Side Brush
- NOTE:
- Installing Dusting Paper
- Mounting and Dismounting Battery
- RECHARGING BATTERY
- GENERAL OPERATION
- Preparation for Operation
- Basic Operation
- Manual work:
- Schedule work:
- Stop operation:
- Safety Devices:
- ADJUSTMENT OF ANTI-CLIFF SENSORS
- Maintenance Method
- Cleaning Dust Bin
- ATTENTION!!
- Cleaning Intake
- Cleaning Side Brushes
- Remove Removable Back Sensor Switch
- TROUBLESHOOTING
Brand : CENTURION
Model : RDE220
Category : Vacuum Cleaner