DE130 - Vacuum Cleaner CENTURION - Free user manual and instructions
Find the device manual for free DE130 CENTURION in PDF.


| Product Type | Cylinder Vacuum Cleaner |
| Brand | Centurion |
| Model | DE130 |
| Dimensions (LxWxH) | 400 x 250 x 300 mm |
| Weight | 5.2 kg |
| Power Consumption | 1200 W |
| Power Cord Length | 6 m |
| Dust Capacity | 2.5 L (bagless) |
| Filtration System | HEPA filter |
| Noise Level | 75 dB(A) |
| Main Functions | Dry vacuuming for carpets and hard floors |
| Accessories Included | Crevice tool, dusting brush, upholstery nozzle |
| Maintenance | Empty dust container after each use; clean or replace filter every 3 months |
| Cleaning | Wipe exterior with damp cloth; do not submerge in water |
| Safety Features | Thermal overload protection, automatic shut-off |
| Spare Parts Availability | Filters, brush rolls, and accessories available from manufacturer |
| Repairability | Modular design allows easy replacement of main components |
| Warranty | 1 year |
Frequently Asked Questions - DE130 CENTURION
User questions about DE130 CENTURION
0 question about this device. Answer the ones you know or ask your own.
Ask a new question about this device
Download the instructions for your Vacuum Cleaner in PDF format for free! Find your manual DE130 - CENTURION and take your electronic device back in hand. On this page are published all the documents necessary for the use of your device. DE130 by CENTURION.
USER MANUAL DE130 CENTURION
natural_image
Product photo of a black vacuum cleaner with attached blue device (no visible text or symbols)CONTENTS / INNEHÅLLSFÖRTECKNING / REGISTER
ENGLISH
Chapter 1: Safety Instructions ....3
Chapter 2: Product Components ....4
Chapter 3: Assemble and Use ....4
Chapter 4: Maintenance ....6
SVENSKA
Kapitel 1: Säkerhetsinstruktioner ....7
CHAPTER 1: SAFETY INSTRUCTIONS
Ensure the voltage rating on the type plate corresponds to your mains 1. voltage (type plate is located on the bottom of the product).
Always unplug the vacuum cleaner from the outlet when you are not 2. using it.
Do not use outdoors or on wet surfaces.3.
Do not use if the cord or plug have been damaged.4.
If vacuum cleaner is not working as it should, has been dropped, 5. damaged, left outdoors, or dropped into water, take it for a service.
Do not pull or carry the vacuum cleaner by the cord.6.
Do not run vacuum cleaner over cord.7.
Keep cord away from heated surfaces.8.
To unplug, grasp the plug, not the cord.9.
Keep hair, loose clothing, fingers and all body parts away from openings 10. and moving parts.
Do not use to pick up flammable or combustible liquids.11.
Do not pick up anything that is burning or smoking, such as cigarettes, 12. matches, or hot ashes.
Do not use without dust bag and/or filter in place.13.
-
Before you start using the vacuum cleaner, please remove large or sharp objects from the floor in order to prevent that the paper filter is damaged.
-
This appliance is not intended for use by persons (including children) with reduced physical, sensory or mental capabilities, or lack of experience and knowledge, unless they are under supervision or instruction by a person responsible for their safety. Children must always be supervised.
CHAPTER 2: PRODUCT COMPONENTS
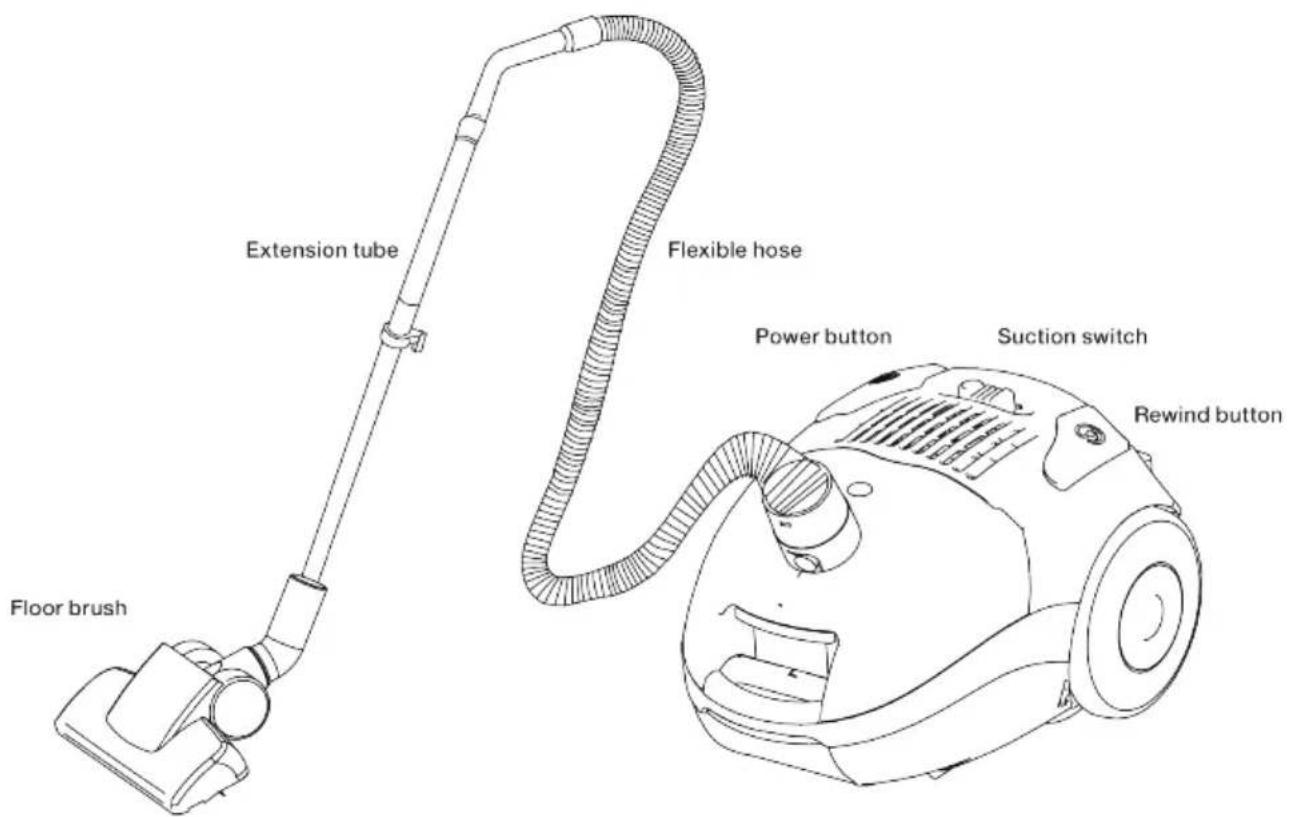
CHAPTER 3: ASSEMBLE AND USE
ASSEMBLING THE VACUUM CLEANER
Always remove the plug from the power socket before fitting or removing accessories.
FITTING AND REMOVING THE FLEXIBLE HOSE:
FITTING:
Insert the flexible hose into the air intake duct on the top of the vacuum cleaner. Press until it clicks into position.
REMOVING:
Press the end of the hose firmly and pull from the air intake duct.
4 // English
FITTING THE EXTENSION TUBES AND ACCESSORIES:
Fit the extension tube to the handle.1.
Fit the brush to the extension tube.2.

CLEANING TOOLS:
Crevice tool - for radiators, crevices, corners, baseboards and between 1. cushions.
Dusting brush - for the furniture, blinds, books, lamp shades and shelves.2.
Small brush - for cleaning a sofa and other furniture.3.

natural_image
Three technical line drawings of mechanical components: a cylindrical pipe, a conical connector with threaded end, and a flanged connector (no text or symbols)INSTRUCTIONS FOR USE
Before using the vacuum cleaner; unwind the sufficient length of cable and insert the plug into a wall socket. The yellow mark on the power cable shows the ideal cable length. Do not expand the cable beyond the red mark.
Press the power button to switch the vacuum cleaner on.1.
To rewind the power cable, press the rewind button with one hand, and 2. guide the cable with the other hand to ensure that it does not whip.
Slide the Suction Switch to control the suction of the cleaner.3.
CHAPTER 4: MAINTENANCE
MAINTENANCE
CHANGING THE DUST BAG:
After removing the flexible tube open the front cover.1.
Remove the bracket and the dust bag.2.
Throw away the dust bag and replace it with a new one.3.
Put the bracket and bag back and close the cover.4.
CLEANING AND CHANGING THE FILTER:
Remove the dust bag. Pull the filter bracket upwards.1.
Rinse the filter in lukewarm water, then dry it completely.2.
Put the filter back or change to a new one.3.
CHANGING FILTER FOR AIR-OUTLET:
Open the cover for the filter.1.
- When you open the cover use two fingers to pull the filter outwards and then upwards.
Take out the filter and change it to a new one.3.
Close the cover.4.
Note: Filter for air-inlet should be cleaned at least twice a year or when it becomes visible solid. Always operate the cleaner with filters and HEPA installed or reduced suction or motor damage may occur. Do not use a washing machine to rinse the filter.
SPECIFICATIONS
| Load 220-240 V | |
| Frequency 50 Hz | |
| Input Power | 1600 W |
| Maximal Vacuum Pressure | 24 Kpa |
| Sound Level | < 84 dB |
| Dust Bag | GAMEO 9351 |
KAPITEL 1: SÄKERHETSINSTRUKTIONER
natural_image
Simple line drawing of a cylindrical object with a curved top surface (no text or symbols)
natural_image
Technical line drawing of a cylindrical mechanical component with threaded end (no text or symbols)
natural_image
Technical line drawing of a mechanical pipe fitting (no text or symbols)INSTRUKTIONER
BYTA FILTER I UTBLÅSET:
natural_image
Three technical line drawings of mechanical components: a cylindrical shaft, a conical connector with threaded end, and a flanged bracket (no text or symbols)BRUKSANVISNING
Før du bruker støvsugeren, rull ledningen tilstrekkelig langt ut, og sett støpselet i en stikkontakt. Det gule merket på strømledningen viser den ideelle lengden på ledningen. Ikke rull ledningen lengre ut enn det røde merket.
KAPITTEL 4: VEDLIKEHOLD
VEDLIKEHOLD
SKIFTE ST∅VPOSE:
This symbol on the product or in the instructions means that your electrical and electronic equipment should be disposed at the end of its life separately from your household waste. There are separate collection systems for recycling in the EU. For more information, please contact the local authority or your retailer where you purchased the product.

WARRANTY
Thank you for purchasing this product. We hope it will be useful. Should you have any problems with the product we ask you to contact the store where you bought it for advice and assistance. Proof of purchase must be presented at all times. Warranty under applicable law.
RESERVATIONS
We reserve the right to correct any typographical errors, and reserve the right to make ongoing changes and improvements to the product and related materials.
MILJÖINFORMATION
- CONTENTS / INNEHÅLLSFÖRTECKNING / REGISTER
- ENGLISH
- SVENSKA
- CHAPTER 1: SAFETY INSTRUCTIONS
- CHAPTER 2: PRODUCT COMPONENTS
- CHAPTER 3: ASSEMBLE AND USE
- ASSEMBLING THE VACUUM CLEANER
- FITTING AND REMOVING THE FLEXIBLE HOSE:
- FITTING:
- REMOVING:
- // English
- FITTING THE EXTENSION TUBES AND ACCESSORIES:
- CLEANING TOOLS:
- INSTRUCTIONS FOR USE
- CHAPTER 4: MAINTENANCE
- MAINTENANCE
- CLEANING AND CHANGING THE FILTER:
- CHANGING FILTER FOR AIR-OUTLET:
- KAPITEL 1: SÄKERHETSINSTRUKTIONER
- INSTRUKTIONER
- BYTA FILTER I UTBLÅSET:
- BRUKSANVISNING
- KAPITTEL 4: VEDLIKEHOLD
- VEDLIKEHOLD
- SKIFTE ST∅VPOSE:
- WARRANTY
- RESERVATIONS
- MILJÖINFORMATION
Brand : CENTURION
Model : DE130
Category : Vacuum Cleaner