
AWM-AHX-S - Mount Atdec - Free user manual and instructions
Find the device manual for free AWM-AHX-S Atdec in PDF.


| Product Type | Heavy Duty Dynamic Arm (Single Monitor Arm) |
| Brand | Atdec |
| Model | AWM-AHX-S |
| Weight Capacity (Desk Base Mount) | 6 – 16 kg (13 – 35 lb) |
| Weight Capacity (Post Mount) | 6 – 14 kg (13 – 31 lb) |
| Mounting Options | Desk clamp, grommet mount, or post mount (base sold separately) |
| Compatible Bases | AWM-LB (arm base) or AWM-LC (channel clamp) |
| Compatible Heads | AWM-LTH (heavy duty tilt head) or AWM-LR (dual crossbar) – sold separately |
| VESA Compatibility | 75 x 75 mm and 100 x 100 mm (via compatible head) |
| Arm Sections | 2-link dynamic arm with heavy duty dynamic link and lower angled link |
| Materials | High grade steel and aluminum |
| Color | Black (standard) |
| Tension Adjustment | Yes, via 4mm Allen key (included) – tool-less fine tuning |
| Cable Management | Integrated cable hooks and clips for routing cables down the arm |
| Monitor Types Supported | Curved monitors, all-in-one PCs, and offset VESA locations – check weight limits |
| Installation | DIY – requires assembly of arm links, mounting base, and head |
| Tools Included | 4mm Allen key (all tools supplied) |
| Warranty | Manufacturer warranty (check official Atdec support) |
| Intended Use | Professional/office environment, heavy duty monitor positioning |
| Adjustability | Height, tilt, swivel, and rotation (depends on head unit) |
Frequently Asked Questions - AWM-AHX-S Atdec
User questions about AWM-AHX-S Atdec
0 question about this device. Answer the ones you know or ask your own.
Ask a new question about this device
Download the instructions for your Mount in PDF format for free! Find your manual AWM-AHX-S - Atdec and take your electronic device back in hand. On this page are published all the documents necessary for the use of your device. AWM-AHX-S by Atdec.
USER MANUAL AWM-AHX-S Atdec
Heavy Duty Dynamic Arm

natural_image
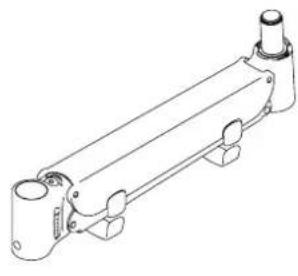
Technical line drawing of a mechanical lever assembly (no text or symbols)COMPONENT CHECKLIST REQUIRED TOOLS
natural_image
Technical line drawing of a mechanical component with cylindrical ends and mounting feet (no text or symbols)A
Heavy Duty
Dynamic Link
(x1)

natural_image
Technical line drawing of a mechanical lever or support structure (no text or symbols)B
Lower Angled
Link
(x1)

C
4mm
Allen Key
(x1)
All tools supplied
WEIGHT RANGE
Desk Base Mount
$$ \begin{array}{l} 6 - 1 6 \mathrm{kg} \ (1 3 - 3 5 \mathrm{lb}) \ \end{array} $$
Post Mount
$$ 6 - 1 4 \mathrm{kg} $$
$$ (1 3 - 3 1 \mathrm{lb}) $$
Monitor weight should be within the weight range of all modular elements that make up the complete monitor mounting solution.
IMPORTANT INFORMATION
! Please ensure this product is installed as per these installation instructions.
! Curved monitors, deep devices (such as all-in-one PCs) and offset VESA locations exert additional leverage that can exceed the capacity of the mount even though the monitor weight may be within the stated range.
! The manufacturer accepts no responsibility for incorrect installation.
! This product is compatible with AWM Series monitor arm products.
1. Assemble Arm Links

2. Fit arm onto Arm Base (AWM-LB) or Channel Clamp (AWM-LC) (sold separately)
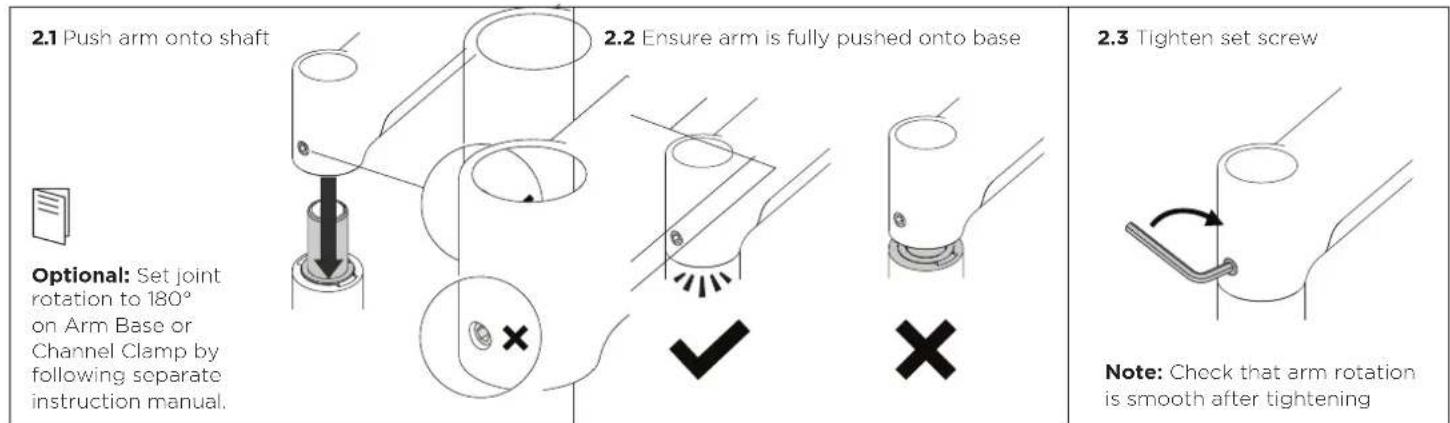
3. Fit Heavy Duty Tilt Head (AWM-LTH) or Dual Crossbar (AWM-LR) (sold separately)

4. Adjust arm tension
4.1 Use the provided allen key to adjust the arm tension

4.2 Installing multiple similar monitors?
- Set up one monitor and record the position of the marker on the gauge.
- When installing other similar monitors, pre-tension the arm to the recorded marker position then fine-tune the tension by following steps 4.3 to 4.5.

4.3 If the monitor sags or falls down, increase the arms tension by rotating the screw anti-clockwise.

- Increase Tension
4.4 If the monitor springs upwards, decrease the arms tension by rotating the screw clockwise.

— Reduce Tension
4.5 If the monitor floats or hovers in all positions the arm tension is balanced and does not require further adjustment.

Balanced
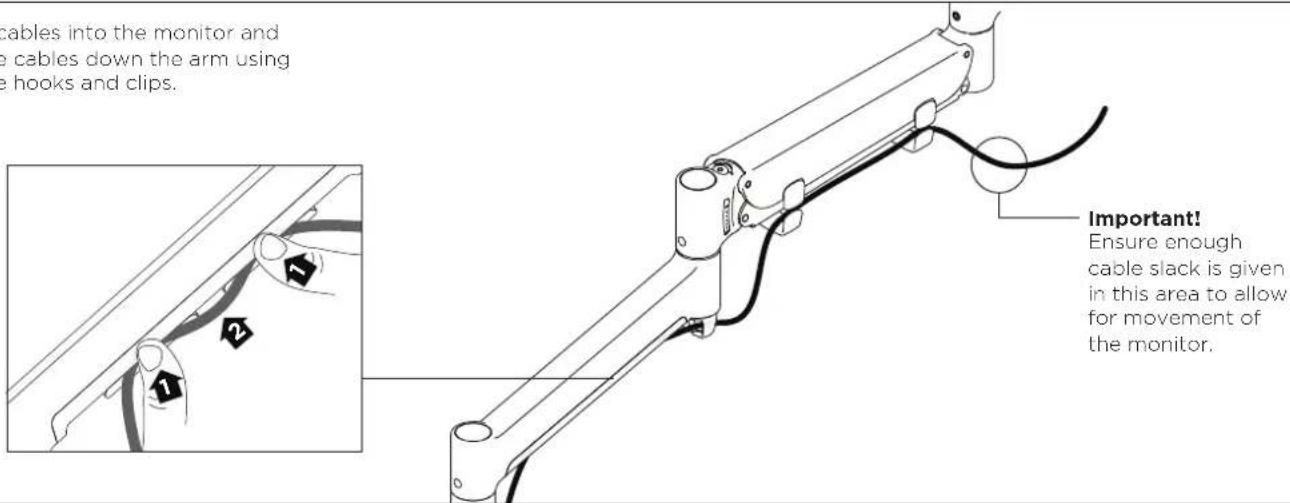
5. Cable management
5.1 Plug cables into the monitor and route the cables down the arm using the cable hooks and clips.


- Heavy Duty Dynamic Arm
- WEIGHT RANGE
- IMPORTANT INFORMATION
- Assemble Arm Links
- Fit arm onto Arm Base (AWM-LB) or Channel Clamp (AWM-LC) (sold separately)
- Fit Heavy Duty Tilt Head (AWM-LTH) or Dual Crossbar (AWM-LR) (sold separately)
- Adjust arm tension
- Installing multiple similar monitors?
- Cable management
Brand : Atdec
Model : AWM-AHX-S
Category : Mount