
G 18DL(S) - Angle Grinder HiKOKI - Free user manual and instructions
Find the device manual for free G 18DL(S) HiKOKI in PDF.


| Brand | HiKOKI |
| Model | G 18DL(S) |
| Product type | Cordless angle grinder |
| Rated voltage | 18 V |
| Battery type | Lithium-ion (Li-ion) |
| Battery capacity | 3.0 Ah (model EBM1830) |
| No-load speed | 9100 min⁻¹ |
| Wheel diameter | 125 mm |
| Wheel bore | 22 mm |
| Max peripheral speed | 80 m/s |
| Weight (with battery) | 1.9 kg |
| Included charger | UC18YRL (7.2–18 V) |
| Charging time (3.0 Ah) | Approx. 45 min |
| Applications | Grinding, cutting, deburring, finishing |
| Side handle | Yes, included |
| Protection guard | Tool-free adjustable |
| Safety function | Overload and restart protection |
| Maintenance | Clean ventilation slots, replace carbon brushes |
| Spare parts | Carbon brushes (code 999054), wheels, etc. |
| Warranty | In accordance with national regulations |
| Included accessories | Wheel, wrench, side handle, charger, battery, plastic case |
| Sound level (power) | 85 dB(A) |
| Vibration emission | 9.3 m/s² (uncertainty K=1.5 m/s²) |
Frequently Asked Questions - G 18DL(S) HiKOKI
User questions about G 18DL(S) HiKOKI
0 question about this device. Answer the ones you know or ask your own.
Ask a new question about this device
Download the instructions for your Angle Grinder in PDF format for free! Find your manual G 18DL(S) - HiKOKI and take your electronic device back in hand. On this page are published all the documents necessary for the use of your device. G 18DL(S) by HiKOKI.
USER MANUAL G 18DL(S) HiKOKI
Cordless Disc Grinder
natural_image
Line drawing of a mechanical power tool with a central blade and surrounding components (no text or symbols)Read through carefully and understand these instructions before use.

natural_image
Line drawing of a hand using a power tool to work on an angle grinder (no text or symbols present)| English | Deutsch | Français | Italiano | |
| 1 | Rechargeable battery | Akkumulator | Batterie rechargeable | Batteria ricaricabile |
| 2 | Latch | Schnapper | Loquet | Fermo |
| 3 | Pull out | Herausziehen | Tirer | Estrarre |
| 4 | Insert | Einsatz | Insérer | Inserire |
| 5 | Wrench | Schlüssel | Clef | Chiave |
| 6 | Wheel nut | Mutter für Schleifscheibe | Ecrou de la meule | Dado ad anello |
| 7 | Depressed center wheel | Schleifscheibe | Meule | Mola |
| 8 | Wheel washer | Unterlegscheibe | Rondelle de la meule | Rondella “grover” |
| 9 | Wheel guard | Schutzhaube | Couvre-meule | Carter della mola |
| 10 | Spindle | Spindel | Arbre | Asse |
| 11 | Push button | Drukknop | Bouton-poussoir | Tasto di blocco dell’asse |
| 12 | Diamond wheel | Diamantscheide | Disque diamant | Disco diamantata |
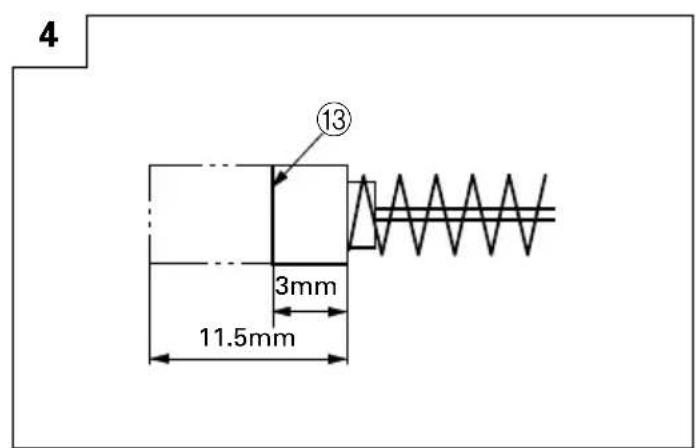
| 13 | Wear limit | Verschließgrenze | Limite d'usure | Limite di usura |
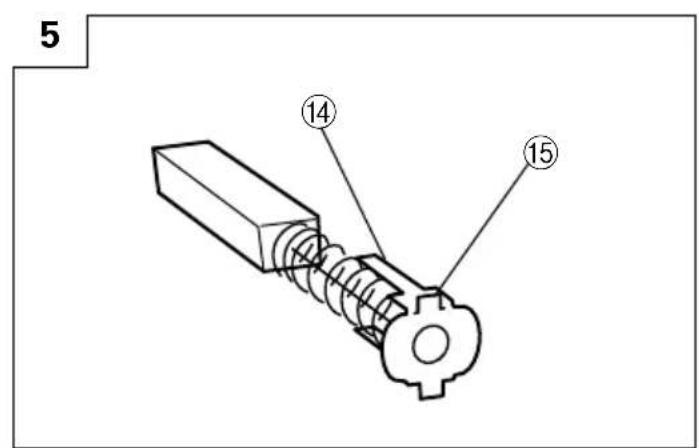
| 14 | Nail of carbon brush | Klaue der Kohlebürste | Clou de balai en carbone | Chiodo di spazzola di carbone |
| 15 | Protrusion of carbon brush | Krempe der Kohlebürste | Saillie de balai en carbone | Sporgenza di spazzola di carbone |
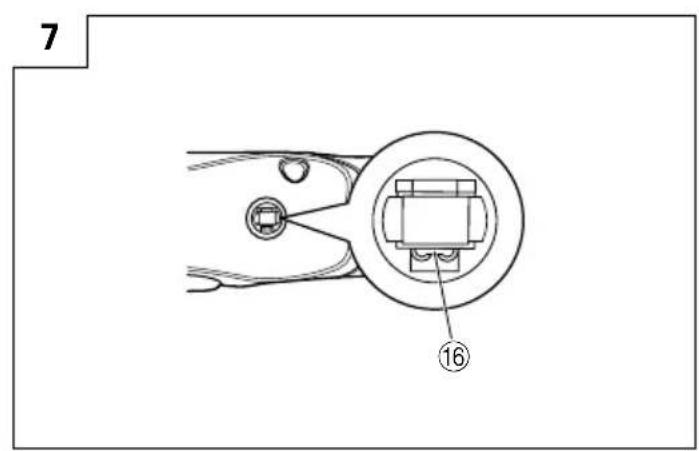
| 16 | Contact portion outside brush tube | Kontaktteil außerhalb des Bürstenrohrs | Section de contact à l’extérieur du tube de balai | Parte di contatto fuori dal tubo spazzola |
| Nederlands | Español | Português | Ελληνικά | |
| 1 | Oplaadbare batterij | Batería recargable | Bateria recarregável | Επαναφορτιζόμενη μπαταρία |
| 2 | Vergrendeling | Enganche | Lingüeta | Μάνδαλο |
| 3 | Uittrekken | Sacar | Retirar | Βραβήξτε έξω |
| 4 | Insteken | Insertar | Inserir | Εισχωρήστε |
| 5 | Sleutel | Llave para tuercas | Chave inglesa | Κλειδί |
| 6 | Moer voor de schuurschijf | Contratuerca molar | Arruela de roda | Παξιμάδι τροχού |
| 7 | Schuurschijf | Muela de alisado | Esmeril | Χαμηλωμένος κεντρικά τροχός |
| 8 | Onderlegschijf | Arandela molar | Porca de roda | Ροδέλλα τροχού |
| 9 | Beschermkap | Cubierta protector de muela | Proteção de roda | Προφυλακτήρας τροχού |
| 10 | As | Eje | Eixo | Άξονας |
| 11 | Drukknop | Botón pulsador | Botão de pressão | Κουμπί ώθησης |
| 12 | Diamantzaagblad | Adiamantado | Disco adiamantado | Διαμαντένιος τροχός |
| 13 | Slijtagegrens | Límite de uso | Limite de desgaste | Όριο φθοράς |
| 14 | Nagel van koolborstel | Uña de escobilla de carbón | Prego da escova de carvão | Καρφί καρβουνακιού |
| 15 | Uitsteeksel van koolborstel | Saliente de escobilla de carbón | Saliência da escova de carvão | Προεξοχή καρβουνακιού |
| 16 | Contact-gedeelte buiten de borstelbuisSymbols⚠ WARNINGThe following show symbols used for the machine. Be sure that you understand their meaning before use. | Tubo exterior de la arte de contacto de la escobilla de carbónSymbole⚠ WARNINGDie folgenden Symbole werden für diese Maschine verwendet. Achten Sie darauf, diese vor der Verwendung zu verstehen. | Segmento de contato no exterior do tubo da escovaSymboles⚠ AVERTISSEMENTLes symboles suivants sont utilisés pour l'outil. Bien se familiariser avec leur signification avant d'utiliser l'outil. | Τμήμα επαφής έξω από το σωλήνα της ψήκτραςSimboli⚠ AVVERTENZADi seguito mostriamo i simboli usati per la macchina.Assicurarsi di comprenderne il significato prima dell'uso. |
 | Read all safety warnings and all instructions.Failure to follow the warnings and instructions may result in electric shock, fire and/or serious injury. | Lesen Sie sämtliche Sicherheitshinweise und Anweisungen durch.Wenn die Warnungen und Anweisungen nicht befolgt werden, kann es zu Stromschlag, Brand und/oder ernsthaften Verletzungen kommen. | Lire tous les avertissements de sécurité et toutes les instructions.Tout manquement à observer ces avertissements et instructions peut engendrer des chocs électriques, des incendies et/ou des blessures graves. | Leggere tutti gli avvertimenti di sicurezza e tutte le istruzioni.La mancata osservanza degli avvertimenti e delle istruzioni potrebbe essere causa di scosse elettriche, incendi e/o gravi lesioni. |
 | Always wear eye protection. | Tragen Sie immer einen Augenschutz. | Toujours porter des verres de protection. | Indossate sempre le protezioni oculari. |
 | Only for EU countriesDo not dispose of electric tools together with household waste material!In observance of European Directive 2002/96/EC on waste electrical and electronic equipment and its implementation in accordance with national law, electric tools that have reached the end of their life must be collected separately and returned to an environmentally compatible recycling facility. | Nur für EU-LänderWerfen Sie Elektrowerkzeuge nicht in den Hausmüll!Gemäss Europäischer Richtlinie 2002/96/EG über Elektro- und Elektronik-Altgeräte und Umsetzung in nationales Recht müssen verbrauchte Elektrowerkzeuge getrennt gesammelt und einer umweltgerechten Wiederververung zugeführt werden. | Pour les pays européens uniquementNe pas jeter les appareils électriques dans les ordures ménagères!Conformément à la directive européenne 2002/96/EG relative aux déchets d'équipements électriques ou électroniques (DEEE), et à sa transposition dans la législation nationale, les appareils électriques doivent être collectés à part et être soumis à un recyclage respectueux de l'environnement. | Solo per Paesi UENon gettare le apparecchiature elettriche tra i rifiuti domestici.Secondo la Direttiva Europea 2002/96/CE sui rifiuti di apparecchiature elettriche ed elettroniche e la sua attuazione in conformità alle norme nazionali, le apparecchiature elettriche esauste devono essere raccolte separatamente, al fine di essere reimpiegate in modo eco-compatibile. |
 | Symbolen⚠ WAARSCHUWINGHieronder staan symbolen afgebeeld die van toepassing zijn op deze machine. U moet de betekenis hiervan begrijpen voor gebruik. | Símbolos⚠ ADVERTENCIAA continuación se muestran los símbolos usados para la máquina. Asegúrese de comprender su significado antes del uso. | Símbolos⚠ AVISOA seguir aparecem os símbolos utilizados pela máquina. Assimile bem seus significados antes do uso. | Σύμβολα⚠ ΠΡΟΣΟΧΗΤα παρακάτω δείχνουν τα σύμβολα που χρησιμοποιούνται στο μηχάνημα. Βεβαιωθείτε ότι κατανοείτε τη σημασίας τους πριν τη χρήση. |
 | Lees alle waarschuwingen en instructies aandachtig door.Nalating om de waarschuwingen en instructies op te volgen kan in een elektrische schok, brand en/of ernstig letsel resulteren. | Lea todas las instrucciones y advertencias de seguridad.Si no se siguen las advertencias e instrucciones, podría producirse una descarga eléctrica, un incendio y/o daños graves. | Leia todas as instruções e avisos de segurança.Se não seguir todas as instruções e os avisos, pode provocar um choque eléctrico, incêndio e/ou ferimentos graves. | Διαθάζετε όλες τις προειδοποιήσεις ασφαλείας και όλες τις οδηγίες.Η μη τήρηση των προειδοποιήσεων και οδηγιών μπορεί να προκαλέσει ηλεκτροπλήξία, πυρκαγιά κανή σοβαρό τραμματισμό. |
 | Draag altijd oogbescherming. | Utilice siempre una protección ocular. | Utilize sempre protecção para os olhos. | Φοράτε πάντα προστασία για τα μάτια. |
 | Alleen voor EU-landen Geef elektrisch gereedschap niet met het huisvuil mee!Volgens de Europese richtlijn 2002/96/EG inzake oude elektrische en elektronische apparaten en de toepassing daarvan binnen de nationale wetgeving, dient gebruikt elektrisch gereedschap gescheiden te worden ingezameld en te worden afgevoerd naar een recycle bedrijf dat voldoet aan de geldende milieu-eisen. | Sólo para países de la Unión Europea¡No deseche los aparatos eléctricos junto con los residuos domésticos!De conformidad con la Directiva Europea 2002/96/CE sobre residuos de aparatos eléctricos y electrónicos y su aplicación de acuerdo con la legislación nacional, las herramientas eléctricas cuya vida útil haya llegado a su fin se deberán recoger por separado y trasladar a una planta de reciclaje que cumpla con las exigencias ecológicas. | Apenas para países da UE Não deite ferramentas eléctricas no lixo doméstico!De acordo com a directiva europeia 2002/96/CE sobre ferramentas eléctricas e electrónicas usadas e a transposição para as leis nacionais, as ferramentas eléctricas usadas devem ser recolhidas em separado e encaminhadas a uma instalação de reciclagem dos materiais ecológica. | Μόνο για τις χώρες της ΕΕ Μην πετάτε τα ηλεκτρικά εργαλεία στον κάδο οικιακών απορριμμάτων!Σύμφωνα με την ευρωπαϊκή οδηγία 2002/96/EK περί ηλεκτρικών και ηλεκτρονικών συσκευών και την ενωμάτωσή της στο εθνικό δίκαιο, τα ηλεκτρικά εργαλεία πρέτει να συλλέγονται ξεχωριστά και να επιστρέφονται για ανακύκλωση με τρόπο φιλικό προς το περιβάλλον. |
GENERAL POWER TOOL SAFETY WARNINGS

WARNING
Read all safety warnings and all instructions.
Failure to follow the warnings and instructions may result in electric shock, fire and/or serious injury.
Save all warnings and instructions for future reference.
The term "power tool" in the warnings refers to your mains-operated (corded) power tool or battery-operated (cordless) power tool.
1) Work area safety
a) Keep work area clean and well lit.
Cluttered or dark areas invite accidents.
b) Do not operate power tools in explosive atmospheres, such as in the presence of flammable liquids, gases or dust.
Power tools create sparks which may ignite the dust or fumes.
c) Keep children and bystanders away while operating a power tool.
Distractions can cause you to lose control.
2) Electrical safety
a) Power tool plugs must match the outlet.
Never modify the plug in any way.
Do not use any adapter plugs with earthed (grounded) power tools.
Unmodified plugs and matching outlets will reduce risk of electric shock.
b) Avoid body contact with earthed or grounded surfaces, such as pipes, radiators, ranges and refrigerators.
There is an increased risk of electric shock if your body is earthed or grounded.
c) Do not expose power tools to rain or wet conditions.
Water entering a power tool will increase the risk of electric shock.
d) Do not abuse the cord. Never use the cord for carrying, pulling or unplugging the power tool. Keep cord away from heat, oil, sharp edges or moving parts.
Damaged or entangled cords increase the risk of electric shock.
e) When operating a power tool outdoors, use an extension cord suitable for outdoor use.
Use of a cord suitable for outdoor use reduces the risk of electric shock.
f) If operating a power tool in a damp location is unavoidable, use a residual current device (RCD) protected supply.
Use of an RCD reduces the risk of electric shock.
3) Personal safety
a) Stay alert, watch what you are doing and use common sense when operating a power tool. Do not use a power tool while you are tired or under the influence of drugs, alcohol or medication. A moment of inattention while operating power tools may result in serious personal injury.
b) Use personal protective equipment. Always wear eye protection.
Protective equipment such as dust mask, non-skid safety shoes, hard hat, or hearing protection used for appropriate conditions will reduce personal injuries.
c) Prevent unintentional starting. Ensure the switch is in the off-position before connecting to power source and/or battery pack, picking up or carrying the tool.
Carrying power tools with your finger on the switch or energising power tools that have the switch on invites accidents.
d) Remove any adjusting key or wrench before turning the power tool on.
A wrench or a key left attached to a rotating part of the power tool may result in personal injury.
e) Do not overreach. Keep proper footing and balance at all times.
This enables better control of the power tool in unexpected situations.
f) Dress properly. Do not wear loose clothing or jewellery. Keep your hair, clothing and gloves away from moving parts.
Loose clothes, jewellery or long hair can be caught in moving parts.
g) If devices are provided for the connection of dust extraction and collection facilities, ensure these are connected and properly used.
Use of dust collection can reduce dust related hazards.
4) Power tool use and care
a) Do not force the power tool. Use the correct power tool for your application.
The correct power tool will do the job better and safer at the rate for which it was designed.
b) Do not use the power tool if the switch does not turn it on and off.
Any power tool that cannot be controlled with the switch is dangerous and must be repaired.
c) Disconnect the plug from the power source and/or the battery pack from the power tool before making any adjustments, changing accessories, or storing power tools.
Such preventive safety measures reduce the risk of starting the power tool accidentally.
d) Store idle power tools out of the reach of children and do not allow persons unfamiliar with the power tool or these instructions to operate the power tool.
Power tools are dangerous in the hands of untrained users.
e) Maintain power tools. Check for misalignment or binding of moving parts, breakage of parts and any other condition that may affect the power tools operation.
If damaged, have the power tool repaired before use.
Many accidents are caused by poorly maintained power tools.
f) Keep cutting tools sharp and clean.
Properly maintained cutting tools with sharp cutting edges are less likely to bind and are easier to control.
g) Use the power tool, accessories and tool bits etc. in accordance with these instructions, taking into account the working conditions and the work to be performed.
Use of the power tool for operations different from those intended could result in a hazardous situation.
5) Battery tool use and care
a) Recharge only with the charger specified by the manufacturer.
A charger that is suitable for one type of battery pack may create a risk of fire when used with another battery pack.
b) Use power tools only with specifically designated battery packs.
Use of any other battery packs may create a risk of injury and fire.
c) When battery pack is not in use, keep it away from other metal objects like paper clips, coins, keys, nails, screws, or other small metal objects that can make a connection from one terminal to another.
Shorting the battery terminals together may cause burns or a fire.
d) Under abusive conditions, liquid may be ejected from the battery; avoid contact. If contact accidentally occurs, flush with water. If liquid contacts eyes, additionally seek medical help. Liquid ejected from the battery may cause irritation or burns.
6) Service
a) Have your power tool serviced by a qualified repair person using only identical replacement parts.
This will ensure that the safety of the power tool is maintained.
PRECAUTION
Keep children and infirm persons away.
When not in use, tools should be stored out of reach of children and infirm persons.
SAFETY WARNINGS COMMON FOR GRINDING OR ABRASIVE CUTTING-OFF OPERATIONS
a) This power tool is intended to function as a grinder or cut-off tool. Read all safety warnings, instructions, illustrations and specifications provided with this power tool.
Failure to follow all instructions listed below may result in electric shock, fire and/or serious injury.
b) Operations such as sanding, wire brushing or polishing are not recommended to be performed with this power tool.
Operations for which the power tool was not designed may create a hazard and cause personal injury.
c) Do not use accessories which are not specifically designed and recommended by the tool manufacturer.
Just because the accessory can be attached to your power tool, it does not assure safe operation.
d) The rated speed of the accessory must be at least equal to the maximum speed marked on the power tool.
Accessories running faster than their rated speed can break and fly apart.
e) The outside diameter and the thickness of your accessory must be within the capacity rating of your power tool.
Incorrectly sized accessories cannot be adequately guarded or controlled.
f) The arbour size of wheels, flanges, backing pads or any other accessory must properly fit the spindle of the power tool.
Accessories with arbour holes that do not match the mounting hardware of the power tool will run out of balance, vibrate excessively and may cause loss of control.
g) Do not use a damaged accessory. Before each use inspect the accessory such as abrasive wheels for chips and cracks, backing pad for cracks, tear or excess wear, wire brush for loose or cracked wires. If power tool or accessory is dropped, inspect for damage or install an undamaged accessory. After inspecting and installing an accessory, position yourself and bystanders away from the plane of the rotating accessory and run the power tool at maximum no-load speed for one minute.
Damaged accessories will normally break apart during this test time.
h) Wear personal protective equipment. Depending on application, use face shield, safety goggles or safety glasses. As appropriate, wear dust mask, hearing protectors, gloves and workshop apron capable of stopping small abrasive or workpiece fragments.
The eye protection must be capable of stopping flying debris generated by various operations. The dust mask or respirator must be capable of filtrating particles generated by your operation.
Prolonged exposure to high intensity noise may cause hearing loss.
i) Keep bystanders a safe distance away from work area. Anyone entering the work area must wear personal protective equipment.
Fragments of workpiece or of a broken accessory may fly away and cause injury beyond immediate area of operation.
j) Hold power tool by insulated gripping surfaces only, when performing an operation where the cutting accessory may contact hidden wiring or its own cord.
Cutting accessory contacting a "live" wire may make exposed metal parts of the power tool "live" and shock the operator.
k) Position the cord clear of the spinning accessory.
If you lose control, the cord may be cut or snagged and your hand or arm may be pulled into the spinning accessory.
I) Never lay the power tool down until the accessory has come to a complete stop.
The spinning accessory may grab the surface and pull the power tool out of your control.
m) Do not run the power tool while carrying it at your side.
Accidental contact with the spinning accessory could snag your clothing, pulling the accessory into your body.
n) Regularly clean the power tool's air vents.
The motor's fan will draw the dust inside the housing and excessive accumulation of powdered metal may cause electrical hazards.
o) Do not operate the power tool near flammable materials.
Sparks could ignite these materials.
p) Do not use accessories that require liquid coolants.
Using water or other liquid coolants may result in electrocution or shock.
KICKBACK AND RELATED WARNINGS
Kickback is a sudden reaction to a pinched or snagged rotating wheel, backing pad, brush or any other accessory. Pinching or snagging causes rapid stalling of the rotating accessory which in turn causes the uncontrolled power tool to be forced in the direction opposite of the accessory's rotation at the point of the binding.
For example, if an abrasive wheel is snagged or pinched by the workpiece, the edge of the wheel that is entering into the pinch point can dig into the surface of the material causing the wheel to climb out or kick out. The wheel may either jump toward or away from the operator, depending on direction of the wheel's movement at the point of pinching. Abrasive wheels may also break under these conditions.
Kickback is the result of power tool misuse and/or incorrect operating procedures or conditions and can be avoided by taking proper precautions as given below.
a) Maintain a firm grip on the power tool and position your body and arm to allow you to resist kickback forces. Always use auxiliary handle, if provided, for maximum control over kickback or torque reaction during start-up.
The operator can control torque reactions or kickback forces, if proper precautions are taken.
b) Never place your hand near the rotating accessory. Accessory may kickback over your hand.
c) Do not position your body in the area where power tool will move if kickback occurs.
Kickback will propel the tool in direction opposite to the wheel's movement at the point of snagging.
d) Use special care when working corners, sharp edges etc. Avoid bouncing and snagging the accessory. Corners, sharp edges or bouncing have a tendency to snag the rotating accessory and cause loss of control or kickback.
e) Do not attach a saw chain woodcarving blade or toothed saw blade.
Such blades create frequent kickback and loss of control.
SAFETY WARNINGS SPECIFIC FOR GRINDING AND ABRASIVE CUTTING-OFF OPERATIONS
a) Use only wheel types that are recommended for your power tool and the specific guard designed for the selected wheel.
Wheels for which the power tool was not designed cannot be adequately guarded and are unsafe.
b) The guard must be securely attached to the power tool and positioned for maximum safety, so the least amount of wheel is exposed towards the operator.
The guard helps to protect operator from broken wheel fragments and accidental contact with wheel.
c) Wheels must be used only for recommended applications. For example: do not grind with the side of cut-off wheel.
Abrasive cut-off wheels are intended for peripheral grinding, side forces applied to these wheels may cause them to shatter.
d) Always use undamaged wheel flanges that are of correct size and shape for your selected wheel.
Proper wheel flanges support the wheel thus reducing the possibility of wheel breakage. Flanges for cut-off wheels may be different from grinding wheel flanges.
e) Do not use worn down wheels from larger power tools.
Wheel intended for larger power tool is not suitable for the higher speed of a smaller tool and may burst.
ADDITIONAL SAFETY WARNINGS SPECIFIC FOR ABRASIVE CUTTING-OFF OPERATIONS
a) Do not "jam" the cut-off wheel or apply excessive pressure. Do not attempt to make an excessive depth of cut.
Overstressing the wheel increases the loading and susceptibility to twisting or blinding of the wheel in the cut and the possibility of kickback or wheel breakage.
b) Do not position your body in line with and behind the rotating wheel.
When the wheel, at the point of operation, is moving away from your body, the possible kickback may propel the spinning wheel and the power tool directly at you.
c) When wheel is binding or when interrupting a cut for any reason, switch off the power tool and hold the power tool motionless until the wheel comes to a complete stop. Never attempt to remove the cut-off wheel from the cut while the wheel is in motion otherwise kickback may occur.
Investigate and take corrective action to eliminate the cause of wheel binding.
d) Do not restart the cutting operation in the workpiece. Let the wheel reach full speed and carefully reenter the cut.
The wheel may bind, walk up or kickback if the power tool is restarted in the workpiece.
GENERAL SAFETY INSTRUCTIONS FOR CORDLESS DISC GRINDERS
- Check that speed marked on the wheel is equal to or greater than the rated speed of the grinder;
- Ensure that the wheel dimensions are compatible with the grinder;
– Abrasive wheels shall be stored and handled with care in accordance with manufacturer's instructions; - Inspect the grinding wheel before use, do not use chipped, cracked or otherwise defective products;
- Ensure that mounted wheels and points are fitted in accordance with the manufacturer's instructions;
- Ensure that blotters are used when they are provided with the bonded abrasive product and when they are required;
-
Ensure that the abrasive product is correctly mounted and tightened before use and run the tool at no-load for 30 s in a safe position, stop immediately if there is considerable vibration or if other defects are detected. If this condition occurs, check the machine to determine the cause;
-
If a guard is equipped with the tool never use the tool without such a guard;
- Do not use separate reducing bushings or adapters to adapt large hole abrasive wheels;
- For tools intended to be fitted with threaded hole wheel, ensure that the thread in the wheel is long enough to accept the spindle length;
- Check that the work piece is properly supported;
- Do not use cutting off wheel for side grinding;
- Ensure that sparks resulting from use do not create a hazard e.g. do not hit persons, or ignite flammable substances;
- Ensure that ventilation openings are kept clear when working in dusty conditions, if it should become necessary to clear dust, first disconnect the tool from the mains supply (use non metallic objects) and avoid damaging internal parts;
- Always use eye and ear protection. Other personal protective equipment such as dust mask, gloves, helmet and apron should be worn;
– Pay attention to the wheel that continues to rotate after the tool is switched off. - Always charge the battery at a temperature of 0
- 40°C.
A temperature of less than 0^ C will result in over charging which is dangerous. The battery cannot be charged at a temperature greater than 40^ C. The most suitable temperature for charging is that of 20 - 25^ C. - Do not use the charger continuously.
When one charging is completed, leave the charger for about 15 minutes before the next charging of battery. - Do not allow foreign matter to enter the hole for connecting the rechargeable battery.
- Never disassemble the rechargeable battery and charger.
- Never short-circuit the rechargeable battery. Short-circuiting the battery will cause a great electric current and overheat. It results in burn or damage to the battery.
- Do not dispose of the battery in fire. If the battery burnt, it may explode.
- Do not insert object into the air ventilation slots of the charger. Inserting metal objects or inflammables into the charger air ventilation slots will result in electrical shock hazard or damaged charger.
- Bring the battery to the shop from which it was purchased as soon as the post-charging battery life becomes too short for practical use. Do not dispose of the exhausted battery.
- Using an exhausted battery will damage the charger.
CAUTION ON LITHIUM-ION BATTERY
To extend the lifetime, the lithium-ion battery equips with the protection function to stop the output. In the cases of 1 and 2 described below, when using this product, even if you are pulling the switch, the motor may stop. This is not the trouble but the result of protection function.
- When the battery power remaining runs out, the motor stops.
In such case, charge it up immediately.
- If the tool is overloaded, the motor may stop. In this case, release the switch of tool and eliminate causes of overloading. After that, you can use it again.
Furthermore, please heed the following warning and caution.
WARNING
In order to prevent any battery leakage, heat generation, smoke emission, explosion and ignition beforehand, please be sure to heed the following precautions.
- Make sure that swarf and dust do not collect on the battery.
○During work make sure that swarf and dust do not fall on the battery.
○Make sure that any swarf and dust falling on the power tool during work do not collect on the battery.
○Do not store an unused battery in a location exposed to swarf and dust.
Before storing a battery, remove any swarf and dust that may adhere to it and do not store it together with metal parts (screws, nails, etc.). - Do not pierce battery with a sharp object such as a nail, strike with a hammer, step on, throw or subject the battery to severe physical shock.
- Do not use an apparently damaged or deformed battery.
- Do not use the battery in reverse polarity.
- Do not connect directly to an electrical outlets or car cigarette lighter sockets.
- Do not use the battery for a purpose other than those specified.
- If the battery charging fails to complete even when a specified recharging time has elapsed, immediately stop further recharging.
- Do not put or subject the battery to high temperatures or high pressure such as into a microwave oven, dryer, or high pressure container.
- Keep away from fire immediately when leakage or foul odor are detected.
- Do not use in a location where strong static electricity generates.
- If there is battery leakage, foul odor, heat generated, discolored or deformed, or in any way appears abnormal during use, recharging or storage, immediately remove it from the equipment or battery charger, and stop use.
- If liquid leaking from the battery gets into your eyes, do not rub your eyes and wash them well with fresh clean water such as tap water and contact a doctor immediately. If left untreated, the liquid may cause eye-problems.
- If liquid leaks onto your skin or clothes, wash well with clean water such as tap water immediately. There is a possibility that this can cause skin irritation.
- If you find rust, foul odor, overheating, discolor, deformation, and/or other irregularities when using the battery for the first time, do not use and return it to your supplier or vendor.
CAUTION
SPECIFICATIONS
Cordless disc grinder
| Model G18DL(S) | ||
| Voltage 18V | ||
| No-Load speed 9100 min | -1 | |
| Wheel | outer dia. × hole dia. | 125 × 22 mm |
| peripheral speed 80 m/s | ||
| Rechargeable battery 3.0 Ah | EBM1830: Li-ion (10 cells) | |
| Weight 1.9 Kg | ||
Charger
| Model UC18YRL | ||
| Charging voltage 7.2 – 18 V | ||
| Charging time 3.0 Ah : Ni-MH | 2.0 Ah : Ni-Cd 30 min. | |
| 2.6 Ah : Ni-MH 40 min. | ||
| MH 45 min. | ||
| 3.3 Ah : Ni-MH 50 min. | ||
| 3.0 Ah : Li-ion 45 min. | ||
| Weight 0.6 Kg | ||
Charge time is approximate. Actual charge time may vary.
STANDARD ACCESSORIES
| G18DL(S)(2MRK) | 1 Depressed center wheel ..... 12 Wrench ..... 13 Side handle ..... 14 Charger ..... 15 Battery ..... 26 Plastic case ..... 1 |
| G18DL(S)(MRK) | 1 Depressed center wheel ..... 12 Wrench ..... 13 Side handle ..... 14 Charger ..... 15 Battery ..... 16 Plastic case ..... 1 |
| G18DL(S)(NN) | Without charger, battery, plastic case |
Standard accessories are subject to change without notice.
APPLICATIONS
○Removal of casting fin and finishing of various types of steel, bronze and aluminum materials and castings.
○Grinding of welded sections or sections cut by means of a cutting torch.
○Grinding of synthetic resins, slate, brick, marble, etc.
○Cutting of synthetic concrete, stone, brick, marble, and similar materials.
BATTERY REMOVAL/INSTALLATION
1. Battery removal
Hold the handle tightly and push the battery latch to remove the battery (See Fig. 1).
CAUTION
Never short-circuit the battery.
2. Battery installation
Insert the battery while observing its polarities (See Fig. 1).
CHARGING
Before using the cordless disc grinder, charge the battery as follows.
- Connect the charger's power cord to a receptacle When the power cord is connected, the charger's pilot lamp will blink in red (At 1-second intervals).
2. Insert the battery into the charger
Insert the battery firmly, until it contacts the bottom of the charger compartment.
CAUTION
○If the battery is inserted in the reverse direction, not only recharging will become impossible, but it may also cause problems in the charger such as deformed recharging terminal.
3. Charging
When inserting a battery in the charger, charging will commence and the pilot lamp will light up continuously in red.
When the battery becomes fully recharged, the pilot lamp will blink in red (At 1-second intervals) (See Table 1).
(1) Pilot lamp indication
The indications of the pilot lamp will be as shown in Table 1, according to the condition of the charger or the rechargeable battery.
Table 1
| Indications of the lamps | |||
| Before charging | Blinks (RED) | Lights for 0.5 seconds. Does not light for 0.5 seconds. (off for 0.5 seconds) | |
| While charging | Lights (RED) | Lights continuously | |
| Charging complete | Blinks (RED) | Lights for 0.5 seconds. Does not light for 0.5 seconds. (off for 0.5 seconds) | |
| Charging impossible | Flickers (RED) | Lights for 0.1 seconds. Does not light for 0.1 seconds. (off for 0.1 seconds) | Malfunction in the battery or the charger. |
| Overheat standby | Lights (GREEN) | Lights continuously | Battery overheated. Unable to charge (Charging will commence when battery cools). |
NOTE: When standby for cooling battery, UC18YRL cools the overheated battery by cooling fan.
(2) Regarding the temperatures of the rechargeable battery
The temperatures for rechargeable batteries are as shown in the table below, and batteries that have become hot should be cooled for a while before being recharged.
Table 2 Recharging ranges of batteries
| ChargerRechargeable batteries | UC18YRL |
| Ni-Cd batteries -5°C - | 55°C |
| Ni-MH batteries -5°C - | 50°C |
| Li-ion batteries 0°C - | 50°C |
4. Disconnect the charger's power cord from the receptacle
5. Hold the charger firmly and pull out the battery NOTE
Be sure to pull out the battery from the charger after use, and then keep it.
CAUTION
○If the battery is charged while it is heated because it has been left for a long time in a location subject to direct sunlight or because the battery has just been used, the pilot lamp of the charger lights up green. In such a case, first let the battery cool, then start charging.
When the pilot lamp flickers in red quickly (at 0.2-second intervals), check for and take out any foreign objects in the charger's battery installation hole. If there are no foreign objects, it is probable that the battery or charger is malfunctioning. Take it to your Authorized Service Center.
○Since the built-in micro computer takes about 3 seconds to confirm that the battery being charged with UC18YRL is taken out, wait for a minimum of 3 seconds before reinserting it to continue charging. If the battery is reinserted within 3 seconds, the battery may not be properly charged.
Regarding electric discharge in case of new batteries, etc.
As the internal chemical substance of new batteries and batteries that have not been used for an extended period is not activated, the electric discharge might be low when using them the first and second time. This is a temporary phenomenon, and normal time required for recharging will be restored by recharging the batteries 2 – 3 times.
How to make the batteries perform longer
(1) Recharge the batteries before they become completely exhausted.
When you feel that the power of the tool becomes weaker, stop using the tool and recharge its battery. If you continue to use the tool and exhaust the electric current, the battery may be damaged and its life will become shorter.
(2) Avoid recharging at high temperatures. A rechargeable battery will be hot immediately after use. If such a battery is recharged immediately after use, its internal chemical substance will deteriorate, and the battery life will be shortened. Leave the battery and recharge it after it has cooled for a while.
PRIOR TO OPERATION
- Preparing and checking the work environment Make sure that the work site meets all the conditions laid forth in the precautions.
2. Checking the battery
Make sure that the battery is installed firmly. If it is at all loose it could come off and cause an accident.
3. Fitting and adjusting the wheel guard
The wheel guard is a protective device to prevent injury should the depressed center wheel shatter during operation. Ensure that the guard is properly fitted and fastened before commencing grinding operation. By slightly loosening the setting screw, the wheel guard can be turned and set at any desired angle for maximum operational effectiveness. Ensure that the setting screw is thoroughly tightened after adjusting the wheel guard.
- Ensure that mounted wheels and points are fitted in accordance with the manufacturer's instructions. Ensure that the depressed center wheel to be utilized is the correct type and free of cracks or surface defects. Also ensure that the depressed center wheel is properly mounted and the wheel nut is securely tightened, Refer to the section on "ASSEMBLING AND DISASSEMBLING THE DEPRESSED CENTER WHEEL"
Ensure that blotters are used when they are provided with the bonded abrasive product and when they are required.
Do not use separate reducing bushings or adaptors to adapt large hole abrasive wheels.
For tools intended to be fitted with threaded hole wheel, ensure that the thread in the wheel is long enough to accept the spindle length.
Do not use cutting off wheel for side grinding.
5. Conducting a trial run
Ensure that the abrasive products is correctly mounted and tightened before use and run the tool at no-load for 30 seconds in a safe position, stop immediately if there is considerable vibration or if other defects are detected.
If this condition occurs, check the machine to determine the cause.
6. Confirm the push button.
Confirm that the push button is disengaged by pushing push button two or three times before switching the power tool on (See Fig. 2).
7. Fixing the side handle.
Screw the side handle into the gear cover.
PRACTICAL GRINDER APPLICATION
1. Pressure
To prolong the life of the machine and ensure a first class finish, it is important that the machine should not be overloaded by applying too much pressure. In most applications, the weight of the machine alone is sufficient for effective grinding. Too much pressure will result in reduced rotational speed, inferior surface finish, and overloading which could reduce the life of the machine.
2. Grinding angle
Do not apply the entire surface of the depressed center wheel to the material to be ground. As shown in Fig. 1, the machine should be held at an angle of 15^-30^ so that the external edge of the depressed center wheel contacts the material at an optimum angle.
- To prevent a new depressed center wheel from digging into the workpiece, initial grinding should be performed by drawing the grinder across the workpiece toward the operator (Fig. 1 direction B). Once the leading edge of the depressed center wheel is properly abraded, grinding may be conducted in either direction.
4. Precautions immediately after finishing operation The wheel continues to rotate after the tool is switched off.
After switching off the machine, do not put it down until the depressed center wheel has come to a complete stop. Apart from avoiding serious accidents, this precaution will reduce the amount of dust and swarf sucked into the machine.
NOTE
To prevent injuries, this product has a function that prevents unexpected motor rotation when the battery is inserted. The motor will not run if the battery is inserter while the switch is still ON. After installing the battery, turn the switch off and then back on again.
○The G18DL(S) model is equipped with a protection function that will shut down the tool in the event of an overload.
Should the tool shut down due to an overload, turn the power off and then turn it back on again.
An overload that stops tool operation and lasts more than 10 seconds may not be released by turning the power off and on. Should this happen, remove the battery from the tool and reinstall it before turning on the power switch.
CAUTIONS
○Check that the work piece is properly supported.
○Ensure that ventilation openings are kept clear when working in dusty conditions.
If it should become necessary to clear dust, first disconnect the tool from the mains supply (use non-metallic objects) and avoid damaging internal parts.
○Ensure that sparks resulting from use do not create a hazard e.g. do not hit persons, or ignite flammable substances.
○Always use eye and ear protection.
Other personal protective equipment such as dust mask, gloves, helmet and apron should be worn when necessary.
If in doubt, wear the protective equipment.
○When the machine is not use, the battery should be disconnected.
ASSEMBLING AND DISASSEMBLING THE DEPRESSED CENTER WHEEL (Fig. 2)
CAUTION: Be sure to turn off the switch and pull out the battery.
1. Assembling (Fig. 2)
(1) Turn the disc grinder upsidedown so that the spindle is facing upward.
(2) Align the across flats of the wheel washer with the notched part of the spindle, then attach them.
(3) Fit the protuberance of the depressed center wheel onto the wheel washer.
(4) Screw the wheel nut onto the spindle.
(5) While pushing the push button with one hand, lock the spindle by turning the depressed center wheel slowly with the other hand.
Tighten the wheel nut by using the supplied wrench as shown in Fig. 2.
2. Disassembling
Follow the above procedures in reverse.
CAUTIONS
○Confirm that the depressed center wheel is mounted firmly.
○Confirm that the push button is disengaged by pushing push button two or three times before switching the power tool on.
MAINTENANCE AND INSPECTION
1. Inspecting the depressed center wheel
Ensure that the depressed center wheel is free of cracks and surface defects.
2. Inspecting the mounting screws
Regularly inspect all mounting screws and ensure that they are properly tightened. Should any of the screws be loose, retighten them immediately. Failure to do so could result in serious hazard.
3. Maintenance of the motor
The motor unit winding is the very "heart" of the power tool.
Exercise due care to ensure the winding does not become damaged and/or wet with oil or water.
4. Inspecting the carbon brushes (Fig. 4)
The motor employs carbon brushes which are consumable parts. Since and excessively worn carbon brush can result in motor trouble, replace the carbon brush with new ones when it becomes worn to or near the "wear limit". In addition, always keep carbon brushes clean and ensure that they slide freely within the brush holders.
NOTE
When replacing the carbon brush with a new one, be sure to use the HiKOKI Carbon Brush Code No. 999054.
5. Replacing carbon brushes
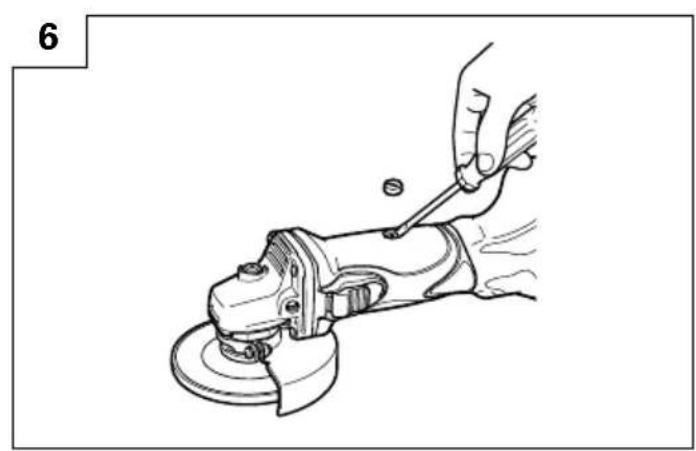
Take out the carbon brush by first removing the brush cap and then hooking the protrusion of the carbon brush with a slotted head screw driver, etc., as shown in Fig. 6.
When installing the carbon brush, choose the direction so that the nail of the carbon brush agrees with the contact portion outside the brush tube. Then push it in with a finger as illustrated in Fig. 7. Lastly, install the brush cap.
CAUTION
Be absolutely sure to insert the nail of the carbon brush into the contact portion outside the brush tube. (You can insert whichever one of the two nails provided.)
Caution must be exercised since any error in this operation can result in the deformed nail of the carbon brush and may cause motor trouble at an early stage.
6 Cleaning of the outside
When the cordless disc grinder is stained, wipe with a soft dry cloth or a cloth moistened with soapy water. Do not use chloric solvents, gasoline or paint thinner, as they melt plastics.
7. Storage
Store the cordless disc grinder in a place in which the temperature is less than 40^ C, and out of reach of children.
8. Service parts list
A: Item No.
B: Code No.
C: No. Used
D: Remarks
CAUTION
Repair, modification and inspection of HiKOKI Power Tools must be carried out by a HiKOKI Authorized Service Center.
This Parts List will be helpful if presented with the tool to the HiKOKI Authorized Service Center when requesting repair or other maintenance.
In the operation and maintenance of power tools, the safety regulations and standards prescribed in each country must be observed.
MODIFICATIONS:
HiKOKI Power Tools are constantly being improved and modified to incorporate the latest technological advancements.
Accordingly, some parts (i.e. code numbers and/or design) may be changed without prior notice.
GUARANTEE
We guarantee HiKOKI Power Tools in accordance with statutory/country specific regulation. This guarantee does not cover defects or damage due to misuse, abuse, or normal wear and tear. In case of complaint, please send the Power Tool, undismantled, with the GUARANTEE CERTIFICATE found at the end of this Handling instruction, to a HiKOKI Authorized Service Center.
NOTE
Due to HiKOKI's continuing program of research and development, the specifications herein are subject to change without prior notice.
IMPORTANT
Correct connection of the plug
The wires of the main lead are coloured in accordance with the following code:
Blue: -Neutral
Brown: -Live
As the colours of the wires in the main lead of this tool may not correspond with the coloured markings identifying the terminals in your plug proceed as follows: The wire coloured blue must be connected to the terminal marked with the letter N or coloured black. The wire coloured brown must be connected to the terminal marked with the letter L or coloured red. Neither core must be connected to the earth terminal.
NOTE
This requirement is provided according to BRITISH STANDARD 2769: 1984.
Therefore, the letter code and colour code may not be applicable to other markets except The United Kingdom.
Information concerning airborne noise and vibration
The measured values were determined according to EN60745 and declared in accordance with ISO 4871.
Measured A-weighted sound power level: 85 dB (A)
Measured A-weighted sound pressure level: 74 dB (A)
Uncertainty KpA: 3 dB (A).
Wear ear protection.
Vibration total values (triax vector sum) determined according to EN60745.
Surface grinding:
Vibration emission value , AG = 9.3 m/s ^2
Uncertainty K = 1.5 m/s ^4
WARNING
○The vibration emission value during actual use of the power tool can differ from the declared value depending on the ways in which the tool is used.
To identify the safety measures to protect the operator that are based on an estimation of exposure in the actual conditions of use (taking account of all parts of the operating cycle such as the times when the tool is switched off and when it is running idle in addition to the trigger time).
KICKBACK AND RELATED WARNINGS
natural_image
Line drawing of a quill pen with inkwell (no text or symbols)| English | Nederlands | ||
| GUARANTEE CERTIFICATE1Model No.2Serial No.3Date of Purchase4Customer Name and Address5Dealer Name and Address(Please stamp dealer name and address) | GARANTIEBEWIJS1Modelnummer2Serienummer3Datum van aankoop4Naam en adres van de gebruiker5Naam en adres van de handelaar(Stempel a.u.b. naam en adres vande de handelaar) | ||
| Deutsch | Español | ||
| GARANTIESCHEIN1Modell-Nr.2Serien-Nr.3Kaufdaturn4Name und Anschrift des Kunden5Name und Anschrift des Händlers(Bitte mit Namen und Anschrift des Handlers abstempeln) | CERTIFICADO DE GARANTIA1Número de modelo2Número de serie3Fecha de adquisición4Nombre y dirección del cliente5 Nombre y dirección del distribudor(Se ruega poner el sellú del distribudor con su nombre y dirección) | ||
| Français | Português | ||
| CERTIFICAT DE GARANTIE1No. de modèle2No. de série3Date d'achat4Nom et adresse du client5Nom et adresse du revendeur(Cachet portant le nom et l'adresse du revendeur) | CERTIFICADO DE GARANTIA1Número do modelo2Número do série3Data de compra4Nome e morada do cliente5Nome e morada do distribuidor(Por favor, carímbe o nome e morada do distribuidor) | ||
| Italiano Ελληνικά | |||
| CERTIFICATO DI GARANZIA1Modello2N° di serie3Data di acquisto4Nome e indirizzo dell'acquirente5Nome e indirizzo del rivenditore(Si prega di apporre il timbro con questi dati) | ΠΙΣΤΟΠΟΙΗΤΙΚΟ ΕΓΓΥΗΣΗΣ1Ap. Μοντέλου2Αύξων Ap.3Ημερομηνία αγοράς4Ονομα και διεύθυνση πελάτη5Ονομα και διεύθυνση μεταπωλητή(Παρακαλούμε χρησιμοποιηθεί σφραγίδα) | ||
HiKOKI
| 1 | |
| 2 | |
| 3 | |
| 4 | |
| 5 |

natural_image
Line drawing of a quill pen in an inkwell (no text or symbols)| English Nederlands | ||
| EC DECLARATION OF CONFORMITYWe declare under our sole responsibility that Cordless Disc Grinder, identified by type and specific identification code *1), is in conformity with all relevant requirements of the directives *2) and standards *3). Technical fi le at *4) – See below.The European Standard Manager at the representative office in Europe is authorized to compile the technical fi le.The declaration is applicable to the product affi xed CE marking. | EC VERKLARING VAN CONFORMITEITWij verklaren onder onze eigen verantwoordelijkheid dat Snoerloze haakse slijpmachine, geïdentificeerd door het type en de specifieke identificatiecode*1), voldoet aan alle relevante bepalingen van de richtlijnen*2) en normen*3). Technische documentatie bij*4) – zie onder.De Europese Normen Manager bij de vertegenwoordiging in Europa is gemachtigd om het technisch dossier samen te stellen.Deze verklaring is van toepassing op producten voorzien van de CE-markeringen. | |
| Deutsch Español | ||
| EG-KONFORMITÄTSERKLÄRUNGWir erklären in alleiniger Verantwortung, dass der durch den Typ und den spezifischen Identifizierungscode *1) identifizierte Akku-Winkelschleifer allen einschlägigen Bestimmungen der Richtlinien *2) und Normen *3) entspricht. Technische Unterlagen unter *4) – Siehe unten.Die Leitung der repräsentativen Behörde für europäische Normen und Richtlinien ist berechtigt, die technischen Unterlagen zusammenzustellen.Die Erklärung gilt für die an dem Produkt angebrachte CE-Kennzeichnung. | DECLARACIÓN DE CONFORMIDAD DE LA CEDeclaramos bajo nuestra única responsabilidad que la Amoladora angular a batería, identificada por tipo y por código de identificación específico *1), está en conformidad con todas las disposiciones correspondientes de las directivas *2) y de las normas *3). Documentación técnica en *4) – Ver a continuación.El Director de Normas Europeas en la oficina de representación en Europa está autorizado para elaborar el expediente técnico.La declaración se aplica al producto con marcas de la CE. | |
| Français PortuguêsDECLARATION DE CONFORMITE CENous déclarons sous notre entière responsabilité que la meuleuse à batterie, identifiée par le type et le code d'identification spécifique *1) est en conformité avec toutes les exigences applicables des directives *2) et des normes *3). Dossier technique en *4) - Voir ci-dessous.Le Gestionnaire des normes européennes du bureau de représentation en Europe est autorisé à constituer le dossier technique.Cette déclaration s'applique aux produits désignés CE. | DECLARAÇÃO DE CONFORMIDADE CEDeclaramos, sob nossa única e inteira responsabilidade, que Rebarbadora a Bateria, identificada por tipo e código de identificação específico *1), está em conformidade com todos os requerimentos relevantes das diretivas *2) e normas *3). Ficheiro técnico em *4)-Consulte abaixo.O Gestor de Normas Europeias no escritório de representação na Europa está autorizado a compilar o fi cheiro técnico.A declaração aplica-se aos produtos com marca CE. | |
| Italiano ΕλληνικάDICHIARAZIONE DI CONFORMITÀ CEDichiariamo sotto la nostra esclusiva responsabilità che la smerigliatrice angolare a batteria, identificata dal tipo e dal codice identificativo specifico *1), è conforme a tutti i requisiti delle direttive *2) e degli standard *3). Documentazione tecnica presso *4) – Vedere sotto.Il gestore delle norme europee presso l'ufficio di rappresentanza in Europa è autorizzato a compilare il fascicolo tecnico.La dichiarazione è applicabile ai prodotti cui sono applicati i marchi CE. | ΕΚ ΔΗΛΟΣΗ ΕΝΑΡΜΟΝΙΣΜΟΥΔηλώνουμε με αποκλειστική μας ευθύνη ότι ο Γωνιακός τροχός λειάνσεως μπαταρίας, ο οποίος προσδιορίζεται από τον τύπο και ειδικό αναγνωριστικό κωδικό *1), είναι σύμφωνος με όλες τις σχετικές απαιτήσεις των Οδηγιών *2) και στα σχετικά πρότυπα *3).Τεχνικό Αρχείο στο *4) – Δείτε παρακάτω.Ο Διαχειριστής Ευρωπαϊκών Προτύπων στο γραφείο εκπροσώπησης στην Ευρώπη είναι εξουσιοδοτημένος για τη σύνταξη του τεχνικού φακέλου.Η δήλωση ισχύει μόνο για το προϊόν που είναι τοποθετημένη σήμανση CE. | |
| *1) G18DL C336338R*2) 2006/42/EC, 2014/30/EU, 2014/35/EU, 2011/65/EU*3) EN60745-1:2009+A11:2010EN60745-2-3:2011+A2:2013+A11:2014+A12:2014+A13:2015EN60335-1:2012+A11:2014EN60335-2-29:2004+A2:2010EN55014-1:2006+A1:2009+A2:2011EN55014-2:1997+A1:2001+A2:2008 | ||
| *4) Representative office in EuropeHikoki Power Tools Deutschland GmbHSiemensring 34, 47877 Willich, GermanyHead office in JapanKoki Holdings Co., Ltd.Shinagawa Intercity Tower A, 15-1, Konan 2-chome,Minato-ku, Tokyo, Japan | 29. 6. 2018Naoto YamashiroEuropean Standard Manager29. 6. 2018A. NakagawaCorporate Officer | |
- Cordless Disc Grinder
- GENERAL POWER TOOL SAFETY WARNINGS
- WARNING
- Save all warnings and instructions for future reference.
- 1) Work area safety
- 2) Electrical safety
- 3) Personal safety
- 4) Power tool use and care
- PRECAUTION
- SAFETY WARNINGS COMMON FOR GRINDING OR ABRASIVE CUTTING-OFF OPERATIONS
- KICKBACK AND RELATED WARNINGS
- SAFETY WARNINGS SPECIFIC FOR GRINDING AND ABRASIVE CUTTING-OFF OPERATIONS
- ADDITIONAL SAFETY WARNINGS SPECIFIC FOR ABRASIVE CUTTING-OFF OPERATIONS
- GENERAL SAFETY INSTRUCTIONS FOR CORDLESS DISC GRINDERS
- CAUTION ON LITHIUM-ION BATTERY
- CAUTION
- SPECIFICATIONS
- APPLICATIONS
- BATTERY REMOVAL/INSTALLATION
- Battery removal
- Battery installation
- CHARGING
- Insert the battery into the charger
- Charging
- Pilot lamp indication
- Regarding the temperatures of the rechargeable battery
- Disconnect the charger's power cord from the receptacle
- Hold the charger firmly and pull out the battery NOTE
- Regarding electric discharge in case of new batteries, etc.
- How to make the batteries perform longer
- PRIOR TO OPERATION
- Checking the battery
- Fitting and adjusting the wheel guard
- Conducting a trial run
- Confirm the push button.
- Fixing the side handle.
- PRACTICAL GRINDER APPLICATION
- Pressure
- Grinding angle
- Precautions immediately after finishing operation The wheel continues to rotate after the tool is switched off.
- NOTE
- CAUTIONS
- ASSEMBLING AND DISASSEMBLING THE DEPRESSED CENTER WHEEL (Fig. 2)
- Assembling (Fig. 2)
- Disassembling
- MAINTENANCE AND INSPECTION
- Inspecting the depressed center wheel
- Inspecting the mounting screws
- Maintenance of the motor
- Inspecting the carbon brushes (Fig. 4)
- Replacing carbon brushes
- Cleaning of the outside
- Storage
- Service parts list
- MODIFICATIONS:
- GUARANTEE
- IMPORTANT
- Correct connection of the plug
- Information concerning airborne noise and vibration
- HiKOKI
Brand : HiKOKI
Model : G 18DL(S)
Category : Angle Grinder