
NF980ANTA - Frying Pan Pelgrim - Free user manual and instructions
Find the device manual for free NF980ANTA Pelgrim in PDF.


| Product Type | Freestanding Wood-Burning Stove |
| Brand | Pelgrim |
| Model | NF980ANTA |
| Dimensions (H x W x D) | 900 x 600 x 600 mm |
| Weight | 80 kg |
| Fuel Type | Wood logs |
| Heat Output | 10 kW |
| Heating Area | Up to 100 m² |
| Efficiency | 78% |
| Cooking Top | Yes, cast iron hotplate |
| Door Type | Single door with ceramic glass |
| Airwash System | Yes, to keep glass clean |
| Flue Outlet Diameter | 150 mm (top or rear) |
| Energy Class | A+ |
| Cleaning | Ash pan and removable baffle for easy cleaning |
| Safety Features | Overheat protection, cool-to-touch handle |
| Spare Parts Available | Door gasket, baffle plate, firebricks |
| Certifications | CE, EN 13240 |
| Warranty | 2 years |
Frequently Asked Questions - NF980ANTA Pelgrim
User questions about NF980ANTA Pelgrim
0 question about this device. Answer the ones you know or ask your own.
Ask a new question about this device
Download the instructions for your Frying Pan in PDF format for free! Find your manual NF980ANTA - Pelgrim and take your electronic device back in hand. On this page are published all the documents necessary for the use of your device. NF980ANTA by Pelgrim.
USER MANUAL NF980ANTA Pelgrim
natural_image
Front view of a kitchen stove with control knobs and a digital display (no visible text or symbols)NF1082ANT
NF1082RVS
NF980ANT
NF980RVS
natural_image
Prohibition sign with crossed lines and leafy ground (no text)natural_image
Diagram showing a circular object with a vertical structure and curved arrows indicating motion (no text or symbols)
natural_image
Illustration of a cooking pot on a stove burner with flames (no text or symbols)Fout
natural_image
Illustration of a stainless steel cooking pot on a gas stove (no text or symbols)Goed

Speciale emailcoating
natural_image
Diagram of a mechanical device with rotating components and directional arrows (no text or symbols)natural_image
Diagram showing a window with a hand holding a tool, enclosed in a circular frame, and two labeled points A (no text or symbols on the diagram itself)
natural_image
Circular diagram showing a window with a hand holding a tool, labeled 'A' (no text or symbols beyond the label)natural_image
Diagram of a heat exchanger or cooling unit with directional arrows indicating flow (no text or symbols)natural_image
Diagram of a metal rack with an arrow indicating downward motion (no text or symbols)Plaatsing
Setting the clock 17
Manual operation of the main oven 17
Main oven functions 17
Operating the small oven 18
Small oven functions 19
Operating the oven with clock 19
Turning off the oven in between uses 21
Setting the audible signal 22
Kitchen timer 22
Operating the gas hob
Ignition and adjustment 23
Comfortable cooking
Optimal use of the hob 24
Wok burner 24
Maintenance 25
Faults 31
Installation 33
Environmental aspects 38
Introduction
You have chosen a Pelgrim cooker. Optimum user comfort and easy operation were paramount during the development of this product. The extensive adjustment options allow you to always choose the perfect method of preparation.
The gas hob has been designed for people who love to cook. The many different burner capacities ensure that you can prepare every dish. The integrated spark ignition allows you to ignite and operate the burners with only one hand. The gas hob is furthermore fitted with a flame safeguard that will shut off the gas supply if the flame goes out while cooking.
The oven functions are logically grouped around the function knob. The oven is also fitted with a timer. The timer switches off the oven when the cooking time has elapsed. Efficient and hassle free.
This manual describes how you can make the best possible use of the cooker. In addition to information about its operation, you will also find background information that may assist you when using the appliance.
Read the manual thoroughly before using the appliance, and store these instructions in a safe place for future reference.
The manual also serves as reference material for the Service Department. The appliance identification card contains all the information the Service Department will need in order to respond appropriately to your needs and questions.
Enjoy your cooking!
Description
NF1082ANT/NF1082RVS NF980ANT/NF980RVS
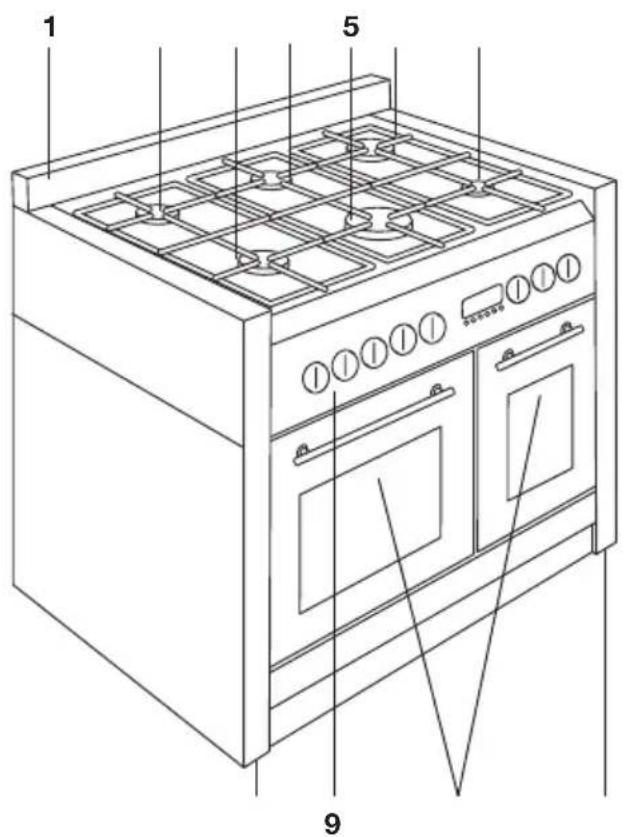

- Upright edge
- Rear left standard burner
- Front left rapid burner
- Rear middle standard burner
- Wok burner
- Rear right rapid burner
- Front right simmer burner
- Levellers
- Control panel
- Oven
Control panel
NF1082ANT/NF1082RVS
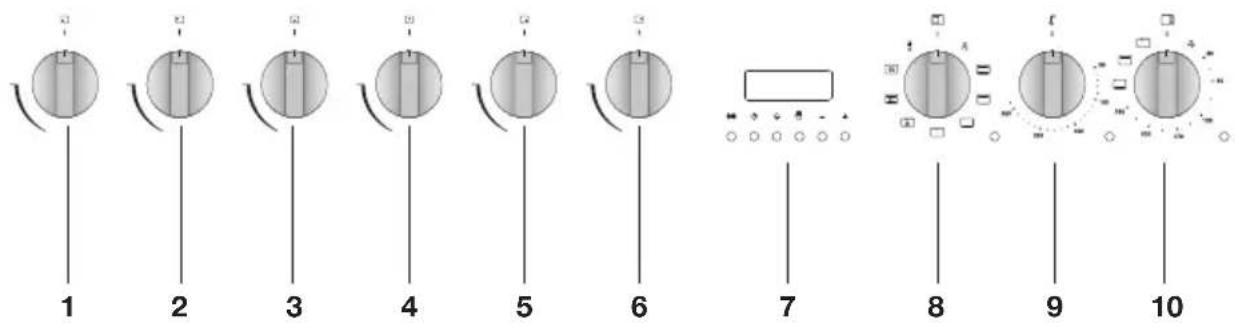
NF980ANT/NF980RVS

- Front left burner control knob
- Rear left burner control knob
- Rear middle burner control knob
- Middle front wok burner control knob
- Front right burner control knob
- Rear right burner control knob
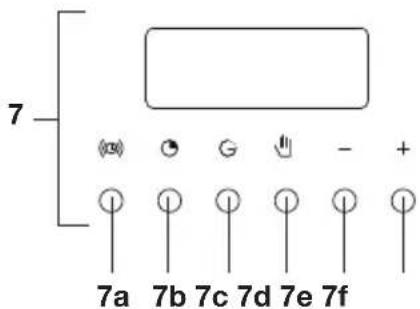
- Oven display with buttons
7a. Timer button
7b. Duration button
7c. End time button
7d. Manual control button
7e. - button
7f. + button
-
Oven function knob
-
Oven temperature knob
-
Small oven function knob
-
Middle burner control knob
Connecting and repair

- This appliance may only be installed by a qualified installer. The installation instructions and any applicable local safety regulations must be followed.
- Check the appliance for damage caused in transit. Do not connect an appliance if it is damaged.
- Never open the casing of the appliance. The casing may only be opened by a service technician.
- Disconnect the appliance from the mains supply before starting any repair work. Preferably unplug the appliance, switch off the fuses and/or automatic fuses or, with a permanent connection, set the switch in the meter cupboard to zero. Turn off the gas tap on the supply line.
Electrical safety

- Should a fault occur, or the device is damaged, make sure to have it repaired by an expert before use.
- Repairs may only be carried out by technicians who have been instructed by the Service Department. If the device is faulty, switch off the fuse in the meter cupboard or remove the power plug from the wall socket. Contact the Customer Service Department.
- To avoid dangerous situations resulting from any damage to the connecting cable, this should only be replaced by the manufacturer, the manufacturer's service organisation or suitably qualified persons.
- Make sure that the cable does not come into contact with parts of the oven that may become hot.
- The device is equipped with a plug and must only be connected to a earthed socket outlet. The distribution circuits in the meter cupboard must have fuses of at least 16 A (automatic circuit breaker with characteristic B or C).
Safe use

- If the plug is no longer accessible after installation, the connection must be equipped with an omnipolar switch with a contact separation of at least 3 mm.
- Do not use adaptors or extension leads. These may become warm during use, resulting in fire.
- Be careful with leads from electrical appliances, such as mixers. They can get caught in the door of the hot oven.
- WARNING: this appliance and its accessible parts become hot during use. Do not touch hot parts. Keep children younger than 8 away from the appliance, unless you can watch them continuously.
- This equipment may be used by children older than 8, as well as by people with physical, sensory or learning difficulties or with a lack of experience and knowledge, if they are supervised and instructed in the safe use of the appliance and understand the associated dangers.
- This appliance is for household use only. It is to be used exclusively for the preparation of food.
- Keep children at a safe distance from the oven during baking or roasting. The oven becomes hot during use. Make sure to touch the elements and the interior only after the oven has cooled completely.
- The outside of the oven may become hot if it is used for a long period of time at high temperatures. If the oven is used at the maximum temperature for a long time (when grilling, for example), the glass panel in the oven door may become hot. Please be careful if children are around.
- The oven is fully insulated. Despite this, there is always some transfer of heat, as a result of which the outside of the oven heats up. This is well within the standard limits.
- The oven has a fan that cools the oven casing. The fan may run for some time after the oven is switched off.
- Make sure the device is turned off before replacing the bulb to avoid risk of electric shock.
- Do not place accessories on the open oven door.
- Close the oven door during cooking.
- Be careful while baking when opening the door as hot steam may escape.
- Do not store flammable materials in the oven.
- Take care when cooking dishes that contain alcohol. Alcohol vapour can catch fire if it comes into contact with hot oven parts.
- Never heat food in unopened tins. Pressure will build up inside the tin and may cause it to explode.
- Frozen products such as pizzas should preferably be cooked on the grid shelf. If the baking tray is used, it may become deformed due to the large differences in temperature.
- Never cover the bottom of the oven with aluminium foil. The foil blocks heat flow, which may result in inferior cooking results. This can also damage the enamel of the bottom of the oven.
- Make sure that the food is always heated sufficiently. The time required for this depends on various factors, such as the quantity and type of food. Any bacteria in the food will only be killed if the food is heated to a temperature greater than 70^ C for at least 10 minutes. Allow the food to cook for a bit longer if you are not sure whether it has been heated sufficiently.
- Smaller quantities require a shorter cooking time. When the cooking times given in recipes are used, you might burn them.
- Never use a pressure washer or steam cleaner to clean the oven.
- Never use abrasive cleaning agents or sharp metal scrapers to clean the glass of the oven door. These can scratch the surface, which could cause the glass to break.
- Never pour cold water on the hot oven floor. This can damage the enamel.
Children
- Fruit juices can result in difficult to remove stains on the oven floor. When cooking moist cake (e.g., apple pie), make sure to use the roasting tin as a drip tray.
- Spilled food containing sugar or fruit juices, such as prune juice or rhubarb, can damage the colour of the enamel. We recommend you clean such spillages immediately.
- The appliance is not intended to be operated by means of an external timer or separate remote-control system.
- Furniture in contact with the cooker must be able to withstand a temperature of 90^ C.
- The manufacturer cannot be held liable for any damage resulting from failure to follow the safety instructions and warnings.
• Children may not play with the appliance.
Children may not clean or maintain the appliance unless supervised.
- Do not store anything of interest to children in cabinets above or behind the device.
Safe use

- WARNING: this appliance and its accessible parts become hot during use. Do not touch hot parts. Keep children younger than 8 away from the appliance, unless you can watch them continuously.
- This equipment may be used by children older than 8, as well as by people with physical, sensory or learning difficulties or with a lack of experience and knowledge, if they are supervised and instructed in the safe use of the appliance and understand the associated dangers.
- Ensure that there is adequate ventilation during use
- Keep all natural ventilation openings open.
- When using the hob for long periods, extra ventilation is necessary. For example, open a window or install an electric fan.
- The hob is only to be used for the preparation of food. The unit is not designed to heat spaces.
- Never flambé under a cooker hood. The high flames can cause a fire, even if the cooker hood is switched off.
- The burner components are hot during and immediately after use.
- Do not touch them, and avoid contact with non-heat resistant materials.
- Never immerse hot burner caps and pan supports in cold water. The rapid cooling can damage the enamel.
- The distance from the pan to a knob or non-heat resistant wall should always be greater than two centimetres. In case of smaller distances the high temperature may cause the knobs or wall to discolour or deform.
- Always use the pan supports and suitable cookware.
-
Always place the pan on the pan support. Placing the pan directly on the burner cap can result in dangerous situations.
-
Aluminium trays or foil are not suitable as cooking utensils. They can burn into the burner caps and pan supports.
- The hob can only function effectively if the burner components have been assembled using the guide ridges. Ensure that the pan supports lie properly against each other and flat on the drip tray. Only then can the pans be positioned stably.
- Never open the casing of the appliance.
- Always wear oven gloves or use oven cloths when operating the device.
- Keep oven gloves or oven cloths away from the flame.
- Do not warm closed tins on the hob. There will be a build-up of pressure that will cause tins to explode. You might get injured or scalded.
- WARNING: danger of fire: never leave anything on the hob.
- WARNING: cooking with fat or oil on a hob without supervision can be dangerous and can lead to fire. NEVER try to extinguish a fire with water. Instead switch the appliance off and then cover the flames with, for example, a cover or a fire blanket.
- WARNING: if the surface is cracked, switch off the appliance to reduce the risk of electric shock.
- The device is not to be positioned nor used outdoors.
- Do not use the device as a worktop. The device may be switched on by accident or still be hot, which means objects could melt, become hot or catch fire.
- Never cover the device with a cloth or something similar. If the device is still hot or is switched on, there is a risk of fire.
- Be extra careful when using oils or fats. Overheated oil or fats may catch fire. Risk of fire! Under no circumstances should you use water to try and extinguish the flames if the oil or fat catches fire! Extinguish the flames with a suitable lid, a damp cloth or some such object.
Children
- If there is a drawer underneath the device, without an intermediate bottom, this should not be used to store highly flammable objects/materials.
- Never use a pressure cleaner or steam cleaner to clean the hob.
- The appliance is not intended to be operated by means of an external timer or separate remote-control system.
-
The manufacturer cannot be held liable for any damage resulting from failure to follow the safety instructions and warnings.
-
Children may not play with the appliance. Children may not clean or maintain the appliance unless supervised.
- Do not store anything of interest to children in cabinets above or behind the device.
- Children may sustain burns when pulling pots or pans off the device. A special frame that stops children from getting close to the device is available from the specialist dealer.
Decorative cover (if present)

natural_image
Prohibition sign with crossed-out diagonal lines and leafy base (no text)- Always raise the decorative cover when using the hob. Before lifting the decorative cover, you should make sure it is dry.
- The decorative cover can break through heating. Ensure that all burners / cooking zones are switched off and cooled down before closing the decorative cover.
- If there is water on the decorative cover, dry it before opening. If you fail to do so, moisture may enter the unit.
- Do not use the decorative cover as a cooking surface.
Using the oven
- Remove all accessories from inside the oven and clean them with warm soapy water. Do not use any abrasive cleaning materials.
- Set the oven at its highest setting for one hour with top and bottom heat (see page 16). This will remove any protective grease used during manufacture.
- When you heat the oven for the first time you will notice a ‘new-oven smell’. Don’t worry, this is normal. If necessary, switch on the cooker hood.
• After letting it cool down, clean the oven with hot water. - Only preheat the oven if it is required in the recipe or in the tables of this manual.
Cooking tips
Energy-conscious use of the oven
- Open the oven door as little as possible.
- Prepare dishes with the same cooking temperature simultaneously (e.g., an apple pie and an oven dish) on the same grid, or above each other using hot air. You can also let meat stew at the same time.
- Prepare more meals after each other, for example an oven meal after a cake. Often, the preparation time of the second dish will be 10 minutes shorter because the oven is still hot.
- Because the oven is insulated, the residual heat from the oven will continue to cook dishes with longer cooking times (from 1 hour). Turn the oven off 10 minutes earlier than indicated, but leave the door closed.
- Pre-heating is generally not necessary, with the exception of dishes with cooking times of less than 30 minutes, or when indicated by a recipe.
- Remove everything you don't need for the dish from the oven.
- Turn the oven off before taking out the cooked dish.
Ovenware
- In principle, you can use any type of heat-resistant ovenware.
- Do not rinse glass ovenware with cold water immediately after use. The sudden temperature difference can cause the glass to crack.
- Use black or dark baking tins. These conduct heat better and allow the food to cook more evenly.
Do not cover the oven floor
- Covering the oven bottom with, for example, aluminium foil or a baking tray can lead to overheating and damage to the enamel.
- It is possible to prevent spring forms from leaking onto the oven floor by folding a container out of aluminium foil and placing it on the grid under the form or by laying baking paper under it.
Time setting
- Choose a 5 minute shorter cooking time than indicated in the recipe. This will allows you to check whether your food or cake is cooked through and golden brown at the last moment. If not, close the oven door and check again after some time. Opening and closing of the door should be done slowly. Preferably not before three quarters of the cooking time has elapsed.
Keeping food warm
- You can use the oven to keeping already prepared dishes warm. To do so, select the hot air setting and a temperature of 75 °C . Cover dishes you want to keep warm to prevent them from drying out.
Roasting meat
- Large pieces of meat, from 1 kg, are the most suitable. The meat will get a regularly shaped, crispy crust, with virtually no weight loss.
- Rub the meat with salt and spices fifteen minutes beforehand. Use 80 to 100 g of butter or fat (or mixture of the two) per 500 g of meat for roasting.
Cooking times
- Flat, thin pieces require approximately 5 minutes less cooking time than thick or rolled pieces of meat. When cooking larger pieces of meat, cook for 15 to 20 minutes longer per 500 grams extra.
- Put the meat in a roasting pan and douse in hot butter or fat. Place the meat in the roasting pan with the fatty side facing up. Make sure to baste meat without a fatty side every 15 minutes. Meat with a fatty side should be basted every 30 minutes.
Using the gas hob
- If the gravy is too dark, add a few spoonfuls of water now and then during roasting.
- Cover the meat loosely with foil and let stand for 10 minutes before serving.
- Regularly check that the burner caps and burner rings are correctly positioned on the burner bases. Incorrect positioning can result in poor ignition, poor combustion, or damage to the caps.
- Over time, the enamel on the support point can become burnt in because the pan support is very strongly heated by the burner. This is unavoidable and is therefore not covered by the guarantee.
Setting the clock

When connecting the unit for the first time, 'auto' and '0:00' will flash on the display. The correct time of day has yet to be set.
- Press the 'manual' button.
'0:00' will stop flashing and the cooking symbol will appear. - Press '+' or '-' within 5 seconds to set the correct time.
The time of day is set and the unit is set to manual (for the large oven).
▶Each press of the button increases/decreases the time by one minute. - You can press and hold the ‘+’ or ‘-’ button to set the desired time quicker.
Manual operation of the main oven

flowchart
graph TD
    A["Top Left"] --> B["Central Chamber"]
    B --> C["Bottom Left"]
    B --> D["Bottom Right"]
    B --> E["Bottom Left"]
    B --> F["Bottom Right"]
    B --> G["Bottom Left"]
    B --> H["Bottom Right"]
    style B fill:#ccc,stroke:#333,stroke-width:2px

- Select a temperature with the temperature knob and an oven function with the function knob.
The red function indicator light and the orange temperature indicator light will light up; the oven is switched on.
▶See the table below for more information on the various oven functions that are available. - After the cooking time has elapsed, turn the temperature knob and the function knob to '0' to switch the oven off.
Main oven functions
| Oven lightThe oven light switches on. | |
| Top and bottom heat (conventional)A top and bottom heating element heat the food, suitable for the preparation of one dish. This mode is used for light pastry and cake where the heat supply from above and below needs to be equal to obtain an airy result. The dish should preferably be placed in a preheated oven, i.e., once the indicator light next to the temperature knob has gone out. | |
 | Top heatThis mode is suitable for quickly baking soufflé's, meringues, etc., a little longer. When you are finished baking, turn the function knob to ‘top heat’.Bottom heatThis mode is recommended for dishes where the bottom should be well cooked. The bottoms of dishes are cooked well.Before you are finished baking (with a quarter of the baking time to go), switch the function knob to ‘bottom heat’ mode. Adjust the temperature knob to the maximum setting. The dish will be heated mainly by the bottom element, while continuing to brown on top. |
 | GrillThe top element heats the dish. This mode is suitable for grilling steaks, sausages, and making cheese on toast. The fan distributes the heat from the grill through the oven. This makes sure that the food is cooked evenly. Ideal for larger dishes such as poultry and larger pieces of meat. Put a baking dish under the dish to catch dripping fat. |
 | Fan with grillYou can grill with the fan running. The radiant heat is distributed around the dish by the fan. |
 | Conventional with fanThe top and bottom heating element are turned on. The fan evenly distributes the heat throughout the oven. This function is suitable for roasting meat and baking cakes. This function can also defrost food. To do so, set the temperature knob to ‘0’. |
 | Hot air circulationThe air in the oven is heated by the hot air element. The fan in the rear wall blows hot air in the oven. This is how the dishes are heated. You can bake on multiple levels simultaneously, allowing you to save energy. Because of the intensive heat transfer, you can choose a temperature that is approximately 20–30°C lower than indicated in conventional recipes. |
| * | DefrostThis function may be used for slowly defrosting food. You do not need to set a temperature. The fan will start running, causing the air to circulate through the oven. |
Operating the small oven (NF1082)
All of the functions of the small oven can be operated using one knob. The most suitable temperature for the various functions is set automatically. If you adjust the temperature manually, the top and bottom element will be switched on. The display with electronic timer has no influence on the operation of the small oven.

-
Select a temperature or an oven function with the function knob. The orange indicator light of the small oven will light up; the oven is switched on.
▶See the table below for more information on the various oven functions that are available. -
After the cooking time has elapsed, turn the temperature knob and the function knob to '0' to switch the oven off.
Small oven functions
| [Cx87] | Oven lightThe oven light switches on. |
| 100–260°C | Top and bottom heat (conventional)A top and bottom heating element heat the food, suitable for the preparation of one dish. This mode is used for light pastry and cake where the heat supply from above and below needs to be equal to obtain an airy result. The dish should preferably be placed in a preheated oven, i.e., once the indicator light next to the temperature knob has gone out. |
 | Bottom heatThis mode is recommended for dishes where the bottom should be well cooked. The bottoms of dishes are cooked well.Before you are finished baking (with a quarter of the baking time to go), switch the function knob to ‘bottom heat’ mode. Adjust the temperature knob to the maximum setting. The dish will be heated mainly by the bottom element, while continuing to brown on top. |
 | Top heatThis mode is suitable for quickly baking soufflé’s, meringues, etc., a little longer. When you are finished baking, turn the function knob to ‘top heat’. |
 | GrillThe top element heats the dish. This mode is suitable for grilling steaks, sausages, and making cheese on toast. The fan distributes the heat from the grill through the oven. This makes sure that the food is cooked evenly. Ideal for larger dishes such as poultry and larger pieces of meat. Put a baking dish under the dish to catch dripping fat. |
Operating the oven with clock (for the small oven)
The electronic timer can be used in two ways:
- It allows you to determine the duration of baking / roasting / grilling. The oven switches off when the set time has elapsed. An audible signal will sound once the time is up.
- You can also enter a duration or an end time (for an automatic baking process). The oven will start and stop automatically. An audible signal will sound once the automatic baking process is finished.


Programming baking time
- Press the 'duration' button.
The display will read '0:00'.
- Press the 'duration' button again and hold.
- Use the '+' or '-' button to adjust the duration
- Pressing the ‘+’ or ‘-’ button for the first time will call up ‘auto’ in the display.
- You can press and hold the ‘+’ or ‘−’ button to set the desired time quicker. - When the ‘duration’ button is released, the countdown of the programmed baking time will start and the current time will once again be shown in the display.
- Select a temperature with the temperature knob and an oven function with the function knob.
The red function indicator light and the orange temperature indicator light will light up; the oven is switched on.
-
When the set baking time has elapsed, an audible signal will sound and the oven will switch off automatically.
-
Switch off the audible signal by pressing the 'manual' button.
-
After the cooking time has elapsed, turn the temperature knob and the function knob to '0' to also switch off the indicator lights of the oven.
- You can see the remaining baking time in the display at any time by pressing the ‘duration’ button.
If you want to adjust the duration, press the 'duration' button and immediately after that the '+' or '-' button.
Programming the automatic baking process
You can program the oven to turn on and off automatically by setting a duration and end time. The oven will calculate the start time and switch off automatically after the end of the cooking time.

The display will read '0:00'.
-
Press the 'duration' button again and hold.
-
Use the '+' or '-' button to adjust the duration.
- Pressing the ‘+’ or ‘−’ button for the first time will call up ‘auto’ in the display.
- You can press and hold the ‘+’ or ‘-’ button to set the desired time quicker.
- Press the 'end time' button.
In the display you will see the current time multiplied by the set duration.
-
Press the 'end time' button again and hold.
-
Use the '+' or '-' button to adjust the end time.
- Pressing the ‘+’ or ‘−’ button will cause the cooking symbol in the display to disappear.
- You can press and hold the ‘+’ or ‘−’ button to set the desired time quicker. - When the ‘end time’ button is released, the countdown of the programmed time will start and the current time will once again be shown in the display.
- Select a temperature with the temperature knob and an oven function with the function knob.
The red function indicator light and the orange temperature indicator light will light up as soon as the start time is reached; the oven is switched on.
-
When the set baking time has elapsed, an audible signal will sound and the oven will switch off automatically.
-
Switch off the audible signal by pressing the 'manual' button.
-
After the cooking time has elapsed, turn the temperature knob and the function knob to '0' to also switch off the indicator lights of the oven.
-
You can see the remaining baking time in the display at any time by pressing the ‘duration’ button.
- You can see the end time in the display at any time by pressing the 'end time' button.
If you want to adjust the duration, press the 'duration' button and immediately after that the '+' or '-' button.
- Example: Current time: 17:30, the set duration of the baking process: 1 hour and 15 minutes, the set end time of the baking process: 19:45. The oven will start the baking process at 18:30 with the preset temperature and function and will stop at 19:45.
Turning off the oven in between uses
- Press the 'duration' button.
- Press the ‘–’ button until the time in the display shows ‘0.00’. You will hear an audible signal.
- Switch off the audible signal by pressing the 'manual' button.
Setting the audible signal
If you have not set an oven function, you can change the audible signal using the ‘-’ button. There are three different types.
- Press the '-' button twice.
You will hear an audible signal. - Then immediately press the ‘-’ button a third time.
You will hear a different audible signal. -
Then immediately press the ‘-’ button a fourth time.
You will hear yet another audible signal. -
Choose from these three signals by pressing the ‘-’ button (several times).
Kitchen timer
((0))


The audible signal of the kitchen timer will only sound after the expiry of the set time. The timer will not turn off the oven.
- Press the 'kitchen timer' button.
The display will read '0:00'. - Press the 'kitchen timer' button again and hold.
- Use the '+' or '-' button to adjust the desired time.
- Pressing the ‘+’ or ‘−’ button for the first time will call up kitchen timer symbol in the display.
-
You can press and hold the ‘+’ or ‘-’ button to set the desired time quicker.
When the ‘kitchen timer’ button is released, the countdown of the time will start and the current time will once again be shown in the display. -
When the time has elapsed, an audible signal will sound and the kitchen timer symbol will disappear.
-
Switch off the audible signal by pressing the 'manual' button.
▶You can see the remaining time in the display at any time by pressing the ‘kitchen timer’ button.
If you want to adjust the time, press the 'kitchen timer' button and immediately after that the '+' or '-' button to adjust the time.
Igniting and adjusting

A symbol next to the control knob indicates which burner is being operated. Each burner is infinitely variable between high and low.
Spark ignition
Push in the control knob and turn it to the left.
The burner ignites.
The control knob should be pushed in for about 10 seconds in connection with the flame safeguard.
Flame safeguard
Your gas hob has a flame failure device. This ensures that the gas supply is shut off if the flame goes out during cooking.
If the burner fails to ignite, check that:
- the burner cap is securely placed on the burner;
- the burner / spark plug is clean and dry.
Optimal use of the hob

natural_image
Illustration of a cooking pot on a stove burner with flames (no text or symbols)Wrong
Always ensure that the flames remain below the pan. If flames play around the edges of the pan, a lot of energy is lost. In addition, the handles can get too hot. Do not use pans with a base diameter of less than 12 cm. Smaller pans will not be stable.
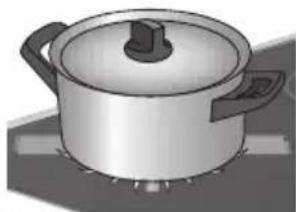
natural_image
Illustration of a cooking pot on a gas stove (no text or symbols)Right

- When frying, stir-frying, cooking through large quantities, or deep-frying, it is best to use the rapid or wok burner.
- Preparing sauces, simmering and boiling can be done best on the simmer burner. On its high setting this burner is large enough for cooking food right through.
• Cook with the lid on the pan. This way you save up to 50% energy. - Use pans with a flat, clean, dry base. Pans with a flat base stand stably and pans with a clean base transfer the heat more effectively to the food.
Wok burner
With the wok burner you can prepare dishes at a very high temperature. For this purpose it is important:
• to cut the ingredients into strips, slices or pieces before cooking.
- to use good-quality oil, such as olive, maize, sunflower or peanut oil when stirfrying. A small quantity is enough. Butter and margarine on the other hand will burn because of the high heat.
- place the dishes with the longest cooking time in the pan first, so that at the end of the cooking time all ingredients are cooked al dente at the same time.
Please note
Disconnect the appliance from the power supply before beginning repairs. Preferably unplug the appliance, switch off the fuses, or set the switch in the meter cupboard to zero. Turn off the gas tap on the supply line.
Do not use steam cleaners or high-pressure steam cleaner to clean the device.
General
Ffront of the unit
Clean the surface with a liquid, non-abrasive cleaner for smooth surfaces and a soft cloth. Apply the cleaning agent to the cloth and wipe away the dirt; then rinse with water. Do not apply the cleaning agent directly onto the surface. Do not use harsh or abrasive cleaning agents, sharp objects, or steel wool, as this can cause scratches on the unit.
Aluminium surfaces
Aluminium surfaces should be cleaned with non-abrasive, liquid cleaning agents designed for such materials. Apply the cleaning agent to a damp cloth and wipe the surface clean; then rinse the surface with water. Do not apply the cleaning agent directly onto the aluminium surface. Do not use any abrasive cleaning materials or scourers. The surface must not come into contact with oven sprays.
Stainless steel front panels
Clean the surface with a mild detergent (soapsuds) and a soft sponge that doesn't scratch the surface. Do not use abrasive or solvent-based cleaning agents. If you do not follow these instructions the casing may become damaged.
Painted and plastic surfaces
Clean the knobs buttons and door handle with a soft cloth and liquid cleaning agent suitable for cleaning smooth, painted surfaces. You can also use cleaning agents specifically designed for this type of surfaces. In this case, follow the instructions of the manufacturer.
Enamelled parts
The inside of the oven door, the entire oven interior, and the baking tray and griddle are entirely enamelled. They can best be cleaned with warm soapy water.
Glass
Clean glass parts with soapy water or Glassex.
Cleaning the oven
- The inside of the oven can be cleaned in the traditional way (with cleaning agents or oven spray), but only when the oven is very dirty and the stains are very stubborn.
- The following procedure is recommended for regular cleaning (after each use):
Set the oven to 'top and bottom heat' mode. Set the temperature knob to 50 °C.
Pour 0.6 litres of water into a baking tin and place it on the bottom rack. After half an hour the food residues on the enamel of the oven will become soft and you can gently wipe them off with a damp cloth.
In the event of stubborn stains, the following should be observed:
The oven should be cooled down before cleaning.
- Clean the oven and the accessories after each use, in order to prevent the dirt from burning into the oven.
- The easiest way to remove grease is by using warm soapy water while the oven is still warm.
- For very stubborn dirt, use conventional oven cleaners. Make sure to thoroughly rinse the oven afterwards with clean water, to remove any residual cleaning agent.
- Never use aggressive cleaning agents such as steel wool, scouring pads, stain removers, etc.
- Varnished, stainless steel, and galvanised surfaces, and aluminium parts must never come into contact with oven sprays, because this will damage and discolour them. The same applies to the thermostat sensor (if the device is equipped with a timer with a sensor), and to the heating elements that are accessible at the top.

- When purchasing and using cleaning agents, be sure to take account of the environment and heed the instructions of their manufacturer.
Please Note: never use abrasive cleaning agents or sharp metal scrapers to clean the glass of the oven door. These can scratch the surface, which could cause the glass to break.
Practical tips
- It is recommended to wrap large pieces of fatty meat in aluminium foil or put them in a suitable roasting bag to prevent grease from splashing on the oven walls.
- Put a drip tray under the meat when grilling.
Accessories
Wash any accessories (baking trays, grids, etc.) with warm water and standard washing-up liquid.
Special enamel coating
The oven, the inside of the door, and the baking trays have been treated with special enamel, which has a smooth and strong surface. This special coating makes cleaning at room temperature easier.
natural_image
Diagram of a mechanical device with rotating components and directional arrows (no text or symbols)Replacing the oven bulb
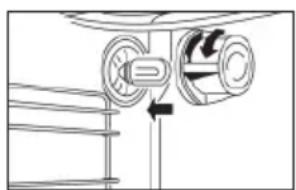
- You need a bulb with the following specifications: E14 socket, 230V / 15Hz, 15W, suitable for high temperatures (300 °C).
- Remove the glass cover (counter-clockwise), switch the oven light bulb, and replace the glass cover.
Disassembly of the oven door
In normal use, the oven door will not need to be removed. However, should you want to do this, please follow the instructions below.
Warning! The oven door is very heavy and should be well supported.
- Open the door and tilt lock A in both hinges fully to the outside.
- Close the oven door halfway, so that the tension is off of the springs (the oven door will be at an angle of approximately 30^ ).
- Hold the door securely at both sides, move along with the closing movement of the door, while simultaneously lifting the door.
- Turn the lower part of the door with the hinges B towards you. The door has now been removed.
- Clean the door. The door may optionally be tilted so as to clean the space between the glass with a soft bottlebrush.
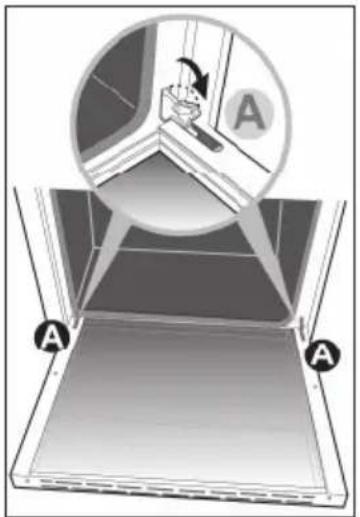

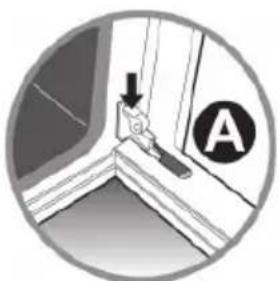
To put the door back in place, proceed in reverse order. The door hinges are in the extended position.
natural_image
Circular diagram showing a mechanical component with an arrow and label 'A' (no text or symbols beyond the label)- Slide the door hinges into the hinge openings.
- Tilt the door in the horizontal position and click the hinges in place by tilting lock A back inwards.
Please note: the hinge protectors must always be secured again after replacing the oven door.
natural_image
Diagram of a heat exchanger or cooling unit with directional arrows indicating flow (no text or symbols)Removing the runners
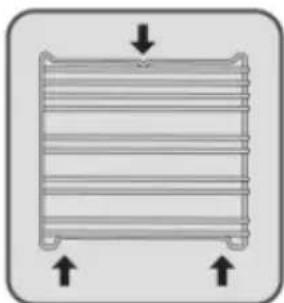
You can remove both runners to clean the oven easier. The runners are attached to the oven wall at three points (see figure).

natural_image
Diagram of a metal rack with an arrow indicating downward motion (no text or symbols)-
Click the runner out of the lock by pushing in the middle of the top of the runner.
-
Lift the runner upwards slightly and pull it outwards.
To put the runners back in place, proceed in reverse order.
-
Place the lower part of the runner on the two lower attachment points.
-
Then press and click the upper part back into the upper attachment point.
Cleaning the gas hob
Your gas hob has been manufactured from high-grade, easy to clean materials.
- Regular cleaning immediately after use prevents food spills from being able to become ingrained and cause stubborn stains that are difficult to remove. Use a mild cleaning agent. Do not use too much moisture, as there is a risk that it will penetrate into the burner or vent holes.
- Clean the control knobs, burners, and pan supports first and then the drip tray. This avoids the drip tray getting dirty again during cleaning.
- The ignition plugs should preferably be cleaned with a cloth. Do this carefully. Otherwise the spark plug can become defective. The spark plug will only operate correctly in a dry environment. If the plug is very dirty, you can clean it with a tiny brush.
- Set the pan supports down vertically, without sliding them over the drip tray.
- Assemble the burner parts using the guide ridges. Pay attention to the notches for the ignition plug and thermocouple. Make sure the burner parts are lying flat.
Cleaning the pan supports
Do not clean the pan supports in the dishwasher. The enamel on the pan supports is suitable for cleaning in the dishwasher, but the connection with the rubber feet is not. Moreover, the pan supports might show some discolouration if washed in the dishwasher. If the rubber feet are lost, the pan support is likely to damage the drip tray.
Stubborn stains on enamel (pan supports, burner caps, and drip tray)
Stubborn stains can best be removed with a liquid cleaning agent. Never use scouring powder, scouring pads, sharp objects, or aggressive cleaning agents.
Cleaning removable burner components
Burner parts should not be cleaned in the dishwasher. The parts may be damaged by the dishwasher detergent! The removable burner components (including those of the wok) are best cleaned with a mild cleaning agent and a soft cloth. For stubborn stains, soak the burner components in hot soapy water. Never use scouring powder, scouring pads, sharp objects, or aggressive cleaning agents.
Faults table
When in doubt about the proper operation of your appliance, this does not automatically mean there is a defect. Make sure to check the points mentioned below in the table first, or visit our website ‘www.pelgrim.nl’ for more information.
| Problem with the hob Possible cause Solution | ||
| There is a smell of gas in the vicinity of the appliance. | The gas connection of the unit is leaking. | Turn off the main gas tap. Contact your installer. |
| A burner won't ignite. Plug not in socket. Plug the plug into the wall socket. | ||
| Problem with the hob Possible cause Solution | ||
| The burner won’t burn evenly. | Burner parts not correctly installed. | Assemble the burner parts using the centring ridges. |
| Burner components dirty/ damp. | Clean/dry the burner components. Make sure that the outflow holes are open. | |
| Wrong type of gas used. Check | that the gas used is suitable for the appliance. If not, contact your gas fitter. | |
| The burner goes out after igniting. | Control knob not pressed in long enough. | Keep the control knob pressed in for at least 10 seconds. |
| Problem with the oven Possible cause Solution | |
| The oven won’t heat up. No temperature set. Set the temperature using the temperature knob. | |
General

This appliance should only be connected by a registered installer! The gas connection and the electrical connection must comply with national and local regulations.
Warning!
This appliance must be earthed at all times.
Installation, maintenance, or repairs should only be carried out by professionals who are authorised by the manufacturer, as failure to do so will void the guarantee.
The device should be disconnected from the mains prior to installation, maintenance or repairs. The device is only disconnected from the electric power if:
- the main switch of the domestic electrical system is switched off, or the fuse of the domestic electrical system has been completely removed, or
- the plug has been pulled out of the socket.
Faulty parts may only be replaced by original Pelgrim parts. Only those parts are guaranteed by Pelgrim to meet the safety requirements.
To avoid dangerous situations resulting from any damage to the connecting cable, this should only be replaced by the manufacturer, the manufacturer's service organisation or suitably qualified persons.
Gas connection

- We recommend that the hob be connected by means of a fixed pipe. Connection using a specially designed safety hose is also permitted.
- The pipe behind the oven must be made entirely out of metal.
Warning!
- A safety hose may not be bent and must not come into contact with moving parts of kitchen units.
- The connection tap for the appliance must always be positioned such that it is easily accessible.
- The type of gas and the country for which the appliance has been designed are indicated on the appliance identification card.

Before using the appliance for the first time check the connections using water and washing-up liquid to ensure that there are no gas leaks.
Electrical connection
220-240V\~ - 50Hz
• Wall socket and plug must be accessible at all times.
- Make sure that the cable does not come into contact with parts of the oven that may become hot.
- If you want to make a fixed connection, ensure that a multi-pole switch with a distance between contacts of 3 mm is installed in the supply cable.
- Do not use a multiple socket or an extension lead to connect the device to the electrical mains. Safe use of the device cannot be guaranteed with such accessories.
Assembling the upright edge
- Place the upright edge A on the back of the plane, and align the holes.
- Tighten the 4 screws B with a cross-head screwdriver.


natural_image
Technical line drawing of a mechanical assembly with a lever and bracket (no text or symbols)Installation
- When placing the cooker next to a tall cupboard or another wall made of flammable material, keep at least 50 mm distance between the cooker and the walls.
- Also keep a minimum distance of 650 mm between the hob and any cooker hood placed above the cooker.
- If you place the cooker in a kitchen unit, the minimum space must be adhered to.
- If the cooker is built in between kitchen cabinets, the lining of the units must be able to withstand temperatures up to 90 °C.

The height of the cooker can be adjusted with the adjusting feet.
If you want to install the cooker on a platform, make sure that it is securely fastened.

Warning!
After installation of the device, check whether the burners work properly. The flame pattern should be regular and stable on the high setting, and the burners must not go out on low.
Dimensions
NF1082ANT/NF1082RVS NF980ANT/NF980RVS
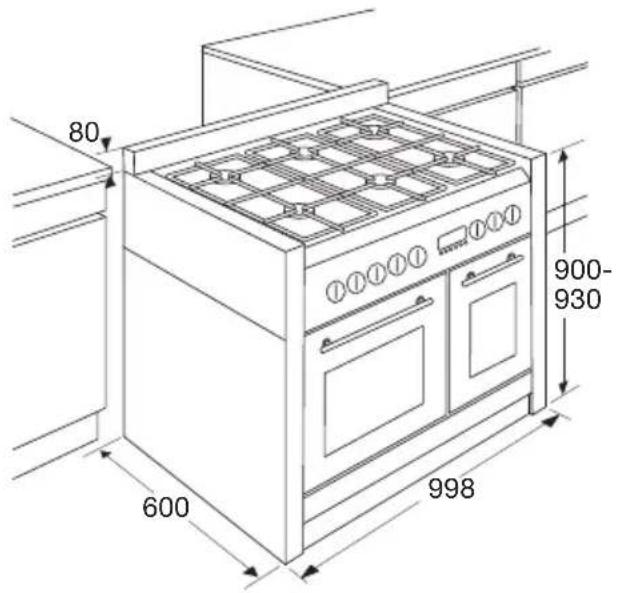

Technical data
The appliance identification card lists the total connected load, the required voltage, and the frequency.
This appliance meets all relevant CE guidelines.
| NF1082ANT/RVS NF980ANT/RVS | |
| Connection 230V - 50Hz 230V - 50Hz | |
| Power | 3.9 kW 3.9 kW |
| Volume 65 litres (small oven 31 litres) 85 litres |
Gas information
| Burner Gas | Operating pressure (mbar) | |
| High (3.0 kW) G25 25 | ||
| Medium 1.75 kW G25 25 | ||
| Simmer (1.0 kW) G25 25 | ||
| Wok (3.5 kW) G25 25 | ||
Disposal of packaging and appliance
Durable materials were used in the manufacture of this appliance. Make sure to dispose of the unit responsibly at the end of its life cycle. Ask your local authorities for more information about how to do so.
The appliance packaging is recyclable. The following may have been used:
- cardboard;
• polyethylene film (PE);
• CFC-free polystyrene (PS rigid foam).
Dispose of these materials in a responsible manner and in accordance with government regulations.

The product is marked with a crossed-out dustbin symbol to remind you to dispose of household appliances separately. This means that at the end of its working life, the product must not be disposed of as urban waste. The appliance must be taken to a special municipal centre for separated waste collection or to a dealer providing this service.
Separate collection of household appliances helps to prevent potential negative impact on the environment and on human health caused by improper disposal. It ensures that the materials that make up the unit can be recycled to achieve a significant saving in terms of energy and raw materials.
CE
Declaration of Conformity
We hereby declare that our products satisfy the applicable European directives, orders and regulations, as well as the requirements stated in the referenced standards.
- Speciale emailcoating
- Plaatsing
- Operating the gas hob
- Comfortable cooking
- Introduction
- Read the manual thoroughly before using the appliance, and store these instructions in a safe place for future reference.
- Description
- Control panel
- Connecting and repair
- Electrical safety
- Safe use
- Children
- Decorative cover (if present)
- Using the oven
- Cooking tips
- Energy-conscious use of the oven
- Ovenware
- Do not cover the oven floor
- Time setting
- Keeping food warm
- Roasting meat
- Cooking times
- Using the gas hob
- Setting the clock
- Manual operation of the main oven
- Main oven functions
- Operating the small oven (NF1082)
- Small oven functions
- Operating the oven with clock (for the small oven)
- Programming baking time
- Programming the automatic baking process
- Turning off the oven in between uses
- Setting the audible signal
- Kitchen timer
- Igniting and adjusting
- Spark ignition
- Flame safeguard
- Optimal use of the hob
- Wok burner
- Please note
- General
- Ffront of the unit
- Aluminium surfaces
- Stainless steel front panels
- Painted and plastic surfaces
- Enamelled parts
- Glass
- Cleaning the oven
- In the event of stubborn stains, the following should be observed:
- Practical tips
- Accessories
- Special enamel coating
- Replacing the oven bulb
- Disassembly of the oven door
- Removing the runners
- Cleaning the gas hob
- Cleaning the pan supports
- Stubborn stains on enamel (pan supports, burner caps, and drip tray)
- Cleaning removable burner components
- Faults table
- Warning!
- Gas connection
- Electrical connection
- Assembling the upright edge
- Installation
- Dimensions
- Technical data
- Disposal of packaging and appliance
- Declaration of Conformity
Brand : Pelgrim
Model : NF980ANTA
Category : Frying Pan