
KX-TG9382 - Cellphone PANASONIC - Free user manual and instructions
Find the device manual for free KX-TG9382 PANASONIC in PDF.


| Product Type | Cordless Phone (DECT) |
| Brand | Panasonic |
| Model | KX-TG9382 |
| Dimensions (Base) | Approx. 170 x 50 x 30 mm |
| Dimensions (Handset) | Approx. 48 x 30 x 170 mm |
| Weight (Handset) | Approx. 200 g |
| Power Supply | AC 230 V, 50 Hz (adapter) |
| Battery Type | Ni-MH rechargeable (AAA) |
| Standby Time | Up to 200 hours |
| Talk Time | Up to 18 hours |
| Range (Indoor) | Up to 50 meters |
| Range (Outdoor) | Up to 300 meters |
| Key Features | Caller ID, Call Waiting, Answering Machine, Hands-free Speakerphone, Intercom, Phonebook (200 entries) |
| Display | Backlit LCD, 1.8 inch |
| Answering Machine Capacity | Up to 18 minutes |
| Maintenance | Clean with a soft, dry cloth. Do not use liquid or abrasive cleaners. |
| Safety | Use only the specified Panasonic AC adapter. Keep away from water and heat sources. |
| Spare Parts & Repairability | Spare batteries and chargers available. For repairs, contact an authorized Panasonic service center. |
| General | DECT 6.0 (European version), compatible with analog phone lines. Operating temperature: 5°C to 40°C. |
Frequently Asked Questions - KX-TG9382 PANASONIC
User questions about KX-TG9382 PANASONIC
0 question about this device. Answer the ones you know or ask your own.
Ask a new question about this device
Download the instructions for your Cellphone in PDF format for free! Find your manual KX-TG9382 - PANASONIC and take your electronic device back in hand. On this page are published all the documents necessary for the use of your device. KX-TG9382 by PANASONIC.
USER MANUAL KX-TG9382 PANASONIC
Operating Instructions
Expandable Digital Cordless
Answering System
Model No. KX-TG9381
with 2 Handsets
Model No. KX-TG9382
2LINE

Model shown is KX-TG9381.

Bluetooth®
DECT
6.0
Thank you for purchasing a Panasonic product.
This unit is compatible with Caller ID. You must subscribe to the appropriate service offered by your service provider/telephone company.
Charge the batteries for about 7 hours before initial use.
Please read these operating instructions before using the unit and save them for future reference.
For assistance, visit our Web site:
http://www.panasonic.com/help for customers in the U.S.A. or Puerto Rico.
Consulte "Guía Rápida Española", página 60.


Table of Contents
Introduction
Model composition 3
Accessory information....3
System capabilities 5
Important Information
For your safety 6
Important safety instructions ....7
For best performance 7
Specifications 7
Other information 8
Getting started
Connections 9
Battery installation....12
Battery charge....12
Controls. 13
Display 15
Initial settings 16
Making/Answering Calls
Making calls 18
Answering calls 19
Useful features during a call 20
Using the other line during a call. 21
Phonebook
Handset/base unit phonebook 22
Copying phonebook entries 24
Programming
Programmable settings 26
Special programming 32
Registering a unit 33
Caller ID Service
Using Caller ID service 34
Caller list 34
Answering System
Answering system....37
Turning the answering system on/off ..... 37
Greeting message....37
Listening to messages using the base unit .... 38
Listening to messages using the handset....39
Remote operation 40
Answering system settings 42
Voice Mail Service
Voice mail service 43
Intercom/Locator
Intercom 44
Handset locator....44
Transferring calls....45
Conference calls 45
Using Bluetooth devices
Using Bluetooth devices. 47
Copying phonebook entries from a Bluetooth
cellular phone to the base unit (phonebook
transfer) 47
Using a Bluetooth wireless headset (optional) . 48
Useful Information
Wall mounting 50
Belt clip 51
Error messages 52
Troubleshooting 53
FCC and other information 58
Customer services 68
Warranty (For United States and Puerto Rico) . 69
Index
Index. 71
Model composition
| Series Model No. | Base unit Handset | ||
| Part No. Part No. | Quantity | ||
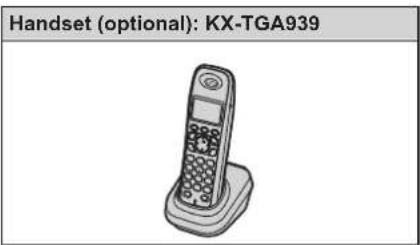
| KX-TG9381 series KX-TG9381 *1 | KX-TG9381 KX-TGA939 1 | ||
| KX-TG9382 KX-TG9381 KX-TGA939 2 | |||
*1 Feature differences: Intercom calls can be made between the handsets by purchasing and registering one or more optional handsets (page 4).
Accessory information
Supplied accessories
| No. Accessory item/Order number | Quantity | ||
| KX-TG9381 KX-TG9382 | |||
| 1AC adaptor/PQLV219Z 1 2 | |||
| 24-wire telephone line cord with green plugs/PQJA10088Z 1 1 | |||
| 3 | 2-wire telephone line cord with transparent plugs/PQJA10075Z | 1 | 1 |
| 4Wall mounting adaptor/PQKL10078Z2 | 1 1 | ||
| 5Rechargeable batteries/HHR-4DPA(Part No. HHR-55AAABU or N4DHYYY00004) | 2 | 4 | |
| 6Handset cover *1/PNYNTGA430BR | 1 2 | ||
| 7Belt clip/PNKE1004Z1 | 1 2 | ||
| 8Charger/PNWETG9382T | -1 | ||
*1 The handset cover comes attached to the handset.
①

②

③

④

⑤

⑥

⑦

⑧

Introduction
Additional/replacement accessories
Please contact your nearest Panasonic dealer for sales information (page 68).
| Accessory item Order | number |
| Rechargeable batteries | HHR-4DPA*1 ●To order, please call 1-800-332-5368 or visithttp://www.panasonic.com/batterystore |
| Battery type:-Nickel metal hydride (Ni-MH)-2 AAA (R03) size for each handset | |
| Corded headset KX-TCA60, KX-TCA86, KX-TCA92, KX-TCA93, KX-TCA94 | |
| T-adaptor KX-J66 | |
| 2-line splitter KX-J42 | |
| Battery back-up power supply | KX-TCA230 |
*1 Replacement batteries may have a different capacity from that of the supplied batteries.
Expanding your phone system
You can expand your phone system by registering optional handsets (6 max.) to a single base unit.
System capabilities
The unit can accommodate up to 2 external telephone lines and the following operations are available at a time.
How many units can be in use at one time?
■A maximum of 4 parties are available:
Line 1: Outside call (including 1 extension and 1 outside party)
Line 2: Outside call (including 1 extension and 1 outside party)
Example: Outside call on line 1 Example: Outside call on line 2


■A maximum of 5 parties are available:
Line 1: Conference call (including 2 extensions and 1 outside party)
Line 2: Outside call (including 1 extension and 1 outside party)
Example: Conference call on line 1 Example: Outside call on line 2


■The following operations are possible simultaneously:
- An outside call and 1 pair of intercom calls can be made at a time.
- While a caller is leaving a message on your answering system through one line, the unit can make an outside call through another line.
Note:
- The maximum operating number may decrease, depending on the state of usage, for example, when the answering system is taking a call.
Important Information
For your safety
To prevent severe injury and loss of life/property, read this section carefully before using the product to ensure proper and safe operation of your product.
WARNING
Power connection
- Use only the power source marked on the product.
- Do not overload power outlets and extension cords. This can result in the risk of fire or electric shock.
- Completely insert the AC adaptor/power plug into the power outlet. Failure to do so may cause electric shock and/or excessive heat resulting in a fire.
- Regularly remove any dust, etc. from the AC adaptor/power plug by pulling it from the power outlet, then wiping with a dry cloth. Accumulated dust may cause an insulation defect from moisture, etc. resulting in a fire.
- Unplug the product from power outlets if it emits smoke, an abnormal smell, or makes an unusual noise. These conditions can cause fire or electric shock. Confirm that smoke has stopped emitting and contact the Panasonic Call Center at 1-800-211-PANA (1-800-211-7262).
- Unplug from power outlets and never touch the inside of the product if its casing has been broken open.
- Never touch the plug with wet hands. Danger of electric shock exists.
Installation
- To prevent the risk of fire or electrical shock, do not expose the product to rain or any type of moisture.
- Do not place or use this product near automatically controlled devices such as automatic doors and fire alarms. Radio waves emitted from this product may cause such devices to malfunction resulting in an accident.
- Do not allow the AC adaptor or telephone line cord to be excessively pulled, bent or placed under heavy objects.
Operating safeguards
- Unplug the product from power outlets before cleaning. Do not use liquid or aerosol cleaners.
- Do not disassemble the product.
- Do not spill liquids (detergents, cleansers, etc.) onto the telephone line cord plug, or allow it to become wet at all. This may cause a fire. If the telephone line cord plug becomes wet, immediately pull it from the telephone wall jack, and do not use.
Medical
- Consult the manufacturer of any personal medical devices, such as pacemakers or hearing aids, to determine if they are adequately shielded from external RF (radio frequency) energy. (The product operates in
the frequency range of 1.92 GHz to 1.93 GHz, and the RF transmission power is 115 mW (max.).
- Do not use the product in health care facilities if any regulations posted in the area instruct you not to do so. Hospitals or health care facilities may be using equipment that could be sensitive to external RF energy.
CAUTION
Installation and relocation
- Never install telephone wiring during an electrical storm.
- Never install telephone line jacks in wet locations unless the jack is specifically designed for wet locations.
- Never touch uninsulated telephone wires or terminals unless the telephone line has been disconnected at the network interface.
- Use caution when installing or modifying telephone lines.
- The AC adaptor is used as the main disconnect device. Ensure that the AC outlet is installed near the product and is easily accessible.
- This product is unable to make calls when:
- the handset batteries need recharging or have failed.
- there is a power failure.
Battery
- We recommend using the batteries noted on page 4. USE ONLY rechargeable Ni-MH batteries AAA (R03) size.
- Do not mix old and new batteries.
- Do not open or mutilate the batteries. Released electrolyte from the batteries is corrosive and may cause burns or injury to the eyes or skin. The electrolyte is toxic and may be harmful if swallowed.
- Exercise care when handling the batteries. Do not allow conductive materials such as rings, bracelets, or keys to touch the batteries, otherwise a short circuit may cause the batteries and/or the conductive material to overheat and cause burns.
- Charge the batteries provided with or identified for use with this product only, in accordance with the instructions and limitations specified in this manual.
- Only use a compatible base unit (or charger) to charge the batteries. Do not tamper with the base unit (or charger). Failure to follow these instructions may cause the batteries to swell or explode.
Important Information
Attention:

A nickel metal hydride battery that is recyclable powers the product you have purchased. Please call 1-800-8-BATTERY (1-800-822-8837) for information on how to recycle this battery.
Important safety instructions
When using your product, basic safety precautions should always be followed to reduce the risk of fire, electric shock, and injury to persons, including the following:
- Do not use this product near water for example, near a bathtub, washbowl, kitchen sink, or laundry tub, in a wet basement or near a swimming pool.
- Avoid using a telephone (other than a cordless type) during an electrical storm. There may be a remote risk of electric shock from lightning.
- Do not use the telephone to report a gas leak in the vicinity of the leak.
- Use only the power cord and batteries indicated in this manual. Do not dispose of batteries in a fire. They may explode. Check with local codes for possible special disposal instructions.
SAVE THESE INSTRUCTIONS
For best performance
Base unit location/avoiding noise
The base unit and other compatible Panasonic units use radio waves to communicate with each other.
- For maximum coverage and noise-free communications, place your base unit:
- at a convenient, high, and central location with no obstructions between the handset and base unit in an indoor environment.
- away from electronic appliances such as TVs, radios, personal computers, wireless devices, wireless routers, or other phones.
— facing away from radio frequency transmitters, such as external antennas of mobile phone cell stations. (Avoid putting the base unit on a bay window or near a window.)
- Coverage and voice quality depends on the local environmental conditions.
- If the reception for a base unit location is not satisfactory, move the base unit to another location for better reception.
Environment
- Keep the product away from electrical noise generating devices, such as fluorescent lamps and motors.
- The product should be kept free from excessive smoke, dust, high temperature, and vibration.
● The product should not be exposed to direct sunlight. - Do not place heavy objects on top of the product.
- When you leave the product unused for a long period of time, unplug the product from the power outlet.
- The product should be kept away from heat sources such as heaters, kitchen stoves, etc. It should not be placed in rooms where the temperature is less than 0 °C (32 °F) or greater than 40 °C (104 °F). Damp basements should also be avoided.
- The maximum calling distance may be shortened when the product is used in the following places: Near obstacles such as hills, tunnels, underground, near metal objects such as wire fences, etc.
- Operating the product near electrical appliances may cause interference. Move away from the electrical appliances.
Routine care
- Wipe the outer surface of the product with a soft moist cloth.
- Do not use benzine, thinner, or any abrasive powder.
Notice for product disposal, transfer, or return
- This product can store your private/confidential information. To protect your privacy/confidentiality, we recommend that you erase information such as phonebook or caller list entries from the memory before you dispose of, transfer, or return the product.
Specifications
Standard:
DECT 6.0 (Digital Enhanced Cordless Telecommunications 6.0) Bluetooth® wireless technology 2.0
■Frequency range:
1.92 GHz to 1.93 GHz (DECT) 2.402 GHz to 2.48 GHz (Bluetooth)
■RF transmission power: 115 mW (max.)
■Power source:
120 V AC, 60 Hz
■Power consumption:
Base unit: Standby: Approx. 1.4 W Maximum: Approx. 4.2 W Charger: Standby: Approx. 0.6 W Maximum: Approx. 3.6 W
■Operating conditions:
0 °C - 40 °C (32 °F - 104 °F), 20 % - 80 % relative air humidity (dry)
Important Information
Note:
- Design and specifications are subject to change without notice.
- The illustrations in these instructions may vary slightly from the actual product.
Other information
CAUTION: Risk of explosion if battery is replaced by an incorrect type. Dispose of used batteries according to the instructions.
Notice
- This product is designed for use in the United States of America. Sale or use of this product in other countries may violate local laws.
- Cet appareil est conçu pour être utilisé aux États-Unis d'Amérique. La vente ou l'emploi de cet appareil dans certains autres pays peut constituer une infraction à la législation locale.
- Este producto está diseñado para usarse en los Estados Unidos de América. La venta o el empleo de este producto en ciertos países puede constituir violación de la legislación local.
- 本產品專為美國使用而設。若在其他國家銷售或使用,可能會違反當地法例。
- この製品は、日本国外での使用を目的として設計されており、日本国内での使用は法律違反となります。従って、当社では日本国内においては原則として修理などのサービスは致しかねます。
ENERGY STAR
As an ENERGY STAR® Participant, Panasonic has determined that this product meets the ENERGY STAR guidelines for energy efficiency. ENERGY STAR is a U.S. registered mark.

Trademarks
The Bluetooth ® word mark and logos are owned by the Bluetooth SIG, Inc. and any use of such marks by Panasonic Corporation is under license. Other trademarks and trade names are those of their respective owners.
Getting started
Connections
Connecting the AC adaptor
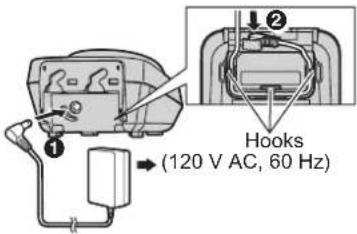
Connect the AC adaptor cord (①) by pushing the plug firmly (②).
Base unit
- Use only the supplied Panasonic AC adaptor PQLV219.

Charger
- Use only the supplied Panasonic AC adaptor PQLV219.
Note:
- The AC adaptor must remain connected at all times. (It is normal for the adaptor to feel warm during use.)
- The AC adaptor should be connected to a vertically oriented or floor-mounted AC outlet. Do not connect the AC adaptor to a ceiling-mounted AC outlet, as the weight of the adaptor may cause it to become disconnected.
During a power failure
The unit will not work during a power failure. We recommend connecting a corded-type telephone (without AC adaptor) to the same telephone line or to the same telephone line jack using a Panasonic T-adaptor (page 4). Emergency power can be supplied to the unit by connecting a Panasonic battery back-up power supply noted on page 4.
Getting started
Connecting the telephone line cord
Refer to one of the following methods depending on your situation:
- To connect to a 2-line telephone jack: page 10
- To connect to 2 single-line telephone jacks: page 10
- If you use the unit as a single-line telephone only: page 10
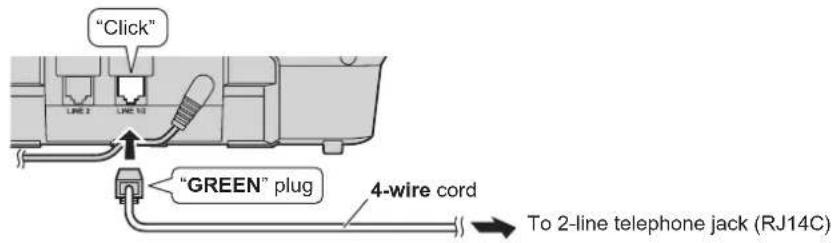
Connect the telephone line cord until it clicks into the base unit and telephone line jack.
To connect to a 2-line telephone jack
To connect to 2 single-line telephone jacks

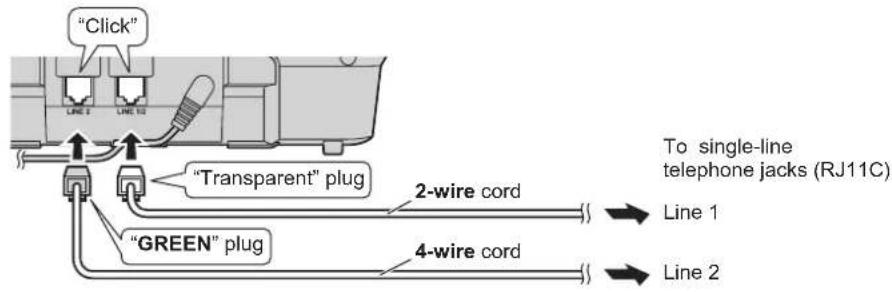
If you use the unit as a single-line telephone only
Be sure to connect the telephone line cord to LINE 1/2. Change the line selection mode from "Auto" to "Line1" (page 17).

Note:
- "Check tel line 2" is displayed on the unit. To erase it, see page 52.
Getting started
If you subscribe to a DSL/ADSL service
Please attach a DSL/ADSL filter (contact your DSL/ADSL provider) to the telephone line between the base unit and the telephone line jack in the event of the following:
– noise is heard during conversations.
- Caller ID features do not function properly.
To connect to a 2-line telephone jack
For this connection, please purchase a Panasonic 2-line splitter (page 4).
Example: DSL/ADSL line is line 2
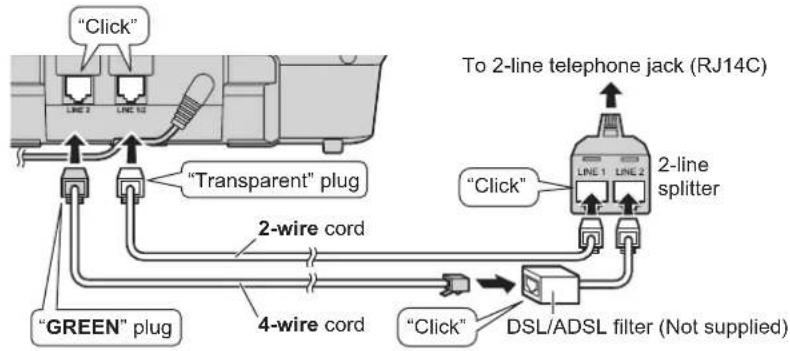
To connect to 2 single-line telephone jacks
Example: DSL/ADSL line is line 2
![graph TD A["Click"] --> B[""Transparent" plug"] B --> C["2-wire cord"] C --> D["4-wire cord"] D --> E[""GREEN" plug"] E --> F["DSL/ADSL filter (Not supplied)"] G["Click"] --> H["To single-line telephone jacks (RJ11C)"] I["Line 1"] --> J["To single-line telephone jacks (RJ11C)"] K…](/content/2026/05/1078645/images/3ecb2577b1a58695f0aceaa2fc6e9ab573df695c41590ee994144e7d1a32f2f7.jpg)
Getting started
Battery installation
- USE ONLY Ni-MH batteries AAA (R03) size.
- Do NOT use Alkaline/Manganese/Ni-Cd batteries.
- Confirm correct polarities (⊕, ⊖).

Note:
- Use the supplied rechargeable batteries. For replacement, we recommend using the Panasonic rechargeable batteries noted on page 4, 6.
- Wipe the battery ends (, ) with a dry cloth.
- Avoid touching the battery ends (⊕, ⊖) or the unit contacts.
- If the handset does not automatically turn on after installing/replacing batteries, place the handset on the base unit or charger.
Battery charge
Charge for about 7 hours.
- When the batteries are fully charged, "Charge completed" is displayed.
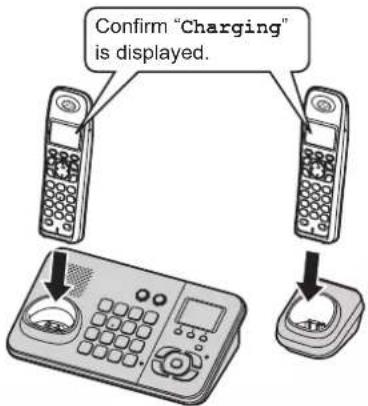
Note:
- It is normal for the handset to feel warm during charging.
- Clean the charge contacts of the handset, base unit, and charger with a soft and dry cloth once a month. Clean more often if the unit is exposed to grease, dust, or high humidity.
Battery level
| Icon Battery level | |
| High | |
| Medium | |
| Low | |
| Needs charging. | |
| Empty | |
Note:
- The batteries need to be charged if the handset beeps while you are engaged in a call or operating the answering system remotely.
Getting started
Panasonic Ni-MH battery performance (supplied batteries)
Operation Operating time
| In continuous use 12 hours max. |
| Not in use (standby) 6 days max. |
Note:
- Actual battery performance depends on a combination of how often the handset is in use and how often it is not in use (standby).
- Even after the handset is fully charged, the handset can be left on the base unit or charger without any ill effect on the batteries.
● The battery level may not be displayed correctly after you replace the batteries. In this case, place the handset on the base unit or charger and let it charge for at least 7 hours.
Controls
Handset
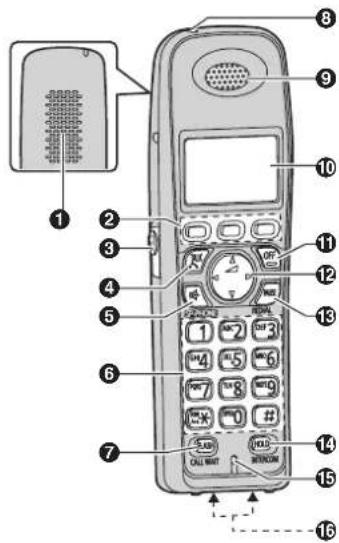
①Speaker
②Soft keys
③Headset jack
④[\~] (TALK)
⑤[◀] (SP-PHONE: Speakerphone)
⑥Dial keypad
([★]: TONE)
⑦ [FLASH] [CALL WAIT]
⑧Charge indicator
Ringer indicator
⑨Receiver
⑩Display
⑪[OFF]
⑫ Navigator key ([▲]/[▼]/[◀]/[▶])
△ (Volume: [▲]/[▼])
⑬ [PAUSE] [REDIAL]
⑭ [HOLD] [INTERCOM]
⑮Microphone
16Charge contacts
Getting started
Base unit

①Charge contacts
②Speaker
③[LINE 1]
LINE1 indicator
④[LINE 2]
LINE2 indicator
⑤[HOLD]
⑥ [REDIAL] [PAUSE]
⑦ [FLASH] [CALL WAIT]
⑧Display
9Soft keys
⑩Dial keypad
([※]: TONE)
⑪[SP-PHONE] (Speakerphone)
SP-PHONE indicator
⑫MIC (Microphone)
⑬ Navigator key ([▲]/[▼]/[◄◄]/[►►])
VOL. (Volume: [▲]/[▼])
Repeat/Skip ([◄◄]/[►►])
⑭[▶] (Play)
Message indicator
⑮[ERASE]
16【■】(STOP)(EXIT)
⑰[ANSWER SELECT]
18 ANSWER ON indicator
⑲[ANSWER ON]
⑳ [LOCATOR] [INTERCOM]
Using the navigator key/volume key ( , VOL.)
Handset

Base unit
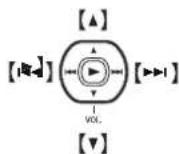
■Scrolling through lists or items
By pressing this key ([▲] or [▼]) repeatedly, you can scroll through (up or down) various lists or items.
■Adjusting the volume
By pressing this key ( [▲] or [▼] ) repeatedly, you can adjust the receiver or speaker volume (up or down) while talking.
■Moving the cursor
Handset: [▲], [▼], [◀], or [▶]
Base unit: [▲], [▼], [◀◀], or [▶▶]
By pressing the above keys repeatedly, you can move the cursor to edit a number or name.
■Repeating/skipping the messages
Handset: [◀] or [▶]
Base unit: [◀◀] or [▶▶]
By pressing the above keys, you can repeat/skip messages during playback.
Soft keys
Each unit features 3 soft keys. By pressing a soft key, you can select the feature shown directly above it on the display.
Handset

Base unit
![graph TD A["Book"] --> B["Menu"] C["CID"] --> D["Blank Box"] E["Menu"] --> F["Blank Box"] G["CID"] --> H["Blank Box"]](/content/2026/05/1078645/images/a3168413f28202b384dfbad1efd4113b1c5fbf0f2f867b7028187299cf416d72.jpg)
Getting started
Display
Handset display items
| Item Meaning | |
| Battery level | |
| Within range of a base unitWhen flashing: Handset is searching for the base unit. (page 54) | |
| The line is in use.When flashing:The call is put on hold on that line.The answering system is answering a call on that line.When flashing rapidly: An incoming call is now being received on that line. | |
| Ringer volume is off.*1(page 19) | |
| Speakerphone is on. (page 18) | |
| Night mode is on. (page 32) | |
| Alarm is on. (page 32) | |
| Handset number | |
| PRIV. Call privacy mode is on. (page 21) |
*1 Corresponding line number(s) is indicated next to the item.
Base unit display items
| Item Meaning | |
| Indicates the selected line(s) for answering system operations and settings.*1 | |
| Ringer volume is off.*1(page 19) | |
| Night mode is on. (page 32) | |
| PRIV. Call privacy mode is on. (page 21) | |
| is activated. Ready to make/receive calls on a Bluetooth headset. (page 48) | |
| Making/Answering calls on Bluetooth headset. (page 49) | |
*1 Corresponding line number(s) is indicated next to the item.
Menu icons
When in standby mode, pressing [MENU] (middle soft key) reveals the main menu. From here you can access various features and settings.
Handset menu icons
| Menu icon Menu/feature | |
| [G3Z0] | View Caller ID |
| [GTAZ] | Phonebook |
| [4H5S] | Answering device |
 | Ringer settings |
| [YS3S] | Initial settings |
| [S7T8] | Customer support |
Base unit menu icons
| Menu icon Menu/feature | |
 | View Caller ID |
| [WOTD] | Phonebook |
| [D3ZZ] | Set answering |
| [T3WG] | Ringer settings |
| [3AXK] | Initial settings |
 | Bluetooth |
LINE1 indicator/LINE2 indicator on the base unit
The LINE1 indicator and LINE2 indicator show the status of each line, respectively, as follows.
| Status Meaning | |
| Light off | The line is available. |
| Light on | The line is in use. |
Getting started
| Status Meaning | |
| Flashing rapidly | An incoming call is now being received on that line. |
| Flashing A call | is put on hold or the answering system is answering a call on that line. |
Initial settings
Symbol meaning:
| Symbol Meaning | |
| Example:【▼】/【▲】: “Off” | Press [▼] or [▲] to select the words in quotations. |
Display language
You can select either "English" or "Español" as the display language. The default setting is "English".

Handset / Base unit
1 [MENU] → [#][1][1][0]
2 [▼]/[▲]: Select the desired setting.
3 Press the middle soft key to save.
4 Proceed with the operation for your unit.
Handset: [OFF]
Base unit: [■] (EXIT)
Voice guidance language
You can select either "English" or "Español" as the voice guidance language of the answering system. The default setting is "English". Program this setting using either one of the handsets or the base unit.

Handset / Base unit
1 [MENU] → [#][1][1][2]
2 [▼]/[▲]: Select the desired setting.
3 [SAVE]
4 Proceed with the operation for your unit.
Handset: [OFF]
Base unit: [■] (EXIT)
Dialing mode
If you cannot make calls, change this setting according to your telephone line service. The default setting is "Tone".
"Tone": For tone dial service.
"Pulse": For rotary/pulse dial service.
Program this setting using either one of the handsets or the base unit.

Handset / Base unit
1 [MENU] → [#][1][2][0]
2 [▼]/[▲]: Select the desired setting.
3 [SAVE]
4 Proceed with the operation for your unit.
Handset: [OFF]
Base unit: [■] (EXIT)
Date and time
Program this setting using either one of the handsets or the base unit.

Handset / Base unit
1 [MENU] → [#][1][0][1]
2 Enter the current month, date, and year by selecting 2 digits for each.
Example: July 15, 2009
[0][7] [1][5] [0][9]
3 Enter the current hour and minute (12-hour clock format) by selecting 2 digits for each.
Example: 9:30
[0][9] [3][0]
4 Press [★] to select "AM" or "PM".
5 [SAVE]
6 Proceed with the operation for your unit. Handset: [OFF] Base unit: [■] (EXIT)
Note:
- When English is selected as the display language, 12-hour clock format is used. When Spanish is selected, 24-hour clock format is used.
- To correct a digit: Handset: Press [▲], [▼], [◀], or [▶] to move the cursor to the digit, then make the correction. Base unit: Press [▲], [▼], [◀◀], or [▶▶] to move the cursor to the digit, then make the correction.
Getting started
- The date and time may be incorrect after a power failure. In this case, set the date and time again.
Line selection mode
The line selection mode determines which line is selected when:
- you press [ˈ]/[ˈ] on the handset (when making/answering calls).
- you press [SP-PHONE] on the base unit (when making/answering calls).
The following settings are available:
- "Auto" (default): When making a call, line 1 is selected. If that line is unavailable, line 2 is selected. When you call back using the caller list (page 34) or while listening to a message (page 38, 39), the indicated line is used. When answering a call, the ringing line is selected.
- "Line1": Line 1 is selected.
- "Line2": Line 2 is selected.
Handset / Base unit
1 [MENU] → [☐][2][5][0]
2 [▼]/[▲]: Select the desired setting.
3 [SAVE]
4 Proceed with the operation for your unit.
Handset: [OFF]
Base unit: [■] (EXIT)
Note:
- You can select a line manually regardless of the line selection mode by pressing [LINE 1] or [LINE 2].
Making/Answering Calls
Making calls
Using the handset
1 Lift the handset and dial the phone number.
• To correct a digit, press [CLEAR].
2 [\~]
- An available line is automatically selected and the line number is displayed. To change the line selection mode, see page 17.
- You can also select the line manually by pressing [LINE 1] or [LINE 2].
3 When you finish talking, press [OFF] or place the handset on the base unit or charger.
Note:
- The LINE1 indicator or LINE2 indicator on the base unit lights up while using the handset.
Using the speakerphone
1 During a conversation, press [◀] to turn on the speakerphone.
●Speak alternately with the other party.
2 When you finish talking, press [OFF].
Note:
- For best performance, use the speakerphone in a quiet environment.
- To switch to the receiver, press [\~].
Using the base unit
1 Dial the phone number.
• To correct a digit, press [CLEAR].
2 [SP-PHONE]
●An available line is automatically selected and either the LINE1 indicator or LINE2 indicator lights up. To change the line selection mode, see page 17.
- You can also select the line manually by pressing [LINE 1] or [LINE 2].
3 When the other party answers, speak into the MIC.
●Speak alternately with the other party.
4 When you finish talking, press [SP-PHONE].
Note:
- For best performance, use the speakerphone in a quiet environment.
- While on a call, you can switch from the base unit to the handset:
- Press [LINE 1] or [LINE 2] on the handset to select the line that is being used by the base unit, then press [SP-PHONE] on the base unit.
- If the handset is on the base unit, lift the handset then press [LINE 1] or [LINE 2] on the handset within 3 seconds to select the line that is being used by the base unit.
Adjusting the receiver or speaker volume

Handset /

Base unit
Press [▲] or [▼] repeatedly while talking.
Making a call using the redial list
The last 10 phone numbers dialed are stored in the redial list in each unit (each 48 digits max.).

Handset /

Base unit
1 [REDIAL]
2 [▼]/[▲]: Select the desired phone number.
3 Proceed with the operation for your unit.
Handset: [☐]
Base unit: [SP-PHONE]
Erasing a number in the redial list
1 [REDIAL]
2 [▼]/[▲]: Select the desired phone number.
→ [ERASE] (soft key)
3 [▼]/[▲]: "Yes" → [SELECT]
4 Proceed with the operation for your unit.
Handset: [OFF]
Base unit: [■] (EXIT)
Pause (for PBX/long distance service users)
A pause is sometimes required when making calls using a PBX or long distance service. When storing a calling card access number and/or PIN in the phonebook, a pause is also needed (page 24).

Handset /

Base unit
Example: If you need to dial the line access number "9" when making outside calls with a PBX:
Making/Answering Calls
1 [9] → [PAUSE]
2 Dial the phone number.
3 Proceed with the operation for your unit.
Handset: [☐]
Base unit: [SP-PHONE]
Note:
- A 3.5 second pause is inserted each time [PAUSE] is pressed. Repeat as needed to create longer pauses.
Answering calls
Using the handset
When a call is being received, the ringer indicator and 📄 and/or 📋 flash rapidly.
1 Lift the handset and press [→] or [←] when the unit rings.
- The called line is automatically selected. To change the line selection mode, see page 17.
- You can also answer the call by pressing [LINE 1] or [LINE 2].
- You can also answer the call by pressing any dial key from [0] to [9], [*], or [#]. (Any key answer feature)
2 When you finish talking, press [OFF] or place the handset on the base unit or charger.
Auto talk
You can answer calls simply by lifting the handset off the base unit or charger. You do not need to press [\~]. To turn this feature on, see page 29.
Adjusting the handset ringer volume
■While the handset is ringing for an incoming call:
Press [▲] or [▼] repeatedly to select the desired volume.
■Programming the volume beforehand:
1 [MENU] → [#][1][6][0]
2 [▼]/[▲]: Select the desired line(s). → [SELECT]
3 [▼]/[▲]: Select the desired volume.
4 [SAVE] → [OFF]
Temporary handset ringer off
While the handset is ringing for a call, you can turn the ringer off temporarily by pressing [OFF].
Using the base unit
When a call is being received, the LINE1 indicator and/or LINE2 indicator on the base unit flashes rapidly.
1 Press [SP-PHONE] when the unit rings.
●The called line is automatically selected. To change the line selection mode, see page 17.
- You can also answer the call by pressing [LINE 1] or [LINE 2].
2 Speak into the MIC.
3 When you finish talking, press [SP-PHONE].
Adjusting the base unit ringer volume
■While the base unit is ringing for an incoming call:
Press [▲] or [▼] repeatedly to select the desired volume.
■Programming the volume beforehand:
1 [MENU] → [☐][1][6][0]
2 [▼]/[▲]: Select the desired line(s). → [SELECT]
3 [▼]/[▲]: Select the desired volume.
4 [SAVE] → [■] (EXIT)
Temporary base unit ringer off
While the base unit is ringing for a call, you can turn the ringer off temporarily by pressing [∅].
Making/Answering Calls
Useful features during a call
Hold
This feature allows you to put an outside call on hold.

Handset
1 Press [HOLD] 2 times during an outside call.
2 To release hold, press [LINE 1] or [LINE 2] that is flashing on the handset.

Base unit
1 Press [HOLD] during an outside call.
2 To release hold, press [LINE 1] or [LINE 2] that is flashing on the base unit.
Note for handset and base unit:
- If a call is kept on hold for more than 9 minutes, an alarm tone starts to sound. After 1 additional minute on hold, the call is disconnected.
- If another phone is connected to the same line, you can also take the call by lifting its handset.
Mute
While mute is turned on, you can hear the other party, but the other party cannot hear you.

Handset / Base unit
1 Press [MUTE] during an outside call.
• [MUTE] flashes.
2 To return to the conversation, press [MUTE] again.
Note:
- [MUTE] is a soft key visible on the display during a call.
Flash

Handset / Base unit
[FLASH] allows you to use the special features of your host PBX such as transferring an extension call, or accessing optional telephone services.
Note:
● To change the flash time, see page 30.
For call waiting or Call Waiting Caller ID service users
To use call waiting, you must first subscribe to call waiting from your service provider/telephone company.
This feature allows you to receive calls while you are already talking on the phone. If you receive a call while on the phone, you will hear a call waiting tone.
If you subscribe to both Caller ID and Call Waiting with Caller ID services, the 2nd caller's information is displayed on the handset or base unit that is in use after you hear the call waiting tone.

Handset / Base unit
1 Press [CALL WAIT] to answer the 2nd call.
2 To switch between calls, press [CALL WAIT].
Note:
- Please contact your service provider/telephone company for details and availability of this service in your area.
Temporary tone dialing (for rotary/pulse service users)
You can temporarily switch the dialing mode to tone when you need to access touch-tone services (for example, answering services, telephone banking services, etc.).

Handset / Base unit
Press [★] (TONE) before entering access numbers which require tone dialing.
Call share
This feature allows you to join an existing outside call.
Important:
- To prevent other users from joining your conversations with outside callers, turn call privacy on (page 21).

Handset / Base unit
To join the conversation, press [LINE 1] or [LINE 2] to select the line that is being used by another extension for an outside call.
Note:
- A maximum of 3 parties (including 1 outside party) can join a conversation.
Call privacy
Call privacy allows you to prevent other users from joining your conversations with outside callers. You can turn the feature on for both lines by programming the base unit before the call. To allow other users to join your conversations, leave this feature off. The default setting is "Off".

Base unit
1 [MENU] → [#][1][9][4]
2 [▼]/[▲]: "On" or "Off" → [SAVE]
3 [■] (EXIT)
- When this feature is turned on, "PRIV." is displayed during an outside call.
Temporarily turning call privacy on/off During an outside call, you can temporarily turn call privacy on/off.

Handset / Base unit
1 Press [MENU] during an outside call.
2 [▼]/[▲]: "Privacy" → [SELECT]
3 [▼]/[▲]: "On" or "Off" → [SELECT]
- When this feature is turned on, "PRIV." is displayed.
Note:
● After you hang up the call, the feature will return to the setting programmed on page 21.
Using the other line during a call
You can use the other line in the following ways:
- When a call is being received on the other line during a conversation, an interrupt tone will be heard (page 29). You can answer the 2nd call while holding the 1st call.
– During an outside call, you can also make a call using the other line by holding the 1st call.

Handset
Example: If you are using line 1:
1 Press [HOLD] 2 times to put the 1st call (line 1) on hold.
2 Press [LINE 2] to make or answer a 2nd call.
• To hold the 2nd call, press [HOLD] 2 times.
3 To return to the 1st call (line 1), press [LINE 1].

Base unit
Example: If you are using line 1:
1 Press [HOLD] to put the 1st call (line 1) on hold.
2 Press [LINE 2] to make or answer a 2nd call.
• To hold the 2nd call, press [HOLD].
3 To return to the 1st call (line 1), press [LINE 1].
Note for handset and base unit:
- If you subscribe to Caller ID, the 2nd caller's information is displayed when a call is being received on the other line (page 34).
Phonebook
Handset/base unit phonebook
The phonebook allows you to make calls without having to dial manually. You can add names and phone numbers to the handset and base unit phonebook independently, and assign each phonebook entry to the desired group.
- Handset: up to 100 entries
- Base unit: up to 600 entries
Important:
- You can also copy phonebook entries from a Bluetooth cellular phone to the base unit (page 47).
Adding entries

Handset / Base unit
1 Proceed with the operation for your unit.
Handset: [MENU] → [#][2][8][0]
Base unit: [☐]
2 [ADD]
3 Enter the party's name (16 characters max.)
→ [OK]
4 Enter the party's phone number (24 digits max.). → [OK]
5 [▼]/[▲]: Select the desired group. →
[SELECT] 2 times
• To add other entries, repeat from step 3.
6 Proceed with the operation for your unit.
Handset: [OFF]
Base unit: [■] (EXIT)
Note:
- Caller ID subscribers can use group ringer tone feature (page 34).
Character table for entering names
While entering characters, you can switch between uppercase and lowercase by pressing [★].
| Key Character | |
| [1]Space # &'( ) *, - . / 1 | |
| [2]A B | C 2 |
| a b c 2 | |
| Key Character | |
| [3]D E | F 3 |
| d e f 3 | |
| [4]G H | l 4 |
| g h i 4 | |
| [5]J K | L 5 |
| j k l 5 | |
| [6]M N | O 6 |
| m n o 6 | |
| [7]P Q | R S 7 |
| p q r s 7 | |
| [8]T U | V 8 |
| t u v 8 | |
| [9]W X | Y Z 9 |
| w x y z 9 | |
| [0]Space 0 | |
- To enter another character that is located on the same dial key:
Handset: Press [▶] to move the cursor to the next space.
Base unit: Press [▶▶] to move the cursor to the next space.
Correcting a mistake
1 Proceed with the operation for your unit. Handset: Press [◀] or [▶] to move the cursor to the character or number you want to erase. Base unit: Press [◀◀] or [▶◀] to move the cursor to the character or number you want to erase.
2 Press [CLEAR], and then enter the appropriate character or number.
- Press and hold [CLEAR] to erase all characters or numbers.
Groups
Groups can help you find entries in the phonebook quickly and easily. When adding an entry to the phonebook, you can assign it to one of 9 groups. You can change the names of groups assigned for phonebook entries ("Friends", "Family", etc.) and then search for phonebook entries by group. The group ringer tone feature is available for Caller ID subscribers (page 34).
Changing group names
The default group name is "Group 1" to "Group 9".

Handset / Base unit
1 Proceed with the operation for your unit. Handset: [MENU] → [☐][2][8][0] Base unit: [☐]
2 [MENU]
3 [▼]/[▲]: "Group" → [SELECT]
4 [▼]/[▲]: Select the desired group. → [SELECT]
5 [▼]/[▲]: "Group name" → [SELECT]
6 Edit the name (10 characters max.; page 22).
→ [SAVE]
7 Proceed with the operation for your unit.
Handset: [OFF]
Base unit: [■] (EXIT)
Finding and calling a phonebook entry
Once you have found the desired entry using one of the following 4 methods, make a call with your unit.
Handset: [→]
- You can also make a call by pressing [CALL], then pressing [LINE 1] or [LINE 2].
Base unit: [SP-PHONE]
- You can also make a call by pressing [LINE 1] or [LINE 2].
Note:
- Phonebook entries are listed alphabetically in the following order:
- uppercase ABC
– lowercase abc - character with accent mark (when an accent mark is included in an entry copied from your cellular phone: page 47)
Scrolling through all entries

Handset / Base unit
1 Proceed with the operation for your unit.
Handset: [MENU] → [☐][2][8][0]
Base unit: [☐]
2 [▼]/[▲]: Select the desired entry.
Searching by first character (alphabetically)

Handset / Base unit
1 Proceed with the operation for your unit.
Handset: [MENU] → [☐][2][8][0]
Base unit: [☐]
2 Press the dial key ([0] - [9]) which contains the character you are searching for (page 22).
- Press the same dial key repeatedly to display the first entry corresponding to each character located on that dial key.
- If there is no entry corresponding to the character you selected, the next entry is displayed.
3 [▼]/[▲]: Scroll through the phonebook if necessary.
Searching by query
You can narrow down the search by using the base unit to enter the first characters of a name.

Base unit
1 [∅] → [*]
2 To search for the name, enter the first characters (up to 4) in uppercase (page 22). → [OK]
- Characters cannot be entered in lowercase.
- If there is no entry corresponding to the characters you selected, the next entry is displayed.
3 [▼]/[▲]: Scroll through the phonebook if necessary.
Searching by group

Handset / Base unit
1 Proceed with the operation for your unit.
Handset: [MENU] → [☐][2][8][0]
Base unit: [☐]
2 [GROUP]
3 [▼]/[▲]: Select the group you want to search.
→ [SELECT]
- If you select "All groups", the unit ends the group search.
4 [▼]/[▲]: Select the desired entry.
Phonebook
Editing entries

Handset / Base unit
1 Find the desired entry (page 23). → [MENU]
2 [▼]/[▲]: "Edit" → [SELECT]
3 Edit the name if necessary (16 characters max.; page 22). → [OK]
4 Edit the phone number if necessary (24 digits max.). → [OK]
5 [▼]/[▲]: Select the desired group (page 22). → [SELECT] 2 times
6 Proceed with the operation for your unit.
Handset: [OFF]
Base unit: [■] (EXIT)
Erasing entries

Handset / Base unit
Erasing an entry
1 Find the desired entry (page 23). → [MENU]
2 [▼]/[▲]: "Erase" → [SELECT]
3 [▼]/[▲]: "Yes" → [SELECT]
4 Proceed with the operation for your unit.
Handset: [OFF]
Base unit: [■] (EXIT)
Erasing all entries
1 Proceed with the operation for your unit.
Handset: [MENU] → [#][2][8][0]
Base unit: [☐]
2 [MENU]
3 [▼]/[▲]: "Erase all" → [SELECT]
4 [▼]/[▲]: "Yes" → [SELECT]
5 [▼]/[▲]: "Yes" → [SELECT]
6 Proceed with the operation for your unit.
Handset: [OFF]
Base unit: [■] (EXIT)
Chain dial
This feature allows you to dial phone numbers in the phonebook while you are on a call. This feature can be used, for example, to dial a calling card access number or bank account PIN that you have
stored in the phonebook, without having to dial manually.

Handset / Base unit
1 Proceed with the operation for your unit. During an outside call: Handset: [MENU] → [▼]/[▲]: "Phonebook" → [SELECT] Base unit: [☐]
2 [▼]/[▲]: Select the desired entry.
3 Press [CALL] to dial the number.
Note:
- When a Bluetooth headset is registered to the base unit (page 48), [O] is displayed instead of [☐] on the base unit's left soft key in step 1. To enter the chain dial feature on the base unit: During an outside call, press [MENU]. → [▼]/[▲]: "Phonebook" → [SELECT]
- When storing a calling card access number and your PIN in the phonebook as one phonebook entry, press [PAUSE] to add pauses after the number and PIN as necessary (page 18).
- If you have rotary/pulse service, you need to press [✗] before pressing [MENU] on the handset or [☐] on the base unit in step 1 to change the dialing mode temporarily to tone. When adding entries to the phonebook, we recommend adding [✗] to the beginning of phone numbers you wish to chain dial (page 22).
Copying phonebook entries
You can copy phonebook entries from the base unit to a handset, and vice versa.
The unit can receive entries until the phonebook memory is full (page 22).
Important:
- Groups (including their names and ringer tones) are not copied.
- You cannot make phonebook copy between handsets directly. However it is possible by first copying a handset's phonebook entries to the base unit, then copying the base unit's phonebook entries to another handset.
Phonebook
Copying an entry
Base unit
1 【】
2 [▼]/[▲]: Select the desired entry. → [MENU]
3 [▼]/[▲]: "Copy to handset" → [SELECT]
4 Enter the handset number you want to copy to.
- When an entry has been copied, "Completed" is displayed.
- To continue copying another entry: [▼]/[▲]: "Yes" → [SELECT] → Find the desired entry (page 23). → [SEND]
5 [■] (EXIT)
Handset
1 [MENU] → [#][2][8][0]
2 [▼]/[▲]: Select the desired entry. → [MENU]
3 [▼]/[▲]: "Copy to base" → [SELECT]
- When an entry has been copied, "Completed" is displayed.
- To continue copying another entry: [▼]/[▲]: "Yes" → [SELECT] → Find the desired entry (page 23). → [SEND]
4 [OFF]
Copying multi entries
You can copy selected entries (up to 100) from the base unit to a handset.
Base unit
1 [ ]
2 Find the desired entry (page 23).
3 [MENU]
4 [▼]/[▲]: "Copy multi items" → [SELECT]
5 Press [SELECT] to select an entry in step 2.
- The selected entries are indicated by "√".
6 [▼]/[▲]: Select the next desired entry. → [SELECT]
- To continue copying other entries, perform this step repeatedly.
- To cancel an entry, press [▼]/[▲] to select the entry, then press [SELECT].
- You can also search for another entry by entering the first character (page 23) or query (page 23).
7 After selecting entries, press [SEND]
8 Enter the handset number you want to copy to.
- When the entries have been copied, "Completed" is displayed.
9 [■] (EXIT)
Note:
- When you copy the desired entries in a group:
– In step 2, find a desired group (page 23).
- In step 5, select the desired entry. →
【SELECT】
Copying all entries
A maximum of 100 entries can be copied from the base unit phonebook to the handset. If the base unit phonebook contains more than 100 entries, select and copy desired entries only, using "Copying multi entries", page 25.
Base unit
1 [☐] → [MENU]
2 [▼]/[▲]: "Copy all to HS" → [SELECT]
3 Enter the handset number you want to copy to.
- When all entries have been copied, "Completed" is displayed.
4 [■] (EXIT)
Handset
1 [MENU] → [#][2][8][0] → [MENU]
2 [▼]/[▲]: "Copy all to base" → [SELECT]
- When all entries have been copied, "Completed" is displayed.
3 [OFF]
Programming
Programmable settings
You can customize the unit by programming the following features using the handset or base unit.
To access the features, there are 2 methods:
- scrolling through the display menus (page 26)
- using the direct commands (page 29)
- Direct command is the main method used in these operating instructions.
Programming by scrolling through the display menus
Handset / Base unit
1 [MENU]
2 Proceed with the operation for your unit.
Handset: Press [▼], [▲], [◀], or [▶] to select the desired main menu. → [SELECT] Base unit: Press [▼], [▲], [◀◀], or [▶▶] to select the desired main menu. → [SELECT]
3 Press [▼] or [▲] to select the desired item in sub-menu 1. → [SELECT]
- In some cases, you may need to select from sub-menu 2. → [SELECT]
4 Press [▼] or [▲] to select the desired setting. → [SAVE]
● This step may vary depending on the feature being programmed.
- To exit the operation, press [OFF] on the handset or [■] (EXIT) on the base unit.
Note:
- See page 29 for the default settings.
Handset
| Main menu Sub-menu 1 S | Sub-menu 2 Page | ||
| View Caller ID -→) | - | 3 | |
| Phonebook - | - | 2 | |
| Answering device Play | new msg. - | 39 | |
| Play all msg. - | 39 | ||
| Erase all | - | 39 | |
| Settings | Ring count 1 | 42 | |
| Recording time 1 | 42 | ||
| Remote code 1 | 40 | ||
| Call screening | 42 |

4
2
Programming
| Main menu | Sub-menu 1 | Sub-menu 2 | Page |
| Ringer settings Ringer volume Line1 19 | |||
| Line2 | |||
| Ringer tone Line1 - | |||
| Line2 | |||
| Interrupt tone -21,44 | |||
| Night mode Start/End 32 | |||
| On/Off 32 | |||
| Initial settings Set = | date & time Date and time | *1 | 16 |
| Alarm 32 | |||
| Time adjustment*1 | - | ||
| Contrast - | - | ||
| Key tone - | - | ||
| Auto talk - | 19 | ||
| Line select | - | 17 | |
| Set tel line | Caller ID edit | 35 | |
| Set dial mode*1 | 16 | ||
| Set flash time*1- Line1- Line2 | 20 | ||
| Set line mode*1- Line1- Line2 | - | ||
| VM tone detect*1 | 43 | ||
| Registration | HS registration | 33 | |
| Deregistration | 33 | ||
| Change language Display | language 16 | ||
| Voice prompt*1 | 16 | ||
| Customer support ?# | - | - | - |
*1 If you program these settings using one of the handsets, you do not need to program the same item using another handset or the base unit.
Base unit
| Main menu | Sub-menu 1 | Sub-menu 2 | Page |
| View Caller ID→) | - | - | 34 |
| Phonebook | - | - | 22 |
Programming
| Main menu | Sub-menu 1 | Sub-menu 2 | Page |
| Set answering Record | greeting Line1&Line2 37 | ||
| Line1 | |||
| Line2 | |||
| Play greeting Line1&Line2 38 | |||
| Ring count*1 | - | 42 | |
| Recording time*1 | - | 42 | |
| Remote code*1 | - | 40 | |
| Call screening - | 4 | 2 | |
| Ringer settings Ringer volume Line1 19 | |||
| Line2 | |||
| Line2 | |||
| On/Off 32 | |||
| Initial settings | Set date & time Date and time *1 | 16 | |
| Contrast | - | - | |
| Line select | - | 1 | |
| Set tel line | Caller ID edit | 35 | |
| Set dial mode*1 | 16 | ||
| Set flash time*1- Line1- Line2 | 20 | ||
| Set line mode*1- Line1- Line2 | - | ||
| VM tone detect*1 | 43 | ||
| Privacy | - | 2 | |
| Customer support | - | - | |
| Change language Display language 16 | |||
| Bluetooth | Ph.book transfer | - | 4 |
| Headset | - | 4 | |
| Set PIN | - | 4 | |
*1 If you program these settings using the base unit, you do not need to program the same item again using the handset.
1
7
8
7
Programming using the direct commands
1 [MENU] → [#]
2 Enter the desired feature code.
3 [▼]/[▲]: Select the desired setting. → [SAVE]
- This step may vary depending on the feature being programmed.
- To exit the operation, press [OFF] on the handset or ■ on the base unit.
Note:
- The operating unit column shows the unit(s) that can be used to program the item.
: Only the handset can program the item.
: Only the base unit can program the item.
☐ / ☐: Both the handset and base unit can program the item.
- In the following table, < > indicates the default settings.
| Operating unit | Feature Feature | code | Setting System | setting*1 | Page |
| Alarm | [7][2][0] | - | 32 | ||
| OnceDaily | |||||
| Auto | talk *2 | [2][0][0] | On | - | 19 |
| Call screening | [3][1][0] | - | 42 | ||
| Caller ID edit (Caller ID number auto edit) | [2][1][4] | - | 35 | ||
| Contrast (Display contrast) | [1][4][5] | Level 1-6 <3> | - | - | |
| Customer support *3 | [6][8][0] | - | - | - | |
| Date and time | [1][0][1] | - | ● | 16 | |
| Deregistration | [1][3][1] | - | - | 33 | |
| Display language | [1][1][0] | - | 16 | ||
| Erase all (Erasing all messages) | [3][2][5] | - | - | 39 | |
| Headset | [6][2][3] | - | - | 48 | |
| Registration (Handset registration) | [1][3][0] | - | - | 33 | |
| Interrupt tone *4 | [2][0][1] | - | 21, 44 | ||
| tone *5 | [1][6][5] | - | - | ||
| Line select | [2][5][0] | - | 17 | ||
| Night mode (On/Off) | [2][3][8] | On | - | 32 |
Programming
| Operating unit | Feature | Feature code | Setting | System setting*1 | Page | |
| Night mode(Start/End) | [2][3][7] | <11:00 PM/06:00 AM> | - | 32 | ||
| Ph.book transfer(Ph.:Phonebook) | [6][1][8] | - | - | 47 | ||
| Phonebook | [2][8][0] | - | - | 22 | ||
| all msg.(msg.:messages) | [3][2][4] | - | - | 39 | ||
| Play greeting | [3][0][3] | - | - | 38 | ||
| new msg.(msg.:messages) | [3][2][3] | - | - | 39 | ||
| Privacy *6 | [1][9][4] | On | - | 21 | ||
| Record greeting | [3][0][2] | - | - | 37 | ||
| Recording time | [3][0][5] | 1min2min<3min> | ●42 | |||
| Remote code | [3][0][6] | <111> | ● | 40 | ||
| Ring count | [2][1][1] | Toll saver2-7 rings <4rings> | ●42 | |||
| Ringer tone *7,*8,*9 | [1][6][1] | Line 1Line 2 | Line 1:Line 2:Handset:Tone 1-5Melody 1-10Base unit:Tone 1-3Melody 1-3 | - | - | |
| Ringer volume *10 | [1][6][0] | Line 1Line 2 | Handset:Level 1-<6>, OffBase unit:Level <1>-6, Off | - | 19 | |
| Set dial mode | [1][2][0] | Pulse | ●16 | |||
| Set flash time *11 | [1][2][1] | Line 1Line 2 | 80ms 90ms100ms 110ms160ms 200ms250ms 300ms400ms 600ms<700ms>900ms | ●20 | ||
| Set line mode *12 | [1][2][2] | Line 1Line 2 | A | ● | - | |
| Set PIN | [6][1][9] | - | - | 47 | ||
| Time adjustment *13(Caller ID subscribers only) | [2][2][6] | Manual | ● | - | ||
| View Caller ID | [2][1][3] | - | - | 34 | ||
Programming
| Operating unit | Feature Feature | code | Setting System | setting*1 | Page |
| tone detect(VM: Voice mail) | [3][3][2] | Off | ●43 | ||
| voice prompt(Change language) | [1][1][2] | Español | ●16 |
*1 If "System setting" column is checked, you do not need to program the same item using another unit.
*2 If you subscribe to a Caller ID service and want to view the caller's information after lifting up the handset to answer a call, turn off this feature.
*3 The handset and base unit can display the Internet address where you can download the operating instructions or get further information for this product, using your computer.
*4 This tone lets you know when you receive an outside call while you are on the other line or an intercom call. If you select "On", the tone sounds 2 times.
*5 Turn this feature off if you prefer not to hear key tones while you are dialing or pressing any keys, including confirmation tones and error tones.
*6 To prevent other users from joining your conversations with outside callers, turn this feature on.
*7 If you subscribe to a distinctive ring service (such as IDENTA-RING), select a tone (handset: tone 1 to 5/base unit: tone 1 to 3). If you select a melody, you cannot distinguish lines by their ringers.
*8 If you select one of the melody ringer tones, the ringer tone continues to play for several seconds even if the caller has already hung up. You may either hear a dial tone or no one on the line when you answer the call.
*9 The preset tones and melodies in this product are used with permission of © 2007 Copyrights Vision Inc.
*10When the ringer volume is turned off, is displayed followed by the selected line number(s) and the handset and/or base unit do not ring for outside calls.
*11The flash time depends on your telephone exchange or host PBX. Contact your PBX supplier if necessary. The setting should stay at "700ms" unless pressing [FLASH] fails to pick up the waiting call.
*12Generally, the line mode setting should not be adjusted. If the LINE1 indicator or LINE2 indicator does not light when another phone connected to the same line is in use, you need to change the line mode to "A".
*13This feature allows the unit to automatically adjust the date and time setting when caller information is received. To use this feature, set the date and time first.
Programming
Special programming
Night mode
Night mode allows you to select a period of time during which the handset and/or base unit will not ring for outside calls. This feature is useful for time periods when you do not want to be disturbed, for example, while sleeping. Night mode can be set independently for each handset and base unit.
Important:
- Set the date and time beforehand (page 16).
- Handset only: If you have set the alarm, the alarm sounds even if the night mode is turned on.
Setting the start and end time
Handset / Base unit
1 [MENU] → [#][2][3][7]
2 Enter the desired hour and minute you wish to start this feature.
3 Press [✗] to select "AM" or "PM". → [OK]
4 Enter the desired hour and minute you wish to end this feature.
5 Press [★] to select "AM" or "PM". → [OK]
6 Proceed with the operation for your unit.
Handset: [OFF]
Base unit: [■] (EXIT)
Note:
• To correct a digit:
Handset: Press [◀] or [▶] to move the cursor to the digit, then make the correction.
Base unit: Press [◀◀] or [▶▶] to move the cursor to the digit, then make the correction.
Turning night mode on/off
Handset / Base unit
1 [MENU] → [☐][2][3][8]
2 [▼]/[▲]: "On" or "Off" → [SAVE]
3 Proceed with the operation for your unit.
Handset: [OFF]
Base unit: [■] (EXIT)
Note:
- When the night mode is turned on, ⚙ is displayed.
Alarm
An alarm sounds at the set time for 3 minutes once or daily. Alarm can be set for each handset.
Important:
- Set the date and time beforehand (page 16).
Handset
1 [MENU] → [#][7][2][0]
2 [▼]/[▲]: Select the desired alarm option. → [SELECT]
| Off Turns alarm off. Go to step 6. |
| Once An alarm sounds once at the set time. |
| Daily An alarm sounds daily at the set time. Go to step 4. |
3 Enter the desired month and date
4 Set the desired time. → [OK]
5 [▼]/[▲]: Select the desired ringer tone. → [SELECT]
- We recommend selecting a ringer tone different from the ringer tone set for outside calls.
6 [SELECT] → [OFF]
- When the alarm is set, ⏻ is displayed.
Note:
- To stop the alarm, press any dial key or place the handset on the base unit or charger.
- When the handset is in use, the alarm will not sound until the handset is in standby mode.
- If you select "Once", the setting changes to "Off" after the alarm sounds.
●The ringer volume for alarm follows the higher volume level of the 2 lines (page 30). - When the ringer volume for outside calls of the 2 lines is set to off (page 30), the alarm sound is heard at the low level.
Programming
Registering a unit
Operating additional units
Additional handsets
Up to 6 handsets can be registered to the base unit.
Important:
- See page 4 for information on the available model.
Registering a handset to a base unit
The supplied handset and base unit are pre-registered. If for some reason the handset is not registered to the base unit, re-register the handset.
1 Handset:
[MENU] → [口] [1] [3] [0]
2 Base unit:
Press and hold [LOCATOR] for about 5 seconds until the registration tone sounds.
- If all registered handsets start ringing, press the same button to stop. Then repeat this step. - The next step must be completed within 90 seconds.
3 Handset:
Press [OK], then wait until a long beep sounds.
Note:
- When you purchase an additional handset, refer to the additional handset's installation manual for registration.
Deregistering a handset
A handset can cancel its own registration (or the registration of another handset) that is stored to the base unit. This allows the handset to end its wireless connection with the system.
Handset
1 [MENU] → [#][1][3][1]
2 [3][3][5] → [OK]
3 Select the handset you want to cancel by pressing the desired handset(s) number.
●The selected handset number(s) flashes.
- To cancel a selected handset number, press the number again. The number will stop flashing.
4 [OK] → [▼]/[▲]: "Yes" → [SELECT]
- When you cancel a different handset than the one you are now using, press [OFF] to exit.
Caller ID Service
Using Caller ID service
Important:
- This unit is Caller ID compatible. To use Caller ID features, you must subscribe to a Caller ID service. Contact your service provider/ telephone company for details.
Caller ID features
When an outside call is being received, the caller's name and phone number are displayed. Caller information for the last 50 callers is logged in the caller list from the most recent call to the oldest.
- If the unit cannot receive caller information, the following is displayed:
- "Out of area": The caller dials from an area which does not provide a Caller ID service.
- "Private caller": The caller requests not to send caller information.
- "Long distance": The caller makes a long distance call.
- If the unit is connected to a PBX system, caller information may not be properly received. Contact your PBX supplier.
Missed calls
If a call is not answered, the unit treats it as a missed call. The display shows "Missed call". This lets you know if you should view the caller list to see who called while you were away.
Phonebook name display
When caller information is received and it matches a phone number stored in the phonebook, the stored name in the phonebook is displayed and logged in the caller list.
Group ringer tone for phonebook
This feature can help you identify who is calling by using different ringer tones for different groups of callers. When adding an entry to the phonebook, you can assign it to the desired group (page 22). When a call is received from a caller assigned to a group, the group's ringer you selected rings after the caller information is displayed. If you select "No ringer ID" (default), the unit uses the
ringer tone you selected on page 30 when calls from this group are received.

Handset / Base unit
1 Proceed with the operation for your unit. Handset: [MENU] → [#][2][8][0] Base unit: [☐]
2 [MENU]
3 [▼]/[▲]: "Group" → [SELECT]
4 [▼]/[▲]: Select the desired group. → [SELECT]
5 [▼]/[▲]: Select the current setting of the group ringer tone. → [SELECT]
6 [▼]/[▲]: Select the desired entry. → [SAVE]
7 Proceed with the operation for your unit. Handset: [OFF] Base unit: [■] (EXIT)
Caller list
Important:
- Only 1 person can access the caller list at a time.
- Make sure the unit's date and time setting is correct (page 16).
Viewing the caller list and calling back

Handset / Base unit
1 Proceed with the operation for your unit. Handset: [MENU] → [▼]/[▲]: "View Caller ID" → [SELECT] Base unit: [CID]
2 Press [▼] to search from the most recent call, or [▲] to search from the oldest call.
3 Proceed with the operation for your unit. Handset:
- To call back, press [\~]. - To exit, press [OFF].
Base unit:
- To call back, press [SP-PHONE]. - To exit, press [■] (EXIT).
Caller ID Service
Note:
• In step 2;
- L1 and L2 indicate which line the caller information was received from.
- If the item has already been viewed or answered, "√" is displayed, even if it was viewed or answered using another unit.
- if an arrow (▶) is displayed after the number, the whole phone number is not shown. Proceed with the operation for your unit.
Handset:
Press [▶] to see the remaining numbers. To return to the previous display, press [◀].
Base unit:
Press [▶▶] to see the remaining numbers. To return to the previous display, press [◀◀].
- In step 3, the unit automatically uses the line you set in line selection mode (page 17) to call back. When the line selection mode is set to "Auto", the indicated line (L1 or L2) is used for the call. If the indicated line is already being used or you want to select the other line:
Handset: Press [CALL], then press [LINE 1] or [LINE 2].
Base unit: Press [LINE 1] or [LINE 2].
Editing a caller's phone number before calling back
You can edit a phone number in the caller list by removing its area code and/or the long distance code "1".

Handset / Base unit
1 Proceed with the operation for your unit. Handset: [MENU] → [▼]/[▲]: "View Caller ID" → [SELECT] Base unit: [CID]
2 [▼]/[▲]: Select the desired entry.
3 Proceed with the operation for your unit. Handset: [CALL] Base unit: [EDIT]
4 Press [EDIT] repeatedly until the phone number is shown in the desired format.
①Local phone number Example:
321-5555
②Area code – Local phone number Example:
555-321-5555
③1 – Area code – Local phone number Example:
1-555-321-5555
5 Proceed with the operation for your unit. Handset: [→]
Base unit: [SP-PHONE]
- If the indicated line is already being used or you want to select the other line:
Handset: Press [LINE 1] or [LINE 2].
Base unit: Press [LINE 1] or [LINE 2].
Caller ID number auto edit feature
Once you call back an edited number, the unit remembers the Area Code and Format of the Edited Number. Next time when someone calls from the same Area Code, caller information is customized by the unit as follows:
- When the call is being received, the Caller ID number is displayed in the same Format as the Edited Number.
- After the call is ended, the phone number of the caller, when reviewed from the Caller list, is displayed in the same Format as the Edited Number.
For example, you can use this feature to set the unit to ignore the area code of callers in your area, so that you can call these local numbers using caller information without dialing the area code. To activate this feature, you must edit an entry in the caller list, then call that number. After that, phone numbers from that caller's area code are edited automatically.
Note:
- Phone numbers from the 4 most recently edited area codes are automatically edited.
- If you move to another area, you can turn this feature off to erase previously edited area codes. To use this feature again, turn it on and reprogram the area codes you want to edit once again.
Turning Caller ID auto edit on/off

Handset / Base unit
1 [MENU] → [#][2][1][4]
Caller ID Service
2 [▼]/[▲]: Select the desired setting.
3 [SAVE]
4 Proceed with the operation for your unit.
Handset: [OFF]
Base unit: [■] (EXIT)
Erasing selected caller information
Handset / Base unit
1 Proceed with the operation for your unit.
Handset: [MENU] → [▼]/[▲]: "View
Caller ID" → [SELECT]
Base unit: [CID]
2 [▼]/[▲]: Select the desired entry.
3 [ERASE] (soft key) → [▼]/[▲]: "Yes" → [SELECT]
4 Proceed with the operation for your unit.
Handset: [OFF]
Base unit: [■] (EXIT)
Erasing all caller information
Handset / Base unit
1 Proceed with the operation for your unit.
Handset: [MENU] → [▼]/[▲]: "View
Caller ID" → [SELECT]
Base unit: [CID]
2 [ERASE] (soft key) → [▼]/[▲]: "Yes" → [SELECT]
3 Proceed with the operation for your unit.
Handset: [OFF]
Base unit: [■] (EXIT)
Storing caller information to the phonebook
Handset
1 [MENU] → [▼]/[▲]: "View Caller ID"
→ [SELECT]
2 [▼]/[▲]: Select the desired entry.
- To edit the number, press [SAVE]. → Press [EDIT] repeatedly until the phone number is shown in the desired format. → [SAVE] → Go to step 4.
3 Press [SAVE] 2 times.
4 If necessary, edit the party's name (16 characters max.). → [OK]
5 If necessary, edit the party's phone number (24 digits max.). → [OK]
6 [▼]/[▲]: Select the desired group (page 22).
→ [SELECT] 2 times
• To add other entries, repeat from step 2.
7 [OFF]
Base unit
1 [CID]
2 [▼]/[▲]: Select the desired entry. • To edit the number, press [EDIT] repeatedly until the phone number is shown in the desired format.
3 [SAVE]
4 If necessary, edit the party's name (16 characters max.). → [OK]
5 If necessary, edit the party's phone number (24 digits max.). → [OK]
6 [▼]/[▲]: Select the desired group (page 22).
→ [SELECT] 2 times
• To add other entries, repeat from step 2.
7 [■] (EXIT)
Answering system
The answering system can answer and record calls for you when you are unavailable to answer the phone.
Important:
- Only 1 person can access the answering system (listen to messages, record a greeting message, etc.) at a time.
- When callers leave messages, the unit records the day and time of each message. Make sure the date and time have been set correctly (page 16).
Memory capacity
The total recording capacity (including your greeting message) is about 40 minutes. A maximum of 64 messages can be recorded.
Note:
- If message memory becomes full:
- "Messages full" is shown on the handset and base unit display.
- The ANSWER ON indicator on the base unit flashes rapidly when the answering system is turned on.
- When the message memory becomes full:
- If you use the pre-recorded greeting message, the unit automatically switches to another pre-recorded greeting message asking callers to call again later.
- If you recorded your own greeting message, the same message is still announced to callers even though their messages are not recorded.
Turning the answering system on/off
Base unit
■To turn on:
Press [ANSWER SELECT] repeatedly to select the desired line(s). → [ANSWER ON]
●The ANSWER ON indicator lights up.
■To turn off:
Press [ANSWER ON].
●The ANSWER ON indicator turns off.
Call screening
Handset / Base unit
While a caller is leaving a message, you can listen to the call through the handset's or base unit's speaker. To adjust the speaker volume, press [▲] or [▼] repeatedly.
You can answer the call by pressing [→] on the handset or pressing [SP-PHONE] on the base unit.
Call screening can be set for each handset and/or the base unit.
Note:
- To turn this feature off, see page 42.
Greeting message
When the unit answers a call, a greeting message is played to callers.
You can use either:
- your own greeting message
- a pre-recorded greeting message
Recording your greeting message
Greeting messages can be recorded in one of the two following ways:
- for line 1 and line 2 with different greetings (2 minutes max. for each greeting)
- for line 1 and line 2 with the same greeting (2 minutes max.). Select "Line1&Line2" in step 2.
Base unit
1 [MENU] → [卍][3][0][2]
2 [▼]/[▲]: Select the desired line(s). → [SELECT]
3 After the base unit beeps, speak clearly about 20 cm (8 inches) away from the MIC.
4 Press [STOP] to stop recording.
●The message you have recorded is played after the beep.
5 [■] (EXIT)
Answering System
Using a pre-recorded greeting message
If you erase or do not record your own greeting message, the unit plays a pre-recorded greeting message for callers and asks them to leave messages.
Erasing your greeting message (Resetting to a pre-recorded greeting message)
If you want to use a pre-recorded greeting message once you record your own greeting message, you need to erase your own greeting message.

Base unit
1 [MENU] → [☐][3][0][3]
2 [▼]/[▲]: Select the desired line(s). → [SELECT]
3 Press [ERASE] while your greeting message is playing.
4 [■] (EXIT)
Playing back the greeting message

Base unit
1 [MENU] → [#][3][0][3]
2 [▼]/[▲]: Select the desired line(s). → [SELECT]
3 [■] (EXIT)
Listening to messages using the base unit
When new messages have been recorded, the message indicator on the base unit flashes. Press [▶].
- If new messages have been recorded, the base unit plays back new messages.
- If there are no new messages, the base unit plays back all messages.
Playing back messages for the desired line(s) Press [ANSWER SELECT] repeatedly to select the desired line(s), then press [▶].
Operating the answering system during playback
| Key Operation | |
| [▲] or [▼]Adjust the speaker volume | |
| [◄◄]Repeat message *1 | |
| [►►]Skip message | |
| [PAUSE]Pause messageTo resume playback, press【►】. | |
| [■] (STOP) Stop playbackTo exit the playback mode,press 【■】 (EXIT). | |
| [ERASE]Erase currently playingmessage | |
*1 If pressed within the first 5 seconds of a message, the previous message is played.
Calling back (Caller ID subscribers only)
If caller information was received for the call, you can call the caller back while listening to a message.
Press [SP-PHONE] during playback.
- To edit the number before calling back, press [EDIT] repeatedly until the phone number is shown in the desired format (page 35).
- The unit automatically uses the line you set in line selection mode (page 17) to call back. When the line selection mode is set to "Auto", the indicated line (L1 or L2) is used for the call. If the indicated line is already being used or you want to select the other line, press [LINE 1] or [LINE 2].
Erasing all messages
Erasing all messages for both line 1 and line 2
1 [ERASE]
- L1 is displayed.
2 Press [ERASE] again.
Erasing all messages for the desired line(s) Press [ANSWER SELECT] repeatedly to select the desired line(s), then press [ERASE] 2 times.
Listening to messages using the handset
When new messages have been recorded, "New message" is displayed.
1 To play new messages:
[MENU] → [#][3][2][3]
To play all messages:
[MENU] → [#][3][2][4]
2 When finished, press [OFF].
Note:
- To switch to the receiver, press [→].
Playing back messages for the desired line(s)
1 [MENU] → [▼]/[▲]: "Answering device" → [SELECT]
2 Press [☐☐☐] repeatedly to select the desired line(s).
3 [▼]/[▲]: "Play new msg." or "Play all msg." → [SELECT]
4 When finished, press [OFF].
Operating the answering system
You can also operate the answering system by pressing dial keys on the handset. To use the following commands:
[MENU] → [▼]/[▲]: "Answering device" → [SELECT] → Press [○○L12] repeatedly to select the desired line(s) if necessary.
| Key Operation | |
| [▲] or [▼]Adjust the receiver/speaker volume (during playback) | |
| [1] or [◀] | Repeat message (during playback) 1 |
| [2] or [▶] | Skip message (during playback) |
| [3] | Enter the “Settings” menu |
| [4]Play new messages | |
| [5]Play all messages | |
| [PAUSE]Pause message 2 | |
| [9]Stop playback | |
| [0]Turn answering system off | |
| [★][4]Erase | currently playing message |
| Key Operation | |
| [*][5]Erase | all messages |
| [#][1] → [8]*3 | Turn answering system on for line 1 only |
| [#][2] → [8]*3 | Turn answering system on for line 2 only |
| [#][0] → [8]*3 | Turn answering system on for both line 1 and line 2 |
*1 If pressed within the first 5 seconds of a message, the previous message is played.
*2 To resume playback: [▼]/[▲]: "Playback" → [SELECT]
*3 For English voice guidance only: When you press a line selection number ([□][1], [□][2], or [□][0]), the selected line(s) is announced, then press [8].
Calling back (Caller ID subscribers only)
If caller information is received for the call, you can call the caller back while listening to a message.
1 Press [MENU] during playback.
2 [v]/[▲]: "Edit & Call" → [SELECT]
- To edit the number before calling back, press [EDIT] repeatedly until the phone number is shown in the desired format (page 35).
3 [\~]
- The unit automatically uses the line you set in line selection mode (page 17) to call back. When the line selection mode is set to "Auto", the indicated line (☐ or ☑) is used for the call. If the indicated line is already being used or you want to select the other line, press [LINE 1] or [LINE 2].
Erasing all messages
Erasing all messages for both line 1 and line 2
1 [MENU] → [#][3][2][5]
2 [▼]/[▲]: "Yes" → [SELECT] → [OFF]
Erasing all messages for the desired line(s)
1 [MENU] → [▼]/[▲]: "Answering device" → [SELECT]
Answering System
2 Press [OL2L1] repeatedly to select the desired line(s).
3 [▼]/[▲]: "Erase all" → [SELECT]
4 [▼]/[▲]: "Yes" → [SELECT] → [OFF]
Remote operation
Using a touch-tone phone, you can call your phone number from outside and access the unit to listen to messages or change answering system settings. The unit's voice guidance prompts you to press certain dial keys to perform different operations.
Remote access code
A 3-digit remote access code must be entered when operating the answering system remotely. This code prevents unauthorized parties from listening to your messages remotely. The default setting is "111".
Program this setting using either one of the handsets or the base unit.

Handset / Base unit
1 [MENU] → [#][3][0][6]
2 Enter the desired 3-digit remote access code.
→ [SAVE]
3 Proceed with the operation for your unit.
Handset: [OFF]
Base unit: [■] (EXIT)
Using the answering system remotely
1 Dial your phone number from a touch-tone phone.
2 After the greeting message starts, enter your remote access code.
- The unit announces the number of new messages.
●The voice guidance announcements are different depending on the voice guidance language setting (page 16).
3 Follow the voice guidance prompts as necessary or control the unit using remote commands (page 41).
4 When finished, hang up.
Note:
- You can also leave a message just as any outside caller can. After the greeting message starts, press [★] to skip the greeting message and record your message after the beep.
Voice guidance
When the English voice guidance is selected During remote operation, the unit's voice guidance starts and prompts you to press [1] to perform a specific operation, or press [2] to listen to more available operations. Operations are presented by voice guidance in the following order:
- Play back all messages
- Play back new messages
- Record your message
- Erase all messages
– Record your greeting message
Note:
- If you do not press any dial keys within 10 seconds after a voice guidance prompt, the unit disconnects your call.
When the Spanish voice guidance is selected To start the voice guidance, press [9]. The voice guidance announces the available remote commands (page 41). See the Spanish quick guide for details (page 60).
Note:
- If you do not press any dial keys within 10 seconds after a voice guidance prompt, the unit disconnects your call.


Answering System
Remote commands
You can press dial keys to access certain answering system functions without waiting for the voice guidance to prompt you.
1 Select the desired line(s) while you are accessing the answering system if necessary. For line 1: [☐][1] For line 2: [☐][2] For line 1 and line 2: [☐][0]
2 Press the desired dial keys.
| Key Operation | |
| [1]Repeat message (during playback) 1 | |
| [2]Skip message (during playback) | |
| [4]Play new messages | |
| [5]Play all messages | |
| [6]Play greeting message | |
| [1][1][7] | Record a greeting message for line 1 only |
| [1][2][7] | Record a greeting message for line 2 only |
| [1][0][7] | Record a common greeting message for both line 1 and line 2 |
| [1][1][8] | Turn answering system on for line 1 only |
| [1][2][8] | Turn answering system on for line 2 only |
| [1][0][8] | Turn answering system on for both line 1 and line 2 |
| [9]Stop recording Stop playback 2 Start voice guidance 3 | |
| [0]Turn answering system off | |
| [∗][4]Erase currently playing message | |
| [∗][5]Erase all messages | |
| [∗][6]Erase greeting message (during greeting message playback) 4 | |
| [∗][1]End remote operation (or hang up) | |
*1 If pressed within the first 5 seconds of a message, the previous message is played.
*2 For English voice guidance only: To resume operation, enter a remote command within 3 seconds, or the voice guidance starts.
*3 For Spanish voice guidance only
*4 Unit resets to a pre-recorded greeting message.
Turning on the answering system remotely
If the answering system is turned off, you can turn it on remotely.
Important:
- The answering system can be remotely turned on only for the line which you have currently selected in "Turning the answering system on/off", page 37.
1 Dial your phone number from a touch-tone phone.
2 Let the phone ring 15 times.
3 Enter your remote access code after the beep.
●The greeting message is played back.
- You can either hang up, or enter your remote access code again and begin remote operation (page 40).
Note:
- If you want to turn on the answering system for the line which has not been selected in "Turning the answering system on/off", page 37, enter the desired remote commands, [☐][1][8], [☐][2][8], or [☐][0][8] (refer to the column to the left) to turn on and access the other line.
Answering System
Answering system settings
Number of rings before the unit answers a call
You can change the number of times the phone rings "Ring count" before the unit answers calls. You can select 2 to 7 rings, or "Toll saver".
The default setting is "4rings".
"Toll saver": The unit's answering system answers at the end of the 2nd ring when new messages have been recorded, or at the end of the 4th ring when there are no new messages. If you call your phone from outside to listen to new messages (page 40), you know that there are no new messages when the phone rings for the 3rd time. You can then hang up without being charged for the call.
Program this setting using either the one of the handsets or base unit.

Handset / Base unit
1 [MENU] → [#][2][1][1]
2 [▼]/[▲]: Select the desired setting. → [SAVE]
3 Proceed with the operation for your unit.
Handset: [OFF]
Base unit: [■] (EXIT)
For voice mail service subscribers
If you subscribe to a flat-rate service package that includes Caller ID, call waiting, voice mail, and unlimited local/regional/long distance calls, please note the following:
- To use the voice mail service provided by your service provider/telephone company rather than the unit's answering system, turn off the answering system (page 37).
- To use this unit's answering system rather than the voice mail service provided by your service provider/telephone company, please contact your service provider/telephone company to deactivate your voice mail service.
If your service provider/telephone company cannot do this: - Set this unit's "Ring count" setting so that this unit's answering system answers calls before the voice mail service of your service
provider/telephone company does. It is necessary to check the number of rings required to activate the voice mail service provided by your service provider/telephone company before changing this setting.
- Change the number of rings of the voice mail service so that the answering system can answer the call first. To do so, contact your service provider/telephone company.
Caller's recording time
You can change the maximum message recording time allotted to each caller. The default setting is "3min".
Program this setting using either the one of the handsets or base unit.

Handset / Base unit
1 [MENU] → [#][3][0][5]
2 [▼]/[▲]: Select the desired setting. → [SAVE]
3 Proceed with the operation for your unit.
Handset: [OFF]
Base unit: [■] (EXIT)
Turning the call screening on/off
You can set the call screening feature "On" or "Off". For details, see page 37. The default setting is "On".

Handset / Base unit
1 [MENU] → [#][3][1][0]
2 [▼]/[▲]: Select the desired setting. → [SAVE]
3 Proceed with the operation for your unit.
Handset: [OFF]
Base unit: [■] (EXIT)
Voice Mail Service
Voice mail service
Voice mail is an automatic answering service offered by your service provider/telephone company. After you subscribe to this service, your service provider/telephone company's voice mail system answers calls for you when you are unavailable to answer the phone or when your line is busy. Messages are recorded by your service provider/telephone company, not your telephone. Please contact your service provider/telephone company for details of this service.
Important:
- To use the voice mail service provided by your service provider/telephone company rather than the unit's answering system, turn off the answering system (page 37). For details, see page 42.
Voice mail message indication
The unit lets you know that you have new voice mail messages by showing "VoiceMail:Line1" and/or "VoiceMail:Line2" on the display. To listen to your voice mail messages, you must dial your service provider/telephone company's voice mail access number.
Note:
- If the handset or base unit still indicates there are new messages even after you have listened to all new messages, turn it off by pressing and holding [OFF] on the handset until a beep sounds.
- If your voice mail service uses voice mail tones and a message is over 3 minutes long, the unit may not indicate new messages.
Voice mail (VM) tone detection
Your service provider/telephone company sends special signals (sometimes called "voice mail tones" or "stutter tones") to the unit to let you know you have new voice mail messages. If you hear a series of dial tones followed by a continuous dial tone after you press [→] on the handset or press [SP-PHONE] on the base unit, you have new voice mail messages. Soon after you hang up a call or after the phone stops ringing, your unit checks the phone line to see if new voice mail messages have been recorded.
Turn this feature off when:
- You do not subscribe to voice mail service.
- Your service provider/telephone company does not send voice mail tones.
- Your phone is connected to a PBX.
If you are not sure which setting is required, contact your service provider/telephone company.
Turning VM tone detection on/off
The default setting is "On".
Program this setting using either the one of the handsets or base unit.

Handset / Base unit
1 [MENU] → [#][3][3][2]
2 [▼]/[▲]: Select the desired setting. → [SAVE]
3 Proceed with the operation for your unit.
Handset: [OFF]
Base unit: [■] (EXIT)
Intercom/Locator
Intercom
Intercom calls can be made:
- between the handset and base unit
- between handsets
Note:
- If you receive an outside call while talking on the intercom, an interrupt tone will be heard (page 29).
- To answer the call with the handset, press [OFF], then press [\~]. You can also answer the call by pressing [LINE 1] or [LINE 2] after hanging up the intercom.
- To answer the call with the base unit, press [SP-PHONE] 2 times. You can also answer the call by pressing [LINE 1] or [LINE 2] after hanging up the intercom.
- When paging unit(s), the paged unit(s) beeps for 1 minute.
Making an intercom call
Handset
1 [INTERCOM]
2 To page the base unit, press [0]. To page another handset, enter its extension number.
• To stop paging, press [OFF].
3 When you finish talking, press [OFF].
Base unit
1 Proceed with the desired operation.
■When 1 handset is registered: Press [INTERCOM].
■When 2 or more handsets are registered: Press [INTERCOM].
- To page a specific handset, enter the handset number.
- To page all handsets, press [0] or wait for a few seconds.
- To stop paging, press [INTERCOM].
2 When you finish talking, press [INTERCOM].
Answering an intercom call
Handset
1 Press [→] to answer the page.
2 When you finish talking, press [OFF].
Base unit
1 Press [INTERCOM] to answer the page.
2 When you finish talking, press [INTERCOM].
Note for handset and base unit:
- The ringer volume for intercom calls follows the higher volume level of the 2 lines (page 30). Even when the ringer volume for both lines is set to off (page 30), the handset and/or base unit still rings at the low level for intercom calls.
Handset locator
You can locate a misplaced handset by paging it.
1 Base unit: [LOCATOR]
● All registered handsets beep for 1 minute.
2 To stop paging: Handset:
Press [→], then press [OFF].
Base unit: Press [LOCATOR].
Note:
- Even when the ringer volume for both lines is set to off (page 30), the handset still rings at the low level for paging.
Transferring calls
Outside calls can be transferred between 2 people.
Handset
1 During an outside call, press [INTERCOM] once to put the call on hold.
2 To page the base unit, press [0].
To page another handset, enter its extension number.
3 Wait for the paged party to answer.
- If the paged party does not answer, press [LINE 1] or [LINE 2] that is flashing on the handset to return to the outside call.
4 [OFF]
●The outside call is being routed to the destination unit.
Base unit
1 Proceed with the desired operation.
■When 1 handset is registered:
During an outside call, press [INTERCOM].
■When 2 or more handsets are registered:
During an outside call, press [INTERCOM].
- To page a specific handset, enter the handset number.
- To page all handsets, press [0] or wait for a few seconds.
2 Wait for the paged party to answer. - If the paged party does not answer, press the flashing [LINE 1] or [LINE 2] to return to the outside call.
3 Press [INTERCOM]. The outside call is being routed to the handset.
Answering a transferred call
Handset
Press [→] to answer the page.
Base unit
Press [SP-PHONE] to answer the page.
Note for handset and base unit:
● After the paging party disconnects, you can talk to the outside caller.
Conference calls
3 people can establish a conference call.
Conference call with 2 outside calls
While you are talking with an outside caller, you can make or answer a 2nd call on the other line, and then combine the calls to establish a conference call.
Handset
1 During an outside call, press [HOLD] 2 times.
2 To answer a 2nd call, press [LINE 1] or [LINE 2].
To make a 2nd call, press [LINE 1] or [LINE 2], then dial the phone number.
3 When the 2nd call is connected, press
[MENU]. → [▼]/[▲]: "Conference" →
[SELECT]
●The 2 calls are combined.
- To hang up only one line, press [LINE 1] or [LINE 2] for the party with which you want to continue talking.
- To put both lines on hold, press [HOLD]. To talk with only one caller, press [LINE 1] or [LINE 2] for the party with which you want to continue talking. To resume both lines, press [CONF].
Base unit
1 During an outside call, press [HOLD].
2 To answer a 2nd call, press [LINE 1] or [LINE 2].
To make a 2nd call, press [LINE 1] or [LINE 2], then dial the phone number.
3 When the 2nd call is connected, press [MENU]. → [▼]/[▲]: "Conference" → [SELECT]
●The 2 calls are combined.
- To hang up only one line, press [LINE 1] or [LINE 2] for the party with which you want to continue talking.
- To put both lines on hold, press [HOLD]. To talk with only one caller, press [LINE 1] or [LINE 2] for the party with which you want to continue talking. To resume both lines, press [CONF].
Intercom/Locator
Conference call with an outside call and an intercom call
While you are talking with an outside caller, one more extension can join the conversation and establish a conference call.

Handset
1 During an outside call, press [INTERCOM] once to put the call on hold.
2 To page the base unit, press [0].
To page a specific handset, enter the handset number.
3 When the paged party answers, press [CONF].
●The 2 calls are combined.
- To leave the conference, press [OFF]. The other 2 parties can continue the conversation.

Base unit
1 Proceed with the desired operation.
■When 1 handset is registered:
During an outside call, press [INTERCOM].
■When 2 or more handsets are registered: During an outside call, press [INTERCOM].
- To page a specific handset, enter the handset number.
- To page all handsets, press [0] or wait for a few seconds.
2 When the paged party answers, press [CONF].
●The 2 calls are combined.
- To leave the conference, press [SP-PHONE]. The other 2 parties can continue the conversation.
Note for the handset and base unit:
- The outside call can be put on hold by pressing [HOLD]. Only the person who placed the call on hold can resume the full conference by pressing [CONF].
Using Bluetooth devices
Using Bluetooth devices
The base unit is Bluetooth wireless technology compatible.
By using with other Bluetooth devices such as a cellular phone and headset, the following features are available:
– Copying phonebook entries from your cellular phone to the base unit (page 47)
- Having a hands-free conversation by registering a Bluetooth headset to the base unit (page 48)
Important:
- Your cellular phone and headset must be Bluetooth wireless technology compatible.
Copying phonebook entries from a Bluetooth cellular phone to the base unit (phonebook transfer)
You can copy phonebook entries from your cellular phone to the base unit.
Once you have copied phonebook entries to the base unit, you can copy those entries to the handset (page 24).
Important:
- If a copied entry has 2 or more phone numbers, each phone number (6 max.) is stored as a separate entry but with the same name in the phonebook.
- If a phonebook entry in your cellular phone includes additional data such as a picture, that entry may fail to copy to the base unit.
1 Base unit:
[MENU] → [#] [6] [1] [8]
- "Please transfer phonebook data from cell phone." is displayed.
2 Your cellular phone:
Follow the instructions of your cellular phone to copy phonebook entries. (You need to search for and select the base unit on your cellular phone.)
- The base unit's PIN may be required (default: "0000").
- The entries being copied are displayed on the base unit.
- When entries have been copied, "Completed" is displayed on the base unit.
- You can continue copying other entries if necessary. (depending on your cellular phone)
3 Base unit:
【■】(EXIT)
Note:
- Some copied entries may have characters which do not exist in the character table (page 22). These characters can be displayed but cannot be entered when editing an entry.
- The unit does not support some characters. If a copied entry includes those characters, they are replaced with “*”.
Changing the base unit's PIN (Personal Identification Number)
For security, the base unit's PIN must be entered when copying phonebook entries from a cellular phone to the base unit. The default setting is "0000".

Base unit
Important:
- If you change the PIN, please make a note of the new PIN. The unit does not reveal the PIN to you. If you forget the PIN, see page 57.
1 [MENU] → [#][6][1][9]
- If you set the PIN for the first time, go to step 3.
2 Enter the current 4-digit PIN.
3 Enter the new 4-digit PIN. → [OK]
4 Enter the new 4-digit PIN again. → [OK]
5 [■] (EXIT)
Using Bluetooth devices
Using a Bluetooth wireless headset (optional)
By registering a Bluetooth headset to the base unit, you can have a hands-free conversation wirelessly.
Important:
- Up to 2 headsets can be registered to the base unit. However, only 1 Bluetooth headset can be used at a time.
- For best performance, we recommend using a Bluetooth headset within 1 m (3.3 feet) of the base unit. A headset can communicate with the base unit within a range of approximately 10 m (33 feet).
Registering a headset
1 Your headset:
Set your headset to registration mode.
- Refer to your headset operating instructions.
2 Base unit:
[MENU] → [] [6] [2] [3] → [] / []: "Add device" → [SELECT]
3 Base unit:
Enter your headset PIN.
- Typically, default PIN is "0000". Refer to your headset operating instructions.
4 Base unit:
[OK]
- When registration is complete, ✗ is displayed. You are ready to use the headset.
Note:
- When you register a 2nd headset, the 1st registered headset is disconnected from the base unit. To use the 1st registered headset, change the headset connection. See "Changing the headset connection (when 2 headsets are registered)", page 48.
Reconnecting a headset
If ♂ is not displayed even when the headset is turned on, the headset has been disconnected from the base unit. Reconnect the headset.
Important:
● Make sure that the headset is turned on.

Base unit
1 [MENU] → [☐][6][2][3]
2 [▼]/[▲]: Select the headset indicated by "√".
→ [MENU]
3 [▼]/[▲]: "Connect" → [SELECT]
• is displayed.
4 [■] (EXIT)
Disconnecting a headset from the base unit (when using a headset with another Bluetooth device)
To use your headset with another Bluetooth device such as a cellular phone, you may need to disconnect the headset from the base unit.

Base unit
1 [MENU] → [#][6][2][3]
2 [▼]/[▲]: Select the headset indicated by "√". → [MENU]
3 [▼]/[▲]: "Disconnect" → [SELECT]
•* disappears from the display.
4 [■] (EXIT)
Changing the headset connection (when 2 headsets are registered)
Only 1 headset can be used at a time. If the headset you want to use is not connected to the base unit, change the connection to that headset.
Important:
● Make sure that the headset is turned on.

Base unit
1 [MENU] → [#][6][2][3]
2 [▼]/[▲]: Select the desired headset. → [SELECT]
- The selected headset is indicated by "√".
- is displayed.
3 [■] (EXIT)
Using Bluetooth devices
Deregistering a headset
If you want to cancel your headset, you can deregister the headset from the base unit.
Base unit
1 [MENU] → [☐][6][2][3]
2 [▼]/[▲]: Select the headset you want to cancel. → [MENU]
3 [▼]/[▲]: "Deregistration" → [SELECT]
4 [▼]/[▲]: "Yes" → [SELECT]
- After the headset is deregistered, the base unit beeps and "Add new device" is displayed.
5 [■] (EXIT)
Operating a Bluetooth wireless headset
Making calls
After dialing the phone number using the base unit, you can operate the call with your headset. Refer to your headset operating instructions for further details.
Answering calls
Refer to your headset operating instructions for further details.
Switching a call between the headset and base unit speakerphone
Base unit
To switch to the base unit speakerphone, press [✿].
To return to the headset, press [O].
Adjusting the headset receiver volume
Base unit
Press [▲] or [▼] repeatedly while talking on the headset.
- To adjust the volume using the headset, refer to your headset operating instructions.
Listening to messages recorded on the base unit answering system
You can listen to messages with your headset.
Base unit
1 Press [▶] to play back.
2 Press [Q] to switch from the base unit to the headset.
Useful Information
Wall mounting
Base unit
1 Lead the AC adaptor cord and telephone line cord through the hole in the wall mounting adaptor in the direction of the arrow.
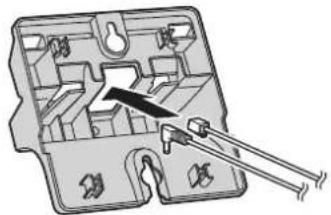
2 Tuck the telephone line cord inside the wall mounting adaptor (①). Connect the AC adaptor cord and telephone line cord (②).
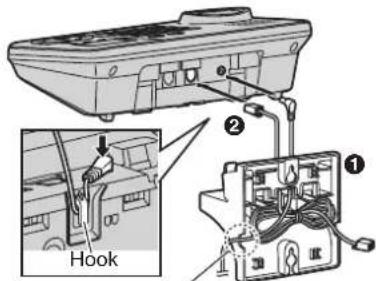
AC adaptor cord
3 Insert the hooks on the wall mounting adaptor into holes A and B on the base unit.

4 Adjust the adaptor to hold the base unit, then push it in the direction of the arrow until it clicks into place.


Useful Information
5 Connect the telephone line cord. Mount the unit by inserting the mounting pins into the round openings on the adaptor (for pin B, use the round cut out at the bottom of the adaptor if you are using the 4 inch phone plate), then slide the unit down to secure it. Connect the AC adaptor to power outlet (page 9).
- There are 2 common types of wall phone plates. The distance between A and B may vary depending on the size of the wall phone plate installed.
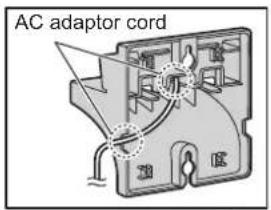
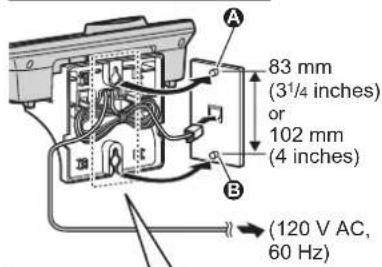
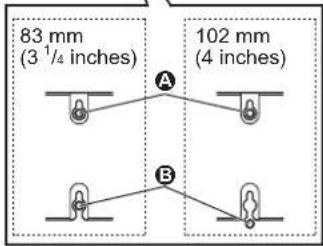
To remove the wall mounting adaptor While pushing down the release levers (①), remove the adaptor (②).

Charger
1 Drive the screws (not supplied) into the wall.

2 Mount the charger (1), then slide it down (2) and to the right (3) until it is secure.
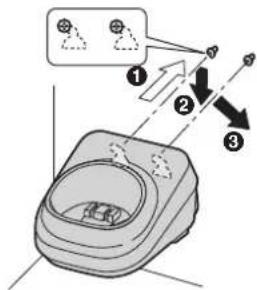
Belt clip
■ To attach

■ To remove

Useful Information
Error messages
If the unit detects a problem, one of the following messages is shown on the display.
| Display message Cause/solution | |
| Busy●The called unit is in use. | ●Other units are in use and the system is busy. Try again later.●Privacy mode is on for the call you tried to join (page 21).●The handset you are using is too far from the base unit. Move closer and try again.●The handset's registration may have been canceled. Re-register the handset (page 33). |
| Check tel line 1Check tel line 2 | ●The supplied telephone line cord has not been connected yet or not connected properly. Check the connections (page 10).●If you use the unit as a single-line telephone only, erase the message as follows:To erase “Check tel line 1”, press [MENU]. → 【#】[1][8][9]To erase “Check tel line 2”, press [MENU]. → 【#】[1][9][0]When a power failure occurs, the message is displayed again.Erase again as above. |
| Couldn't connectConfirm headsetis on then retry | ●The headset has lost connection with the base unit. Confirm that your headset is turned on.●The headset is too far from the base unit. Move closer to the base unit. |
| Error!! | ●The handset's registration has failed. Move the base unit and handset away from all electrical appliances and try again.●Recording was too short. Try again. |
| Failed | ●Phonebook copy failed (page 24). Confirm the other unit (the receiver) is in standby mode and try again. |
| Incomplete | ●Phonebook copy is incomplete. The receiver's phonebook memory is full. Erase the unnecessary phonebook entries (page 24) from the other unit (the receiver) and try again. |
| Memory full | ●The phonebook memory is full. Erase unnecessary entries (page 24).●Message memory is full. Erase unnecessary messages (page 38, 39). |
| Messages full | ●Message memory is full. Erase unnecessary messages (page 38, 39). |
| No link to base.Reconnect AC adaptor. | ●The handset has lost communication with the base unit. Move closer to the base unit and try again.●Unplug the base unit's AC adaptor to reset the unit. Reconnect the adaptor and try again.●The handset's registration may have been canceled. Re-register the handset (page 33). |
Useful Information
| Display message Cause/solution | |
| Use rechargeable battery. | A wrong type of battery such as Alkaline or Manganese was inserted. Use only the rechargeable Ni-MH batteries noted on page 4, 6. |
| You must first subscribe to Caller ID. | You must subscribe to Caller ID service. Once you receive caller information after subscribing to Caller ID service, this message will not be displayed. |
Troubleshooting
If you still have difficulties after following the instructions in this section, disconnect the base unit's AC adaptor, then reconnect the base unit's AC adaptor. Remove the batteries from the handset, and then insert the batteries into the handset again.
General use
| Problem Cause/solution | |
| The unit does not work. | Make sure the batteries are installed correctly (page 12).Fully charge the batteries (page 12).Check the connections (page 9).Unplug the base unit's AC adaptor to reset the unit. Reconnect the adaptor and try again.The handset has not been registered to the base unit. Register the handset (page 33). |
| I cannot hear a dial tone. | The base unit's AC adaptor or telephone line cord is not connected. Check the connections.If you are using a splitter to connect the unit, remove the splitter and connect the unit to the wall jack directly. If the unit operates properly, check the splitter.Disconnect the base unit from the telephone line and connect the line to a known working telephone. If the working telephone operates properly, contact our service personnel to have the unit repaired. If the working telephone does not operate properly, contact your service provider/telephone company. |


Useful Information
Programmable settings
| Problem Cause/solution | |
| The display is in a language I cannot read. | ●Change the display language (page 16). |
| While programming, the unit starts to ring. | ●A call is being received. Answer the call and start again after hanging up. |
| I cannot register a handset to a base unit. | ●The maximum number of handsets (6) is already registered to the base unit. Cancel unused handset registrations from the base unit (page 33).●Place the handset and the base unit away from other electrical appliances. |
Battery recharge
| Problem Cause/solution | |
| The handset beeps and/or flashes. | ●Battery charge is low. Fully charge the batteries (page 12). |
| I fully charged the batteries, but still flashes or is displayed. | ●Clean the charge contacts and charge again (page 12).●It is time to replace the batteries (page 12). |
| I fully charged the batteries, but the operating time seems to be shorter. | ● Clean the battery ends ( , ) and the charge contacts with a dry cloth and charge again. |
Making/answering calls, intercom
| Problem Cause/solution | |
| Y is flashing. | The handset is too far from the base unit. Move closer.The base unit's AC adaptor is not properly connected.Reconnect AC adaptor to the base unit.You are using the handset or base unit in an area with high electrical interference. Re-position the base unit and use the handset away from sources of interference.The handset is not registered to the base unit. Register it (page 33). |
| Noise is heard, sound cuts in and out. | You are using the handset or base unit in an area with high electrical interference. Re-position the base unit and use the handset away from sources of interference.If you are using the handset and base unit near a cellular phone, move the cellular phone at least 0.6 m (2 feet) away from them to prevent electrical interference.Move closer to the base unit.If you use a DSL/ADSL service, we recommend connecting a DSL/ADSL filter between the base unit and the telephone line jack. Contact your DSL/ADSL provider for details. |
| The handset and/or base unit does not ring. | The ringer volume is turned off. Adjust the ringer volume (page 19).Night mode is turned on. Turn it off (page 32). |
Useful Information
| Problem Cause/solution | |
| I cannot make a call. | The dialing mode may be set incorrectly. Change the setting (page 16).The handset is too far from the base unit. Move closer and try again. |
| I cannot make long distance calls. | Make sure that you have long distance service. |
Caller ID
| Problem Cause/solution | |
| Caller information is not displayed. | You must subscribe to Caller ID service. Contact your service provider/telephone company for details.If your unit is connected to any additional telephone equipment such as a Caller ID box or cordless telephone line jack, plug the unit directly into the wall jack.If you use a DSL/ADSL service, we recommend connecting a DSL/ADSL filter between the base unit and the telephone line jack. Contact your DSL/ADSL provider for details.The name display service may not be available in some areas. Contact your service provider/telephone company for details.Other telephone equipment may be interfering with this unit. Disconnect the other equipment and try again. |
| Caller information is displayed late. | Depending on your service provider/telephone company, the unit may display the caller's information at the 2nd ring or later.Move closer to the base unit. |
| The caller list/incoming phone numbers are not edited automatically. | The Caller ID number auto edit feature is turned off. Turn it on and try again (page 35).You need to call back the edited number to activate Caller ID number auto edit. |
| I cannot dial the phone number edited in the caller list. | The phone number you dialed might have been edited incorrectly (for example, the long distance "1" or the area code is missing). Edit the phone number with another pattern (page 35). |
| Time on the unit has shifted. | Incorrect time information from incoming Caller ID changes the time. Set the time adjustment to "Manual" (off) (page 30). |
| The 2nd caller's information is not displayed during an outside call. | In order to use Caller ID, call waiting, or Call Waiting Caller ID (CWID), you must first contact your service provider/telephone company and subscribe to the desired service. After subscribing, you may need to contact your service provider/telephone company again to activate this specific service, even if you already subscribed to both Caller ID and Call Waiting with Caller ID services (CWID). |


Useful Information
Answering system
| Problem Cause/solution | |
| The unit does not record new messages. | ●The answering system is not turned on for the line you wish to record messages from. Select the desired line or both lines, then turn the answering system on (page 37).●The message memory is full. Erase unnecessary messages (page 38).●The answering system is activated for both lines, and the 1st caller is leaving a voice message. The 2nd caller cannot leave a message, but the caller information will be stored (page 34).●If you subscribe to a voice mail service, messages are recorded by your service provider/telephone company, not your telephone. Change the unit's number of rings setting or contact your service provider/telephone company (page 42). |
| I cannot operate the answering system. | ●Someone is using the unit. Wait for the other user to finish.●A caller is leaving a message. Wait for the caller to finish.●The handset is too far from the base unit. Move closer. |
| I cannot operate the answering system remotely. | ●You are entering the wrong remote access code. If you forgot the remote access code, store a new remote access code (page 40).●Press each key firmly.●The answering system is turned off. Turn it on (page 41).●You are using a rotary/pulse telephone. Try again using a touch-tone phone. |
| While recording a greeting message or listening to messages, the unit rings and recording stops. | ●A call is being received. Answer the call and try again later. |
Using Bluetooth devices
| Problem Cause/solution | |
| I cannot copy phonebook entries from my cellular phone. | Confirm that your cellular phone supports Bluetooth wireless technology.Confirm that your cellular phone supports the Object Push Profile (OPP) specification.If your cellular phone is already connected to another Bluetooth device such as a Bluetooth headset, turn it off or disconnect it from your cellular phone.Turn your cellular phone off, then turn it on and try again. |
| I cannot have a conversation using the headset. | Your Bluetooth headset is not registered. Register it (page 48).Turn your headset off, then turn it on and try again. |
| Noise is heard during a call on the headset. | A Bluetooth headset can communicate with the base unit within a range of approximately 10 m (33 feet). The connection may be subject to interference from obstructions such as walls or electronic devices. Move closer to the base unit. |
Useful Information
| Problem Cause/solution | |
| I cannot connect my headset to the base unit. | Confirm that your headset is turned on.Only 1 headset can be connected at a time. Change the connection to your headset (page 48).If your headset is already connected to another Bluetooth device such as your cellular phone, disconnect the headset from your cellular phone, then perform the connecting procedure from the base unit. |
| Some headset enhanced features are not available. | The base unit does not support enhanced features such as Last number redial or Call reject. |
| An error tone is heard when I try to program the Bluetooth feature. | The bluetooth feature cannot be accessed immediately after connecting the AC adaptor to the base unit. Wait a few seconds and try again.The headset has not connected to the base unit yet even though you performed the connecting procedure setting. Wait a few seconds and try again. |
| “Add new device” is not displayed on the base unit when I try to register a headset. | 2 headsets have already been registered to the base unit. To register another headset, deregister an unwanted headset using the base unit (page 49). |
| I cannot remember the base unit's PIN. | Use the base unit to change your PIN as follows.[MENU] → [[6][1][9][*][7][0][0][0]Enter the new 4-digit PIN. → [OK]Enter the new 4-digit PIN again. → [OK] → [■] (EXIT) |
Liquid damage
| Problem Cause/solution | |
| Liquid or other form of moisture has entered the handset/base unit. | ●Disconnect the AC adaptor and telephone line cord from the base unit. Remove the batteries from the handset and leave to dry for at least 3 days. After the handset/base unit are completely dry, reconnect the AC adaptor and telephone line cord. Insert the batteries and charge fully before use. If the unit does not work properly, contact an authorized service center. |
Caution:
- To avoid permanent damage, do not use a microwave oven to speed up the drying process.
Useful Information
FCC and other information
This equipment complies with Part 68 of the FCC rules and the requirements adopted by the ACTA. On the bottom of this equipment is a label that contains, among other information, a product identifier in the format US:ACJ----.
If requested, this number must be provided to the telephone company.
- Registration No......(found on the bottom of the unit)
• Ringer Equivalence No. (REN).....0.1B
A plug and jack used to connect this equipment to the premises wiring and telephone network must comply with the applicable FCC Part 68 rules and requirements adopted by the ACTA. A compliant telephone cord and modular plug is provided with the product. It is designed to be connected to a compatible modular jack that is also compliant.
The REN is used to determine the number of devices that may be connected to a telephone line. Excessive RENs on a telephone line may result in the devices not ringing in response to an incoming call. In most but not all areas, the sum of RENs should not exceed five (5.0). To be certain of the number of devices that may be connected to a line, as determined by the total RENs, contact the local telephone company. For products approved after July 23, 2001, the REN for the product is part of the product identifier that has the format US:AAAEQ##TXXXX. The digits represented by ## are the REN without a decimal point (e.g., 03 is a REN of 0.3).
If this equipment causes harm to the telephone network, the telephone company will notify you in advance that temporary discontinuance of service may be required. But if advance notice isn't practical, the telephone company will notify the customer as soon as possible. Also, you will be advised of your right to file a complaint with the FCC if you believe it is necessary.
The telephone company may make changes in its facilities, equipment, operations or procedures that could affect the operation of the equipment. If this happens the telephone company will provide advance notice in order for you to make necessary modifications to maintain uninterrupted service.
If trouble is experienced with this equipment, for repair or warranty information, please contact a Factory Service Center or other Authorized Servicer. If the equipment is causing harm to the telephone network, the telephone company may request that you disconnect the equipment until the problem is resolved.
Connection to party line service is subject to state tariffs. Contact the state public utility commission, public service commission or corporation commission for information.
If your home has specially wired alarm equipment connected to the telephone line, ensure the installation of this equipment does not disable your alarm equipment. If you have questions about what will disable alarm equipment, consult your telephone company or a qualified installer.
This equipment is hearing aid compatible as defined by the FCC in 47 CFR Section 68.316.
When you hold the phone to your ear, noise might be heard in your Hearing Aid. Some Hearing Aids are not adequately shielded from external RF (radio frequency) energy. If noise occurs, use an optional headset accessory or the speakerphone option (if applicable) when using this phone. Consult with your audiologist or Hearing Aid manufacturer about the availability of Hearing Aids which provide adequate shielding to RF energy commonly emitted by digital devices.
WHEN PROGRAMMING EMERGENCY NUMBERS AND(OR) MAKING TEST CALLS TO EMERGENCY NUMBERS:
1) Remain on the line and briefly explain to the dispatcher the reason for the call.
2) Perform such activities in the off-peak hours, such as early morning or late evenings.
This device complies with Part 15 of the FCC Rules. Operation is subject to the following two conditions:
(1) This device may not cause harmful interference, and (2) this device must accept any interference received, including interference that may cause undesired operation.
Privacy of communications may not be ensured when using this phone.
CAUTION:
Any changes or modifications not expressly approved by the party responsible for compliance could void the user's authority to operate this device.
NOTE:
This equipment has been tested and found to comply with the limits for a Class B digital device, pursuant to Part 15 of the FCC Rules. These limits are designed to provide reasonable protection against harmful interference in a residential installation. This equipment generates, uses, and can radiate radio
Useful Information
frequency energy and, if not installed and used in accordance with the instructions, may cause harmful interference to radio communications. However, there is no guarantee that interference will not occur in a particular installation. If this equipment does cause harmful interference to radio or television reception, which can be determined by turning the equipment off and on, the user is encouraged to try to correct the interference by one or more of the following measures:
– Reorient or relocate the receiving antenna.
- Increase the separation between the equipment and receiver.
- Connect the equipment into an outlet on a circuit different from that to which the receiver is connected.
- Consult the dealer or an experienced radio/TV technician for help.
Some cordless telephones operate at frequencies that may cause interference to nearby TVs and VCRs. To minimize or prevent such interference, the base of the cordless telephone should not be placed near or on top of a TV or VCR. If interference is experienced, move the cordless telephone further away from the TV or VCR. This will often reduce, or eliminate, interference.
FCC RF Exposure Warning:
- This product complies with FCC radiation exposure limits set forth for an uncontrolled environment.
- To comply with FCC RF exposure requirements, the base unit must be installed and operated 20 cm (8 inches) or more between the product and all person's body (excluding extremities of hands, wrist and feet).
- This product may not be collocated or operated in conjunction with any other antenna or transmitter.
- The handset may be carried and operated with only the specific provided belt-clip. Other non-tested belt-clips or similar body-worn accessories may not comply and must be avoided.
Notice
- FCC ID can be found inside the battery compartment or on the bottom of the units.
Compliance with TIA-1083 standard:
Telephone handsets identified with this logo have reduced noise and interference when used with T-Coil equipped hearing aids and cochlear implants.

[MENU] → [#][6][2][3] → [▼]/[▲]: "Agr. Disp. Nvo." → [SELEC.]
3 Unidad base:

Auricular
Customer Services Directory (United States and Puerto Rico)
Obtain Product Information and Operating Assistance; locate your nearest Dealer or Service Center; purchase Parts and Accessories; or make Customer Service and Literature requests by visiting our Web Site at:
http://www.panasonic.com/help
or, contact us via the web at:
http://www.panasonic.com/contactinfo
You may also contact us directly at: 1-800-211-PANA (1-800-211-7262),
Monday - Friday 9 am to 9 pm; Saturday - Sunday 10 am to 7 pm, EST.
TTY users (hearing or speech impaired users) can call 1-877-833-8855.
Accessory Purchases (United States and Puerto Rico)
Purchase Parts, Accessories and Instruction Books online for all Panasonic Products by visiting our Web Site at:
http://www.pstc.panasonic.com
or, send your request by E-mail to:
npcparts@us.panasonic.com
You may also contact us directly at:
1-800-332-5368 (Phone) 1-800-237-9080 (Fax Only)
(Monday - Friday 9 am to 9 pm, EST.)
Panasonic Service and Technology Company
20421 84th Avenue South, Kent, WA 98032
(We Accept Visa, MasterCard, Discover Card, American Express, and Personal Checks.)
TTY users (hearing or speech impaired users) can call 1-866-605-1277.
Warranty (For United States and Puerto Rico)
PANASONIC CORPORATION OF NORTH AMERICA
One Panasonic Way, Secaucus, New Jersey 07094
Panasonic Telephone Products Limited Warranty
Limited Warranty Coverage
If your product does not work properly because of a defect in materials or workmanship, Panasonic Corporation of North America (referred to as "the warrantor") will, for the length of the period indicated on the chart below, which starts with the date of original purchase ("Limited Warranty period"), at its option either (a) repair your product with new or refurbished parts, or (b) replace it with a new or a refurbished product. The decision to repair or replace will be made by the warrantor.
Parts
Labor
One (1) Year One (1) Year
During the "Labor" Limited Warranty period there will be no charge for labor. During the "Parts" Limited Warranty period, there will be no charge for parts. You must mail-in your product prepaid during the Limited Warranty period. This Limited Warranty excludes both parts and labor for batteries, antennas, and cosmetic parts (cabinet). This Limited Warranty only applies to products purchased and serviced in the United States or Puerto Rico. This Limited Warranty is extended only to the original purchaser and only covers products purchased as new.
Ship-In Service
For assistance in the continental United States and Puerto Rico in obtaining repairs please ship the product prepaid to:
PSTC (Panasonic) Exchange Center,
4900 George McVay Drive, Suite B Door #12, McAllen, TX 78503
panacare@us.panasonic.com
When shipping the unit carefully pack in a padded shipping carton, include all accessories, and send it prepaid. Include a letter detailing the complaint, a return address and provide a day time phone number where you can be reached. P.O. Boxes are not acceptable. Keep the tracking number for your records. A copy of valid registered receipt is required under the 1 year parts and labor Limited Warranty.
For Limited Warranty service for headsets if a headset is included with this product please follow instructions above.
IF REPAIR IS NEEDED DURING THE LIMITED WARRANTY PERIOD THE PURCHASER WILL BE REQUIRED TO FURNISH A SALES RECEIPT/PROOF OF PURCHASE INDICATING DATE OF PURCHASE, AMOUNT PAID AND PLACE OF PURCHASE. CUSTOMER WILL BE CHARGED FOR THE REPAIR OF ANY UNIT RECEIVED WITHOUT SUCH PROOF OF PURCHASE.
Appendix
Limited Warranty Limits And Exclusions
This Limited Warranty ONLY COVERS failures due to defects in materials or workmanship, and DOES NOT COVER normal wear and tear or cosmetic damage. The Limited Warranty ALSO DOES NOT COVER damages which occurred in shipment, or failures which are caused by products not supplied by the warrantor, or failures which result from accidents, misuse, abuse, neglect, bug infestation, mishandling, misapplication, alteration, faulty installation, set-up adjustments, misadjustment of consumer controls, improper maintenance, power line surge, lightning damage, modification, introduction of sand, humidity or liquids, commercial use such as hotel, office, restaurant, or other business or rental use of the product, or service by anyone other than a Factory Service Center or other Authorized Servicer, or damage that is attributable to acts of God.
THERE ARE NO EXPRESS WARRANTIES EXCEPT AS LISTED UNDER "LIMITED WARRANTY COVERAGE". THE WARRANTOR IS NOT LIABLE FOR INCIDENTAL OR CONSEQUENTIAL
DAMAGES RESULTING FROM THE USE OF THIS PRODUCT, OR ARISING OUT OF ANY BREACH OF THIS LIMITED WARRANTY. (As examples, this excludes damages for lost time, lost calls or messages, cost of having someone remove or re-install an installed unit if applicable, travel to and from the servicer. The items listed are not exclusive, but are for illustration only.) ALL
EXPRESS AND IMPLIED WARRANTIES, INCLUDING THE WARRANTY OF MERCHANTABILITY, ARE LIMITED TO THE PERIOD OF THE LIMITED WARRANTY.
Some states do not allow the exclusion or limitation of incidental or consequential damages, or limitations on how long an implied warranty lasts, so the exclusions may not apply to you. This Limited Warranty gives you specific legal rights and you may also have other rights which vary from state to state. If a problem with this product develops during or after the Limited Warranty period, you may contact your dealer or Service Center. If the problem is not handled to your satisfaction, then write to the warrantor's Consumer Affairs Department at the addresses listed for the warrantor.
PARTS AND SERVICE, WHICH ARE NOT COVERED BY THIS LIMITED WARRANTY, ARE YOUR RESPONSIBILITY.
When you ship the product
- Carefully pack your unit, preferably in the original carton.
- Attach a letter, detailing the symptom.
- Send the unit to PSTC (Panasonic) Exchange Center, prepaid and adequately insured.
- Do not send your unit to Panasonic Corporation of North America listed on the back cover or to executive or regional sales offices. These locations do not repair consumer products.
Index
A Additional handset: 33
Alarm: 32
Answering calls
Base unit: 19
Handset: 18
Answering system
Call screening: 37
Erasing messages: 38, 39, 41
Listening to messages: 38, 39, 40
Number of rings: 42
Recording time: 42
Remote access code: 40
Remote operation: 40
Ring count: 42
Toll saver: 42
Turning on/off: 37, 41
B Battery: 12
Belt clip: 51
Bluetooth wireless technology
Cellular phonebook: 47
Headset: 48
C Caller ID number auto edit: 35
Caller ID service: 34
Caller list: 34
Call privacy: 21
Call share: 20
Call waiting: 20
Call Waiting Caller ID: 20
Chain dial: 24
Check tel line 1:52
Check tel line 2: 10, 52
CID (Caller ID): 34
Conference calls: 45
Customer support: 29
D Date and time: 16
Dialing mode: 16
Direct commands: 29
Display
Contrast: 29
Language: 16
E Error messages: 52
F Flash: 20, 30
G Greeting message: 37
Group ringer tone: 34
H Handset
Deregistration: 33
Locator: 44
Registration: 33
Hold: 20
I Intercom: 44
Interrupt tone: 29
K Key tone: 29
L Line mode: 30
Line selection mode: 17
M Making calls
Base unit: 18
Handset: 18
Menu icons: 15
Missed calls: 34
Mute: 20
N Night mode: 32
P Pause: 18
Phonebook: 22
Phonebook copy: 24, 47
Power failure: 9
R Redialing: 18
Ringer tone: 30
Rotary/pulse service: 20
S SP-PHONE (Speakerphone): 18
T Temporary tone dialing: 20
Time adjustment: 30
Troubleshooting: 53
TTY: 68
V VM (Voice mail): 43
Voice guidance language: 16
Voice mail: 42, 43
Volume
Receiver: 18
Ringer (Base unit): 19, 30
Ringer (Handset): 19, 30
Speaker: 18
W Wall mounting: 50
IMPORTANT!
If your product is not working properly...
① Reconnect AC adaptor to the base unit.
② Check if telephone line cord is connected.
③ Use rechargeable Ni-MH batteries.
(Alkaline/Manganese/Ni-Cd batteries CANNOT be used.)
④ Read troubleshooting page in the Operating Instructions.

Visit our Web site: http://www.panasonic.com/help
- FAQ and troubleshooting hints are available.
For your future reference
We recommend keeping a record of the following information to assist with any repair under warranty.
Serial No. Date of purchase
(found on the bottom of the base unit)
Name and address of dealer
Attach your purchase receipt here.
Panasonic Corporation of North America
One Panasonic Way, Secaucus, New Jersey 07094
Copyright:
This material is copyrighted by Panasonic Communications Co., Ltd., and may be reproduced for internal use only. All other reproduction, in whole or in part, is prohibited without the written consent of Panasonic Communications Co., Ltd.
© Panasonic Communications Co., Ltd. 2009
Printed in Malaysia

*TG9381*
PNQX2118YA CM0609SH1079





- OPERATING INSTRUCTIONS
- TABLE OF CONTENTS
- INTRODUCTION
- IMPORTANT INFORMATION
- GETTING STARTED
- MAKING/ANSWERING CALLS
- PHONEBOOK
- PROGRAMMING
- CALLER ID SERVICE
- ANSWERING SYSTEM
- VOICE MAIL SERVICE
- INTERCOM/LOCATOR
- USING BLUETOOTH DEVICES
- USEFUL INFORMATION
- INDEX
- ACCESSORY INFORMATION
- ADDITIONAL/REPLACEMENT ACCESSORIES
- EXPANDING YOUR PHONE SYSTEM
- SYSTEM CAPABILITIES
- FOR YOUR SAFETY
- WARNING
- POWER CONNECTION
- INSTALLATION
- OPERATING SAFEGUARDS
- MEDICAL
- CAUTION
- INSTALLATION AND RELOCATION
- BATTERY
- ATTENTION
- IMPORTANT SAFETY INSTRUCTIONS
- SAVE THESE INSTRUCTIONS
- FOR BEST PERFORMANCE
- BASE UNIT LOCATION/AVOIDING NOISE
- ENVIRONMENT
- ROUTINE CARE
- NOTICE FOR PRODUCT DISPOSAL, TRANSFER, OR RETURN
- SPECIFICATIONS
- STANDARD
- FREQUENCY RANGE
- POWER SOURCE
- POWER CONSUMPTION
- OPERATING CONDITIONS
- NOTE
- OTHER INFORMATION
- NOTICE
- ENERGY STAR
- TRADEMARKS
- CONNECTIONS
- CONNECTING THE AC ADAPTOR
- BASE UNIT
- CHARGER
- DURING A POWER FAILURE
- CONNECTING THE TELEPHONE LINE CORD
- IF YOU USE THE UNIT AS A SINGLE-LINE TELEPHONE ONLY
- IF YOU SUBSCRIBE TO A DSL/ADSL SERVICE
- TO CONNECT TO A 2-LINE TELEPHONE JACK
- TO CONNECT TO 2 SINGLE-LINE TELEPHONE JACKS
- BATTERY INSTALLATION
- BATTERY CHARGE
- CONTROLS
- USING THE NAVIGATOR KEY/VOLUME KEY ( , VOL.)
- SOFT KEYS
- MENU ICONS
- LINE1 INDICATOR/LINE2 INDICATOR ON THE BASE UNIT
- INITIAL SETTINGS
- DISPLAY LANGUAGE
- VOICE GUIDANCE LANGUAGE
- DIALING MODE
- DATE AND TIME
- LINE SELECTION MODE
- MAKING CALLS
- USING THE HANDSET
- USING THE SPEAKERPHONE
- USING THE BASE UNIT
- ADJUSTING THE RECEIVER OR SPEAKER VOLUME
- MAKING A CALL USING THE REDIAL LIST
- PAUSE (FOR PBX/LONG DISTANCE SERVICE USERS)
- ANSWERING CALLS
- AUTO TALK
- ADJUSTING THE HANDSET RINGER VOLUME
- TEMPORARY HANDSET RINGER OFF
- ADJUSTING THE BASE UNIT RINGER VOLUME
- TEMPORARY BASE UNIT RINGER OFF
- USEFUL FEATURES DURING A CALL
- HOLD
- HANDSET
- NOTE FOR HANDSET AND BASE UNIT
- MUTE
- HANDSET / BASE UNIT
- FLASH
- FOR CALL WAITING OR CALL WAITING CALLER ID SERVICE USERS
- TEMPORARY TONE DIALING (FOR ROTARY/PULSE SERVICE USERS)
- CALL SHARE
- IMPORTANT
- CALL PRIVACY
- USING THE OTHER LINE DURING A CALL
- HANDSET/BASE UNIT PHONEBOOK
- ADDING ENTRIES
- CHARACTER TABLE FOR ENTERING NAMES
- CORRECTING A MISTAKE
- GROUPS
- CHANGING GROUP NAMES
- FINDING AND CALLING A PHONEBOOK ENTRY
- HANDSET: [→]
- BASE UNIT: [SP-PHONE]
- SCROLLING THROUGH ALL ENTRIES
- SEARCHING BY FIRST CHARACTER (ALPHABETICALLY)
- SEARCHING BY QUERY
- SEARCHING BY GROUP
- EDITING ENTRIES
- ERASING ENTRIES
- ERASING AN ENTRY
- ERASING ALL ENTRIES
- CHAIN DIAL
- COPYING PHONEBOOK ENTRIES
- COPYING AN ENTRY
- COPYING MULTI ENTRIES
- COPYING ALL ENTRIES
- PROGRAMMABLE SETTINGS
- PROGRAMMING BY SCROLLING THROUGH THE DISPLAY MENUS
- 1 [MENU]
- PROGRAMMING USING THE DIRECT COMMANDS
- ONLY THE HANDSET CAN PROGRAM THE ITEM
- SPECIAL PROGRAMMING
- NIGHT MODE
- SETTING THE START AND END TIME
- TURNING NIGHT MODE ON/OFF
- ALARM
- REGISTERING A UNIT
- OPERATING ADDITIONAL UNITS
- ADDITIONAL HANDSETS
- REGISTERING A HANDSET TO A BASE UNIT
- 1 HANDSET
- 2 BASE UNIT
- 3 HANDSET
- DEREGISTERING A HANDSET
- USING CALLER ID SERVICE
- CALLER ID FEATURES
- MISSED CALLS
- PHONEBOOK NAME DISPLAY
- GROUP RINGER TONE FOR PHONEBOOK
- 2 [MENU]
- CALLER LIST
- VIEWING THE CALLER LIST AND CALLING BACK
- EDITING A CALLER'S PHONE NUMBER BEFORE CALLING BACK
- CALLER ID NUMBER AUTO EDIT FEATURE
- TURNING CALLER ID AUTO EDIT ON/OFF
- ERASING SELECTED CALLER INFORMATION
- ERASING ALL CALLER INFORMATION
- STORING CALLER INFORMATION TO THE PHONEBOOK
- 7 [OFF]
- MEMORY CAPACITY
- TURNING THE ANSWERING SYSTEM ON/OFF
- TO TURN ON
- TO TURN OFF
- CALL SCREENING
- GREETING MESSAGE
- RECORDING YOUR GREETING MESSAGE
- USING A PRE-RECORDED GREETING MESSAGE
- ERASING YOUR GREETING MESSAGE (RESETTING TO A PRE-RECORDED GREETING MESSAGE)
- PLAYING BACK THE GREETING MESSAGE
- LISTENING TO MESSAGES USING THE BASE UNIT
- OPERATING THE ANSWERING SYSTEM DURING PLAYBACK
- CALLING BACK (CALLER ID SUBSCRIBERS ONLY)
- ERASING ALL MESSAGES
- ERASING ALL MESSAGES FOR BOTH LINE 1 AND LINE 2
- LISTENING TO MESSAGES USING THE HANDSET
- PLAYING BACK MESSAGES FOR THE DESIRED LINE(S)
- OPERATING THE ANSWERING SYSTEM
- 3 [\~]
- ERASING ALL MESSAGES FOR THE DESIRED LINE(S)
- REMOTE OPERATION
- REMOTE ACCESS CODE
- USING THE ANSWERING SYSTEM REMOTELY
- VOICE GUIDANCE
- REMOTE COMMANDS
- TURNING ON THE ANSWERING SYSTEM REMOTELY
- ANSWERING SYSTEM SETTINGS
- NUMBER OF RINGS BEFORE THE UNIT ANSWERS A CALL
- FOR VOICE MAIL SERVICE SUBSCRIBERS
- CALLER'S RECORDING TIME
- TURNING THE CALL SCREENING ON/OFF
- VOICE MAIL MESSAGE INDICATION
- VOICE MAIL (VM) TONE DETECTION
- TURNING VM TONE DETECTION ON/OFF
- INTERCOM
- MAKING AN INTERCOM CALL
- ANSWERING AN INTERCOM CALL
- HANDSET LOCATOR
- TRANSFERRING CALLS
- 4 [OFF]
- ANSWERING A TRANSFERRED CALL
- CONFERENCE CALLS
- CONFERENCE CALL WITH 2 OUTSIDE CALLS
- CONFERENCE CALL WITH AN OUTSIDE CALL AND AN INTERCOM CALL
- NOTE FOR THE HANDSET AND BASE UNIT
- COPYING PHONEBOOK ENTRIES FROM A BLUETOOTH CELLULAR PHONE TO THE BASE UNIT (PHONEBOOK TRANSFER)
- 1 BASE UNIT
- 2 YOUR CELLULAR PHONE
- 3 BASE UNIT
- CHANGING THE BASE UNIT'S PIN (PERSONAL IDENTIFICATION NUMBER)
- USING A BLUETOOTH WIRELESS HEADSET (OPTIONAL)
- REGISTERING A HEADSET
- 1 YOUR HEADSET
- 4 BASE UNIT
- [OK]
- RECONNECTING A HEADSET
- CHANGING THE HEADSET CONNECTION (WHEN 2 HEADSETS ARE REGISTERED)
- DEREGISTERING A HEADSET
- OPERATING A BLUETOOTH WIRELESS HEADSET
- SWITCHING A CALL BETWEEN THE HEADSET AND BASE UNIT SPEAKERPHONE
- ADJUSTING THE HEADSET RECEIVER VOLUME
- LISTENING TO MESSAGES RECORDED ON THE BASE UNIT ANSWERING SYSTEM
- WALL MOUNTING
- BELT CLIP
- ERROR MESSAGES
- TROUBLESHOOTING
- FCC AND OTHER INFORMATION
- FCC RF EXPOSURE WARNING
- COMPLIANCE WITH TIA-1083 STANDARD
- AURICULAR
- CUSTOMER SERVICES DIRECTORY (UNITED STATES AND PUERTO RICO)
- ACCESSORY PURCHASES (UNITED STATES AND PUERTO RICO)
- WARRANTY (FOR UNITED STATES AND PUERTO RICO)
- PANASONIC TELEPHONE PRODUCTS LIMITED WARRANTY
- LIMITED WARRANTY COVERAGE
- PARTS
- LABOR
- ONE (1) YEAR ONE (1) YEAR
- SHIP-IN SERVICE
- APPENDIX
- LIMITED WARRANTY LIMITS AND EXCLUSIONS
- THERE ARE NO EXPRESS WARRANTIES EXCEPT AS LISTED UNDER "LIMITED WARRANTY COVERAGE". THE WARRANTOR IS NOT LIABLE FOR INCIDENTAL OR CONSEQUENTIAL
- EXPRESS AND IMPLIED WARRANTIES, INCLUDING THE WARRANTY OF MERCHANTABILITY, ARE LIMITED TO THE PERIOD OF THE LIMITED WARRANTY
- WHEN YOU SHIP THE PRODUCT
- FOR YOUR FUTURE REFERENCE
- PANASONIC CORPORATION OF NORTH AMERICA
- COPYRIGHT
Brand : PANASONIC
Model : KX-TG9382
Category : Cellphone