
APPTDTLCD - TV Tuner Approx - Free user manual and instructions
Find the device manual for free APPTDTLCD Approx in PDF.


| Product Type | DVB-T LCD TV Box / TV Tuner |
| Model | APPTDTLCD |
| Brand | Approx |
| Power Supply | DC 5V via included power adapter |
| Antenna Input | 75Ω unbalanced, Frequency 48.25–863.25 MHz |
| Video Output Resolutions | 4:3 up to 1280x1024@75Hz; 16:9 up to 1600x900@60Hz; 16:10 up to 1680x1050@60Hz |
| Frame Rate | 60Hz / 75Hz |
| Main Functions | DVB-T reception, Picture in Picture (PIP), USB media play (MP3/JPEG/MPEG-4), USB recording (MPEG-2), Teletext, EPG, Parental Lock |
| Input Interfaces | VGA IN, AV IN, S-Video IN, Audio IN, LINE IN (PC) |
| Output Interfaces | VGA OUT, Audio OUT, Video OUT |
| USB Port | 1x USB for media playback and recording |
| Remote Control | Full function infrared remote included (batteries: 2x AAA 1.5V) |
| OSD Languages | Multiple languages (selectable) |
| Games Included | Box Man, Tetris, Hit Rat |
| Package Contents | DVB-T Box, Remote, Batteries, VGA cable, Stereo audio cable, Power adapter, Antenna, User manual |
| Maintenance | Clean with a soft dry cloth; avoid liquids |
| Safety | Do not pull cables while device is on; use stable voltage; keep away from moisture |
| Spare Parts / Repairability | Contact technical support for service |
Frequently Asked Questions - APPTDTLCD Approx
User questions about APPTDTLCD Approx
0 question about this device. Answer the ones you know or ask your own.
Ask a new question about this device
Download the instructions for your TV Tuner in PDF format for free! Find your manual APPTDTLCD - Approx and take your electronic device back in hand. On this page are published all the documents necessary for the use of your device. APPTDTLCD by Approx.
USER MANUAL APPTDTLCD Approx
1. INTRODUCTION ......47
1.1 SPECIFICATION....47
1.2 TECHNICAL SPECIFICATION......47
1.3 PACKAGE LIST....48
2. PRODUCT DESCRIPTION......48
2.1 FRONT KEY-PRESS INSTRUCTION....49
2.2 BACKSIDE INTERFACES....49
2.3 REMOTE CONTROL INSTRUCTION....51
3. HARDWARE INSTALLATION....52
4. BASIC FUNCTIONS....52
4.1 ENTER INTO SYSTEM AND POWER ON-OFF....52
4.2 VOLUME ADJUSTMENT AND MUTE....53
4.3 TV/RADIO PROGRAMS SWITCH....53
4.4 STATION SWITCH....53
4.5 DISPLAY INFORMATION OF PROGRAMS....54
4.6 PROGRAM RECALL....54
4.7 AUDIO LANGUAGE SWITCH AND L/R CHANNEL SWITCH.....55
4.8 ELECTRONIC PROGRAMS GUIDE (EPG)......55
4.9 TELETEXT....57
4.10 SUBTITLE....57
5. MAIN MENU....58
5.1 INSTALLATION....59
5.1.1 AREA SEARCH....59
5.1.2 MANUAL SEARCH....60
5.1.3 AUTO SEARCH....61
5.2 CHANNEL MANAGER....62
5.2.1 CHANNEL ORGANIZER....62
5.2.2 CHANNEL SORTING....64
5.2.3 CHANNEL GROUPING 65
5.2.4 EDIT CHANNEL......66
5.2.5 DELETE ALL....67
5.3 CONFIGURATION....68
5.3.1 OSD....68
5.3.2 TV....70
5.3.2.1 Display Mode....70
5.3.2.2 Aspect Ratio....71
5.3.2.3 Video Output....71
5.3.2.4 Brightness....71
5.3.2.5 Contrast....72
5.3.2.6 HUE 72
5.3.2.7 Saturation....72
5.3.3 SYSTEM SETUP....73
5.3.4 TIME....74
5.3.5 WAKEUP TIMER....75
5.3.6 PARENTAL LOCK....77
5.4 SOFTWARE UPGRADE....78
5.5 VERSION....78
- USB MEDIA PLAY....78
6.1 USB MOVIE....79
6.2 USB MUSIC....79
6.3 USB PHOTO....80
- GAMES....80
7.1 BOX MAN....80
7.2 TETRIS....81
7.3 HIT RAT....82
- OTHER FUNCTIONS......82
8.1 CHOOSE VGA OUTPUT RESOLUTION....82
8.2 VCD OR DVD INPUT OPERATION....83
8.3 PICTURE IN PICTURE OPERATION....83
1. INTRODUCTION
Thank you for purchasing this DVB-T LCD TV Box of Approx. It adopts the newest digital video processing technology, built-in 3D technology, and do not require any other software or hardware installation. The high resolution output and refresh rate provides high quality picture, and reduces screen flicker.
1.1 SPECIFICATION
• Full channel scan, support DVB-T TV system
- Adopt advanced digital technology, output resolution up to:
- (4:3) 800*600*60Hz, 800*600*75Hz, 1024*768*60Hz, 1024*768*75Hz, 1280*1024*60Hz, 1280*1024*75Hz
- (16:9) 1280*720*60Hz, 1280*720*75Hz, 1600*900*60Hz
- (16:10) 1440*900*60Hz, 1440*900*75Hz, 1680*1050*60Hz
• Picture in picture function, display the picture of DVB-T TV program on the computer desktop
• Full functional remote control, OSD displaying and very convenient operating
- With VIDEO, S-VIDEO interfaces, capable of connecting with camera, VCD or TV game console
• Support Video Out function
- Support recording the DVB-T TV program into your U-Disk or HDD-Disk on MPEG-2 format through the USB interface
- Support playback Video files, Audio files, Still image files inside your U-Disk or HDDDisk
1.2 TECHNICAL SPECIFICATION
• Frame Frequency: 60Hz/75Hz
• Line Frequency: 31KHz-80KHz
• Antenna: 75Ω unbalance mode
• Frequency range: 48.25MHz\~863.25MHz
1.3 PACKAGE LIST
• DVB-T Recorder box 1 pcs
- User's manual 1 pcs
• Full functional remote control 1 pcs
- AAA1.5V battery 1 pair
- VGA cable 1 pcs
- Stereo audio cable 1 pcs
• Power Adapter 1 pcs
• DVB-T Antenna 1 pcs
2. PRODUCT DESCRIPTION

2.1 FRONT KEY-PRESS INSTRUCTION

flowchart
graph LR
    A["POWER"] --> B["SOURCE"]
    B --> C["MENU"]
    C --> D["VOL-"]
    D --> E["VOL+"]
    E --> F["CH-"]
    F --> G["CH+"]
- POWER (power key): Switch between the PC status and TV status.
- SOURCE (video switch key): Switch among TV, VIDEO, and S-VIDEO signal sources.
- MENU (menu key): Open/Close MENU
- VOL+/VOL- (volume up/down key): TV volume up/down key. And work with menu key to choose each item parameter.
- CH+/CH- (channel up/down key): TV channel up/down key. And work with menu key to choose each item parameter.
2.2 BACKSIDE INTERFACES

- S-VIDEO IN (video input end): Connecting with s-video devices such as: camera, VCD, DVD.
• AV IN (video input end): Connecting with video devices such as: camera, VCD, DVD.
• AUDIO IN: Connecting with DVD/VCD stereo audio output end, to realize stereo sound function.

• AUDIO OUT (audio output end): Connecting to the external speakers (if available) to output sound of TV programs or connected devices such as VCD/DVD.
• LINE IN (stereo audio cable input end): Connecting with the stereo audio cable to the PC sound card.
- DC 5V (power supply): Connecting with the power adapter.
- VGA IN (VGA input end): Connecting with VGA cable, the other end of VGA cable connected with PC display.
• VGA OUT (display switch): Connecting with the monitor.
• VIDEO OUT: Connect to AV IN of TV or FM Antenna.
- DTV (antenna switch): Connecting with the antenna.
- USB Port
2.3 REMOTE CONTROL INSTRUCTION

• (Power key): Switch between the PC status and TV status
• (Mute key): Turn off TV voice and renew it
• 0-9 (Num key): Press 0-9 Num key to choose the channel you like
- -/-- (Single/double key): Choose single or double number channel (working with Num key)
• TV/RADIO (TV/Radio switch key): Switch between DVB-T TV and Radio
- RECALL: Switch between the current channel and the last channel watched
- EPG: Go to Electronic program guide interface
• TELTEXT: Go to Teletext interface
- SUBTITLE: Display subtitle information
• FAVORITE: The favorite channels list
• TV FORMAT: Not defined
- RETURN: Return to upper menu
• LIST: Display the TV program list
• REC/STOP: Recording the TV program into the U-Disk or HDD-Disk
• Key: Fast backward for media play function
• (FF key): Fast forward for media play function
• PAUSE: Pause the TV program and Media playing
- RESUME: Resume the TV program and
Media playing
- Preview program
• Next program - SOURCE: Switch between TV/S-Video/Composite status
• PICTURE: Switch among different color temperature
• LANG: Display the language of audio under TV mode
• DISPLAY: Display the information of the TV channel - PIP: Enter into PIP mode
• PREVIEW: Preview the TV channels
• MODE: Switch among the display resolution - SETTING: Setting the status of the OSD
• (UP/DOWN, LEFT/RIGHT): Direction key and selection
3. HARDWARE INSTALLATION
Turn off the computer when installing the hardware. Turn on the computer after firmly connecting hardware to it. Please don't pull and plug any cable or interface when the DVB-T LCD TV box is working, otherwise it will be possibly damaged.
When it is started for the first time, the settings of the TV Box are of default values.
4. BASIC FUNCTIONS
4.1 ENTER INTO SYSTEM AND POWER ON-OFF
Please check up whether it is good connection with power, whether the voltage is stable, whether the antennae is connected, and whether there is any physical damage to the circuit board.
1. Enter into DVB system
It will enter DVB mode as soon as system power on. The figure below shows the system interface while none TV/RADIO programs in the database:

It will continue to play the latest program before previous power off if the database having and TV or RADIO program.(If failed to enter into the mode, please check above operations and ensure the remoter works well).
2. Power on
When it is in "standby" mode, press "power" to power on.
3. Power off
When it is running, press "power" will enter into "standby" mode.
4.2 VOLUME ADJUSTMENT AND MUTE
-
Press "LEFT/RIGHT" to adjust volume when system is in normal playing mode; and it will show volume bar on the image.
-
Press "MUTE" to enter into the mode when normally playing and re-press "MUTE" to back the normal state.
4.3 TV/RADIO PROGRAMS SWITCH
Press "TV/RADIO" to switch the programs when it is in full screen.
4.4 STATION SWITCH
- Press "UP/DOWN" to switch to the previous or next program.
Press "OK" to switch to the speediness program list, press "LEFT/RIGHT" to select different program class; press "UP/DOWN" to select program.
Press "OK" to affirm program selection, press "RETURN" return to hide menu.
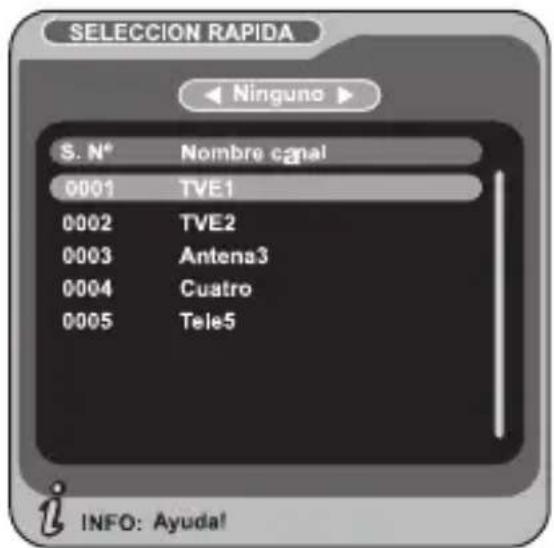
Press number keys to input program number.
If there are some favorite programs that been set up, just press "FAVORITE" key to enter into the favorite program list:

Press "UP/DOWN" to select favorite program, Press "OK" affirm the selection, press "RETURN" to return to hide menu.
4.5 DISPLAY INFORMATION OF PROGRAMS
Press key "DISPLAY" to show the information of current programs when it is in normal playing state.
4.6 PROGRAM RECALL
Press “RECALL” under state of full-screen to return to the previous program played.
4.7 AUDIO LANGUAGE SWITCH AND L/R CHANNEL SWITCH
- Press "LANGUAGE" key to switch the language of sound of current programs and switch among "stereo"/ "left"/ "right" (stereo/ left channel/right channel).

- Press "LEFT/RIGHT" to switch among "stereo"/ "left"/ "right" (stereo/left channel/ right channel), press "UP/DOWN" to switch the language of sound.
Press "OK" key confirm the selection and return to full-screen play mode, press "RETURN" to return to full-screen play mode but not save the setting.
4.8 ELECTRONIC PROGRAMS GUIDE(EPG)
- You can press key "EPG" on the remote controller to enter into the EPG page to know more about the programs to be played.
Enter into EPG menu default enter Daily Mode, menu under this mode contain 7 parts.
(1).Tab 1 shows the Title.
(2).Tab 2 shows time and date list.
(3).Tab 3 shows particular date list.
(4).Tab 4 shows program list, press "UP/DOWN" to switch between programs.
(5). Tab 5 shows the time range and program information, press “F.R & F.F” circularly to choose to browse the time range and program information on basis of days of every week.
(6). Tab 6 shows the detailed program information in Tab 5;
(7). Tab 7 shows hint information for keys, corresponding to the four colors on the remote controller: ZOOM,A-B,3D,ANGLE.
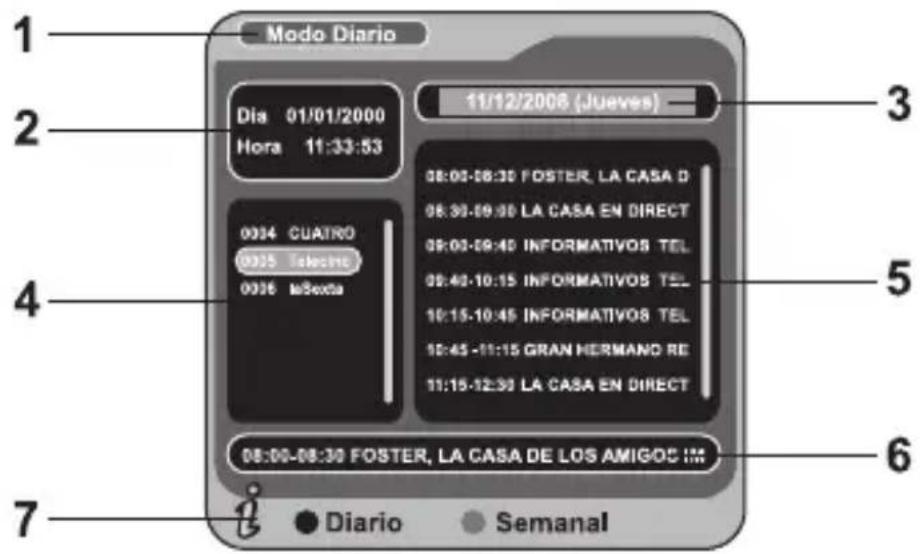
Press "LEFT/RIGHT" to switch between Tab 4 and Tab 5;
- Press “A-B” key to enter into Weekly Mode to display the programs and program information in different time ranges of the current program list within one week.
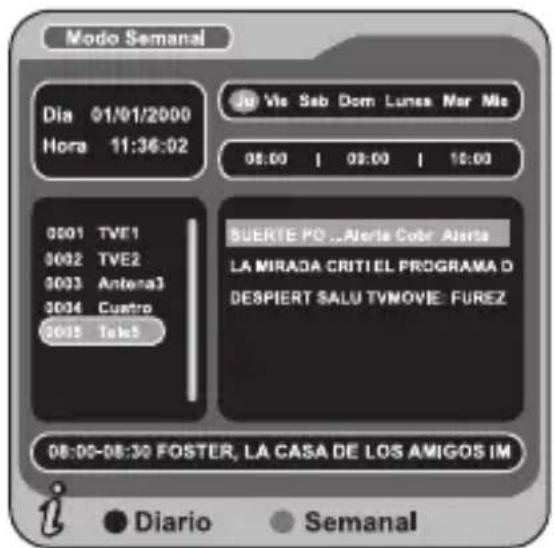
(1). Press F.R & F.F key to switch between Sunday - Saturday in Tab 3;
(2). Press UP/DOWN key to move upward and downward to switch between the different programs in Tab 5;
(3). Press LEFT/RIGHT key to choose to view the program information in different time ranges in Tab 6.
- When the cursor stops on Tab 5 or Tab 6, press the yellow 3D key to
choose the detailed information corresponding to the current program.
-
When the cursor stops in Tab 5 or Tab 6, press the blue ANGLE key to enter Wakeup Timer menu to book programs.
-
Press "RETURN" to exit from EPG.
4.9 TELETEXT
- If you want to watch teletext, please press "TELTEXT" on the remote controller to enter into EPG page.

-
Input three digits to go to corresponding page you want
-
Press "UP" to go to the previous page, while press "DOWN" to go to the next page;
-
Press "LEFT" to back for 100 pages, while press "RIGHT" to advance for 100 pages.
-
Press "TELTEXT" or "RETURN" to exit from teletext.
4.10 SUBTITLE
- Subtitle is defaulted to be off; to see the capitation information, press the SUBTITLE key on the remote controller to enter the Subtitle menu of the current programs.

Press LEFT/RIGHT key to choose whether to open Subtitle, press UP/DOWN key move upward and downward to choose language.
5. MAIN MENU
In the main menu of the system, under Digital TV, there are such options as auto TV search or broadcast programs, program management, system setup, software update and software version information view etc.
After the platform is opened,, as shown in, to set some information about Digital TV, enter Digital TV menu of the system; and press MENU key firstly to enter the main menu.

There are three kinds of Installation mode as follow:
- Area Search: searching programs by scan area;
- Manual Search: Search channels manually
• Auto Search: Search channels automatically
You can enter into parameter "installation page" via input password digital (default password is "0000").

Area search is a kind of intelligent and convenient mode of programs searching, which covers programs of all frequent points of target countries or regions. At present, this system covers many targets countries and regions including: Germany/ England/ Italy/ France/ Spain/ Holland/
Taiwan/ China/Norway/Finland;
The default country(region) of system is Spain (you can select target countries you want under system setting-->scan Area).
You can move the cursor to “area search” via press “UP/DOWN” key under “installation menu”, then press “OK” to enter into area searching page.
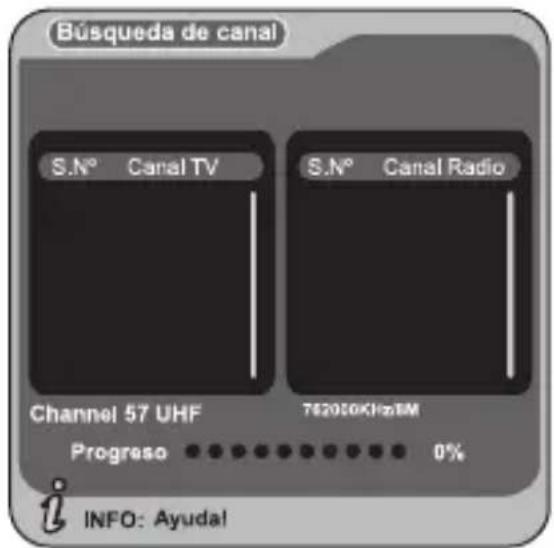
After entering into area search page, system will scan all programs one by one under frequency points of current countries or regions selected automatically.
During scanning, press "RETURN" key to stop and exit scanning.
If any program is detected and the scanning process is finished, system will exit the scanning page and save the program, at the same time return to the “installation menu” and to play them in vpp window automatically.
5.1.2 MANUAL SEARCH
If you understand much about digital TV and know the frequency of the program or if you want to scan the program at any frequency required, you can select manual scanning, which can save your much time.
You can move the cursor to “area search” via press “UP/DOWN” key under “installation menu”, then press “OK” to enter into area searching page.
- Prior manual scanning, you need to configure relevant parameters including:
- Freq (KHz): the default frequency is 474000KHz, you can input
relevant digits to modify it.
- Band Width: the default value of bandwidth is 64MHz. While you can set it to 6MHz,7MHz,8MHz.
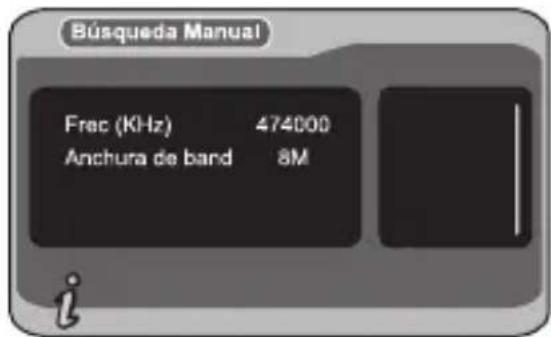
- Press "OK" key after configuration of parameters to start manual scan.
- If any program is detected and the scanning process is finished, system will exit the scanning page and save the program, at the same time return to the “installation menu” and to play them in vpp window automatically.
5.1.3 AUTO SEARCH
You can search the programs of any channel.
- You can move the cursor to “area search” via press “UP/DOWN” key under “installation menu”, then press “OK” to enter into area searching page.

-
Prior to auto searching, you need to configure relevant parameters including:
-
Start Freq (KHz): the default frequency is 474000 KHz. You can input relevant digits to modify it.
- End Freq (KHz): the default frequency is 474000 KHz. You can input relevant digits to modify it.
- Band Width: the default value of bandwidth is 64MHz. While you can
set it to 6MHz, 7MHz, and 8MHz.
- Press "OK" key after configuration of parameters to start manual scan.
- If any program is detected and the scanning process is finished, system will exit the scanning page and save the program, at the same time return to the “installation menu” and to play them in vpp window automatically.
5.2 CHANNEL MANAGER
System offer an efficient function of channel management such as channel deleting, marking, moving, locking, sorting and grouping.
There are two independent pages for channel management, TV and RADIO. You can enter the page via “digital TV-->channel manager”.

5.2.1 CHANNEL ORGANIZER
Channel organizer page includes favorite channels, channel deleting, moving, locking and rename.
- You can enter the page as shown in the figure below via "MENU->Digital TV->Channel Manager -> Channel Organizer".

- It will pop up and dialogue box prompting that "Channel not available" when there are no channels in database to enter into, and it will not enter into channel organizer page.
Channel Organizer menu includes: Favorite Channel, Delete Channel, Skip Channel, Lock Channel. Press UP/DOWN key to choose the line where Favorite Channel is, then press the 4-color key on the remote controller:
- Press the red ZOOM key to set and cancel Favorite Channel
- Press the green A-B key to set or cancel Delete Channel
- Press the yellow 3D key to set or cancel Skip Channel
-
Press the blue ANGLE key to set or cancel Lock Channel; After setting, corresponding figure will appear.
-
To rename channel, press UP/DOWN key to choose the line where the channel to be renamed is, press LEFT/RIGHT key to enter the page to rename the channel.
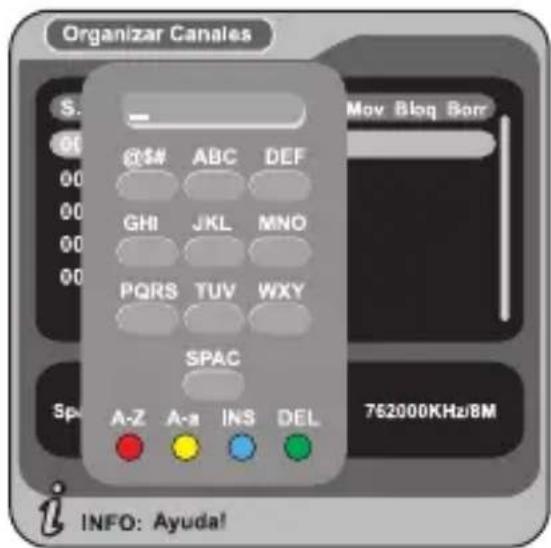
After program editing, to edit the program, press OK key; to set or cancel Lock Program, the system will hint to input "0000"; to set Delete Program, the system will hint to choose dialogue box "Do you want to delete the selected items?". Press LEFT/RIGHT key to choose "Yes" to delete the program chosen, "No" to cancel;
Press RETURN key to exit Channel Organizer page.
5.2.2 CHANNEL SORTING
- The channels shall be listed according to certain sequence so that the user can easily find them. You can enter the page As shown in the figure below via “MENU->Digital TV-> Channel Manager -> Channel Sorting”:

-
It will pop up and dialogue box prompting that "Channel not available" when there are no programs in database to enter into, and it will not enter into channel sorting page.
-
Before sorting, the type of sorting shall be set, including the following items:
-
First Option: choose the programs to be sorted via the selection area;
-
Second Option: Press FTA (free of charge), Scramble (encrypted), ALL (Free and Encrypted Channels).
• Third Option: According to alphabetic order A-Z, or Z-A. -
Press UP/DOWN key choose Type, Press LEFT/RIGHT key to set Sorting Parameters.
- After sorting is set, to realize channel sorting, press OK key, then the system will hint with the dialogue box "Are you sure?". To choose "Yes" to confirm, you can see the programs in the program list; to choose "No" to cancel, you can return to Channel Sorting page;
Press RETURN key to exit Channel Sorting page.
5.2.3 CHANNEL GROUPING
Group channels according to Movies, Sport, Music, Kids, Fashion etc.
You can enter the page As shown in the figure below via "MENU->Digital TV-> Channel Manager -> Channel Grouping":

It will pop up and dialogue box prompting that “Channel not available” when there are no programs in database to enter into, and it will not enter into channel grouping page.
Press UP/DOWN key to choose the line where the channel to be grouped is in, then press the number keys 1-8 on the remote controller to set different channel grouping.
After channel is edited, when RETURN key is pressed to exit the menu, if actual channel editing action exists, the system will carry out channel grouping renewal, with the hint of “Update succeeds”.
5.2.4 EDIT CHANNEL
Have such operations as Add, Delete and Rename to channels.
You can enter the page as shown in the figure below via "MENU->Digital TV-> Channel Manager -> Edit Channel":

It will pop up and dialogue box prompting that “No Carriers” when there are no programs in database to enter into, and it will not enter into ADD-Edit Channel page.
Press the red key ZOOM of the remote controller to enter Add Channel menu.

Under Add Channel menu, there are 6 parameters for adding one channel as follows:
- Area Name: For Area Name, press the RIGHT key of the remote controller to enter the Area Name list on the right, then press UP/DOWN key to choose area name, press OK key to confirm.
- Carrier: Press LEFT/RIGHT key to choose;
- Channel Name: Press LEFT/RIGHT key to enter Rename Channel page.
- Audio PID, Video PID, PCR PID: Press 0-9 number key to revise values;
Press OK key to confirm the adding, the system will hint with "Update succeeds" and return to Edit Channel menu;
Press RETURN key to return to Edit Channel page.
Press the yellow 3D key of the remote controller to enter Rename Channel menu. The operation for this menu is as that of for Add Channel page.
5.2.5 DELETE ALL
If you do not like one or some channels, you can delete it/them in Channel Organizer menu (Chapter 5.2.1), but, if you do not like all TV or Radio, you can enter Delete All menu to choose to delete all TV, RADIO, Carriers.
Under Channel Manager menu, press UP/DOWN key to choose Delete All option, press OK key again, then the system will hint with the dialogue box of inputting password which is defaulted as “0000”, input the proper password via the 0 \~ 9 number key of the remote controller, then enter Delete All menu.
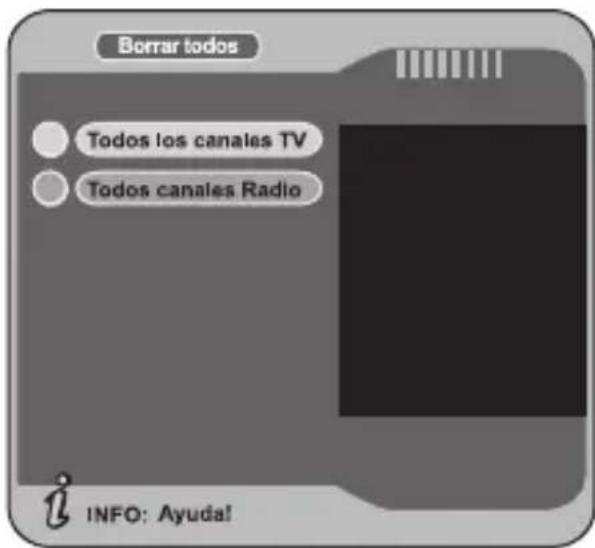
To delete all TV channels, press UP/DOWN key to move the cursor to ALL TV Channels option, press OK key, then the system will hint with "Delete all TV Channels?" dialogue box.
Press LEFT/RIGHT key to choose "Yes" or No", press OK key to confirm.
To delete all RADIO channel, press UP/DOWN key move the cursor to ALL Radio Channels option, press OK key, then the system will hint with "Delete all Radio Channels?" dialogue box, press LEFT/RIGHT key to choose "Yes" or "No", press OK key to confirm; To delete all Carriers and delete all TV and Radio channel, press UP/DOWN key to move the cursor to ALL Carriers option. Press OK key, then the system will hint with "Delete all Carriers?" dialogue box, press LEFT/RIGHT key to choose "Yes" or "No", press OK key to confirm.
5.3 CONFIGURATION
Configuration provides individualized system setup function, you can configure the system according to your own hobby and demand. You can enter Configuration menu via the menu(MENU->Digital TV->Configuration).
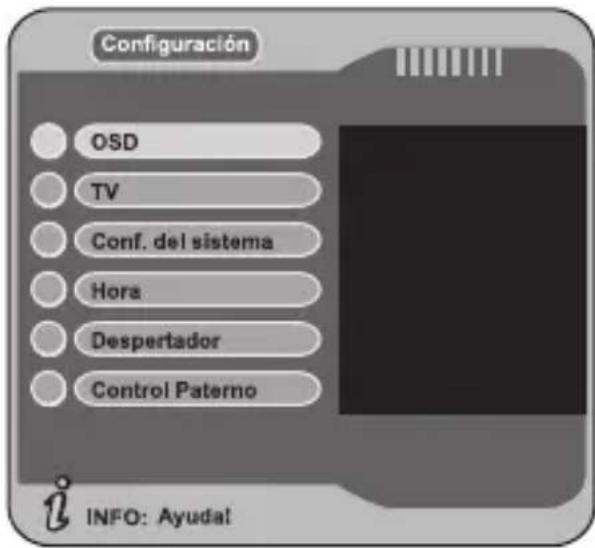
Via OSD option setup, you can set the user interface display mode according to your own demand. Via the menu (MENU -> Digital TV -> Configuration -> OSD), you can enter OSD menu.
All options are listed on the left of the OSD menu, when the cursor moves on the option in OSD menu, the values corresponding to this option on the right of the menu, press UP/DOWN key to move upward and down-
ward to choose the options in OSD menu.

There are following options in OSD menu:
- OSD Option sets system menu mode; currently, one mode is supported.
- Time on OSD Option sets whether to display system time in full-screen play channel. Move the cursor to Time on OSD option, press LEFT/RIGHT key to choose between On and Off, the default is Off.
- OSD Timeout Option sets some information hint dialogue box and displays time length, move the cursor to OSD Timeout Option, press LEFT/RIGHT key to choose among 1-16s, the default is 3s;
- Position Option sets channel information hints dialogue box display position in full-screen display channel. Move the cursor to Position option, press LEFT/RIGHT key to choose circularly between Bottom and Top;
- Trans option sets menu transparency, press LEFT/RIGHT key to adjust between 0% - 60%.
- OSD Language option: The system has the user interface supporting a couple of languages, you can set language via OSD Language option:
- Move the cursor onto OSD Language option. Press RIGHT key to enter OSD.
- Press LEFT/DOWN key to choose language.
- Press OK key to confirm system interface language selection, then the setting is effective, and then the interface language turns into the currently chosen language, the cursor can move onto OSD Language option on the left.
- 1st Audio Language option: Press RIGHT key to enter the currently supported Audio Language list, in the Audio Language list, press UP/DOWN key to choose language, press OK key to confirm.
- 2nd Audio Language option: Press RIGHT key to enter the currently supported Audio Language list, in the Audio Language list, press UP/DOWN key to choose language, press OK key to confirm;.
Press OK key to confirm the editing action in OSD menu, the system will hint with "Update succeeds" and then return to the previous menu.
5.3.2 TV
TV setup provides convenient TV input mode, you can via menu (MENU -> Digital TV -> Configuration -> TV) enter TV set.

All options are listed on the left of the menu, when the cursor moves to the option on the left of the TV menu, the values corresponding to this option can be displayed on the right of the menu.
5.3.2.1 Display Mode
TV mode can change the mode of the output video, you can adjust TV mode according to the actual situation of you receiving equipment.
(1) Move the cursor to Display Mode option, press LEFT/RIGHT key to choose circularly among the options, and the TV mode set can be effective immediately;
(2) TV Mode can be set as Auto, PAL, NTSC;
(3) Default TV Mode: AUTO;
(4) Press OK key to save the setting, the system will hint with "Update succeeds".
5.3.2.1 Aspect Ratio
Video output mode can change the mode of video output, you can adjust TV mode according to the actual situation of you receiving equipment.
(1) Move the cursor to Aspect Ratio option, press LEFT/RIGHT key to move circularly and choose options.
(2) Aspect Ratio can be set as 16:9, 4:3 PanScan, 4:3 LetterBox.
(3) Default Aspect Ratio 4:3 PS.
(4) Press OK key to save the setting, the system will hint with "Update succeeds".
5.3.2.2 Video Output
Video Output mode can change the mode of video output, you can adjust TV mode according to the actual situation of you receiving equipment.
(1) Move the cursor to Video Output option. Press LEFT/RIGHT key to move circularly and choose options and the setting can be effective.
(2) Video Output mode can be set as CVBS, RGB, P-YUV, P-RGB, S-Video.
(3) Default: RGB.
(4) Press OK key to save set, the system will hint with "Update succeeds".
5.3.2.3 Brightness
If the brightness is not proper during watching, you can adjust the current brightness to be a proper one.
(1) Move the cursor to Brightness option, press RIGHT key to move the cursor into the Properties list on the right.
(2) Press UP/DOWN key to move upward and downward the cursor to choose, press OK key to confirm; in this moment, move the cursor onto the options on the left, and then values will become the ones you want.
(3) Brightness can be set as: 0%, 10%, 20%, 30%, 40%, 50%, 60%, 70%, 80%, 90% or 100%.
(4) Default: 80%.
(5) Press OK key to save the setting, the system will hint with "Update succeeds".
5.3.2.4 Contrast
You can set system contrast via Contrast option.
(1) Move the cursor to Contrast option, press RIGHT key to move the cursor into the Properties list on the right.
(2) Press UP/DOWN key to move upward and downward the cursor to choose, press OK key to confirm, in this moment, move the cursor onto the options on the left, and then values will become the ones you want.
(3) Contrast can be set as: 0%, 10%, 20%, 30%, 40%, 50%, 60%, 70%, 80%, 90% or 100.
(4) Default: 80%.
Press OK key to save the setting, the system will hint with “Update succeeds”.
5.3.2.5 HUE
Adjust the system hue.
(1) Move the cursor to HUE option. Press RIGHT key to move the cursor into the Properties list on the right.
(2) Press UP/DOWN key to move upward and downward the cursor to choose, press OK key to confirm, in this moment, move the cursor onto the options on the left, and then values will become the ones you want.
(3) Hue can be set as: -6, -5, -4, -3, -2, -1, 0, 1, 2, 3, 4, 5 or 6.
(4) Default: 0.
Press OK key to save set, the system will hint with "Update succeeds".
5.3.2.6 Saturation
Adjust system saturation.
(1) Move the cursor to Saturation option. Press RIGHT key to move the cursor into the Properties list on the right.
(2) Press UP/DOWN key to move upward and downward the cursor to choose and press OK key to confirm, in this moment, move the cursor onto the options on the left, and then values will become the ones you want.
(3) Saturation can be set as: 0-12.
(4) Default: 0.
(5) Press OK key to save set, the system will hint with "Update succeeds".
5.3.3 SYSTEM SETUP
System Setup menu can provide convenient system setup, you can via menu (MENU -> Digital TV -> Configuration -> System Setup) enter System Setup menu. In System Setup menu:
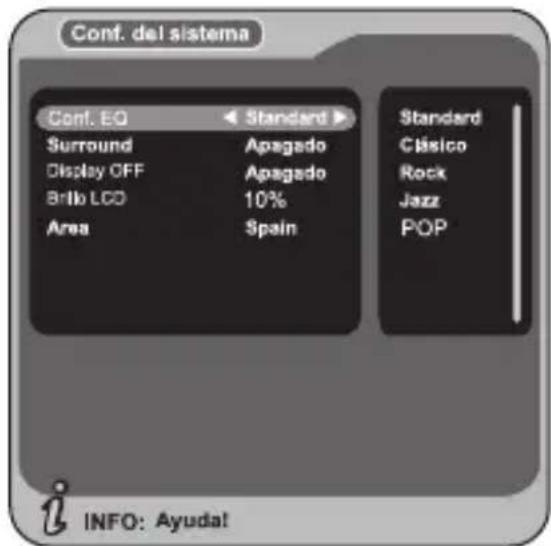
(1) Press UP/DOWN key to move upward and downward the cursor to choose option;
(2) When the cursor stays on the option: Press LEFT/RIGHT key to choose circularly among the values in this option or press RIGHT key to move the cursor into the right list. Press UP/DOWN key to move upward and downward the cursor to choose, press OK key to confirm.
(3) To edit the option in the System Setup menu, press OK key to save the information and return previous menu.
(4) Press RETURN key to return the previous menu.
| Items Purposes | Options | |
| EQ setting | To set output sound effect. | Standard, Classic, Rock, Jazz, POP; default: Standard |
| Surround To | set stage effect. | OFF, Concert, Church, Passive, Live; default: OFF |
| Area | To set scanning area and choose, choose area to download preset channel settings. | Germany/ England/ Italy/ France/ Spain/ Holland/ Taiwan/ China/ Norway/ Swead/ Finland supported, depending on different version. |
5.3.4 TIME
Via menu (MENU->Digital TV->Configuration -> Time), enter time set. You can set Timer Mode in Time page:

- Timer Mode: set time mode
- Date: set date
- Time: set time
• GMT Offset: set GMT Offset - Summer Time: set summer time
In Time menu, there are two time modes, one is Auto setting: revise via setting GMT Offset, Summer Time options; the other is Manual setting: revise via setting Date, Time options. When the cursor moves onto Timer Mode option, press LEFT/RIGHT key to choose time mode.
- The system defaults the setting as Automatic, press UP/DOWN key to move upward and downward the cursor to move only between Timer Mode, GMT Offset and Summer Time.
(1) Move the cursor to GMT Offset option. Press RIGHT key to move
the cursor into the Properties list on the right.
(2) Press UP/DOWN key to move upward and downward the cursor to choose, you can see corresponding change in Time option. Press OK key to confirm;.
(3) Move the cursor to Summer Time option, and then press LEFT/RIGHT key to set Summer Time.
- When the setting is Manual, press UP/DOWN key to move upward and downward the cursor to move only between Timer Mode, Date and Time.
(1) Set Date option, move the cursor upward and downward onto Date option, press LEFT/RIGHT key to enter date setting menu.
In date setting menu, press DISPLAY key to eject key help information.
(2) Move the cursor upward and downward to Time option, press 0-9 number key to revise values.
(3) After time is set, press OK key to save the setting, the system will hint with "Update succeeds".
5.3.5 WAKEUP TIMER
If you want to set channel playing at certain time or giving some hint information such as Birthday. You can set via Wakeup Timer menu.

In Wakeup Timer menu, you can set Timer No: set Wakeup event number, the system can support at most 8 events:
- Timer Mode: set time mode
-
Wakeup Mode: set wakeup mode
-
Wakeup Message: set wakeup message
- Wakeup Channel: set wakeup channel name
- Wakeup Date: set wakeup date
• On Time: set wakeup time
• Duration: set duration
Hint with some related message at certain time:
(1) Set Wakeup Time Event Number: Move the cursor upward and downward to Timer No. option. Press RIGHT key to move the cursor onto the right list. Press UP/ DOWN key to choose event number. Press OK key to confirm.
(2) Set Wakeup Time mode: Set as off, move the cursor to Timer Mode option. Press LEFT/RIGHT key to move circularly and choose among options, time mode options include Off, Once, Daily, Weekly, Yearly.
(3) Set Wakeup mode: move the cursor to Wakeup Mode option, this option has 4 options as: OFF, Message, Channel, On. Press LEFT/RIGHT key to choose Message.
(4) Move the cursor to Wakeup Message option. Press LEFT/RIGHT key to choose Wakeup message information, the system will support Birthday, Anniversary, General;
(5) Set date: move the cursor to Wakeup Date option. Press LEFT/RIGHT key to enter date setting menu.
(6) Set time: move the cursor to On Time option. Press 0-9 number key on the remote controller to revise time;
(7). Press OK key the system will hint with "Update succeeds". Press RETURN key to return previous menu.
Preset Channel:
(1) Set Wakeup Time Event Number: Move the cursor onto Timer No. option, press RIGHT key to move the cursor onto the list on the right, press UP/DOWN key to choose event number, press OK key to confirm;
(2) Set Wakeup time mode: Default is Off, move the cursor to Timer Mode option Press LEFT/RIGHT key move circularly and choose among options, time mode options include Once, Daily, Weekly, Yearly.
(3) Set Wakeup mode: This option has 4 options as OFF, Message, Channel, On. Press LEFT/RIGHT key to choose as Channel. If there is no channel in the database, this option cannot choose Channel;
(4) Move the cursor upward and downward to Wakeup Channel option. Press RIGHT key to move the cursor onto the list on the right. Press UP/DOWN key to choose Preset Channel, Press OK key to confirm;
(5) Set Date: move the cursor to Wakeup Date option. Press LEFT/RIGHT key to enter date set menu.
(6) Set Time: move the cursor to On Time option, Press 0 -9 number key on the remote controller to revise time.
(7) Set Continuous Time: Move the cursor to Duration option, Press 0 - 9 number key on the remote controller to revise time.
(8) Press OK key, the system will hint with "Update succeeds". Press RETURN key to return the previous menu.
5.3.6 PARENTAL LOCK
You can revise system Password, you can via menu (MENU->Digital TV -> Configuration -> Parental Lock) to enter Parental Lock menu.

-
Press the 0-9 number key on the remote controller to input Old Password, the system defaults Password as "0000".
-
If the password is input correctly, the cursor can move onto Input New Password option, press 0-9 number key on the remote controller to input new 4-digit Password.
The cursor move Confirm New Password option. Press 0-9 number key
press on the remote controller to input new 4-digit Password. If it is confirmed the new password is different from the new Password input, the system will hint to input new password again, until they are consistent. After the password is set successfully, the system will hint the success and save the setting, and the new password will come into effect.
5.4 SOFTWARE UPGRADE
You can automatically update the software of the equipment. The software of the new version can support more areas and more functions or solve more problems.
Via menu (MENU->Digital TV-> Software Upgrade) enter Software Upgrade menu.

Via menu (MENU->Digital TV->Version), enter the page. You can be provided with system software information, including H/W Version, S/W Version, Tuner Type, Date, Time, Press RETURN key to return previous menu.
6. USB MEDIA PLAY
This solution integrates powerful function to support USB and you can connect Ex-equipments via the USB. At present, system can support usual USB media players and upgrade to system software.
This product supports the play of MP3, JPEG and MPEG-4 (AVI). It can support only the files displaying in the list and the file format this product plays.
- Copy media document to USB;
- Plug in USB device;
- Enter device in main menu.
6.1 USB MOVIE
- In main menu, press UP/DOWN to choose USB Movie option. Press OK key to confirm, enter USB main directory.
Press OK key to enter next directory, every directory displays only movie file and folder name.
- Press RETURN key to return to previous directory ;
- Press UP/DOWN key to choose movie file name;
- Press OK key to play movies;
- Press FF key to play movie quickly( ×2, ×4, ×8, ×20, ×1);
- Press REW key to rewind movie ( ×2, ×4, ×8, ×20, ×1);
- Press PREV key to play previous movie, NEXT key to play next movie;
- Press LANGUAGE key to switch between the left and right channel and stereo;
- Press PAUSE key to pause;
- Press RESUME to replay.
All movies can be replayed after paused during playing ;
Press RETURN key to exit movie play mode and return to the file directory.
6.2 USB MUSIC
- In main menu, press UP/DOWN to choose USB Music option, to choose OK key to confirm, enter USB main directory.
- Press OK key to enter next directory, every directory can show music file and folder name only.
Press RETURN key to return to the previous directory.
-
Press UP/DOWN key to choose music file name;
-
Press OK key to play music file.
-
Press FF key to play quickly( ×2, ×4, ×8, ×20, ×1);
-
Press REW key to rewind music ( ×2, ×4, ×8, ×20, ×1);
- Press PREV key to play previous music, press NEXT key to play next music;
- Press LANGUAGE key to switch between the left and right channel and stereo;
- Press PAUSE key to pause music;
- Press RESUME to replay the music;
- Press RETURN key to exit the music play mode and return to the file directory.
6.3 USB PHOTO
- In main menu, press UP/DOWN to choose USB Photo option. Press ENTER key to confirm, enter USB main directory.
- Press OK key to enter next directory, every directory can show photo file and folder name.
Press RETURN key to return to the previous directory;
- Press UP/DOWN key to choose photo file name;
- Press OK key to play Photo file;
- Press PREV key to play previous Photo, NEXT key to play next Photo;
- In full-screen play state:
(1) Press Left, Right key to rotate the photo clockwise/ counterclockwise by 90 degrees;
(2) Press UP key to view lens photo vertically;
(3) Press DOWN key to view lend photo horizontally.
- Press RETURN key to exit play mode and return to file directory.
7. GAMES
If you want to have a rest or to relieve yourself after hard working, you can play some games attached in the system.
7.1 BOX MAN
Play: press "MENU" under normal playing mode and select GAME-> Na-
tive Games->BoxMan step to play the game.
-
There are six function selection menus on the left of the interface for user:
-
New Game: Restart game
- Reset: reset map
- Continue: Continue game
• Level: Display game level
• Help: offer help information - Exit Game: exit game;
- In New Game option, press OK key to enter Game, the function menu on the left, if turning into grey, cannot be used.
- Press direction keys up, down, left and right to move the cartoon man here and there.
- Press OK key Pause Game, you can reset game on the function menu on the left of the interface.
7.2 TETRIS
Play: press "Menu" under normal playing mode and select GAME-> Native Games->Tetris step by step to play the game.
-
There are five function selection menu on the left of the interface for user:
-
Start Game: Start Game
- Setting: set game speed and difficulty
• Help: provide game information
• Score List: score list -
Exit Game: exit the game.
-
After game-setting, move cursor to "start game" parameter, press "OK" key enter into the game.
-
Press key left and right to move the square left or right.
-
Press key up to change the direction.
-
Press key down to accelerate the square.
-
Press OK key to pause game, Continue Game via the left function key, Main Menu returns to the previous menu, reset Game or exit Game.
7.3 HIT RAT
Play: press "menu" under normal playing mode and select GAME-> Native
Games->Hit Rat step by step to play the game.
-
There are five function selection menu on the left of the interface for user:
-
New Game: Restart Game
- Speed: Set Game Speed, Press LEFT/RIGHT key to set
• Score List: score list
• Help: help information -
Exit Game: exit the game
-
After game-setting, move the cursor to "New Game" parameters, press "OK" key enter into the game.
- The direction keys compose 1, 2, 3, 4, 5, 6, 7, 8, 9 vs top left, top mid, top right, mid left, mid right, down left, down mid, down right.
- Press "OK" to pause the game.
- Left button "Continue" to continue the game.
- Left button "Main Menu" return to the previous menu and reset games.
8. OTHER FUNCTIONS
8.1 CHOOSE VGA OUTPUT RESOLUTION
About the display, you may choose the resolution as followings:
• (4:3): 800x600x60Hz, 800x600x75Hz, 1024x768x60Hz, 1024x768x75Hz, 1280x1024x60Hz, 1280x1024x75Hz;
• (16:9): 1280x720x60Hz, 1280x720x75Hz, 1600x900x60Hz;
• (16:10): 1440x900x60Hz, 1440x900x75Hz, 1680x1050x60Hz;
If your monitor supports high resolution, you may press “MODE” key to choose the different resolution. The highest resolution of this box can
reach to 1680x1050x60Hz. If you choose the resolution over the range of your PC display supporting, the monitor can not display.
8.2 VCD OR DVD INPUT OPERATION
- Put AUDIO IN cable, VIDEO IN cable into AUDIO IN, VIDEO IN interface with VCD or DVD.
- Turn on VCD, DVD.
- Press "SOURCE" key on remote control and then you can enjoy the programs of VCD or DVD player on your monitor.
8.3 PICTURE IN PICTURE OPERATION
When the product is working on the state of TV/ AV/ S-VIDEO, please press PIP button on the remote and open PIP function. The screen will show a window on your desktop.
PIP function operating is as following:
- Press "PIP" key, the TV picture will show on the PC desktop.
- Press "Preview" key, the picture will show in 1/4, 1/9, 1/16 size of PC desktop.
- Press "MODE" to adjust the picture position.
- Press "PIP" key to quite the status.
Notice: In order to attain the best effect of PIP, please set the resolution of PC and refresh rate in accordance with that of the TV BOX.
Importado por / Imported by:
APPROX IBERIA S. L.
CIF: B-91202499
Soporte técnico / Technical support:
soporte@approx.es
MADE IN CHINA
aqprox!
www.printyourideas.com
- INTRODUCTION ......47
- PRODUCT DESCRIPTION......48
- HARDWARE INSTALLATION....52
- BASIC FUNCTIONS....52
- MAIN MENU....58
- INTRODUCTION
- SPECIFICATION
- TECHNICAL SPECIFICATION
- PACKAGE LIST
- PRODUCT DESCRIPTION
- FRONT KEY-PRESS INSTRUCTION
- BACKSIDE INTERFACES
- REMOTE CONTROL INSTRUCTION
- Media playing
- HARDWARE INSTALLATION
- BASIC FUNCTIONS
- ENTER INTO SYSTEM AND POWER ON-OFF
- Enter into DVB system
- Power on
- Power off
- VOLUME ADJUSTMENT AND MUTE
- TV/RADIO PROGRAMS SWITCH
- STATION SWITCH
- DISPLAY INFORMATION OF PROGRAMS
- PROGRAM RECALL
- AUDIO LANGUAGE SWITCH AND L/R CHANNEL SWITCH
- ELECTRONIC PROGRAMS GUIDE(EPG)
- TELETEXT
- SUBTITLE
- MAIN MENU
- MANUAL SEARCH
- AUTO SEARCH
- CHANNEL MANAGER
- CHANNEL ORGANIZER
- CHANNEL SORTING
- CHANNEL GROUPING
- EDIT CHANNEL
- DELETE ALL
- CONFIGURATION
- TV
- Display Mode
- Aspect Ratio
- Video Output
- Brightness
- Contrast
- HUE
- Saturation
- SYSTEM SETUP
- TIME
- WAKEUP TIMER
- Preset Channel:
- PARENTAL LOCK
- SOFTWARE UPGRADE
- USB MEDIA PLAY
- USB MOVIE
- USB MUSIC
- USB PHOTO
- GAMES
- BOX MAN
- TETRIS
- HIT RAT
- OTHER FUNCTIONS
- CHOOSE VGA OUTPUT RESOLUTION
- VCD OR DVD INPUT OPERATION
- PICTURE IN PICTURE OPERATION
Brand : Approx
Model : APPTDTLCD
Category : TV Tuner