
NRC-190 - Alarm Clock Naxa - Free user manual and instructions
Find the device manual for free NRC-190 Naxa in PDF.


| Product Type | Alarm Clock Radio |
| Brand | Naxa |
| Model | NRC-190 |
| Color | Black |
| Display Type | LED |
| Radio Bands | AM / FM |
| Alarm Type | Dual (two separate alarms) |
| Snooze Duration | 9 minutes |
| Sleep Timer | 90 minutes (max) |
| Power Source | AC adapter (120V 60Hz) and battery backup |
| Battery Backup | 2 x AAA batteries (not included) |
| Dimensions (approx) | 5.5 x 3.0 x 5.0 inches (140 x 76 x 127 mm) |
| Weight (approx) | 1.0 lb (450 g) |
| Warranty | 1 year limited |
| Care Instructions | Clean with a soft, dry cloth; avoid liquids |
| Safety Precautions | Do not immerse in water; unplug during storms |
| Spare Parts / Replaceable | Battery compartment cover |
| Additional Features | Wake to radio or buzzer; dimmer switch |
Frequently Asked Questions - NRC-190 Naxa
User questions about NRC-190 Naxa
0 question about this device. Answer the ones you know or ask your own.
Ask a new question about this device
Download the instructions for your Alarm Clock in PDF format for free! Find your manual NRC-190 - Naxa and take your electronic device back in hand. On this page are published all the documents necessary for the use of your device. NRC-190 by Naxa.
USER MANUAL NRC-190 Naxa
THE NEW GENERATION IN TECHNOLOGY
1.8" DUAL ALARM CLOCK DIGITAL FM RADIO
with Wireless charging Technology
NRC-190

Instruction Manual
Please read carefully before use and keep for future reference.
Important Safety Information


The lightning flash with arrowhead symbol, within an equilateral triangle, is intended to alert the user to the presence of uninsulated "dangerous voltage" within the product's enclosure that maybe of sufficient magnitude to constitute a risk of electric shock to persons.

The exclamation point within an equilateral triangle is intended to alert the user to the presence of important operating and maintenance (servicing) instructions in the literature accompanying the appliance.
WARNING: TO REDUCE THE RISK OF FIRE OR ELECTRIC SHOCK, DO NOT EXPOSE THIS APPARATUS TO RAIN OR MOISTURE.
WARNING: This product contains lead, a chemical known to the State of California to cause cancer and birth defects or other reproductive harm. Wash hands after handling.
- Read these instructions.
- Keep these instructions.
- Heed all warnings.
- Follow all instructions.
- Do not use this apparatus near water.
- Clean only with dry cloth.
- Do not block any ventilation openings. Install in accordance with the manufacturer's instructions.
- Do not install near any heat sources such as radiators, heat registers, stoves, or other apparatus (including amplifiers) that produce heat.
- Do not defeat the safety purpose of the polarized or grounding-type plug. A polarized plug has two blades with one wider than the other. A grounding type plug has two blades and a third grounding prong. The wide blade or the third prong are provided for your safety. If the provided plug does not fit into your outlet, consult an electrician for replacement of the obsolete outlet.
-
Protect the power cord from being walked on or pinched particularly at plugs, convenience receptacles, and the point where they exit from the apparatus.
-
Only use attachments/accessories specified by the manufacturer.
- Use only with the cart, stand, tripod, bracket, or table specified by the manufacturer, or sold with the apparatus. When a cart is used, use caution when moving the cart/apparatus combination to avoid injury from tip-over.
- Unplug this apparatus during lightning storms or when unused for long periods of time.
- Refer all servicing to qualified service personnel. Servicing is required when the apparatus has been damaged in any way, such as power-supply cord or plug is damaged, liquid has been spilled or objects have fallen into the apparatus, the apparatus has been exposed to rain or moisture, does not operate normally, or has been dropped.
FCC NOTICE
This device complies with Part 15 of the FCC Rules. Operation is subject to the following two conditions: (1) this device may not cause harmful interference, and (2) this device must accept any interference received, including interference that may cause undesired operation.
Note: This equipment has been tested and found to comply with the limits for a Class B digital device, pursuant to Part 15 of the FCC Rules. These limits are designed to provide reasonable protection against harmful interference in a residential installation. This equipment generates, uses and can radiate radio frequency energy and, if not installed and used in accordance with the instructions, may cause harmful interference to radio communications. However, there is no guarantee that interference will not occur in a particular installation. If this equipment does cause harmful interference to radio or television reception, which can be determined by turning the equipment off and on, the user is encouraged to try to correct the interference by one or more of the following measures:
• Reorient or relocate the receiving antenna.
- Increase the separation between the equipment and receiver.
- Connect the equipment into an outlet on a circuit different from that to which the receiver is connected.
- Consult the dealer or an experienced radio/TV technician for help.
CAUTION ON MODIFICATIONS
Any changes or modifications not expressly approved by the grantee of this device may void the authority granted by the FCC to operate the equipment.
At a Glance
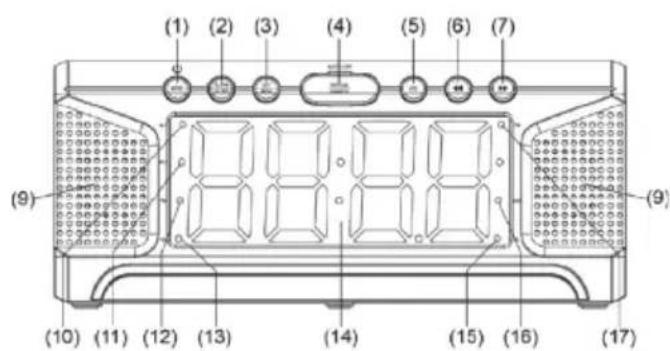
| 1. ⏻ (Standby)/MODE Button | Press to turn unit on. Press repeatedly to change MODES. |
| 2. ALARM/SLEEP Button | Press to set Alarm |
| 3. SET/MEM Memory button | Press to deactivate alarm for 6 minutes. |
| 4. SNOOZE/ DIMMER Button | Press to turn off the alarm when it sounds. Press repeatedly to set dimmer setting. |
| 5. VOL(Volume)Button | Press to adjust the volume control |
| 6. ◀ | • Press to decrease the volume.• Press to adjust time for Alarm/Clock |
| 7. ▶ | • Press to increase the volume.• Press to adjust time for Alarm/Clock |
| 8. Qi (Wireless Charging)Area | Location where to place mobile phone to charge wirelessly |
| 9. Speakers | Dual Speakers |
| 10. AL 1(Alarm 1)Indicator | Alarm 1 Indicator light |
| 11. AL 2(Alarm 2)Indicator | Alarm 2 Indicator light |
| 12. PMIndicator | PM Indicator light |
At a Glance

| 13. Qi (Wireless Charging) Indicator | Qi Wireless Charging Indicator light. |
| 14. LED Display | LED Display panel |
| 15. SL (SLEEP) Indicator | SLEEP Indicator light |
| 16. AUX Indicator | AUX Indicator light |
| 17. FM Indicator | FM Indicator light |

| 18. FM Antenna Wire | Antenna Wire for FM Radio |
| 19. AUX IN Jack | 3.5 mm stereo mini jack to connect external media player/mobile phone |
| 20. USB Charge Port | USB charge port to connect to mobile phone (charging only) |
| 21. DC 5V Power Jack | Power Adapter port |
| 22. Battery Door | Battery door cover for 2 (AAA) batteries for time/alarm backup. |
Connecting the Unit to Power
Before plugging in the AC/DC power adapter to the outlet, make sure that the voltage of your electricity supply is same as that indicated on the rating plate or power adapter.

The provided power adapter works with AC 100-240V,50/60Hz Power.
Battery backup
Battery backup will preserve the current time, alarm settings in the case of power failure or interrupted AC power.
Insert (2) two UM-4 batteries (AAA) into the battery compartment. Be sure to observe the proper polarity (the "+" and "-" signs) as indicated inside the battery compartment.
Setting the Clock
- Connect the AC power adapter to a wall outlet. The LED Display will illuminate
- Press the SET/MEM button, the hour digit will flash. Press the ◀ or ▶ buttons repeatedly to set the hour.
- Press the SET/MEM button twice, the minute digits will flash. Press the ◀ or ▶ buttons repeatedly to set the minutes.
12-Hour / 24-Hour Mode
- Press the SET/MEM button 3 times, "12H" or "24H" will display. Press the « or» buttons repeatedly to set the 12 or 24 hour format.

Take note of the PM LED indicator when setting the time.
- Press the SET/MEM button repeatedly until the actual time appears on the display to exit.
Setting the Alarms
With the unit in Clock mode:
- Press the ALARM/SLEEP button once, the AL 1 (Alarm 1) indicator will illuminate on the screen and the hour digit will flash. Press the◀ or▶ buttons repeatedly to set the hour.
- Press the ALARM/SLEEP button again, the minute digit will flash. Press the ◀ or ▶ buttons repeatedly to set the minute.
- Press the ALARM/SLEEP button again, the Alarm 1 status will appear on the display. Press the ◀ or ▶ buttons repeatedly to activate alarm, turn off alarm, and set wake up mode as illustrated below.
| Wake up Mode: | Display or Indicators |
| Buzz | “ON” will appear on the display and AL 1 indicator light will illuminate |
| Radio | “FM” and AL 1 indicators will illuminate |
| AUX | “AUX” and AL 1 indicators will illuminate |
- After alarm has been set, wait a few seconds. The unit will save the settings and exit while going back to displaying the current time.
Alarm 2 Settings:
With the unit in Clock mode:
- Press the ALARM/SLEEP button 4 times, the AL 2 (Alarm 2) indicator will illuminate on the screen. Alarm 2 time will appear on the display and the hour digit will flash. Press the ◀ or ▶ buttons repeatedly to set the hour.
- Press the ALARM/SLEEP button again, the minute digit will flash. Press the ◀ or ▶ buttons repeatedly to set the minute.
- Press the ALARM/SLEEP button again, the Alarm 3 status will appear on the display. Press the « or » buttons repeatedly to activate alarm, turn off alarm, and set wake up mode as illustrated below.
| Wake up Mode: | Display or Indicators |
| Buzz | “ON” will appear on the display and AL 2 indicator light will illuminate |
| Radio | “FM” and AL 2 indicators will illuminate |
| AUX | “AUX” and AL 2 indicators will illuminate |
- After alarm has been set, wait a few seconds. The unit will save the settings and exit while going back to displaying the current time. buttons repeatedly to set the minute.
SNOOZE:
Press the SNOOZE button when the alarm is sounding to stop the alarm and have it sound again automatically at your designated Snooze setting.

Press the SET/MEM button 4 times to set Snooze interval between 5 - 60 mins. Press the ◀ or ▶ buttons to adjust and set Snooze interval.
Turning OFF the Alarm
Press the ALARM/SLEEP button to shut off the alarm and alarm will reset for the next day.
To disable the alarm completely:
Alarm 1: Press the ALARM/SLEEP button 3 times, the Alarm 1 status will display. Press the ◀ or ▶ buttons repeatedly until "OFF" is displayed. Wait a few seconds to save the settings.
Alarm 2: Press the ALARM/SLEEP button 6 times, the Alarm 2 status will display. Press the ◀ or ▶ buttons repeatedly until "OFF" is displayed. Wait a few seconds to save the settings.
How to Set the SLEEP TIMER
In Radio or AUX playback mode, press and hold the ALARM/SLEEP button until the sleep timer appears on the display to activate the sleep function. The SL indicator on the display will illuminate. Press the ALARM/SLEEP button repeatedly to set the sleep timer from 05 - 90 minutes.
To turn off the sleep timer before time is up, press and hold the ⏻ /MODE button to shut off.
DIMMER:
Press the SNOOZE/DIMMER button repeatedly to set the brightness level of the display.
Listening to the Radio
- Press the ⏻/MODE button once to access the Radio input. The radio station number will display on the screen. (87.5 - 108)
- Press and hold the ◀ or ▶ buttons to engage the auto search and play to cycle through different radio stations.
- If reception is poor, press and release the◀◀ or▶◀ buttons to fine tune your desired radio station.
- To adjust the volume, press the VOL button once followed by the ◀ or ▶ buttons to adjust your desired level. (L01- L15)
- Press and hold the ⏻ /MODE button to turn OFF the radio.
Radio Station Preset
-
Press the ⏻/MODE button once to access the Radio input and select your desired station.
-
Press and hold the SET/MEM button, "01-20" will appear on the screen and flash.
- Press the ◀ or ▶ buttons to repeatedly to select the program number of your choice.
- Then press the SET/MEM button again to store it.
- Repeat the steps above until all the desired radio stations are stored in the program list.
- Once you have completed and set your radio station presets, simply press the SET/MEM button repeatedly to select and play your desired stored radio station.

If the back up batteries aren't installed, the preset stations may erase upon power failure to the unit.
The stored radio stations can be replaced by storing another new radio station.
A total of 20 FM radio stations can be stored in the program.
BUILT-IN QI WIRELESS CHARGER
- Place a Qi supported mobile device on the center of the charging surface as illustrated below. The Qi inindicator light will display and your mobile device should begin charging.

natural_image
Line drawing of a portable electronic device with multiple front panels and control knobs (no text or symbols)- When charging has completed, please remove the mobile device from the unit.

Check the mobile device's charging status using the charging icon displayed on the screen.
BUILT-IN USB CHARGER
- Connect the USB plug from the external USB device to the USB Charger port at the back of the unit.
- Unit should begin to charge.
- When charging has completed, please remove the mobile device from the unit.
AUX IN MODE
- Connect the AUX cable from the output jack of your MP3 player or mobile phone to the AUX input jack on the Radio.
- Press the ⏻/MODE button twice to access the AUX input. AUX will be displayed on the screen.
- Adjust the volume on both your MP3 player or mobile device and on the unit to your desired level.
Specifications
| Power Source | DC---5V, 2000 mA |
| Clock Back up | DC---3V, 2 x AAA batteries (Not included) |
| Audio Power | 0.5W per channel (1W RMS) |
| Impedence of Speakers | 8 ohm, 2W |
| Radio Tuner | FM |
| Radio Band Coverage | 87.5 - 108 MHz |
| Output from USB Charge Port | DC---5V, 1000 mA (Max) |
| Output from QI Wireless Charge Port | DC---5V, 1000 mA (Max) |
Accessories
1 x Owner's Manual
1 x AC/DC Adapter (Input: AC 100\~240V, 50/60 Hz, 0.5A
Output: DC---5V, 2000 mA)
Specifications are subject to change without prior notice.
Support
If you have problems with your device, please review the instructions in this manual. Please also visit us on the web at www.naxa.com to get the latest news, alerts, and documentation for your device. For additional assistance, please contact Naxa Technical Support.
NAXA Technical Support
2320 East 49th St.
Vernon, CA 90058
866-411-6292
http://www.naxa.com/naxa_support/

THE NEW GENERATION IN TECHNOLOGY
natural_image
Line drawing of a portable air conditioner unit with control knobs and indicator lights (no text or symbols)http://www.naxa.com/naxa_support/



- 1.8" DUAL ALARM CLOCK DIGITAL FM RADIO
- Instruction Manual
- Important Safety Information
- FCC NOTICE
- CAUTION ON MODIFICATIONS
- At a Glance
- Connecting the Unit to Power
- Battery backup
- Setting the Clock
- 12-Hour / 24-Hour Mode
- Setting the Alarms
- SNOOZE:
- Turning OFF the Alarm
- How to Set the SLEEP TIMER
- DIMMER:
- Listening to the Radio
- Radio Station Preset
- BUILT-IN QI WIRELESS CHARGER
- BUILT-IN USB CHARGER
- AUX IN MODE
- Accessories
- Support
Brand : Naxa
Model : NRC-190
Category : Alarm Clock