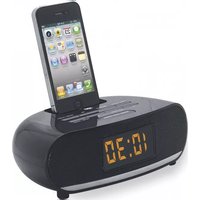
NI-3107 - Alarm Clock Naxa - Free user manual and instructions
Find the device manual for free NI-3107 Naxa in PDF.


| Product Type | iPod/iPhone Docking Music System with Alarm Clock Radio |
| Brand | Naxa |
| Model | NI-3107 |
| Dimensions (Net) | 240 x 68 x 130 mm |
| Dimensions (Packaged) | 287 x 255 x 155 mm |
| Net Weight | 2.0 kg |
| Gross Weight | 2.3 kg |
| Power Supply | AC-DC adaptor: Input 100-240V~50/60Hz, Output 5V 1800mA |
| Backup Battery | 2 x 1.5V AAA (UM-4) batteries (not included) |
| FM Tuner Range | 87.5 – 108 MHz |
| FM Presets | 20 stations |
| Compatible Devices | iPhone, iPod touch, iPod nano, iPod classic, iPod video (up to 160GB) |
| Alarm Functions | Dual alarm (AL1/AL2) with wake to buzzer, radio, or iPod/iPhone; snooze (9 min) |
| Sleep Timer | 10 to 90 minutes (10 min increments) |
| Audio Inputs | iPod/iPhone dock, AUX-IN (3.5mm), FM antenna |
| Display | LED clock with dimmer (high/medium/low) |
| Clock Format | 12-hour (default) or 24-hour selectable |
| Time Sync | From docked iPod/iPhone (SYNC button, power off) |
| Care & Maintenance | Clean with dry cloth; avoid direct sunlight, heat, humidity; unplug during cleaning |
| Safety Notes | Do not use near water; unplug during lightning storms; replace batteries correctly |
| Repair | Refer to qualified service personnel; do not attempt to dismantle |
| Regulatory Compliance | FCC Part 15 Class B |
Frequently Asked Questions - NI-3107 Naxa
User questions about NI-3107 Naxa
0 question about this device. Answer the ones you know or ask your own.
Ask a new question about this device
Download the instructions for your Alarm Clock in PDF format for free! Find your manual NI-3107 - Naxa and take your electronic device back in hand. On this page are published all the documents necessary for the use of your device. NI-3107 by Naxa.
USER MANUAL NI-3107 Naxa
natural_image
Digital mobile phone with a smartphone displaying its home screen, showing status LEDs and a digital clock display (no readable text or symbols on device body)Docking System with Alarm Clock Radio for iPhone® and iPod®
Owner's Manual
IMPORTANT SAFETY INSTRUCTIONS
When used in the directed manner, this unit has been designed and manufactured to ensure your personal safety. However, improper use can result in potential electrical shock or fire hazards. Please read all safety and operating instructions carefully before installation and use, and keep these instructions handy for future reference. Take special note of all warnings listed in these instructions and on the unit.
- Read these instructions – All the safety and operating instructions should be read before the appliance is operated.
- Keep these instructions – The safety and operating instructions should be kept for future reference.
- Heed all warnings – All warnings on the appliance and in the operating instructions should be adhered to.
- Follow all instructions – All operation and use instructions should be followed.
- Do not use this apparatus near water – The appliance should not be used near water; for example, near a bath tub, washbowl, kitchen sink, laundry tub, in a wet basement, or near a swimming pool.
- Clean only with dry cloth - The appliance should be cleaned only as recommended by the manufacturer.
- Do not block any ventilation openings. Install in accordance with the manufacturer's instructions. The appliance should be situated so that its location or position does not interfere with its proper ventilation. For example, the appliance should not be situated on a bed, sofa, rug, or similar surface that may block the ventilation openings; or placed in a built-in installation, such as a bookcase or cabinet that may impede the flow of air through the ventilation openings.
- Do not install near any heat sources such as radiators, heat registers, stoves, or other apparatus (including amplifiers) that produce heat.
- Protect the power cord from being walked on or pinched particularly at plugs, convenience receptacles, and the point where they exit from the apparatus.
- The system has as AC plug and will only fit into matching AC outlets. This is a safety feature to reduce the possibility of electric shock. If the plug will not fit in your AC outlets, you should have the outlet changed by qualified licensed electrician. Do not use an adaptor to make the plug fit into your outlet. This defeats the safety feature and could expose you to electric shock.
- Only use attachments / accessories specified by the manufacturer.
- Unplug this apparatus during lightning storms or when unused for long periods of time.
- Refer all servicing to qualified service personnel. Servicing is required when the apparatus has been damaged in any way, such as power-supply cord or plug is damaged, liquid has been spilled or objects have fallen into the apparatus, the apparatus has been exposed to rain or moisture, does not operate normally, or has been dropped.
- This appliance shall not be exposed to dripping or splashing water and that no object filled with liquids such as vases shall be placed on the apparatus.
- Power Sources – The appliance should be connected to a power supply only of the type described in the operating instructions or as marked on the appliance. Do not overload wall outlet.
- Danger of explosion if battery is incorrectly replaced. Replace only with the same or equivalent type.
- There is a high energy rechargeable battery inside the speaker box, do not throw it into fire to avoid danger of explosion.
- Do not charge the internal rechargeable battery longer than specified to prevent danger of fire. Overcharging rechargeable batteries may shorten their life span.
- Do not attempt to dismantle, open or repair this product yourself. If a fault occurs, seek advice from your local qualified service technician or contact the
distributor via the telephone number at the back of this instruction manual. 20. The nameplate is located on bottom of product.
IMPORTANT NOTES
Avoid installing the unit in locations described below:
- Places exposed to direct sunlight or close to heat radiating appliances such as electric heaters.
- Places subject to constant vibration.
• Dusty, humid or moist places.
COMPLIANCE WITH FCC REGULATIONS
This device complies with Part 15 of the FCC Rules. Operation is subject to the following two conditions:
(1) this device may not cause harmful interference, and
(2) this device must accept any interference received, including interference that may cause undesired operation.
NOTE: This equipment has been tested and found to comply with the limits for a Class B digital device, pursuant to Part 15 of the FCC Rules. These limits are designed to provide reasonable protection against harmful interference in a residential installation. This equipment generates, uses and can radiate radio frequency energy and, if not installed and used in accordance with the instructions, may cause harmful interference to radio communications. However, there is no guarantee that interference will not occur in a particular installation. If this equipment does cause harmful interference to radio or television reception, which can be determined by turning the equipment off and on, the user is encouraged to try to correct the interference by one or more of the following measures:
- Reorient or relocate the receiving antenna.
- Increase the separation between the equipment and receiver.
- Connect the equipment into an outlet on a circuit different from that to which the receiver is connected.
- Consult the dealer or an experienced radio/TV technician for help.
CAUTION: Changes or modifications not expressly approved by the party responsible for compliance could void the user's authority to operate the equipment.
PROTECT YOUR FURNITURE!
This model is equipped with non-skid rubber 'feet' to prevent the product from moving when you operate the controls. These 'feet' are made from non-migrating rubber material specially formulated to avoid leaving any marks or stains on your furniture. However certain types of oil based furniture polishes, wood preservatives, or cleaning sprays may cause the rubber 'feet' to soften, and leave marks or a rubber residue on the furniture. To prevent any damage to your furniture we strongly recommend that you purchase small self-adhesive felt pads, available at hardware stores and home improvement centers everywhere, and apply these pads to the bottom of the rubber 'feet' before you place the product on fine wooden furniture.
PRODUCT FEATURES
The NI-3107 is an iPod/iPhone Docking Music System that incorporates the following features:
● Play and Charge your iPod nano, iPod touch, iPod classic, iPod video and iPhone.
● FM digital tuner with 20 presets
Auxiliary input jack
• Digital volume control
- Sleep timer function
• Time synchronization
● Dual Alarm clock function - Wake to radio/alarm or your iPod/iPhone
- Snooze function
LOCATION OF CONTROLS
TOP VIEW

- FM Antenna
- DC Input Jack
- iPod/iPhone Docking Connector
- Memory/Set Button
- Power/Function Button
- iPod/iPhone Play/Pause ▶Button
-
Sync/Preset Button
-
Snooze/Sleep/Dimmer Button
- iPod/iPhone SKIP Forward ▶; Radio TUNE+ Button; Clock Adjust Forward; Memory Up
- Volume Up (+) / Alarm1 Set Button
- Volume Down (-) / Alarm2 Set Button
- iPod/iPhone SKIP Backward 🏠; Radio TUNE- Button; Clock Adjust Backward; Memory Down
- AUX-IN Jack
CLOCK DISPLAY UNIT

AL1: Icon lights when Alarm 1 is on.
AL2: Icon lights when Alarm 2 is on.
PM: PM time indicator
GETTING STARTED
This NI-3107 is designed to operate using the included AC Adaptor. 2 x 1.5V, 'AAA' batteries (not included) are also required for the clock, radio preset and alarm memory back up.
To install the batteries proceed as follows
- Open the battery door located on the bottom of the cabinet.
- Insert two new batteries (not included) into the compartment following the + and - markings inside the compartment and close the battery door.
WARNING:
DANGER OF EXPLOSION IF BATTERY IS INCORRECTLY REPLACED.
REPLACE ONLY WITH THE SAME OR EQUIVALENT TYPE.
Note: Use a well-known brand of battery for longer life and best performance.
BATTERY CARE
i. If the unit is not used for an extended period of time, remove the battery. An old or leaking battery can cause damage to the unit and may void the warranty.
ii. Do not dispose batteries in fire. Batteries may leak or explode.
iii. Do not try to recharge batteries that are not intended to be recharged; they can overheat, rupture and leak (Follow battery manufacturer's directions).
iv. (a) Do not mix old and new batteries.
(b) Do not mix alkaline, standard (carbon-zinc) or rechargeable (nickel-cadmium) batteries.
AC Adaptor Operation
- Insert one end of the AC adaptor into the DC Jack on back of NI-3107
- Connect the AC plug of the AC adaptor to an AC 100-240V 50Hz/60Hz power source.
Note:
Unplug the AC adaptor and disconnect the DC Jack when the NI-3107 is not in use for a long period of time.
CLOCK SETTING
NOTE:
i. The clock has to be set the first time you plug the unit in.
ii. The Clock is set to default in 12 Hour format mode.
Setting the Time Manually
When the AC adaptor is plugged into a 100-240V 50Hz/60Hz power outlet, the clock display will light flashing "12:00".
1.) To set the hour, press and hold the MEMORY/SET button until the hour digits flash.
2.) While the hour digits are flashing, repeatedly press the ◀◀ or ▶▶ buttons to select the correct hour digits.
NOTE:
Make sure the hour is set so that AM or PM is displayed correctly. There is a PM Indicator located in the bottom right corner of the Display. The displayed time is PM when the indicator is lit. The displayed time is AM when the indicator is off.
3.) Press the MEMORY/SET button to confirm the hour setting and the minute digits will flash to prompt for input.
4.) While the minute digits are flashing, repeatedly press the ◀◀ or ▶▶ buttons until the correct minute digits are displayed.
5.) Press the MEMORY/SET button again to complete the clock setting.
TIME SYNCHRONIZATION
The NI-3107 features a "SYNC" button that allows you to set the time using the internal clock of the iPod/iPhone.
With the iPod/iPhone docked and power OFF, press the "SYNC" button once.
NOTE:
- When you first dock your iPod/iPhone, the unit will run an authentication process, so it may not respond immediately to the SYNC button when pressed. Wait for few seconds and try pressing the SYNC Button again
- An iPod/iPhone can only sync time up to the nearest minute; it's possible to have up to 59 seconds difference between the clock radio and synced iPod/iPhone.
- The iPod internal clock is automatically updated when sync'd with iTunes. We recommend you sync the iPod with iTunes prior to docking to NI-3107 to make sure you have the current time available.
- The iPhone receives constant updates from the phone service provider, so the iPhone time will always be current.
- This NI-3107 SYNC function does not support earlier iPod models, like iPod mini, iPod 3G, 4G and iPod photo (4G /color display).
• The SYNC function can only be done when the NI-3107 power is Off.
Switching to 24 Hour format
1.) With the current time showing, press and hold the SNOOZE/SLEEP/DIMMER button until "12H" appears and flashes on the Display.
2.) Press the ◀◀ or ▶▶ buttons to switch to 24 hour format. After a few seconds the display will resume to show current clock time.
DIMMER Function
With the NI-3107 in standby mode, press the SNOOZE/SLEEP/DIMMER to change the LED display brightness to High, Medium or Low.
RADIO OPERATIONS
TUNING THE RADIO
1.) Press the POWER/FUNCTION button on the main unit to turn on the unit. The unit will enter iPod mode. iPod is displayed.
2.) Press the FUNCTION button again to select the RADIO mode. The FM station frequency will be displayed.
3.) Repeatedly press the ◀◀ or ▶▶ buttons until a station is received.
4.) To automatically search for stations with strong signals, press and hold either the ◀◀ or ▶▶ buttons. The tuner will stop on the first strong station signal it finds. The frequency reading of the tuned station will be displayed and will revert back to the current time after about 5 seconds.
5.) Adjust the sound level by pressing the VOLUME+/ALARM1 or VOLUME-/ALARM 2 buttons. The Volume Level reading will be displayed and revert back to the current time after about 5 seconds.
Notes:
- Manual tune to select weaker stations that might be bypassed during the automatic tuning.
- If the automatic tuning does not stop on the exact frequency of the station, for
example, if it stops on 100.9 MHz instead of 100.8 MHz, use the manual tuning method to "fine tune" to the exact frequency of the desired station.
- If a station is broadcasting in Stereo, the unit will automatically receive the stereo broadcast.
Hints for the Best Reception
- To obtain the best FM Stereo reception, unwrap and fully extend the FM Antenna and adjust the position of the wire for best station reception.
STORING THE RADIO STATION PRESETS
The NI-3107 allows you to store up to 20 FM stations for easy recall at any time.
1.) In the FM mode, tune to the radio station you want to store in memory using the ◀◀ or ▶▶ buttons.
2.) Press the MEMORY/SET button once. The preset channel number "P01" will appear with "01" flashing on the display.
3.) To change the preset channel number location, press the ◀◀ or ▶▶ buttons to step through the preset locations (P01 – P20).
4.) To confirm the preset location, press the MEMORY/SET button.
5.) To store up to 20 FM station presets, repeat steps 1 to 4 above.
Note:
You can overwrite a preset station by storing the new frequency in its place.
RECALL PRESET RADIO STATIONS
1.) Set NI-3107 to the RADIO mode.
2.) Tap the PRESET button, the preset channel appears on the display then press the ◀◀ or ▶▶ buttons to recall the preset stations. The LED display will show the frequency of the preset radio station and then revert back to the current time in a few seconds.
PLAYING AN APPLE iPhone / iPod
CHARGING YOUR APPLE DEVICE
The NI-3107 will charge your iPhone or iPod when it's properly docked on the Docking Connector.
LISTENING TO MUSIC ON YOUR APPLE DEVICE
This NI-3107 works with all models of iPhone, iPod touch, iPod nano, iPod Video and iPod classic up to 160GB.
1.) Dock your Apple device carefully and securely onto the Docking Connector.
2.) Repeatedly press the POWER/FUNCTION Button on NI-3107 until "IPod" appears on the Display.
3.) After selecting your favorite song, press the Play/Pause ▶■ Button on NI-3107 to play or pause.
4.) Press the ▶Button to advance to next song. Press and hold the button
during playback for fast forward searching within the song.
5.) Press the Button to go to the starting point of current song or previous song. Press and hold the button during playback for fast backward search within the song.
6.) Press the VOLUME + / ALARM 1 or VOLUME - / ALARM 2 buttons to adjust the volume output level.
7.) Playback will be suspended if there is an incoming call. The iPhone will ring.
8.) Touch the Answer icon once to pick up the call.
9.) Touch the Speaker Button on the iPhone once to answer the call in handsfree mode.
10.) Press the End Call Icon when you have finished answering the call. Music will resume.
11.) Press and hold the ▶II Button until your iPhone/iPod turns off.
12.) Press and hold the POWER/FUNCTION Button to turn NI-3107 off.
Note:
- Adjust the built-in preset EQ of your Apple device to fine tuning the sound quality to suit your needs.
- The volume control slider on your iPhone or iPod touch are disabled when docked.
- Your Apple device will charge as long as it remains docked.
ALARM OPERATIONS
Your NI-3107 provides two different wakeup times, ALARM1 and ALARM2. You can choose to use them independently or simultaneously: ALARM 1, ALARM 2 or both ALARM 1 and ALARM 2.
SETTING THE ALARM(S)
Note: Alarm time (s) can only be set in Power Off mode.
1.) To set the wakeup time for ALARM 1 or ALARM 2, press and hold the VOLUME + / ALARM 1 or VOLUME - / ALARM 2 buttons for approximately 2 seconds until the hour digit blinks. The Alarm 1 or Alarm 2 Indicator will light depending which Alarm is chosen.
2.) When the hour digit blinks, press the ◀◀ or ▶▶ buttons to adjust your desired hour digit.
Note: For the 12 Hour format, Make sure the Hour is set so that AM or PM is correctly displayed. There is a PM Indicator located in the right bottom corner of the Display. When it lights the displayed time is PM and vice versa.
3.) Press the VOLUME + / ALARM 1 or VOLUME - / ALARM 2 buttons to save the hour setting, the minute digits will blink.
4.) When the minute digits blink, press the ◀◀ or ▶◀ buttons to adjust your desired minute digit.
5.) Press the VOLUME + / ALARM 1 or VOLUME - / ALARM 2 buttons to save the wakeup setting.
SETTING THE WAKEUP MODE
6.) Following step 5 above, press the VOLUME+/ALARM1 or VOLUME-/ALARM 2 buttons once to enter the wake up selection mode.
Note: "b" stands for Wake to Alarm, "I" stands for Wake to iPod/iPhone, and "F" stands for Wake to Radio.
i. Wake to Alarm (b)
- Repeatedly press the ◀ or ▶ buttons until the ALARM Indicator, "b", appears and blinks on the display.
- Press the VOLUME + / ALARM 1 or VOLUME - / ALARM 2 buttons again to enter the VOLUME setting mode. The volume digit will blink on the Display.
- Repeatedly press the ◀◀ or ▶▶ buttons until the desired Volume level (05-32) appears on the Display then press the VOLUME + / ALARM 1 or VOLUME - / ALARM 2 buttons to complete the setting.
- The alarm will beep when the set Alarm time is reached.
- When the alarm time is reached, only the Power and Snooze Buttons can be pressed. Press the Power Button to turn the Alarm Off or Press the Snooze Button to activate the Snooze.
- Press the Power Button again to turn the NI-3107 on again if you want to listen to the Radio or the iPod/iPhone.
ii. Wake to Radio
- Repeatedly press the ▶ or ▶ Buttons until the Radio Indicator, "F", appears and blinks on the Display.
- Press the VOLUME + / ALARM 1 or VOLUME - / ALARM 2 buttons again to enter the VOLUME setting mode. The volume digit will blink on the Display.
- Repeatedly press the ◀◀ or ▶▶ buttons until the desired Volume level (05-32) appears on the Display then press the VOLUME + / ALARM 1 or VOLUME - / ALARM 2 buttons to complete the setting.
- The Radio will come on when the set Alarm time is reached.
- When the alarm time is reached, only the Power and Snooze Buttons can be pressed. Press the Power Button to turn the Radio Off or Press the Snooze Button to activate the Snooze.
- Press the Power Button again to turn the NI-3107 on again if you want to continue listening to the Radio, adjust the volume or change the station.
iii. Wake to iPod/iPhone
- Repeatedly press the ◀◀ or ▶▶ Buttons until the iPod Indicator, "I", appears and blinks on the Display.
- Press the VOLUME + / ALARM 1 or VOLUME - / ALARM 2 buttons again to enter the VOLUME setting mode. The volume digit will blink on the Display.
- Repeatedly press the ◀◀ or ▶▶ buttons until the desired Volume level (05-32) appears on the Display then press the VOLUME + / ALARM 1 or VOLUME - / ALARM 2 buttons to complete the setting.
- The iPod/iPhone will play when the set Alarm time is reached.
- When the alarm time is reached, only the Power and Snooze Buttons can be pressed. Press the Power Button to turn the Radio Off or Press the Snooze Button to activate the Snooze.
- Press the Power Button again to turn the NI-3107 on again if you want to continue listening to the Radio, adjust the volume or change the TRACKS.
Note:
i. The relevant Alarm Indicator will blink when the alarm time is reached.
ii. If you have chosen the "Wake to RADIO" alarm mode, make sure that you have tuned to a station and adjusted the volume to a comfortable level.
iii. After waking to beeping, iPod/iPhone or Radio alarm, the volume level of the iPod or radio cannot be adjusted.
TURNING THE ALARM ON/OFF
With the SR-L8Xi in STANDBY mode, briefly press the VOLUME + / ALARM 1 or VOLUME - / ALARM 2 buttons once to activate or deactivate the alarm. The Alarm 1 or Alarm 2 Alarm Indicator will appear or disappear on the display.
SNOOZE FUNCTION
When the alarm sound is on, press the SNOOZE/SLEEP/DIMMER button once. The alarm sound will stop and resume after 9 minutes.
SLEEP TIMER
The sleep timer allows you to turn the unit off after a designated time is reached. You can use the SLEEP Timer to fall asleep to Radio AUX or iPod/iPhone for 90, 80, 70, 60, 50, 40, 30, 20 or 10 minutes intervals.
1.) Turn the unit on and either dock your iPod/iPhone or tune to the desired radio station and set the volume to a comfortable level.
2.) Press the SLEEP button. The display will show 90 minutes of playing time and then return to the current time mode in 10 seconds.
The NI-3107 will automatically turn off after 90 minutes has elapsed.
3). Press the SLEEP button repeatedly to select a sleep time. Each time the Sleep button is pressed, the Sleep time will be decreased in a 10 minutes decrement. The unit will play for the selected length of time then automatically turn off.
5.) To turn the unit off before the selected length of time, press and hold the POWER/FUNCTION button at any time.
AUXILIARY INPUT
This unit provides an auxiliary audio signal input jack for connecting external audio devices like MP3 players, CD players and older, non-dockable iPods (except iPod shuffle 3 ^rd gen) and listen to your external source through the speakers of this system.
- Use an audio cable (not included) with one 3.5 mm stereo plug on each end of the cable.
- Plug one end into the Aux-in jack on NI-3107 and the other end of the cable into the Line-out Jack or Headphone Jack of your external audio device.
- Turn on the external audio device.
- To select auxiliary audio input, press the POWER/FUNCTION button to select "AUX" mode. The LED display will show "AU" for about 10 seconds and revert back to the current time.
- Adjust the volume control on NI-3107 . Operate all other functions on the auxiliary device as usual.
Note:
(1) If you connected the Line Out Jack of your external device then you only need to adjust the volume control on NI-3107. If you connected the Headphone Jack of your external device then you may need to adjust both the volume control of your external device and the volume control of this system to find the most desirable volume setting.
(2) Press the POWER/FUNCTION button to turn off NI-3107 when you finish listening. Don't forget to switch off the power of your external device as well.
CARE AND MAINTENANCE
- Avoid operating your unit under direct sunlight or in hot, humid or dusty places.
- Keep your unit away from heating appliances and sources of electrical noise such as fluorescent lamps or motors.
- For better Clock Display clarity, avoid operating the unit under direct sunlight or in strong room illumination.
- Unplug the unit from the electrical power outlet immediately in case of malfunction.
CLEANING THE UNIT
- To prevent fire or shock hazard, disconnect your unit from the AC power source when cleaning.
- The finish on the unit may be cleaned with a dust cloth and cared for as other furniture. Use caution when cleaning and wiping the plastic parts.
- If the cabinet becomes dusty wipe it with a soft dry dust cloth. Do not use any wax or polish sprays on the cabinet.
- If the front panel becomes dirty or smudged with fingerprints it may be cleaned with a soft cloth slightly dampened with a mild soap and water solution. Never use abrasive cloths or polishes as these will damage the finish of your unit.
CAUTION: Never allow any water or other liquids to get inside the unit while cleaning.
TROUBLESHOOTING GUIDE
If you experience difficulties in the use of this Docking System, please check the following for Customer Service and Support.
| Symptom | Possible Problem | Solution |
| The unit does not respond (no power). | AC Adaptor is not plugged into a wall outlet or the connector is not plugged into the power supply jack on the back of the unit. | Plug the AC adaptor into a wall outlet and plug the connector into the supply jack on the unit. |
| Wall outlet is not functioning. | Plug another device into the same outlet to confirm the outlet is working. | |
| iPod/iPhone does not respond to the speaker system. | iPod/iPhone is not installed properly. | Remove your iPod/iPhone from the dock and check for obstruction on the connectors in the dock and on your iPod/iPhone. Then reseat it on the dock. |
| Your iPod/iPhone is locked up. | Please make sure that your iPod/iPhone is working properly before docking into the unit. Please refer to your iPod/iPhone manual for info on resetting the iPod/iPhone. | |
| iPod/iPhone does not charge. | Unit turned to CD or radio mode. | Select other modes for iPod charging. |
| iPod/iPhone is not installed properly. | Remove your iPod/iPhone from the dock and check for obstruction on the connectors in the dock and on your iPod/iPhone. Then reseat it in the dock. | |
| iPod/iPhone is locked up/ frozen. iPod/iPhone battery has problem. | Please make sure your iPod/iPhone is working properly before docking into the unit. Please refer to your iPod/iPhone manual for details on resetting. | |
| Weak FM reception | FM antenna wire is not fully extended. | Extend or reposition the wire antenna for best reception. |
| Sound is distorted. | Volume level is set too high. | Decrease the volume. |
| Sound source is distorted. | If the iPod/iPhone original sound source is of poor quality, distortion and noise are easily noticed with high-power speakers. Try a different audio source such as a music CD. | |
| If you are using an external sound source like older generation of iPod, try reducing the output volume on the device itself. Also try turning bass boost OFF or change the EQ setting. | ||
| Unit gets warm after extended play at high volume. | This is normal. | Turn the unit off for a period of time or lower volume. |
SPECIFICATIONS
| Power Requirement | |
| AC-DC adaptor | Input: 100-240V 50Hz/60Hz |
| Output: 5 V = 1800 mA ⊙-⊕-⊕ | |
| Backup Battery | 2 x 1.5 V = 'AAA' (UM-4) |
| Frequency | |
| FM | 87.5 – 108 MHz |
| Net Weight | 2.0 KG |
| Gross Weight | 2.3 KG |
| Net Dimension | 240*68*130mm |
| Packaged Dimension | 287*255*155mm |



- IMPORTANT SAFETY INSTRUCTIONS
- IMPORTANT NOTES
- COMPLIANCE WITH FCC REGULATIONS
- PROTECT YOUR FURNITURE!
- PRODUCT FEATURES
- LOCATION OF CONTROLS
- CLOCK DISPLAY UNIT
- GETTING STARTED
- To install the batteries proceed as follows
- WARNING:
- BATTERY CARE
- AC Adaptor Operation
- Note:
- CLOCK SETTING
- Setting the Time Manually
- TIME SYNCHRONIZATION
- Switching to 24 Hour format
- DIMMER Function
- RADIO OPERATIONS
- TUNING THE RADIO
- Notes:
- Hints for the Best Reception
- STORING THE RADIO STATION PRESETS
- RECALL PRESET RADIO STATIONS
- PLAYING AN APPLE iPhone / iPod
- CHARGING YOUR APPLE DEVICE
- LISTENING TO MUSIC ON YOUR APPLE DEVICE
- ALARM OPERATIONS
- SETTING THE ALARM(S)
- SETTING THE WAKEUP MODE
- i. Wake to Alarm (b)
- ii. Wake to Radio
- iii. Wake to iPod/iPhone
- TURNING THE ALARM ON/OFF
- SNOOZE FUNCTION
- SLEEP TIMER
- AUXILIARY INPUT
- CARE AND MAINTENANCE
- CLEANING THE UNIT
- TROUBLESHOOTING GUIDE
- SPECIFICATIONS
Brand : Naxa
Model : NI-3107
Category : Alarm Clock