USER MANUAL MWGT263XD THOMSON
You have just purchased a Thomson microwave oven and we would like to thank you.
We have placed in this appliance all our passion and know-how so that it best meets your needs. Innovation and performance: we designed it so that it is always easy to use.
In the line of Thomson products, you will also find a wide range of ovens, hobs, ventilation hoods, dishwashers, refrigerators and freezers that can be coordinated with your new microwave oven.
Of course, in an ongoing effort to satisfy your demands with regard to our products as best as possible, our after-sales service department is at your disposal and ready to listen in order to respond to all of your questions and suggestions (contact information at the end of this booklet).
You can also log on to our web site at where you will find all our products, as well as additional, useful information.
As part of our commitment to constantly improving our products, we reserve the right to make changes to their technical, functional and/or esthetic properties in line with their technological development.

Attention: Before installing and using your appliance, please carefully read this Guide to Installation and Use, which will allow you to quickly familiarise yourself with its operation.
TABLE OF CONTENTS
EN
1/NOTICES TO THE USER
- Safety recommendations 4
- Operating principle 6
- Protecting the environment. 6
2/INSTALLING YOUR APPLIANCE
Before hook-up 7
- Electrical connection 7
Utensils 8
Description of your appliance 9
3/USING YOUR APPLIANCE
Operation instruction 11
- Menu chart for automatic programs 16
4/CARING FOR AND CLEANING YOUR APPLIANCE 19
5/TROUBLESHOOTING 20
6/AFTER-SALES SERVICE AND CUSTOMER RELATIONS
Service calls 21
- Customer relations 21
Important :
Keep this user guide with your appliance. If the appliance is ever sold or transferred to another person, ensure that the new owner receives the user guide. Please become familiar with these recommendations before installing and using your appliance. They were written for your safety and the safety of others.
SAFETY RECOMMENDATIONS
Your appliance is designed for standard household use for cooking, reheating and defrosting foods. The manufacturer declines any responsibility in the case of inappropriate use.
Ensure that the cookware is suitable for use in a microwave oven.
To avoid damaging your appliance, never operate it while empty or without the turntable.
Do not interfere with the openings on the lock on the front of the appliance; this could cause damage to your appliance that would require a service call.
The seal and frame of the door must be regularly examined to ensure that they have not deteriorated. If these areas are damaged, discontinue use of the appliance and have a specialised technician check it.
While heating food items in plastic or paper containers, monitor the microwave's contents for there is a risk of spontaneous combustion.
For the microwave and microwave + circular heating functions, the use of metallic cookware, forks, spoons, knives or metal staples or fasteners for frozen foods is not recommended.
The contents of baby bottles and baby food jars should be shaken or stirred and their temperature checked before consumption to avoid burns.
Never heat a baby bottle with the nipple on (risk of explosion).
Do not allow children to use the microwave oven without supervision, unless appropriate instructions have been given so that the child can use the oven safely and understands the dangers of incorrect operation.
Always use oven mitts to remove dishes from the oven. Some dishes absorb the heat of foods and, therefore, are very hot.
Liquids and other foods should not be heated in sealed containers because they may explode.
It is recommended that you avoid heating eggs in their shells and whole hard-boiled eggs in the microwave oven because they run the risk of explosion, even after cooking is complete.
Heating beverages in the microwave oven can cause sudden and/or delayed splattering of boiling liquid, so precautions must be taken when handling their containers.
In the case of small quantities (a sausage, a croissant, etc.) place a glass of water next to the food.
Excessive cooking times may dry out foods and carbonise them. To avoid such incidents, never use the same times recommended for cooking in a traditional oven.
If smoke appears, stop or unplug the oven and leave the door closed to smother any flames that may appear.

It is hazardous for anyone other than a competent person to remove a cover
which gives protection against exposure to microwave energy.
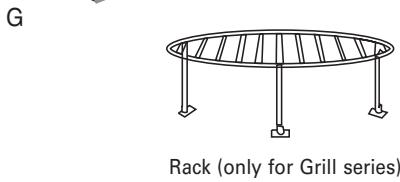
When the appliance is operated in the combination mode, children should only use the oven under adult supervision due to the temperatures generated. (only for grill series)
Read and follow the specific:"PRECAUTIONS TO AVOID POSSIBLE EXPOSURE TO EXCESSIVE MICROWAVE ENERGY".
Do not overcook food.
Do not use the oven cavity for storage purposes. Do not store items, such as bread, cookies, etc. inside the oven.
Remove wire twist-ties and metal handles from paper or plastic containers/bags before placing them in the oven.
nstall or locate this oven only in accordance with the installation instructions provided.
Use this appliance only for its intended uses as described in manual. Do not use corrosive
chemicals or vapors in this appliance. This oven is especially designed to heat. It is not designed for industrial or laboratory use.
If the supply cord is damaged, it must be replaced by the manufacturer, its service agent or similarly qualified persons in order to avoid a hazard.
Do not store or use this appliance outdoors.
Do not use this oven near water, in a wet basement or near a swimming pool.
The temperature of accessible surfaces may be high when the appliance is operating. Keep cord away from heated surface, and do not cover any events on the oven.
Do not let cord hang over edge of table or counter.
Failure to maintain the oven in a clean condition could lead to deterioration of the surface that could adversely affect the life of the appliance and possibly result in a hazardous situation.
Specifications
| Model: | MWGT263XD |
| Rated Voltage: | 230V~50Hz |
| Rated Input Power(Microwave): | 1450W |
| Rated Output Power(Microwave): | 900W |
| Rated Input Power(Grill): | 1000W |
| Oven Capacity: | 26 L |
| Turntable Diameter: | 32 cm |
| External Dimensions(LxWxH): | 513x425x305mm |
| Net Weight: | 14 kg |
OPERATING PRINCIPLE
The micro-waves used for cooking are electro-magnetic waves. They are commonly found in our environment in the form of radio-electric waves, light or infrared rays. Their frequency is in the 2450 MHz range. Their behaviour:
They are reflected by metals.
- They travel through all other materials.
- They are absorbed by water, fat and sugar molecules.
When food is exposed to micro-waves, its molecules begin moving rapidly, which causes heating.
The penetration depth of waves into the food is approximately 2.5cm ; if the food is thicker, the core of the food will be cooked by conduction, as in traditional cooking.
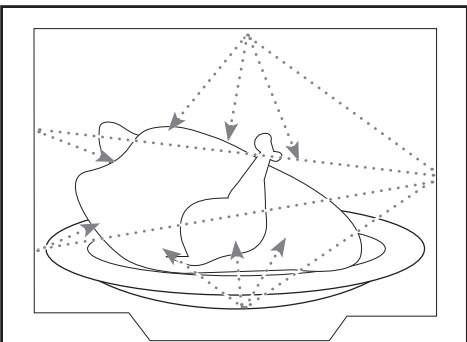
Fig.01
- PROTECTING THE ENVIRONMENT
It is valuable to note that the micro-waves trigger within the food a simple thermal phenomenon and that they are not harmful to one's health.

This appliance's packing materials are recyclable. Recycle them and play a role in protecting the environment by disposing of them in municipal containers provided for this purpose.
Your appliance also contains various recyclable materials. Thus it is stamped with this logo to indicate to you that used appliances should be mixed with other waste. The recycling of appliances organised by your manufacturer will take place under the best conditions, in compliance with European directive 2002/96/CE concerning electrical and electronic equipment waste. Consult your city hall or your retailer to find the drop-off points for used appliances that is nearest to your home. We thank you for your help in protecting the environment.
BEFORE HOOK-UP

Warning:
Ensure that your appliance has not suffered any damage during transport (deformed seal or door, etc...). If you see any kind of damage, before doing anything else, contact your retailer.
In order to easily locate the reference information for your appliance, we recommend that you note these data on the "After-Sales Service Department and Customer Relations" page.
- ELECTRICAL CONNECTION
Ensure that:
- The electrical installation has sufficient voltage.
- The electrical wires are in good condition.
- The diameter of the wires complies with the installation requirements.
- Your electrical installation is equipped with 16-ampere thermal-sensitive protection.
In case of doubt, consult your electrician-inverter.
The electrical connections are made before the appliance is installed in its housing.
Electrical safety must be provided by a correct build-in. During installation and maintenance operations, the appliance must be unplugged from the electrical grid; fuses must be cut off or removed.
The oven must be connected with a power cable (standardized) with three 1.5mm^2 conductors (1ph + 1N + ground) that must be connected to a monophase 220 - 240V network via a CEI 60083 standardised receptacle (1ph + 1N + ground lead) or in accordance with installation rules. The safety wire (green-yellow) is connected to the appliance's terminal and must be connected to the ground lead of the electrical set-up.
In the case of connections with an electric receptacle, it must remain accessible after installation of the appliance.
The oven's neutral conductor (blue wire) must be connected to the network's neutral conductor.
In your electrical installation, allow for a user-accessible device that must be able to separate the appliance from the main power supply and whose contact opening is at least 3mm above all the terminals.
If the power cable is damaged, it should be replaced by the manufacturer, its after-sales service department or by a qualified person to avoid danger.

Warning:
We cannot be held responsible for any accident resulting from an inexistent, defective or incorrect ground lead.
If the oven malfunctions in any way, unplug the appliance or remove the fuse corresponding to the sector there the oven is hooked up.
- UTENSILS
See the instructions on "Materials you can use in microwave oven or to be avoided in microwave oven." There may be certain non-metallic utensils that are not safe to use for microwaving. If in doubt, you can test the utensil in question following the procedure below.
Utensil Test:
- Fill a microwave-safe container with 1 cup of cold water (250ml) along with the utensil in question.
- Cook on maximum power for 1 minute.
- Carefully feel the utensil. If the empty utensil is warm, do not use it for microwave cooking.
- Do not exceed 1 minute cooking time.
CAUTION
Personal Injury Hazard
It is hazardous for anyone other than a competent person to carry out any service or repair operation that involves the removal of a cover which gives protection against exposure to microwave energy.
Materials you can use in microwave oven
| Utensils | Remarks |
| Aluminum foil | Shielding only. Small smooth pieces can be used to cover thin parts of meat or poultry to prevent overcooking. Arcing can occur if foil is too close to oven walls. The foil should be at least 1 inch (2.5cm) away from oven walls. |
| Browning dish | Follow manufacturer's instructions. The bottom of browning dish must be at least 3/16 inch (5mm) above the turntable. Incorrect usage may cause the turntable to break. |
| Dinnerware | Microwave-safe only. Follow manufacturer's instructions. Do not use cracked or chipped dishes. |
| Glass jars | Always remove lid. Use only to heat food until just warm. Most glass jars are not heat resistant and may break. |
| Glassware | Heat-resistant oven glassware only. Make sure there is no metallic trim. Do not use cracked or chipped dishes. |
| Oven cooking bags | Follow manufacturer's instructions. Do not close with metal tie. Make slits to allow steam to escape. |
| Paper plates and cups | Use for short-term cooking/warming only. Do not leave oven unattended while cooking. |
| Paper towels | Use to cover food for reheating and absorbing fat. Use with supervision for a short-term cooking only. |
| Parchment paper | Use as a cover to prevent splattering or a wrap for steaming. |
| Plastic | Microwave-safe only. Follow the manufacturer's instructions. Should be labeled “Microwave Safe”. Some plastic containers soften, as the food inside gets hot. “Boiling bags” and tightly closed plastic bags should be slit, pierced or vented as directed by package. |
| Plastic wrap | Microwave-safe only. Use to cover food during cooking to retain moisture. Do not allow plastic wrap to touch food. |
| Wax paper | Use as a cover to prevent splattering and retain moisture. |
Materials to be avoided in microwave oven
| Utensils | Remarks |
| Aluminum tray | May cause arcing. Transfer food into microwave-safe dish. |
| Food carton with metal handle | May cause arcing. Transfer food into microwave-safe dish. |
| Metal or metal-trimmed utensils | Metal shields the food from microwave energy. Metal trim may cause arcing. |
| Metal twist ties | May cause arcing and could cause a fire in the oven. |
| Paper bags | May cause a fire in the oven. |
| Plastic foam | Plastic foam may melt or contaminate the liquid inside when exposed to high temperature. |
| Wood | Wood will dry out when used in the microwave oven and may split or crack. |
DESCRIPTION OF YOUR APPLIANCE
Names of Oven Parts and Accessories
Remove the oven and all materials from the carton and oven cavity.
Your oven comes with the following accessories:
Glass tray 1
Turntable ring assembly 1
Instruction Manual 1
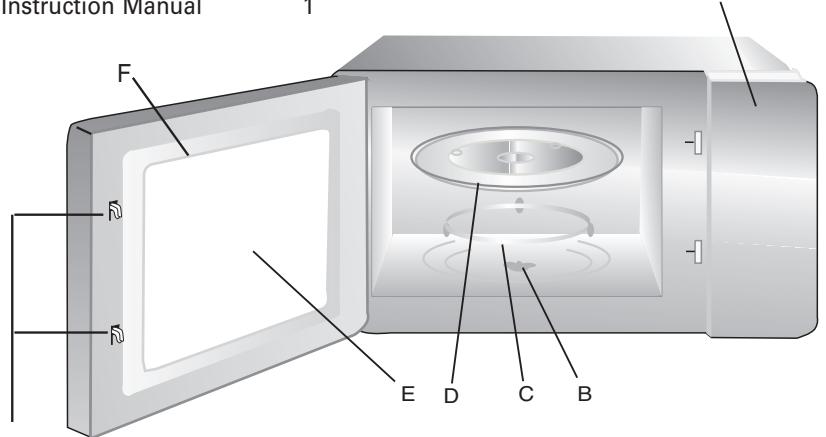
A) Control panel
B) Turntable shaft
C) Turntable ring assembly
D) Glass tray
E) Observation window
F) Door assembly
G) Safety interlock system
TURNTABLE INSTALLATION
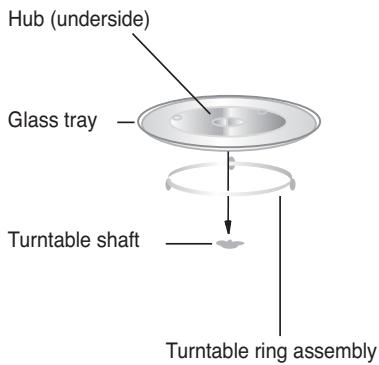
a. Never place the glass tray upside down. The glass tray should never be restricted.
b. Both glass tray and turntable ring assembly must always be used during cooking.
c. All food and containers of food are always placed on the glass tray for cooking.
d. If glass tray or turntable ring assembly cracks or breaks, contact your nearest authorized service center.
COUNTERTOP INSTALLATION
Remove all packing material and accessories. Examine the oven for any damage such as dents or broken door. Do not install if oven is damaged.
Cabinet: Remove any protective film found on the microwave oven cabinet surface. Do not remove the light brown Mica cover that is attached to the oven cavity to protect the magnetron.
INSTALLATION
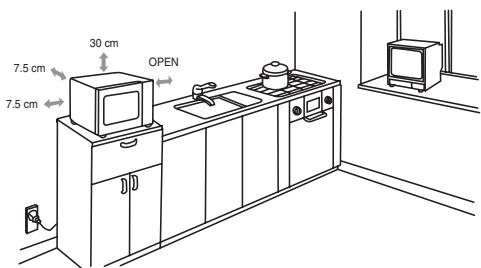
- Select a level surface that provide enough open space for the intake and/or outlet vents (no built in).
A minimum clearance of 3.0 inches (7.5cm) is required between the oven and any adjacent walls. One side must be open.
(1) Leave a minimum clearance of 12 inches (30cm) above the oven.
(2) Do not remove the legs from the bottom of the oven.
(3) Blocking the intake and/or outlet openings can damage the oven.
2. Electrical connection
- Your installation must be protected by a 16 Amp thermal fuse.
- It is mandatory to use a power point with a ground terminal, connected in accordance with current safety regulations.
- In your electrical installation, provide a device that is accessible to the installer, capable of separating the appliance from the mains power and whose contact opening is at least 3mm at all of the poles.
- If the sapply cord is damaged, it must be replaced by the manufacturer, its service agent or similarly qualified persons in order to avoid a hazard.
WARNING: Do not install oven over a range cooktop or other heat-producing appliance. If installed near or over a heat source, the oven could be damaged and the warranty would be void.

The accessible surface may be hot during operation.
When the microwave oven is electrified, the oven will display "0:00", buzzer will ring once.
| Clock Setting | Display |
| Time set | Press the TIME SET key, the hour figures will flash. | 0: |
| Turn the function selector to adjust the hour figures, the input time should be within 0--23. | |
| Time set | Press the TIME SET key, the minute figures will flash. | 12:00 |
| Turn the function selector to adjust the minute figures, the input time should be within 0--59. | |
| Time set | Press the TIME SET key to finish clock setting. “:” will flash, and the time will light. | 12:35 |
Microwave Cooking
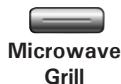
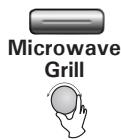
| Microwave Grill | Press the MICROWAVE GRILL key once,"P900" displays. then keep pressing to choose the power you want, and "P900", "P700", "P500", "P350" or "P150" will display for each added pressing. | P900 |
| Start/Quick start | Turn the function selector to set cooking time from 0:05 to 95:00. | 1:30 |
| Press the START/QUICK START key to start cooking. | |
| Example: If you want to use 700W microwave power to cook for 20 minutes, you can operate the oven as the following steps. | |
| Microwave Grill | Press the MICROWAVE GRILL key once, the screen display"P900". | P900 |
| Keep pressing the MICROWAVE GRILL key to choose 700W microwave power. "P700" displays. | P700 |
| Microwave Grill | | |
EN
3/USING YOUR APPLIANCE

Turn the function selector to adjust the cooking time until the oven displays "20:00".
20:00

Press the START/QUICK START key to start cooking or

Press the STOP/CANCEL key to cancel the setting.

Note: the step quantities for the adjustment time are as follow:
Microwave Power Chart
| Power | 900W | 700W | 500W | 350W | 150W |
| Display | P900 | P700 | P500 | P350 | P150 |
Grill Cooking
Pressing the MICROWAVE GRILL key once, "P900" displays.
Then keep pressing until "G-1" displays.

Turn the function selector to set cooking time. The maximum cooking time is 95:00.
Example: 8 minutes 30 seconds.

Press the START/QUICK START key to start cooking.
Example: If you want to use grill power to cook for 10 minutes, you can operate the oven as the following steps.
Press the MICROWAVE GRILL key several times until the screen display "G-1".
Turn the function selector to adjust the cooking time until the oven displays "10:00".
Display


Stop/Cancel
Press the START/QUICK START key to start cooking
or
Press the STOP/CANCEL key to cancel the setting.

Note: Halfway through the grilling time the oven will beep twice. This indicates that the food should be turned over.
Combination Cooking
| Microwave Grill | Press the MICROWAVE GRILL key once, the screen display “P900”. | P900 |
| Microwave Grill | Keep pressing the MICROWAVE GRILL key until “G-2” or “G-3” displays. | G-2 |
| Turn the function selector to adjust the cooking time, the maximum cooking time is 95 minutes. | |
| Start/Quick start | Press the START/QUICK START key to start cooking or | |
| Stop/Cancel | Press the STOP/CANCEL key to cancel the setting. | |
Display
P900
6-2
Grill & Combination Instructions
| Order | Display | Microwave Power | Grill Power |
| 1 | G-1 | 0% | 100% |
| 2 | G-2 | 20% | 80% |
| 3 | G-3 | 40% | 60% |
EN
3/USING YOUR APPLIANCE
| Speedy Cooking | Display |
| Start/Quick start | In waiting state, press the START/QUICK START key to start cooking with 100% microwave power for 30 seconds, each added press will increase 30 seconds. The maximum cooking time is 95 minutes. | 0:30 |
| Start/Quick start | In microwave cooking state, each press of the START/QUICK START key can increase 30 seconds. | 1:30 |
| Start/Quick start | During auto menu and weight defrost cooking, time cannot be increased by pressing the START/QUICK START key. | |
| Defrost by Weight | Display |
| Speed Defrost | Press the SPEED DEFROST key once, and the oven will display “100”. | 100g |
| Turn the function selector to select the weight of food from 100 to 2000 g. | 400g |
| Start/Quick start | Press the START/QUICK START key to start defrosting. | |
| Auto Menu | Display |
| AutoProgramme | Keep pressing the AUTO PROGRAMME key to choose the menu from "A-1","A-2"..."A-8". | R-1 |
| Turn the function selector to choose the default weight as the menu chart. | 400g |
| Start/Quick start | Press the START/QUICK START key to start cooking. | |
| After cooking finished, buzzer will sound five times. | |
Example: If you want to use auto menu to cook the poisson for 150g.
Display
| Auto
Programme | Press the AUTO PROGRAMME key four times to choose "A-4". The fish indicator lights up. |
| Start/
Quick start | Turn the function selector to choose 150g. |
| Press the START/QUICK START key to start cooking. |
Please kindly refers to the next page for menu chart.

Recommendation :
Meat cooking : turn the food at mid cooking time to obtain an homogeneous colour and cooking.
-MENU CHART FOR AUTOMATIC PROGRAMS
| Menu | Weight |
| A-1 | 400 g |
| 600 g |
| 800 g |
| 1 000 g |
| 1 200 g |
| A-2 | 400 g |
| 600 g |
| 800 g |
| 1 000 g |
| 1 200 g |
| A-3 | 500 g |
| 750 g |
| 1 000 g |
| 1 200 g |
| 1 500 g |
| A-4 | 150 g |
| 250 g |
| 300 g |
| 400 g |
| 600 g |
| A-5 | 300 g |
| 450 g |
| 600 g |
| 750 g |
| 1 000 g |
| A-6 | 200 g |
| 300 g |
| 400 g |
| 500 g |
| 600 g |
| A-7 | 200 g |
| 400 g |
| 600 g |
| 800 g |
| 1 000 g |
| A-8 | 200 ml |
| 300 ml |
| 400 ml |
| 500 ml |
| 600 ml |
Memory function
Display
| Memory | Press the Memory key to select the cooking programme 1, 2 ou 3. | 1 |
| Make the cooking programme of your choice. | P900 |
| Memory | Confirm the programme by pressing the Memory button. A bip will confirm the setting and the time is set. | 8:59 |

Note: Auto menu cooking cannot be set as memory procedure.
For example: to set the program as memory 2: cook the food with 700W power for 3 minutes and 20 seconds.
| Display |
| Memory | In waiting states, press the Memory key twice, LED displays “2”. |
| Microwave Grill | Press the MICROWAVE GRILL key once, “P900” displays. |
| Microwave Grill | Keep pressing the MICROWAVE GRILL key until “P700”. |
| Memory | Turn the function selector to select 3 minutes and 20 seconds. “3:20” displays. |
| Start/Quick start | Press the Memory key to save the setting. |
| Or you can press the START/QUICK START key to start cooking and save the setting at the same time. |
EN
3/USING YOUR APPLIANCE
| Memory
Start/
Quick start | For the next time, in waiting states, press the MEMORY key twice and press the START/QUICK START key to operate the program that has been saved. |
| Inquiring Function | Display |
| Microwave Grill | In states of microwave, grill and combination cooking, press the MICROWAVE GRILL key, the current power will be displayed for 3 seconds. | |
| Time set | In cooking state, press the TIME SET key to inquire the current time and the time will display for 3 seconds. | |
| Lock-out Function for Children | Affichage |
| Stop/Cancel | Lock: In waiting state, press the STOP/CANCEL key for 3 seconds, there will be a beep denoting entering the children-lock state and the current time will display if the time has been set, otherwise, the oven will display “[ ]” . | [ ] |
| Stop/Cancel | Lock quitting: In locked state, press the STOP/CANCEL key for 3 seconds, there will be a long “beep” denoting that the lock is released. | [ ] |

Note:
Buzzer will sound five times when cooking finished.
During cooking, if the door is opened and after closing the door, START/QUICK START must be pressed to continued cooking.
Once the cooking program has been set, START/QUICK START is not pressed in one minute, the setting will be cancelled.
Buzzer will sound once by efficient pressing. no responds by inefficient pressing.
It is recommended that you regularly clean your oven and remove any food build-up on the inside and outside of the appliance. Use a damp, soapy sponge. If the appliance is not cleaned regularly, its surface could become damaged, permanently affecting the appliance's lifespan and possibly causing a safety hazard. If the door or door hinge are damaged, the oven should not be used until it has been repaired by an authorised person.
Do not clean the appliance with a steam cleaner.
The use of abrasive products, alcohol or thinner is not recommended; they may damage the appliance.
In the event of odour or caked-on dirt, boil water with lemon juice and vinegar in a cup for two minutes and clean the insides with a bit of dishwashing liquid.
The table can be removed to facilitate cleaning. To do this, handle it by the access zones provided for this purpose. If you remove the turning gear, do not let water penetrate into the the motor axle hole.
Don't forget to return the turning gear, wheel guide and turntable.
If you have doubts about the proper functioning of your appliance, this does not necessarily mean it is broken. In any event, check the following items:
| You observe that ... | What should you do? |
| The appliance does not start. | Check the electrical connection of your appliance.
Ensure that your oven's door is fully closed.
Ensure that the child safety feature is not activated. |
| The appliance is noisy.
The turntable does not rotate properly. | Clean the wheels and the rolling area under the turntable.
Ensure that the wheels are properly positioned. |
| You see steam on the window. | Wipe the condensation away with a cloth. |
| Food is not heated during a microwave programme. | Ensure that the cookware is suitable for microwave ovens and that the power level is appropriate. |
| The appliance is creating sparks. | Thoroughly clean the appliance: remove grease, cooking particles, etc.
Remove any metal items from the walls of the oven.
Never use metal items with the grid. |
| The bulb doesn't work. | Call the brand's authorized technician to replace the bulb. |

Warning:
Be careful, this appliance is equipped with a high tension circuit. Do not make yourself any repairing inside the oven.
- SERVICE CALLS
Any repairs that are made to your appliance must be handled by a qualified professional authorised to work on the brand. When you call, mention your appliance's "Service" reference, as well as its serial number "Nr". This information appears on the manufacturer's nameplate which can be found stuck behind the oven.
CUSTOMER RELATIONS
To find out more about all the brand's products:
information, tips, sales outlets, after-sales specialists.
THOMSON
MWGT263XD
FAGORBRANDT SAS
During maintenance work, request the exclusive use of certified original replacement parts.