
Q1585 - Laptop GIGABYTE - Free user manual and instructions
Find the device manual for free Q1585 GIGABYTE in PDF.


| Product Type | Laptop |
| Brand | Gigabyte |
| Model | Q1585 |
| Dimensions (Approx) | 38.0 x 25.0 x 2.5 cm |
| Weight (Approx) | 2.2 kg |
| Power Adapter | 19V 3.42A 65W |
| Battery Type | Lithium-ion, 6-cell |
| Display Size | 15.6 inches |
| Processor | Intel Core i5 or equivalent (varies) |
| Memory | 4-8 GB DDR3 |
| Storage | 500 GB HDD or 256 GB SSD (varies) |
| Operating System | Windows 10 Home |
| Connectivity | Wi-Fi 802.11 b/g/n, Bluetooth 4.0, Ethernet RJ-45 |
| Ports | USB 3.0 x2, USB 2.0 x1, HDMI, VGA, Audio combo, SD card reader |
| Webcam | 1.3 MP |
| Audio | Stereo speakers, microphone |
| Main Functions | Computing, internet browsing, multimedia playback, office applications, gaming (entry-level), video conferencing |
| Maintenance & Cleaning | Use a soft, dry cloth to clean the surface; avoid liquids; periodically clean vents with compressed air |
| Safety Precautions | Do not block vents; avoid extreme temperatures; use only the provided charger; do not expose to moisture |
| Spare Parts & Repairability | Battery, charger, keyboard, and RAM are user-replaceable; other components require professional service |
| General Information | Supports up to 16 GB RAM; has a multi-touch touchpad; includes DVD-RW drive in some models |
Frequently Asked Questions - Q1585 GIGABYTE
User questions about Q1585 GIGABYTE
0 question about this device. Answer the ones you know or ask your own.
Ask a new question about this device
Download the instructions for your Laptop in PDF format for free! Find your manual Q1585 - GIGABYTE and take your electronic device back in hand. On this page are published all the documents necessary for the use of your device. Q1585 by GIGABYTE.
USER MANUAL Q1585 GIGABYTE
natural_image
Exterior view of a modern black and silver laptop with visible 'GIGABYTE' branding on the front screen (no other text or symbols)• English
• 繁體中文
• Русский
V2.0
* Images Used for Reference Only
Copyright © 2010 GIGABYTE TECHNOLOGY CO., LTD.
All Rights Reserved
GIGABYTE Q1585 Series Notebooks User's Manual
Date Issued: 2010/04
This manual takes you, step by step, through setting up and using your new Notebook PC. Information in this manual has been carefully checked for accuracy and is subject to change without prior notice.
No part or parts of this manual may be reproduced, stored in a retrieval system, or transmitted, in any form or by any means, electronic, mechanical, by photocopy, recording, or otherwise, without prior written consent.
Trademarks
Product names used herein are for identification purposes only and may be the trademarks of their respective companies. Microsoft ^® , MS-DOS, Windows ^® , and Windows ^® Sound System are trademarks of the Microsoft Corporation.
Intel ^® & Atom ^™ . are registered trademarks of Intel Corporation.
Sound Blaster & Sound Blaster Pro are trademarks of Creative Technology.
All other brands or product names mentioned in this manual are trademarks or registered trademarks of their respective companies.
General Safety Precautions
In order to ensure your safety and the safety of you notebook, we ask that your carefully follow these safety precautions.

CAUTION: Using your notebook for long periods of time, with the base resting directly on exposed skin, can cause injury, burns or discomfort from the heat buildup that is generated from the base of your portable computer.
- After removing the notebook from the box, please ensure that all packaging materials are kept out of the reach of small children as they can cause a potential choking hazard. The packaging materials should be safely stored away in the event that it may be used again for safe transportation of the notebook.
- Ensure that the AC Adapter and power cable are placed in a safe area where it cannot be tripped over or stepped on. The AC Adapter should be situated in a well ventilated area and should have nothing resting on or covering it.
- Before turning on the notebook, ensure that it is placed on a level surface with at least 10 cm of clearance around the air vents, which will aid in proper cooling.
- Do not obstruct the air vents of the notebook and do not insert any foreign objects into this space. Doing this may cause a short circuit or may cause the CPU fan to malfunction, resulting in the risk of a fire or electric shock. This may eventually render permanent damage to the notebook.
- Do note press or touch the display panel.
- Only use the AC Adapter that is provided with the notebook or
that which is recommended by the manufacturer. Using non-recommended or non-approved parts may cause damage or increase the risk of a fire or explosion. In the event that another AC Adapter is required, advice should be sought from a GIGABYTE service agent, in order to make sure that the correct part is recommended.
- Please follow the battery installation guidelines. Incorrect installation of batteries may increase the risk of a fire or explosion.
- Only replace old batteries with the same or an alternative compatible battery that is recommended by GIGABYTE or an authorized GIGABYTE Service Centre.
- Before connecting the notebook to the power outlet, make sure that the voltage rating of the AC Adapter is compatible with the power specification in the country where you are located. A detailed list of the power specification for different countries can be found on page 23.
- When using an extension cord, please make sure that the total sum of ampere ratings for all connected devices does not exceed the total ampere capacity for the circuit.
- Before removing the battery from the notebook, make sure firstly that the notebook is switched off and secondly that the AC Adapter is disconnected from the electrical wall socket. Once this is done, it would be safe to remove the battery.

Do not carry the notebook battery, loose, in your handbag, backpack or pocket where loose metal objects (money, keys, chains, pens, etc) may be present. The metal objects can short circuit the terminals of the battery resulting in overheating that could cause a fire hazard. In the event that you need to transport the battery separately from the notebook, please place it inside an anti-static bag.
- Discard old worn out batteries according to the instructions on Page VI. Never throw batteries into a fire as this can cause an explosion.
- Never attempt to repair or service the notebook yourself. Please refer all repairs and servicing to qualified service personnel at a GIGABYTE Authorized Service Centre.
Travel Tips
Although notebooks are designed to be as robust as possible to cater for a mobile lifestyle, extreme care and caution should be taken when travelling. When travelling by land, sea or air, every precaution should be taken to make sure that the notebook is well secured when it is not in use.
- The most essential accessory you should have when travelling is a good carry case for your notebook. The case should be well padded to protect your notebook from drops and bumps, etc and should be big enough to hold the size of notebook.
- Make sure there is enough room to carry your AC Adapter and spare battery etc. Only carry the necessary items in your carry case, as the weight can become tedious especially when walking long distances or waiting in long queue's.
- When travelling by air, never book your notebook with checked baggage. Always declare it as hand baggage so that you can carry it into the airplane cabin with you. Most airlines allow two pieces of hand baggage with one of them being a bag or carry case with a portable notebook. Please consult your local airline for more details.
- When placing your notebook on an X-Ray, make sure that you keep a close eye on it when it is on the conveyor belt. Hold on to your
notebook until the last minute before placing it on the conveyor. In some airports it could be stolen while you are stuck in a queue waiting to pass through the metal detector.
- Notebooks and hard drives can pass through X-Ray machines but never allow these to pass through a metal detector. This can cause data loss to the hard drive.
- Never place your notebook in the overhead storage compartment as this can make it susceptible to damage caused by turbulence that may be experienced during the flight or in other case theft. You can store your notebook under your seat, where it is always in sight.
- You should take every precaution to protect your notebook from dust, dirt, liquid spillage, food droppings, extreme weather conditions and direct exposure to sunlight.
- When travelling between different climates, from one extreme to another, condensation may occur inside the notebook. If this does happen, please allow sufficient time for the moisture to evaporate completely, before attempting to switch on.
- When travelling from extremely colder to extremely warmer climates in a short space of time, and vice versa, please allow the notebook some time to adapt to the change in environment.
Usage Tips
- When unplugging the power connector from the notebook, please hold and pull on the connector or the strain relief loop to disconnect. Do not pull the power cord itself as this can cause damage to the cable or the notebook.
- In the event of an electrical storm, please disconnect the notebook from the power source and unplug any network or telephone cables that may be connected to the notebook.
- Do not use the notebook near water sources, like bathtubs, washing basins, kitchen or laundry sinks or swimming pools. Liquid that can spill onto the notebook by accident can cause electric shock to you and damage to the notebook.
Cleaning Tips
When cleaning the notebook, please make sure that the notebook is switched off and disconnected from the power source and that the battery is removed.
Notebook Cover:
Use a microfiber or lint free soft cotton cloth and kitchen detergent (mix 5 parts water to 1 part detergent).
- Wet the cloth and wring out all excess liquid and wipe the surfaces clean.
- Take extra care to make sure that the cloth is damp and not very wet, especially when cleaning around the air vents and other openings as too much liquid in the cloth could drip onto the external components causing damage to the notebook.
- Do not clean the keyboard with this liquid.
Keyboard:
- It is advisable to use a can of compressed air to clean debris that maybe caught underneath the keys.
- Isopropyl alcohol can be used to clean the keys by dipping a lint-free soft cloth into it, wringing out the excess liquid and wiping the keys.
- Allow to dry for at least 5 minutes.
LCD:
- It is best to use a microfiber cloth to clean the surface of the LCD.
- If there are any marks or stains present, it would be wise to use commercially available LCD cleaning kit. When using a commercially available LCD cleaning kit, never spray the liquid directly onto the screen. You must spray it onto the cleaning cloth and then wipe the screen clean.
- If this is not available then you can mix 50% isopropyl alcohol and 50% distilled water to clean the surface of the LCD screen.
- Dip the lint free soft cotton cloth into the solution, wringing out excess liquid.
- The cloth must be damp but not dripping with liquid.
• Take care not to let any excess liquid drip into the notebook. - Start from the top of the LCD surface and wipe from side to side.
- Continue with this until the entire LCD surface has been cleaned.
- Wipe the display with a clean, dry lint free soft cotton or microfiber cloth.
- Wait for the LCD surface to dry completely and then close the lid.

Be careful when using Isopropyl Alcohol as this is a flammable liquid. Please keep away from children, naked flames or a notebook that is switched on.
Warranty Guidelines
All warranty repairs and service must be carried out by a GIGABYTE Authorized Repair Centre.
GIGABYTE Limited Warranty
GIGABYTE warrants, that the GIGABYTE branded Notebook/Netbook is free of any defects in materials and workmanship under normal use during the warranty period.
- All GIGABYTE supplied AC adapters and batteries carry a 1 year limited warranty.
- The warranty is effective from date of purchase.
- If proof of purchase cannot be shown, then the warranty will be determined based on the date of manufacture.
- The limited warranty is only valid for GIGABYTE branded or supplied hardware.
- In the event that a defect arises in materials or workmanship and proof is shown of this defect, GIGABYTE will, through its authorized service provider or partner, repair the product at no extra charge, using new or refurbished replacement parts in order to fulfill the warranty obligations.
- If, during the warranty period, GIGABYTE or its service provider is unable to repair the product, the product will be replaced with a comparable product that is new or refurbished.
Warranty Limitations
The GIGABYTE Limited Warranty does not cover the following...
- Software, including the operating system and applications supplied with the product. This also includes third party software that may be installed after purchase.
- Third party hardware, products and accessories not supplied by GIGABYTE. This also includes third party hardware that may be bundled with the notebook or netbook.
- Products with missing or defaced labels and/or serial numbers
- Products damaged by environmental factors, which include oxidation
- Products damaged by natural disasters or acts of God.
- Physical Damages which include, but not limited to, the following:
▶ Unauthorized modifications, repairs or servicing - Misuse, abuse, neglect or failure to follow instructions in the user manual.
▶ Improper assembly
▶ Damages caused by transport due to improper packaging or mishandling by the courier company unless transport is part of the warranty conditions in certain countries.
▶ Electric damage resulting from faulty or failed electric power or power surges.
▶ Damaged or cracked components
▶ Liquid damage
Regulatory Notices
Federal Communications Commission Notice
This equipment has been tested and found to comply with the limits for a Class B digital service, pursuant to Part 15 of the FCC rules. These limits are designed to provide reasonable protection against harmful interference in a residential installation.
Any changes or modifications made to this equipment may void the user's authority to operate this equipment. This equipment generates, uses, and can radiate radio frequency energy. If not installed and used in accordance with the instructions, may cause harmful interference to radio communications. However, there is no guarantee that interference will not occur in a particular installation. If this equipment does cause harmful interference to radio or television reception, which can be determined by turning the equipment off and on, the user is encouraged to try to correct the interference by one or more of the following measures:
- Reorient or relocate the receiving antenna.
- Increase the separation between the equipment and receiver.
- Connect the equipment into an outlet on a circuit different from that to which the receiver is connected.
- Consult the dealer or an experienced radio/TV technician for help.
- All external cables connecting to this basic unit must be shielded.
For cables connecting to PCMCIA cards, see the option manual or installation instructions.
RF Exposure
This equipment must be installed and operated in accordance with provided instructions and must not be co-located or operating in conjunction with any other antenna or transmitter. End-users and installers must be provide with antenna installation instructions and transmitter operating conditions for satisfying RF exposure compliance.
CE Notice (European Union)
This symbol indicates this Booktop Q1585 notebook complies with the EMC Directive and the European Union's Low Voltage Directive. This symbol also indicates that Q1585 meets the following technical standards:
- EN 55022 — “Limitations and Methods of Measurement for the Radio Interferences of Information Technology Equipment.”
- EN 55024 — “Information technology equipment - Immunity characteristics - Limits and methods of measurement.”
- EN 61000-3-2 — “Electromagnetic compatibility (EMC) - Chapter 3: Limits - Section 2: Limits on the harmonic current emissions (Equipment input current up to and including 16 A per phase).”
- EN 61000-3-3 — “Electromagnetic compatibility (EMC) - Chapter 3: Limits - Section 3: Limits on the voltage fluctuations and flicker in low-voltage power supply systems for equipment with rate current up to and including 16 A.”

: EN 55022 emissions requirements provide for two classifications
• Class A governs commercial use
• Class B is governs residential use
For CB:
- Only use batteries designed for this computer. The wrong battery type may explode, leak or damage the computer
- Do not remove any batteries from the computer while it is powered on
- Do not continue to use a battery that has been dropped, or that appears damaged (e.g. bent or twisted) in any way. Even if the computer continues to work with a damaged battery in place, it may cause circuit damage, which may possibly result in fire.
- Recharge the batteries using the notebook's system. Incorrect recharging may make the battery explode.
- Do not try to repair a battery pack. Refer any battery pack repair or replacement to your service representative or qualified service personnel.
- Keep children away from, and promptly dispose of a damaged battery. Always dispose of batteries carefully. Batteries may explode or leak if exposed to fire, or improperly handled or discarded.
- Keep the battery away from metal appliances.
- Affix tape to the battery contacts before disposing of the battery.
- Do not touch the battery contacts with your hands or metal objects.
Battery Disposal & Caution
The product that you have purchased contains a rechargeable battery. The battery is recyclable. At the end of its useful life, under various state and local laws. It may be illegal to dispose of this battery into the municipal waste stream. Check with your local solid waste officials for details in your area for recycling options or proper disposal.
Danger of explosion if battery is incorrectly replaced. Replace only with the same or equivalent type recommended by the manufacturer. Discard used battery according to the manufacturer's instructions.
BSMI Notice (Taiwan Only)
Most Q1585 computers are classified by the Bureau of Standards, Meteorology and Inspection (BSMI) as Class B information technology equipment (ITE).

R32323
The symbol above must be attached to the product indicating compliance with the BSMI standard.
Replaceable Batteries
If any equipment is provided with a replaceable battery, and if replacement by an incorrect type could result in an explosion (for example, with some lithium batteries), the following applies:
- if the battery is placed in an operator access area, there shall be a marking close to the battery or a statement in both the operating and the servicing instructions;
- if the battery is placed elsewhere in the equipment, there shall be a marking close to the battery or a statement in the servicing instructions.
This marking or statement shall include the following or similar text:
CAUTION
RISK OF EXPLOSION IF BATTERY IS REPLACED
WITH AN INCOMPATIBLE BATTERY TYPE.
DISPOSE OF USED BATTERIES
ACCORDING TO THE INSTRUCTIONS


natural_image
Illustration of a person running toward a door with motion lines indicating speed (no text or symbols)Introduction
Congratulations and thank you for purchasing the GIGABYTE notebook computer. This portable notebook computer provides excellent multimedia functionality and is designed to provide you reliable, no fuss computing.
This manual will explain to you, step by step, how to setup and begin using your Q1585. It provides basic configuring, operation, care and troubleshooting guidelines.
Content
General Safety Precautions....
Travel Tips ......II
Usage Tips ......II
Cleaning Tips....III
Warranty Guidelines IV
Regulatory Notices & Certifications ......V
Battery Disposal & Caution......VI
Introduction VIII
Chapter 1 Before You Start
1.1 Make Sure You Have Everything ....2
1.2 Familiarize Yourself with the Computer ....2
1.3 Top View .... 3
1.4 Left View 4
1.5 Right View 5
1.6 Back View 6
1.7 Bottom View 6
Chapter 2 Getting Started
2.1 Power Sources 10
2.2 Recharging the Battery 11
2.3 Starting Your Notebook 12
2.4 Status Indicators 12
2.5 Using Function Keys 13
2.6 Using the Touch Pad 14
2.7 Memory Module Upgrade ....15
Chapter 3 GIGABYTE Smart Recovery
3.1 GIGABYTE Smart Recovery 18
Chapter 4 Troubleshooting
4.1 Identifying the Problem ....20
4.2 GIGABYTE Service Information 20
Appendix
Q1585 Specifications 22
International Country Voltage 23
Plug Type 27

natural_image
Illustration of a stack of books with question marks and a document, held by hands (no text or symbols)Chapter 1 Before You Start
This chapter provides basic information to help you get started and to use the Q1585 notebook.
Some of the features described herein may not function properly or at all unless used in conjunction with the pre-installed operating system. Any change to the operating system may cause improper function.
1.1 Make Sure You Have Everything
When you receive your notebook PC, unpack it carefully and check to make sure you have all the items listed below. For a pre-configured model you should have the following:
• GIGABYTE Notebook Computer
• Lithium-Ion Battery
• AC Adapter with Power Cord
- Driver Disc
- Quick Start Guide
Once you have checked and confirmed that your notebook system is complete, read through the following pages to learn about all of your notebook components.

NOTE: Depending on the model you purchased, the actual appearance of your notebook may vary from that shown in this manual. These images are for illustration purposes.
1.2 Familiarize Yourself with the Computer
Opening The Display Panel
To open the display panel, simply lift the lid up. Use one hand to keep the base of the notebook down firmly, and use the other hand to open the display. The hinges are designed to keep the notebook screen closed without the need for a latch.
When closing it, be sure not to slam the display shut as this can damage the display and notebook.

natural_image
Line drawing of a laptop with an arrow indicating left-hand side (no text or symbols)1.3 Top View
The following is an overview of the front of the notebook.

NO. Item Function
| 1 Webcam | The built-in 1.3 megapixel camera with 2 digital microphones allows you to snap a photo or create a video or hold a video conference or chat with just a click. |
| 2 Microphone | The built-in microphone allows for the reception and transmission of voice and/or other audio data to any program capable of utilizing the microphone. |
| 3 LCD Display | The display panel is a color LCD panel with back lighting for the display of text and graphics. | |
| 4 | Status Indicator Lights | The Status indicator lights correspond to specific operating modes. These modes are: Power on / Suspend status, Battery / AC Adapter status, Hard Drive Activity (HDD), Num Lock, Caps Lock, and Wireless LAN activity. |
| 5 | Keyboard | A full-size keyboard with dedicated Windows® keys. The layout will depend on the region you live in. |
| 6 | Touchpad | The touchpad pointing device is a mouse like cursor control with two buttons and a touch sensitive movement pad. |
| 7 | Touchpad Buttons | The left and right buttons function like the left and right mouse buttons. |
| 8 | Power On Button | This button turns your notebook on and off or puts it to sleep. (See Suspend/Power On Button in the Power On section for more information.) |
1.4 Left View
The following is a brief description of the left side of the notebook.

NO. Item Function
| 1 | External Monitor Port | The external monitor port allows you to connect an external monitor. |
| 2 | LAN (RJ-45) Port | The LAN port is designed to support a 10/100/1000 Base-T standard RJ-45 plug. |
| 3 | HDMI Port | The HDMI port allows you to connect a video device such as an HD television, projector, or HD display to your computer for outputing a high definition signal. |
| 4 | e-SATA/USB combo port | The e-SATA/USB combo port allows you to connect an external device such as an external hard disk drive or optical drive that use serial ATA as well as any type of USB device. |
| 5 | Multi Card Reader | The memory card reader offers the fastest and most convenient method to transfer pictures, music and data between your notebook and flash compatible devices such as digital cameras, MP3 players, mobile phones, and PDAs. |
| 6 | Express Card Slot | The Express Card Slot allows you to install one Type-II Express Card Slot. |
1.5 Right View
The following is a brief description of the right side of the notebook.

NO. Item Function
| 1 | Microphone Jack | The microphone jack allows you to connect an external microphone. |
| 2 | Headphone Jack | The headphone jack allows you to connect headphones or external speakers and amplifiers. |
| 3 | USB 2.0 Port | The USB port allows you to connect universal serial bus devices. It supports v2.0 of the USB standard, which allows data exchange rates as high as 480 Mb/s. |
| 4 | Optical Disc Drive | The optical drive allows you to play back and write media discs such as CDs & DVDs. |
| 5 | Optical Drive Activity Indicator | This light flickers to indicate activity when the ODD is playing a media disc or is being accessed by the operating system. |
| 6 | Optical DiscDrive EjectButton | The optical drive eject button allows you to open the optical drive tray to remove or insert a CD,DVD or BD. |
| 7 | Emergency TrayRelease | The emergency tray release allows you to open the optical drive tray without powering on your notebook or in an emergency. |
| 8 | Power AdapterPort | The power adapter port allows you to plug in the AC adapter to power your notebook and charge the internal Lithium-Ion battery. Only use certified AC adaptors. |
1.6 Back View
The following is an overview of the back of the notebook.

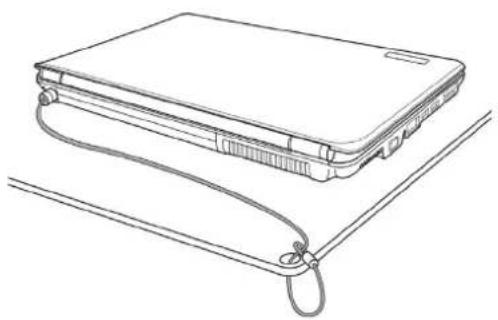
Kensington Lock Slot
The Kensington lock slot allows you to secure your notebook to an immovable object with an optional security cable.
natural_image
Line drawing of a laptop case with attached cable (no text or symbols)1.7 Bottom View
The following is an overview of the bottom of the notebook.
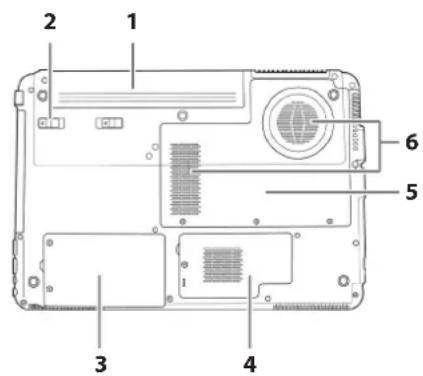
NO. Item Function
| 1 Battery Bay | The battery bay contains the internal Lithium-Ion battery. It can be unlatched for the removal of the battery when stored over a long period of time or for swapping a discharged battery with a charged Lithium-Ion battery, and latched in place again. |
| 2 Battery Release Latch | Release the battery for removal. |
| 3 | HDD Compartment Cover | The HDD compartment contains the computer's hard disk drive. |
| 4 | WiFi Compartment Cover | The Wi-Fi compartment contains the Wireless LAN card (Not available in all configurations). |
| 5 | RAM Compartment Cover | The memory compartment contains the computer's memory modules. |
| 6 | Cooling Vents | These are open vents for the fan to dissipate heat from the computer's internal components. Do not block these or place the computer in such a position that you inadvertently allow the outlets to become blocked. Do not cover the vents or place any object into or over the vents. |

Chapter 2 Getting Started
This chapter will show you the various ports and components of the Q1585 and familiarizes you with the notebook. Certain parts of the notebook can be user upgraded while others are fixed and cannot be changed.
2.1 Power Sources
Your computer has two types of power sources: a Lithium-Ion battery and an AC adapter.
Connecting the Power Adapters
The AC adapter provides power for operating your notebook PC as well as charging the battery.
Connecting the AC Adapter
- Plug the DC output cable into the DC power jack of your.
- Plug the AC adapter into an AC electrical outlet.
Switching from AC Adapter Power to Battery Power
- Be sure that you have at least one charged battery installed.
- Remove the AC adapter. Your notebook will automatically switch from DC power to battery power.

CAUTION: The Lithium-Ion battery does not ship with a pre-charge initially. You will need to connect the AC adapter to use your notebook PC the first time.
It is recommended that only the AC adapter supplied with the Q1585 is used. Any other adapter could cause damage or malfunction and might result in injury.

- Connect the power cord to the AC adapter.
- Connect the AC adapter to the DC power port of your computer.
- Connect the AC adapter power cord to an AC outlet.
2.2 Recharging the Battery
The Lithium-Ion battery is recharged internally using the AC adapter. To recharge the battery, make sure the battery is installed and the computer is connected to the AC adapter.
There is no “memory effect” in Lithium-Ion batteries; therefore you do not need to discharge the battery completely before recharging. The charge times will be significantly longer if your notebook PC is in use while the battery is charging. If you want to charge the battery more quickly, put your computer into Suspend mode or turn it off while the adapter is charging the battery.
Low Battery State
When the battery level is low, a notification message appears. If you do not respond to the low battery message, the battery continues to discharge until it is too low to operate. When this happens, your notebook PC goes into Suspend mode. There is no guarantee your data will be saved once the notebook reaches this point.

CAUTION: To protect your notebook from damage, use only the power adapter that came with it because each power adapter has its own power output rating.
Once your notebook PC goes into suspend mode as a result of a dead battery, you will be unable to resume operation until you provide a source of power either from an adapter or a charged battery. Once you have provided power, you can press the Suspend/Resume button to resume operation. In Suspend mode, your data is maintained for some time, but if a power source is not provided promptly, the power indicator stops flashing and then goes out, in which case you have lost the data that was not saved. Once you
provide power, you can continue to use your computer while an adapter charges the battery.
Battery Replacement
There is danger of explosion if an incorrect battery type is used for replacement. For computers equipped with a replaceable Lithium-Ion battery pack, the following applies:
- If the battery is placed in an OPERATOR ACCESS AREA, there shall be a marking close to the battery, or a statement in both the operating and the servicing instructions;
- If the battery is placed elsewhere in the computer, there shall be a marking close to the battery or a statement in the servicing instructions.
The marking or statement shall include the following or similar text:

CAUTION: Risk of explosion if battery is replaced with an incorrect type. Dispose of used batteries according to the instructions.
2.3 Starting Your Notebook
Suspend / Power on Button
The suspend/power on switch is used to switch on your notebook from its off state. Once you have connected your AC adapter or charged the internal Lithium-Ion battery, you can power on your notebook by pressing the suspend/power on button located above the keyboard. If you need to take an extended break, press the button again to place the notebook into sleep mode or turn it off.

CAUTION: Do not carry your notebook around with the power on or subject it to shocks or vibration, as you risk damaging the hard disk.
When you power on your notebook, it will perform a Power On Self Test (POST) to check the internal parts and configuration for correct functionality. If a fault is found, your computer emits an audio warning and/or displays an error message on the display with a description or code.
Depending on the nature of the problem, you may be able to continue by starting the operating system or by entering the BIOS setup utility and revising the settings. After satisfactory completion of the Power On Self Test (POST), your notebook loads the installed operating system.

CAUTION Never turn off your notebook during the Power On Self Test (POST), or an unrecoverable error may occur.
2.4 Status Indicators
The status indicator lights correspond to specific operating modes. These modes are: Power on/ Suspend status, Battery/AC Adapter status, hard Drive Activity (HDD), Num Lock, Caps Lock, and Wireless transmission activity.

natural_image
Line drawing of a laptop with a speech bubble highlighting the screen (no text or symbols present)NO. Symbol Item Function
| 1 | Power On/SuspendStatusIndicator | This light illuminates when the computer is powered on, and flashes when the computer is in Suspend mode. | |
| 2 | Battery Indicator | The Battery indicator tells you whether the Lithium-Ion battery is charging or is already fully charged..If you are charging your battery, the Battery indicator remains on even if your notebook is shut off.If there is no battery activity, the power adapters are not connected, or the power switch is off, the Battery indicator will also be off.Batteries subjected to shocks, vibrations or extreme temperatures can be permanently damaged. | |
| 3 | Hard Disk Drive (HDD) Activity Indicator | The Hard Disk Drive (HDD) activity indicator tells you whether your internal hard drive is being accessed and, if so, how fast.Do not switch off the botebook if this light is flashing. | |
| 4 | The Num Lock Indicator | This indicator shows when the internal keyboard is in ten-key numeric keypad mode. | |
| 5 | The Caps Lock Indicator | This indicator tells you that the keyboard is set to type in all capital or uppercase letters. | |
| 6 | Wireless Transmission Activity Indicator | The Wireless Transmission Activity indicator tells you whether your computer is connected to a Bluetooth/wireless network or not. |
2.5 Using Function Keys
Your computer has 12 function keys, F1 through F12. The functions assigned to these keys differ for each application. You should refer to your software documentation to find out how these keys are used. The FN key provides extended functions for the notebook and is always used in conjunction with another key.
- FN+F1: Places the notebook in Suspend mode. Pressing the Power button returns it to active mode.
- FN+F2: Enables or disables the wireless network connection. Press this key combination to enable Wireless LAN connection.
- [FN+F3]: Allows you to change your selection of where to send your display video. Each time you press the combination of keys you will step to the next choice. The choices, in order, are: built-in display panel only, both built-in display panel and external monitor, or external monitor only.
- FN+F4: Decreases the screen Brightness.
- FN+F5: Increases the screen Brightness.
- FN+F6: Mutes the computer's volume.
- FN+F7: Decreases the computer's volume.
- FN+F8: Increases the computer's volume.
- FN+F9: Play or Pauses the current/selected multimedia track.
- FN+F10: Stop the current multimedia track.
- FN+F11: Skip Back to the previous multimedia track.
- FN+F12: Skip Forward to the next multimedia track.
- FN+Esc: Enables or disables the Bluetooth function.
2.6 Using the Touchpad
A touchpad pointing device comes built into your computer. It is used to control the movement of the pointer to select items on your desktop and use applications on the notebook.
The touchpad consists of a cursor control, a left and right button, and a scroll bar. The cursor control works the same way a mouse does, and moves the cursor around the display. It only requires light pressure from the tip of your finger. The left and right buttons function the same as mouse buttons. The actual functionality of the buttons may vary depending on the application that is being used. The scroll bar allows you to navigate quickly through pages, without having to use the on-screen cursor to manipulate the up and down scroll bars.

Clicking
Clicking means pushing and releasing a button. To left-click, move the cursor to the item you wish to select, press the left button once, and then immediately release it. To right click, move the mouse cursor to the item you wish to select, press the right button once, and then immediately release it. You also have the option to perform the clicking operation by tapping lightly on the touchpad once.
Double-Clicking
Double-clicking means pushing and releasing the left button twice in rapid succession. This procedure does not function with the right button. To double-click, move the cursor to the item you wish to select, press the left button twice, and then immediately release it. You also have the option to perform the double-click operation by tapping lightly on the touchpad twice.
Dragging
Dragging means pressing and holding the left button while moving the cursor. To drag, move the cursor to the item you wish to move. Press and hold the left button while moving the item to its new location and then release it. Dragging can also be done using the touchpad. First, tap the touchpad twice over the item you wish to move, making sure to leave your finger on the pad after the final tap. Next, move the object to its new location by moving your finger across the touchpad, and then release your finger. Using the Scroll bar allows you to navigate through a document quickly without using the window's scroll bars. This is particularly useful when you are navigating through on-line pages.
2.7 Memory Module Upgrade
To increase your notebook's memory capacity (up to 8 GB maximum), additional memory modules may be installed. The memory upgrade must be a dual-in-line (DIMM) SDRAM module. Do not remove any screws from the memory upgrade module compartment except for the ones specifically shown in the directions here.
Installing a Memory Module
The following steps describe how to install a memory upgrade module. We do not recommend that you do this yourself.

natural_image
Technical line drawing of a mechanical assembly with no visible text or symbols- Turn off power to your notebook using the power switch, disconnect the power adapter, and/or remove the battery pack.
- Place your notebook upside-down on a clean work surface.
- Loosen the five screws securing the compartment cover.
- Lift up and remove the compartment cover. The memory upgrade module can be severely damaged by electrostatic discharge (ESD). Be sure you are properly grounded when handling and installing the module.
-
Align the connector edge of the memory upgrade module, chip side up, with the connector slot in the compartment.
-
Insert the memory upgrade module at a 45^ angle and press it firmly onto the connector.
- Press the memory upgrade module down into the compartment until it locks into the retaining clips on either side. You will hear a click when it is properly in place.
- Replace the cover and screws that were removed previously. Installation of the new memory module is now complete.
The memory upgrade module is not something you routinely remove from your notebook PC. Once it is installed, you should leave it in place unless you want to increase system memory capacity.

Chapter 3 GIGABYTE Smart Recovery
3.1 GIGABYTE Smart Recovery
System Recovery - Restore your Q1585 operating system. The hard drive of the Q1585 has a hidden partition that contains a full backup image of the operating system that can be used to recover the system in the event that something happens to the operating system.

If the hard drive is removed or the partition deleted, the recover options will no longer be available and a recovery service will be needed.
Launch System Recovery
The system recover feature is part of the netbook installation and it ships preset from the factory. The options menu allows you to launch the Windows recovery tool to reinstall the operating system to factory defaults.
Below will briefly describe how to launch the recovery tool and to get the recovery started.
- Turn off or restart the netbook.
- Turn the netbook on and press and hold the F9 key to launch the tool.
- The recovery window will open and give you the option to "Recovery" in the toolbar. You will be prompted if you want to recovery. Click on "Recovery" to begin the repair if you do.

- The "Recovering" window will open and begin the recovery.
- Once it is complete you will be prompted to reboot the netbook.



natural_image
Illustration of a human head silhouette with a brain containing three question marks, symbolizing thinking or confusion (no text present)Chapter 4 Troubleshooting
This section will briefly cover some frequently encountered problems and questions and provide a quick guide to assist with solve these problems. Most problems can be resolved quickly, simply and easily and are not always a system problem. Should you encounter a problem that is not yet or differently listed, please consult the GIGABYTE website or call your unit supplier for assistance.
For website assistance go to the Support section of www.gigabyte.com for telephonic assistance please call the supplier of your unit or take the unit to the supplier directly for assistance.
Troubleshooting
Your notebook PC is sturdy and subject to few problems in the field. However, you may encounter simple setup or operating problems that you can solve on the spot, or problems with peripheral devices, that you can solve by replacing the device. The information in this section helps you isolate and resolve some of these straightforward problems and identify failures that require service.
4.1 Identifying The Problem
If you encounter a problem, go through the following procedure before pursuing complex troubleshooting:
- Turn off your notebook.
- Make sure the AC adapter is plugged into your notebook and to an active AC power source.
- Make sure that any card installed in the PC card slot is seated properly. You can also remove the card from the slot, thus eliminating it as a possible cause of failure.
- Make sure that any devices connected to the external connectors are plugged in properly. You can also disconnect such devices, thus eliminating them as possible causes of failure.
- Turn on your notebook. Make sure it has been off at least 10 seconds before you turn it on.
- Go through the boot sequence.
- If the problem has not been resolved, contact your support representative.
Before you place the call, you should have the following information ready so that the customer support representative can provide you with the fastest possible solution:
- Product name
• Product configuration number
• Product serial number - Purchase date
- Conditions under which the problem occurred
- Any error messages that have occurred
• Hardware configuration - Type of device connected, if any
See the configuration label on the bottom of your notebook for configuration and serial numbers.
Copyright-protected technology This product incorporates copyright protection technology that is protected by U.S. patents and other intellectual property rights. Use of this copyright protection technology must be authorized by Macrovision, and is intended for home and other limited viewing uses only unless otherwise authorized by Macrovision. Reverse engineering or disassembly is prohibited.
4.2 GIGABYTE Service Information
More service information please link to GIGABYTE official website: www.gigabyte.com

natural_image
Illustration of a hand holding a document with lines, no text or symbols presentAppendix
Q1585 Specifications
| Specifications | ||
| Q1585M Q1585N | ||
| CPU Intel | ^ CoreTM i7 / i5 / i3 processor Intel | ^ CoreTM i7 / i5 / i3 processor |
| OS Genuine Windows | ^ 7 Compliant Genuine Windows | ^ 7 Compliant |
| LCD Display | 15.6" WXGA HD(1366x768) LED backlight | 15.6" WXGA HD(1366x768) LED backlight |
| System Memory DDRIII SO-DIMM 1333MHz*2 (Max 8GB) DDRIII SO-DIMM 1333MHz*2 (Max 8GB) | ||
| Chipset Mobile Intel | ^ HM55 Express Chipsets Mobile Intel | ^ HM55 Express Chipsets |
| Video Graphics Intel | ^ HD Graphics with dynamic frequency NVIDIA | ^ GeForce ^ GT 335M |
| Hard Disk Drive | 320/500GB 2.5" SATA HDD | 320/500GB 2.5" SATA HDD |
| Optical Drive | 12.7mm Super Multi DVD RW | 12.7mm Super Multi DVD RW |
| I/O Port | USB(2.0)*3(eSATA/USB Combo*1), HDMI, D-Sub,RJ45, Mic-in, Earphone-out, 4-in-1 card reader(SD/MMC/MS/MS Pro), Mini Express Card Slot, DC-in Jack | USB(2.0)*3(eSATA/USB Combo*1), HDMI, D-Sub, Mic-in, Earphone-out, RJ45, 4-in-1 card reader(SD/MMC/MS/MS Pro), Mini Express Card Slot, DC-in Jack |
| Audio | 1.5 Watt Speakers*2, Internal Mic-in | 1.5 Watt Speakers*2, Internal Mic-in |
| Communications | 10/100/1000Mbps Ethernet Base-T802.11b/g/n Wireless | 10/100/1000Mbps Ethernet Base-T802.11b/g/n Wireless |
| Bluetooth | Build-in V2.1 + EDR | Build-in V2.1 + EDR |
| Webcam | 1.3 Mega Pixel | 1.3 Mega Pixel |
| Security HDD Password, Kensington Lock HDD Password, Kensington Lock | ||
| Battery Li-ion 6-cell, 2200mAh Li-ion 6-cell, 2600mAh | ||
| Dimensions | 373(W) x 257(D) x 33~40.9(H) mm | 373(W) x 257(D) x 33~40.9(H) mm |
| Weight | ~2.8kg (w/ODD and battery) | ~2.8kg (w/ODD and battery) |
International Country Voltage
| Region Voltage Frequency | ||
| Afghanistan 240V 50 Hz | ||
| Albania 220V 50 Hz | ||
| Algeria 230V 50 Hz | ||
| American Samoa 120V 60 Hz | ||
| Andorra 230V 50 Hz | ||
| Angola 220V 50 Hz | ||
| Anguilla 110V 60 Hz | ||
| Antigua 230V 60 Hz | ||
| Argentina 220V 50 Hz | ||
| Armenia 230V 50 Hz | ||
| Aruba 127V 60 Hz | ||
| Australia | 230V 50 Hz | |
| Austria 230V 50 Hz | ||
| Azerbaijan | 220V 50 Hz | |
| Azores 220V 50 Hz | ||
| Bahamas | 120V 60 Hz | |
| Bahrain | 230V 50 Hz | |
| Balearic Islands | 220V 50 Hz | |
| Bangladesh 220V 50 Hz | ||
| Barbados | 115V 50 Hz | |
| Belarus 220V 50 Hz | ||
| Belgium | 230V 50 Hz | |
| Belize 110V / 220V 60 Hz | ||
| Benin | 220V 50 Hz | |
| Bermuda | 120V 60 Hz | |
| Bhutan | 230V 50 Hz | |
| Bolivia | 220V 50 Hz | |
| Bonaire | 127V 50 Hz | |
| Bosnia | 220V 50 Hz | |
| Botswana | 231 V | 50 Hz |
| Region Voltage Frequency | ||
| Brazil | 127V / 220 V | 60 Hz |
| Brunei | 240V 50 Hz | |
| Bulgaria | 230V 50 Hz | |
| Burkina Faso | 220V 50 Hz | |
| Burundi | 220V 50 Hz | |
| Cambodia | 230V 50 Hz | |
| Cameroon | 220V 50 Hz | |
| Canada 120V 60 Hz | ||
| Canary Islands | 220V 50 Hz | |
| Cape Verde 220V 50 Hz | ||
| Cayman Islands | 120V 60 Hz | |
| Central African Republic | 220V 50 Hz | |
| Chad | 220V 50 Hz | |
| Channel Islands | 230V 50 Hz | |
| Chile | 220V 50 Hz | |
| China (mainland only) | 220V 50 Hz | |
| Colombia | 120V 60 Hz | |
| Comoros | 220V 50 Hz | |
| Congo-Brazzaville | 230V 50 Hz | |
| Congo-Kinshasa | 220V 50 Hz | |
| Cook Islands | 240V 50 Hz | |
| Costa Rica | 120V 60 Hz | |
| Côte d'Ivoire | 230V 50 Hz | |
| Croatia | 230V 50 Hz | |
| Cuba | 110V 60 Hz | |
| Cyprus | 240V 50 Hz | |
| Czech Republic | 230V 50 Hz | |
| Denmark | 230V 50 Hz | |
| Djibouti 220V 50 Hz | ||
| Dominica | 230V 50 Hz | |
| Dominican Republic 110V 60 Hz | ||
| East Timor 220V 50 Hz | ||
| Ecuador 120V 60 Hz | ||
| Egypt 220V 50 Hz | ||
| El Salvador 115V 60 Hz | ||
| Equatorial Guinea 220V 50 Hz | ||
| Eritrea 230V 50 Hz | ||
| Estonia 230V 50 Hz | ||
| Ethiopia 220V 50 Hz | ||
| Faroe Islands 220V 50 Hz | ||
| Falkland Islands 240V 50 Hz | ||
| Fiji | 240V 50 Hz | |
| Finland | 230V 50 Hz | |
| France | 230V (formerly 220V) | 50 Hz |
| French Guiana | 220V 50 Hz | |
| Gaza Strip 230V 50 Hz | ||
| Gabon | 220V 50 Hz | |
| Gambia | 230V 50 Hz | |
| Georgia | 220V 50 Hz | |
| Germany | 230V (formerly 220V) | 50 Hz |
| Ghana | 230V 50 Hz | |
| Gibraltar | 240V 50 Hz | |
| Greece | 230V (formerly 220V) | 50 Hz |
| Greenland | 220V 50 Hz | |
| Grenada | 230V 50 Hz | |
| Guadeloupe | 230V 50 Hz | |
| Guam | 110V 60 Hz | |
| Guatemala | 120V 60 Hz | |
| Guinea | 220V 50 Hz | |
| Guinea-Bissau | 220V 50 Hz |
| Region Voltage Frequency | ||
| Guyana | 240V 60 Hz | |
| Haiti | 110V 60 Hz | |
| Honduras | 110V 60 Hz | |
| Hong Kong | 220V 50 Hz | |
| Hungary | 230V (formerly 220V) | 50 Hz |
| Iceland | 230V 50 Hz | |
| India | 220V 50 Hz | |
| Indonesia | 127V / 230V | 50 Hz |
| Iran | 220V 50 Hz | |
| Iraq | 230V 50 Hz | |
| Ireland | 230V (formerly 220V) | 50 Hz |
| Isle of Man | 240V 50 Hz | |
| Israel | 230V 50 Hz | |
| Italy | 230V (formerly 220V) | 50 Hz |
| Jamaica | 110V and 220V | 50 Hz |
| Japan | 100 V | 50 Hz / 60Hz |
| Jordan | 230V 50 Hz | |
| Kazakhstan | 220V 50 Hz | |
| Kenya | 240V 50 Hz | |
| Kiribati | 240V 50 Hz | |
| Kuwait | 240V 50 Hz | |
| Kyrgyzstan | 220V 50 Hz | |
| Laos | 230V 50 Hz | |
| Latvia | 220V 50 Hz | |
| Lebanon | 240V 50 Hz | |
| Lesotho | 220V 50 Hz | |
| Liberia | 120V / 240V | 50 Hz |
| Libya | 127V 50 Hz | |
| Lithuania | 230V (formerly 220V) | 50 Hz |
| Liechtenstein | 230V 50 Hz | |
| Luxembourg 230V (formerly 220V) 50 Hz | ||
| Macau S.A.R. of China 220V 50 Hz | ||
| Macedonia 220V 50 Hz | ||
| Madagascar 127V / 220 V 50 Hz | ||
| Madeira 220V 50 Hz | ||
| Malawi 230V 50 Hz | ||
| Malaysia 240V 50 Hz | ||
| Maldives 230V 50 Hz | ||
| Mali 220V 50 Hz | ||
| Malla 230V 50 Hz | ||
| Martinique 220V 50 Hz | ||
| Mauritania 220V 50 Hz | ||
| Mauritius | 230V 50 Hz | |
| Mexico | 127V 60 Hz | |
| Micronesia | 120V 60 Hz | |
| Moldova | 220-230V | 50 Hz |
| Monaco | 127V / 220 V 50 Hz | |
| Mongolia | 230 V | 50 Hz |
| Montenegro | 220V 50 Hz | |
| Montserrat (Leeward Is.) | 230V 60 Hz | |
| Morocco | 127V / 220 V 50 Hz | |
| Mozambique | 220V 50 Hz | |
| Myanmar/Burma | 230V 50 Hz | |
| Namibia | 220V 50 Hz | |
| Nauru | 240V 50 Hz | |
| Nepal | 230V 50 Hz | |
| Netherlands | 230V (formerly 220V) 50 Hz | |
| Netherlands Antilles | 127V / 220V | 50 Hz |
| New Caledonia | 220V 50 Hz | |
| Region Voltage Frequency | ||
| New Zealand | 230V 50 Hz | |
| Nicaragua | 120V 60 Hz | |
| Niger | 220V 50 Hz | |
| Nigeria | 240V 50 Hz | |
| North Korea | 220V 50 Hz | |
| Norway | 230V 50 Hz | |
| Okinawa | 100 V | 60 Hz |
| Oman | 240V 50 Hz | |
| Pakistan | 230V 50 Hz | |
| Panama | 110V 60 Hz | |
| Papua New Guinea | 240V 50 Hz | |
| Paraguay | 220V 50 Hz | |
| Peru | 220V 60 Hz | |
| Philippines | 220V 60 Hz | |
| Poland 230V 50 Hz | ||
| Portugal | 220V 50 Hz | |
| Puerto Rico | 120V 60 Hz | |
| Qatar | 240V 50 Hz | |
| Réunion | 220V 50 Hz | |
| Romania | 230V (formerly 220V) | 50 Hz |
| Russian Federation | 220V 50 Hz | |
| Rwanda | 230V 50 Hz | |
| St. Kitts and Nevis | 110V / 230V | 60 Hz |
| St. Lucia (Winward Is.) | 240V 50 Hz | |
| St. Vincent (Winward Is.) | 230V 50 Hz | |
| São Tomé and Príncipe | 220V 50 Hz | |
| Saudi Arabia 127V / 220V | 60 Hz | |
| Senegal | 230V 50 Hz | |
| Serbia | 220V 50 Hz | |
| Seychelles 240V 50 Hz | ||
| Sierra Leone 230V 50 Hz | ||
| Singapore 230V 50 Hz | ||
| Slovakia 230V 50 Hz | ||
| Slovenia 230V 50 Hz | ||
| Somalia 220V 50 Hz | ||
| South Africa 220V 50 Hz | ||
| South Korea 220V 60 Hz | ||
| Spain 230V (formerly 220V) 50 Hz | ||
| Sri Lanka 230V 50 Hz | ||
| Sudan 230V 50 Hz | ||
| Suriname | 127V 60 Hz | |
| Swaziland 230V 50 Hz | ||
| Sweden 230V 50 Hz | ||
| Switzerland | 230V 50 Hz | |
| Syria | 220V 50 Hz | |
| Tahiti | 110V / 220V | 60 Hz / 50 Hz |
| Taiwan | 110V | 60 Hz |
| Tajikistan | 220V 50 Hz | |
| Tanzania | 230V 50 Hz | |
| Thailand 220V 50 Hz | ||
| Togo | 220V 50 Hz | |
| Tonga | 240V 50 Hz | |
| Trinidad & Tobago | 115V | 60 Hz |
| Tunisia | 230V 50 Hz | |
| Turkey | 230V 50 Hz | |
| Turkmenistan | 220V 50 Hz | |
| Uganda | 240V 50 Hz | |
| Ukraine | 220V 50 Hz |
| Region Voltage Frequency | ||
| United Arab Emirates | 220V 50 Hz | |
| United Kingdom | 230V (formerly 240V) | 50 Hz |
| United States of America | 120V 60 Hz | |
| Uruguay | 230V (formerly 220V) | 50 Hz |
| Uzbekistan | 220V 50 Hz | |
| Vanuatu 230V 50 Hz | ||
| Venezuela | 120V 60 Hz | |
| Vietnam | 220V 50 Hz | |
| Virgin Islands | 110V | 60 Hz |
| Western Samoa | 230V 50 Hz | |
| Yemen | 230V 50 Hz | |
| Zambia | 230V 50 Hz | |
| Zimbabwe | 220V 50 Hz |
Plug Type
| Country Plug Type Plug Picture Connector Type Connector Picture | |||||
| USA | LP-30B LS15 | 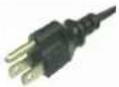 |  | ||
| Canada | |||||
| Japan LP-54 LS15 |  |  | |||
| Taiwan LP-53 LS15 |  |  | |||
| China PC-323 LS15 |  |  | |||
| Korea LP-E04 LS15 |  |  | |||
| England | LP-60L LS15 |  |  | ||
| Singapore | |||||
| South Africa | PE-364 LS15 |  |  | ||
| PE-361 LS15 |  |  | |||
| Australia LP-23A LS15 |  |  | |||
| Germany | LP-33 |  | LS15 |  | |
| France | |||||
| Sweden | |||||
| Finland | |||||
| Norway | |||||
| Belgium | |||||
| Netherlands | |||||
| Austria | |||||
| Switzerland LP-37 LS15 |  |  | |||
| Denmark LP-38 LS15 |  |  | |||
| Italy PE-336 LS15 |  |  | |||
natural_image
Illustration of a person running toward a door with motion lines indicating speed (no text or symbols)前言
natural_image
Illustration of a stack of books with question marks and a document, held by hands (no text or symbols)第一章 開始使用前
natural_image
Line drawing of a foldable electronic device with an arrow indicating the fold change (no text or symbols present)1.3 前視圖
以下所示為本筆記型電腦的前視圖

NO. 項目 說明
Kensington ↓ 2 键接槽
natural_image
Line drawing of a laptop with attached cable (no text or symbols)1.7 底視圖
以下所示為本筆記型電腦的底視圖

NO. 項目 說明
natural_image
Line drawing of a laptop with a speech bubble highlighting the screen (no text or symbols present)natural_image
Line drawing of a laptop with a magnified inset showing a small screen and button (no text or symbols)注
natural_image
Technical line drawing of a mechanical or electronic component with no visible text or symbolsnatural_image
Illustration of a human head with a brain containing three question marks, surrounded by motion lines (no text or symbols)第四章 疑難排解
natural_image
Illustration of a hand holding a document with a computer monitor (no text or symbols visible)附錄
Q1585 規格
| 規格 | ||
| Q1585M Q1585N | ||
| 口贝處® | Intel® CoreTM i7/i5/i3處® | Intel® CoreTM i7/i5/i3處® |
| 色獎茶絲 | j-版Microsoft® Windows® 7 | j-版Microsoft® Windows® 7 |
| 籲小品 | 15.6吋閥板座 1366x768 LED®水液晶器 | 15.6吋閥板座 1366x768 LED®水液晶器 |
| 行機器 | DDRIII SO-DIMM 1333MHz*2 (Max 8GB) DDRIII | SO-DIMM 1333MHz*2 (Max 8GB) |
| 茶絲品目組 | Intel® HM55® 池品目組 | Intel® HM55® 池品目組 |
| 籲小品 | Intel® HD Graphics with dynamic frequency NVIDIA | ® GeForce® GT 335M |
| 倒機機 | 2.5" 9.5mm SATA 倒機 320/500GB 2.5" 9.5mm SATA | 倒機 320/500GB |
| 火機機 | 12.7mm DVD Super Multi RW 12.7mm DVD Super Multi RW | |
| 連接串 | USB(2.0)*3(eSATA/USB Combo*1), HDMI, D-Sub, RJ45, 多処処処処処処, 出合一鍵上鍵支接(SD/MMC/MS/MS Pro), Mini Express Card控機, 晶源機 | USB(2.0)*3(eSATA/USB Combo*1), HDMI, D-Sub, RJ45, 多処処処処処, 出合一鍵上鍵支接(SD/MMC/MS/MS Pro), Mini Express Card控機, 晶源機 |
| 背鈎 | 1.5°接機器*2, 弹進式接機 | 1.5°接機器*2, 弹進式接機 |
| 通訊 | 10/100/1000亿綁路介台, 802.11b/g/n無線綁路, 弹進時可 V2.1 + EDR | 10/100/1000亿綁路介台, 802.11b/g/n無線綁路, 弹進時可V2.1 + EDR |
| 報訊鏡頭 | 130引導表 | 130引導表 |
| 貝多報音 | 倒機器防撞, Kensington防撞器防撞器防撞器防撞器防撞器防撞器防撞器防撞器防撞器防撞器防撞器防撞器防撞器防撞器防撞器防撞器防撞器防撞器防撞器防撞器防撞器防撞器防撞器防撞器防撞器防撞器防撞器防撞器防撞器防撞器防撞器防撞器防撞器防撞器 | |
| 品汁 | 6-cell光晶式光晶汁, 2200mAh 6-cell | 光晶式光晶汁, 2600mAh |
| 片 | 373(W) x 257(D) x 33~40.9(H) mm 373(W) x 257(D) x 33~40.9(H) mm | |
| 产品 | 約2.8kg(台 ODD,品汁) | 約2.8kg(台 ODD,品汁) |
各國電壓列表
natural_image
Illustration of a person running toward a large door with motion lines indicating speed (no text or symbols)ВВЕДЕНИЕ
natural_image
Illustration of a stack of books with question marks and a document, held by hands (no text or symbols)natural_image
Line drawing of a laptop with an arrow indicating left-hand rule (no text or symbols)1.3 Вид сверху
natural_image
Line drawing of a laptop with attached cable (no text or symbols)1.7 Вид снизу
natural_image
Line drawing of a laptop with a speech bubble showing icons, no text or symbols presentnatural_image
Line drawing of a laptop computer with a magnified inset showing a small screen and button (no text or symbols)Щелчок кнопкой
natural_image
Technical line drawing of an internal mechanical or electronic component with no visible text or symbols
natural_image
Illustration of a human head silhouette with a brain containing three question marks, symbolizing thinking or confusion (no text present)natural_image
Illustration of a hand holding a document with lines, no text or symbols presentПриложение
- Trademarks
- General Safety Precautions
- Travel Tips
- Usage Tips
- Cleaning Tips
- Notebook Cover:
- Keyboard:
- LCD:
- Warranty Guidelines
- GIGABYTE Limited Warranty
- Warranty Limitations
- Regulatory Notices
- RF Exposure
- CE Notice (European Union)
- For CB:
- Battery Disposal & Caution
- BSMI Notice (Taiwan Only)
- Replaceable Batteries
- Introduction
- Content
- Chapter 1 Before You Start
- Chapter 2 Getting Started
- Chapter 3 GIGABYTE Smart Recovery
- Chapter 4 Troubleshooting
- Appendix
- Make Sure You Have Everything
- Familiarize Yourself with the Computer
- Opening The Display Panel
- Top View
- Left View
- Right View
- Back View
- Kensington Lock Slot
- Bottom View
- Power Sources
- Connecting the Power Adapters
- Connecting the AC Adapter
- Switching from AC Adapter Power to Battery Power
- Recharging the Battery
- Low Battery State
- Battery Replacement
- Starting Your Notebook
- Suspend / Power on Button
- Status Indicators
- Using Function Keys
- Using the Touchpad
- Clicking
- Double-Clicking
- Dragging
- Memory Module Upgrade
- Installing a Memory Module
- GIGABYTE Smart Recovery
- Launch System Recovery
- Troubleshooting
- Identifying The Problem
- GIGABYTE Service Information
- 前言
- 第一章 開始使用前
- 前視圖
- Kensington ↓ 2 键接槽
- 底視圖
- 注
- 第四章 疑難排解
- ВВЕДЕНИЕ
- Вид сверху
- Вид снизу
- Щелчок кнопкой
Brand : GIGABYTE
Model : Q1585
Category : Laptop