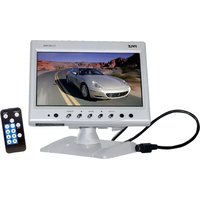
PLHR78W - Monitor Pyle - Free user manual and instructions
Find the device manual for free PLHR78W Pyle in PDF.


| Brand | Pyle |
| Model | PLHR78W |
| Product Type | Wireless Video Baby Monitor |
| Display Size | 3.5-inch TFT LCD |
| Display Resolution | 480 x 320 pixels |
| Camera Resolution | 0.3 MP (VGA) |
| Wireless Technology | 2.4 GHz FHSS |
| Transmission Range | Up to 300 feet (90 meters) outdoors |
| Night Vision | Infrared LED, automatic activation |
| Two-Way Audio | Built-in microphone and speaker |
| Temperature Monitoring | Displays room temperature on parent unit |
| Lullabies | 5 pre-loaded melodies |
| Power Source (Parent Unit) | Rechargeable lithium-ion battery (DC 5V adapter) |
| Power Source (Baby Unit) | DC 5V adapter (included) |
| Battery Life (Parent Unit) | Up to 8 hours |
| Expandable | Up to 4 cameras (additional cameras sold separately) |
| Dimensions (Parent Unit) | 3.5 x 2.2 x 0.8 inches (approx.) |
| Dimensions (Baby Unit) | 2.5 x 2.5 x 3.5 inches (approx.) |
| Weight (Parent Unit) | 5.3 ounces |
| Weight (Baby Unit) | 4.2 ounces |
| Audio Monitoring | High-sensitivity microphone with sound-activated display |
| Mounting Options | Desktop stand or wall mount (hardware included) |
| Included Accessories | 1 camera, 1 parent unit, 2 power adapters, user manual |
Frequently Asked Questions - PLHR78W Pyle
User questions about PLHR78W Pyle
0 question about this device. Answer the ones you know or ask your own.
Ask a new question about this device
Download the instructions for your Monitor in PDF format for free! Find your manual PLHR78W - Pyle and take your electronic device back in hand. On this page are published all the documents necessary for the use of your device. PLHR78W by Pyle.
USER MANUAL PLHR78W Pyle
Operating Instructions
PLHR78W PLHR79


IHTTP://WWW.PYLEAUDIO.COM
STRUCTURE

1.V1/V2 (Video1, Video2)
2. Reduce Button
3. Menu(brightness.volume, Color contrast) buttons
4. Increase Button
5. Power on/off
6. Remote controller receiver
7. Power indicator light
SPECIFICATION:
Name: STAND COLOR TFT LCD
Resolution pixel: 1440x234Dots
System: PAL / NTSC
Power: DC 12V ±10%
Video frequency: AV input
Power consumption: 8W
Screen size: 7 inch (16:9)
Remote control: full function 6m
Operating method: Press the button "AV1/AV2" on the remote control unit to choose AV display mode. If the VCD or DVD signal is connected, there should be display normally pictures signal; If the VCD or DVD signal isn't connected, AV character should be appear top the left corner and the screen is blue.. the system will display "NO SIGNAL".
- BRIGHTNESS
- CONTRAST
- COLOR
- TINT(only NTSC system)
- SCALING (16:9/4:3)
The above functions can be executed by MENU on the display or remote control unit.
- Brightness: Press the MENU button on the display or MENU on the remote control unit, then press: “◀” “▶” button on the display or “▲”▼ keys on the remote control unit to choose what you need.
- COLOR: Press the MENU button on the display or MENU on the remote control unit thrice, then press: “◀” “▶” button on the display or “▲” “▼” keys on the remote control unit to choose what you need.
- Contrast Ratio: Press the MENU button on the display or MENU on the remote control unit twice, then press: “◀” “▶” button on the display or “▲” “▼” keys on the remote control unit to choose what you need.
- TINT: Press the MENU button on the display or MENU on the remote control unit four times, then press: “◀” “▶” button on the display or “▲” “▼” keys on the remote control unit to choose what you need.
- scaling: Press the MENU button on the display five times, then press: "▶" "◀" button on the display to choose.
The use of remote control
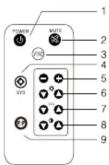
- power: switch on/off power
- mute: press this button, the sound disappear.
3.V1/V2: V1/V2 switch - Reverse: Turn the picture from left to right or up to down.
5.vol+/-:Press them to increase and decrease the volume.
6.♂+/-:Press them to increase and decrease the brightness.
7.col+/-:press them to increase and decrease the color. - ⬆ Press them the increase and decrease contrast.
- Mode: press it to select the mode (standard, brightness,
soft, Vividness.self-defined.)
Replacing the battery
1 Insert your finger nails into A and B on the diagram below, press A according to the direction, then pull out the battery holder.
3 Fit the battery holder back to its place.


2 Remove the old battery, then insert the new battery into the battery holder with the + side facing upwards.
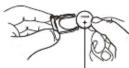
Lithium battery (Cr2025)
Note:
To prevent leakage of fluid from the lithium battery, remove the battery when not using the remote control unit for long periods of time (one month or more). If the battery leaks fluid, carefully wipe it out of the battery case, then change to a new lithium battery.
6. SIMPLE TROUBLE-SHOOTING GUIDE
Below symptom no mean this production have been broken, Please check before you repair!
| Symptom | Probable Cause | Solution |
| Black Screen | 1.No12 voltage2.Brightness or contrast ratio is too small3.no high-voltage | 1.check the power is on or connect rightly2. check the A/V Cable is loose or not3. Increase the brightness and contrast ratio |
| NO picture | 1.No sources output2.The video concentric plug becomes loose | 1.Check the output of VCD or DVD2.Replace with the A/Vcable3.Tighten the Video input cable |
| color picture | 1 Video sources have no output2.Color ratio should be re-adjust | 1.check the video sources2.Enter into the Menu to re-adjust |
| With a little regular light spots and color spots on the screen or black horizontal line in the picture | It is normal symptom in the active matrix display technology. | it is normal symptom in view range with a little regular light spots on display screen. |
| Unclear picture | 1.Poor quality of the video sources2.Bright &Contrast | 1.Replace with the high quality videodisc2.Reset Bright &contrast. |
| The outer cover of the monitor has been deformed | 1.External temperature is too high2. The power has not been switch off for a long time | 1.The surround temperature could not exceed to 0^ -60°2.Turn off the power after using the unit |
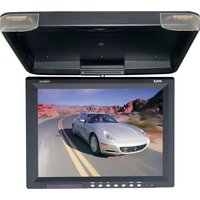
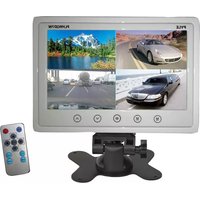
Brand : Pyle
Model : PLHR78W
Category : Monitor