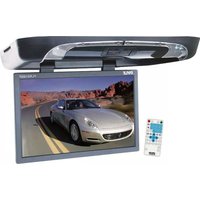
PLRD195IF - Monitor Pyle - Free user manual and instructions
Find the device manual for free PLRD195IF Pyle in PDF.


| Product Type | Flip-Down Overhead Monitor with Built-in DVD/SD/USB Player |
| Brand | Pyle |
| Model | PLRD195IF |
| Screen Size | 19 inches |
| Display Resolution | 1440 x 900 pixels |
| Aspect Ratio | 16:10 |
| Video System | NTSC / PAL |
| Power Supply | DC 12V (negative ground) |
| Power Consumption | 48W Max |
| Dimensions (W x D x H) | 545 x 435 x 65 mm |
| Disc Compatibility | MP3, VCD, DVD, CD, CD-R, CD-RW, DVD-R, DVD-RW |
| Media Playback | DVD, SD Card, USB Drive |
| Wireless FM Modulator | Yes (for audio transmission to car radio) |
| IR Transmitter | Yes (for wireless headphones) |
| Dome Light | Yes (built-in) |
| Remote Control | Included (IR) |
| Video Inputs | 1 x RCA (yellow) |
| Video Outputs | 1 x RCA (yellow) |
| A/V Inputs | 2 x RCA (red/white) |
| A/V Outputs | 2 x RCA (red/white) |
| Mounting Type | Overhead flip-down (ceiling mount) |
| Operating Temperature | -4°F to +176°F (-20°C to +80°C) |
| Cleaning Instructions | Use only a damp cloth with purified water; no solvents |
| Safety Warnings | Do not operate while driving; install out of driver's field of vision; do not obstruct airbags |
| Included Accessories | Remote control, mounting bracket, screws, wiring harness |
Frequently Asked Questions - PLRD195IF Pyle
User questions about PLRD195IF Pyle
0 question about this device. Answer the ones you know or ask your own.
Ask a new question about this device
Download the instructions for your Monitor in PDF format for free! Find your manual PLRD195IF - Pyle and take your electronic device back in hand. On this page are published all the documents necessary for the use of your device. PLRD195IF by Pyle.
USER MANUAL PLRD195IF Pyle
Operating Instructions
PLRD195IF
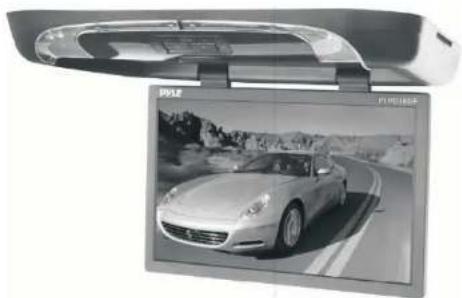
natural_image
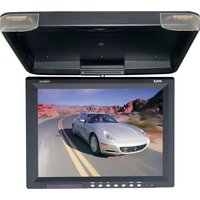
Side view of a car with a side-mounted display showing a silver sedan on a road (no visible text or symbols)19"Flip Down Monitor w/Built In DVD/SD/USB player with Wireless FM Modulator/ IR Transmitter

natural_image
Exterior view of a modern office building (no signage)HTTP://WWW.PYLEAUDIO.COM
Contents
Caution. 1
Check Point. 2
Name and Function of Each Part
Unit. 3
Remote Control....4
Remote Control....5
Picture control
Picture Selections....6
Playing a Disc
Play DVD Player....6
Basic Operation
FM Channel....6
DVD Setup
System setting....7
Language Setting....8-9
DVD Function Playback Function....10-11
Advanced Function....12
USB/SD card Function....12
Installation....13
Connect Diagram....13
Disc Information....14
Cautions of Use. 15
Trouble Shooting....16
Specifications....17
Specifications
| Power | DC12V |
| Current Consumption | 48W Max |
| Screen Format | 16:10 |
| Resolution | 1440*900 pixel |
| System | NTSC/PAL |
| Video Input | 1EA |
| Video Output | 1EA |
| A/V Input | 2EA |
| A/V Output | 2EA |
| Disc Format | MP3/VCD/DVD/CD/CD-R CD-RW/DVD-R/DVD-RW |
| IR Transmitter | Yes |
| FM Transmitter | Yes |
| Dome Light | Yes |
| Remote Control | Yes |
| Dimensions (mm) | (W) 545*(D) 435*(H) 65 |
Note:
This equipment can be generated, used and accordance with the instruction manual, and, if not installed and used in accordance with the instruction manual, may cause harmful interference to radio communications. Operation of this equipment in a residential area is likely to cause harmful interference in which case the user will be required to correct the interference at his own expense.
Touble Shooting
| TROUBLE | ACTION |
| No power | Check to see that the AC power cable is connected properly. |
| No picture | Make sure that the equipment is connected properly. Check to see that the connected monitor is turned on. |
| Stopped picture | Check to see that the video cable is connected. Check to see that the monitor is turned on. |
| The playbook picture is poor | Clean the disc |
| No color | The color system set by this unit does not match the color system of the monitor. Check the color system of the unit. |
| Distored slund | Ajust the video system by pressing the TV system button. (PAL, NTSC) |
| The remote control doesn't work properly | Remove any obstacles between the remote control unit and the remote control sensor. Operate the remote control at a shorter distance. |
| "DISK ERROR" is display on the screen | Set the power button to OFF and then back to ON alternatively, Turn off the power, disconnect the power plug, and then reconnect it. |
Check point
When a disc is brought from acold environment to a hot one, there may be steam on the face of the disc, or water will appear on the pickup lens. It will affect the play.
- Remove the disc from the DVD player.
- Turn on the power and leave it on for an hour to vaporize the condensation.
- You can operate the DVD player without any problem.
Caution
Please read and observe all warnings and instructions in this owner's manual and those marked on the unit. Retain this booklet for future reference.
There are two kinds of alarm symbols as follows:
WARNING
The lightning flash with arrowhead symbol within an equilateral triangle is intended to alert the user to the presence of "dangerous voltage" within the product's enclosure that may be of sufficient magnitude to constitute a risk of electric shock to persons.
CAUTION
The exclamation point within an equilateral triangle is intended to alert the user to the presence of important operating and maintenance (servicing) instructions in the literature accompanying the product.
WARNING
The driver should never operate these products while the vehicle is in motion!
Installation of all TV monitors must be out of the driver's field of vision!
Do not try and service these products yourself, seek only a qualified service center or factory service center.
Be careful not to drop or apply undue pressure to the front panel of your video monitor. If the screen cracks due to misuse your warranty will be void!
Make sure to keep products away from heater ducts or vents and out of direct sunlight. Do not mount forward of the driver's shoulders.
Be careful not to overload your cigarette lighter plug by adding more than one device at a time.
Use extra caution with any liquids in your car. If you or your child spill any liquid on these products, pull your vehicle to the roadside and trun the key off to disconnect or wipe the products with a towel. Do not operate the equipment until all liquids have either evaporated or you have had the monitor inspected at a service center by a qualified Technician. Severe harm or death can occur!
Use only a damp cloth to clean the screen and use only purified water on the cloth. wring out all excess water prior to wiping the screen. Do not use any cleaners or chemicals to clean the screen. In most cases a dry cloth will do!
Do not mount the product where it will obstruct the deployment of the airbag or in an area where it would affect the vehicular control. Also be careful to avoid mounting the product where it can become hazardous during sudden stops or in the event of an accident.
Caution
Quality installations are best performed by qualified and certified installers.
Watching the monitor for an extended period of time without the engine running may deplete the vehicle's battery charge
This product is designed for operation with a 12 Volt DC, negative ground vehicle. It is not suitable for operation under other conditions or voltages.
Check Point
1 The operating temperature of this product is limited to -4° F\~+ 176° F. Your vehicle can reach temperatures up to 212° F in the summertime.
2 From time to time when your vehicle is extremely hot or cold you must allow time for your air conditioner or heater too cool or heat the vehicle and for operating temperatures to return to normal operating ranges. Your monitor will return to its normal functions when these operating ranges are achieved.
3 Your optimum picture quality is achieved when you are directly in front of the monitor (+/-30 degrees).
4 Do not open covers and repair yourself. Refer servicing to qualified personnel.
5 DVD Players use an invisible laser beam which can cause hazardous radiation exposure. Be sure to operate the unit correctly as instructed.
6 Do not cut the car power supply off while a disc is palying. It can cause damage to the DVD Player.
Cautions on Use
Handing
When holding with both hands


Cleaning discs
Fingerprints or dust on discs may reduce sound or picture quality. remove them by gently wiping the disc from the center toward the edges using a soft cloth
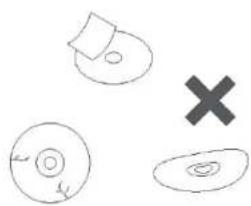
. Do not use damaged (cracked or warped) disc.
. Do not scratch signal surface or let it dirty.
. Do not attach paper or seals to discs.
. The player may be damaged if there is any exposed glue, etc.x on discs. using such discs.
Check carefully for any exposed glue before are often attached to the discs.
For rental disc in particular, extra labels are often attached to the discs.
Check carefully for any exposed glue before using such discs.
natural_image
Simple line drawings of three abstract shapes: a circle with a central dot, a flat rectangular shape, and a cross symbol (no text or labels)
Do not use benzee. Thinner or other volatile chemicals. Do not use record spray or an anitstatic spray either.
We recommend using the separately sold cleaning set to clean discs.
For tough dirt, apply some water to a soft cloth, wring out thoroughly, wipe off the dirt, then wipe off the disc with a dry cloth.
Irregularly shaped dies
Irregularly shaped discs(heart-shaped discs, hexagonal discs, etc.) cannot be played on this player.
Doing so could damage the player.
Never use such discs.
Storing discs
Always place discs in their case and store them vertically.
A void storing discs in hot or humid places, places exposed to direct sunlight and places in which the temperature is extremely low. in which the temperature is extremely low.
. Read any cautions included with the disc carefully

natural_image
Simple geometric shapes: an oval with concentric circles, a pentagon, and a cross (no text or symbols)Disc Information
DVD features
DVD disc provide high-resolution images with high-quality sound and surround sound effects. This DVD player can play not only DVD discs of various versions, but also S-VCD ,VCD , audio CD and MP3 discs.
Each disc plays only the information saved on it, and some functions cannot be utilized.
Discs that cannot be played
DVD-RW, DVD- REM, CD-ROM, CD- EXTRA discs cannot be played on this unit. Also, a CD or a CD-RW which was recorded on special software cannot be played.
Region code
Your DVD player is designed and manufactured to region management information that is recorded on a DVD disc. The region number of this DVD Player is 1. This DVD player plays free code also.
Copyright protection.
This product incorporates copyright protection technology that is protected by methods claims of certain U.S. patents and other intellectual property rights owned by the Macrovision Corporation and other rights. Owner's use of this copyright protection technology must be authorized by the Macrovision Corporation, and is intended for home and other limited viewing uses only unless otherwise authorized by the Macrovision Corporation.
How to handle the disc
Don't touch the shiny side of the disc (the side with the embedded information). Don't stick a lable or a glue - based note on either side of the disc. Don't use discs that have glue or a damaged gluey label- it might result in damage to your DVD player, Don't put discs in the sunshine. Park your car in the shade.
Caution
Wipe softly with a wet cloth and then with a try one. Before playback, wipe the disc outward from the center with a clean cloth. Do not use any type of solvent such as thinner, benzene, cocommercially - available cleanners or antistatic spray.
To avoid damaging your DVD player, don't use a scratched disc.
Name and function of each part
UNIT
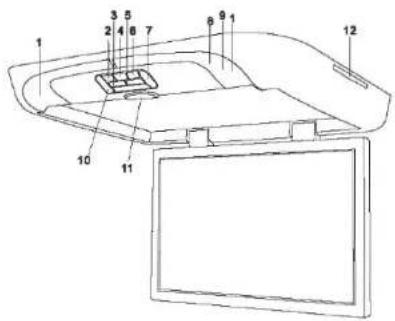
- IR wireless transmitter/Dome light 2. Up button
- PLAY/PAUSE button 4. Menu button
- EJECT button
- Down button
- Dome light switch 8. Power led
- Remote control 10. Power button
- Monitor release button 12. Disc tray
THE BACK PANEL
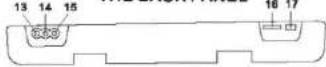
- Right audio output 14. Left audio output 15. video output
16.SD card slot 17.USB port
Name and function of each part
Remote Control Unit
- MENU button
Press this button to display the
LCD's menu screen.
- EJECT button
Press this button to slide the disc out and in.
- NUMBER buttons
Press these buttons to input numbers.
- REV/FWD-Scan buttons
Use these buttons to scan forward and
backward through pictures or sound.
- TITLE button
Press this button to display the DVD's title.
- MENU button
Press this button to display the DVD's menu screen.
- ZOOM button
Zoom in or zoom out the picture on screen.
- ANGLE button
Press it to switch the picture's angle.
- SLOW button
Press this button slow playback at 1/2, 1/4, 1/6, 1/8speed.
- Program button
Use this button to program individually.
- VOL+ button
Press this button to volume up.
- PBC button
Playback control.
- POWER button
The power turns on and off when
this button is pressed.
- Play/Pause button
Use this button to play picture or
sound or stop temporarily.
- STOP button
Press this button to stop playback of the picture or sound
16.10+ button
Press this button to select a program of
which the sequence number on the disc is more than 10.
- DVD/AV buttons
Press these buttons to DVD/AV functions
switch screen.

Installation (Professional installation recommended)
- Unpack and check the contents. Disassemble the meral support bracket from the unit as shown in the illustration, by unscr ewing the six screws on the unit body.

natural_image
Technical line drawing of a mechanical assembly with a tool and directional arrows indicating motion (no text or symbols)- Tighten the metal support bracket to the ceiling support beam(s), using the supplied screws. Take extra care to not penetrate the roof of your car.

- Connect the wiring harness, according to the diagram under "Connection Diagram" on the following diagram, to the wires located in the dome light of your vehicle.

natural_image
Technical line drawing of a mechanical assembly with no visible text or symbols- Flip the monitor screen down and tighten the monitor to the support bracket, using the supplied screws.
Connection Diagram

flowchart
graph TD
    A["IR/FM wireless headphone (optional)"] --> B["OUTPUT"]
    B --> C["12V Battery"]
    C --> D["FUSE"]
    D --> E["BATTERY"]
    E --> F["CAR VIDEO (DVD OR VCD)"]
    G["other monitor"] --> H["IR/FM wireless headphone (optional)"]
    I["1. Yellow RCA --video"] --> J["Output Monitor"]
    K["2. Red RCA --right audio"] --> L["Car Video (DVD OR VCD)"]
    M["3. White RCA --left audio"] --> N["Car Video (DVD OR VCD)"]
13
Advanced Functions
Viewing in slow motion DVDs and video CDs
Press the SLOW button during playback, the playback speed becomes 1/2, 1/4, 1/6, or 1/8 of the normal speed each time you press the SLOW button.
Repeat play DVDs, Video CDs and CDs
. Repeat a TITLE, CHAPTER, or TRACK
Press the REPEAT button.
Select the title, chapter, or track you want to repeat.
. Repeat a section between Point A and B.
During playback, press A-B button on the remote control at the starting point of the Section you want to repeat. (Point A)
Press A-B button again at the ending point of the section you want to repeat. ( Point B ) Press A-B button again to cancel the A-B repeat function.
. Selecting the DVD's angle (multi-angle)
Press the ANGLE button while playing back a scene record with multiple angels. If your DVD disc is not recorded with multiple angles. Press ANGLE button will not have any effect.
SD card & USB play
While in DVD source, Insert MMC/SD/MS or connect USB, Press
Note: please do not use the removable hard disk. This will lead to abnormal working.
.SD card & USB play interface
-
Music display window
-
Display music played currently
-
Display folder played currently
4.Folder window
5.Music
6.Picture
7.Video

.Switch Music/picture/video play
Press [◄/►] of the remote control to move the cursor leftwards/rightwards to select music, picture or video. Red shows that it has been selected, press [ ] button to confirm selection.
Press[▲/▼] of the remote control to select upwards/downwards music or folder to play. Red shows that it has been selected, press [ ] to confirm selection.
.Previous/Next
Press[◀◀]/[▶▶] of the remote control to play the previous/next music
.Fast Forward/Fast Back
Press[◀]/[▶] of the remote control to realize x2,x4,x8,x20 fast forward/fast back play.
.Pause/Play
Press [▶] of the remote control to play or pause play.
.Stop
Press [■] of the remote control to stop play.
- SD CARD & USB button
Press the button to select disc/SD card/USB input.
- CURSOR▲/▼, ◀/▶ [LCD menu
adjustment button
Use these buttons when select setting items to move the cursor up, down, left and right. Press up, and down buttons to change TV channels.
- PRE/ NEXT buttons
Use these buttons to search for the beginnings of tracks or chapters.
- ENTER button
Press it to enter setting.
- SUBTITLE button
Press it to switch the DVD's subtitle languages.
- SETUP button
Press it to enter or quit the SETUP
Menu.
- REPEAT button
For DVDs use it to play title or chapters repeatedly.
For CDs, use it to play tracks or the entire disc repeatedly.
25.GOTO button
Press this button, select time or chapter to goto and play when disc is playing.
- AUDIO button
Press it to switch the audio Lanuages.
- DISPLAY button
Press it to display the disc
information
- VOL-. button
Press this button to volume down.

Picture control
Picture selections:
use to achieve the desired settings.
- Press the MENU(Unit or Remote) button to bring up the on-screen picture control menu.
-
Select the desired menu by pressing the UP (Unit, Remote) buttns to change PICTURE, AUDIO, FUNCTION, OSD.
-
Adjust the current settings with the DOWN(Unit, Remote) buttons, press UP buttons, then press UP or DOWN on the unit to achieve the desired settings.
Playing a disc
Playing DVD player
- Press the POWER (Unit, Remote) buttons.
- Load a disc in the disc loading slot with the lable side front.
Insert a disc in the discs loading slot and it will be played automatically.

natural_image
Line drawing of a device with a screen and handle (no text or symbols)Basic operation
FM channel:
press menu button, press (unit +) or (remote right) button, then press (unit AV) or (remote down) to select the AUDIO CONTROL item, press + or - to adjust of FM press (unit AV) or (remote down) button, press + or - to select FM channel.
Playback Functions
.Stopping the disc
Press the STOP button.
Resume function (DVDs and Video CDs)
Playback will be stopped when the STOP button is pressed, when the play button is pressed.
Playback starts from the position at which it was stopped. When the disc is removed or the STOP button is pressed again, the resume function is cancelled.
.Hint:
For some discs, playback may not start from the position at which was stopped. If the STOP button then the previous is pressed while the resume function is on, playback starts from the beginning to the title.
. Pausing the disc
Press the play/pause button.
Press the button again to resume playback.
.Scanning forward and backward
During playback, press the previous or next button. Reverse direction Forward direction
.Returning to the previous chapter or track DVDs, Video CDs and CDs
Press the previous button during playback.
When pressed, playback returns to the beginning of the previous chapter or track.
.Moving ahead to the next chapter or track DVDs, Video CDs and CDs Press the next button during playback.
When pressed once, playback moves forward to the next chapter or track.
. Removing discs
- Press the STOP button.
- Press the EJECT button to open the disc.
- Remove the disc.
.Note:
With CDs or on-sided DVDs, you do not have to worry about touching the label (printed) side or the disc with you finger. Two sided DVDs . however, have signals recorded on both sides, so be careful not to scratch them when removing them from the player.
.Search for a specific scene
- Press the SEARCH button.
- Press the number button to select specific time or titlel chapter.
- Press the ENTER button and playback starts from the specific chapter number
DVD Functions
DVD Setup
Playback Functions
Playing disc
- Loading the disc
. One of the following messages appears on the LCD: DVD, VCD, CD.
. For some discs, playback starts automatically when the disc is close.
. When discs for which program memories are set, playback starts automatically in the order.
2. Press the PLAY/PAUSE button
.Playback starts.
For some discs, a menu screen appears. For video CDs, playing the disc according to the instructions on the disc's menu screens I called PBC ( playback control) playback.
3.Hint:
For video CDs, it is also possible to playa disc without displaying the menu screen. For example, to play from track 1, press the 1 number button while in the stop mode. "When play CD disc or MP3 discs, you are recommended to turn off the TFT LCD screen to save power. ( Please make reference of" TFT ON/ OFF Function" on Page 10 and Page 12.)
If a menu screen appears
For DVDs with menu screen or video CDs with playback control (PBC), a menu screen appears.
DVD
Use the cursor buttons to select the item, then press the ENTER button. Press the number button on the remote control unit to select item. Example: For DVDs with menu screen.
TITLE MENU
1 POP
2 JAZZ
3 COUNTRY
4R&B
5 CLASSICAL
1POP
2 JAZZ
3 COUNTRY
4R&B
5 CLASSICAL
Video CD
Press the number button on the remote control unit to select item.
To display the menu screen
The way in which the menu screen is displayed differs from disc to disc. Press the MENU, TITLE button during playback or DVDs, the RETURN button during PBC playback of video CDs. For details, refer to documentation included with the disc.
How To Setup Menu
You can easily modify setup information on the setup menu.
System Setting

Please press setup button, then press ▲/▼ to select [SYSTEM] items.
Still Mode Setting

- STILL MODE To setup display mode of still pictures. There are three options[AUTO] [FIELD] and [FRAME].
Auto Play Setting

- AUTO PLAY To setup DISC auto play mode.
DVD Setup
DVD Setup
Parental Lock Password Setting

- PASSWORD
Setup parental lock password. It is acceptable to input new password with 4 numeral to re-setup the parental lock.
Parental Lock Setting
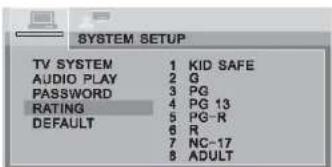
- RATINGS
According to different grade, setup the parental lock. Hint: Normally, the grade is set as [0 LOCK ALL]
DEFAULTS Setting

- DEFAULTS
Setup all menus to the initial setting of factory.
Language Setting
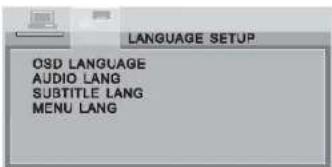
Please press setup buttor, then press ◀/▶ to select [LANGUAGE] items.press ▲/▼ to select language menu.
OSD Language Setting

LANGUAGE
To setup OSD languages
Audio Language Setting

- AUDIO
To setup disc output languages.
Subtitle Language Setting
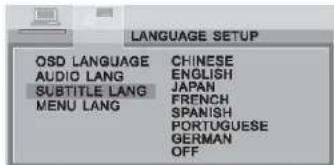
- SUBTITLE
To setup disc subtitle languages.
MENUS Language Setting

- MENUS
To setup DISC MENU
languages
- Contents
- Touble Shooting
- Check point
- Caution
- There are two kinds of alarm symbols as follows:
- WARNING
- Cautions on Use
- Handing
- Cleaning discs
- Irregularly shaped dies
- Storing discs
- Disc Information
- DVD features
- Discs that cannot be played
- Region code
- Copyright protection.
- How to handle the disc
- Name and function of each part
- Remote Control Unit
- Installation (Professional installation recommended)
- Connection Diagram
- Advanced Functions
- SD card & USB play
- .SD card & USB play interface
- Picture control
- Picture selections:
- Playing a disc
- Playing DVD player
- Basic operation
- FM channel:
- Playback Functions
- .Stopping the disc
- .Hint:
- Pausing the disc
- .Scanning forward and backward
- .Returning to the previous chapter or track DVDs, Video CDs and CDs
- Removing discs
- .Note:
- .Search for a specific scene
- DVD Functions
- DVD Setup
- Playing disc
- Press the PLAY/PAUSE button
- 3.Hint:
- DVD
- Video CD
- To display the menu screen
- How To Setup Menu
Brand : Pyle
Model : PLRD195IF
Category : Monitor