LED3701 - Television Manta - Free user manual and instructions
Find the device manual for free LED3701 Manta in PDF.


| Product Type | Television |
| Brand | Manta |
| Model | LED3701 |
| Screen Size | 37 inches (Full HD) |
| Max Resolution | 1920 x 1080 pixels |
| Best Resolution | 1920 x 1080 @ 60 Hz |
| Pixel Pitch | 0.42675 mm x 0.42675 mm |
| Active Area | 819.36 mm x 460.89 mm |
| Color Depth | 16.7 million colors |
| Power Supply | 100-240 V AC, 60/50 Hz |
| Power Consumption (On) | ≤90 W |
| Power Consumption (Standby) | ≤1.0 W |
| Speaker Power | 8 W + 8 W |
| Dimensions without Stand | 898 x 572 x 47 mm |
| Dimensions with Stand | 898 x 624 x 47 mm |
| Connectivity | HDMI, VGA, YPbPr, SCART, AV, USB 2.0 |
| USB Playback | Video, Music, Photo, Text |
| PVR Function | Yes (via USB) |
| 3D Support | Yes (side-by-side, top-bottom, line-by-line, etc.) |
| Teletext | Yes |
| Energy Star Compliant | Yes |
| Auto Sleep | Yes |
| Hotel Function | Optional (via menu) |
| Cleaning | Use a soft, wet cloth; no alcohol or ammonia |
Frequently Asked Questions - LED3701 Manta
User questions about LED3701 Manta
0 question about this device. Answer the ones you know or ask your own.
Ask a new question about this device
Download the instructions for your Television in PDF format for free! Find your manual LED3701 - Manta and take your electronic device back in hand. On this page are published all the documents necessary for the use of your device. LED3701 by Manta.
USER MANUAL LED3701 Manta
natural_image
Black-and-white photo of a MANTA TV remote displaying a racing game (no visible text or symbols on screen)DVD053G Emperor Portable 2

natural_image
Black-and-white photo of a MANTA portable TV with a skier on screen (no visible text or symbols)Important Safety Instructions....22
Characteristic Functions 23
Technical Specification....24
LED3701....24
LED4201 24
VGA Display Mode 25
Power Management 25
Connection 25
Power Connection 25
Computer Connection....26
HDMI Digital Port Connection 26
Video Signal Connection 26
Antenna Connection....26
YPbPr/YCbCr Input Connection....26
SCART Connection....26
Position of Control Keys 27
Remote Control....27
Telecontrol battery installation method 28
Remote control user manual about teletext....28
Precautions for use of remote control 28
Basic Operation....29
Power ON 29
Standby 29
Signal Source Selection....29
Menu Operation 29
Channel 30
Auto Tuning 30
DTV Manual Tuning....30
ATV Manual Tuning 30
Programme Edit....31
Signal Information....31
CI Information 31
Software Update(USB)....31
Picture 32
Sound 32
Option 33
Remote Control Shortcut Keys 34
Important Safety Tips 34
3D formats supported by 3D video 35
Time 35
Lock 35
Hotel Function (optional) 36
USB Media Function 36
Remote Control Shortcut Keys 36
Basic Function 37
Trableshooting....38
INSTRUKCJA OBSŁUGI
Instrukcja obsługi
INSTRUKCJA OBSŁUGI
natural_image
Line drawing of a flat-screen monitor with labeled parts (1 and 2), no text or symbols present.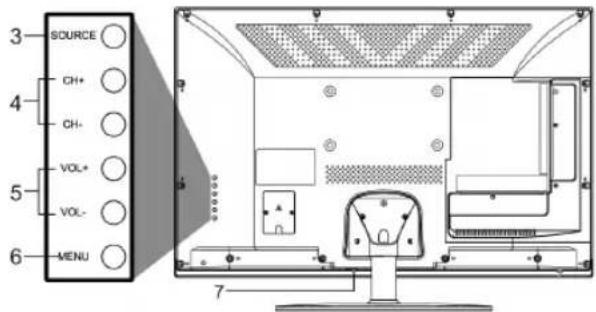
| Hotel Menu | |
| Hotel Lock | ON |
| Picture Lock | OFF |
| Key Lock | OFF |
| Set Source | DTV |
| Channel Num | OFF |
| Set Volume | 27 |
| Max Volume | 98 |
| USB Clone | USB Copy |
| MENU: RETURN | |
Important Safety Instructions
When the following troubles occur, please pull out the plug and call the professional engineers to repair.
A. The cable or plug is damaged.
B. The product was fallen down or the case is damaged.
C. Obvious abnormal situation occurs. In spite of correct operation according to the user manual but it still can't work normally.
D. Some abnormal substances or liquid fall into it.
E. Unusual sound or smell sends out.
There is high voltage inside the machine but no parts which can be repaired by users themselves. In order to assure the people's safety, please do not open the case to repair it by yourself. If it is needed to repair, please contact qualified engineer to repair.
●Please put this machine in the place of well ventilation, instead of extremely hot, cool or moist, and direct sunlight.
The slots on the case is designed to release heat so as to assure that all inside components will not reach an extra high temperature and can work normally for a long time. Please do not cover the holes while place it. Unless there is good ventilation installation, please do not put this machine in inlaid device.
Please do not place it on an unstable position so as to avoid falling off.
- Do not place the LED TV near water source, like a bathtub, pool, washing machine, or moist cellar and similar environment.
During a thunder rain weather, do not touch the power cord and antenna cable. Please pull out the power line and aerial plugs for preventing thunder and lightning damage to this machine.
●All cables can be connected or pull out only after power supply is turned off.
The power cord must be taken off before you clean the machine. Do not use the liquid cleanser or aerosol cleanser. It is recommended to use a wet soft cloth to clean the machine. Do not use the alcohol, impregnant or ammoniac liquid to wipe the screen.
If you will not use the machine for a long time, please pull out the power cord. Do not keep the sleeping mode for too long time.
Read the manual and marking label before using the machine, and keep the user manual for later use.
Don't use the attachments which are not recommended- ●ed by the machine manufacturer as they may cause hazards.
●The power cord must be placed correctly so as to avoid be trample or crush.
Please do not make the power socket overloaded or the power cord extended. Otherwise it will cause fire or electrical shock.
The LED panel is fragile and expensive. The surface of the panel is easy to be scratched. Please do not use the hard thing to knock, press, score the panel.
Otherwise it will be harmful for the panel. The exchange cost is very high.
All technical specification on this instruction book and outer package are subject to change without notice. If the instruction book has slight difference with actual operation, please take the actual operation as standard.
- When the MAINS plug or an appliance coupler is used as the disconnect device, the disconnect device shall remain readily operable.
The machine should not suffer from waterdrop or water-splash, do not place the vessel with water (or other liquids) on it, for like this it is possibly to cause fire or electric shock.
The attaching plug should be inserted into the power point completely, otherwise it may cause spark to bring fire.
- please do not put candle, ash-tray, incense, inflammables or explosive nearby this machine.
Please do not stretch into any sharp object, metal or liquid, or touch the signal attachment or the inner of radiation hole, in order to avoid short circuit and product damage, or possibly causing electric shock. Especially pay attention when there are children on the spot. - lease do not use the machine immediately when moving the machine from low temperature place to high temperature one, or install and use at the place of facing air conditioning, otherwise it may cause the condensation in the machine, to cause fault.
Must be careful when moving this machine, avoiding being struck, especially pay attention to protect the screen part. In addition, if using handcart, must note the injury as the product is overturned from the handcart because of hard braking, overexerting and uneven ground.
USER'S MANUAL
Characteristic Functions
Support USB interface. ●
●Support for H.264 FULL HD receiver and supports PVR functionality.
It can support 3D video player function, bringing you with true-to-life 3D scene and vivid experience.
Compatibility with 2D/3D display allows you to freely switch from 2D to 3D, and vice versa.
●high quality 3D LED screen is free from flashing and has little radiation, thus greatly reducing fatigue of your eyes for care. It also features high brightness & contrast and wide view. Extremely responsiveness greatly reduces blurred pictures in motion.
Having inter high quality speakers, which will give you ● purely audiovisual enjoyment and save your table place.
Having many ideal connectors, you may directly connect your DVD, vidicon etc. its disport components of input connector let you enjoy beautiful image effect.
The product can be used as a computer monitor with VGA and HDMI connectors. Also it can be used as a TV machine when you insert the antenna.
●Much faster response time will completely eliminate shadow of picture. seeing film and playing game may be more fluent.
Enough colours. ●
●Vider viewing angle, higher brightness, higher contrast, lower consumption.
Intelligent image mode and sound mode can offer you • intelligent audiovisual effect.
Built-in the latest digital comb filter, which makes image more clear. The internal 3D De-Interlace technique can totally eliminate the screen dithering caused by interlace signals.
Own perfect timing functions, you can set time to turn off. It will be turned off in state of no signals, too.
●Automatically operated convenient with telecontrol device.
●Auto-setup function help you set the image to best performance in several seconds in VGA mode.
Auto color balance adjustment technology takes your machine to the best color setting for all different kinds of display adapters in VGA mode.
Automatic denoise technique can greatly eliminate background noise caused by menu interference and the noise caused by weak signals so as to make the picture on the screen clear.
USER'S MANUAL
Technical Specification
LED3701
| Panel size 37" (Full HD) | ||
| Max. resolution 1920x1080 | ||
| Best resolution 1920x1080@60Hz | ||
| Pixel pitch 0.42675mm 0.42675mm | ||
| Active Area 819.36mm 460.89mm | ||
| Color 16,7M | ||
| Power Supply 100V-240VAC 60/50 Hz | ||
| Power Consumption of Speakers 8W+8W | ||
| Dimensions (L x H x W) | Excluding base 898 x 572 x 47 mm | |
| Including base 898 x 624 x 47mm | ||
LED4201
| Panel size 42" (Full HD) | ||
| Max. resolution | 1920x1080 | |
| Best resolution | 1920x1080@60Hz | |
| Pixel Pitch | 0.4845mm 0.4845mm | |
| Active Area | 930.24mm 523.26mm | |
| Color | 16,7M | |
| Power Supply | 100V-240VAC 60/50 Hz | |
| Power Consumption of speakers | 8W + 8W | |
| Dimensions (L x H. x W) | Excluding base | 1008 x 634 x 48mm |
| Including base | 1008 x 684 x 48mm | |
USER'S MANUAL
VGA Display Mode
37", 42"
| NR P | Panel Mode Res | resolution Refresh | ||
| 1 | x 480 60 Hz | VGA | 720 x 400 70 Hz | |
| 2 640 | ||||
| 3 SVGA | 800 x 600 FHD/HD | 60 Hz | ||
| 4 | XGA | 1024 x 768 60 Hz | ||
| 5 128 | ||||
| 6 | WXGA | 1360 x 768 60 Hz | ||
| 7 | FHD | 1600 x 900 60 Hz | ||
| 8 WU | XGA 1920 x 10 | |||
| 1080 60 Hz | ||||
Recommended mode: Full HD 1920 x 1080@60Hz
Power Management
This product is complied with EPA Energy Star Standard and compatible with VESA DPMS Standard.
Details are listed as follows:
| Mode | LED Indicator | Power Consumption | |
| 37" 42" | |||
| On OFF ≤90W | ≤125W | ||
| Standby | Lighting | ≤1,0W | ≤1,0W |
Note: All the specifications in the user manual or on the packing carton may be changed without additional notice.
Connection
Power Connection
Notes:
- This machine uses AC 100-240V, 60/50Hz.
- If a long time at leisure, please disconnect it from power supply.
- This TV must be connected to a three pin socket outlet for safety.

USER'S MANUAL
Computer Connection
Please connect one end of VGA cord with the output port of the computer (available for both desktop or laptop computer), and another end of VGA cord with the input port of the VGA on its rear cover.
HDMI Digital Port Connection
Connect external HDMI high signal source to HDMI digital input port of this machine through HDMI digital connector cable; push "SOURCE" button to select „HDMI" signal source.
Video Signal Connection
Through composite cable, connect AV equipment VIDEO output termination to this machine VIDEO input, and AV equipment AUDIO output termination to this machine AUDIO input, respectively.
Antenna Connection
It is better to use outdoor antenna or CATV cable if you want to watch the colorful and hi-definition pictures.
Attention:
Please turn off TV power before the outdoor antenna is connected to the TV signal input port. Outdoor antenna can't be located near the high voltage cables. Please pull out the plug of outdoor antenna to avoid thunder shock in thunder weather.
Note:
Earphone Socket: The TV speakers will be shut off when earphone is inserted into this socket. (Please adjust the volume to a suitable size, to avoid sounds excessive to affect the hearing.)
YPbPr/YCbCr Input Connection
If the signal source is DVD, Digital wired receiver or equipments with the YPbPr/YCbCr output, recommends you to connect YPbPr or YCbCr output with the TV YPbPr/YCbCr input. In order to obtain the better picture quality, at the same time, please connect its audio output with TV audio input as shown in the following chart. If you choose the YPbPr/YCbCr signal, please set signal source selection under YPbPr pattern.
SCART Connection
Connect your equipment with SCART interface to the SCART interface of the machine.

USER'S MANUAL
Position of Control Keys
Remote Control

natural_image
Line drawing of a flat-screen monitor with labeled sides (1 and 2), no text or symbols present.
1) Remote Receiving Sensor.
2) Power Indicator.
3) SOURCE: Press this key to enter the menu of signal source and choose signal source.
4) CH+/CH-: Press these two keys to select the channel, and adjust the options you need under OSD operation.
5) VOL+/VOL-: Press these two keys to add or reduce volume, and adjust the analog value under OSD operation.
6) MENU: Press this key to enter main menu.
7) Power switch.
Note:
There are some apparent differences between modes, please according to practicality
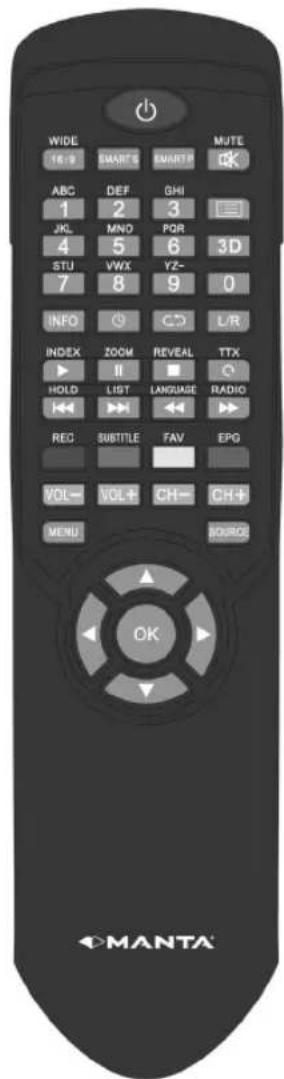
| POWER | Switch the receiver in and out of standby mode. |
| 16:9 | Switch picture ratio: 16: 9, 4:3, Auto, Panorama, Zoom1, Zoom2. |
| MUTE | Switch off sound when viewing a program. |
| Numerical Input number. | |
| Cursor key | Move cursor up/down/left / right in menu item or change date of EPG. |
| 3D 3D menu shortcut key. | |
USER'S MANUAL
| MENU Press this button to display menu. | |
| SMART S | Smart sound mode selection: Standard, Music, News, Sports, User. |
| SMART P | Smart image mode selection: Standard, Soft, User, Dynamic |
| SOURCE | Press this key to display signal source selection menu. |
| CH+/CH- | Channel changing keys. To change different pages of current channel EPG |
| VOL-/VOL+ Press to adjust the volume. | |
| OK To confirm current setting. | |
| INFO | Display the information of current program. |
| Time (➊) | Press this key to set time of sleeping automatically: Off, 10, 20, 30, 60, 90, 120, 180, 240 min. |
| Return (⩽Ⓧ) | Press this button to return to last watching channel. |
| L/R | Select NICAM mode (under ATV signal source). |
| INDEX (▶) | In DTV mode, press INDEX key to display a list of recorded programs. |
| ZOOM (II) | In DTV mode, press ZOOM key to zoom aspect ratio when there with graphic display; When no graphic display, and the USB port connected to memory, press the ZOOM key to delay broadcast of television programs currently playing. |
| REVEAL (■) | For teletext operation or USB operation. |
| TTX (○) | |
| HOLD (◀◀) | |
| LIST (▶◀) | |
| LANGUAGE (◀◀) | |
| RADIO (▶▶) | |
| REC Teletext red key or record. | |
| SUBTITLE | Teletext green key or display subtitle message, when current channel has subtitle option. |
| FAV | Teletext yellow key or Favourite key, to set or display your favorite programs. |
| EPG | Teletext blue key, or switch on Teletext, if current channel have this option, and use EXIT key to switch off Teletext or to show the Electronic Program Guide of current channel during no-menu state. |
Telecontrol battery installation method
Take off the cover of battery box, fix two AAA batteries with 1.5 volt, and conform with the polarity of remote control battery box.
Note: Appearance of the remote control may be different from this picture, please according to practicality.
Remote control user manual about teletext
TeleText: Press 'Teletext' key, It loops in 3 modes: Mix Display – Text Mode – TeleText Off Thereinto: Text Mode is Automatic Mode. In Automatic mode, the system automatically selects TOP, Fastext, or Default mode as appropriate, depending on the data being received. In Text Mode or Mix Display press number 0 9, 'CH+' or 'CH-'key to select text page
Reveal: Display any hidden characters for 6 seconds.
Hold: Toggle hold on or off for current display pages. If the page is not held, it will become held, thus preventing it from being updated. If the page is currently held, the hold will be removed thus allowing the page to update. When the page is held, this is indicated by a Hold prompt.
Index: In Fastext mode, request the index page if the index link is valid, or the Packet 8/30 initial page if valid, or page100. In TOP mode, if the Hitlist option is enabled, toggle the system between the current text page and the Hitlist menu; otherwise request page 100. In List mode, reset the list of preferred pages either to that of the current channel as read from the EEPROM if fitted, or to the default list (pages 100, 101, 102, 899), and request the first page in the list. In Default mode, request the Packet 8/30 initial page if valid, or page 100.
List: Toggle between List mode and the current acquisition mode (Fastext, TOP, or Default).
Red, Green, Yellow, Cyan: Request the associated page in the display block according to the acquisition mode. In TOP Hitlist mode, the Red, Green, and Cyan commands control selections from the Hitlist menu, while the Yellow command is ignored.
Precautions for use of remote control
- When using remote control you should point it to the remote-control inductive window. The goods between remote control and inductive window may hinder normal operation.
USER'S MANUAL
- Do not cause the remote control to receive fierce vibration. In addition, do not set or place the remote control under direct sunlight, for the thermal energy will cause the distortion of remote control.
- When remote-control inductive window of main machine is under direct sunlight or intense illumination, the remote control may malfunction, by now, please change the angle of illumination or this machine, or approach the inductive window to operate the remote control.
- When the battery voltage is insufficiency it influences the remote control distance, you should replace with new battery; when not to use the remote control for long or the battery is exhausted, please take out the battery, in order to avoid bringing the battery leakage to corrode the remote control and thus cause it out of commission.
- Do not use different batteries. The mix use of new and old batteries is not allowed, you should use battery pair.
- Do not throw battery into fire, charge or disassembly, especially do not charge, assemble and disassemble, heat or burn to the used battery. Please observe the related environmental protection stipulation on wasted battery.
Basic Operation
Before power-on platform, please make sure that the power supply is stable; the antenna cable is well connected.
Power ON

Plug power cord into the electrical socket, press power switch button on right down part of the back cover, then press "POWER" on the remote control to turn on the TV. The screen display "please Select an OSD Language" menu if no signal input. Press "Up/Down/Left/Right" key on the remote control to select language which you wish, then press "OK" key on the remote control to confirm, The screen display "Country" menu at the same time, you can select country where you are by pressing "Up/Down/Left/Right" key on the remote control, the machine start auto search channel after pressing "OK" key.
Standby
Press "Power" key on the remote control, TV will be in standby.
Note:
- TV set will automatically turn to standby if there is no signal input for 5 minutes when the TV turns on.
- TV set will automatically turn to standby when the preset time for turning off is reached.
- If you do not use it for a long time, please turn off the power supply for the machine. Do not let the machine work in standby state for a long time.
Signal Source Selection
Press "SOURCE" key either on the remote control or on the panel. "Input Source" will be displayed on the screen.
Then press "Up/Down" key on remote control or „CH+/CH-" key on the panel to select the signal source such as DTV, ATV, AV1, AV2, S-Video, SCART, YPBPR, HDMI1, HDMI2, VGA, USB. Press "OK" key on the remote control and the TV will switch the current signal source to the source which you select.

Menu Operation

USER'S MANUAL
Press "MENU" key on the remote control or on the panel. The screen will display the main menu.
- Press "Left/Right" key on the remote control or "VOL+/VOL-" key on the panel to select the adjustment sort menu, which includes 6 sorts: CHANNEL, PICTURE, SOUND, OPTION, TIME, LOCK.
- Press "Up/Down" key on the remote control or "CH+/CH-" on the panel to select what is needed to adjust in sort menu.
- Press "OK" key on the remote control to set or enter into next menu.
- Press "Menu" key to exit the main menu when the TV displays the Main Menu; Press "Menu" key to return to previous menu when the TV displays the sub-menu; Press "Source" key to display the signal source menu.
- During the operation, the selections which can not be adjusted at current mode will be hidden automatically and the color of the selections will be changed into gray.
- Menu Operation Instruction in this manual is explained according to TV mode. The operations in other modes are similar to the one in TV mode. Users can take it as reference.
Note:
"UP, Down, Left, Right" in this Manual stand for the direction cursor keys on the remote control unless specifically defined. The operating instructions in the text below are all based on keys on the remote control. Please understand the keys on the panel by yourself.
Channel
Press "MENU" key, CHANNEL menu shows on the screen. Press "Up/Down" key to select the item you'd like to adjust or set.
Auto Tuning

Press the "MENU" key, CHANNEL menu shows on the screen. Press "Up/Down" key to select Auto Tuning. Press "OK" key, then press "Left/Right" key to select Tune Type: DTV+ATV, DTV, ATV. Press "Down" key to enter into "Country" menu, then you can select country where you are by pressing "Up/Down/Left/Right", Press "OK" key to confirm, the machine start auto tuning. During auto tuning, the screen display "Do you want to skip ATV Tuning" by pressing "MENU" Key. Press "Left" key to confirm, or press "Right" key to cancel. When you press "Left" key to confirm, the machine start auto tuning DTV channel, During auto tuning DTV channel, the screen display "Do you want to skip DTV Tuning" by pressing "MENU" key. Press "Left" key to confirm, or press "Right" key to cancel.
DTV Manual Tuning

Press the "MENU" key, CHANNEL menu shows on the screen. Press "Up/Down" key to select DTV Manual Tuning. Press "OK" key to enter into DTV Manual Tuning menu. Press "Left/Right" key to select channel, then press "OK" key to conduct search. After searching, the DTV Manual Tuning menu automatically exits. During the search you may press "MENU" key to interrupt the search and return to the last menu.
ATV Manual Tuning

USER'S MANUAL
Press the "MENU" key, CHANNEL menu shows on the screen. Press "Up/Down" key to select ATV Manual Tuning. Press "OK" key to enter into ATV Manual Tuning menu. Press "Up/Down" key to select Search, and then press "Left/Right" key to conduct manual search.
After searching you may save the channel searched to other positions. At this time, press "Up/Down" key to select Storage To, and then press the "Left/Right" key to choose channel Number. After selecting Fine-Tune press "Left/Right" key to tune from low frequency or high frequency. During manual searching, you also may press "MENU" key to interrupt the search and return to the last menu.
Programme Edit
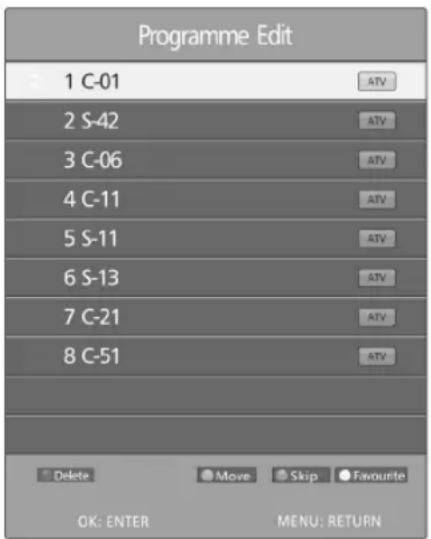
Press the "MENU" key, CHANNEL menu shows on the screen. Press "Up/Down" key to select Programme Edit.
Press "OK" key to enter into Programme Edit menu, then press "Up/Down" key to select the channel you'd like to edit.
DELETE: When you select a channel, a dialog box of "Are you sure?" will appear on the screen after pressing the "Red" key, then press the "Left" key to delete the channel, press "Right" key to cancel operation.
MOVE: After selecting channel press "Green" key, MOVE icon appears behind the channel which you select, and press "Green" key again to cancel it. Press "Up/Down" key to select the channel position that you'd like to move, then press "OK" key to confirm. You also can press "Menu" key to return main menu.
SKIP: After selecting channel press "Blue" key, SKIP icon appears behind the channel which you select, press
"Blue" key again to cancel it. Press "MENU" key to return main menu.
Favourite: After choosing channel press "Yellow" key, Favourite icon appears behind the channel which you select, press "Yellow" key again to cancel it. Press "MENU" key to return main menu
Signal Information
Press the "MENU" key, CHANNEL menu shows on the screen. Press "Up/Down" key to select Signal Information. Press "OK" key to enter into Signal Information menu.
You can look through signal information.
CI Information
Press the "MENU" key, CHANNEL menu shows on the screen. Press "Up/Down" key to select CI Information. When you insert the CI card, press "OK" key to enter into CI Information menu. You can look through CI information.
Note:
Before you press the MENU button, please select the input source first. Only in DTV and ATV mode you can change it.
Software Update(USB)
Open or close software update function by pressing "OK" key on the remote control.
Select Channels with „CH+/CH-“ Key
Press Program key on the remote control or „CH+/CH-“ key on the panel to select the channels.
Select channels with the Return key : you can go to the last channel when pressing the Return key. For example, if the last channel is 10 and the current channel is 20, you will go to channel 10 when pressing the Return key. You can switch the two favourite channels as you like.
Select Channels with Numeric Keys
- Operations to select channels with 1 digit (0-9):
Press the number keys (0-9) on the remote control to select TV channel directly. - Operations to select channels with 2 digits (10-99):
Press the number keys with 2 digits (10-99) on the remote control to select TV channels. - Operations to select channels with 3 digits (100-399):
Press the number keys with 3 digits (100-399) on the remote control to select TV channels.
USER'S MANUAL
Picture
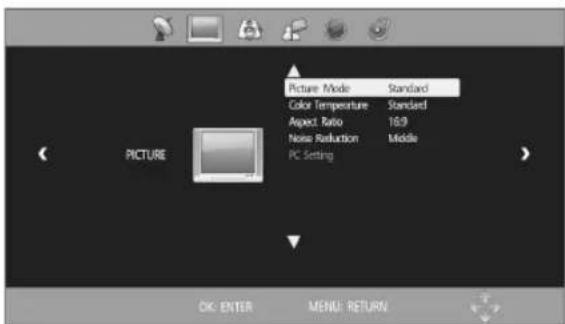
Press the "MENU" key, CHANNEL menu shows on the screen. Press "Left/Right" key to select PICTURE, then press "Up/Down" key to choose the item you'd like to adjust or set.
After selecting Picture Mode, press "OK" key to enter into Picture Mode submenu. Press "Up/Down" key to select item you'd like to adjust or set.
| Item Function | Description | |
| Picture Mode | Select picture mode | "Standard", "Soft", "User", "Dynamic" four modes. |
| Contrast | Adjust the contrast of whole picture | Increasing analog value increases Contrast |
| Decreasing analog value decreases Contrast (0-100) | ||
| Brightness | Adjust brightness and blackness of whole picture | Increasing analog value increases brightness; |
| Decreasing analog value decreases brightness(0-100). | ||
| Color | Adjust the color of whole picture | Increasing analog value increases color temperature; |
| Decreasing analog value decreases color temperature (0-100.) | ||
| Sharpness | Adjust the sharpness of whole picture | Increasing analog value increases definition; |
| Decreasing analog value decreases definition (0-100). | ||
| Tint | Adjust the tint of whole picture | Increasing analog value increases green; |
| Decreasing analog value increases purple (0-100). |
Note:
Tint can be adjusted only in NTSC system.
After selecting Color Temperature, press "OK" key to enter into Color Temperature submenu. Press "Up/Down" key to select item you'd like to adjust or set.
| Item Function | Description | |
| Color Temperature | Select Color Temperature | „Standard“, „Warm“, „User“, „Cool“ four modes |
| Red Adjust red | Increasing analog value increases red; | |
| Decreasing analog value decreases red (0-100 | ||
| Green Adjust green | Increasing analog value increases green | |
| Decreasing analog value decreases green (0-100 | ||
| Blue Adjust blue | Increasing analog value increases blue; | |
| Decreasing analog value decreases blue (0-100) |
Note:
The adjustment on Red, Green and Blue is only available under User states.
After selecting Aspect Ratio, press "OK" key to enter into Aspect Ratio submenu.
Press "Up/Down" key to select aspect ratio mode: Auto, 4:3, 16:9, Zoom1, Zoom2 and Panorama
After selecting Noise Reduction, press "OK" key to enter into Noise Reduction submenu. Press "Up/Down" key to select Noise Reduction mode: Off, Low, Middle, High and Default.
Sound

Press the "MENU" key, CHANNEL menu shows on the screen. Press "Left/Right" key to select SOUND, then press "Up/Down" key to select the item you'd like to adjust or set.
After selecting Sound Mode, press "OK" key to enter into Sound Mode submenu. Press "Up/Down" key to select item you'd like to adjust or set.
USER'S MANUAL
| Item Function Description | ||
| Sound Mode | Select Sound Temperature | "Standard", "Music", "News", "Sports", "User" five modes. |
| Treble | Adjust treble value | Increasing analog value increases treble; |
| Decreasing analog value decreases treble (0-100). | ||
| Bass | Adjust bass value | Increasing analog value increases bass; |
| Decreasing analog value decreases bass (0-100). | ||
| Balance | Adjust balance of left or right sound | Increasing analog value decreasing left volume; |
| Decreasing analog value decreases right volume(0-100). | ||
After selecting Auto Volume, press "OK" key to select "On" or "Off", open or close Auto Volume function.
After selecting Surround Sound, press "OK" key to enter into Surround Sound submenu. Press "Up/Down" key to select surround sound mode: Off, Surround.
After selecting AD Switch, press "OK" key to enter into AD Switch submenu. Press "Left/Right" key to select "On" or "Off", when you select "On", you can adjust AD Switch by pressing "Left/Right" key.
Option
Press the "MENU" key, CHANNEL menu shows on the screen. Press "Left/Right" key to select OPTION, then press "Up/Down" key to select the item you'd like to adjust or set.
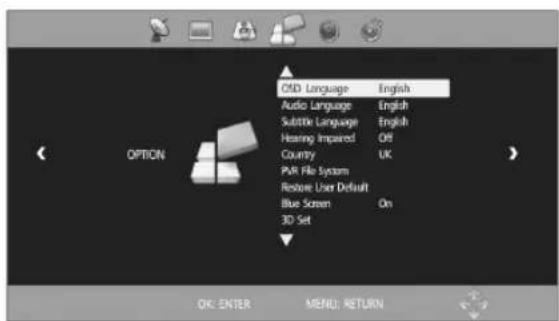
After selecting OSD Languages, press "OK" key to enter into OSD Languages submenu. Press "Up/Down/Left/Right" key to select language which you wish. Press "MENU" key to return previous menu.
Note:
The operation method of the Audio Languages, Country and Subtitle Language are the same as OSD Languages.
After selecting Hearing Impaired, press "OK" key to select "On" or "Off".
| Select Disk | C: |
| Check PVR File System | Start |
| USB Disk | |
| Format | |
| Time Shift Size | |
| Speed | |
| Free Record Limit | 6 Hr. |
| MENU: RETURN | |
After selecting PVR File System, press "OK" key to enter into PVR File System submenu. Press "Up/Down" key to select "Check PVR File System", then the machine start check by pressing "OK" key.
After checking successful, press "MENU" key to exit menu operation. Press "Red" key to record.
Note:
Insert U disk into the interface of the machine before operating the PVR File System function.
After selecting Restore User Default, the screen display "Are you sure?" by pressing "OK" key. You can press "Left" key to resume the factory setting or press "Right" key to cancel current operation.
After selecting Blue Screen, press "OK" key to select "On" or "Off". Open or close Blue Screen function.
After selecting 3D Set, press "OK" key to enter into 3D Set submenu.
| 3D Type | |
| 3D | On |
| 3D Mode | AUTO |
| L/R Switch | LR |
| 2D to 3D | Off |
| 3D Scene | 5 |
| 3D to 2D | Off |
| Menu:Exit | |
Note:
- This function works only in USB and HDMI modes.
- Only when appropriate 3D mode is selected you can see 3D effect.
- Wear 3D glasses before watching 3D videos.
USER'S MANUAL
Remote Control Shortcut Keys
Press „3D“ key on the remote control to access the menu for 3D Setup.
| Item Function | Description | |
| 3D | Switch on and off 3D function | Switch on or off 3D function |
| 3D Mode Select 3D format | Side by side: side by side image format, displaying two overlapped images side by side;Top bottom: top bottom image format, displaying two overlapped images from top bottom;Line by line: line by line format, displaying images line by line for both eyes;Frame alternative: frame alternative format, displaying images by frame alternative format for both eyes;Automatic: this function works when HDMI 1.4 format 3D signal is used. | |
| L/R Switch | Arrange images for left and right eyes | Left-right: arrange images from left to right eye; |
| right-left: arrange images from right to left | ||
| 2D to 3D | Switch from 2D to 3D | Enable/disable the function to switch from 2D to 3D |
| 3D Scene | Adjust the depth of field for images after switch from 2D to 3D | Adjustment range from grade 1-10 |
| 3D to 2D | Switch from 3D to 2D | Enable/disable the function to switch from 3D to 2D |
Important Safety Tips
Please first read the following warnings before you or your child uses 3D function:
- If you have headache, fatigue and dizziness when watching 3D video for long time, please stop watching it and take a break. We suggest that you do not watch 3D video for long time or in a short distance, for this will weaken your eyesight.
- Suggest that those in poor health condition (have insufficient sleep or drink much) and pregnant women do not watch 3D video.
- The children are only allowed to watch 3D video with the company of their parents. The children younger than 6 are not allowed to watch 3D video.
- Warning for photosensitive epilepsy patients and other health risks:
The photosensitive epilepsy patients may suffer from sudden epilepsy or stroke when seeing some flashing images or light in the video. If you or your relatives have once suffered from epilepsy or stroke, please consult the physician
before using 3D function. Even those without personal or family clinical record of epilepsy or stroke might suffer from elicited „photosensitive epilepsy attack” that has not diagnosed before.
Once you have the following symptoms, please stop watching 3D video and consult physician: faintness, dizziness; involuntary movement (like eyes and muscle twitches), confusion; nausea, unconsciousness, twitches, spasm and disorientation, etc..
Parents should observe and inquire if their children have such symptoms, for children are more likely to have these symptoms than adults.
- Please do not watch 3D video in open staircase or balcony with cables or other articles that might stumble, knock down or hit you. As this product is designed to make you feel personally on the scene, some true-to-life 3D videos might make you take evasive action, resulting in knock down of the objects nearby and personal injuries.
Note:
- You may not be able to experience 3D effect wearing 3D glasses of other company, so please wear the 3D glasses designated by our company.
- As 3D glasses are easily to be scratched, please properly keep them when they are not used. Please clear the glasses with clean and soft cloth.
- Please watch 3D video in effective visual angle and distance. The most preferable distance is equivalent to 3 times of the height of screen. You will not be able to experience 3D effect beyond effective visual angle and distance. Suggest that you try to align your sight with the screen height.
- You may not be able to experience 3D effect if your eyesight differs significantly for both eyes.
- You may not be able to experience 3D effect if you watch 3D video by sleeping on the side.
- Do not use 3D glasses as sunglasses or for other purposes.
USER'S MANUAL
3D formats supported by 3D video
| Mode Resolution Refresh | 3D video file that can be played | Function | ||
| Formats supported by HDMI input | 1280 x 1470P 50Hz | Frame Parking (HDMI V1.4 with 3D) frame package | HDMI Frame Parking can only support the video formats of these 3 resolutions; HDMI device should support Version 1.4 | |
| 1280 x 1470P 60Hz | Frame Parking (HDMI V1.4 with 3D) frame package | |||
| 1920 x 2205P 24Hz | Frame Parking (HDMI V1.4 with 3D) frame package | |||
| 1920 x 720P 50/60Hz | Side by side/top bottom | |||
| 1920 x 1080i 50/60Hz | Side by side/top bottom | |||
| 60Hz | Side by side/top bottom/line by line/ | |||
| 1920 x 1080P 50Hz | Side by side/top bottom | |||
| 24Hz | Side by side/top bottom/line by line | |||
| Formats supported by USB input | 1920 x 1080P 30Hz | Side by side/top bottom/line by line | Other 3D formats not recommended | |
Time

Press the "MENU" key, CHANNEL menu shows on the screen. Press "Left/Right" key to select TIME, then press "Up/Down" key to select the item you'd like to adjust or set. After selecting Clock, press "OK" key to enter into Clock submenu. Press "Up/Down" key to select Date, Mouth, Year, Hour and Minute, then press "Left/Right" key to adjust value.
After selecting Off Time, press "OK" key to enter into Off Time submenu. Press "Up/Down" key to select Off Time, Hour and Minute, then press "Left/Right" key to adjust value.

Note:
Yon can set Hour and Minute only the Off Time is not under "Off" Mode.
After selecting Sleep Time, press "OK" key to enter into Sleep Time submenu. Press "Up/Down" key to select sleep time: Off, 10Min, 20Min, 30Min, 60Min, 90Min, 120Min, 180Min, 240Min.
After selecting Auto Sleep, press "OK" key to select "On" or "Off".
After selecting Time Zone, press "OK" key to enter into Time Zone submenu. Press "Up/Down/Left/Right" key to select country where you are.
Lock

Press the "MENU" key, CHANNEL menu shows on the screen. Press "Left/Right" key to select LOCK. After pressing "OK" key, press the Numerical key to input default password 0000 for entering LOCK menu, and then press "Up/Down" key to select the item you'd like to adjust or set.
After selecting Lock System, press "OK" key to select "On" or "Off".
After selecting Set Password, press "OK" key, then a dialog box of "Set password" appears on the screen. Press the numerical key to input old password, and input new password twice to complete the password change and return to last menu.
USER'S MANUAL
After selecting Block Program, press "OK" key, then a "Block Program" menu shows on the screen. Press "Up/Down" key to select the channel that you'd like to lock, and then press "LOCK" key to lock or unlock, finally press "MENU" key to exit menu operation.
After selecting Parental Guidance, press 'OK' key to enter into Parental Guidance menu, press "Up/Down" key to select :Off, 4, 5, 6, 7, 8, 9, 10, 11, 12, 13, 14, 15, 16, 17, 18.
Hotel Function (optional)

Press „MENU” key on the remote control to display the main TV menu, and then press „4578” on the remote control to display the hotel function menu. Press „Up/Down” key to enter into the menu and select the item which you need to adjust, and then press „Left/Right” key to adjust the value or state.
| Item Function | Description | |
| Hotel Lock | Open or close hotel function | „ON“ „OFF“ two states |
| Picture Lock | Set whether starting up screen is locked | „ON“ „OFF“ two states |
| Key Lock | Set whether the machine control panel key is locked | „ON“ „OFF“ two states |
| Set Source | Set starting up type of the signal source | OFF, DTV, ATV, AV1, AV2, S-Video, SCART, YPBPR, HDMI1, HDMI2, VGA, USB |
| Channel Num. | Set starting up channel number | |
| Set Volume Set starting up volume (0-100) | ||
| Max Volume | Set starting up maximum volume | (0-100) |
| USB Clone | Set USB copy function or USB clone function | USB Copy/USB Clone |
Note:
You can set hotel function only the Hotel Function is "ON".
USB Media Function
Please insert USB memory card into USB interface of TV, press „SOURCE“ key on the remote control or control panel to select USB signal source, press „OK“ key to enter.
Note:
- USB function support file format with video file/sound file/graphic file/text file. For some nonstandard USB storage devices, may appear condition of unable recognize, please replace the standard USB storage device.
- Streaming media system to play a file for each format has certain limitations, if more than the system limit, then play will be wrong.
- Do not pull up USB storage devices when system playing, this may result in system or equipment problems
- The system supports USB1.1 and USB2.0 connector, the standard transport protocol such as U disk and removable hard disk storage devices, USB devices file format must be FAT or FAT32, does not support NTFS.
Press "SOURCE" key either on the remote control or on the panel. "INPUT SOURCE" will be displayed on the screen. Then press "Up/Down" key on remote control or "CH+/CH-" key on the panel to select USB. Press "OK" key to enter into USB

Remote Control Shortcut Keys
The last second row keys and last third row keys on the remote control are used for USB operation.
Press "Left/Right" key on the remote control or "VOL+/VOL-” key on the panel to select the adjustment sort menu, which includes 4 sorts: PHOTO, MUSIC, MOVIE, TEXT.
USER'S MANUAL
Press "Left/Right" key to select PHOTO. Then press "OK" key to read your photo documents. Press cursor key on the remote control to select photo and press „OK" key (After the photo was selected, the file lower right corner shows a red hook. you can choose photos to join playlist.). Press „INDEX" key on the remote control to play.
When you choose nothing, the machine will join all the photos in the file in playlist automatically.
Note:
The operation method of the MUSIC, MOVIE and TEXT are the same as PHOTO. Please refer to PHOTO options.
Basic Function
When photos are playing, press „INFO“ key on the remote control, then a toolbar will display under the screen (Press „Down“ key on the remote control to hide toolbar).
| Play/Pause:Press „Left/Right" key on the remote control to select this function, press „OK" key to play or pause. | |
| Prev.:Press „Left/Right" key on the remote control to select this function, press „OK" key to read previous photo. | |
| Next:Press „Left/Right" key on the remote control to select this function, press „OK" key to read next photo. | |
| Stop:Press „Left/Right" key on the remote control to select this function, press „OK" key to stop playing and return to previous menu. | |
| Repeat:Press „Left/Right" key on the remote control to select this function, press „OK" key to select repeat One or repeat all or not repeat. | |
| Music:Press „Left/Right" key on the remote control to select this function, press „OK" key to play background music. Music and photos need to place in the identical folder, or you may select some music in music file first.) | |
| Playlist:Press „Left/Right" key on the remote control to select this function, press „OK" key to show playlist. | |
| Info:Press „Left/Right" key on the remote control to select this function, press „OK" key to show the information of photo. Including resolution, size and so on. | |
| Clockwise:Press „Left/Right" key on the remote control to select this function, press „OK" key to clockwise rotation photo. | |
| Counter-clockwise:Press „Left/Right" key on the remote control to select this function, press „OK" key to counter-clockwise rotation photo. |
| Zoom in:Press „Left/Right" key on the remote control to select this function, press „OK" key to enlarge picture. | |
| Zoom out:Press „Left/Right" key on the remote control to select this function, press „OK" key to reduce picture. | |
| Movie View:If the picture big enough to surpasses the screen, you may use this function to move the picture. | |
| FB:Press „Left/Right" key on the remote control to select this function, press „OK" key to fast back. Press „PLAY" key to play normally. | |
| FF:Press „Left/Right" key on the remote control to select this function, press „OK" key to fast forward. Press „PLAY" key to play normally. | |
| MUTE:Press „Left/Right" key on the remote control to select this function, press „OK" key to fast back. Press „MUTE" key to Switch off sound. | |
| GO TO Time:Press „Left/Right" key on the remote control to select this function, press „OK" key to select the time to play. | |
| Set A:Press „Left/Right" key on the remote control to select this function, press „OK" key to set A and B, the film will circulating play in the time of A to B. | |
| SF:Press „Left/Right" key on the remote control to select this function, press „OK" key to slow down play speed. Press „PLAY" key to play normally. | |
| Step:Press „Left/Right" key on the remote control to select this function, press „OK" key to play one step by step. Press „PLAY" key to play normally. | |
| Aspect Ratio:Press „Left/Right" key on the remote control to select this function, press „OK" key to select Auto, 4:3, 16:9 or PC Mode. |
USER'S MANUAL
Trableshooting
| Symptom Factor Solution | ||
| Snowflake speckle and sound noise. | 1. Antenna cable connector is loose, cable is damaged. | 1. Check the antenna cable connector plug whether or not loose, cable whether or not perfect. |
| 2. Antenna cable type is not matching. | 2. Check antenna cable type (VHF/UHF) | |
| 3. Direction or position of antenna is incorrect. | 3. Adjust direction or position of antenna . | |
| 4. Signal is weak. 4. Attempt to use signal amplifier.. | ||
| TV image is better, but has noise. | Antenna cable connector is loose, cable is damaged. | Check the antenna cable connector plug whether or not loose, check cable condition. |
| No image. No sound. | Power plug is loose, power cord don't connect well. | 1. Check power cord whether or not connect well. |
| 2. Press "power" on panel or remote control. | ||
| 3. Check if „POWER,, on the front panel is on. | ||
| TV image has stripes. | Signal is exposed to interference, such as car, neon light, electric blower etc. | Don't use electric blower around machine, adjust antenna cable direction to reduce interference. |
| TV image has shadows. 1. TV signal is reflected by valley or building. 1. Use high directional antenna. | ||
| 2. Direction of antenna is incorrect. | 2. Adjust direction of antenna. | |
| TV no sound. 1. Volume setting is too low. 1. Adjust volume to proper value. | ||
| 2. Sound is muted. 2. Press "MUTE" button on remote control to eliminate mute. | ||
| Computer no display, and prompt no signal input, red indicator LED twinkling. | Signal cable is loose or fallen off. Check signal cable whether or not loose, fall off, reconnect again. | |
| Remote control distance is short, lose control. | 1. Receive window of remote control was covered by objects. | 1. Remove objects, obstructing the receiver window of remote control. |
| 2. The battery energy of remote control is to low. | 2. Change battery. | |
| Computer display is faint. | 1. Adjustment is incorrect. | 1. Use auto-adjustment function. |
| 2. Display mode is incorrect. | 2. Use recommended mode. | |
| Computer display image does not fill the screen. | 1. Adjustment is incorrect. | 1. Use Auto-adjustment function. |
| 2. Display mode is incorrect. | 2. Enter PICTURE to adjust horizontal or vertical position. | |
| 3. Use recommended mode. | ||
| Noise Signals at turning off. | Electrical release at turning off. | It is normal.. |
| Can not operate this machine. | Exterior influence, for example lightning, static electricity and so on, which are possibly to disturb the normal operation of this machine. | Press „POWER,, button to turn off electrical source, then press „POWER,, button to turn on the TV again after 1-2minutes. |
CAUTION: Don't let your machine display the same picture for a long time, please set up a screen protection procedure. If a high contrast picture remains for along time, this picture will bring a 'leave shadow' in screen. Usually the 'leave shadow' will disappear gradually when you turn off the machine power. However, this trouble can't be repaired, Which isn't in range of warranty.
NOTE

INFORMACJA O PRAWIDŁOWYM POSTĘPOWANIU W PRZYPADKU UTYLIZACJI URZĄDZEŃ ELEKTRONICZNYCH I ELEKTRYCZNYCH
- DVD053G Emperor Portable 2
- INSTRUKCJA OBSŁUGI
- Important Safety Instructions
- USER'S MANUAL
- Characteristic Functions
- Technical Specification
- VGA Display Mode
- Power Management
- Connection
- Power Connection
- Notes:
- Computer Connection
- HDMI Digital Port Connection
- Video Signal Connection
- Antenna Connection
- Attention:
- Note:
- YPbPr/YCbCr Input Connection
- SCART Connection
- Position of Control Keys
- Remote Control
- Telecontrol battery installation method
- Remote control user manual about teletext
- Precautions for use of remote control
- Basic Operation
- Power ON
- Standby
- Signal Source Selection
- Menu Operation
- Channel
- Auto Tuning
- DTV Manual Tuning
- ATV Manual Tuning
- Programme Edit
- Signal Information
- CI Information
- Software Update(USB)
- Select Channels with „CH+/CH-“ Key
- Select Channels with Numeric Keys
- Picture
- Sound
- Option
- Remote Control Shortcut Keys
- Important Safety Tips
- Hotel Function (optional)
- USB Media Function
- Basic Function
- NOTE
- INFORMACJA O PRAWIDŁOWYM POSTĘPOWANIU W PRZYPADKU UTYLIZACJI URZĄDZEŃ ELEKTRONICZNYCH I ELEKTRYCZNYCH
Brand : Manta
Model : LED3701
Category : Television