LED2802 - Television Manta - Free user manual and instructions
Find the device manual for free LED2802 Manta in PDF.


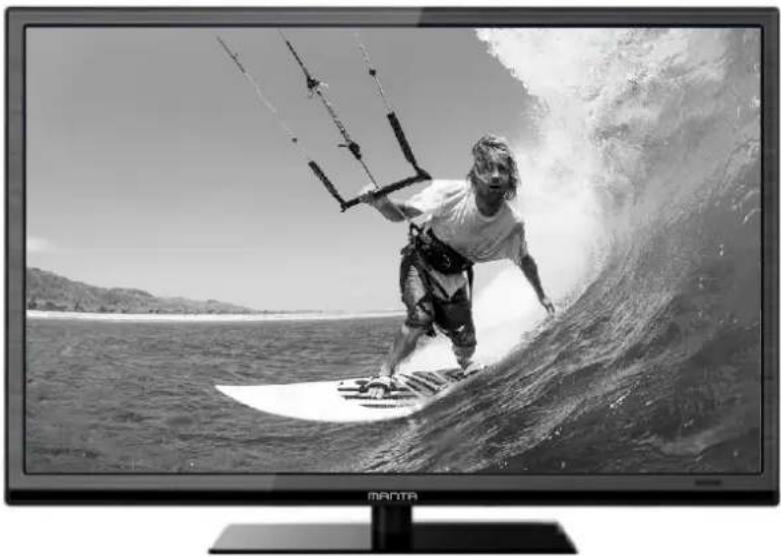
| Product Type | LED Television |
| Brand | Manta |
| Model | LED2802 |
| Screen Size | 28 inches (71 cm) |
| Display Technology | LED |
| Resolution | HD (1366 x 768) |
| Dimensions (without stand) | Approx. 635 x 375 x 80 mm (WxHxD) |
| Weight | Approx. 3.5 kg |
| Power Supply | AC 100-240V, 50/60Hz |
| Power Consumption | Approx. 35W (max) |
| HDMI Inputs | 1 x HDMI |
| USB Port | 1 x USB 2.0 |
| Tuner | DVB-T/T2/C |
| Audio Output | 3.5mm headphone jack |
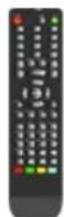
| Remote Control | Included (batteries not included) |
| VESA Mount | 100 x 100 mm |
| Cleaning Instructions | Wipe with a soft, dry cloth. Do not use liquids or sprays. |
| Safety Precautions | Keep away from water, do not block ventilation, unplug during lightning storms. |
| Spare Parts Availability | Contact Manta customer support or authorized service centers. |
Frequently Asked Questions - LED2802 Manta
User questions about LED2802 Manta
0 question about this device. Answer the ones you know or ask your own.
Ask a new question about this device
Download the instructions for your Television in PDF format for free! Find your manual LED2802 - Manta and take your electronic device back in hand. On this page are published all the documents necessary for the use of your device. LED2802 by Manta.
USER MANUAL LED2802 Manta
natural_image
Abstract black-and-white circular logo design with interlocking curved shapes (no text or symbols)MANTA
LED TV28"
LED2802
natural_image
Black-and-white photo of a man surfing on a beach with kitesurfing waves, displayed on a flat-screen TV (no text or symbols visible)- Safety instructions ....26
- Accessories .....28
- Controls and connections .....28
3.1 Front view/side view. 28
3.2 Rear View. 29
3.3 Remote Control 30 - TV OPERATION AND SYSTEM SETUP....33
natural_image
Four black-and-white icons representing prohibited items: a flame, a document, a person handling a box, and a hand holding a tool (no text or symbols)natural_image
Black remote control with black, red, green, and yellow buttons (no text or symbols visible)natural_image
Top-down view of a computer monitor with visible internal components and mounting feet (no text or symbols)6

1. Gniazdo HDMI
natural_image
Close-up of a dark, curved object with a gray arrow pointing to it (no text or symbols visible)natural_image
Two black rectangular objects, one with a curved line and arrow, placed side by side on a white background (no text or symbols visible)natural_image
Close-up of a dark, elongated object with a gray arrow pointing to it (no text or symbols visible)
natural_image
Black-and-white photo of a person surfing on a surfboard with kites flying, displayed on a flat-screen monitor (no text or symbols visible)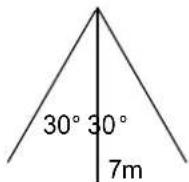
bar
PICTURE | Picture Mode | Standard | Current Value | |---|---|---| | Contrast | 50 | 50 | | Brightness | 50 | 50 | | Colour | 50 | 50 | | Tint | 50 | 50 | | Sharpness | 50 | 50 | | Contrast Booster | On | | | Colour Temperature | Normal | |bar
PICTURE | Picture Mode | Standard | Value | |---|---|---| | Contrast | 50 | 50 | | Brightness | 50 | 50 | | Colour | 50 | 50 | | Tint | 50 | 50 | | Sharpness | 50 | 50 | | Contrast Booster | On | | | Colour Temperature | Normal | || APPLICATIONS | |
| Channel | Enter |
| Channel Options | Enter |
| Country | Russia |
| DTV Type | Terrestrial |
| Auto Tuning | Enter |
| ATV Manual Tuning | Enter |
| DTV Manual Tuning | Enter |
| Common Interface | Enter |
| PREFERENCES | |
| Menu Language | English |
| Teletext Language | English |
| Key Lock | Off |
| PC Settings | Enter |
| Energy Saving Setting | Enter |
| PIN Setting | Enter |
| Parental Control | Enter |
Energy Saving Settings
| Automatic Power Down | Off |
| No Signal Power Down |
Zmiana kodu PIN (Change Pin Code)
1. Safety instructions
Welcome
Congratulations! You now own one of the most state of the art and technologically advanced high definition Television products available. In order to make set-up as easy as possible, we would like to familiarize you with the features and functions of this special product. Please read this user's manual carefully and thoroughly and keep in a safe place for future reference.
We thank you for your business and hope you enjoy this product.
Caution



CAUTION: TO REDUCE THE RISK OF ELECTRIC SHOCK, DO NOT REMOVE COVER (OR BACK), NO USER-8SERVICEABLE PARTS INSIDE.REFER SERVICING TO QUALIFIED SERVICE PERSONNEL

This symbol is intended to alert the user to the presence of uninsurable "dangerous Voltage" within the Product's enclosure that may be of
sufficient magnitude to constitute a risk of electric shock to persons.

This symbol is intended to alert the user to the presence of important operating and maintenance (servicing) instructions in the literature accompanying the appliance.
CAUTION
-TO PREVENT DAIMAGE WHICH MAY RESULT IN FIRE OR SHOCK HAZARD -DO NOT EXPOSE THIS APPLIANCE TO RAIN OR MOISTURE.
-SHOCK HAZARD DO NOT OPEN
CAUTION
These servicing instructions are use by qualified service personnel only. To reduce the risk of electric shock, do not perform any servicing other than that contained in the operating instruction unless you are qualified to do so.
CAUTION
The stand intended for use only with this TV. Use with other apparatus is capable of resulting in instability causing possible injury.
WARNING
-Apparatus shall not be exposed to dripping or splashing and no objects filled with liquids, such as vases, shall be placed on the apparatus.
-This is Class B product. In a domestic environment this product may cause radio interference in which case the user may be required to take adequate measures.
To reduce the risk of fire and electric shock, do not expose this product to rain moisture.
WARNING
-Apparatus shall not be exposed to dripping or splashing and no objects filled with liquids, such as vases, shall be placed on the apparatus.
-This is Class B product. In a domestic environment this product may cause radio interference in which case the user may be required to take adequate measures.
To reduce the risk of fire and electric
FCC NOTICE
This device has been tested and found to comply with the limits for a Class B device, pursuant to Part 15 of the FCC Rules. These limits are designed to provide reasonable protection against harmful interference in home environment as well as in a commercial, industrial or business environment. This equipment can generate, use and radiate radio frequency energy and, if not installed and used in accordance with the instruction, may cause harmful interference to radio communications. However, there is no guarantee that interference will not occur in a particular installation. If this equipment does cause harmful interference to radio or television reception, which can be determined by tuning the equipment off and on, the user is encouraged to try to correct the interference by one or more of the following measures:
-Reorient or relocate the receiving antenna.
-Increase the separation between the equipment and receiver.
-Connect the equipment into an outlet on circuit's different form that to which the receiver is connected.
-Consult the dealer or an experienced radio/TV technician for help.
Changes or modrticalion not expressly approved by the party for compliance could void the user's authority to operate the equipment.
Connecting of peripherals requires the use of grounded shielded signal cables.
Important Safety Precautions
Always be careful when using your television. To reduce the risk of fire, electrical shocks, and other injuries, keep these safety precautions in mind when installing, using, and maintaining your Television.
③ Read these instructions and keep them in a safe place.
③ Heed all warnings.
③ Follow all instructions.
③ Do not use this apparatus near water.
③ Do not block any of the ventilation openings.
③ Install it in accordance with the manufacturer's instructions.
③ Do not install near any heat sources such as radiators, heat registers, stoves, or other apparatus (including amplifiers) that produce heat.
③ Do not defeat the safety purpose of the polarized or grounding type plug. A polarized plug has two blades with one wider than the other. A grounding type plug has two blades and a third grounding prong. The wide blade or the third prong is provided for your safety. When the provided plug does not fit into your outlet, consult an electrician for replacement of the obsolete outlet.
③ Protect the power cord from being walked on or pinched particularly at plugs, convenience receptacles, and the point where they exit from the Television.
③ Only use the attachments/accessories specified by the manufacturer.
③ Use only with a cart, stand, tripod, bracket, or table specified by the manufacturer, or sold with the Television. When a cart is used, use caution when moving the cart/apparatus combination to avoid injury from tip-over.
③ Unplug this Television during lightning storms or when unused for long periods of time.
③ Refer all servicing to qualified service personnel. Servicing is required when the Television has been damaged in any way, such as power supply cord or plug is damaged, liquid has been spilled or objects have fallen into the unit, the Television has been exposed to rain or moisture, does not operate normally, or has been dropped.
③ Clean only with a lint free cloth.

natural_image
Three black-and-white icons representing electronic devices and food safety symbols (no text or labels)2. Accessories
natural_image
Front view of a black remote control with gray buttons and a green handle (no text or symbols visible)User's Manual Remote Control
3. Controls and connections
3.1 Front view/side view
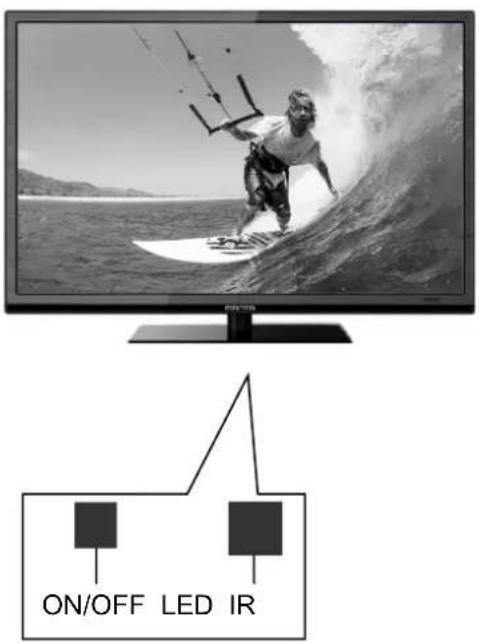
- INPUT: Display the input source list
- MENU: Display the main OSD menu
- CH-: Move to the lower programmer
- CH+: Move to the upper programmer
- VOL-: Decrease the volume level
- VOL+: Increase the volume level
- POWER: Turn the TV On or OFF

ON is indicated by GREEN LED
OFF ( standby) is indicated by RED LED
3.2 Rear View
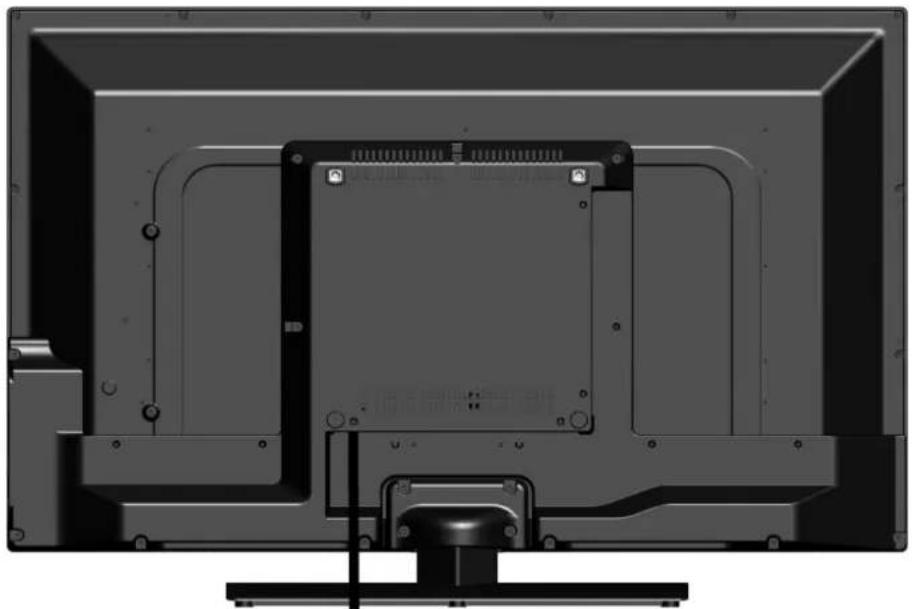
natural_image
Interior view of a computer monitor with visible drive bays and mounting feet (no text or symbols)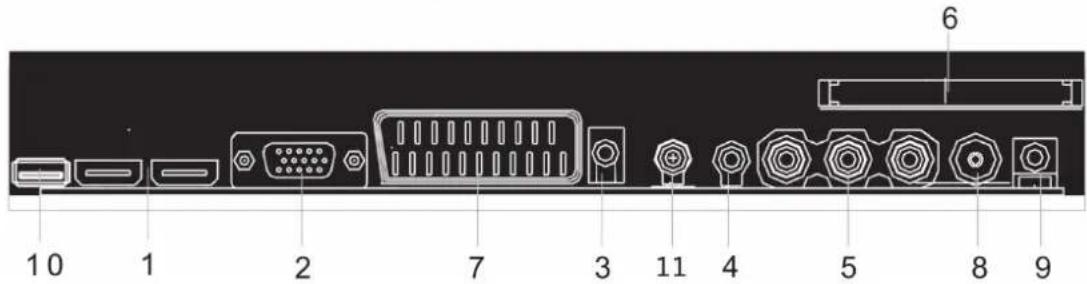
1. HDMI Input Jack
Connecting for HDMI signal.
2. VGA input Jack
Connected to the VGA output jack on a personal computer.
3. PC Audio Input Jack
Connected to the audio output jack on a personal computer.
4. Y/Pb/Pr Input Jacks
Connecting for the Y/Pb/Pr Input in component mode.
5. AV Input Jacks
Connecting for AV signal input in composite mode.
6. CI Card Slot
Used to insert the CI card.
7. SCART Jack
Connecting for SCART signal.
8. Antenna Input Jack
Connected to external antenna to receive the ATV/DTV program in ATV/DTV mode.
9. Headphone Jack
Connecting for headphone.
10. USB HOST
Connecting for USB device.
11. Coax OUT
3.3 Remote Control

1. POWER button
Press to enter or exit the standby mode.
2. MUTE button
Press to turn on or off the audio output.
3. Number buttons (0\~9)
Press to select numbers.
4. -/-- button
Press this button to enter a program number for multiple program channels such as 2-1, etc.
5.
In the ATV/DTV mode, press to return to the channel list viewed.
6. INPUT button
Press to select enter the input selecting menu, press the ▲/▼ direction buttons or press the INPUT button repeatedly to select desired mode and press the ENTER button to enter the selected mode.
7. INFO button
Press this button to display information about the current channel on the screen.
8. Direction buttons
Press the direction buttons to select menu options or settings.
9. ENTER button
Press to confirm selection in the setup menu.
10. MENU button
Press to enter or exit the setup menu.
11. SLEEP button
This feature allows you to set up sleep time. Press the button repeatedly to select the desired time to sleep or select off to close the function.
12. EXIT button
Press to exit all the OSD on the screen.
13. VOL+/- button
Press to increase or decrease the volume.
14. CH+/- button
In ATV or DTV mode, press to select analog channel or digital channel.
15.AUDIO
MANUAL
16. SUBTITLE button
In DTV mode, press to select alternate subtitle language during view/playback of a DTV program. In teletext mode, press to display P.100.
Note: Subtitle and teletext is only available if the service is provided by broadcaster.
17. SUBPAGE (TeleText Mode)
Press to turn on or turn off subpage.
18. CANCEL (TeleText Mode)
Press to cancel what you are doing.
19. P. M O D E button
Press to select the picture mode: choose User, Standard, Dynamic or Mild.
20. S.MODE button
Press this button to change the audio mode: User, Standard, Movie or Music.
21. FAV button
Display the selected favorite programmers.
Mix( Teletextmode)
TV and TXT pictures are mixed together on a transparent background.
22. FAV+
Display the selected favorite up programmers.
REVEAL: Press to reveal hidden telete
xt information
23. FAV-
Display the selected favorite down programmers.
HOLD( Teletext Mode)
Hold on or off for current page display.
24-27. Color button(Media and Teletext)
28. FREEZE button
Press this button to freeze the analogue text image on the screen.
29. ASPECT (TV Mode)
Change display size in Analog TV mode.
SIZE (Teletext and DVD Mode)
Change display size in teletext or DVD mode.
30.TT/CC button
TT button (Teletext Mode-Europ)
CC button (Teletext mode-South American)
Switch on or off the teletext mode( TV mode)
31. INDEX button (Teletext Mode)
Request the index page (Teletext mode)
LIST (TV and DTV Mode)
Press to show Analog or Digital programme list.
32-35. Media and DVD key

Playing backward fast.

Playing forward fast.

Skip backward button.

Skip forward Button.
36. EPG button
Press to display the EPG menu in DTV mode.
37. T.SHIFT
Press button to start the T.shift function.
Pause the playback when auto T.shift is on.
Press Again to resume normal playback.

Stop the playback and Exit to the up-menu.
39. DTV/RADIO
Select the DTV.RADIO mode.
EJECT Button (DVD)
40. MEDIA button
Press to enter the MEDIA source.
41. REC.TASK
Hot key to enter set or check the Rec.Task.
42. REC.File
Hot key to enter set or check the Rec.File

Record Button.
MANUAL
Preparation of Remote Control Using of Remote control
Place the remote control on an even surface and insert the supplied batteries into the remote control as follows.
1. Softly push the back cover to open the battery compartment.
Point the remote control unit from on more than about 7m from the remote control sensor and within about 60 degrees of the front of the unit.

natural_image
Close-up of a dark, curved object with a gray arrow pointing right (no text or symbols visible)
2. Insert two batteries(1.5V size AAA), please make sure the polarity matches the marks inside the compartment.

natural_image
Close-up of a dark rectangular electronic component with internal slots, next to a separate black rectangular block (no text or symbols visible)
3. Softly press the back cover to close it.

natural_image
Close-up of a dark, curved object with an arrow pointing to it (no text or symbols visible)

natural_image
Black-and-white photo of a person surfing on a large wave, no visible text or symbols


The operating distance may vary depending to the brightness around.

Under normal use the battery will la for six months.
Take out battery when the remote is not in use for a long time.

Do not point bright lights directly at the remote control sensor.
Do not place objects between the remote control unit and the remote control sensor.
Do not use this remote control unit while simultaneously operating the remote control unit of any other equipment.
4. TV OPERATION AND SYSTEM SETUP
SELECT INPUT SOURCE

Press SOURCE button to display the input source list;
Press ▲/▼ button to select the input source you want to watch;
Press ENTER button to enter the input source;
③ Press MENU button to display the MAIN OSD MENU;

bar
PICTURE
| Picture Mode | Standard | Normal |
|---|---|---|
| Contrast | 50 | 50 |
| Brightness | 50 | 50 |
| Colour | 50 | 50 |
| Tint | 50 | 50 |
| Sharpness | 50 | 50 |
| Contrast Booster | On | |
| Colour Temperature | Normal | |
MANUAL
③ Press ▲/▼ button to select the MENU you want;
③ Press ENTER button or ▶ button to enter the sub menu, and press ◀ button to return back to the previous menu.
③ Press ▲/▼ button to select the option and then press ENTER button or ▶ button to enter the submenu, press ◀/▶ button to adjust the value or press ◀/▶ button to select in the sub menu;
③ You can press MENU button to save and return back to the previous menu, and press EXIT button to exit the entire menu.
Press INFO button on the remote control to display program information.

1. Current Source.
2. Current program Number.
3. The NICAM mode of current program.
4. The sound system of current channel could be changed on Analog Manual Search Menu.
Picture Menu
The picture is for a reference only; the actual item is the standard.
Press TV MENU button to display the main menu.
Press ▲/▼ button to select Picture in the main menu, and then press ENTER button to enter.

bar
PICTURE
| Picture Mode | Standard | Normal |
|---|---|---|
| Contrast | 50 | 50 |
| Brightness | 50 | 50 |
| Colour | 50 | 50 |
| Tint | 50 | 50 |
| Sharpness | 50 | 50 |
| Contrast Booster | On | |
| Colour Temperature | Normal | |
1. Press ▲/▼ button to select the option that you want to adjust in the Picture menu, and then press ENTER button or ▶ button to enter.
2. Press ◀/▶ button to adjust or press ▲/▼ button to select. And press ENTER button to select the sub menu.
3. After finishing your adjustment, press MENU button to save and return back to the previous menu, and press EXIT button to exit the entire menu.
Picture Mode
Press ▲/▼ button to select Picture Mode, then press ENTER button to enter and press ◀/▶ button to select. (Available Picture Mode: User, Dynamic, Standard, Mild)
You only can change the value of brightness, contrast, sharpness, color, when the picture is in User mode.
TIPS: You can press P-MODE button on the remoter control again and again to change the picture mode directly.
Picture Mode
Standard
Contrast
Press ▲/▼ button to select Contrast, then press ENTER button to enter and press ◀/▶
MANUAL
button to adjust. Then press MENU button to return back the previous menu directly.
Brightness
Press ▲/▼ button to select Brightness, then press ENTER button to enter and press ◀/▶ button to adjust. Then press MENU button to return back the previous menu directly.
Colour
Press ▲/▼ button to select Colour, then press ENTER button to enter and press ◀/▶ button to adjust. Then press MENU button to return back the previous menu directly.
Tint
Press ▲/▼ button to select Tint, then press ENTER button to enter and press ◀/▶ button to adjust. Then press MENU button to return back the previous menu directly.
Sharpness
Press ▲/▼ button to select Sharpness, then press ENTER button to enter and press ◀/▶ button to adjust. Then press MENU button to return back the previous menu directly.
Contrast Booster
Press ▲/▼ button to select Contrast Booster, then press ENTER button to enter and press ◀/▶ button to select On or Off. Then press MENU button to return back the previous menu directly.
Colour Temperature
Press ▲/▼ button to select Colour Temperature, then press ENTER button to enter and ◀/▶ button to select Standard, Cool, Warm.
DNR
Press ▲/▼ button to select DNR, and then press ENTER button to enter and ◀/▶ button to select Off, Low, Middle, High.
Reset
Press ▲/▼ button to select Reset, then press ENTER button to enter the confirm menu, and then choose OK to reset the value.
SOUND Menu
The picture is for a reference only; the actual item is the standard.
Press MENU button to display the main menu.
Press ▲/▼ button to select Sound in the main menu, and then press ENTER button or ▶ button to enter.

bar
SOUND
| Sound | Stable Sound | Standard |
| :--- | :--- | :--- |
| Bass | | 50 |
| Treble | | 50 |
| Balance | | 0 |
| Surround | Off | |
| AVL | Off | |
| Digital Audio Output | PCM | |
| Reset | Enter | |
1. Press ▲/▼ button to select the option that you want to adjust in the Sound menu, then press ENTER button to enter.
2. press ◀/▶ button to adjust or press ▲/▼ to select, and press ENTER button to select submenu.
3. After finishing your adjustment, Press MENU button to save and return back to the previous menu, or press EXIT button to exit the entire menu.
Sound mode
Press ▲/▼ button to select Sound mode, and then press ENTER button to enter. And then press ◀/▶ button to select. (Available Sound mode: User, Standard, Music, Movie).
You can change the value of bass and treble, Balance and EQ, when the sound is in User mode.
TIPS: You can press S-MODE button on the remote control to change the Sound Mode directly.
Sound Mode
Standard
Bass
Press ▲/▼ button to select Bass, then press ENTER or ▶ button to enter and press ◀/▶ button to adjust. It can only be adjusted under user mode. Then press MENU button to return
back the previous menu directly.
Treble
Press ▲/▼ button to select Treble, then press ENTER button to enter and press ◀/▶ button to adjust. It can only be adjusted under user mode Then press MENU button to return back the previous menu directly.
Balance
Press ▲/▼ button to select Balance, then press ENTER button to enter and press ◀/▶ button to adjust. Then press MENU button to return back the previous menu directly.
Surround
Press ▲/▼ button to select Surround, and then press ENTER button to enter and press ◀/▶ button to select ON or OFF.
AVL
Press ▲/▼ button to select AVL, and then press ENTER button to enter and press ◀/▶ button to select ON or OFF.
Digital Audio Output
Press ▲/▼ button to select Digital Audio Output, then press ENTER button to enter and press ◀/▶ button to select.
(Available SPDIF mode: OFF, PCM, AUTO)
Then press ENTER button or ▶ button to enter and press ◀/▶ button to adjust, then press MENU button to return back the previous menu directly.
Reset
Press ▲/▼ button to select Reset, then press ENTER button to enter RESET menu.
APPLICATIONS
The picture is for a reference only; the actual item is the standard.
Press MENU button to display the main menu.
Press ▲/▼ button to select APPLICATIONS in the main menu, and then press ENTER button to enter.
APPLICATIONS Channel Enter Channel Options Enter Country Russia DTV Type Terrestrial Auto Tuning Enter ATV Manual Tuning Enter DTV Manual Tuning Enter Common Interface Enter
1. Press ▲/▼ button to select the option that you want to adjust in the APPLICATIONS menu, and then press ENTER button to enter.
2. Press ◀/▶ button to select and press ENTER button to select the sub menu.
3. After finishing your adjustment, press MENU button to save and return back to the previous menu, or press EXIT button to exit the entire menu.
MANUAL
Channel
Press ▲/▼ button to select Channel, and then press ENTER button to play the channel selected. The menu will appear as follows:

Key Description
CH button: Press CH+ or CH- to turn the page.
RED button: Press this button to modify the channel number.
GREEN button: Press this button to move down the channel.
YELLOW button: Press this button to the order to restore the default channel.
GREEN button: Press this button to delete the channel selected.
0-9 button: Press these buttons to jump to the appropriate channel by inputting different channel number.
Channel Options
Press ▲/▼ button to select Channel Options, and then press ENTER button to the channel List menu. The menu will appear as follows:

Key Description
CH button: Press CH+ or CH- to turn the page.
RED button: Press this button to set the favorites channels.
GREEN button: Press this button to lock the channel.
YELLOW button: Press this button to skip the channel, if the channels already skipped, press YELLOW button again will cancel skip.
Country
Press ▲/▼ button to select Country, and then press ◀/▶ button to select which area you stay.
DTV Type
Press ▲/▼ button to select DTV Type, then press ◀/▶ button to select.
(Available DTV Type: Cable, Terrestrial)
Auto Tuning
Press ▲/▼ button to select Auto Tuning, and then press ENTER button to enter (When the System Lock is on, please input the PIN code to unlock).
Select to open the auto searching page, and press Enter button to start the scan.
ATV Manual Tuning
Press ▲/▼ button to select ATV Manual Tuning, and then press ENTER button to start the scan.
MANUAL
DTV Manual Tuning
Press ▲/▼ button to select DTV Manual Tuning, and then press ENTER button to start the scan.
Common Interface
Press ▲/▼ button to select Common Interface, and then press ENTER button to display the CI slot Information.
PREFERENCES
The picture is for a reference only; the actual item is the standard.
Press MENU button to display the main menu.
Press ▲/▼ button to select PREFERENCES in the main menu, and then press ENTER or ▶ to enter.
PREFERENCES Menu Language English Teletext Language English Key Lock Off PC Settings Enter Energy Saving Setting Enter PIN Setting Enter Parental Control Enter
1. Press ▲/▼ button to select the option that you want to adjust in the PREFERENCES menu, then press ENTER to enter.
2. Press ◀/▶ button to adjust or press ▲/▼ button to select.
3. After finishing your adjustment, press MENU button to save and return back to the previous menu and press EXIT button to exit the entire menu.
MANUAL
Menu Language
Press ▲/▼ button to select Menu Language, then press ENTER or ▶ button to enter the sub menu, then press ▲/▼ button to select, then press ENTER or ▶ button to confirm.
Teletext Language
Press ▲/▼ button to select Teletext Language, then press ENTER or ▶ button to enter the sub menu, then press ▲/▼ button to select, then press ENTER or ▶ button to confirm.
Key Lock
Press ▲/▼ button to select Key Lock, then press ENTER button to enter and press ◀/▶ button to select ON or OFF.
PC Settings
Press ▲/▼ button to select PC Settings, then press ENTER to enter the sub menu, Then Press ▶ to enter, then press ENTER or ▶ to confirm. (When the PC signal is connected).
Energy Saving Settings
Press ▲/▼ button to select Energy Saving Settings, and then press ENTER to enter the sub menu.
Automatic Power Down
Press ▲/▼ button to select Automatic Power Down and press ◀/▶ button to select ON or OFF.
Energy Saving Settings
Automatic Power Down Off No Signal Power Down
No Signal Power Down
Press ▲/▼ button to select No Signal Power Down and press Enter button to enter the sub menu.
No Signal Power Down
TV Off AV On YPBPR Off HDMI On SCART On PC On MEDIA Off
Press ▲/▼ button to select the options and press ◀/▶ button to select ON or OFF.
PIN Setting
Press ▲/▼ button to select PIN Setting, then press ENTER button to enter the sub menu, and than you can set a password.
Parental Control
Press ▲/▼ button to select Parental Control, then press ENTER or ▶ button to enter the sub menu. Then press ▲/▼ button to select Rate (From4-17, or None). Then press ENTER or ▶ button to confirm.
Change Pin Code
Press ▲/▼ button to select Change Pin Code, then press ENTER to enter and Change Pin Code menu will appear as follows:
Input old password at "Old Password", (if the old password is incorrect, the password will not be allowed to modify.)
Input new password at "New Password".
Input new password again at "Confirm New Password", if new password and confirm new password consistent, the successfully updated menu will appear a few second, otherwise, the menu will display the password mismatch.
MANUAL
SETUP
The picture is for a reference only; the actual item is the standard.
Press MENU button to display the main menu.
Press ▲/▼ button to select Setup in the main menu, then press ENTER to enter.

natural_image
Four icons on a dark blue background: monitor, speaker, keyboard, and wrenches (no text or symbols)
SETUP
OSD Timer
Off
Cinema
Super Live
Blue Screen
On
Sleep Timer
Off
Location
Home
Quick Setup
Enter
Reset TV
Enter
1. Press ▲/▼ button to select the option that you want to adjust in the Setup menu, then press ENTER or ▶ button to enter.
2. Press ◀/▶ button to adjust or press ▲/▼ button to select.
3. After finishing your adjustment, press MENU button to save and return back to the previous menu and press EXIT button to exit the entire menu.
OSD Timer
Press ▲/▼ button to select OSD Timer, and then Press ◀/▶ button to select. (Available OSD Timer: 10 S, 20 S, 30S, 40S, 50S, 60S, off), then press ENTER button to confirm.
Cinema
Press ▲/▼ button to select Cinema, and then Press ◀/▶ button to select. (Available Cinema: Auto, 4x3, Wide, Super Live), then press ENTER button to confirm.
Blue Screen
Press ▲/▼ button to select Blue Screen, then press ◀/▶ to select On or Off. Then press ENTER to confirm.
MANUAL
Sleep Timer
Press ▲/▼ button to select Sleep Timer, and then Press ◀/▶ button to select. (Available Sleep Timer: 00:15, 00:30, 01:00, 01:30, 02:00, off), then press ENTER button to confirm.
Location
Press ▲/▼ button to select Location, and then Press ◀/▶ button to select Home or Store, then press ENTER button to confirm.
Quick Setup
Press ▲/▼ button to select Quick Setup, and then Press then press ENTER button to enter the sub menu, enter the password if locked, and then you can quickly make some basic settings of the TV.
Reset TV
Press ▲/▼ button to select Reset TV, and then press ENTER to enter the sub menu, enter the password if locked, and then you can restore factory settings.
MEDIA OPERATION
The picture is for a reference only; the actual item is the standard.
Note: Before operation MEDIA menu, Plug in USB device or memory card, then press SOURCE button to set the Source to Media.
Press ▲/▼ button to select MEDIA in the Source Menu, and then press ENTER or ▶ to enter. You can also enter the Media by pressing MEDIA button on the remote control.

1. Press ▲/▼ button to select the option that you want to adjust in the Media menu, then press ENTER or ▶ button to enter.
2. Press ◀/▶ button to adjust or press ▲/▼ button to select.
3. After finishing your adjustment, press MENU button to save and return back to the previous menu and press EXIT button to exit the entire menu.

natural_image
Abstract black-and-white circular logo design with interlocking curves (no text or symbols)
MANTA
CUSTOMER SERVICE
tel: +48 22 332 34 63 lub e-mail: serwis@manta.com.pl
FROM MONDAY TO FRIDAY, IN HOURS: 9.00-17.00
The manufacturer reserves the right to make changes to product specifications without notice.
Main page: www.manta.com.pl
Technical suport page: www.manta.info.pl


Assembled in Poland
6. INPUT button
Press to select enter the input selecting menu, press the ▲/▼ direction buttons or press the INPUT button repeatedly to select desired mode and press the ENTER button to enter the selected mode.7. INFO button
Press this button to display information about the current channel on the screen.8. Direction buttons
Press the direction buttons to select menu options or settings.9. ENTER button
Press to confirm selection in the setup menu.10. MENU button
Press to enter or exit the setup menu.11. SLEEP button
This feature allows you to set up sleep time. Press the button repeatedly to select the desired time to sleep or select off to close the function.12. EXIT button
Press to exit all the OSD on the screen.13. VOL+/- button
Press to increase or decrease the volume.14. CH+/- button
In ATV or DTV mode, press to select analog channel or digital channel.15.AUDIO
MANUAL
16. SUBTITLE button
In DTV mode, press to select alternate subtitle language during view/playback of a DTV program. In teletext mode, press to display P.100. Note: Subtitle and teletext is only available if the service is provided by broadcaster.17. SUBPAGE (TeleText Mode)
Press to turn on or turn off subpage.18. CANCEL (TeleText Mode)
Press to cancel what you are doing.19. P. M O D E button
Press to select the picture mode: choose User, Standard, Dynamic or Mild.20. S.MODE button
Press this button to change the audio mode: User, Standard, Movie or Music.21. FAV button
Display the selected favorite programmers. Mix( Teletextmode) TV and TXT pictures are mixed together on a transparent background.22. FAV+
Display the selected favorite up programmers. REVEAL: Press to reveal hidden telete xt information23. FAV-
Display the selected favorite down programmers. HOLD( Teletext Mode) Hold on or off for current page display.24-27. Color button(Media and Teletext)
28. FREEZE button
Press this button to freeze the analogue text image on the screen.29. ASPECT (TV Mode)
Change display size in Analog TV mode.SIZE (Teletext and DVD Mode)
Change display size in teletext or DVD mode.30.TT/CC button
TT button (Teletext Mode-Europ) CC button (Teletext mode-South American) Switch on or off the teletext mode( TV mode)31. INDEX button (Teletext Mode)
Request the index page (Teletext mode) LIST (TV and DTV Mode) Press to show Analog or Digital programme list.32-35. Media and DVD key
 Playing backward fast.  Playing forward fast.  Skip backward button.  Skip forward Button.36. EPG button
Press to display the EPG menu in DTV mode.37. T.SHIFT
Press button to start the T.shift function. Pause the playback when auto T.shift is on. Press Again to resume normal playback.  Stop the playback and Exit to the up-menu.39. DTV/RADIO
Select the DTV.RADIO mode. EJECT Button (DVD)40. MEDIA button
Press to enter the MEDIA source.41. REC.TASK
Hot key to enter set or check the Rec.Task.42. REC.File
Hot key to enter set or check the Rec.File  Record Button.MANUAL
Preparation of Remote Control Using of Remote control
Place the remote control on an even surface and insert the supplied batteries into the remote control as follows. 1. Softly push the back cover to open the battery compartment. Point the remote control unit from on more than about 7m from the remote control sensor and within about 60 degrees of the front of the unit. natural_image
Close-up of a dark, curved object with a gray arrow pointing right (no text or symbols visible)natural_image
Close-up of a dark rectangular electronic component with internal slots, next to a separate black rectangular block (no text or symbols visible)natural_image
Close-up of a dark, curved object with an arrow pointing to it (no text or symbols visible)natural_image
Black-and-white photo of a person surfing on a large wave, no visible text or symbols4. TV OPERATION AND SYSTEM SETUP
SELECT INPUT SOURCE  Press SOURCE button to display the input source list; Press ▲/▼ button to select the input source you want to watch; Press ENTER button to enter the input source; ③ Press MENU button to display the MAIN OSD MENU; bar
PICTURE | Picture Mode | Standard | Normal | |---|---|---| | Contrast | 50 | 50 | | Brightness | 50 | 50 | | Colour | 50 | 50 | | Tint | 50 | 50 | | Sharpness | 50 | 50 | | Contrast Booster | On | | | Colour Temperature | Normal | |MANUAL
③ Press ▲/▼ button to select the MENU you want; ③ Press ENTER button or ▶ button to enter the sub menu, and press ◀ button to return back to the previous menu. ③ Press ▲/▼ button to select the option and then press ENTER button or ▶ button to enter the submenu, press ◀/▶ button to adjust the value or press ◀/▶ button to select in the sub menu; ③ You can press MENU button to save and return back to the previous menu, and press EXIT button to exit the entire menu. Press INFO button on the remote control to display program information.  1. Current Source. 2. Current program Number. 3. The NICAM mode of current program. 4. The sound system of current channel could be changed on Analog Manual Search Menu.Picture Menu
The picture is for a reference only; the actual item is the standard. Press TV MENU button to display the main menu. Press ▲/▼ button to select Picture in the main menu, and then press ENTER button to enter. bar
PICTURE | Picture Mode | Standard | Normal | |---|---|---| | Contrast | 50 | 50 | | Brightness | 50 | 50 | | Colour | 50 | 50 | | Tint | 50 | 50 | | Sharpness | 50 | 50 | | Contrast Booster | On | | | Colour Temperature | Normal | |Picture Mode
Press ▲/▼ button to select Picture Mode, then press ENTER button to enter and press ◀/▶ button to select. (Available Picture Mode: User, Dynamic, Standard, Mild) You only can change the value of brightness, contrast, sharpness, color, when the picture is in User mode. TIPS: You can press P-MODE button on the remoter control again and again to change the picture mode directly. Picture Mode StandardContrast
Press ▲/▼ button to select Contrast, then press ENTER button to enter and press ◀/▶MANUAL
button to adjust. Then press MENU button to return back the previous menu directly.Brightness
Press ▲/▼ button to select Brightness, then press ENTER button to enter and press ◀/▶ button to adjust. Then press MENU button to return back the previous menu directly.Colour
Press ▲/▼ button to select Colour, then press ENTER button to enter and press ◀/▶ button to adjust. Then press MENU button to return back the previous menu directly.Tint
Press ▲/▼ button to select Tint, then press ENTER button to enter and press ◀/▶ button to adjust. Then press MENU button to return back the previous menu directly.Sharpness
Press ▲/▼ button to select Sharpness, then press ENTER button to enter and press ◀/▶ button to adjust. Then press MENU button to return back the previous menu directly.Contrast Booster
Press ▲/▼ button to select Contrast Booster, then press ENTER button to enter and press ◀/▶ button to select On or Off. Then press MENU button to return back the previous menu directly.Colour Temperature
Press ▲/▼ button to select Colour Temperature, then press ENTER button to enter and ◀/▶ button to select Standard, Cool, Warm.DNR
Press ▲/▼ button to select DNR, and then press ENTER button to enter and ◀/▶ button to select Off, Low, Middle, High.Reset
Press ▲/▼ button to select Reset, then press ENTER button to enter the confirm menu, and then choose OK to reset the value.SOUND Menu
The picture is for a reference only; the actual item is the standard. Press MENU button to display the main menu. Press ▲/▼ button to select Sound in the main menu, and then press ENTER button or ▶ button to enter. bar
SOUND | Sound | Stable Sound | Standard | | :--- | :--- | :--- | | Bass | | 50 | | Treble | | 50 | | Balance | | 0 | | Surround | Off | | | AVL | Off | | | Digital Audio Output | PCM | | | Reset | Enter | |Sound mode
Press ▲/▼ button to select Sound mode, and then press ENTER button to enter. And then press ◀/▶ button to select. (Available Sound mode: User, Standard, Music, Movie). You can change the value of bass and treble, Balance and EQ, when the sound is in User mode. TIPS: You can press S-MODE button on the remote control to change the Sound Mode directly. Sound Mode StandardBass
Press ▲/▼ button to select Bass, then press ENTER or ▶ button to enter and press ◀/▶ button to adjust. It can only be adjusted under user mode. Then press MENU button to return back the previous menu directly.Treble
Press ▲/▼ button to select Treble, then press ENTER button to enter and press ◀/▶ button to adjust. It can only be adjusted under user mode Then press MENU button to return back the previous menu directly.Balance
Press ▲/▼ button to select Balance, then press ENTER button to enter and press ◀/▶ button to adjust. Then press MENU button to return back the previous menu directly.Surround
Press ▲/▼ button to select Surround, and then press ENTER button to enter and press ◀/▶ button to select ON or OFF.AVL
Press ▲/▼ button to select AVL, and then press ENTER button to enter and press ◀/▶ button to select ON or OFF.Digital Audio Output
Press ▲/▼ button to select Digital Audio Output, then press ENTER button to enter and press ◀/▶ button to select. (Available SPDIF mode: OFF, PCM, AUTO) Then press ENTER button or ▶ button to enter and press ◀/▶ button to adjust, then press MENU button to return back the previous menu directly.Reset
Press ▲/▼ button to select Reset, then press ENTER button to enter RESET menu.APPLICATIONS
The picture is for a reference only; the actual item is the standard. Press MENU button to display the main menu. Press ▲/▼ button to select APPLICATIONS in the main menu, and then press ENTER button to enter.| APPLICATIONS | |
| Channel | Enter |
| Channel Options | Enter |
| Country | Russia |
| DTV Type | Terrestrial |
| Auto Tuning | Enter |
| ATV Manual Tuning | Enter |
| DTV Manual Tuning | Enter |
| Common Interface | Enter |
MANUAL
Channel
Press ▲/▼ button to select Channel, and then press ENTER button to play the channel selected. The menu will appear as follows:  Key Description CH button: Press CH+ or CH- to turn the page. RED button: Press this button to modify the channel number. GREEN button: Press this button to move down the channel. YELLOW button: Press this button to the order to restore the default channel. GREEN button: Press this button to delete the channel selected. 0-9 button: Press these buttons to jump to the appropriate channel by inputting different channel number.Channel Options
Press ▲/▼ button to select Channel Options, and then press ENTER button to the channel List menu. The menu will appear as follows:  Key Description CH button: Press CH+ or CH- to turn the page. RED button: Press this button to set the favorites channels. GREEN button: Press this button to lock the channel. YELLOW button: Press this button to skip the channel, if the channels already skipped, press YELLOW button again will cancel skip.Country
Press ▲/▼ button to select Country, and then press ◀/▶ button to select which area you stay.DTV Type
Press ▲/▼ button to select DTV Type, then press ◀/▶ button to select. (Available DTV Type: Cable, Terrestrial)Auto Tuning
Press ▲/▼ button to select Auto Tuning, and then press ENTER button to enter (When the System Lock is on, please input the PIN code to unlock). Select to open the auto searching page, and press Enter button to start the scan.ATV Manual Tuning
Press ▲/▼ button to select ATV Manual Tuning, and then press ENTER button to start the scan.MANUAL
DTV Manual Tuning
Press ▲/▼ button to select DTV Manual Tuning, and then press ENTER button to start the scan.Common Interface
Press ▲/▼ button to select Common Interface, and then press ENTER button to display the CI slot Information.PREFERENCES
The picture is for a reference only; the actual item is the standard. Press MENU button to display the main menu. Press ▲/▼ button to select PREFERENCES in the main menu, and then press ENTER or ▶ to enter.| PREFERENCES | ||
| Menu Language | English | |
| Teletext Language | English | |
| Key Lock | Off | |
| PC Settings | Enter | |
| Energy Saving Setting | Enter | |
| PIN Setting | Enter | |
| Parental Control | Enter | |
MANUAL
Menu Language
Press ▲/▼ button to select Menu Language, then press ENTER or ▶ button to enter the sub menu, then press ▲/▼ button to select, then press ENTER or ▶ button to confirm.Teletext Language
Press ▲/▼ button to select Teletext Language, then press ENTER or ▶ button to enter the sub menu, then press ▲/▼ button to select, then press ENTER or ▶ button to confirm.Key Lock
Press ▲/▼ button to select Key Lock, then press ENTER button to enter and press ◀/▶ button to select ON or OFF.PC Settings
Press ▲/▼ button to select PC Settings, then press ENTER to enter the sub menu, Then Press ▶ to enter, then press ENTER or ▶ to confirm. (When the PC signal is connected).Energy Saving Settings
Press ▲/▼ button to select Energy Saving Settings, and then press ENTER to enter the sub menu.Automatic Power Down
Press ▲/▼ button to select Automatic Power Down and press ◀/▶ button to select ON or OFF. Energy Saving Settings| Automatic Power Down | Off |
| No Signal Power Down |
No Signal Power Down
Press ▲/▼ button to select No Signal Power Down and press Enter button to enter the sub menu. No Signal Power Down| TV | Off |
| AV | On |
| YPBPR | Off |
| HDMI | On |
| SCART | On |
| PC | On |
| MEDIA | Off |
PIN Setting
Press ▲/▼ button to select PIN Setting, then press ENTER button to enter the sub menu, and than you can set a password.Parental Control
Press ▲/▼ button to select Parental Control, then press ENTER or ▶ button to enter the sub menu. Then press ▲/▼ button to select Rate (From4-17, or None). Then press ENTER or ▶ button to confirm.Change Pin Code
Press ▲/▼ button to select Change Pin Code, then press ENTER to enter and Change Pin Code menu will appear as follows: Input old password at "Old Password", (if the old password is incorrect, the password will not be allowed to modify.) Input new password at "New Password". Input new password again at "Confirm New Password", if new password and confirm new password consistent, the successfully updated menu will appear a few second, otherwise, the menu will display the password mismatch.MANUAL
SETUP
The picture is for a reference only; the actual item is the standard. Press MENU button to display the main menu. Press ▲/▼ button to select Setup in the main menu, then press ENTER to enter. natural_image
Four icons on a dark blue background: monitor, speaker, keyboard, and wrenches (no text or symbols)SETUP
OSD Timer Off Cinema Super Live Blue Screen On Sleep Timer Off Location Home Quick Setup Enter Reset TV Enter 1. Press ▲/▼ button to select the option that you want to adjust in the Setup menu, then press ENTER or ▶ button to enter. 2. Press ◀/▶ button to adjust or press ▲/▼ button to select. 3. After finishing your adjustment, press MENU button to save and return back to the previous menu and press EXIT button to exit the entire menu.OSD Timer
Press ▲/▼ button to select OSD Timer, and then Press ◀/▶ button to select. (Available OSD Timer: 10 S, 20 S, 30S, 40S, 50S, 60S, off), then press ENTER button to confirm.Cinema
Press ▲/▼ button to select Cinema, and then Press ◀/▶ button to select. (Available Cinema: Auto, 4x3, Wide, Super Live), then press ENTER button to confirm.Blue Screen
Press ▲/▼ button to select Blue Screen, then press ◀/▶ to select On or Off. Then press ENTER to confirm.MANUAL
Sleep Timer
Press ▲/▼ button to select Sleep Timer, and then Press ◀/▶ button to select. (Available Sleep Timer: 00:15, 00:30, 01:00, 01:30, 02:00, off), then press ENTER button to confirm.Location
Press ▲/▼ button to select Location, and then Press ◀/▶ button to select Home or Store, then press ENTER button to confirm.Quick Setup
Press ▲/▼ button to select Quick Setup, and then Press then press ENTER button to enter the sub menu, enter the password if locked, and then you can quickly make some basic settings of the TV.Reset TV
Press ▲/▼ button to select Reset TV, and then press ENTER to enter the sub menu, enter the password if locked, and then you can restore factory settings.MEDIA OPERATION
The picture is for a reference only; the actual item is the standard. Note: Before operation MEDIA menu, Plug in USB device or memory card, then press SOURCE button to set the Source to Media. Press ▲/▼ button to select MEDIA in the Source Menu, and then press ENTER or ▶ to enter. You can also enter the Media by pressing MEDIA button on the remote control.  1. Press ▲/▼ button to select the option that you want to adjust in the Media menu, then press ENTER or ▶ button to enter. 2. Press ◀/▶ button to adjust or press ▲/▼ button to select. 3. After finishing your adjustment, press MENU button to save and return back to the previous menu and press EXIT button to exit the entire menu. natural_image
Abstract black-and-white circular logo design with interlocking curves (no text or symbols)MANTA
CUSTOMER SERVICE
tel: +48 22 332 34 63 lub e-mail: serwis@manta.com.pl FROM MONDAY TO FRIDAY, IN HOURS: 9.00-17.00 The manufacturer reserves the right to make changes to product specifications without notice. Main page: www.manta.com.pl Technical suport page: www.manta.info.pl     Assembled in Poland- MANTA
- Gniazdo HDMI
- Energy Saving Settings
- Zmiana kodu PIN (Change Pin Code)
- Safety instructions
- Caution
- WARNING
- FCC NOTICE
- Important Safety Precautions
- Accessories
- Controls and connections
- Front view/side view
- Rear View
- HDMI Input Jack
- VGA input Jack
- PC Audio Input Jack
- Y/Pb/Pr Input Jacks
- AV Input Jacks
- CI Card Slot
- SCART Jack
- Antenna Input Jack
- Headphone Jack
- USB HOST
- Coax OUT
- Remote Control
- POWER button
- MUTE button
- Number buttons (0\~9)
- -/-- button
- In the ATV/DTV mode, press to return to the channel list viewed. 6. INPUT button
- INFO button
- Direction buttons
- ENTER button
- MENU button
- SLEEP button
- EXIT button
- VOL+/- button
- CH+/- button
- 15.AUDIO
- MANUAL
- SUBTITLE button
- SUBPAGE (TeleText Mode)
- CANCEL (TeleText Mode)
- P. M O D E button
- S.MODE button
- FAV button
- FAV+
- FAV-
- 24-27. Color button(Media and Teletext)
- FREEZE button
- ASPECT (TV Mode)
- SIZE (Teletext and DVD Mode)
- 30.TT/CC button
- INDEX button (Teletext Mode)
- 32-35. Media and DVD key
- EPG button
- T.SHIFT
- DTV/RADIO
- MEDIA button
- REC.TASK
- REC.File
- Preparation of Remote Control Using of Remote control
- TV OPERATION AND SYSTEM SETUP
- Picture Menu
- Picture Mode
- Contrast
- Brightness
- Colour
- Tint
- Sharpness
- Contrast Booster
- Colour Temperature
- DNR
- Reset
- SOUND Menu
- Sound mode
- Bass
- Treble
- Balance
- Surround
- AVL
- Digital Audio Output
- APPLICATIONS
- Channel
- Channel Options
- Country
- DTV Type
- Auto Tuning
- ATV Manual Tuning
- DTV Manual Tuning
- Common Interface
- PREFERENCES
- Menu Language
- Teletext Language
- Key Lock
- PC Settings
- Automatic Power Down
- No Signal Power Down
- PIN Setting
- Parental Control
- Change Pin Code
- SETUP
- OSD Timer
- Cinema
- Blue Screen
- Sleep Timer
- Location
- Quick Setup
- Reset TV
- MEDIA OPERATION
- CUSTOMER SERVICE
Brand : Manta
Model : LED2802
Category : Television