
CT-1421ANF - Television AKAI - Free user manual and instructions
Find the device manual for free CT-1421ANF AKAI in PDF.


| Product Type | Color CRT Television |
| Brand | AKAI |
| Model | CT-1421ANF |
| Screen Size | 14 inches (diagonal) |
| Display Technology | CRT (Cathode Ray Tube) |
| Aspect Ratio | 4:3 |
| Resolution | Standard definition (approx. 640x480) |
| Tuning System | VHF/UHF analog tuner |
| Inputs | RF coaxial antenna input, composite video/audio (RCA) |
| Audio Output | Built-in mono speaker |
| Power Consumption | 65 W (approx.) |
| Standby Power | < 1 W |
| Dimensions (W x H x D) | 14.2 x 12.5 x 14.5 in (36 x 32 x 37 cm) |
| Weight | 18 lbs (8.2 kg) |
| Operating Temperature | 32°F to 104°F (0°C to 40°C) |
| Safety Certification | UL, FCC |
| Color | Black or dark gray |
| Cabinet Material | ABS plastic |
| Remote Control | Included (IR) |
| User Manual | Included (PDF available) |
Frequently Asked Questions - CT-1421ANF AKAI
User questions about CT-1421ANF AKAI
0 question about this device. Answer the ones you know or ask your own.
Ask a new question about this device
Download the instructions for your Television in PDF format for free! Find your manual CT-1421ANF - AKAI and take your electronic device back in hand. On this page are published all the documents necessary for the use of your device. CT-1421ANF by AKAI.
USER MANUAL CT-1421ANF AKAI

Nota:
Modele diferite de TV pot avea diferite pozitii ale butoanelor, dar functiile raman identice daca butoanele au acelasi nume.
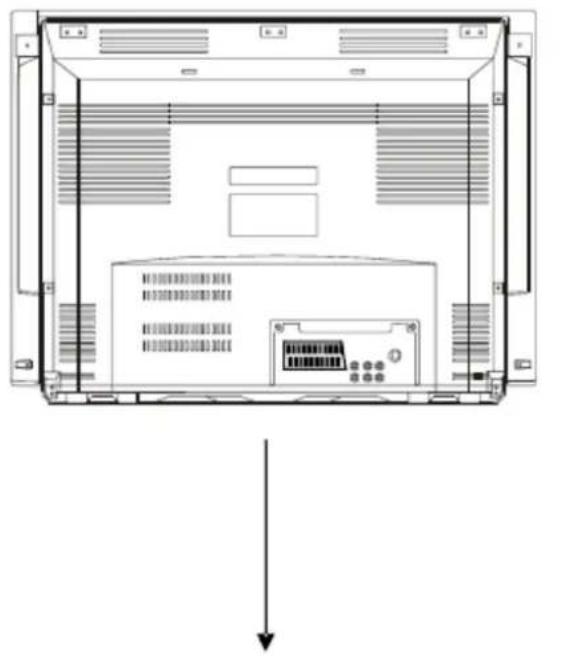
4. Mufele de Intrare si Iesire.

6-5. ZOOM
6-8 .Mute (Muting)

6-9. Quick View(Vedere Rapida)

Mod TV: Programul va trece repede programul vizionat anterior.
Mod AV: Inapoi la programul TV
![graph TD A["to the"] --> B["10"] B --> C["2"] C --> A](/content/2026/05/1071412/images/74515f26c5c0e2b86f43289058bd217464af280cc286a2d112d189d2d25bbf92.jpg)
![graph TD A["2"] --> B["AV"]](/content/2026/05/1071412/images/40063c378ac3952f10ce483032c9faf8a6914bd1f5bbe0fb68653eb1b33f507f.jpg)
6-10 DISPLAY(AFISAJ)

Apasand tasta [
\*Mod TV/AV
8-4. MENU TIME (menu timp) Functie: Programarea Timpului si Timer-ului.
A. Selectati "TIMER" cu tasta [MENU]
Folosind tastele [P+]/[P-] selectati un parametru
B. Folosind tatsele [P+]/[P-] selectati "CLOCK", "ON-TIME", "OFF-TIME".
C. Folositi tastele [V+]/[V-] minutele se schimba de La “00” la “59”.
Folosind tastele [V+] /[V-], orele se schimba astfel: “0,1……23,-:-:--“
D. Pentru programarile “ON-TIME”, “OFF-TIME” Folositi tastele [P+]/[P-] selectati “ON PROGRAM”. Folositi [V+]/[V-] pentru a schimba numarul On-Program(program pornire).

8-5 .SETUP SETTINGS(programari) : programarea altor functii.
A. Folosind tastele [P+]/[P-] alegeti un parametru.Folositi tastele [V+]/[V-] schimbati parametrul
B. Folosind tastele [P+]/[P-] alegeti LANGUAGE(limba).Folositi tastele [V+]/[V-] schimbati limba.
C. Folosind tastele [P+]/[P-] alegeti "BLUE SCREEN"

Conectarea echipamentelor externe
Conectarea la mufele Intrare/lesire AV.
Reciclarea ecipamentelor electrice si electronice uzate
Please read this manual carefully before installing and operating the TV. Keep this manual handy for further reference.
CONTENTS
- Introduction ....1
- Warnings and Cautions ...... 2
- Control location.... 4
- Input and Output.... 5
- Remote controller ....6
- Control Your TV 7
- Tuning Procedure ......9
- Menu Operation ...... 11
- Television Installation.... 13
- Trouble Shooting 15
- Specifications ....16
1 Introduction
Thank you very much for your purchase of this product-the most natural Colour Television Receiver. To enjoy your set to the full from the very beginning, read this manual carefully and keep it handy for ready reference.
INSTALLATION
- Locate the receiver in the room where direct light does not strike the screen.
Total darkness or a reflection on the picture screen can cause eyestrain.
Soft and indirect lighting is recommended for comfortable viewing. - Allow enough space between the receiver and the wall to permit ventilation.
- Avoid excessively warm locations to prevent possible damage to the cabinet or premature component failure.
- This TV receiver can be connected to AC 130-260 Volts. 50/60Hz. Never connect to DC supply or any other power supply.
- Do not install the receiver in a location near heat sources such as radiator, air ducts, direct sunlight, or in a place somewhere like close compartment and close area.
- Do not cover the ventilation openings when using the set.
CAUTION
Never tamper with any components inside your set, or any other adjustment controls not mentioned in this manual. All television receivers are high voltage instruments. Your PICTURE TUBE is highly evacuation. If broken, glass fragments will be violently expelled. Scratching, chipping or undue pressure is dangerous and should be avoided. When you clean up dust or stick of a water drop on the PICTURE TUBE FACE or CABINET, the power cord should be pulled out from the plug receptacle, then wipe the receiver with dried soft cloth. During thunder and lighting, unplug the power cord and antenna cord to prevent your TV set from damage. All "inside work" on your receiver should be performed only by the TV service personnel.
2 Warnings and Cautions

Warning
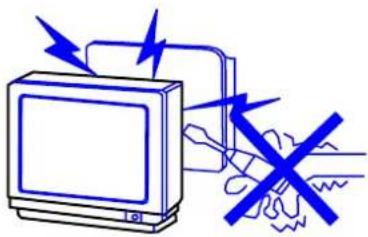
High voltages are used in the operation of this television receiver. Do not remote the cabinet back from your set. Refer servicing to qualified service personnel.


Warning
To prevent fire or electrical shock hazard, Do not expose the television receiver to rain or moisture.


Warning
Do not drop or push objects into the television cabinet slots or openings.
Never spill any kind of liquid on the television receiver.
Minimum distances


Caution
If the television is to be built into a compartment or similarly enclosed The minimum distances must be Maintained.
Heat build-up can reduce the service life of your television, and can also be dangerous.


Caution
Never stand on, lean on push suddenly the television or its stand. You should pay special attention to children.


Caution
Do not place your television on an unstable cart stand, shelf or table. Serious injury to an individual, and damage to the television, may result if it should fall.

Caution
When the television receiver is not used for an extended period of time, it is advisable to disconnect the AC power cord from the AC Outlet.

Caution
Avoid exposing the television receiver to direct sunlight and other source of the heat.
Do not stand the television receiver directly on other produces which give off heat. E. g. video cassette players. Audio amplifiers.
Do not block the ventilation holes in the back Cover. Ventilation is essential to prevent failure of electrical component.
Do not squash power supply cord under the television receiver.

Caution
The television receiver shall not be exposed to dripping or splashing, and no objects filled with liquid, such as vases, shall be placed on the television receiver. The all-pole switch is used as the disconnect device, which is located in the front of the television receiver, and shall be remain readily operable.
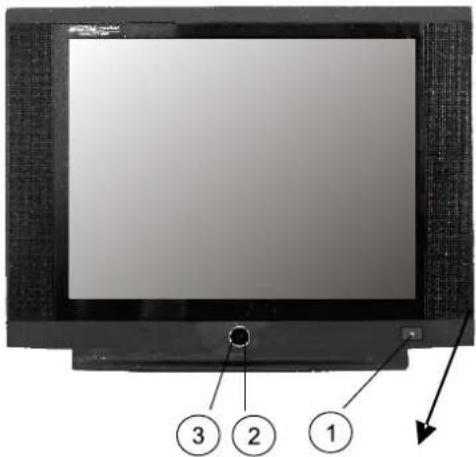
3 Control location
- Main SWITCH
- Remote Sensor
- Power indicator
- Side AV in
- TV / AV button
- Menu button
- Volume down / up button
- Program down / up button
9.Antenna input socket (75 Ω) - AV OUT
- AV IN 1
- SCART
- AC Power cord
![graph TD A["8"] --> B[" "] C["7"] --> D[" "] E["6"] --> F[" "] G["5"] --> H[" "]](/content/2026/05/1071412/images/575fc2d4b33c60ec923e19615245273cd72d4fc2fd276cf38dc844e3ff252496.jpg)
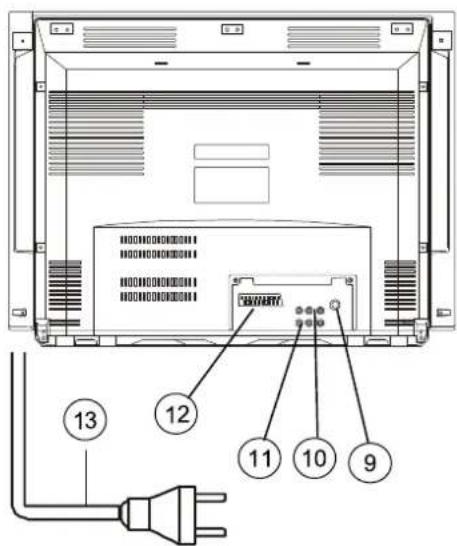

NOTE:
Different models may have different button positioning, but function keeps same if the name of button is same.
4 Input and Output Terminals
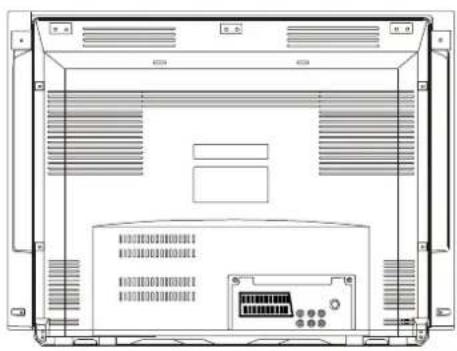


It can be connected to the following appliances:
video-tape recorder, video camera, tape recorder and audio amplifier, etc.....
*Please keep AC cord unplugged when connecting TV system.
5 Remote Controller
Please refer indicated pages.
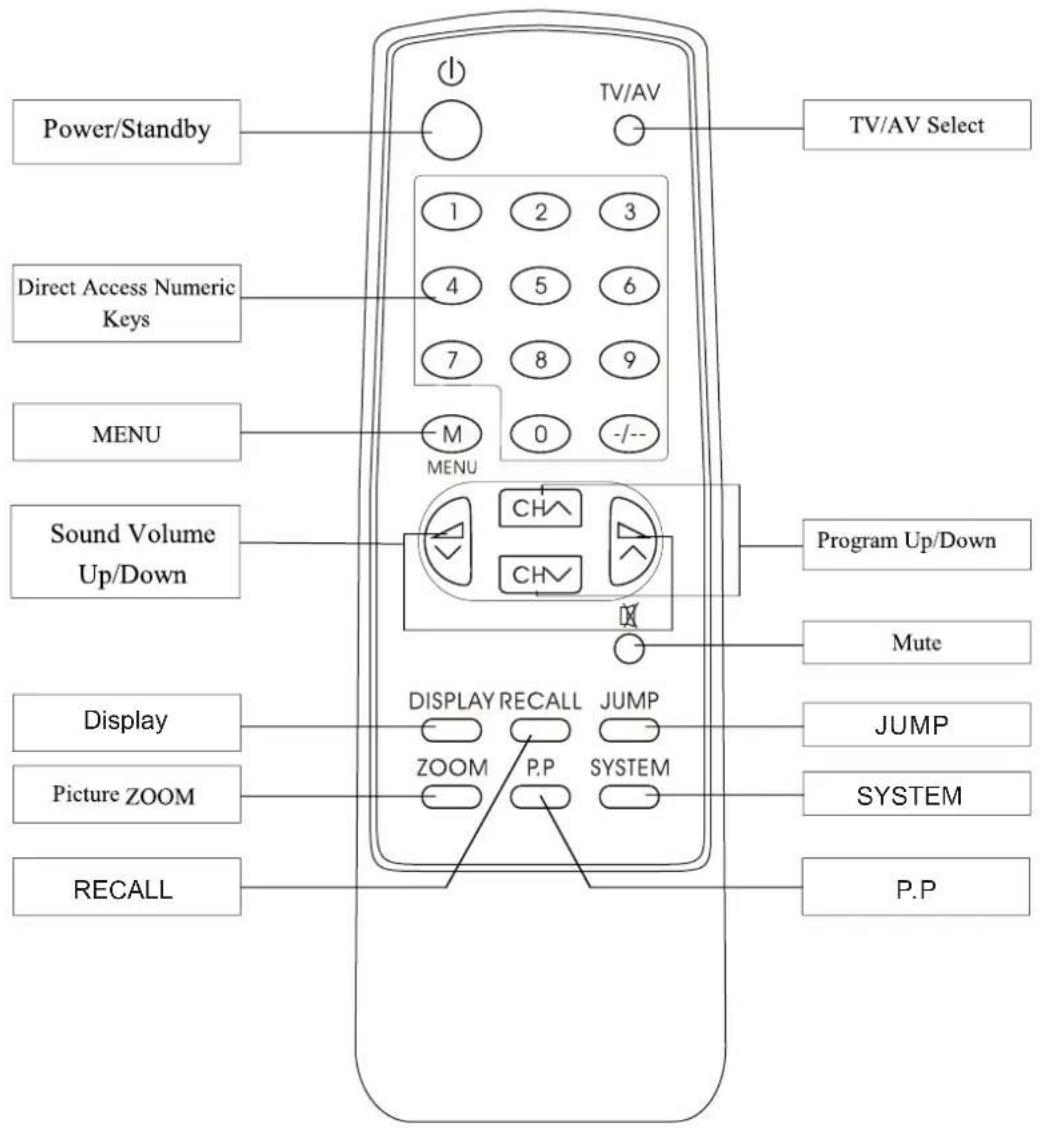
6 CONTROL YOUR TV
6-1 Power/Stand-By ON/OFF

With Mains status On, you can also turn off using Remote Control Hand Set.
This status is called Stand-By mode. In this mode; You can also turn ON
the TV by pushing the Channel Up/Down keys on the front controls.
Note: The TV has an Automatic Power OFF function. With No Signal condition, the TV will automatically turn OFF after 10 min.
![graph TD A["P+"] --> B["MENU"] C["V-"] --> B D["V+"] --> B E["P-"] --> B F["Hand icon"] --> G["Arrow pointing to P-"]](/content/2026/05/1071412/images/c6425e812fb4a8a384714f77afdc7cb1f2068cf0cb2ef8d176536934576b8aac.jpg)
Program Up/Down
Push [P+] key, to change Program Up Push [P-] key, to change Program Down.
![graph TD A["1"] --> B["2"] B --> C["3"]](/content/2026/05/1071412/images/60854a724bf6e9d923910447d797c9e58f97e24a3c7abdc2e62cce5e11512140.jpg)
6-3
Direct Access Tuning

Using the numeric keys on Remote Control Hand Piece, Channels can be selected directly, for 0 to 199 channels.
Or repeatedly press the “-/--” button, to select the desired mode then press numeric buttons.
“-” 1 digit mode
“—” 2 digit mode
“---” 3 digit mode (Max Ch. 199)

6-4
Volume Control
![graph TD A["MENU"] --> B["P+"] A --> C["V-"] A --> D["V+"] A --> E["P-"] E --> F["Hand icon pointing to the center"]](/content/2026/05/1071412/images/db60375d7fc221c4734cf34263866002a0d80bbdb5582413d0dd17fa0ad65d68.jpg)
Push [V+] key, for Volume Up Push [V-] key, for Volume Down

6-5

ZOOM
Push [ZOOM] key, to change as follows:

16:9 -- picture height is reduce, — picture height is expanded.
6-6
SLEEP
Push [SLEEP] key repeatedly. Sleep time will change follow as: 0 → 240 minute by step 15 minute.
240
6-7 TV/AV Selection
You can select your video source by the [TV/AV] key.
![graph TD A["EURO"] --> B["AV"] B --> C["3"] C --> A](/content/2026/05/1071412/images/9e9bcd4c5245bef7381e0f0941eb10ce3b2ee75b2b9401eefee9fb579f7fbdca.jpg)
6-8 MUTE

By pushing this key, sound output will be muted. Push [MUTE] again, or Volume Up/Down, and sound Volume will return.

6-9 Quick View

TV Mode: Program will quick back to the previous Program being watched.
![graph TD A["O the"] -->|2| B["10"] B -->|10| C["End"]](/content/2026/05/1071412/images/8e1734351d33f521a51360e43f38cd32198b6081b73dbac86301d540d7bee016.jpg)
![graph TD A["2"] --> B["A V"]](/content/2026/05/1071412/images/3da070f8a46c4c638e7ee0fe7c92e840a441f351f52164070621749396ab3e15.jpg)
AV Mode: Back to TV program.
6-10 DISPLAY

• TV / AV MODE
This key will call the On screen display. Push again, to remove the on screen display.
- Menu MODE Pressing the [ ? ] key, current menu will exit directly.

6-11 Picture EFFECT

By repeatedly pushing this key, picture effects will change as follows.
![graph LR A["DYNAMIC"] --> B["PERSONAL"] B --> C["MILD"] C --> D["STANDARD"] D --> A](/content/2026/05/1071412/images/9d3978d7115e428c5a24fc3e5e917c9f43e1edc8e05df0ab475bf26b3a943d54.jpg)
6-12 GAME

Press the [HOLD] key, celerity In this game function.
Push [V+] / [V-] key, to move the box for right or left.
Push [MENU] key, to start again. Push [?] key, to exit game.
6-13 LOCK
By pushing the [ ] key, lock menu will
Appears on the screen.
pressing the password the digits that you defined yourself correctly, the lock menu will be used.
A. Select each function using the [P+] [P-] keys.
B. Each value can be changed by the [V+] [V-] keys.
C. CHILD LOCK will be locked or unlocked for current Program.
D. HOTEL MODE will be switched on or off.
E. VOLUME LIMIT will limit the value of volume.
F. When you will change the password, you may be Selected "NEW PASSWORD" item. and push
[V+] [V-] key, the "CHANGE PIN" menu will appear.
- NEW PIN: input 4 digits you like.
- CONFIRM: again input above new password 4 digits correctly.
G. Press the [ ] key or [ ? ] key, lock menu will disappear.
Note : • The tune menu will not appear when any program would be locked.
- Initialization Password: “0000”。After new password was set, the basic password “4100” still is available.
![graph TD A["Red Lock Icon"] --> B["..."] C["Down Arrow"]](/content/2026/05/1071412/images/f054552f9c07f328958ab22193552e5e907141db4376cf9a67c3131c9d01c5c3.jpg)

7 Tuning procedure
7-1 Auto Search Function: Automatic Search and Memory (ASM) is available for program installation from Antenna input.
. Using [MENU] key on the front or [MENU] key on the remote controller for ASM.
A. Push [MENU] key repeatedly to select "SEARCH"
B. Push [P+] or [P-] key, to select "AUTO SEARCH"
C. Push [V+] or [V-] key, to start ASM. and memorize into program list (0\~199).
D. Wait until function has finished.

7-2 SEARCH
Function: Manual Search for Antenna input.
A. Push [MENU] key repeatedly to select "SEARCH".
B. Using [P+] or [P-] key, select “PROGRAM”. Using [V+] or [V-] or numeric keys to change Program Number.
C. Push [P+] or [P-] key to select “BAND”.
Push [V+] or [V-] key to change BAND.
D. Push [P+] or [P-] key to select "SEARCH".
E. Push [V+] or [V-] key to start search.
F. Wait until function has finished.

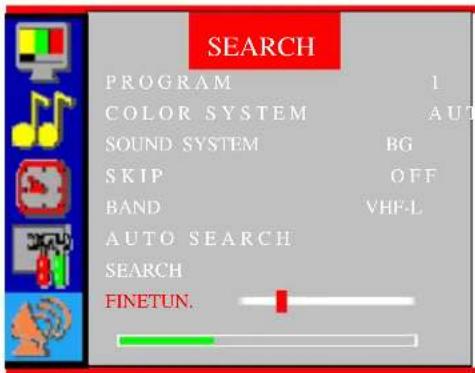
7-3 FINE TUNING Function: Fine Tuning for current setting.
A. Push [MENU] key repeatedly to select "SEARCH".
B. Using [P+] or [P-] key, select “PROGRAM”. Using [V+] or [V-] change Program Number.
C. Using [P+] or [P-] key, select "FINE TUNE".
D. Using [V+] or [V-] key, adjust for best tuning.
7-4 SKIP
Function: Use to "SKIP" programs. After setting to "ON", the program will not be selected by [P + ] / [P-] keys.
A. Push [MENU] key repeatedly to select "SEARCH"
B. Using [P+] or [P-] key, select "PROGRAM".
Using [V+] or [V-] key, change program number.
C. Using [P+] or [P-] key, select "SKIP".
Using [V+] or [V-] key, select "ON" or "OFF".
8 Menu Operation
8-1 [MENU] key
Push [MENU] key continuously, to scroll through the MENU selection, as follows.
![graph LR A["PICTURE"] --> B["SOUND"] B --> C["TIMER"] C --> D["SETTINGS"] D --> E["SEARCH"] E --> F["NORMAL"] F --> A](/content/2026/05/1071412/images/6844f64f270b45205bb1a024ddea80b452af3bbde373ea063ad7ebf7f4bfa4fa.jpg)
8-2 PICTURE MENU Function: Brightness, Contrast, Colour, Sharpness, Tone
A. Select each function using the [P + ] / [P-] keys.
B. Each value can be controlled by the [V+]/[V-] keys.
C. Repeat any functions if required.

NOTE: TINT control will be appeared only if a NTSC signal is being received.
8-3 SOUND MENU Function: Volume.
A. Select each function using the [P+]/[P-] keys.
B. Each value can be controlled by the [V+] or [V-] keys.
C. Repeat any functions if required.

8-4 TIME MENU Function: Time and Timer setting.
A. Select "TIMER" with the [MENU] key.
Using the [P+]/[P-] key, select the item.
B. Using the [P+]/[P-] key, select "CLOCK", "ON-TIME", "OFF-TIME".
C. Using the [V+] / [V-] key, minutes will change from “00” to “59”.
Using the [V+] / [V-] key, hours will change as follows; "0,1...23,--: --".
D. For "ON-TIME", "OFF-TIME" setting,
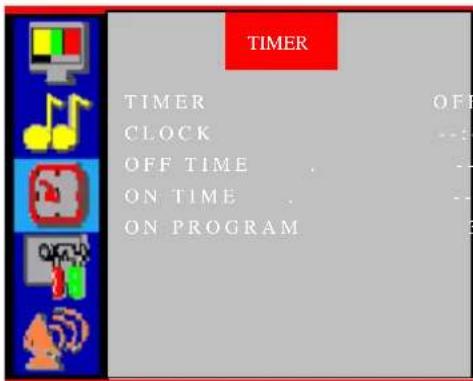
using [P+]/[P-] keys, select "ON PROGRAM", Using [V+]/[V-] keys, change On-Program number.
8-5 SETUP SETTINGS: other functions setting.
A. Using the [P+]/[P-] key, select the item. Using the [V+]/[V-] key, change the item.
B. Using the[P+]/[P-] key, select the "LANGUAGE". Using the [V+] / [V-] key, language will change
C. Using the [P+] / [P-] key, select the “BLUE SCREEN”. Using the [V+] / [V-] key, blue back will be turned OFF or ON.
D. Using the [P+] / [P-] key, select the "PICTURE ENHANCE". Using the [V+] / [V-] key, black stretch will be turned OFF or ON.

E. Using the [P + ] / [P - ] key, select the "EXCHANGE". Using the number keys or [-/-] key, to select change number. Using [V + ] or [V - ] key, exchange is over.

F. Using the [P+] / [P-] key, select the “GAME” Using the [V+] / [V-] key, GAME will be appear.
SANKE
Push [V+] / [V-] key, the snake may be turn on to right or left.
Push [MENU] key, the game may be again.
Push [ ? ] key, to exit game.
G. Using the [P+] / [P-] key, select the "CALENDAR". Using the [V+] / [V-] key, CALENDAR will be appear. After CALENDAR is appeared on screen, Using the [P+] / [P-] key, change the year. Using the [V+] / [V-] key, change the month.

9 Television Installation
Connect antenna or video facility
- Use 75 Ω coaxial cable plug or 300-75 Ω impedance converter to plug in antenna input terminal on the rear of the cabinet.
- Connect the video facility to the audio, video in jack on the rear of the cabinet.

Battery installation and replacement for remote control unit
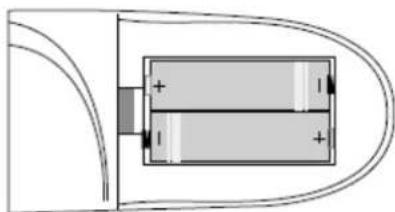
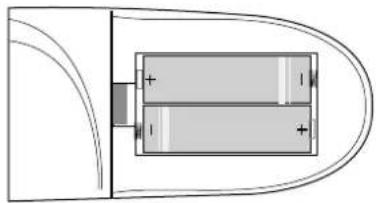
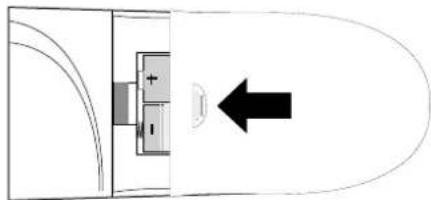
The remote control uses two 1.5V AA batteries. For battery installation and replacement are as following:
1 Turn the remote control unit upside down. Press down the grip of battery compartment and slide the color in the direction of the arrow.
2 Install two new batteries, make sure that battery polarity matches with the “+”, “-” marks inside the battery. Or not it could damage the unit.
3 Close the battery compartment covers

Connecting other external devices
Connection of AV input /output terminal
1 In AV mode, connect the external signal line of back panel board according to the following figure.

1 In AV mode, connect the external signal line of back panel board or side video frequency according to the following figure.
![graph TD A["Input"] --> B["V"] A --> C["L"] A --> D["R"] B --> E["Audio right input"] C --> F["Audio left input"] D --> G["Video input"] H["LD OR VCR"] --> I["LASER DISC ○ ○"] J["VCR"] --> K["Output"]](/content/2026/05/1071412/images/40d3add4c28d1236868974548277faf16d3dd6a62d04d0237180555736a2a912.jpg)
10 Trouble Shooting
Before arranging for service, firstly know the status and then check simply as follows:
| Problems | Check |
| No picture or sound. Check if | the power supply is plugged in.Check if the power switch is in “on” position. |
| Picture is OK, no sound. Check | if the volume control is set to the minimum or mute position. |
| Remote control doesn’t work. | Check if the power switch is in “on” position.Check if the batteries are out of use or not connected well.Make sure that there is no strong light striking the sensor window of remote control unit.Check there are no obstacles between the sensor window and remote control unit. |
| No TV signal. Check if the TV | /AV button is not set to TV status.Check if the antenna is well connected.Check if you installed the TV correctly. |
| No external video signal. Check | if you installed the TV correctly.Check if the TV/AV button is set to AV position. |
| Picture lacks colour or picture too dark. | Check colour, brightness and contrast controls are correctly adjusted. |
| All channels lose colour intermittently. | Check if the antenna is broken.Check if the antenna is disconnected.Check if the antenna is damaged. |
| Poor reception, loss of colour with certain channels. | Check if channels are correctly tuned (see “Fine tuning”). |
| Diagonal stripes appear on picture. | The receiver may be affected by interference (e.g. from nearby radio broadcasting transmitter or from another TV receiver). |
| Picture has “snow”. Check if | the antenna is broken.Check if the antenna is disconnected.Check if the antenna is damaged. |
| Ghost images appear. Check | if the antenna direction has been changed by a storm or strong wind, etc. (because ghost images are caused by the arrival at the antenna of both the signal which has traveled directly from the transmitter and the signal which has been reflected from a hill or a large building. The direction of the antenna should be chosen for minimized ghosting.) |
11 Specifications
Television RF system PAL SECAM B/G, D/K, I
Video Color System PAL, NTSC 3.58/4.43
Channel and frequencies VHF Low channel (VL)=46.25 to 168.25 MHz VHF High channel (VH)=175.25 to 463.25 MHz UHF channel (UHF)=471.25 to 863.25 MHz
Television Channel: 200-Position Program Memory
Power input AC 130-260V, 50/60 Hz
Power consumption 14 inch ≤ 65W
Screen size 14 inch is 37 cm
Speaker output 2 x 3W (RMS)
- Note:
All specifications are subject to change without notice. Different country marketed item, it is the few function with use manual content maybe is differential. All quality and size are approximate value.
- Nota
- Mufele de intrare si iesire
- 6-5. Zoom
- 6-8 .Mute (muting)
- 6-9. Quick view(vedere rapida)
- 6-10 Display(afisaj)
- Mod tv/av
- 8-4. Menu time (menu timp) functie: programarea timpului si timer-ului
- 8-5 .Setup settings(programari) : programarea altor functii
- Conectarea echipamentelor externe
- Reciclarea ecipamentelor electrice si electronice uzate
- Contents
- 1 Introduction
- Installation
- Caution
- 2 Warnings and cautions
- Warning
- 3 Control location
- Note
- 4 Input and output terminals
- 5 Remote controller
- 6 Control your tv
- 6-1 Power/stand-by on/off
- Program up/down
- 6-3
- Direct access tuning
- 6-4
- Volume control
- 6-5
- Zoom
- 6-6
- Sleep
- 6-7 Tv/av selection
- 6-8 Mute
- 6-9 Quick view
- 6-10 Display
- 6-11 Picture effect
- 6-12 Game
- 6-13 Lock
- 7 Tuning procedure
- 7-2 Search
- Function: manual search for antenna input
- 7-3 Fine tuning function: fine tuning for current setting
- 7-4 Skip
- 8 Menu operation
- 8-1 [Menu] key
- 8-2 Picture menu function: brightness, contrast, colour, sharpness, tone
- 8-3 Sound menu function: volume
- 8-4 Time menu function: time and timer setting
- 8-5 Setup settings: other functions setting
- Sanke
- 9 Television installation
- Connect antenna or video facility
- Battery installation and replacement for remote control unit
- Connecting other external devices
- 10 Trouble shooting
- 11 Specifications
- Note
Brand : AKAI
Model : CT-1421ANF
Category : Television