
TTV-29TB - Television TELEFUNKEN - Free user manual and instructions
Find the device manual for free TTV-29TB TELEFUNKEN in PDF.


| Product Type | Television |
| Brand | Telefunken |
| Model | TTV-29TB |
| Screen Size | 29 inches (estimated) |
| Display Type | CRT |
| Input Terminals | Side AV (optional), S-Video, YUV (Y, Cb, Cr), AV In 1, AV In 2 |
| Output Terminals | AV Out (composite) |
| Antenna Input | 75 Ohm coaxial |
| Tuning Methods | Full auto search, manual tuning, fine tuning |
| Band Selection | VHF-L, VHF-H, UHF |
| Color Systems Supported | AUTO, PAL, SECAM, NTSC 3.58, NTSC 4.43 |
| Sound Systems Supported | BG, DK, I, M |
| Picture Adjustment | Brightness, contrast, color, sharpness (via menu) |
| Sound Adjustment | Volume, treble, bass, balance |
| Remote Control | 36-key handset included |
| Power Supply | AC power cord (integrated) |
| Main Switch | Manual on/off mechanical switch |
| Power Indicator | LED (lights when main power is on) |
| Safety | Turn off main switch during long absence; discharge picture tube before servicing |
| Service Features | Cabinet back removable (10 screws), chassis and picture tube removable |
| Spare Parts | Cabinet components, remote, battery door, knobs, etc. (listed in manual) |
Frequently Asked Questions - TTV-29TB TELEFUNKEN
User questions about TTV-29TB TELEFUNKEN
0 question about this device. Answer the ones you know or ask your own.
Ask a new question about this device
Download the instructions for your Television in PDF format for free! Find your manual TTV-29TB - TELEFUNKEN and take your electronic device back in hand. On this page are published all the documents necessary for the use of your device. TTV-29TB by TELEFUNKEN.
USER MANUAL TTV-29TB TELEFUNKEN
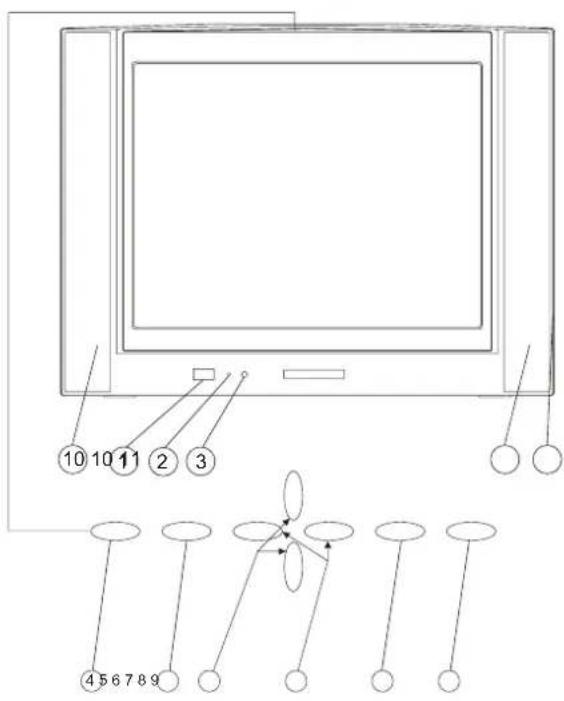
- Main Switch
- Power Indicator
- Remote Sensor
- AV/TV Button
- Sound Mode Button
- Program Down & Up Button
- Bøttone Down & Up
- Picture Mode Button
- Menu Button
- Speakers
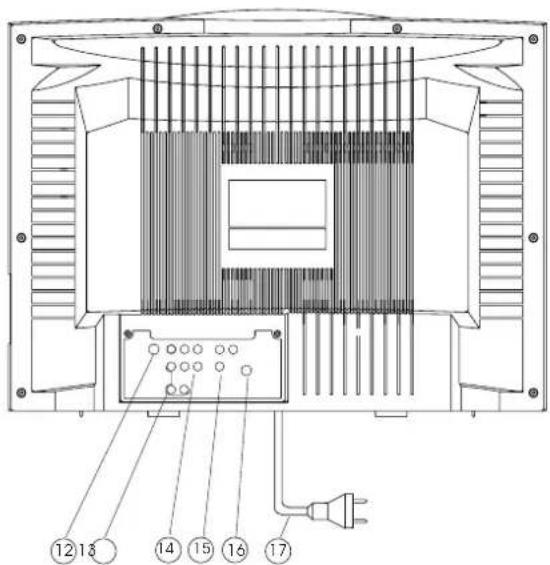
- Side AV In (Option)
- S-Video In
- YUV(Y, Cb, Cr) In
- AV In 1 /AV IN In 2
- AV OUT
- Antenna Input Socket (75 Ohm)
- AC Power Cord
Side AV In(option)
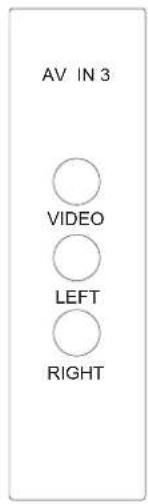
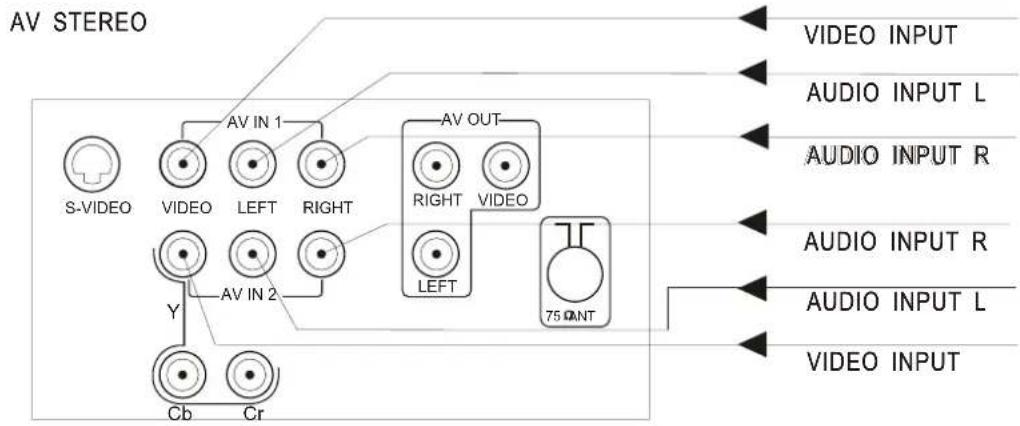
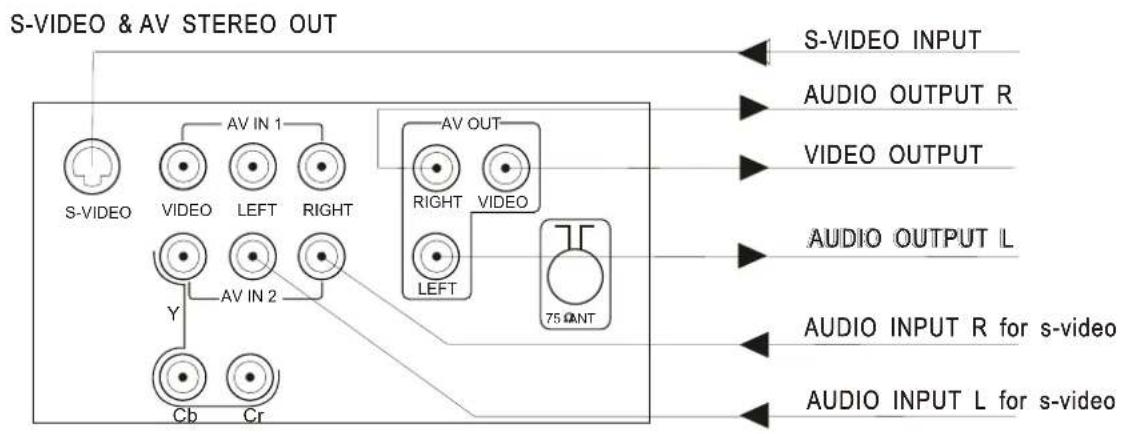
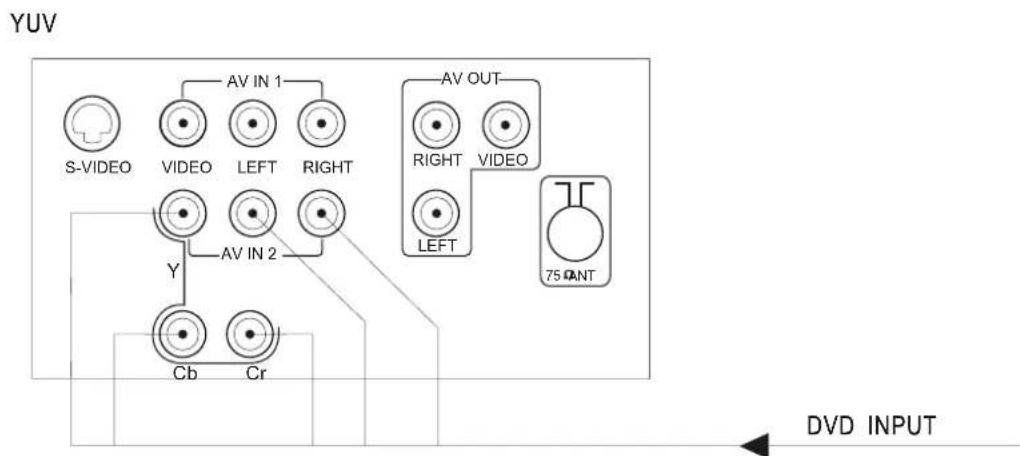
VIDEO AND AUDIO INPUT/OUTPUT TERMINALS
- Video / Audio input for playback for VCR.
- Video / Audio monitor output.
- Y Cb Cr input for DVD.
*Please keep AC cord unplugged when connecting TV system.
flowchart
graph TD
    A["S-VIDEO"] --> B["AV IN 1"]
    B --> C["AV OUT"]
    C --> D["75ΩNT"]
    E["Cb"] --> F["Y"]
    G["Cr"] --> H["AV IN 2"]
    I["LEFT"] --> J["AV OUT"]
    K["RIGHT"] --> L["AV OUT"]
    M["LEFT"] --> N["75ΩNT"]
    O["VIDEO INPUT"] --> P["75ΩNT"]
    Q["AUDIO INPUT L"] --> R["75ΩNT"]
    S["AUDIO INPUT R"] --> T["75ΩNT"]
    U["AUDIO INPUT R"] --> V["75ΩNT"]
    W["AUDIO INPUT L"] --> X["75ΩNT"]
    Y["VIDEO INPUT"] --> Z["75ΩNT"]
flowchart
graph TD
    A["S-VIDEO"] --> B["AV IN 1"]
    C["VIDEO"] --> D["LEFT"]
    E["RIGHT"] --> F["AV OUT"]
    G["75ΩNT"] --> H["LEFT"]
    I["Cb"] --> J["Cr"]
    K["Y"] --> L["AV IN 2"]
    style A fill:#f9f,stroke:#333
    style C fill:#f9f,stroke:#333
    style E fill:#f9f,stroke:#333
    style G fill:#f9f,stroke:#333
    style I fill:#ccf,stroke:#333
    style K fill:#ccf,stroke:#333
    style L fill:#ccf,stroke:#333
    style_M["DVD INPUT"] --> N["Arrow to right"]
**You can not get video signal output on AV out terminal when the CTV works at YUV(Y, Cb, Cr) input or S-video input mode. It can be connected to the following appliances: VCR, multi disc player, DVD, camcorder, video game or stereo system, etc.... If your DVD player can output interlace and progressive mode signals, select the interlace output when connecting to component video input on your TV. Your TV can receive either 525i/60Hz or 625i/50Hz interlace signals.
*Please keep AC cord unplugged when connecting TV system.
WARNING: The Main Power Switch (No.6 of the Control Location page) is the Manually Operated Mechanical Switch (MOMS). It is requested to Manually to turn On and Off the Main power. The Remote control can not cut off main voltage at the TV set. For safety purpose, turn off the Main Switch manually when long time not use the TV or for the long vacation. Press once will turn on the Main supply of the TV set. The Power indicator (No.6 of the Control Location page) will light up. To make sure the power is turn off, please fully press the Main switch and make sure the power indicator light off.
TUNING PROCEDURE
STEP 1
Push the Power "ON/OFF" Switch to the ON Position, the "POWER" Indicator will light up. A few seconds later the picture(or blue screen) will appear The program number is displayed on the top right-hand corner of the screen.
STEP 2
FULL AUTO SEARCHING
-
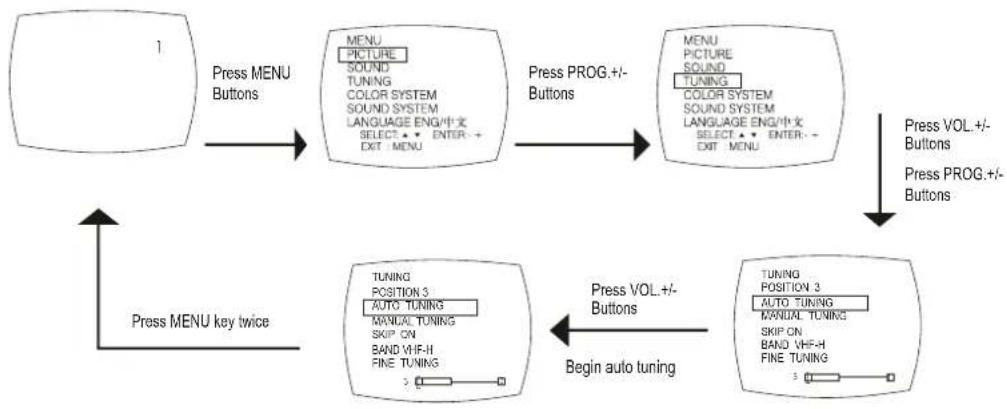
Press the MENU key on your TV set (or remote handset). If it is in AV state, it will not display "TUNING".
-
You can select "TUNING" by pressing PROG.+/-buttons. Then press VOL.+/-buttons to enter into TUNING submenu.
-
Press PROG.+/- Buttons to select "AUTO TUNING" then press VOL. +/- Button to automatically search and memory all the broadcasting TV stations in your area. When presetting is complete, the initial position number will reappear.
-
Press the MENU key twice to go back to the normal TV mode.
flowchart
graph TD
    A["1"] -->|Press MENU Buttons| B["MENU"]
    B -->|Press PROG.+/- Buttons| C["MENU"]
    C -->|Press VOL.+/- Buttons| D["TUNING POSITION 3"]
    D -->|Press VOL.+/- Buttons| E["TUNING POSITION 3"]
    E -->|Begin auto tuning| F["TUNING POSITION 3"]
    F -->|Press MENU key twice| A
    style A fill:#f9f,stroke:#333
    style B fill:#ccf,stroke:#333
    style C fill:#ccf,stroke:#333
    style D fill:#cfc,stroke:#333
    style E fill:#cfc,stroke:#333
    style F fill:#cfc,stroke:#333
Remark: You'd better select correct colour and sound system for the first channel before searching.
TO SKIP A PROGRAM
You may skip any program number by following the steps below:
- Select the program number to be skipped by pressing PROG+/- button or direct select buttons.
- According to above mentioned steps, open the TUNING menu.
- Press PROG+/- Buttons to select "SKIP", then select "ON" with VOL.+/- Buttons.
- Press the MENU key twice to go back to the normal TV mode.
STEP 3
MANUAL TUNING
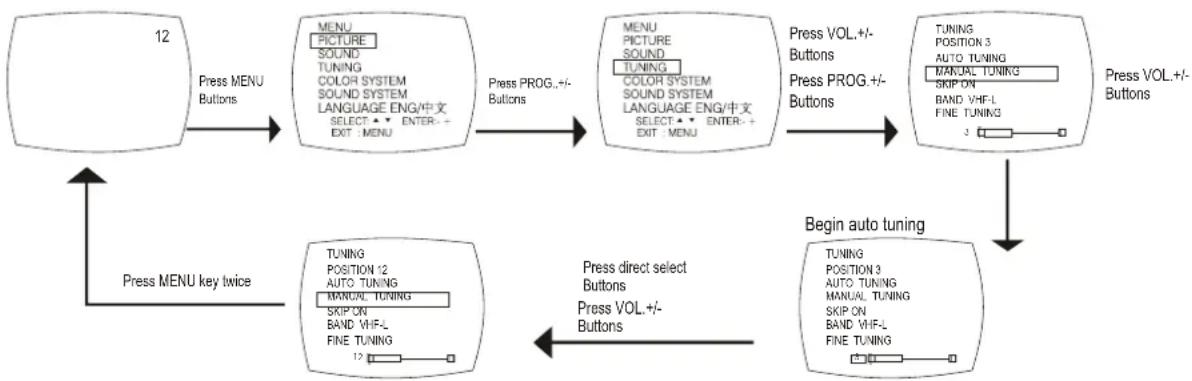
- According to above mentioned steps, open the TUNING menu.
- Move to "MANUAL TUNING" with PROG+/- buttons.
- Press VOL.+/-buttons, the search is being carried out. When a TV station signal is received, the character stops flicker and the current item moves to program number item.
- Enter new program number with direct select buttons. Press VOL.+/-to store the program, then the current menu item jumps to "MANUAL TUNING" automatically.
- Then press VOL. +/- button to continue search.
- Press the MENU key twice to go back to the normal TV mode.
flowchart
graph TD
    A["12"] -->|Press MENU Buttons| B["MENU PICTURE"]
    B -->|Press PROG.+/- Buttons| C["MENU PICTURE SOUND TUNING"]
    C -->|Press VOL.+/- Buttons| D["TUNING POSITION 3 AUTO TUNING MANUAL TUNING SKIP ON BAND VHF-L FINE TUNING 3"]
    D --> E["Begin auto tuning"]
    E -->|Press direct select Buttons Press VOL.+/- Buttons| F["TUNING POSITION 3 AUTO TUNING MANUAL TUNING SKIP ON BAND VHF-L FINE TUNING 3"]
    F --> G["TUNING POSITION 3 AUTO TUNING MANUAL TUNING SKIP ON BAND VHF-L FINE TUNING 3"]
    G --> H["Press MENU key twice"]
    H --> A
STEP 4
FINE TUNING
To tune in to weak stations manual tuning must be used.
- Select the program number you want to fine-tune with the PROG +/- buttons or direct select buttons.
- According to above mentioned steps, open the TUNING menu.
- Select "FINE TUNE" with PROG+/- button.
- Press VOL. +/- buttons until the best possible picture and sound are obtained, while "FINE TUNE" flickers.
- Move to program number item with PROG+/- buttons.
- Enter new program number with direct select buttons. Store the program with VOL.+/-buttons.
- Press the MENU key twice to go back to the normal TV mode.
TO SELECT BAND
- According to above mentioned steps, open the TUNING menu.
- Select "BAND" submenu with PROG.+/-buttons.
- Press VOL. +/- buttons, you can select VHF-L, VHF-H and UHF band.
NOTE:
There is no manual TINT control when selected COMPONENT VIDEO IN mode.
TO SELECT COLOR SYSTEM
If the color system setting is incorrect, the color of the channel will be abnormal.
- According to above mentioned steps, open the COLOR SYSTEM menu.
- Select the correct color system with PROG.+/- buttons, press VOL+/- to choose.
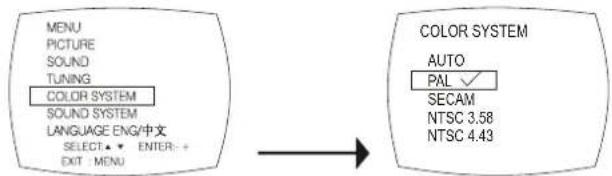
flowchart
graph LR
    A["MENU"] --> B["COLOR SYSTEM"]
    C["PICTURE"] --> B
    D["SOUND"] --> B
    E["TUNING"] --> B
    F["COLOR SYSTEM"] --> G["LANGUAGE ENG/中文"]
    H["SOUND SYSTEM"] --> I["SELECT ▲ ENTER: +"]
    J["EXIT MENU"] --> K["→"]
    L["COLOR SYSTEM"] --> M["AUTO"]
    M --> N["PAL ✓"]
    M --> O["SECAM"]
    M --> P["NTSC 3.58"]
    M --> Q["NTSC 4.43"]
TO SELECT SOUND SYSTEM
If the sound system setting is incorrect, the sound and colour of the channel will be abnormal.
- According to above mentioned steps, open the SOUND SYSTEM menu.
- Select the correct sound system with PROG+/- buttons.
- Move green symbol "to the sound system which you just select by pressing VOL. +/- buttons.
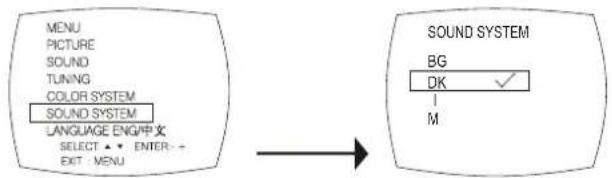
flowchart
graph LR
    A["MENU"] --> B["PICTURE"]
    B --> C["SOUND"]
    C --> D["TUNING"]
    D --> E["COLOR SYSTEM"]
    E --> F["SOUND SYSTEM"]
    F --> G["LANGUAGE ENG/中文"]
    G --> H["SELECT ▲ ▼ ENTER→"]
    H --> I["EXIT MENU"]
    J["SOUND SYSTEM"] --> K["BG"]
    K --> L["DK ✓"]
    L --> M["I"]
    L --> N["M"]
TO ADJUST THE PICTURE
- According to above mentioned steps, open the PICTURE menu.
- Choose the item to be adjusted with PROG+/- buttons.
- Adjust the image quality with VOL.+/- Buttons.
- Press the MENU key twice to go back to the normal TV mode. Meanwhile, the picture mode has been stored. It is stored in picture mode "PERSONAL".
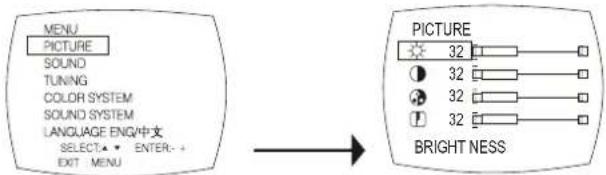
TO ADJUST THE SOUND(OPTION)
- According to above mentioned steps, open the SOUND menu.
- Choose the item to be adjusted with PROG+/- buttons.
- Adjust the sound quality with VOL.+/- Buttons.
- Press the MENU key twice to go back to the normal TV mode. Meanwhile, the sound mode has been stored. It is stored in sound mode "DEFINE".
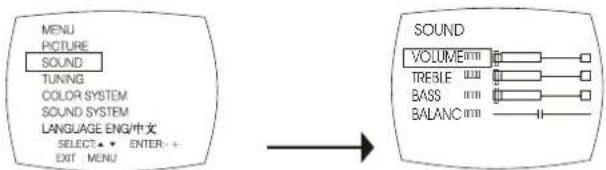
flowchart
graph LR
    A["MENU"] --> B["SOUND"]
    C["PICTURE"] --> B
    D["TUNING"] --> B
    E["COLOR SYSTEM"] --> B
    F["SOUND SYSTEM"] --> B
    G["LANGUAGE ENG/中文"] --> H["SELECT★ ▼ ENTER- +"]
    I["EXIT MENU"] --> H
    J["SOUND"] --> K["VOLUME"]
    J --> L["TREBLE"]
    J --> M["BASS"]
    J --> N["BALANC"]
CABINET BACK REMOVAL
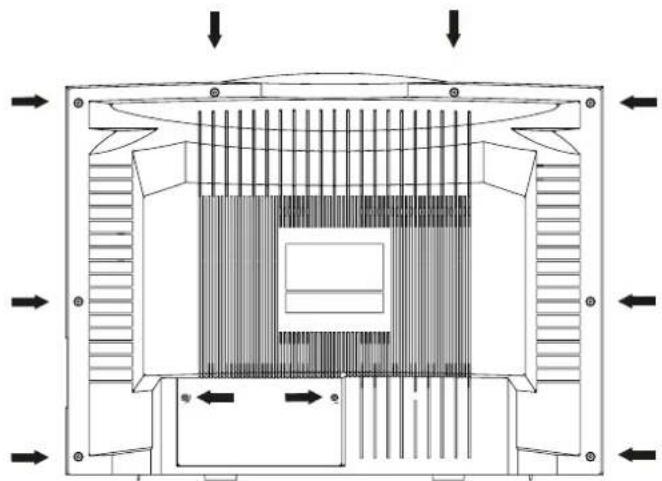
- Refer to Figure 1, remove 10 screws.
- Pull off cabinet back and remove.
natural_image
Technical diagram of a mechanical or electrical component with internal structure and directional arrows (no text or symbols)CHASSIS REMOVAL
- Remove cabinet back.
- Discharge the picture tube anode(2nd anode lead) to the dag coating (picture tube grounding lead).
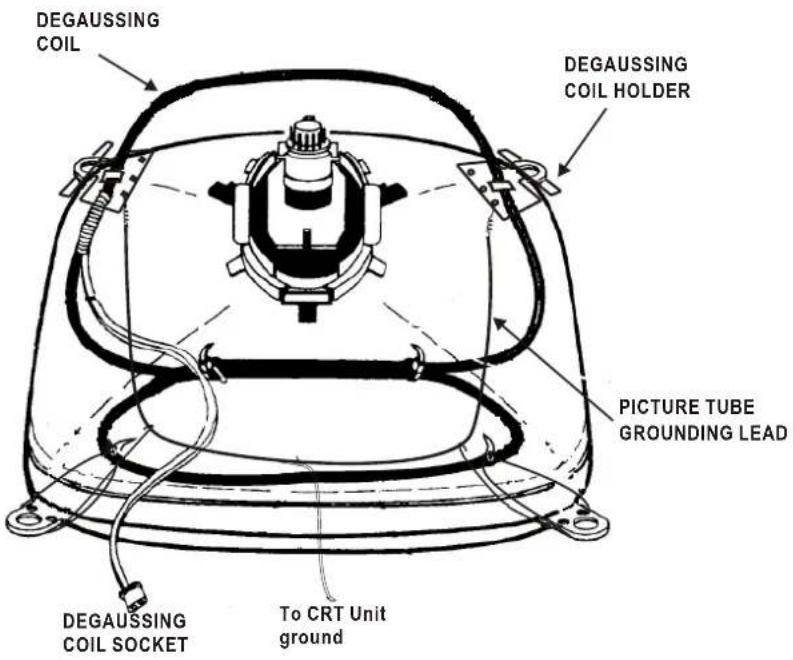
- Disconnect Degaussing coil socket(KE), Picture tube socket, Deflection yoke connector (KDY), Speaker connectors(KL and KR), and 2nd anode lead.
- Remove chassis completely by sliding it straight back.
PICTURE TUBE REMOVAL
CAUTION: Do not disturb the deflection yoke or magnet assembly on the picture tube Neck. Care must be taken to keep these assemblies intact, unless picture tube is being replaced. Discharge the picture tube to the coating before handing the Tube.
- Remove chassis, referring to Chassis Removal instructions.
- Place cabinet front face down on the soft surface.
- Remove the screw on each corner of the picture tube and GENTLY lift the picture tube out of the cabinet.
- Install a replacement picture tube in reverse order. Properly install the degaussing coil and picture tube grounding lead on the picture tube. See Figure 2.
Note: If the Picture Tube is being replaced, mount the Degaussing Coil on the picture tube. See following..
| Key No. | Part No. | Description |
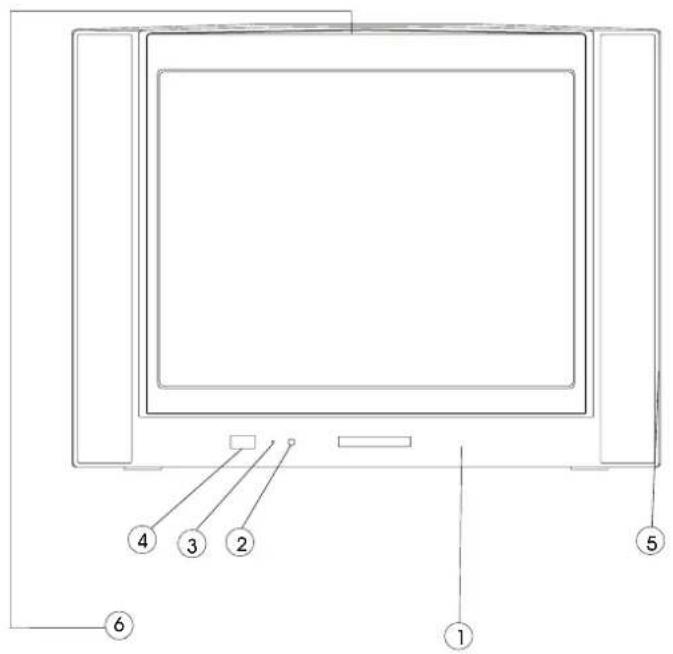
| 1 | SKCM 0025TM 0110 | CABINET COLOUR MATCH-METAL SILVER GREY #MS G001 |
| 2 | SK100729TM0001 | FRONT LENS (REMOTE CONTROL WINDOW) |
| 3 | SK100729TM0001 | FRONT LENS (LED WINDOW) |
| 4 | SK100925TM0001 | POWER KNOB-ELECTROPLATING SILVER(ABS) |
| 5 | SK100425TM0002 | SIDE AV JACK BRACKET-DARK GREY #DG001(ABS) |
| 6 | SK100829TM0001 | CONTROL KEY KNOB-ELECTROPLATING SILVER(ABS) |
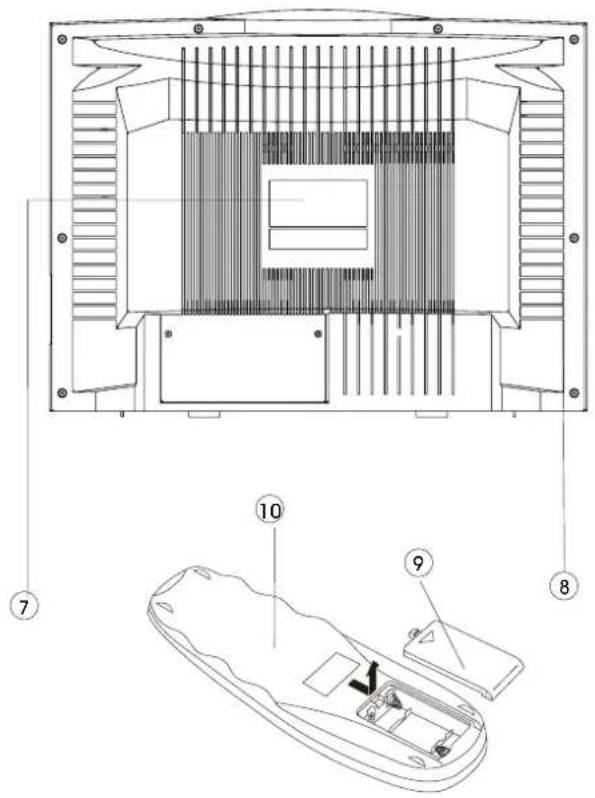
| 7 | SK060125TM00W6 | BACK LABEL FISHER TF25M2T W/PCB ENG |
| 8 | SK100225TM0003 | BACK CABINET-DARK GREY #DG001(HIPS)94V-0 |
| 9 | SK1016HS080006 | BATTERY DOOR-METAL SILVER GREY #MSG001(ABS) |
| 10 | SKHS08S0360600 | HANDSET-36 KEYS FOR OVERSEAS NORMAL GREY ENG (5N11) |
- VIDEO AND AUDIO INPUT/OUTPUT TERMINALS
- TUNING PROCEDURE
- STEP 1
- STEP 2
- FULL AUTO SEARCHING
- TO SKIP A PROGRAM
- STEP 3
- MANUAL TUNING
- STEP 4
- FINE TUNING
- TO SELECT BAND
- TO SELECT COLOR SYSTEM
- TO SELECT SOUND SYSTEM
- TO ADJUST THE PICTURE
- TO ADJUST THE SOUND(OPTION)
- CABINET BACK REMOVAL
- CHASSIS REMOVAL
- PICTURE TUBE REMOVAL
Brand : TELEFUNKEN
Model : TTV-29TB
Category : Television