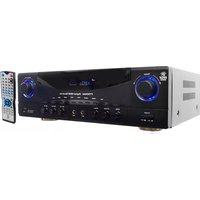
PT590AU - Radio Pyle - Free user manual and instructions
Find the device manual for free PT590AU Pyle in PDF.


| Product Type | Portable AM/FM Radio |
| Brand | Pyle |
| Model | PT590AU |
| Dimensions (W x H x D) | 7.5 x 4.5 x 2.5 inches |
| Weight | 1.2 lbs |
| Power Source | AC adapter (included) or 4 x AA batteries (not included) |
| Frequency Range | AM: 530-1710 kHz; FM: 88-108 MHz |
| Speaker | 3-inch dynamic speaker, 5W output |
| Audio Input | 3.5mm auxiliary input for external devices |
| Headphone Jack | 3.5mm stereo headphone output |
| Antenna | Telescopic FM antenna; built-in ferrite AM antenna |
| Tuning Method | Analog dial with thumbwheel |
| Controls | On/Off volume knob, tuning knob, function selector (AM/FM/AUX) |
| Display | Analog frequency indicator |
| Construction | ABS plastic cabinet with carrying handle |
| Cleaning | Wipe with a soft dry cloth. Do not use solvents or abrasive cleaners. |
| Safety Notes | Keep away from water and excessive heat. Do not open the casing; no user-serviceable parts inside. |
| Spare Parts | Contact Pyle customer service for replacement AC adapter or battery compartment cover. |
| Repairability | Repairs should be performed by qualified service personnel only. |
| General Information | Supports both AM and FM bands with clear reception. Features a classic design with tactile controls. |
Frequently Asked Questions - PT590AU Pyle
User questions about PT590AU Pyle
0 question about this device. Answer the ones you know or ask your own.
Ask a new question about this device
Download the instructions for your Radio in PDF format for free! Find your manual PT590AU - Pyle and take your electronic device back in hand. On this page are published all the documents necessary for the use of your device. PT590AU by Pyle.
USER MANUAL PT590AU Pyle
OWNER'S MANUAL
Please Read the Manual First before Operation
PT590AU
5.1 Channel 350 Watts Built-In AM/FM Radio/
HDMI Amplifier Receiver
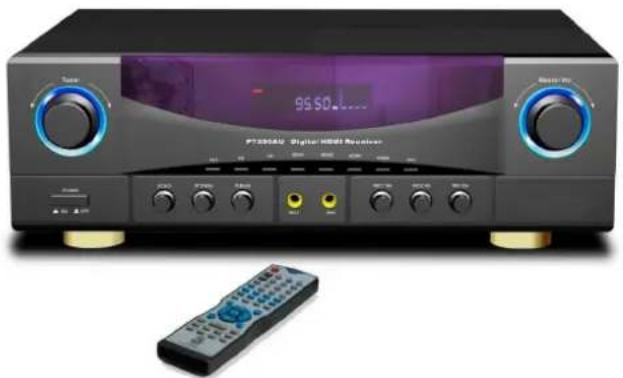
natural_image
Exterior view of a black digital HDMI receiver with external control panel and remote control (no visible text or symbols on device body)Table of Contents
Important Safety Information....1
For Customers
Caution
System Features....1
Front Panel Function 1
Front Panel Display Window....2
Real Panel Connectors....2
Using the Remote Control 3
Battery Installation
Note
Basic Operation....4
Turn on/off the Power
Master Volume Control
Side Left Channel Volume Control
Side Right Channel Volume Control
Center Channel Volume Control
Subwoofer Volume Control
How to Adjust Treble
How to Adjust Bass
How to Play HDMI
How to Play AUX
How to Play Tuner
Select Program
Listen to the Preset Program
Memory Program
How to Mute
Introduction of DSP Control Key
Introduction of Source Output Selector Area
Trouble Shooting. 5
Important Safety Information
For Customers
Thank you for purchasing the HDMI receiver. We strongly recommend that you carefully study the operating instructions before attempting to operate the unit and that you note the listed safety information.
Caution
You are cautioned that changes or modifications not expressly approved in this manual could void your authority to operate this equipment.
To reduce the risk of fire or electric shock, do not expose this apparatus to rain or moisture.
To prevent fire, do not cover the ventilation of the apparatus with newspapers, table-cloths, curtains and etc. Do not place lighted candles on the apparatus.
To prevent fire or shock hazard, do not place objects filled with liquid, such as vases, on the apparatus.
Do not install the appliance in a confined space, such as a bookcase or built-in cabinet.
Install this system so that the power cord can be unplugged from the wall socket immediately in the event of trouble.
Datteries or batteries installed apparatus shall not be exposed to excessive heat such as sunlight or fire.
System Features
• 5.1 Channel Amplifier
• HDMI: 2160P/4K
• 4 HDMI Input Port and 1 HDMI Output Port for HDMI Receiver
• Built-In AM/FM Radio
• 2 MIC Input, Treble and Bass of MIC Adjustable, Independent MIC Volume Control
• Over Current Protection, Short Circuit Protection And over Voltage Protection
• 12 Preset Radio Station
• Full Remote control
• VFD Display
• Power Input: AC 115V 60Hz
• Power Output: 300W LR Channel (4 ohm); 50W for Center, Surround L and Surround R(4 ohm)
- Input Selector:4 in 1 out HDMI Selector, 3 Stereo RCA Selector, 1AM/FM Radio, 2 Microphone Input
• Output: 5 Channel Speaker Output Terminal for L, R, Cent, SL, SR, And 1 line Out for Subwoofer
• Total Power Consumption: 350W
Front Panel Function

- Tuner band adjustment knob.
2.AUX1/AUX2/AUX3 input selector.
3.FM input selector.
4.AM input selector
5.HDMI1 input selector.
6.VFD display window.
7.HDMI2 input selector.
8.HDMI3 input selector.
9.HDMI4 input selector.
10.Mute control selector.
-
Master volume adjustment knob.
-
Power on/off selector.
13.Mic echo adjustment knob.
14.Mic treble adjustment knob.
15.Mic bass adjustment knob.
16.Mic1 input socket.
17.Mic2 input socket.
18.Mic1 volume adjustment knob.
19.Mic2 volume adjustment knob.
20.Mic volume adjustment knob.
Front Panel Display Window

Name
| 1.STEREO | AUX/TUNER INPUT |
| 2.AC-3 PROLOGIC | HDMI INPUT |
| 3.DSP | DSP STATE ICON |
| 4.DIGITAL DISPLAY | |
| 5.KHz MHz | KHz MHz ICON |
6.SPECTRUM DISPLAY
Function
| Light up when AUX1/2/3, FM/AM, input. |
| Light up when 5.1 channel or HDMI1/2/3/4 input. |
| Light up when play DSP effect. |
| Light up to display value of current input mode. |
| Light up when tuner input is selected and indicates the value on the display for KHz/MHz . |
| Light up to display the spectrum of different channel. |
Real Panel Connectors

Using the Remote Control
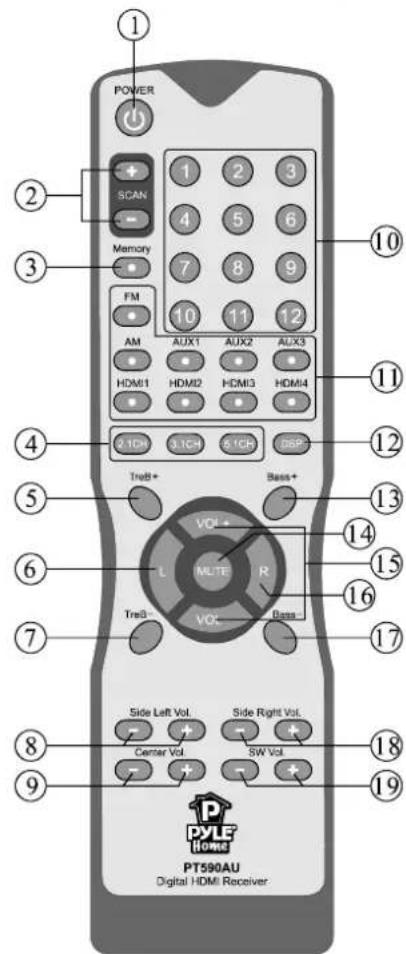
- Power on/off control selector
2.Tuner band control selector
3.Tuner memory selector
4.Channel source output selector
5.Treble volume increase selector
6.Left balance selector
7.Treble volume decrease selector
8.Side left volume adjustment selector - Center volume adjustment selector
10.Tuner number selector
11.Input mode selector - DSP control selector(live, hall, church)
13.Bass volume increase selector
14."Mute mode" control selector
15.Master volume control selector
16.Right balance selector
17.Bass volume decrease selector - Side right volume adjustment selector
19.Subwoofer volume adjustment selector
Battery Installation
-
On the back of the remote control, push the tab and lift off the battery cover.
-
Obtain two (2) fully-charged AAA batteries. Match the "+" and "-" marks on the batteries to the "+" and "-" marks in the battery case, then insert the new batteries.
-
Align the cover keys with the case holes and press the cover back into place. The tab should click when the cover is locked.
-
Test the unit by pressing POWER or any mode key. If the batteries are inserted correctly, the selected mode key will blink once.
Note
- Do not leave the remote control in an extremely hot or humid place.
• Do not use a new battery with old ones. - Do not mix manganese batteries with other kinds of batteries.
- Do not expose the remote sensor to direct sunlight or lighting apparatuses. Doing so may cause a malfunction.
- If you do not intend to use the remote control for an extended period of time, remove the batteries to avoid possible damage from battery leakage and corrosion.
Basic Operation
Turn on/off the Power
Press "💡" key to control the power on and off.
Master Volume Control
Press the "VOL" or "VOL" Key to adjust the main channel volume.
Side Left Channel Volume Control
Press "Side Left Vol." key, screen display the SL volume, press "-ADJUST+" key to adjust side left channel volume.
Side Right Channel Volume Control
Press "State Right Vol." key, screen display the SR volume, press "-ADJUST+" key to adjust side right channel volume.
Center Channel Volume Control
Press "Center Vol." key, screen display the CEN volume, press "-ADJUST+" key to adjust center channel volume.
Subwoofer Volume Control
Press "SW vs." key, screen display the SW volume, press "-ADJUST+" key to adjust subwoofer channel volume.
How to Adjust Treble
Press "○" key to adjust the treble output of the main channel.
How to Adjust Bass
Press "○○" key to adjust the bass output of the main channel.
How to Play HDMI
Make sure HDMI1/2/3/4 connection lines are correct, Press the "☐/☐/☐/☐" key to play HDMI.
How to Play AUX
Make sure AUX1/2/3 connection lines are correct, Press the "AUX1/AUX2/AUX3" key to play AUX.
How to Play Tuner
1. Select Program
Use "☐/☐" key to select FM/AM band. Press the "☐"key to adjust the band of tuner. Press the "☐"key
for 2 seconds, the FM will search automatically. You can press the "☐"key once to stop the function.
2. Listen to the Preset Program
Press the number keys "1-12" to select the radio program that you already saved. Once selected, screen will display the radio program's frequency in the memory area.
3. Memory Program
When you receive a clear radio program, press the "→" key first, and then the screen displays the "Memory" icon. Press one of the 12 "→-→" number key on the remote control to select the memory station. If you want to extract the channel you saved, just press the number key you selected.
How to Mute
Press "###" key to turn sound off/on. Press again to restore the audio to the original level.
Introduction of DSP Control Key
Press the key "☐" repeatedly to switch to different operations: Live, Hall or Church. DSP off. All the above functions can give different sound effects.
Introduction of Source Output Selector Area
Press "☐" key to receive 5.1 channel(default mode); Press "☐" key to receive 3.1 channel(SL, SR mute); Press "☐" key to receive 2.1 channel(SL, SR, CEN mute).
Trouble Shooting
Use this chart to help you solve operational problems. If there are any problems that can not be solved, please contact Service Center.
| Problem | Possible Reasons | Solutions |
| Can't get through power supply | The plug is not inserted properly. | Check power supply and plug. |
| The socket has no power. | Check socket and power supply. | |
| Display can't be turned on | ||
| The fuse is broken. | Replace the fuse. | |
| Have not pressed "POWER" button. | Press the "POWER" button again. | |
| No sound at all | Incorrect selection of input signal. | Read the manual carefully again. |
| The wire and lead are not connected correctly. | Check the wire and lead. | |
| The mute state is turned on. | Turn off the mute state. | |
| Sound source machine is not powered. | Turn on the power of sound source. | |
| Neither of the main channels have sound | The speaker line is not connected properly. | Read the manual. |
| The signal plug is connected incorrectly or lines are short-circuited. | Check the connection of the signal plug. | |
| Center channel has no sound. | The speaker line is not connected properly. | Read the manual. |
| Mode is not set properly. | Mode should be set that the center channel has output. | |
| Side Surround channels have no sound | The speaker line is not connected properly. | Read page 3 of the manual. |
| Mode is not set properly. | Mode should be set that the surround channel has output, for example, 5.1 channel. | |
| The sound of surround channel is low | The sensitivity of speakers is too low. | |
| The volume is set too low. | Reset volume. | |
| The input signal is STEREO. | Change to 5.1 channel. | |
| The sound of center channel is low. | The sensitivity of speakers is too low. | |
| The volume is set too low. | Reset volume. | |
| Sound from speakers is out of order | Speakers are located inappropriately. | Read the manual. |
| The lines are not connected properly or the Disc is defective. | ||
| No sound when you choose HDMI input | Sound source machine is not powered. | Turn on the power of sound source. |
| The HDMI line is not connected properly. | Read the manual. | |
| Sound source machine doesn't set the HDMI out mode | Set the Sound source machine to HDMI out mode | |
| Can't operate or display normally | Affected by exterior strong disturbance. | Turn off first then turn on again. |
| Avoid direct sunlight/heat. | ||
| Radio | ||
| The FM/AM reception is poor. | Need outdoor antenna. | Stretch the FM/AM antenna of the receiver in the rear panel. But please don't connect the receiver to an outdoor FM/AM antenna on raining days. |
| Radio stations cannot be tuned in. | Check that the antennas are connected securely. | Adjust the antennas and connect an external antenna, if necessary. |
| The signal strength of the stations is too weak (when tuning in with automatic tuning). | Adjust manually | |
| No stations have been preset or the preset stations have been cleared (tuning by scanning preset stations). | Make sure you set the tuning interval correctly. | |
| The remote control does not function. | Obstacles exist between the remote and the receiver. | Remove any obstacles in the path between the remote and the receiver. |
| The remote batteries are weak. | Replace all batteries in the remote control with new ones. | |
| Incorrect input selection on the remote control. | Make sure you select the correct input on the remote control. | |
| Error messages | If appears a message, there may be a malfunction. | You can check the condition of the system by the message. |
| Should any problems persist. | Consult your nearest Paramax dealer. | |
| Protect | Irregular current is output to the speakers. The receiver will automatically turn off after a few seconds. | Check the speaker connection then turn on the power again. |


- OWNER'S MANUAL
- PT590AU
- Table of Contents
- Important Safety Information
- For Customers
- Caution
- System Features
- Battery Installation
- Note
- Basic Operation
- Turn on/off the Power
- Master Volume Control
- Side Left Channel Volume Control
- Side Right Channel Volume Control
- Center Channel Volume Control
- Subwoofer Volume Control
- How to Adjust Treble
- How to Adjust Bass
- How to Play HDMI
- How to Play AUX
- How to Play Tuner
- Select Program
- Listen to the Preset Program
- Memory Program
- How to Mute
- Introduction of DSP Control Key
- Introduction of Source Output Selector Area
- Trouble Shooting
Brand : Pyle
Model : PT590AU
Category : Radio