
LED1950DVD - Television TELEFUNKEN - Free user manual and instructions
Find the device manual for free LED1950DVD TELEFUNKEN in PDF.


| Product Type | 19" HD LED TV with built-in DVD player |
| Model | LED1950DVD |
| Screen Size | 19 inches (48 cm) |
| Resolution | 1366 x 768 pixels |
| Brightness | 250 cd/m² |
| Contrast Ratio | 1000:1 |
| Viewing Angle | 170° horizontal / 160° vertical |
| Power Supply | AC 230V~ (DC 12V, 3A adapter included) |
| Power Consumption | 24 W (typical) |
| Energy Class | A (35 kWh/annum) |
| Dimensions (L x W x H) | 466 x 161 x 348.4 mm |
| Weight | 4.2 kg |
| Inputs | HDMI, VGA, SCART, YPbPr, Composite Video/Audio, USB, Antenna (RF) |
| Outputs | Earphone (3.5mm), Digital Audio Out (coaxial) |
| Built-in DVD Player | Supports DVD, CD, JPEG playback; region-free (PAL/NTSC) |
| USB Media Playback | Photo (JPEG/BMP/PNG), Music (WMA/M4A/AAC), Movie (AVI/MP4/MKV/MOV/MPG/DAT/VOB/RM/RMVB), Text |
| TV Tuner | Analog (PAL) via RF input; auto tuning |
| Remote Control | IR remote with full function buttons; uses 2x AAA batteries (included) |
| Mounting Options | Desktop stand included; wall-mountable (VESA not specified, screw length max 10mm) |
| Safety | No user-serviceable parts; do not open; keep ventilation holes clear; avoid liquids |
| Maintenance | Clean with soft dry cloth; no solvents; avoid direct sunlight and heat sources |
| Accessories Included | Remote control, 2x AAA batteries, AC adapter, stand, USB extension cable, user manual |
Frequently Asked Questions - LED1950DVD TELEFUNKEN
User questions about LED1950DVD TELEFUNKEN
0 question about this device. Answer the ones you know or ask your own.
Ask a new question about this device
Download the instructions for your Television in PDF format for free! Find your manual LED1950DVD - TELEFUNKEN and take your electronic device back in hand. On this page are published all the documents necessary for the use of your device. LED1950DVD by TELEFUNKEN.
USER MANUAL LED1950DVD TELEFUNKEN
natural_image
Front view of a black telefunken monitor with a CD/DVD disc on the right (no text or symbols on screen)19" HD LED TV
LED1950DVD
BEDIENUNGSANLEITUNG
INSTRUCTION MANUAL
MODE D'EMPLOI
- Names of each part / Accessories....6
- Names of each part....7
• Installation the TV Stand / Installation Precautions....8
• Power Input Connections / Installing an Antenna....9 - Remote control....10
- Precautions / How to use the remote control....11
Connection
• VCR Connections / SCART Connections / Watching Video Tape....12
- Satellite/TV Set-Top Box Connections / Watching TV....13
• DVD Connections / Playing the DVD....14
• PC Connections / EARPHONE Connections / How to use as PC monitor....15
- USB Connections....16
Basic Use
- Selecting input source....17
- Basic Operation....18
Application
TV Part
- Operating the Menu....19
- Customizing the CHANNEL Settings....20\~21
- Customizing the PICTURE Settings....22
- Customizing the SOUND Settings....23
- Customizing the TIME Settings....24
- Customizing the OPTION Settings....25
- Customizing the SCREEN Settings....26
- Customizing the MEDIA Settings....27
DVD Part
• DVD Functions....28
- Customizing the Language Setup Settings....29
- Customizing the Screen Setup Settings......30
- Customizing the Audio Setup Settings....31
- Customizing the Custom Setup Settings....32
Maintenance and Service
- Trouble shooting....33
- Specifications....34
- Energy label....35
- Notice about recycling / Notice about ROHS......
Installation and Safety Warnings
1) Position the unit on a flat surface avoiding anywhere which may be subject to vibration.
2) It is advisable to un-plug both the power and aerial during a storm to avoid damage.
Electrical surges causing damage to the TV are not covered under the manufacturer's warranty.
3) Avoid rapid changes in environmental or temperature conditions. Allow the TV to reach room temperature and avoid locating near heat sources, i.e radiators/fires.
4) Do not place naked flames, such as candles or night lights near to the TV.
5) Do not place ornaments or vases near the TV where liquid spillages could cause a danger.
6) Do not locate the TV directly against a wall where it could restrict ventilation to the rear of the TV.
7) Do not place the TV on or near appliances which may cause electromagnetic interference (such as TV or Hi-Fi Speakers) as these could cause a distorted picture or sound.
8) Batteries are a potential choking hazard. Do not allow young children to remove the battery compartment cover on the remote control.
9) There are no user serviceable parts inside this TV. Do not remove any of the covers, front or rear, which could expose high voltages within the TV set.
10) If you intend to leave the TV for long periods of time, in the interests of energy consumption, do not leave the TV in standby mode, instead, unplug the TV from the power supply.
11) Never display the same image on the TV for long periods of time as this could cause a permanent after-image to remain on the screen. This is called 'screen-burn'. This may also be caused by some channels displaying a static logo in the corner of the screen. Be sure that your chosen channels have constantly moving images to avoid this irreparable damage.
Warnings

Warning
Risk of electric shock Do not open

Warning: To Avoid the risk of electric shock.
Do not remove cover (or back).
No user-serviceable parts inside.
Refer servicing to qualified service personnel.

This symbol is intended to alert the user to avoid the risk of electric shock, do not disassemble this equipment by anyone except a qualified service personnel.

This symbol is intended to alert the user to the presence of important operating and maintenance instructions in the literature accompanying the appliance.
Caution
natural_image
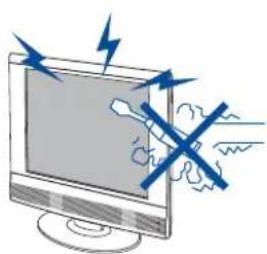
Illustration of a computer monitor with electric shockwave and a crossed-out tool, no text or symbols presentCaution
High voltages are used in the operation of this product. Do not remove the cabinet back from your set. Refer servicing to qualified service personnel.
natural_image
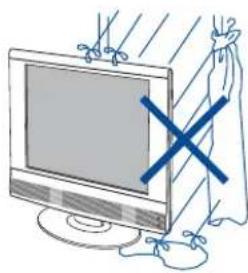
Illustration of a computer monitor with a blue X symbol and a hanging garment (no text or symbols present)Caution
To prevent fire or electrical shock hazard, do not expose the main unit to moisture.
natural_image
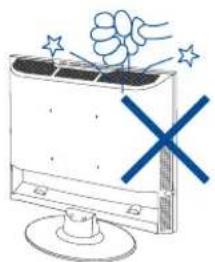
Illustration of a computer monitor with a hand holding a ball above it and a blue X symbol on the screen (no text or symbols present)Caution
Do not drop or push objects into the television cabinet slots or openings. Never spill any kind of liquid on the television receiver.
natural_image
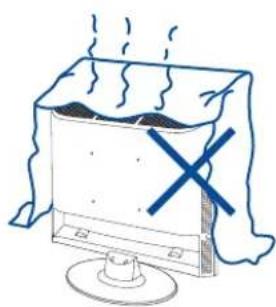
Simple line drawing of a steaming machine with a cross mark on its side (no text or symbols)Caution
Avoid exposing the main unit to direct sunlight and other source of heat. Do not put the television receiver directly on other products that give off heat. E. g. video cassette players, Audio amplifiers. Do not block the ventilation holes in the back cover. Ventilation is essential to prevent failure of electrical components. Do not squash power supply cord under the main unit.
Caution
natural_image
Illustration of a person using a computer with a 'X' symbol on screen, surrounded by floating stars (no text or symbols present)Caution
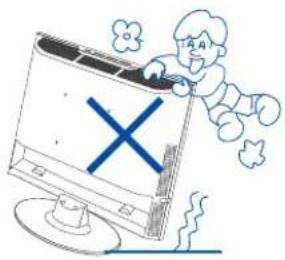
Never stand on, lean on, push suddenly the product or its stand. You should pay special attention to children.
natural_image
Illustration of a computer monitor with a blue X mark and lightning bolts on a table (no text or symbols)Caution
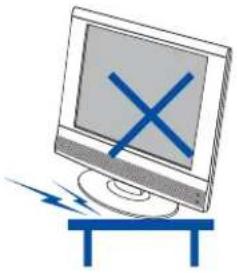
Do not place the main unit on an unstable cart stand, shelf or table. Serious injury to an individual, and damage to the television, may result if it should fall.
natural_image
Illustration of a person standing next to a large air conditioner unit with a magnifying glass nearby (no text or symbols)Caution
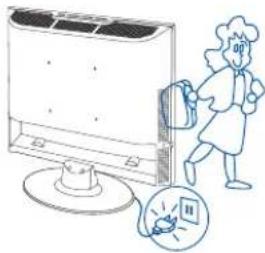
When the product is not used for an extended period of time, it is advisable to disconnect the AC power cord from the AC outlet.
natural_image
Line drawing of a white air conditioner unit with cooling fins and mounting base (no text or symbols)Caution
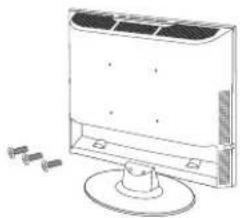
Length of screw for wall mount can not exceed 10MM.
Names of each part
Front View
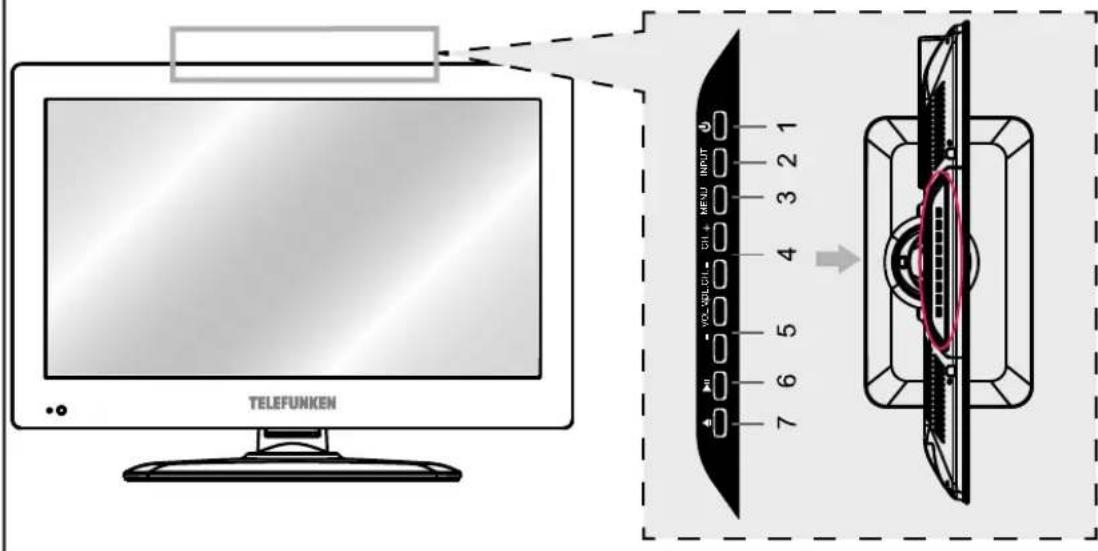
① Button
⑤ VOL.+/VOL.- Button
② INPUT Button
6 ▶11 Button
③ MENU Button
7 ▲ Button
④ CH.+/CH.- Button
Accessories
* The configuration of the components may look different from the following illustration.
LED TV

Bottom Stand

USB Extention Cable
Adapter
User's Manual
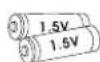
Battery 1.5V(AAA x2)
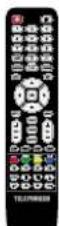
Remote Control
Names of each part
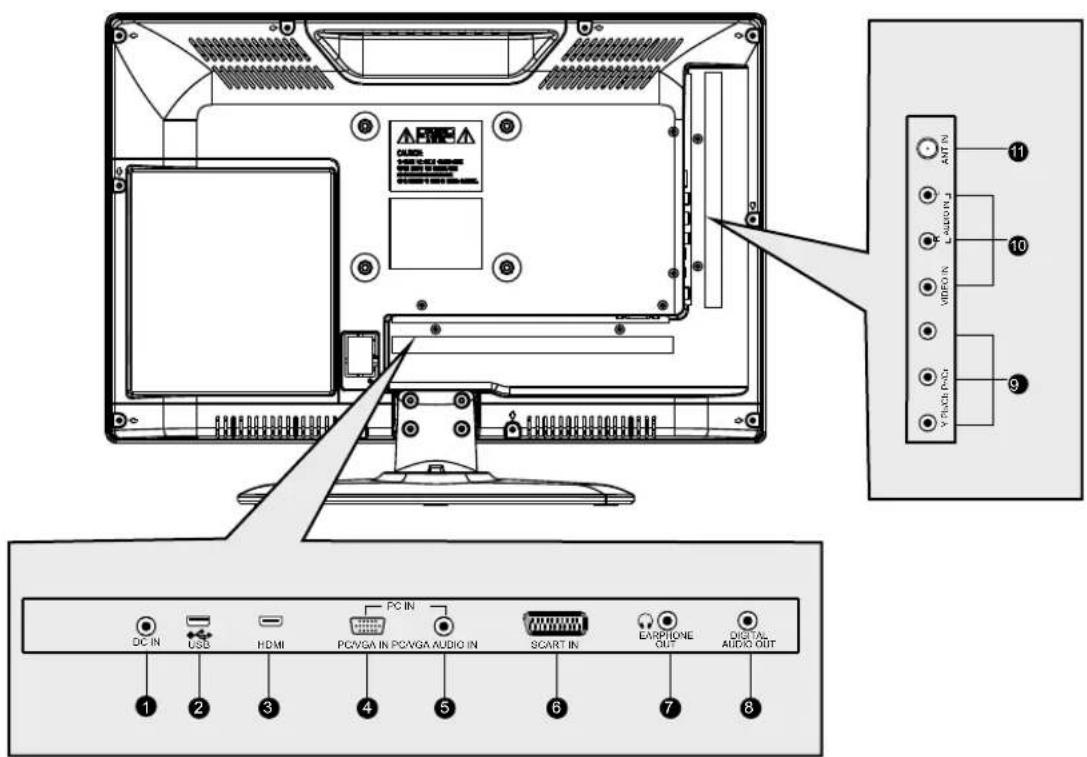
① DC IN (12V)
⑥ SCART IN jack
① ANT IN jack
② USB jack
EARPHONE OUT jack
③ HDMI jack
⑧ DIGITAL AUDIO OUT jack
4 PC/VGA IN jack
⑨ Y/PbCb/PrCr jack
⑤ PC/VGA AUDIO IN jack
10 VIDEO IN/AUDIO (R/L)IN jack
Installation the TV Stand
natural_image
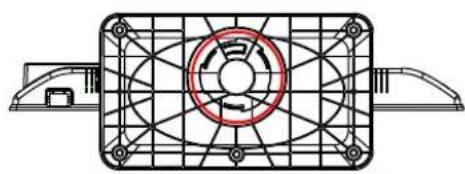
Technical line drawing of a mechanical fan or vent assembly with grid pattern and central hub (no text or symbols)Place the TV face down on a protective surface. To attach the stand, insert the neck of the TV stand into the socket of the stand plate. Turn the base of the stand to lock it into position on the TV. Using the open and close arrows for guidance.
Note: It's normal to hear a click sound when screwing the stand.
Installation Precautions
Wall Mounting
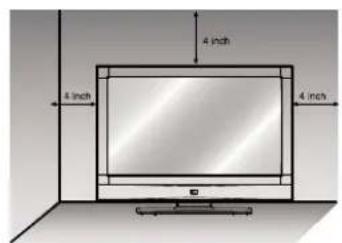
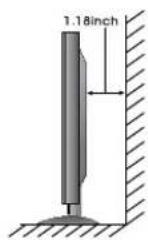
- Please secure enough space for safe use. (Please refer to A and B.)
•Installation of the LED TV in an improperly ventilated location can cause a fire or damage to the LED TV due to increased temperature.
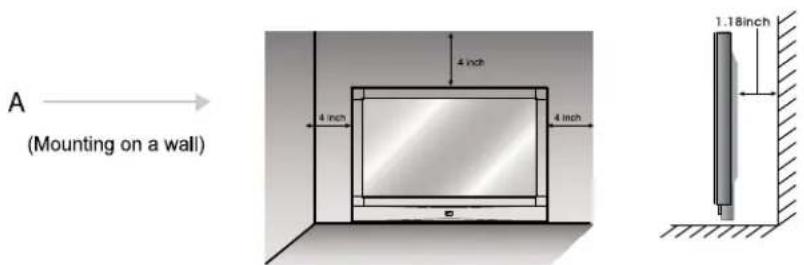
* Contact your dealer to purchase the "Adjustable-angle wall mount" required for wall-mounted installation.
TV Stand
- Do not install on an unstable location with support area smaller than the LED TV.
- Please refer to the desktop stand user's manual for details of installation.
POWER INPUT Connections
- Connecting to POWER INPUT +12V
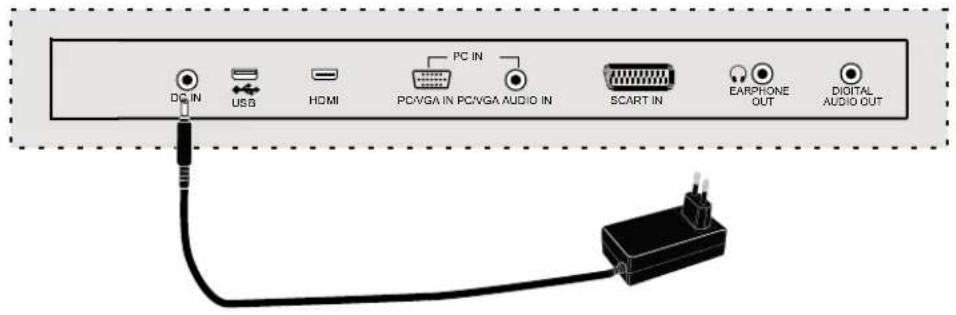
Installing an Antenna
- For connecting to PAL broadcast
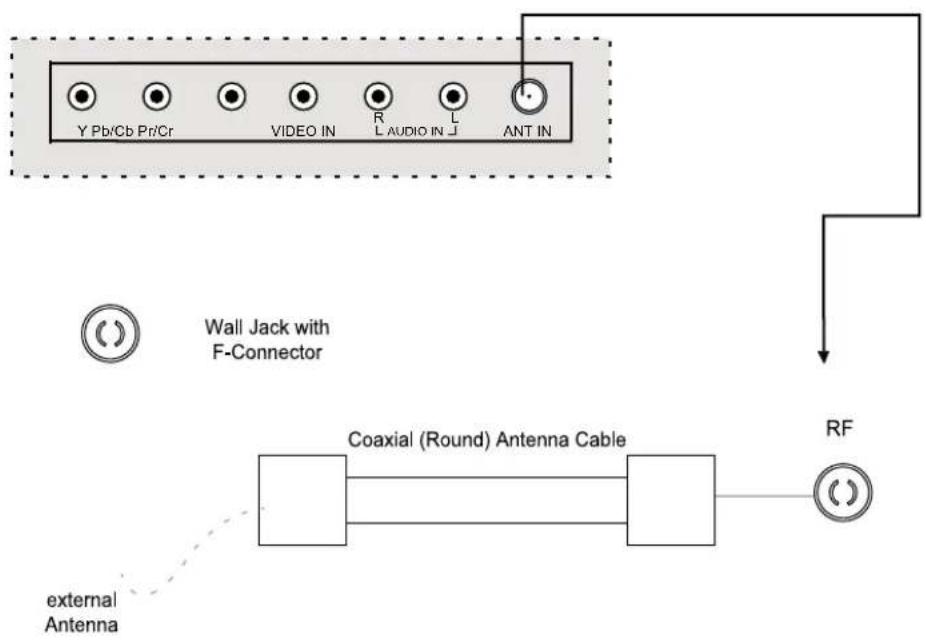
Press INPUT button to select TV, then press OK button.
Remote Control
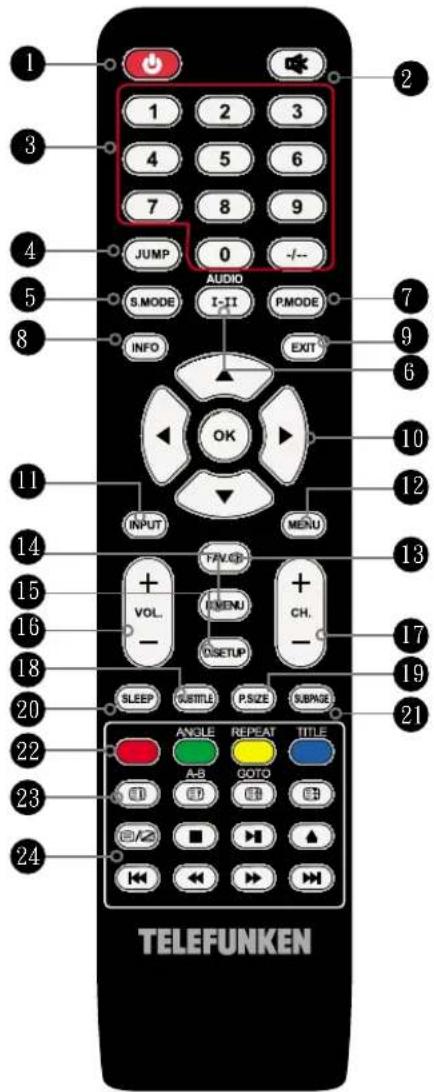
- Functions of remote control buttons
The remote control is using Infra-Red(IR). Point it towards the front of the LED TV. The remote control may not work correctly if it is operated out of range or out of angle.
| 24 | -Turn on and off the Teletext function. |
| ■ - Press the button to stop playback. (Media mode and DVD mode) | |
| ▶ - Press ▶ button to start playback or pause.(Media mode and DVD mode) | |
| ▲ - Press ▲ button to open and close the disc tray. (DVD mode) | |
| ◀ - Press ◀ button to skip to the beginning of the currently played chapter or track. (Media mode and DVD mode) | |
| ◀◀ - Use ◀◀/▶▶ buttons to reverse playback rapidly.(Media mode and DVD mode) | |
| ▶◀ - Press ▶▶ button to skip to the beginning of the next chapter or track.(Media mode and DVD mode) |
| 1 | Press this button to switch on the TV when at standby mode or enter standby mode. |
| 2 | - Press this button to mute or restore sound. |
| 3 [0-9, /--] - Select and switch to a channel using 0-9. | |
| 4 JUMP - Switch back and forth between the current and previous channels | |
| 5 | S.MODE - Select the sound mode. |
| 6 | I-II - Display the TV sound menu on the screen in ATV mode, use ▲▼ to select the TV sound options.AUDIO - Press ◀/► button to select Audio Language. |
| 7 P.MODE - Select the picture mode. | |
| 8 | INFO - Press once to display a variety of information such as the current channel and the input source. |
| 9 EXIT - Exit the OSD menu. | |
| 10 | ▲▼►◄ - Cycle through OSD options and select individual menuOK items. Press OK to confirm option settings. |
| 11 | INPUT - Available input source selection. |
| 12 | MENU - Display the OSD menu on the screen. |
| 13 | FAV.CH - Press FAV.CH to display favourite menu. |
| 14 | D.MENU - Press D.MENU button to display the DVD disc menu. ( DVD mode ) |
| 15 | D.SETUP - Press D.SETUP to call up setup menu screen. ( DVD mode ) |
| 16 | VOL.+/- - Increase and decrease volume. |
| 17 | CH.+/- - Scan▼ / ▲ the channels. |
| 18 | SUBTITLE - Display the subtitle menu on the screen in DVD mode, use ▲▼ to select the TV subtitle options. |
| 19 | P.SIZE - Cycle through Wide mode settings |
| 20 | SLEEP - Cycle through the LED TV sleep time. |
| 21 | SUBPAGE - Video text sub-page button. |
| 22 | ■ ■ ■ ■ - Press the appropriate color to direct access functions in TELETEXT mode.ANGLE - Multi-angle featureREPEAT - Press REPEAT button repeatedly to select the repeat mode.TITLE - Press the button to display the DVD title content. |
| 23 | ◎ - Display the main index in TELETEXT mode. |
| ◎ - Reveal hidden information such as the answer to a quiz in TELETEXT mode.A-B - To repeat playback a specific section of a disc. | |
| ◎ - Display the top, bottom or all of page, to easily read in TELETEXT mode.GOTO - Play from the desired location. ( DVD mode ) | |
| ◎ - Freeze a multi-page passage on screen in TELETEXT mode. | |
Precautions
Avoiding Remote Control Problems
- Check the polarity (+,-) of the batteries in the remote control.
- Check that the batteries have power.
- Check that the LED TV is powered and that it is properly plugged in.
- Check if any three-wavelength lamp, special fluorescent or neon sign is turned on near the LED TV.
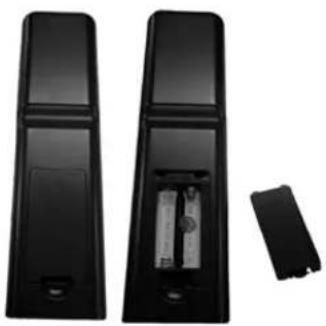
Inserting Batteries in the Remote Control
- Open the cover completely.
- Insert the two supplied batteries (AAA, 1.5V). Ensure that the polarities (+ and -) of the batteries are aligned correctly.
- Side back the cover.
natural_image
Two black rectangular electronic devices with internal components, one partially open and the other a separate device (no visible text or symbols)
CAUTION: Risk of explosion if battery is replaced by an incorrect type.
Dispose of used batteries according to the national code (Recycling programmes).
How to Use the remote control
- The remote control should be operated within 30 feet (7m) and 30^ to the left and the right of the IR receiver at the front of the LED TV.
• Used batteries should be disposed properly.
VCR Connections
- Connecting to the Composite terminal
* Connection terminals of other equipments differ by manufacturer and model.
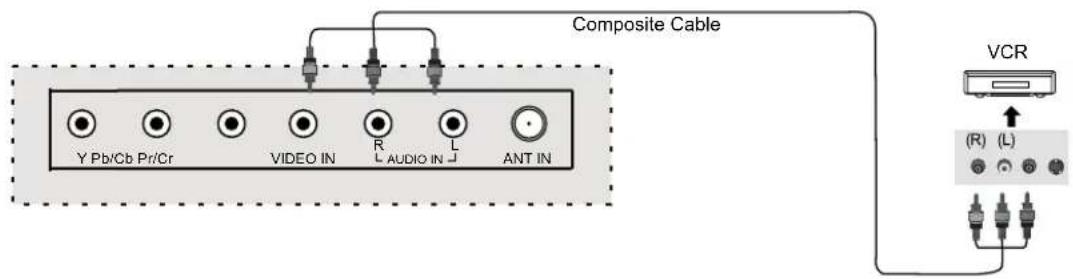
- Connect the LED TV's Composite In terminal to the VCR's Composite Out terminal using the Composite cable. (Make sure the color of the terminals and the color of the cable are the same)
- Connecting to the SCART terminal
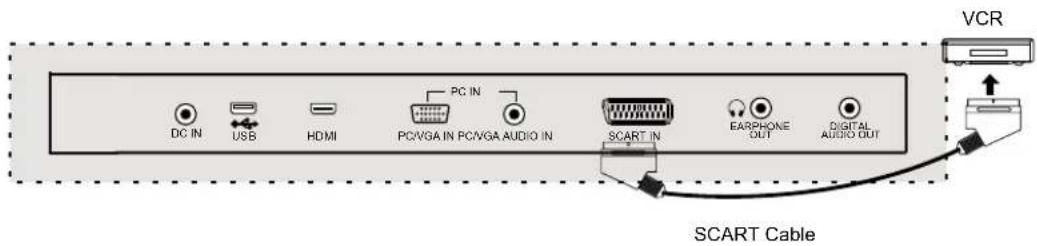
Watching Video Tape
- Turn on the LED TV and press INPUT button on the remote control.
- Use ▼ / ▲ buttons to select AV. If SCART has been connected, select "SCART"
- Turn on the VCR, insert the tape and press ▶ (Play) button.
Satellite/ TV Set-Top Box Connections
- Connecting to the Composite terminal
* In order to watch Cable TV, subscribe to your local Cable TV company and install a separate receiver(Set-Top-Box)
* Connection terminals of other equipments differ by manufacturer and model.
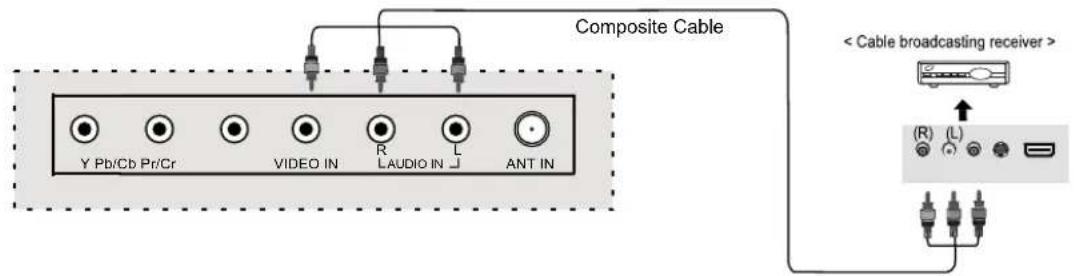
Connect the LED TV's Composite In terminal to the cable broadcasting receiver Composite Out terminal using the Composite cable. (Make sure the color of the terminals and the color of cable are the same)
- Connecting to the HDMI terminal
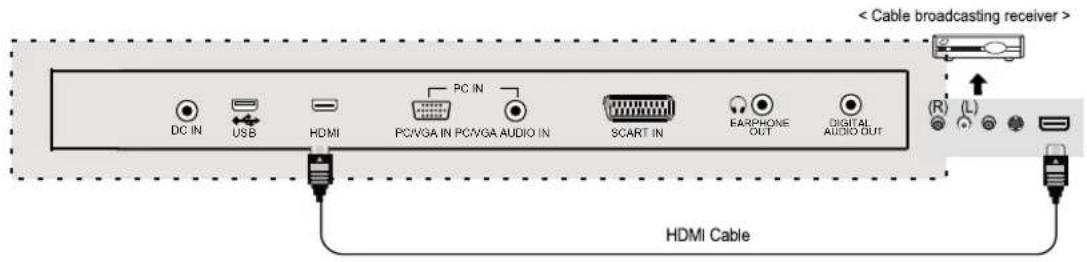
Watching TV
- Turn on the LED TV and press INPUT button on the remote control.
- Use ▼ / ▲ buttons to select AV. If HDMI has been connected, select "HDMI"
- Turn on the broadcasting receiver and select the channel you wish to view.
DVD Connections
- Connecting to the component terminal
* Connection terminals of other equipments differ by manufacturer and model.
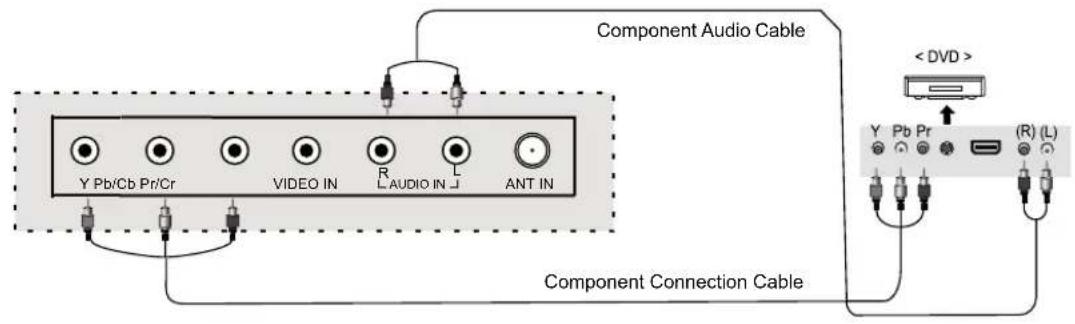
- Connect LED TV's Y, Pb, Pr Terminal to DVD's Video Out terminal using the external cable.
- Connect LED TV's Audio terminals (left & right) in AV to DVD's Audio Out terminal using the Audio cable.
- It must match the component connection cable Y, Pb, Pr between the LED TV and DVD Player.
- Connecting to the HDMI terminal
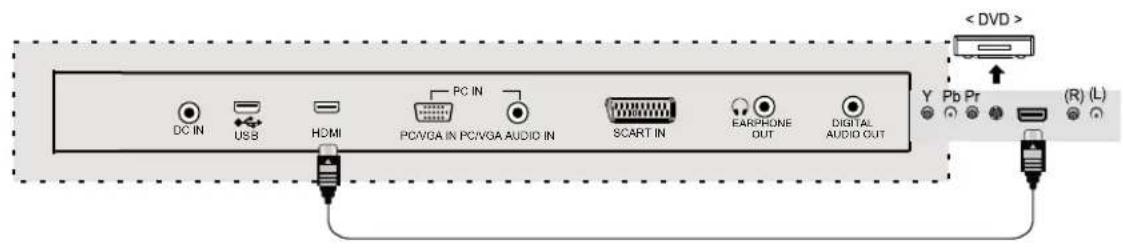
Playing the DVD
- Turn on the LED TV and press INPUT button on the remote control.
- Use ▼ / ▲ buttons to select "YPbPr". If HDMI has been connected, select "HDMI"
- Turn on the DVD, insert the DVD disc and press ▶ (Play) button.
PC Connections
* Connection terminals of other equipments differ by manufacturer and model.
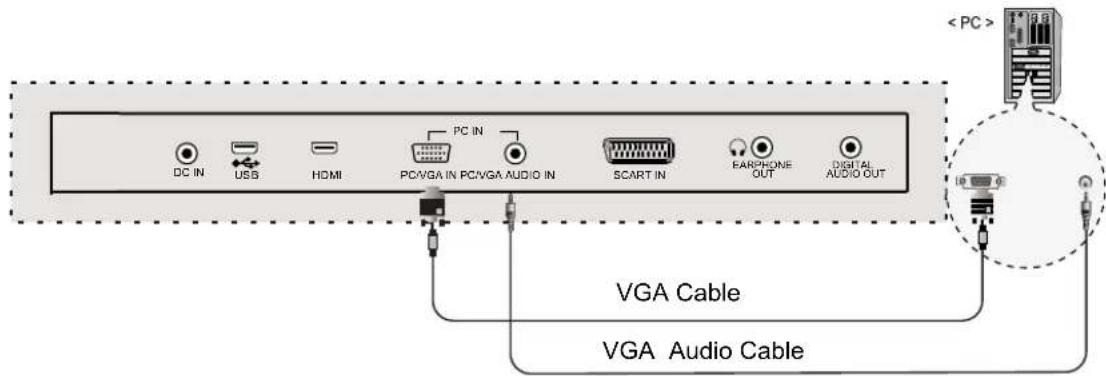
- Connect LED TV's PC Input terminal to PC's VGA terminal using the VGA cable.
- Connect LED TV's PC Audio terminal to PC's Audio terminal using the Audio cable. (Only for PC's with Audio terminal)
EARPHONE Connections
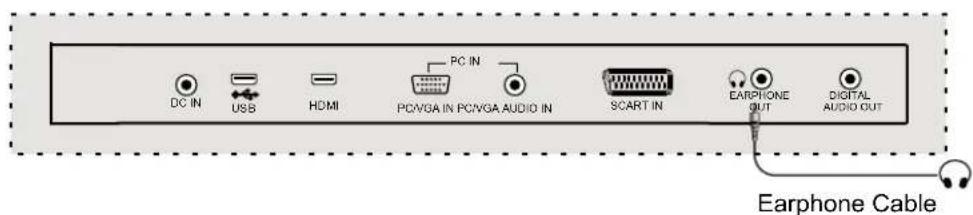
How to Use as PC monitor
- Turn on the LED TV and press INPUT button on the remote control.
- Use ▼ / ▲ buttons to select "PC"
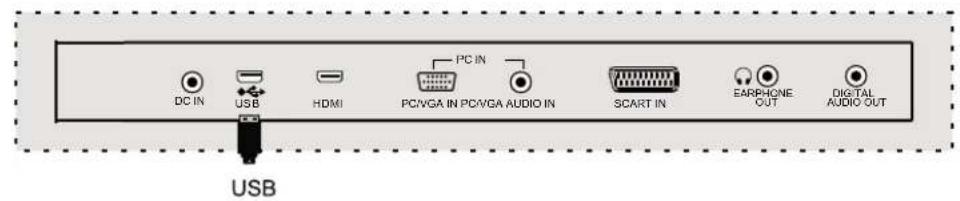
USB Connections
- Connecting to the USB
Digital Amplifier Connections
- Connecting to the Digital Amplifier * Connection terminals of other equipments differ by manufacturer and model.
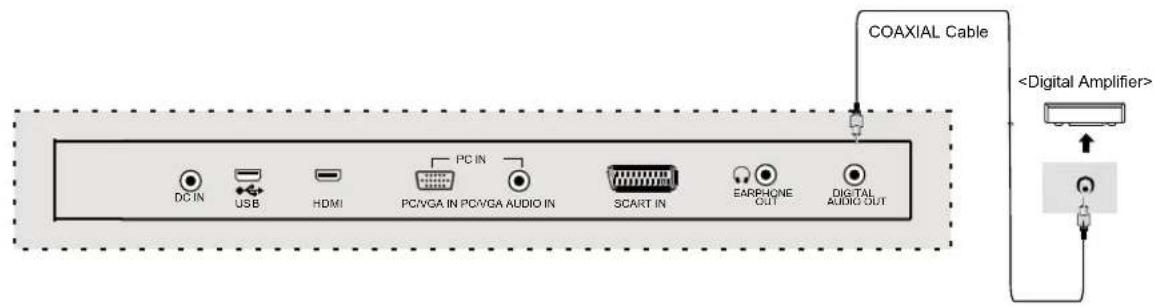
NOTE: Only in DVD modes can output.
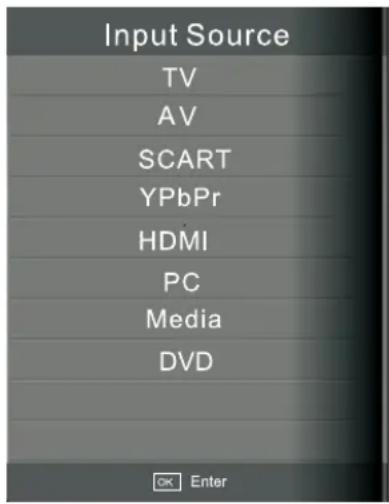
Selecting Input Source
- You can select between the TV signal and the input signal of other equipments connected to the TV.
-
Use this function to switch to the input source you wish to view.
-
Press INPUT button on the remote control.
- Use ▼ / ▲ buttons to move to the desired input source.
- Press OK button to select.
Basic Operation
Select TV for example. (Press INPUT button to select TV mode)
- Press the ⏻ button to turn the LED TV on.
- Press MENU button to display the main menu, and press the ◀▶ button to select CHANNEL in the main menu, it will highlight the first option.
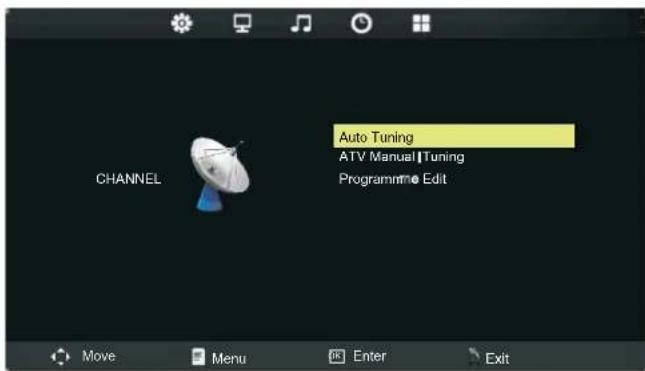
- Press the ▼ button to select Auto Tuning and press the OK button to start auto search, and use the ◀▶ buttons to select the country in which you will operate the TV (You need to select your current aerial if you wish to receiving all channels reliably). The Auto Tuning automatically creates a list of receivable channels. Press the EXIT button at any time to interrupt the memorization process (The list cannot be created if interrupted)
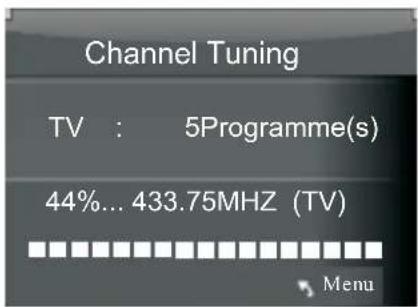
- Press the ⬆ button on the unit or on the remote control to switch on the TV. The power indicator will light up in green color. Press the ⬆ button again to switch to standby mode, the indicator will change to red.
- Press the VOL.- or VOL.+ button to adjust the volume level. Press the VOL.- button repeatedly to decrease the volume; press the VOL.+ button repeatedly to increase the volume from 0 to 100.
Operating the MENU
- Press the button to turn the LED TV on.
- Press the MENU button on the remote control, the on-screen menu will appear on the screen.
- Use ◀ / ▶ buttons to select your main menu option.
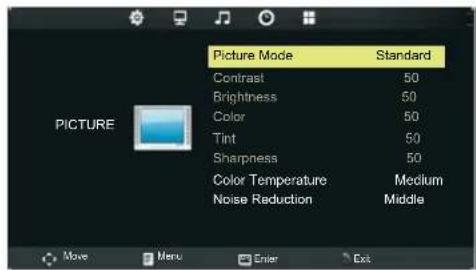
PICTURE MENU:
Allow you to set up a variety of picture options.
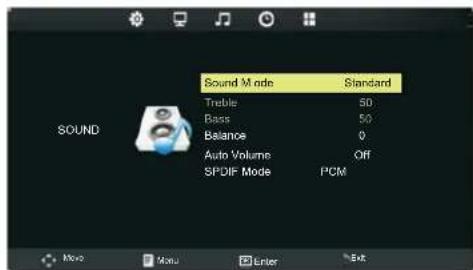
SOUND MENU:
Allow you to customize the sound options and effects.
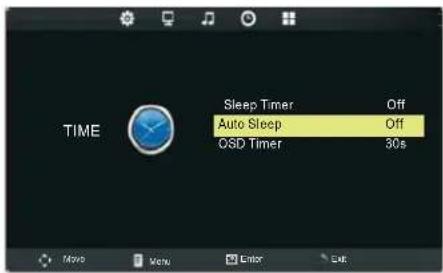
TIME MENU:
Allow you to set up a variety of time options.
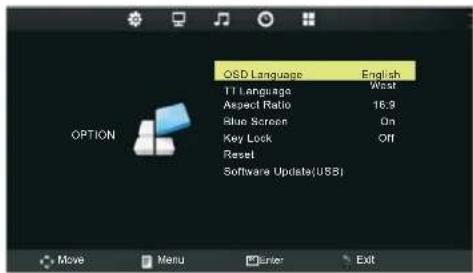
OPTION MENU:
Allow you to set up a variety of option options.
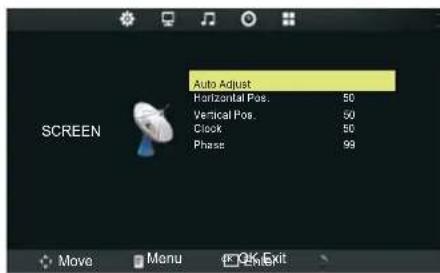
SCREEN MENU:
Allow you to set up a variety of screen options.
( Only for VGA mode)
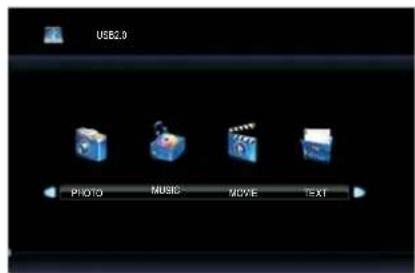
MEDIA MENU:
Allow you to set up a variety of media options (Select MEDIA Source).
- Use the ▼ / ▲ buttons to select an option of the sub-menu, and press the ▶ button.
While in adjustment mode, use the ◀ / ▶ to change the value of the item.
- Press the MENU button to exit the menu.
Note:
Only when you input the suitable signal, the relevant items can be activated.
Customizing the CHANNEL Settings
Select TV for example. (Press INPUT button to select TV mode)
- Press the ⏻ button to turn the LED TV on.
- Press the MENU button on the remote control to display the Main menu, and use the ◀ / ▶ buttons to select the CHANNEL.
- Use ▼ / ▲ buttons to highlight an individual CHANNEL option, use ◀ / ▶ buttons to change the setting, and press the MENU button to exit.
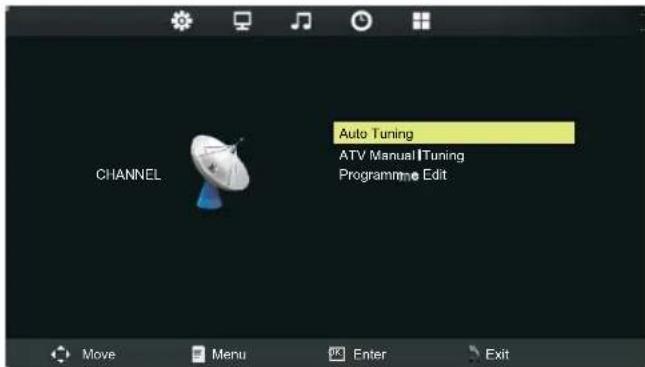
The CHANNEL menu includes the following options :
Auto Tuning Press the OK button, the Auto Tuning automatically creates a list of receivable channels.
ATV Manual Tuning Allow adjustment for the fine tune level by hand if signal is too weak or picture is blurry in ATV mode.
Programme Edit Allow DELETE/SKIP/RENAME/MOVE of channels on the channel list.
Customizing the CHANNEL Settings
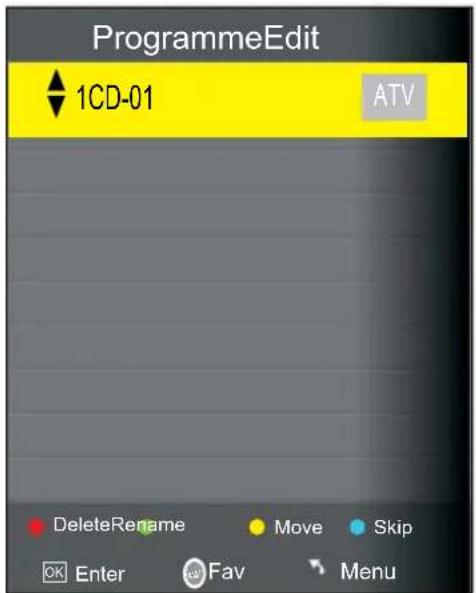
- DELETE (red button)
Press the red button on the remote control with the selected channel, then press it again if you wish to delete it. To retrieve the deleted channel you must return the TV.
- RENAME (green button)
Press the green button on the remote control with the selected channel, change the characters by pressing the ▲▼ buttons and move the cursor by ◀▶ buttons. Press the green button again when finished. (Only for ATV)
NOTE: Only analogue TV channel names can be edited.
- MOVE (yellow button)
Press the yellow button on the remote control with the selected channel, move the channel by pressing the ▲▼ buttons then press the yellow button again. (Only for ATV)
- SKIP (blue button)
Press the blue button on the remote control with the highlighted channel; press again to un-skip.
- Set up the favourite channels (FAV.CH button)
Press ▲▼ buttons to select your favourite channel.
Customizing the PICTURE Settings
Select TV for example. (Press INPUT button to select TV mode)
- Press the ⏻ button to turn the LED TV on.
- Press the MENU button on the remote control to display the Main menu, and use the ◀ / ▶ buttons to select the PICTURE.
- Use ▼ / ▲ buttons to highlight an individual PICTURE option, use ◀ / ▶ buttons to change the setting, and press the MENU button to exit.
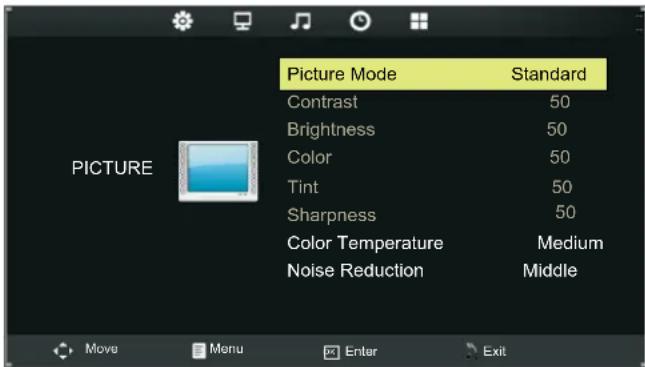
The PICTURE menu includes the following options :
| Picture Mode | Cycle among display types: Dynamic, Standard, Mild and User.User: Allow to store your preferred settings. If you select the User mode,you can individually set the items shown: |
| Contrast | Control the difference between the brightest and darkest regions of the picture. |
| Brightness | Control the overall brightness of the picture |
| Color | Control the color. |
| Sharpness | Increase this setting to see crisp edges in the picture; decrease it for soft edges |
| Tint( Only for NTSC ) | Control the difference between the green and red regions of the picture. |
| Color Temperature | Cycle among color temperature display modes: Cool/Warm/Medium. |
| Noise Reduction | Select to reduce the noise level of connected equipment: Off/Low/Middle/High |
Customizing the SOUND Settings
Select TV for example. (Press INPUT button to select TV mode)
- Press the ⏻ button to turn the LED TV on.
- Press the MENU button on the remote control to display the Main menu, and use ◀ / ▶ buttons to select the SOUND
- Use ▼ / ▲ buttons to highlight an individual SOUND option, use ◀ / ▶ buttons to change the setting, and press the MENU button to exit.
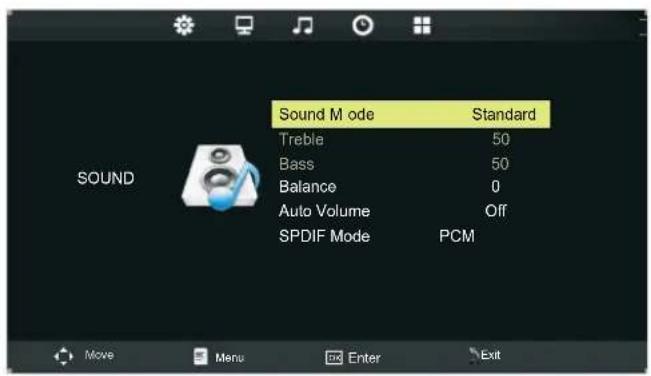
The SOUND menu includes the following options :
| Sound Mode | Allow you to select among: User / Sport / Movie / Music / Standard |
| Treble | Control the relative intensity of higher pitched sounds. |
| Bass | Control the relative intensity of lower pitched sounds. |
| Balance | Adjusts the relative volume of the speakers in a multiple speaker system. |
| Auto Volume lowering the sound output when the modulation signal is high or by raising the sound output when the modulation signal is low. | |
| SPDIF MODE | Allow selection of SPDIF MODE from among the following options: Auto / Off / PCM . |
Customizing the TIME Settings
Select TV for example. (Press INPUT button to select TV mode)
- Press the ⏻ button to turn the LED TV on.
- Press the MENU button on the remote control to display the Main menu, and use ◀ / ▶ buttons to select the TIME.
- Use ▼ / ▲ buttons to highlight an individual TIME option, use ◀ / ▶ buttons to change the setting, and press the MENU button to exit.
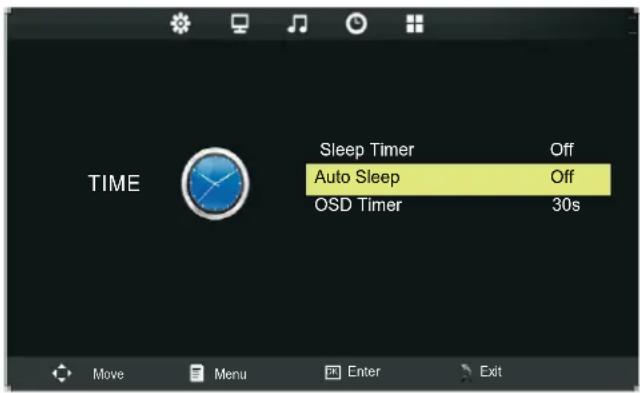
The TIME menu includes the following options :
Sleep Timer Use ◀▶ buttons to select a period of time after which the TV automatically switches to standby mode: Off, 10, 20, 30, 60, 90, 120, 180, 240 (minutes)
Auto Sleep Select on, the TV will be automatically turned off, in case of no signal in TV & input source or no remote control input.
OSD Timer Allow selection of the display time of the on-screen menu.
Customizing the OPTION Settings
Select TV for example. (Press INPUT button to select TV mode)
- Press the ⏻ button to turn the LED TV on.
- Press the MENU button on the remote control to display the Main menu, and use ◀ / ▶ buttons to select the OPTION.
- Use ▼ / ▲ buttons to highlight an individual OPTION option, use ◀ / ▶ buttons to change the setting, and press the MENU button to exit.
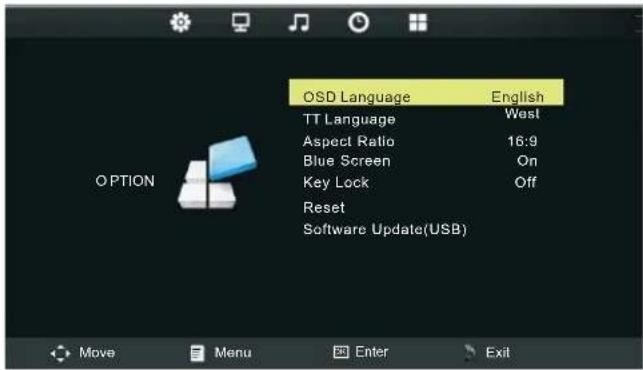
The OPTION menu includes the following options :
| OSD Language English / French | The default language is Dutch. You can select other OSD languages: Dutch / |
| English / German / Italian / Spanish | |
| TT Language | Allow to select the TT language. |
| Aspect Ratio | Allow to select the option of Aspect Ratio: Auto,4:3, 16:9, Zoom1, Zoom2. |
| Blue Screen | Allow to select the option of Blue Screen: On, Off. |
| Key Lock | Allow you to select the keylock to be On or Off. When keylock's statue is on, you can't use the key panel button. |
| Reset | Allow you to restore the factory settings. |
| Software Update(USB) | Allow you to update software using USB. |
Customizing the SCREEN Settings
Press INPUT button to select VGA mode
- Press the ⏻ button to turn the LED TV on.
- Press the MENU button on the remote control to display the Main menu, and use ◀ / ▶ buttons to select the SCREEN.
- Use ▼ / ▲ buttons to highlight an individual SCREEN option, use ◀ / ▶ buttons to change the setting, and press the MENU button to exit.
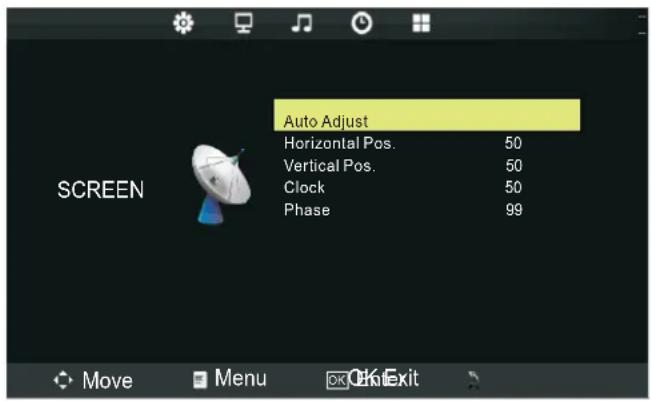
The SCREEN menu includes the following options :
| Auto Adjust | Select to display all on-screen menus in your language of choice. |
| Horizontal Pos. | Allow you to adjust the Horizontal Position of the picture. |
| Vertical Pos. | Allow you to adjust the Vertical Position of the pictureKey Lock. |
| Clock | Control the width of the picture based on the VGA mode |
| Phase | Allow you to improve focus clarity and image stability. |
Customizing the MEDIA Settings
Press INPUT button to select Media mode)
- Press the ⏻ button to turn the LED TV on.
- Press the INPUT button on the remote control to display the Source menu, and use the ▼ / ▲ buttons to select the Media.
- Use ◀ / ▶ buttons to highlight an individual Media option. The Media Menu will appear on the screen. Press ◀ / ▶ button to select the option (Photo, Music, Movie, Text) that you want to active in the Media menu, then press OK button.
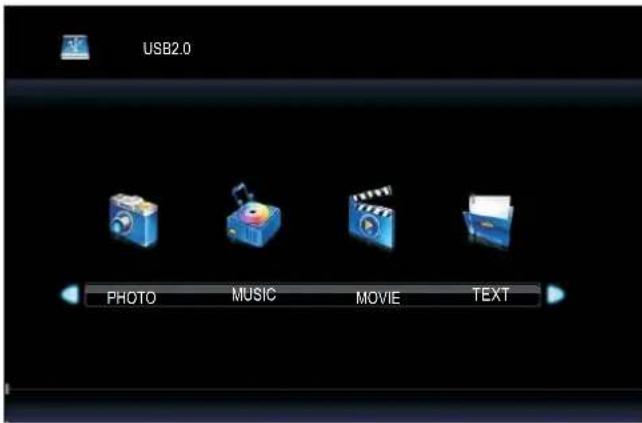
Note:
USB support: Photo (.jpeg / .bmp / .png), Music [.wma / .m4a(.aac)], Movie (.avi / .mp4 / .ts(trp) / .mkv / .mov / .mpg / .dat / .vob / .rm / .rmvb ).
The USB supported formats depend on license availability.
The USB equipment supported formats: NTFS / FAT32 / FAT16 (Not supported NTFS format compressed files.)
Photo/Music/Movie/Text Play
- Press ▲/▼ button to select the folder that you want to view, then press OK button to select the sub folder. Press OK button to play, press the exit button to return back. Press OK button to select the up folder, and return to the previous level menu, press ◀/▶ buttons to turn pages.
- Press ▶ or II button to start playback or pause. Press ■ button to stop playback.
- Press ◀ button to play to the last item. Press ▶ button to play to the next item.
DVD Functions
Information Functions
Information display
An On Screen Display (OSD) indicator will be displayed at the upper part TV screen when certain functions are executed, or when pressing the OSD button on the remote control. The OSD indicator is a user friendly interface designed to display the status of playback type. When a different disc is loaded (DVD, CD, Music ready); the OSD indicator bar will be different.
Support formats
DVD support DVD / CD-DA / JPEG formats.
DVD Player Functions
△ (Close / Open)
Press ▲ button on the front panel or the remote to open and close the disc tray.
▶ II (Play / Pause)
Press to start playback or pause
■ (Stop)
Press ■ button to stop.
K
Press to skip to the beginning of the currently played chapter or track.
▶▶
Press to skip to the beginning of the next chapter or track.
◀ / ▶
Use to advance or reverse playback rapidly.
A-B
To repeat playback a specific section of a disc.
REPEAT
Press REPEAT button repeatedly to select the repeat mode.
D.MEMU
Press D.MENU button to display the DVD disc menu.
D.SETUP
Press D.SETUP button to call up setup menu screen. ( DVD mode )
TITLE
Press TITLE button to display the DVD title content.
Audio
Press ◀ / ▶ button to select Audio Language.
Angle
While playback a DVD disc, press ANGLE button repeatedly to select the desired camera angle.
SUBTITLE
While play a DVD disc, press SUBTITLE button repeatedly to select the desired subtitle.
Customizing Language Setup Settings
Press DVD SETUP button to enter setup menu
- Use the ▼ / ▲ buttons to select Language Setup option.
- Use the ▼ / ▲ ◀ / ▶ buttons to highlight an individual Language Setup option.
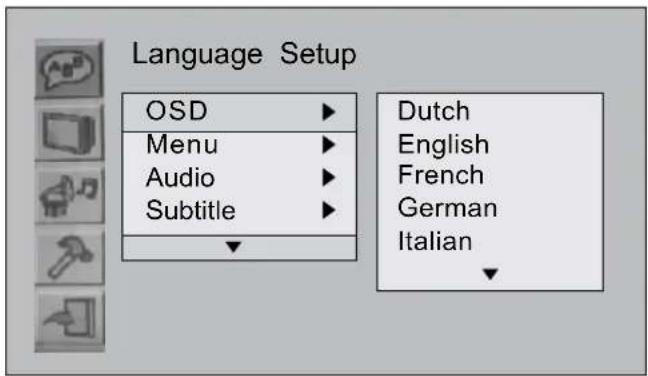
The Language Setup Menu includes the following options :
| OSD | The default language of the On Screen Display is Dutch. You can select other OSD languages: Dutch / English / French / German / Italian / Spanish |
| Menu | The following languages can be selected in the Menu option: Dutch / English/ French / German / Italian / Spanish. |
| Audio | The following languages can be selected in the Audio option: Dutch / English / French / German / Italian / Spanish. |
| Subtitle | The following languages are available in the Subtitle option: Dutch/English/ French /German / Italian / Spanish / Off. NOTE: Not all DVD support multiple languages. |
| Encoding | The Encoding selections available are ‘Western European’ or ‘Central European’. |
Customizing Screen Setup Settings
Press DVD SETUP button to enter setup menu
-
Use the ▼ / ▲ buttons to select Screen Setup option.
-
Use the ▼ / ▲ ◀ / ▶ buttons to highlight an individual Screen Setup option.
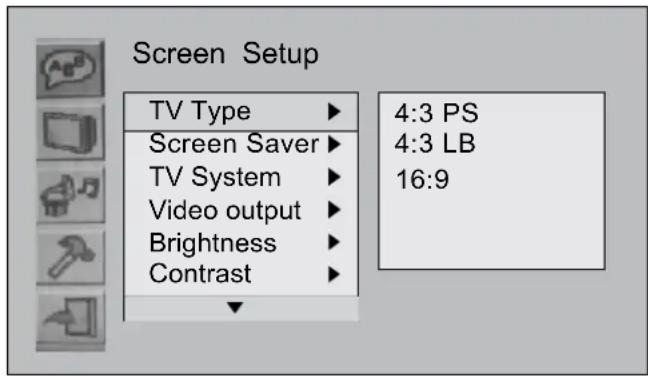
The Screen Setup Menu includes the following options :
TV Type
4:3 PS - Standard format
When viewing widescreen content in 4:3 PS mode, the on screen image will not be
shown in full. Use this setting for standard format content.
4:3 LB - Standard format
When viewing widescreen content in 4:3LB mode, the display will show black bars on the top and bottom of the screen. Use this setting for standard format content.
16:9 - Widescreen picture viewing
Use this setting for viewing widescreen images.
Screen Saver
ON: To activate the screen saver
OFF: To disable the screen saver
If the DVD player stops, or the screen is motionless for a period of time, the screen
saver will appear to prevent damage to the LED screen.
TV System
NTSC
To be used when viewing NTSC content.
PAL
To be used when viewing PAL content.
Auto
The TV will adjust automatically to play the DVD content in the correct format.
Video output
Select from output options: CVBS+YUV or YUV P-SCAN.
Brightness
Select from options: normal, bright, or soft.
Contrast
Adjust the contrast levels of the TV image.
Last Memory
ON: When the DVD player has been turned off and turned on again, the LAST function will resume playing of the content from the same point.
OFF: Disable the last memory function.
Customizing Audio Setup Settings
Press DVD SETUP button to enter setup menu
- Use the ▼ / ▲ buttons to select Audio Setup option.
- Use the ▼ / ▲ ◀ / ▶ buttons to highlight an individual Audio Setup option.
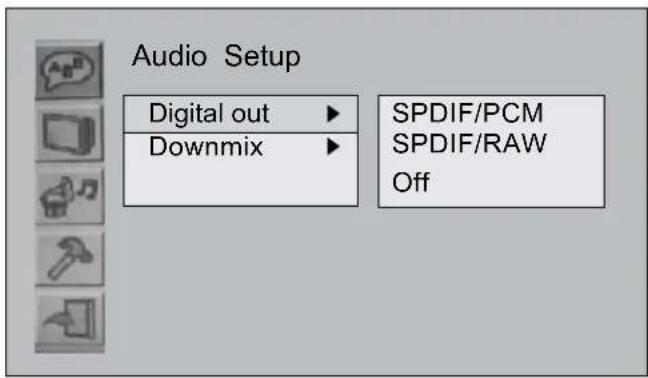
The Language Setup Menu includes the following options :
Digital out Select from options: SPDIF/PCM, SPDIF/RAW or OFF.
Down mix Select from options: Lo/Ro or Lt/Rt.
Customizing Cutom Setup Settings
Press DVD SETUP button to enter setup menu
-
Use the ▼ / ▲ buttons to select Custom Setup option.
-
Use the ▼ / ▲ ◀ / ▶ buttons to highlight an individual Custom Setup option.
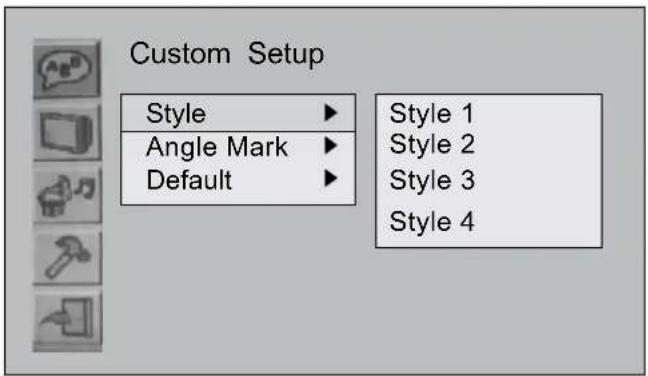
The Screen Setup Menu includes the following options :
Style Change the background colour and style from the four options available.
Angle Mark Angle Mark can be set to ON or OFF.
Default Restores the setup parameters (excluding the password) to the factory default settings. Use this option only when the DVD has stopped playing, or has been removed from the disc tray.
DVD Supports following formats:
- ( CVR/VBR ) bite rate range : 32kbps\~320kbps.
WMA bite rate range: 64kbps\~192kbps (Sample Rate) - JPG picture maximum resolution:
Baseline JPG: 3072X2048 Progressive JPG: Width x (High+128) <3300000 - *.MPG, *.DAT MPEG1 video format, same as VCD.
Trouble shooting
- Do not use other functions that are not mentioned in this user's manual. In case a problem occurs with
- your LED TV, please take the following steps first. If you still have the problem, turn the power off and
- contact your dealer or an authorized service center.
| Problem Action | |
| The screen does not appear. | Is the power plug pulled out? Insert the power plug.Press the ⏻ button of the remote control. |
| The screen appears too slowly after the power is turned on, | This problem occurs for a brief time in the process of image elimination processing in order to hide temporary screen noise that occurs when the power is turned on. But if the screen does not come after 1 minute please contact your dealer or an authorized service center. |
| Screen is too bright or too dark. Make adjustment for brightness or contrast. | |
| Screen is too large or too small. Adjust the screen size. | |
| Stripes appear on the screen and it shakes. | Stop using wireless telephones, hair driers and electric drills. |
| The screen does not move. | Press the PAUSE button. Check if the Pause button is pressed on external equipment. |
| Screen appears, Voice is not heard | 1. Press the “MUTE” button.2. Increase the sound level by pressing volume adjustment button.3. Check if sound terminal of external input is connected properly.4. Check if audio cables are connected properly.5. Select and check the other input.If the sound still does not work and the other channels are the same after you have done as the above, contact your dealer or an authorized service center. |
| Remote control does not work | 1. Check if main power is On.2. Check that the batteries of the remote controller were loaded properly.3. Check to see if any obstacle exists between the LED TV and the remote control, then remove it, if any.4. If the batteries have no power, replace them with two new batteries. |
| ·This LED TV is for household use and registered as harmless on electromagnetic waves.·Therefore, you can use it in every location as well as residential areas. | |
Specifications
| Panel | Panel Size 19" TFT LED | |
| Brightness 250 cd/m | 2 | |
| Contrast Ratio 1000:1 | ||
| Viewing Angle 170°/160° | ||
| Max. Resolution 1366 x 768 | ||
| Input Connector | VIDEO/AUDIO (L/R) 1 | |
| SCART 1 | ||
| YPbPr(Component) 1 | ||
| PC VGA/PC VGA AUDIO IN 1 | ||
| HDMI 1 | ||
| ANT IN 1 | ||
| USB 1 | ||
| Output Connector | EARPHONE 1 | |
| DIGITAL AUDIO OUT | 1 | |
| Power Source | AC 230V~ (DC 12V, 3A) | |
| Power Consumption | 24 W | |
| Dimension | 466 (L) x 161 (W) x 348.4 (H) mm | |
| Weight | 4.2 Kg | |
- The cabinet design and electronics specifications will be modified without prior notice for improving the performance.
• Weight and dimensions are approximate
Energy Label

ENERG
енергия · ενεργεια

TELEFUNKEN
LED1950DVD
A
B
C
D
E
F
G
ENERGIA · ЕНЕРГИЯ
ENEPΓEIA · ENERGIJA
ENERGY·ENERGIE
ENERGI

24
Watt
35
kWh/annum
48
cm
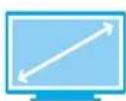
19
inch
2010/1062 - 2011
NOTICE ABOUT RECYCLING
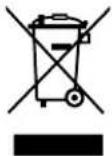
Your product is designed and manufactured with high quality materials and components which can be recycled and reused.
This symbol means that electrical and electronic equipment, at their end-of-life, should be disposed of separately from your household waste. Please dispose of this equipment at your local community waste collection/ recycling centre.
In the European Union there are separate collection systems for used electrical and electronic products. Please help us to conserve the environment we live in!
NOTICE ABOUT ROHS

This symbol means that in electrical and electronic equipment, restriction the use of certain harmful substances.
- 19" HD LED TV
- LED1950DVD
- Connection
- Basic Use
- Application
- TV Part
- DVD Part
- Maintenance and Service
- Installation and Safety Warnings
- Warnings
- Warning
- Caution
- Names of each part
- Accessories
- Installation the TV Stand
- Installation Precautions
- Wall Mounting
- TV Stand
- POWER INPUT Connections
- Installing an Antenna
- Remote Control
- - Functions of remote control buttons
- Precautions
- Avoiding Remote Control Problems
- Inserting Batteries in the Remote Control
- How to Use the remote control
- VCR Connections
- Watching Video Tape
- Satellite/ TV Set-Top Box Connections
- Watching TV
- DVD Connections
- Playing the DVD
- PC Connections
- EARPHONE Connections
- How to Use as PC monitor
- USB Connections
- Digital Amplifier Connections
- Selecting Input Source
- Basic Operation
- Operating the MENU
- PICTURE MENU:
- SOUND MENU:
- TIME MENU:
- OPTION MENU:
- SCREEN MENU:
- MEDIA MENU:
- Customizing the CHANNEL Settings
- Customizing the PICTURE Settings
- Customizing the SOUND Settings
- Customizing the TIME Settings
- Customizing the OPTION Settings
- Customizing the SCREEN Settings
- Customizing the MEDIA Settings
- Note:
- Photo/Music/Movie/Text Play
- DVD Functions
- Information Functions
- Information display
- Support formats
- DVD Player Functions
- △ (Close / Open)
- ▶ II (Play / Pause)
- ■ (Stop)
- K
- ▶▶
- ◀ / ▶
- A-B
- REPEAT
- D.MEMU
- D.SETUP
- TITLE
- Audio
- Angle
- SUBTITLE
- Customizing Language Setup Settings
- Customizing Screen Setup Settings
- 4:3 PS - Standard format
- 4:3 LB - Standard format
- 16:9 - Widescreen picture viewing
- Customizing Audio Setup Settings
- Customizing Cutom Setup Settings
- Trouble shooting
- Energy Label
- TELEFUNKEN
- NOTICE ABOUT RECYCLING
- NOTICE ABOUT ROHS
Brand : TELEFUNKEN
Model : LED1950DVD
Category : Television