ASCD-15 - CD Player Axxion - Free user manual and instructions
Find the device manual for free ASCD-15 Axxion in PDF.

User questions about ASCD-15 Axxion
0 question about this device. Answer the ones you know or ask your own.
Ask a new question about this device
Download the instructions for your CD Player in PDF format for free! Find your manual ASCD-15 - Axxion and take your electronic device back in hand. On this page are published all the documents necessary for the use of your device. ASCD-15 by Axxion.
USER MANUAL ASCD-15 Axxion
natural_image
Top-down line drawing of a car front view showing dome, rear seats, and dashboard (no text or symbols)ASCD-15
STEREO TOP LOADING CD SYSTEM WITH RADIO TRAGBARE STEREOANLAGE MIT CD-OBERLADEFACH UND RADIO STEREO BOVENLADEND CD-SYSTEEM MET RADIO LECTEUR CD STEREO A CHARGEMENT PAR LE DESSUS AVEC RADIO SISTEMA CD ESTÉREO DE CARGA SUPERIOR CON RADIO ODTWARZACZ CD Z RADIEM
For information and support, www.stl.nl/axxion
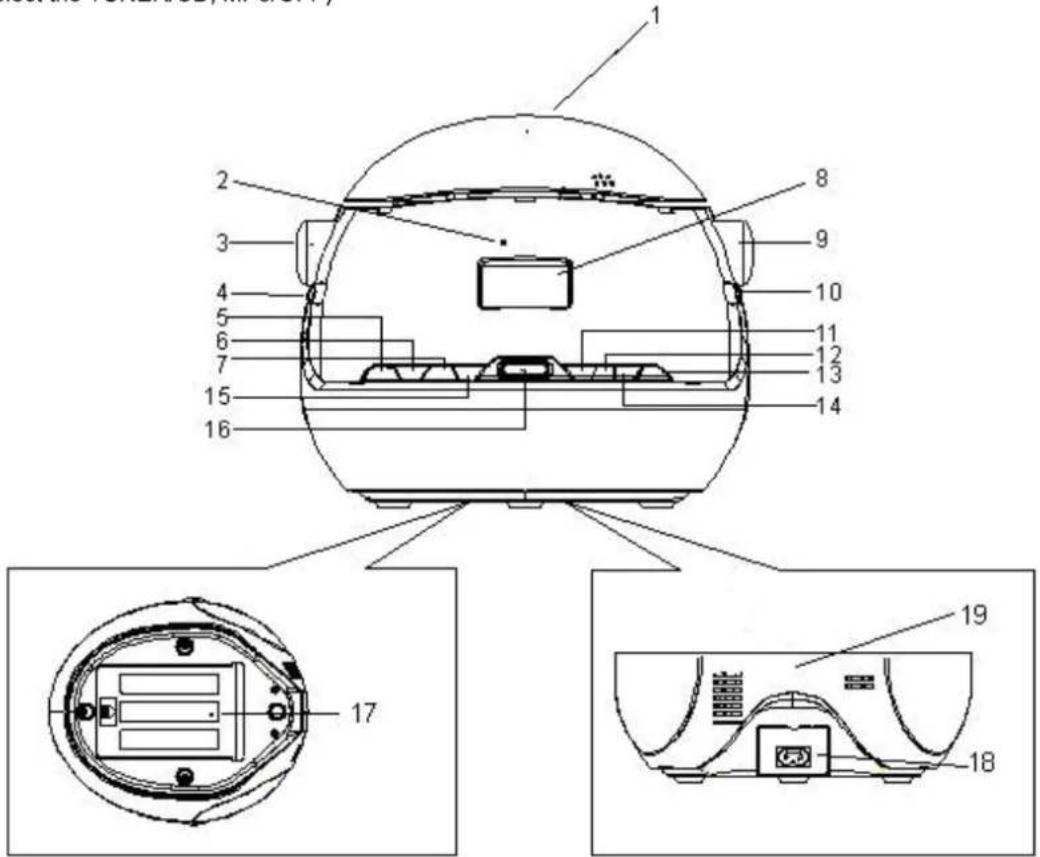
- Open CD door.
- Power indicator
- Tuning control
- Band button (AM/FM)
- Mode button
- Program button (Repeat and random).
- Fast Backward button (FB/SKIP -)
- LCD display
- Volume control
- Function button
(To select the TUNER/CD, MP3/OFF)
- Play Button
- Stop button
- Folder Button
- CD/USB button
- Fast Forward button (FF/SKIP +)
- USB socket
- Battery Compartment
- AC socket (Connection for AC power cord)
- FM Antenna wire
text_image
Technical diagram of a device with numbered components and exploded views, including front, top, and side views.2. Installation for the use of the equipment
Mains Power Supply:
Heed the following instructions to avoid malfunction, fire, injury and electric shock:
- Check if the mains voltage as shown on the type plate (under the set) corresponds to your local mains voltage. This unit is designed for AC 230V\~50Hz.
- Connect the mains lead to the AC mains socket and the wall outlet.
• To disconnect from wall outlet only pull the plug and not the cable.
- Hold the plug tight, when connecting to or disconnecting from wall outlet.
- Do not touch the power cord with wet hands.
- Protect the power cord from heat generating devices.
- Please turn off the player if it has been dropped or is damaged otherwise.
Battery Safety Precautions:
- Keep batteries away from children and pets.
- Insert the batteries observing the polarity (+/-). Failure to properly align the battery polarity can cause personal injury and/or property damage.
- Remove exhausted batteries from the device. Remove the batteries when the device will not be used for extended periods of time to prevent damage due to rusted or corroded batteries.
- Never throw batteries into the fire. Do not expose batteries to fire or other heat sources.
Safety precautions
- Unpack all parts and remove protective material. Before operating the CD helmet, check that the operating voltage is identical with the voltage of your local power supply.
- Do not cover any vents and allow a sufficient amount of free space all around your system for adequate ventilation.
AC mains operation
- Insert the AC power cord into the unit and then plug the corresponding end into an AC household mains outlet, ensuring the voltage is compatible.
Battery operation
- Remove the battery compartment cover
- Insert 6 x UM-2 'C' size batteries, ensuring correct polarity as indicated inside the battery compartment.
NOTE: Check your batteries regularly. Old or discharged batteries may leak and damage the unit. When replacing batteries always ensure that are the same type batteries. When replacing the batteries make sure that are the same type. Remove the batteries if the unit will not be used for a long period of time or if AC power predominately is being used.
The unit will automatically switch between AC/DC powers. If the AC cord is plugged in, the unit will use AC power. If the AC cord is not plugged in and batteries are inserted the unit will use DC power.
3. Functions of the equipment
Radio Operation
Turning on and off
Turn on/off: To avoid unnecessary power consumption, always set the function selector to position OFF when not using the unit.
- Use the function selector to choose an operating mode: OFF, CD/USB or TUNER.
- Adjust the volume using the volume buttons.
- To turn off the unit, set the function selector to position OFF.
Listening to the radio
Recommendations for a better reception:
- UKW (FM): The unit is equipped with a FM wire antenna at the rear, which should be fully uncoiled. Direct the wire antenna for a better reception.
- MW (AM): The unit has a built-in AM antenna. Change the position of the unit when the reception is poor.
Radio reception
- Set the function selector to radio mode.
- Use the band selector to select a frequency range: AM, FM or FM ST.
The display shows the selected frequency range (FM or AM) and the current frequency (XXX.X MHz or XXX:X KHz). - Use the TUNING knob to search a desired station.
- To turn off the unit, set the function selector to position CD/USB or OFF.
NOTES:
- If a single FM (STEREO) station is poor and you hear a lot of background noise, set the band selector to FM (MONO). This way the reception often becomes better.
- The display shows (((FM ST))) when the band selector is set to FM ST. and a stereo station is played.
CD PLAYBACK
Insert/ take out a CD
Before you open the CD compartment, always make sure the CD is not spinning. Always press the STOP on the unit first.
- Insert a CD with the printed side facing up.
- After you have inserted the CD, carefully lower the CD door until it is completely closed.
- The CD is now ready for playback.
- To take out a CD, place one finger on the center of the CD (central shaft). Hold the CD with the other fingers on its edges and carefully lift it up.
- IMPORTANT: Always hold a CD on its edges. Protect the CD surface from finger prints, stains or dirt. Use a special CD cleaning cloth or cleaning kit to remove dirt or stains.
Normal CD playback (CD/MP3/USB)
- Set the function selector to position CD/USB. The POWER LED lights up and the display show DISC and no.
- Press OPEN/CLOSE to open the door of the CD drive on the top of the unit.
- Insert a CD with the printed side facing up and close the door of the CD drive manually.
- The display shows three dashes “---” for a few seconds and subsequently the total number of tracks.
- Press on the unit PLAY/PAUSE to start playback of the first track.
- Press on the unit PLAY/PAUSE to pause playback. Press the PLAY/PAUSE again to resume playback.
- Press on the unit STOP to stop playback.
Select a track during stop mode (CD/MP3/USB)
- Press the unit SKIP- or SKIP + until your desired track number is displayed.
- Press on the unit PLAY/PAUSE to start playback of the selected track. The LCD displays the selected track number.
-
Shortly press SKIP - on the unit to return to the beginning of the current track.
-
Shortly press SKIP + on the unit to the next track or repeatedly, press this button until your desired track number is shown on the display.
- To skip back one or several tracks, press on the unit SKIPS once or repeatedly.
Fast forward and fast rewind (CD/MP3/USB)
Press and hold on the unit - SKIP or SKIP + to fast forward or fast rewind a track.
Playback accelerates and audio turns mute. As soon as you release on the unit - SKIP or SKIP + the unit resumes normal playback.
Program playback (CD/MP3/USB)
You can program up to 20 tracks in arbitrary order.
- Select CD mode.
- Press PROGAM on the unit.
- Press the unit - SKIP or SKIP + to select the track number you want to program.
- After you have selected a track numbers press PROGAM again.
- Repeat steps 2 through 4 to add further tracks.
- When you have programmed all tracks, start program playback by pressing on the unit PLAY/PAUSE button. Playback starts with the first programmed track.
The program memory will be deleted when you turn off the radio mode or the unit.
Repeat (MODE button CD/MP3/USB)
- Repeat current track
- Press MODE button once to repeat the current track. REP appears on the display.
- Repeat complete disc (CD/MP3/USB)
- Press MODE twice to repeat the complete disc. REP ALL appears on the display.
- Random repeat (CD/MP3/USB)
- Press MODE three times to play all tracks in random order. RANDOM appears on the display.
Resume normal playback by pressing MODE a fourth time.

flowchart
graph LR
    A["REP"] --> B["REP ALL"]
    B --> C["RANDOM"]
    C --> D["Repeat mode off"]
    D --> E["↑"]
MP3-CD playback
- Set the function selector to CD/USB. The POWER LED lights up and the display shows DISC and no.
- Press OPEN/CLOSE to open the door of the CD drive on the top of the unit.
- Insert a MP3-CD with the printed side facing up and close the door of the CD drive manually.
- The display shows three dashes “---” for a few seconds and subsequently the total number of tracks.
- Press the PLAY/PAUSE on the unit to start playback of the first track.
- Press the PLAY/PAUSE on the unit to pause playback. Press the PLAY/PAUSE again to resume playback.
- To select the next or previous folder, repeatedly press - SKIP or SKIP + until the unit shortly displays ALBUM and the folder number. Now you are located in the next / previous folder on the MP3-CD. Press FOLDER UP to immediately skip to the next folder on the CD.
- Press STOP button to stop playback.
USB mode
- Set the function selector to CD/USB. The POWER LED lights up and the display shows DISC and "no"
- Press CD/USB button on the unit to turn on USB mode. The display shows USB and "no".
- Now connect a USB device to the USB port.
- The display shows three dashes “---” for a few seconds and subsequently the total number of tracks that are read from the USB device connected to the USB port.
- Press the PLAY/PAUSE to start playback of the first track.
- Press the PLAY/PAUSE to pause playback. Press PLAY/PAUSE again to resume playback.
- To select the next or previous folder, repeatedly press - SKIP or SKIP + shortly displays ALBUM and the folder number.
Now you are located in the next/ previous folder on the USB device. Press FOLDER UP on the unit to immediately skip to the next folder on the USB device. - Press CD/USB to turn back to CD mode. After a few seconds you can remove the USB device from the USB port.
SPECIFICATIONS
Voltage: AC 230V \~ 50Hz
Frequency range: AM, FM (Stereo)
Frequency range: UKW (FM) 87.5 - 108MHz
MW (AM) 540 - 1600kHz
Antenna: MW (AM) built-in ferrite antenna
UKW (FM) wire antenna
Subject to changes without prior notice.
SAFETY INSTRUCTIONS
-
READ INSTRUCTIONS - All the safety and operating instructions should be read before the unit is operated.
-
RETAIN INSTRUCTIONS - The safety and operating instruction should be retained for future reference.
-
HEED WARNINGS - All warnings on the unit and in the operating instructions should be adhered to.
-
FOLLOW INSTRUCTIONS - All operating instructions should be followed.
-
WATER AND MOISTURE - The appliance should not be used near water, for example, near a bathtub, washbowl, kitchen sink, laundry tub, swimming pool or in a wet basement.
-
VENTILATION - Openings in the device serve its proper ventilation, are necessary for the operation and prevent overheating. The unit should be situated so that its location or position does not interfere with its proper ventilation. Do not place on bed, sofa, rug or similar surface that may block the ventilation openings, in a built-in installation, such as a bookcase or cabinet that may impede the flow of air through the ventilation openings.
-
HEAT - The unit should be situated away from heat sources such as radiators, stoves, or other appliances (including amplifiers) that produce heat.
-
POWER SOURCE - The unit should be connected to power supply only of the type described in the operating instructions or as marked on the unit.
-
POWER CORD PROTECTION - Power supply cords should be routed so that they are not likely to be walked on or pinched by items placed upon or against them.
-
NON-USE - During longer periods of non-use please disconnect from mains power supply and antenna.
-
OBJECT and LIQUID ENTRY - Care should be taken so that objects do not fall and liquids are not spilled into the enclosure through openings. Do not disassemble.
-
DAMAGE REQUIRING SERVICE - The unit should be serviced by qualified service personnel when:
a. The power-supply cord or plug has been damaged.
b. Objects have fallen into, or liquid has been spilled into the unit enclosure.
c. The unit has been exposed to rain or moisture.
d. The appliance has been dropped, or the enclosure damaged. Only use controls and adjustments as specified in the manual.
e. The unit does not appear to operate normally.
f. The unit displays serious changes in its performance.
-
SERVICING - The user should not attempt to service the unit beyond that described in the user operating instructions. All other servicing should be referred to qualified service personnel.
-
CLEANING - Disconnect from mains power supply before cleaning. Do not use liquid or spray cleaners, only use a damp cloth. Follow the care and maintenance instructions in this manual.
-
LIGHTNING - During lightning and longer periods of non-use please disconnect from mains power supply and antenna.
-
SAFETY CHECK – After servicing the unit ask the customer service for a safety check.
-
OVERLOAD - To avoid fire and electric shock do not overload wall outlets and convenience receptacles.
-
ELECTROSTATIC DISCHARGE - Disconnect from mains power supply and remove batteries if unit malfunctions.
Reconnect after a short time.
CAUTION
THIS CD PLAYER IS A CLASS 1 LASER PRODUCT. HOWEVER, THIS CD PLAYER USES A VISIBLE/INVISIBLE LASER BEAM, WHICH COULD CAUSE HAZARDOUS RADIATION EXPOSURE IF DIRECTED. BE SURE TO OPERATE THE CD PLAYER CORRECTLY AS INSTRUCTED. USE OF CONTROLS OR ADJUSTMENTS OR PERFORMANCE OF PROCEDURES OTHER THAN THOSE SPECIFIED HEREIN MAY RESULT IN HAZARDOUS RADIATION EXPOSURE. TO PREVENT FIRE, ELECTRIC SHOCK AND INTERFERENCE, USE ONLY RECOMMENDED ACCESSORIES AND DO NOT EXPOSE TO RAIN OR HUMIDITY.
SETTING A SAFE VOLUME LEVEL
- If you continually listen to loud music, your hearing gradually adapts to it and gives you the impression that the volume is lower.
• What seems normal to you can actually be damaging.
• To protect yourself from this, set the volume to a low level. - Increase the volume slowly, until you can hear clearly and without problems.
- Damage to your hearing can be extensive and cannot be reversed.
- If you notice a hearing problem, please consult a doctor
1. Bedienelemente
text_image
Technical diagram of a device rear panel with numbered components and internal cross-sections for assembly or maintenance.2. Aufstellung
Netzanschluss:
flowchart
graph LR
    A["REP"] --> B["REP ALL"]
    B --> C["RANDOM"]
    C --> D["Repeat mode off"]
    D --> A
MP3-CD afspelen
MW (AM) 540 - 1600kHz
flowchart
graph LR
    A["REP"] --> B["REP ALL"]
    B --> C["RANDOM"]
    C --> D["Repeat mode off"]
    D --> A
Lecture MP3-CD
MW (AM) 540 - 1600kHz
text_image
Technical diagram of a device with numbered components and exploded views, including front, top, and side views.MW (AM) 540 - 1600kHz
Antena: Antena de ferrita MW (AM) integrada
Cable antenna UKW (FM)