
AVM32F9 - Television SANYO - Free user manual and instructions
Find the device manual for free AVM32F9 SANYO in PDF.


| Product Type | CRT Television |
| Brand | Sanyo |
| Model | AVM32F9 |
| Screen Size | 32 inches (81 cm) |
| Aspect Ratio | 4:3 |
| Display Technology | CRT (Cathode Ray Tube) |
| Dimensions (W x H x D) | Approximately 780 x 600 x 520 mm |
| Weight | Approximately 45 kg |
| Power Consumption | 150 W (max) |
| Power Supply | AC 110-240V, 50/60Hz |
| Input Connectors | Composite AV (RCA), Antenna (RF), S-Video (optional) |
| Output Connectors | Headphone jack, Audio out (RCA) |
| Speaker System | 2 x 10W stereo speakers |
| Remote Control | Included (model RC-32F9) |
| On-Screen Display | Multilingual menu (English, French, Spanish, etc.) |
| Channel Memory | 100 channels (analog) |
| Safety Features | Automatic degaussing, overcurrent protection |
| Cleaning Instructions | Wipe with a soft, dry cloth; do not use liquids or abrasive cleaners |
| Repairability | Spare parts available through authorized service centers; user-replaceable fuses |
Frequently Asked Questions - AVM32F9 SANYO
User questions about AVM32F9 SANYO
0 question about this device. Answer the ones you know or ask your own.
Ask a new question about this device
Download the instructions for your Television in PDF format for free! Find your manual AVM32F9 - SANYO and take your electronic device back in hand. On this page are published all the documents necessary for the use of your device. AVM32F9 by SANYO.
USER MANUAL AVM32F9 SANYO
natural_image
Front view of a silver CRT television with a blank screen and control buttons (no text or symbols visible)SANYO Canada Inc.
www.sanyocanada.com
Part No. 11906369
Printed in Korea 08.01
TABLE OF CONTENTS
Introduction 2
Safety Instructions 3
Location of Controls 4
Remote Control Use 5
Antenna Connection 6
Cable TV(CATV) Connection 7
Video/Audio Connections 8
Basic Operation 10
Basic Menu Operation 11
Set-Up 13
Antenna Selection
Auto Channel Programming
Manual Memory (Channel Add/Delete)
Fine Tuning
LNA Effects
Picture Adjustment 18
P.STD Button
Custom(Manual) Adjustment
Sound Adjustment 20
Using S.STD Button
Using On-Screen Menu
Equalizer
Headphones
SUNDING SOUTH
Clock/Timer 28
Other Functions 31
Picture-in-Picture (PIP) AVM-32F9 ONLY
V-Chip Operation 36
Reception Disturbance 48
Care and Maintenance 48
Troubleshooting Guide 49
Sanyo Comfort Warranty 50
34
INTRODUCTION
Congratulations on your purchase of this Sanyo MTS stereo TruFlat™ screen television.
Sanyo's TruFlat™ screen offers these important benefits.
- Distortion-Free Images - Sanyo TruFlat™ recreates the theater screen experience by eliminating distortion that a curved conventional TV screen produces.
- Wider Viewing Angle - No curves mean that the full picture can be seen from a wider seating range in your room.
- Less Reflection - Window and other reflections are reduced because of the curve-free design.
The speakers are front-mounted at the left and right sides of the TV screen for better stereo
effect, delivering a high audio output of 30 watts (total) with surround sound modes.
Other Features
• 181-channel cable-compatible frequency synthesizer tuner with built-in MTS decoder
• Parental guide using V-chip technology
.600-line horizontal resolution
-3-line digital comb filter
• Velocity scan modulation for sharpest picture quality when brightness levels change from
one scene to another
• Component video inputs (DVD)
.S-Video input (Video 1/Video 2)
.3 sets of AV inputs
• Picture-in-Picture (1-tuner) (AVM-32F9 only)
Clock and Sleep On-Off Timer
• Multi-color on-screen menu/display in English, French, Portuguese or Spanish
• High-contrast dark picture tube
• Closed-captioning decoder/Blocking
• Audio out jacks
• Auto channel programming
•Automatic power shut-off
• Remote control with Moon Glow ^TM keys for easy operation in a dark room (uses 2 x AAA
batteries, not incl.)
Note: Some illustrations in this manual may differ from the actual unit for explanation purposes.
HOW TO GET THE MOST ENJOYMENT FROM YOUR NEW COLOR TV SET
Your new Color TV incorporates a host of features designed to give you excellent performance. In addition, this model utilizes a highly sophisticated Control Microprocessor for ultimate convenience and control in the areas of Picture Adjustment, Channel Tuning, and On-Screen display.
We therefore strongly urge that you read all of these instructions before using your TV for the first time.
It is especially important that you read and follow the instructions under the heading "SET-UP" on page 13.
SAFETY INSTRUCTIONS
• ANTENNA
Unless your TV is connected to a Cable TV system or to a centralized antenna system, a good outdoor color TV antenna is recommended for the best performance. However, if you are located in a strong signal area that is free from interference and ghost conditions (multipath), an indoor antenna may be sufficient.
• LOCATION
Select an area where sunlight or bright indoor illumination will not fall directly on the picture
screen.
Also, be sure that the location selected allows a free flow of air to and from the perforated back cover of the set.
Caution
Do not block or cover the ventilation holes on the cabinet top.
Do not allow water or any liquids to enter the cabinet.
• NOTES
- Never remove the back cover of the set. This can expose you to very high voltage and other hazards.
- If the set does not operate properly, unplug it and call your dealer or service shop.
• VIEWING
This color TV may be viewed from any desired distance. Most viewers prefer a distance of
three to six feet or more depending on screen size for maximum eye comfort.
Caution
To prevent electric shock do not use this (polarized) plug with an extension cord, receptacle or other outlet unless the blades can be inserted fully to prevent blade exposure.
Caution
Any changes or modifications in construction of this device which are not expressly approved by the party responsible for compliance could void the user's authority to operate the equipment.
GRAPHICAL SYMBOLS EXPLANATION
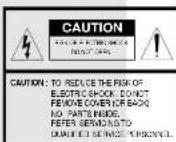

This lightning flash with arrowhead symbol, within an equilateral triangle is intended to alert the user to the presence of uninsulated "dangerous voltage" within the product's enclosure that may be of sufficient magnitude to constitute a risk of electric shock to persons.

The exclamation point within an equilateral triangle is intended to alert the user to the presence of important operating and maintenance (Servicing) instructions in the literature accompanying the appliance.
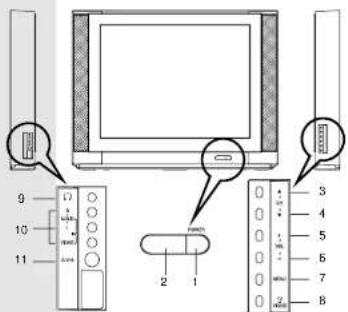
LOCATION OF CONTROLS
FRONT
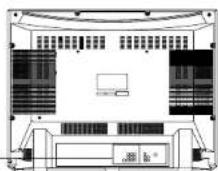
REAR
-
Power Button
-
Remote Control Sensor with STAND BY Indicator
-
Channel Up (▲) Button
-
Channel Down (▼) Button
-
Volume Up { + } Button
-
Volume Down (-) Button
-
Menu Button
-
Video Button
m = 311
-
Headphone Jack
-
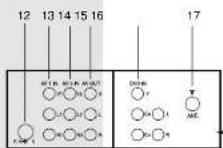
Video/Audio 2 Input Jacks
-
S-VHS 2 Input Jack
-
S-VHS 1 Input Jack
-
Video / Audio 1 Input Jacks
-
Video / Audio 3 Input Jacks
-
Video / Audio Output Jacks
-
Component Video Input Jacks (DVD IN)
-
Coaxial cable Connector (75ohm)
REMOTE CONTROL USE
- Point to remote control sensor of the TV set.
- The maximum operable distance is approximately 20 feet from the remote control sensor, and not more than 30^ to either side of center.
- The operation of the remote control is most effective when there is nothing between it and the remote control sensor.
• The duration of the batteries is approximately 6 months to 1 year.
Replace the batteries when the remote operation becomes unstable.
BATTERY INSTALLATION
- The battery compartment is located at the bottom of the remote control. To access it, remove the cover by sliding it down while lifting it.
- Correctly install 2 AAA batteries, observing polarities as shown in the compartment.
- Do not use a combination of old and new batteries or different type of batteries.
- If batteries become exhausted, remove and replace them soon.
- When battery leakage occurs, clean the battery compartment with a soft cloth and replace the batteries.
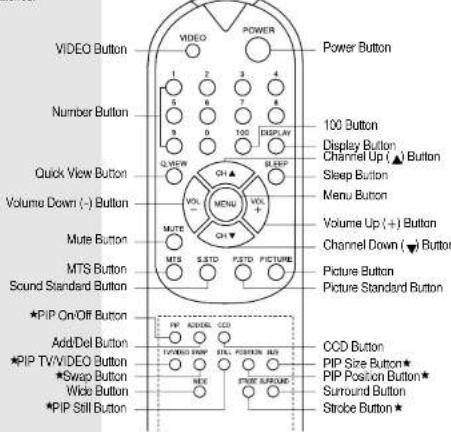
★ These buttons included with AVM-32F9 only.
ANTENNA CONNECTION
ANTENNA
- The antenna requirements for good color television reception are more important than those for black & while television reception. For this reason, a good quality outdoor antenna is strongly recommended.
The following is a brief explanation of the type of connections that are provided with the various antenna systems:
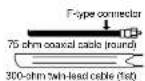
- A 75-ohm system is generally a round cable with F-type connector that can easily be attached to a terminal without tools.
- A 300-ohm system is a flat "twin-lead" cable that can be attached to a 75 ohm terminal through a 300-75 ohm ADAPTOR.
OUTDOOR ANTENNA CONNECTION
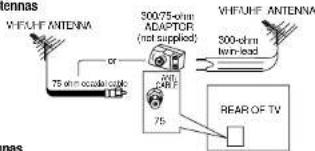
- Use one of the following two diagrams if you connect an outdoor antenna. A: Using a VHF/UHF combination outdoor antenna. B: Using separate VHF and/or UHF outdoor antenna. - Connect an outdoor antenna cable lead-in to the COAXIAL CABLE CONNECTOR on the rear of the TV set.
A. Combination VHF/UHF Antennas
B. Separated VHF/UHF Antennas
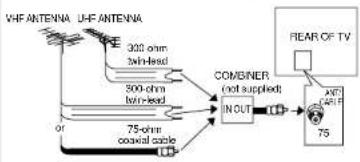
flowchart
graph LR
    A["VHF Antenna"] --> B["300 ohm twin-head"]
    A --> C["500 ohm twin-head"]
    A --> D["75 ohm coastal scale"]
    B --> E["COMBINED (not supplied)"]
    C --> E
    D --> E
    E --> F["IN OUT"]
    F --> G["REAR OF TV"]
    G --> H["75"]
    H --> I["AVF CARF"]
CABLE TV (CATV) CONNECTION
- A 75-ohm coaxial cable connector is built into the set for easy hookup. When connecting the 75 ohm coaxial cable to the set, screw the 75-ohm cable to the COAXIAL CABLE CONNECTOR. - Some cable TV companies offer "premium pay channels". Since the signals of these premium pay channels are scrambled, a cable TV converter/descrambler is generally provided to the subscriber by the cable TV company. This converter/descrambler is necessary for normal viewing of the scrambled channels. (Set your TV to channel 3 or 4, as typically one of these channels is used. If this is unknown, consult your cable TV company. One possible method of utilizing the converter/descrambler provided by your cable TV company is explained below.)
NOTE : An RF switch equipped with position A/B (not provided) is required.
"A" position on the RF switch (not supplied) You can view all unscrambled channels using the TV's channel keys. "B" position on the RF switch (not supplied) You can view the scrambled channels via the converter/descrambler using the converter's channel keys.
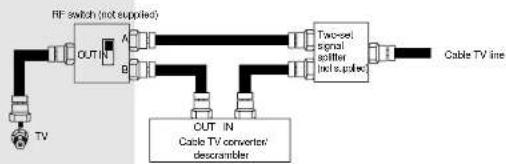
flowchart
graph LR
    TV["TV"] --> OUT_IN1["OUT IN"]
    OUT_IN1 --> A["A"]
    OUT_IN1 --> B["B"]
    A --> Two_Set["S-two-set signal scatter"]
    B --> Two_Set
    Two_Set --> Cable_TVLine["Cable TV line"]
    OUT_IN2["OUT IN Cable TV converter descrambler"] --> Cable_TVLine
    Cable_TVLine --> Two_Set
7
VIDEO/AUDIO CONNECTIONS
- Prior to making any connections to your TV set, be sure to turn the POWER off.
- For a more detailed understanding of each connection, it is recommended that you read the instruction manual for each connected component.
- If you use video or audio equipment placed near the TV, picture and/or sound may become distorted due to interference between these components.
In such case, separate each piece of equipment at a sufficient distance. Two following shows example for operating external equipment - The following shows examples for connecting external equipment.
- Do not connect another audio source to the same speaker to which the TV set is connected, otherwise it may damage the amplifier of the TV set or that of the other audio source.
(1) Rear Input Jacks
Please use the rear jacks (AVIN) for VCR, VDP or DVD.
- A/V 1 IN jacks
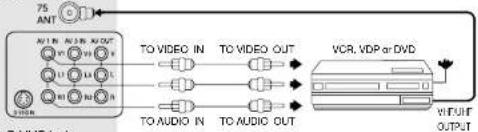
- S-VHS jack
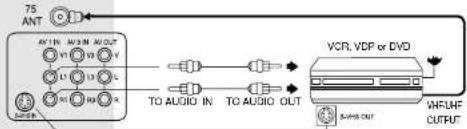
- Component Video In jacks
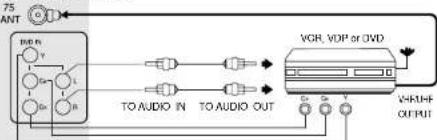
flowchart
graph LR
    A["75 ANT"] --> B["75 ANT"]
    B --> C["VDR"]
    C --> D["VDP/VD"]
    D --> E["VCLK OUTPUT"]
    C --> F["TO AUDIO IN"]
    C --> G["TO AUDIO OUT"]
    F --> H["Ground"]
    G --> I["Ground"]
NOTE - There will be no color in the video signal from the VIDEO OUTPUT jack when the selected video source is COMPONENT VIDEO IN/OUT (YUV).
- To view a connected video source, press the TV/VIDEO button on the side of the cabinet or VIDEO button on the remote control.

NOTES In the case that sound output of your VCR/VDP is MONO, connect it to "AUDIO IN L (MONO)" Jack of your TV. Then the sound can be heard from both R and L speakers.
(2) Side Input Jacks
Please use the side jacks (VIDEO 2) for a GAME-PLAYER or CAMCORDER.
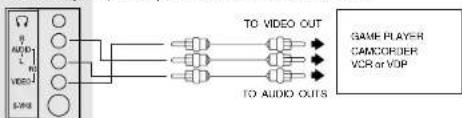
- To view a connected video source, press VIDEO button to set the TV to the VIDEO 2 mode.
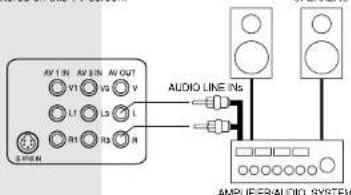
(3) Audio System Connectors
You can hear the TV sound with a better stereo effect connecting the TV to your audio system. The audio signal available at these jacks is the same as the audio source of the program being monitored on this TV screen. SPEAKERS
flowchart
graph TD
    A["AV1 IN"] --> B["V1"]
    C["AV2 IN"] --> D["V2"]
    E["AV3 IN"] --> F["V3"]
    G["AV4 OUT"] --> H["V4"]
    I["AV5 IN"] --> J["V5"]
    K["AV6 IN"] --> L["V6"]
    M["AV7 IN"] --> N["V7"]
    O["AV8 IN"] --> P["V8"]
    Q["AV9 IN"] --> R["V9"]
    S["AV10 IN"] --> T["V10"]
    U["AV11 IN"] --> V["V11"]
    W["AV12 IN"] --> X["V12"]
    Y["AV13 IN"] --> Z["V13"]
    AA["AV14 IN"] --> AB["V14"]
    AC["AV15 IN"] --> AD["V15"]
    AE["AV16 IN"] --> AF["V16"]
    AG["AV17 IN"] --> AH["V17"]
    AI["AV18 IN"] --> AJ["V18"]
    AK["AV19 IN"] --> AL["V19"]
    AM["AV20 IN"] --> AN["V20"]
    AO["AV21 IN"] --> AP["V21"]
    AQ["AV22 IN"] --> AR["V22"]
    AS["AV23 IN"] --> AT["V23"]
    AU["AV24 IN"] --> AV["V24"]
    AW["AV25 IN"] --> AX["V25"]
    AY["AV26 IN"] --> AZ["V26"]
    BA["AV27 IN"] --> BB["V27"]
    BC["AV28 IN"] --> BD["V28"]
    BE["AV29 IN"] --> BF["V29"]
    BG["AV30 IN"] --> BH["V30"]
    BI["AV31 IN"] --> BJ["V31"]
    BK["AV32 IN"] --> BL["V32"]
    BM["AV33 IN"] --> BN["V33"]
    BO["AV34 IN"] --> BP["V34"]
    BQ["AV35 IN"] --> BR["V35"]
    BS["AV36 IN"] --> BT["V36"]
    BU["AV37 IN"] --> BV["V37"]
    BW["AV38 IN"] --> BX["V38"]
    BY["AV39 IN"] --> BYB["V39"]
    CA["AV40 IN"] --> CB["V40"]
    CC["AV41 IN"] --> CD["V41"]
    DD["AV42 IN"] --> DE["V42"]
    BEY["AV43 IN"] --> EYE["AVYE"]
    BFY["AV44 IN"] --> EYE
    BFZ["AV45 IN"] --> EYE
    BFYE["AV46 IN"] --> EYE
    BFYZ["AV47 IN"] --> EYE
    BFZYE["AV48 IN"] --> EYE
    BFZYF["AV49 IN"] --> EYE
    BFZYG["AV50 IN"] --> EYE
    BFZYH["AV51 IN"] --> EYE
    BFZYI["AV52 IN"] --> EYE
    BFZYJ["AV53 IN"] --> EYE
    BFZYK["AV54 IN"] --> EYE
    BFZYL["AV55 IN"] --> EYE
    BFZYM["AV56 IN"] --> EYE
    BFZYN["AV57 IN"] --> EYE
    BFZYO["AV58 IN"] --> EYE
    BFZYP["AV59 IN"] --> EYE
    BFZYQ["AV60 IN"] --> EYE
    BFZYR["AV61 IN"] --> EYE
    BFZYS["AV62 IN"] --> EYE
    BFZYT["AV63 IN"] --> EYE
    BFZYU["AV64 IN"] --> EYE
    BFZYV["AV65 IN"] --> EYE
    BFZYW["AV66 IN"] --> EYE
    BFZYX["AV67 IN"] --> EYE
    BFZYY["AV68 IN"] --> EYE
    BFZYZ["AV69 IN"] --> EYE
    BFZYY["AV70 IN"] --> EYE
    BFZYZ["AV71 IN"] --> EYE
    BFZYY["AV72 IN"] --> EYE
    BFZYZ["AV73 IN"] --> EYE
    BFZYY["AV74 IN"] --> EYE
    BFZYZ["AV75 IN"] --> EYE
    BFZYZT["AV76 IN"] --> EYE
    BFZYZU["AV77 IN"] --> EYE
    BFZYZV["AV78 IN"] --> EYE
    BFZYZY["AV79 IN"] --> EYE
    BFZYZYT["AV80 IN"] --> EYE
    BFZYZYU["AV81 IN"] --> EYE
    BFZYZYV["AV82 IN"] --> EYE
    BFZYZYW["AV83 IN"] --> EYE
    BFZYZYX["AV84 IN"] --> EYE
    BFZYZYY["AV85 IN"] --> EYE
    BFZYZYZ["XAMPLIFIER AUDIO SYSTEM"]
- Adjust the volume of the TV to minimum.
- Connect the AUDIO OUT jacks on the rear of the set with the AUDIO LINE IN jacks through an optional AUDIO/VIDEO cable.
- Set the INPUT SELECTION switch on the AMPLIFIER/AUDIO SYSTEM into the AUX position and adjust the volume.
NOTE • If you have no "AUX IN" jack on your audio system, connect to CD or Video jacks.
BASIC OPERATION
FIRST PREPARATIONS
- Connect either Antenna or Cable TV according to "ANTENNA CONNECTION"
instructions on page 6.
- Insert batteries into the remote control unit according to "REMOTE CONTROL USE"
instructions on page 5.
- Insert the AC Cord Plug into a standard 120V, 60Hz polarized AC outlet
TURN ON/OFF THE TV
| POWER(Front panel) | or | POWER(Remote control) |
CHANNEL SELECTION
Use CHANNEL (▲/▼) buttons on the remote control (or on the front panel). Press the ▲
button to advance for the higher channels, and the ▼ button to go down for the lower channels.
NOTE: Certain channels have been preset at the factory. It may be necessary to add or erase some channels in your areas. See "AUTO PROGRAMMING" on page 14 for presetting channels.
- Channels can be selected directly by using the number buttons on the remote control.
- For example, to select channel 5, press "0" first, then press "5".
- For channel 120, press the 100 button first, then press "2", then "0".
VOLUME CONTROL
Press VOLUME (+/-) buttons on either the remote control or
front panel to adjust volume to your desired listening level. Pressing the + button will increase sound volume, and the - button will decrease sound volume. The volume level is displayed on the screen with reference number (0-100) and bar scale as shown.
NOTE: The volume level can be muted instantly by pressing MUTE button on the remote control. See "MUTE Button" on page 47.
LANGUAGE

MENI
PICTURE
SOUND
TIME
□ SETU
FUNCTION
LANGUAGE : ENGLISH
L'AGNORGE - ENGLER
SEL + ENTER EXIT
VOLUME 25
图1-
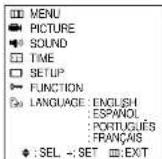
• You can select language among
ENGLISH, SPANISH
PORTUGUESE and FRENCH by
pressing VOL + button.
-
Press POWER button to turn the TV on.
-
Press MENU button and move the cursor to "SETUP" option and press VOL + button. The "SETUP" menu is displayed.

MENU
PICTURE
SCUN
TIME
□ SETUP
FUNCTION
Language·ENGLISH
• SEL • ENTER
- SEE - EMEN

□ SETUP
ANTENNA:CATV2
AUTO PROGRAM
FINE TUNE:0
UNA:CN
:SEL.1:SET REV.
-
Press VOL- button to select ANTENNA option. (TV or CATV)
-
Press CH ▲/buttons to place cursor on the "AUTO PROGRAM" option and press VOL + button.

□ SETUP
ANTEN
ANTENNA, QATVE AUTO PROGRAM
FINE TUNE:0
LINE TON LNA CN
SEL+ENTER

AUTOPROGRAMMING
CATV 15
+ STOP
25%
- When you have finished "AUTO PROGRAMMING", press MENU button repeatedly until the menu disappears.
- Press CH ▲' buttons to select the channel you want.
- Press VOL + or VOL - buttons to adjust volume to your desired listening level.
You can execute every operation by pressing CH / buttons and VOL +/- buttons alternately.
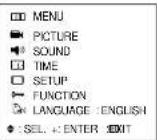
If you learn one menu, you can easily operate other functions by viewing pictures.
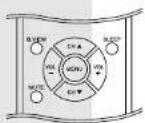
- Pressing these buttons alternately makes
every operation easy
- MOVE→Press CH ▲▼ buttons to move
cursor
- SELECTION ▲Press VOL +/- buttons to
change your selection.
SET-UP
ANTENNA SELECTION
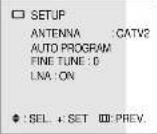
In this mode, you can change the antenna mode between "TV" (If you use a VHF/UHF antenna) and "CATV" (If you have cable connection.)
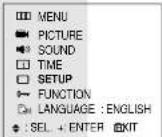
- Press MENU button, move the cursor to "SETUP" option and press VOL + button. The "SET UP" menu is displayed.

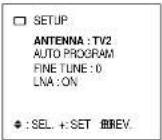
- Press CH ▲/▼ buttons to place the cursor on the "ANTENNA" option and press VOL + button. You can select "TV" (on-air) or "CATV" (cable TV) mode.
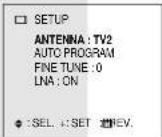

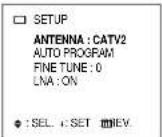
- When you have finished "ANTENNA" mode selecting, press MENU button repeatedly until the menus disappear.
SET-UP
AUTO CHANNEL PROGRAMMING
This function allows the channels to be memorized automatically to match the TV broadcasts and cable channels in your area.
- Press MENU button, move the cursor to *SETUP* option and press VOL + button. The *SETUP* menu is displayed.
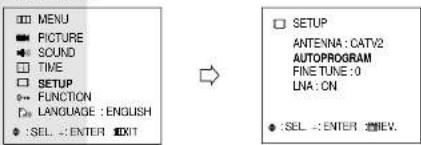
- Press CH ▲/buttons to place the cursor on the "AUTO PROGRAM" option and press VOL + button.
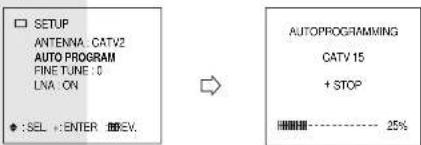
When tuned to an active channel in which TV programming is broadcast, this channel is memorized and the color of the channel number changes from magenta to green. After all active channels are memorized, "SETUP" menu is displayed.
- When you have finished "AUTO PROGRAMMING", press MENU button repeatedly until the menus disappear.
NOTES • If the broadcast signal is weak, the channel will not be memorized. • If you wish to stop this procedure during the operation, press VOL + button.
SET-UP
MANUAL MEMORY (channel add/delete)
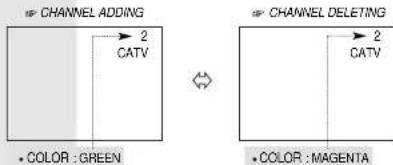
1. TO ADD A CHANNEL
If you want to add a channel not store during AUTO PROGRAM to the memorized channel follow these steps.
① Select a channel you want to view by using the number buttons on the remote control.
② Press "ADD:DEL" button on the remote control.
The channel is added to memory and the color of the channel number changes from magenta to green.
flowchart
graph LR
    A["CHANNEL ADDING"] --> B["2 CATV"]
    C["COLOR : GREEN"] --> D["CHANNEL DELETING"]
    E["COLOR : MAGENTA"] --> F["2 CATV"]
    G["CHANNEL DELETING"] --> H["2 CATV"]
2. TO DELETE CHANNEL
You can exclude the channels of your choice from the memorized channels. Follow these steps to delete the channel in the TV's memory.
① Press CH ▲/▼ buttons or use the number buttons to select a channel you want to delete.
② Press 'ADD' DEL button on the remote control.
The channel is removed from the memory and the color of the channel number changes from green to magenta.
SET-UP
FINE TUNING
If the reception is clear, you do not have to fine-tune the channel, because this is done automatically during auto program and manual memory.
II, however, the signal is weak or distorted, you may have to fine-tune the channel manually.
-
Press CH ▲/▼buttons or use the number buttons to select a channel you want to adjust.
-
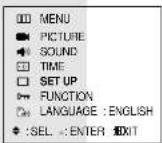
Press MENU button, move the cursor to "SETUP" option and press VOL + button. The "SET UP" menu is displayed.
→
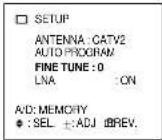
- Press CH ▲▼ buttons to place the cursor on the "FINE TUNE" option.
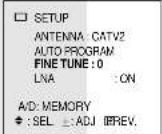
- Use VOL + /- buttons until you obtain a sharp and clear picture and good sound quality.
→
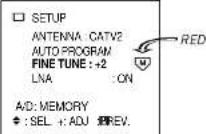
- If you wish to memorize the fine-tuned frequency for the channel, press ADD:DEL button. The [symbol (red color) appears to the right of the channel number. To delete the memory, press the same button again. The [symbol disappears.
NOTES The AFT (Automatic Fine Tuning) mode does not operate on the channels that are fine tuned. - After the Auto Channel Programming has been performed, memorized channels are automatically tuned to their optimum frequencies.
SET-UP
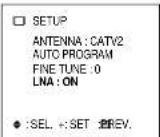
Set LNA ON to increase a weak incoming signal. However, if you are located in a strong signal area, such as nearby a broadcasting station, and if the picture is distorted, set LNA OFF.
- Press CH ▲/▼buttons or use the number buttons to select a channel you want to adjust.
- Press MENU button, move the cursor to "SETUP" option and press VOL + button. The "SET UP" menu is displayed.
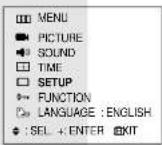
→
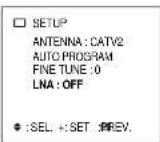
- Press CH buttons to place the cursor on the "LNA" option.
- Press the VOL+ button.
Whenever this bullon is pressed, the mode will change as follows.
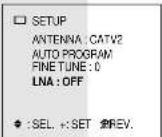
→
PICTURE ADJUSTMENT
P.STD (Picture Standard) BUTTON
By pressing the P.STD button on the remote control, you can sequentially select one of four preset picture standards.
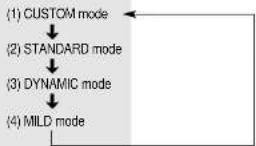
| MODE | PICTURE |
| CUSTOM | Select this mode to use your customized picture setting.See next page. |
| STANDARD | Select this mode to use thefactory-preset standard picture setting |
| DYNAMIC | Select this mode-To emphasize more contrast.-To watch in brighter (daylight) environments. |
| MILD | Select this mode- For soft contrast.-When the room is dark.-To lessen eye fatigue. |
PICTURE ADJUSTMENT
CUSTOM (MANUAL) ADJUSTMENT
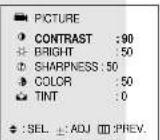
You can sequentially select and adjust one of five picture properties.
- Contrast, Brightness, Sharpness, Color, or Tint.
7

| ● PICTURECONTRAST: 90+ BRIGHT: 50+ SHARPNESS: 50+ COLOR: 50+ TNT: 0 | Move the cursor to CONTRAST by pressing the CH ▲/buttons and press the VOL +/− buttons. |
| ● : SEL -ADJ -RREV. |
3

CONTRAST 90
特此声明的详细说明
Adjust "CONTRAST" with VOL +/- buttons.
44

When you have finished contrast adjustment, press MENU repeatedly until the menus disappear.
SOUND ADJUSTMENT
USING S.STD BUTTON
There is a choice of five audio settings. By pressing the S.STD button, the five settings can be viewed in the sequence illustrated.
- Press S.STD button.
Whenever this button is pressed, the mode will change as follows.
| → CUSTOM STANDARD MUSIC MOVIE SPEECH → |
| CUSTOM | Select this mode to hear the adjusted sound you want. See EQUALIZER page 22. |
| STANDARD | Select this mode to use the factory presetting. |
| MUSIC | Select this mode when listening to music |
| MOVIE | Select this mode when viewing a movie |
| SPEECH | Select this mode to hear voices clearly |
SOUND ADJUSTMENT
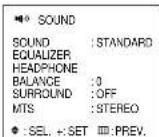
USING ON-SCREEN MENU
You can also select a sound setting by using the on-screen menu.
1

MENU
PICTURE
SOU
TIME
□ SETUP
47 FUNCTION 5. LANGUAGE
(2) LANGUAGE. ENGLISH
◆ : SEL +: ENTER EXIT
Press the MENU button. Move the
cursor to SOUND by pressing the CH ▲
▼ buttons and press the VOL + button.
22

SOUND
SOUND: STANDARD
EQUADZER
HEADPHONE ON LANGE
BREHANCE, S SURROUND, CEE
MTS:STEREO
▲ REL. SET
Move the cursor to SOUND by pressing
the CH ▲' buttons.
33

SOUND
SOUND: MUSIC
EQUALIZER
HEADPHONE
BALANCE:
SURROUND:OFF
MTS.STEREO
◆ : SEL. +: SET : REV.
Press the VOL + button.
- Whenever this button is pressed, the
mode will change as follows.
SOUND ADJUSTMENT
EQUALIZER
You can adjust five frequency ranges to your preference.
1

MENU
PICTURE
SOUNI
图19
□ SETUP
FUNCTION LANGUAGE
图
:SEL -:ENTER EXIT
Press the MENU button. Move the cursor to SOUND by pressing the CH ▲/
▼ buttons and press the VOL + button.
22

SOUND
SOUND: STANDARD
EQUALIZER
HEADPHONE
BALANCE:0
SOHOOND:OFF
mits STEREO
:SEL -:ENTER :RREV.
Move the cursor to EQUALIZER by pressing the CH ▲/buttons and
press the VOL+ button.
35

EQUALIZER
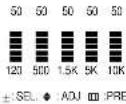
Adjust each frequency band, using
CH ▲/▼ buttons
SOUND ADJUSTMENT
HEADPHONES
Follow these instructions to select the audio source (main screen or PIP channel) that you want to receive through the headphones.
If you want to listen to sound from the PIP, make sure that sound from the PIP is being received.
1

TV2
AV1
Press PIP button to display a PIP.
22

MENU
PICTURE
SOUND
TIME
□ SETUP
FUNCTION
LANGUAGE : ENGLISH
- :SEL +:ENTER EXIT
Move the cursor to SOUND by pressing
the CH ▲' buttons and press the
VOL+ button.
33

SOUND
SOUND: STANDARD
EQUALIZER
HEADPHONE
BALANCE:0
SURROUND:OFF
MTS:STEREO
- :SEL - :ENTER (BREV
Move the cusor to HEADPHONE by
pressing the CH ▲'▼ buttons and
press the VOL+ button.
23
SOUND ADJUSTMENT
44

HEADPHONE
SELECT: MAIN
VOLUME:30
◆: SEL +: SET :BREV
Move the cursor to SELECT by pressing VOL+ button. Each time you press, the audio source changes between main picture and PIP.
55

HEADPHONE
SELECT: MAIN
VOLUME:30
: SEL ± ADJ ■REV.
Move the cursor to VOLUME and press VOL+/- buttons, the headphone sound level is adjusted.
SOUND ADJUSTMENT
SURROUND SOUND
SOUND MENU
1

MENU
PICTURE
SOUN
TIME
□ SETUP
FUNCTION
B) LANGUAGE : ENGLISH
:SEL :ENTER EXIT
Move the cursor to SOUND by pressing
the CH ▲/buttons and press the
VOL + button,
22

SCUND
SOUND: STANDARD
EQUALIZER
HEADPHONE
- :SEL. +: SET 逆REV.
Move the cursor to SURROUND by
pressing the CH ▲ buttons.
33
Press the VOL+ button.
- Whenever this button is pressed, the mode will change as follows.
OFF ON
SOUND ADJUSTMENT
MTS
USING MTS BUTTON
Your TV set incorporates an MTS (Multichannel Television Sound) decoder to receive stereo broadcasts and any accompanying SAP (Second Audio Program) such as another language sound track.
- Press the MTS button
Depending on the audio signal type of the currently receiving broadcast, on-screen selection appears as follows:
Receiving signal
Stereo and SAP
Stereo or SAP
Mono
On-screen selections
| STEREO SAP MONO | |
| STEREO ↔ MONO/SAP ↔ MONO |
MONO only
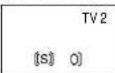
The "[S] symbols indicate that MTS mode is being broadcast.
[s] →
0] →
STEREO symbol (RED color)
SAP symbol (RED color)
When the power is switched on or channel is changed, the "[s]", "O] "symbols are automatically displayed, depending on the current
broadcast
NOTES
- If the received signal is weak, noise may be heard.
In such a case, press MTS button to set to the MONO mode for better sound reception.
- If the received SAP signal is weak, the SAP will not be heard.
Even if both STEREO and SAP broadcasts are received, both broadcasts cannot be heard at the same time.
• Transmission of CABLE TV signals may differ from off-air TV broadcasts.
SOUND ADJUSTMENT
MTS
USING SOUND MENU


MENU
PICTURE
SOUN
TIME
□ SETUP
LANGUAGE
Press the MENU button. Move the cursor to SOUND by pressing the CH
▲! buttons and press the VOL button.


SOUND
SOUND: STANDARD
EQUALIZER
HEADPHONE
BALANCE:0
SURCOND:OFF
MTS.STEREO
◆ :SEL. +: SET #REV.
Move the cursor to MTS by pressing the CH ▲' buttons.

Press the VOL + button.
- Whenever this button is pressed, the move in change as follows.

SOUND
SOUND: STANDARD
EQUALIZER
HEADPHONE
BALANCE:
SURROUND:OFF
MTS:STEREO
◆ : SEL → SET BREV


SOUND
SOUND:STANDARD
EQUALIZER
HEADPHONE
BALANCE:0
SURROUND: OFF
MTS: SAP
- :SE1.4:SE1 国HEV.
CLOCK/TIMER
CLOCK
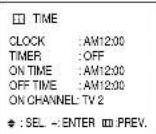
You can set the television's clock so that the current time will be displayed when you press the MENU button on the remote control.
- You must set the current time before you can set the automatic On/OFF timer.
1

MENU
PICTURE
SOUND
TIME
□ SETUP
→ FUNCTION
D: LANGUAGE : ENGLISH
: SEL +: ENTER EXIT
Press MENU button and move to
"TIME"option by using CH

- Press VOL + button and press it again.
22



CLOCK TIME
ONLINE: AM 1200
OFF TIME AM 12:00
ON CHANNEL : TV2
±:MOVE ● :ADJ □REV.
35

田TME
CLOCK
CLOCK . AM 30.00 TIMER . OFF
ON TIME AM 12:00
OFF TIME AM 12:00
ON CHANNEL: TV2
◆ : SEL + ENTER Ⅲ:PREV.
Adjust "HOUR" with CH ▲:▼ buttons.
- Whenever these buttons are pressed,
the hour indication increases or
decreases by 1:
Press VOL + button and adjust
"MINUTE" by using CH ▲/▼buttons.
• Whenever these buttons are pressed,
the minute indication increases or
decreases by 1.
44

Press the *MENU *button to return to the main menu.
CLOCK/TIMER
ON/OFF TIMER
The ON/OFF timer lets you use alarm and automatic off functions.
1

MENU
PICTURE
SOUND
TIME
□ SETUP
FUNCTION
LANGUAGE : ENGLISH
: SEL. +: ENTER EXIT
Press MENU button.
- The "MENU" is displayed on the
screen.
22

MENU
PICTURE
18 SOUND
TIME
□SETUP
FUNCTION
LANGUAGE : ENGLISH
▲ ASEL → ENTER KEY
Move the cursor to TIME by pressing the
CH ▲ buttons and press the VOL +
button.
• "TIME" menu is displayed on the
screen.
33

TIME
CLOCK:AM06:00
TIMER:ON
ON TIME: AM 12:00
OFF TIME : AM
ON CHANNEL
2、合作方:中国光大证券股份有限公司
◆ :SEL + :SET □:PREV
Move the cursor to TIMER by using CH
▲ buttons and press VOL + button
to set TIMER ON. The time display
changes to green.
NOTES • If you have not yet set the television's clock, the message "CLOCK STOPPED"
is displayed.
- If this happens, refer to "CLOCK" on previous page.
CLOCK/TIMER
4

| TIME | |
| CLOCK | AM 06:00 |
| TIMER | ON |
| ON TIME | AM 07:30 |
| OFF TIME | AM 12:00 |
| ON CHANNEL | TV 2 |
Move the cursor to ON TIME by using CH ▲'▼ buttons and press the VOL +/- buttons to set the time. (Refer to page 28)
5

| TIME | |
| CLOCK | : AM 12:00 |
| TIMER | : ON |
| ON TIME | : AM 07:30 |
| OFF TIME | : PM 10:15 |
| ON CHANNEL | : TV 2 |
Move the cursor to OFF TIME by using CH ▲'▼ buttons and press the VOL +/ - buttons to set the time.
6

Press "MENU" to return to the main menu.
AUTOMATIC POWER-OFF MODE
If the set is not switched off when the TV station stops broadcasting, it will automatically go to power-off mode after 15 minutes.
| NOTES | ·If you set "ON TIME" and "OFF TIME" with the same time. "NOT AVAILABLE" message will be displayed. ·If the power is disconnected (in case of a power failure) and reapplied later, the clock operation must be reset. |
CLOCK/TIMER
ON TIME CHANNEL NUMBER
- You can select the channel on which the TV turns on as programmed by ON-TIMER. - This function will not work if the TIMER is set to OFF or the current time has not been set.

TIME CLOCK: AM 06:00 TIMER: ON ON TIME: AM 07:30 OFF TIME: PM 10:15 ON CHANNEL: TV 2
• : SEL +: ENTER## :PREV.
1) Move cursor to ON CHANNEL and press CH ▲/▼. 2) Set channel number you want.
OTHER FUNCTIONS
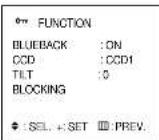
- Press the MENU button. Move the cursor to FUNCTION by pressing the CH ▲▼ buttons. Make a selection by pressing the VOL + button.


| MENU |
| PICTURE |
| SOUND |
| TIME |
| SETUP |
| FUNCTION |
| LANGUAGE :ENGLISH |
| SEL : ENTER EXIT |
| MENU |
| PICTURE |
| SOUND |
| TIME |
| SETUP |
| FUNCTION |
| LANGUAGE :ENGLISH |
| SEL + ENTER EXIT |
| ● : SEL +: SET ■REV. | |
| → | |
OTHER FUNCTIONS
BLUE BACKGROUND
- When there is no picture signal or the signal is weak, the screen reverts to a solid blue color.
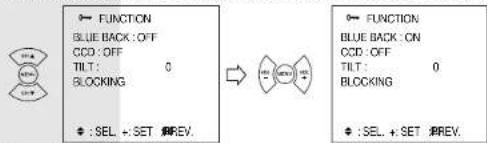
Disable this feature to watch very weak signals.
CCD (Closed Caption Decoder)
- You can select closed caption mode. - Press CCD button on the remote control to change selections as follows:
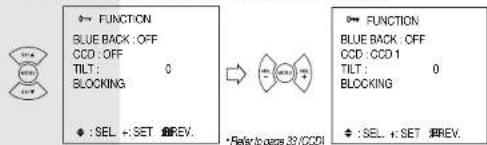
TILT COMPENSATION
If you notice a slight tilt of the picture (caused by a geomagnetic effect) you can compensate for it:
- Press VOL+ to tilt to the left. - Press VOL- to tilt to the right.

TILT TO THE LEFT

NORMAL

TILT TO THE RIGHT
OTHER FUNCTIONS
CCD:
- This TV set incorporates a CCD (Closed Caption Decoder) to enable viewing closed captions and TEXT broadcasts.
- Closed caption and TEXT each has 2 channels (CH1 & CH2).
- Closed caption and TEXT information can only be viewed if they are being broadcast by a television station, or contained in a videotape or videodisc.
- Press the CCD button to select CCD mode.

= CAPTION OPERATION AND CHARACTERISTICS :
- After the set is turned on, caption signals will be displayed on screen (if broadcast) in about 10 seconds. Once activated, the television will always remain in caption mode unless deactivated by the CCD button.
- Captions appear on screen in various positions where they will least interfere with the picture. Generally captions will be displayed at the top or bottom of the screen.
- It is common to see unusual characters or misspelled words appearing in the caption. This is especially true during a live broadcast as captions are created while the program is in progress.
NOTES
- When any function is displayed on screen, captions cannot be seen. Captions will reappear after display disappears.
- Errors will occur in captioning if the signal is weak or the videotape/videodisc is poorly recorded. A videotape that has been recorded over numerous times can also cause caption malfunction.
◆ QUICK VIEW Button : Press Q.VIEW button on the remote control. The previously viewed channel will appear on the screen. Press Q.VIEW again to switch back to the original channel. Repeatedly pressing Q.VIEW switches between these two channels.
DISPLAY BUTTON: Press DISPLAY button on the remote control. The channel number of the program you are viewing, the TIMER settings and the current time are displayed in sequence. The current time remains displayed on the screen, until DISPLAY button is pressed again.
MUTE BUTTON: Press MUTE button on the remote control. The sound of the TV program being viewed will be reduced to zero and "MUTE" will appear on the screen.
To restore normal sound, press MUTE again.
NOTE: Changing the audio volume also restores the sound.
WIDE BUTTON: This function lets you select between wide and normal screens.
Wide 16:9 Normal 4:3
PICTURE-IN-PICTURE (PIP) AVM-32F9 ONLY
• In this mode, you can enjoy viewing two programs at the same time.
NOTE
- Your TV set must be connected to a VCR for PIP to function.
① PIP
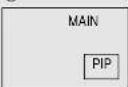
Press PIP on the remote control. When it is ON, the PIP screen appears in the lower right corner. Press PIP again to clear the PIP screen from the main screen.
② PIP SIZE
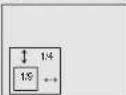
Press SIZE to increase or decrease the PIP screen size.
③ PIP POSITION
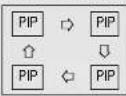
Press POSITION Key on the remote control unit and the position of PIP changes as shown.
④ PIP SWAP WITH MAIN SCREEN
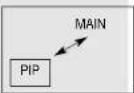
Press SWAP to replace main screen with PIP contents.
PICTURE-IN-PICTURE (PIP) AVM-32F9 ONLY
⑤PIP STILL
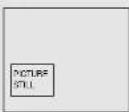
Press STILL to freeze-frame the picture. Press STILL again to resume normal PIP screen.
⑥ MONITORING AV on PIP
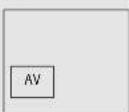
1) Press PIP. 2) Press VIDEO to monitor AV source sequentially.

⑦STROBE
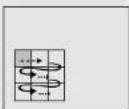
Press STROBE for frame by frame movement. 1) PIP is divided into 9 screens, and each displays the movement one frame per second. (e.g.) If you want to take a close look at the batting form of a baseball player, press STROBE. Nine PIP screens will display the movement frame by frame in one second intervals. 2) Press STROBE or PIP to clear the function.
NOTE
- PIP can not function when blocking is on.
V-CHIP OPERATION
WHAT IS THE V-CHIP?
The V-CHIP is a microprocessor control circuit which recognizes TV and Motion Picture Ratings.
These ratings are contained in a special electronic identification signal that is part of many television programs and recorded videotapes.
An on-screen menu allows the parent to set a secret 4-key combination ACCESS CODE and choose which programs are suitable for viewing, and which programs should be blocked.
(Please note that we have set an initial ACCESS CODE at the factory. This initial code is VOL+, VOL+, VOL+VOL+).
Once set, the television will only display those programs whose ratings fall within the standards the parent has chosen. Programs which do not fall within the standards the parent has chosen will not be displayed unless the access code is entered.
Some TV programs and movies may not be compatible with V-chip ratings.
GENERAL PROCEDURE
As shipped from the factory, the V-CHIP is not operational until you perform these procedures:
Enter your 4-key ACCESS CODE to bring up the BLOCKING MENU
For initial setup, we strongly recommend that you use the factory preset ACCESS CODE of
VOL +, VOL +, VOL + VOL +. Instructions on changing the ACCESS CODE are at the end of this section.
- Enable Motion Picture rating and choose the Motion Picture Ratings which you wish to block.
- Enable TV Parental Guide Ratings and choose the TV Parental Guide Ratings which you wish to block.
IMPORTANT NOTICE - READ BEFORE PROCEEDING FURTHER
We urge you to read the entire V CHIP section of this manual and make sure you understand it throughly before proceeding further.
Once chosen and enabled, programs whose ratings have been blocked CANNOT be viewed unless you enter the 4 button key combination ACCESS CODE.
If you forget the Access Code, the only way that you can clear the settings is by bringing the television to an Authorized Service Center. This is NOT covered under the warranty.
PLEASE NOTE THAT THE INITIAL V-CHIP ACCESS CODE AS SHIPPED FROM OUR FACTORY IS VOL +, VOL +, VOL +, VOL + (Press the VOL + button 4 times).
V-CHIP OPERATION
CALLING UP THE BLOCKING MENU WITH YOUR ACCESS CODE
-
Press the MENU button to display the MAIN MENU.
-
Use the CHANNEL ▼ buttons move the cursor to FUNCTION.
-
Use the CHANNEL ▼' buttons to move the cursor to BLOCKING.
-
Press the VOLUME + button.
-
The ACCESS CODE screen will appear.


MENU
PICTURE
+ SOUND
FR DME
□ SETUP
FUNCTION
D. LANGUAGE
Language. ENGLISH
: SEL +: ENTER EBIT

FUNCTION
BLUEBACK-OFF
000·OFF
SOS. ON TILT:
HET. BLOCKING

L. + SET PREV

ENTER ACCESS CODE
......
-
Enter the 4-button ACCESS CODE you have chosen. As you press each button, an asterisk (*) will appear on the screen. For initial set-up, use the factory preset ACCESS CODE: VOL +, VOL +, VOL -, VOL +.
-
As soon as you press the 4th button the BLOCKING menu appears on the screen.
BLOCKING
MOTION PICTURE
TV PARENTAL GUIDE
CANADIAN ENGLISH
CANADIAN FRENCH
BLOCK:OFF
CHANGE CODE
◆ :SEL. +: SET 重REV.
V-CHIP OPERATION
This procedure allows parents to block programs which contain MOTION PICTURE ratings that they consider inappropriate see next page for Motion Picture ratings.
- Press VOL +, CH ▲/button and select the rating which you wish to block.
- Press VOL + button. VIEW (yellow) changes to LOCK (red)
- To change the rating, press CH ▲/▼ button and select N/A, and then press VOL+ button.
| MOTION PICTURE | |
| N/A | |
| G | V |
| PG VIEW | |
| PG-13 VIEW | |
| R | V |
| NC-17 VIEW | |
| X | V |
| ◆ : SEL +: SET □□:PREV. | |
V-CHIP OPERATION
MOTION PICTURE RATING.
| RATING | REMARKS |
| N/A (No rating) Not rated or not applicable program moviehas not been rated or ratings do not apply. | |
| G (General audience) All ages admitted | |
| PG (Parental guidance suggested) Some material may not be suitable for children. | |
| PG-13 (Parents strongly cautioned) Some material may be inappropriate for children under 13. | |
| R (Restricted) Under 17 requires accompanying parent or adult guardian. | |
| NC-17 (No one 17 and under admitted)X (Adults only) | |
| NOTEYou do not need to block each MOTION PICTURE rating individually.For example, if you block movies with an R (restricted) rating, the V-chip will automatically block NC-17 and X rated movies.In the same manner, passing (unblocking) the PG-13 rating would automatically pass PG and G rated movies. | |
V-CHIP OPERATION
TV PARENTAL GUIDE RATING
This procedure allows parents to block programs which contain TV Parental guide ratings that they consider inappropriate. Content labels are designed to indicate specific contents of TV programs within each TV Parental Guide rating. For example, if a program is rated TV-Y7 but has strong Fantasy Violence content, the program will be labeled as TV-Y7-FV. The TV Parental Guide menu allows you to block all -FV labeled programs while viewing all regular TV-Y7 programs.
NOTE: Each rating has a different set of content labels that you can choose to block or view. Labels that show ---- cannot be changed within the selected rating.
Refer to the rating and content label guides on the following pages.
- Press VOL +, CH ▲▼ button and select the rating which you wish to block.
- Press VOL + BLOCKING in the center column changes to magenta, and VIEW will
change to LOCK. - Press CH ▲/▼ to select the content label you want to block.
Press VOL + to switch the selected label between VIEW and LOCK. - When you have finished setting the TV parental guide ratings, press MENU button repeatedly to return to TV screen.
TV PARENTAL GUIDE
NA
BLOCKING VIEW
TV-Y7 FANTASY V VIEW
TV-G VIOLENCE
TV-PG SEXUAL ----
TV-14 LANGUAGE ----
TV-MA DIALCG
◆ : SEL - : SET ■REV.
V-CHIP OPERATION
▶N/A(No Rating): Not rated or not applicable program.
Important note: You have the ability to block all programs which are not rated, but you should be aware that such blocking may have unintended consequences.
For example, the following types of non-rated programming might be blocked: emergency bulletins, news, weather, religion, sports, politics, local, unrated old movies, etc.
TV PARENTAL GUIDE
NA VIEW
TV-Y
TV-Y7
TV-G
TV-PG
TV-14
TV-Mo
◆ SEL : SET 00REV
▶TV-Y(All Children): This rating is designed to be appropriate for all children.
Whether animated or live-action, the themes and elements in this program are specifically designed for a very young audience, including children from ages 2\~6.
All content labels are blocked.
TV PARENTAL GUIDE
N/A
TV-Y BLOCKING VIEW
TV-Y7 FANTASY V
TV-G VIOLENCE ....
TV-PG SEXUAL
TV-14 LANGUAGE ....
TV-MA DIALOG
- SEL + SET RBEV
V-CHIP OPERATION
▶ TV-Y7 (FV: Directed to older children): This program is designed for children age 7 and above.
It may be more appropriate for children who have acquired the developmental skills needed to distinguish between make-believe and reality.
Themes and elements in this program may include mild fantasy violence or comedic violence that may frighten children under the age of 7.
Therefore, parents may wish to consider the suitability of this program for their very young children.
| TV PARENTAL GUIDE | ||
| N/A | ||
| TV-Y | BLOCKING | VIEW |
| TV-Y7 FANTASY V | VIEW | |
| TV-G VIOLENCE | ---- | |
| TV-PG SEXUAL | ---- | |
| TV-14 | LANGUAGE | ---- |
| TV-MA | DIALOG | ---- |
| ◆ : SEL ← SET ■REV. | ||
NOTE
- For those program where fantasy violence may be more intense or more combative than other programs in this category may be designated TV-Y7-FV.
V-CHIP OPERATION
TV-G (General audience): Most parents would find this rating suitable for all ages. Although this rating does not signify a program designed specifically for children, most parents may let younger children watch TV-G programs unattended. It contains little or no violence, no strong language and little or no sexual dialogue or situations.
TV PARENTAL GUIDE
NA
TV-Y BLOCKING VIEW
TV-Y7 FANTASY
TV-3 VIOLENCE
TV+PG SEXUAL
TUMA DIALGC
(1) (2)
:SEL.4SET
▶ TV-PG (D/L/S/V: Parental guidance suggested): This rating contains material that parents may find unsuitable for younger children.
Many parents may want to watch it with their younger children.
The theme itself may call for parental guidance and/or the program contains one or more of the following:
Moderate violence (V), some sexual situations (S), infrequent coarse language (L), or some suggestive dialogue (D).
TV PARENTAL GUIDE
N/A
TV-Y BLOCKING VIEW
TV-Y7 FANTASY V
TV-G VICLENCE VIEW
TVPG SEXUAL VIEW
TV-14 LANGUAGE VIEW TV/MAPRIL02 VIEW
NAMA DIALOG VIEW
◆ : SEL + SET PFEV
V-CHIP OPERATION
TV-14 (D/L/S/V: Parental caution recommended): This rating contains some material that many parents would find unsuitable for children under 14 years of age. Parents are strongly urged to exercise great care in monitoring the programs and are cautioned against letting children under the age of 14 watch unattended.
TV-14 rated programs contain one or more of the following:
Intense violence (V), intense sexual situations (S), strong coarse language (L), or Intensely suggestive dialogue (D).
| TV PARENTAL GUIDE | ||
| N/A | ||
| TV-Y BLOCKING VIEW | ||
| TV-Y7 FANTASY V | ---- | |
| TV-G VIOLENCE VIEW | ||
| TV-PG | SEXUAL | VIEW |
| TV-14 | LANGUAGE | VIEW |
| TV-MA | DIALOG | VIEW |
| SEL. + SET PREV. | ||
▶ TV-MA (L/S/V: Mature audience only): This rating is specifically designed to be viewed by adults and therefore may be unsuitable for children under 17.
TV-MA rated programs contain one or more of the following:
Graphic violence (V), explicit sexual activity (S), or crude indecent language (L).
| TV PARENTAL GUIDE | ||
| N/A | ||
| TV-Y BLOCKING VIEW | ||
| TV-Y7 FANTASY V | ---- | |
| TV-G VIOLENCE VIEW | ||
| TV-PG | SEXUAL | VIEW |
| TV-14 | LANGUAGE | VIEW |
| TV-MA | DIALOG | ---- |
V-CHIP OPERATION
CONTENT LABELS
▶ TV Parental Guidelines may have one or more letters added to the basic rating to let parents know when a show contains higher levels of potentially, offensive material. Note that the content label should be considered in light of its associated rating. For example, a "V" is likely to designate considerably more intense violence when associated with a TV-MA rated program than when it is associated with a TV-PG rated program.
| V Violence D Suggestive dialogue | ||
| S Sexual situations FV Fantasy violence | ||
| L Coarse or crude indecent language |
NOTE
- You do not need to block each TV parental guide rating individually. The TV-Y and TV-Y7 ratings are handled as a group, and the TV-G, TV-PG, TV-14, and TV-MA Ratings are handled as a group. For example, if you choose a program with a TV-14 rating, the V-chip will automatically also block TV-MA rated programs. In the same manner, passing (unblocking) the TV-MA rating would automatically also pass TV-14 rated programs.
- Also note that you have the option of passing or blocking programs based on their content label (D,L,S,V,FV) without necessarily blocking all programs that carry a specific rating. For example, you may pass some TV-PG programs, but not those which also carry a "V" (moderate violence) content label. In this case, the V-chp would automatically block TV-14 and TV-MA rated programs which carry the "V".
V-CHIP OPERATION
CANADIAN ENGLISH RATING
▶ CANADIAN ENGLISH RATING
| RATING | REMARKS |
| E | Exempt |
| C | Children |
| C8+ | Children eight years and older |
| G | General programming, suitable for all audience |
| PG | Parental Guidance |
| 14- | Viewers 14 years and older |
| 18+ | Adult Programming |
| CANADIAN ENGLISH RATING | |
| E VIEW | |
| C VIEW | |
| C8+ VIEW | |
| G | V |
| PG VIEW | |
| 14+ | VIEW |
| 18+ | VIEW |
CANADIAN FRENCH RATING
▶ CANADIAN FRENCH RATING
| RATING | REMARKS |
| E | Exempt |
| G | General |
| 8ANS+ | Children eight years and older |
| 13ANS+ | Viewers 13 years and older |
| 16ANS+ | Viewers 16 years and older |
| 18ANS+ | Adult Programming |
| CANADIAN FRENCH RATING | |
| E VIEW | |
| G | VIEW |
| 8ANS-1 | VIEW |
| 13ANS-1 | VIEW |
| 16ANS-1 | VIEW |
| 18ANS-1 | VIEW |
:SEL +:SET :BREV.
V-CHIP OPERATION
TO ACTIVATE V-CHIP FUNCTION
▶BLOCK
- Press MENU,
- Use CH ▲▼ to select BLOCK.
- Press VOL+ button to set BLOCK ON.
E
W
BLOCKING
MOTION PICTURE
TV PARENTAL GUIDE
CANADIAN ENGLISH
CANADIAN FRENCH
BLOCK : ON
CHANGE CODE
:SEL +:SET REV.
▶CHANGING THE ACCESS CODE
This procedure allows you to choose a private 4 button key combination to the ACCESS CODE.
- Press the MENU button to display the MAIN MENU.
- Use the CHANNEL ▼! buttons move the cursor to FUNCTION. Press VOL+ button.
- Use the CHANNEL ▼:utions to move the cursor to BLOCKING.
- Press the VOL - Buick
- The ACCESS CODE screen will appear.
- Enter "VOL +, VOL +, VOL +, VOL +" in sequence.
- Press CH ▲▼ution and select CHANGE C
a. Press VOL + button and then input 4 button key combination in the vacant spaces.
| BLOCKING |
| MOTION PICTURE |
| TV PARENTAL GUIDE |
| CANADIAN ENGLISH |
| CANADIAN FRENCH |
| BLOCK: CN |
| CHANGE CODE |
BLOCKING
MOTION PICTURE
TV PARENTAL GUIDE
CANADIAN ENGLISH
CANADIAN FRENCH
BLOCK ON CHANGE CODE
ACCESS CODE CHANGED
◆ : SEL +: SET :BREV.
NOTE
• 4 Button key combination exclude Power, Video, CH ▲CH keys.
- If you forget the access code, the only way that you can clear the settings is to take the TV set to an authorized service center.
RECEPTION DISTURBANCE
The most common types of television interference are as follows:

IGNITION :
Black spots or horizontal lines may appear; picture may flutter or drift. Usually caused by interference from automobile ignition systems, neon lamps, electric drills and other electric appliances.

GHOSTS:
Ghosts are caused by the television signal following two paths. One is the direct path and the other is reflected from tall buildings, hills or other objects. Changing the direction or position of the antenna may improve the reception.

SNOW:
If you are located on the fringes of a television reception area, the signal will be weak, and your picture may contain many small dots. When the signal is extremely weak, it may be necessary to install an external antenna to improve the picture.

RADIO FREQUENCY INTERFERENCE:
This interference produces moving ripples or diagonal streaks, and in some cases causes loss of contrast in the picture.
PICTURE SIZE VARIATION:
A slight variation in picture size is normal when you adjust the CONTRAST or BRIGHTNESS controls.
NOTE: If you subscribe to a cable service and any these symptoms appear, the problem may be caused by the cable company.
CARE AND MAINTENANCE
To prevent fire or shock hazard, disconnect your unit from the AC power source when cleaning. The finish on the receiver may be cleaned with a dust cloth and cared for as other furniture. Use caution when cleaning and wiping the plastic parts. Mild soap and a soft, damp cloth may be used.
TROUBLESHOOTING GUIDE
Before requesting service, please refer to the following chart for the symptom and possible solution. For more information, see the corresponding page in this manual.
| SYMPTOM | POSSIBLE SOLUTIONS |
| TV does not operate | Make sure the power cord is plugged in.Try another AC outlet.Power is off. Check fuse or circuit breaker. |
| Poor sound or no sound | Station or CATV experiencing problems. Turn to another station.Check sound adjustments (Volume and Multi).Check for sources of possible interference. |
| Poor picture or no picture | Station or CATV experiencing problems. Turn to another station.Check antenna or CATV connections and reorient antenna.Check for sources of possible interference.Check picture control adjustments. |
| Poor reception on some channels. | Station or CATV experiencing problems. Turn to another station.Station signal is weak. Reorient antenna to receive a strong signal.Check for sources of possible interference. |
| Poor color or no color | Station or CATV experiencing problems. Turn to another station.Make sure channels are set into memory.Check picture control adjustments.Make sure TV/CATV Mode is in the correct position.Check antenna or CATV connections and reorient antenna.Check for sources of possible interference. |
| Picture wobbles or drifts | Station or CATV experiencing problems. Turn to another station.Make sure channels are set into memory.CATV company is scrambling signal.Check antenna connections and reorient antenna. |
| No CATV reception | Check CATV connections.Make sure TV/CATV is in the correct position.Station or CATV system problems. Try another station. |
| Horizontal or diagonal bars on screen | Check antenna connections and reorient antenna.Make sure TV/CATV mode in the correct position.Check for sources of possible interference. |
| No reception above Channel 13 | Make sure TV/CATV mode is in the correct position.If using antenna, check UHF antenna connections. |
| No remote operation | Batteries are weak, dead, or inserted improperly.Remote is out of range. Move closer to TV.Make sure remote is aimed at sensor.Confirm there are no obstructions between the remote and the TV.Make sure the power cord is plugged in. |
| TV shuts off | Power interrupted.Sleep Timer. On Timer or Off Timer are set. Station has stopped broadcasting. |
THE SANYO COMFORT WARRANTY
COLOR TELEVISION
WARRANTY APPLICATION
New, unused Sanyo Color Television products purchased in Canada through a Sanyo authorized dealer are warranted against manufacturing defects in materials and workmanship for ONE YEAR for parts and labor, from the date of purchase by the original retail purchaser. This warranty only applies in favor of the original retail purchaser of the warranted product.
SANYO CANADA INC.'S RESPONSIBILITY
During the warranty period, SANYO Canada Inc. will repair, or at our option, replace a Color Television product which shows evidence of a manufacturing defect in materials or workmanship. Replacement PARTS are warranted for the remaining portion of the warranty period.
WHAT IS NOT COVERED
(a) Color Television products purchased outside Canada.
(b) Color Television products purchased in a used condition.
(c) Problems due to product set-up and installation.
(d) Adjustments that are outlined in the Operating Manual.
(e) Accessory items including antenna, batteries and connecting cables.
(f) Damage in or due to transportation.
(g) Damage due to improper maintenance, accident, abuse, misuse or negligence.
(h) Damage caused by lightning and power surges.
ORIGINAL RETAIL PURCHASER'S RESPONSIBILITY
You, the original retail purchaser, must present your original, dated bill-of-sale together with this warranty to SANYO Canada Inc. or to an authorized Sanyo Service Depot* when you make a claim under this warranty.
You, the original retail purchaser, are responsible for any costs of TRANSPORTING the product to and from SANYO Canada Inc. or an authorized Sanyo Service Depot. You also are responsible for the cost of any MAINTENANCE necessary in respect of the product.
* In-home service is only available to the units whose screen size is 25 inches or over, and limited to the locations within a 30-km radius of any authorized Sanyo Service Depot, throughout Canada.
WARRANTY BECOMES VOID
This warranty becomes void if the product's serial numbers are altered or removed or if any repair to the product is made other than by SANYO Canada Inc. or by an authorized Sanyo Service Depot.
LIMITATIONS
(a). SANYO Canada Inc. reserves the right to change or improve the design of the model of the product warranted hereunder without incurring any obligation to make any modifications to or to install any improvement in or on the product.
(b). In no event shall SANYO Canada Inc. or any of its Authorized Dealers be liable for special or consequential damage arising from the use of this product.
STATUTORY WARRANTIES
The above provisions do not preclude the operation of any applicable provincial statute which in certain circumstances may not allow some of the limitations and exclusions described in this Warranty. Where any terms of this Warranty are prohibited by such a statute, they shall be deemed null and void but the remainder of this warranty shall remain in effect.
HOW TO OBTAIN WARRANTY SERVICE
Please contact the Sanyo Authorized Dealer from whom the product was purchased or contact us directly at:
SANYO Canada Inc.
1-300 Applewood Cres., Concord Ont. L4K 5C7
(905) 760-9944
1-800-263-2244
SCTV 99/03
- TABLE OF CONTENTS
- INTRODUCTION
- Other Features
- HOW TO GET THE MOST ENJOYMENT FROM YOUR NEW COLOR TV SET
- SAFETY INSTRUCTIONS
- • ANTENNA
- • LOCATION
- Caution
- • NOTES
- • VIEWING
- GRAPHICAL SYMBOLS EXPLANATION
- REMOTE CONTROL USE
- BATTERY INSTALLATION
- ANTENNA CONNECTION
- ANTENNA
- OUTDOOR ANTENNA CONNECTION
- CABLE TV (CATV) CONNECTION
- VIDEO/AUDIO CONNECTIONS
- Rear Input Jacks
- Side Input Jacks
- Audio System Connectors
- BASIC OPERATION
- FIRST PREPARATIONS
- CHANNEL SELECTION
- VOLUME CONTROL
- SET-UP
- ANTENNA SELECTION
- AUTO CHANNEL PROGRAMMING
- MANUAL MEMORY (channel add/delete)
- TO ADD A CHANNEL
- TO DELETE CHANNEL
- FINE TUNING
- PICTURE ADJUSTMENT
- P.STD (Picture Standard) BUTTON
- CUSTOM (MANUAL) ADJUSTMENT
- SOUND ADJUSTMENT
- USING S.STD BUTTON
- USING ON-SCREEN MENU
- EQUALIZER
- HEADPHONES
- SURROUND SOUND
- MTS
- USING MTS BUTTON
- NOTES
- USING SOUND MENU
- LANGUAGE
- CLOCK/TIMER
- CLOCK
- ON/OFF TIMER
- 4
- 5
- 6
- AUTOMATIC POWER-OFF MODE
- ON TIME CHANNEL NUMBER
- OTHER FUNCTIONS
- BLUE BACKGROUND
- CCD (Closed Caption Decoder)
- TILT COMPENSATION
- CCD:
- = CAPTION OPERATION AND CHARACTERISTICS :
- PICTURE-IN-PICTURE (PIP) AVM-32F9 ONLY
- NOTE
- ① PIP
- ② PIP SIZE
- ③ PIP POSITION
- ④ PIP SWAP WITH MAIN SCREEN
- ⑤PIP STILL
- ⑥ MONITORING AV on PIP
- ⑦STROBE
- V-CHIP OPERATION
- WHAT IS THE V-CHIP?
- GENERAL PROCEDURE
- IMPORTANT NOTICE - READ BEFORE PROCEEDING FURTHER
- CALLING UP THE BLOCKING MENU WITH YOUR ACCESS CODE
- TV PARENTAL GUIDE RATING
- CONTENT LABELS
- CANADIAN ENGLISH RATING
- CANADIAN FRENCH RATING
- TO ACTIVATE V-CHIP FUNCTION
- ▶BLOCK
- ▶CHANGING THE ACCESS CODE
- RECEPTION DISTURBANCE
- IGNITION :
- GHOSTS:
- SNOW:
- RADIO FREQUENCY INTERFERENCE:
- PICTURE SIZE VARIATION:
- CARE AND MAINTENANCE
- TROUBLESHOOTING GUIDE
- THE SANYO COMFORT WARRANTY
- COLOR TELEVISION
- WARRANTY APPLICATION
- SANYO CANADA INC.'S RESPONSIBILITY
- WHAT IS NOT COVERED
- ORIGINAL RETAIL PURCHASER'S RESPONSIBILITY
- WARRANTY BECOMES VOID
- LIMITATIONS
- STATUTORY WARRANTIES
- HOW TO OBTAIN WARRANTY SERVICE
- SANYO Canada Inc.
Brand : SANYO
Model : AVM32F9
Category : Television