
CTB214NTF - Television AKAI - Free user manual and instructions
Find the device manual for free CTB214NTF AKAI in PDF.


| Product Type | CRT Television |
| Brand | AKAI |
| Model | CTB214NTF |
| Screen Size | 21 inches (visible diagonal) |
| Display Type | CRT (Cathode Ray Tube) |
| Aspect Ratio | 4:3 |
| Resolution | PAL/SECAM, 576i |
| Dimensions (W x H x D) | Approx. 500 x 450 x 470 mm |
| Weight | Approx. 15 kg |
| Power Supply | AC 220-240V, 50/60Hz |
| Power Consumption | ~70 W (typical) |
| Inputs | RF aerial, Scart (RGB), Composite AV |
| Outputs | Headphone jack (3.5mm) |
| Audio Power | 2 x 5 W RMS |
| Remote Control | Included (batteries not included) |
| Stand | Fixed base |
| Safety Features | Automatic degaussing, X-ray protection (CRT) |
| Cleaning | Unplug before cleaning; use dry soft cloth |
| Spare Parts | Remote, power cord, fuse; consult authorized service |
| Reparability | Serviceable by qualified technician; CRT and chassis accessible |
| Energy Class | Not applicable (CRT, pre-energy label era) |
Frequently Asked Questions - CTB214NTF AKAI
User questions about CTB214NTF AKAI
0 question about this device. Answer the ones you know or ask your own.
Ask a new question about this device
Download the instructions for your Television in PDF format for free! Find your manual CTB214NTF - AKAI and take your electronic device back in hand. On this page are published all the documents necessary for the use of your device. CTB214NTF by AKAI.
USER MANUAL CTB214NTF AKAI
COLOUR TELEVISIONS KLEUREN TELEVISIONS TELEVISIONS COULEUR
20", 21", 24", 25", 28", 29", 32", 33"
Operating Instructions 1
Safety instructions 3
Getting started 4
Aerial connection 4
Switching on 4
Battery fitting 4
Control unit 5
Front and rear panel.... 5
External connections table 6
Remote control 6
Using the TV 7
TV controls 7
Manual tuning 8
Automatic tuning 9
Program edit 10
TV setup 11
Sound menu 11-12
Picture menu 13
Picture format 14
Sleep timer 14
Child lock 15
Using teletext.... 16-17
Connecting external equipment 18-22
Help and service tips 23
Technical specifications table 24

Television
Thank you for buying this television which is designed to give you many years of satisfactory service.
You may already be familiar with using a television but do please take time to read these instructions. They are designed to familiarise you with the unit's many new features and to ensure you get the very best out of your purchase.
Special features
- Your TV can receive stereo channels directly (NICAM optional).
• Automatic tuning system with country selection.
• 100 Programme Memory
• Available for Cable Channels (A decoder maybe required) - Manual Fine Tuning
Child Lock - Return to the last channel viewed (SWAP)
Spatial Sound effect
• 16.9 picture format
• S-Video connection (optional)
• Audio/Video RCA sockets (optional).
External Loudspeakers (optional)
• Normalisation system to recall the setting in memory after the colour, contrast, brightness setting have been changed.
• Picture adjustment using one button (Smart control).
• Sound adjustment using one button (Smart control).
• Equalizer Sound Setup
• Automatic Volume Limiting - Your TV set is equipped with an On-Screen Display system. This system enables the user to see the function on-screen and to control them efficiently.
• Infrared Remote Control
• Virtual Dolby Surround (optional) - Your TV will automatically switch off if it's been programmed from 5 to 120 minutes, and it will automatically switch to Stand by five minutes after a channel ceases to transmit.
- Multi language menu system
• Stereo headphone socket (optional) - Scart Socket: Video cassette recorder, satellite receiver, video disc player, DVD, TV games or a home computer can be connected to this AV socket with an appropriate connecting cable.
• Second scart socket (optional). - Subwoofer (optional)
- Zoom, Letterbox, Subtitle picture formats (for Widescreen TV sets)
- Naming the channels
- Teletext reception
Safety is Important
Your safety and the safety of others is important. Please, therefore, ensure you read the Safety instructions before you operate this television.
Safety instructions
Read all the safety instructions before first use of your TV.

- Position the television so that direct light does not fall on the screen. Excessive light will cause a washed out effect.

- Position the power supply lead and other leads so that they are not likely to be walked on or pinched by things placed on or against them.

- Do not use the appliance in humid or damp conditions. Do not allow the appliance to get wet, i.e. dripping or splashing, as this may be dangerous. Do not place water filled objects, such as vases and flower top on top of the appliance.

- Make sure that no naked flame sources, such as lighted candles, are placed on top of the appliance. - Do not place the television near heat sources such as radiators, ovens, stoves, etc.

- Do not use the television near any apparatus that produces a magnetic field such as HI-FI speakers or electric motors otherwise colourpurity may be affected.

- The heat built up in the set escapes through ventilation holes, so do not cover the set by drapes, clothes etc. that may block air circulation. Do not place the television on carpet or soft furnishings. - NEVER let children push anything into the holes or slots on the case.

- Clean the TV Screen using a slightly damp cloth or chamois leather. Never use abrasive cleaning agents like liquid or aerosol cleaners. - Remove the mains plug from the socket outlet while cleaning.

- If you wish to place the television on a shelf or in a wall unit always ensure there is a minimum air gap of 8 cm around the top, sides and rear of the television, to assist ventilation.

- Your TV set is designed to operate with mains voltages 230V AC; 50Hz. Do not connect your TV set to power sources other than the mains supply.
Getting started
Remove your Television carefully from the box. You may wish to store the packaging for future use.
In the box
Inside your this package you should have:
- Television
• Remote control
User guide
AAA batteries x 2
4
Read these instructions before use.
Aerial connection
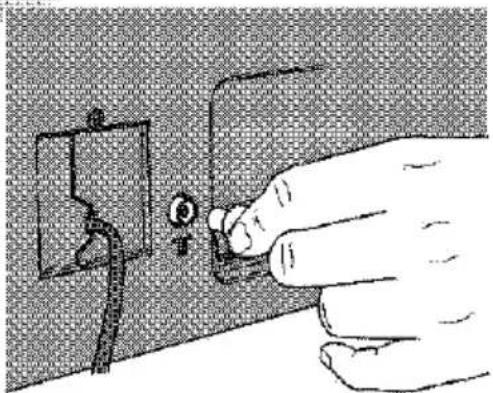
To connect an aerial, plug the aerial lead into the aerial socket on the rear of the TV.
natural_image
Hand inserting a small component into a wall socket (no text or symbols visible)You can use an outdoor or indoor aerial. However, if you use an indoor aerial the quality of the reception may be reduced and adjustment of the aerial may be required when changing programs.
Please note
If you live in a poor reception area or use an indoor aerial you may experience loss or corruption of teletext transmissions.
Switching on
Mains power
Connect the mains plug into the mains socket and switch on.
Connect the TV mains plug into your domestic mains socket outlet (230 V 50 Hz AC).
Please Note
When not in use disconnect the plug from the mains power supply.

Press the Power button on the front of the TV. The standby indicator will illuminate.
Press a Numeric button or the Program up or Program down button on the remote handset or Program up or Program down button on the front panel to switch the TV on.
The standby indicator remains on. The picture will appear after a few seconds.

Press the Standby button to switch the TV to standby. The standby indicator will brighter.
Please Note
Do not leave the television on standby unattended or overnight.
Switching the TV on for the first time
To install your TV, please read the sections "TV controls" and "Tuning the television".
Battery fitting
Insert the 2 AAA Batteries supplied into the compartment on the rear of the remote control, ensure you follow the polarity diagram inside the compartment.

natural_image
Three technical diagrams showing internal components or structures, possibly mechanical parts or structural elements, with no visible text or symbols.Control Unit
20" (51 cm) and 21" (55 cm) TV sets:

-Program/Volume selection button


or UP
Program/Volume decrease button


or
DOWN
Program/Volume increase button
25" (63 cm) and bigger size TV sets:


Program Down/Up button


P-
(五)本说明仅供参考。

-
-


or
广力云智慧零售收银系统
V+
Volume Down/Up button.
General

Program ON/OFF switch

Stand by (Depends on model)

Stand by indicator
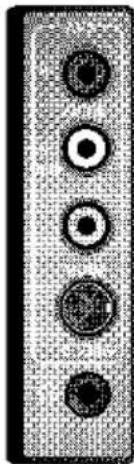
External Connections: (Front or side) (External connections: (Rear)
natural_image
Vertical panel with five circular buttons, no visible text or symbolsRight audio RCA (Red)
Left audio RCA/Mono RCA (White)
Video RCA (Yellow)
S-Video connection
Headphone socket

AV1 scart

AV2 scart

Aerial socket
Power cable

External speaker connections, Loudspeaker switch.
Please note
- See the external connections table on next page for available connections depending the size and model of your TV set.
- Do not use Video RCA and S-Video connections at the same time, otherwise they will effect the picture each other.
External connections table
| Picture tube size/typee | 20"4:3 | 21"4:3 | 24"16:9 | 25"4:3 | 28"4:3 | 28"16:9 | 29"4:3 | 32"16:9 | 33"4:3 |
| AV1 Scart | STD. | STD. | STD. | STD. | STD. | STD. | STD. | STD. | STD. |
| AV2 Scart | OPT. | OPT. | STD. | STD. | STD. | STD. | STD. | STD. | STD. |
| Headphone socket | OPT. | OPT. | OPT. | OPT. | OPT. | OPT. | OPT. | OPT. | OPT. |
| Audio/Video RCA | OPT. | OPT. | OPT. | OPT. | OPT. | OPT. | OPT. | OPT. | OPT. |
| S-Video socket | OPT. | OPT. | OPT. | OPT. | OPT. | OPT. | OPT. | OPT. | OPT. |
| Ext. speaker connections | N/A | N/A | OPT. | OPT. | OPT. | OPT. | OPT. | OPT. | OPT. |
STD:Standart
OPT:Optional
N/A Not available
Please note:
The Audio/Video RCA, S-Video and Headphone socket can be placed on the front panel or on the right-hand side of the cabinet depending to the model of your TV.
Remote control

Using the TV
TV controls
Programme selection

Press the Program up or Program down buttons on the TV or remote control or press a Numeric button to select a programme.
To select a programme whose number is greater than 9 using the numeric buttons, press the -/-- button first and then press the two Numeric buttons. For example, to select programme 12, press the -/-- button followed by 1 and then 2.
You can also select a program by pressing in the OK button.
Press the OKbutton and a blue box will appear on the screen with programme numbers on it.

Use the Program up and Program down buttons to scroll through the programme numbers. When you find the program number you want press the OK button again.
Press the TV button to close the blue box.
Volume

Press the Volume + or Volume - button on the TV or the Vol◄ or Vol ► button on the remote control. A sound level bar will appear on the screen.
Mute

To mute the sound press the Mute button on the remote control. A loudspeaker symbol will appear on the screen.

Press the Mute button again to restore the sound. The symbol will disappear.
Pressing Volume up buttons will also restore the sound. But pressing the Volume down button will increase the volume without restoring.
PP

Personal preference. Press the PP button to revert to the default settings for the TV. (See TV setup).
Swap

Allows you to swap between the program you are watching and the last selected program. i.e. If you were watching Program 1 and change to Program 11, press the Swap button to go back to Program 1. Press it again to return to Program 11.
PR 01→ SWAP PR 11→ SWAP PR 01
Info

Press the P100 button and the program number and program name will be displayed for a few seconds.
AV
For use when you are connecting an external source to your TV (Video recorder, DVD player etc.) via the SCART sockets or RCA sockets.
See 'Connecting external equipment'.

Press the AV button to select your input as follows:
2 Scart models:
1 AV1 when using SCART socket 1.
2 AV2 when using SCART socket 2.
3 AV2-S for S-Video equipment. (Optional)
4 AV3 when using the RCA sockets of the TV. (Optional)
5 AV3-S when using the S-video socket and RCA audio sockets of the TV. (Optional)
1 Scart models:
1 AV1 when using SCART socket 1.
2 AV2 when using the RCA sockets of the TV. (Optional)
3 AV2-S when using the S-video socket and RCA audio sockets of the TV. (Optional)

Press the AV button again to return to TV.
Tuning the television
There are two ways of tuning your television: Manual, where you control the tuning process or
Autoprogram where the television does it all automatically.
Please Note
If the TV is set to a channel with no signal the TV will return to standby after 5 minutes.
The time remaining is displayed on the screen.
Manual tuning
Tuning the TV is accessed through the SETUP menu.
There are two ways to access the SETUP menu:

Press the blue Setup button. or
Press the Menu button and use the Program down button to select SETUP. Press the OK button to enter the SETUP menu.

Please note
The system will displayed automatically on SYSTEM row i.e.BG, L, I, DK depending the receiving broadcasting system of the country. In some countries the broadcasting system can be both in BG/DK or BG/LL'. Only the TV sets produced with Pal Secam BG/DK or Pal Secam BG/LL' systems can receive both BG/DK or BG/LL' broadcasts. In this case the user can select the required SYSTEM using Volume up/down buttons.
Please note
If you do not press any buttons for 15 seconds the TV will exit the menu system.

In the Setup menu select PROG NUMBER and change to 01 using the Program down button to select it and the Volume up button to change it.
Starting with Program 01, tune in the first channel as follows:
Use the Program down button to select SEARCH.
Press the Volume up or Volume down button to start the tuning search.
The search arrow will flash and the tuning indicator will move up the scale.
When the search finds a strong channel signal it will stop searching. The picture will appear.
Identify which channel you are watching (BBC 1, ITV 1 etc.) and decide which program number you want it to be.

Use the Program down button to select PROGRAM NUMBER.
Use the Volume up/down buttons to select the program number.
Use the Program down button to select Store. Press the OK button and STORED will appear on the STORE line.
You have now stored the first channel.
Use the Program up button to select again SEARCH and continue the tuning procedure until you have tuned in all the programmes you want or the television can receive.
Tuning with channel numbers Enter the SETUP menu by pressing the blue button.

Press the OK button to enter the CHANNEL row.
Use the Program down/up buttons to select "S" for cable channels and "C" for terrestrial broadcast.
Use Volume up button to select the channel number
Enter the channel number using the Numeric or Volume up/down buttons.
Press the OK button to exit the channel row.
Use the Program down button to select PROGRAM NUMBER.
Use the Volume up/down buttons to select the program number.
Use the Program down button to select STORE. Press the OK button and STORED will appear on the STORE line.
You have now stored the first channel.
Use the Program up button to select again SEARCH and continue the tuning procedure until you have tuned in all the programmes you want or the television can receive.

To exit the SETUP menu press the TV button.
Automatic tuning (Autoprogram)
Enter the SETUP menu as before.


Use the Program down button to select AUTOPROGRAM and press the OK button. A list of countries will appear. Select the desired country using Program and Volume buttons.

When you are sure the aerial is connected properly press the OK button. Autopogam will start. AUTOPROGRAM WORKING will flash.
To cancel Autoprogram whilst it is working press the Menubutton repetitively.
As Autoprogram stores a channel, it will appear briefly on the screen before the search continues.
When Autoprogram has finished it will flash AUTOPROGRAM SORTING whilst it puts the programmes in order and name them, then go to the first programme stored.
Your TV is now tuned and ready to use.
Please note:
If auto sort fails to arrange the programmes in the required sequence please refer to programme organising.
Fine tuning
Although the search and Autoprogram will automatically try and tune to the best reception, in areas of poor reception a bit of fine tuning may be required.

In the SETUP menu use the Program up/down buttons to select FINE TUNING. Use the Volume up and Volume down buttons to fine tune.
When you have finished use the Program down button to select STORE and press the OK button.
Program organising
Once you have tuned in all the channels you want, you can change their programme number, if required, and name them.

To enter the PROGRAM EDIT menu press the Menu button and select PROGRAM EDIT and press the OK button or press directly the Yellow button.

PROGRAM 01 will be selected and the channel stored under PROGRAM 01 will be showing on the screen.
The details of the program will be shown across the top of the screen i.e. P1 CH31.
The buttons used to edit the programs are shown at the bottom of the display:
| Blue button | - | Name |
| Green button | - | Move |
| Pink button | - | Delete |
| Red button | - | Skip |
To name the programmes

Press the Blue button, the selected line will turn blue and the CH will be highlighted.
Use the Program up and Program down buttons to select the letters and numbers and the Volume up and Volume down buttons to move through the name.

Press the Blue button again to store the name.
Repeat this process to name all the programmes.
Please Note
Some TV channels may send their names with teletext transmission. In this case their names will be automatically shown on the name line.
To move the programmes
You can move the programmes around the programme list to the order you want

Select the programme you want to move and press the Green button. The programme will turn to green. Select the number you want to move the programme to and press the Green button again and the programme will be moved to that number.
All the following programmes are shifted down by one place.
To delete a programme

To delete a programme, select it and press the Pink button. The programme will turn pink. Press the Pink button again and the programme will be deleted.
All the following programmes are shifted up by one position.
To skip programmes

Skipped programmes will not appear when you move through the program list using the Program up/Program down buttons.
They can still be selected using the numeric buttons or the OK button.
Select the programs you want to skip and press the Red button. The program will turn red. To unskip the program press the Red button again.
To exit the PROGRAM EDIT press the TV button once or the Menu button twice.
When you select a programme, the information you entered in the PROGRAM EDIT menu will appear on the top of the screen i.e. P1 BBC1. This will disappear after about three seconds.
TV set up
The TV set up is accessed through a menu system.
Once you have stored your set up, this is the set up the TV will default to when you switch it on.

To enter the MAIN menu press the Menu button.
Once in the MAIN menu use the Program up and Program down buttons to select items in the menu and the OK to access sub menus or use the coloured fastext buttons for quick access.
Red button - SOUND
Green button - PICTURE
Pink button - FEATURES

Please note
If you do not press any buttons for 15 seconds the TV will exit the menu system.
Sound menu (red button)
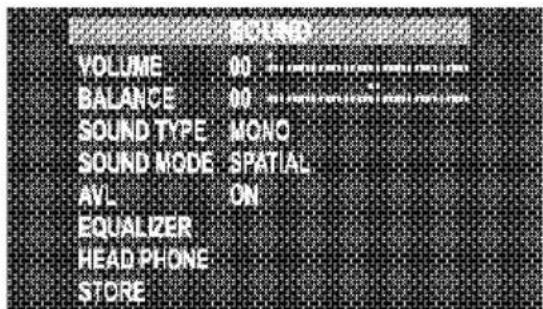

Select the required item in the menu using the Program up/down buttons and make the changes pressing Volume up/down buttons. Use the OK button to enter EQUALIZER and HEADPHONE sub menus.
Volume
Sets default volume using the Volume up and down buttons.

To save your settings, select STORE and press the OK button. STORED will be displayed. Press the Menu button to go back to the previous menu.
Balance

Sets the sound balance when the TVis in stereo mode using the Volume up and down buttons
To save your settings, select STORE and press the OK button. STORED will be displayed. Press the Menu button to go back to the previous menu.
Sound type
This item shows STEREO when receiving stereo transmission and MONO for mono transmissions.
The TV can be produced to receive the NICAM broadcasts as a optional feature.
If the channel you are watching is in Nicam stereo the On Screen Display will show NICAM STEREO for a while.
Please Note
If, while watching a nicam stereo channel, the signal strength drops and the system cannot receive nicam stereo the OSD will show MONO. If the signal strength increases again and nicam stereo can be received again, the OSD will show NICAM STEREO.
Dual I/II
Some broadcasters supply the programmes in two languages. To able to listen the second language select DUAL II by SOUND TYPE using Volume up/down buttons.

To save your settings, select STORE and press the OK button. STORED will be displayed. Press the Menu button to go back to the previous menu.
Sound mode
You can select NORMAL, SPATIAL or DOLBY VIRTUAL (optional) using the Volume up/down buttons.
SPATIAL sound is an 'expanded stereo'. It gives the impression that the two speakers in the TV are further apart than they really are.
"Virtual Dolby Surround sound is based on Dolby Pro Logic decoding for the reproduction of Left, Right, Centre and Surround channels using two loudspeakers.
Manufactured under license from Dolby Laboratories.
"Dolby", "Pro Logic" and the double-D symbol are trademarks of Dolby Laboratories.
Please Note
To get the surround effects in "Dolby Virtual" mode, you must apply a Dolby Pro Logic coded input to the TV. You can't adjust the AVL and EQUALIZER in DOLBY VIRTUAL mode.

To save your settings, select STORE and press the OK button. STORED will be displayed. Press the Menu button to go back to the previous menu.
AVL
TV transmitters have different sound levels. AVL (automatic volume limiting) maintains the same sound level as you switch from program to program.
To supply this press Volume up or down button and select ON for AVL.

To save your settings, select STORE and press the OK button. STORED will be displayed. Press the Menu button to go back to the previous menu.
Equalizer

bar
| Category | Value | |---|---| | C | 26.9 | | L | 27.2 | | L | 27.8 | | L | 28.3 | | L | 28.7 | | L | 29.3 | | L | 30.0 | | L | 30.8 | | L | 31.6 | | L | 32.5 |In this menu are a series of preset equalizer settings for different types of sound output. There are four music settings - MUSIC, SPORT, CINEMA and SPEECH and USER mode.
USER allows you to set your own sound output as follows:

Use the Program down button to select USER.
Press OK button to adjust the frequency band levels.
Use the Volume up button to select the KHz column you want to change.
Use the Program up/down buttons to make the changes.
To save your settings, press the OK button. Press the Menu button to go back to the previous menu.
You can change the equalizer setting whilst watching the TV using the sound Smart control.

Press the sound Smart control to page through the different equalizer settings and select the one you want.
Once you have switched the TV off the equalizer setting will revert to the stored setting.
Headphone
You can set up the volume, balance, bass and treble and sound mode (stereo or mono). Use OK button to enter the HEADPHONE
menu.


To save your settings, select STORE and press the OK button. STORED will be displayed. Press the Menu button to go back to the previous menu.

When you have finished in the Sound sub-menu select STORE and press the OK button.
To exit the sub-menu press the Menu button and return to the main menu.
Picture menu (Green button)

The picture menu allows you to set up the following:
BRIGHTNESS
CONTRAST
COLOUR
SHARPNESS

To change, for example, the colour, select it using Program buttons.
Use the Volume up and Volume down buttons to change the setting.
To save your settings, select STORE and press the OK button. STORED will be displayed.
Smart cont.
This gives you a choice of picture type: SOFT, NATURAL, RICH or USER.

Use the Program up and Program down buttons to select the type of picture you want. As you select each one the TV picture will change to that type.
USER allows you to set your own picture type as follows:

Use the Program down button to select USER.
Select BRIGHTNESS, CONTRAST COLOUR and, SHARPNESS using the Program up/down buttons.
Change the settings with the Volume up/down buttons.
To save your settings, select STORE and press the OK button. STORED will be displayed. Press the Menu button to go back to the previous menu.
You can change the picture type whilst watching the TV using the picture Smart control.
Press the picture Smart control to page through the different picture types and select the one you want.
Once you have switched the TV off the picture type will revert to the stored setting.
Feature Menu (Pink button)

Picture format
This allows you to select the picture size on corresponding to the screen type widescreen of your TV:
Available formats for widescreen TV sets are 16:9, 4:3, zoom, Letterbox and Subtitle.
Available formats of 4:3 TV sets are 4:3 and 16:9.
Widescreen TV sets:
16:9, this is the screen format of widescreen TV sets (28" SF/PF, 32" SF/PF).
The TV will automatically switch to this format if it detects 16:9 format from the SCART inputs.

4:3, conventional TV picture format.

natural_image
Simple geometric diagram with a circle inside a rectangle, no text or symbols presentZoom, an enlarged 4:3 format retaining the same aspect ratio.

natural_image
Simple geometric diagram with a circle inside a rectangle, no text or symbols presentL Box (Letter box), Useful for watching video, some film formats and Pal-Plus format.

natural_image
Simple geometric diagram with a circle inside a rectangle and four corner dots (no text or symbols)
If you cannot see subtitles supplied by an external source at the bottom of the screen, especially when watching 4:3 pictures in Letter box format press the Mix button.
4:3 Sets:
4:3, is the screen format of 20", 21", 25", 28", 29" and 33" TV sets But you can change the picture format to 16:9 to able to watch the inputs in 16:9 format, i.e. some broadcasts and DVD's.

natural_image
Two rectangular frames containing simple circles, no text or symbols present
Press the 16:9 button to page through the different picture formats and select the one you want. The selected format will appear on the lower left side of the screen for a short while.
Once you have switched the TV off the picture format will revert to the stored setting.

To exit the sub-menu press the Menu button and return to the main menu.
Sleep timer
Allows you to preset the period of time before the TV will switch off automatically.

Press the Volume up button to increase the time period in 5 minute steps from 5 minutes to a maximum of 2 hours and to switch the sleep timer off.
The countdown will start immediately. To cancel the sleep timeselect OFF in SLEEP TIMER row by using Volume buttons.
Child lock
Childlock switches off the programme you are watching when you select it. All other programmes are unaffected. If you go back to the programme with childlock on you will see a black screen with the OSD showing CHILD LOCK. You can lock as many programs as you want.

Press the Volume up button to switch the Child lock on or off.
Language
There are many languages available for the On Screen Displays (OSD).

Press the OK button to select the language list.
Press the Program down button to page through all the languages and OK to select.
Subwoofer (optional)
A sub woofer speaker can be fitted within the TV case as an option depending to the model.
By 33"(84cm) TV sets there is an external subwoofer (optional) to be fixed as shown below.

natural_image
Technical diagram showing a device with labeled ports and a top-down view of a mechanical component (no text or symbols present)Select SUBWOOFER in FEATURES menu,

Press the Volume up button to switch the Subwoofer on or off.
Please Note
If you move the loudspeaker switch, on the rear of the TV, to the external position, the internal speakers in the TV will be switched off but the Subwoofer will remain on if switched on.
Setup menu (blue button)
Program edit menu (yellow button)
These two menus are explained under 'Tuning the TV'.
Using Teletext
Teletext is an information system that displays text on your TV screen. Using the teletext control buttons you can view pages of information that are listed in the teletext index.
Please Note
No on screen display is available in text mode. The contrast, brightness and colour cannot be changed but the volume control is still available.
To enter Text mode
Please Note
Make sure the TV channel you are watching transmits teletext.

Press the TV/TEXT button. The text page will appear, normally the index page.
To exit Text mode

Press the TV/TXT button. The TV will return to the channel you were watching.
To select a page of text

Find the number of the page in the index and enter it using the Numeric buttons. The number of the page will appear in the top left hand corner of the screen.
The page counter will search for your page. When it finds it, the page will be displayed.
To move to the next page of text press the Program up button.
To move to the previous page press the Program down button.
To return to the index page press the P100 button.
TV/text mix

To view a page of text whilst watching a TV programme press the Mix button. The text will be superimposed over the TV programme.
Press the Mix button again to return to the text page.
Page search whilst watching TV

In Text mode press the Update button. The TV will return to TV mode with the text page number in the top left hand corner of the screen.
Enter the page number you want using the Numeric buttons.
The top line of the text page will appear whilst the text searches for your page. When the page is found the number will remain in the top left hand corner of the screen.
Press the Update button to view your selected page of text.
Double height text

If you have difficulty reading the text on the TV you can double the height of the text.
Press the Double height button. The top half of the page will be displayed in double height text.
Press the Double height button again. The bottom half of the page will be displayed in double height text.
Press the Double height button again to return to the full page.
Page hold

If the page of text you have selected contains sub pages, these sub pages will automatically be displayed in order with a delay to allow you to read the page.
To stop the move to the next sub page press the Hold button. STOP will appear in the top left hand corner.
To continue moving through the sub pages press the Hold button again.
To select a sub page

If the page of text you are viewing contains sub pages, the number of the sub page you are on and the total number of sub pages is displayed on the right of the screen i.e. 1/7.
To select a sub page press the Sub button. The number in the top left hand corner will be replaced by S followed by 4 asterisks.
Enter the number of the sub page, using the Numeric buttons in the format S0001 for sub page 1.
The teletext will search for the sub page. This may take some time. To return to the TV whilst the teletext is searching press the Update button.
When the page number is found it will appear in the top left hand corner of the screen.
Press the Update button again to view the text page.
To reveal information

Press the Rev button to reveal concealed information (quiz answers etc.).
Press the Rev button again to conceal the information again.
Clock

Press the Sub button, whilst watching a TV program, to display the time.
Fast text
At the bottom of the teletext screen is a row of subject headings in red, green yellow and blue.
The remote control has a row of coloured buttons corresponding to the row of coloured subjects on the screen.
Pressing one of the coloured buttons will take you directly to the page corresponding to the subject heading.
Connecting external equipment
You can connect a wide range of audio and video equipment to your TV.
External speakers (optional)
You can replace the two internal speakers with external speakers (not supplied). The speakers must have an impedance of 8 ohms.
Connect the speaker wires to the external speaker connections on the rear of the TV.
Connect the negative wires to the black connectors and the positive wires to the red connectors.


Put the Loudspeaker switch on the back of the TV to the EXT position. The internal speakers will be switched off.
Please Note
Do not position the external loudspeakers too close the TV as the magnets on the speakers can upset the TV picture.
Headphones (optional)
The headphones must have an impedance of between 8 and 32 ohms and have a 3.5 mm stereo jack plug.
Plug the headphone jack into the headphone socket of the TV.
Select the SOUND menu to set up the headphones.
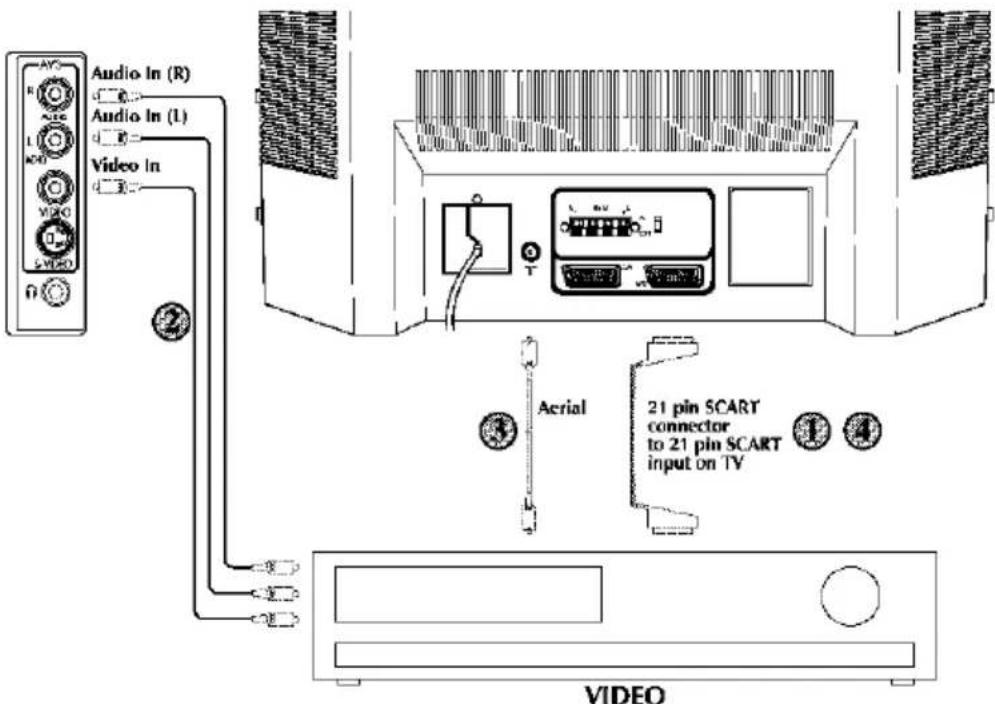
Connecting a video recorder
① Via SCART
Make sure the TV and video recorder are both switched off.
Plug one end of the SCART lead (not supplied) into the back of the video recorder and the other end into one of the SCART sockets on the back of the TV.
Switch on the video recorder and the TV.

Press the AV button on the remote control to select AV1 or AV2 to correspond with SCART socket you are using on the back of the TV.
Please note:
You can connect a RGB external equipment via Scart 1. It is necessary to you use full Scart cable for this purpose.
Select the video outputs of external device by using its menu to RGB if it's available.
② Via RCA lead (optional)
Make sure the TV and video recorder are both switched off.
Plug one end of the RCA lead into the video and audio out sockets on the back of the video recorder and plug the other end into the video and audio in sockets of the TV.
If the sound is in mono use the Audio Input L. In the SOUND menu select MONO.

Press the AV button repetitively and select the AV3 mode by two scart models or select AV2 mode by one scart models.

Via aerial socket
Make sure the TV and video recorder are both switched off.
Unplug the aerial lead form the TV and plug it into the aerial socket on the video recorder (if fitted).
Plug a coaxial plug into the RF out socket on the rear of the video recorder and plug the other end into the aerial socket of the TV.
Switch on the video recorder and the TV.
If your video recorder has a test signal, switch it on. (Refer to the video recorder user guide).
See 'Tuning the TV' and carry out the tuning procedure for the video recorder test signal. Select a programme number 0 or between 55 and 99.

S-Video Player
If you have an S-Video player you can connect it to SCART socket 2 (optional) via an adaptor from scart to S-Video/RCA audio (not supplied).

Press the AV button three times to select AV-2S (available by two scart models).

Via RCA lead and S-Video socket
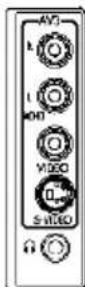
You can also connect it through the S-Video socket of the TV (optional).
Plug the S-Video plug into the S-Video socket and the audio leads into the audio sockets.

Press the AV button repetitively to select AV3-S by two scart models or AV2-S by one scart models.

Connecting a DVD player
①Via SCART
Make sure the TV and DVD player are both switched off.
Plug one end of the SCART lead (not supplied) into the back of the DVD player and the other end into one of the SCART sockets on the back of the TV.
Switch on the DVD and the TV.

Press the AV button on the remote control to select AV1 or AV2 to correspond with SCART socket you are using on the back of the TV.
② Via RCA lead (optional)
Make sure the TV and DVD player are both switched off.
Plug one end of the RCA lead into the video and audio out sockets on the back of the DVD player and plug the other end into the video and audio in sockets of the TV.

Press the AV button repetitively and select the AV3 mode by two scart models or select AV2 mode by one scart models.
③ Via RCA lead and S-Video socket
You can also connect it through the S-Video socket of the TV (optional).
Plug the S-Video plug into the S-Video socket and the audio leads into the audio sockets.

Press the AV button repetitively to select AV3-S by two scart models or AV2-S by one scart models.


Connecting a decoder

Via SCART
Make sure the TV and decoder are both switched off.
Plug one end of the SCART lead (not supplied) into the back of the decoder and the other end into the SCART1 on the back of the TV.
Switch on the decoder and the TV.

Press the AV button on the remote control to select AV1.

Via RCA lead (optional)
Make sure the TV and decoder are both switched off.
Plug one end of the RCA lead into the video and audio out sockets on the back of the decoder and plug the other end into the video and audio in sockets on the TV.

Press the AV button repetitively and select the AV3 mode by two scart models or select AV2 mode by one scart models.
Please Note
You can record from one external piece of equipment to another via the TV by connecting the playback to SCART 1 and the recorder to SCART 2 and selecting AVL. You cannot watch the TV.
You can connect NTSC supported equipment to the TV via the SCART sockets and adjusting the colour via the PICTURE menu.
Select TINT by using Program down button and use the adjust the colour to Volume up and down buttons.

Connecting TV with video and satellite/digital receiver
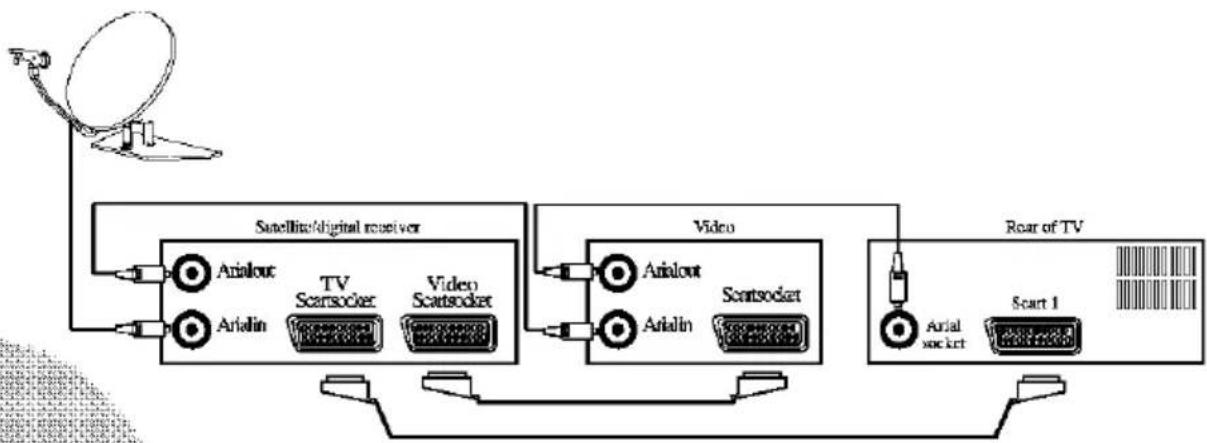
flowchart
graph LR
    A["Satellite"] --> B["Satellite/digital receiver"]
    B --> C["Video"]
    C --> D["Rear of TV"]
    B --> E["Arialout"]
    B --> F["Arialin"]
    E --> G["TV Scansocket"]
    F --> H["Video Scansocket"]
    G --> I["Scansocket"]
    H --> I
    I --> J["Arialout"]
    I --> K["Arialin"]
    J --> L["Arialout"]
    K --> M["Arialin"]
    L --> N["Scart 1"]
    M --> N
Connecting TV with camcorder

flowchart
graph TD
    A["Camcorder"] -->|Audio In (R)| B["AV1"]
    A -->|Audio In (L)| B
    A -->|Video In| B
    C["S-Video camcorder"] -->|Audio In (R)| D["AV2"]
    C -->|Audio In (L)| D
    C -->|S-Video In| D
Connecting TV games and computer

Help and service tips
The TV does not work
Make sure it is plugged into the mains supply and switched on.
Poor picture
• Is the aerial plugged in?
• If you are using a set top aerial is it properly aligned for the best signal.
• Make sure the aerial is not to close to neon lights, loudspeakers etc.
- Try changing the direction of the outdoor aerial. High buildings and mountains can cause ghost pictures or double images.
- The picture quality may be reduced by connecting two external sources at once. Disconnect one of the sources.
- Adjust the fine tuning.
No picture
• Is the aerial plugged in properly?
• Is the aerial lead damaged?
- Are all the plugs in the aerial lead fitted correctly?
• Have you pressed the correct buttons on the remote control?
No sound
- Is the sound muted? Press the Mute button.
• Is the volume turned down?
• Are there headphones connected?
Sound coming from only one speaker
- Is the balance set to one side? See the sound menu.
• If you have external speakers, has one of them become disconnected.
No response to the remote control
• Try changing the batteries.
- Is there an obstruction between the remote control and the sensor on the TV.
If nothing works
If you have tried the above solutions and none seem to work, try switching the unit off and on again.
If this does not work contact your supplier or TV repair technician. Never attempt to repair a defective TV yourself.
| Symptoms | Solutions | Check if on/off switch is "on" | |||||||||||||||
| Try a different channel, if OK, probably station trouble | Check aerial connections on back of set | Check aerial broken wires | Re orientate aerial | Probably local interference, such as an appliance | Adjust fine tuning control | Adjust brightness control | Adjust contrast control | ||||||||||
| No picture, no sound | √ | √ | √ | √ | |||||||||||||
| Poor sound, picture OK | √ | √ | √ | √ | |||||||||||||
| Poor Picture, sound OK | √ | √ | √ | √ | √ | √ | √ | ||||||||||
| Weak picture | √ | √ | √ | √ | √ | √ | |||||||||||
| Blurred picture | √ | √ | √ | √ | √ | ||||||||||||
| Double image | √ | √ | √ | √ | √ | √ | |||||||||||
| Lines in picture | √ | √ | √ | √ | √ | ||||||||||||
| Dislorted picture | √ | √ | √ | √ | √ | ||||||||||||
| Weak reception on some channels | √ | √ | √ | √ | √ | √ | |||||||||||
| Horizontal bars | √ | √ | √ | √ | |||||||||||||
| Picture rolls vertically | √ | √ | √ | √ | |||||||||||||
| Poor colour | √ | √ | √ | √ | √ | √ | √ | √ | √ | √ | |||||||
| No colour | √ | √ | √ | √ | √ | √ | √ | √ | |||||||||
| Remote control not working | √ | √ | |||||||||||||||
| TV does not accept any command | √ | ||||||||||||||||
| Teletext rolling up/down | √ | ||||||||||||||||
| Inappropriate colour, color spots | √ | ||||||||||||||||
Technical specifications table
| Picture tube size/typee | 20"4:3 | 21"4:3 | 21"4:3 PF | 24"16:9 SF | 25"4:3 | 28"4:3 | 28"16:9 SF | 28"16:9 PF | 29"4:3 SF | 29"4:3 PF | 32"16:9 SF | 32"16:9 PF | 33"4:3 |
| Screen size | 51 cm | 55 cm | 55 cm | 61 cm | 63 cm | 70 cm | 70 cm | 70 cm | 72 cm | 72 cm | 82 cm | 82 cm | 84 cm |
| Visible screen size | 48 cm | 51 cm | 51 cm | 56 cm | 59 cm | 66 cm | 66 cm | 66 cm | 68 cm | 68 cm | 77 cm | 77 cm | 80 cm |
| Sound Output (% 10 THD) | 2x7 W | 2x7 W | 2x7 W | 2x10 W | 2x10 W | 2x10 W | 2x10 W | 2x10 W | 2x10 W | 2x10 W | 2x10 W | 2x10 W | 2x10 W |
| Power consumption | 55 W | 55 W | 55 W | 130 W | 145 W | 145 W | 155 W | 150 W | 140 W | 145 W | 155 W | 165 W | 160 W |
| Stand by Power consumption | 4 W | 4 W | 4 W | 3 W | 3 W | 3 W | 3 W | 3 W | 3 W | 3 W | 3 W | 3 W | 3 W |
| Subwoofer | — | — | — | — | — | optional | optional | optional | optional | optional | optional | optional | optional |
| Dolby Virtual | — | — | optional | optional | optional | optional | optional | optional | optional | optional | optional | optional | optional |
SF: Superflat picture tube
PF: Pureflat picture tube
16:9: Widescreen TV
4:3 : Conventional TV
Please note:
Using a subwoofer causes 20 W extra power consumption and supplies maximum 20 W extra sound output.
General technical specifications
Power Supply
AC: 230-240V 50Hz
Number of preset programmes ..... 100
RF Aerial input 75 ohm (unbalanced)
Speaker empedance 8 ohm
Audio output ...... Mono/Stereo/NICAM (optional)
Batteries 2x AAA
Receiving channels ...... VHF (Band I Channels 2-4)
VHF (Band III Channels 5-12)
UHF (Channels 21-69)
Receiving broadcast system.... PAL BG
PAL SECAM BG
PAL SECAM BG DK/DK
PAL SECAM BG LL
PALI
Please note: Your TV set is produced to receive only "one" of this colour and sound system options which is based one your countries norms and can not be changed by user except BG/DK and BG/LL' if both systems are available to receive (BG or DK and BG or LL'). Please refer to "Tuning the TV".
Importer AKAI Benelux - Elmarc B.V.
Information: www.akai.nl
- COLOUR TELEVISIONS KLEUREN TELEVISIONS TELEVISIONS COULEUR
- Television
- Special features
- Safety is Important
- Safety instructions
- Getting started
- In the box
- Aerial connection
- Please note
- Switching on
- Mains power
- Switching the TV on for the first time
- Battery fitting
- Control Unit
- 20" (51 cm) and 21" (55 cm) TV sets:
- 25" (63 cm) and bigger size TV sets:
- General
- External Connections: (Front or side) (External connections: (Rear)
- External connections table
- Remote control
- Using the TV
- TV controls
- Programme selection
- Volume
- Mute
- PP
- Swap
- Info
- AV
- Scart models:
- Scart models:
- Tuning the television
- Manual tuning
- Please note:
- Fine tuning
- Program organising
- To name the programmes
- To move the programmes
- To delete a programme
- To skip programmes
- TV set up
- Sound menu (red button)
- Balance
- Sound type
- Dual I/II
- Sound mode
- Manufactured under license from Dolby Laboratories.
- AVL
- Equalizer
- Headphone
- Smart cont.
- Picture format
- Widescreen TV sets:
- 4:3 Sets:
- Sleep timer
- Child lock
- Language
- Subwoofer (optional)
- Setup menu (blue button)
- Program edit menu (yellow button)
- Using Teletext
- To enter Text mode
- To exit Text mode
- To select a page of text
- TV/text mix
- Page search whilst watching TV
- Double height text
- Page hold
- To select a sub page
- To reveal information
- Clock
- Fast text
- Connecting external equipment
- External speakers (optional)
- Headphones (optional)
- Connecting a video recorder
- ① Via SCART
- ② Via RCA lead (optional)
- Via aerial socket
- S-Video Player
- Via RCA lead and S-Video socket
- Connecting a DVD player
- ①Via SCART
- ③ Via RCA lead and S-Video socket
- Connecting a decoder
- Via SCART
- Via RCA lead (optional)
- Connecting TV with video and satellite/digital receiver
- Connecting TV with camcorder
- Connecting TV games and computer
- Help and service tips
- The TV does not work
- Poor picture
- No picture
- No sound
- Sound coming from only one speaker
- No response to the remote control
- If nothing works
- Technical specifications table
- General technical specifications
Brand : AKAI
Model : CTB214NTF
Category : Television