
CB350S-IS - Drink cooler Avanti - Free user manual and instructions
Find the device manual for free CB350S-IS Avanti in PDF.


| Product Type | Beverage Cooler |
| Brand | Avanti |
| Model | CB350S-IS |
| Dimensions (W x D x H) | 20" x 20" x 33" (approx.) |
| Weight | 70 lbs (approx.) |
| Capacity | Up to 120 standard cans (approx.) |
| Power Supply | 115V, 60Hz |
| Energy Consumption | ~0.5 kWh/day (estimated) |
| Temperature Range | 35°F - 50°F (adjustable) |
| Cooling Type | Compressor |
| Interior Light | Yes, LED |
| Number of Shelves | 4 adjustable wire shelves |
| Door Type | Solid door with handle |
| Door Lock | Yes, keyed lock |
| Installation Type | Freestanding or undercounter |
| Ventilation | Front grille for airflow |
| Defrost | Automatic |
| Cleaning | Wipe interior with mild soap; clean condenser annually |
| Safety | Leveling legs, avoid extension cords, keep ventilation clear |
| Spare Parts | Replaceable shelves, thermostat, fan motor, door gasket |
| Repairability | Serviceable by qualified technician; parts available |
| Certifications | ETL, Energy Star (assumed) |
Frequently Asked Questions - CB350S-IS Avanti
User questions about CB350S-IS Avanti
0 question about this device. Answer the ones you know or ask your own.
Ask a new question about this device
Download the instructions for your Drink cooler in PDF format for free! Find your manual CB350S-IS - Avanti and take your electronic device back in hand. On this page are published all the documents necessary for the use of your device. CB350S-IS by Avanti.
USER MANUAL CB350S-IS Avanti
natural_image
Line drawing of a portable oven with control panel and speaker (no text or symbols)BEFORE USE, PLEASE READ AND FOLLOW ALL SAFETY RULES AND OPERATING INSTRUCTIONS.
Avanti has a policy of continuous improvement on its products and reserves the right to change materials and specifications without notice.
TABLE OF CONTENTS
| Important Safety Instructions and Appliance Safety | 3 |
| Important Safeguides | 4 |
| Help Us Help You ... | 5 |
| Parts and Features | 6 |
| Installation Instructions | 7 |
| Before Using Your Appliance | 7 |
| Electrical Connection | 8 |
| Installation of Your Appliance | 9 |
| Preparing the Keg | 9 - 11 |
| Setting up the Keg | 11 |
| Setting up the Gas Cartridge | 11 – 12 |
| Adjusting the Gas Pressure | 12 |
| Operating Your Appliance | 13 |
| Setting the Temperature | 13 |
| Interior LED Light | 13 |
| Dispensing Your Beer | 13 |
| Care and Maintenance | 13 |
| Keg Removal and Cleaning the Unit | 13 – 14 |
| Storage | 14 |
| Troubleshooting Guide | 14 |
| Draught Beer Trouble Guide | 15 – 16 |
| Your Avanti Products Warranty | 17 |
| Service for Your Appliance | 18 |
| Instrucciones en Español | 19 – 26 |
| Registration Information and Registration Card | 27 |
IMPORTANT SAFETY INSTRUCTIONS
| WARNING | To reduce the risk of fire, electrical shock, or injury when using your appliance, follow these basic precautions: |
| Read all instructions before using the appliance.Never allow children to operate, play with, or crawl inside the appliance.Never clean the appliance parts with flammable fluids. The fumes can create a fire hazard or explosion.Do not store or use gasoline or any other flammable vapors and liquids in the vicinity of this or any other appliance. The fumes can create a fire hazard or explosion.Do not repair or replace any part of the appliance or attempt any servicing unless specifically recommended in the user-maintenance instructions or in published user-repair instructions. Replace the fuse with the same type- Save these instructions - | |
APPLIANCE SAFETY
Your safety and the safety of others are very important.
We have provided many important safety messages in this manual for your appliance. Always read and obey all safety messages.

This is the Safety Alert Symbol. This symbol alerts you to potential hazards that can kill or injure you and others. All safety messages will follow the Safety Alert Symbol and either the words" DANGER", "WARNING" or "CAUTION".
! DANGER !
WARNING
CAUTION
Danger means that failure to heed this safety statement may result in severe personal injury or death.
Warning means that failure to heed this safety statement may result in extensive product damage, serious personal injury, or death.
Caution means that failure to heed this safety statement may result in minor or moderate personal injury, property or equipment damage.
All safety messages will alert to know what potential hazard is, tell you how to reduce the chance of injury, and let you know what can happen if the instructions are not followed.

IMPORTANT SAFEGUIDES
Before the appliance is used, it must be properly positioned and installed as described in this manual, so read the manual carefully. To reduce the risk of fire, electrical shock or injury when using the appliance, follow basic precaution, including the following:

DANGER

- Plug into a grounded 3-prong outlet, do not remove grounding prong, do not use an adapter, and do not use an extension cord.
- Replace all panels before operating.
- Never clean appliance parts with flammable fluids. These fumes can create a fire hazard or explosion. And do not store or use gasoline or other flammable vapors and liquids in the vicinity of this or any other appliance. The fumes can create a fire hazard or explosion.
- Before proceeding with cleaning and maintenance operations, make sure the power line of the unit is disconnected.
- Do not connect or disconnect the electric plug when your hands are wet.
- Unplug the refrigerator or disconnect power before cleaning or servicing. Failure to do so can result in electrical shock or death.
- Do not attempt to repair or replace any part of your refrigerator unless it is specifically recommended in this manual. All other servicing should be referred to a qualified technician.

WARNING

FOLLOW WARNING CALL OUTS BELOW ONLY WHEN APPLICABLE TO YOUR MODEL
- To ensure proper ventilation for your Appliance, the front of the unit must be completely unobstructed. Choose a well-ventilated area with temperatures above 53^ F ( 12^ C) and below 77^ F ( 25^ C). This unit must be installed in an area protected from the element, such as wind, rain, water spray or drips.
- The Appliance should not be located next to ovens, grills or other sources of high heat.
- The Appliance must be installed with all electrical connections in accordance with state and local codes. A standard electrical supply (115 V AC only, 60 Hz), properly grounded in accordance with the National Electrical Code and local codes and ordinances is required.
- Do not kink or pinch the power supply cord of the Appliance.
• The fuse (or circuit breaker) size should be 15 amperes. - It is important for the Appliance to be leveled in order to work properly. You may need to make several adjustments to level it.
• Make certain that the hoses are not pinched or kinked or damaged during installations. - Check for leaks after connection.
- Never allow children to operate, play with or crawl inside the Appliance.
- Do not use solvent-based cleaning agents of abrasives on the interior. These cleaners may damage or discolor the interior.
- Do not use this appliance for other than its intended purpose.
HELP US HELP YOU...
Read this guide carefully.
It is intended to help you operate and maintain your new unit properly.
Keep it handy to answer your questions. If you don't understand something or you need more assistance, please call:
Avanti Customer Service 800-220-5570
Keep proof of original purchase date (such as your sales slip) with this guide to establish the warranty period.
CAUTION:
THIS UNIT IS NOT DESIGNED FOR THE STORAGE OF MEDICINE OR OTHER MEDICAL PRODUCTS.
Write down the model and serial numbers.
You'll find them on a plate located on the rear outside wall of the unit.
Please write these numbers here:
Date of Purchase
Model Number
Serial Number
Use these numbers in any correspondence or service calls concerning your unit.
If you received a damaged unit, immediately contact the dealer (or builder) that sold you the unit.
Save time and money. Before you call for service, check the Troubleshooting Guide. It lists causes of minor operating problems that you can correct yourself.
IF YOU NEED SERVICE
We're proud of our service and want you to be pleased. If for some reason you are not happy with the service you receive, here are some steps to follow for further assistance. FIRST, contact the people who serviced your unit. Explain why you are not pleased. In most cases, this will solve the problem.
NEXT, if you are still not pleased, write all the details, including your telephone number, and send it to:
Customer Service
Avanti Products
10880 NW 30 Street
Miami, FL 33172 USA
PARTS & FEATURES
1 Safety Latch
2 See -thru window
3 Leveling Legs
4 Upper Door Hinge
5 Pressure gauge window
6 Tap with pull handle
7 Temperature Control Panel
8 Drip Tray
9 Regulator with pressure gauge and cartridge holder assembly
10 Keg Piercing assembly
11 Keg support rail
12 Glass mug tray
13 Cleansing cylinder (Not Shown)
14 Keg Seal (Total 2) (Not Shown)
15 Replacement Hoses (Total 2) (Not Shown)
16 Tap Plug (Total 1) (Not Shown)
INSTALLATION INSTRUCTIONS
Before Using Your Appliance
- Remove the exterior and interior packing.
- Check to be sure you have all of the accessories.
- Clean the interior surface with lukewarm water using a soft cloth.
• Prior to operating the appliance, read the following instructions:
- Do not use the appliance if the power supply cord is damaged. Should it be the case, it must be replaced by a qualified person so as to avoid any shock hazard.
- This appliance is not designed for young children. Never leave unattended children use this appliance.
- Prior to any cleaning, and in general when it is not operated, make sure that the appliance is disconnected.
- Make sure that your Appliance is set on a flat surface, protected from the sun and any other heat source.
• This appliance should be operated at a room temperature between 12° - 25 °C / 53° - 77°F.
- Do not move the appliance when it is full so as to prevent it from falling over.
- The power supply cable must be grounded. Never pull the cable directly to disconnect the appliance. Always pull the plug out of the socket.
- Never lift the appliance by the power supply cable or the dispensing tap. Lift the Appliance by its stand.
- Keep the power supply cable away from heating surfaces.
- Do not try to repair, adjust this appliance or replace its components by yourself. Should it not operate correctly, contact Avanti Products Customer Service.
- This appliance is designed for household use only and not for an intensive professional use. Do not use the appliance for other uses than the one for which it is designed.
- Do not immerse the appliance or its power supply cord in water or any other liquid. Never place it into the dishwasher.
- Do not cover the appliance or place anything on it.
- Do not insert any object into the ventilation spaces.
- Only use the gas cartridges provided for this appliance.
- Cartridges contain pressurised CO _2 . Keep them in a dry and cool place, away from heat.
- Do not throw away empty CO _2 cartridges into a fire or any other incendiary device.
- Prior to operating the Appliance, clean it complying with the instructions given in the "Keg Removal and Cleaning the Unit" chapter.
Warning
Improper use of the grounded plug can result in the risk of electrical shock. If the power cord is damaged, have it replaced by an authorized Avanti Products service center.
This appliance should be properly grounded for your safety. The power cord of this appliance is equipped with a three-prong plug which mates with standard three prong wall outlets to minimize the possibility of electrical shock.
Do not under any circumstances cut or remove the third ground prong from the power cord supplied. For personal safety, this appliance must be properly grounded.
This appliance requires a standard 115/120 Volt AC \~/60Hz electrical ground outlet with three-prong. Have the wall outlet and circuit checked by a qualified electrician to make sure the outlet is properly grounded. When a standard 2-prong wall outlet is encountered, it is your responsibility and obligation to have it replaced with a properly grounded 3-prong wall outlet.
The cord should be secured behind the appliance and not left exposed or dangling to prevent accidental injury.
The appliance should always be plugged into its own individual electrical outlet which has a voltage rating that matches the rating label on the appliance. This provides the best performance and also prevent overloading house wiring circuits that could cause a fire hazard from overheated. Never unplug the appliance by pulling the power cord. Always grip the plug firmly and pull straight out from the receptacle. Repair or replace immediately all power cords that have become frayed or otherwise damaged. Do not use a cord that shows cracks or abrasion damage along its length or at either end. When moving the appliance, be careful not to damage the power cord.
EXTENSION CORD
Because of potential safety hazards under certain conditions, it is strongly recommended that you do not use an extension cord with this appliance. However, if you must use an extension cord it is absolutely necessary that it be a UL/CUL-Listed, 3-wire grounding type appliance extension cord having a grounding type plug and outlet and that the electrical rating of the cord be 115 volts and at least 10 amperes.
SURGE PROTECTOR
Most electrical appliances use a series of electric control boards to operate. These boards are very susceptible to power surges and could be damaged or destroyed.
If the appliance is going to be used in an area or if your city / country is prone to power surges / outages; it is suggested that you use a power surge protector for all electrical devices / appliances you use. The surge protector that you select must have a surge block high enough to protect the appliance it is connected to. If you have any questions regarding the type and size of surge protector needed contact a licensed electrician in your area.
Damages due to power surges are not considered a manufacturer covered defect and will void your product warranty.
Installation of Your Appliance
- Take the appliance out of its packaging (do not allow children to play with plastic parts, as this can cause a possible choking hazard).
- Place your Party Pub on a steady and horizontal flat surface, leaving at least 5 inches / 10 cm on either side so as to allow correct ventilation of the appliance.
- Set the drip tray into the notches provided.
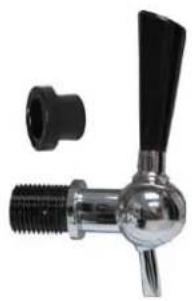
- Install the dispenser handle and the dispensing head to the door, making sure that both endpieces perfectly fit together.
natural_image
Close-up of a metallic pipe fitting with a black handle and threaded end (no text or symbols visible)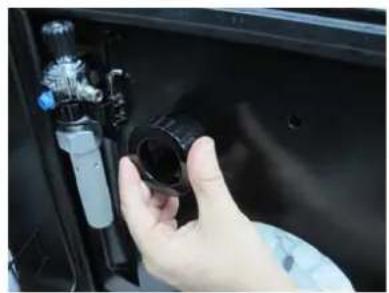
natural_image
Hand holding a black plastic hose inside a vehicle engine compartment (no visible text or symbols)- Connect the appliance to the 115V AC power supply
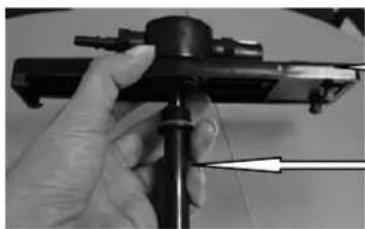
- Screw the piercing pin into the dispensing unit. Make sure that the transparent seal is properly located on the pin before screwing, otherwise, fit it correctly.
natural_image
Close-up of a hand holding a mechanical device with a pointer arrow pointing to it (no visible text or symbols)Dispensing unit
Piercing pin with transparent Keg seal
Preparing the keg
Your Party Pub will keep your 5L Keg cool for an almost indefinite period. Once a keg (your Party Pub is designed to hold up to 2 5L Kegs) has been inserted into the running Party Pub, it will maintain a nice, cool temperature. Remember to keep your Party Pub out of direct sunlight and away from any other direct sources of heat.
This appliance is designed for most 5-liter kegs.
Your Party Pub can cool a 5-liter keg from 25°C to 3°C (77° to 38°F) in 9 hours.
Pre-cooling is not needed if the Party Pub is cooled to a temperature of 38°F
Your Party Pub is designed to refrigerate a 5-liter keg down to a 3 °C (38°F) temperature within 10 hours.
Never put a keg into the freezer. The beer might freeze and the keg could burst.
IMPORTANT:
Before piercing the plug on the top of the keg, you must always follow the instructions marked on the keg to eliminate the excess gas and ensure that the keg has rested long enough to avoid foam coming out through the tap faucet.
a) Heineken keg:
When using the Heineken type keg:
Remove the spout that is supplied with the keg. Remove the adaptor from the keg.
Using the Heineken keg adapter supplied with your Mini-Pub attach it to the dispensing end of the spout. Insert the end of the faucet hose into the Heineken adapter.
b) Keg with rubber plug:
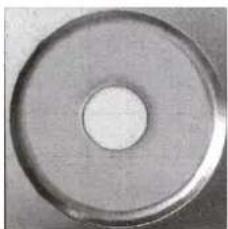
This type of plug allows you to pierce the keg simply using the dispensing kit.
natural_image
Close-up of a metallic ring with a central hole (no text or symbols visible)c) Keg with combined plug:
This type of plug requires the excess air to be vented from the keg by complying with the instructions indicated on the keg. Then, this part must be removed by vigorously pulling it so as to reveal the second part of the plug which can be pierced as in example b).
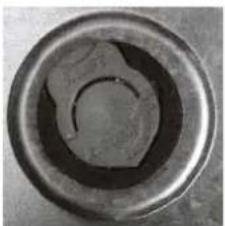
natural_image
Close-up of a circular mechanical component with concentric rings and central slot (no visible text or symbols)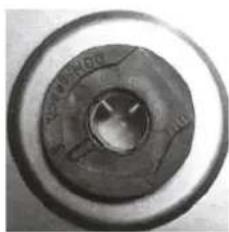
natural_image
Close-up of a circular mechanical component with central hole and flanges (no visible text or symbols)d) Keg with vent plug:
Since both plugs are visually similar, it is impossible to differentiate between a vent plug and a combined plug.
With the vent plug, proceed as with the combined plug (see example c): open the plug and allow the air to vent out (Follow the keg manufacturer's guide as printed on the keg).
Then, you must remove the vent plug as follows:
Using a flat head screwdriver, place the screwdriver underneath the locking ring and lift up the plug. A part of the plug will fall into the keg. This is normal and will not alter the beer's flavor.
Then, fit the all-purpose plug (white keg seal) provided with your appliance into the opening where the original plug used to be.
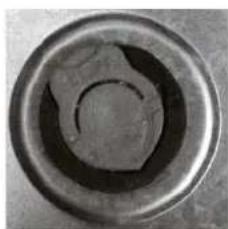
natural_image
Close-up of a metallic circular component with a central hole and concentric rings (no visible text or symbols)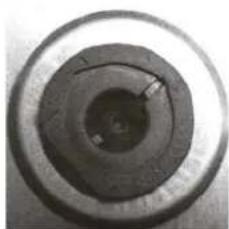
natural_image
Close-up of a circular mechanical component with concentric rings and central bore (no visible text or symbols)d) Other types of kegs:
Remove the plug's cover then cut the vent plug with the pliers or other tools. Then, fit the all-purpose plug (white keg seal) provided with your appliance into the opening where the original plug used to be.
CAUTION: allow the beer to rest before piercing the plug so as to avoid beer spray.
Piercing pin:
Prior to installing the piercing pin in the keg, place it under running water so that it is wet at the time of insertion.
Fit the bit vertically and drive it vigorously into the keg.
Then, secure the dispensing head on the keg, pull the locking latch outwards then release it. A click should be heard, indicating that the dispensing head is correctly secured on the keg.
IMPORTANT:
Once the keg is pierced, the beer contained must be consumed within 28 days, provided that it remains refrigerated.
Setting up the keg
- Open the door by pulling the door forward with enough force to release the safety latch.
- Place the keg on the refrigerating stand, making sure that the female plug of the dispensing head is on the right.
- Connecting the hoses: the male plug of the dispensing head corresponds to the gas inlet. The female plug corresponds to the beer outlet.
Setting up the gas cartridge
a) 16 gram cartridge (Accessory item, sold separately)
• A 16 gram cartridge can be ordered and will dispense one or more 5L keg.
- Make sure that the pressure gauge valve is shut (to shut the valve, turn it counterclockwise).
- Attach the pressure gauge to the end piece of the CO2 adapter, all the way until it is completely tight.
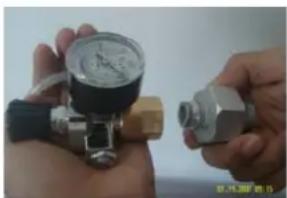
natural_image
Close-up of hands holding a pressure regulator and a mechanical component (no visible text or symbols)- Insert the 16 gram CO_2 cartridge in the long part of the adapter.
- Screw the two parts of the adapter together until they are properly tightened and no leaks are detected.
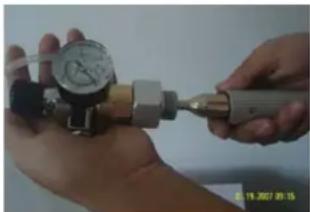
natural_image
Close-up of hands using a pressure gauge tool to measure a mechanical component (no visible text or symbols)- Connect the hose by inserting it into the hose outlet (to check that the hose is correctly connected, try to remove it by slightly pulling it. Resistance indicates that the hose is correctly connected. In order to disconnect the hose, push in the blue plastic collar on the hose outlet while pulling the hose). See below.
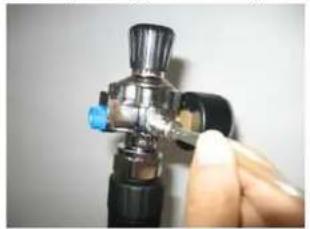
natural_image
Close-up of a hand holding a metallic pressure regulator with blue valve (no text or symbols visible)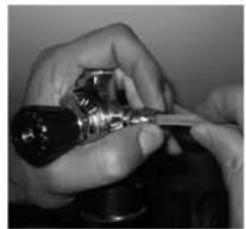
natural_image
Close-up of hands using a screwdriver to adjust a mechanical component (no visible text or symbols)- Place the face of the regulator into the opening on the door and hold it in place with the latch provided.
- Close the door.
b) 255 gram (9 oz) cylinder (Accessory item, sold separately)
• A 255 gram (9 oz) cylinder can be ordered and will dispense up to ten 5L kegs.
- Make sure that the pressure gauge valve is shut (to shut the valve, turn it counterclockwise).
- Screw the gas cartridge on the pressure gauge until fit is tight and firm.
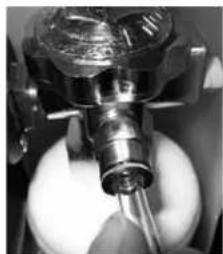
- Connect the hose by inserting it into the regulator hose outlet (to check that the hose is correctly connected, try to remove it by slightly pulling it. Resistance indicates that the hose is correctly connected. In order to disconnect the hose, push in the blue plastic collar on the hose outlet while pulling the hose). See below.
natural_image
Close-up of a mechanical component with a metallic shaft and circular base (no visible text or symbols)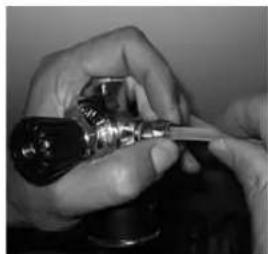
natural_image
Close-up of hands using a screwdriver to adjust a mechanical component (no visible text or symbols)- Place the assembly into the housing provided, making sure that the pressure gauge dial is in front of the window and close the latch.
- Close the door.
Adjusting the gas pressure
| Beer type | CO2 content in % | Pressure in bar approx. 5°C |
| German beers | +/- 0.5 | +/- 0.4 à 0.5 bars |
| French beers | +/- 0.6 à 0.8 | +/- 0.8 bars |
| Very fermented brown ales | +/- 0.6 à 0.8 | +/- 0.8 à 1 bars |
Setting the Temperature
You will need to set the temperature to best suit your taste.
The temperature can be set from 38^ to 43^ F ( 3^ to 6^ C), using the temperature selectors (▲ and ▼ located below the temperature display.

You can select temperature display setting from Fahrenheit to Celsius degree by pushing appear in blue color in the temperature display window.
Interior LED Light
The Party Pub is also equipped with an interior LED light, that can be turned ON or OFF by pressing the light ON / OFF button.

Dispensing Your Beer
- Always use clean glasses rinsed with very cold water at the time of serving. Impurities prevent the foam from forming in the glass.
- Hold the glass under the dispensing tap, making sure that its end-piece is not in contact with the glass.
- Pull the dispensing tap handle towards you while holding the glass inclined at a slight angle. The quantity of foam depends on the glass inclination. Set the glass upright as the beer level rises.
- Return the tap handle to its original position when the foam reaches the glass brim. The beer will stop flowing.
CARE AND MAINTENANCE
Keg Removal and Cleaning the Unit
When the keg is empty, it is advisable to thoroughly clean the Party Pub before loading another keg.
a) To empty remaining beer from the beer line and remove the keg.
- Open the door and shut the regulator valve (to shut the valve, turn it counter clockwise).
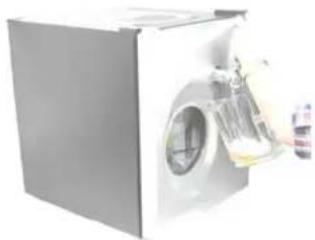
- Place a container under the dispensing tap and drain by pulling the handle towards you until nothing flows.
natural_image
Exterior view of a modern stainless steel cabinet with a water dispenser inside (no visible text or symbols)- Disconnect the hoses from the dispensing head.
natural_image
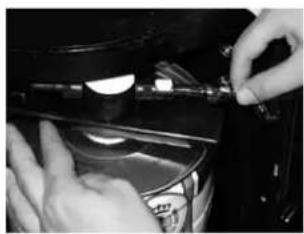
Close-up of hands installing or adjusting a component on a dark surface, no visible text or symbols- Empty the remaining gas using the relief valve supplied as indicated in the photograph to the right. You will hear a "hissing" sound that will indicate that all of the remaining gas is being expelled, continue this step until you no longer hear the "hissing" sound.
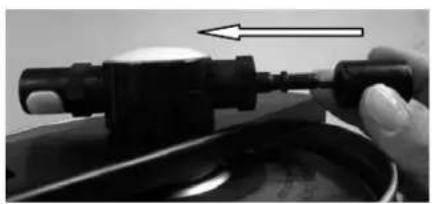
natural_image
Close-up of a hand using a tool to adjust or install a mechanical component, with no visible text or symbols.- Unlock the dispensing head from the keg by pushing the catch and remove the piercing pin from the keg.
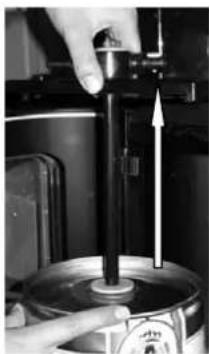
natural_image
Close-up of a hand operating a cylindrical device with a pointer and arrow indicating motion (no visible text or symbols)b) To clean the beer lines
- Fill the cleaning bottle supplied with your appliance half-way with lukewarm water. As required, you may add a bit of detergent. Push it firmly onto the dispensing kit.
- Reconnect the hoses on the dispensing kit as indicated in section "Setting up the keg".
- Open the valve of the pressure gauge and set the pressure to 1.0 bar for 5 seconds and then close the valve again immediately.
• Pull the tap handle towards you and allow the cleaning solution to flow completely. - Once you have completely finished all of the cleaning solution, rinse the appliance using the same method but with clean water.
- Pull on the tap handle to empty the cleaning bottle and release the remaining gas.
• The various Party Pub accessories are not designed to be washed in a dishwasher.
c) To clean the Party Pub exterior surfaces.
- Before cleaning the appliance, it is essential to turn off the main switch and then pull the plug out of the socket.
- The drip tray and cover can be removed from the unit either separately or together by pulling it away from the unit. After cleaning the tray and cover can be returned to place in the reverse manner.
CAUTION
Failure to unplug the Party Pub could result in electrical shock or personal injury.
Storage
When the appliance is not used for a long period of time. Store the appliance in a dry place out of children's reach.
PROBLEMS WITH YOUR APPLIANCE?
You can solve many common unit problems easily, saving you the cost of a possible service call. Try the suggestions below to see if you can solve the problem before calling the servicer.
TROUBLESHOOTING GUIDE
| PROBLEM | POSSIBLE CAUSE |
| Unit does not operate. | Unit is not plugged in.The circuit breaker tripped or a blown fuse. |
| Unit is not cold enough. | Check the temperature control setting.External environment may require a higher setting.The door is opened too often.The door is not closed completely.The door gasket does not seal properly.The unit does not have the correct clearances.Abnormal voltage. |
| Vibrations. | Check to assure that the unit is level. |
| The light does not work. | Not plugged in.The circuit breaker tripped or a blown fuse.The light button is “OFF”. |
DRAUGHT BEER TROUBLE GUIDE
CLOUDY BEER
When beer in glass appears hazy, and not clear.
Causes Corrections
| 1)Over chilling beverage cooler and/or beverage lines. | 1)Excessive low temperatures ma y cause hazy, cloudy beer, particularly when beer lies in cold coil for long periods of time. Make certain that lines are thoroughly cleaned, and then raise temperature slightly. |
| 2)General conditions causing cloudy beer. | 2)See wild beer corrections #2, #5, #6, and #7, and flat beer corrections #5, #7, and #8. |
FLAT BEER
Foamy head disappears quickly: beer lacks usual zestful brewery fresh flavor.
Causes Corrections
| 1)Greasy glass | 1)Do not wash beer glasses together with glasses that have contained milk or any other fatty substance. Lipstick is a fatty substance.. Make sure it is removed from glass.Excess amount of germicides build up and leave a fatty film on glass, which may cause flat beer.It is preferable to steam and sterilize glasses where health laws permit.Wash glasses thoroughly with a good detergent.Do not use soap.Do not dry-wipe glasses. Permit glasses to air-dry by placing them on wire or corrugated metal.Rinse in fresh cold water just before serving beer. It is best to serve beer in a wet glass. |
| 2)Improper drawing of beer into glass. | 2)Open faucet quickly and completely.Check and find the correct distance to hold glass from faucet when drawing. Proper foam should be a tight creamy head, and the collar on the average glass should be 34 " to 1" high.Beer drawn without head has appearance of being flat. |
| 3)Not enough pressure. | 3)Increase pressure if beer runs too slowly.Correct flow is to fill |
| 4)Sluggish pressure regulators. | 6)A regular seat, or the regulator diaphragm, may require replacing.Also, check the same as you would for Corrections 3 & 4. |
LOOSE FOAM
Causes Corrections
| • Large soap- like bubbles (sometimes called fish eyes). Foam settles quickly. | • This is generally a Flat Beer condition: the Causes and corrections for Flat Beer should be followed. |
WILD BEER
Beer, when drawn, is all foam, or too much foam, and not enough liquid beer.
Cause Corrections
| 1)Improper drawing beer into glass. | 1)Open faucet quickly and completely.Check and find the correct distance to hold glass from faucet when drawing. Proper foam should be a tight, creamy head, and the collar on the average glass should be 34 “ to 1” high. |
| 2)Yeast growth, or other obstructions in faucet. | 2)Clean faucet hoses daily. |
| 3)Kinks, dents, or twists in coils, or direct draw lines: obstructions in line, near, or behind faucet. | 3)Check for, and replace kinked, dented, or twisted line from barrel to faucet.Examine for frayed coupling washer behind faucet that may cause obstruction. |
| 4)Excess CO _2 . | 10)Adjust pressure when using CO _2 as low as possible, however, remembering that the applied pressure must be slightly higher than the internal pressure of the beer (no more than 18 lbs. should be applied.)The colder the beer and the higher the applied CO _2 pressure, the more rapid the absorption of CO _2 by the beer. This over-carbonates the beer, causing Wild Beer. |
| 5)Not enough pressure.No pressure | 11)Always turn pressure on before drawing beer. |
| 6)Old Beer. | 12)Rotate stock. The oldest beer should be tapped first; if beer has been allowed to stand in warm temperature beyond 45° for any excessive length of time, it may begin secondary fermentation.Store beer at 40° all year round. |
YOUR Avanti Products WARRANTY
Staple your sales receipt here. Proof of original purchase date is needed to obtain service under warranty.
WHAT IS COVERED LIMITED ONE-YEAR WARRANTY
For one year from the date of purchase by the original owner, Avanti Products will, at its option, repair or replace any part of the unit, which proves to be defective in material or workmanship under normal use.
Avanti Products may provide you with a reasonably similar replacement product that is either new or factory refurbished.
During this period Avanti Products will provide all parts and labor necessary to correct such defects free of charge, so long as the unit has been installed and operated in accordance with the written instructions in this manual. In rental or commercial use, the warranty period is 90 days. All Avanti Appliances of 3.5 cubic feet capacity or less must be brought/sent to the appliance service shop for repair.
LIMITED SECOND THROUGH FIFTH YEAR WARRANTY
For the second through the fifth year from date of original purchase, Avanti Products will provide a replacement compressor free of charge due to a failure. You are responsible for the service labor and freight charges. In rental or commercial use, the limited compressor warranty is one year and nine months. Cost to move the unit to the servicers' shop and back to the user's home, as may be required, are the user's responsibility.
WHAT IS NOT COVERED
- Content losses of food due to spoilage.
- Incidental or consequential damages.
- Parts and labor costs for the following will not be considered as warranty:
- Evaporator doors, door springs, and/or frames.
- Inner door panels, door shelves, door rails, and/or door supports.
- Chest refrigerator lid liners.
- Vegetable crispers.
• Light bulbs and/or plastic housing. - Plastic cabinet liners.
- Punctured evaporator that voids the warranty on the complete sealed system.
- Shipping and handling costs associated with the replacement of the unit.
• Repairs performed by unauthorized servicers.
- Service calls that do not involve defects in material or workmanship such as customer education, door reversal, or proper installation.
- Service calls that are related to external problems, such as abuse, misuse, inadequate electrical power, accidents, fire, floods, or acts of God.
- Surcharges including but not limited to, any after hour, weekend, or holiday service calls, tolls, ferry trip charges, or mileage expense for service calls to remote areas, including the state of Alaska.
- Replacement of house fuses or resetting circuit breakers.
- Failure of the product if it is used for other than its intended purpose.
- This warranty does not apply outside the Continental USA.
SERVICE FOR YOUR APPLIANCE
We are proud of our customer service organization and the network of professional service technicians that provide service on your Avanti refrigerators. With the purchase of your Avanti unit, you can be confident that if you ever need additional information or assistance, the Avanti Products Customer Service team will be here for you. Just call us toll-free.
AVANTI PRODUCTS CUSTOMER SERVICES
| Product Information800-323-5029 | Whatever your questions are about our products, help is available. |
| Part Orders800-220-5570 | You may order parts and accessories that will be delivered directly to your home, by personal check, money order, Master Card, or Visa. |
| In-Home Repair Service800-220-5570 | An Avanti Products authorized service center will provide expert repair service, scheduled at a time that is convenient for you. Our trained servicers know your refrigerator inside and out. |
Thank you for purchasing this fine Avanti product. Please fill out this form and return it to the following address within 100 days from the date of purchase and receive these important benefits:
Avanti Products, A Division of The Mackle Co., Inc.
P.O.Box 520604 – Miami, Florida 33152
Protect your product:
We will keep the model number and date of purchase of your new Avanti product on file to help you refer to this information in the event of an insurance claim such as fire or theft.
➢ Promote better products:
We value your input. Your responses will help us develop products designed to best meet your future needs.
(detach here)
Avanti Registration Card
| Name | Model # | Serial # | ||
| Address | Date Purchased | Store / Dealer Name | ||
| City | State | Zip | E-mail Address | |
| Area Code | Phone Number | Occupation | ||
| Did You Purchase An Additional Warranty | As your Primary Residence, Do You: | |||
| ☐ Extended☐ None | ☐ Own | ☐ Rent | ||
| Reason for Choosing This Avanti Product: Please indicate the most important factors That influenced your decision to purchase this product: | Your Age: | |||
| ☐ under 18 | ☐ 18-25 ☐ 26-30 | |||
| ☐ 31-35 | ☐ 36-50 ☐ over 50 | |||
| Marital Status: | ||||
| ☐ Married | ☐ Single | |||
| ☐ Price☐ Product Features☐ Avanti Reputation☐ Product Quality☐ Salesperson Recommendation☐ Other: ____☐ Friend / Relative Recommendation☐ Warranty☐ Other: ____ | Is This Product Used In The: | |||
| ☐ Home | ☐ Business | |||
| How Did You Learn About This Product: | ||||
| ☐ Advertising | ||||
| ☐ In-Store Demo | ||||
| ☐ Personal Demo | ||||
Comments:
Ver 1 – 10-19-2010
PRINTED IN CHINA
- TABLE OF CONTENTS
- IMPORTANT SAFETY INSTRUCTIONS
- APPLIANCE SAFETY
- ! DANGER !
- WARNING
- CAUTION
- IMPORTANT SAFEGUIDES
- DANGER
- HELP US HELP YOU...
- Read this guide carefully.
- Avanti Customer Service 800-220-5570
- CAUTION:
- Write down the model and serial numbers.
- IF YOU NEED SERVICE
- PARTS & FEATURES
- INSTALLATION INSTRUCTIONS
- Before Using Your Appliance
- EXTENSION CORD
- SURGE PROTECTOR
- Installation of Your Appliance
- Preparing the keg
- IMPORTANT:
- a) Heineken keg:
- b) Keg with rubber plug:
- c) Keg with combined plug:
- d) Keg with vent plug:
- d) Other types of kegs:
- Piercing pin:
- Setting up the keg
- Setting up the gas cartridge
- Setting the Temperature
- Interior LED Light
- Dispensing Your Beer
- CARE AND MAINTENANCE
- Keg Removal and Cleaning the Unit
- Storage
- PROBLEMS WITH YOUR APPLIANCE?
- DRAUGHT BEER TROUBLE GUIDE
- CLOUDY BEER
- FLAT BEER
- LOOSE FOAM
- Causes Corrections
- WILD BEER
- YOUR Avanti Products WARRANTY
- WHAT IS COVERED LIMITED ONE-YEAR WARRANTY
- LIMITED SECOND THROUGH FIFTH YEAR WARRANTY
- WHAT IS NOT COVERED
- SERVICE FOR YOUR APPLIANCE
- Protect your product:
- ➢ Promote better products:
Brand : Avanti
Model : CB350S-IS
Category : Drink cooler