
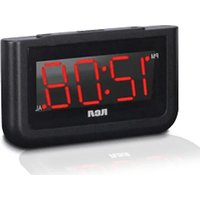
RC130iGR - Alarm clock radio RCA - Free user manual and instructions
Find the device manual for free RC130iGR RCA in PDF.

| Product Type | Alarm Clock Radio with iPod/iPhone Dock |
| Brand | RCA |
| Model | RC130iGR |
| Power Supply | AC Adapter 100-240V~50/60Hz, Output 3V DC 1.2A |
| Radio Bands | FM |
| Preset Stations | Up to 20 FM presets |
| Alarm Features | Dual alarms with Gradu-Wake (volume gradually increases), Snooze (9 minutes), Sleep timer up to 90 minutes |
| Alarm Sources | Buzzer, FM Radio, iPod/iPhone |
| Compatible Devices | iPhone 4, 3GS, 3G; iPod touch 4th/3rd/2nd gen; iPod nano 6th/5th/4th gen; iPod classic; iPod mini; iPod 4G/5G (see manual for full list) |
| Clock Display | Digital with AM/PM indicator, auto-sync with docked iPhone/iPod |
| Controls | SOURCE, STORE, VOL+/-, SNOOZE/SLEEP, play/pause, skip/search |
| Dimensions (Approx.) | 6.5 x 4.5 x 2.5 inches (165 x 115 x 65 mm) |
| Weight (Approx.) | 1.1 lbs (500 g) |
| Cleaning Instructions | Clean with dry cloth only |
| Safety Features | Do not expose to rain/moisture; unplug during lightning storms; use only specified accessories |
| Warranty | 12-month limited warranty (defects in materials/workmanship) |
| Included Accessories | AC power adapter, FM antenna (built-in wire) |
| FM Antenna | Rear wire antenna, extend for best reception |
| Country of Origin | China |
Frequently Asked Questions - RC130iGR RCA
User questions about RC130iGR RCA
0 question about this device. Answer the ones you know or ask your own.
Ask a new question about this device
Download the instructions for your Alarm clock radio in PDF format for free! Find your manual RC130iGR - RCA and take your electronic device back in hand. On this page are published all the documents necessary for the use of your device. RC130iGR by RCA.
USER MANUAL RC130iGR RCA
v2.0 [1.0.2.0] (EN/F)
IMPORTANT SAFETY INSTRUCTIONS PLEASE READ AND SAVE THIS FOR FUTURE REFERENCE

user manual
It is important to read this user manual prior to using your new product for the first time. Thus was recommended that one or manuel avant d'utiliser votre nouveau product pour la première fois.
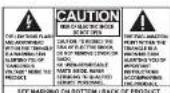
WARNING: TO PREVENT FIRE OR
ELECTRICAL SHOCK HAZARD, DO NOT EXPOSE THIS PRODUCT TO RAIN OR MOISTURE.
Some of the following information may
not apply to your particular product;
however, as with any electronic product precautions should be observed during
producters should be observed during handling and use.
- Read these inst
- Keep these instructions - Need all provisions
- Need all Warnings. - Follow all instructi
- Do not use this appar
water.
- Clean only with dry cloth.
• Do not block any verification
openings. Install in accordance with the manufacturer's instructions.
- Do not install near any heat sources
such as radiators, heat registers,
stoves, or other apparatus-inducing
• Protect the power card from being
walked on or pinched particularly at
plugs, convenience receptacles, and
the point where they exit from the
-
Oak, no.
-
-
-
-
-
-
-
-
-
-
-
-
-
-
-
-
-
-
-
-
-
-
-
-
-
-
-
-
-
-
-
-
-
-
-
-
-
-
-
-
-
-
-
-
-
-
-
-
-
-
-
-
-
-
-
-
-
-
-
-
-
-
-
-
-
-
-
-
-
-
-
-
-
-
-
-
-
-
-
-
-
- 100.
-
-
-
-
-
-
-
-
-
-
-
-
-
-
-
-
-
-
-
-
-
-
-
-
-
-
-
-
-
-
-
-
-
-
-
-
-
-
-
-
-
-
-
-
-
-
-
-
-
-
-
-
-
-
-
-
-
-
-
-
-
-
-
-
-
-
-
-
-
-
-
-
-
-
-
-
-
-
-
-
specified by the manual
• Use only with the
cart, stand, tripod, bracket, or table.
specified by the
manufacturer.
or sold with the
apparatus. When a cort is used. Use caution when moving the cari
apparatus combination to avoid
injury from tie
• Unplug this apparatus during
fghming storms of when on used for long periods of time.
- Refer all servicing
service personnel. Scriving is
required when the apparatus has been damaged in any way, such
as power supply
damaged, liquid
or objects have
apparatus, the abbotus has been exposed to rain or moisture. does
not operate normally, or has been
dropped.
ADDITIONAL SAFETY INFORMATION
• The AC adapter supplied with this product is intended to be correctly
product is intended to be correctly oriented in a vertical or fluar per mou
position.
- Do not use unauthorized chargers
or pause adapters. Use only
products that is listed in the user
guide

• Apparatus shall not be exposed to
dripping or splashing and no objects
filled with liquids, such as vases, shall be placed up the square
• Always leave sufficient space around
the product for ventilation. Do
not place product in or on a bed,
rug. In a bookcase of cabinet that may prevent air flow through vent
may prevent an 100% through 100% openings.
• Do not place lighted candles
cigarettes, cigars, etc. on the
• Care should be taken so that objects
do not fall into the product.
• Do not attempt to disassemble
the cabinet. This product does not contain customer reasonable
FOR CONTINUING MATERIAL SERVICE COMPONENTS.
• The marking information is located
at the bottom of apparatus.
• To be completely disconnect the power input, the AC adapter of
apparatus shall be disconnected
from the mains.
- AC adaptor is a disconnect device. and iPod touch are trademarks of Apple Inc., registered in the U.S. and other
The AC adaptor shall not be obstructed OR should be easily ill., registered in the U.S. and all the countries.
• Attention should be drawn to the
environmental aspects of Battery
disposal.
- The use of apparatus in moderate climates.
Electrical power
information
AC Adaptor
Input: 100 - 240 V AC, 50/60 Hz
Cupol: 3V DC, 1.2 A
"Made for iPod" and "Made for
iPhone* mean that an electronic
acrossby has been designed to connect specifically to iPod or iPhone.
respectively, and has been certified
by the developer to meet Apple
performance standards. Apple is not responsible for the operation of this
responsible for the operation of this device or its compliance with safety and
regulatory standards.
iPhone, iPod, iPod classic, iPod nano
and iPod touch are trademarks of Apple Inc. securities in the U.S. and other
in., registered in the U.S. and in the countries.
FCC Information
FCC Information
Note: This equipment has been tested
and found to comply with the limits for a Class II digital device, pursuant
15 of Class B digital device, pursuant to Part 15 of FCC Rules. These limits
are designed to provide reasonable
protection against harmful interference in a residential installation. This
in a residential installation. The equipment generates uses and can
radiate radio frequency energy and, if
not installed and used in accordance
with the instructions, may cause harmful
However, there is no guarantee
that interference will not occur in a particular installation. If this environment
particular installation of this equipped does cause harmful interference to
radio or television reception, which
can be determined by turning the
equipment off and on, the user is
intefreeze by one at none of the
following measures
- Remitted or relocate the remaining
аптения
• Increase the separation of an appliance and equipment and receiver.
Before you begin
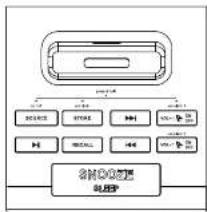
General controls
Plugging in for power
Connect the supplied power 262570 to the 100% Power [25]
and present the other and to a
covenient wall outlet.
- Once connected with power, the dock flashes. Refer to the "Clock" section and follow the instructions in set the clock time.
• To turn on the unit, press and hold SOURCE.
SOURCE - Press to select source, press and hold to turn the unit or or to standby mode.
STORE - In radio mode, store radio stations are usually. In standards made
press and hold to set the clock time.
144/144search radio frequencies; skip or search music file in iPodiphone; adjust clock time and wake time.
VOL+! ON/OFF - In radio or iPod mode, increase volume. In standby mode, press to turn on/off alarm 1 or press and hold to set alarm 1.
flowchart
graph TD
    A["Device 1"] --> B["Switch"]
    A --> C["USB"]
    A --> D["Microcontroller"]
    A --> E["External Monitor"]
    A --> F["Control Panel"]
    A --> G["Data Bus"]
    A --> H["External Display"]
    A --> I["External Audio"]
    A --> J["External Audio Interface"]
    A --> K["External Audio Link"]
    A --> L["External Audio Link to SHORTS USB"]
▶ I - Play/pause when in iPod/Phone mode. In radio mode, switch to iPod/Phone mode.
RECALL - Recall preset stations
VOL-I ON/OFF - In radio or iPod mode, decrease volume, in standby mode, press to turn on/off alarm 2 or press and hold to set alarm 2.
SNOOZE/SLEEP - Turn off the wake function momentarily; set sleep time. Refer to "Sleep function".
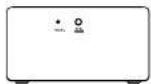
Front view
Rear view
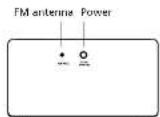
POWER - Connect to the power adapter
Clock
Setting clock
-
In standby mode, press and hold STORE until the hour flashes on the display.
-
Press 🖼️/▶️ adjust the hour time, indicator beside PM lights when the time is set to PM. Press STORE to shift to minute time. Press 🖼️/▶️ adjust the minute time and then press STORE to save. The time decrements or increments follow a faster rate when you press and hold the 🖼️/▶️
-
To save and exit the clock setting, wait for about 5 seconds or press STORE until the hour and minute step flashing.
Auto time synchronization Each time on iPhone/Fod is docked, the clock would automatically synchronize
with the iPhone's or iPod's ti

When docking an iPhone/iPod,
• the clock will be synced to the iPhone.
- the time on your iPhone is provided by your mobile phone service. The time on your iPod is provided from iTunes during the last connection to your computer. Please note that it is possible to have up to 59 seconds time difference between your RCA clock display and your iPhone or iPod time display.
Radio
Listening to the radio
To turn on or off radio: • In standby mode, press and hold SOURCE to switch to radio mode.
• Press and hold SOURCE to return to
To tune frequency:
- In redia moche, press H4. H4
selected frequency shows by the display.
• Press and hold ◄◄10►►
automatically search for the
previously available station.
FM Antenna
This unit is equipped with an FM antenna at the back. Uncoll the antenna to its full length for best reception. Tape the end of the antenna onto the wall if possible to improve reception.
Station presets
To store a station as preset:
-
Table 10: a stereo spectral;
-
Press STORE, an available preset location (e.g. P01) shows on the deploy.
-
Press ▶▶▶—lect a desired preset location (01 - 20).
-
Press STORE. You can save up to 20 preset stations.
iPod/iPhone
Listening to iPod/iPhone
To connect iPod/Phone: Place your iPod/Phone on the universal desk for iPod/Phone
To select iPod mode
- In standby mode, press and hold SOURCE to turn on the unit. Press SOURCE until Press is discharged.
- Playback from the iPodPhone starts automatically.
- If no iPodiPhone is connected in the iPod mode, the unit will exit the iPod mode and return to standing mode.
To control the playback:
-
During playback, press F1 to pause the playback and press again to resume.
-
Press Hot Book to the
previous or next file. - Press and hold (▲▲▲▲▲▲▲▲▲▲▲▲▲▲▲▲▲▲▲▲▲▲▲▲▲▲▲▲▲▲▲▲▲▲▲▲▲▲▲▲▲▲▲▲▲▲▲▲▲▲▲▲▲▲▲▲▲▲▲▲▲▲▲▲▲▲▲▲▲▲▲▲▲▲▲▲▲▲▲▲▲▲▲▲▲▲▲▼
To charge the iPod/iPhone:
- You may charge the battery of your iPodiPhone through the universal dock for iPod while the unit is in standby mode, radio mode or iPod mode. Charging control should be operated on the iPodiPhone.
iPod/iPhone
Wake function
Incoming call alert When there is an incoming call during iPhone music playback, the music station will stop music playback and play the rington. Music playback would resume when the phone call is finished.
Made for
- iPhone 4 16GB, 32GB
- iPhone 365 RGB, 36GB
3258
- iPhone 3G 958.1859
- iPod touch 4th generation UGU.
3205, 6405
8453
- iPod touch 2nd generation RGB,
18:32:55
- I'll look at generation date, 1938, 32GB
- iPod nano 6th generation 8GB,
16GB
• iPod page 5th generation 8GB
or 16GB
- iPod nano 4th generation
Ividel 8GB, 10GB
[video] 4GB, 9GB
- iPod classic BDGB.
- iPod as a 2nd generation (claring) 161, 451, 853
• iPod per 1GB, 2GB or 4GB
- iPost 5th generation (video)
30GB, 60GB, 80GB
- iPod mini 4GB, eGB
- iPod 4G penetration
- iPod 4th generation (color
divalry! 20GB, 30GB, 40GB, 60GB
Set wake time
This unit allows 2 wake times to be set
1. In Michigan, Michigan, press and VOLT VOL+/- ON/OFF or VOL- PON/ OFF until the hour 4 avies on the display.
-
Press set the wake time the time decrements or increments follow by a faster rate when you press and hold the button. Press
VOL+ON/OFF or VOL-PON' OFF to adjust the minute when you have finished setting the hour. Free VOL+ON/OFF or VOL-PON' OFF when you have finished setting the minute. -
Press 🖼️ /▶ select the alarm
source.
E - EM Radio
iPod/iPhone
Press VOL ON/OFF or VOL ON/OFF to confirm.
- Press ▶▶ that the alarm
volume level from level 10 to level 30.
- To save and exit the wave setting press VOL+ON/OFF or VOL-/ON/OFF.
• To check the wake time after
VOL (2) BURSE and the connection
VOLATE ON/OFF and the respective assigned wake time shows on the
disloy.
• The unit is equipped with GRAD-
U-WAKE feature, the alarm tone
volume will increase gradually to its maximum in 10.39 years. The
to maximum in 10-30 seconds. The maximum volume level disperses on
the alarm volume level set in step 4.
will sound again when the snooze
period is over. The snouze period is
9 minutes.
To turn off the alarm
- Press any keys other than SNOOZE/ FLEE
JULCEP.
To stop the wake function or
to disable the wake function
completely:
- Press VOL+ ON/OFF or VOL-/P
UNOFF NICE until the indicator beade AL1 or AL2 does not show
on the display.
Sleep function
in the sleep mode, the radio or iPad can
be
while above turning an automatically.
To set the sleep time:
- Post SNOOZE'SLEEP repeatedly to grip aware the sicer time.
to cycle among the deep line available 190min, 80min, 70min,
10min at 60. The sleep time is
default to 01.
To change or check the remaining
time in sleep mode
the remaining sleep time. Press
SNOOZE/SLEEP repeatedly to select
another sleep time.
To cancel the sleep mode:
• Press and hold SOURCE to cancel
the cheap, omms and turn on the unit.
37
If you press SNOOZE/SLEEP
repeatedly to select "00".
this will only turn off the
Sleep function: The unit will not be turned off.
(1) 2017年1月1日
Warranty information
12 Month Limited Warranty
Applies to RCA Clock Radios
AUDIOVOX ACCESSORIES CORP.
(the Company) warrants to the original retail purchases of this
original retail purchaser of the product that should this product.
or any part thereof, under normal
defective in material or ownership
within 12 months from the date
of original purchase, such defect(s)
Will be repaired by Applified with reperfigned product (a) the
Company's option without charge for
parts and repair labor.
To obtain repair or replacement
within the terms of this Warranty, the
product is to be attained with proof of warranty coverage (e.g. dated bill
of sale, specification of detectis),
transportation prepaid, to the
Company at this address shown below:
This Warranty does not extend to the
- elimination of externally generated static or noise, to correction of
antenna problems, low/interruptions of
broadcast or internet service, to costs
Incurred for installation, removal of reinstallation of product to corruptions
caused by computer viruses, spyware
or other malware, to loss of media,
If xs, data or content, or to damage to tapes, class, removable memory.
devices or cards, speakers, accessories.
computers, computer peripherals, other
media players, home networks or
vehicle electrical systems,
This Warranty does not apply to any
product at part thereof which, in the
opinion of the Company, has uifond
opinion of the company, has suffered or been damaged through alteration.
improper installation, misharding,
reversal or defecement of the factory
serial rannlan/par code label[s]. THE
EXTENT OF THE COMPANY'S LIABILITY UNDER THIS WARRANTY IS UNITED
UNDER THIS WARRANTY IS LIMITED TO THE REPAIR OR REPLACEMENT
PROVIDED ABOVE AND, IN NO EVENT,
SHALL THE COMPANY'S LIABILITY EXCEED THE PURCHASE PRICE DAILY
EXCEED THE PURCHASE PRICE PAID BY PURCHASER FOR THE PRODUCT.
This Warranty is in lieu of all other
express warranties or liabilities. ANY IMPLIED WARRANTIES, INCLUDING
ANY IMPLIED WARRANTY OF
MERCHANTABILITY, SHALL BE LIMITED
TO THE DURATION OF THIS WRITTEN WARRANTY ANY ACTION FOR PREACH
WARRANTY ANY ACTION FOR BREAK OF ANY WARRANTY HEREUNDER
INCLUDING ANY IMPLIED WARRANTY
OF MERCHANTABILITY MUST BE EROUGHT WITHIN A PERIOD OF 24
BROUGHT WITHIN A PERIOD OF 24 MONTHS FROM DATE OF ORIGINAL
PURCHASE IN NO CASE SHALL THE
COMPANY BE LIABLE FOR ANY CONSEQUENTIAL OR NOTED
CONSEQUENTIAL OR INCIDENTAL DAMAGES FOR BREACH OF THIS OR
ANY OTHER WARRANTY. No person or
representative is authorized to assume
for the company any liability other
than expressed herein in connection
with the sale of this product.
Some states do not allow limitations on how long an implied warranty lasts or the exclusion or limitation of incidental or consequential damage so, the above limitations or exclusions may not apply to you. This Warranty gives you specific legal rights and you may also have other rights which vary from state to state.
Recommendations before returning
your product for a warranty claim:
- Property, back your limit, includes any remates, memory cards, tables, etc., which were originally provided.
c. Which were originally provided with the product. However, DO NOT
return any removable batteries,
even if batteries were included
with the original purchase, we recommend using the original
carton and packing materials. Ship
to the address shown below.
- Note that product will be satisfied with factory default settings.
Consumer will be responsible to
restore any personal preference settings
settings.
Audiovox Electronics Corp.
Aton Service Dep 150 Marcus Blvd
Hauppauge N.Y. 11786
1.202.767.438
1-200-645-4994
For Cnads Customers, please ship in
Audicovax Return Centre
501 GENTO 5985 Kennedy Road
Unit43, Down 15.
Missesuaga. Ontario LET 265
131 201
Illustrations contained within this publication
are far represented on only and subject to
: 601854.
The descriptions and characteristics given in the document are given as a general
Pension shall turn as quarantine, in fact to satisfy the method of site research.
applicable, we reserve the right to make any
Improvement or modification without risk
TICK: PH.
Visit http://store.audievos.com to find the best accounts for your products.
Best Successes for your products.
For Customer Service Visit Our Website At www.rcaaudiovideo.com Product Information, Photo, FAQs, User Manual
© 2011 Audiosys Accessories Corporation
1:1 Congressional BAC, 502-350 Canaol, D. 46037
Trademarks: Registered
Printed in China
- IMPORTANT SAFETY INSTRUCTIONS PLEASE READ AND SAVE THIS FOR FUTURE REFERENCE
- FCC Information
- Before you begin
- General controls
- Clock
- Radio
- iPod/iPhone
- Wake function
- Set wake time
- Sleep function
- Warranty information
- Month Limited Warranty
- media players, home networks or
- than expressed herein in connection
- For Cnads Customers, please ship in
- Illustrations contained within this publication
- Visit http://store.audievos.com to find the best accounts for your products.
- © 2011 Audiosys Accessories Corporation
- Printed in China
Brand : RCA
Model : RC130iGR
Category : Alarm clock radio