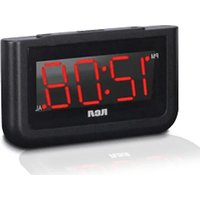
RCD30 - Alarm clock radio RCA - Free user manual and instructions
Find the device manual for free RCD30 RCA in PDF.


| Product Type | Alarm Clock Radio |
| Brand | RCA |
| Model | RCD30 |
| Dimensions (W x H x D) | 6.5 x 3.5 x 5.0 inches (approx.) |
| Weight | 1.1 lbs (approx.) |
| Power Supply | AC adapter (120V, 60Hz) with battery backup (2 x AAA) |
| Radio Tuner | AM/FM with digital tuning |
| Alarm Function | Dual alarm with radio or buzzer, snooze |
| Display | LED display with adjustable brightness |
| Sleep Timer | Yes, adjustable up to 90 minutes |
| Additional Functions | USB charging port, aux input |
| Maintenance & Cleaning | Clean with a soft, dry cloth; do not use liquids |
| Safety Precautions | Use only supplied AC adapter; keep away from water |
| Spare Parts Availability | Not available directly; contact RCA support for options |
| Repairability | Professional repair recommended; no user-serviceable parts inside |
Frequently Asked Questions - RCD30 RCA
User questions about RCD30 RCA
0 question about this device. Answer the ones you know or ask your own.
Ask a new question about this device
Download the instructions for your Alarm clock radio in PDF format for free! Find your manual RCD30 - RCA and take your electronic device back in hand. On this page are published all the documents necessary for the use of your device. RCD30 by RCA.
USER MANUAL RCD30 RCA
v2.0 (1.0.2.0) (EN/F/E)
RCA
user manual
Product registration
Thank you for purchasing an RCA product. We pride ourselves on the quality and reliability of all our electronic products but if you ever need service or have a question, our customer service staff stands ready to help. Contact us at www.rcaaudiovideo.com. PURCHASE REGISTRATION: Registering On-line will allow us to contact you in the unlikely event a safety notification is required under the Federal Consumer Safety Act. Register Online at: WWW.RCAAUDIOVIDEO.COM. Click on Product Registration and Fill Out the Brief Questionnaire.
IMPORTANT SAFETY INSTRUCTIONS
PLEASE READ AND SAVE THIS FOR FUTURE REFERENCE
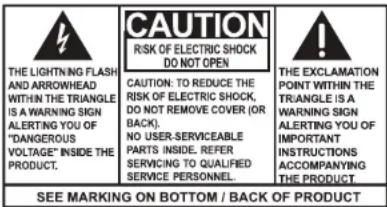
WARNING: TO PREVENT FIRE OR ELECTRICAL SHOCK HAZARD, DO NOT EXPOSE THIS PRODUCT TO RAIN OR MOISTURE.
Some of the following information may not apply to your particular product; however, as with any electronic product, precautions should be observed during handling and use.
- Read these instructions.
- Keep these instructions.
- Heed all warnings.
- Follow all instructions.
- Do not use this apparatus near water.
- Clean only with dry cloth.
- Do not block any ventilation openings. Install in accordance with the manufacturer's instructions
- Do not install near any heat sources such as radiators, heat registers, stoves, or other apparatus (including amplifiers) that produce heat.
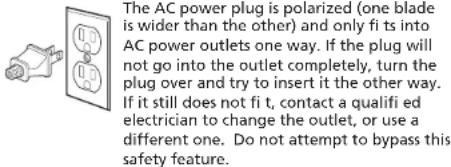
- Do not defeat the safety purpose of the polarized or grounding-type plug. A polarized plug has two blades with one wider than the other. A grounding type plug has two blades and a third grounding prong. The wide blade or the third prong is provided for your safety. If the provided plug does not fit into your outlet, consult an electrician for replacement of the obsolete outlet.
- Protect the power cord from being walked on or pinched particularly at plugs, convenience receptacles, and the point where they exit from the apparatus.
- Only use attachments/accessories specified by the manufacturer.
- Use only with the cart, stand, tripod, bracket, or table specified by the manufacturer, or sold with the apparatus. When a cart is used, use caution when moving the cart/apparatus combination to avoid injury from tip-over.

Portable Cart Warning
- Unplug this apparatus during lightning storms or when unused for long periods of time.
- Refer all servicing to qualified service personnel. Servicing is required when the apparatus has been damaged in any way, such as power-supply cord or plug is damaged, liquid has been spilled or objects have fallen into the apparatus, the apparatus has been exposed to rain or moisture, does not operate normally, or has been dropped.
ADDITIONAL SAFETY INFORMATION
- Apparatus shall not be exposed to dripping or splashing and no objects filled with liquids, such as vases, shall be placed on the apparatus.
- Always leave suffi cient space around the product for ventilation. Do not place product in or on a bed, rug, in a bookcase or cabinet that may prevent air flow through vent openings.
- Do not place lighted candles, cigarettes, cigars, etc. on the product.
- Connect power cord only to AC power source as marked on the product.
- Care should be taken so that objects do not fall into the product.
- Do not attempt to disassemble the cabinet. This product does not contain customer serviceable components.
- The marking information is located at the bottom of apparatus.
• To be completely disconnect the power input, the Mains plug of apparatus shall be disconnected from the mains. - Mains plug is a disconnect device. The mains plug should not be obstructed OR should be easily accessed during intended use.
- The ventilation should not be impeded by covering the ventilation openings with items such as newspaper, table-cloths, curtains etc.
- No naked flame sources, such as lighted candled, should be placed on the apparatus.
- Attention should be drawn to the environmental aspects of battery disposal.
• The use of apparatus in moderate climates.
CAUTION: TO PREVENT ELECTRIC SHOCK DO NOT USE THIS (POLARIZED) PLUG WITH AN EXTENSION CORD, RECEPTACLE OR OTHER OUTLET UNLESS THE BLADES CAN BE FULLY INSERTED TO PREVENT BLADE EXPOSURE.
Plugging in for power
AC OUTLET POWER SUPPLY: 120 V \~ 60 Hz
Electrical consumption
Power Supply: 120 V \~ 60 Hz Power Consumption: 5 Watts
Important battery precautions
- Any battery may present a risk of fire, explosion, or chemical burn if abused. Do not try to charge a battery that is not intended to be recharged, do not incinerate, and do not puncture.
- Non-rechargeable batteries, such as alkaline batteries, may leak if left in your product for a long period of time. Remove the batteries from the product if you are not going to use it for a month or more.
- If your product uses more than one battery, do not mix types and make sure they are inserted correctly. Mixing types or inserting incorrectly may cause them to leak.
- Discard any leaky or deformed battery immediately.
They may cause skin burns or other personal injury. - Please help to protect the environment by recycling or disposing of batteries according to federal, state, and local regulations.
WARNING: The battery (battery or batteries or battery pack) shall not be exposed to excessive heat such as sunshine, fire or the like.
Ecology
Help protect the environment - we recommend that you dispose of used batteries by putting them into specially designed receptacles.
Before you begin
Plugging in for power
- Connect the power cord to a convenient wall outlet.
- Once connected with power, the clock fl ashes. Refer to the Clock section for instructions on properly setting the Clock.
Battery back-up operation
- This clock is equipped with a timekeeping system that can be powered with a 9-volt alkaline battery (not included). The power failure protection circuit will not operate unless battery is installed.
- When normal household power is interrupted, the battery will power the clock to keep track of time and alarm settings programmed into memory.
- When the battery backup functions, the digital display will not light, however, the function of alarm still occurs during the power interruption if remaining battery power is adequate.
- Normal operation will resume after AC power is restored so you will not have to reset the time or the alarm.
To install the battery:
- Remove battery compartment door (located at the back of the clock) by applying thumb pressure to the tab on battery door and then lift the door out and off the cabinet.
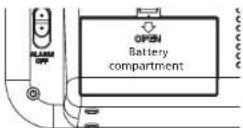
- Connect a 9-volt alkaline battery (not included) to the connector plug.
-
Replace the compartment door.
-
Replace the compartment door.
Power failure indicator
If you have not installed the 9-volt alkaline battery in the product, or the battery runs out while power is interrupted, all the settings (clock and alarm) will be lost. After AC power is restored, the Digital Display will flash to indicate that power was interrupted and you should readjust the time settings.
Note: It is recommended to replace the battery at least once per year even if no power failures have occurred.
Alkaline (NEDA 1604A/IEC 6LR61) type battery is recommended. Carbon-zinc battery may be used but memory holding time will be substantially reduced. Memory holding time for a fresh alkaline battery is approximately 8 hours (if alarm is not operated) which should take care of short, nuisance type AC power failures. To preserve battery life, the unit should remain plugged into an AC outlet. As the battery gets older, its voltage drops and memory may be lost. Be sure to replace the battery periodically. Battery should be removed if the unit will be stored for more than one month. A leaky battery can badly damage unit.
General controls
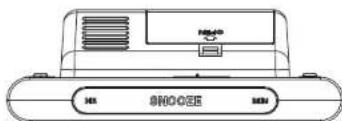
Top view
natural_image
Line drawing of a device casing with labeled buttons (no readable text or symbols)HR - Adjust hour in clock setting mode or alarm setting mode
MIN - Adjust minute in clock setting mode or alarm setting mode
SNOOZE - Enter snooze mode where the alarm will quiet but sound again once the snooze period is over
Back view
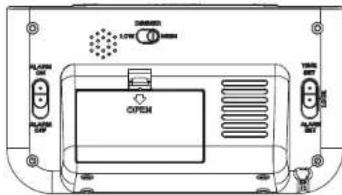
ALARM ON/OFF - Turn the alarm on/off
DIMMER LOW/HIGH – Adjust the brightness of the display
TIME SET/ALARM SET – Enter clock setting mode or alarm setting mode
Clock
Setting clock manually
- Slide the TIME SET/ALARM SET switch to the TIME SET position to enter clock setting mode.
- Press HR to set the hour.
- The clock is in 12 hour format. The PM indicator will appear for showing a PM time.
- Press MIN to set the minute.
- Slide the TIME SET/ALARM SET switch to the LOCK position to confirm and exit clock setting mode.
Alarm
Setting alarm time
-
Slide the TIME SET/ALARM SET switch to the ALARM SET position to enter alarm setting mode.
-
Press HR to set the hour.
- The clock is in 12 hour format. The PM indicator will appear for showing a PM time.
- Press MIN to set the minute.
- Slide the TIME SET/ALARM SET switch to the LOCK position to confirm and exit alarm setting mode.
Turning on/off the alarm
- Slide the ALARM ON/OFF switch to the ON position. The AL indicator will turn on to show that the alarm is on.
- Slide the ALARM ON/OFF switch to the OFF position. The AL indicator will turn off to show that the alarm is off.
Ways to turn off alarm
- To silence the wake function momentarily, press SNOOZE. The alarm will be on again when the snooze period (9 minutes) is over.
- To disable the wake function completely, slide the ALARM ON/OFF switch to the OFF position. The AL indicator will turn off to show that the alarm is off.
Light
Slide the DIMMER LOW/HIGH to adjust the brightness of the display.

- RCA
- user manual
- Product registration
- IMPORTANT SAFETY INSTRUCTIONS
- WARNING: TO PREVENT FIRE OR ELECTRICAL SHOCK HAZARD, DO NOT EXPOSE THIS PRODUCT TO RAIN OR MOISTURE.
- ADDITIONAL SAFETY INFORMATION
- Plugging in for power
- Electrical consumption
- Important battery precautions
- Ecology
- Before you begin
- Battery back-up operation
- To install the battery:
- Power failure indicator
- General controls
- Clock
- Setting clock manually
- Alarm
- Setting alarm time
- Turning on/off the alarm
- Ways to turn off alarm
- Light
Brand : RCA
Model : RCD30
Category : Alarm clock radio