Janus - Smartphone ITTM - Free user manual and instructions
Find the device manual for free Janus ITTM in PDF.

| Product Type | Smartphone |
| Brand | ITTM |
| Model | Janus |
| Operating System | Android 10 (Go edition) |
| Display | 5.5-inch IPS LCD, 720x1440 pixels |
| Processor | Quad-core 1.3 GHz Cortex-A53 |
| RAM | 2 GB |
| Internal Storage | 16 GB expandable via microSD (up to 128 GB) |
| Rear Camera | 8 MP with autofocus and LED flash |
| Front Camera | 5 MP |
| Battery | Li-Ion 3000 mAh, removable |
| Charging | microUSB 2.0, 5V/1A charger |
| Dimensions | 151 x 72 x 8.9 mm |
| Weight | 175 g |
| Connectivity | Wi-Fi 802.11 b/g/n, Bluetooth 4.2, GPS, 4G LTE |
| Sensors | Accelerometer, proximity, ambient light |
| Audio | 3.5mm headphone jack, loudspeaker |
| SIM | Dual SIM (Nano-SIM, dual standby) |
| Maintenance | Clean with soft dry cloth; avoid liquids |
| Safety | Do not expose to extreme temperatures; use original charger |
| Spare Parts | Battery, charging port, screen assembly available from authorized service centers |
Frequently Asked Questions - Janus ITTM
User questions about Janus ITTM
0 question about this device. Answer the ones you know or ask your own.
Ask a new question about this device
Download the instructions for your Smartphone in PDF format for free! Find your manual Janus - ITTM and take your electronic device back in hand. On this page are published all the documents necessary for the use of your device. Janus by ITTM.
USER MANUAL Janus ITTM
3.1 Appearance ....7
3.2 Insert the SIM card and baery 8
3.3 When using with 383....8
3.4 Charging the battery ....8
3.4.1 Charging with 383....8
3.4.2 Separate charge....8
3.5 Headset 8
3.6 Security code....9
4.1 Menu map....9
4.2 Turn on/o 10
4.3 Home screen 10
4.4 Display indicators ....10
- Phonebook....11
- Messages....12
6.1 Text message .... 12
6.2 Chat....12
6.3 Voicemail server....12
6.4 Broadcast message....12
7.1 Make calls....12
7.2 Answer or reject a call....13
7.3 Call Center....13
- User Proles ....14
- Mulmedia....15
10.1 Games .... 16
10.2 Themes....16
11.1 Calendar 16
11.2 Tasks....16
11.3 Alarm....17
11.4 World clock....17
- Your Device....9
- Calls....12
9.1 Sound recorder....15
9.1 Sound recorder....15
9.1 Sound recorder....15
9.1 Sound recorder....15
9.1 Sound recorder....15
9.1 Sound recorder....15
9.1 Sound recorder....15
9.1 Sound recorder....15
9.1 Sound recorder....15
9.1 Sound recorder....15
9.1 Sound recorder....15
9.1 Sound recorder....15
9.1 Sound recorder....15
9.1 Sound recorder....15
9.1 Sound recorder....15
9.1 Sound recorder....15
9.1 Sound recorder....15
9.1 Sound recorder....15 - Fun&Games....16
- Tools .... 16
- Extra....17
12.1 Calculator .... 17
12.2 Currency converter....17
12.3 Stopwatch....17
- Sengs....17
13.1 Phone setup....17
13.2 Network setup....18
13.3 Security setup....18
13.4 Restore factory sengs....19
- Troubleshoong ....19
1. SAFETY AND PRECAUTIONS
Please read these simple guidelines. Not following them may be dangerous or illegal.
Read the complete user guide for further information.
Switch off the phone in the vicinity of chemical plants, gas stations and other locations containing explosive objects.
Keep the phone far away from children.
When driving, please use the hands free calling device to ensure safety. Please park the car at roadside for communication unless in emergency.
Switch off the phone when boarding an airplane and do not switch the phone on during the flight.
Be careful when using the mobile phone in the vicinity of such devices as pacemakers, hearing aids and other electro-medical equipment, which may be interfered by the mobile phone.
No guarantee for the accessories and parts not produced by the original factory.
Never attempt to disassemble the phone by yourself. Contact the supplier in case of any trouble with your mobile phone.
Do not recharge the phone without battery being installed.
Charge the phone in well-ventilated environment and keep away from inflammable and high explosive articles.
To avoid demagnetization, keep the handset away from magnetic substances, such as magnetic discs or credit cards.
Keep the phone away from liquid. If soaking or erosion occurs, take the battery out and contact the supplier.
Avoid using the phone in too high or too low temperature environments. Never leave the phone exposed under direct sunlight, in high humidity or in a dusty environment.
Do not use liquid or a damp cloth with strong detergents to clean the handset.
Wireless phones may be susceptible to interference, which can affect performance.
Use only approved enhancements and batteries. Do not connect incompatible products.
Use only in the normal position as explained in the produce documentation. Do not touch the antenna unnecessarily.
Ensure the phone is switched on and in service. Enter the emergency number, then press the call key. Give your location. Do not end the call until given permission to do so


2. CARE AND MAINTENANCE
Battery care
-Your device is powered by a rechargeable battery. When the charge is low, please re-charge the battery. In order to extend the lifetime of the battery allow the battery to run out of power before recharging.
- Unplug the charger from power source and the phone when not in use. Do not leave the battery connected to a charger once the battery is full. Overcharging may shorten battery lifetime.
- Extreme temperature can affect the ability of your battery to charge. Battery works only at room temperature (between 15 and 25^ ). If the temperature of the battery is too hot or too cold, the battery will not charge and can malfunction. Extreme temperatures reduce and cause malfunctions in the battery.
- Use the battery only for intended purpose.
Never use unauthorized charger or battery or that is damaged.
Do not short-circuit the battery. Accidental short-circuiting can occur when a metallic object such as a coin, clip, or pen causes direct connection of the polarity; (+) and (-) terminals of the battery (metal stripes on the battery). This might happen, for example, when you have a spare battery or magnetic objects in the vicinity. Short-circuiting the terminals can damage the battery or the connectors.
·Do not leave the battery in very warm or cold places, such as in a closed car in summer or winter.
All of the above suggestions apply to the phone, battery, charger, or any accessory. If phone or accessories are not working properly, take only to authorised service facilities. Damaged batteries can damage or ruin components (e.g. Plastics).
- When the phone or accessories return to normal temperature, moisture can form inside and damage circuit boards.
- Do not attempt to open the phone or accessories other than as instructed in this guide.
- Do not drop, knock, or shake the phone or accessories. Rough handling can break internal circuit boards and fine mechanics.
- Do not use chemicals, solvents, or detergents to clean the phone or accessories.
- Do not paint the phone or accessories. Paint can clog the moving parts and prevent proper operation.
- Use only the supplied or authorized replacement parts. Unauthorized parts, modifications, or attachments can damage the phone and may violate regulations governing radio devices.
- Do not dispose of batteries in a fire!
Dispose of batteries according to local regulations. Please recycle when possible. Do not dispose as household waste.
Mobile phone maintenance
- Keep the device dry. Precipitation, humidity, and all types of liquids or moisture can contain minerals that will corrode internal parts and circuits. If your device does get wet, remove the battery and allow the device to dry completely before replacing it.
- Do not use or store the device in dusty, dirty areas to avoid damage to moving parts and components.
- Do not store the phone or accessories in warm areas. High temperatures reduce the life of electronic devices.
Charging your battery
Your device is powered by a rechargeable battery. The full performance of a new battery is achieved only after two or three complete charge and discharge cycles. The battery can be charged and discharged hundreds of times but it will eventually wear out. When the talk and standby times are noticeably shorter than normal, replace the battery. Use only approved batteries and recharges your battery only with approved chargers designated for this device.
If a replacement battery is being used for the first time or if the battery has not been used for a long period, it may be necessary to connect the charger, disconnect it and then reconnect it to begin charging the battery.
Unplug the charger from the electrical plug and the device when not in use. Do not leave a fully charged battery connected to a charger, since overcharging may shorten its lifetime. If left unused, a fully charged battery will lose its charge over time.
If the battery is completely discharged, it may take a few minutes before the charging indicator appears on the display or before any calls can be made.
Use the battery only for its intended purpose. Never use any charger or battery that is damaged.
Do not short-circuit the battery. Accidental short-circuiting will occur when a metallic object such as a coin, clip, or pen causes direct connection of the positive (+) and negative (-) terminals of the battery. (These look like metal strips on the battery.) This might happen, for example, when you carry a spare battery in your pocket or purse. Short-circuiting the terminals may damage the battery or the connecting object.
Leaving the battery in hot or cold places, such as in a closed car in summer or winter conditions, will reduce the capacity and lifetime of the battery. Always try to keep the battery between 15°C and 25°C (59°F and 77°F). A device with a hot or cold battery may not work temporarily, even when the battery is fully charged. Battery performance is particularly limited in temperatures well below freezing.
Do not dispose of batteries in a fire as they may explode. Batteries may also explode if damaged. Dispose of batteries according to local regulations. Please recycle when possible. Do not dispose as household waste.
Note: Actual operation time of the battery varies according to operation mode, network settings and call settings.
Note:
- After the phone has run out of battery, we recommend you recharge in time.
- To ensure safety, do not change the parts and accessories of the battery by yourself or take off the battery shell.
- We suggest you only use the original battery supplied with your phone by our company to avoid any damage to your phone.
- The temperature range for charging the phone is 0^ C- 40^ C. Do not charge the battery in too high or too low temperatures.
- Do not use the mobile phone during charging. Keep the phone away from charger before use.
- Please don't keep charging for a long time. Pull out the charger quickly after the battery is fully charged.
3. Get Started
3.1 Appearance
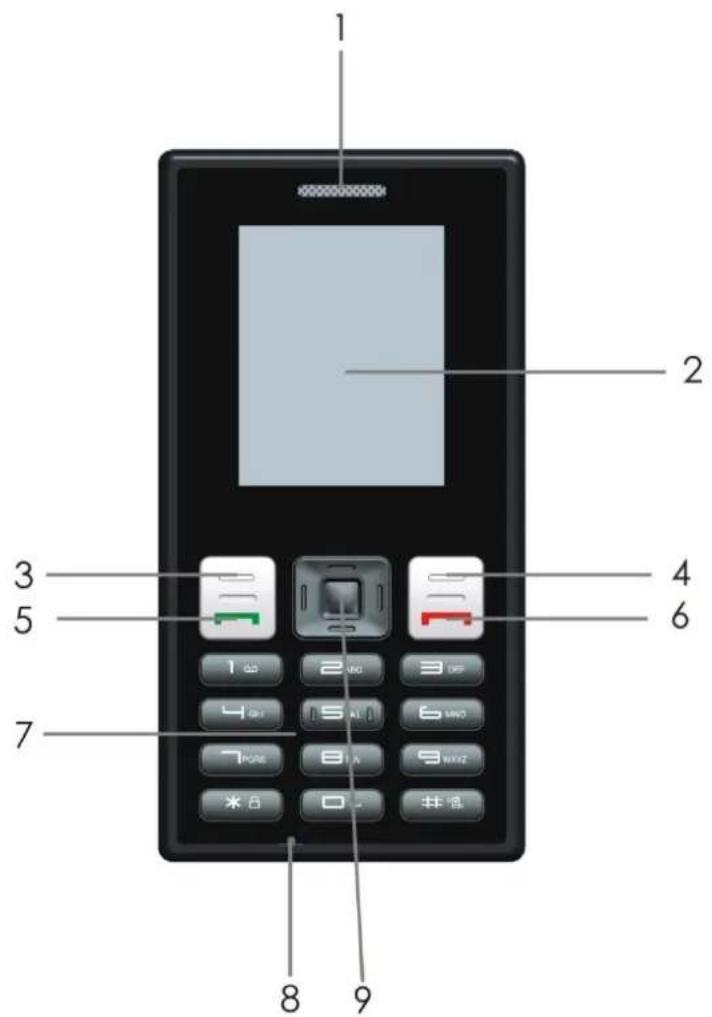
text_image
1 2 3 4 5 6 7 8 9- Loudspeaker
- Le sokey
- Call key
- Numeric keys
-
Navigaon keys
-
Display screen
- Right sokey
- End key
- Microphone
3.2 Insert the SIM card and baery
SIM card
-Before using the telephone you need to insert a valid SIM card rst. Any informaon and messages related to establish a network conncon and your calling iniaon, along with the names and phone numbers in your address book and messages are stored in the at metal area. To prevent damaging or losing informaon stored in the SIM card, you should avoid touching the metal area, and keep it away from electrical and magnec environments. Once the SIM card is damaged, you can not access the GSM network.
Warning: Do remember to turn o the phone before taking out the SIM card. Taking out or inserng the SIM card with external power connected is absolutely prohibited, as this damaged the card.
-Switch o the phone, remove the back cover, aer inserng the SIM card into its slot in the right direcon, card inseron is completed.
Baery
-To install the baery: Gently posion the contact pins at the boom of the baery into the recess, then gently push the boom of the baery into the posion, place baery cover in place and slide until it clicks into place.
-To remove the baery: Push the back cover down gently, then remove it, and gently take out the baery from the boom.
3.3 When using with 383
When use together with 383, the phone should turn the power o before push into the 383, then put it into the back of 383, aer that you can turn the 383,353 power on.
3.4 Charging the baery
If the device indicates a low charge, do the following:
3.4.1 Charging with 383
When the phone charging with 383, the baery power displayed in the idle screen will not indicate charging status. Only the 383 shows the charging status.
3.4.2 Separate charge
- Connect the charger to an appropriate electrical outlet.
- Connect the charger to the device. The charger indicator light is lit when the battery is being charged.
- When the device indicates a full charge, disconnect the charger form the device, then from the electrical outlet.
Tip: Disconnect the charger from the electrical outlet when the charger is not in use. A charger that is connected to the outlet consumes power even when it is not connected to the device.
3.5 Headset
You can connect a compatible headset to your device. The mode of the device will switch to earphone mode automacally. You can listen to music and answer /end calls via it.
3.6 Security code
—PIN code
PIN code (Personal identify number) prevents unauthorized use of your phone. The PIN code usually comes from your service provider along with the SIM card.
If you enter the wrong code three mes connuously, the PIN code is locked. To unlock the PIN code, you need a personal unlocking key (PUK) from your service provider.
—PIN2 code
Some funcons, call costs for example, require a second PIN2 code. The PIN2 code comes from your service provider along with some of the SIM cards, and these funcons are only available when the SIM card supports them.
If you enter the wrong PIN2 code three mes, the PIN2 code is locked. To unlock the PIN2 code, you need a personal unblocking key (PUK2) from your service provider.
—Phone code
Acvate/Modify/Deacvate Startup password (the length of the password is 4-8 digital numbers). If you acvate the "Startup password", you need to enter the password each me you turn the phone on. If you want to modify the Startup password or deacvate "Startup password", you can enter=Modify/Deacvate opon to set.
4. Your Device
4.1 Menu map
Phonebook
- Search contact
- Add new contact
- Copy all
- Delete
- Caller groups
- Extra numbers
- Phonebook sengs
Fun&Games
•Games
- Themes
Call center
- Call history
- Call sengs
Messages
- Text message
- Chat
•Voicemail server
- Broadcast message
Mulmedia
- Sound recorder
- Melody composer
Tools
- Calendar
•Tasks
•Alarm
- World clock
Sengs
- Phone setup
- Network setup
•Security setup
- Restore factory sengs
User proles
- General
•Meeng
•Outdoor
- Indoor
- Headset
Extra
- Calculator
•Currency converter
-Stopwatch
4.2 Turn on/o
Press and hold the power key to turn on or o.
4.3 Home screen
About the home screen
In the home screen, you can choose to access the menu or phonebook and view at a glance if you have missed calls or new messages.
4.4 Display indicators
In standby mode the following icons are displayed:
| Icon | Explanaon |
 | Network signal strength |
 | Baery power |
 | Vibrang acvated |
| [E3X4] | Ring and vibraon acvated |
| [K40K] | Ring only acvated |
 | Unread message |
| [ZCXX] | Missed calls |
 | Keypad locked |
| [AW20] | Keypad unlocked |
| [KZC0] | Alarm set and acvated |
 | Earphone plugged in |
5. Phonebook
Search contact: Search for numbers according to names.
Add new contact: Add a new entry to phonebook.
Copy all: Copy all the records stored in the phone or SIM card. Select to copy from SIM card to the phone, and vice versa.
Delete: Select to delete all the records from SIM card, phone or one by one.
Caller groups: The phone provides 5 caller groups; you can change the name, or select a specific ring tone, caller ID image, caller ID video, and other individual seng.
Extra numbers:
Owner number: Input 2 entries, each with a number and a name, or you can choose to edit or delete existing numbers and names.
Service dialing number: This funcon needs to be supported by SIM card, call the network operator's service number when it has been acvated.
SOS number: You can call emergency numbers when the funcon is acvated.
Phonebook settings:
Memory status: Storage status of the Phone and SIM card.
Preferred storage: Select to save in the phone or on the SIM card.
Fields: Set to edit the content in the phonebook.
Name list Iter: Set the certain phone number receiving rights.
My vCard: Edit or send My Card. (example: business card or private card)
vCard version: Select 2.1 or 3.0.
6. Messages
6.1 Text message
Write message: Write a SMS in this opon.
Inbox: Received SMS messages are stored here.
Outbox: The messages that have been sent are stored here.
Templates: To avoid rewring messages that you send oen, use texts in the Templates, you can also create and save your own templates.
SMS sengs
Prole sengs: Select a suitable prole for SMS for each to have the same seng, such as: Name, Address, Validity period, Message type.
Common sengs: Choose to acvate Delivery report and Reply path.
Memory status: To check the storage status of SIM card and Phone.
Preferred storage: Choose the storage locaon in SIM card or Phone.
Preferred conncon: Prefer GPRS, GSM or GSM only.
6.2 Chat
The phone supports 2 chat rooms, select one and start chat aer sengs complete.
6.3 Voicemail server
Your voicemail is stored on the network; dial your voicemail number to get your mail.
Call voicemail: Dial voicemail number to get your message.
Edit: Add or edit your voicemail name and number for quick operaon.
6.4 Broadcast message
Receive mode: Select to acvate or deacvate the broadcast.
Read message: Read your customized news.
Languages: Select language.
Channel sengs: Select channel.
Note: Broadcast message and voicemail are provided by operator, please contact your service provider.
7. Calls
7.1 Make calls
-Make call
In the standby mode, tap the keypad and enter the number, right sokey to delete digits, then press call key to make call. Tap end key to end a call.
-Emergency call
If you stay within the range of your network(check the signal strength in the upper le corner for details), you can make an emergency call. If your service provider does not provide roaming service within this area, the screen will display Emergency call only, which means that you can only make an emergency call. If you stay within the range of the network service, you can make emergency call without installing the SIM card.
-Making an internaonal call
Before making an internaonal call, press and hold the *, unl the prex “+” of the internaonal call is displayed. This will allow you to make an internaonal call from any country without knowing the local prex of the internaonal call.
Aer you input the prex, you need to insert the country code and the phone number. Every country has a specific number.
7.2 Answer or reject a call
If "Any key" answer mode is acvated, you can press any key to answer a call, or you need to press call key or le sokey to answer a call.
Press the end key or right sokey to reject a call.
7.3 Call Center
Call history
The menu includes items: Missed calls, Dialed calls, Received calls, Delete call logs, Call mers, Call cost, Text message counter and GPRS counter.
Select the Missed, Dialed, Received calls to view the informaon. There are several opons for you to operate of the logs.
-Delete: Delete the selected record.
-Save to phonebook: Save selected number to Phone or SIM card.
-Call: Call the selected number.
-Edit: Edit selected number then save in phonebook.
-Send text message: Send a message to the selected number.
Delete call logs: There are 4 submenus under this menu: Received calls, Dialed calls, Missed calls and Delete all.
Call mers: Show me of the Last call, Dialed calls, Received calls.
Call cost: Store the total call expense.
Text message counter
-Sent: Record number of sent SMS.
-Received: Record number of received SMS.
GPRS counter
-Last sent: Record ow of last sent.
-Last received: Record ow of last received.
-All sent: Record ow of total sent.
-All received: Record ow of total received.
-Reset counter: Start new counng.
Call sengs
Call ID
-Set by network: Follow network default seng.
-Hide ID: The receiver can not see your number when you make a call. (Needs support from network operator)
-Send ID: The receiver can see your number when you make a call.
Call waiing
Select to acvate or deacvate Call waing. Query status to show status of call waing.
Call divert
-Divert all voice calls: Divert all calls to preset number when acvated.
-Divert if unreachable: Divert your calls to preset number when acvated.
- Divert if no answer: Divert your calls to preset number when acvated.
- Divert if busy: Divert your calls to preset number when acvated.
-Divert all data calls: Divert all data calls.
- Cancel all diverts: Cancel all call diverts.
Call barring
- Outgoing calls: Limit outgoing calls
-Incoming calls: Limit incoming calls.
-Acvate all: Acvate all call barring. - Cancel all: Cancel all operaon limits (need to input password)
- Change barring password: Modify password.
Line switching: Select to acve line 1 or line 2.
Closed user group: Select to turn o the group.
Note: Some funcons need support from network operator.
8. User Proles
Select dierent proles and redene it from 5 choices: General, Meeng, Outdoor, Indoor and Headset.
General
Acvate: Select to acvate the General mode in the opons.
Customize
-Tone setup: Change the ringtone of Incoming call, Alarm, Power on/o, Message, Keypad tone.
-Volume: Adjust volume for ring and key tone.
-Alert type: Select one from Ring only, Vib only, Vib and ring, Vib then ring.
-Ring type: Select single, Repeat, Ascending.
-Extra tone: Set Warning, Error, Camp on and Connect on or o.
-Answer mode: Select to acvate Any key to answer.
Meeng
Acvate: Select to acvate the Meeng mode in the opons.
Customize: As General.
Outdoor
Acvate: Select to acvate the Outdoor mode in the opons.
Customize: As General.
Indoor
Acvate: Select to acvate the Indoor mode in the opons.
Customize: As General.
Headset
Acvate: Plug in earphone to acvate the Headset mode.
Customize: As General.
9. Mulmedia
9.1 Sound recorder
Record: Recording a new voice clip.
Play: Play selected voice clip.
Append: Add a new clip to the selected voice clip.
Rename: Change the name of the selected le.
Delete: Delete the selected voice clip.
Delete all les: Delete all voice recording les.
Sengs: Select File format and Audio quality.
Use as: Send the selected voice clip to User proles or Background sound.
9.2 Melody composer
Play: Play selected melody.
Edit: Edit selected melody clip.
Add: Add a new clip to the selected melody clip.
Rename: Change the name of the selected le.
Delete: Delete the selected melody clip.
Delete all les: Delete all melody recording les.
Use as: Send the selected melody clip to User proles.
10. Fun&Games
10.1 Games
There are two pre-installed games: Panda, UFO
Panda
Start game: Start a new game.
Best grades: Show the best scores of the game.
Help: Explanaon of the game.
UFO
Start game: Start a new game.
Best grades: Show the best scores of the game.
Help: Explanaon of the game.
Games sengs
BGM: Set on or o.
Sound eect: Set on or o.
Vibraon: Set on or o.
Volume: Set on or o.
10.2 Themes
There are 3 themes to select.
Acvate: Select to acvate the theme.
Update period: Select from O, Hourly, Daily, Weekly, Monthly and Seasonally.
Set order: Select none or theme.
11. Tools
11.1 Calendar
In the funcon, you have several opons:
Add event: Create an event.
Delete event: Delete selected event.
Jump to date: Set the present date as a specific date.
Go to weekly/monthly view: Browse by week/month aer seng.
11.2 Tasks
View: Browse the stored memo.
Add: Create a new schedule.
Edit: Modify a saved memo.
Delete: Delete a selected memo.
Delete overdue: Delete the memo expired.
Delete all: Delete all saved memo.
Jump to date: Set the present date as a specific date.
Send vCalendar: Send memo by SMS.
11.3 Alarm
On/O: Turn on or o the alarm.
Time: Set me of the alarm.
Repeat: Once/Everyday/Custom
Snooze: Set snooze me.
Alert type: Vib & Ring, Ring only, Vib only.
11.4 World clock
Select world me by navigaon buon. Press Opons to turn on/o other cies to save power.
12. Extra
12.1 Calculator
This feature allows you to do simple calculaons.
-Press numeric key to input numbers.
-Press right sokey to delete digits.
-Press le so key to compute.
12.2 Currency converter
The funcon allows you to do exchange rate conversion.
12.3 Stopwatch
There are two modes of the Stopwatch: Typical stopwatch and nWay stopwatch.
13. Sengs
13.1 Phone setup
Time & Date
Select me zone: Select a city for the me set of your phone.
Set me/date: Set present me and date.
Set format: Set the display format of me and date.
Update me with me zone: Set on or o.
Schedule power on/o
Set the status and power on/o.
Language
Set the display language of the menu.
Display characterisc
You can set Wallpaper, Screen saver, Power on/o display, Main menu style, Show date and me,
Show owner number of the home screen display in this funcon.
Greeng text
Select to display greengs in standby.
Shortcuts
Add the items to the shortcuts.
Dedicated key
Set the shortcut funcons of the navigaon keys.
Auto update of date and me
Set on or o of this funon.
Flight mode
Out of network range, you can only perform paral operaons, especially set for ight.
Select one from Normal mode, Flight mode and Query when power on.
Misc. sengs
Set the LCD backlight duraon.
13.2 Network setup
Select network for SIM card
Network selecon
-New search: Register the network again that is manually searched.
-Select network: Search for compatible network.
-Selecon mode: elect auto or manual search for network.
Preferences: Pre-stored few networks you need.
GPRS conncon: Select when needed or always.
13.3 Security setup
-SIM Lock
PIN code protects your SIM card from been illegally used. Select to acvate PIN code protecon if deacvated, then next me you turn on the phone, it will ask you to input PIN code. Select to deacvate PIN code protecon if acvated. If you want to change the old PIN code, please follow the instrucons to input the old PIN code, the new PIN code and then repeat new PIN again.
Noce: If you input PIN 1 code incorrectly for 3 successive mes, your SIM card will be locked by
the network, and then you need the PUK code to unlock the SIM card. PIN code and PUK code are provided together. If not, please contact your network operator. Usually, the default PIN code is 1234, please change it to your own.
-Phone lock
The security code protects against unauthorized use of your phone. It is usually supplied with the phone. When you choose this opon, you need to input lock code every me you switch on the phone, then make or answer a call. User can also choose to cancel lock code, under which the phone is not protected against illegal use.
Input the lock code, use right sokey to cancel input error, and then press OK.
Note: The default password for phone lock is 1122, you need to change it as soon as possible.
And if you forget your password, you need to contact your retailer or local service center to unlock your phone.
Change password: Change the password of the phone.
Note: Certain funcon needs support from your network operator.
-Auto keypad lock
Set the automacally lock me of the keypad.
-Fixed dial
You can only dial the numbers in the xed dialing list or those which share few common gures (needs support from SIM card).
Mode: Turn on/o xed dialing (need to input PIN2 code).
Fixed dial list: Input the numbers for xed dialing.
Note: Acvate or deacvate the xed dial, you need to input PIN2 code, please contact your network service provider for it. Aer you come into xed dial, what you see in the card folder is the numbers in the xed dial list.
-Barred dial: Set dialing limitaon on certain numbers.
-Change password: Change PIN, PIN2 and phone password.
Note: Paral funcon needs support from your network operator.
13.4 Restore factory sengs
Restore the sengs to default. The initial password is 1122.
14. Troubleshoong
Please refer to the following instrucons if your phone shows any problems.
| Problem | Cause | Soluon |
| Bad recepon | The area has bad recepon due to poor network coverage or interference from object and electronic devices. | Avoid, if possible. |
| During rush hour the network lines are overloaded by users. | Avoid, if possible. | |
| Related to the distance of | Ask your network operator for | |
| network base. | service range map. | |
| Echo and noise | Area problem caused by bad network exchange line. | Hang up the redial, exchanger may switch for beer line. |
| Bad line in some communicaon areas. | ||
| Short standby me | Standby me is related to network system sengs | Please turn o the phone while is in a bad area recepon. |
| Baery exhausted | Change with a new baery. | |
| The phone will search for base connuously when there is no signal, which causes large power consumpon. | Move to place with stronger signal or turn o the phone temporarily. | |
| Dead phone | Run out of power | Check baery and/or recharge |
| SIM error | SIM card damage | Contact your network operator. |
| SIM card not properly installed. | Make sure the SIM card has been properly installed. | |
| Metal area of SIM card has been damaged. | Wipe clean the metal contact area with clean cloth. | |
| Disconnected from network | Invalid SIM card | Contact your network operator. |
| Out of GSM service range | Consult your network operator for service range. | |
| Weak signal | Move to nd an area with stronger signal. | |
| Unable to make call | Call limitaon acvated | Cancel call limitaon |
| Fixed dialing acvated | Cancel xed dialing | |
| PIN error | Incorrect input of PIN code for 3 mes connuously. | Contact your network operator. |
| Unable to charge | Baery or charger damaged. | Change with new baery or charger. |
| Charging environment below -10 or above 55. | Change charging environment | |
| Bad conncon | Make sure the plug has been connected correctly | |
| Unable to add numbers to phonebook | Phonebook is full | Delete some records from phonebook. |
| Unable to dene certain funcons | The funcon is not supported by your network operator or you have not applied for it. | Contact your network operator. |