Senio - Smartwatch BEMI - Free user manual and instructions
Find the device manual for free Senio BEMI in PDF.

User questions about Senio BEMI
0 question about this device. Answer the ones you know or ask your own.
Ask a new question about this device
Download the instructions for your Smartwatch in PDF format for free! Find your manual Senio - BEMI and take your electronic device back in hand. On this page are published all the documents necessary for the use of your device. Senio by BEMI.
USER MANUAL Senio BEMI
natural_image
Empty white square with a thin black border (no text or symbols)V:1.5
BEZPIECZEŃSTWO UŻYTKOWANIA
natural_image
Top-down view of a smartwatch with a circular button and a yellow connector, showing a red arrow pointing to the next component (no text or symbols present)Przycisk zasilania
8.8. Termometr
flowchart
graph TD
    A["Hand pointing at Temperature"] --> B["Wrist"]
    B --> C["Realtime"]
    C --> D["History"]
    D --> E["On/Offer/Reduction"]
    E --> F["Start"]
    F --> G["Vero ahead"]
    G --> H["36.16°C"]
    F --> I["Lowest 34.36°C"]
    I --> J["Highest 34.10°C"]
    J --> K["Reset End"]
9.3 Menu główne
ip_url:52.28.132.157;
port:8001;
center:;
slave:;
sos1:;
sos2:;
sos3:;
upload:600S;
bat level:96;
language:1;
zone:8.00;
GPS:NO(0);
GPRS:OK(73);
pw:123456;
Rm12, 23/F, On Hong Commercial Bldg, 145 Hennessy Rd, Wan Chai, Hong Kong
Dystrybutor w Polsce: 4cv Mobile Sp. z o.o. Sp. K.
Office 1029, 3 Hardman Street, 10th Floor Spinningfields, Manchester, UK M3 3HF goalservice@hotmail.com

This user manual is available on www.bemi-electronics.com/manuals
Product outlook
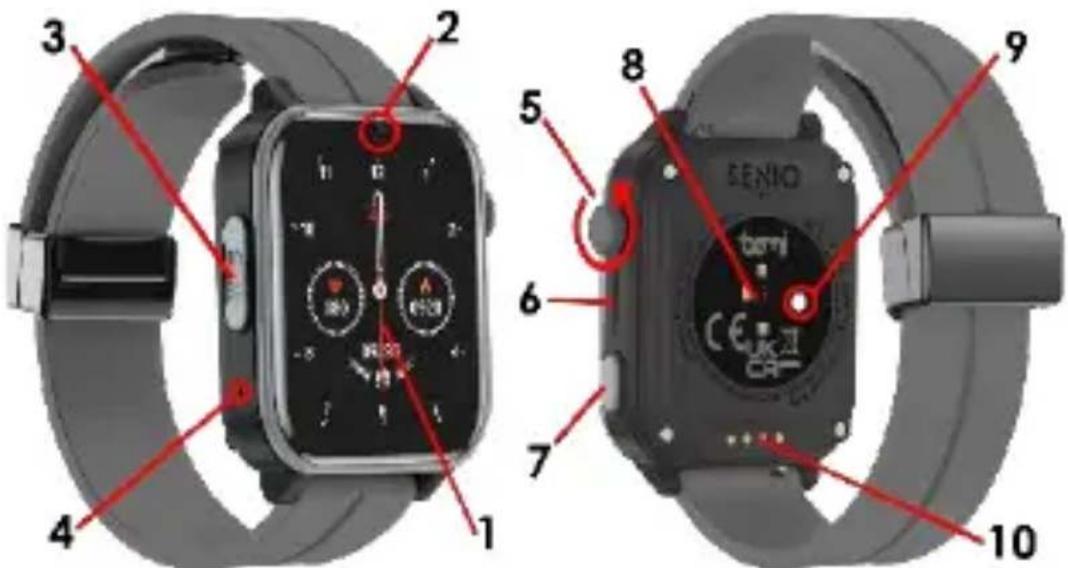
1 - Touch screen / 2 - camera / 3 - nano SIM card slot / 4 - microphone / 5 - multifunction rotary key / 6 - loudspeaker / 7 - power key on/off, screen wake-up, SOS / 8 - heart rate and saturation sensor / 9 - thermometer / 10 - magnetic charging connector
SAFETY OF USE
Before using the device, it is mandatory to read this manual.
Do not expose the device to high (above +50°C), low (below -10°C) temperatures or heat caused by e.g. sunlight or another heat source, as this may damage the device.
Do not operate the device with wet hands.
Do not use this device while driving or walking.
Do not expose the device to cleaning agents, corrosives, or other chemicals.
The manufacturer is not responsible for data loss, damage caused by improper use/maintenance or any mechanical damage.
To avoid loss, back up important materials at any time.
Do not press hard on the display panel.
Use only authorized accessories.
Prevent the device from falling to the ground or receiving a strong impact.
Do not attempt to repair this device yourself.
In case of damage, please contact an authorized service center for inspection or repair.
Always disconnect the product from the power source before cleaning.
The device must be connected to a power source as specified in the user manual or as marked on the device.
The battery cannot be disconnected, do not try to disassemble it.
The product is not suitable for babies.
Note: IP67 means this device is resistant to dust, rain, moisture, and single immersion in standing water for a short time.
Exposing the device to harsher conditions may damage it.
This device is not intended for water sports, diving, or swimming.
Smartwatch Model: Senio, is named in this user manual as "device". It is mandatory to read this manual and the warranty card before using the device.
Children's watch is a telecommunications device used to locate its location and transmit data. The device is based on the 4G LTE / GSM / GPRS cellular network.
To determine the location, the device uses the mobile operator's network (LBS), GPS system and WIFI network.
What's the difference between LBS, GPS and WIFI?
LBS
LBS base station positioning is based on calculating cellphone location based on differences in mobile communication towers, and it depends largely on base station coverage density nearby. If there are many base stations, the positioning is
accurate. If there are several base stations, the positioning is not so good. Overall, the positioning accuracy is 50-2000 meters.
GPS
Thanks to GPS, the position can be precisely located anywhere and anytime without much effort. However, it takes some time to find satellites after starting GPS. usually about 2 minutes. Positioning has high accuracy. The position may be within 5 meters (when it receives signals from at least four satellites)
Disadvantages: GPS positioning is heavily influenced by weather and location.
When the weather is bad or indoors, in the corner of a tall building, underground garage (when the sky is not visible), GPS positioning will be affected.
WIFI
The purpose of WIFI positioning is to solve the problem of precise positioning indoors, the principle is like base station positioning. Each wireless access point has a globally unique MAC address. WIFI Positioning is by detecting the MAC addresses of all nearby wireless access points (WIFI Access Point), comparing the MAC address coordinates in a database, and then calculating the location.
Attention!
The device requires the installation of a nanoSIM card with an active service make / receive calls with disabled PIN lock. It is suggested to disable voicemail. When sending information about location, the watch will need access to mobile Internet, so it is worth buying a minimum of 1 GB package. When using the watch, network and connection fees may be charged in accordance with the operator's tariff.
The device support nano SIM cards
Make sure you have the correct type of SIM card.
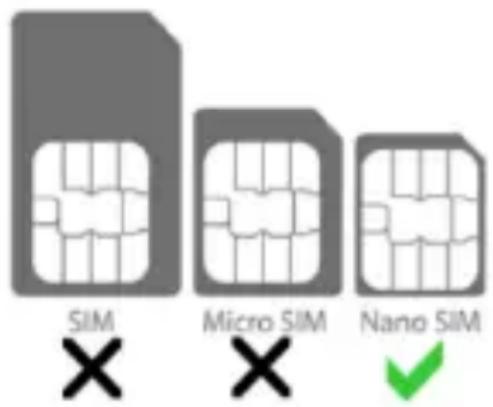
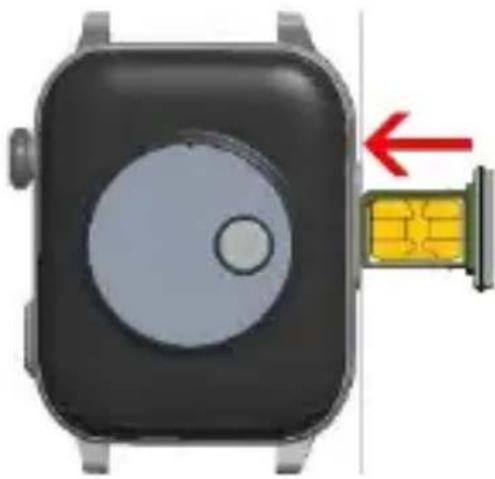
Installing a nano SIM card
Before inserting or removing the SIM card, always make sure that the watch is turned off.
Never insert or remove a SIM card while the watch is on.
- Locate the SIM card cover on the left side of your device
- Slide out the SIM card tray.
- Insert the nano SIM card with the card chip facing down as in the photo below.
- Slide the tray into the device.
- Make sure the tray with lid fits tightly. This is very important to maintain the waterproofness of the device.
- Turn on the device.
natural_image
Diagram of a smartwatch with a circular display and a yellow connector, showing a red arrow pointing to the next component (no text or symbols present)Power button
Turn on: press and hold the on/off button for 5s to turn on the watch.
Turn off: press and hold the power button for 5 seconds to turn off the watch (only works without a SIM card) or enter the watch settings and select the Turn off function or remotely using the application on your phone.
Restart: You can restart your watch remotely from the application on your phone.
SOS: press and hold the power button for 3s to activate the SOS function in an emergency.
1. First run
- After installing the SIM card in the watch please be sure the device is charged. You can power on device by pressing and holding the switch on button.
- After starting, the watch connects to the mobile network.
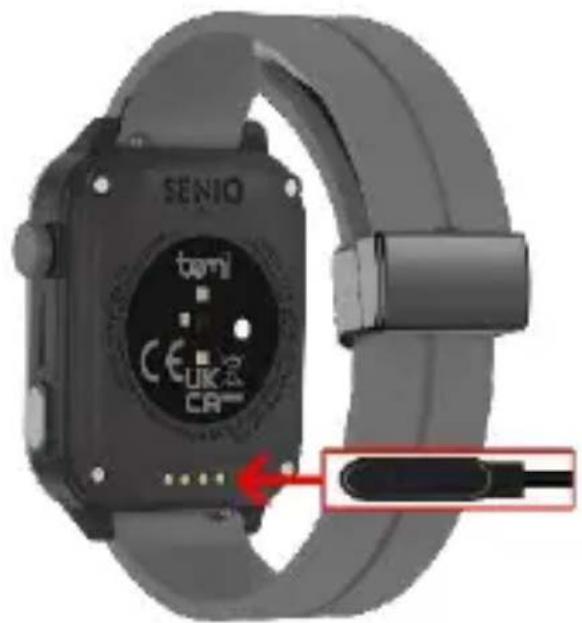
2. Battery charging
Make sure that the battery is charged before using the device. For charging, use the cable provided in the set. It is recommended to use a 5V 1A power adapter. The power supply is not included in the set. It takes approximately 2 hours to fully charge the device.
To charge the device, follow the steps below:
- Place the charging cord connector under the device so that its pins touch the metal points on the terminal.
- Magnets will locate the connector in the correct position.
- Connect the charging cable to a power source with the USB connector.
- If everything is correct, the loading graphic will be displayed on the screen.
Note! if the device was completely discharged, charging graphics may be displayed after a few minutes.
3. Device operation
The device is operated via a touch screen. To enter the device menu, slide your finger on the screen to the left in the main menu. The menu consists of several screens, and you can navigate it by swiping your finger left, right or up/down.
To access a specific function, touch the icon on the screen.
To go back, swipe right on the screen. Roll the top button on the clock face screen to change the face.
Click the bottom button to wake up the screen, click again to turn off the screen. Hold the power key for 3 seconds to make an SOS call.
Hold the power key for 5 seconds to turn off the device (only works without a SIM card).
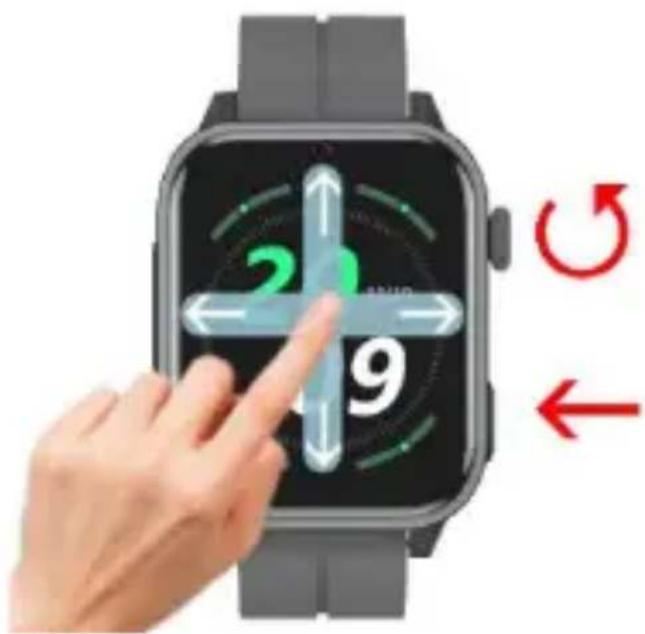
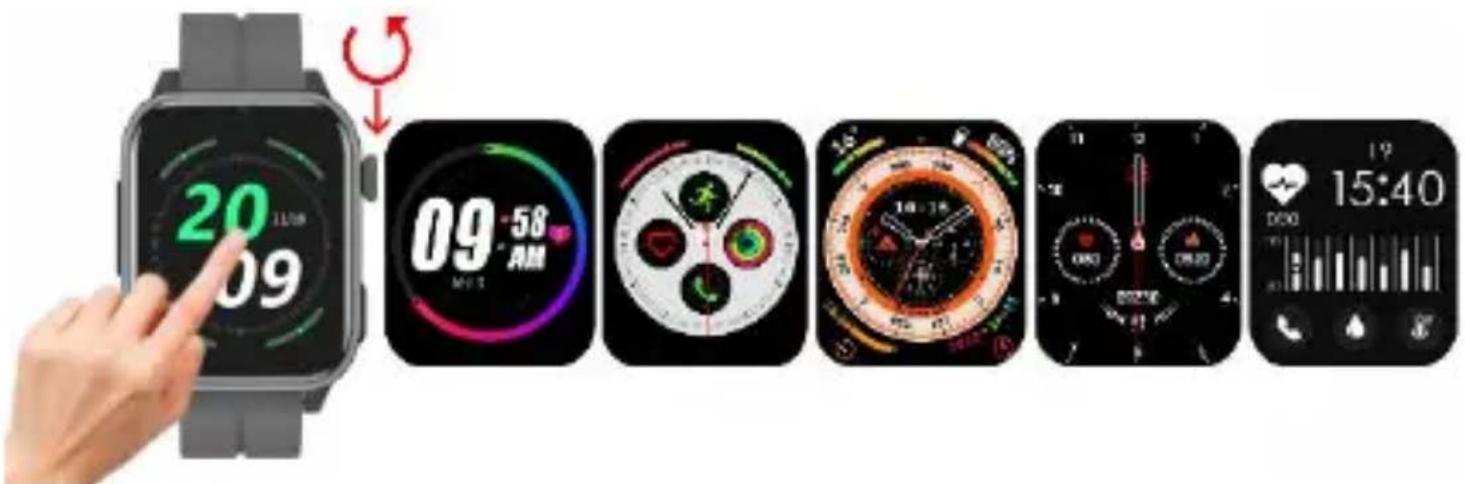
4. Clock faces selection
On the main screen, press and hold the screen for a moment to enter the dial selection menu.
Swipe left/right to select a watch face.
Then tap the screen to make the clock face appear on the home screen.
Alternatively, rotate the top key to change the dial.
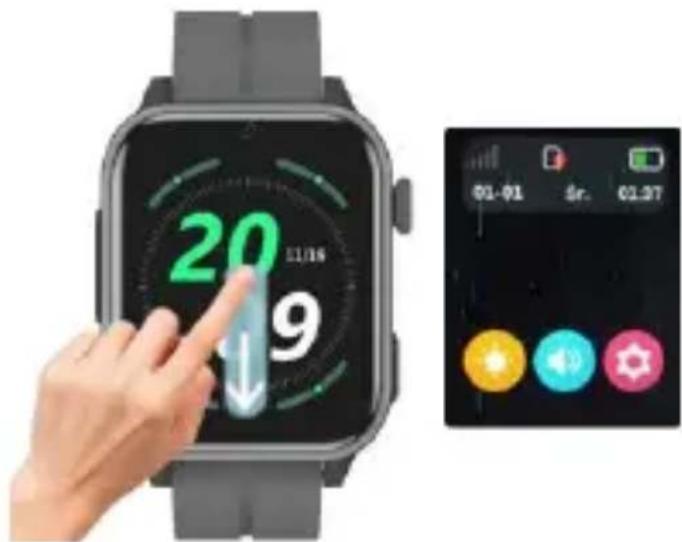
5. Access to the submenu
On the clock face, swipe down to enter the submenu with shortcuts.
Information about coverage strength, SIM card availability, battery level, date, day of the week and time is available.
Additionally, there are shortcut icons for adjusting brightness, volume and device settings.
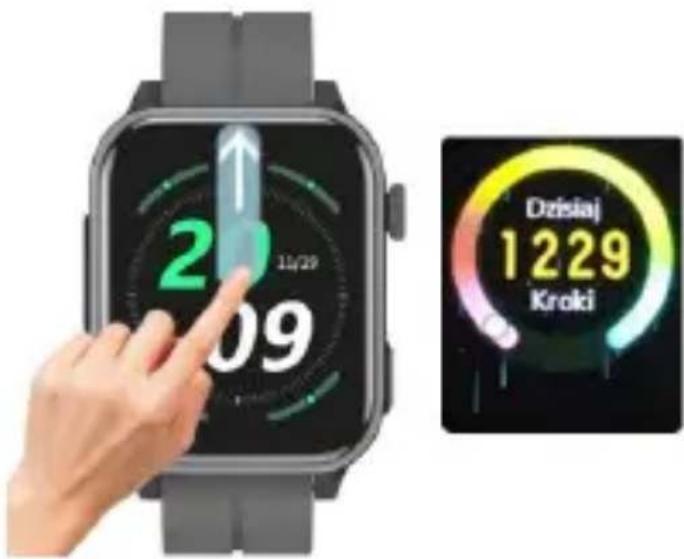
6. Shortcut to steps
On the clock face, swipe up to access step data.
Attention! For the device to count steps, you must first activate the function in the application.
7. Add friends
The watch has a function to add friends to your Chat.
Thanks to this, you will be able to communicate easily with friends.

flowchart
graph LR
    A["Chat"] --> B["Family"]
    B --> C["爸爸"]
    C --> D["fhf"]
    E["Two watches must enter the Friends function"] --> F["Chat + Family + Friends"]
To add a friend, proceed as follows:
- enter the Chat function on the watch
- in the upper right corner, click on the add arrival function
- the other person must perform the same action.
- information about readiness to connect will appear on both watches.
- then bring both watches close to each other and shake for about 5 seconds
- then after a few seconds the contacts should appear on both watches in the Chat function.
8. Device menu
On the clock face, swipe left or right to enter the menu with available functions. While in the menu, turn the knob on the right side of the device or swipe left or right to navigate the menu.
Click on the selected function to enter.
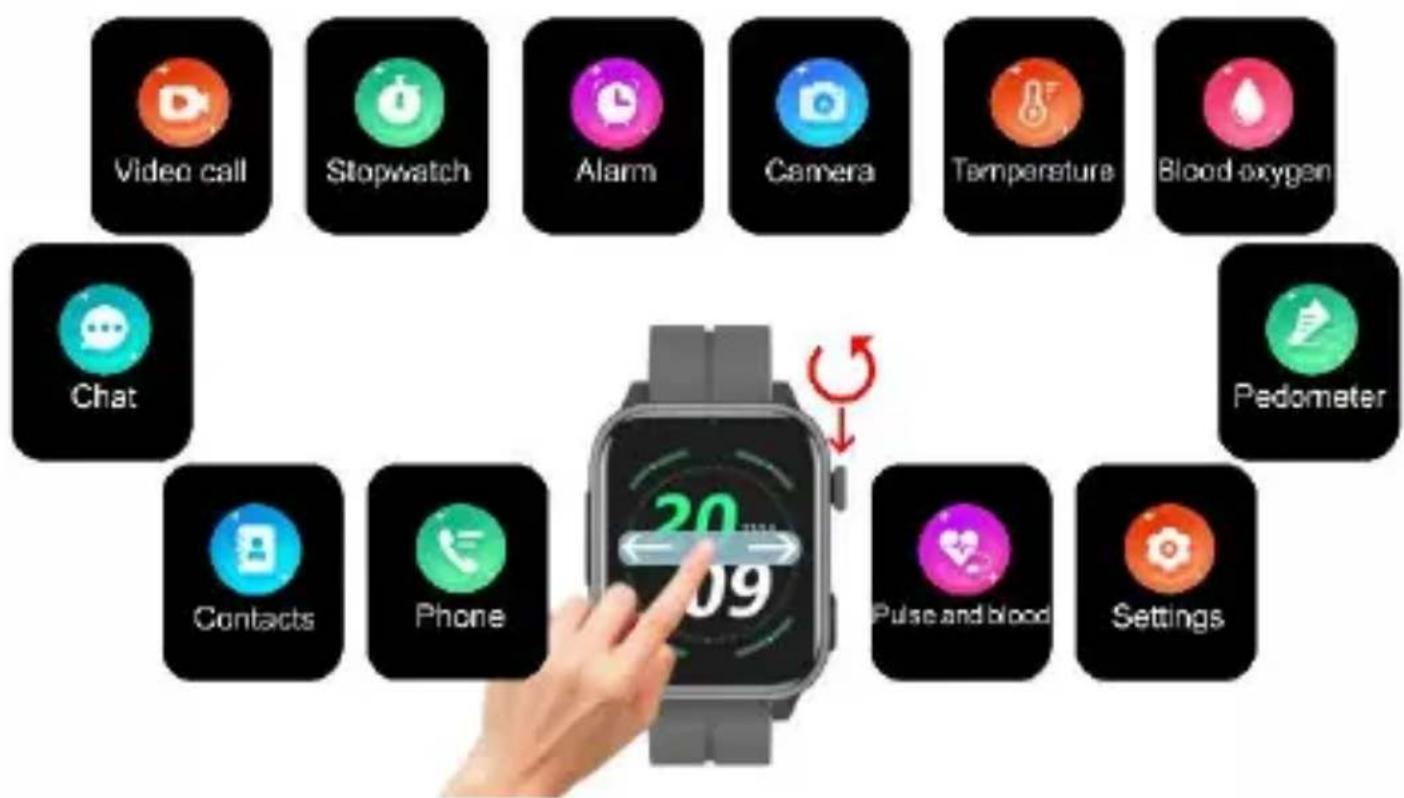
flowchart
graph TD
    A["Video call"] --> B["Stopwatch"]
    B --> C["Alarm"]
    C --> D["Camera"]
    D --> E["Temperature"]
    E --> F["Blood oxygen"]
    G["Chat"] --> H["Pedometer"]
    I["Contacts"] --> J["Phone"]
    K["Pulse and blood"] --> L["Settings"]
    M["20/9"] --> N["Switch icon"]
    style A fill:#f9f,stroke:#333
    style B fill:#ccf,stroke:#333
    style C fill:#cfc,stroke:#333
    style D fill:#fcc,stroke:#333
    style E fill:#cff,stroke:#333
    style F fill:#ffc,stroke:#333
    style G fill:#cfc,stroke:#333
    style H fill:#fcc,stroke:#333
    style I fill:#cfc,stroke:#333
    style J fill:#fcc,stroke:#333
    style K fill:#cfc,stroke:#333
    style L fill:#fcc,stroke:#333
    style M fill:#cfc,stroke:#333
8.1 Phone
Allows you to make a phone call by manually entering the number.
Attention! In the application, it is possible to block the keyboard from appearing on the watch and executing it child calls from outside your available contacts.
8.2 Contacts
Gives access to defined phone numbers in the application.
A maximum of 15 contacts can be saved.
8.3 Chat
Allows you to send and receive voice messages and photos.
Attention! Only voice messages and currently taken photos can be sent from the device. The parent can also send text messages from the app.
8.4 Call log
Log of incoming and outgoing calls.
8.5 Video Call
Allows you to make a video call with one person.
It is possible to make a group call (up to 8 people) via the application.
8.6 Pulse and blood pressure
The device has a built-in heart rate sensor.
Press start and wait about 30 seconds until the measurement is completed.
After completing the measurement, the device will show the result of the heart rate and blood pressure measurement.
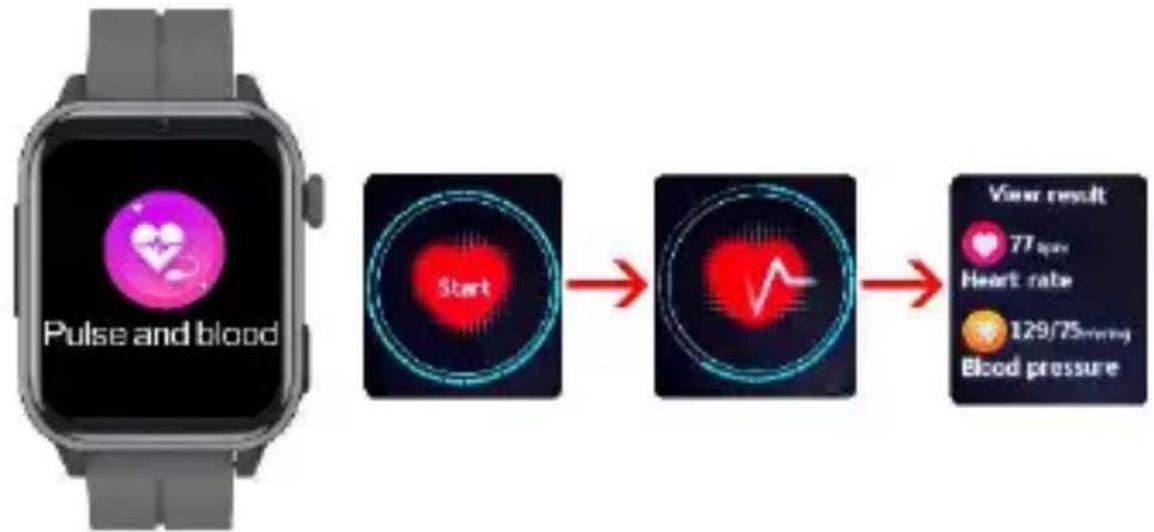
flowchart
graph LR
    A["Pulse and blood"] --> B["Start"]
    B --> C["Heart Rate"]
    C --> D["129/75mmg Blood pressure"]
    D --> E["View result: 77 bpm Heart rate"]
8.7 Blood oxygen (saturation)
The device has a built-in saturation sensor.
Start the function and wait about 30 seconds until the measurement is completed.
Once completed, the device will show the result.
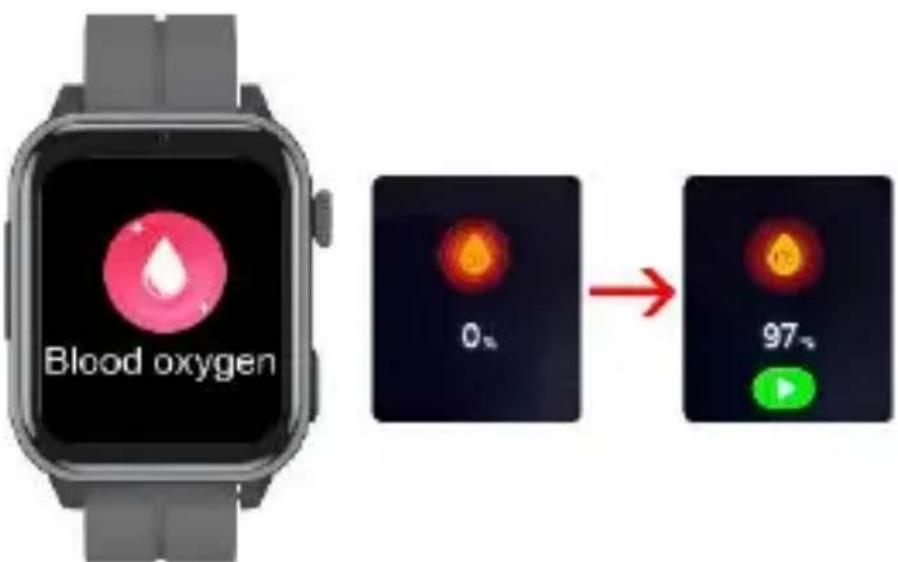
Attention! During the examination of pulse, blood pressure and saturation, the examined person should remain still. Any activities during the test such as eating, talking, etc. will affect the accuracy of the measurement. Factors that reduce measurement accuracy include tattoos, scars, moisture, thickness, strong pigment and hair at the measurement site. Keep the heart rate monitor clean and close to your skin. If you wear it too loosely, the sensor light will be exposed, resulting in inaccurate measurement values. Do not look directly at the green light of the sensor. During the test, keep your body inactive and do not move, otherwise the data will be inaccurate. If there is a large difference in the measured data, take a break and test again. Long-term measurement may cause the device to overheat. If it overheats, remove the device until it cools down. Cold weather will affect the measurement results, please measure while keeping warm. Place the device correctly on your wrist.
The device's heart rate, blood pressure and oxygen saturation measurements are not intended for medical use, including self-diagnosis or medical consultation, and are intended solely for purposes related to general physical fitness and well-being.
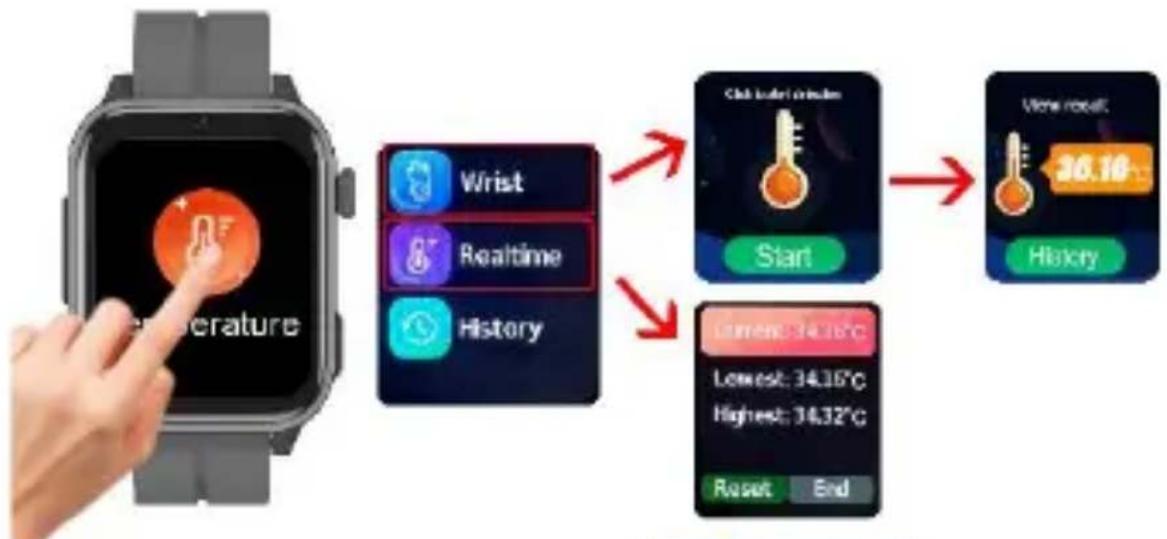
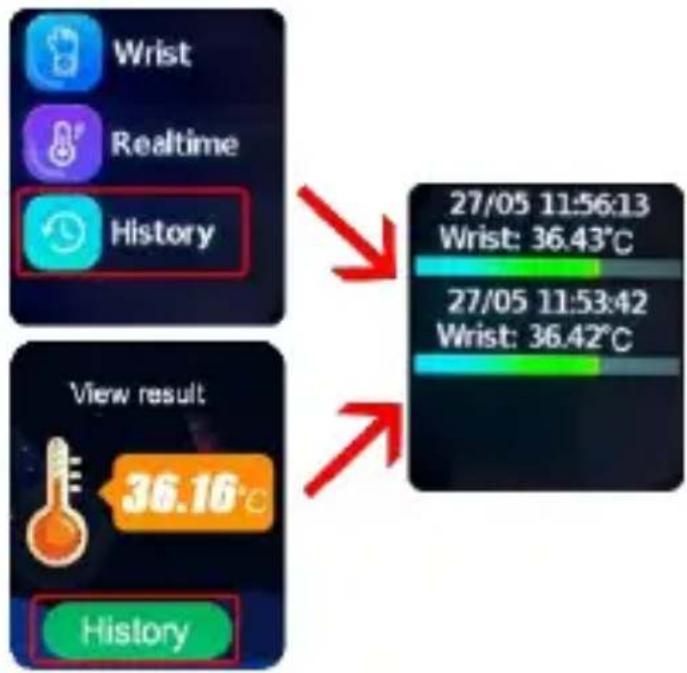
8.8 Temperature
The device has a built-in thermometer.
- Select one of the measurement methods:
1. Wrist
Click "Start" to start measuring. After several seconds, the result will appear.
2. Real-time measurement
Click to start continuous measurement in real time.
flowchart
graph TD
    A["Hand pointing at Temperature"] --> B["Wrist"]
    B --> C["Realtime"]
    C --> D["History"]
    D --> E["Start"]
    E --> F["Close-up of 30.16°C"]
    F --> G["View recovery"]
    G --> H["Lowest: 34.35°C"]
    G --> I["Highest: 34.32°C"]
    H --> J["Reset"]
    I --> K["End"]
-To see the data of previous measurements, go to "History".
Attention! To make the measurement more accurate, wear the device on your wrist at least 5 minutes before the measurement so that the metal tip of the tester adjusts its temperature to your body temperature.
8.9 Pedometer
Preview of the number of steps taken after turning on the pedometer function in the application.
flowchart
graph TD
    A["Wrist"] --> B["Realtime"]
    B --> C["History"]
    D["View result"] --> E["36.16°C"]
    F["27/05 11:56:13 Wrist: 36.43°C"] --> G["27/05 11:53:42 Wrist: 36.42°C"]
    H["History"] --> I["End"]
8.10 Camera
Allows you to take photos that will be saved in the gallery.
8.11 Gallery
Gallery of photos taken.
Attention! Due to the limited amount of memory on the device, the watch can store 15 photos.
To be able to save more photos, after taking 15 photos, they must be sent to the application.
To send a photo to the application, go to the Gallery, click on the photo you want to send, then click on the icon in the upper right corner.
The photos will appear in the parent app.
8.12 Stopwatch
Built-in stopwatch.
8.13 Alarm
There are 3 Alarms/Alarm Clocks available. To activate the function, set an alarm/alarm clock in the application.
8.14 QR Code
Direct access to the device registration code and QR code for the application.
8.15 Settings
Here you can make device settings. The following settings are available:
- Dial gallery
Select a clock face.
-Volume
Volume control
-Brightness
Set the screen brightness level.
-Sleep
Set the screen sleep time. After this time, the screen will turn off.
-VoLTE
Enable or disable VoLTE.
Attention! To be able to make voice calls, you must enable this function.
-Language
Select your device language.
-Turn off
Select to turn off the device.
- Information
Enter to see information about the software number and IMEI number of the device.
8.16 Calculator
Built-in calculator.

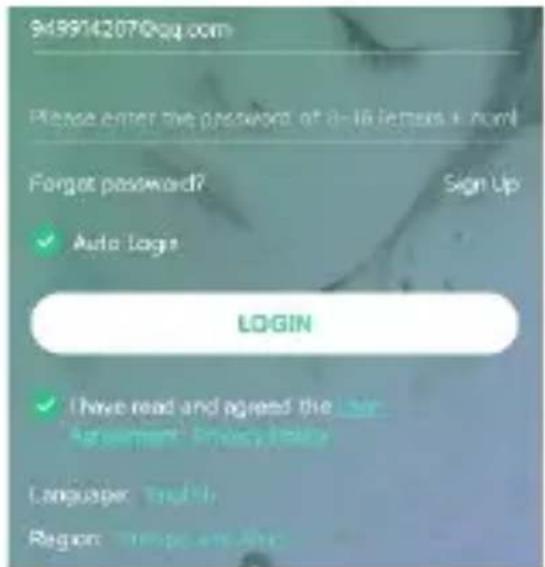
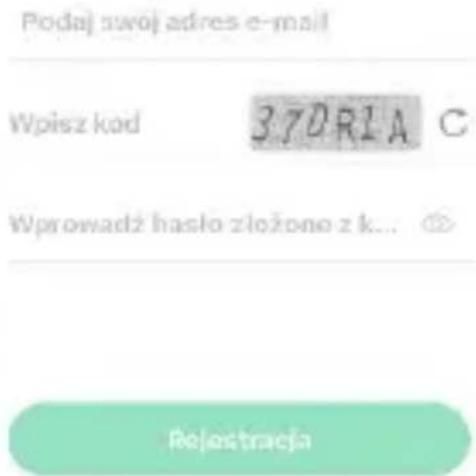
9. Application
Download the application "
SeTracker2 " for iOS or Android.

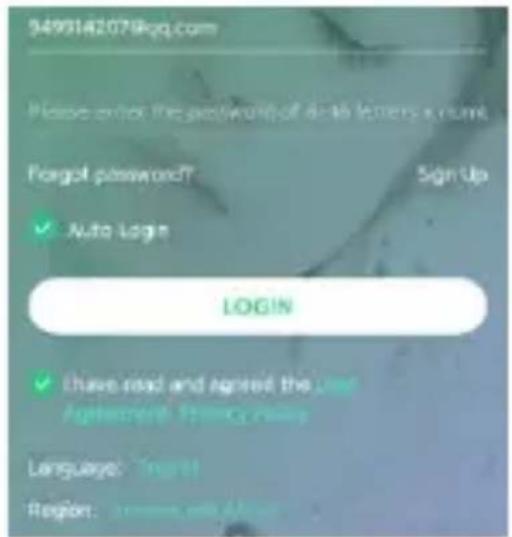
9.1. Account and watch
registration
In the registration window, enter or scan the watch code (REG CODE) located on label attached to your watch or at the beginning of this user manual as well as on the device in the Device menu. Enter your email address, name and password. Then select the language of the application and the area of use of the watch.

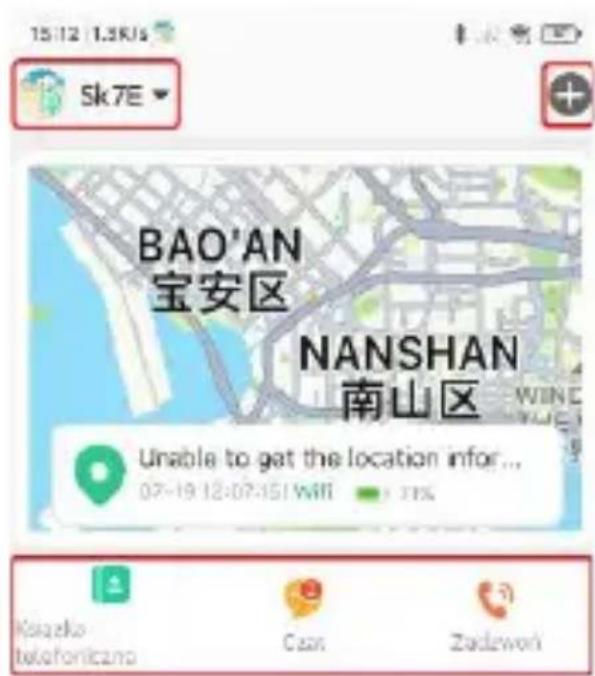
Shows the current position of the watch on the map.
The following map functions are available:
1 - Device selection: tap to switch between paired watches.
2 – Location: press to refresh the location of the watch.
3 - Phone location: press to locate the phone.
4 - Safety zone: Click on the + sign to define the safety zone.
Enter the name of your zone, click on the map and then select the size of the designated zone in the range from 200m to 2000m. After the watch has crossed the zone, you will receive notification.
5 - History: Set the date and time for which you want to check the route which the user of the watch has traveled in each time.
6 - Map mode: press to select one of the three map modes.

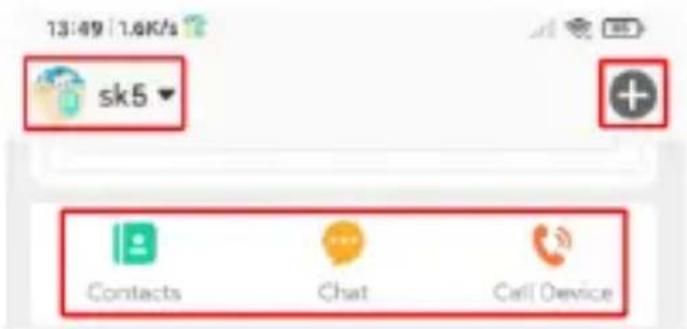
On the left top corner of the main screen, you can select a device if we have several watches connected to the application. On the right side, press + to add a new device.
Below are shortcut icons for: - phone book with contacts, -chat with your device -calling function.
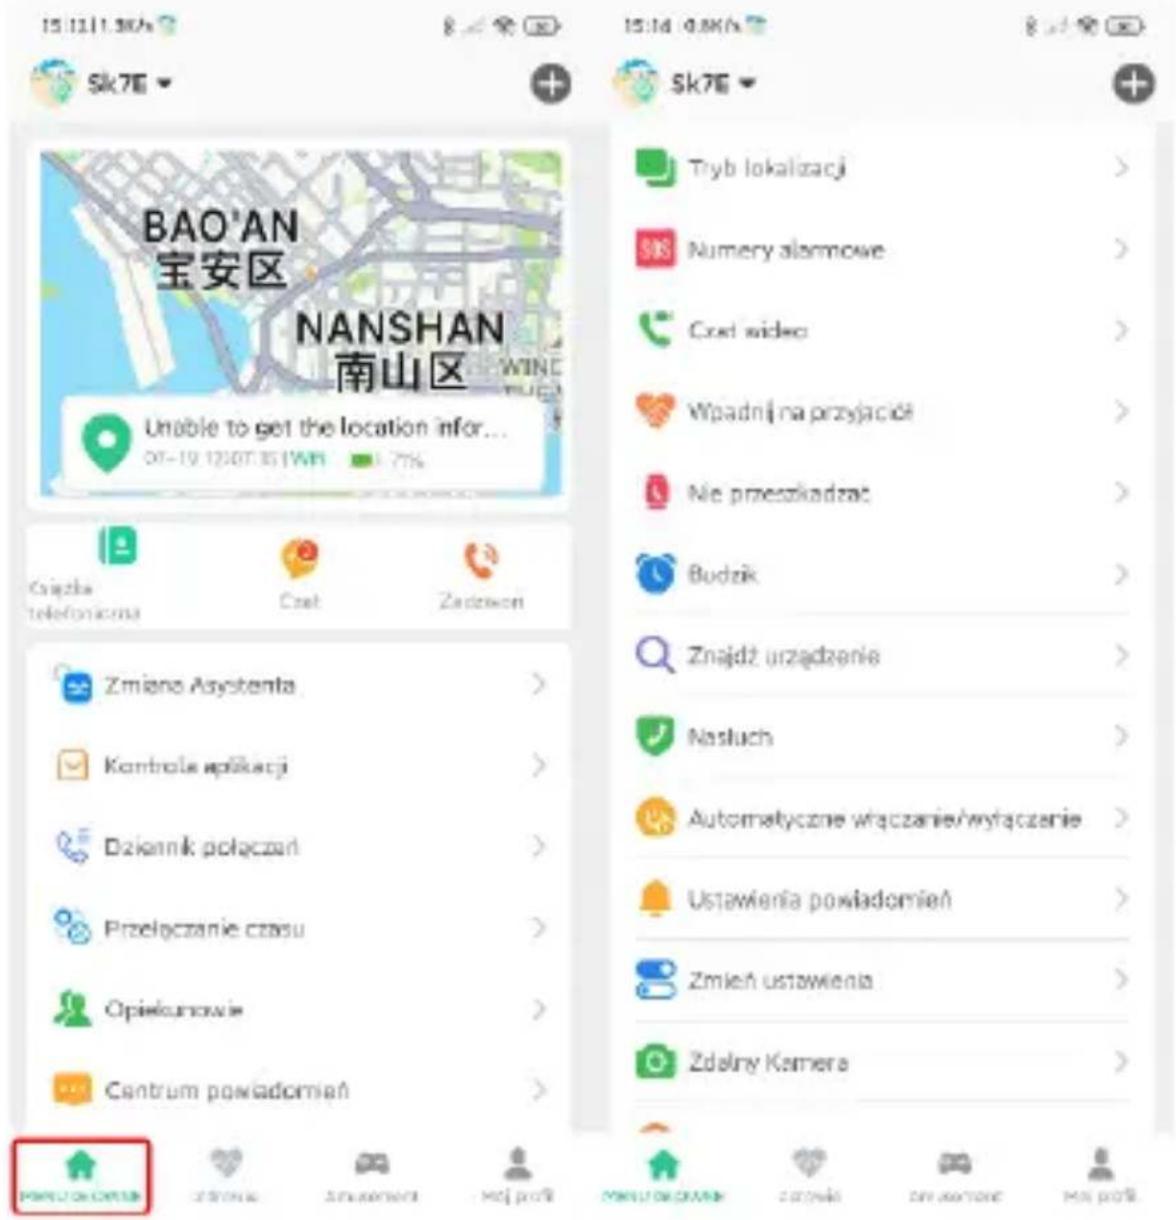
9.3 Main menu
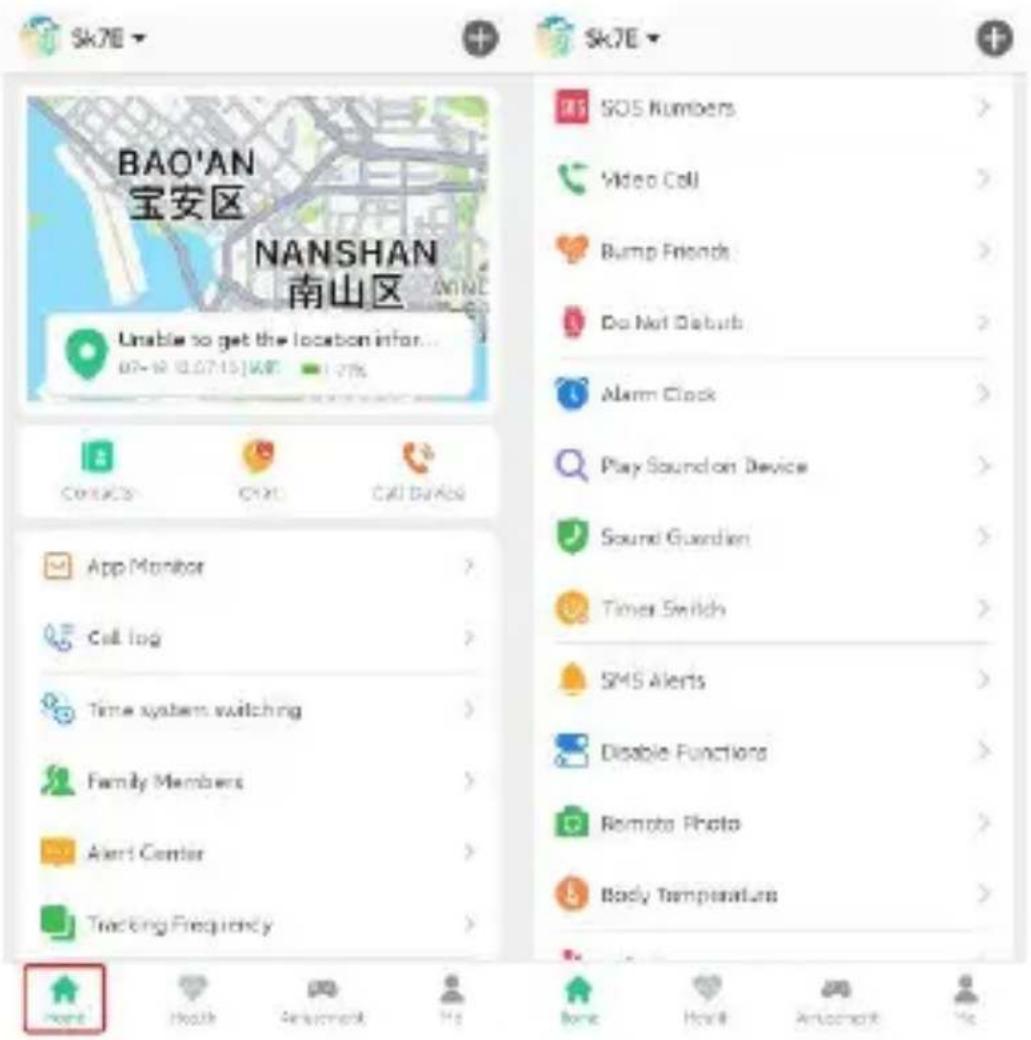
1. App Monitoring
Here we can remotely turn on/off the functions available in the watch. Thanks to this, we can control access and extend the device's battery life by turning off unnecessary functions at a given moment.
2. Call log
Contains a log of incoming and outgoing calls.
3. Time system switching
Allows to select 12/24 hour format.
4. Family Members
View a list of family members.
5. Alert Center
Here you receive and have a preview of all notifications and alarms received from the watch.
6. Tracking Frequency
Select the watch location refresh time:
-Sleep mode: manual location check,
- every 10 minutes
- every 1 hour.
7. SOS numbers
When the watch user presses and holds the SOS button, watch make automatic emergency call up to three contacts defined here.
8.Video Call
Allows you to make a video call with one person. It is possible to make a group call (up to 8 people) via the application.
9. Bump Friends
Contains a list of friends added by the child.
10.Do Not Disturb
Select a time during the day when the watch user will not receive phone calls.
11. Alarm Clock
Alarm clock settings. Set the selected time and repetition frequency.
12. Play sound on Device
Click search for watch to find it if it is near you. The watch will ring to let you know your position.
13. Sound Guardian
Enter the phone number you want the watch to call to listen to its surroundings.
Answer the call and check what's happening nearby. The user of the watch does not have any notification that such a connection has been made.
14. Timer switch
Here you can set the watch to be turned off or restarted remotely.
15.SMS Alerts
Enter the number to which you want to receive SMS notifications about events such as: low battery level in the watch, triggering the SOS alarm using the watch button.
16. Disable Functions
Here you can enable or disable features such as:
- dial lock on the watch
- priority positioning via WIFI
- positioning using GPS.
17.Remote Photo
Remotely take a photo using the watch's camera and receive it on your phone. The captured photo may take some time to appear depending on the strength of the mobile network signal.
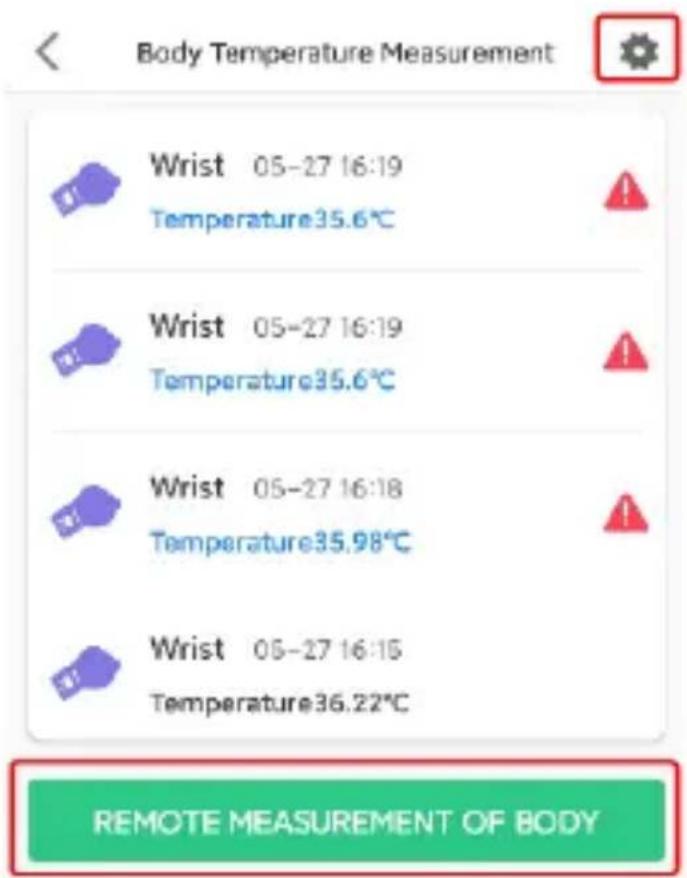
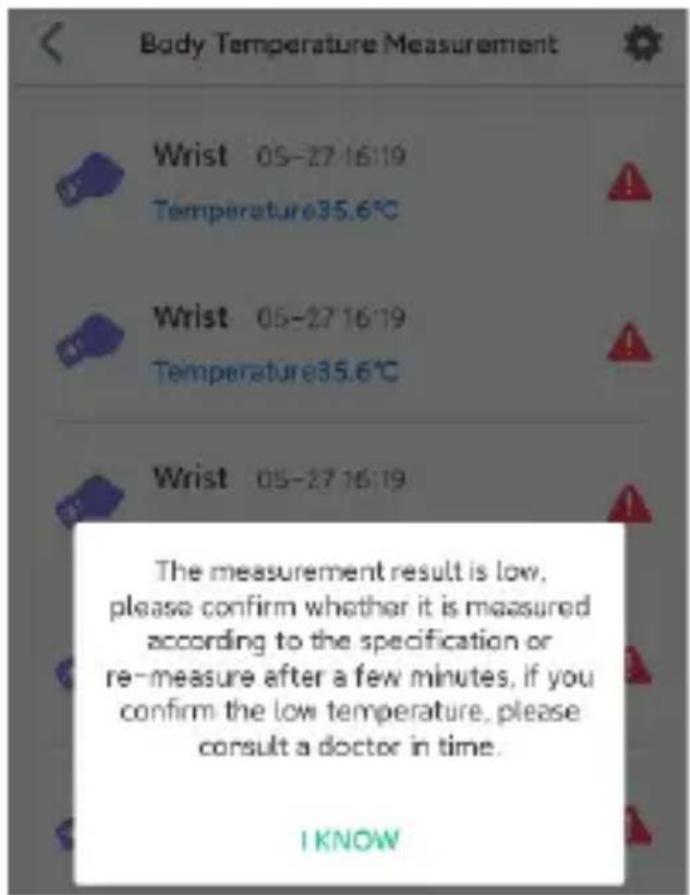
18. Body temperature
The device can remotely measure body temperature.
Click on "Remote measurement of body" at the bottom of the screen.
After a while, the result will appear.
The app stores data from previous measurements.
Additionally, the application will send an alert if the measurement temperature is too low or too high.
In the upper right corner of the screen there are settings for remote body temperature measurement parameters.
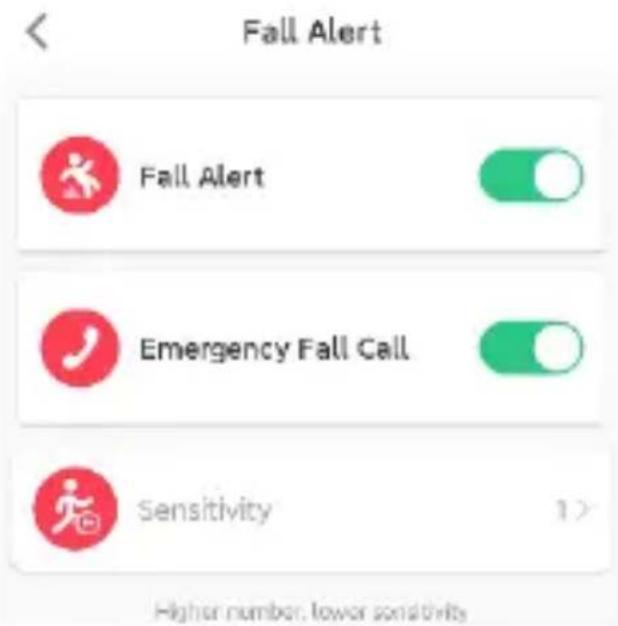
19. Fall Alert
The function allows you to turn on/off the fall detector. Additionally, you can set the fall sensitivity and activate an automatic SOS call.
20. View Watch SMS
Enable/disable the ability to receive SMS messages.
21.Reject Unknown Calls
Block numbers from outside your contact list.
22. Auto answer
Activate the function so that the watch answers your call after 10 seconds, regardless of whether the child clicks on the answer call icon or not.
23.Time Zone
Set your time zone so that the watch shows the correct date and time on the screen.
24.Language
Select one of the available watch languages.
25.LBS
Enable or disable location using mobile operators' antennas and available WIFI networks.
26. Reset Device
Remotely restore your device to factory defaults.
27.Remote Restart
Remotely reset your device.
28.Remote Shutdown
Remotely turn off your device.
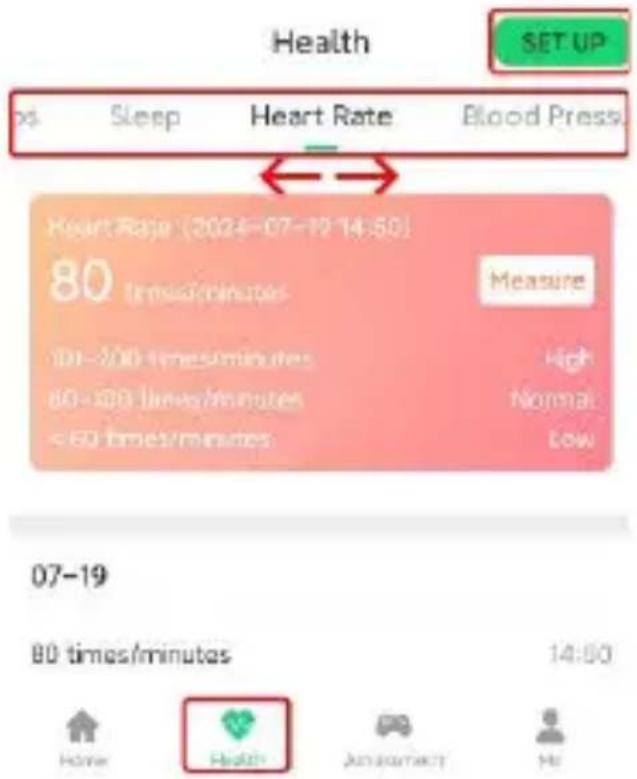
9.4 Health
To enter, click on the "Health" icon at the bottom of the screen.
The following functions are available at the top of the screen:
- Steps
- Sleep
- Heart Rate
- Blood Pressure
- Blood Oxygen
Swipe left on the names to see more.
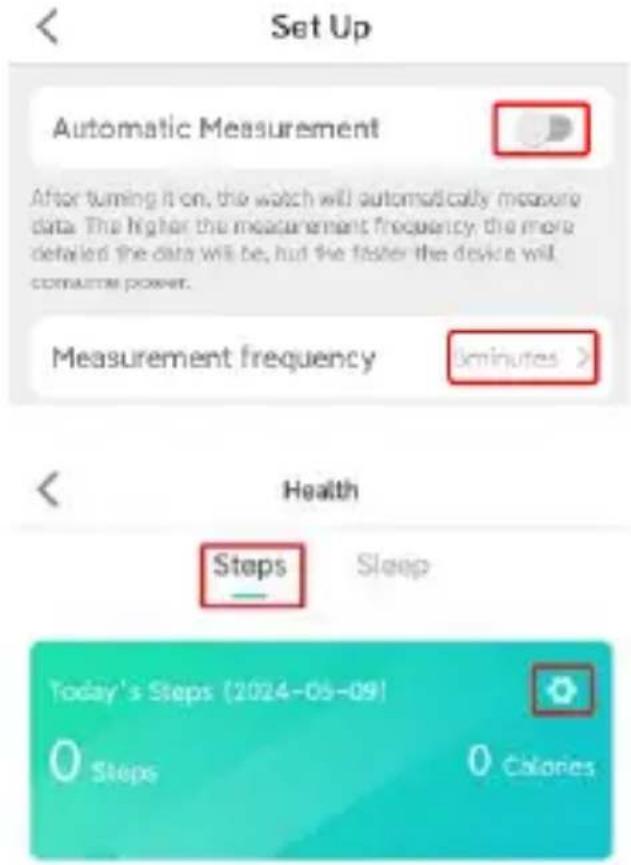
9.4.1 Health monitoring
Click on the "Set up" icon in the upper right corner.
Touch on slider to enable/disable automatic measurement of health parameters
Select time gap between measurements.
9.4.2 Steps
Click on Steps in the top bar to see today's data on the number of steps and calories burned. At the bottom of the screen, you can view step data from the last 7 days.
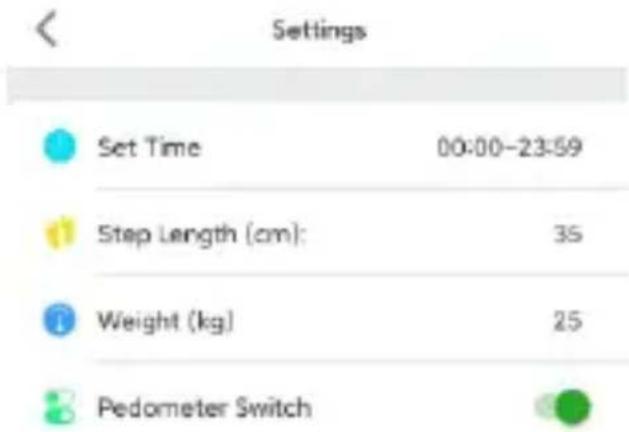
Steps settings
There is a settings icon in the upper right corner of the Steps window. Click on the icon to enter.
We can set and enter:
- Set time, hour range in which the device will count steps.
- child's step length
- child's weight
This data will help calibrate and more accurately measure steps and burned calories.
- Pedometer switch.
Attention! Turn on this function if you want to run the pedometer on the watch.
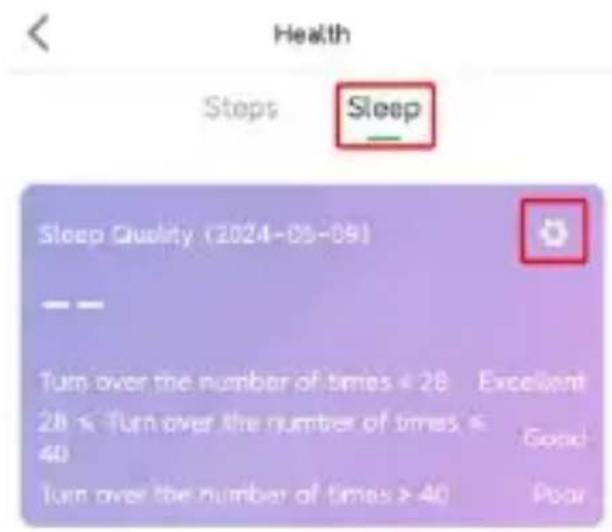
9.4.3 Sleep
Click on the top Sleep bar to see today's sleep quality data.
The quality of sleep is assessed based on the number of movements and turns during the night.
At the bottom of the screen you can view sleep quality data for the last 7 days.
Sleep settings
There is a settings icon in the upper right corner of the Sleep window.
Click on the icon to enter.
We can set and enter:
- Set Time, the hourly range in which the sleep function will track the movements. - Sleep Switch
Attention! Turn on to activate the sleep function.
9.4.4 Heart Rate
Click on the top bar Heart rate range to see the result of the most recent heart rate measurement. Today's heart rate data is available at the bottom of the screen.
Remote heart rate measurement
There is a Measure icon in the upper right corner of the window.
Click to perform remote measurement.
![Health ps Sleep Heart Rate Blood Pressu Heart Rate [2024-05-27 16:12] 69 minutes/minutes Measure 01-200 times/minutes High 60 + 1100 times/minutes Normal < 60 times/minutes Low 05-27 69 times/minutes 16:12](/content/2026/05/1064971/images/034e0eee7a0d2c917f85c5a9eca12de51f9bccd0f1cf33dfe96533fdc97e2663.jpg)
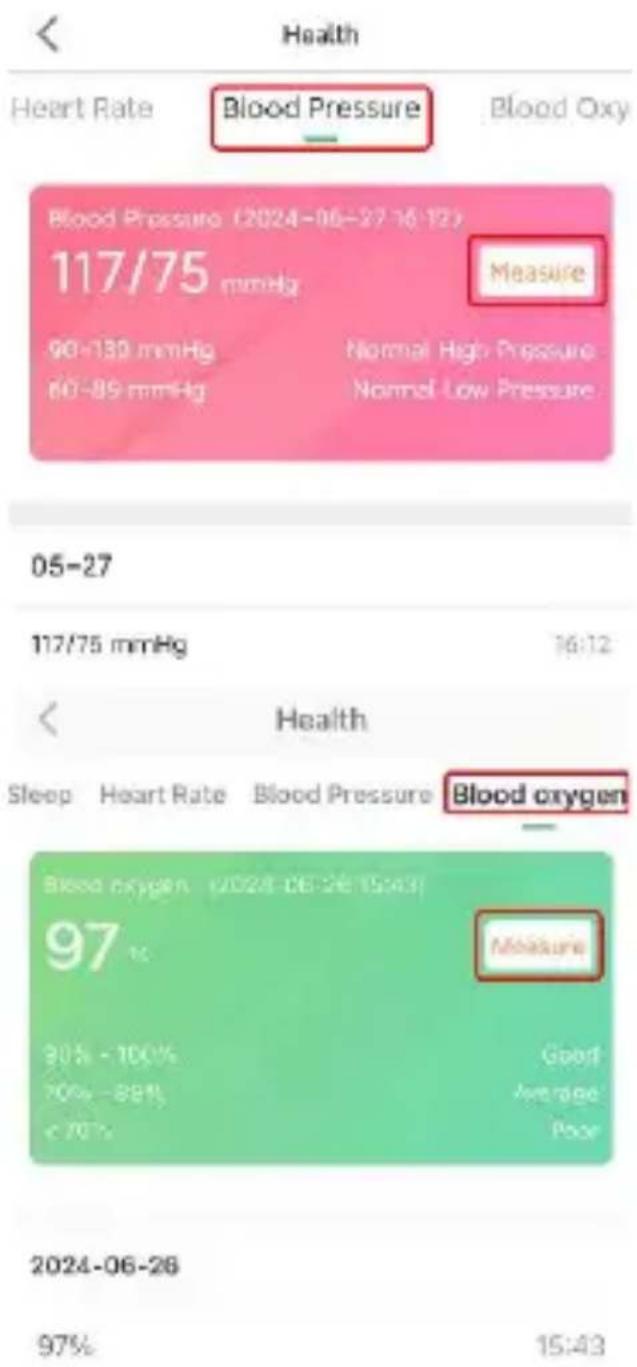
9.4.5 Blood pressure
Click on Blood Pressure in the top bar to see the result of the most recent blood pressure measurement. At the bottom of the screen, data about today's measurements is available.
Remote blood pressure measurement
There is a Measure icon in the upper right corner of the window.
Click to perform remote measurement.
9.4.6 Blood Oxygen
Click on the Blood Oxygen bar at the top to see the result of the most recent oxygen saturation measurement.
At the bottom of the screen, data about today's measurements is available.
Remote blood oxygen measurement
There is a Measure icon in the upper right corner of the window.
Click to perform remote measurement.
9.5. Me
- Personal Info: Set photo and login.
- Change Password: Change the password for your account.
- Device List: Add, edit, or remove pairing with watches.
- Device Registration Code. Look at the watch's registration code.
- Date Format Setting: Select one of the available date formats
- Delete Account. Click to delete your account.
10. Help
The application does not accept commands and shows information that the watch is not online.
- Check if the GSM signal is correct. The range is visible on the display. If not, turn off the device.
- Check that the SIM card is properly installed in watch and whether it supports 2G internet. Check if you have an available internet data package.
- Start the device and check if the network range is visible on the screen. If there is still no coverage, go to the next step.
Check if the icon symbolizing the data transfer appears, if not you need to set APN (Access Point Name, specific packet network, e.g. Internet).
Send an SMS from the phone to the device number with the following text:
pw,123456,apn,internet,,XXXXX#
the X character above means the number assigned to a specific operator, e.g.: 26001 – Plus / 26002 - T-Mobile / 26003 – Orange / 26006 – Play.
Other operator codes are available at www.mcc-mnc.com
After sending the SMS, wait several minutes for the device to receive the settings from the network. Data transfer arrows will appear as confirmation.
- Check if the server parameters contain the correct number IP, port and ID. Check the parameters by sending an SMS from the phone to device phone number with the following content:
pw,123456,ts#
In response, the device will send a message with the content containing IP address, port and ID, for example:
ID: 1451498657;
ip_url:52.28.132.157;
port:8001;
center:;
slave:;
sos1:;
sos2:;
sos3:;
upload:600S;
bat level:96;
language:1;
zone:8.00;
GPS:NO(0);
GPRS:OK(73);
pw:123456;
Check the data received in the SMS with the device number.
- If the ID / IMEI / REG CODE number is different from the badge on the watch, set a new IMEI number.
Send from the phone to the number of the card installed in the device SMS with the following text:
pw,123456,imei,xxxxxxxxxxxxxx#
- device after receiving the SMS with the code, it sends back in the SMS reply with the correct IMEI number, for example:
pw,123456,imei,359614514986574#
Check in the application, on the device list, whether the registered ID number matches the watch's ID.
- If IP_URL and PORT are different than in the example above, send an SMS from the phone to the device number with following text:
pw,123456,ip,52.28.132.157,8001#
- the device in response sends a text message about the content
[surl,52.28132.157,port,8001#]Ok.!
After that it will work properly.
-The GPRS / NET line from the example above should contain the word OK and the signal strength in parentheses. If the information contains the word NO, it means
that the device is not connected to the internet. In that case, go back to the beginning of this paragraph and follow the guidelines.
Could not call watch. The signal is busy or subscriber does not answer
Reason: The device does not recognize the incoming number or in application is set to do not disturb mode.
- Check if the number you are calling from is unlisted.
- Check if contact numbers are set in the application.
The watch only receives calls from numbers previously set in the contacts of the application.
The application does not update the location in real time. Selects only LBS locations
Reason: The GPS signal is too weak to locate the watch or it is in sleep mode.
Solution: - Leave the building, with the watch and in the application in the "MAP" function, press the "LOCATION" function. - Please note that you can set the appropriate operating mode for the watch in the application. This is related to the frequency of downloading data, including location. In energy-saving mode, data is sent once an hour. Therefore, in order to have full real-time location control, it is recommended to use the normal mode, which downloads data every 10 minutes.
The watch does not show the current time and date
Reason: The device failed to connect to the application server for the purpose time update.
- If the watch shows several hours back, check and select the appropriate time zone via the app.
- If the above does not help, please send SMS from phone to device with the following content:
pw,123456,ntpservers,121.40.88.40,8089#
In response, the watch should send an SMS with similar content OK. After that, restart your watch.
- Additionally, you can also send an SMS from phone to device number with the following text: pw,123456,time,hour.minute.second,date,year.month.day# for example giving the current time: pw,123456,time,11.45.00, date,2021.06.01#
Attention!
When writing an SMS, please pay attention to punctuation marks and spaces. Entering a wrong command will result in no response.
Basic parameters: Screen type: 1.85 inch TFT; touch panel, battery capacity: 650mAh; nano SIM card slot, Support 4G/LTE network, GPS, Wifi (for tracking only), camera, speaker, microphone, HR sensor, thermometer.

Proper disposal of this product. The device cannot be disposed of together with household waste. To prevent potential threats to the environment and human health due to improper disposal of waste, it is mandatory to take used electronic equipment to a designated collection point, or to the place where the product was purchased for the purpose of recycling electronic waste.
Warning: Lithium battery inside.

This device, smartwatch model Senio, is in compliance with Directive 2014/53/EU of the European Parliament and of the Council. The complete declaration of conformity is available online at the following link www.bemi-
electronics.com/certificates
This manual is not covered by the warranty, and the appearance and/or functionality of the software installed on the device may be different from the one described. The Guarantor reserves the right to modify the instruction manual at any time without prior notice.
Data on the maximum radiated power of the radio frequency
| Frequency range | GSM 900/1800 MHz | UMTS 900/2100 MHz |
| Max. power emitted | 32.51 / 30.44 dBm EIRP | 22.77 / 22.87 dBm EIRP |
Manufacturer:
Minrek Hongkong Limited
Rm12, 23/F, On Hong Commercial Bldg, 145 Hennessy Rd, Wan Chai, Hong Kong
Distributor in Poland:
4cv Mobile Sp. z o.o. Sp. K.
successservice2@hotmail.com
| UK | REP |
GOAL REACH CONSULTING LTD
Office 1029, 3 Hardman Street, 10th Floor
Spinningfields, Manchester, UK M3 3HF
goalservice@hotmail.com

Made in China
EC Declaration of Conformity
Manufacturer: Minrek Hongkong Limited
Address: Rm 12, 2397, On Hong Commercial Building, 145 Hennessy Road, Wanchai, Hong Kong
Validity Period: From 15 November 2023 to 14 November 2024
Notified body: Shenzhen CTB Testing Technology Co., Ltd(19438)
European Representative:

SUCCESS COURIER SL
GALLE BIO TORMES MUSE, L. PLANTA L. DERECHA, ORICINA S. Fuorl abrieta, Madrid, 28947 Spain
successservice2@hotmail.com
We simply act as EU representatives for consumer-border clients, and are not manufacturers/Importers/distributors for the product, not involved in the manufacture/enport/sale of the product. Therefore, we are not responsible for any after-sales services related to the product. In case of any product quality or infringement issues, the manufacture/importers shall be solely held responsible.
Product name: Edible smartwatch
Model: Senio
ASIN: 6972689174607/6972689174621
Trade Mark: BEMI
Place of production: CN
European Standard: IEC 62321-3-1:2013, IEC 62321-4:2013+AMD1:2017.
IEC 62321-5:2013,IEC 62321-6:2015,
IEC 62321-7-1:2015&IEC62321-7-2:2017,IEC 62321-8:2017
Test Report:
We here with declare that the above mentioned products meet the transposition into national law, the provisions of the following EC Council Directives and Standards. All supporting documentations are retained under the premises of the manufacturer.
General applicable directives: 2011/05/EU, (EU)2015/863
The CE markings as shown below can be affixed on the product after preparation of necessary conformity documentation.
According to the Council Directive, this declaration of conformity is issued under the sole responsibility of the manufacturer or the brand owner. The Declaration of Conformity status that it is compliant with the relevant directives and harmonized standards.
Start of CE Marking: 14 September 2023
Signature:

Name: JI MIN
Position Manager
Issued date: 18 July 2024
