VP-774A - Network switch Kramer - Free user manual and instructions
Find the device manual for free VP-774A Kramer in PDF.


| Product Type | Managed Network Switch |
| Model | VP-774A |
| Brand | Kramer |
| Ports | 8 x Gigabit Ethernet RJ-45 |
| Uplink Ports | 2 x SFP (Gigabit) |
| Switching Capacity | 20 Gbps |
| Dimensions (W x D x H) | 19 x 6.7 x 1.7 inches (483 x 170 x 44 mm) |
| Weight | 4.4 lbs (2.0 kg) |
| Power Supply | 100-240 VAC, 50/60 Hz, 12W max |
| Management | Web GUI, SNMP v1/v2c/v3, Telnet, CLI |
| VLAN Support | 802.1Q VLAN (up to 256 groups) |
| QoS | 802.1p, DSCP, 4 priority queues |
| Security | 802.1X, ACL, port security, SSH/SSL |
| Operating Temperature | 32°F to 104°F (0°C to 40°C) |
| Humidity | 10% to 90% non-condensing |
| Cooling | Fanless, silent operation |
| Mounting | 19-inch rackmount (1U), brackets included |
| Maintenance | Wipe with dry cloth; avoid liquids |
| Safety Compliance | CE, FCC, RoHS |
| Spare Parts | Contact Kramer for replacement power adapter or brackets |
| Repairability | No user-serviceable parts; contact authorized service |
Frequently Asked Questions - VP-774A Kramer
User questions about VP-774A Kramer
0 question about this device. Answer the ones you know or ask your own.
Ask a new question about this device
Download the instructions for your Network switch in PDF format for free! Find your manual VP-774A - Kramer and take your electronic device back in hand. On this page are published all the documents necessary for the use of your device. VP-774A by Kramer.
USER MANUAL VP-774A Kramer
Presentation Switcher/Scaler

Scan for full manual
VP-774A Quick Start Guide
This guide helps you install and use your VP-774A for the first time.
Go to www.kramerav.com/downloads/VP-774A to download the latest user manual and check if firmware upgrades are available.
Step 1: Check what's in the box
VP-774A Presentation Switcher/Scaler
1 Set of rack ears
4 Rubber feet
IR remote control transmitter with batteries
1 Power cord
1 Quick start guide
Step 2: Get to know your VP-774A

flowchart
graph TD
    A["1"] --> B["O"]
    C["2"] --> D["O"]
    E["3"] --> F["MPV203"]
    G["4"] --> H["MPV203"]
    I["5"] --> J["MPV203"]
    K["6"] --> L["MPV203"]
    M["7"] --> N["MPV203"]
    O["8"] --> P["MPV203"]
    Q["9"] --> R["MPV203"]
    S["10"] --> T["MPV203"]
    U["11"] --> V["MPV203"]
    W["12"] --> X["MPV203"]
    Y["13"] --> Z["MPV203"]
    AA["14"] --> AB["MPV203"]
    AC["15"] --> AD["MPV203"]
    AE["16"] --> AF["MPV203"]
    AG["17"] --> AH["MPV203"]
    AI["Presentation Switcher / Scale"] --> AJ["Box 1"]
    AK["Presentation Switcher / Scale"] --> AL["Box 2"]
    AM["Presentation Switcher / Scale"] --> AN["Box 3"]
    AO["Presentation Switcher / Scale"] --> AP["Box 4"]
    AQ["Presentation Switcher / Scale"] --> AR["Box 5"]
    AS["Presentation Switcher / Scale"] --> AT["Box 6"]
    AU["Presentation Switcher / Scale"] --> AV["Box 7"]
    AW["Presentation Switcher / Scale"] --> AX["Box 8"]
    AY["Presentation Switcher / Scale"] --> AZ["Box 9"]
    BA["Presentation Switcher / Scale"] --> BB["Box 10"]
    BC["Presentation Switcher / Scale"] --> BD["Box 11"]
    BE["Presentation Switcher / Scale"] --> BF["Box 12"]
    BG["Presentation Switcher / Scale"] --> BH["Box 13"]
    BI["Presentation Switcher / Scale"] --> BJ["Box 14"]
    BK["Presentation Switcher / Scale"] --> BL["Box 15"]
    BM["Presentation Switcher / Scale"] --> BN["Box 16"]
    BO["Presentation Switcher / Scale"] --> BP["Box 17"]
| # | Feature | Function | |
| 1 | IR Receiver | Accepts IR remote commands | |
| 2 | IR LED | Lights red when the unit accepts IR remote commands | |
| 3 | INPUT Selector Buttons | HDMI | Press to select the HDMI input (from 1 to 4) |
| 4 | PC | Press to select the computer graphics input (from 1 to 2) | |
| 5 | CV | Press to select the composite video input (from 1 to 2) | |
| 6 | DP | Press to select the Display Port input | |
| 7 | SDI | Press to select the SDI input | |
| 8 | PIP Button | Toggles the dual window mode (Picture-in-Picture) functionNote that while browsing the OSD menu in the dual window mode, a long press of the PIP button will instantly toggle the window control (between Main and PiP) | |
| 9 | BLANK Button | Press to toggle between a blank screen (blue or black screen) and the display | |
| 10 | FREEZE Button | Press to freeze/unfreeze the output video image | |
| 11 | Navigation Buttons | ▼/- Button | Press to move down the menu list and to decrease numerical values. When not within the OSD menu mode, press to reduce the output volume |
| 12 | ◄/MENU Button | Press to access the OSD menu, exit the OSD menu and, when in the OSD menu, move to the previous level in the OSD screen | |
| 13 | ▲/+ /VOLUME Button | Press to move up the menu list values and to increase numerical values. When not within the OSD menu mode, press to increase the output volume | |
| 14 | ►/ENTER Button | Press to access sub-menu items and select from several settings | |
| 15 | RESET TO XGA/720P Button | Press to reset the video output resolution to XGA or 720p and change the deep color settings to Off on the outputPress and hold for about 3 seconds to toggle between reset to XGA and reset to 720p | |
| 16 | PANEL LOCK Button | Press and hold for about 3 seconds to lock/unlock the front panel buttons | |
| 17 | Mic 2 | Connect to a microphoneMic2 on the front panel is identical to Mic2 on the rear panel and overrides it when connected | |

| # | Feature | Function | ||
| 18 | AUDIO IN Unbalanced Connectors | HDMI 3.5mm Mini Jack | Connect to an unbalanced audio source for audio takeover of the HDMI 1 to HDMI 4 embedded audio (see Step 4) | |
| 19 | PC 3.5mm Mini Jack | Connect to the unbalanced stereo audio of the computer graphics source (from 1 to 2; see Step 4) | ||
| 20 | DP 3.5mm Mini Jack | Connect to the unbalanced stereo audio source for analog audio takeover of the DisplayPort embedded audio (see Step 4) | ||
| 21 | CV (L, R) RCA | Connect to the unbalanced stereo audio of the composite video source | ||
| 22 | REMOTE IR 3.5mm Mini Jack (opening) Covered by a cap. The 3.5mm connector at the end of the internal IR connection cable fits through this opening | Connects to an external IR receiver unit for controlling the machine via an IR remote controller (instead of using the front panel IR receiver). Optional. Can be used instead of the front panel (built-in) IR receiver to remotely control the machine (only if the internal IR connection cable has been installed). | ||
| 23 | AUDIO IN Unbalanced Connectors | MIC 1 | 6mm Jack | Connect to a microphone (see Step 4) |
| 24 | COND/DYN MIC DIP-switch | Select between a condenser and a dynamic type microphone | ||
| 25 | MIC 2 | 6mm Jack | Connect to a microphone (see Step 4) Note that Mic2 on the rear panel is identical to Mic2 on the front panel. Mic2 on the front panel overrides Mic2 on the rear panel when connected | |
| 26 | COND/DYN MIC DIP-switch | Select between a condenser and a dynamic type microphone | ||
| 27 | SPKR OUT 4-pin Terminal Block | Connects to a pair of loudspeakers | ||
| 28 | S/PDIF OUT RCA Connector | Connect to a digital audio acceptor | ||
| 29 | Power Connector with Fuse | AC connector, enabling power supply to the unit | ||
| 30 | POWER Switch | Switch for turning the unit on or off | ||
| 31 | VIDEO INPUT Connectors | HDMI IN | Connect to the HDMI source (from 1 to 4) | |
| 32 | PC IN 15-pin HD | Connect to the computer graphics source (from 1 to 2) | ||
| 33 | CV IN RCA | Connect to the composite video source | ||
| 34 | DP IN | Connect to the DisplayPort source | ||
| 35 | SDI IN BNC | Connect to the SDI source | ||
| 36 | SDI LOOP BNC | Connect to a local display | ||
| 37 | VIDEO OUTPUT Connectors | SDI OUT BNC | Connect to an SDI acceptor | |
| 38 | HDMI OUT | Connect to an HDMI acceptor (from 1 to 2) | ||
| 39 | HDBT OUT RJ-45 | Connect to an HDBT receiver (for example, Kramer TP-580RXR) to pass audio and video signals as well as serial commands | ||
| 40 | LINK LED | Lights to indicate a link | ||
| 41 | RS-232 9-pin D-sub Port | Connect to the PC or other serial controller | ||
| 42 | ETHERNET Connector | Connects to the PC or other Controller through computer networking | ||
| 43 | ETHERNET RESET Button | Press while turning power off and then on, to reset the Ethernet settings to their factory default state | ||
| 44 | AUDIO LINE OUT (L, R) Terminal Block Connector | Connect to the L and R balanced stereo audio acceptor | ||
Step 3: Install the VP-774A
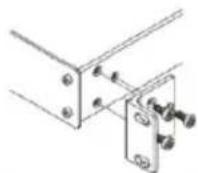
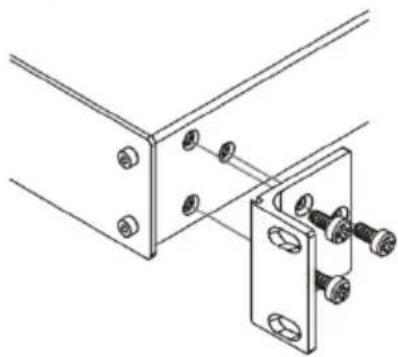
To rack mount the machine attach both ear brackets to the machine (by removing the three screws from each side of the machine and replacing those screws through the ear brackets) or place the machine on a table.
Step 4: Connect the inputs and outputs
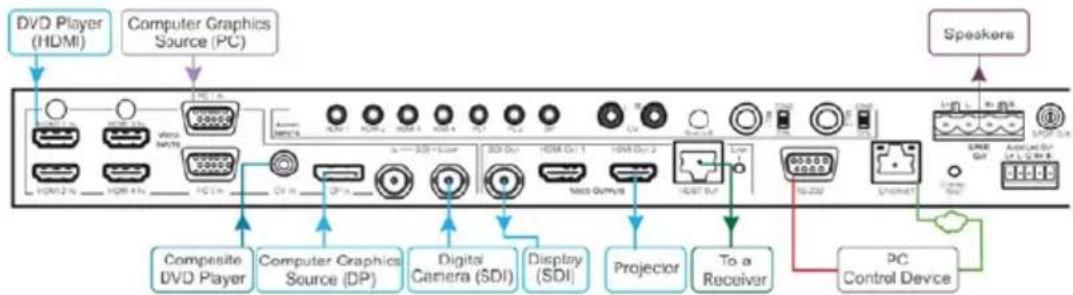
Always switch OFF the power on each device before connecting it to your VP-774A. For best results, we recommend that you always use Kramer high-performance cables to connect AV equipment to the VP-774A.
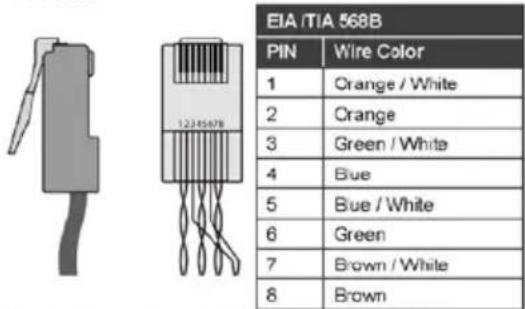
RJ-45 Pinout
TP pinout using straight pin-to-pin cable with RJ-45 connectors
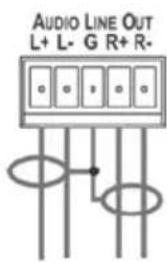
Line Output Pinout:
Balanced stereo audio output
Balanced stereo audio output to unbalanced acceptor
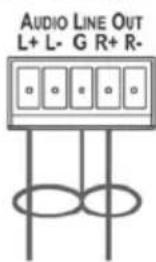
For optimum range and performance, use Kramer's BC-UNIKat cable which significantly outperforms regular CAT 5/CAT 6 cables.
Mic Pinout:
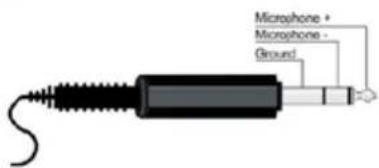
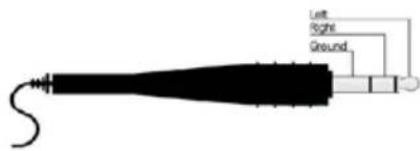
Audio Input Pinout:
Step 5: Connect the power
Connect AC power to the rear of the VP-774A, switch on its power and then switch on the power on each device.
Step 6: Set operation parameters via OSD menu
Enter the OSD menu via the MENU button on the front panel or the IR remote control transmitter. Select a menu item and set parameters as required. Sub-menus include: Input, Audio, Process, Picture, Enhance, Scale and Misc
Note: By default the output resolution is set to Native, the VP-774A is triggered to read the EDID of the main display and change the output resolution value according to the native resolution of the display.
If you cannot see any images, verify that the display, TV, or projector is in good working order and is connected to the VP-774A. If you still don't see an image, press and hold the RESET TO XGA/720P button for 2 seconds to reset the output to XGA or 720p resolution.
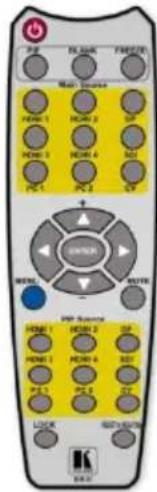
Step 7: Operate via the front panel buttons and via the:
IR remote controller:
RS-232 and Ethernet:
Web pages:
| RS-232 | ||
| Protocol | 3000 (Default) | Legacy |
| Baud Rate: | 115,200 | 9,600 |
| Data Bits: | 8 | 8 |
| Stop Bits: | 1 | 1 |
| Parity: | None | None |
| Command Format: | ASCII | ASCII |
| Example (set display mode to Picture in Picture): | #Y 0,110,1> | >Y 0 110 1 |
Ethernet
| To reset the IP settings to the factory reset values, power cycle the device while holding in the Ethernet Reset button, located on the rear panel of the unit | |||
| IP address: | 192.168.139 | UDP port #: | 50000 |
| Subnet mask: | 255.255.000.000 | Max. UDP ports: | 10 |
| Default gateway: | 000.000.000.000 | Max. TCP ports: | 4 |
| TCP port #: | 5000 | Web page password: | 1234 |
Full Factory Reset
| Front panel buttons | Turn power off. Turn power on again while holding the RESET TO XGA/720p front panel button. The LEDs blink. Full factory reset is complete once the LEDs cease to blink and react normally.Note that full factory reset includes Ethernet reset as well |
| OSD | Factory Reset through the Misc menu item |
| Web pages | Factory reset via the Device Settings embedded Web page |
| Protocol 3000 | Use "Factory" command or #Y 0,771,1 |
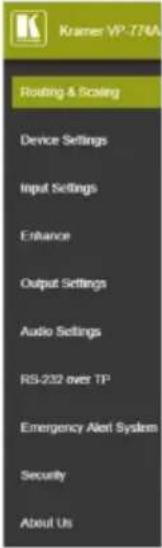
Step 8: Control the display via HDBaseT:
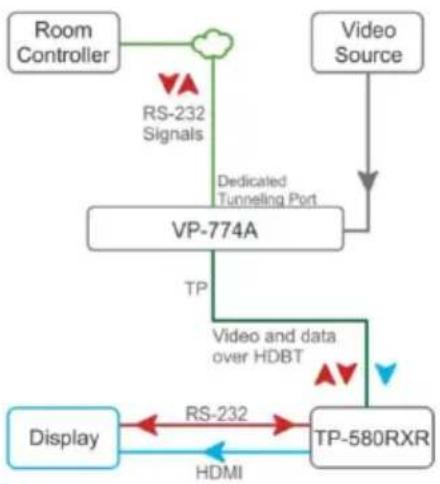
The Port Tunneling feature lets you send RS-232 commands to a serial device connected to the HDBaseT output via the Ethernet port of the VP-774A.
Commands sent to a dedicated TCP port of the VP-774A are forwarded to the RS-232 port on the HDBaseT receiver connected to its output.
To activate port tunneling:
- Set the dedicated port tunneling Ethernet connection port type and port number through which the VP-774A will be passing RS-232 signals (TCP and 5050, by default).
- Use the HDBT UART command to set the communication parameters (9600, 8, N and 1, by default).
flowchart
graph TD
    A["Room Controller"] --> B["VP-774A"]
    C["Video Source"] --> D["TP-580RXR"]
    B -->|TP| E["Display"]
    D -->|HDMI| F["RS-232 Signals"]
    B -->|Dedicated Tunneling Port| G["Video and data over HDBT"]
    D -->|RS-232 Signal| H["RS-232 Signals"]
Contents
1 Introduction 1
2 Getting Started 2
2.1 Achieving the Best Performance 2
2.2 Safety Instructions 2
2.3 Recycling Kramer Products 3
3 Overview 4
3.1 HDCP Compliance 7
3.2 About HDBaseT™ Technology 7
3.3 Using Twisted Pair Cable 8
3.4 Defining the VP-774A Presentation Switcher/Scaler 8
4 Installing in a Rack 12
5 Connecting the VP-774A 13
5.1 Wiring the RJ-45 Connectors 16
5.2 Connecting the Balanced Stereo Audio Output 17
5.3 Microphone Pinout 17
5.4 Audio Input Pinout 17
6 The OSD Menu 18
6.1 OSD Menu Operation Example 18
6.2 The Input Menu 21
6.3 The Audio Menu 28
6.4 The Process Menu 34
6.5 The Picture Menu 35
6.6 The Enhance Menu 36
6.7 The Scale Menu 37
6.8 The Miscellaneous Menu 40
7 The Display Modes 46
7.1 The Single Window Display Mode 46
7.2 The Dual Window Display Mode 46
8 Controlling the VP-774A 51
8.1 Controlling via the Front Panel Buttons 51
8.2 Controlling via the OSD Menu 51
8.3 Controlling via the VP-774A Web Pages 52
8.4 Controlling via the Infrared Remote Control Transmitter 57
9 Using the Embedded Web Pages 59
9.1 The Routing and Scaling Page 61
9.2 The Device Settings Page 71
9.3 The Input Settings Page 77
9.4 The Enhance Page 80
9.5 The Output Settings 81
9.6 The Audio Settings Page 82
9.7 The RS-232 over TP Page 85
9.8 The Emergency Alert System Page 89
9.9 The Security Page 91
9.10 The About Us Page 92
9.11 Save or Upload a Configuration 92
10 Port Tunneling 94
11 Flash Memory Upgrade 96
12 Technical Specifications 97
12.1 Default Communication Parameters 98
12.2 Input Resolutions 98
12.3 Output Resolutions 100
13 The VP-774A RS-232 Communication Protocol 101
13.1 Using the Communication Protocol 101
13.2 Communication Protocol: Mimicking OSD 101
13.3 Protocol Table: Mimicking Remote and Front Panel Buttons 111
13.4 The Protocol 3000 Common Operation Commands 112
Figures
Figure 1: VP-774A Presentation Switcher/Scaler Front Panel 9
Figure 2: VP-774A Presentation Switcher/Scaler Rear Panel 10
Figure 3: 15-pin HD Connector Pinout 13
Figure 4: Connecting the VP-774A Presentation Switcher/Scaler 15
Figure 5: TP PINOUT 16
Figure 6: Connecting the Balanced Stereo Audio Output 17
Figure 7: Connecting an Unbalanced Stereo Audio Acceptor to the Balanced Output 17
Figure 8: Microphone Pinout 17
Figure 9: Audio Input Pinout 17
Figure 10: Input Menu 21
Figure 11: Select the Display Mode 23
Figure 12: Changing the Size of the Window 24
Figure 13: Increasing the Width 25
Figure 14: Increasing the Height 25
Figure 15: Positioning the Window 26
Figure 16: Window Customization 26
Figure 17: H-Position Slide Bar 27
Figure 18: Moving the PiP Window 27
Figure 19: Audio Menu 28
Figure 20: Set the Output Volume Level 30
Figure 21: SDI Channeling Example 31
Figure 22: The SDI Channeling Menu 31
Figure 23: SDI Channeling Example 32
Figure 24: SDI bypassed Channels Menu 33
Figure 25: Process Menu 34
Figure 26: Picture Menu 35
Figure 27: Enhance Menu 36
Figure 28: Scale Menu 37
Figure 29: Misc Menu 40
Figure 30: XML File Transfer 44
Figure 31: Emergency Alert System Display 44
Figure 32: CV superimposed over DP 49
Figure 33: Entering the IP Number in the Address Bar 52
Figure 34: Local Area Connection Properties Window 54
Figure 35: Internet Protocol Version 4 Properties Window 55
Figure 36: Internet Protocol Version 6 Properties Window 55
Figure 37: Internet Protocol Properties Window 56
Figure 38: Infrared Remote Control Transmitter 57
Figure 39: The Authentication Window 59
Figure 40: The Loading Page 60
Figure 41: The Routing & Scaling Page with Web page list on the left 61
Figure 42: The Routing & Scaling Page – Single Window 61
Figure 43: The Routing & Scaling Page – standby mode 62
Figure 44: The Routing & Scaling Page – Moving the PIP Window 62
Figure 45: The Routing & Scaling Page – PIP Window 63
Figure 46: The Routing & Scaling Page – Changing the Resolution 64
Figure 47: The Routing & Scaling Page – The Swap Inputs 65
Figure 48: The Routing & Scaling Page – Swapping the Inputs 65
Figure 49: The Routing & Scaling Page – Auto Switching Window (Main Tab) 66
Figure 50: The Routing & Scaling Page – selecting the Inputs to Scan (PiP Tab) 66
Figure 51: The Routing & Scaling Page – Auto Switching Window 67
Figure 52: The Routing & Scaling Page – Lower Buttons Bar 67
Figure 53: The Routing & Scaling Page – Selecting a Preset 68
Figure 54: The Routing & Scaling Page – Saving the selected Preset 68
Figure 55: The Routing & Scaling Page – Recalling a Preset 69
Figure 56: The Routing & Scaling Page – TAKE Mode 69
Figure 57: The Routing & Scaling Page – Cancel the Changes 70
Figure 58: The Routing & Scaling Page – Audio Level Sliders 70
Figure 59: The Routing & Scaling Page – Muting the Audio Level 70
Figure 60: The Device Settings Page 71
Figure 61: The Device Settings Page – Changing the IP number 71
Figure 62: The Device Settings Page – Selecting the Firmware File 72
Figure 63: The Device Settings Page – Firmware File Downloaded 72
Figure 64: The Device Settings Page – Firmware Upgrade Warning 73
Figure 65: The Device Settings Page – Firmware Upgrade Stage 73
Figure 66: The Device Settings Page – Writing the Firmware 74
Figure 67: The Device Settings Page – Firmware Upgrade Waiting for Restart 74
Figure 68: The Device Settings Page – The Reset Device Window 75
Figure 69: The Device Settings Page – The Reset Device Window Including Ethernet 75
Figure 70: The Device Settings Page – Web Page Reset 76
Figure 71: The Device Settings Page – The Information Window 76
Figure 72: The Input Settings Page 77
Figure 73: The Input Settings Page – PIP Window Inactive 78
Figure 74: The Enhance Page 80
Figure 75: The Output Settings Page 81
Figure 76: The Audio Settings Page – General Tab 82
Figure 77: The Audio Settings Page – Microphones Tab 83
Figure 78: The Audio Settings Page – Microphones Tab 83
Figure 79: The Audio Settings Page – Setting the Mix Level 84
Figure 80: The Audio Settings Page – Output Volume Pre-limiter 84
Figure 81: The RS-232 over TP Page 86
Figure 82: The RS-232 over TP Page – the Remote Device Commands Table 86
Figure 83: The RS-232 over TP Page – the Edit Command Window 87
Figure 84: The RS-232 over TP Page – Setting the Trigger 87
Figure 85: The RS-232 over TP Page – Setting the Sync on Trigger 88
Figure 86: The RS-232 over TP Page – the Power on Command 88
Figure 87: The Emergency Alert System Page 89
Figure 88: The Emergency Alert System Page – Local Message Example 90
Figure 89: The Security Page – Security Deactivated 91
Figure 90: The Security Page – Activating the Security 91
Figure 91: The Security Page – Authentication Required 91
Figure 92: The Security Page 92
Figure 93: The About Us Page 92
Figure 94: Loading a Configuration 93
Figure 95: Saving a Configuration 93
Figure 96: Port Tunneling 94
1 Introduction
Welcome to Kramer Electronics! Since 1981, Kramer Electronics has been providing a world of unique, creative, and affordable solutions to the vast range of problems that confront video, audio, presentation, and broadcasting professionals on a daily basis. In recent years, we have redesigned and upgraded most of our line, making the best even better!
Our 1,000-plus different models now appear in 14 groups that are clearly defined by function: GROUP 1: Distribution Amplifiers; GROUP 2: Switchers and Routers; GROUP 3: Control Systems; GROUP 4: Format/Standards Converters; GROUP 5: Range Extenders and Repeaters; GROUP 6: Specialty AV Products; GROUP 7: Scan Converters and Scalers; GROUP 8: Cables and Connectors; GROUP 9: Room Connectivity; GROUP 10: Accessories and Rack Adapters; GROUP 11: Sierra Video Products; GROUP 12: Digital Signage; GROUP 13: Audio; and GROUP 14: Collaboration.
Congratulations on purchasing your Kramer VP-774A Presentation Switcher/Scaler. This product, which incorporates HDMI™ technology, is ideal for:
- Projection systems in conference rooms, boardrooms, auditoriums, hotels and churches, production studios, rental and staging
- Any application where high quality conversion and switching of multiple and different video signals to graphical data signals is required for projection purposes
2 Getting Started
We recommend that you:
- Unpack the equipment carefully and save the original box and packaging materials for possible future shipment
• Review the contents of this user manual

Go to www.kramerav.com/downloads/VP-774A to check for up-to-date user manuals, application programs, and to check if firmware upgrades are available (where appropriate).
2.1 Achieving the Best Performance
To achieve the best performance:
- Use only good quality connection cables (we recommend Kramer high-performance, high-resolution cables) to avoid interference, deterioration in signal quality due to poor matching, and elevated noise levels (often associated with low quality cables)
- Do not secure the cables in tight bundles or roll the slack into tight coils
- Avoid interference from neighboring electrical appliances that may adversely influence signal quality
• Position your VP-774A away from moisture, excessive sunlight and dust

This equipment is to be used only inside a building. It may only be connected to other equipment that is installed inside a building.
2.2 Safety Instructions

Caution: There are no operator serviceable parts inside the unit
Warning: Use only the power cord that is supplied with the unit
Warning: Do not open the unit. High voltages can cause electrical shock! Servicing by qualified personnel only
Warning: Disconnect the power and unplug the unit from the wall before installing
2.3 Recycling Kramer Products
The Waste Electrical and Electronic Equipment (WEEE) Directive 2002/96/EC aims to reduce the amount of WEEE sent for disposal to landfill or incineration by requiring it to be collected and recycled. To comply with the WEEE Directive, Kramer Electronics has made arrangements with the European Advanced Recycling Network (EARN) and will cover any costs of treatment, recycling and recovery of waste Kramer Electronics branded equipment on arrival at the EARN facility. For details of Kramer's recycling arrangements in your particular country go to our recycling pages at www.kramerav.com/support/recycling/.
3 Overview
The Kramer VP-774A is a high quality presentation switcher and scaler. It accepts one of nine inputs: an SDI signal on a BNC connector, a DisplayPort (DP) signal on a DisplayPort connector, one composite video signal on an RCA connector, two computer graphics signals on 15-pin HD connectors, and four HDMI signals on HDMI connectors. It scales the video, embeds the audio, and simultaneously outputs the signal as follows: to two HDMI outputs, to an SDI output and to an HDBaseT TP output, together with a digital audio output and a balanced stereo audio output.
The VP-774A Presentation Switcher / Scaler features:
- PixPerfect™ Scaling Technology – Kramer's precision pixel mapping and high quality scaling technology. High-quality 3:2 and 2:2 pull down de-interlacing and full up and down scaling of all video input signals
- State-of-the-art video processing technology, with the highest quality de-interlacing, noise reduction, and scaling performance for both standard-definition and high-definition signals
- K-IIT XL™ Picture-in-Picture Image Insertion Technology - Ultra stable picture-in-picture, picture-and-picture and split screen capability, or fully customizable windows' size and position control: any source can be inserted into or positioned next to any other source and resized as desired
- Ultra-Fast Fade-Thru-Black (FTB™) Switching - Video switching transitions are clean and ultra-fast. The video fades to black and the new input fades from black for smooth, glitch-free switching. The output signal provides constant sync so the display never glitches
- An emergency alert system that can have a national or campus-wide notification immediately displayed when an emergency situation develops, by means of automatic text overlaying, either via a crawler or a full screen cover up, as well as an optional audio alert
- Port tunneling, bidirectional RS-232 interface – simple control commands and data can flow in both directions from a controller to the VP-774A via the Ethernet, allowing status requests and control of the destination unit
- Advanced deinterlacing functions - including 3D comb filtering, film mode,
diagonal correction and motion detection
- Scaled Outputs – 2 HDMI outputs, an SDI output and an HDBaseT TP output simultaneously
- HDBaseT™ technology with a bandwidth of up to 6.75Gbps (2.25Gbps per graphic channel)
- System Range - Up to 130m (430ft) at normal mode (2k), up to 100m at normal mode (4K), up to 180m (590ft) at ultra-mode (1080p @60Hz @24bpp) when using BC-UNIKat cables

For optimum range and performance using HDBaseT™, use Kramer's BC-UNIKat cable. Note that the transmission range depends on the signal resolution, source and display used. The distance using non-Kramer CAT 6 cable may not reach these ranges.
- Output Resolutions – HDTV and Computer Graphics up to 2K and 1080p/UXGA with selectable refresh rates
- Multiple Aspect Ratio Selections – Follow input, follow output, best fit, letterbox
- Multi-Standard SDI support - SDI (SMPTE 259M), HD-SDI (SMPTE 292M) and 3G HD-SDI (SMPTE 424M)
• Looping 3G HD-SDI Input - SDI channeling, letting you select one active audio signal and three bypassed signals from eight embedded stereo audio channels
• Multi-Standard Video support - NTSC (3.58/4.43), PAL (M/N/60) and SECAM
• Built-in Time Base Corrector - Stabilizes unstable video sources - Built-in Proc-Amp with enhanced functions such as color correction, gamma and dither
• Input and output audio level adjustment - Balanced stereo audio inputs, with two unbalanced microphone inputs, as well as digital stereo and balanced stereo outputs
- Selectable Microphone talkover or mix modes
-
A built-in 2x10W power amplifier with speaker outputs on a 4-pin terminal block connector
-
Automatic detection and selection of the HDMI and DP embedded audio. The VP-774A automatically outputs the signal from the HDMI and DP embedded audio inputs or performs an analog takeover to output the respective analog audio input
- Selectable Power Save modes for energy efficient usage
- HDCP Compliant - The HDCP (High Definition Content Protection) license agreement allows copy-protected data on the HDMI input to pass only to the HDMI and HDBaseT outputs
In addition, the VP-774A Presentation Switcher / Scaler:
- Includes luma keying via the PiP window
- Features advanced EDID management (native resolution and color depth) per input
- Analyzes the connected output's EDID for optimal scaling
• Auto-positions the input to fit the window perfectly - Supports picture zooming both on main and PiP window from 100% to 1600%, including separate V and H sharpness control
- Provides input and output color space control
• Supports HDMI deep color for inputs and output
• Features vertical Keystone operation - Features selectable test patterns
- Comes with an On-Screen Display (OSD) for easy setup and adjustment, accessible via the IR remote control and via the front-panel buttons
- Has a non-volatile memory that retains the last settings used for each input and window combination
• Supports firmware upgrade via RS-232 and Ethernet - Is HDTV and computer graphics compatible and the resolution can be up- or down-scaled as required (see output resolutions in Section 6.7)
Control your VP-774A:
- Directly, via the front panel push buttons
- By RS-232 serial commands transmitted by a touch screen system, PC, or other serial controller
- Remotely, from the infrared remote control transmitter
• Via the Ethernet (optionally via the Web pages)
The VP-774A is housed in a 19" 1U rack mountable enclosure, with rack "ears" included, and is fed from a 100-240 VAC universal switching power supply.
3.1 HDCP Compliance

If an HDMI signal is HDCP protected, it can only appear on HDMI and HDBaseT outputs that are connected to HDCP compliant displays.
The VP-774A will not output an HDCP protected source to a display that is not HDCP compliant. Instead it will show a green screen.
In the dual window display mode (see Section 7.2), even if only one of the inputs is HDCP protected, and is output to a non-compliant display, it will affect the entire screen and turn it green.
3.2 About HDBaseT™ Technology
HDBaseT™ is an advanced all-in-one connectivity technology (supported by the HDBaseT Alliance). It is particularly suitable in the ProAV – and also the home – environment as a digital networking alternative, where it enables you to replace numerous cables and connectors by a single LAN cable used to transmit, for example, uncompressed full high-definition video, audio, IR, as well as various control signals.

The products described in this user manual are HDBaseT certified.
3.3 Using Twisted Pair Cable
Kramer engineers have developed special twisted pair cables to best match our digital twisted pair products; BC-UNIKat (CAT 6A U/FTP cable) significantly outperforms regular CAT 5 / CAT 6 cables.

We strongly recommend that you use shielded twisted pair cable.
3.4 Defining the VP-774A Presentation Switcher/Scaler
This section defines the VP-774A.

flowchart
graph TD
    A["1"] --> B["2"]
    B --> C["3"]
    C --> D["4"]
    D --> E["5"]
    E --> F["6"]
    F --> G["7"]
    G --> H["8"]
    H --> I["9"]
    I --> J["10"]
    J --> K["11"]
    K --> L["12"]
    L --> M["13"]
    M --> N["14"]
    N --> O["15"]
    O --> P["16"]
    P --> Q["17"]
    Q --> R["Mac 2"]
    R --> S["+"]
    S --> T["Volumes"]
    T --> U["External"]
    U --> V["Reset To XOM/DBM"]
    V --> W["Pack Lock"]
    W --> X["+"]
    X --> Y["Micro"]
    Y --> Z["+"]
    Z --> AA["Micro"]
    AA --> AB["Micro"]
    AB --> AC["Micro"]
    AC --> AD["Micro"]
    AD --> AE["Micro"]
    AE --> AF["Micro"]
    AF --> AG["Micro"]
    AG --> AH["Micro"]
    AH --> AI["Micro"]
    AI --> AJ["Micro"]
    AJ --> AK["Micro"]
    AK --> AL["Micro"]
Figure 1: VP-774A Presentation Switcher/Scaler Front Panel
| # Feature Function | |||
| 1 | IR Receiver | Accepts IR remote commands | |
| 2 | IR LED | Lights red when the unit accepts IR remote commands | |
| 3 | INPUT Selector Buttons | HDMI | Press to select the HDMI input (from 1 to 4) |
| 4 | PC | Press to select the computer graphics input (from 1 to 2) | |
| 5 | CV | Press to select the composite video input (from 1 to 2) | |
| 6 | DP | Press to select the Display Port input | |
| 7 | SDI | Press to select the SDI input | |
| 8 PIP Button | Toggles the dual window mode (Picture-in-Picture) function (see Section 7.2)Note that while browsing the OSD menu in the dual window mode, a long press of the PIP button will instantly toggle the window control (between Main and PiP) | ||
| 9 | BLANK Button | Press to toggle between a blank screen (blue or black screen) and the display | |
| 10 | FREEZE Button | Press to freeze/unfreeze the output video image | |
| 11 | Navigation Buttons | ▼/- Button | Press to move down the menu list (see Section 8.1.1) and to decrease numerical values. When not within the OSD menu mode, press to reduce the output volume |
| 12 | ◄/MENU Button | Press to access the OSD menu, exit the OSD menu and, when in the OSD menu, move to the previous level in the OSD screen (see Section 8.1.1) | |
| 13 | ▲/+ /VOLUME Button | Press to move up the menu list values (see Section 8.1.1) and to increase numerical values. When not within the OSD menu mode, press to increase the output volume | |
| 14 | ►/ENTER Button | Press to access sub-menu items and select from several settings (see Section 8.1.1) | |
| 15 | RESET TO XGA/720P Button | Press to reset the video output resolution to XGA or 720p and change the deep color settings to Off on the output (see Section 6.7)Press and hold for about 3 seconds to toggle between reset to XGA and reset to 720p | |
| 16 | PANEL LOCK Button | Press and hold for about 3 seconds to lock/unlock the front panel buttons | |
| 17 | Mic 2 | Connect to a microphone.Mic2 on the front panel is identical to Mic2 on the rear panel and overrides it when connected | |

Figure 2: VP-774A Presentation Switcher/Scaler Rear Panel
| # | Feature | Function | ||
| 18 | AUDIO IN Unbalanced Connectors | HDMI 3.5mm Mini Jack | Connect to an unbalanced audio source for audio takeover of the HDMI 1 to HDMI 4 embedded audio (see Section 6.3). The pinout is defined in Section 5.4 | |
| 19 | PC 3.5mm Mini Jack | Connect to the unbalanced stereo audio of the computer graphics source (from 1 to 2). The pinout is defined in Section 5.4 | ||
| 20 | DP 3.5mm Mini Jack | Connect to the unbalanced stereo audio source for analog audio takeover of the DisplayPort embedded audio (see Section 6.3). The pinout is defined in Section 5.4 | ||
| 21 | CV (L, R) RCA | Connect to the unbalanced stereo audio of the composite video source | ||
| 22 | REMOTE IR 3.5mm Mini Jack (opening) Covered by a cap. The 3.5mm connector at the end of the internal IR connection cable fits through this opening | Connects to an external IR receiver unit for controlling the machine via an IR remote controller (instead of using the front panel IR receiver)Optional. Can be used instead of the front panel (built-in) IR receiver to remotely control the machine (only if the internal IR connection cable has been installed), see Section 8.4.1 | ||
| 23 | AUDIO IN Unbalanced Connectors | MIC 1 | 6mm Jack | Connect to a microphone (see pinout in Section 5.3) |
| 24 | COND/DYN MIC DIP-switch | Select between a condenser and a dynamic type microphone | ||
| 25 | MIC 2 | 6mm Jack | Connect to a microphone (see pinout in Section 5.3)Note that Mic2 on the rear panel is identical to Mic2 on the front panel. Mic2 on the front panel overrides Mic2 on the rear panel when connected | |
| 26 | COND/DYN MIC DIP-switch | Select between a condenser and a dynamic type microphone | ||
| 27 | SPKR OUT 4-pin Terminal Block | Connects to a pair of loudspeakers | ||
| 28 | S/PDIF OUT RCA Connector | Connect to a digital audio acceptor | ||
| 29 | Power Connector with Fuse | AC connector, enabling power supply to the unit | ||
| 30 POWER Switch | Switch for turning the unit on or off | |||
| # Feature Function | ||||
| 31 | VIDEO INPUT Connectors | HDMI IN | Connect to the HDMI source (from 1 to 4) | |
| 32 | PC IN 15-pin HD | Connect to the computer graphics source (from 1 to 2) | ||
| 33 | CV IN RCA | Connect to the composite video source | ||
| 34 | DP IN | Connect to the DisplayPort source | ||
| 35 | SDI IN BNC | Connect to the SDI source | ||
| 36 | SDI LOOP BNC | Connect to a local display | ||
| 37 | VIDEO OUTPUT Connectors | SDI OUT BNC | Connect to an SDI acceptor | |
| 38 | HDMI OUT | Connect to an HDMI acceptor (from 1 to 2) | ||
| 39 | HDBT OUT RJ-45 | Connect to an HDBT receiver (for example, Kramer TP-580Rxr) to pass audio and video signals as well as serial commands | ||
| 40 | LINK LED | Lights to indicate a link | ||
| 41 | RS-232 9-pin D-sub Port | Connect to the PC or other serial controller | ||
| 42 | ETHERNET Connector | Connects to the PC or other Controller through computer networking | ||
| 43 | ETHERNET RESET Button | Press while turning power off and then on, to reset the Ethernet settings to their factory default state (see also Section 12.1) | ||
| 44 | AUDIO LINE OUT (L, R) Terminal Block Connector | Connect to the L and R balanced stereo audio acceptor | ||
4 Installing in a Rack
This section provides instructions for rack mounting the unit.
Before installing in a rack, be sure that the environment is within the recommended range:
| OPERATING TEMPERATURE: | 0° to +40°C (32° to 104°F) |
| STORAGE TEMPERATURE: | -40° to +70°C (-40° to 158°F) |
| HUMIDITY: | 10% to 90%, RHL non-condensing |

CAUTION!
When installing on a 19" rack, avoid hazards by taking care that:
- It is located within the recommended environmental conditions, as the operating ambient temperature of a closed or multi unit rack assembly may exceed the room ambient temperature.
- Once rack mounted, enough air will still flow around the machine.
- The machine is placed straight in the correct horizontal position.
- You do not overload the circuit(s). When connecting the machine to the supply circuit, overloading the circuits might have a detrimental effect on overcurrent protection and supply wiring. Refer to the appropriate nameplate ratings for information. For example, for fuse replacement, see the value printed on the product label.
- The machine is earthed (grounded) in a reliable way and is connected only to an electricity socket with grounding. Pay particular attention to situations where electricity is supplied indirectly (when the power cord is not plugged directly into the socket in the wall), for example, when using an extension cable or a power strip, and that you use only the power cord that is supplied with the machine.
To rack-mount a machine:
- Attach both ear brackets to the machine. To do so, remove the screws from each side of the machine (3 on each side), and replace those screws through the ear brackets.
natural_image
Technical line drawing of a mechanical bracket assembly with bolts and mounting holes (no text or symbols)- Place the ears of the machine against the rack rails, and insert the proper screws (not provided) through each of the four holes in the rack ears.
Note:
• In some models, the front panel may feature built-in rack ears
- Detachable rack ears can be removed for desktop use
• Always mount the machine in the rack before you attach any cables or connect the machine to the power
- If you are using a Kramer rack adapter kit (for a machine that is not 19"), see the Rack Adapters user manual for installation instructions available from our Web site
5 Connecting the VP-774A

Always switch off the power to each device before connecting it to your VP-774A. After connecting your VP-774A, connect its power and then switch on the power to each device.

You do not have to connect all the inputs and outputs, connect only those that are required.
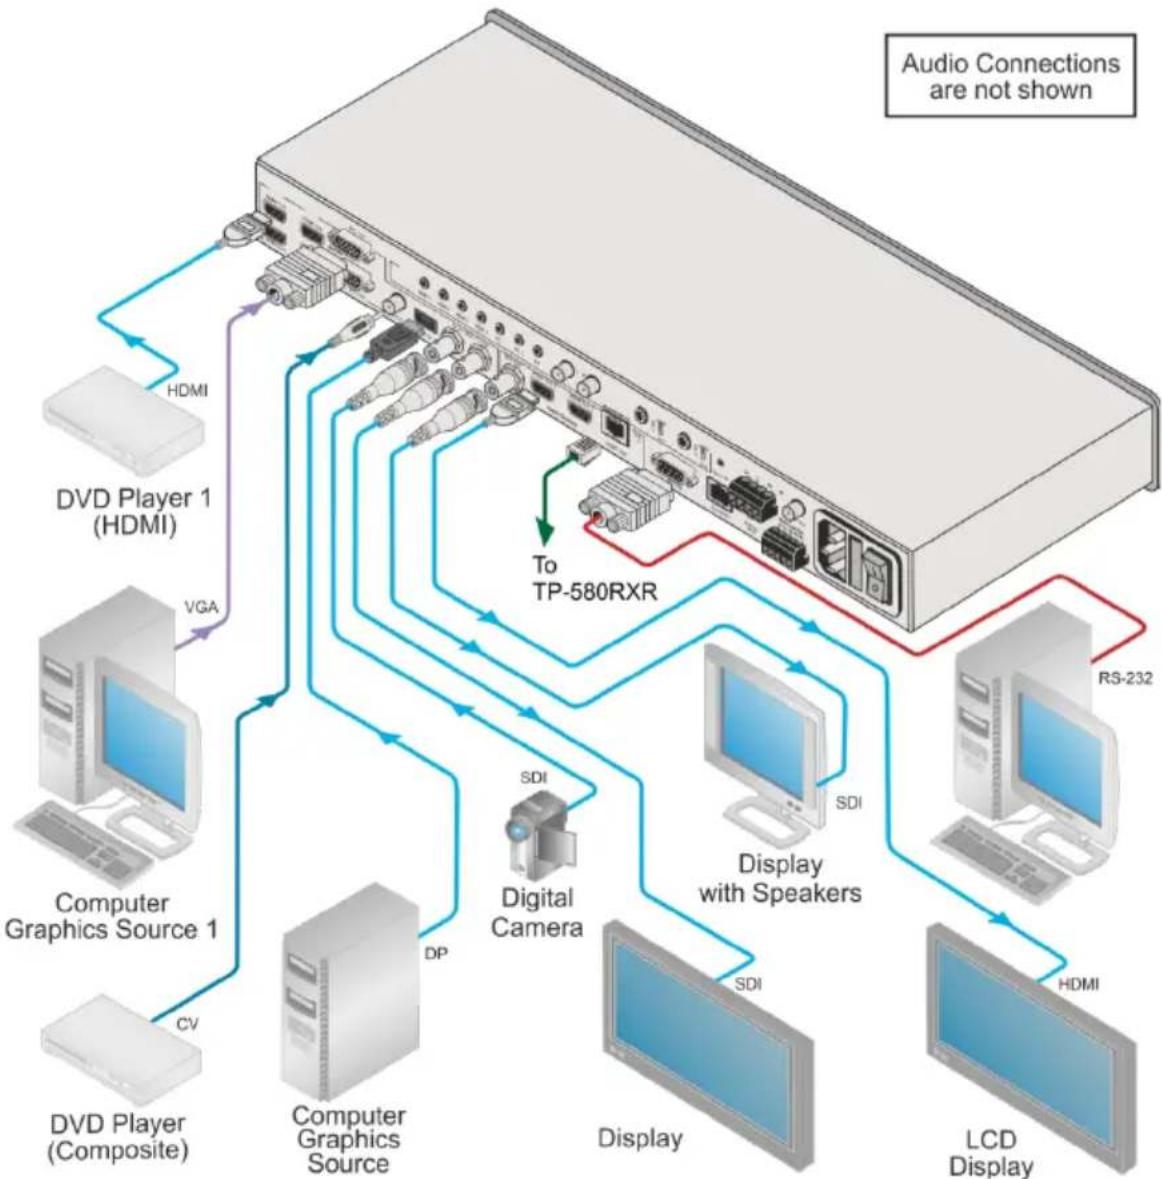
To connect the VP-774A, as illustrated in the example in Figure 4, do the following:
- Connect an HDMI source (for example, a DVD player) to the HDMI 1 IN VIDEO INPUT connector.
Alternatively, you can connect the DVI connector on the DVD player to the HDMI connector on the VP-774A via a DVI-HDMI adapter. You can connect the audio signal via the AUDIO IN HDMI 3.5mm mini jack, or use the embedded audio
- Connect a computer graphics source to the PC 1 IN VIDEO INPUT 15-pin HD connector.
Alternatively, you can connect a component (YPbPr) or RGBHV source via the 15-pin HD connector, see Figure 3
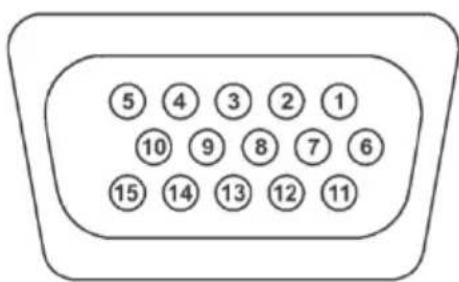
① Red, Pr
② Green, Y
③ Blue, Pb
⑤ GND
⑥ Red GND
⑦ Green GND
⑧ Blue GND
⑩ Sync GND
⑫ DDC SDA
⑬ Hsync
⑭ Vsync
⑮ DDC SCL
Figure 3: 15-pin HD Connector Pinout
- Connect a composite video source (for example, a composite video player) to the CV 1 IN RCA connector.
- Connect a DisplayPort video source (for example, a computer graphics source) to the DP IN connector.
-
Connect the audio input signals to the AUDIO IN connectors (3.5mm mini jack and RCA connectors), as required (not shown in Figure 4).
-
Connect an SDI source (for example, an SDI digital camera) to the SDI IN BNC connector.
- Connect the SDI LOOP BNC connector to an SDI monitor (for example, an SDI display).
- Connect the SDI OUT BNC connector to an SDI acceptor (for example, an SDI display with speakers).
-
Connect the HDMI 1 OUT connector to an HDMI acceptor (for example, an LCD display).
You can also connect the HDMI OUT 2 output (not shown in Figure 4) -
Connect the HDBT RJ-45 connector to a receiver (for example, the Kramer TP-580Rxr).
-
Connect the AUDIO LINE OUT Terminal Block connector to a balanced audio acceptor and the S/PDIF OUT RCA connector to a digital audio acceptor (not shown in Figure 4).
-
Connect the SPKR OUT block connector to a pair of loudspeakers, by connecting the left loudspeaker to the "L+" and the "L-" terminal block connectors, and the right loudspeaker to the "R+" and the "R-" terminal block connectors. Do not Ground the loudspeakers.
-
If required, you can connect a PC and/or controller to the:
RS-232 terminal block (see Section 8.3.2)
- Ethernet connector (see Section 8.3.3)
- Connect the power cord (not shown in Figure 4).
flowchart
graph TD
    A["To TP-580RXR"] --> B["DVD Player 1 (HDMI)"]
    A --> C["Computer Graphics Source 1"]
    A --> D["Digital Camera"]
    A --> E["Display with Speakers"]
    A --> F["Display"]
    A --> G["LCD Display"]
    B --> H["DVD Player 1 (HDMI)"]
    C --> I["Computer Graphics Source 1"]
    D --> J["Display with Speakers"]
    E --> K["LCD Display"]
    F --> L["Display with Speakers"]
    G --> M["LCD Display"]
    N["HDMI"] --> A
    O["VGA"] --> C
    P["CV"] --> C
    Q["DP"] --> D
    R["SDI"] --> D
    S["SDI"] --> E
    T["SDI"] --> F
Figure 4: Connecting the VP-774A Presentation Switcher/Scaler
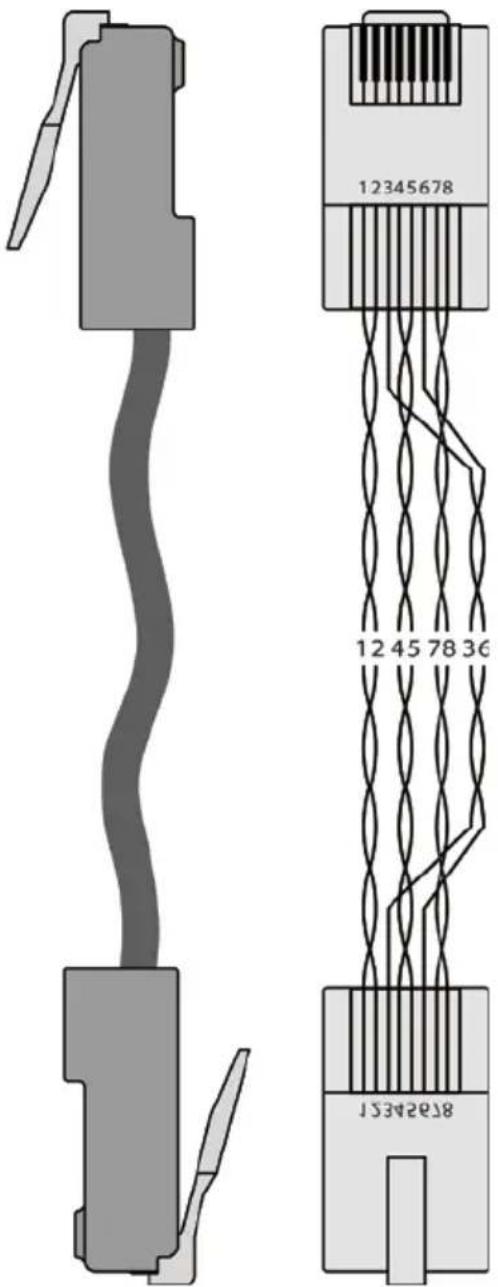
5.1 Wiring the RJ-45 Connectors
This section defines the TP pinout, using a straight pin-to-pin cable with RJ-45 connectors.
| EIA /TIA 568B | |
| PIN | Wire Color |
| 1 | Orange / White |
| 2 | Orange |
| 3 | Green / White |
| 4 | Blue |
| 5 | Blue / White |
| 6 | Green |
| 7 | Brown / White |
| 8 | Brown |
Figure 5: TP PINOUT
5.2 Connecting the Balanced Stereo Audio Output
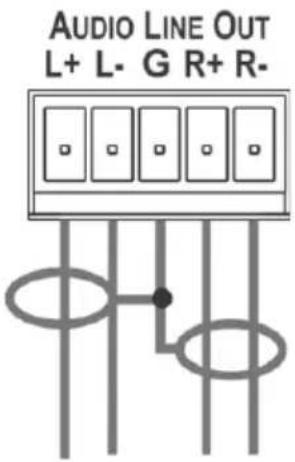
Figure 6: Connecting the Balanced Stereo Audio Output
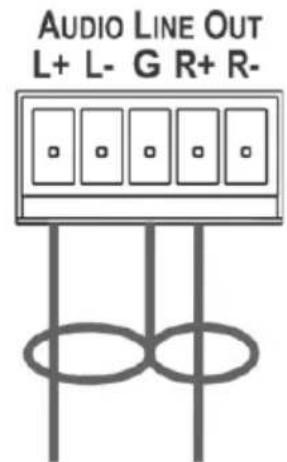
Figure 7: Connecting an Unbalanced Stereo Audio Acceptor to the Balanced Output
5.3 Microphone Pinout
This section defines the microphone 6mm jack pinout.
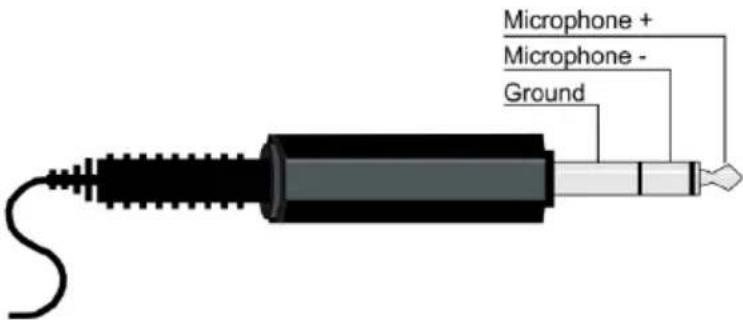
Figure 8: Microphone Pinout
5.4 Audio Input Pinout
This section defines the audio input 3.5mm jack pinout.
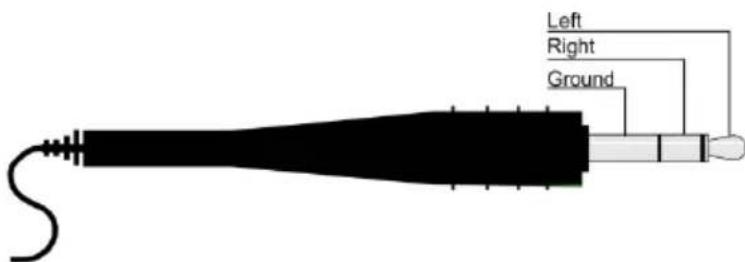
Figure 9: Audio Input Pinout
6 The OSD Menu
The VP-774A OSD menu lets you set the operation parameters for the:
- Main Window Control
- PIP Window Control
- Entire System Control
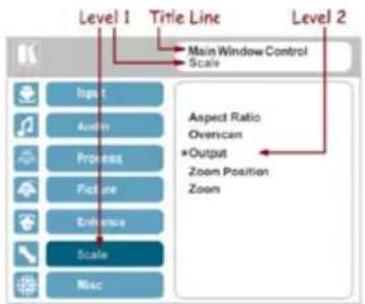
The nature of the operation setup appears in the OSD title, as shown in the example in Section 6.1:
- The title line shows the control mode (Main, PIP or Entire system)
• Level 1 lists the main menu items
• Level 2 includes the second hierarchy level, below level 1
• Level 3 includes the third hierarchy level, below level 2 - Function, is the selectable parameter or numerical value and can appear either under level 2 or 3
6.1 OSD Menu Operation Example
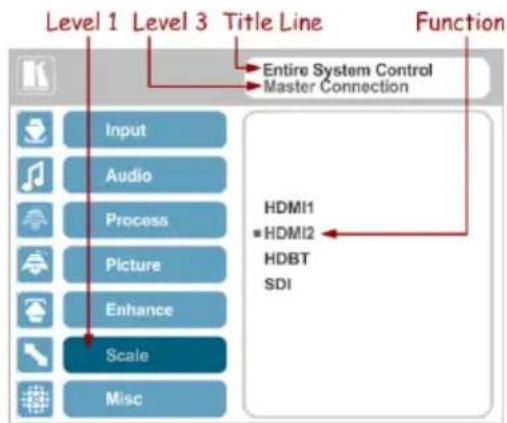
In the example illustrated below, the Master Connection is set to HDMI2 (see Section 6.7).
The table below shows function 632 (from the Protocol in Section 13.2):
- 6 in the hundreds, represents "Scale" which is the 6^th menu item in the main menu list
- 3 in the tens, represents "Output" which is 3^rd in the Scale menu
- 2 in the units, represents "Master Connection" which is second in the Output menu
| Level 1 | Level 2 | Level 3 | Level 4 (Function) | Range | Function |
| Scale (6) Output (3) Master Connection (2) | HDMI1 0 632 | ||||
| HDMI2 | 1 | ||||
| HDBT | 2 | ||||
| SDI | 3 | ||||
The subtitle, below the title line shows the current level accessed (Scale in this example)
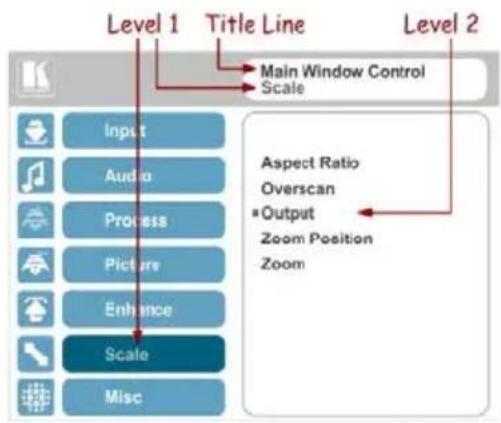
After selecting Output (which is the second Level), it appears in the subtitle
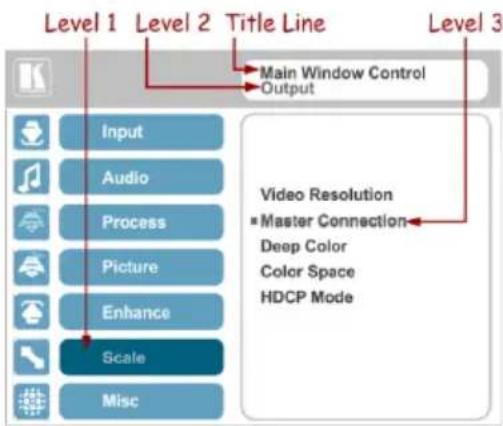
Once Master Connection is selected, the Title changes to "Entire System Control" indicating that the selection will affect the entire system. The subtitle shows the current, Level 3, selection and the menu list shows the function (HDMI2)
If the display layout includes a PiP window, you can set the OSD menu to control the main source window and the PIP window separately (by defining Window Control, see Section 6.8).
General characteristics which apply to the entire system (for example, setting the volume) are changed without needing to shift control (the title line will state: Entire System Control).
Note that:
- A selected parameter that turns gray becomes valid immediately. You can press Enter at this point to save these parameter changes to the memory immediately (the screen will display "Saving Data" for a split second).
• In any case, exiting the menu saves the parameter to the memory - Data is saved per window and per input (to a dedicated input + window memory), as applicable
The control buttons let you control the VP-774A via the OSD menu. Press the:
- MENU (or ◀) button to enter the menu, exit the menu, and when in the OSD menu, move to the previous level and change menu settings in the OSD screen.
Changes are immediate
The default timeout is set to 30 seconds and can be changed (see Section 6.8)
- ENTER (or ▷) button to access sub-menu items
- Arrow buttons to move through the OSD menu
- Up or down arrows to change settings

Note that when exiting the menu, all the changes are automatically saved to the non-volatile memory.
The default OSD timeout for auto exit is set to 30 seconds and can be changed (see Section 6.8).
6.1.1 OSD Control Icons
The following three icons: M, P, and E are included to indicate when functionality applies to the Main window, the PiP Window or the entire system:
• M for Main Window Control
• P for PiP window Control
• E for Entire System Control
6.2 The Input Menu
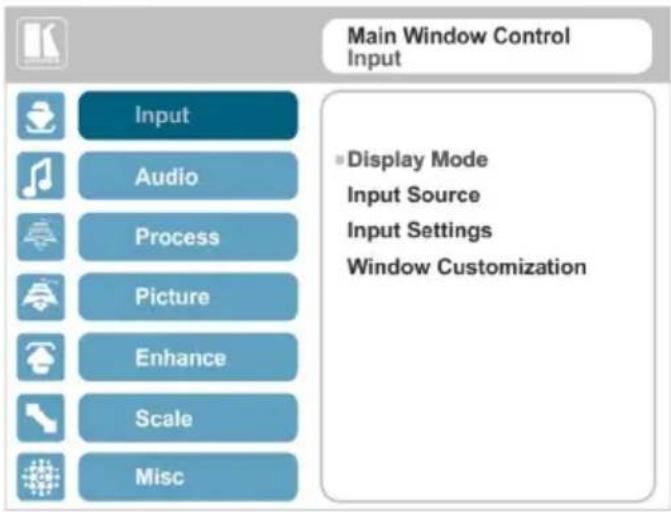
Figure 10: Input Menu
| Setting Function | ||
| Display Mode | Select the display mode (see Figure 11):Single Window – single window mode operation with one channel displayedEPicture in Picture (PiP) – dual window mode operation, a smaller window superimposed over a full screen image (see Section 7.2) EPicture + Picture (PoP) – dual window mode operation, both images appear side-by-side and the aspect ratios of both images are maintained (see Section 7.2) ESplit (SbS) – dual window mode operation, both images are placed side-by-side with the same height (see Section 7.2) EWhen selecting the dual window mode, set the Main window or the PiP window parameters via Misc -> OSD -> Window Control (see Section 6.8)Note that while browsing the OSD menu in the dual window mode, press of the PIP button to instantly toggle the window control (between Main and PiP)Customized – customized image sizeE Note that any change in the output resolution may cause disproportion or even cancel the window customization. Note that any change in the output resolution may cause disproportion or even cancel the window customization. | |
| Input Source | Select the input source: HDMI1, HDMI2, HDMI3, HDMI4, PC1, PC2, CV, DP or SDIM/P Note that any change in the input source may cancel the freeze and blank settings. Note that any change in the input source may cancel the freeze and blank settings. | |
| Setting | Function | |
| Input Settings | Set the:H Image Shift– to set the horizontal position of the image within the windowM/PVolatile parameterV Image Shift– to set the vertical position of the image within the windowM/PVolatile parameterAuto Positioning– to search the input image during the tuning process and automatically position it on the output window in a perfect fit.Set to Off to disable auto positioningSet to Normal Scan to perform a normal range image searchSet to Wide Scan to perform a wide range image searchM/PIn the Normal/Wide Scan option the machine automatically adjusts the PC (PC 1 and PC 2) and DP input video resolutions. For the other inputs, the machine automatically adjusts all the input video resolutions except for HD/SD (CEA 861 standard) video resolutionsHDCP Mode– to select the HDCP option for each HDMI/DP input: either ON (the default) or OFFM/PSetting HDCP mode to Off on the HDMI/DP input allows the source to transmit a non-HDCP signal if required (for example, when working with a Mac computer).Note that if you did not get the source to transmit the desired result, make sure you have saved the change (by pressing the ENTER button) and then physically disconnect and reconnect the cable connecting the source to the HDMI/DP inputEDID Select– to select the native resolution on each input (HDMI, DP and VGA inputs) to be read by the video source connected to that input:1024x768@60, 1280x800@60, 1280x1024@60, 1366x768@60,1440x900@60, 1400x1050@60, 1600x900@60, 1600x1200@60,1680x1050@60, 1920x1200@60RB, 720p50, 720p60, 1080p50, 1080p60,2k50 or 2k60ENote that for the HDMI and DP inputs, you can either select the color depth to be 8bpp or 12bpp after selecting the native resolution and after selecting the color depth you can select either single or multiple modeline.Native as Multiple Modelines – generating a group of resolutions in the detailed timing, including the native resolution), orNative as Single Modeline – generating only the native resolution in the detailed timingNote that when the EDID is set on the inputs, the changes are per input and immediate.Color Space– to select the color space for the PC and HDMI inputs: RGB,YPbPr or Follow InputNote that if the machine is set to the dual display mode, and both the Main and PiP windows display the same input, you need to set the same input color space value for both windows In case of digital video, Follow Input follows the actual color space;in case of analog video it follows only the input resolution: HD/SD resolutions are considered to be YUV color space and other resolutions will be considered as RGB color space. In case of digital video, Follow Input follows the actual color space;in case of analog video it follows only the input resolution: HD/SD resolutions are considered to be YUV color space and other resolutions will be considered as RGB color space. | |
| Input Settings (continued) | Image Shift Mode – to get the best image positioning possible. Set to Auto to automatically get the best possible image positioning automatically; set to Semi-auto to store the best image possible until the video resolution of the selected input is changed (in which case the setting bounces to Auto); set to Customize to keep the settings even if the video resolution of the selected input is changedNote that a video resolution change, when in the Customized mode, may possibly result in an image positioning that is inaccurate with regards to the new video resolution and may need to be set once again | |
| Window Customization | Select the position and the size of the selected window: H Position, H Width, V Position and V Height (see Section 6.2.1.1 and Section 6.2.1.2)M/EThe value range is dynamic. The FW prevents windows from exceeding the boundaries or over-sizing. The position and size of the windows are saved to the system.The size and position of the customized window (Main or PiP) remain valid even when toggling the PIP button (front panel, remote control transmitter or protocol command).The customized setup is cancelled only by explicitly selecting a preset Display Mode (see first item in this table) or if a new customized setup is created.Use the front panel + and – buttons, IR remote control transmitter or Web page to set the position and height of the Main and/or PiP windows | The PiP window maximum horizontal active image area is 1600 pixels |
The display mode setup, shown in Figure 11, is part of the entire system control and the selected Single Window also shows the current aspect ratio (Best Fit):
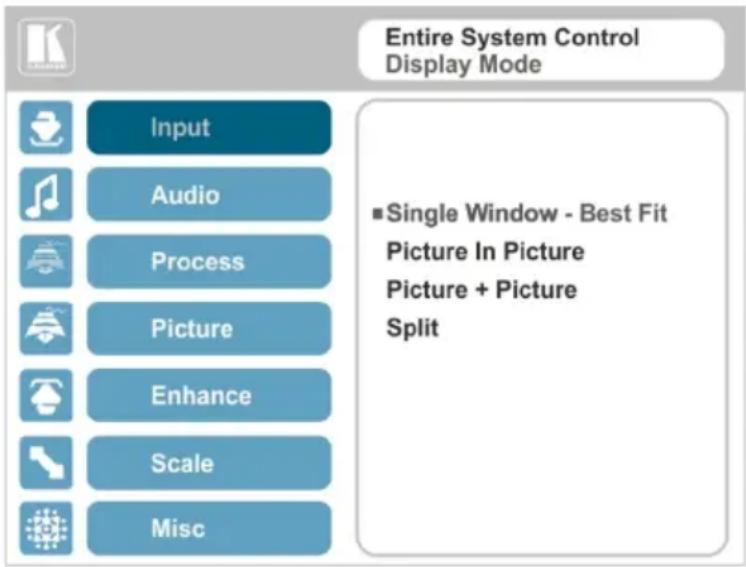
Figure 11: Select the Display Mode
6.2.1 Window Customization
Window customization lets you change the size and position of a selected window. Make sure that you have control over the window that requires customization (Main Window Control or PiP Window Control). If not, select it via the OSD item in the Miscellaneous menu, see Section 6.8.
In the following examples, PiP Window Control is selected, but the same procedure applies to Main Window Control.

Note that you can also customize the window size and position via the "Y" commands (see Section 13.2) or protocol 3000 (see Section 13.4).
6.2.1.1 Changing the Size of the Main and/or PiP Window
Use the H Width and V Height to change the size of the window using the + and - buttons on the front panel or remote control transmitter (as illustrated in Figure 12).
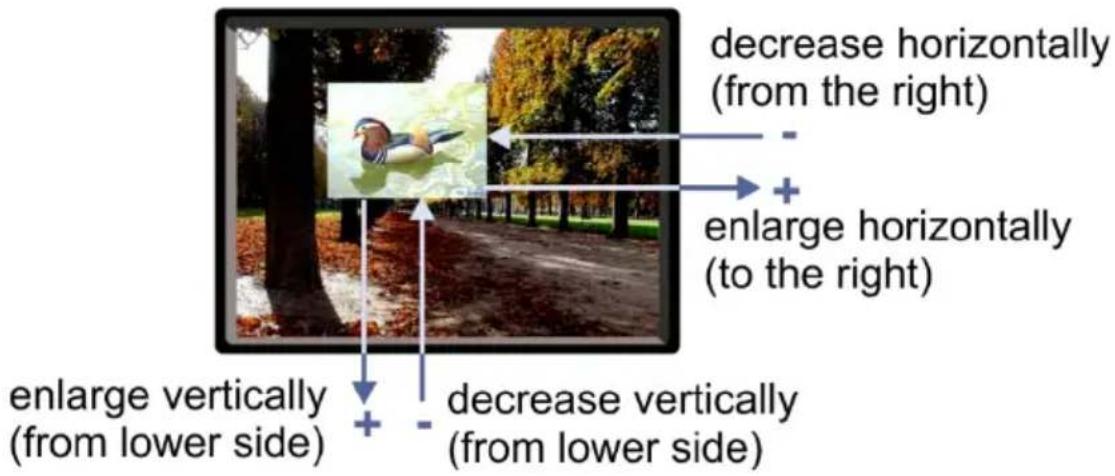
Figure 12: Changing the Size of the Window
To change the size of the window, do the following:
-
Check that window control is set as required (for example, PiP Window Control).
-
Select Window Customization (see Figure 16).
-
Select H width (an OSD slide bar appears) and press + to increase the width, or – to decrease the width, see Figure 13.
The following example shows how to increase the width of the window
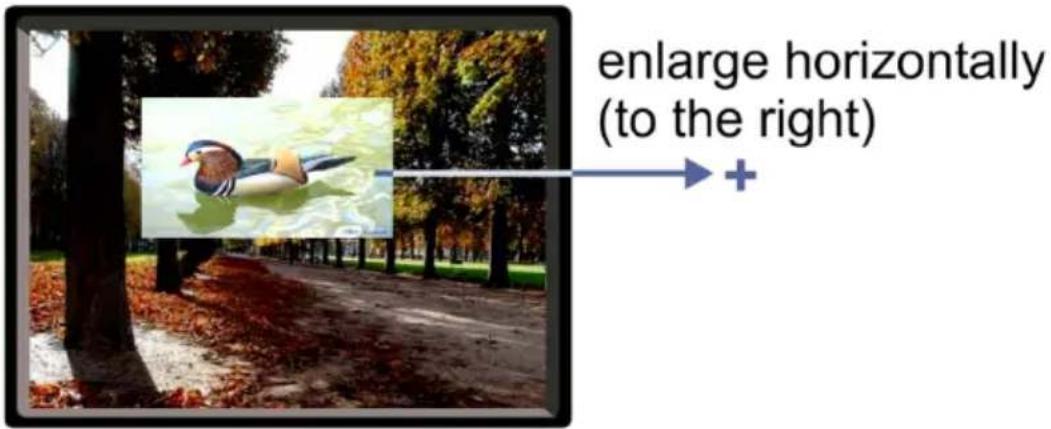
Figure 13: Increasing the Width
- Select V Height (an OSD slide bar appears) and press + to increase the height, or – to decrease the height, see Figure 14.
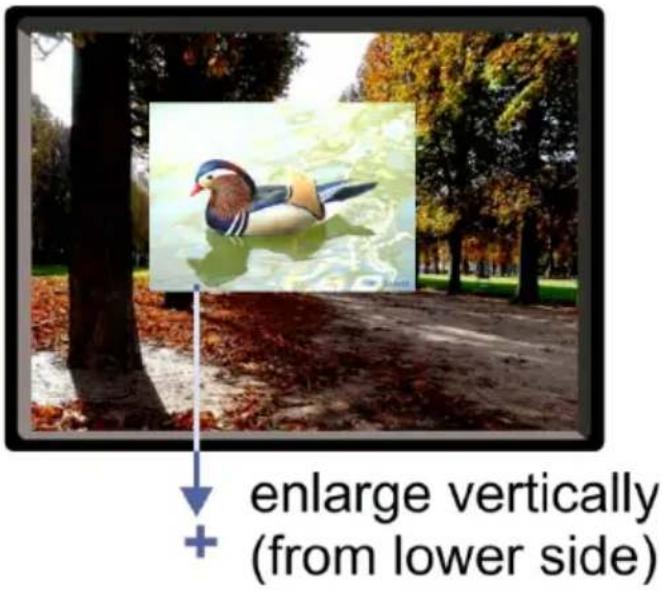
Figure 14: Increasing the Height
6.2.1.2 Moving the Position of the Main and/or PiP Window
Use the H Position and V Position items in the OSD to change the position of the window using the + and - buttons on the front panel or remote control transmitter (as illustrated in Figure 15).
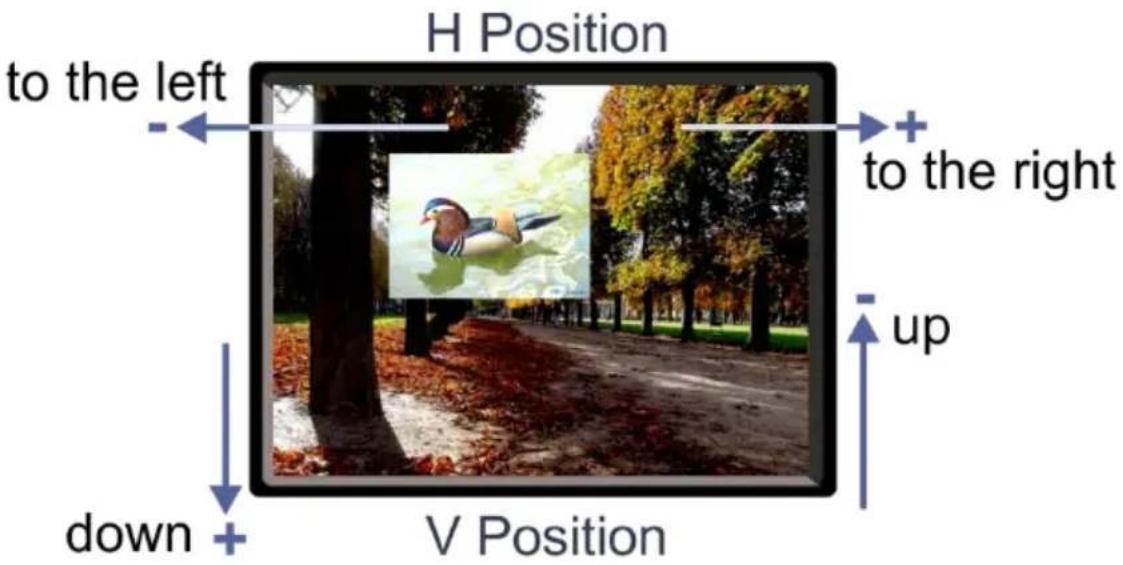
Figure 15: Positioning the Window
To move the position of the window, do the following:
- Check that window control is set as required (for example, PiP Window Control).
- Select Window Customization. The following Window appears:
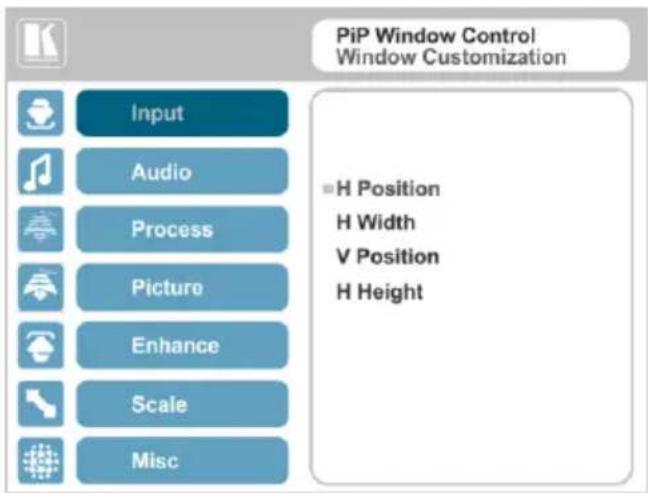
Figure 16: Window Customization
- To move the picture to the right, select H Position. An OSD slide bar appears:
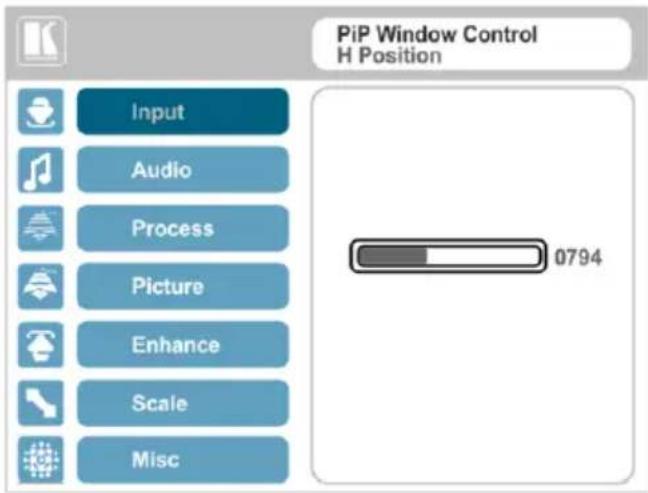
Figure 17: H-Position Slide Bar
- Press the +/- buttons to move the PiP window horizontally.
Use the V Position menu item in the same way to move the PiP vertically, see Figure 18.
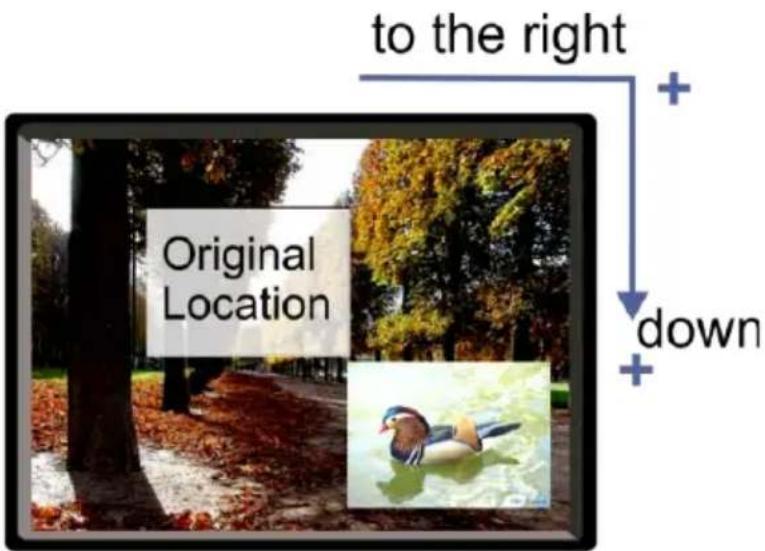
Figure 18: Moving the PiP Window

Note that the sequence in which you change the size and position of the window is insignificant, as long as you make sure that the resized image does not go beyond the window boundaries.
6.3 The Audio Menu
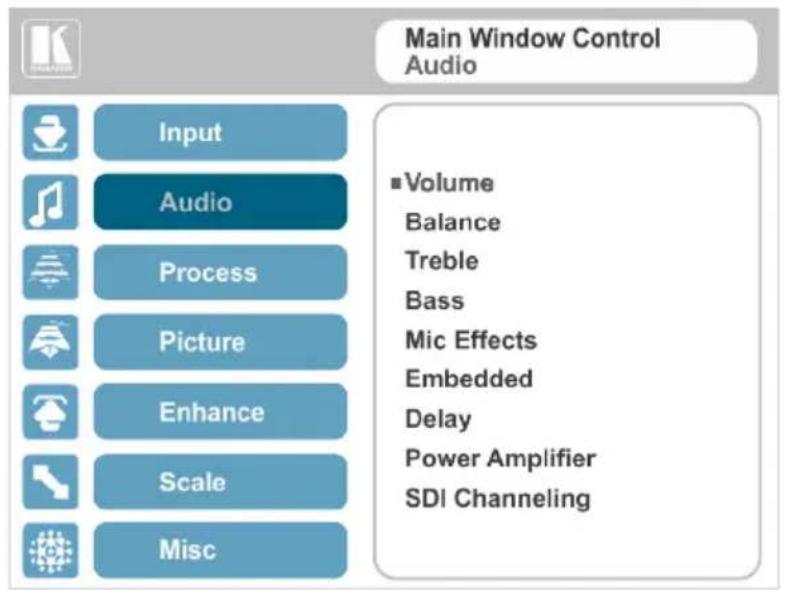
Figure 19: Audio Menu
| Setting | Function |
| Volume | Set the input/output volume level [dB], see Figure 20 E. Set the:Input Volume [dB] – to adjust the audio input levelOutput Volume [dB] – to adjust the audio output levelThe maximum output volume can be pre-limited via the Web pages (see Section 9.6.2). When setting the volume level, once the slider reaches the maximum defined by the pre-limiter, a “Volume is pre-limited” message appears on screen.The output audio level can also be set via the + and – buttons on the front panel buttons (when not in the OSD mode) and/or the IR remote control transmitter buttons (see Section 8.4) |
| Note that when set to MUTE (see Section 6.8), changing the output level unmutes the audio signal.Mic1 Volume [dB] – to adjust the Microphone 1 audio levelMic2 Volume [dB] – to adjust the Microphone 2 audio level | |
| Balance | Set the balance [ratio] ☑ |
| Treble | Set the treble [dB] ☑ |
| Bass | Set the bass level [dB] ☑ |
| Mic Effects For Mic 1, set the:Mic1 Talkover Depth [%] – to determine the decrease of the audio level during microphone 1 takeover (press + to further decrease the talkover audio output level; press – to lessen the talkover output audio decrease level) EMic1 Talkover Trigger [dB] – to determine the microphone 1 threshold level that triggers the audio output-level decrease EMic1 Mix [dB] – set to 1 to enable the Talkover mode or set to any other value to decrease the Mic1 volume without changing the Line out and Mic2 volume levels.In the Mix mode, set the:Line Mix [dB] – to decrease of the line out volume level without changing the Mic 1 and Mic 2 volume levels | |
| Mic Effects (continued) | For Mic 2, set the:Mic2 Mix [dB] – set to 1 to enable the Talkover mode or set to any other value to decrease the Mic2 volume without changing the Line out and Mic1 volume levels.Mic2 Talkover Trigger [dB] – to determine the microphone 1 threshold level that triggers the audio output-level decreaseEMic2 Talkover Depth [%] – to determine the decrease of the audio level during microphone 2 takeover (press + to further decrease the talkover audio output level; press – to lessen the talkover output audio decrease level)EBoth microphone inputs can be output along with the audio output in the Talkover (default) mode or the Mix mode, separately or together.In the Talkover mode (Mic Mix is set to 1), the audio output volume level decreases when the microphone is used and it returns back to its original set level when the microphone input is inactive.In the Mix mode, the microphone input is mixed with the audio output at a set level.For each microphone input you can set the Mic Talkover Depth, Mic Talkover Trigger and Mic Mix independently. You can also set the Line Mix separately. |
| Embedded | Set:Pass-through– to On to pass the digital audio input directly to the output without any processing or set to Off to process the digital audio inputENote that this feature is disabled for the non-embedded audio inputs  (PC and CV)In case the audio signal is encrypted or compressed set the Pass-through to On, although in some cases there may not be sufficient capacity to accurately transmit the audio.Analog Takeover– to On for the analog inputs of the HDMI and DP inputs to take over the embedded inputs; select Off to use the embedded inputsEAnalog takeover is available only if an unbalanced audio signal is connected (via 3.5mm connector). When set to On, the embedded audio is disabled as long as the 3.5mm cable is connected to the 3.5mm mini jack (PC and CV)In case the audio signal is encrypted or compressed set the Pass-through to On, although in some cases there may not be sufficient capacity to accurately transmit the audio.Analog Takeover– to On for the analog inputs of the HDMI and DP inputs to take over the embedded inputs; select Off to use the embedded inputsEAnalog takeover is available only if an unbalanced audio signal is connected (via 3.5mm connector). When set to On, the embedded audio is disabled as long as the 3.5mm cable is connected to the 3.5mm mini jack |
| Delay Set: | Lip Sync delay value [msec]EMic1 Delay value [msec]EMic2 Delay value [msec]E |
| Power Amplifier | Set the power amplifier (SPKR OUT) level to Off or to levels 1 to 4EThis submenu item is specific for the power amplifier on top of the general volume level |
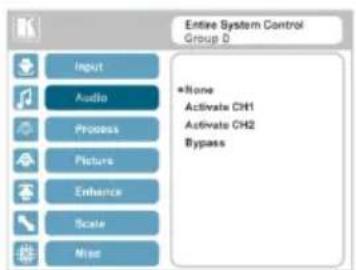
| SDI Channeling | Set the SDI channeling for groups A, B, C and D and connect the active and the bypassed channels (seeSection 6.3.1)By default, groups A and B are connected and groups C and D are disconnectedSet the SDI channeling for groups A, B, C and D to Activate CH1, Activate CH2 or Bypass. If other groups are set to Activate or Bypass, the remaining groups are read as NoneSet Bypassed channels toUnmuteorMute(seeSection 6.3.1.1) |
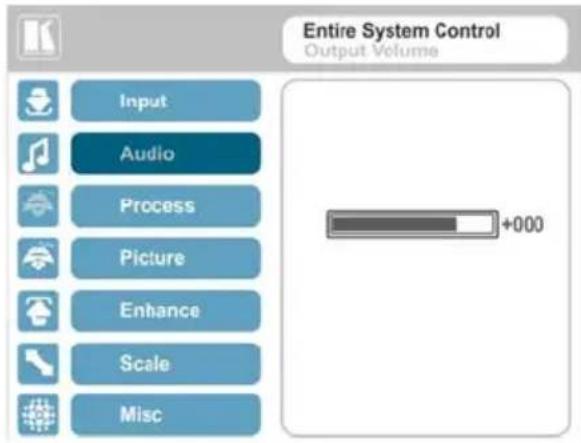
Figure 20: Set the Output Volume Level
6.3.1 SDI Channeling
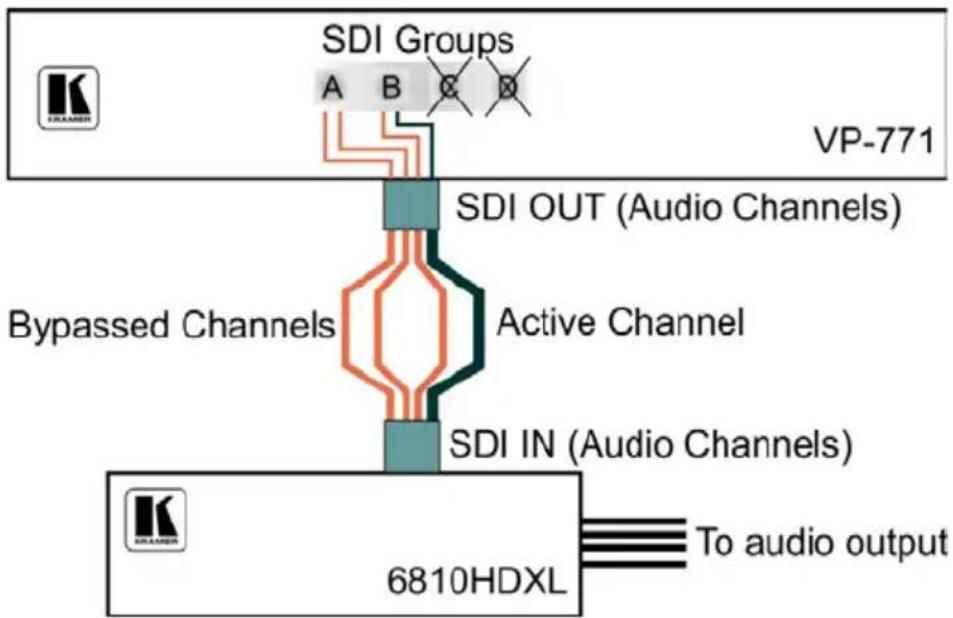
SDI channeling includes four groups with two stereo channels each. Two of the groups are always connected and the other two disconnected. You can select (via the OSD) one of the eight SDI embedded stereo audio channels, together with three bypassed channels, to be routed to the input of a connected machine with SDI audio channels (for example, the Kramer 6810HDXL SDI/HD-SDI/3G Audio Embedder/De-embedder, or the Kramer 6809HD HD/SD-SDI AES Embedder).

Within the two connected groups, one channel can be activated and the remaining three channels are bypassed. The acceptor device will input the channels as follows: the active channel is input as Group A, CH1; the bypassed channel in the same group is input as Group A, CH2; the two remaining bypassed channels are input as Group B CH1 and CH2.
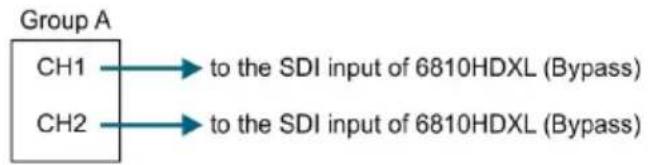
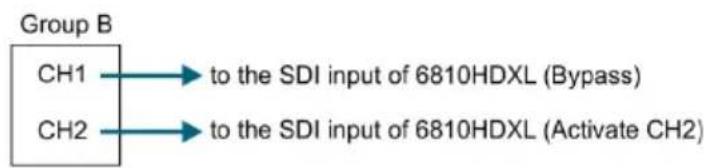
In the example illustrated in Figure 21, channels C and D are disconnected and channels A and B are connected (CH1 and CH2 in group A are bypassed, CH1 in group B is bypassed and CH2 in group B is active).
These channels are input to the Kramer 6810HDXL, processed and output to an audio acceptor:
• The group B active CH2 signal is input as Group A, CH1
• The group B bypassed CH1 signal is input as Group A CH2
• The group A bypassed CH1 signal is input as Group B CH1
• The Group A bypassed CH2 signal is input as Group B CH2
flowchart
graph TD
    A["SDI Groups"] --> B["VD-771"]
    B --> C["SDI OUT (Audio Channels)"]
    C --> D["Active Channel"]
    D --> E["SDI IN (Audio Channels)"]
    E --> F["To audio output"]
    G["Bypassed Channels"] --> D
    H["6810HDXL"] --> F
Figure 21: SDI Channeling Example
The active channel and bypassed channels are selected via the OSD menu.
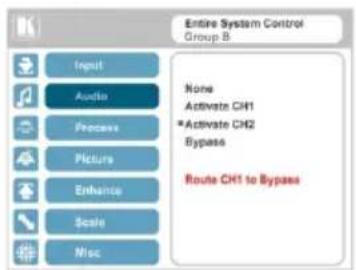
Figure 22 shows the SDI Channeling menu:
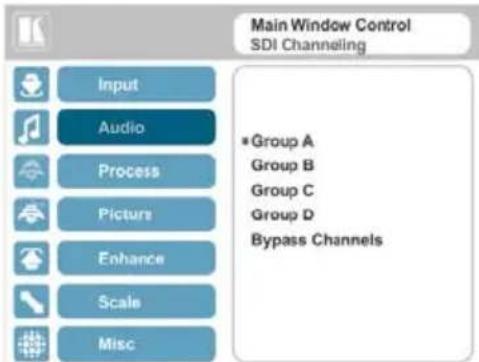
Figure 22: The SDI Channeling Menu
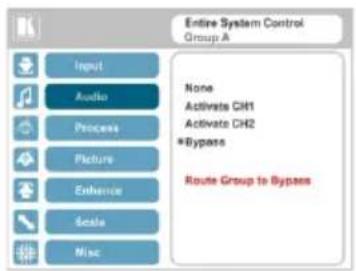
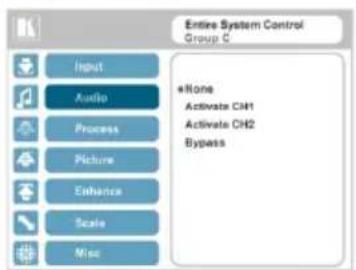
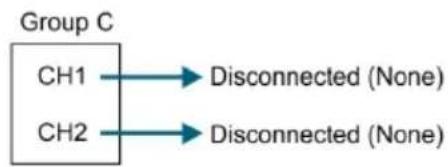
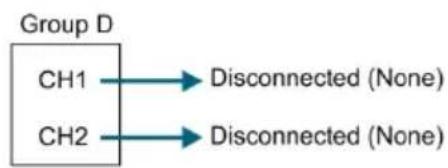
In the OSD setup that is illustrated in Figure 23, CH 2 in group B (active), CH1 in group B as well as CH 1 and CH2 in group A (bypassed) are routed via the VP-774A SDI output to the input of 6810HDXL; groups C and D are disconnected and therefore read as None (see example in Figure 21).
flowchart
graph LR
    A["CH1"] --> B["to the SDI input of 6810HDXL (Bypass)"]
    C["CH2"] --> D["to the SDI input of 6810HDXL (Bypass)"]
flowchart
graph LR
    A["CH1"] --> B["to the SDI input of 6810HDXL (Bypass)"]
    C["CH2"] --> D["to the SDI input of 6810HDXL (Activate CH2)"]
flowchart
graph LR
    A["CH1"] --> B["Disconnected (None)"]
    C["CH2"] --> D["Disconnected (None)"]
flowchart
graph LR
    A["CH1"] --> B["Disconnected (None)"]
    C["CH2"] --> D["Disconnected (None)"]
Figure 23: SDI Channeling Example
If a different channel within the connected groups is activated, the remaining three channels will be automatically routed to bypass.
If a channel in a disconnected group is activated, the system will automatically rearrange the groups and channel assignments to keep two groups connected and two others disconnected.
6.3.1.1 Bypassed Channels
Select Bypass channels to set the bypassed channels to mute to cutoff the bypassed audio channels or to Unmute to let them pass through:
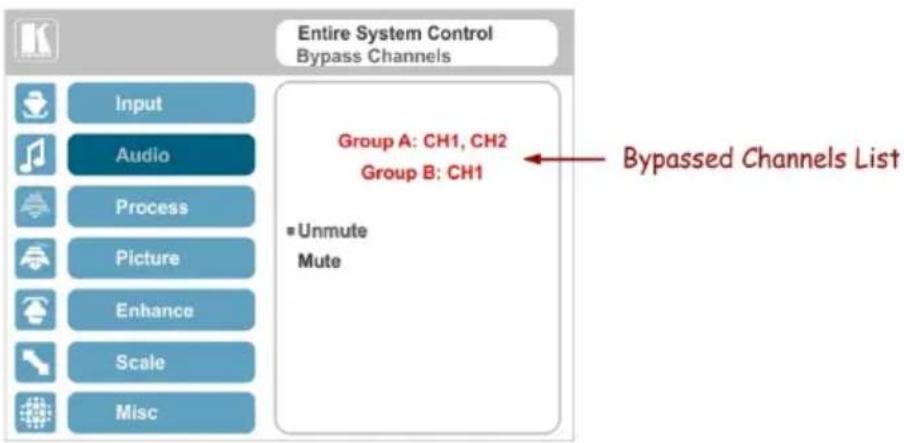
Figure 24: SDI bypassed Channels Menu
The Bypass Channels menu also lists the selected bypassed channels in the enabled groups.
6.4 The Process Menu

The Process menu functions are available for interlaced video processing only and not for progressive scan.
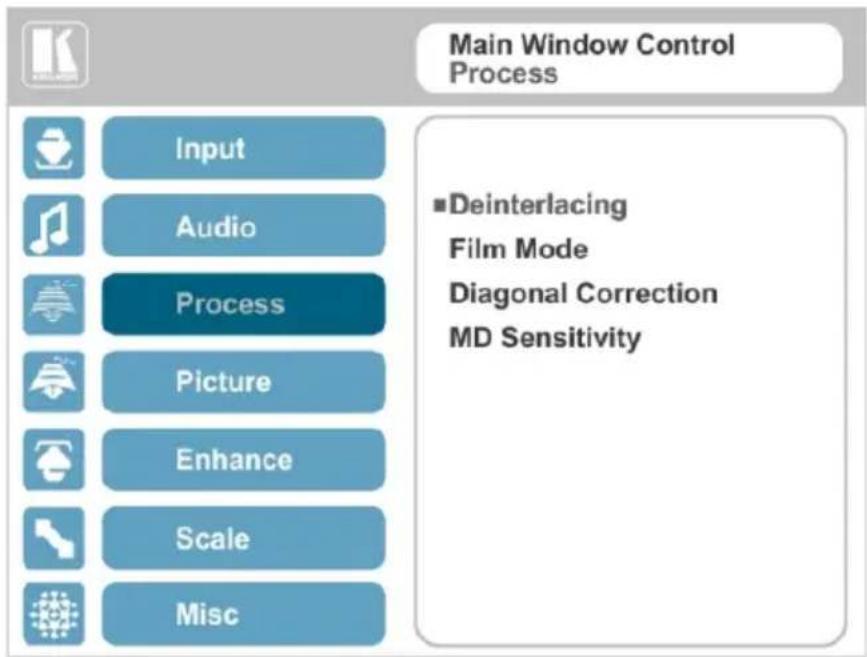
Figure 25: Process Menu
| Setting | Function |
| Deinterlacing | Set the deinterlacing method to:Line Doubler – reduces the flicker and improves the quality of the image to some extentM/PLine doubler takes an interlaced scan, doubles the lines. The additional lines provide a better quality image and a brighter outputMotion adaptive – to produce a brighter smoother and higher resolution imageM/PSet the deinterlacing (per window) sync to:Current Field – for a long delayM/POlder Field – for a short delayM/PWhen selecting Older Field, diagonal correction is disabled |
| Film Mode | Set to:Off – for no pull-downM/PFollow Input – to automatically identify the required pull-down (2:2 or 3:2 pull-down)M/P24PsF – to force 24PsF pull-downM/P |
| Diagonal Correction | Set the level of diagonal interpolation from 0 to 3.When set to the lower level, the diagonal image does not appear smoothM/P |
| MD Sensitivity | Set (from Level 1 to Level 5)M/PSelect the motion detection sensitivity for filtering of interlaced images. Set a high value for video where there is generally a large amount of motion, or a low value for little motion |
6.5 The Picture Menu
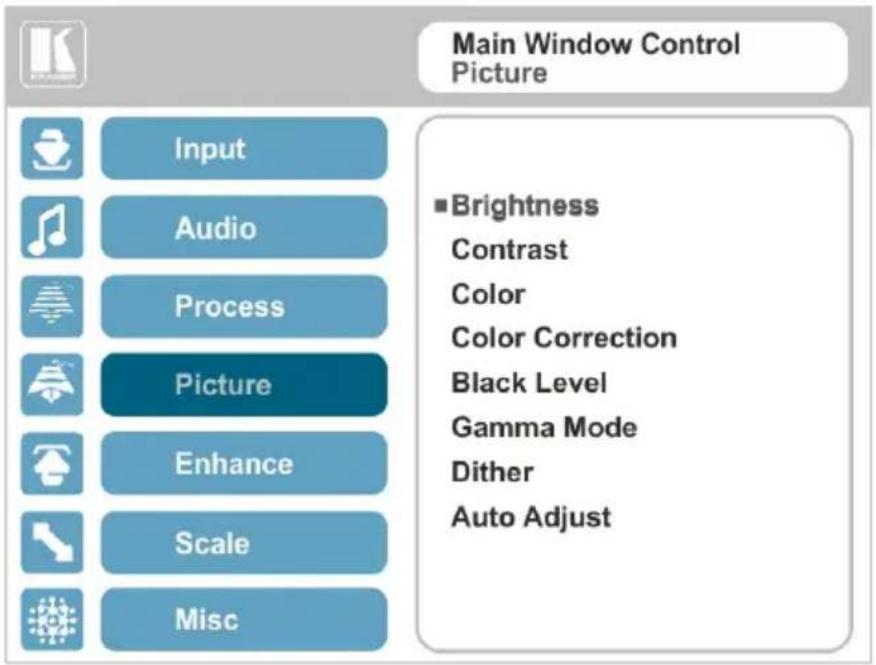
Figure 26: Picture Menu
| Setting | Function |
| Brightness | Set the brightness levelM/P |
| Contrast | Set the contrast levelM/P |
| Color | Set the color levelM/P |
| Color Correction | Set the blue, green and flesh color levels from 0 to 4M/P |
| Black Level | Set the black levelM/P |
| Gamma Mode | Set the gamma correction factor to Off, 0.4, 0.8, 1.2, 1.6, 2.0, 2.4 or 2.8EThe higher the value, the darker the image |
| Dither | Set the error diffusionE:Mode0: Disable error diffusionMode1: In-frame 8:6 conversionMode2: Intra-frame 8:6 conversionMode3: In-frame 10:8 conversionMode4: Intra-frame 10:8 conversionMode5: In-frame 12:10 conversionMode6: Intra-frame 12:10 conversion |
| Auto Adjust | Set the image color (back to its default values) and position per window (centers it correctly on the screen)M/PSee Auto Positioning menu item inSection 6.2Note that Auto Adjust is disabled when in the Freeze state |
6.6 The Enhance Menu
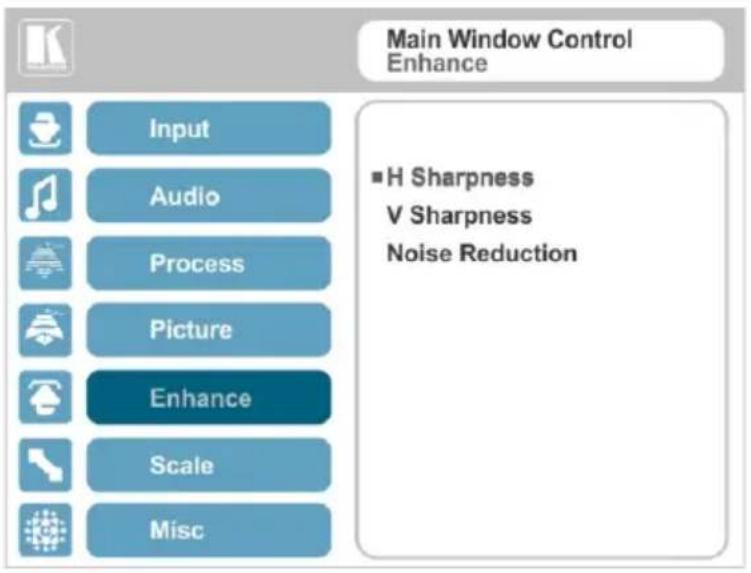
Figure 27: Enhance Menu
| Setting | Function | |
| H Sharpness | Select the horizontal sharpness level M/P | |
| V Sharpness | Select the vertical sharpness level M/P | |
| Noise Reduction | Set the input noise reduction levels:Mosquito NR – the higher the level, the stronger the filtering of the image M/P Combing NR – set to improve the quality of the subtitles M/P Temporal NR – the higher the level, the stronger the filtering of the image. Useful when the noise is visible to the eye M/P Block NR – as the level is set higher, the block noise disappears and the image appears softer M/P  | Input noise reduction (except for Temporal NR) is enabled for interlaced video processing only and is inactive in the progressive scan. |
6.7 The Scale Menu
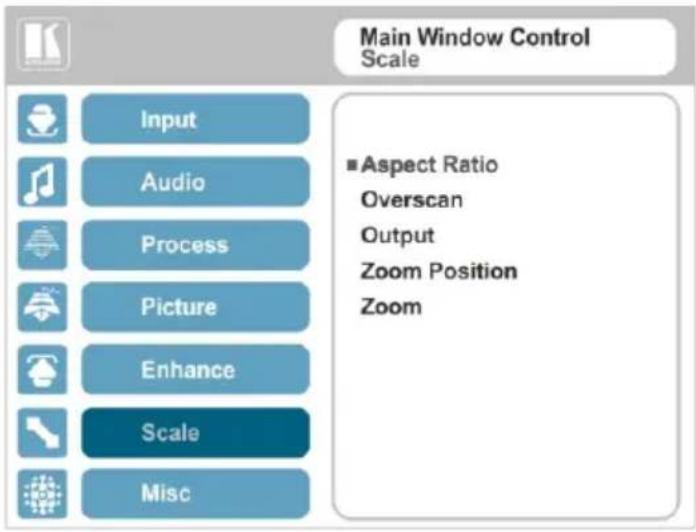
Figure 28: Scale Menu
| Setting Function | |
| Aspect Ratio | Set (seeSection 6.7.1) to:Follow Input– Display on the output with pixel-to-pixel mapping of the input. If the input resolution ≤ output resolution, display with a blank border.If the input resolution > output resolution, Follow Input is denied and the aspect ratio automatically changes to Follow OutputMFollow Output– Display as a full picture at the selected output resolution. If the input resolution < output resolution, scale up the picture. If the input resolution > output resolution, scale down the pictureMBest Fit– the best possible compromise between the input and the output aspect ratios, showing the largest possible picture with no distortionMLetterbox– to compress the top and bottom edges of the input signal, but fill the width of the screenMApplies to the Single Window display mode only |
| Overscan | Set the overscan (per window) to Off, 5% or 10%MP |
| Output Set the: | Output Resolution– to Native, 640x480@60, 640x480@75, 800x600@50, 800x600@60, 800x600@75, 1024x768@50, 1024x768@60, 1024x768@75, 1280x768@50, 1280x768@60, 1280x800@60, 1280x1024@50, 1280x1024@60, 1280x1024@75, 1360x768@60, 1366x768@50, 1366x768@60, 1400x1050@50, 1400x1050@60, 1600x900@60, 1600x1200@50, 1600x1200@60, 1680x1050@60, 1920x1200@60, 480i60, 480p60, 576i50, 576p50, 720p50, 720p59.94, 720p60, 1080p23.976, 1080p24, 1080p25, 1080p29.97, 1080p30, 1080p50, 1080p59.94, 1080p60, 2k50 or 2k60ENote that any change in the output resolution may cancel the zoom  setting and window customization.Master Connection– to HDMI1, HDMI2, HDBT or SDI to determine the machine’s behavior (seeSection 6.7.2)EIf the native resolution is not supported by the selected Master Connection, the system searches for the best supported resolution. If the search fails (for example, if the master connection is disconnected or EDID is unreadable), the resolution will default to XGA. setting and window customization.Master Connection– to HDMI1, HDMI2, HDBT or SDI to determine the machine’s behavior (seeSection 6.7.2)EIf the native resolution is not supported by the selected Master Connection, the system searches for the best supported resolution. If the search fails (for example, if the master connection is disconnected or EDID is unreadable), the resolution will default to XGA. |
| Setting | Function |
| Output (continued) | Deep Color – to Off (the default) for 8bit color depth or to Follow Output for applying deep color automatically on the HDMI output if supported by the display.Note that Follow Output sets the Deep Color of the HDMI and the HDBT outputs independently, according to the screen connected to each output  A change in the Deep Color setting will take effect after there is a hot plug on the HDMI/HDBaseT output or if the user selects a new output resolution.Color Space – to RGB, YPbPr422 or YPbPr444 (does not apply to the SDI output)HDCP Mode – define the HDMI out HDCP activation policy.Set to:Follow Input: to activate the HDCP on all HDMI outputs in the case that the video on the Main or PiP window is HDCP encrypted.Follow Output (This option is recommended when the HDMI output is connected to a splitter/switcher): to activate the HDCP per output according to the setting of the HDMI acceptor to which it is connected; that is, if the HDMI acceptor is not HDCP compliant, the VP-774A always outputs without HDCP and vice versa.Note that the VP-774A will output a green screen if the output acceptor to which it is connected is not HDCP compliant, in the case that the video on the Main or PiP window is HDCP encrypted. A change in the Deep Color setting will take effect after there is a hot plug on the HDMI/HDBaseT output or if the user selects a new output resolution.Color Space – to RGB, YPbPr422 or YPbPr444 (does not apply to the SDI output)HDCP Mode – define the HDMI out HDCP activation policy.Set to:Follow Input: to activate the HDCP on all HDMI outputs in the case that the video on the Main or PiP window is HDCP encrypted.Follow Output (This option is recommended when the HDMI output is connected to a splitter/switcher): to activate the HDCP per output according to the setting of the HDMI acceptor to which it is connected; that is, if the HDMI acceptor is not HDCP compliant, the VP-774A always outputs without HDCP and vice versa.Note that the VP-774A will output a green screen if the output acceptor to which it is connected is not HDCP compliant, in the case that the video on the Main or PiP window is HDCP encrypted. |
| Zoom Position | Set H Position and V Position, the horizontal and vertical zoom positions respectively, to zoom into certain areas of the imageMPLets you “move” the zoom area (same as scanning an area with a magnifying glass) |
| Zoom | Set the zoomWPZooms into the center of the display.When zooming in the Freeze state, in case the input resolution is larger than the output resolution, the image may be cut-off or change its position. This can be fixed via Zoom Position (above). |
 | Note that any change in the output resolution will cancel the zoom setting. |
6.7.1 Selecting the Correct Aspect Ratio
You can configure the aspect ratio of any output image to fit your application. The VP-774A offers four different aspect ratio settings: Follow Input, Follow Output, Best Fit and Letterbox. Here is how each of these settings works.
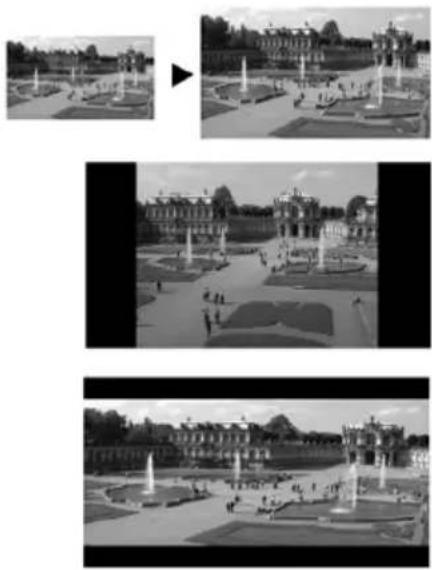
FOLLOW INPUT – The aspect ratio and resolution of the input video or graphics signal are both preserved (no scaling). For example, a composite video image with a 4:3 aspect ratio will appear with the same aspect ratio on a 1080p (16:9) output image, surrounded by black bars
natural_image
Black-and-white exterior view of a grand palace with symmetrical gardens and central fountain (no visible text or signage)FOLLOW OUTPUT – The aspect ratio and resolution of the input signal is re-sized to precisely match the aspect ratio and resolution of the VP-774A output signal. This may result in some distortion to the input signal images
BEST FIT – This setting re-sizes the video or graphics input signal to "best fit" the output resolution while maintaining the aspect ratio of the input signal. For example, a composite video signal (4:3 aspect ratio) will "best fit" to the top and bottom of a widescreen output image, resulting in black pillars on either side.
LETTERBOX – This setting compresses the top and bottom edges of the input signal, but fills the width of the screen. For example, to preserve a widescreen film image on a 4:3 display. When not using a 4:3 monitor, this mode is identical to Best Fit
6.7.2 Master Connection Settings
The Master Connection (HDMI1, HDMI2, HDBT or SDI) is usually set to the main output display so that the optimal resolution for that display can be obtained.
By setting the output resolution to Native, the VP-774A is triggered to read the EDID of the main display and change the output resolution value according to the native resolution of the display.
Note that when the output resolution is set to Native:
- Selecting SDI as the Master Connection results in an output resolution of 720p @60
- If SDI is selected as the Master Connection, hot plugging the HDMI/HDBT output will not change the output resolution
- If HDMI/HDBT is selected as the Master Connection, and a new display is connected to the Master Connection output (hot plug), the VP-774A automatically reads the EDID of that display and updates the output resolution accordingly
- If it is not supported by the selected Master Connection, the system searches for the best supported resolution. If the search fails (for example, if the master connection is disconnected or EDID is unreadable), the resolution will default to XGA
6.8 The Miscellaneous Menu
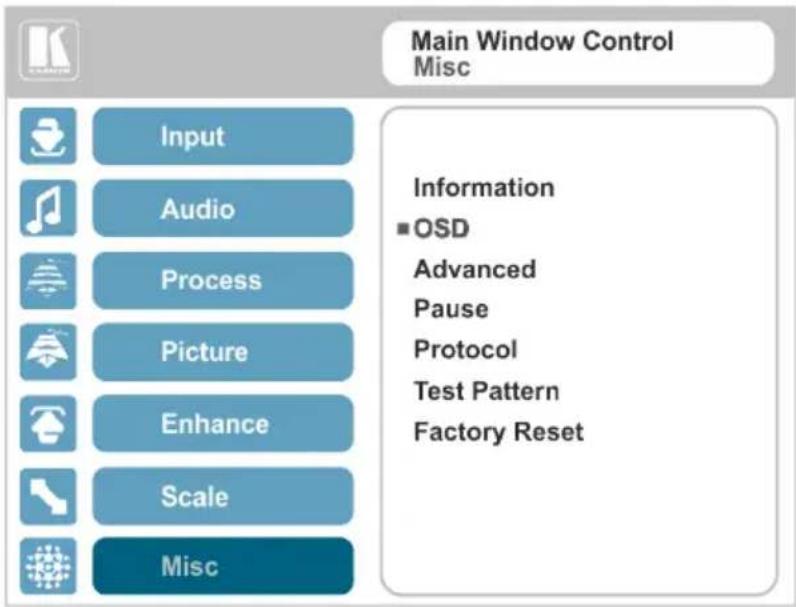
Figure 29: Misc Menu
| Setting | Function |
| Information | Displays the selected input, input resolution and frequency, the output resolution, firmware versions and IP AddressM/PIf the selected output is the native output resolution, it will be displayed under "Native Output" (the master connection will also appear, before "Native Output") ; in case of an explicit output resolution the title will be "Output:"If the input video is encrypted, an HDCP icon appears next to the input information |
| OSD | Set:Window Control– to Main Window Control to set the OSD menu to control the Main window (letting you select the input and other parameters for the main window) or to PiP Window Control to control the PiP window (letting you select the input and other parameters for the PiP window)EWhile browsing the OSD menu in the dual window mode, the window control can be toggled instantly with a long press of the PIP button on the front panel and a short press of the PIP button on the IR remote controller.Note that you can select the window control only when in the dual window modeH Position– to set the horizontal position of the OSDEV Position– to set the vertical position of the OSDETransparency– to set the transparency to On or OffETransparency Gain– to set the transparency level (once set to transparent)ETransparency Bias– to set the transparency levelEBlink– to On for the selected item in the OSD to blink, or OffEBlink Period– to determine the blinking rateETimeout– to 30 seconds before OSD timeout, 60 seconds before OSD timeout or OFF (Off means that that the OSD appears continuously)E |
| Advanced | Set:V Keystone– to set the vertical keystone levelEUseful If the projector is located at an angle above or below the screen. In the OSD menu the value range shows -80 to 80. For interlaced inputs, this feature is disabled |
| Advanced(continued) | Auto Sync Off – to turn the auto sync On/Off.When ON, 2 minutes after not detecting a valid video signal on the selected input (or both inputs in the dual window mode), the unit will disable the syncs and the audio on all the outputs, until a valid input is again detected or any keypad button is pressed to activate the machine (once restored, the buttons return to their normal function) ☑When using the VP-774A for audio only, we recommend that  you turn this feature offLuma Keying – to turn the keying on the PiP window ON or OFF (see Section 6.8.1) ☑Alert System – to set the Alert system On or Off (see Section 6.8.2) ☑No Signal – to set the color of the windows if no signal is detected. Select Gray, Blue or Black M/PIf gray or blue is selected, the Main window color is light while PIP has a darker shade. When black is selected, both windows appear blackAuto Switching – to set auto switching to Off, Scan mode or Last Connected mode separately for the Main window and the PiP window. Set to Scan to scan through the inputs in search of a valid input signal. Set to Last Connected to immediately switch to the latest valid input signal connected (for HDMI and DP inputs only).Note that in case the last connected valid input signal is disconnected, the VP-774A will switch to the previous last-connected valid-input signal, and then to the input before that and so on until the last disconnected inputs, and then a “No Signal” screen will appearSet to Off to disable scanning M/PNote that by default the highest priority input on the list is HDMI1 and the lowest is DP (according to the order of the input front panel buttons). In the scan mode you can select which of the inputs will be included in the scan and also change the order of the scanned inputs (the priority list), via the Web pages only, see Section 9.1.3) you turn this feature offLuma Keying – to turn the keying on the PiP window ON or OFF (see Section 6.8.1) ☑Alert System – to set the Alert system On or Off (see Section 6.8.2) ☑No Signal – to set the color of the windows if no signal is detected. Select Gray, Blue or Black M/PIf gray or blue is selected, the Main window color is light while PIP has a darker shade. When black is selected, both windows appear blackAuto Switching – to set auto switching to Off, Scan mode or Last Connected mode separately for the Main window and the PiP window. Set to Scan to scan through the inputs in search of a valid input signal. Set to Last Connected to immediately switch to the latest valid input signal connected (for HDMI and DP inputs only).Note that in case the last connected valid input signal is disconnected, the VP-774A will switch to the previous last-connected valid-input signal, and then to the input before that and so on until the last disconnected inputs, and then a “No Signal” screen will appearSet to Off to disable scanning M/PNote that by default the highest priority input on the list is HDMI1 and the lowest is DP (according to the order of the input front panel buttons). In the scan mode you can select which of the inputs will be included in the scan and also change the order of the scanned inputs (the priority list), via the Web pages only, see Section 9.1.3) |
| Pause | Set:Freeze – to ON to freeze the window (freezing the main window will also mute the audio output) M/PBlank – to ON to display a blank window (blanking the main window will also mute the audio output) M/PNote that any change in the input source may cancel the freeze  and blank settings.Mute – to ON to mute the audio output EA mute/unmute icon appears on screen according the state selected. Note that MUTE is disabled once changing the volume levelDisable Outputs – to turn the sync and audio On/Off.When ON, the unit will disable the syncs and mute the audio output until any keypad button is pressed ☑Once Disable Outputs is selected, a countdown appears, letting you cancel the process and revert to the previous state and blank settings.Mute – to ON to mute the audio output EA mute/unmute icon appears on screen according the state selected. Note that MUTE is disabled once changing the volume levelDisable Outputs – to turn the sync and audio On/Off.When ON, the unit will disable the syncs and mute the audio output until any keypad button is pressed ☑Once Disable Outputs is selected, a countdown appears, letting you cancel the process and revert to the previous state |
| Protocol | Set the communication protocol to P3K or Legacy (see Section 13) ☑When setting the Protocol to Legacy, some PC applications (for example, K-Upload) as well as the Web pages may not function properly. |
| Test Pattern | Set the Test pattern to Slide Bar (non-HDCP), Color Bar (HDCP) or Off.Each test pattern includes a sinusoid audio signalWe recommend that you set the Display Mode to Single Window (see Section 6.2) and set the Output Resolution to 1080p (see Section 6.7).Note that the Color Bar test pattern changes the OSD menu coloring and the following message appears on the display: “Ignore OSD Coloring” |
| Factory Reset | Reset to factory default values (see Section 12.1) EOnce Factory Reset is selected, a countdown appears, letting you cancel the process and revert to the previous stateNote that full Factory Reset includes Ethernet reset as well |
6.8.1 The Luma Keying Feature
The luma keying feature is an easy-to-use method of compositing two video sources into a single image. By setting up a “key” image or clip on a black background, it can be merged – or overlaid – onto the primary video. The key image is transparent in the areas of its dark background, resulting in a picture which looks as if the key image is cut out and pasted over the primary image. This useful function of combining images from two different sources is suitable for many applications, such as sub-titling, labeling, advertising or logo insertion.
To apply the luma keying feature, first set the PiP window to the desired size and location and then turn luma keying On. The PiP image will show without its background.
The lower the luminance in the PIP window, the more transparent it becomes, thus letting the main window image show. The higher the luminance, the less transparent it becomes, not letting the main window show through. To use this feature it is recommended to set the PIP image as follows: use low-luminance colors for the background (the key image portion) and high-luminance colors for the logo.

For certain displays, the screen may flicker once for about a second after activating or changing the luma keying setting.
We recommend that you activate luma keying after completing the setup.
When the luma keying feature is On, any change in the setup (either by the user or by resetting due to a setup change) may cause the screen to flicker once. The luma keying will recover automatically after resetting.
6.8.2 The Emergency Alert System
The Emergency Alert System (EAS) is a unique, versatile feature for immediate text overlaying, with flexible options such as the inclusion of an audio alert siren and the choice of displaying an emergency notification via either a text crawler or a text window.
The EAS provides the ability to have a site-wide notification immediately displayed when an emergency situation develops that could affect the health and welfare of the people attending the site, whether that site is an educational facility, a corporate site, a stadium or any other location where large groups of people come together. Messages can include specifics about weather (tornadoes, hurricanes, high winds, flooding, storms and so on), Amber and Silver alerts, safety and security, and also general advisories.
Emergency alert messages are composed and transmitted using the Common Alert Protocol (CAP). CAP is an XML-based application that allows a warning message to be consistently disseminated simultaneously over many warning systems to many proprietary applications and devices. By using XML, messages can be composed, transmitted, and received across a broad range of proprietary AV and other devices.
Generally, CAP format alerts can also trigger secondary functions, such as alert tones, horns, buzzers, and sirens. They can be used to switch on AV equipment to display alerts. The system also complies with the Emergency Alert System (EAS) standard, an official, national warning system in the United States, which works in coordination with the Federal Emergency Management Agency (FEMA) and a number of US national emergency agencies.

For more details on CAP, go to https://www.oasis-open.org/committees/download.php/6334/oasis-200402-cap-core-1.0.pdf.
The VP-774A intercepts XML files over the Ethernet in the CAP format via the dedicated EAS port from the alert generator server (for example, a FEMA server or a proprietary CAP message generation application) for immediate alert message triggering.
flowchart
graph TD
    A["Alert XML file (CAP format)"] --> B["Alert Generator Server"]
    B --> C["Dedicated EAS Ethernet Port VP-774AMP"]
    C --> D["Computer monitor with network icon"]
Figure 30: XML File Transfer
The position of the displayed CAP message depends on the severity of the alert. Noticeable messages with “Extreme” and “Severe” headers will appear on the screen and cover up any other content together with an audio alert siren (in case of an Extreme level alert). Messages with lower levels of severity will appear as a text crawler along the bottom of the image. When an alert is activated, the system (via P3K) outputs messages according to the activation mode type (see Section 13.4).
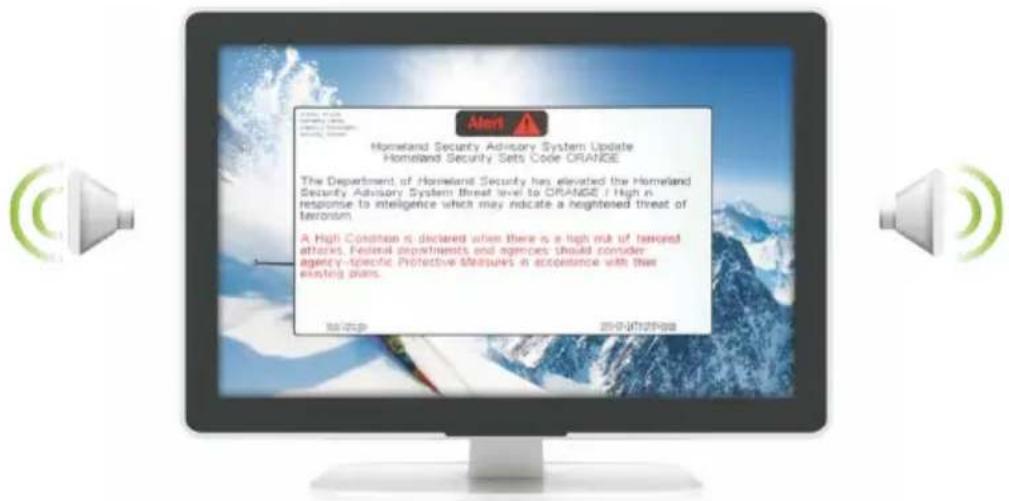
Figure 31: Emergency Alert System Display
The Expiration Date field of the CAP XML file determines when the message will expire. Note that you can remove the message sooner by pressing/clicking any of the buttons on the VP-774A (front panel or remote control buttons, as well as via the Web page or protocol commands).
To setup and activate the alert system on the VP-774A:
- Set the dedicated EAS Ethernet connection port type and port number through which the VP-774A will be listening, as a client, to intercept alerts. By default, the dedicated EAS port settings are TCP, 5005. To change these setting see the “Emergency Alert Configuration” in the table in Section 13.4.
- Make sure that the VP-774A is connected to Ethernet.
- Make sure that Alert System in the Miscellaneous menu is set to On (see Section 6.8).
The VP-774A is now ready to receive any alert and display it.
Note that you can use the Emergency Alert System Web page to connect to an EAS server and create a local command (see Section 9.8).
6.8.2.1 EAS Requirements
The following table specifies the EAS requirements:
| Text Length Definitions | |
| Attribute Name Max Size | |
| Status | 20 |
| Certainty | 20 |
| Urgency | 20 |
| Severity | 20 |
| Event | 45 |
| Headline | 45 |
| Description | 240 |
| Instruction | 240 |
| Sender | 30 |
| Sent | 30 |
| Max 30 contiguous chars per word | |
| Output Resolution | |
| The output resolution needs to be at least 1280x768 | |
7 The Display Modes
The VP-774A can function in the single window display mode (the factory default setup) or the dual window display mode.
7.1 The Single Window Display Mode
The single window mode shows one window on the screen. The window size can be customized, and its parameters modified via the OSD menu.
7.1.1 Activating the Single Window Mode
Set the VP-774A to the single window display mode in any of the following ways:
- Press and hold (for 3 seconds) the illuminated front panel PIP button until the button no longer illuminates
- Access the OSD menu, select INPUT>Display Mode, and then choose Single Window
- Access the Web pages (see Section 8.3)
- Press the PIP window on the remote control transmitter (see Section 8.4)
7.2 The Dual Window Display Mode
The VP-774A dual window mode feature lets you show two images on one screen: the main window and the PiP window. For example, you can show a live video window on top of a graphic background, or show two images on screen of the same input channel. The PiP window appears even if no input signals are connected. In this case the PiP window appears in dark gray and the main window appears in light gray.
The dual window mode appears in the following preset PiP configurations:
Picture-in-Picture, with a smaller PiP window superimposed over a full main window image
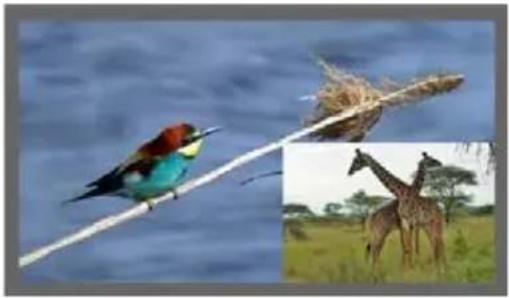
natural_image
Illustration of a colorful bird perched on a branch with an inset showing giraffes in a savanna (no text or symbols)Picture + Picture, where both images appear side-by-side and the aspect ratios of both images are maintained
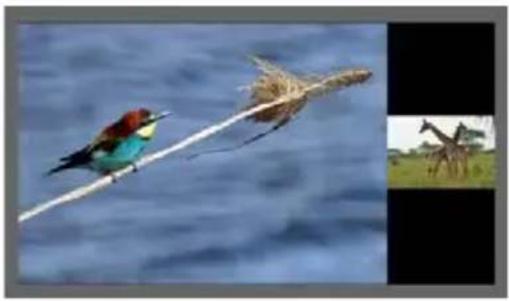
natural_image
Two colorful bird species flying on a branch against a blue sky background, with a separate inset image of giraffes in the background (no text or symbols)Split, where both images are placed side-by-side with the same height
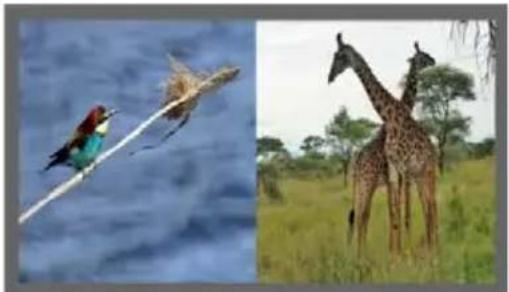
natural_image
Split image showing a bird in flight and a giraffe in a savanna setting (no text or symbols)The window customization feature (see Section 6.2) lets you customize the dual window mode layout (main window and PiP window) to any size and position.

You can superimpose any input type over any or the same input.
If the HDMI signal is HDCP protected, it can appear on HDMI and HDBT outputs that are connected to supported HDCP compliant displays. However, it cannot appear on a display that is not HDCP compliant and will show a green screen instead.
7.2.1 Activating the Dual Window Mode
You can activate the dual window mode (indicated by an illuminated PIP front panel button) in any of the following ways:
- Press and hold (for 3 seconds) the front panel PIP button
The latest PiP configuration appears - Press the PIP button on the IR remote control transmitter (see Section 8.4)
The latest PiP configuration appears - Access the OSD menu, select INPUT>Display Mode, and then choose one of the preset PiP configurations (Picture in Picture, Picture + Picture or Split)
• Access the Web pages (see Section 8.3)
7.2.2 Setting the OSD Menu to PiP Window Control
When the OSD menu is set to PiP Window Control, you can control the PiP window and change its parameters (for example, select the PiP input, size, position and so on). Section 7.2.3.3 shows how to select the PiP source via the OSD menu.
To set the OSD menu to PiP control:
- Press the MENU button to access the OSD menu.
- Scroll down to the Misc menu and press ENTER.
- Select the OSD submenu and press ENTER.
- Select Window Control and choose PIP WINDOW.
The OSD menu controls the PiP source - Press the MENU button to exit and accept changes.
The OSD menu title will show PiP Window Control. - You can press the MENU button several times to exit the menu and save
changes, or modify PiP window parameters via the other menu items.
To return to Main Window control, repeat the procedure above but select Main Window in the Window Control submenu.
7.2.3 Selecting the PIP Source
To select a PiP source you have to set the VP-774A to any of the PiP display mode configurations and then select the desired input.
7.2.3.1 Selecting the PiP Source via the Front Panel Buttons
Press and hold the PIP front panel button while pressing the input button of the required PiP source.
For example, to select CV as the PiP source over DP as the main source, press the PIP front panel button while pressing the CV front panel button (see Figure 32).
In this example, the DP button is illuminated and the CV button blinks
natural_image
Composite image showing zebrae in a forest setting and a colorful bird perched on water (no text or symbols)Figure 32: CV superimposed over DP
7.2.3.2 Selecting the PiP Source via the IR Remote Control Transmitter
Press the PIP button on the IR transmitter (the PIP front panel button is illuminated). Press the desired PiP source button on the IR transmitter (see Section 8.4.
7.2.3.3 Selecting the PiP Source via the OSD Menu

You can select an input source only after you set the display mode to one of the PiP configurations (see Section 6.2).
To set the PiP source via the OSD menu, do the following:
- Press the MENU button to access the OSD menu.
- Scroll through the menu, and for window specific submenus check the menu title:
If PiP Window Control appears, continue to step 7
If not, continue to the next step
-
Press the ▼ button to move to the Misc menu and press ENTER.
-
Select the OSD submenu and press ENTER.
-
Select Window Control and choose PiP Window Control. The OSD menu controls the PIP source
-
Press the MENU button a number of times to return to the main OSD menu (and accept changes).
-
Scroll to the Input menu and press ENTER.
-
Select Input Source and press ENTER.
-
Choose the input for the PiP window.
-
Press the MENU a few times until you exit the OSD menu (changes are saved upon exit).
8 Controlling the VP-774A
The VP-774A can be controlled via:
• The front panel buttons (see Section 8.1)
• The OSD menu (see Section 8.2)
• The Web pages (see Section 8.3)
• The infrared remote control transmitter (see Section 8.4)
8.1 Controlling via the Front Panel Buttons
The VP-774A includes the following front panel buttons:
- Input selector buttons for selecting the required input: HDMI (1 to 4), PC (1 and 2), CV, DP and SDI (see Section 8.1.1)
- PIP, BLANK and FREEZE buttons (note, these buttons illuminate when selected)
- MENU (left arrow), ENTER (right arrow), and up, down, arrow buttons
• Output volume up and down buttons (when not in the OSD mode) - RESET TO XGA/720p and PANEL LOCK buttons
8.1.1 Using the INPUT Front Panel buttons
When selected, an INPUT front panel button behaves as follows:
| Selecting the: | Causes the button to: |
| Main input button | Illuminate continuously |
| PiP input button | Blink (the light On period is shorter than the light Off period) |
| Same Main input button and PiP button | Blink (the light On period is longer than the light Off period) |

If you want to adjust the image of a selected input in a window, press that input button again (up to 3 times) for fast tuning. Pressing that input button for the fourth time initiates full tuning of the window.
8.2 Controlling via the OSD Menu
You can change PiP Window parameters, main window parameters and entire system parameters via the OSD menu, as described in Section 6.8.
8.3 Controlling via the VP-774A Web Pages
The Web pages are described in detail in Section 9. You can remotely operate the VP-774A using a Web browser via the Ethernet connection (see Section 8.3.3). To be able to do so, you must use a supported Web browser:
For Windows 7 and higher:
- Chrome version 35
- Internet Explorer (32/64 bits) version 10
- Firefox version 30
For Mac (PC):
- Chrome version 35
- Safari 7
- Firefox version 27
For iOS:
- Chrome version 35
- Safari 7
For Android OS:
- Chrome version 35
- Safari 7
8.3.1 Connecting to the VP-774A via your Browser

Note that if the Protocol is set to Legacy (via the Miscellaneous menu, see Section 6.8, the Web pages may not function properly.
Make sure that your PC is connected via a network to the VP-774A and do the following:
-
Open your Internet browser.
-
Enter the unit's IP number or name in the Address bar of your browser. If you are using DHCP, you have to enter the name.
The default IP number is 192.168.1.39, and may be changed by the system integrator
192.168.1.39

Figure 33: Entering the IP Number in the Address Bar
You can now control the machine via the Web page.
8.3.2 Connecting to the VP-774A via RS-232
You can connect to the VP-774A via an RS-232 connection using, for example, a PC. Note that a null-modem adapter/connection is not required.
To connect to the VP-774A via RS-232, connect the RS-232 9-pin D-sub rear panel port on the VP-774A unit via a 9-wire straight cable (only pin 2 to pin 2, pin 3 to pin 3, and pin 5 to pin 5 need to be connected) to the RS-232 9-pin D-sub port on your PC.
8.3.3 Connecting the VP-774A via the ETHERNET Port
You can connect to the VP-774A via Ethernet using either of the following methods:
- Directly to the PC using a crossover cable (see Section 8.3.3.1)
- Via a network hub, switch, or router, using a straight-through cable (see Section 8.3.3.2)
Note: If you want to connect via a router and your IT system is based on IPv6, speak to your IT department for specific installation instructions.
8.3.3.1 Connecting the Ethernet Port Directly to a PC
You can connect the Ethernet port of the VP-774A directly to the Ethernet port on your PC using a crossover cable with RJ-45 connectors.

This type of connection is recommended for identifying the VP-774A with the factory configured default IP address.
After connecting the VP-774A to the Ethernet port, configure your PC as follows:
- Click Start > Control Panel > Network and Sharing Center.
- Click Change Adapter Settings.
- Highlight the network adapter you want to use to connect to the device and click Change settings of this connection.
The Local Area Connection Properties window for the selected network adapter appears as shown in Figure 34.
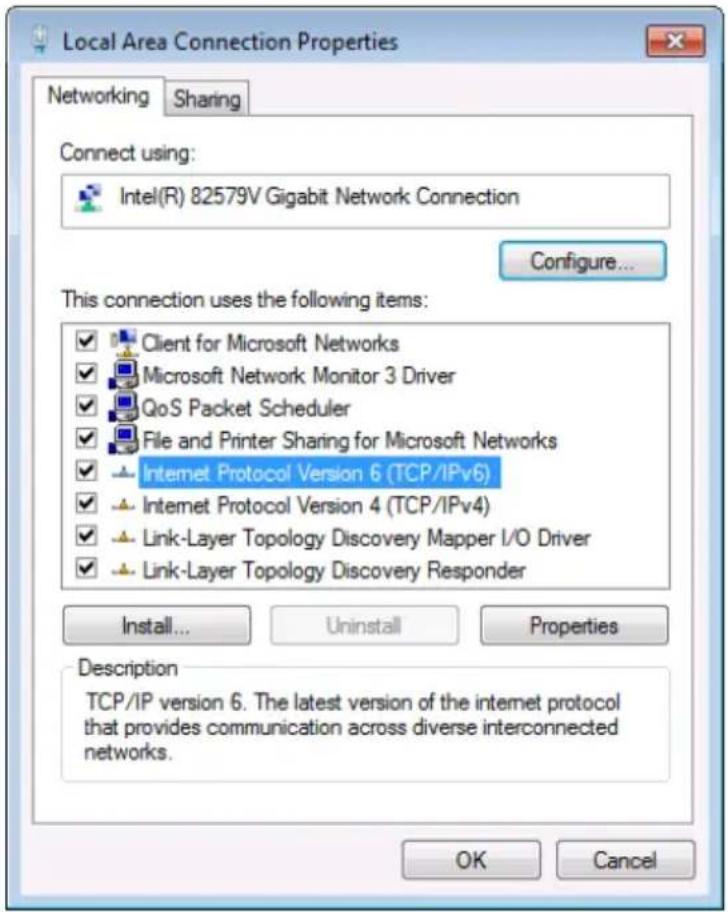
Figure 34: Local Area Connection Properties Window
- Highlight either Internet Protocol Version 6 (TCP/IPv6) or Internet
Protocol Version 4 (TCP/IPv4) depending on the requirements of your IT system.
- Click Properties.
The Internet Protocol Properties window relevant to your IT system appears as shown in Figure 35 or Figure 36.
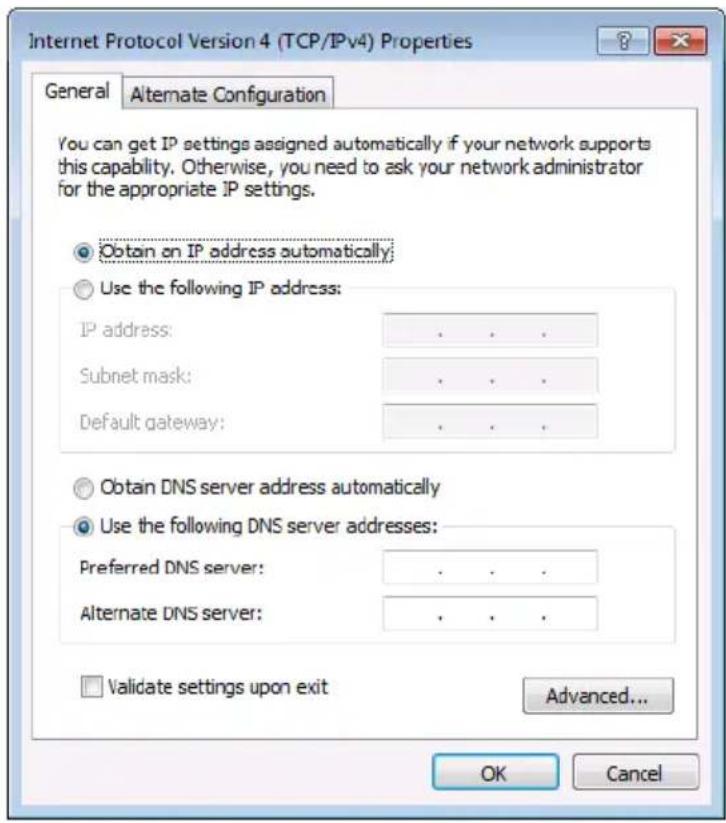
Figure 35: Internet Protocol Version 4 Properties Window
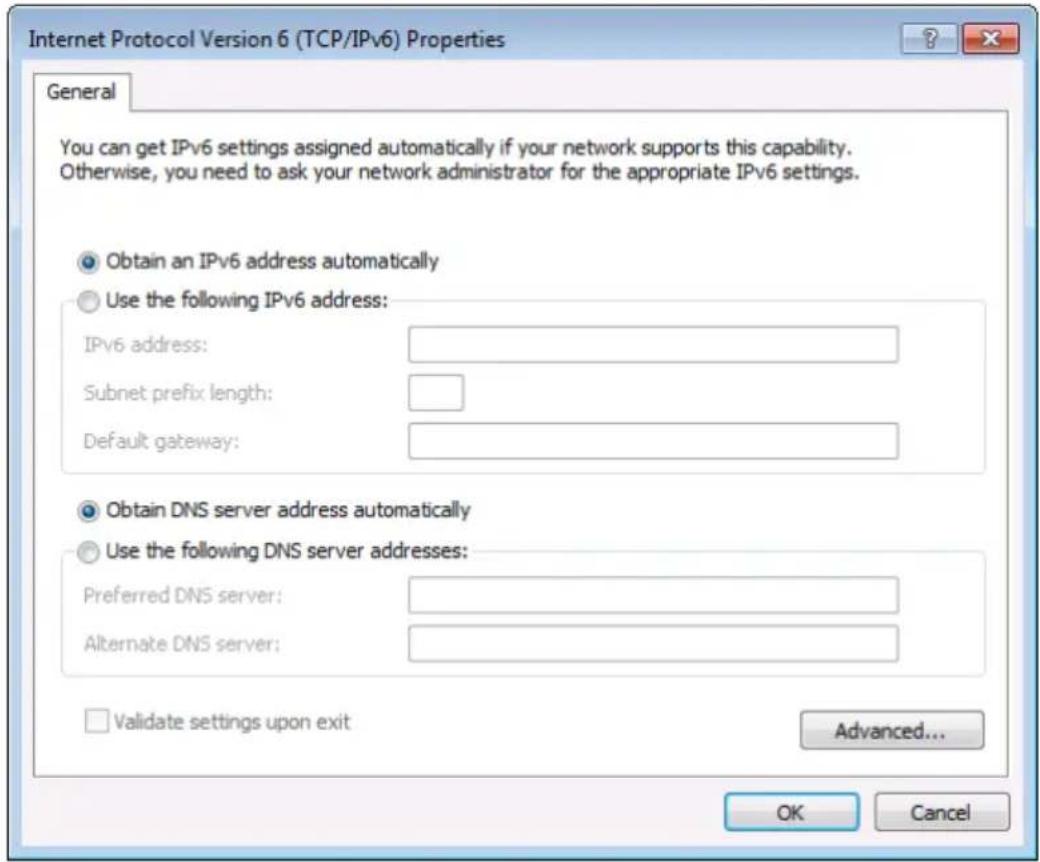
Figure 36: Internet Protocol Version 6 Properties Window
- Select Use the following IP Address for static IP addressing and fill in the details as shown in Figure 37.
For TCP/IPv4 you can use any IP address in the range 192.168.1.1 to 192.168.1.255 (excluding 192.168.1.39) that is provided by your IT department.
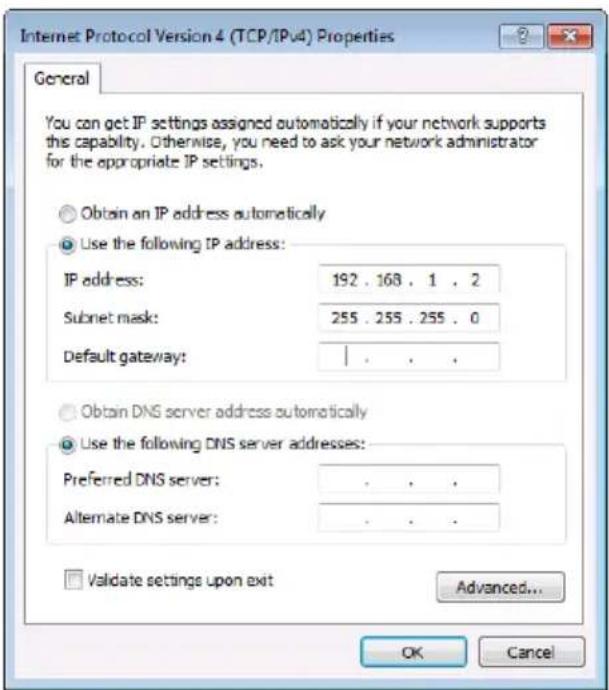
Figure 37: Internet Protocol Properties Window
- Click OK.
- Click Close.
8.3.3.2 Connecting the Ethernet Port via a Network Hub or Switch
You can connect the Ethernet port of the VP-774A to the Ethernet port on a network hub or using a straight-through cable with RJ-45 connectors.
8.3.3.3 Ethernet Port Configuration and Control
Use the Kramer K-UPLOAD software to configure the VP-774A and the Web pages to control it via the Ethernet.

The latest version of K-UPLOAD and installation instructions can be downloaded from the Kramer Web site at www.kramerav.com/support/product_downloads.asp
8.4 Controlling via the Infrared Remote Control Transmitter
You can control the VP-774A from the infrared remote control transmitter:
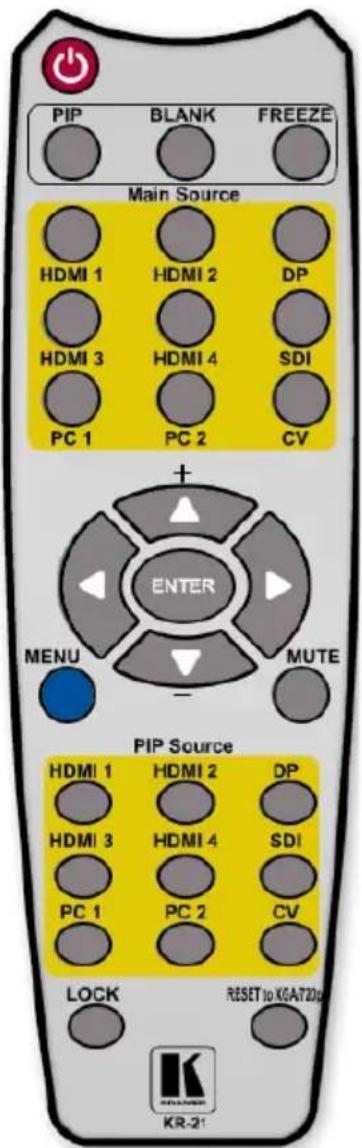
Figure 38: Infrared Remote Control Transmitter
| Keys Function | ||
| POWER | Toggle the power save mode ON or OFF | |
| PIP | Enter the dual window mode (the latest setting), see Section 7.2Note that while browsing the OSD menu in the dual window mode, a short press of the PIP button will instantly toggle the window control (between Main and PiP) | |
| BLANK | Toggle between a blank screen black screen and the display (for both windows) | |
| FREEZE | Freeze/unfreeze the output video image (for both windows) | |
| MAIN Source Inputs | HDMI1 | Select the HDMI 1 input |
| HDMI2 | Select the HDMI 2 input | |
| DP | Select the DisplayPort input | |
| HDMI3 | Select the HDMI 3 input | |
| HDMI4 | Select the HDMI 4 input | |
| SDI | Select the SDI input | |
| PC1 | Select the UXGA 1 input | |
| PC2 | Select the UXGA 2 input | |
| CV | Select the composite video input | |
 | Press ENTER to access menu levels (when in the OSD)Use the up and down arrows to adjust numerical values and adjust the output volume level (when not within the OSD) | |
| MENU Enter/ | Exit the OSD menu and return to the previous menu level | |
| MUTE Toggle | between muting (blocking out the sound) and enabling the audio output | |
| PIP Source Inputs | HDMI1 | Select the HDMI 1 input |
| HDMI2 | Select the HDMI 2 input | |
| DP | Select the DisplayPort input | |
| HDMI3 | Select the HDMI 3 input | |
| HDMI4 | Select the HDMI 4 input | |
| SDI | Select the SDI input | |
| PC1 | Select the UXGA 1 input | |
| PC2 | Select the UXGA 2 input | |
| CV | Select the composite video input | |
| LOCK | Lock the front panel buttons | |
| RESET to XGA/720P | Press to reset to the default resolution (toggles between RESET TO XGA and 720p) | |
8.4.1 Using the IR Transmitter
You can use the IR transmitter to control the machine via the built-in IR receiver on the front panel or, instead, via an optional external IR receiver (Model:
C-A35M/IRR-50). The external IR receiver can be located up to 15 meters away from the machine. This distance can be extended to up to 60 meters when used with three extension cables (Model: C-A35M/A35F-50).
Before using the external IR receiver, be sure to arrange for your Kramer dealer to insert the internal IR connection cable (P/N: 505-70434010-S) with the 3.5mm connector that fits into the REMOTE IR opening on the rear panel. Connect the external IR receiver to the REMOTE IR 3.5mm connector.
9 Using the Embedded Web Pages
The Web pages let you control the VP-774A via the Ethernet. The Web pages include all the OSD items and more.
Each one of the three control methods (front panel/IR transmitter, OSD menu or Web pages) affects the other two control methods. For example, selecting an input via the front panel buttons will affect the Routing & Scaling page (see Section 9.1) and the Input OSD menu (see Section 6.2).
To browse the VP-774A Web pages:
- Open your Internet browser.
- Type the IP number of the device in the Address bar of your browser. For example, the default IP number:

The Authentication window appears:
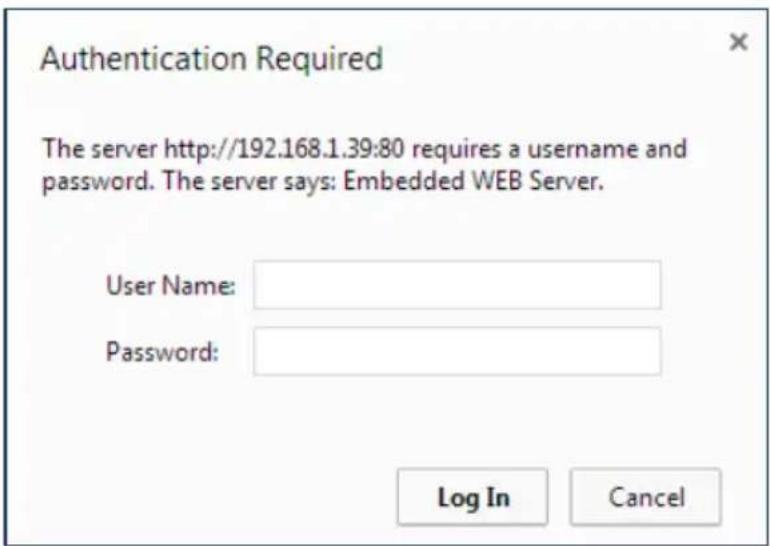
Figure 39: The Authentication Window
- By default, the User Name is "admin" and the Password is "1234". You can change these settings via the Security page (see Section 9.9). The Loading page appears:

Loading resources (31%)
Figure 40: The Loading Page
There are 10 Web pages:
• The Routing & Scaling page (see Section 9.1)
• The Device Settings page (see Section 9.2)
• The Input Settings page (See Section 9.3)
• The Enhance page (see Section 9.4)
• The Output Settings page (see Section 9.5)
• The Audio Settings page (see Section 9.6)
• The RS-232 over TP page (see Section 9.6.3)
• Emergency Alert System page(see Section 9.8)
• The Security page (see Section 9.9)
• The About Us page (see Section 9.10)
9.1 The Routing and Scaling Page
Figure 41 shows the Routing & Scaling page that is also the first page that appears following the loading page. The column on the left shows the Routing & Scaling page selected and below a list of all the other available Web pages.
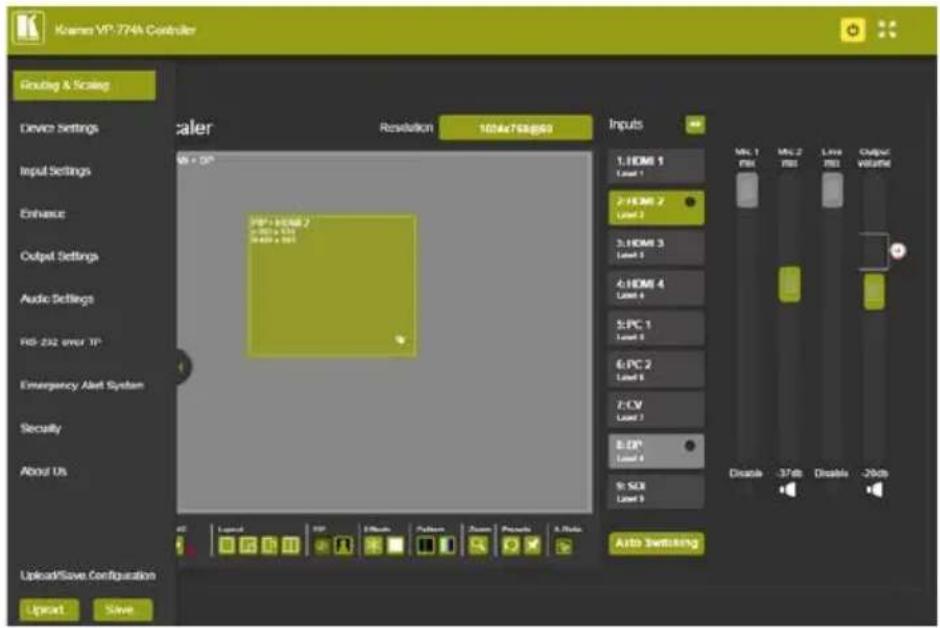
Figure 41: The Routing & Scaling Page with Web page list on the left
Click the arrow on the side to hide the Web pages list:
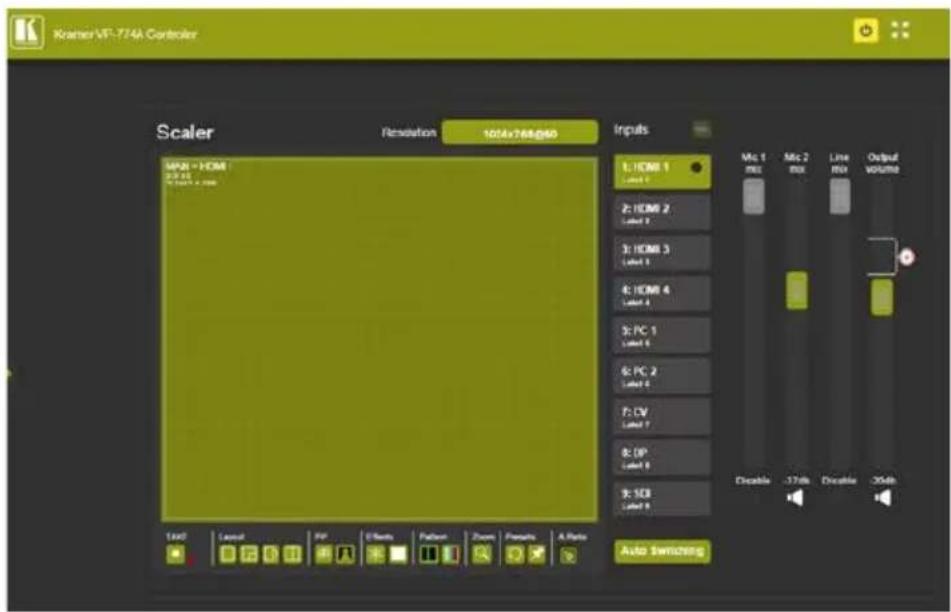
Figure 42: The Routing & Scaling Page – Single Window
The power icon on the top right side lets you set the device to the standby mode. When clicking the standby icon, the following window appears:
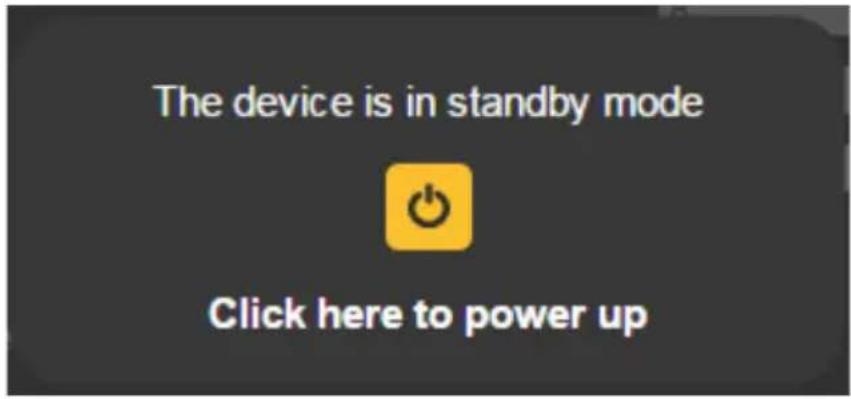
Figure 43: The Routing & Scaling Page – standby mode
The PIP image can be moved in any direction by clicking and moving the mouse and sized by moving the left and bottom edges of the image.
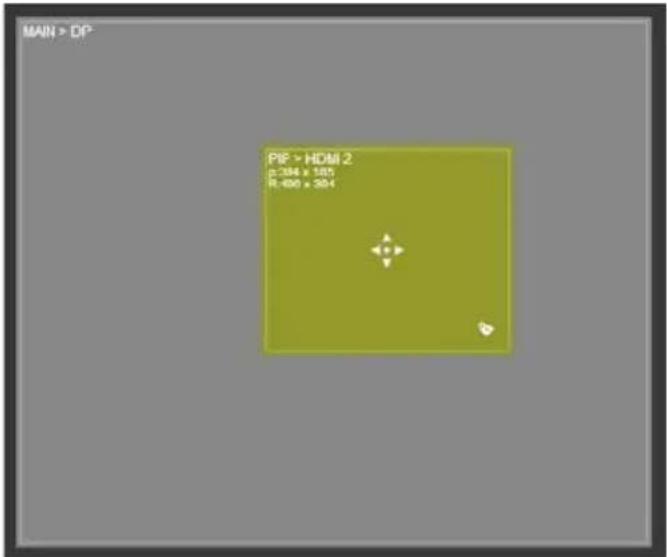
Figure 44: The Routing & Scaling Page – Moving the PIP Window
Note that for each window the top left side area shows the selected input and when selected, also shows the location of the image on the screen and its size.
Click a window to select it. A selected window turns green. An unselected main window appears dark gray and an unselected PIP window appears light gray.
The list of available inputs appears on the right side of the main area. The selected input appears green when its image in the main area is selected. For example, in
Figure 45 the PIP window is selected and on the right the respective input (2: HDMI 2) turns green.
The Routing & Scaling main area shows a depiction of the display which can show a single window (shown in Figure 42) or some variation of a MAIN window and a PIP window (one image over another), as illustrated in Figure 45.
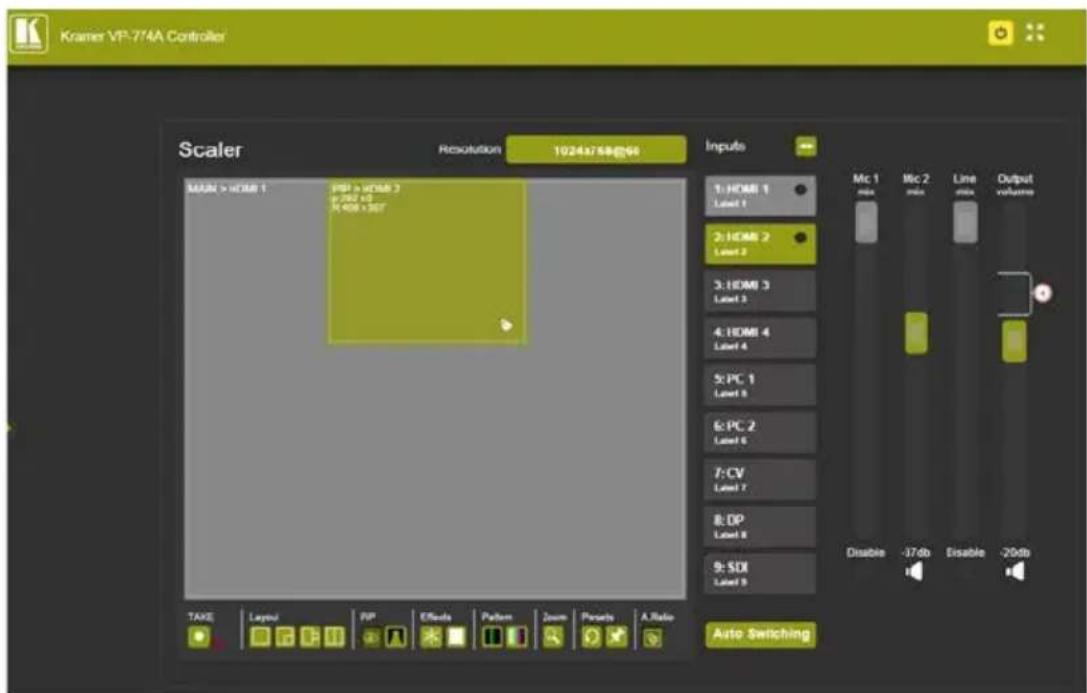
Figure 45: The Routing & Scaling Page – PIP Window
9.1.1 Selecting the Resolution
The Resolution selector above the main area lets you change the current resolution (for both images). Click the green button showing the current resolution (1024x768@60 in this example) to change it, see Figure 46
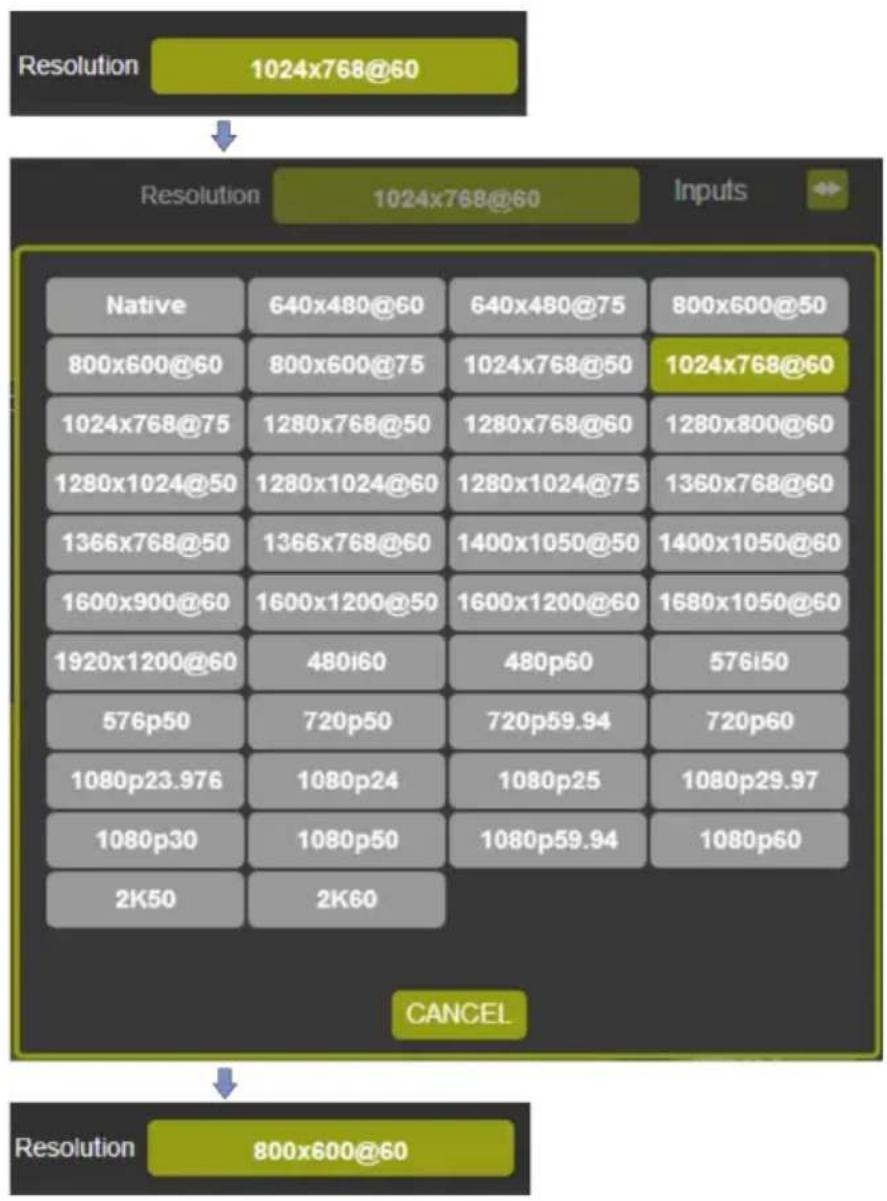
other
| Input | Resolution | | :--- | :--- | | Native | 640x480@60 | | 800x600@50 | 800x600@75 | | 1024x768@60 | 1024x768@50 | | 1024x768@75 | 1280x768@50 | | 1280x768@60 | 1280x768@60 | | 1280x1024@50 | 1280x1024@60 | | 1280x1024@75 | 1280x1024@75 | | 1360x768@60 | 1360x768@60 | | 1366x768@50 | 1366x768@60 | | 1400x1050@50 | 1400x1050@50 | | 1400x1050@60 | 1400x1050@60 | | 1600x900@60 | 1600x1200@50 | | 1600x1200@60 | 1600x1200@60 | | 1680x1050@60 | 1680x1050@60 | | 1920x1200@60 | 480i60 | | 480p60 | 480p60 | | 576i50 | 576i50 | | 576p50 | 720p50 | | 720p59.94 | 720p59.94 | | 720p60 | 720p60 | | 1080p23.976 | 1080p24 | | 1080p25 | 1080p25 | | 1080p29.97 | 1080p29.97 | | 1080p30 | 1080p50 | | 1080p59.94 | 1080p59.94 | | 1080p60 | 1080p60 | | 2K50 | 2K60 | CANCEL Resolution: 800x600@60Figure 46: The Routing & Scaling Page – Changing the Resolution
9.1.2 Swapping Inputs
Press the Swap Inputs button to swap between MAIN and PIP inputs. For example, if the MAIN window displays input 3 and the PIP window displays input 1, these inputs swap places when clicking the Swap Inputs button, so the MAIN window will now show HDMI 1 and the PIP window will show HDMI 3
Figure 47: The Routing & Scaling Page – The Swap Inputs
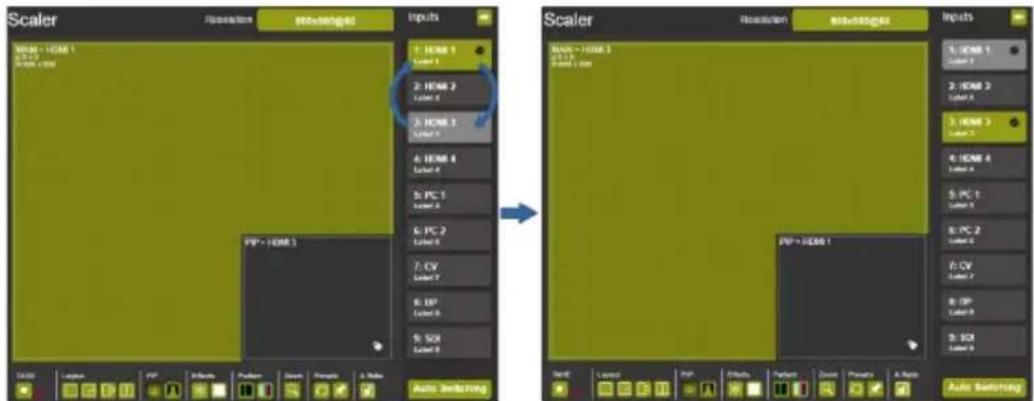
Figure 48: The Routing & Scaling Page – Swapping the Inputs
9.1.3 Auto Switching
Click the Auto Switching button to open the Auto Switching window (see Figure 49). The Auto Switching window lets you set the Main and PiP scanning mode separately to:
• Off to disable scanning
- Scan mode to scan through the inputs in search of a valid input signal. In the scan mode you can select which of the inputs will be included in the scan (see Figure 50) and also change the order of the scanned inputs (see Figure 51)
- Last Connected mode to immediately switch to the latest valid input signal connected (for HDMI and DP inputs only) Note that in case the last connected valid input signal is disconnected, the VP-774A will switch to the previous last-connected valid-input signal, and then to the input before that and so on until the last disconnected inputs, and then a “No Signal” screen will appear
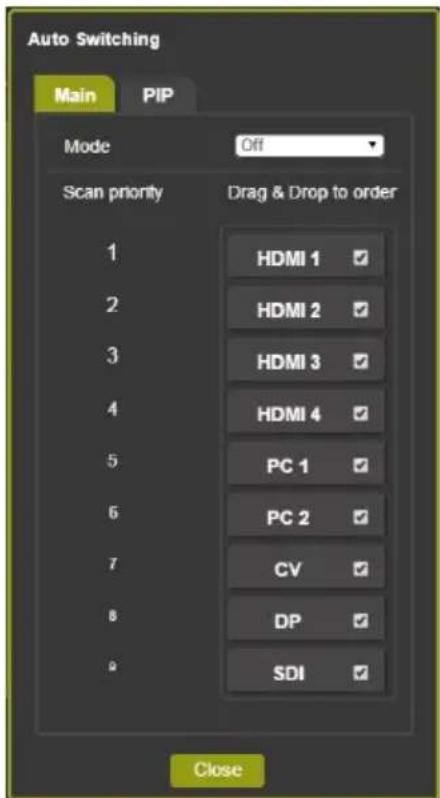
Figure 49: The Routing & Scaling Page – Auto Switching Window (Main Tab)
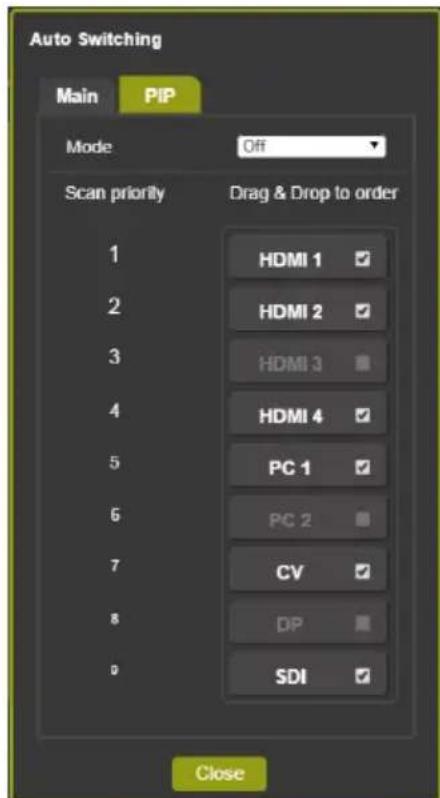
Figure 50: The Routing & Scaling Page – selecting the Inputs to Scan (PiP Tab)
When Scan mode is activated, the system scans the inputs from the highest to the lowest priority in search of a valid input signal for each the Main and PiP windows. The priority is ordered from the lowest input number (9) to the highest (1). For example, if PC 1 and HDMI 2 have a valid signal and auto switching is enabled, the VP-774A will scan through the inputs and select the HDMI 2 which is higher in the priority list (see Figure 49). Once the signal is no longer valid on HDMI 2, the VP-774A will scan for the next highest-priority valid signal.
Note that you can Check/uncheck the box next to an input to include/exclude it from the input scan list.
You can change the priority order as well by dragging an input button and dropping it in a new location, as illustrated in the example in Figure 51. In this example, CV is moved up in the priority list to be scanned for a valid input after HDMI 1.
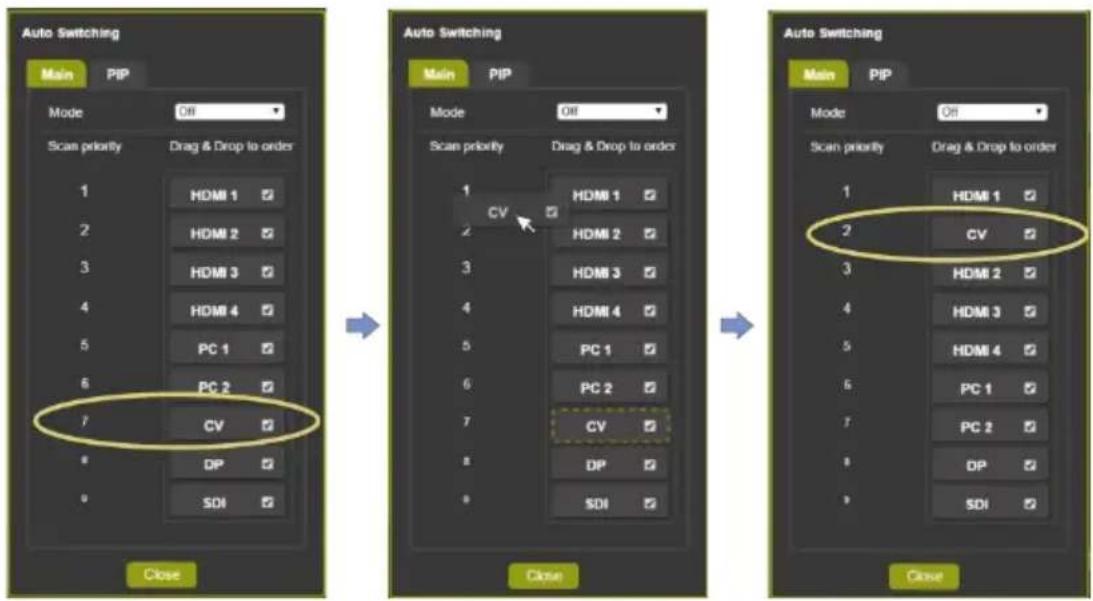
Figure 51: The Routing & Scaling Page – Auto Switching Window
9.1.4 The Lower Buttons Bar
The lower buttons bar lets you perform quick and easy setups:

Figure 52: The Routing & Scaling Page – Lower Buttons Bar
| Button Function | ||
  | Click to apply changes or click x to cancel changes.TAKE applies to Win-cust (main and pip), Luma keying, Input source (main and pip), PiP status, freeze, blank and Zoom position/zoom, see Section 9.1.4.1 | |
  | Select one of the four standard setups.You can customize the size of each window by using the arrows (vertical and horizontal or diagonal if aspect ratio is locked – see below). | |
  | Click to select PIP or single window | |
 | Select freeze and/or blank effects | |
| Button | Function | |
 | Select a pattern | |
 | Zoom the selected window | |
 | Recall or save a preset (see below)Presets apply to: PIP status, Layout, Luma keying, Output volume, Mic 1 mix, Line mix, Mic2 mix, Output volume mute, Output volume delimiter, Mic 1 mix mute, Line mix mute, Mic2 mix mute, Win-cust (main and pip), Input source (main and pip), Output resolution all auto switching functions and Zoom position/zoom | |
 | Lock/unlock the aspect ratio | |
Saving a Preset
To save a preset click the pin preset icon. Save Preset window appears. Click an empty (gray) preset (12 in this example).
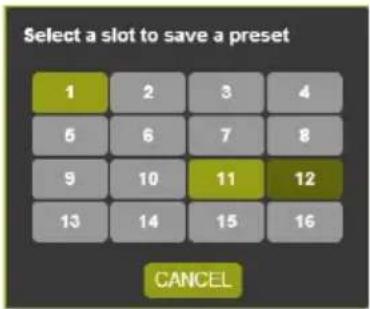
Figure 53: The Routing & Scaling Page – Selecting a Preset
Preset 12 is being saved:
Figure 54: The Routing & Scaling Page – Saving the selected Preset

Note that all the parameters of the scaler are saved to the preset except for the blank and freeze effects.
To recall a preset click the Preset recall icon:
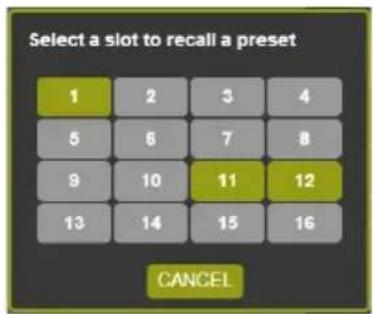
Figure 55: The Routing & Scaling Page – Recalling a Preset
9.1.4.1 The TAKE Mode
Click the TAKE button to enter the TAKE (Confirm) mode. A fine red line encircles the functions that apply to the TAKE mode (for example, the inputs):
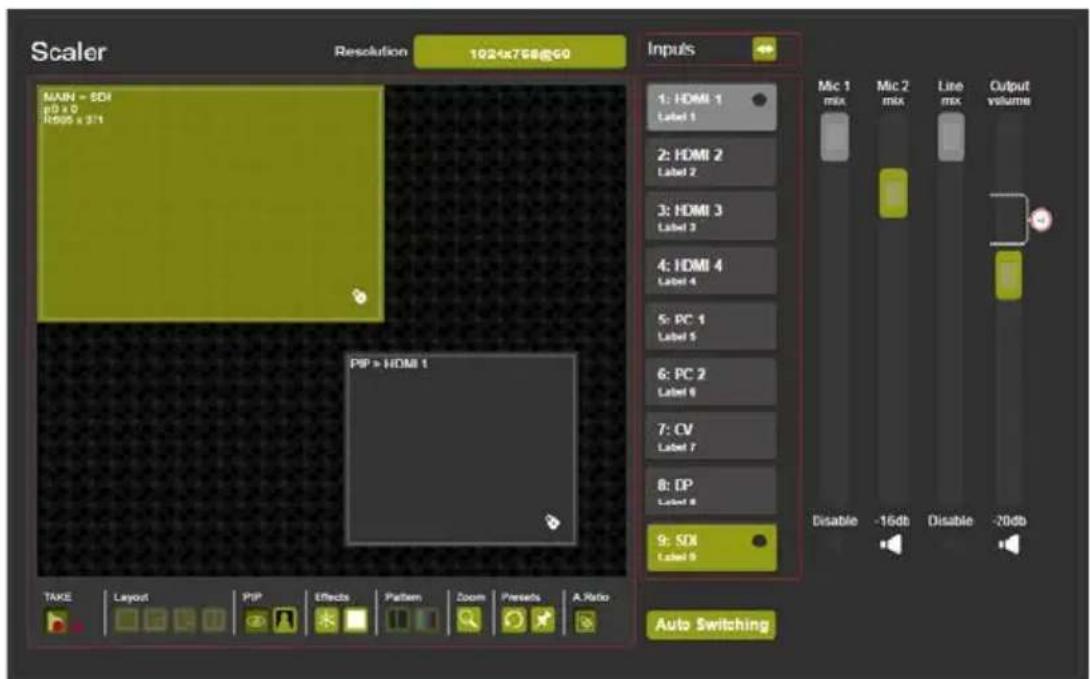
Figure 56: The Routing & Scaling Page – TAKE Mode
Set the changes (for example, the MAIN window input) and click the TAKE button once again. The changes are carried out and the red lines disappear.
Clicking the cancel button will cancel the changes (before pressing TAKE for the second time):
Figure 57: The Routing & Scaling Page – Cancel the Changes
9.1.5 Audio Level Sliders
The Mic/Line mix sliders are enabled via the Audio Settings page (see Section 9.6)
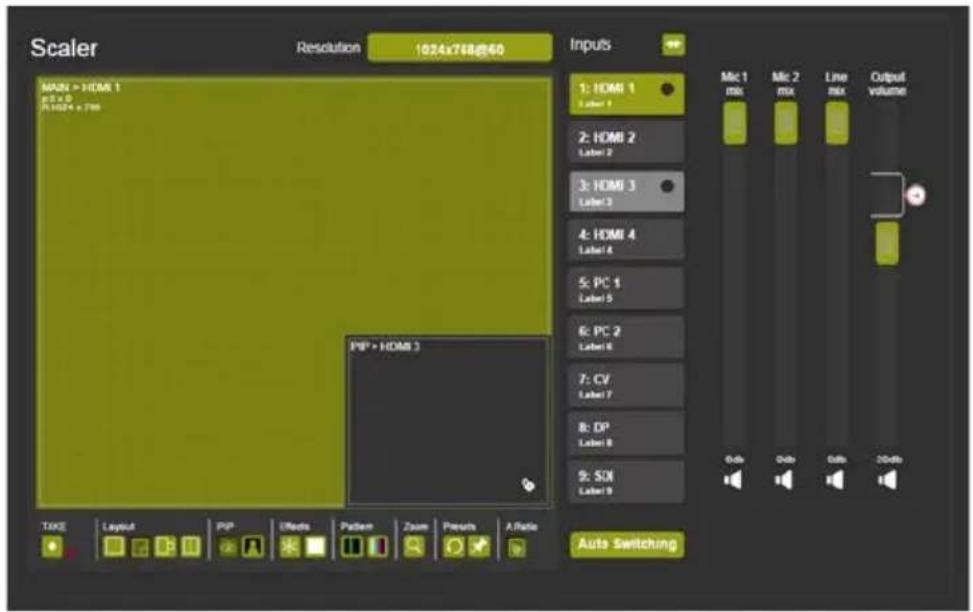
Figure 58: The Routing & Scaling Page – Audio Level Sliders
Audio levels can be set or muted via the speaker icon:
Figure 59: The Routing & Scaling Page – Muting the Audio Level
9.2 The Device Settings Page
The Device Settings window (in Figure 60) displays the device information, lets you upgrade the firmware, set the Ethernet parameters and reset the device to its default values.
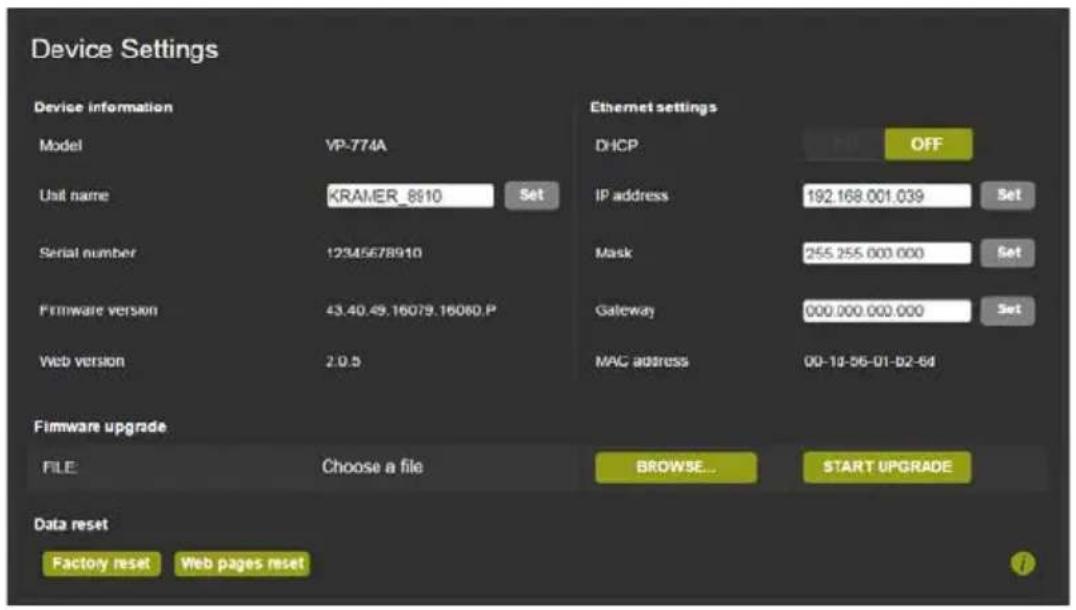
Figure 60: The Device Settings Page
Any change in the device settings requires confirmation, as illustrated in the example in Figure 61.
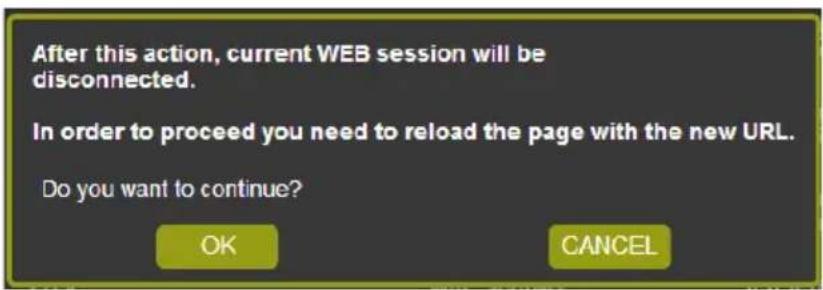
Figure 61: The Device Settings Page – Changing the IP number
9.2.1 Firmware Upgrade
You can upgrade the firmware via the Device Settings page. To do so:
- Choose the firmware file by clicking the BROWSE button in the Firmware upgrade FILE line. The following window appears:
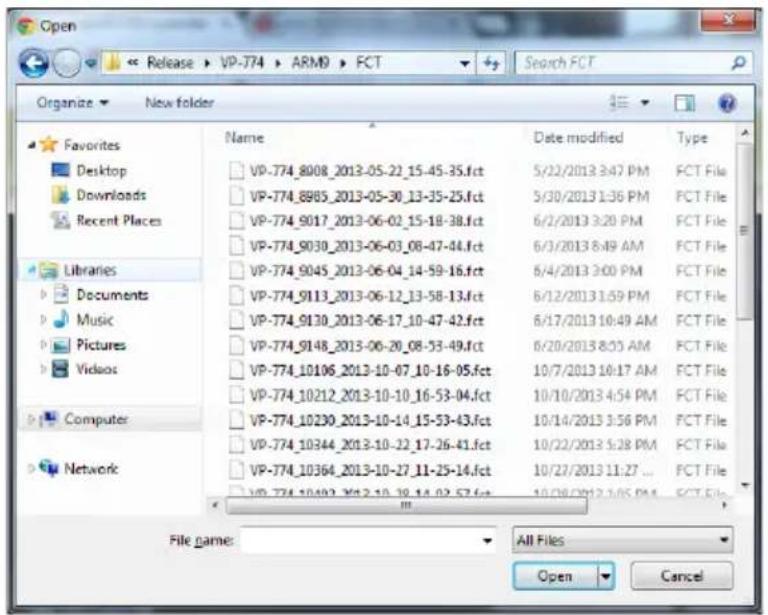
Figure 62: The Device Settings Page – Selecting the Firmware File
- Select the firmware file and click open. The file name appears in the Device Settings Web page:
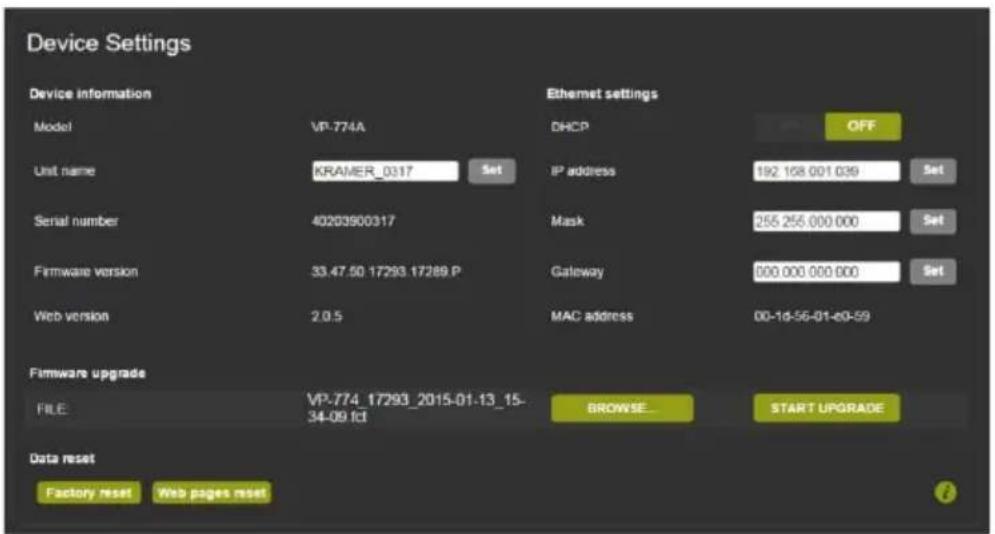
Figure 63: The Device Settings Page – Firmware File Downloaded
- Click the START UPGRADE button. The following warning appears:
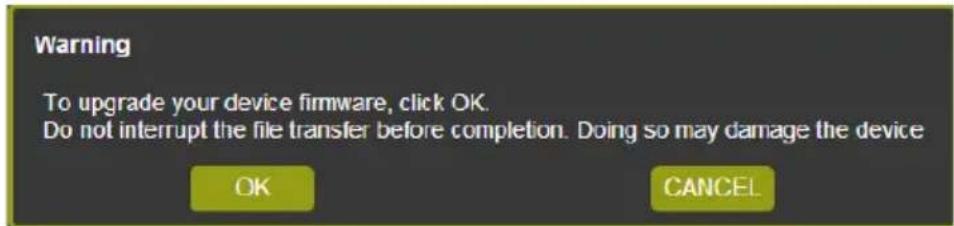
Figure 64: The Device Settings Page – Firmware Upgrade Warning
- Click OK. The lower part of the screen displays the status of each upgrade process stage. The flash memory is erased and then the file is uploaded:
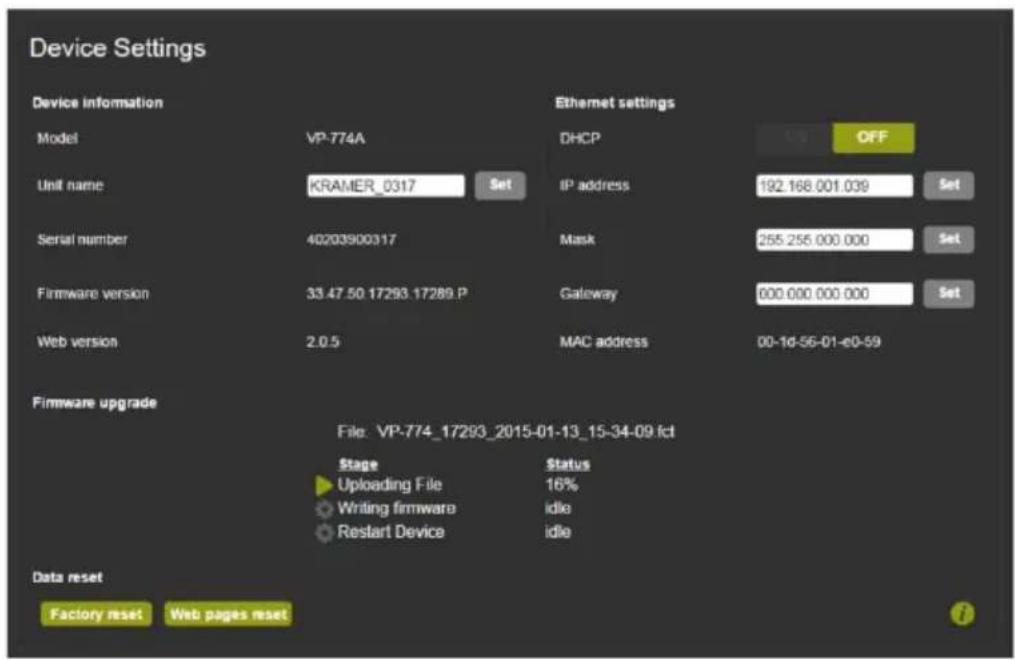
Figure 65: The Device Settings Page – Firmware Upgrade Stage
After the file is uploaded, the firmware is written (see Figure 66) and upon completion, the system automatically restarts (see Figure 67).
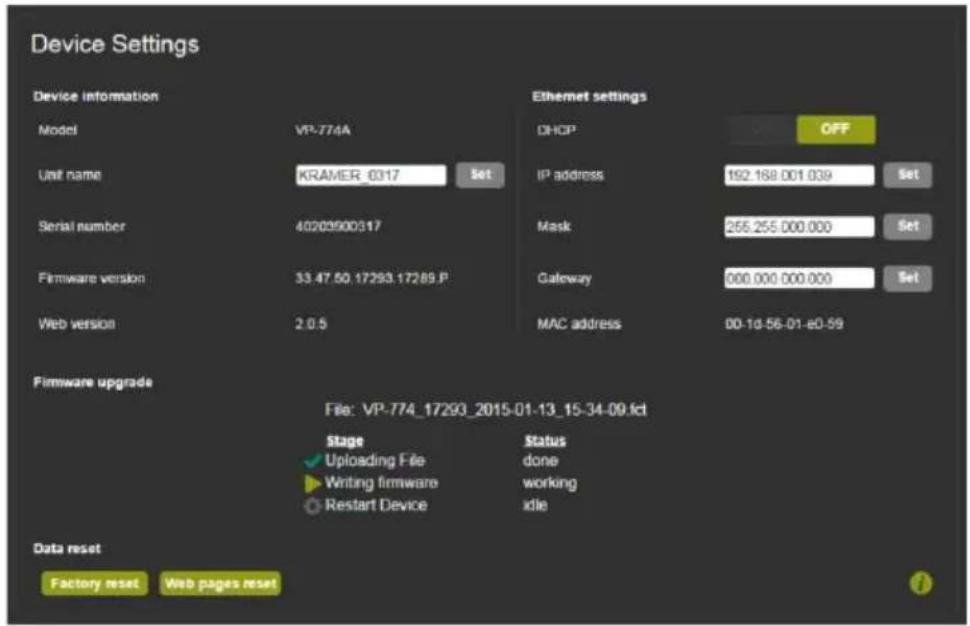
Figure 66: The Device Settings Page – Writing the Firmware
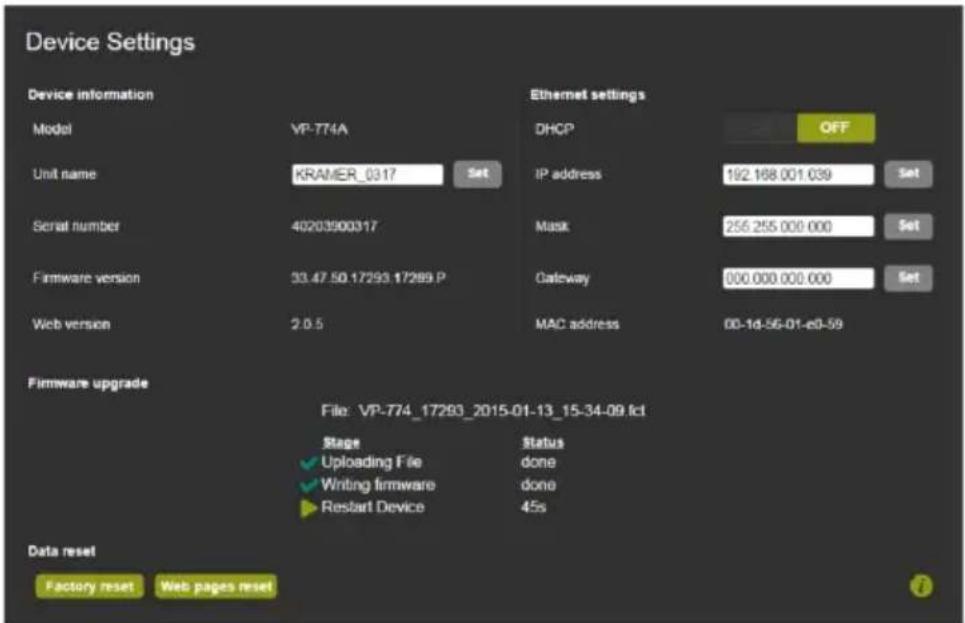
Figure 67: The Device Settings Page – Firmware Upgrade Waiting for Restart
Following reset, make sure that the updated firmware version appears in the Device Settings (Firmware version).
9.2.2 Factory Reset
You can reset the VP-774A parameters to their default state with or without the Ethernet parameters (see Section 9.2.2.1), as well as reset the Web pages only (see Section 9.2.2.2).
9.2.2.1 Device Reset
Click the Device reset button to reset the VP-774A to its default state. The following window appears:
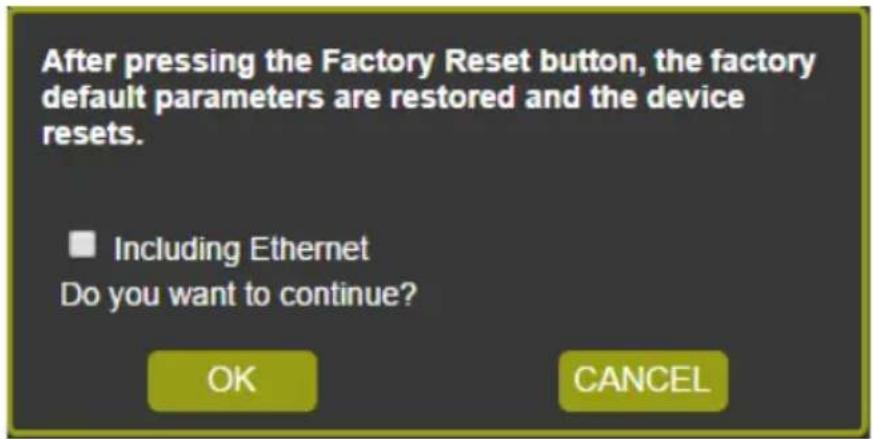
Figure 68: The Device Settings Page – The Reset Device Window
Check the box next to "Including Ethernet" to reset Ethernet parameters as well. You will be asked to reload the page with the default parameter.
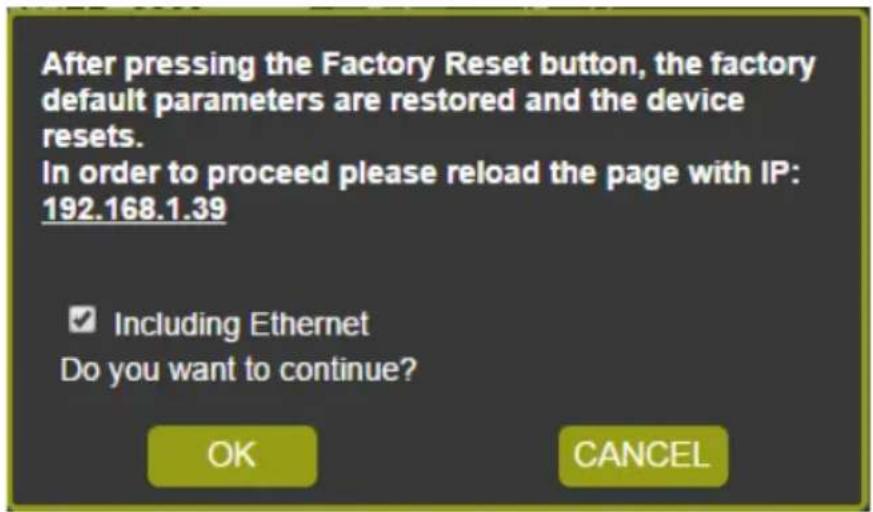
Figure 69: The Device Settings Page – The Reset Device Window Including Ethernet
Click OK. The following message appears:

You can also click the number in the message above to reload Web page.
9.2.2.2 Web Page Reset
To reset the Web page saved data (such as the label names, remote device commands, local messages and all other Web related changes that were made) click the Web-page reset button. The following window appears.
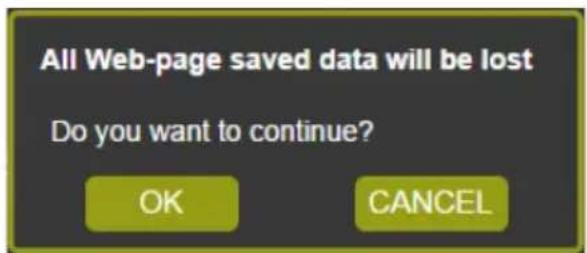
Figure 70: The Device Settings Page – Web Page Reset
Click OK if you want to continue.
The Web page resets and the following message appears:
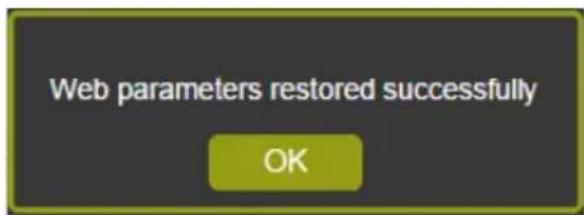
9.2.3 Information
To access the information window, click the icon on the lower right side of the page. You can click the icon to refresh the window.
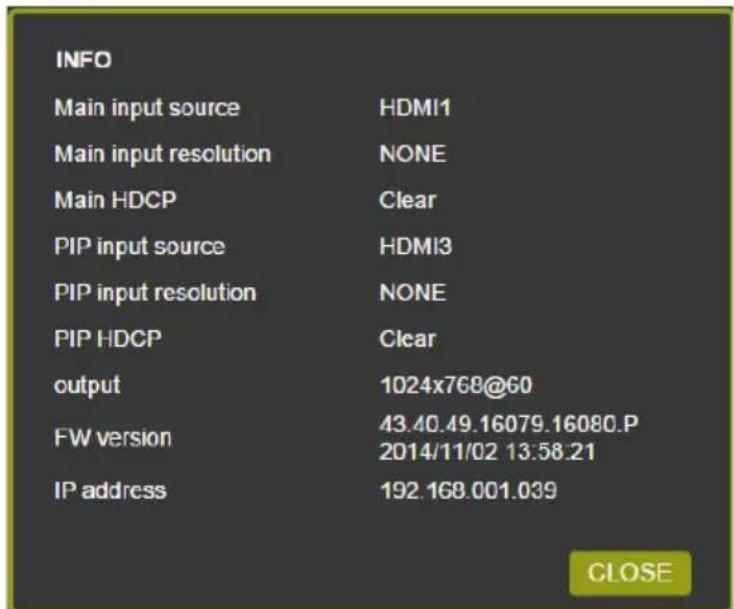
Figure 71: The Device Settings Page – The Information Window
9.3 The Input Settings Page
The Input Settings page (see Figure 72) lets you label the selected input on the main and PIP windows and define the input settings.
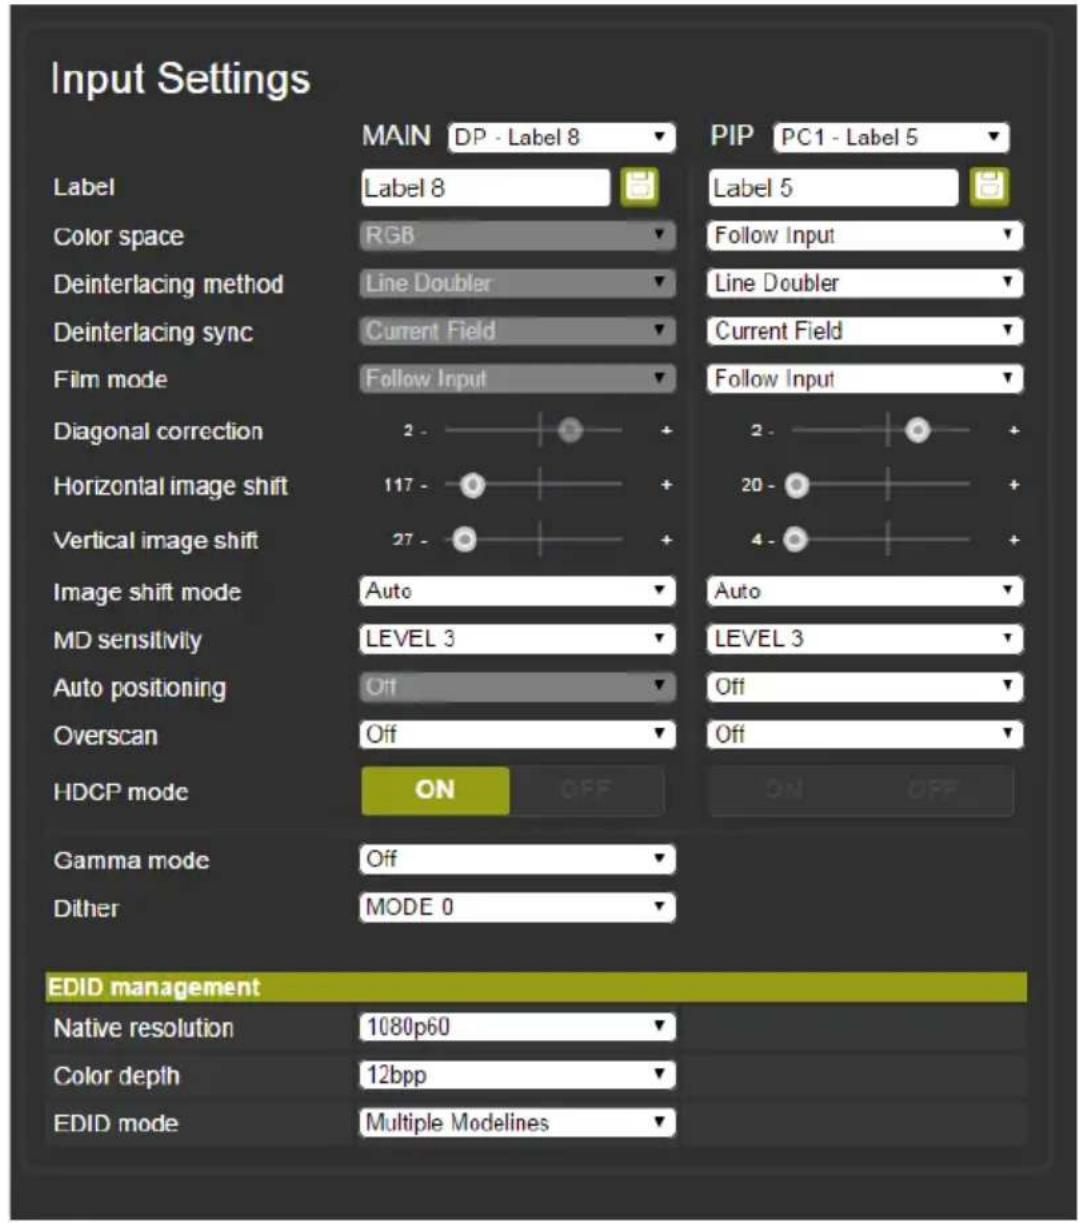
Figure 72: The Input Settings Page
Note that Color depth is available for HDMI and DP inputs only.
If the PIP window is not active, you can activate it by clicking the Activate PIP button (see Figure 73).
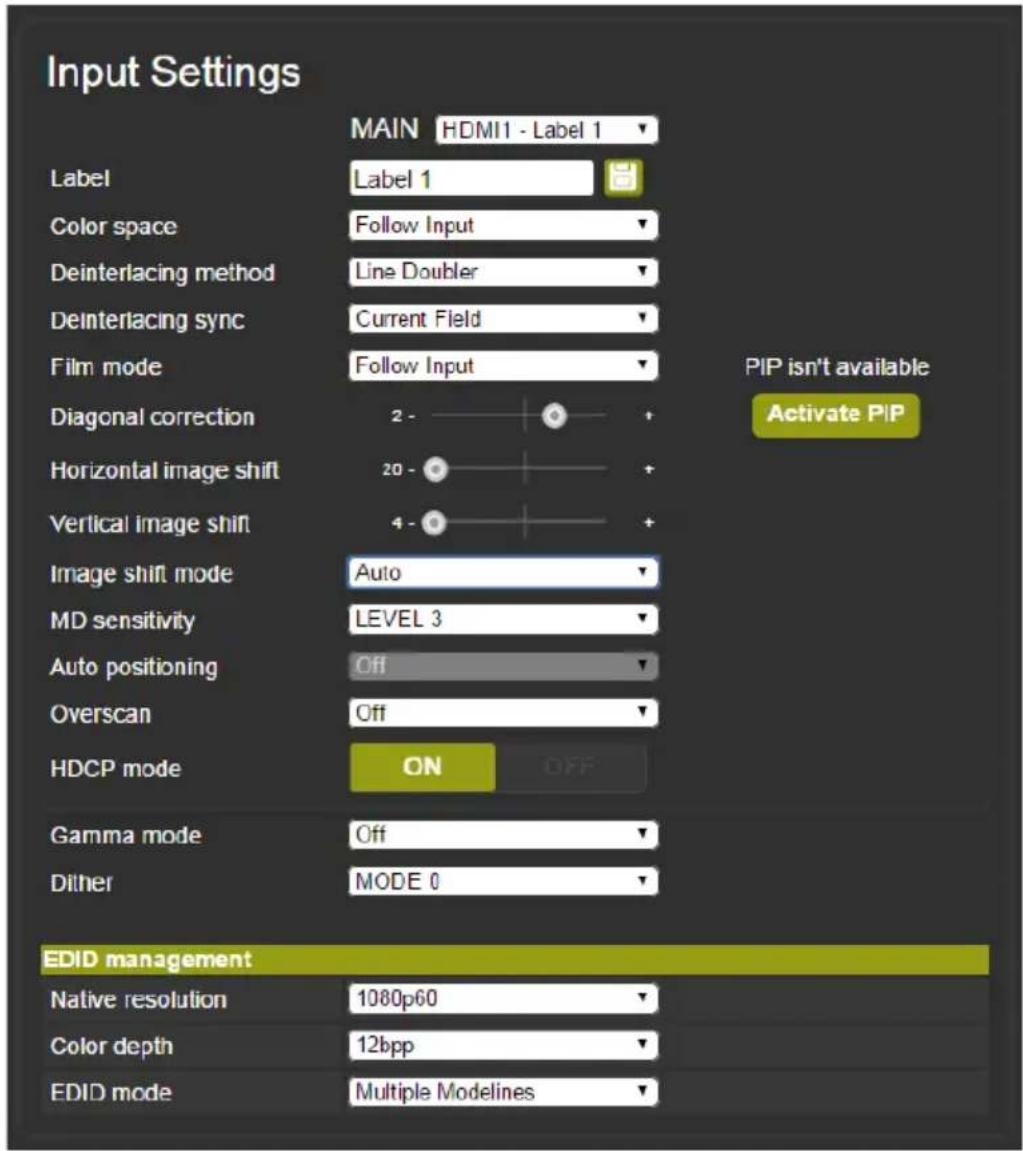
Figure 73: The Input Settings Page – PIP Window Inactive
The following table defines the Input Settings page items:
| Button | Function |
| Label | Label the input |
| Color space | Select the color space for the PC and HDMI inputs |
| Deinterlacing method | Set the deinterlacing method (see Section 6.4) |
| Deinterlacing sync | Set the deinterlacing sync (see Section 6.4) |
| Film mode | Set the film mode (see Section 6.4) |
| Diagonal correction | Set the level of diagonal interpolation (see Section 6.4) |
| Horizontal image shift | Set the horizontal position of the image within the window (see Section 6.2) |
| Vertical image shift | Set the horizontal position of the image within the window (see Section 6.2) |
| Image shift mode | Set the image shift mode within the window (see Section 6.2) |
| MD sensitivity | Set the MD sensitivity (see Section 6.4) |
| Auto positioning | See Section 6.2 |
| HDCP mode | Select the HDCP option for each HDMI input (see Section 6.2) |
| Gamma mode | Set the gamma correction factor (see Section 6.5) |
| Dither | Set the error diffusion (see Section 6.5) |
| EDID management Set | the native resolution for each input and then select the color depth (see EDID Select in Section 6.2)Select the EDID mode:Native as Multiple Modelines – generating a group of resolutions in the detailed timing, including the native resolution), orNative as Single Modeline – generating only the native resolution in the detailed timing |
Note that if auto switching is enabled, the Input Setting Web page is disabled and the following message is displayed:
Auto switching scan is in progress...
9.4 The Enhance Page
The Enhance page lets you improve the appearance of the image:
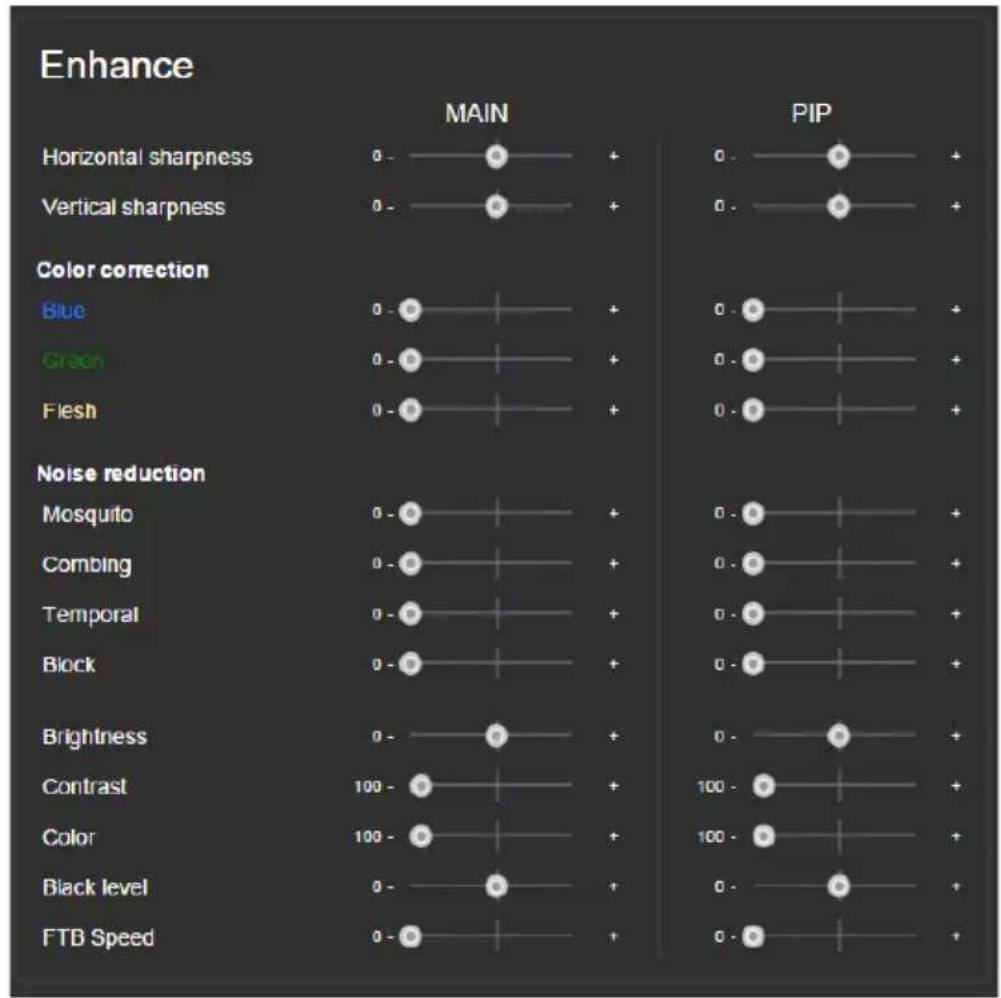
bar_line
| Effect | MAIN | PIP | | --- | --- | --- | | Horizontal sharpness | 0 - | 0 - | | Vertical sharpness | 0 - | 0 - | | Color correction | 0 - | 0 - | | Blue | 0 - | 0 - | | Green | 0 - | 0 - | | Flesh | 0 - | 0 - | | Noise reduction | 0 - | 0 - | | Mosquito | 0 - | 0 - | | Combing | 0 - | 0 - | | Temporal | 0 - | 0 - | | Block | 0 - | 0 - | | Brightness | 0 - | 0 - | | Contrast | 100 - | 100 - | | Color | 100 - | 100 - | | Black level | 0 - | 0 - | | FTB Speed | 0 - | 0 - |Figure 74: The Enhance Page
The following table defines the Enhance page items:
| Button Function | ||||
| Horizontal sharpness | Select the horizontal sharpness level (see Section 6.6) | |||
| Vertical sharpness | Select the vertical sharpness level (see Section 6.6) | |||
| Color correction | Set the blue, green and flesh color levels (see Section 6.5) | |||
| Noise reduction | Set the input noise reduction levels (see Section 6.6) | |||
| Brightness | Set the brightness level (see Section 6.5) | |||
| Contrast | Set the contrast level (see Section 6.5) | |||
| Color | Set the color level (see Section 6.5) | |||
| Black level | Set the black level (see Section 6.5) | |||
| FTB Speed | Set the FTBTM (fade-thru-black) speed:Set from 0 (fastest) to 7 (slowest). Default speed is 1 | |||
| FTB ProtocolCommand | Feature | Function | Range | Note |
| FTB Speed | 4901 | 0:7 | See definition above | |
9.5 The Output Settings
The Output Settings page lets you define the output parameters:
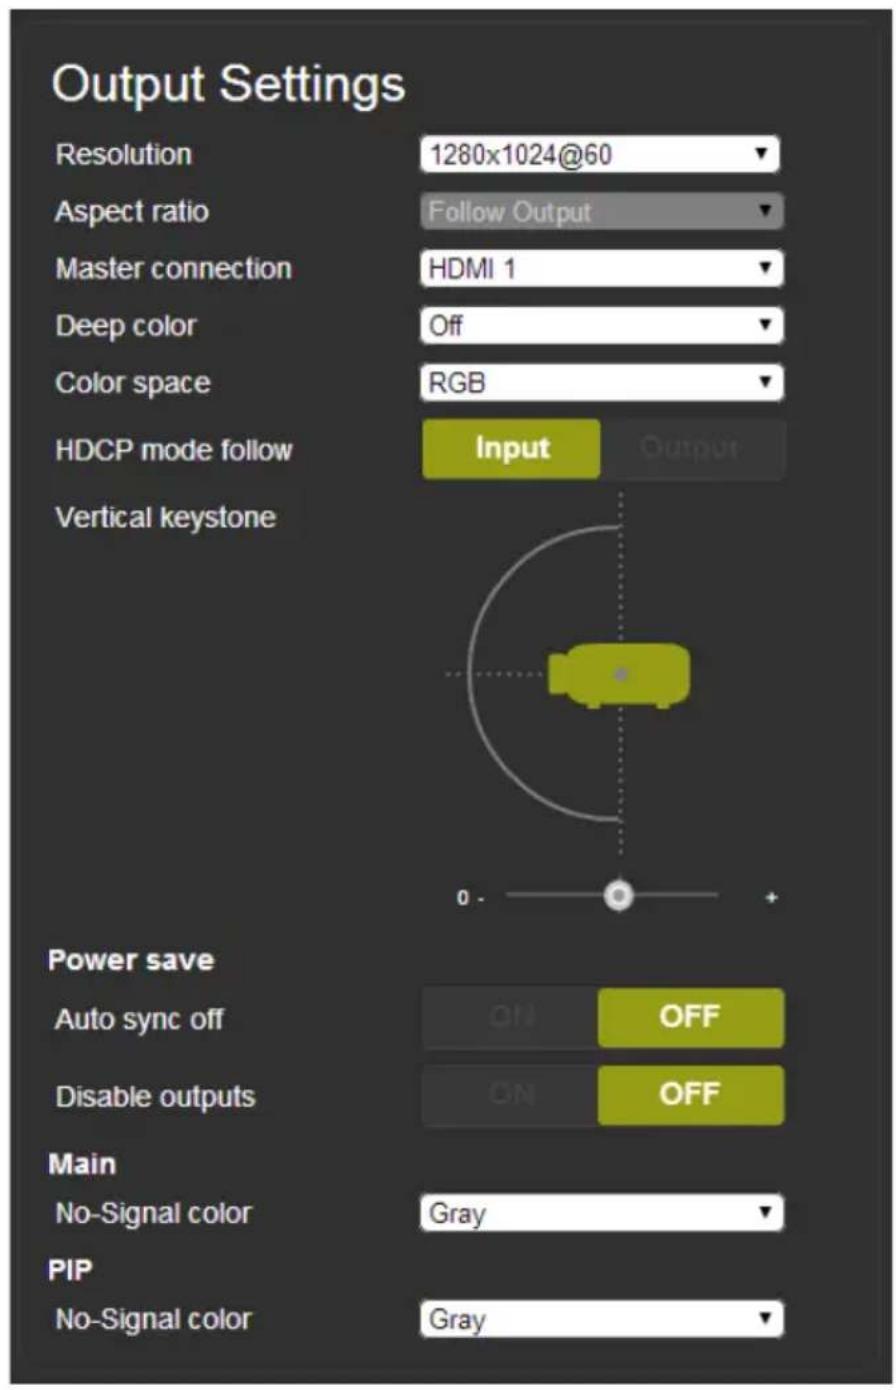
Figure 75: The Output Settings Page
Set the output resolution, the aspect ratio, the master connection, deep color and HDCP mode (see Section 6.7), as well as the vertical keystone, power-save settings and the color of the window if there is no signal on the input (see Section 6.8).
9.6 The Audio Settings Page
The audio settings page includes two tabs: the General tab (see Section 9.6.1) and the Microphone tab (see Section 9.6.2). The features described in both tabs are detailed in Section 6.3.
9.6.1 The General Tab
The General tab (see Figure 76) lets you set the general audio parameters for the selected main window input and the outputs.
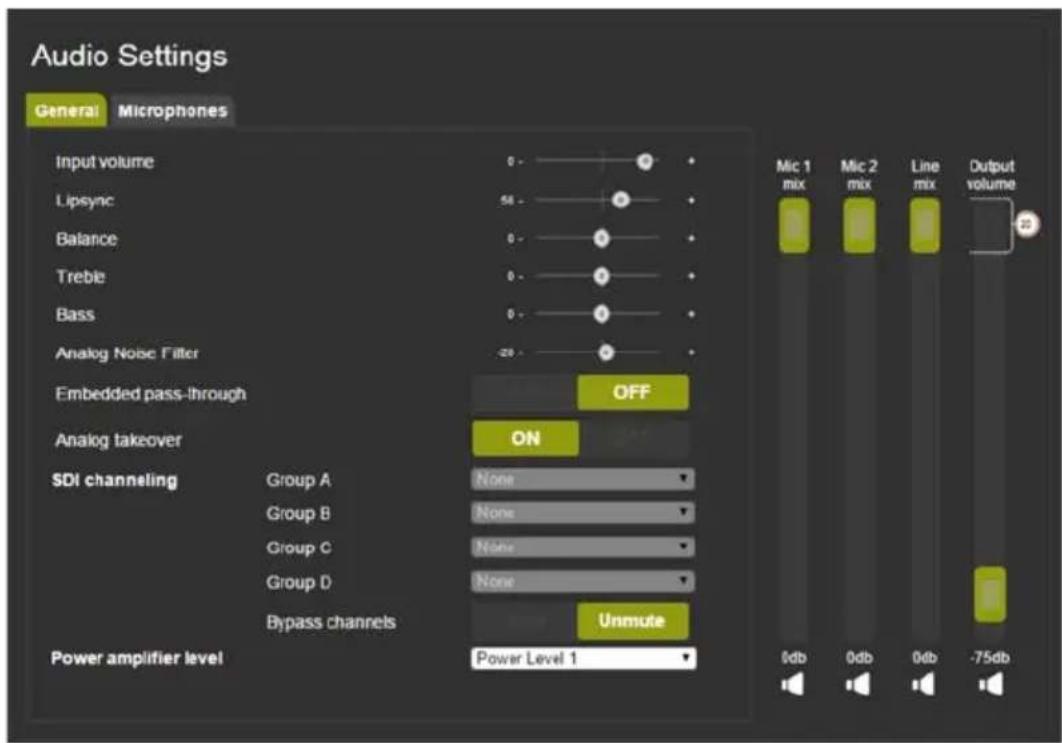
Figure 76: The Audio Settings Page – General Tab
Use the General tab to:
- Set the DSP audio parameters
- Select bypassing of the embedded audio input directly to the output
- Choose whether the analog input takes over the embedded inputs
- Set SDI channeling (see Section 6.3.1) and set the bypassed channels to Mute or Unmute
- Select the power amplifier level from 1 to 4.
Note that if the Embedded pass-through is set to ON, Analog takeover, as well as Mic 1, Mic 2 and Line mix, and the output volume are disabled.
9.6.2 The Microphones Tab
The Microphones tab (see Figure 77) lets you setup the microphone parameters.
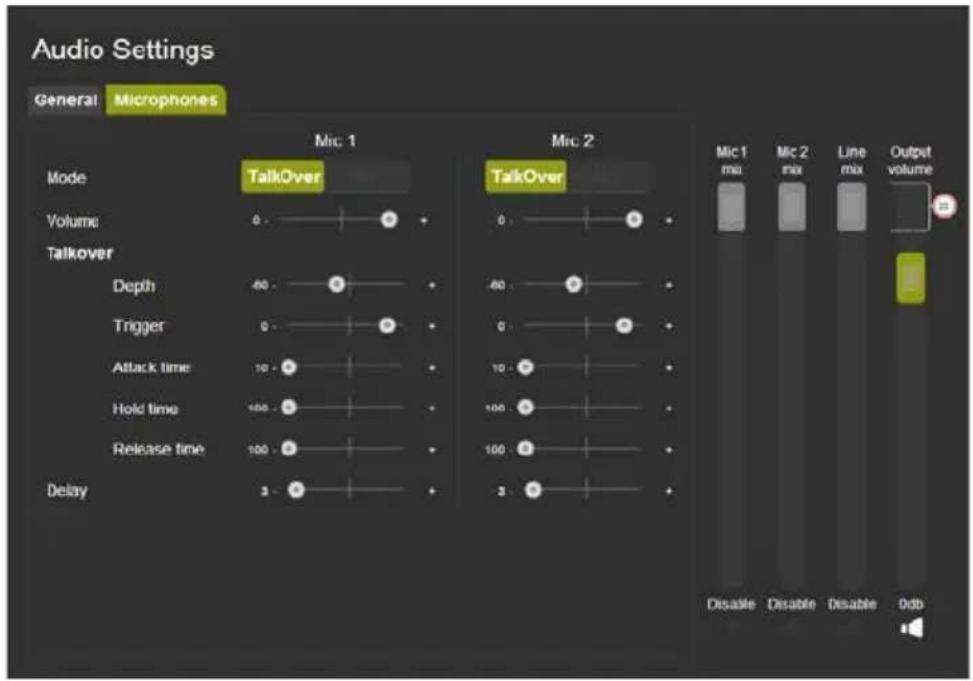
Figure 77: The Audio Settings Page – Microphones Tab
Set the microphone operation mode to Talkover or Mix. If Talkover is selected for both microphones, the Mic 1/Mic 2 sliders are disabled:
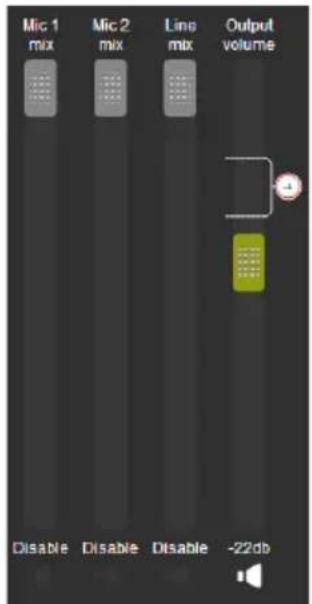
Figure 78: The Audio Settings Page – Microphones Tab
If, for example, Mic 2 is set to Mix, the Mic 2 slider is enabled and you can set the mix level:
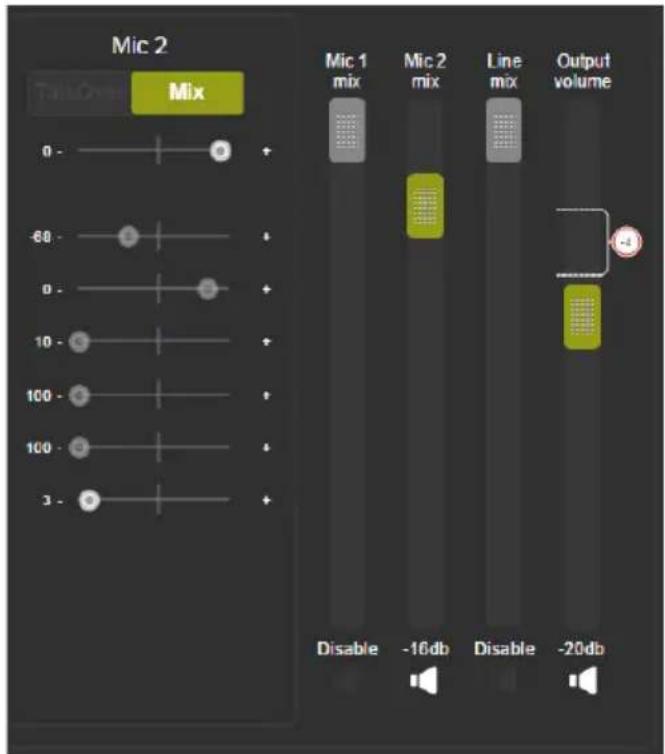
Figure 79: The Audio Settings Page – Setting the Mix Level
You can set the maximum value of the Output Volume by using the pre-limiter on the Output Volume slider. Slide the pre-limiter up or down to determine the maximum allowed volume. The value below shows the maximum allowed value selected:
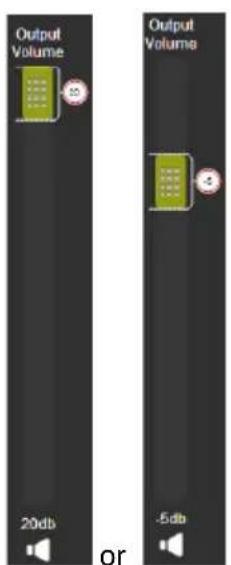
Figure 80: The Audio Settings Page – Output Volume Pre-limiter
In the Talkover mode you can set the:
- Depth to determine the decrease of the audio level during microphone takeover
- Trigger to determine the microphone 1 threshold level that triggers the audio level decrease
- Attack time to set the transition time of the audio level reduction after the signal rises above the threshold level
- Hold time to define the time period talkover remains active although the signal falls below the threshold level (for a short period of time)
- Release time to define the transition time for the audio level to return from its reduced level to its normal level after the Hold Time period
9.6.3 Special Audio Settings Protocol Commands
Several actions that appear only in the Web page can be carried out via RS-232 protocol commands (see Section 13.1). These commands are specified in the following table:
| Feature | Function | Range | Note |
| VOLUME DELIMITER | 2121 | -80:20 | dB |
| MIC1 ATTACK TIME | 2531 | 10:1000 | milliseconds |
| MIC1 HOLD TIME | 2532 | 100:10000 | milliseconds |
| MIC1 RELEASE TIME | 2533 | 100:10000 | milliseconds |
| LINE MIX MUTE | 2541 | 0:1 | OFF/ON |
| MIC2 ATTACK TIME | 2542 | 10:1000 | milliseconds |
| MIC2 HOLD TIME | 5243 | 100:10000 | milliseconds |
| MIC2 RELEASE TIME | 2544 | 100:10000 | milliseconds |
| ANALOG NOISE FILTER | 2802 | -60:0 | dB |
| MIC1 MUTE | 7451 | 0:1 | |
| MIC2 MUTE | 7461 | 0:1 |
9.7 The RS-232 over TP Page
The RS-232 over TP page lets you configure the tunneling port and send various messages through this port (see Section 10).
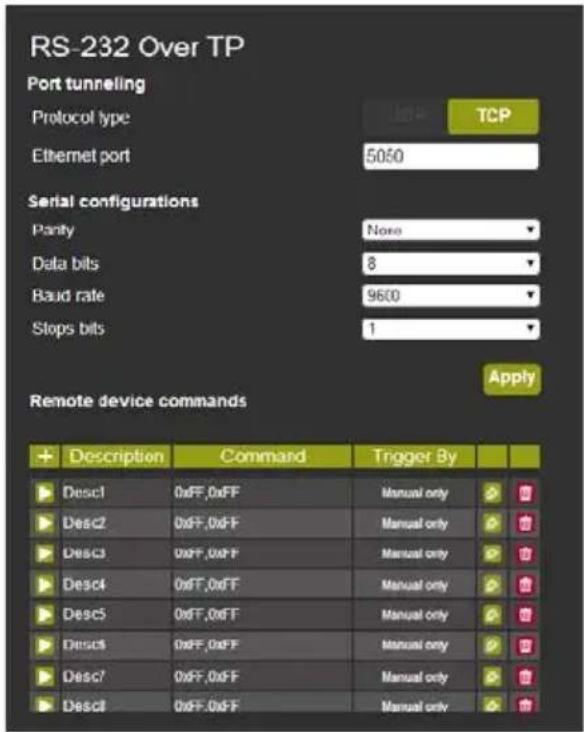
Figure 81: The RS-232 over TP Page
Set the port tunneling protocol type and Ethernet port as well as the parity, Data bits, baud rate and stop bits.
The table in the lower part of this window shows the list of commands:
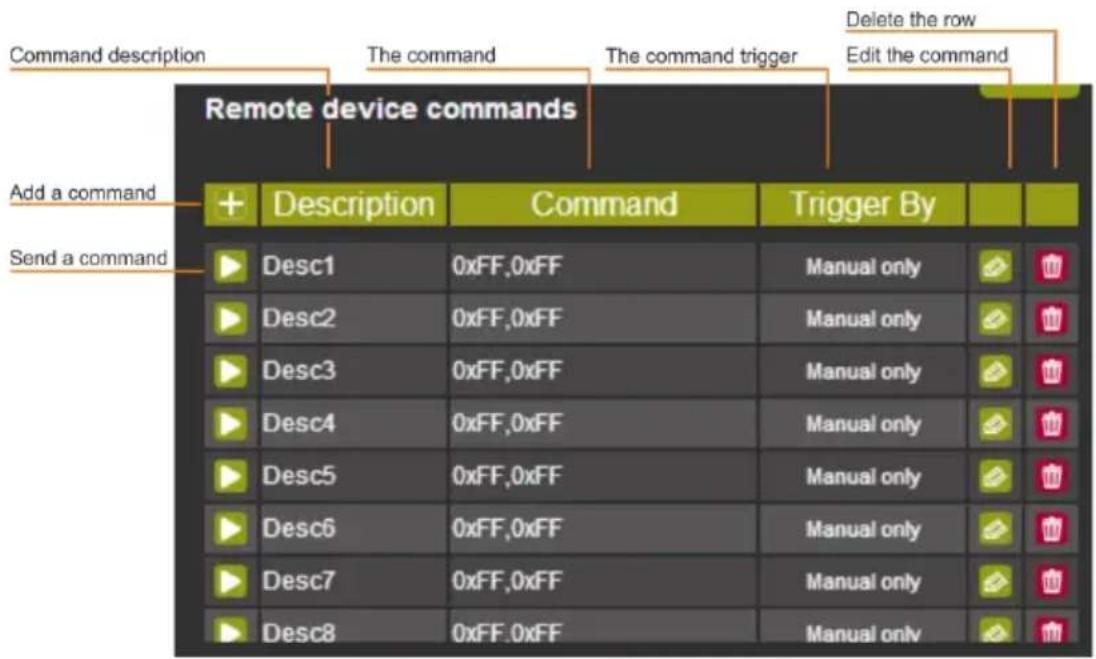
Figure 82: The RS-232 over TP Page – the Remote Device Commands Table
To write or edit a command click the edit icon. The following window appears:
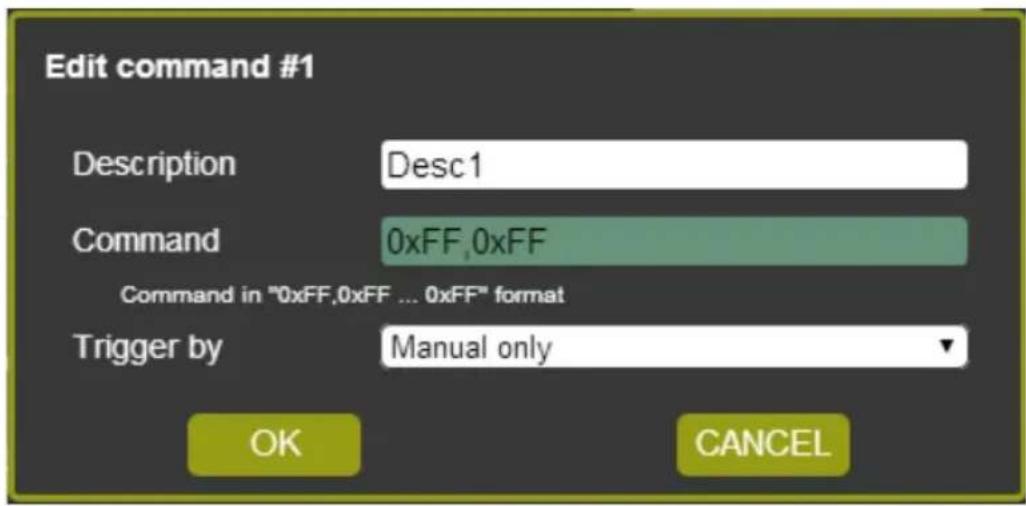
Figure 83: The RS-232 over TP Page – the Edit Command Window
Fill in the details. For example, to power on a projector, fill in the details and select the trigger and the trigger delay time in seconds before the command is carried out (note that for Manual only, the trigger delay time is disabled):
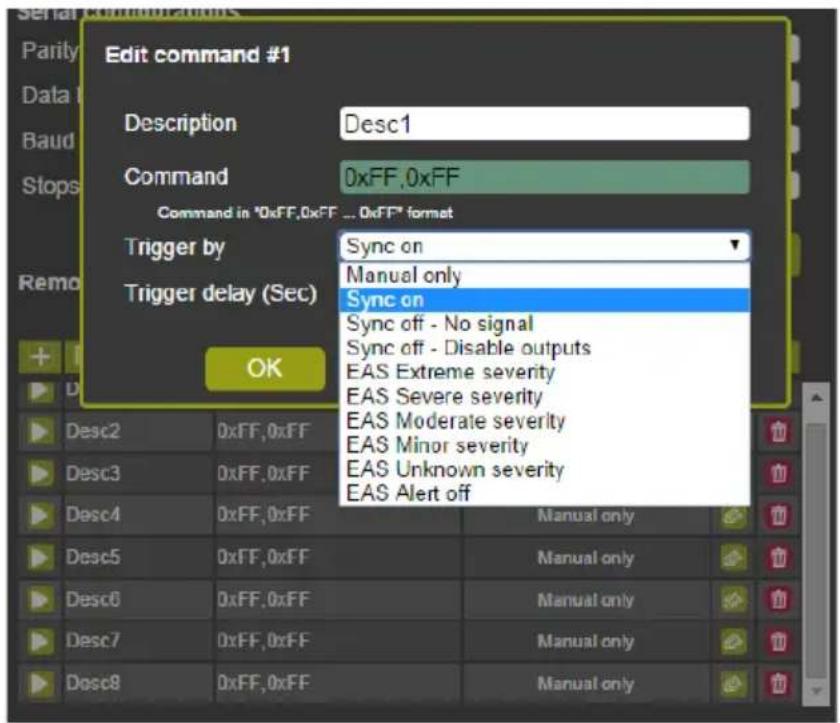
Figure 84: The RS-232 over TP Page – Setting the Trigger
In this example, Sync on triggers the power on command and the delay is set to 30 seconds.
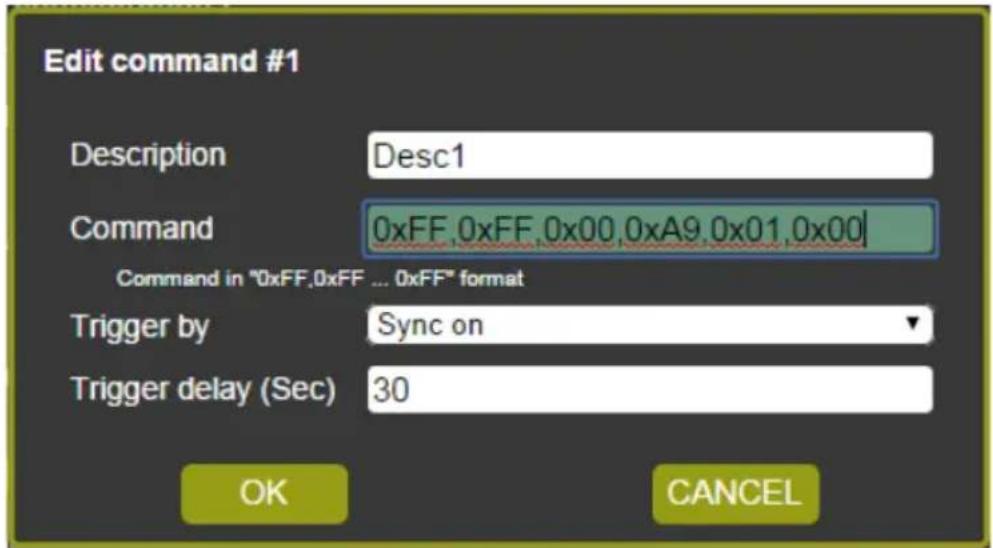
Figure 85: The RS-232 over TP Page – Setting the Sync on Trigger
Click OK to save the command to the list:
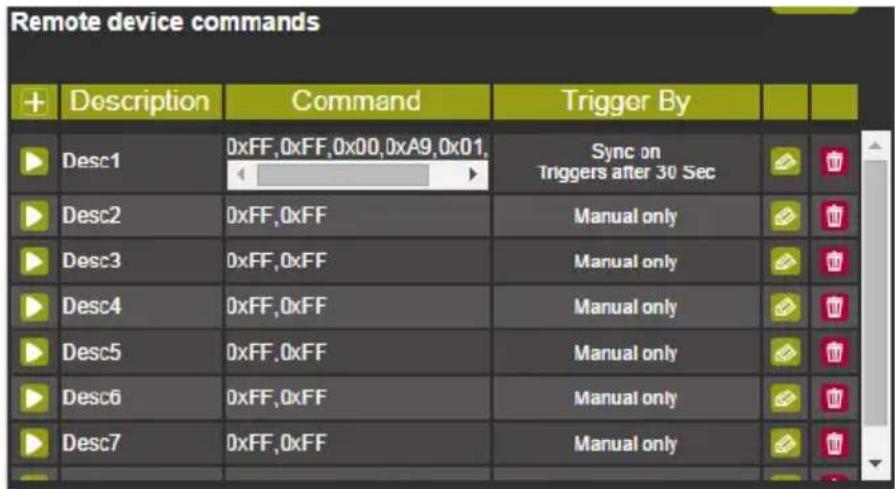
Figure 86: The RS-232 over TP Page – the Power on Command
The system will send a Power on command to the projector connected to the output whenever a signal is detected.
Note that in the manual mode, click the Send Command icon ( ) to send the command.
9.8 The Emergency Alert System Page
The emergency Alert System lets you setup the emergency system on your VP-774A (for further details, see Section 6.8.2).
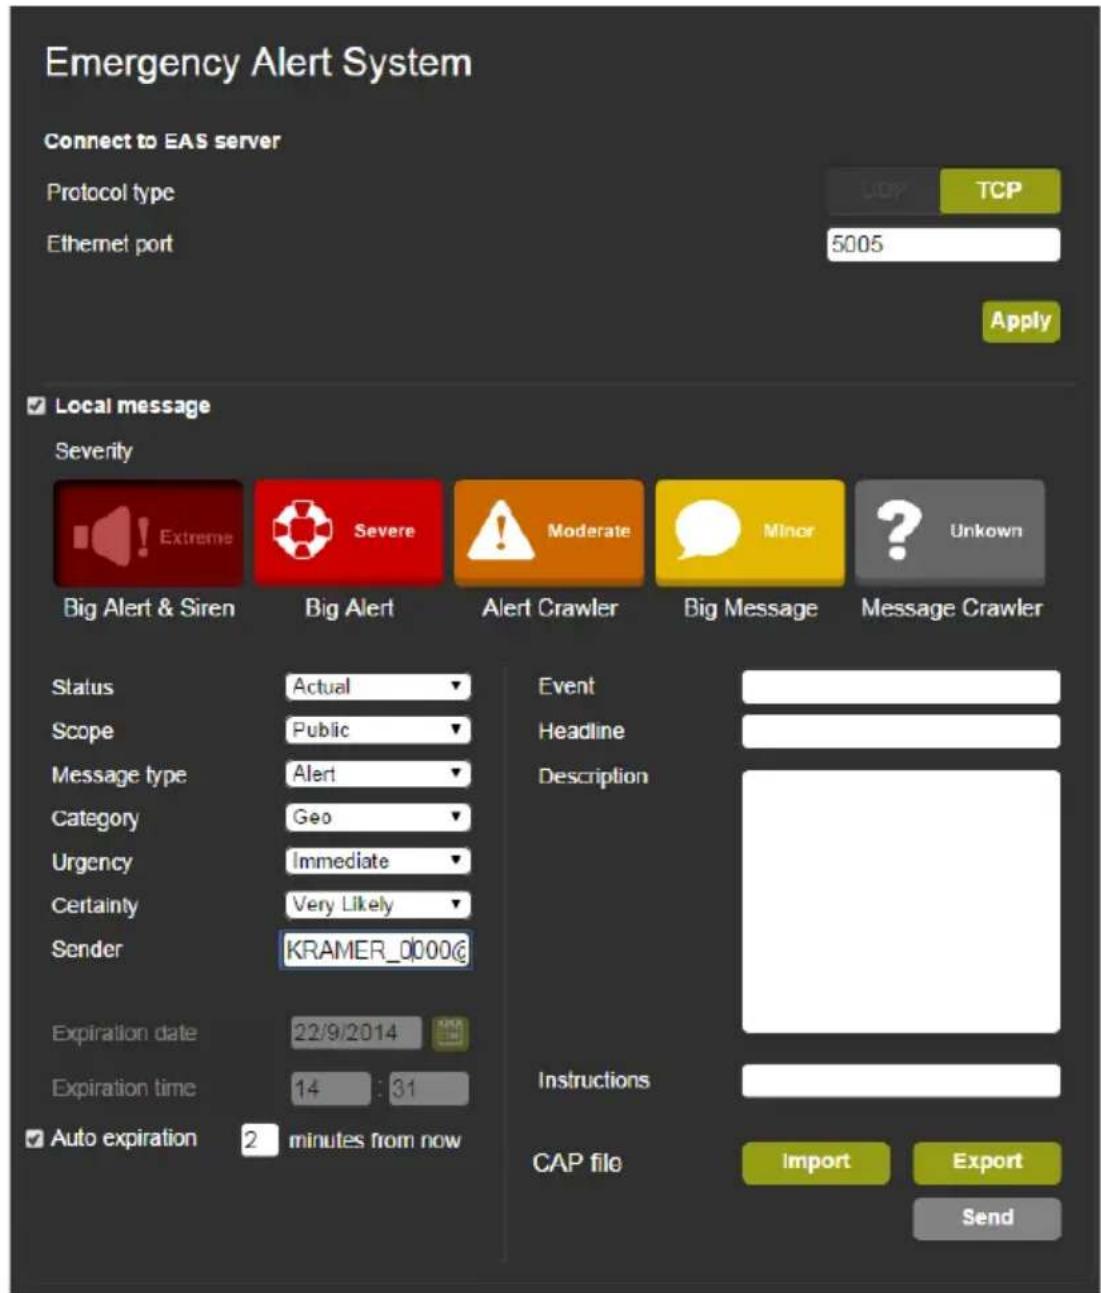
Figure 87: The Emergency Alert System Page
The top part lets you set the means to connect to the EAS server (UDP or TCP) and set the Ethernet port. Click Apply to apply changes.
Check the box next to Local message to create a local message that will be seen on the display. To create the local message, fill in the following details:
| Item Function | |
| Severity | Click on an icon to set the severity level to Extreme (a big alert and a siren), Severe (a big alert) or Moderate (an alert crawler) alert layouts as well as Minor (a big message) or Unknown (a message crawler) message layouts |
| Status | Set the status to Actual, Exercise, System or Test |
| Scope | Set the scope to Public, Restricted or Private |
| Message type | Set the message type to Alert, Update, Cancel, Acknowledgement or Error |
| Category | Set the category to Geophysical (for example landslide), Meteorological (for example, a flood), Safety, Security, Rescue, Fire, Health, Environmental (for example, pollution) Transport, Infra (for example, telecommunication), Other |
| Urgency | Set the urgency level to Immediate, Expected, Future, Past or Unknown |
| Certainty | Set the certainty to Very Likely, Likely, Possible, Unlikely or Unknown |
| Sender | Type in the details of the alarm sender (for example an email, the name of the institute and so on) |
| Expiration date | Set the expiration date |
| Expiration time | Set the expiration time |
| Auto Expiration | Set the alarm to expire after a defined time period (disables expiration date and time) |
| Import | Click the Import button to load a CAP file (Common Alerting Protocol); select the file and click open – the alert will appear in the message text boxes |
| Export | Export the local alert to the Downloads folder |
| Send | Send the alert to the device |
In the example shown in Figure 88, an extreme weather condition alarm is created. You can save the alarm, and/or send it immediately:
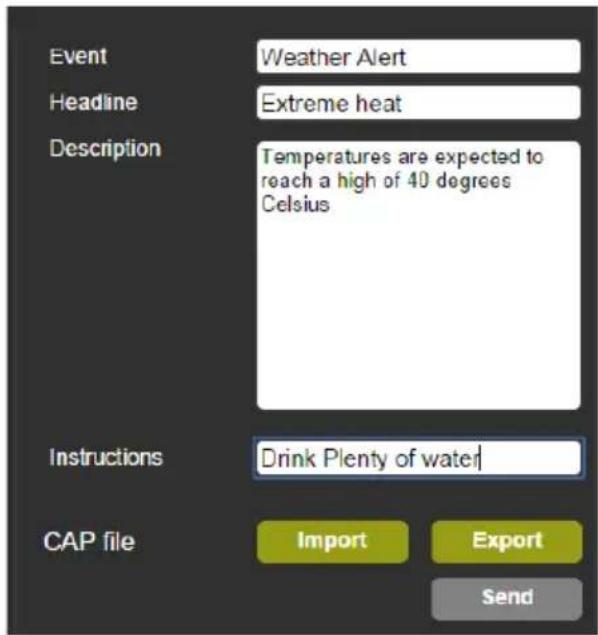
Figure 88: The Emergency Alert System Page – Local Message Example
9.9 The Security Page
The Security page defines two security levels:
- No username or password required
- Access to all settings requires a valid username and password
When security is activated, you can change the password
By default, the Security page is deactivated and there is no need to enter a username and password to access the Web pages:
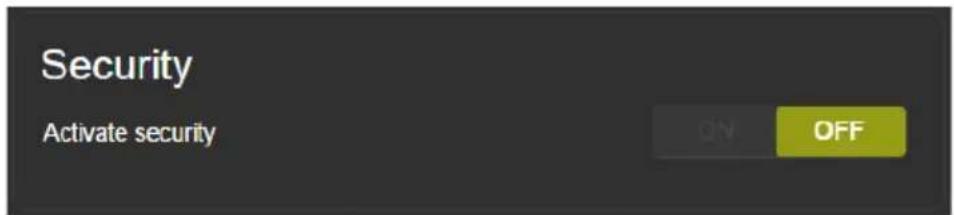
Figure 89: The Security Page – Security Deactivated
To activate security, press the ON button:
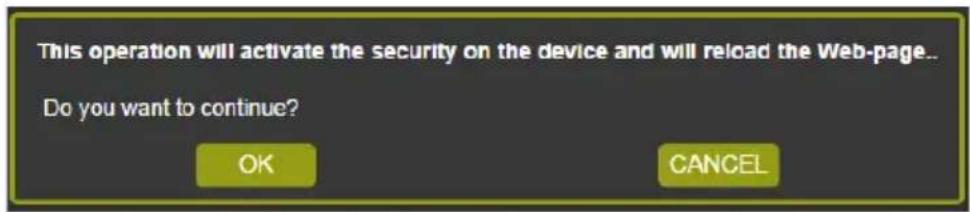
Figure 90: The Security Page – Activating the Security
Click OK.
The Web Page reloads and the following message appears for you to fill in:
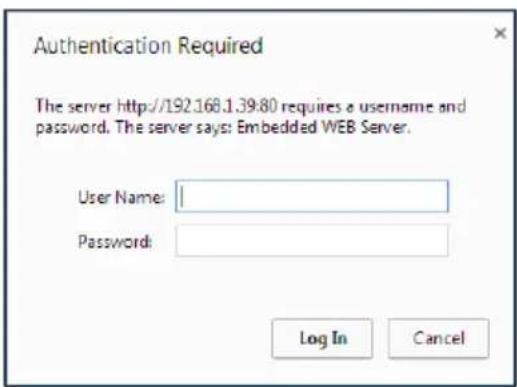
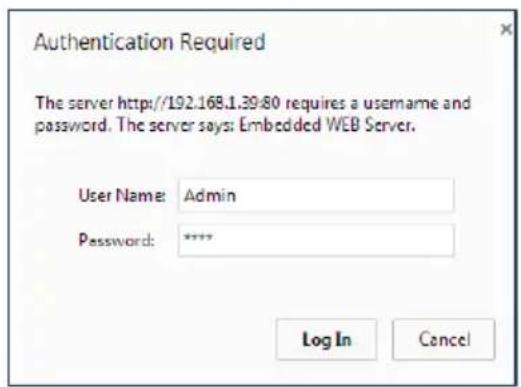
Figure 91: The Security Page – Authentication Required
The Security page (now activated) lets you change the user name and password:
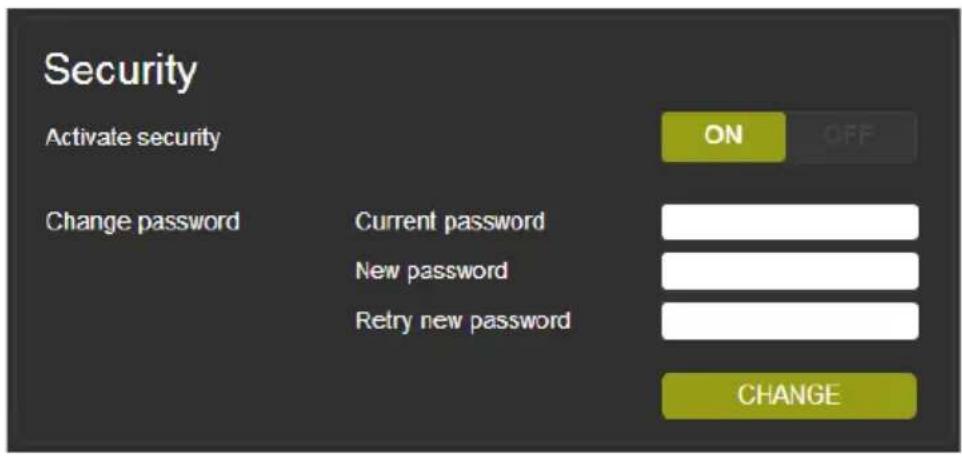
Figure 92: The Security Page
9.10 The About Us Page
The VP-774A About Us page lets you view the Web page version and Kramer Electronics Ltd details.
Figure 93: The About Us Page
9.11 Save or Upload a Configuration
The VP-774A Web page lets you upload a saved configuration or save a configuration. To do so, click the Upload (see Figure 94) and Save (see Figure 95) buttons, respectively, which are located at the lower part of the menu list.

Note that the configuration is automatically saved to the Downloads folder and uploaded from it as well
When saving a configuration, the file automatically saves it to the Downloads
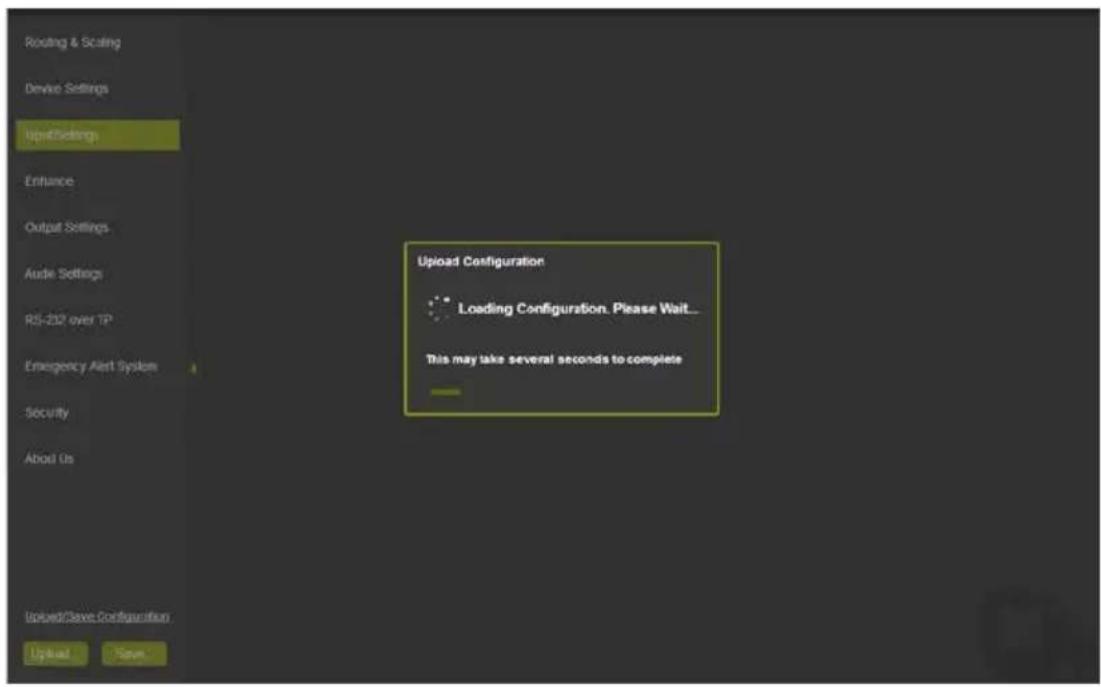
Figure 94: Loading a Configuration
Figure 95: Saving a Configuration
10 Port Tunneling
The port tunneling feature lets you send and receive simple RS-232 signals between a controller and a serial device via the VP-774A which is connected to the Ethernet and outputs via TP cable.
The example, illustrated in Figure 96, shows a Kramer room controller that is connected to the VP-774A via the Ethernet. The HDBT OUT connector on the VP-774A is connected via TP to an HDBT receiver. This HDBT receiver connects to a display via HDMI and RS-232.
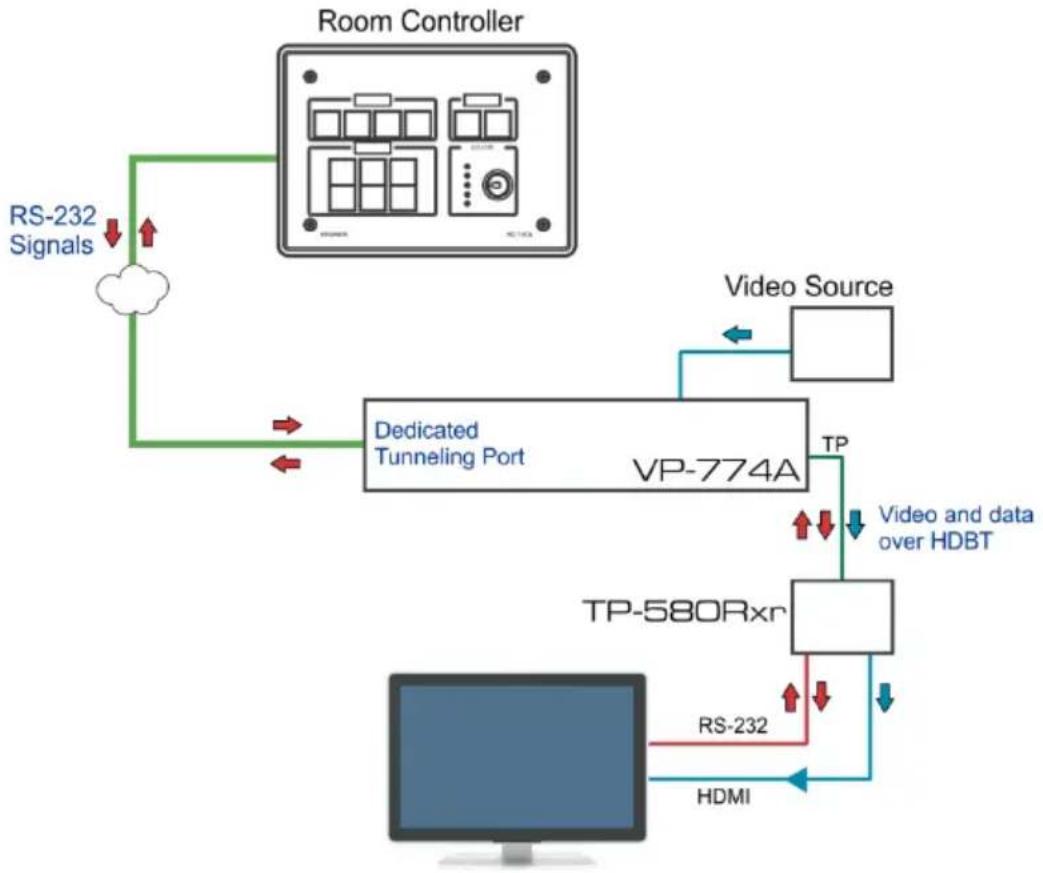
flowchart
graph TD
    A["Room Controller"] -->|RS-232 Signals| B["Cloud"]
    B --> C["Dedicated Tunneling Port"]
    C --> D["VP-774A"]
    D --> E["Video Source"]
    E --> F["TP"]
    F --> G["Video and data over HDBT"]
    D --> H["TP-580Rxr"]
    H --> I["RS-232"]
    I --> J["HDMI"]
    J --> K["Computer"]
Figure 96: Port Tunneling
The room controller sends RS-232 signals over the Ethernet via a dedicated Tunneling port to the VP-774A. The VP-774A sends these signals via TP to a display that is connected to the receiver. This way, control data can flow between the room controller and the display device, tunneling through the VP-774A.
To setup and activate port tunneling on the VP-774A:
- Set the dedicated port tunneling Ethernet connection port type and port number through which the VP-774A will be passing RS-232 signals. By default, the dedicated port settings are TCP, 5050.
To change these settings see the “Port Tunneling Configuration” in the table in Section 13.4 or via the embedded Web pages (see Section 9.6.3). - Set the HDBT UART command (the table in Section 13.4). By default, the settings are 9600,8,N,1
- Make sure that the VP-774A is connected to Ethernet.
The VP-774A is now ready to tunnel RS-232 signals via Ethernet port tunneling.
11 Flash Memory Upgrade
You can upgrade the VP-774A via the Kramer K-UPLOAD software. Two types of upgrade files are available for upgrade: video core and audio/graphics (*.fct) and peripherals (*.kfw).
Note that when uploading files via K-UPLOAD, you must close the embedded Web pages.

The latest firmware version, the Flash Memory Upgrade user guide, as well as the latest version of K-UPLOAD and installation instructions can be downloaded from the Kramer Web site at www.kramerav.com/downloads/
Note that if the Protocol is set to Legacy (via the Miscellaneous menu, see Section 6.8), the Web pages may not function properly.
12 Technical Specifications
| INPUTS: | 4 HDMI (deep color) connectors2 VGA on 15-pin HD connectors1 composite video on an RCA connector1 DisplayPort connector1 SDI (looping) on BNC connectors4 HDMI, 2 VGA, 1 DP, 1 CV unbalanced stereo audio on left and right RCA connectors2 Mic unbalanced and high impedance on 6mm jack connectors (with selectable 48V phantom power) |
| OUTPUTS: | 1 SDI on a BNC connector2 HDMI (deep color) connectors1 HDBaseT on an RJ-45 connector1 S/PDIF digital audio on an RCA connector1 balanced stereo audio on a 5-pin terminal block connector1 stereo speaker output, 2x10W into 8 Ω, on a 4-pin terminal block connector |
| COMPLIANCE WITH HDMI STANDARD: | Supports HDMI (deep color) and HDCPSupports: DisplayPort 1.1a |
| OUTPUT RESOLUTIONS: | 640x480@60, 640x480@75, 800x600@50, 800x600@60, 800x600@75, 1024x768@50, 1024x768@60, 1024x768@75, 1280x768@50, 1280x768@60, 1280x800@60, 1280x1024@50, 1280x1024@60, 1280x1024@75, 1360x768@60, 1366x768@50, 1366x768@60, 1400x1050@50, 1400x1050@60, 1600x900@60, 1600x1200@50, 1600x1200@60, 1680x1050@60, 1920x1200@60, 480i60, 480p60, 576i50, 576p50, 720p50, 720p59.94, 720p60, 1080p23.976, 1080p24, 1080p25, 1080p29.97, 1080p30, 1080p50, 1080p59.94, 1080p60, 2048x1080@60Hz, 2048x1080@50Hz |
| CONTROLS: | Front panel buttons, OSD, IR remote control, RS-232 on a 9-pin D-sub connector, Ethernet |
| OPERATING TEMPERATURE: | 0° to +40°C (32° to 104°F) |
| STORAGE TEMPERATURE: | -40° to +70°C (-40° to 158°F) |
| HUMIDITY: | 10% to 90%, RHL non-condensing |
| POWER CONSUMPTION: | 100-240V AC, 70VA max. |
| DIMENSIONS: | 19" (W), 9.3" (D) 1U (H) rack mountable |
| WEIGHT: | 2.5kg (5.5lbs) approx. |
| INCLUDED ACCESSORIES: | Power cord, rack "ears", IR remote control |
| OPTIONS: | Kramer BC-UNIKat cable |
| Specifications are subject to change without noticeFor the most updated resolution list, go to our Web site at www.kramerav.com | |
12.1 Default Communication Parameters
| RS-232 | ||
| Protocol | 3000 (Default) | Legacy |
| Baud Rate: | 115,200 | 9,600 |
| Data Bits: 8 8 | ||
| Stop Bits: 1 1 | ||
| Parity: None None | ||
| Command Format: ASCII ASCII | ||
| Example (Set display mode to Picture in Picture): | #Y 0,110,1> | >Y 0 110 1> |
| Ethernet | ||
| To reset the IP settings to the factory reset values, power cycle the device while holding in the Ethernet Reset button, located on the rear panel of the unit | ||
| IP Address: | 192.168.1.39 | |
| Subnet mask: | 255.255.000.000 | |
| Default gateway: | 000.000.000.000 | |
| TCP Port #: | 5000 | |
| UDP Port #: | 50000 | |
| Maximum UDP Ports: | 10 | |
| Maximum TCP Ports: | 4 | |
| Web page password | 1234 | |
| Full Factory Reset | ||
| Front panel buttons | Turn power off. Turn power on again while holding the RESET TO XGA/720p front panel button. The LEDs blink. Full factory reset is complete once the LEDs cease to blink and react normally. Note that full factory reset includes Ethernet reset as well | |
| OSD | Factory Reset through the Misc menu item | |
| Web pages | Factory reset via the Device Settings embedded Web page | |
| Protocol 3000 | Use “Factory” command or #Y 0,771,1> | |
12.2 Input Resolutions
This section defines the input resolutions for each input
12.2.1 SDI Input Resolutions
| SDI Input Resolution | |||
| NTSC | 720_P60 | 1080_P24 | 1080_P50 |
| PAL | 1080_I50 | 1080_P25 | 1080_P60 |
| 720_P50 | 1080_I60 | 1080_P30 | |
12.2.2 PC Input Resolutions
| PC Input Resolutions | ||||
| 640X480_60 | 800x600_75 | 625_P50 | 1280x1024_60 | 1400x1050_75 |
| 640x480_72 | 800x600_85 | 525_P60 | 1280x1024_75 | 1600x900_60 |
| 640x480_75 | 1024x768_60 | 720_P50 | 1280x1024_85 | 1600x1200_60 |
| 640x480_85 | 1024x768_70 | 720_P60 | 1360x768_60 | 1680x1050_60 |
| 800x600_56 | 1024x768_75 | 1280x800_60 | 1366x768_60 | 1920x1200_60RB |
| 800x600_60 | 1024x768_85 | 1280x960_85 | 1440x900_60 | 1080_P50 |
| 800x600_72 | 1152x864_75 | 1280x768_60 | 1400x1050_60 | 1080_P60 |
12.2.3 DP Input Resolutions
| DP Input Resolutions | ||||
| 640X480_60 | 800x600_85 | 1280x800_60 | 1366x768_60 | 1920x1200_60RB |
| 640x480_75 | 848x480_60 | 1280x960_85 | 1440x900_60 | 720_P60 |
| 640x480_85 | 1024x768_60 | 1280x768_60 | 1400x1050_60 | 1080_P60 |
| 800x600_56 | 1024x768_70 | 1280x1024_60 | 1400x1050_75 | 2k50 |
| 800x600_60 | 1024x768_75 | 1280x1024_75 | 1600x900_60 | 2k 60 |
| 800x600_72 | 1024x768_85 | 1280x1024_85 | 1600x1200_60 | |
| 800x600_75 | 1152x864_75 | 1360x768_60 | 1680x1050_60 | |
12.2.4 CV Input Resolutions
NTSC and PAL
12.2.5 HDMI Input Resolutions
| HDMI Input Resolutions | ||||
| NTSC | 1080_I60 | 640x480_72 | 1024x768_70 | 1360x768_60 |
| PAL | 1080_P23_976 | 640x480_75 | 1024x768_75 | 1366x768_60 |
| 525_P60 | 1080_P24 | 640x480_85 | 1024x768_85 | 1440x900_60 |
| 625_P50 | 1080_P25 | 800x600_56 | 1152x864_75 | 1400x1050_60 |
| 720_P24 | 1080_P30 | 800x600_60 | 1280x800_60 | 1400x1050_75 |
| 720_P25 | 1080_P50 | 800x600_72 | 1280x960_85 | 1600x900_60 |
| 720_P30 | 1080_P60 | 800x600_75 | 1280x768_60 | 1600x1200_60 |
| 720_P50 | 2k50 | 800x600_85 | 1280x1024_60 | 1680x1050_60 |
| 720_P60 | 2k60 | 848x480_60 | 1280x1024_75 | 1920x1200_60RB |
| 1080_I50 | 640X480_60 | 1024x768_60 | 1280x1024_85 | |
12.3 Output Resolutions
This section defines the output resolutions
12.3.1 HDMI Output Resolutions
| Technical Specifications of the HDMI Output Signal | |||
| 640x480@60 | 1280x1024@50 | 1680x1050@60 | 1080p25 |
| 640x480@75 | 1280x1024@60 | 1920x1200@60 | 1080p29.97 |
| 800x600@50 | 1280x1024@75 | 480i60 | 1080p30 |
| 800x600@60 | 1360x768@60 | 480p60 | 1080p50 |
| 800x600@75 | 1366x768@50 | 576i50 | 1080p59.94 |
| 1024x768@50 | 1366x768@60 | 576p50 | 1080p60 |
| 1024x768@60 | 1400x1050@50 | 720p50 | 2k50 |
| 1024x768@75 | 1400x1050@60 | 720p59.94 | 2k60 |
| 1280x768@50 | 1600x900@60 | 720p60 | |
| 1280x768@60 | 1600x1200@50 | 1080p23.976 | |
| 1280x800@60 | 1600x1200@60 | 1080p24 | |
12.3.2 SDI Output Resolutions
| Technical Specifications of the SDI Output Signal | |||
| 480i60 | 720p60 | 1080p25 | 1080p50 |
| 576i50 | 1080p23.976 | 1080p29.97 | 1080p59.94 |
| 720p50 | 1080p24 | 1080p30 | 1080p60 |
| 720p59.94 | |||
13 The VP-774A RS-232 Communication Protocol
The Kramer Protocol lets you control the VP-774A from any standard terminal software (for example, the Windows ^® HyperTerminal Application).
13.1 Using the Communication Protocol
There are three different methods to control the VP-774A via the RS-232 or the Ethernet:
- Protocol commands (via protocol 3000 or Legacy Protocol) mimicking the OSD, see Section 13.2
- The button functions mimicking the remote controller buttons (as well as the front panel buttons), see Section 13.3
- Protocol 3000 common commands, see Section 13.4

All three tables together include all the protocol commands, but they are not identical and do not always include the same information. Some of the data may appear in one or two of the tables but not in the third table and vice versa.

Commands that are specific for the Web pages, appear in the relevant Web page section, see the Audio Settings protocol commands in Section 9.6.3.
The protocol 3000 communications protocol uses a data rate of 115200 baud, with no parity, 8 data bits, and 1 stop bit.
The Legacy communication protocol uses a data rate of 9600 baud, with no parity, 8 data bits and 1 stop bit. CTS mode and XON/XOFF are set to Off.

Note that if the Protocol is set to Legacy (via the Miscellaneous menu, see Section 6.8, some PC applications (for example, K-Upload), as well as the Web pages may not function properly.
13.2 Communication Protocol: Mimicking OSD
The audio/video protocol commands defines all the function numbers, their valid parameters can be used with protocol 3000 or the Legacy protocol.
13.2.1 Using the Communication Protocol with Protocol 3000 (the "Y" Command)
Set Command:
Type in: "Y Control_Type=0, Function, Param"
Reply: "\~id=01Y Control_Type=0,Function,Param OK"
Set command example, set window control (721) to PiP:
Send: "#y 0,721,1"
Reply: "\~01@Y 0,721,1 OK"
Get Command:
Type in: "Y Control_Type=1,Function"
Result: "\~id=01Y Control_Type=1,Function,Param"
Get command example: get window control setup (721):
Send: "#y 1,721"
Result: "\~01@y 1,721,1"

You can add a last parameter, to be located fourth in SET or third in GET, to define a specific window.
For example:
Set H Sharpness value to 10 on the PiP window (1): “#y 0,510,10,1”
Get H sharpness of the Main window (0): "#y 1,510,0"
The “Y” command also supports the value increment/decrement of any command using the ‘+’ or ‘-’ signs as the third parameter of the “Y” command.
For example, move the PiP window one step to the left
Send: "#Y 0,141,-,1
Reply: "\~01@Y 0,141,-,1 OK"
For example, in order to increase zoom on the main window
Send: "#Y 0,650,+,0
Reply: "\~01@Y 0,650,+,0 OK"
13.2.2 Using the Communication Protocol with Legacy Protocol
Set Command:
Type in: Y■Control_Type■Function■Param[CR]
Reply: Z■Control_Type■Function■Param[CR][LF]
Get Command:
When sending a command, a blank character may precede [CR] if desired
Example:
Example 1: set brightness value as 32
Send: Y■0■410■32[CR]
Reply: Z■1■410■32[CR][LF]
Example 2: get current output resolution. (4 = SVGA)
Send: Y■1■631[CR]
Reply: Z■1■631■4[CR][LF]
| Character Symbols Definitions | |
| Symbol | Meaning |
| □ Space | |
| [CR] | Carriage Return, ASCII code 0x0D |
| [LF] or > | Line Feed, ASCII code 0x0A |
13.2.3 Protocol Table: Mimicking OSD
You can associate a function number to its description and valid parameters intuitively by navigating the OSD menu according to the following logic:
A function number is directly related to its location in the OSD menu.
For example, the third menu on the OSD is Process (3 in the hundreds). The second menu item in Process is Film Mode (2 in the tens), therefore the function number for it will be 320 ( 3^rd item on the Main Window Control and the 2^nd item in the Process submenu (see also Section 6.1). When navigating in the OSD MENU you will be able to see the Film Mode valid parameters. The following table defines the protocol commands:
| 1st Level | 2nd Level | 3rd Level | 4th Level | Range | Func. | Note |
| Input | Display Mode | Single Window | 0 | 110 | Single window also displays the aspect ratio in the OSD MENU | |
| Picture in Picture 1 | ||||||
| Picture + Picture | 2 | |||||
| Split | 3 | |||||
| Customized | 4 | |||||
| Input Source HDMI1 13 | 120 | In case the window is inactive -1 will be returned | ||||
| Color Space R YPbPr 1 | RGB 0 136 | Applicable to PC and HDMI inputs only | ||||
| Follow Input | 2 | |||||
| Auto Shift Mode | Auto | 0 | 137 | |||
| Semi Auto | 1 | |||||
| Customized | 2 | |||||
| Window Customization | H Position 0:2048 | 141 | The value range is dynamic. The FW prevents window overlapping and exceeding of boundaries The PiP window horizontal value range is 0-1600 | |||
| H Width | 0:2048 | 142 | ||||
| V Position | 0:2048 | 143 | ||||
| V Height | 0:2048 | 144 | ||||
| Audio | Volume | Input Volume | -20:4 [dB] | 211 | Unavailable in audio pass-through | |
| Output Volume | -80:20 [dB] | 212 | ||||
| Mic1 Volume | -100:12[dB] | 213 | ||||
| Mic1 Volume | -100:12[dB] | 214 | ||||
| Balance | -10:10 [Ratio] | 220 | ||||
| Treble | -18:18 [dB] | 230 | ||||
| Bass | -18:18 [dB] | 240 | ||||
| Mic Effects | Mic1 Talkover Depth | 0:-100 [%] | 251 | Unavailable in audio pass-through. Talkover is disabled in Mix mode | ||
| Mic1 Talkover Trigger | -100:23 [dB] | 252 | ||||
| Mic1 Mix | -100:1 [dB] | 253 | Unavailable in audio pass-through Mix mode disables talkover mode | |||
| Line Mix | -100:0 [dB] | 254 | Unavailable in audio pass-through | |||
| Mic2 Mix | -100:1 [dB] | 255 | Unavailable in audio pass-through Mix mode disables talkover mode | |||
| Mic2 Talkover Trigger | -100:23 [dB] | 256 | Unavailable in audio pass-through. Talkover is disabled in Mix mode | |||
| Mic2 Talkover | Depth | 0:-100 [%] | 257 | |||
| Embedded | Pass-through | On | 1 | 261 | Unavailable for non-embedded audio | |
| Off | 0 | |||||
| Analog Takeover | On | 1 | 262 | Unavailable in audio pass-through | ||
| Off | 0 | |||||
| Delay | Lip Sync | 0:90 [ms] | 271 | |||
| Mic1 Delay | 0:40 [ms] | 272 | ||||
| Mic2 Delay | 0:40 [ms] | 273 | ||||
| Power Amplifier | Off | 0 | 280 | |||
| Power Level 1 | 1 | |||||
| Power Level 2 | 2 | |||||
| Power Level 3 | 3 | |||||
| Power Level 4 | 4 | |||||
| SDI Channeling | Group A | None | 0 (read only) | 291 | ||
| Activate CH1 1 | ||||||
| Activate CH2 | 2 | |||||
| Bypass | 3 | |||||
| Group B | None | 0 (read only) | 292 | |||
| Activate CH1 1 | ||||||
| Activate CH2 2 | ||||||
| Bypass | 3 | |||||
| Group C | None | 0 (read only) | 293 | |||
| Activate CH1 1 | ||||||
| Activate CH2 2 | ||||||
| Bypass | 3 | |||||
| Group D | None | 0 (read only) | 294 | |||
| Activate CH1 1 | ||||||
| Activate CH2 2 | ||||||
| Bypass | 3 | |||||
| Bypassed Group | Unmute | 0 | 295 | |||
| Mute | 1 | |||||
| Process | Deinterlacing | Method | Line Doubler | 0 | 311 | Volatile parameter unavailable in progressive scan |
| Motion Adaptive | 1 | |||||
| Sync | Current Field | 0 | 312 | Unavailable in progressive scan. | ||
| Older Field | 1 | |||||
| Film Mode | Off | 0 | 320 | Unavailable in progressive scan | ||
| Follow Input | 1 | |||||
| 24PsF Mode | 2 | |||||
| Diagonal Correction | 0:3 | 330 | Unavailable in progressive scan. Unavailable when deinterlacing sync is older field | |||
| MD Sensitivity | LEVEL1 | 0 | 340 | Unavailable in progressive scan | ||
| LEVEL2 | 1 | |||||
| LEVEL3 | 2 | |||||
| LEVEL4 | 3 | |||||
| LEVEL5 | 4 | |||||
| Picture | Brightness | -400:400 | 410 | In the OSD menu the range appears as -80:80 | ||
| Contrast | 0.1:1.6 | 420 | ||||
| Color | 0.1:1.6 | 430 | ||||
| Color Correction | Blue | 0:4 | 441 | |||
| Green | 0:4 | 442 | ||||
| Flesh | 0:4 | 443 | ||||
| Black Level | -80:80 | 450 | ||||
| Gamma Mode | Gamma Off | 0 | 460 | |||
| Gamma 0.4 | 1 | |||||
| Gamma 0.8 | 2 | |||||
| Gamma 1.2 | 3 | |||||
| Gamma 1.6 4 | ||||||
| Gamma 2.0 5 | ||||||
| Gamma 2.4 | 6 | |||||
| Gamma 2.8 | 7 | |||||
| Dither | Mode0: Disable error diffusion | 0 | 470 | |||
| Mode1: In-frame 8:6 conversion 1 | ||||||
| Mode2: Intra-frame 8:6 conversion 2 | ||||||
| Mode3: In-frame 10:8 conversion | 3 | |||||
| Mode4: Intra-frame 10:8 conversion | 4 | |||||
| Mode5: In-frame 12:10 conversion 5 | ||||||
| Mode6: Intra-frame 12:10 conversion 6 | ||||||
| Auto Adjust | 0:1 | 480 | Self-clearing | |||
| Enhance | H Sharpness | -10:10 | 510 | |||
| V Sharpness | -10:10 520 | |||||
| Noise Reduction | Mosquito NR | 0:3 | 531 | Unavailable in progressive scan | ||
| Combing NR | 0:3 | 532 | ||||
| Temporal NR | 0:3 | 533 | ||||
| Block NR | 0:3 | 534 | Unavailable in progressive scan | |||
| Scale | Aspect Ratio | Follow input | 0 | 610 | 1. Single window only2. Customization lost3. In “Follow Input”, output must be bigger than input | |
| Follow Output | 1 | |||||
| Best Fit | 2 | |||||
| Letterbox | 3 | |||||
| Overscan | Off | 0 | 620 | |||
| 5% | 1 | |||||
| 10% | 2 | |||||
| Output | Video Resolution | Native | 0 | 631 | 1. GET command in native mode returns the determined resolution of the master connection2. Special OSD MENU screen, follow OSD instructions | |
| 640x480@60 | 1 | |||||
| 640x480@75 | 2 | |||||
| 800x600@50 | 3 | |||||
| 800x600@60 | 4 | |||||
| 800x600@75 | 5 | |||||
| 1024x768@50 | 6 | |||||
| 1024x768@60 | 7 | |||||
| 1024x768@75 | 8 | |||||
| 1280x768@50 | 9 | |||||
| 1280x768@60 | 10 | |||||
| 1280x800@60 | 11 | |||||
| 1280x1024@50 | 12 | |||||
| 1280x1024@60 | 13 | |||||
| 1280x1024@75 | 14 | |||||
| 1360x768@60 | 15 | |||||
| 1366x768@50 | 16 | |||||
| 1366x768@60 | 17 | |||||
| 1400x1050@50 | 18 | |||||
| 1400x1050@60 | 19 | |||||
| 1600x900@60 20 | ||||||
| 1600x1200@50 | 21 | |||||
| 1600x1200@60 | 22 | |||||
| 1680x1050@60 | 23 | |||||
| 1920x1200@60 | 24 | |||||
| 480i60 25 | ||||||
| 480p60 26 | ||||||
| 576i50 | 27 | |||||
| 576p50 | 28 | |||||
| 720p50 29 | ||||||
| 720p59.94 30 | ||||||
| 720p60 | 31 | |||||
| 1080p23.976 | 32 | |||||
| 1080p24 33 | ||||||
| 1080p25 34 | ||||||
| 1080p29.97 | 35 | |||||
| 1080p30 | 36 | |||||
| 1080p50 | 37 | |||||
| 1080p59.94 38 | ||||||
| 1080p60 39 | ||||||
| 2k50 | 40 | |||||
| 2k60 | 41 | |||||
| Master Connection | HDMI1 0 | 632 | ||||
| HDMI2 1 | ||||||
| HDBT | 2 | |||||
| SDI | 3 | |||||
| Deep Color | Off | 0 | 633 | |||
| Follow Output | 1 | |||||
| Color Space | RGB | 0 | 634 | Not applicable to SDI output.Screen may flicker | ||
| YPbPr422 | 1 | Not applicable to PC output.Screen may flicker | ||||
| YPbPr444 | 2 | Not applicable to SDI output.Screen may flicker | ||||
| HDCP Mode | Follow Output | 0 | 635 | |||
| Follow Input | 1 | |||||
| Zoom Position | H Position | 0:2047 | 641 | Value range is dynamic, FW prevents zoom from exceeding the boundaries | ||
| V Position | 0:2047 | 642 | ||||
| Zoom | 1.0:16.0 | 650 | ||||
| Factory Reset | Information | NTSC | 0 | 710 | READ ONLY:In the OSD MENU - Input, Output video formats & FW version. | |
| PALM | 1 | |||||
| PAL60 | 2 | |||||
| N443 | 3 | |||||
| NTSC_4 | 4 | |||||
| SECAM 5 | In the protocol – Get command returns the Input video format only | |||||
| PAL 6 | ||||||
| PALNC | 7 | |||||
| NTSC_8 | 8 | |||||
| N\A | 9 | |||||
| N\A 10 | ||||||
| N\A 11 | ||||||
| N\A | 12 | |||||
| N\A | 13 | |||||
| 525p60 14 | ||||||
| 625p50 15 | ||||||
| 720p60 | 16 | |||||
| 720p50 | 17 | |||||
| 720p24 18 | ||||||
| 720p25 19 | ||||||
| 720p30 | 20 | |||||
| 1080i60 | 21 | |||||
| 1080i50 | 22 | |||||
| N\A 23 | ||||||
| 1080i100 24 | ||||||
| 1080p60 | 25 | |||||
| 1080p50 | 26 | |||||
| 1080p30 27 | ||||||
| 1080p23_976 28 | ||||||
| 1080p24 | 29 | |||||
| 1080p25 | 30 | |||||
| 2k50 | 31 | |||||
| 2k60 | 32 | |||||
| 640X480@60 33 | ||||||
| N\A | 34 | |||||
| N\A | 35 | |||||
| N\A | 36 | |||||
| 640x480@72 | 37 | |||||
| 640x480@75 | 38 | |||||
| 848x480@60 | 39 | |||||
| 640x480@85 | 40 | |||||
| N\A 41 | ||||||
| 800x600@56 | 42 | |||||
| 800x600@60 | 43 | |||||
| N\A | 44 | |||||
| 800x600@72 | 45 | |||||
| 800x600@75 | 46 | |||||
| 800x600@85 | 47 | |||||
| 1024x768@60 | 48 | |||||
| 1360x768@60 | 49 | |||||
| 1280x768@60 | 50 | |||||
| 1024x768@70 51 | ||||||
| 1024x768@75 52 | ||||||
| 1280x800@60 | 53 | |||||
| 1024x768@85 | 54 | |||||
| 1400x1050@60 | 55 | |||||
| 1400x1050@75 56 | ||||||
| 1440x900@60 57 | ||||||
| 1152x864@75 | 58 | |||||
| 1600x900@60 | 59 | |||||
| 1280x1024@60 60 | ||||||
| 1280x1024@75 61 | ||||||
| 1280x960@85 | 62 | |||||
| 1920x1200@60RB | 63 | |||||
| 1280x1024@85 64 | ||||||
| 1600x1200@60 65 | ||||||
| 1680x1050@60 | 66 | |||||
| NONE | 0XF5 or 0XFF | |||||
| OSD | Window Control | Main Win | 0 | 721 | When in the single window mode, only Main Win is valid | |
| PiP Win 1 | ||||||
| H Position 0:2047 | 722 | The value range is dynamic, FW prevents exceeding of boundaries | ||||
| V Position | 0:2047 | 723 | ||||
| Transparency | ON | 1 | 724 | |||
| OFF | 0 | |||||
| Transparency Gain | 0.1:1.6 725 | |||||
| Transparency Bias | -400:400 | 726 | ||||
| Blink | ON | 1 | 727 | |||
| OFF | 0 | |||||
| Blink Period 0.1:1.6 728 | ||||||
| Timeout Off 0 | 729 | |||||
| 30 Sec | 1 | |||||
| 60 Sec | 2 | |||||
| Advanced | V Keystone | -400:400 | 731 | In the OSD menu the value range shows -80:80. Unavailable for interlaced output | ||
| Auto Sync Off On 1 | 732 | Two idle minutes are required to trigger screen shutdown | ||||
| Off 0 | ||||||
| Luma Keying | On | 1 | 733 | Screen may flicker. Keying the PiP window | ||
| Off | 0 | |||||
| Alert System | On | 1 | 734 | |||
| Off | 0 | |||||
| No Signal | Gray | 0 | 735 | |||
| Blue | 1 | |||||
| Black | 2 | |||||
| Auto Switching | Off | 0 | 736 | Last Connected is available for HDMI and DP inputs only | ||
| Scan | 1 | |||||
| Last Connected | 2 | |||||
| Pause Freeze | On | 1 | 741 | |||
| Off | 0 | |||||
| Blank | On | 1 | 742 | |||
| Off | 0 | |||||
| Mute | On | 1 | 743 | In the PiP Mode, applies to main window only | ||
| Off | 0 | |||||
| Disable Outputs | On | 1 | 744 | Follow OSD instructions | ||
| Off | 0 | |||||
| Protocol | P3K | 0 | 750 | |||
| Legacy | 1 | |||||
| Test Pattern Slide Bar 1 | Off | 0 | 760 | |||
| Non-HDCP content sinusoid sound | ||||||
| Color Bar | 2 | HDCP content sinusoid sound | ||||
| Factory Reset | Including ETH | 0 771 | ||||
| Excluding ETH | 0 | 772 | ||||
13.3 Protocol Table: Mimicking Remote and Front Panel Buttons
The keystroke codes operate in the following way:
SET command third param =0,
Syntax example: "#Y 0,10,0
GET command for keystrokes will return ERR
The following table defines the keystroke function codes:
| Button | Keystroke Code | Button | Keystroke Code | Button | Keystroke Code |
| MENU | 10 | CH1_VGA1 | 21 | CH2_HDMI1 | 32 |
| ENTER | 11 | CH1_VGA2 | 22 | CH2_HDMI2 | 33 |
| MINUS | 12 | CH1_HDMI1 | 23 | CH2_HDMI4 | 34 |
| PLUS | 13 | CH1_HDMI2 | 24 | CH2_DP | 35 |
| RESET | 14 | CH1_HDMI4 | 25 | CH2_SDI | 36 |
| PIP | 15 | CH1_DP | 26 | MUTE | 37 |
| BLANK | 16 | CH1_SDI | 27 | POWER | 38 |
| FREEZE | 17 | CH2_CV1 | 28 | LEFT | 39 |
| LOCK | 18 | CH2_HDMI3 | 29 | RIGHT | 40 |
| CH1_CV1 | 19 | CH2_VGA1 | |||
| CH1_HDMI3 | 20 | CH2_VGA2 |
13.4 The Protocol 3000 Common Operation Commands
The following table lists the protocol 3000 commands:
| Operation Commands | ||
| Command | Syntax | Response |
| Lock front panel | LOCK-FP LOCK-MODE | LOCK-FP LOCK-MODE RESULT |
| Get front panel locking state | LOCK-FP? | LOCK-FP LOCK-MODE |
| Parameters Description:LOCK-MODE = Front panel locking state:"0" or "off" to unlock front panel buttons."1" or "on" to lock front panel buttons. | ||
| Power state | POWER POWER-MODE | POWER POWER-MODE RESULT |
| Get power state | POWER? | POWER POWER-MODE |
| Parameters Description:POWER-MODE = power state:"0" or "off" to enter standby mode."1" or "on" to power up. | ||
| Restart device | RESET | RESET OK |
| Peripheral firmware update execute* | UPGRADE UPGRADE OK | |
| Usually the firmware will upload to the device via a command such as LDFWA device reset may be needed to complete the process | ||
| Video core Firmware update execute* | UPGRADES | UPGRADES OK |
| Reset configuration to factory default (including Ethernet reset) | FACTORY | FACTORY RESULT |
| Reset Ethernet configuration to factory default | ETH-FACTORY | ETH-FACTORY RESULT |
| SET dedicated EAS port settings | EAS-CFG PORTTYPE,PORTNUM | EAS-CFG PORTTYPE,PORTNUM RESULT |
| GET dedicated EAS port settings | EAS-CFG? | EAS-CFG PORTTYPE,PORTNUM |
| Parameters Description:PORTTYPE either "TCP" or "UDP"PORTNUM Ethernet port | ||
| EAS Activation Mode notification messages | N/A | EAS-EXE ACTIVATION-MODE OK |
| Parameters Description:ACTIVATION-MODE = EAS notification:1" to notify full screen + siren alert mode (Severity = Extreme)"2" to notify full screen alert mode (Severity = Severe)"3" To notify full screen alert mode (Severity = Moderate) | ||
| “4” To notify message mode (Severity = Minor)“5” To notify message crawler mode (Severity = Unknown)“0” to notify that the alert went off either by timeout or by keystroke | ||
| SET dedicated port tunneling settings | PTNL-CFG PORTTYPE,PORTNUM | PTNL-CFG CFG PORTTYPE,PORTNUM RESULT |
| GET dedicated port tunneling settings | PTNL-CFG? | PTNL-CFG PORTTYPE,PORTNUM |
| Parameters Description:PORTTYPE either “TCP” or “UDP”PORTNUM Ethernet port | ||
| SET UART port tunneling settings | UART BAUD,DATA BITS,PARITY,STOPBITS | UART BAUD,DATA BITS,PARITY, STOPBITS RESULT |
| GET UART port tunneling settings | UART? | UART BAUD,DATA BITS,PARITY, STOPBITS |
| Parameters Description:BAUD= 1200, 2400, 4800, 9600, 19200, 38400 57600, 115200DATA BITS= 5 to 8 inclusivePARITY= “NONE”, “ODD”, “EVEN”, “MARK”, “SPACE” or the first letter of these wordsSTOPBITS= 1 or 2 | ||
| Audio/video common commands | ||
| Command | Syntax | Response |
| Audio reset | AUD-RESET | AUD-RESET RESULT |
| Output volume | VOLUME VOLUME-PARAMETER | VOLUME VOLUME-PARAMETER RESULT |
| Get output volume | VOLUME? | VOLUME VOLUME-VALUE |
| Parameters Description:VOLUME-PARAMETER = output volume parameters:[VALUE] either positive or negative digits (minus sign precedes negative values).“+” increase current value,“-” decrease current value | ||
| Windowscustomization | WIN-CUST WINDOW, HPOS, HW, VPOS, VH | WIN-CUST WINDOW, HPOS, HW, VPOS, VH RESULT |
| Parameters Description: fast window customization[WINDOW] “0” for main window; “1” for PiP window[HPOS] horizontal position value[HW] horizontal width value[VPOS] vertical position value[VH] vertical height value | ||
| Set dual window state | PIP PIP-MODE | PIP PIP-MODE RESULT |
| Get dual window state | PIP? | PIP PIP-MODE |
| Parameters Description: | ||
PIP-MODE = Dual window state: "0" or "off" for single window. "1" or "on" to for dual window.
| Identification commands | ||
| Command | Syntax | Response |
| Protocol Handshaking | #CR | CRLF |
| Read device model | MODEL? | MODEL MACHINE MODEL |
| Read device serial number | SN? | SN SERIAL_NUMBER |
| Read device firmware version | VERSION? | VERSION MAJOR MINORBUILD REVISION |
| Read device build date | BUILD-DATE? | BUILD-DATE YYYY/MM/DDHH:MM:SS |
| Read device protocol version | PROT-VER? | PROT-VER 3000 MAJORMINOR |
| Command - NAME | Command Type - System (Ethernet) | ||
| Command Name | Permission | Transparency | |
| Set: | NAME | Administrator | Public |
| Get: | NAME? | End User Public | |
| Description Syntax | |||
| Set: Set machine (DNS) name | #NAMESPmachine_nameCR | ||
| Get: Get machine (DNS) name | #NAME?CR | ||
| Response | |||
| Set: ~nn@NAMESPmachine_nameSPOKCR LF | |||
| Get: ~nn@NAME?SPmachine_nameCR LF | |||
| Parameters | |||
| machine_name - String of up to 14 alpha-numeric chars (can include hyphen, not at the beginning or end) | |||
| Notes | |||
| The machine name is not the same as the model name. The machine name is used to identify a specific machine or a network in use (with DNS feature on) | |||
| Network settings commands | ||
| Network settings commands require admin authorization | ||
| Command | Syntax | Response |
| Set IP Address | NET-IPIP_ADDRESSNTIP | NET-IPIP_ADDRESSRESULT |
| Read IPAddress | NET-IP?NTIP? | NET-IPIP_ADDRESS |
| Read MAC | NET-MAC? | NET-MACMAC_ADDRESS |
| Address | NTMC? | |
| Set subnet mask | NET-MASK SUBNET_MASK NTMSK | NET-MASK SUBNET_MASK RESULT |
| Read subnet mask | NET-MASK? NTMSK? | NET-MASK SUBNET_MASK |
| Set gateway address | NET-GATE GATEWAY_ADDRESS NTGT | NET-GATE GATEWAY_ADDRESS RESULT |
| Read subnet mask | NET-GATE? NTGT? | NET-GATE GATEWAY_ADDRESS |
| Set DHCP mode | NET-DHCP DHCP_MODE NTDH | NET-DHCP DHCP_MODE RESULT |
| Read subnet mask | NET-DHCP? NTDH? | NET-DHCP DHCP_MODE |
| DHCP_MODE = 0 (factory default) - Don't use DHCP (Use IP set by factory or IP set command).1 - Try to use DHCP, if unavailable use IP as above.2- Try to use DHCP, if unavailable use AUTO-IP as described here: http://support.microsoft.com/kb/q307287/. After setting DHCP_MODE to 1 or 2 you need to reset the device | ||
| Change protocol Ethernet port | ETH-PORT PROTOCOL, PORT | ETH-PORT PROTOCOL, PORT RESULT |
| Read protocol Ethernet port | ETH-PORT? PROTOCOL | ETH-PORT PROTOCOL, PORT |
| PROTOCOL = TCP / UDP (transport layer protocol)PORT = Ethernet port to enter protocol 3000 commands.1-65535 = User defined port0 - reset port to factory default (50000 for UDP, 5000 for TCP) | ||
| Load new peripheral firmware P | Step 1: LDFW SIZE Response 1: READY or LDFW SIZE ERR###Step 2: If ready was received, send FIRMWARE_DATA P Response 2: LDFW SIZE RESULT | |
| Load new video core firmware | Step 1: LDFWS SIZE Response 1: READY or LDFWS SIZE ERR###Step 2: If ready was received, send FIRMWARE_DATA P Response 2: LDFWS SIZE RESULT | |
| Load new audio/graphic memory file | Step 1: LDMFS SIZE Response 1: READY or LDMFS SIZE ERR###Step 2: If ready was received, send FIRMWARE_DATA P Response 2: LDMFS SIZE RESULT | |
LIMITED WARRANTY
The warranty obligations of Kramer Electronics for this product are limited to the terms set forth below:
What is Covered
This limited warranty covers defects in materials and workmanship in this product.
What is Not Covered
This limited warranty does not cover any damage, deterioration or malfunction resulting from any alteration, modification, improper or unreasonable use or maintenance, misuse, abuse, accident, neglect, exposure to excess moisture, fire, improper packing and shipping (such claims must be presented to the carrier), lightning, power surges, or other acts of nature. This limited warranty does not cover any damage, deterioration or malfunction resulting from the installation or removal of this product from any installation, any unauthorized tampering with this product, any repairs attempted by anyone unauthorized by Kramer Electronics to make such repairs, or any other cause which does not relate directly to a defect in materials and/or workmanship of this product. This limited warranty does not cover cartons, equipment enclosures, cables or accessories used in conjunction with this product.
Without limiting any other exclusion herein, Kramer Electronics does not warrant that the product covered hereby, including, without limitation, the technology and/or integrated circuit(s) included in the product, will not become obsolete or that such items are or will remain compatible with any other product or technology with which the product may be used.
How Long Does this Coverage Last
Seven years as of this printing; please check our Web site for the most current and accurate warranty information.
Who is Covered
Only the original purchaser of this product is covered under this limited warranty. This limited warranty is not transferable to subsequent purchasers or owners of this product.
What Kramer Electronics will do
Kramer Electronics will, at its sole option, provide one of the following three remedies to whatever extent it shall deem necessary to satisfy a proper claim under this limited warranty:
- Elect to repair or facilitate the repair of any defective parts within a reasonable period of time, free of any charge for the necessary parts and labor to complete the repair and restore this product to its proper operating condition. Kramer Electronics will also pay the shipping costs necessary to return this product once the repair is complete.
- Replace this product with a direct replacement or with a similar product deemed by Kramer Electronics to perform substantially the same function as the original product.
- Issue a refund of the original purchase price less depreciation to be determined based on the age of the product at the time remedy is sought under this limited warranty.
What Kramer Electronics will not do Under This Limited Warranty
If this product is returned to Kramer Electronics or the authorized dealer from which it was purchased or any other party authorized to repair Kramer Electronics products, this product must be insured during shipment, with the insurance and shipping charges prepaid by you. If this product is returned uninsured, you assume all risks of loss or damage during shipment. Kramer Electronics will not be responsible for any costs related to the removal or re-installation of this product from or into any installation. Kramer Electronics will not be responsible for any costs related to any setting up this product, any adjustment of user controls or any programming required for a specific installation of this product.
How to Obtain a Remedy under this Limited Warranty
To obtain a remedy under this limited warranty, you must contact either the authorized Kramer Electronics reseller from whom you purchased this product or the Kramer Electronics office nearest you. For a list of authorized Kramer Electronics resellers and/or Kramer Electronics authorized service providers, please visit our web site at www.kramerelectronics.com or contact the Kramer Electronics office nearest you.
In order to pursue any remedy under this limited warranty, you must possess an original, dated receipt as proof of purchase from an authorized Kramer Electronics reseller. If this product is returned under this limited warranty, a return authorization number, obtained from Kramer Electronics, will be required. You may also be directed to an authorized reseller or a person authorized by Kramer Electronics to repair the product.
If it is decided that this product should be returned directly to Kramer Electronics, this product should be properly packed, preferably in the original carton, for shipping. Cartons not bearing a return authorization number will be refused.
Limitation on Liability
THE MAXIMUM LIABILITY OF KRAMER ELECTRONICS UNDER THIS LIMITED WARRANTY SHALL NOT EXCEED THE ACTUAL PURCHASE PRICE PAID FOR THE PRODUCT. TO THE MAXIMUM EXTENT PERMITTED BY LAW, KRAMER ELECTRONICS IS NOT RESPONSIBLE FOR DIRECT, SPECIAL, INCIDENTAL OR CONSEQUENTIAL DAMAGES RESULTING FROM ANY BREACH OF WARRANTY OR CONDITION, OR UNDER ANY OTHER LEGAL THEORY. Some countries, districts or states do not allow the exclusion or limitation of relief, special, incidental, consequential or indirect damages, or the limitation of liability to specified amounts, so the above limitations or exclusions may not apply to you.
Exclusive Remedy
TO THE MAXIMUM EXTENT PERMITTED BY LAW, THIS LIMITED WARRANTY AND THE REMEDIES SET FORTH ABOVE ARE EXCLUSIVE AND IN LIEU OF ALL OTHER WARRANTIES, REMEDIES AND CONDITIONS, WHETHER ORAL OR WRITTEN, EXPRESS OR IMPLIED. TO THE MAXIMUM EXTENT PERMITTED BY LAW, KRAMER ELECTRONICS SPECIFICALLY DISCLAIMS ANY AND ALL IMPLIED WARRANTIES, INCLUDING, WITHOUT LIMITATION, WARRANTIES OF MERCHANTABILITY AND FITNESS FOR A PARTICULAR PURPOSE. IF KRAMER ELECTRONICS CANNOT LAWFULLY DISCLAIM OR EXCLUDE IMPLIED WARRANTIES UNDER APPLICABLE LAW, THEN ALL IMPLIED WARRANTIES COVERING THIS PRODUCT. INCLUDING WARRANTIES OF MERCHANTABILITY AND FITNESS FOR A PARTICULAR PURPOSE. SHALL APPLY TO THIS PRODUCT AS PROVIDED UNDER APPLICABLE LAW. IF ANY PRODUCT TO WHICH THIS LIMITED WARRANTY APPLIES IS A "CONSUMER PRODUCT" UNDER THE MAGNUSON-MOSS WARRANTY ACT (15 U.S.C.A. §2301, ET SEQ.) OR OTHER APPLICABLE LAW, THE FOREGOING DISCLAIMER OF IMPLIED WARRANTIES SHALL NOT APPLY TO YOU, AND ALL IMPLIED WARRANTIES ON THIS PRODUCT, INCLUDING WARRANTIES OF MERCHANTABILITY AND FITNESS FOR THE PARTICULAR PURPOSE, SHALL APPLY AS PROVIDED UNDER APPLICABLE LAW.
Other Conditions
This limited warranty gives you specific legal rights, and you may have other rights which vary from country to country or state to state.
This limited warranty is void if (i) the label bearing the serial number of this product has been removed or delaced, (ii) the product is not distributed by Kramer Electronics or (iii) this product is not purchased from an authorized Kramer Electronics reseller. If you are unsure whether a reseller is an authorized Kramer Electronics reseller, please visit our Web site at
www.kramerelectronics.com or contact a Kramer Electronics office from the list at the end of this document.
Your rights under this limited warranty are not diminished if you do not complete and return the product registration form or complete and submit the online product registration form. Kramer Electronics thanks you for purchasing a Kramer Electronics product. We hope it will give you years of satisfaction.
KRAMER




P/N:

Rev:

SAFETY WARNING
Disconnect the unit from the power supply before opening and servicing
For the latest information on our products and a list of Kramer distributors, visit our Web site where updates to this user manual may be found.
We welcome your questions, comments, and feedback.
www.kramerAV.com
info@kramerel.com
- VP-774A Quick Start Guide
- Step 1: Check what's in the box
- Step 2: Get to know your VP-774A
- Step 3: Install the VP-774A
- Step 4: Connect the inputs and outputs
- RJ-45 Pinout
- Line Output Pinout:
- Step 5: Connect the power
- Step 6: Set operation parameters via OSD menu
- Step 7: Operate via the front panel buttons and via the:
- Step 8: Control the display via HDBaseT:
- To activate port tunneling:
- Contents
- Introduction 1
- Getting Started 2
- Overview 4
- Installing in a Rack 12
- Connecting the VP-774A 13
- The OSD Menu 18
- The Display Modes 46
- Controlling the VP-774A 51
- Using the Embedded Web Pages 59
- Port Tunneling 94
- Flash Memory Upgrade 96
- Technical Specifications 97
- The VP-774A RS-232 Communication Protocol 101
- Figures
- Introduction
- Getting Started
- Achieving the Best Performance
- Safety Instructions
- Recycling Kramer Products
- Overview
- Control your VP-774A:
- HDCP Compliance
- About HDBaseT™ Technology
- Using Twisted Pair Cable
- Defining the VP-774A Presentation Switcher/Scaler
- Installing in a Rack
- CAUTION!
- To rack-mount a machine:
- Note:
- Connecting the VP-774A
- Wiring the RJ-45 Connectors
- Connecting the Balanced Stereo Audio Output
- Microphone Pinout
- Audio Input Pinout
- The OSD Menu
- OSD Menu Operation Example
- Note that:
- OSD Control Icons
- The Input Menu
- Window Customization
- Changing the Size of the Main and/or PiP Window
- Moving the Position of the Main and/or PiP Window
- The Audio Menu
- SDI Channeling
- Bypassed Channels
- The Process Menu
- The Picture Menu
- The Enhance Menu
- The Scale Menu
- Selecting the Correct Aspect Ratio
- Master Connection Settings
- The Miscellaneous Menu
- The Luma Keying Feature
- The Emergency Alert System
- EAS Requirements
- The Display Modes
- The Single Window Display Mode
- Activating the Single Window Mode
- The Dual Window Display Mode
- Activating the Dual Window Mode
- Setting the OSD Menu to PiP Window Control
- Selecting the PIP Source
- Selecting the PiP Source via the Front Panel Buttons
- Selecting the PiP Source via the IR Remote Control Transmitter
- Selecting the PiP Source via the OSD Menu
- Controlling the VP-774A
- Controlling via the Front Panel Buttons
- Using the INPUT Front Panel buttons
- Controlling via the OSD Menu
- Controlling via the VP-774A Web Pages
- For Windows 7 and higher:
- For Mac (PC):
- For iOS:
- For Android OS:
- Connecting to the VP-774A via your Browser
- Connecting to the VP-774A via RS-232
- Connecting the VP-774A via the ETHERNET Port
- Connecting the Ethernet Port Directly to a PC
- Connecting the Ethernet Port via a Network Hub or Switch
- Ethernet Port Configuration and Control
- Controlling via the Infrared Remote Control Transmitter
- Using the IR Transmitter
- Using the Embedded Web Pages
- Loading resources (31%)
- Figure 40: The Loading Page
- There are 10 Web pages:
- The Routing and Scaling Page
- Selecting the Resolution
- Swapping Inputs
- Auto Switching
- The Lower Buttons Bar
- Saving a Preset
- The TAKE Mode
- Audio Level Sliders
- The Device Settings Page
- Firmware Upgrade
- Factory Reset
- Device Reset
- Web Page Reset
- Information
- The Input Settings Page
- The Enhance Page
- The Output Settings
- The Audio Settings Page
- The General Tab
- The Microphones Tab
- Special Audio Settings Protocol Commands
- The RS-232 over TP Page
- The Emergency Alert System Page
- The Security Page
- The About Us Page
- Save or Upload a Configuration
- Port Tunneling
- Flash Memory Upgrade
- Technical Specifications
- Default Communication Parameters
- Input Resolutions
- SDI Input Resolutions
- PC Input Resolutions
- DP Input Resolutions
- CV Input Resolutions
- HDMI Input Resolutions
- Output Resolutions
- HDMI Output Resolutions
- SDI Output Resolutions
- The VP-774A RS-232 Communication Protocol
- Using the Communication Protocol
- Communication Protocol: Mimicking OSD
- Using the Communication Protocol with Protocol 3000 (the "Y" Command)
- Set Command:
- Get Command:
- Using the Communication Protocol with Legacy Protocol
- Example:
- Protocol Table: Mimicking OSD
- Protocol Table: Mimicking Remote and Front Panel Buttons
- The Protocol 3000 Common Operation Commands
- LIMITED WARRANTY
- What is Covered
- What is Not Covered
- How Long Does this Coverage Last
- Who is Covered
- What Kramer Electronics will do
- What Kramer Electronics will not do Under This Limited Warranty
- How to Obtain a Remedy under this Limited Warranty
- Limitation on Liability
- Exclusive Remedy
- Other Conditions
- KRAMER
- SAFETY WARNING
Brand : Kramer
Model : VP-774A
Category : Network switch