WM12 - Microphone AVMATRIX - Free user manual and instructions
Find the device manual for free WM12 AVMATRIX in PDF.

User questions about WM12 AVMATRIX
0 question about this device. Answer the ones you know or ask your own.
Ask a new question about this device
Download the instructions for your Microphone in PDF format for free! Find your manual WM12 - AVMATRIX and take your electronic device back in hand. On this page are published all the documents necessary for the use of your device. WM12 by AVMATRIX.
USER MANUAL WM12 AVMATRIX
natural_image
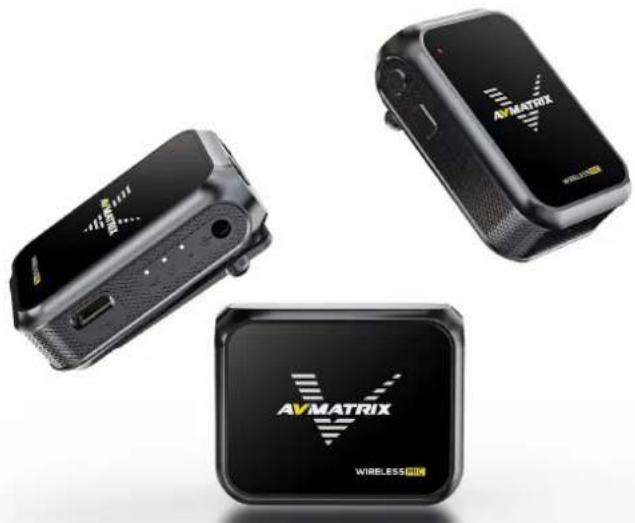
Three black AVMATRIX wireless controllers with visible branding and function buttons (no text or symbols on devices)WM12
Mini Wireless Microphone System
CONTENT
1. BRIEF INTRODUCTION .... 1
1.1. Overview....1
1.2.Main Features....1
2. INTERFACES ...... 2
2.1. Interfaces....2
2.2. Specification ....3
3. TRANSMITTER 5
3.1. Power Button 5
3.2. Pairing Button....5
3.3. (level of) Sensitivity....5
3.4. Pairings....6
3.5. Mode Switching....7
3.6. Battery Indicator 7
4. RECEIVER 7
4.1. Power Button 7
4.2. Volume 8
5. ON SCREEN DISPLAY 8
1. BRIEF INTRODUCTION
1.1. Overview
The WM12 is an extremely small, full-featured wireless microphone system. The transmitter has a built microphone and can be clipped directly to the collar. This product adopts 2.4G frequency band for transmission, the receiver and transmitter will be paired automatically within 2-5 seconds after powering on, and the effective use distance reaches 100 meters (Open and undisturbed environment). The receiv uses a clear TFT display to show the current input and output audio dynamic messages, etc. Use the 3.5mm TRS output to connect to camera tablets, cell phones and other devices to assist in picking high-fidelity audio. Ideal for applications such as interviews, micro-video recording or business presentations.
natural_image
Three black AVMATRIX wireless sensor devices with visible branding and ports, no text or symbols on the devices themselves.1.2. Main Features
- Remote wireless connection
- Up to 2-CH audio pick up
● Two-channel Audio Output USB Output
● Long-Distance Transmission
● Support three-stage sensitivity adjustment
● Real-Time Monitoring with One-Button Muting - Compatible with a variety of devices
● Clear TFT Color LCD Display
● Clip-on Design, Comfortable to Wear - Long Battery Life
2. INTERFACES
2.1. Interfaces
• TX
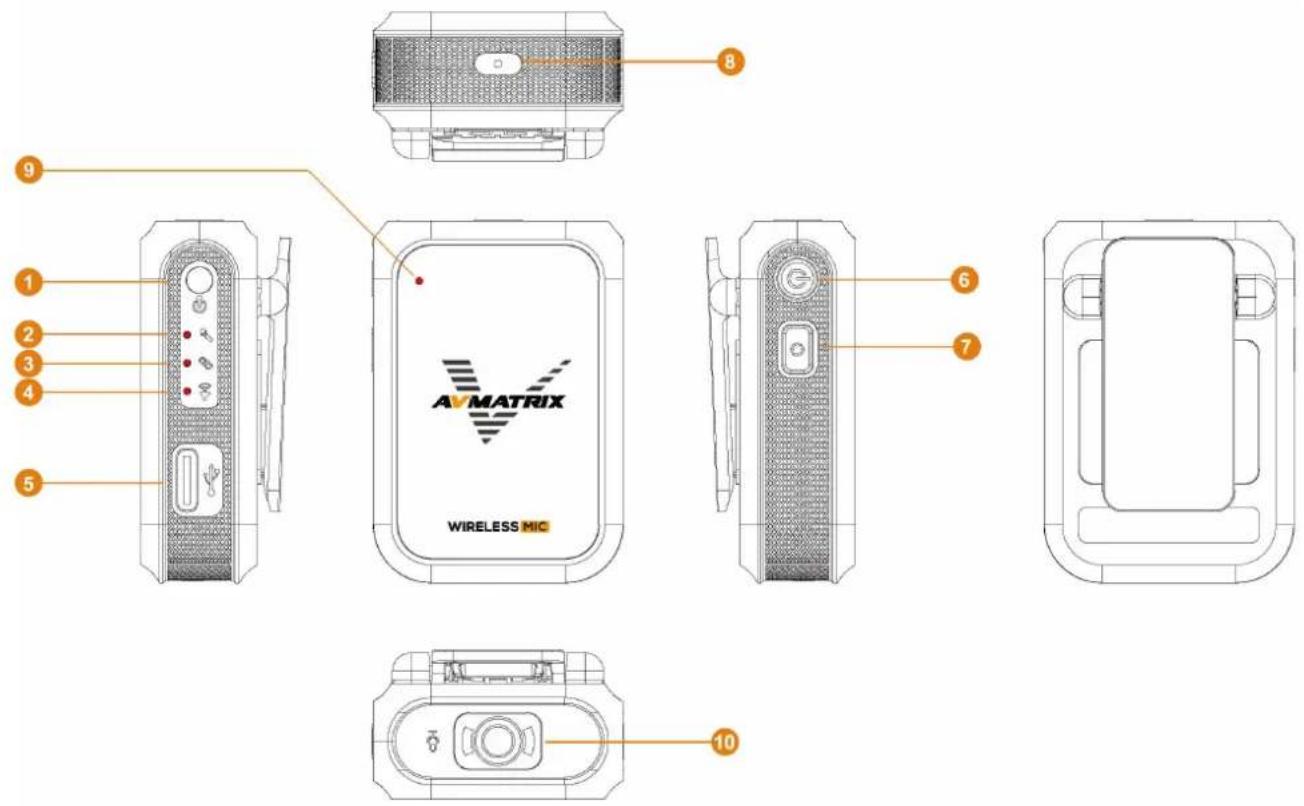
| 1 | Audio In (MIC/LINE in) |
| 2 | Microphone Indicator |
| 3 | Pairing Indicator |
| 4 | Sound Pressure Indicator |
| 5 | USB Type-C (Power Charge) |
| 6 | Power Button |
| 7 | Pairing Key |
| 8 | Reset Hole |
| 9 | Power Indicator |
| 10 | Microphones |
RX
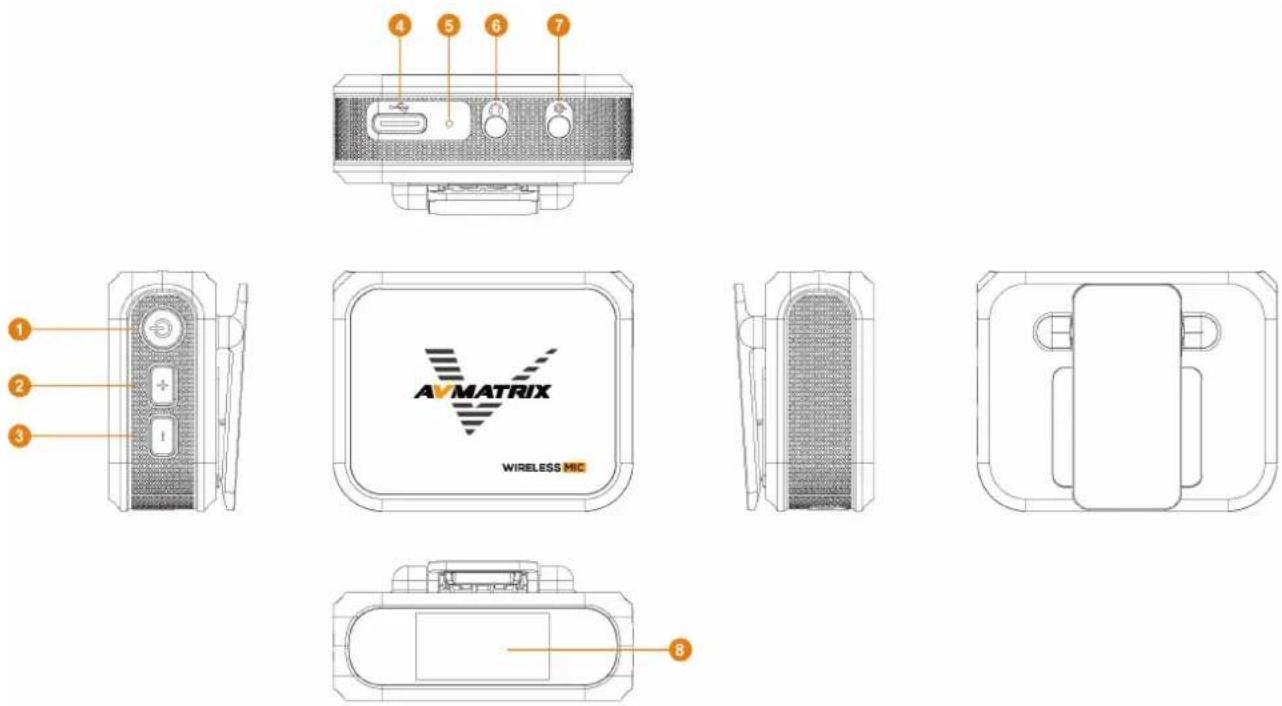
| 1 | Power Button |
| 2 | Volume + |
| 3 | Volume - |
| 4 | USB Type-C(Power Charge & Sound Card) |
| 5 | Reset Hole |
| 6 | Earphone Out |
| 7 | Line Out |
| 8 | 0.96 inch TFT color LCD display |
2.2. Specification
| COMBO | WM12 Dual | 2TX+1RX |
| WM12 Single | 1TX+1RX | |
| TRANSMITTER | Audio In | 3.5mm TRS |
| Power In | USB Type-C (Power charge) | |
| RECEIVER | Earphone Out | 3.5mm TRS |
| Line Out | 3.5mm TRS | |
| Power In | USB Type-C (Power charge & Sound card) | |
| WIRELESS | Modulation Mode | GFSK |
| Operating Frequency | 2.4GHz (2400M~2483 .5MHz) | |
| Transmission Range | 100m (Open and undisturbed environment) | |
| MIC | Frequency Range | 100Hz ~ 20KHz±3dB |
| Mic Polar Pattern | Omnidirectional | |
| Mic Sound Pressure Level | 110dB SPL (Max) | |
| Signal-to-noise Ratio | ≥90 | |
| Sensitivity | TX: -34dB, RX: -94dB | |
| DISPLAY | Display | 0.96 inch TFT color LCD display |
| Display Resolution | 160 × 80 | |
| POWER | Battery Life | TX: 15h, RX: 4h |
| Battery Capacity | TX: 300mAh, RX: 300mAh | |
| Battery Voltage | TX: 3.7V, RX: 3.7V | |
| Charging Time | TX: ≤1.5h (5V 1A), RX: ≤1.5h (5V 1A) | |
| OTHER | Dimension (LWD) | TX: 34.7×50.1×20.6mm, RX: 50.1×40×23.3mm |
| Weight | TX: 25g, RX: 32g, Gross Weight: 267g (2TX+ | |
| Operating Temperature | -20-60°C |
3. TRANSMITTER
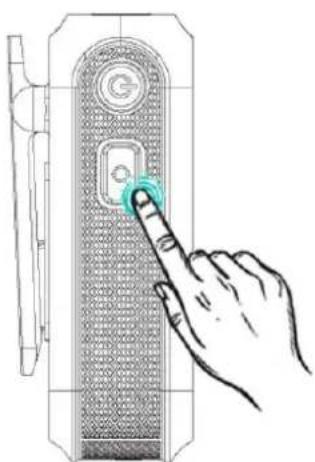
3.1. Power Button
natural_image
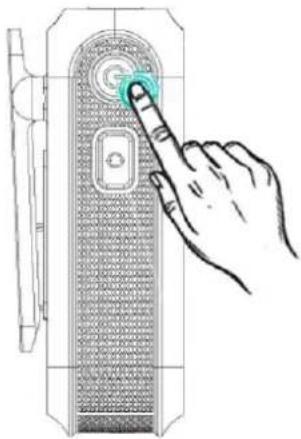
Hand interacting with a device via a finger button (no text or symbols visible)| Power On | Press and hold the power button for 3 seconds to the device. The power light will illuminate to confirm activation. |
| Power Off | Press and hold the power button for 3s to switch power. |
| Mute | Double-click the power button to enter mute mode. sound pressure indicator will flash red. |
3.2. Pairing Button
natural_image
Line drawing of a hand pressing a button on a device panel (no text or symbols)| (level of) Sensitivity | Short press the pairing button to adjust the sensitit 3 levels, high, medium and low.The input connector indicator flashes red, yellow ar green 3 times to indicate. |
| Pairings | Press and hold the Pairing button for 5s to enter pairing mode in the power-on state, and the conn indicator will blink rapidly. |
| Input Mode Switching | Press and hold 3s to switch between microphone and line mode.The input interface indicator will turn green to indic microphone mode, and turn red to indicate line mo |
3.3. (level of) Sensitivity
The sensitivity of a wireless microphone is the strength of the output signal produced by the microphone at a certain sound pressure level, is usually measured in decibels (dB). The higher the sensitivity, t larger the output signal produced by the microphone at the same level of sound pressure, which means that the microphone can pick up quieter sounds.
The sensitivity adjustment can be adjusted according to the usage environment and actual needs. For example, when using the wireless microphone in a noisy environment, the sensitivity can be adjusted high level to pick up human voice better; when using the wireless microphone in a quiet environment sensitivity can be adjusted to low level to avoid picking up ambient noise. The default medium level the best gain.
Short press the pairing button to adjust the sensitivity by 3 levels, high, medium and low. Input conr indicator blinks red, yellow and green 3 times to indicate that the sensitivity has been adjusted successfully.
- Red: High sensitivity for noisy environments or long-distance sound pickup.
- Yellow: Medium sensitivity for general environments or medium distance pickup.
- Green: Low sensitivity for quiet environments or close pickup.
3.4. Pairings
Microphone pairing is the process of connecting a microphone receiver to an audio transmitter, and the followings are guidance to pair the wireless microphone:
3.4.1 Pairing steps
- Power up both the transmitter and receiver in the on state.
- Press and hold the transmitter pairing button for 5 seconds, the connection status indicator flashes rapidly to enter transmitter pairing mode.
- Press and hold the volume + and volume - buttons of the receiver for 5 seconds, the connection status indicator flashes rapidly to enter the pairing mode of the receiver.
- When the connection status indicator flashes rapidly, the microphone is pairing.
- When the connection status indicator on the transmitter is always on and the signal icon on the receiver's screen changes to the connection icon, it means that it's successful connected.
3.4.2 Pairing Status Indication
- The connection status indicator flashes rapidly during the pairing process.
- After successful pairing, the connection status indicator on the transmitter is always on and the sign icon on the receiver's screen changes to the connection icon.
- When pairing fails, the Connection Status LED blinks slowly every 1 second.
- The status display flashes for every 1.5 seconds when the microphone signal strength falls below 20%.
3.4.3 Take note of
- After successful pairing, you can start using the wireless microphone.
- If pairing fails, try restarting the transmitter and receiver and repeat the above steps.
- If the microphone signal strength is too low, move the transmitter and receiver closer together.
3.5. Mode Switching
The wireless microphone system has two input modes, microphone input and analogue audio input mode press and hold the 3s pairing button to switch between modes.
- When the Input Connector indicator shows green, it means that it is currently in microphone mode and the Input Connector receives signals from the microphone.
- When the Input Connector indicator is red, it means that it is currently in analogue audio mode at the Input Connector receives signals from the analogue audio input.
3.6. Battery Indicator
Charge status indication
- While charging, for battery levels below 25%, the power indicator blinks once per second.
- For battery level at 26-50%, the power indicator blinks 2 times per second.
- For battery level at 51-75%, the power indicator blinks 3 times per second.
- For battery level at 76-99%, the power indicator blinks 4 times per second.
- When fully charged, the indicator stays on continuously.
Note: When the power level is lower than 25%, the power indicator will flash once per second to remind you that the device is low on power and needs to be charged. When the power is low, it is recom to charge it in time to avoid affecting the use.
4. RECEIVER
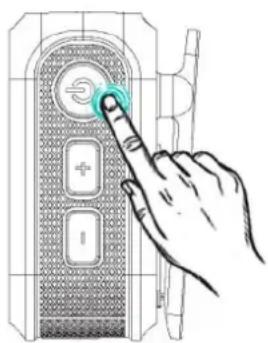
4.1. Power Button
natural_image
Hand pressing a button on a device control panel (no text or symbols visible)| PowerOn/Off | Long press 3s to switch on/off. |
| ScreenOn/Off | Short press to turn off/on the screen. |
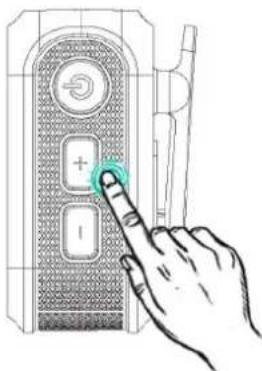
4.2. Volume
natural_image
Hand pointing at a button on a device panel (no text or symbols visible)| Volume + | Press Output Volume + |
| Volume - | Press Output Volume - |
| Pairing Mode Entry | Press Volume + and Volume - at the same time fo seconds, the signal icon on the screen will change connection icon and flash rapidly for 0.5s to enter p mode. |
5. ON SCREEN DISPLAY
The wireless microphone has a clear screen display. The screen can display the microphone's status information, such as power level, volume indication, signal strength, mode, PK value and so on. The on-screen display helps users to better understand the status of the microphone and make finer adjustments.
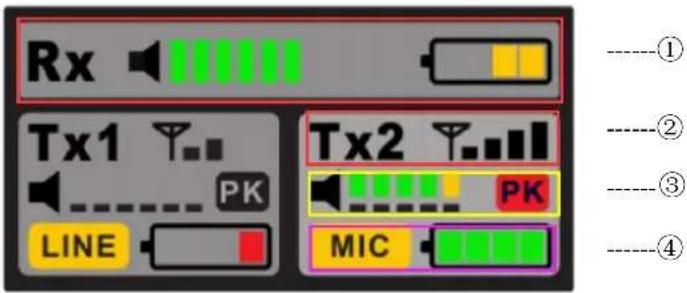
| 1 | Receiver Output Volume and Battery Indicator |
| 2 | Transmitter signal strength indication |
| 3 | Dynamic volume level indication on the large square transmitter, microphone sensitivity configuration level indication on the small square transmitter, the PK Limit Warning, P Red, Volume Too Loud. |
| 4 | Transmitter 3.5mm connector operating mode indication, microphone mode and line audio mode; And transmitter power indicatio. |