
ONEGA675W - Autres appareils de cuisine CORBERO - Free user manual and instructions
Find the device manual for free ONEGA675W CORBERO in PDF.

User questions about ONEGA675W CORBERO
0 question about this device. Answer the ones you know or ask your own.
Ask a new question about this device
Download the instructions for your Autres appareils de cuisine in PDF format for free! Find your manual ONEGA675W - CORBERO and take your electronic device back in hand. On this page are published all the documents necessary for the use of your device. ONEGA675W by CORBERO.
USER MANUAL ONEGA675W CORBERO
natural_image
Modern kitchen interior with white cabinetry, stainless steel HVAC unit, and glassware (no visible text or symbols)Corberō
VICTORIA
ONEGA

natural_image
Exterior view of a black industrial air conditioner unit (no text or symbols visible)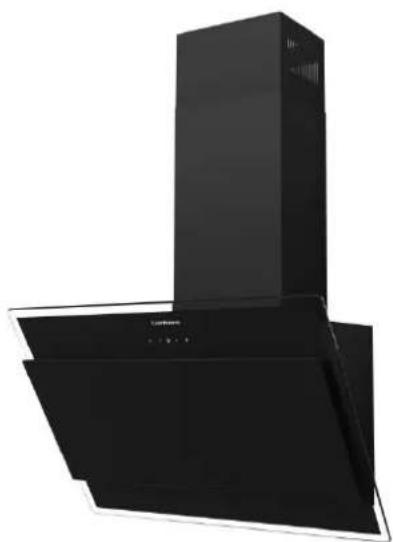
natural_image
Exterior view of a black industrial kitchen tower with ventilation grilles (no text or symbols visible)ES Page 1
POR Page 16
EN....Page 30
Corberō
VICTORIA
ONEGA

natural_image
Black industrial air conditioner unit with a stack top (no visible text or symbols)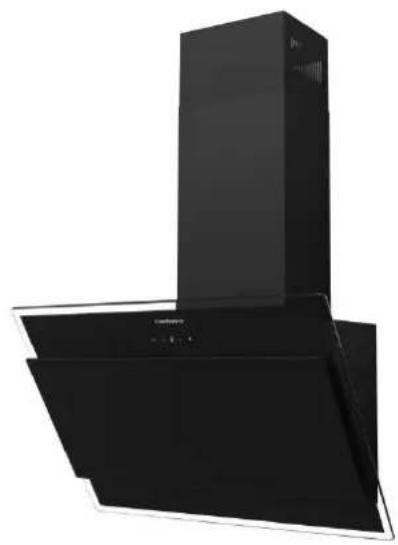
natural_image
Exterior view of a black stainless steel kitchen range hood (no text or symbols visible)CE
natural_image
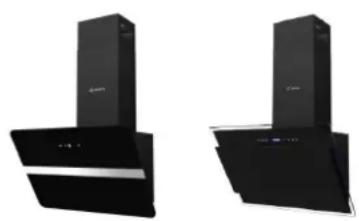
Two black industrial appliances with ventilation grilles, shown from different angles (no visible text or symbols)natural_image
Four-panel line drawing showing different household or furniture arrangements, including a printer, printer case, and interior space (no text or symbols)Touch control switch:
VICTORIA ONEGA
Eliminació n
natural_image
Exterior view of a black and white industrial device labeled 'Caribendi' (no additional text or symbols visible)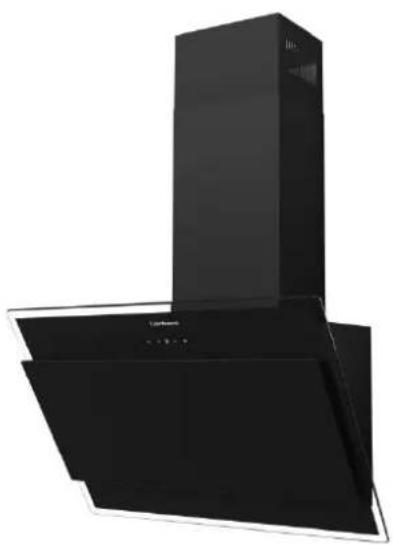
natural_image
Exterior view of a black industrial kitchen range hood (no text or symbols visible)natural_image
Two black industrial appliances with ventilation grilles, shown from different angles (no visible text or symbols)natural_image
Illustration of kitchen utensils and fixtures in four different indoor settings (no text or symbols)Touch control switch:
natural_image
Exterior view of a black industrial air conditioner unit (no visible text or symbols)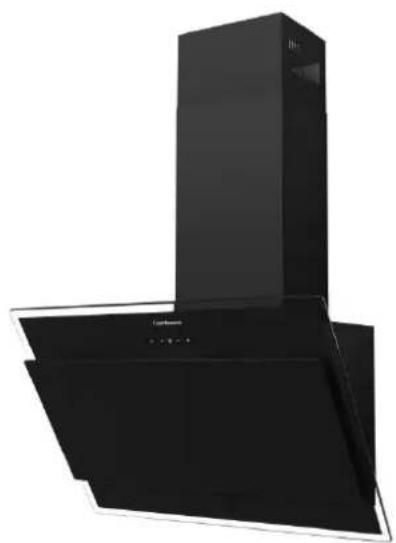
natural_image
Exterior view of a black industrial air conditioner unit (no text or symbols visible)Introduction
Thank you for choosing our product. We hope you enjoy using the device.
Symbols used in this instruction manual
Important information for your safety is clearly marked. It is essential to follow these instructions avoid accidents and damage to the device:

ATTENTION:
Warns of health hazards and indicates possible injury hazards.

PRECAUTIONS:
Refers to possible dangers in the device or other objects.

NOTE: Highlights tips and information.
General information
Carefully read the instruction manual before using the appliance and keep the instructions and receipt. If you pass the device on to another person, you must also pass on the instruction manual.

NOTE: The illustrations in this instruction manual may differ from the original dev
- This appliance has been designed exclusively for private use and for the intended purpose. Not intended for commercial use.
- It should only be used as described in the user manual. Do not use it for any purpose. Any other use will be considered contrary to the intended use and may of property damage or personal injury.
- The device can only be used when it is correctly installed.
- Do not use outdoors. Keep away from heat sources, direct sunlight and moisture. not touch with wet hands.
-
Do not leave the device running unattended.
-
When not in use, for example for cleaning, user maintenance or when there is a switch off the appliance and, if possible, remove the plug (pull the plug itself and the cable) or switch off the fuse.
- The appliance and, if possible, the electrical cord must be regularly inspected for damage. If any damage is found, the device must not be used.
- For safety reasons, modifying or tampering with the device is prohibited.
- To ensure the safety of children, all packaging elements must be kept out of their reach (plastic bags, boxes, polystyrene parts, etc.).

CAUTION: Do not allow small children to play with the plastic bag.
There is a danger of suffocation!
Special safety information
- Respect the manufacturer's instructions for your cooker: check whether an extractor hood is allowed on top of the cooker and which security clearance is required.
For extractor mode operation:
- There must be adequate ventilation in the kitchen when the hood is used in conjunction with gas appliances or other appliances that burn fuel.
- When the hood and other electrical appliances are working at the same time, the pressure in the room must not exceed 4 Pa (4x10⁻⁵ bar).
- Extracted air must not be evacuated through an exhaust pipe used for or waste appliances fueled by gas or other appliances fueled by other fuels.
- When exhaust air is evacuated, the relevant local authority regulations must be adhered to.
- The requirements of the competent local authorities must be respected.
- Follow the installation instructions provided in the "Installation" section.
• Take care of: Accessible hood surfaces can reach high temperatures when used conjunction with kitchen appliances.
- Do not use open flames under the hood. Fry food only under constant supervision avoid any risk of fire.
- Turn on the stove only when there are pots or pans on the stove. Fire risk! This may be damaged.
- Constantly monitor the stove while frying food, as overheating the oil can be a hazard.
- Do not check the condition of the filters while the hood is in operation.
- NEVER use the hood without the aluminum anti-grease filter.
- This appliance can be used by children aged 8 years and over or by persons of reduced physical, sensory or mental capabilities or lack of experience and knowledge, if they have been given supervision or instruction concerning use of the appliance in a safe way and understand the dangers involved.
- Make sure that children do not play with this appliance.
- Children should not be allowed to clean or maintain this appliance unless they are at least 8 old and supervised by an adult.
- The hood must be cleaned regularly. (Follow the instructions in the "Cleaning and maintenance section). There is a risk of fire if cleaning is not done according to instructions.
- Do not attempt to repair this unit yourself. Always contact a technician
authorized. If the power cord is damaged, it must be replaced by the manufacturer or its author technical service in order to avoid any risk.
Unpack the device
- Remove the device from its packaging.
- Remove all packing material such as plastic bags, padding, zip ties, and cartons.
• To avoid danger, inspect the device for shipping damage. - If there is any damage, do not operate the device. Please contact your dealer.
i NOTE:
Production residues or dust may have accumulated in the device. We recommend cleaning the device according to the "Cleaning and maintenance" chapter.
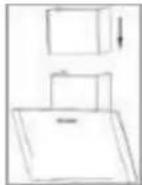
Appliance overview
natural_image
Two black industrial appliances with ventilation grilles, shown from different angles (no visible text or symbols)- Telescopic conduit in 2 pieces
- Main body
- Engine
- Filter
- Glass frame
Parts provided
1 outer (lower) duct
1 inner duct (upper) without ventilation slots 1 connecting piece with non-return valves Includes installation material and drilling template
Installation:
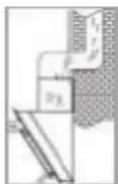
A safety distance must be left between the hob and the lower part of the hood:
The distance should be between 60 - 80 cm. In the case of gas appliances, the distance must least 65 cm. If the gas stove installation instructions specify a greater distance, this distance must be taken into account.
Smoke outlet selection
You can use the hood in two ways:
extractor mode

ATTENTION:
- Extracted air must not be evacuated through an exhaust pipe used for or waste from applian fueled by gas or other appliances fueled by other fuels.
- When exhaust air is evacuated, the relevant local authority regulations must be adhered to. The extractor hood has an air vent at the top to extract cooking odors outside.
Normally, the extracted air is evacuated vertically.
If there is a suitable recess above your kitchen, exhaust air is evacuated through the wall modules and through the base of this recess to the outside.
If your kitchen has a duct underneath the wall modules, the exhaust duct can be installed so the exhaust air can be discharged horizontally through the wall.
Re-circulation mode
If it does not have a direct exhaust opening to the outside, the hood can also be operated in circulation mode (i.e. without an exhaust opening to the outside, the filtered air is returned to the room). In this
In this case, an activated carbon filter must be used as described in the section "Installing the activated carbon filter for recirculation mode".
Activated carbon filter is not provided. You can order it from your dealer or accessory shop. To order, use the reference number indicated in "Technical data".
Assembly

ATTENTION:
- When assembling or inserting the extractor filter and charcoal filter, the appliance must not be connected to the power supply.
- If mounting accessories are not used, there is a risk of electrocution.

PRECAUTIONS:
- Before installation, check that the wall or wall module has sufficient load capacity to support hood.
- When drilling holes in the wall, you should always make sure there are no electrical wires of objects that could be damaged.
- Check that ventilation openings are unobstructed.

NOTE: Recommendations for installation
- Ask someone else to help you with the installation.
- Wear protective gloves to avoid injury from sharp edges.
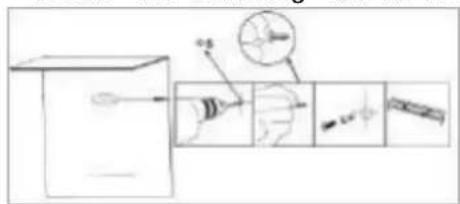
- Determine the position of the hood centered on the hob, respecting the specified safety distances.
- Mark the holes required for wall mounting using the included drilling template. Ch them with a spirit level.
- Drill the 4 holes of ∅8 mm in the wall and place the dowels.
- Next, tighten the mounting screws (4 x ST4*35) until they protrude about 10 mm from the v
- Before hanging the lid, insert the connection piece with the non-return valves.
- Hang the hood and tighten the screws through the hood body. Make sure the mounting is s and the position is horizontal.
- Remove the protective plastic from the telescopic duct.
For extractor mode operation:
- Connect a flexible extractor tube (not supplied) with an inside diameter of ∅ 150 mm to the connection element.

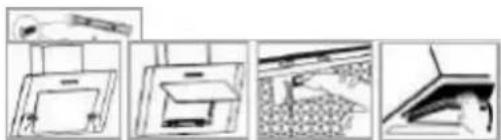
- Slide the inner (upper) duct along the slide fitting, into the outer (lower) duct. Check that the inner duct lines up with the top ventilation holes.
- Determine the length of the duct cover extension by pulling the inner duct up or sliding it back into the outer duct.
- Attach the mounting rail to the upper end of the duct.
Drill two ∅8 mm holes in the wall and place the dowels. Use 2 ST4*35mm screws to fix the rail.
For extractor mode operation:
- Check that the flexible exhaust pipe is in the correct position and connect it to the exhaust outlet to the outside.
- Pull up the inner duct cover and fix the duct unit on the previously mounted rail side by screwing 2 x ST4*10 mm screws.
natural_image
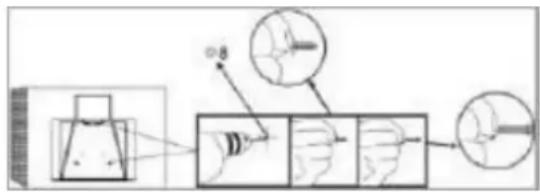
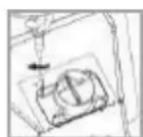
Illustration of four different household appliances or fixtures, including a lamp, refrigerator, washing machine, and nightstand (no text or symbols visible)Activated carbon filter installation for recirculation mode
- Remove the lid and the aluminum grease filter
- Place the charcoal filter over the air inlet of the extraction duct. Check that the extraction duct mounting studs fit into the charcoal filter mounting slots. Turn the respective filter clockwise until it clicks into place.
- Replace the aluminum grease filter and close the lid.
Electrical connection
CAREFUL:
- Connection to the mains must comply with local rules and regulations.
- Incorrect connection can cause electrocution!
- Do not modify the appliance's plug. If the plug does not fit properly into the outlet, have the correct outlet installed by an authorized service technician.
- Accessibility to the socket must be ensured so that the device can be disconnected from the power suit emergency.
- Make sure your power supply matches the device's specifications. Specifications are indicated on the rating plate.
- Plug the power cord into a properly wired and grounded wall outlet.
- If after installation the plug is no longer accessible, a suitable disconnecting device must be installed to comply with current legislation.
Operation/ functioning
Decorative hood
The bottom diameter of pots and pans must be adjusted to the size of the cooking zone.
Use pots and pans with flat bottoms, as uneven bottoms increase energy consumption.
Check that there is a sufficient air source for the hood to work. Adjust the fan power to the evolution generation during the cooking process.
For optimal hood performance, install it in accordance with the installation instructions.
Keep the distance between the upper edge of the kitchen and the lower edge of the hood.
Clean the filter regularly.
Regularly check the activated carbon filter and replace it if necessary. Turn off the hood after use.
If your hood has an off timer, activate this function. Turn off the light after cooking.
We recommend using products from biological cleaning.
Safe disassembly information for maintenance
√ Remove the filter and bulbs as described in the manual.
√ No other measures are foreseen for dismantling for maintenance. If you want to exchange faulty components, please contact our customer service.
Batteries not included.
√ Disassembly information for recycling, recovery and disposal of the device at the end of its life
√ Make sure the unit is disconnected from the power supply before removing any hood filter
√ First remove the chimney.
√ When dismantling the cover, do not forget to unscrew the lower screws first, and then the upper ones.
√ For recycling and recovery of device resources, take the bulbs and various filters to:
- a public authority collection point for waste disposal
- a company specializing in the disposal
- a local appliance retailer who will voluntarily remove the old appliances
Touch control switch:
| [w8zx] | On/Off | Press the On/Off button to turn on the cooker hood display lights up and the cooker hood runs at spee Press the button again to turn off the cooker hood |
| + | Speed | “+” Increase speed“-” Decrease speed |
| - | ||
| [38xK] | Light | Press the light button to turn on LED lights,press i again,the LED lights are off. |
| Press “+” & | Timer (delay-off) | 5 minutesdelay-off |
i NOTE:
If too much steam is produced, the fan should be left running for a few minutes after cook finished.
Cleaning and maintenance

ATTENTION:
• Always switch off the appliance and disconnect the plug from the mains before carrying out or maintenance work.
- Let the device cool down before cleaning it.
- Do not use steam cleaners to clean the device, as moisture can enter electrical component. There is a risk of electrocution! Hot vapors can damage plastic parts.
- The device must be dry before using it again.

PRECAUTIONS:
- Do not use a wire brush or other sharp, abrasive items.
- Do not use acidic or abrasive cleaners.
Decorative hood maintenance
- To clean the hood surface, use a mild detergent and a soft cloth to avoid scratching it.
- The device can be used again after everything has dried properly.
- If you use the decorative extractor hood in re-circulation mode, you must regularly replace the activated filter (see section "Replacing the activated carbon filter").
Cleaning the aluminum grease filter

CAUTION: Risk of fire!
Grease residues on the aluminum filter can ignite if exposed to high temperatures. It is therefore important for grease filter is cleaned regularly.
We recommend that you clean the grease filter monthly:
- Remove the aluminum grease filter by sliding the latch back into the slot, gently push the filter and pu
- Wash the grease filter in a solution of hot water and neutral detergent. Immerse the filter in the solutic
- Then clean with a soft brush, rinse well with warm water and let dry.
- The grease filter is also dishwasher safe (up to 60 °C). Slight discoloration may occur in the dishwasher not affect the function of the grease filter.
Activated carbon filter replacement
The activated charcoal filter absorbs odors and should be replaced at least every six months, depending
Order the charcoal filter from your dealer or accessory store. To order, use the reference number indicate "Technical data".
- See section "Installation of activated carbon filter for re-circulation mode".
- Remove the old charcoal filter by turning it counterclockwise.
Lamp replacement
CAREFUL:
Before replacing the lamp, allow it to cool down. There is a risk of burns! The LED lamp must be repla qualified person.
Light Specifications: LED, 2 x 1.5W
- Remove the aluminum grease filter.
- Open the black protective case of the plug connection with a suitable tool.
- Pull the bulb slightly and disconnect it from the connector.
- Connect the new lamp to the connector and close the protective case.
- Reinsert the lamp unit back into the connector until it clicks into place.
- Replace the aluminum grease filter.
Problem solving
Before contacting an authorized specialist
The following problems can be solved by you by checking the possible cause.
| Problem | Possible Cause | Solution |
| The device does not work or does not work properly | - The device is connected to the network electric?- Have you adjusted the power level yet | -- Connect the plug correctly to the sock Check the fuse.- Check fit. |
| The device does not work well | - Has the power level been set correctly?- Is the grease filter dirty?- Is the carbon filter necessary for the (correct) re-circulation installed?- Is the air outlet free for extractor mode? | - Check fit. The kitchen is not properly ventilated.- Clean the grease filter (see "Cleaning aluminum grease filter").- Check the charcoal filter (see "Replacing activated charcoal filter").- Check the air outlet. |
| the light does it works | The lamp is faulty, installed incorrectly, not positioned correctly in its holder. | Check the lamp (see "Replacing the lamp"). |
| Oil drips on the device | O The grease filter is dirty. | Clean the grease filter. |
i NOTE:
If a problem persists after following the steps above, contact your dealer or an authorized technician.
Corbero reserves the right to make technical and design changes to incorporate continuous product development.
This device has been tested in accordance with all current CE directives, such as electromagnetic compatibility and low voltage directives, and has been manufactured in accordance with the latest safety standards.
Technical data
| Model | VICTORIA960B/W | VICTORIA760B/W | VICTORIA660B/W | ONEGAA960B/W | ONEGAA660B/W |
| Voltage and Frequency | 220-240 V~, 50 Hz | 220-240 V~, 50 Hz | 220-240 V~, 50 Hz | 220-240 V~, 50 Hz | 220-240 V~, 50 Hz |
| Lighting | 2*1.5W LED | 2*1.5W LED | 2*1.5W LED | 2*1.5W LED | 2*1.5W LED |
| Total Power | 168W | 168W | 168W | 233W | 233W |
| Protection Class | I | I | I | I | I |
| Net weight | aprox. 14 kg | aprox. 12kg | aprox. 11kg | aprox. 14 kg | aprox. 12kg |
| Energy Class | A | A | A | A | A |
| Max Aspiration | 594.2M3/H | 594.2M3/H | 594.2M3/H | 705.2M3/H | 705.2M3/H |
Summary of dimensions:
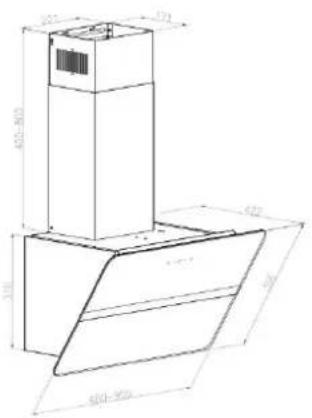
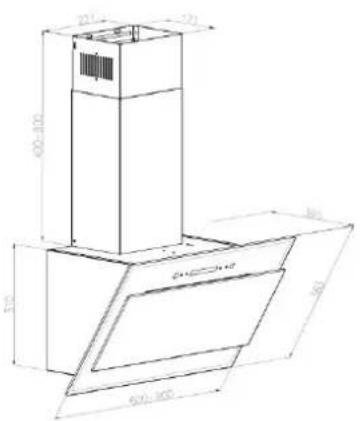
VICTORIA ONEGA
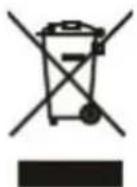
Elimination
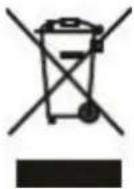
Meaning of the "Waste Bin" symbol
Protect our environment; do not throw away electrical equipment in the household waste.
Return electrical equipment that is no longer in use to
designated collection points for disposal.
This helps to avoid the potential environmental and health effects of improper disposal.
This will contribute to recycling and other forms of reuse of electrical and electronic equipment.
Please contact the appropriate local authorities for information on how to dispose of your equipment.

ATTENTION:
If the appliance has to be taken out of service or discarded, remove or disable existing fasteners and sc
CERTIFICADO DE GARANTÍA
The presentation of the purchase invoice accompanied by this guarantee certificate is essential.
Covered Risks.
This appliance is guaranteed against any malfunction, provided that it is intended for domestic use, proceeding to its repair within the warranty period and only by the authorized SAT network.
Our Corberó appliances have the manufacturer's legal warranty that covers any breakdown or defect for 36 months, from the invoice date of January 1, 2022. If necessary, we take care of any possible incident whenever it is due to a defective component or manufacturing fault. Warranty Exceptions
Warranty Exceptions
- That the date of the certificate does not coincide with the date of sale of the original invoice.
• Faults produced by blow, by fall or any other cause of force majeure.
• If the device has been manipulated by unauthorized personnel. - Faults produced or derived as a consequence of improper use, installation defects, or modifications to the device that alter its operation.
- Start-up, maintenance, cleaning, components subject to wear, lamps, aesthetic parts, oxidation, plastics, rubbers, housings and crystals.
- Microwave ovens (with the exception of built-in ones) and tabletop ovens in the event of any incident of operation, they must be taken to the nearest technical service by the customer. They are not collected or repaired at home.
- Electric thermos guarantee. 3-year warranty including travel and labor costs that correspond to the repair of the product, having to have maintenance once every 12 months. Especially if you have installed a gas appliance, keep in mind as the owner of the installation, the obligation to carry out a complete review of the equipment, (according to Royal Decree 238 / 2013, of April 5. RITE. IT3, M. Lo thermos electrical and boilers that include hot water storage tanks, for the benefit of the Guarantee to apply, it is mandatory that the magnesium anode is operational and that it performs the protection function adequately. For this, it is recommended that the anode be checked biannually by the Official Service and is renewed when necessary Periodicity that must be annual in those areas with critical waters (CaCO3 content greater than 200mg/L, that is, from 20°fH of hardness) Deposits without the correct state of the protection anode are not covered by the warranty Regardless of the type of tank or product, all heating or DHW overpressure valves must be channeled to avoid damage and n the house due to water discharges. The product warranty does not cover damages caused by not channeling the water spilled by this valve.
- Guarantee of pellet stoves, Gas Stoves, it is necessary to have the start-up accreditation from Corberó SAT, to benefit from the 3-year guarantee service.
"THESE EXCEPTIONS VOID THE WARRANTY, THE REPAIR BEING CHARGED TO THE CUSTOMER"
Period covered in devices according to the law of guarantees in the sale of consumer goods Current law is "RD 7/2021"
Official Technical Service: 911 08 08 08
CERTIFICADO DE GARANTIA
- Corberō
- Touch control switch:
- Eliminació n
- Introduction
- ATTENTION:
- PRECAUTIONS:
- General information
- Special safety information
- For extractor mode operation:
- Unpack the device
- i NOTE:
- Appliance overview
- Parts provided
- Installation:
- Re-circulation mode
- Assembly
- NOTE: Recommendations for installation
- Electrical connection
- CAREFUL:
- Operation/ functioning
- Decorative hood
- Safe disassembly information for maintenance
- Cleaning and maintenance
- Decorative hood maintenance
- Cleaning the aluminum grease filter
- Activated carbon filter replacement
- Lamp replacement
- Problem solving
- Elimination
- Meaning of the "Waste Bin" symbol
- CERTIFICADO DE GARANTÍA
- Covered Risks.
- Warranty Exceptions
- Official Technical Service: 911 08 08 08
- CERTIFICADO DE GARANTIA
Brand : CORBERO
Model : ONEGA675W
Category : Autres appareils de cuisine