MTR434KB - Surveillance Camera Lorex - Free user manual and instructions
Find the device manual for free MTR434KB Lorex in PDF.

| Product Type | Surveillance Camera |
| Brand | Lorex |
| Model | MTR434KB |
| Resolution | 1080p HD (1920x1080) |
| Lens | 3.6mm fixed |
| Field of View | 90° diagonal |
| Night Vision | Up to 30m (IR LEDs) |
| Power Supply | 12V DC / PoE (802.3af) |
| Power Consumption | 5W |
| Dimensions (H x W x D) | 200 x 70 x 70 mm |
| Weight | 500 g |
| Protection Rating | IP66 (weatherproof) |
| Operating Temperature | -30°C to 60°C |
| Motion Detection | Yes |
| Audio | No |
| Video Output | BNC (analog) or RJ45 (IP) |
| Storage | Compatible with Lorex DVR/NVR |
| Mounting | Wall or ceiling bracket |
| Maintenance | Clean lens with soft, dry cloth; check cable connections periodically |
| Safety | Use only supplied power adapter; avoid exposure to moisture in connectors |
| Spare Parts | Contact Lorex support for replacement brackets or cables |
| Repairability | Professional repair recommended; no user-serviceable parts |
Frequently Asked Questions - MTR434KB Lorex
User questions about MTR434KB Lorex
0 question about this device. Answer the ones you know or ask your own.
Ask a new question about this device
Download the instructions for your Surveillance Camera in PDF format for free! Find your manual MTR434KB - Lorex and take your electronic device back in hand. On this page are published all the documents necessary for the use of your device. MTR434KB by Lorex.
USER MANUAL MTR434KB Lorex
natural_image
Landscape photo of a rustic wooden cabin nestled in a snow-capped mountain valley under a blue sky with clouds.USER MANUAL
Please read this manual carefully before using, and keep it for future reference.
Table of Contents
IMPORTANT INSTRUCTIONS....2
SAFETY INSTRUCTIONS 2
MAINTENANCE....3
CONNECTING THE MONITOR....4
STEP 1: Connect to Power Source....4
STEP 2: HDMI Connection....4
MONITOR OVERVIEW 5
REMOTE CONTROL....6
Precautions for Batteries 7
Installing the Batteries....7
Using the Remote Control 7
MAIN MENU 8
Navigating the Main Menu 8
Picture Menu 8
Audio Menu 9
Time Menu....9
Setup Menu 10
WALL MOUNTING 11
CONNECTING THE STANDS 12
TECHNICAL SPECIFICATIONS 13
TROUBLESHOOTING....14
IMPORTANT INSTRUCTIONS
SAFETY INSTRUCTIONS

WARNING – TO REDUCE THE RISK OF FIRE, ELECTRIC SHOCK, OR SERIOUS PERSONAL INJURY:
- Do not expose the product to dripping or splashing. Ensure that no objects filled with liquids, such as vases, are placed on the product.
- Keep the product away from heat sources, such as radiators, heat registers, stoves, or other appliances (including amplifiers) that produce heat.
- Clean the product only as recommended by the manufacturer (see MAINTENANCE, page 3 section below for details). Unplug the power cord from the wall outlet before cleaning.
- Unplug the power cord from the power outlet when left unused for extended periods.
• Prevent objects/liquids from falling or spilling on the product. - Route cables so that they will not be walked on or pinched by items placed upon or against them. Pay particular attention to power outlets, receptacles, and the point(s) where cables exit from the product.
- Where the MAINS plug or an appliance coupler is used as the disconnect device, the disconnect device shall remain readily operable.
-
Do not operate this product if:
-
The power-supply cord is damaged.
o Liquid has been spilled into or objects have fallen into the product. - The product has been exposed to rain or water.
- The product does not operate when used according to the instructions.
-
The product has been dropped or damaged in any way.
-
Do not attempt to repair the product by yourself. Take it to the electronics repair shop of your choice for any servicing or repair.
- Do not overload power outlets or extension cords.
- Connect this product to a grounded power outlet.

CAUTION- TO REDUCE THE RISK OR PERSONAL INJURY OR PRODUCT / PROPERTY DAMAGE:
- Do not subject the product to violent shocks, extreme temperatures, or lengthy periods of direct sunlight.
- Keep the product away from magnetic objects, motors, and transformers.
- Do not use this product outdoors.
MAINTENANCE
- Be sure to press POWER button to set this product to the standby mode and disconnect the power plug before performing any maintenance on the product.
- Wipe the product with a dry, soft cloth.
- If the surface is extremely dirty, wipe clean with a cloth which has been dipped in a weak soap-water solution and wrung out thoroughly, then wipe again with a dry cloth.
- Never use alcohol, benzene, thinner, cleaning fluid or other harsh chemicals.
- Do not use compressed air to remove dust.
CONNECTING THE MONITOR
Ensure all the cables are disconnected from the unit before connecting the power source.
STEP 1: Connect to Power Source
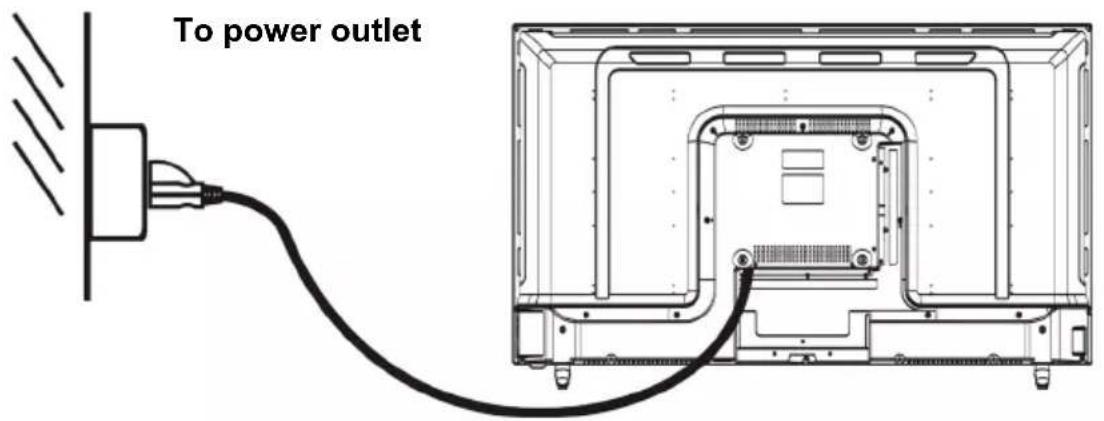
text_image
To power outletSTEP 2: HDMI Connection
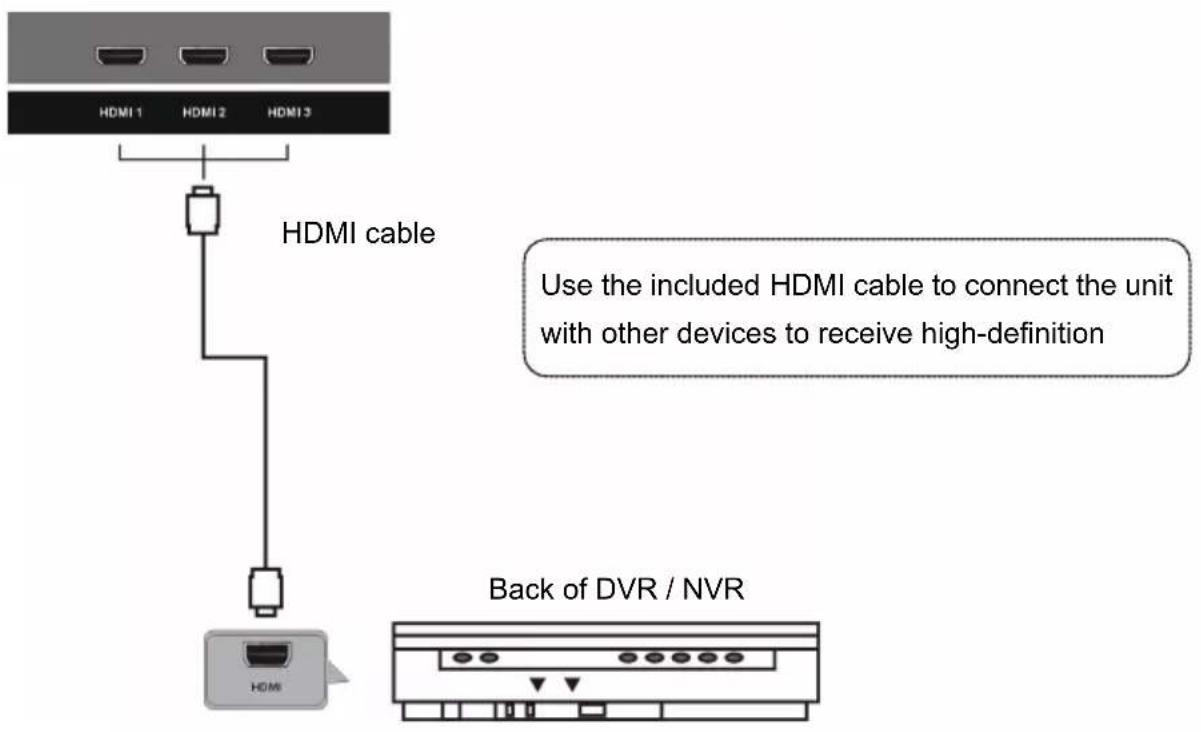
text_image
HDMI 1 HDMI 2 HDMI 3 HDMI cable Use the included HDMI cable to connect the unit with other devices to receive high-definition Back of DVR / NVRNotes:
• Use the included HDMI cable to connect this unit to an external device.
• The USB port is for service only.
MONITOR OVERVIEW
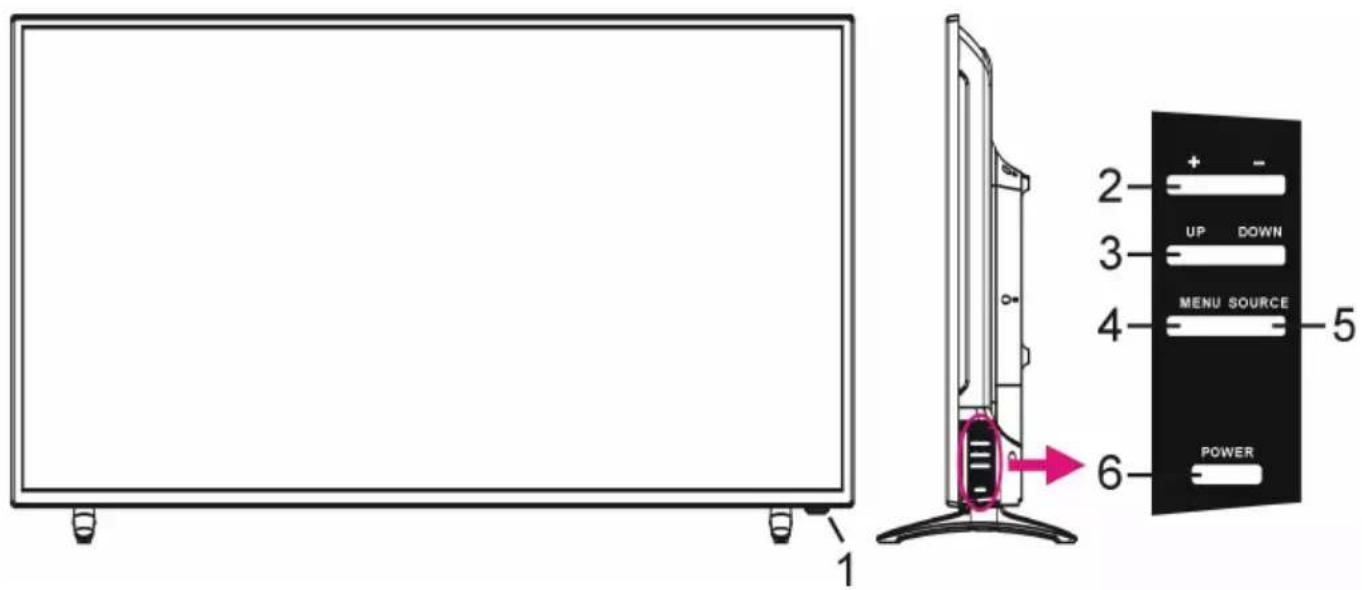
text_image
1 2 3 4 5 6 UP DOWN MENU SOURCE POWER- Remote Control Sensor / POWER Indicator: The indicator glows red when the unit is in standby mode; blue when powered on.
- +/- Buttons: Press to increase/decrease the volume level, or to adjust values in menu pages.
- UP/DOWN Buttons: In menu pages, press to navigate up/down.
- MENU: Press to enter the main menu.
- SOURCE: Press to open the input source list.
- POWER: Press to power the unit on/off.
REMOTE CONTROL
- POWER: Set the unit in standby mode; press it again to switch it on.
- SLEEP: Set desired sleep time.
- MENU: Open main menu or return to previous menu.
- SOURCE: Select desired input source.
- OK: Confirm selection.
- ▲/▼/◄/►: Navigation buttons
- EXIT: Exit the menu page.
- ASPECT: Press repeatedly to select desired screen size.
- MUTE: Mute the sound.
- VOL +/-: Increase/decrease the volume level.
- P. MODE: Switch the picture mode.
- S. MODE: Switch the sound mode.
- DISPLAY: Display the available program information.
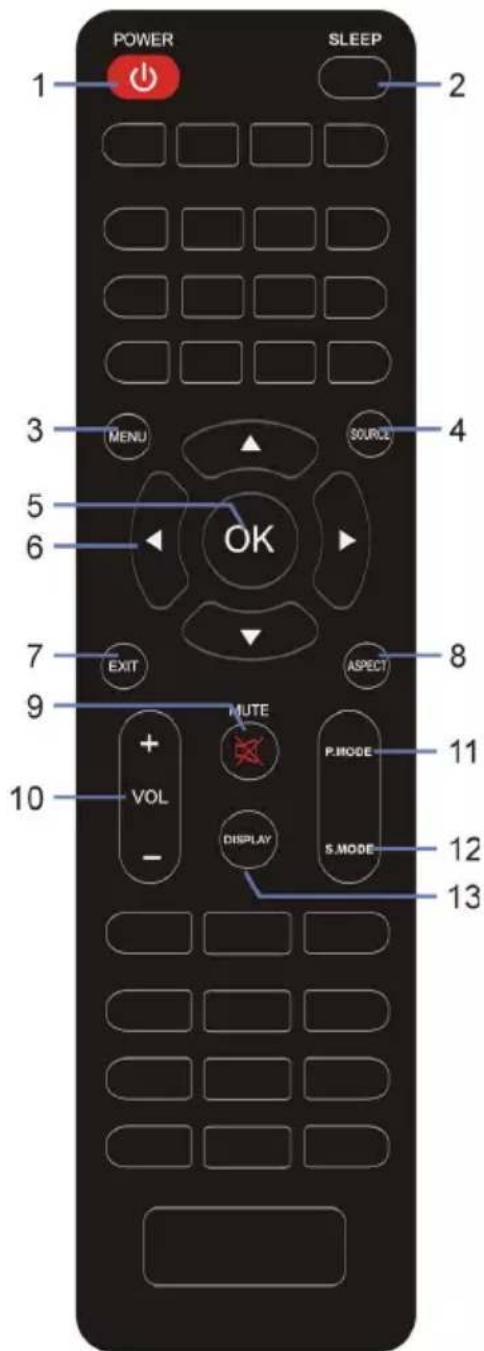
text_image
POWER SLEEP 1 2 3 MENU SOURCE 4 5 OK 6 7 EXIT ASPECT 8 9 MUTE P.MODE 10 VOL DISPLAY S.MODE 11 12 13Precautions for Batteries
• Do not use old and new batteries together.
- Do not use different types of batteries together (for example, do not use Manganese and Alkaline batteries).
• Do not attempt to charge non-rechargeable batteries.
- Remove the batteries from the remote control if you do not intend to use the unit for an extended period.
- When disposing of used batteries, follow local guidelines for recycling and disposal of batteries.
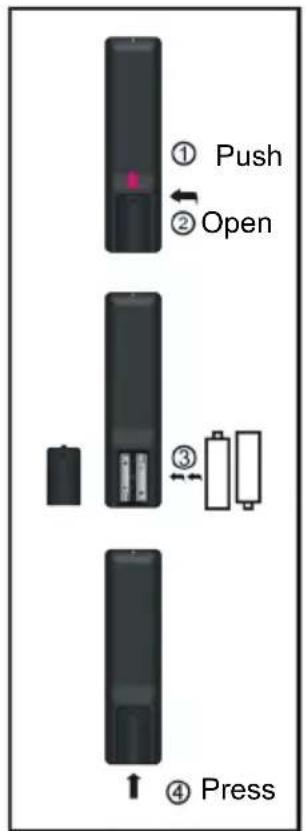
Installing the Batteries
- Open the cover at the back of the remote control.
- Insert two AAA size batteries according to the polarity markings (+/-) inside the compartment. Make sure the batteries are correctly aligned and properly pushed into place.
- Slide the cover back into position.
Using the Remote Control
The remote control should be operated within 6m and 30° to the left or right of the IR receiver at the front of the monitor (see MONITOR OVERVIEW, page 5 for the location of the IR receiver).
text_image
① Push ② Open ③ ④ Press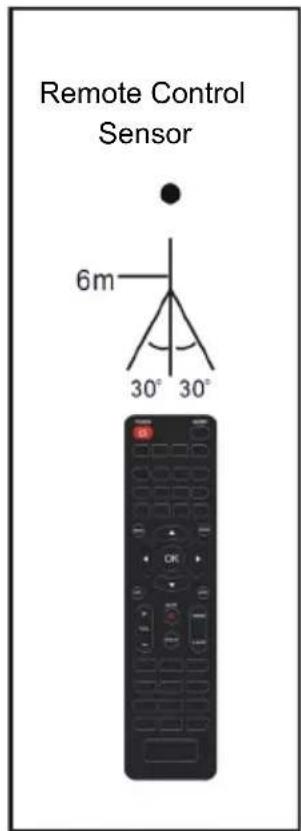
text_image
Remote Control Sensor 6m 30° 30°MAIN MENU
Navigating the Main Menu
- Press MENU on remote control to display the OSD main menu.
- Press UP / DOWN on remote control to highlight desired option.
- Press OK on remote control to enter sub-menu.
- Press LEFT / RIGHT / UP / DOWN to adjust highlighted option.
- Press MENU to return to previous setting page.
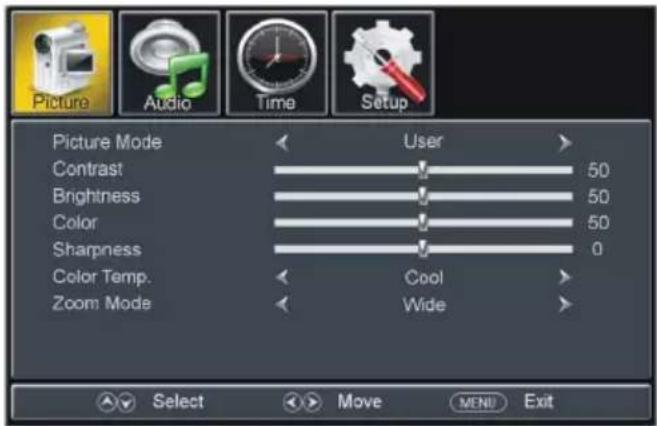
Picture Menu
text_image
Picture Audio Time Setup Picture Mode User Contrast 50 Brightness 50 Color 50 Sharpness 0 Color Temp. Cool Zoom Mode Wide Select Move MENU Exit• Picture Mode: Standard, Dynamic, Mild, User, Energy Saving.
• Contrast: The value of Contrast can be adjusted from 0-100.
- Brightness: The value of Brightness can be adjusted from 0-100.
• Color: The value of Color can be adjusted from 0-100.
- Sharpness: The value of Sharpness can be adjusted from 0-100.
NOTE: If the value of Contrast, Brightness, Color, Tint or Sharpness has been changed, the picture mode will turn to User automatically.
• Color Temp. (Color Temperature): Available options: Normal, Warm, Cool.
- Zoom Mode: This item is used to select preferred zoom mode of display screen. Available options: Normal, Wide, Cinema, Fit to Screen.
NOTE: The available zoom mode may be different for different input source.
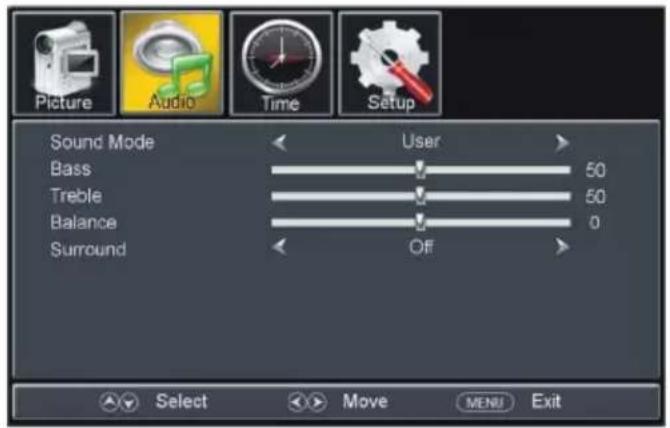
Audio Menu
text_image
Picture Audio Time Setup Sound Mode User Bass 50 Treble 50 Balance 0 Surround Off Select Move MENU Exit• Sound Mode: Available options: Standard, Music, Movie, Sports, User.
• Bass: The value of Bass can be adjusted from 0-100.
• Treble: The value of Treble can be adjusted from 0-100.
• Balance: The value of Balance can be adjusted from -50 to 50.
NOTE: If the value of Bass, Treble, or Balance has been changed, the sound mode will turn to User automatically.
• Surround: This item is used to turn on/off Sound Surround function.
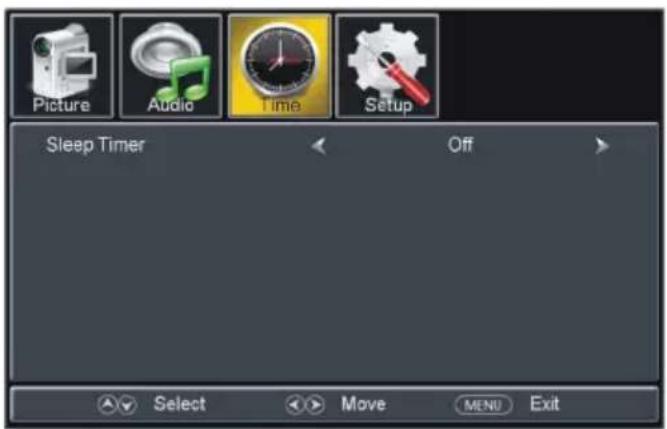
Time Menu
text_image
Picture Audio Time Setup Sleep Timer Off Select Move MENU Exit- Sleep Timer: Available options: Off, 5 min, 10 min, 15 min, 30 min, 45 min, 60 min, 90 min, 120 min, 180 min, 240 min.
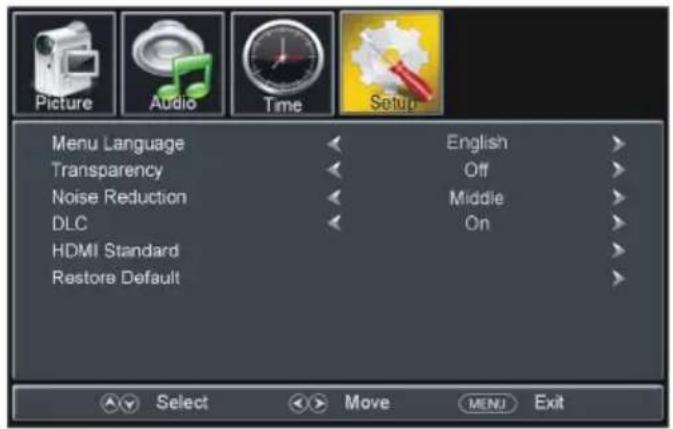
Setup Menu
text_image
Picture Audio Time Setup Menu Language Transparency Noise Reduction DLC HDMI Standard Restore Default English Off Middle On Select Move MENU Exit- Menu Language: This item is used to select preferred OSD menu language.
• Transparent: This item is used to turn on/off Transparent OSD menu.
• Noise Reduction: Available options: Off, Weak, Middle, Strong.
• DLC: This item is used to turn on/off Dynamic Luminance Control. - HDMI Standard: This item is used to select HDMI version to suit connected HDMI device.
- Restore Default: This item is used to reset to factory default settings.
WALL MOUNTING
- Contact a professional for assistance when wall mounting your monitor. We are not responsible for any damage to the product or injury to yourself, if you mount the monitor on your own.
- Do not wall mount the monitor while monitor is turned on. It may cause personal injury due to electric shock.
• Wall mount and mounting accessories not included.
Back of your monitor
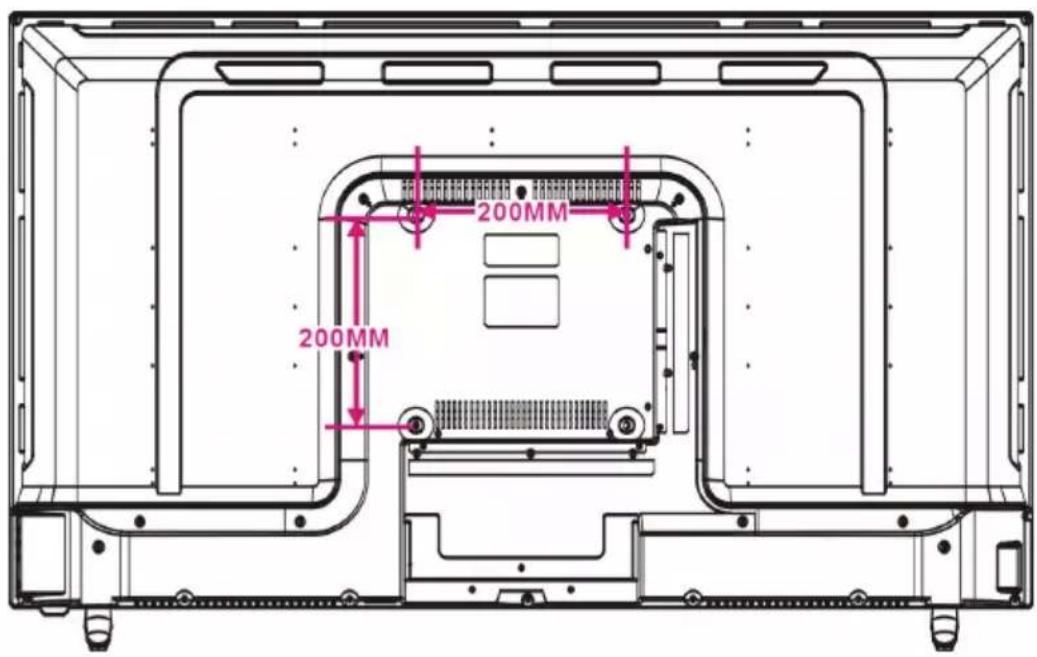
text_image
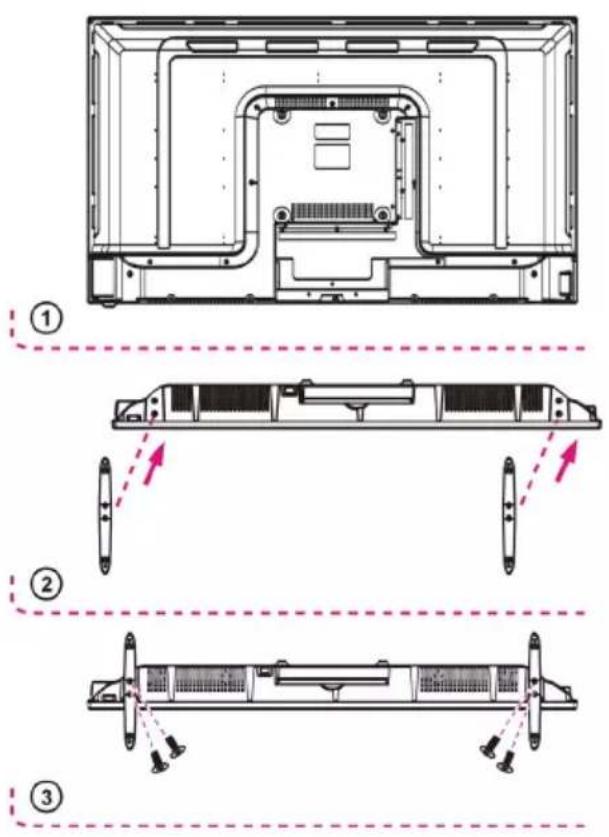
200MM 200MMCONNECTING THE STANDS
Your monitor may be packaged with the stands and monitor separated. Before enjoying this monitor, please connect the stands according to the instructions below.
STEP 1:
Place the monitor faced down on a soft cloth or cushion to prevent the panel from being damaged.
STEP 2:
Align the stands with the slots on the bottom of the monitor as per picture (2).
STEP 3:
Tighten the included screws with a screwdriver.
NOTES:
- Unplug the power cord prior to installing or removing the monitor stands.
- To avoid any damage to the product, get assistance from at least one other person when installing or removing the monitor stand.
TECHNICAL SPECIFICATIONS
| Display Device | 43” LED |
| Resolution | 3840 × 2160 |
| Contrast Ratio | 800:1 |
| Aspect Ratio | 16:9 |
| Life Time | 30,000 Hours |
| Built-in Speakers | Yes |
| Power Source | AC 100~240V, 50/60Hz |
| Power Consumption | <115W |
| Operating Temperature | 23°F to 113°F-5°C to 45°C |
| Dimensions (W × D × H) | 38.2 × 9.1 × 23.9”971 × 231 × 607mm |
| Weight | 16.1lbs / 7.3kg |
Specifications are subject to change without notice.
TROUBLESHOOTING
Check the following points before assuming malfunctions of this unit:
| Problem Solution(s) | |
| Unit is not receiving power. | Make sure the power cord is connected properly. |
| No image. | Make sure the power cord is connected properly.Make sure the signal cable is securely connected.When LED light indicates red, this monitor is in standby mode. Please move your personal mouse to see if the image resumes. |
| Abnormal colors. | Please adjust the monitor color. SeePicture Menu, page 8for details. |
| The image bounces or a wave pattern is present. | Remove any electrical device or appliance that may cause interference. |
| The screen image is not centered or the size is incorrect. | Please try another display size. |