F-C01 - Lens Accsoon - Free user manual and instructions
Find the device manual for free F-C01 Accsoon in PDF.

| Product Type | Lens |
| Brand | Accsoon |
| Model | F-C01 |
| Main Functions | Optical magnification, focusing, aperture control |
| Focus Type | Manual focus (likely) |
| Aperture Type | Manual aperture ring (assumed) |
| Lens Mount | Compatible with standard lens mounts (e.g., PL, EF, E, etc.) |
| Optical Construction | Multi-element design with lens coatings |
| Weight | Approximately 500-800 g (estimated) |
| Dimensions | Typical cine lens dimensions (approx. 100 mm diameter, 150 mm length) |
| Power Source | None (manual operation) |
| Maintenance | Clean with soft, dry cloth; avoid moisture |
| Storage | Store in a dry, dust-free environment |
| Safety Precautions | Avoid drops and impacts; do not disassemble |
| Spare Parts | Not applicable (lens is not user-serviceable) |
| Repairability | Professional repair only |
| Accessories Included | Front and rear lens caps (assumed) |
| Country of Origin | China (typical for Accsoon) |
| Warranty | Standard manufacturer warranty |
| General Information | High-quality lens designed for professional video and cinema production |
Frequently Asked Questions - F-C01 Accsoon
User questions about F-C01 Accsoon
0 question about this device. Answer the ones you know or ask your own.
Ask a new question about this device
Download the instructions for your Lens in PDF format for free! Find your manual F-C01 - Accsoon and take your electronic device back in hand. On this page are published all the documents necessary for the use of your device. F-C01 by Accsoon.
USER MANUAL F-C01 Accsoon
natural_image
Technical line drawing of a mechanical device with gears and mounting bracket (no text or symbols)Motor * 1
跟焦电机 * 1
F-C01 モーター * 1
natural_image
Circular mechanical component with a central arrow symbol, no text or labels presentController * 1
跟焦手轮 * 1
F-C01 コントローラー * 1
Motor Mount Adapter * 1
电机安装附件 * 1
モーター用
マウントアダプター*1
Controller Mount Adapter * 1
手轮安装附件 * 1
コントローラー用
マウントアダプター * 1

15mm Rod * 1
15mm 导管 * 1
15mm ロッド * 1

3/16" Allen Key* 1
3/16英寸内六角扳手*1
3/16インチ六角レンチ * 1
In the Box
natural_image
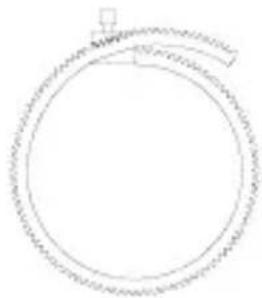
Simple line drawing of a circular object with a small protrusion at the top (no text or symbols)Focus Gear Ring (0.8 Mod; Supports up to 4.1" diameter lens) * 1
natural_image
Six identical empty rectangular shapes arranged in a 2x2 grid (no text or symbols)1/4"-20 x 5/16" Socket Head Cap Screw * 6
1/4-20x5/16in美制内六角圆柱头螺钉*6
User Manual, Warranty Card * 1
说明书、保修卡*1
取扱説明書、保証書 * 1
Contents
■ Instructions·English
Product Feature 1
F-C01 Diagram 2
Instruction 6
Functions 11
Specification 13
Warranty 14
■ 使用说明·中文版
产品特点 15
认识致迅 F-C01 16
安装说明 20
功能说明 25
产品规格 27
保修说明 28
■ 取扱説明・日本語
製品特徵 29
F-C01 について …… 30
取付け説明 34
機能紹介……39
製品仕様 41
メーカー保証 42
Product Features
Equipped with Anti-interference FHSS Technology
0.01s Quick Response, Fast Spinning Support
350ft/100m Control Range
A/B Quick Focus Point Setting
Automatic and Manual Lens Calibration
Support Wired and Wireless Control
Strong Torque in a Compact Design
Switchable Motor Rotation Direction
Equipped with Status OLED Display
Aluminum Alloy and Engineering Plastics Machining
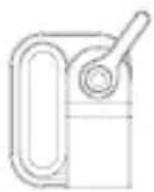
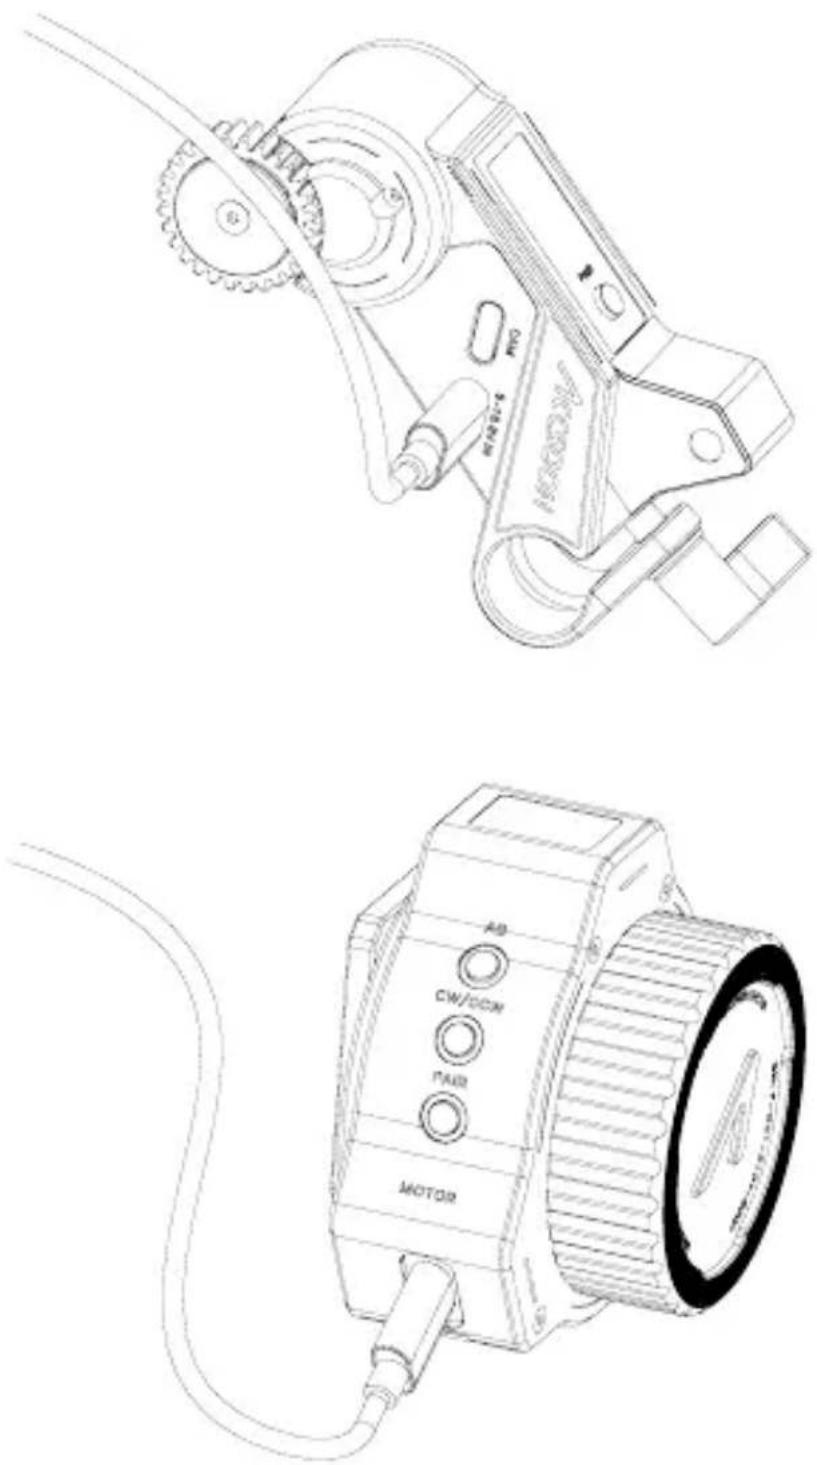
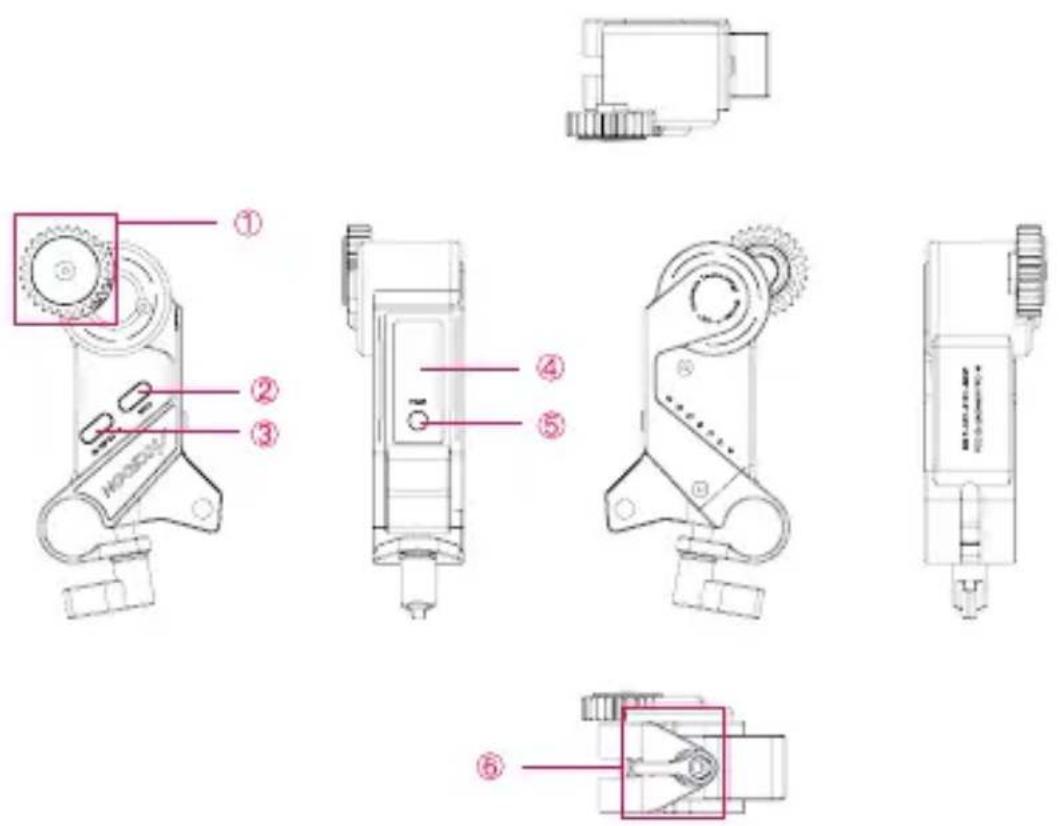
F-C01 Motor
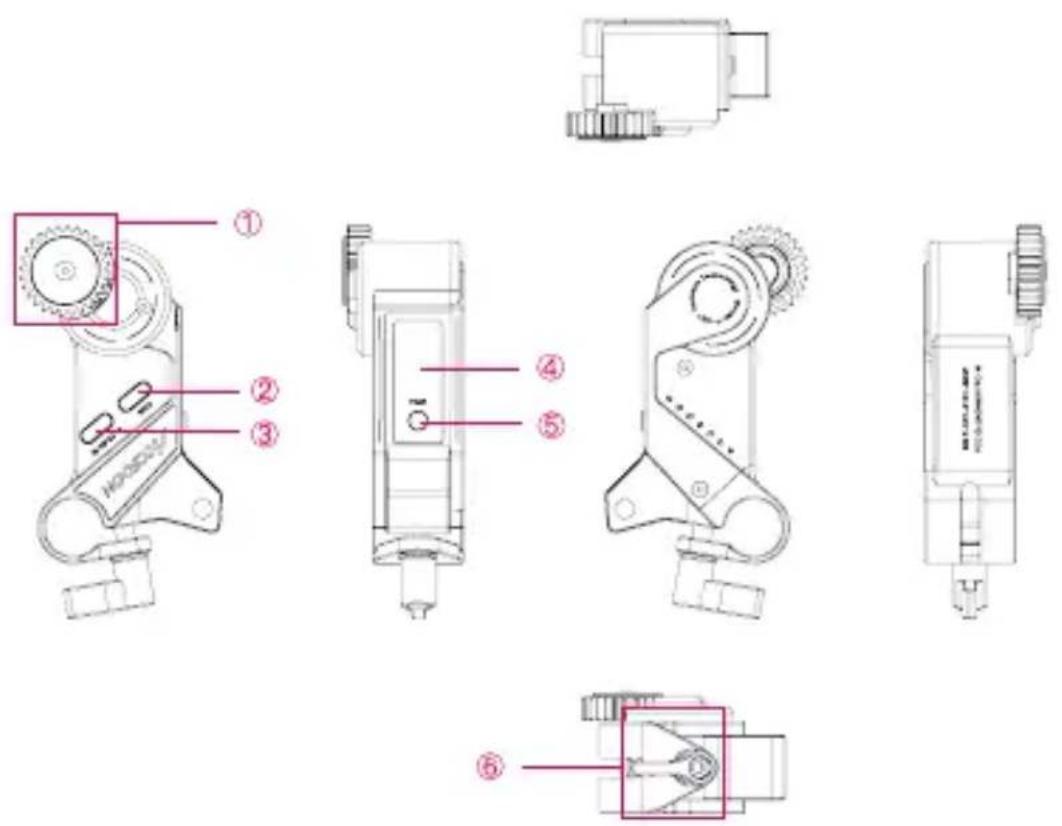
① Follow focus gear
③ Motor power interface & Controller wired control interface
⑤ PAIR button
(for wireless pairing with controller)
② Camera-extension interface
④ OLED display
⑥ Hand screw
01
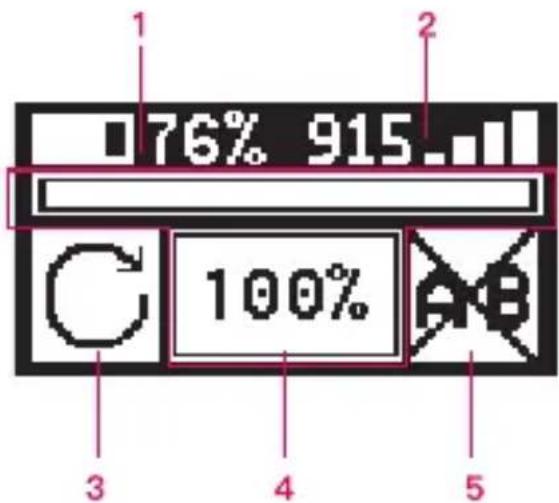
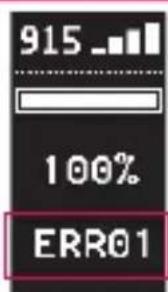
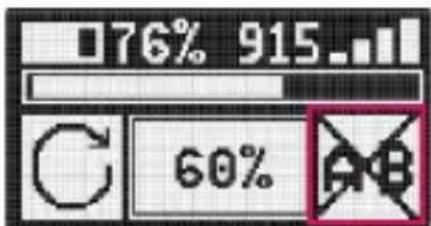
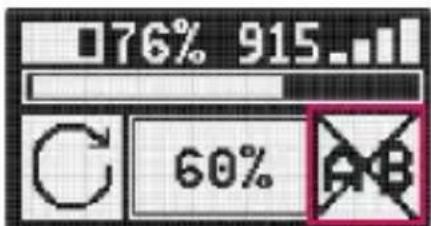
F-C01 Motor OLED Display
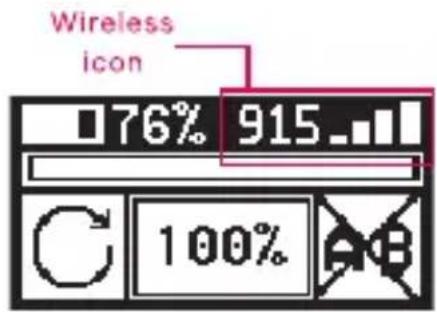
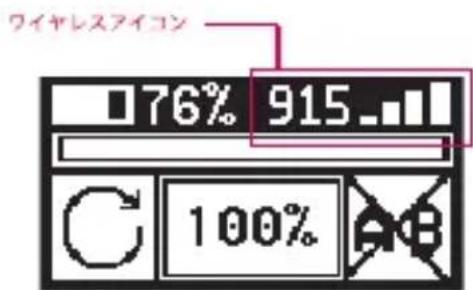
1. Wireless/Wired connection status
① X: No control signal connection.
② Signal strength: The signal strength between the motor and the controller. (Motor is paired with controller)
③ BUS: The motor is cable-connected.
2. Route bar
The percentage of current controller rotation route.
3. Calibration status
④ FREE: Freshly powered on, calibration not yet completed, and route bar at 0%.
⑤ IN CAL: Under calibration.
⑥ ARMED: Calibration completed, and current route percentage is shown.
4. Current firmware version of the motor
5. Error codes
When the motor is under stall protection* or other error, the error code will be shown on the OLED.
*Stall protection: Motor Stall refers to a situation where the motor is mechanically or artificially obstructed and cannot rotate. Accsoon F-C01's stall protection technology can prevent and reduce the damage to the motor.


BUS

FREE
IN CAL
ARMED
Ver:101
ERR01
915
100%
ARMED
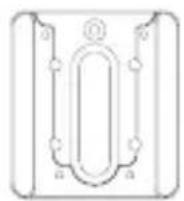
F-C01 Controller
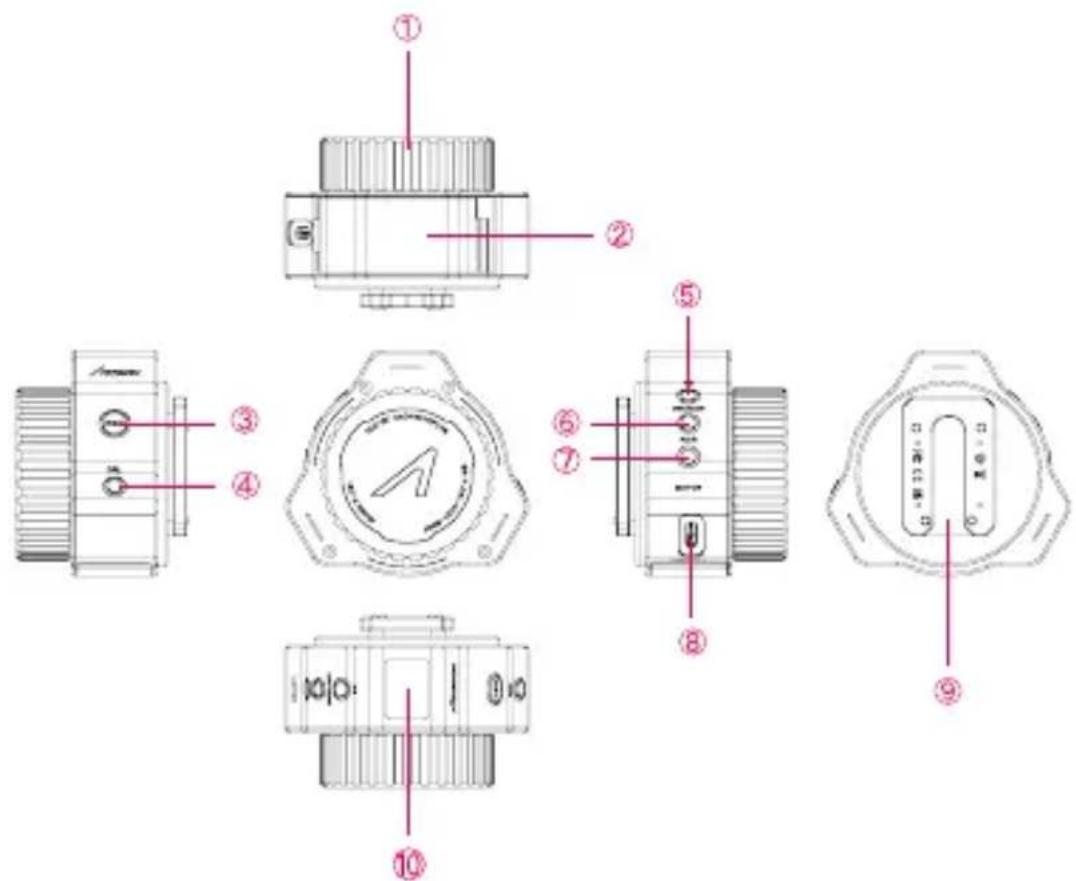
① 320-degree damping knob
④ CAL button (for motor automatic/manual calibration)
⑦ PAIR button (for wireless pairing with F-C01 motor)
② Battery box
⑤ AB button
(for activate/
deactivate AB points)
⑧ Motor interface (for wired connection of motor and controller)
③ REC button (for power On/Off)
⑥ CW/CCW button (for switching motor rotation direction)
⑨ Controller quick release adapter
10 OLED display
02 F-C01 Controller OLED Dispaly
1. Battery power level
When battery level is below 1%, the battery icon will flash and automatically switch off in 3 to 4 seconds.

2. Wireless/Wired connection status
① X: The controller is wireless-connected, the controller is not paired with the motor.

② Singal strength: The signal strength between controller and motor, the controller is paired with the motor.

③ BUS: The controller is cable-connected.

3. Current motor rotation direction
4. Route bar
The percentage of current controller rotation route.
5. A/B setting status


01
Install focus gear ring and adapter
- Focus gear ring: Attach the focus gear ring to the lens and tighten it. Ensure the gear ring is installed properly to allow unobstructed motion. (If your lens has its own follow focus ring, please skip this step).
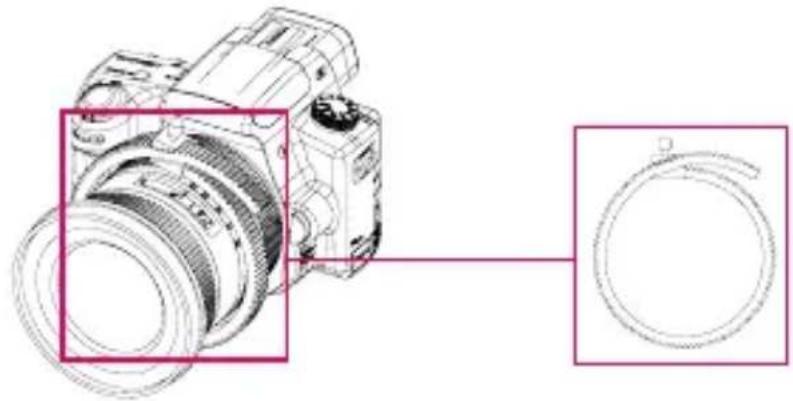
natural_image
Technical line drawing of a DSLR camera with a magnified inset showing the ring detail (no text or symbols present)- Motor mount adapter: Attach the motor mount adapter to the camera cage with screws.
natural_image
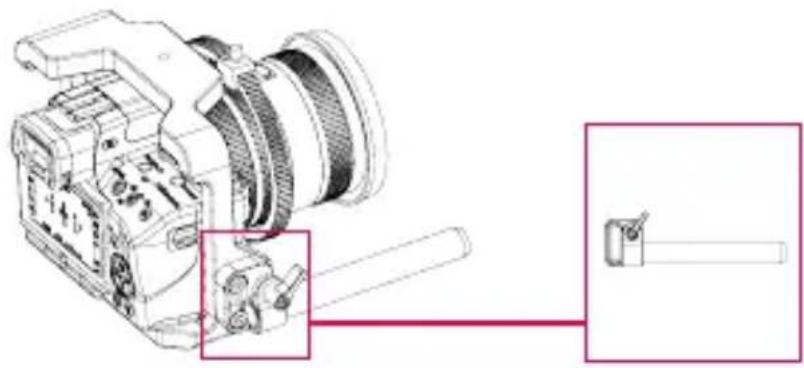
Technical line drawing of a DSLR camera with attached mechanical components (no text or symbols)- Controller mount adapter: If you need to mount the controller to the cage, you can use the screws to attach the adapter to the cage first, and then mount the controller to the adapter.
natural_image
Technical line drawing of a mechanical device with internal components and a close-up inset showing a component detail (no text or symbols)02
Install the F-C01 motor
- Attach the motor to the motor mount adapter and rod with the hand screw, and then engage the focus gear on the motor with the lens ring.
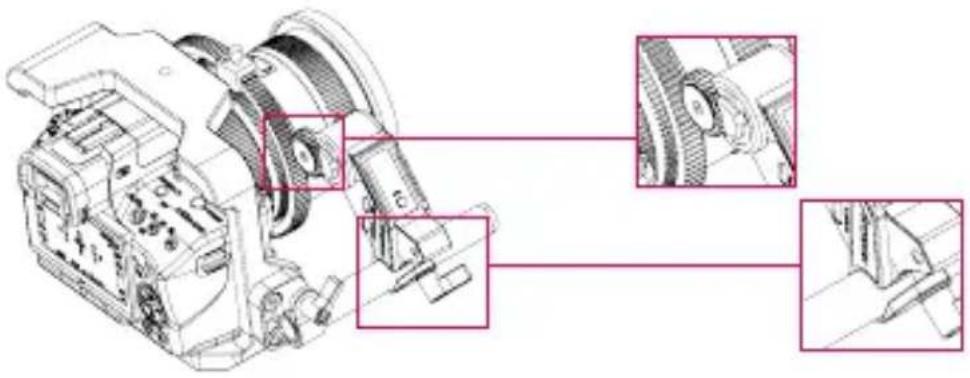
natural_image
Technical line drawing of a mechanical assembly with three inset views showing close-ups of components (no text or labels)- When the motor is powered on, the route bar will be at 0% and flashing "FREE" until the calibration is completed.

03
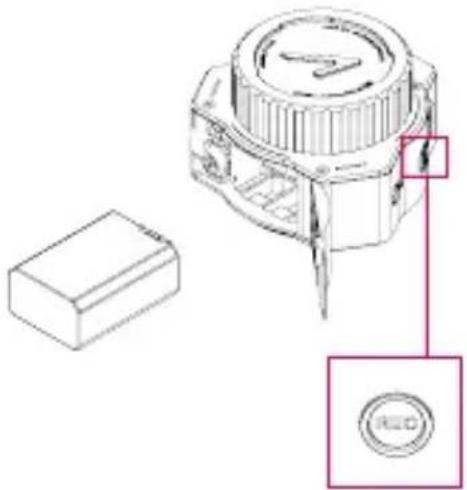
Prepare the F-C01 controller
- Use NP-FW50 batteries to power the F-C01 controller.
- Power On/Off via the REC button on the controller.
Power On/Off: Hold the REC button for 3 seconds.
natural_image
Technical line drawing of a mechanical component with a red circular button labeled 'RED' and a rectangular base (no text or symbols beyond labels)04
Wireless pairing
- F-C01's motor and controller have already been paired before leaving the factory, and are ready to work when powered on.
- If you need to change to a new motor or controller, please follow the steps below for re-pairing.
① Connect power to the motor and hold the PAIR button on the motor until the wireless icon starts to flash on the motor's OLED screen;
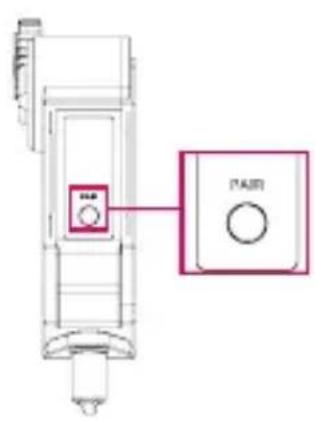

② Hold the PAIR button on the controller until the wireless icon starts to flash on the controller's OLED screen;

③ F-C01's motor and controller will pair automatically;
④ After the pairing is completed, the OLED screens of the motor and controller will display the strength of the wireless signal at the same time.

Lens calibration
After the motor and the controller are paired, a calibration is needed for the motor to find the start point and the end point on the lens.
F-C01 supports both automatic and manual lens calibration. If your camera lens doesn't have mechanical limits, use manual calibration. If it has, use either automatic calibration or manual calibration.
1. Automatic calibration
① Hold CAL button on the controller for 2 seconds to enter automatic calibration mode;
② The motor will automatically rotate to the "Start Point" and "End Point" to complete the automatic calibration;
③ After calibration is completed, the OLED screen of the motor will display "ARMED" and the controller's current route percentage.
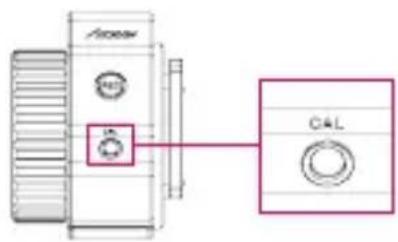

2. Manual calibration
① Double click CAL button on the controller to enter manual calibration mode;
② Rotate the lens to the start position manually, then press CAL button on the controller to set "Start Point";
③ Next rotate the controller manually to the "End Point", press CAL button on the controller to confirm and complete the manual calibration;
④ After calibration is completed, the OLED screen of the motor will display "ARMED" and the controller's current route percentage.
Note:
- After calibration, if: ① the motor direction is changed; or ② the motor is disconnected from the controller, the motor will return to uncalibrated status and need to be recalibrated.
- If encountering motor stall protection (OLED screen will display error code: ERR01), a reboot is needed.

Wired control mode
To achieve wired control connection, you need to connect the 5–16.8V IN interface on the motor to the MOTOR interface on the controller with the motor power cable.
natural_image
Technical line drawings of a mechanical device with labeled components (no readable text or symbols)
A/B points setting
You can set two different quick focus points which allow rapid focus switching during shooting.
How to set:
Press the AB button on controller to activate/deactivate A/B points.
- Rotate the controller to the first point and press the AB button to set point A;
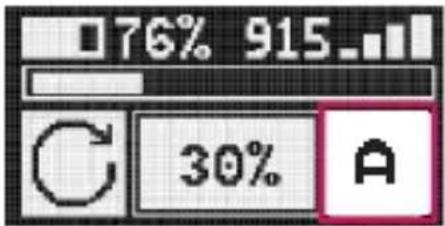
- Rotate the controller to the second point and Press the AB button to set point B;
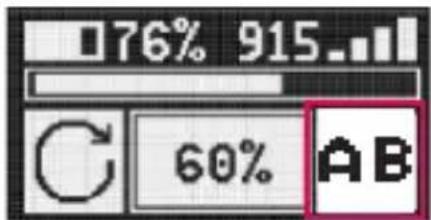
- Press the AB button again to cancel preset AB points.
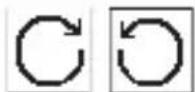
07 Motor rotation direction switching
F-C01's motor can be mounted on either side of the lens, and the user can customize the motor rotation direction as they desired.
Switching method:
Hold the CW/CCW button on the controller for 2 seconds to switch.
Note:
It is recommended that the user switches the direction of rotation before the calibration's completed. If the user wants to change the direction of rotation after calibration, the motor will automatically return to uncalibrated state and need to be recalibrated.
03 Firmware update
You can update F-C01 directly via Accsoon official App - Accsoon Go.
Note:
① Before searching for the latest firmware, please confirm that your mobile phone's WIFI can access the Internet so that the App can search and download the latest firmware from the server.
② Please ensure your mobile phone's Bluetooth is on (If it is not, when the App is launched, the App will ask for permission to turn it on)
1. Download App
Please download the App – Accsoon Go from Google Play Store or iOS Apple Store.
2. Complete connection
① Power the controller, then connect the motor and controller via motor power cable;
② Open Accsoon Go, select "F-C01", and then tap "Connect".
3. Firmware update
① After the connection is completed, the App will automatically search for the latest firmware and compare it with the current F-C01 firmware. If there is a new firmware available for update, tap "Confirm" to start the update.
② If the update completes, the App will prompt "Firmware update succeeded" and the controller and the motor will automatically switch off; if the update fails, the App will prompt "Firmware update failed", please reboot the controller and the motor and try again.
Functions
Note:
① Please ensure that the controller's battery level is above 50% during the update.
② Please ensure that the controller is connected to the motor during the update.
③ Please ensure that no power down occurs during the update.
Specification
| Motor | Controller | |
| Operating Frequency | 915MHz | |
| Operating Current | Static Current: 105mA (@8.4V) Stall Current: 1.5A (@8.4V) | Static Current: 95mA (@8.4V) |
| Transmitter Power | 20dBm | |
| Max Torque | 0.3N·m | |
| Max Rotation Speed | 225RPM | |
| Max Transmission Range | 100m (Outdoors and unobstructed) | |
| Response Time | 10ms (Within communication distance, unobstructed) | |
| Input Voltage | 5-16.8V | 7.4V(NP-FW50 battery input) |
| Output Voltage | 5V | 8.4V |
| Material | Aluminum alloy, engineering plastics | |
| Operation Environment Temperature | -10-40°C | |
| Dimensions | 53.5*104*32mm | 79*73*55mm |
| Weight | 100g | 110g |
01 Warranty Period
- If there is a quality problem that occurs within 15 days after receiving the product, Accsoon will be providing complimentary maintenance or replacement.
- Accsoon will provide a one-year warranty on the products and a three-month warranty on the accessories and cables. Free maintenance service is available during the warranty period.
- Please keep the proof of purchase and the user manual in a safe place.
02 Warranty Exclusions
- Out of warranty (If the proof of purchase is not available, the warranty will be calculated from the date the product is delivered from the factory).
- Damage caused by use or maintenance is not following the requirements of the product manual.
- Unauthorized repair, modification or disassembly.
- Damage caused by force majeure such as fire, flood, lightning strike, etc.
03 Warranty Process
- Contact your local Accsoon authorized dealers for after-sales service. If there is no local authorized dealers, you can contact our customer service via our email (support@accsoon.com) or website (www.accsoon.com) and get appropriate support.
- You will get detailed solutions from the authorized dealers or Accsoon.
- Accsoon reserves the right to review the damaged product.
Contact Us
Facebook: Accsoon
Facebook Group: Accsoon Official User Group
Instagram: accsoontech
Youtube Channel: ACCSOON
Email: Support@accsoon.com
Certificate of Quality
This product is confirmed to meet quality standards and permitted for sale after strict inspection.
QC Inspector:

More details about the product please visit www.accsoon.com
This document is subject to change without notice.
Accsoon ^® is a trademark of Accsoon Technology Co., Ltd.
Copyright© 2022 Accsoon. All rights reserved

产品特点
搭载无线跳频技术,抗干扰能力强
0.01s快速响应,高转速
控制范围可达100米
快速AB点移焦
支持镜头行程自动校准和手动校准
支持无线和有线控制方式
小体积,大扭矩
可切换电机旋转方向
可视化OLED屏
高强度铝合金和高性能工程塑料机身
跟焦电机
安装说明
01
安装跟焦环及附件
natural_image
Technical line drawing of a DSLR camera with a magnified inset showing the ring detail (no text or symbols present)natural_image
Technical line drawing of a DSLR camera with attached mechanical components (no text or symbols)natural_image
Technical diagram of a mechanical device with internal components and a close-up inset showing a component detail (no text or symbols present)安装说明
02 安装跟焦环及附件
natural_image
Technical line drawing of a mechanical assembly with multiple views (no text or symbols)03 准备跟焦手轮
natural_image
Technical line drawing of a mechanical component with a red circular button labeled 'REO' and an inset view of a rectangular block (no text or symbols beyond labels)安装说明
04 无线通讯配对


2. 手动校准
natural_image
Technical line drawings of a mechanical device with labeled components (no readable text or symbols)01 AB点设置及取消
- 再次按下AB键可取消已设置的AB点。
功能说明
02 电机旋转方向切换
欲了解产品全部信息
请浏览致迅科技官网:www.accsoon.com
内容如有更新,恕不另行通知
取付け説明
01 ギアリングとマウントアダプター
natural_image
Technical line drawing of a DSLR camera with a magnified inset showing the ring detail (no text or symbols present)natural_image
Technical line drawing of a DSLR camera with a close-up inset showing internal components (no text or symbols)natural_image
Technical line drawing of a mechanical device with internal components and a close-up inset showing a component detail (no text or symbols)取付け説明
02
モーター
natural_image
Technical line drawing of a mechanical assembly with labeled components (no text or symbols present)03
コントローラー
natural_image
Technical line drawing of a mechanical component with a rectangular base and a circular button labeled 'REO' (no text or symbols beyond labels)取付け説明
04 ペアリング
- 手動キャリブレーション
機能紹介
02 モーター正転逆転切り替え
Facebook Group: Accsoon Official User Group
Instagram: accsoontech
Youtube Channel: ACCSOON
Email: Support@accsoon.com
合格証
www.accsoon.com