
HL-DT108-37 - Screwdriver Cotech - Free user manual and instructions
Find the device manual for free HL-DT108-37 Cotech in PDF.


| Product Type | Cordless Screwdriver |
| Brand | Cotech |
| Model | HL-DT108-37 |
| Voltage | 3.6 V |
| Battery Type | Li-Ion |
| Battery Capacity | 1.5 Ah |
| Charging Time | 3-5 hours |
| No-Load Speed | 200 rpm |
| Max Torque | 5 Nm |
| Chuck Size | 1/4 inch hex |
| Bit Storage | Integrated in handle |
| LED Light | Yes |
| Forward/Reverse | Yes |
| Weight | 0.35 kg |
| Dimensions (L x W x H) | 20 x 5 x 18 cm |
| Housing Material | ABS plastic |
| Included Accessories | 6 bits, USB charging cable, manual |
| Maintenance | Wipe with dry cloth; store in dry place |
| Safety Features | Overload protection, locking mechanism |
| Replaceable Parts | Bits, battery (integrated) |
| Repairability | Not user-serviceable; contact service center |
| General Information | Compact design for home DIY tasks |
Frequently Asked Questions - HL-DT108-37 Cotech
User questions about HL-DT108-37 Cotech
0 question about this device. Answer the ones you know or ask your own.
Ask a new question about this device
Download the instructions for your Screwdriver in PDF format for free! Find your manual HL-DT108-37 - Cotech and take your electronic device back in hand. On this page are published all the documents necessary for the use of your device. HL-DT108-37 by Cotech.
USER MANUAL HL-DT108-37 Cotech
Cordless Drill/Driver
Sladdlös borrmaskin Kabelfri boremaskin Akkuporakone

Important!
Read the entire instruction manual carefully and make sure that you fully understand it before you use the equipment. Keep the manual for future reference.
Viktig information:
natural_image
Black and white photo of a CO TECH electric drill with visible power cord and buttons (no text or symbols on device body)ART.NO. MODEL
18-3125 HL-DT108-37-UK
40-6999 HL-DT108-37
Ver. 200905
Cordless Drill/Driver
ART.NO. 18-3125 MODEL HL-DT108-37-UK
40-6999 HL-DT108-37
Please read the entire instruction manual before use and save it for future reference. We reserve the right for any errors in text or images and for making any necessary technical changes to this document. If you should have any questions concerning technical problems please contact our Customer Services.
Safety
General safety instructions for cordless power tools
Caution: Read all instructions. Failing to adhere to the following instructions may lead to electric shock, fire and/or serious injury. The term “electrical hand tools” in the warning text below refers to your mains operated or battery operated hand tool. SAVE THESE INSTRUCTIONS.
1) The work area
a) Keep the work area clean and well illuminated. Cluttered and poorly lit areas invite accidents.
b) Do not use electrical power tools in explosive environments, e.g. close to flammable liquids, gases or dust. Electrical hand tools generate sparks that can easily ignite dust or fumes.
c) Keep children and other bystanders away from the area where you are using the electrical hand tool. Distractions can cause you to lose your concentration and control.
2) Electrical safety
a) The electrical hand tool's plug must fit correctly into the wall socket. Never modify the plug in any way. Never use an adaptor together with earthed electrical hand tools. Unmodified plugs and suitable wall sockets decrease the risk of electric shock.
b) Avoid physical contact with earthed objects, such as pipes, radiators, ovens or refrigerators. There is an increased risk of electrical shock if your body is earthed.
c) Do not expose the electrical hand tool to rain or other wet conditions. If water gets inside an electrical hand tool it increases the risk of electric shock.
d) Do not abuse the lead. Never use the lead to carry the tool or pull the plug from the wall socket. Keep the lead away from heat, oil, sharp edges and movable parts. Damaged or tangled leads increase the risk of electric shock.
e) When using electrical hand tools outdoors use an extension lead that is suitable for this purpose. Use of an extension lead designed for outdoor use decreases the risk for electric shock.
3) Personal safety
a) Pay attention to your actions and use common sense when using electrical hand tools. Never use electrical hand tools if you are tired or under the influence of drugs, alcohol or medication. One moment of inattention while using an electrical hand tool may result in serious injury.
b) Use protective equipment. Always wear safety glasses. Using protective clothing such as dust masks, non-slip safety shoes, helmets and ear defenders when needed decreases the risk of injury.
c) Avoid accidental starts. Make sure that the power switch is set to OFF before connecting the device to a wall socket. Never carry an electrical hand tool with your finger on the trigger and never connect the hand tool to a wall socket when the switch is set to ON, since it may result in injury.
d) Remove all service tools/keys before switching on the hand tool. A service tool left on a moving part of the electrical hand tool may result in injury.
e) Do not overreach. Make sure you stand steady and well balanced at all times. This will allow you to have more control in unexpected situations.
f) Wear suitable clothing. Do not wear loose-fitting clothing or jewellery. Keep hair, clothes and gloves away from moving parts. Loose-fitting clothes, jewellery or long hair could become caught in moving parts.
g) If equipment for dust extraction or collection is available, make sure that it is connected and used properly. Using technical aids may decrease dust related hazards.
4) Use and maintenance of electrical hand tools.
a) Do not force the electrical hand tool. Use an electrical hand tool suitable for the work you are about to perform. The proper electrical hand tool will perform the task better and safer if used at the correct feed rate.
b) Never use the electrical hand tool if the power switch does not switch the tool on and off properly. All electrical hand tools that cannot be controlled by the power switch are dangerous and must be repaired.
c) Unplug the lead from the wall socket before making any adjustments, changing accessories or storing the electrical hand tool. These precautions reduce the risk of the electrical hand tool starting unexpectedly.
d) Store electrical hand tools that are not being used out of children's reach. Do not allow people who are unfamiliar with the tool or its functions to operate the tool. Electrical hand tools can be dangerous if they fall into the hands of inexperienced users.
e) Maintaining electrical hand tools. Check for any incorrect settings, parts that catch, broken parts or anything else which may cause the electrical hand tool to malfunction. If something is damaged it must be repaired before use. Many accidents are caused by poorly maintained electrical hand tools.
f) Keep tools sharp and clean. Properly maintained cutting tools with sharp blades are less likely to jam and are easier to control.
g) Use the electrical hand tool, accessories and similar according to the instructions and in an appropriate way suitable for the type of electrical hand tool used. Also take into consideration your work environment and the type of work to be done. Using the electrical hand tool for purposes other than that for which it is intended could result in dangerous situations.
5) Use and service of cordless electrical hand tools
a) Make sure that the power switch is set to OFF before attaching the battery. Attaching a battery to an electrical hand tool when the power switch set to ON is inviting an accident.
b) Only charge the battery using a charger approved by the manufacturer. A charger suitable for one type of battery can constitute a fire hazard if used for another type of battery.
c) Only use the rechargeable electric hand tool with batteries intended for that purpose. The use of other types of batteries might cause damage or fire.
d) When not in use, the battery should be stored away from other metal objects such as paper clips, coins, keys, nails, screws or any small objects that could bridge the gap between the battery terminals. Short circuiting the battery terminals can cause burns or fires.
e) If the battery is mistreated, it may leak acid; avoid contact with this acid. If you accidentally come into contact with the acid, rinse the area with water. If the acid comes into contact with your eyes, consult a doctor. Battery acid can cause irritation and burns.
6) Service
a) Repairs and service should only be performed by qualified tradesmen, and only with original spare parts. This guarantees that the safety of the electrical hand tool is maintained.
Additional safety instructions for batteries and chargers
- Never attempt to dismantle a battery.
- Never store a battery in direct sunlight or at temperatures above 40 °C.
- Only charge the battery when the ambient temperature is between 4 °C and 40 °C.
- Never expose the battery or charger to water.
Safety symbol guide

Read the entire instruction manual.

Always use ear protection.

Always use safety glasses.

For indoor use only.
Product description
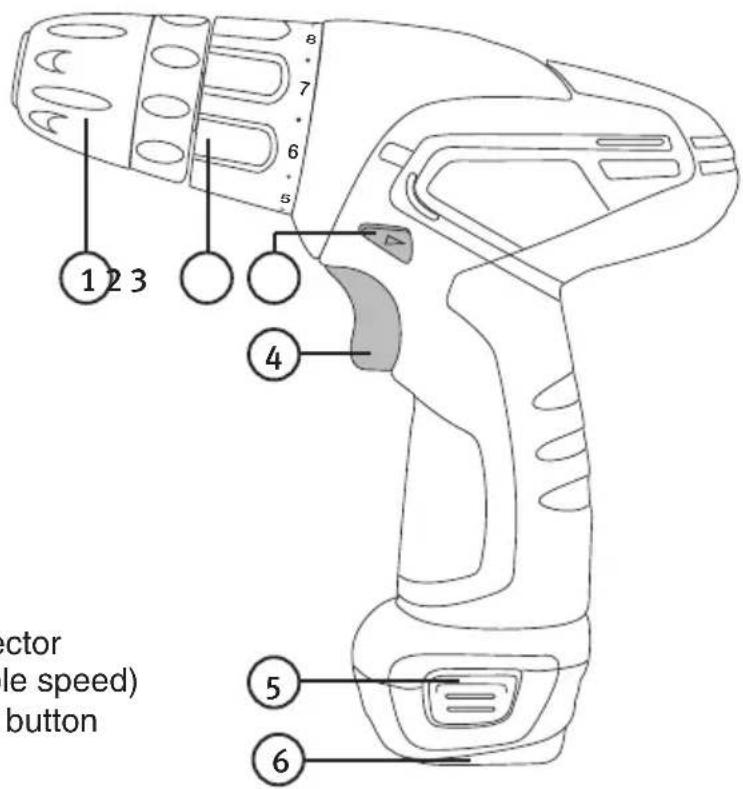
- Keyless chuck
- Torque setting ring
- Forward/reverse selector
- Power trigger (variable speed)
- Battery pack release button
- Battery
Charging
Note:
- The battery is not fully charged when purchased.
- Fully charge the battery before using the drill/driver for the first time.
- The normal charge time is between 3-5 hours.
- The battery does not reach its full capacity until it has been fully charged five times.
- Press in the battery release tabs on the sides and remove the battery from the drill/driver.
- Insert the battery into the charger. The battery will only fit one way.
- The red and green LEDs on the charger will be lit while the battery charges.
- The battery is fully charged when the red LED is no longer lit.
Settings
Forward /reverse
Select forward or reverse using the selector (3). If the selector is not pushed in all the way the drill will not start. The chuck must be completely motionless before changing directions.
Torque
The machine has an adjustable clutch set by the torque selector. If set correctly the clutch will disengage the drive at the preset torque setting. This prevents screws from being driven in too far and prevents damage to the machine. The torque setting should be based upon the type of screw, its size and the type of material used. Always start with the lowest torque setting and increase it gradually to find the correct setting. When used for drilling, the drill/driver should be set to drill mode.
Changing drill/driver bits

Hold the rear collar with one hand and twist the front collar with the other hand to tighten or undo the chuck.
Ensure that the bit sits securely centred in the middle of the chuck.
Operation
The machine is started and stopped by holding or releasing the power trigger (4). The drill/driver is equipped with a variable speed control, which makes it extremely practical for screw removal. The more the power trigger is pressed the greater the speed of the chuck. After working extensively at low speeds, the motor should be run at no-load maximum speed for about 3 minutes to cool down the motor.
Drilling tips and advice
- When drilling into slippery materials, like tiles, you should place a strong piece of tape on the area in which you wish to drill to prevent the bit from wandering.
- When drilling into metal you should first use a centre punch to make a small indentation at the spot where you wish to drill. This indentation will help hold the bit in place and prevents it from wandering when you drill.
- When drilling into metal you should also use thread cutting oil to assist in drilling and to preserve the machine and drill bit.
Care and cleaning
- Always keep the motor's ventilation openings free of dust and debris.
- Clean the machine regularly using a moist cloth and washing up liquid. Avoid using strong detergents.
- Charge the battery regularly for best performance.
- Store the drill/driver in a dry and dust-free environment with an ambient temperature of 5-40 °C.
Disposal
Follow local ordinances when disposing of this product. If you are unsure of how to dispose of this product, please contact your municipality.
Specifications
Variable speed control 0-550 rpm Preset torque settings 16 settings, max. 10 Nm Keyless chuck 10 mm Sound level (Uncertainty K:3 dB) LpA: 60 dB(A) LwA:71 dB(A) Vibration value (Uncertainty K:1.5 m/s²) 0.685 m/s² Battery 10.8 V, 1.3 Ah lithium-ion
Charger
Input power 100-240 V \~ 50/60 Hz
Output power 12.6 V, 400 mA
Charge time 3-5 hours
Sladdlös borrmaskin
ART.NR 18-3125 MODELL HL-DT108-37-UK
40-6999 HL-DT108-37
Declaration of Conformity
CE
Hereby, Clas Ohlson AB, declares that the machinery:
Cordless Drill 10,8 V Cotech
Art. no: 18-3125 Model: HL-DT108-37-uk
Art. no: 40-6999 Model: HL-DT108-37
Complies with the provisions of the following Directives:
98/37/EC MACHINERY
2006/95/EC LOW VOLTAGE DIRECTIVE
2004/108/EC EMC
Complies with the provisions of the following harmonized standards:
EN 50366:2003+A1
EN 60745-1:2006
EN 60745-2-1:2003+A11:2007
EN 60745-2-2:2003+A11:2007
EN 61000-6-3:2007
EN 55014-1:2006
EN 55014-2/A1:2001
Insjön, Sweden, May 2009

Klas Balkow
President
Clas Ohlson, 793 85 Insjön, Sweden
CO TECH®
SVERIGE
KUNDTJÄNST Tel: 0247/445 00
Fax: 0247/445 09
E-post: kundtjanst@clasohlson.se
INTERNET www.clasohlson.se
BREV Clas Ohlson AB, 793 85
INSJÖN
NORGE
KUNDESENTER Tlf.: 23 21 40 00
Faks: 23 21 40 80
E-post: kundesenter@clasohlson.no
INTERNETT www.clasohlson.no
POST Clas Ohlson AS, Postboks 485 Sentrum, 0105 OSLO
SUOMI
ASIAKASPALVELU Puh: 020 111 2222
Faksi: 020 111 2221
For consumer contact, please visit www.clasohlson.co.uk and click on customer service.
INTERNET www.clasohlson.co.uk

- Cordless Drill/Driver
- Important!
- Viktig information:
- Safety
- General safety instructions for cordless power tools
- 1) The work area
- 2) Electrical safety
- 3) Personal safety
- 4) Use and maintenance of electrical hand tools.
- 5) Use and service of cordless electrical hand tools
- 6) Service
- Additional safety instructions for batteries and chargers
- Safety symbol guide
- Product description
- Charging
- Note:
- Settings
- Forward /reverse
- Torque
- Changing drill/driver bits
- Operation
- Drilling tips and advice
- Care and cleaning
- Disposal
- Specifications
- Charger
- Sladdlös borrmaskin
- Declaration of Conformity
- CE
- CO TECH®
- SVERIGE
- NORGE
- SUOMI
Brand : Cotech
Model : HL-DT108-37
Category : Screwdriver