
MAC Viper Quadray - Lighting MARTIN - Free user manual and instructions
Find the device manual for free MAC Viper Quadray MARTIN in PDF.


| Product Type | Lighting Accessory (Quadray Module for MAC Viper AirFX) |
| Brand | Martin |
| Model | MAC Viper Quadray |
| Part Number | 91614052 |
| Compatibility | Martin MAC Viper AirFX fixture |
| Required Firmware | MAC Viper AirFX firmware version 1.2.0 or later |
| DMX Control Channels | 5 additional channels (29-33) in 16-bit Extended mode |
| Functions | Independent indexing and rotation of 4 rays; pre-programmed effects (positions, continuous FX, static FX) |
| Number of Pre-Programmed Effects | Over 20 (positions, continuous, static) |
| Installation | Must be installed by qualified professional technician; requires disconnecting power and cooling |
| Calibration | Calibration values for each lens (L1-L4) printed on module connector; must be entered in fixture control panel |
| Safety | Follow safety precautions in MAC Viper AirFX manual; disconnect power and allow to cool before installation; avoid direct sunlight on lenses |
| Cleaning | Use soft lint-free cloth dampened with distilled water; if needed, add 20% isopropyl alcohol; no abrasive products or solvents |
| Spare Parts / Repairability | Module can be uninstalled and fixture returned to standard configuration; keep original components |
| Warranty / Support | Contact local Martin distributor or Martin 24-hour service hotline (+45 8740 0000, US: 1-888-tech-180) |
Frequently Asked Questions - MAC Viper Quadray MARTIN
User questions about MAC Viper Quadray MARTIN
0 question about this device. Answer the ones you know or ask your own.
Ask a new question about this device
Download the instructions for your Lighting in PDF format for free! Find your manual MAC Viper Quadray - MARTIN and take your electronic device back in hand. On this page are published all the documents necessary for the use of your device. MAC Viper Quadray by MARTIN.
USER MANUAL MAC Viper Quadray MARTIN
MAC Viper Quadray™ Module Installation and Control Guide
Introduction
This Guide explains how to install the Martin MAC Viper Quadray™ Module, P/N 91614052, on a Martin MAC Viper AirFX™ fixture and control the Quadray functions via DMX.
Installation takes only a few minutes. If you keep the standard components you remove when you install the Quadray module, the Quadray components can be uninstalled and the fixture returned to standard configuration at any time.

Warning! Follow all the safety precautions in the MAC Viper AirFX user manual and use the manual for reference when installing the Quadray Module and using the modified product. The user manual is supplied with fixtures, but check that you have the latest revision of the user manual. This is available for download from the Product Support page for the MAC Viper AirFX at www.martin.com

Warning! Disconnect the fixture from power and allow to cool for at least 2 hours and 45 minutes before starting work.
Warning! The Quadray Module must be installed by qualified professional technicians only. Read all of this Installation Guide carefully before starting to install the module.
Important! Make sure that the front of the head does not face the sun or any other strong light source directly for longer than a few seconds at any time. Lenses can focus the sun's rays inside the fixture, causing internal damage and creating a possible fire risk
Important! Do not use concentrated alcohol solutions, abrasive products or solvents to clean the components in the Quadray Module. If wiping with a soft, lint-free cloth dampened with distilled water is not effective, damp the cloth with distilled water containing 20% isopropyl alcohol in solution.
If you have any questions about how to install the Quadray Module or use it safely, please contact your local Martin distributor (see www.martin.com/distributors for details) or call the Martin 24-hour service hotline on +45 8740 0000, or in the USA on 1-888-tech-180.
Software compatibility
MAC Viper AirFX firmware version 1.2.0 or later is required for operation with the Quadray Module. The latest version of the MAC Viper AirFX firmware is available for download from the MAC Viper AirFX Product Support page on the Martin™ website at www.martin.com
© 2013 Martin Professional A/S. Olof Palmes Allé 18, DK-8200 Aarhus N, Denmark. Information subject to change without notice. Martin Professional A/S and all affiliated companies disclaim liability for any injury, damage, direct or indirect loss, consequential or economic loss or any other loss occasioned by the use of, inability to use or reliance on the information contained in this installation note. The Martin logo, the Martin name and all other trademarks in this document pertaining to services or products by Martin Professional A/S or its affiliates and subsidiaries are trademarks owned or licensed by Martin Professional A/S or its affiliates or subsidiaries.
P/N 35000629 Rev. C
Preparation
The Quadray Module accessory contains the following items:
• MAC Viper Quadray Module with integral wireset
• This Installation Guide
Keep the protective packaging supplied with the module for possible re-use.
Without damaging the wiring, remove the adhesive tape that is applied to avoid damage or loss during transport: tape holds the safety wire and wireset together and retains the two screws in the module connector on the end of the wireset.
Calibration values for each individual module are printed on a label on the module connector. Four values are given for the four lenses L1 to L4. Each time you install a Quadray Module on a fixture, you must enter its calibration values in the CALIBRATION menu in the fixture's control panel. Note these values and store them for future use when installing the module on other fixtures.
Installation procedure

Warning! Disconnect from power and allow to cool for 30 minutes before opening the head.
To install the Quadray Module on a standard Martin MAC Viper AirFX fixture:
- Disconnect the fixture from power and allow components to cool for 30 minutes.
-
Place the fixture on a secure work surface. Tilt the head vertically upwards and apply the tilt lock.
-
See Figure 1. Remove the top head cover by loosening its Torx 25 captive retaining screws A until the screws turn freely (the top head cover is on top of the head with the text on the back of the head facing the right way up). Lift the front of the cover slightly away from the head, then slide the cover towards the front of the head to release the rear of the cover. You can allow the head cover to hang on its safety wire, but for easiest access press the cover's safety wire retaining clip B in towards the head chassis, slide the clip down until you can remove it, then remove the head cover completely from the fixture.


natural_image
Close-up of a hand holding a small mechanical component with wires and a labeled point B (no readable text or symbols)Figure 1: Removing the head covers
- See Figure 2. Release the four screws from the front lens assembly, then release the front lens safety attachment. Remove the front lens assembly and store it for possible re-use if the fixture is returned to standard configuration at a later time.

natural_image
Circular diagram with four arrows pointing inward from center, no text or symbols presentFigure 2
-
See Figure 3. Line up the Quadray Module over the head so that the module's safety wire will pass through the cutout in the front of the head above the safety wire attachment point A and the module's wireset will pass through the cutout B in the opposite side of the head.
-
Lower the Quadray Module onto the head, making sure that it sits completely square to the head. Do not use excessive force. You may need to rotate the module slightly to the left and to the right until you can feel that it has engaged correctly. Check also that the safety wire and wireset are not trapped between the module and the head.

natural_image
Close-up of a mechanical device with labeled parts A and B, showing hands adjusting components (no readable text or symbols beyond labels)Figure 3
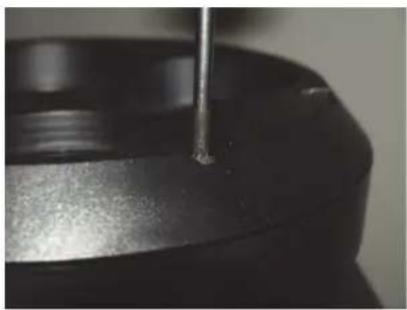
- See Figure 4. Fasten the module in place by tightening the four screws on the front of the module.
natural_image
Close-up of a mechanical component with a metallic tool inserted, showing surface texture and a small hole (no text or symbols visible)Figure 4
- See Figure 5. Pass the Quadray Module's safety cable through the hole A in the head chassis and then into the safety wire attachment point B. Push and slide the fastener so that it is locked into the attachment point.

Figure 5
- See Figure 6. Gather up a loop in the Quadray Module wireset and push it into the space A between the module and the head air filter. Push the wireset's multiconnector onto the corresponding socket B in the head.

Figure 6
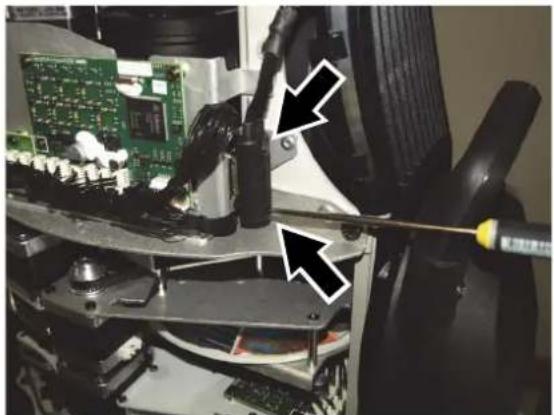
- See Figure 7. Fasten the multiconnector to the socket with the multiconnector's two screws (arrowed).
- Reinstall the head cover, checking that its safety wire is securely attached before tightening its retaining screws.
- Release the tilt lock, then apply power. With MAC Viper AirFX firmware version 1.2.0 or later installed, the fixture will recognize that the Quadray Module is installed.
- In the control panel, scroll through the CALIBRATION menu until you reach Ray1. Enter the calibration value for L1 that is printed on the module connector. Scroll to Ray2 - Ray4 and enter the calibration values for L2 - L4.
- Check and if necessary adjust the lamp alignment as described in the MAC Viper AirFX user manual. Remove any significant hotspot in the rays.
natural_image
Close-up of a screwdriver working on a circuit board with visible components and wiring (no text or symbols)Figure 7
When the Quadray Module is installed and the fixture is powered on, the MAC Viper AirFX recognizes the new module automatically and configures itself for operation with the module.
If you remove the Quadray Module and reinstall the standard components, the fixture will recognize that no module is present and reconfigure itself for operation without the module.
The calibration values printed on the module connector must follow the module. If you install the Quadray Module on another fixture, remember to enter the module's calibration values in the new fixture's control panel.
Remember also to check lamp alignment each time you install the module.
natural_image
Close-up of a black circular mechanical device with four metallic components, mounted on a black frame (no visible text or symbols)Quadray control
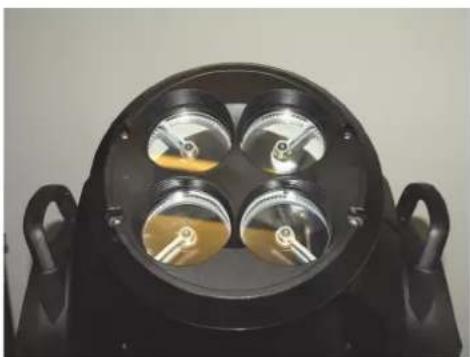
With the Quadray Module installed and the fixture running firmware version 1.2.0 or later and set to 16-bit Extended mode, five extra DMX channels become available after the 23 channels in the standard MAC Viper AirFX. These channels give the DMX control functions shown in the following table:
| Channel Value Function | Fade Status | Default Value | ||
| 29 | Quadray overall control | Snap 101 | ||
| 0 - 40 | Indexing | |||
| 41 - 80 | Rotation | |||
| 81 - 100 | No function | |||
| FX selection (see Table 2) | ||||
| 101 - 130 | Positions | |||
| 131 - 180 | Continuous FX | |||
| 181 - 183 | Static FX | |||
| 184 - 255 | No function | |||
| 30 | Ray 1 Indexing | Fade 128 | ||
| 0 - 255 | Indexing 0^ - 360^ | |||
| Ray 1 Rotation | ||||
| 0 - 2 | No rotation | |||
| 3 - 126 | Rotating CW Fast → CW Slow | |||
| 127 - 129 | No rotation | |||
| 130 - 253 | Rotating CCW Slow → CCW Fast | |||
| 254 - 255 | No rotation | |||
| FX position fade time* | ||||
| 0 - 255 | 0 sec. - 10 sec. | |||
| Continuous FX rotation* | ||||
| 0 - 2 | No rotation | |||
| 3 - 126 | Rotating CW Fast → CW Slow | |||
| 127 - 129 | No rotation (stops at current position) | |||
| 130 - 253 | Rotating CCW Slow → CCW Fast | |||
| 254 - 255 | No rotation | |||
| Static FX* | ||||
| 0 - 255 | Min - Max | |||
| 31 | Ray 2 Indexing | Fade 128 | ||
| 0 - 255 | Indexing 0^ - 360^ | |||
| Ray 2 Rotation | ||||
| 0 - 2 | No rotation | |||
| 3 - 126 | Rotating CW Fast → CW Slow | |||
| 127 - 129 | No rotation | |||
| 130 - 253 | Rotating CCW Slow → CCW Fast | |||
| 254 - 255 | No rotation | |||
| Continuous FX start times* | ||||
| 0 - 50 | Synchronized (all fixtures start FX immediately) | |||
| 51 - 100 | Random (0 - 6 seconds random offset between fixtures) | |||
| 101 - 255 | No function | |||
| 32 | Ray 3 IndexingIndexing 0^ - 360^ Ray 3 RotationNo rotationRotating CW Fast → CW SlowNo rotationRotating CCW Slow → CCW FastNo rotation | Fade 128 | ||
| 0 - 255 | ||||
| 0 - 2 | ||||
| 3 - 126 | ||||
| 127 - 129 | ||||
| 130 - 253 | ||||
| 254 - 255 | ||||
| 33 | Ray 4 IndexingIndexing 0^ - 360^ Ray 4 RotationNo rotationRotating CW Fast → CW SlowNo rotationRotating CCW Slow → CCW FastNo rotation | Fade 128 | ||
| 0 - 255 | ||||
| 0 - 2 | ||||
| 3 - 126 | ||||
| 127 - 129 | ||||
| 130 - 253 | ||||
| 254 -255 | ||||
Table 1: Quadray Module DMX channels
Table 1: Quadray Module DMX channels
*These functions become available if you select one of the pre-programmed FX on channel 29.
Quadray FX
With the Quadray Module installed, the MAC Viper AirFX DMX protocol includes a range of pre-programmed effects. You can select these FX by sending values 101 and above on DMX channel 29 according to the following table. You can then adjust parameters of the effects on channels 30 and 31.
DMX value
on ch. 29 FX Description
| Positions | Channel 30 adjusts fade time | |
| 101 | Home | |
| 102 | Out | |
| 103 | Horizontal V | |
| 104 | Vertical V | |
| 105 | Diagonal 1 | |
| 106 | Diagonal 2 | |
| 107 - 109 | No function | |
| 110 | 3 ray fan | |
| 111 | 3 ray top | |
| 112 | 3 ray bottom | |
| 113 | 3 ray left | |
| 114 | 3 ray right | |
| 115 | Narrow 3 ray left | |
| 116 | Narrow 3 ray right | |
| 117 - 119 | No function | |
| 120 | 4 ray fan H | |
| 121 | 4 ray fan V | |
| 122 | 4 ray fan 2 | |
| 123 - 128 | No function | |
| 129 | Random | Every ray takes a random position |
| 130 | Random 2Continuous FX | Every ray takes a random positionChannel 30 adjusts speed and directionChannel 31 sets synchronized or random start points |
| 131 | Rotate | All rays rotate |
| 132 | Bounce | All rays 0^ to 360^ , small pause, then 360^ to 0^ , small pause |
| 133 | Pair H | 1+4 rotate one way, 2+3 the opposite way |
| 134 | Pair V | 1+2 rotate one way, 3+4 the opposite way |
| 135 | Cross | 1+3 rotate one way, 2+4 the opposite way |
| 136 | Cross bounce | 1+3 fade 0^ - 360^ , 2+4 fade 360^ - 0^ , pause, then reverse, pause |
| 137 | Pair bounce | 2+3 fade 0^ - 360^ , 1+4 fade 360^ - 0^ , pause, then reverse, pause |
| 138 | Cross bounce 2 | 1+3 fade 30^ - 330^ , 2+4 fade 330^ - 30^ , pause, then reverse, pause |
| 139 | Singles | 1 rotates 0^ - 360^ , then 2, then 3, then 4, 1, 2, 3, 4, etc. |
| 140 | Singles reset | Same as singles, but one ray fades backwards as the next ray fades forwards |
| 141 | Singles bounce | 1, 2, 3, 4 forward, pause, 4, 3, 2, 1 backwards, pause |
| 142 | Juggler | All rays start from 180^ . then 1 to 0^ , then 1 to 180^ , 2 to 0^ , then 2 to 180^ , 3 to 0^ , then 3 to 180^ , 4 to 0^ , then 4 to 180^ , 1 to 0^ |
| 143 | Fold out | 1 to 180^ , then 2 to 180^ , then 3, then 4, Pause, All to Home |
| 144 | Fold in | All to 180^ , pause, then 1 to 0^ , 2 to 0^ , 3 to 0^ , 4 to 0^ , pause |
| 145 | Fold in-out | 1 to 180^ , then 2 to 180^ , then 3, then 4, Pause, 1 to 0^ , 2 to 0^ , 3 to 0^ , 4 to 0^ , pause |
| 146 | V-chase | Alternate horizontal and vertical V shape with small pause |
| 147 | Fan chase | Alternate horizontal and vertical fan with small pause |
| 148 | Pair chase | 1+2 from 0^ - 360^ , then 3+4 from 0^ to 360^ , then 1+2 to 0^ , then 3+4 to 0^ |
| 149 | Ripple | 1 at 0^ , 2 at 45^ , 3 at 90^ and 4 at 135^ , then rotate |
| 150 | Home - Out | Alternate Home and Out position: 1+3 go CW, 2+4 go opposite |
| 151 | Home and fan chase | Home, 4 ray fan H, Home, 4 ray fan V |
| 152 | Wide single rotation | All rays start at 180^ , 1 rotates 180^ to 180^ , then 2, then 3, then 4 |
| 153 | Wide mirror rotation | All rays start at 180^ , 1+3 rotate 180^ to 180^ , then 2+4 |
| 154 - 159 | No function | |
| 160 | ‘Shake It’ | All rays move to 180^ and shake |
| 161 - 178 | No function | |
| 179 | Random direction | All rays rotate from Home position, but in random directions |
| 180 | Random ray | All rays assume random positions and directions |
| Static FX | Channel 30 adjusts amount | |
| 181 | Expand | Home at 0^ , then 1-4 move from 0^ to 360^ |
| 182 | Expand mirror | Home, then 1+3 move CW from 0^ to 360^ while 2+4 move CCW from 360^ to 0^ |
| 183 | Spread | Home, then 1 moves to 180^ , then 2 moves to 180^ , then 3 to 180^ , then 4 to 180^ |
| 184 - 255 | No function |
Table 2: Quadray FX
Table 2: Quadray FX
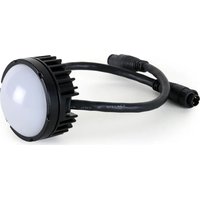
Brand : MARTIN
Model : MAC Viper Quadray
Category : Lighting