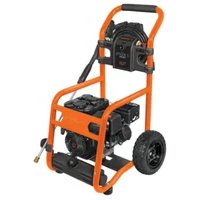
LAGAS-3300 - Pressure washer Truper - Free user manual and instructions
Find the device manual for free LAGAS-3300 Truper in PDF.


| Product Type | Gas Pressure Washer |
| Brand | Truper |
| Model | LAGAS-3300 |
| Engine Displacement | 208 cc |
| Rated Power | 5 Hp |
| Maximum Pressure | 3300 PSI |
| Maximum Flow Rate | 2.37 GPM |
| Fuel Type | Unleaded gasoline |
| Fuel Tank Capacity | 0.95 gallons |
| Oil Capacity | 17 oz |
| Engine Speed | 3600 RPM |
| Maximum Water Inlet Temperature | 104 °F |
| Hose Inner Diameter | 1/2 inch minimum |
| Number of Nozzles | 5 |
| Nozzle Types | 0° (Red), 15° (Yellow), 25° (Green), 40° (White), Detergent (Black) |
| Noise Level | 105 dB |
| Starting System | Recoil start |
| Engine Type | 4-stroke, air-cooled |
| Warranty | 1 year |
Frequently Asked Questions - LAGAS-3300 Truper
User questions about LAGAS-3300 Truper
0 question about this device. Answer the ones you know or ask your own.
Ask a new question about this device
Download the instructions for your Pressure washer in PDF format for free! Find your manual LAGAS-3300 - Truper and take your electronic device back in hand. On this page are published all the documents necessary for the use of your device. LAGAS-3300 by Truper.
USER MANUAL LAGAS-3300 Truper
Apagado
natural_image
Two identical illustrations of a trumper device with labeled parts (H and I), no text or symbols present.Uso de detergente
natural_image
Line drawing of a hairless water spray gun with lever and handle (no text or symbols)Fuel Specifications 3

General power tools safety warnings....4

Safety Standards for Gas Pressure Washers....5
Parts 6
Assembly 7
Fuel and Oil 8
Switch On 8
Start Up 9
Operation 10
Maintenance 11
Troubleshooting 13
Notes 14
Authorized Service Centers 15
Branches 16
Warranty Policy 16

CAUTION
To gain the best performance of the tool, prolong the duty life, make the Warranty valid if necessary, and to avoid hazards of fatal injuries please read and understand this Manual before using the tool.
Keep this manual for future references.
The illustrations in this manual are for reference only. They might be different from the real tool.
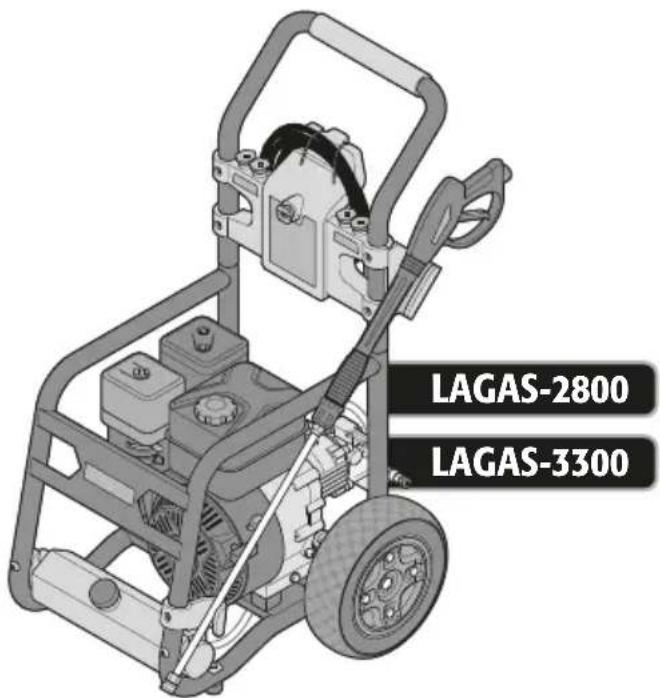
Technical Data

TRUPER®
| LAGAS-2800 | D | |
| Code | 12908 12909 | |
| Description | Gas Power Washer | |
| Engine Capacity | 180 cc 208 cc | |
| Motor Rated Power | 7 Hp5 Hp | |
| Speed | 3600 RPM | |
| Type of Fuel | Gasoline | |
| Fuel Tank Capacity | 0,95 Gallons | |
| Oil Deposit | 17 oz | |
| Maximum Pressure | 2 800 PSI 3 300 PSI | |
| Maximum Flow | 2,37 gpm | |
| Water Flow Maximum Temperature | 104 °F | |
| Hose Inner Diameter | 1/2" minimum | |
| Nozzles | 4 | 5 |
| Noise Level | 105 db | |
Fuel Specifications
- The equipment is built with an air-cooled 4-stroke motor using pure unleaded gasoline.
- Under any circumstance mix oil with fuel.
⚠ WARNING • For any reason, do not use fuels mixed with ethylic alcohol (gasohol) ethanol, or methane. They may attract humidity causing separation and acid build up while being stored. Acidity can damage the motor fuel system when stored.
• To prevent issues with the motor drain the fuel system before storing the equipment 30 days or longer. Drain the gasoline tank. Start the engine and let it run until the fuel and carburetor lines are empty. Next time of use, use fresh gasoline.
- Never use motor or carburetor cleansing products into the gasoline tank. Permanent damage is caused.

Keep your work area tidy and with good lighting.
CAUTION Cluttered and dark areas can cause injuries.

Never use the mixer in explosive environments or where there are flammable liquids present.
DANGER Set the mixer 30 ft. away from the fuel filling up area before starting the motor.

Keep children and passersby at a safe distance while the mixer is operating.
WARNING Distractions can make you loose control and cause accidents.

Avoid making contact with power lines and circuits.
DANGER Find and avoid all power lines and circuits, especially hidden wiring. Also keep away from grounded objects.

Stay always alert, be prudent and use common sense.
CAUTION Even tough you are familiar with the use of the mixer do not get distracted while operating the machine. It can cause accidents.
Do not operate the mixer when tired or under the influence of drugs, alcohol or medication.
A moment of distraction while operating the mixer can cause severe personal injury.
Use the mixer with the guards and protector installed and in good repair.
WARNING Failure to comply with this warning leads to severe personal injury.
Never force the concrete mixer.
CAUTION Working within the range designed assures a belter job and is safer.

Store the mixer is a safe place away from the reach of children.
WARNING Motor concrete mixers are dangerous near inexperienced hands.

Wear the right clothes.
WARNING Loose clothing, jewelry or long hair can get tangled in the moving parts.

Keep your hands away from the rotating or moving parts.
WARNING Failure to comply with this warning leads to severe personal injury.

Do not use the mixer in enclosed areas.
DANGER To prevent accumulation of carbon monoxide, an odorless toxic gas potentially deadly.

Use the right personal protection equipment.
CAUTION Using eye protection, anti-dust masks, non-skid safety shoes, helmet, hearing protection and safety gloves considerably reduce the risk of injury.


Turn off the mixer before adjusting, changing accessories or storing.
WARNING Double-check the mixer motor switch is in the OFF position.
Never run the mixer if the switch is not working or is not duly assembled.
WARNING The operator is exposed to severe injury. Take it to repair immediately to a TRUPER Authorized Service Center.
Do not overreach.
CAUTION Good footing and balance give better control of the mixer in unexpected situations.
Prevent unintentional starting.
WARNING Double-check the mixer motor is OFF before leaving or servicing.

Remove any vise fixed in the mixer before starting it.
DANGER Additional tools or wrenches fixed in a rotating part in the mixer can cause severe personal injury.
Service the mixer and double-check it is in the best conditions before starting it.
CAUTION Check carefully the moving parts. See alignment and assembly. Do it periodically. Look for damaged elements or part that is not functioning correctly. Repair immediately in a TRUPER Authorized Service Center.

Accessories.
CAUTION Use only accessories or spare parts indicated in this Manual o certified by TRUPER.
Never leave the concrete mixer running and unattended.
DANGER To prevent severe accidents turn off the mixer after operating and before setting it in a safe place.
Never smoke near fuel.
DANGER Do not smoke near the area where fuel is being supplied or when operating the mixer.

Fuel Handling
- Never smoke near the fuel, nor the supply area or when operating the tool.
- Reduce the risk of fire or burns. Handle fuel with care. It is extremely flammable.
- Prevent gasoline or oil come into contact with your skin.
- Protect your eyes. Prevent gasoline or oil spilling into your eyes. In case of accidental contact wash your eyes immediately with clean water. If irritation persists, visit your doctor.
- Store fuel in an approved container.
WARNING • Before refueling the tool turn off the motor, set it on clear floor and wait for the motor to cool down.
CAUTION • Wipe clean all the fuel that dripped in the tool before operating.
CAUTION • To prevent fire or burns look for fuel leaks. If there are any correct them before using the tool.
- Set the tool at least 9 meters (30 feet) away from the refueling site before starting the motor.
- Never ever burn spilled fuel to eliminate it.
- Under no circumstance use a different type of fuel different to the one specified in these instructions.
Before Operating the Pressure Washer
- To assure it is perfectly assembled double-check the tool is in perfect conditions. Do not start it if is not well adjusted or not fully assembled, or if the fuel tank shows leaks or loose screws.
- Double-check the tool surface is clean, dry and free of oil or fuel.
- Verify the work area is open and well ventilated.
- During extreme temperatures inspect there is no ice build-up or condensation in the tool.
- Visibility and light conditions shall be adequate. Otherwise do not operate the tool.
CAUTION • Bear in mind that pressure spraying is very powerful. It is not recommended using onto painted or wooden surfaces or on things stuck with adhesive.
- Check instructions and warnings regarding chemical products. Do not use bleach, chlorine or any other cleaning product containing acid.
- To minimize the amount of water that could enter into the pressure washer while running, set the machine as far as possible from the area about to be washed.
- Check the high-pressure hose. If damaged, please replace it immediately.
- To prevent water flow to be cut due to twisting untangle and straighten the hoses in full.
When Operating the Power Washer
WARNING • Wear eye protection. CAUTION • Before starting the or when operating the tool verify the nozzle is not pointing towards people or animals.
- Keep all body parts away from the muffler. It produces severe burns.
- Keep the tool away from flammable materials.
- Do not try to make adjustments to the tool while the motor is running.
- Stay alert of everything around you. The tool noise could prevent you to make out hazards.
- When spraying always use both hands to gain total control over the high-pressure gun.
WARNING • Never touch the nozzle or the water jet while the machine operating.
- To allow free air circulation while the tool is running DO NOT cover the pressure washer.
CAUTION • Never aim the water jet towards the tool. - Prevent the high-pressure hose getting tangled, make contact with sharp edges or hot surfaces, crushed or stepped on.
- Do not drag the pressure washer on top of the hoses.
After Operating the Tool
CAUTION • Always move the Tool with the motor OFF and the muffler away from the body. Before loading into the back of a vehicle empty the fuel tank.
WARNING • Turn off the motor before setting it idle. DO NOT leave the motor running unattended. Leave the tool cooling-off before storing.
CAUTION • The tool service and repairs shall only be carried out by highly trained personnel.
Assembly Recommendations
WARNING • In the event there are some parts missing, do not run the tool until they are replaced. Otherwise can cause severe personal injury.
WARNING • Do not try to modify the tool or produce accessories not recommended for this machine. Otherwise severe personal injuries can happen and makes the warranty void.
WARNING • Whenever you need to gain access to the mobile parts disconnect the spark plug cable to prevent an accidental start causing severe personal injury.

Assembly

TRUPER®
- Set the wheels set passing axis (A) through each wheel (B) and its respective mounting orifice (C) into the chassis. Secure axis with the pin (D).
- Insert the chassis posts (E) in the handle posts and lower until securing with the integrated pins.
• Install the high-pressure gun supports (F) in the chassis using the screws set included. - Connect the metallic spear (G) into the high-pressure gun (H); and the high-pressure gun (I) and the latter onto the pump connection (J). All these joints are threaded and shall be tightened treading in a clockwise direction.
- Close completely the water inlet for the garden hose (K). Connect the garden hose to the garden hose inlet (L). To connect and prevent the hose to twist turn the connection knob.
CAUTION • To prevent from losing pressure use care not to strip out the connections threads.
- Once the connections are set and WITHOUT any nozzle (M) in the metal spear open fully the garden hose faucet. Press the high-pressure trigger until constant water flows out from the metal spear. This step is to purge the water system off air bubbles.
- If using detergent to work with the Pressure Washer, add detergent into the deposit (N) connect the black nozzle in the metal spear.


Oil Supply
- Set the Pressure Washer on a flat and leveled surface.
- Close the fuel valve (A).
- Turn and remove the oil cap from the tool (B).
- Pour all the contents into the 16 oz oil bottle included. Into the oil deposit. Use a Funnel.
- Set the cap back into the deposit mouth and remove it to check the oil level in the cap measuring road.
- Once the tank has the right oil level indicated in the rod tighten the cap to prevent leaks.
Fuel Supply
- Set the Pressure Washer on a flat and leveled surface.
- Mix the fuel stabilizer with the gasoline following the stabilizer manufacturer instruction.
- Clean and dry the area around the fuel cap.
- Remove the fuel cap.
- Using a funnel fill slowly the fuel tank up to an approximate level of 1,5" below the upper part of the tank's neck to allow fuel to expand.
- Clean any fuel spills.
- Cover the tank rotating the cap until hearing a click.
- Clean any fuel spilled before starting up.

Switch On
CAUTION Before starting up the Pressure Washer it is essential to follow the next points. Otherwise the Pressure Washer can get damaged and the warranty will be made void:
- All the hoses shall be connected totally unrolled and with no twists.
• The water supply shall be connected and fully open.
• Gasoline and oil levels shall be the correct ones. - The system shall be purged off any air bubbles (see page 7).
Starting Up
- Open the fuel valve (C).
- Move the choke lever to the "Start" position (D).
- Turn on the switch (E).
- Pull the starter rope handle (F) until the motor starts, but, no more than 6 times. When you pull the starter rope handle let it go back softly. Never allow it to snap back.
- Let the motor running 5 seconds and then move the choke lever into the "Gear" position (G).
CAUTION • If the motor is not starting after pulling the starter rope, press high pressure gun to release pressure from the water before trying to start the motor one more time.
Setting Off
- Turn off the switch.
- Press the trigger in the high-pressure gun to release pressure.

High-pressure Gun Operation
• To get water coming out through the metal spear keep the gun trigger pressed.
• To stop the water jets release the trigger.
- To prevent unexpectedly starting up raise the trigger lock until it gets blocked in the slot (H).
• To release the lock push it back to its original position (1).

natural_image
Two identical illustrations of a triangular weight pump device labeled H and I, showing internal components without any text or symbols.Spray Nozzle Selection
- The Pressure Washer has different spraying nozzles with different flow opening depending on the type of the job:
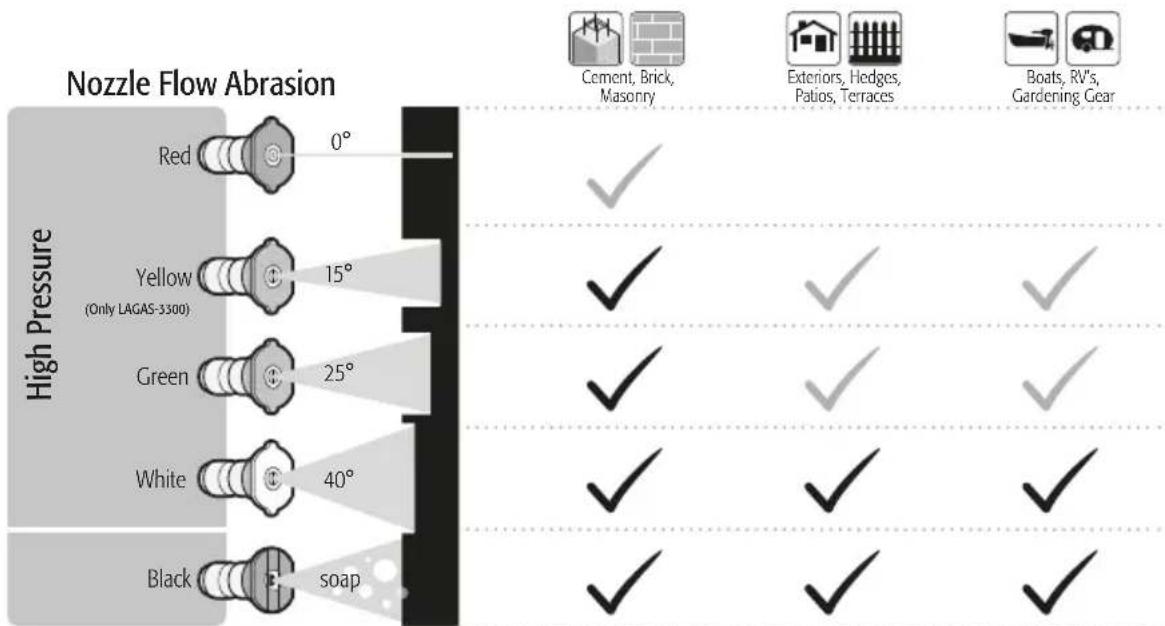
bar
Nozzle Flow Abrasion | Material | Color | Abrasion Angle (°) | Equipment Type | | :--- | :--- | :--- | :--- | | Cement, Brick, Masonry | Red | 0° | ✓ | | Cement, Brick, Masonry | Yellow (Only LAGAS-3300) | 15° | ✓ | | Cement, Brick, Masonry | Green | 25° | ✓ | | Cement, Brick, Masonry | White | 40° | ✓ | | Cement, Brick, Masonry | Black | soap | ✓ | | Exteriors, Hedges, Patios, Terraces | ✓ | ✓ | ✓ | | Boats, RV's, Gardening Gear | ✓ | ✓ | ✓ | The chart displays a single column of 100 square units with 'Nozzle Flow Abrasion' labels above each bar. The values are not explicitly labeled in the image.
Recommended Nozzle Use with Caution
Spray Nozzle Assembly
CAUTION • Before assembling or removing a nozzle in the metal spear turn off the Pressure Washer, close the water supply, press the trigger to release the pressure and lift the gun trigger lock. Failure to comply with one of these points exposes the operator to severe injury.
CAUTION • When assembling and removing nozzles prevent from pointing the spraying pipe towards your face. The nozzles fast connection system could accidentally throw it and injure the operator.
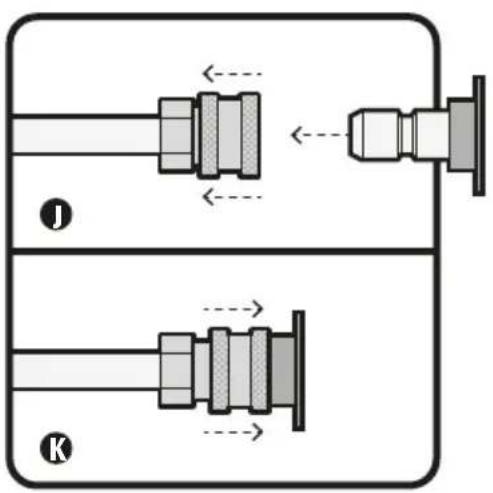
• To assemble the nozzles push the fast connection ring (J).
- Set the nozzle in the spraying pipe.
- Pull the fast connection ring to secure the nozzle in place (K).
- To disassemble the nozzle, push the fast connection ring and pull the nozzle to release it.
Use of Detergent
- The Pressure Washer is built to use detergents specified for "descending flow" pressure washers. In order to the Pressure Washer can be operated with "descending flow" detergent, please call a TRUPER Authorized Service Center to learn more.
CAUTION • Use only detergents designed for Pressure Washers. Household detergents, acid, alkaline, bleach, solvent flammable or industrial grade solutions can damage the pump. Many detergents call for mixing before using. Prepare the mix following the instructions in the bottle. Always test in a less noticeable area before starting to pressure wash. - Remove the detergent container cap and insert the detergent hose end in the container filter.
NOTE The Pressure Washer uses a 20:1 proportion of detergent. It usually uses a 1 gallon undiluted detergent. See the instruction in your detergent to verify if is necessary to make an additional dilution. - Set the detergent nozzle (black) in the metal spear.
- Press the trigger and wait approximately 5 seconds for the detergent to be sprayed.
- Spray the detergent in a dry surface using long, uniform and overlapped passes. To prevent stripes to appear, do not let the detergent drying in the surface.
• After spraying detergent in the work surface and before rinsing, set the end of the detergent hose with the filter into a bucket with clean water and expel the water with the high-pressure gun. It takes two minutes to remove from the system all the detergent residues. - Turn off the motor and press the trigger to pressure-purge the water.
Rinsing
- Remove the detergent nozzle and replace it with the high-pressure nozzle most suitable for the job.
CAUTION Follow the nozzle assembly and removal instructions and how to select the most adequate nozzle in page 9. - Start rinsing from the upper side of the work area. Use side-to-side passes, overlapping each pass up and down.
Moving the Pressure Washer
CAUTION • Never use the handle to lift the Pressure Washer. Never set the unit in a position other than vertical and sitting on its wheels.
- Turn off the Pressure Washer.
- Tilt the unit towards you until is balanced on its wheels. Then, push it to the desired position. Do not tilt forward or sideways while moving it.
CAUTION • DO NOT try to move the unit pulling from either of the hoses.
High Altitude Operation
- At high altitude the air fuel mix in the standard carburetor will be rich in fuel. Performance will be lower and fuel consumption will increase.
- Performance while in a high altitude can be increased if the carburetor is regulated adjusting the main knob. The equipment is set to operate at heights above 6000 feet above sea level. If the tool is not working efficiently call a
TRUPER Service Center to have them carry out modification in the carburetor.
- Even though the carburetor has an adequate injection the potency in the motor will decrease 3,5% approximately per each 1000 feet increment, after 6 890 feet above sea level. Decrease in potency will be higher if there are no modifications in the carburetor.
WARNING • If the equipment is operated in a height that is inadequate to the carburetor setting, low performance, over-heating and severe damage to the motor caused by the excessive air mix in the fuel may be obtained
CAUTION
• Use only TRUPER®
original spare parts.
CAUTION
- When servicing or repairing the
Pressure Washer use eye protection complying with ANSI Z87.1.
CAUTION
• Before servicing the Pressure Washer,
shut off water supply, shut off the motor, press the trigger to release pressure, disconnect all the hoses, disconnect the spark plug cable and set it apart.
- Failure to comply with any of the previous points exposes the operator to severe injury or damage the Pressure Washer thus making the warranty void.
General Maintenance
- Use a clean cloth to remove dirt, dust, oil or grease from the unit. ⚠ CAUTION Refrain from using detergent when cleaning the plastic parts. Use care not to make contact of the plastic parts with fluid like brake fluid, gasoline, other petroleum-based products, penetrating oils, etc. Otherwise the plastic could damage, it would alter the unit operation and expose the operator to severe injury.
- Periodically double-check the bolts, nuts and screws to be firmly tightened.
• Periodically check the filter to make sure is clean. - Verify oil and fuel levels to fill up when necessary.
- Check the jack-line. If frayed, replace it immediately in a
TRUPER® Authorized Service Center.
Nozzle Cleansing
- Nozzles can get partially obstructed due to residues, thus increasing pressure in the high-pressure gun. This issue can be detected if there is constant pulsating when pressing the trigger.
- To solve this issue turn off the Pressure Washer and remove the nozzle as indicated in page 9.
- Using a paper clip, remove the obstruction from the nozzle.
- Set the nozzle in the front end of the garden hose. Open the faucet so that the water flow goes through the nozzle in an inverse sense and releases the rest of dirt.
- Connect back the nozzle into the metal spear.
Air Filter Cleansing
- Check the air filter once a month to make sure it is in good repair. Remember, a dirty filter can cause trouble when the motor is started, loss of performance and shorten the useful life of the motor.
- Uncover the air filter cover loosening and removing the wing nut.
-
Using a damp cloth clean inside and out the filter cover. Do not allow dust to enter into the carburetor.
-
Remove the sponge air filter and rinse it with clean water.
- Press the filter lightly to remove the excessive water.
- Apply a thin layer of motor oil to the filter. Let it drip.
- Set the filter in place. Double-check it sits perfectly into the compartment. Otherwise, dust will enter the motor and cause premature wear.
- Set the filter cover back in place. Tighten the wing nut.
Oil Change
- Set an approved oil container under the unit.
- Uncover the oil tank inlets and remove the hex screw in the lower side of the motor. Drain the oil into the container.
- Before filling up again, set and tighten the hex screw and follow instructions in page 8.
Spark Plug Maintenance
- Before removing the spark plug clean the area around the spark plug base to stop dust or debris enter into the motor. Remove the spark plug.
- Clean the carbon deposits from the spark plug electrodes. Use a spark plug cleaner or a wire brush.
- If you find the old one is worn or using it again is doubtful replace the spark plug using an identical LG F7RTC spare plug.
- Verify the gap between electrodes. It shall be 0.02" to 0.03" mm. If necessary, adjust the gap by carefully bending the earth connection electrode.
- Verify the spark plug joint.
- Set the spark plug in place. Thread it and tighten by hand.
- Tighten with a wrench to compress the washer. If it is a new spark plug, give it a 1/2 turn to press the washer in an adequate manner. If using an old spark plug give it an 1/8 to 1/4 turn to compress the washer properly.
CAUTION Use care to adjust the spark plug correctly. Otherwise the motor can get too hot and get damaged.
Pump Maintenance
- Make a visual inspection of the pump every day. If noticing oil loss around the pump seals, take the Pressure Washer to a TRUPER Authorized Service to be repaired.
- Do not try to repair or alter the pump. Otherwise the Pump Washer could get damaged and the warranty will be void.
Long Term Storage
- Connect and open the water supply. Keep the unit running until running out of fuel. Remember, gasoline gets spoiled after 30 days even with the recommended stabilizer.
• After all the fuel is gone and the motor stops, turn off the switch and disconnect all the hoses, see they are empty and roll without twisting while the motor cools off (approximately 30 minutes). - Empty the pump. Pull the manual start jack-line handle 6 times approximately.
- Replace oil as indicated in page 11.
- Disconnect the spark plug and remove it. Pour less than a spoonful of 4-stroke clean motor oil through the spark plug orifice, into the combustion chamber.
- Having the spark plug removed pull the manual start jack-line two or three times to cover the insides of the cylinder wall.
• Service the plug before installing it back as indicated in page 11. Leave the spark plug cable disconnected. - Clean the air filter as indicated in page 11.
- Store the unit and accessories in an area under a roof, well ventilated and protected from freezing temperatures. Using an adequate cover is recommended if stored in low temperatures. Do not store it near furnaces or other heat sources because it makes the pump seals dry.
Using the Unit After Long Term Storage
- Pull the start jack-line three to four times to clean the oil from the combustion chamber.
- Remove the spark plug from the cylinder. Clean the oil in the spark plug and set it back into the cylinder.
- Connect the spark plug cable.
- Fill up as indicated in page 8.
| Periodic Maintenance | Each use | Every 8 h | Every 20 h | Every 50 h | Every 100 h | Every 300 h |
| General Maintenance | √ | |||||
| Oil Inspection | √ | |||||
| Oil Change | √ | |||||
| Water Filter Inspection | √ | |||||
| Pump Oil Change | √ | |||||
| Cleaning Spark Plug | √ | |||||
| Cleaning Air Filter | √ | |||||
| Replace air filter | √ | |||||
| Adjust spark Plug Spark Plug Electrodes | √ | |||||
| Replace Spark Plug | √ | |||||
| Verify and Adjust Valve* | √ |
* Go to a TRUPER® Authorized Service Center for this Service.
Troubleshooting
Problem Cause Solution
| The motor will not start. | No fuel.Water Pressure in the hose.Defective or inadequate spark plug.Disconnected or damaged spark plug cable.Ignition system is not working. | Fill up the fuel tank.Press the trigger to release water pressure before starting the motor.Replace spark plug.Connect the cable or replace if worn.Go to a TRUPER Authorized Service Center. |
| Trouble starting the motor. | There is water in the gasoline.Weak spark in the spark plug. | Drain the whole system and refill with new fuel.Go to a TRUPER Authorized Service Center. |
| Engine power is lacking. | Air filter is dirty. | Clean or replace the air filter. |
| Detergent is not mixing in the spray. | The detergent hose end is not submerged into the detergent.A high-pressure nozzle is installed. | Submerge the whole detergent hose filter into the detergent container.Use the black nozzle to apply detergent. |
| The pump will not generate pressure. | The detergent nozzle is installed.Water supply is inadequate.Wrong hose and high-pressure gun connection.Clogged nozzle.Air in the hoses.Leaks in the hose.Twisted hose.Choke in the start position.Defective pump. | Replace the nozzle with a high-pressure nozzle.Connect adequately the garden hose to the Pressure Washer and open the water supply all the way.Verify and correct all the connections.Unclog the nozzle as indicated in page 11.Press the trigger to purge the air from the system.Replace the hose.Stretch, untangle and untwist the hose.Set the choke in the Gear position.Go to a TRUPER Authorized Service Center. |
| The unit will not reach high pressure. | The garden hose diameter is too small.Water supply is restricted.There is not enough water inlet.The detergent nozzle is installed. | Replace the hose. Use a 3/4"Double-check the garden hose to stretch bends, leaks or blockage.Open the water supply all the way.Replace the nozzle. Use a high-pressure nozzle. |
Notes

natural_image
Line drawing of a hairless water spray gun with lever and handle (no text or symbols)Authorized Service Centers
In the event of any problem contacting a Service Center, please see our webpage www.truper.com to get an updated list, or call our toll-free numbers 01(800) 690-6990 or 01 (800) 018-7873 to get information about the nearest TRUPER Authorized Service Center.
AGUASCALIENTES
671615 SUPER TOOLS
ZARAGOZA NO. 1205, COL. EL SOL, AGUASCALIENTES, AGS. TEL.: 01(449) 996-5978
BAIA
670796 CONTRURENTAS
CALIFORNIA SUR
This product, its parts and components have a one year cover against any defects in material and/or workmanship as well as its function, without expense for the customer. This warranty excludes the following: 1) when product is used under different from normal conditions; 2) usage in breach of the operating manual furnished or; 3) when this product has been altered or repaired by personnel not certified by TRUPER.
This warranty shall be effective with the supplier selling the product, or at TRUPER Authorized Service Centers listed in this manual.
This warranty shall be effective when presenting the product and the valid Warranty policy duly stamped by the supplier or the proof of purchase.
To comply with this warranty, Truper will cover transportation expenses in case consumer's address is out of range from TRUPER® Authorized Service Centers listed herein or at the website www.truper.com or at our toll-free numbers: 01 (800) 690-6990 or 01(800) 018-7873.
In the event of any problem regarding the validity of this warranty please call toll-free numbers mentioned above.
Parts, components, consumables and accessories when applicable may be acquired at TRUPER Authorized Service Centers listed herein.
Stamp of the business:

1 YEAR
Date of purchase:
TRUPER, S.A. de C.V.
Parque Industrial No.1, Jilotepec, C.P. 54240, Estado de México, México TEL. 01(761) 782 91 00, FAX 01(761) 782 91 70, (TIN) R.F.C.: THE-791105-HP2
www.truper.com

- Apagado
- Uso de detergente
- CAUTION
- Fuel Specifications
- Fuel Handling
- Before Operating the Pressure Washer
- When Operating the Power Washer
- After Operating the Tool
- Assembly Recommendations
- Assembly
- TRUPER®
- Oil Supply
- Fuel Supply
- Starting Up
- Setting Off
- High-pressure Gun Operation
- Spray Nozzle Selection
- Spray Nozzle Assembly
- Use of Detergent
- Rinsing
- Moving the Pressure Washer
- High Altitude Operation
- General Maintenance
- Nozzle Cleansing
- Air Filter Cleansing
- Oil Change
- Spark Plug Maintenance
- Pump Maintenance
- Long Term Storage
- Using the Unit After Long Term Storage
- Troubleshooting
- Notes
- Authorized Service Centers
- AGUASCALIENTES
- SUPER TOOLS
- BAIA
- CONTRURENTAS
- CALIFORNIA SUR
Brand : Truper
Model : LAGAS-3300
Category : Pressure washer