AX40T3030WM - Air purifier SAMSUNG - Free user manual and instructions
Find the device manual for free AX40T3030WM SAMSUNG in PDF.

| Product Type | Air Purifier |
| Model | AX40T3030WM |
| Brand | Samsung |
| Dimensions (W x H x D) | 410 x 580 x 240 mm |
| Weight | 8.2 kg |
| Power Supply | 220-240 V, 50/60 Hz |
| Power Consumption | 45 W |
| Noise Level | 25 - 50 dB |
| CADR (Clean Air Delivery Rate) | 400 m³/h |
| Recommended Room Size | Up to 30 m² |
| Filter Type | HEPA H13 + Pre-filter + Activated Carbon |
| Air Quality Sensor | PM2.5 Sensor |
| Operating Modes | Auto, Sleep, Turbo, Manual |
| Fan Speeds | 3 speeds |
| Timer | 1-8 hours |
| Filter Replacement Indicator | Yes |
| Child Lock | Yes |
| Remote Control | Included |
| Energy Star Certified | Yes |
| Maintenance | Clean pre-filter every 2 weeks; replace HEPA filter every 6-12 months |
| Warranty | 2 years |
Frequently Asked Questions - AX40T3030WM SAMSUNG
User questions about AX40T3030WM SAMSUNG
0 question about this device. Answer the ones you know or ask your own.
Ask a new question about this device
Download the instructions for your Air purifier in PDF format for free! Find your manual AX40T3030WM - SAMSUNG and take your electronic device back in hand. On this page are published all the documents necessary for the use of your device. AX40T3030WM by SAMSUNG.
USER MANUAL AX40T3030WM SAMSUNG
• Thank you for purchasing this Samsung air purifier.
- Before operating this unit, please read this user manual carefully and retain it for future reference.
Directory
Safety Precautions 3
Confirmations before use 9
Accessories / Product specification 9
Checking the air purifier 10
Main body 10
Displayandbuttons11
Disassembling the filter 12
Assembling the filter 13
Using the air purifier 15
Turning the power on/off / Fan speed / Sleep mode 15
Timer function / Lighting function / Lock function 16
Filter reset function / Checking the air cleanness 17
Use of dongle / Clean and dry pre filter 18
Cleaning and maintenance 19
Cleaning the exterior of the air purifier / Cleaning the sensors 19
Cleaning the air outlet 20
Others 21
Troubleshooting 21
Correct Disposal of This Product (Waste Electrical & Electronic Equipment)
(Applicable in countries with separate collection systems)
This marking on the product, accessories or literature indicates that the product and its electronic accessories (e.g. charger, headset, USB cable) should not be disposed of with other household waste at the end of their working life. To prevent possible harm to the environment or human health from uncontrolled waste disposal, please separate these items from other types of waste and recycle them responsibly to promote the sustainable reuse of material resources.
Household users should contact either the retailer where they purchased this product, or their local government office, for details of where and how they can take these items for environmentally safe recycling. Business users should contact their supplier and check the terms and conditions of the purchase contract. This product and its electronic accessories should not be mixed with other commercial wastes for disposal.
Safety Precautions
These safety precautions are for owner's safety and preventions of property damage. Therefore, please read this manual thoroughly before using your product.

WARNING
Hazards or unsafe practices that may result in severe personal injury or death.

CAUTION
Hazards or unsafe practices that may result in minor personal injury or property damage.

Followdirections.

Do NOT attempt.

Unplug the power plug from the wall socket.

Do NOT disassemble.
FOR INSTALLATION

WARNING

Plug the power cord into a wall socket with the power specifications of the product or higher and use the socket for this appliance only. Also, do not extend the power cord on your own.
- Sharing a wall socket with other appliances using a multi outlet power strip or extending the power cord may result in electric shock or fire.
- Do not use an electric transformer. It may result in electric shock or fire.
- If the voltage/frequency/rated current condition is different, it may cause electric shock or fire.

Do not install this appliance near a heater, inflammable material. Do not install this appliance in a humid, oily or dusty location, in a location exposed to direct sunlight and water (rain drops). Do not install this appliance in a location where gas may leak.
- Failure to do so may result in electric shock or fire.

CAUTION

The appliance should be installed in a place where the power cord of the product can be easily pulled out.
- Failure to do so may result in electric shock or fire due to electric leakage.
Install your appliance on a level and hard floor that can support its weight.
- Failure to do so may result in abnormal vibrations, noise, or problems with the product.
When installing the appliance, allow enough space around the appliance.
- Space between both sides of the product and the wall: At least 60 cm or more, Space in front of the product: 25 cm or more
- If enough space for air intake is not provided, purifying capacity may deteriorate.
- Make sure obstacles such as a curtain do not block air inlet or outlet of the appliance.
When installing the product, make sure that no heavy objects are on the power cord (or cable).
- Failure to do so may result in electric shock or fire.
For power supply

WARNING

Remove all foreign substances such as dust or water from the power plug terminals and contact points using a dry cloth on a regular basis.
- Failure to do so may result in electric shock or fire.
When plugging in the appliance, the power plug should face downward.
- If the power plug faces in the opposite direction, the electric wires within the cable may be damaged and this may result in electric shock or fire.
When the product, power plug or power cord is damaged, contact your nearest service center.
If the supply cord is damaged, it must be replaced by the manufacturer, its service agent or similarly qualified persons in order to avoid a hazard.
These instructions shall also be available in an alternative format, e.g. on a website.

Plug the power plug into the wall socket firmly. Do not use a damaged power plug, damaged power cord or loose wall socket.
- Failure to do so may result in electric shock or fire.
When unplugging the product, do not pull the power cord. Grip the power plug, and then pull the power plug.
- Failure to do so may result in electric shock or fire.
Do not pull or excessively bend the power cord. Do not twist or tie the power cord. Do not hook the power line over a metal object, place a heavy object on the power cord, insert the power line between objects, or push the power cord into the space behind the appliance.
- This may result in electric shock or fire.

CAUTION

When the air purifier will not be used for a long period of time or during a thunder or lightning storm, disconnect the power supply.
- Failure to do so may result in electric shock or fire.
It is dangerous when the power cable gets damaged, therefore contact a service center or qualified experts for the repair.
Before cleaning or repairing the appliance, unplug the appliance.
For operation

WARNING

If the appliance is flooded, turn off the appliance and contact a service center.
- Failure to do so may result in electric shock or fire.
If the appliance generates a strange noise, a burning smell or smoke, disconnect the power supply immediately and contact a service center.
- Failure to do so may result in electric shock or fire.
In the event of a gas leak (such as propane gas, LP gas, etc.), ventilate immediately without touching the appliance or power cord and contact a service center or a qualified technician.
- Do not use a ventilating fan.
- If there is a spark, explosion or fire may occur.
Do not unplug the appliance during operation.
- When plugging the appliance in again, flame may occur and it may result in electric shock or fire.
When a repair is needed, contact the service center.
- Failure to do so may result in a product malfunction, water leakage, electric shock or fire.

Do not touch the power plug with wet hands.
- This may result in electric shock.
Do not apply a force to or pull the product using excessive force.
- This may result in fire, injury, or a problem with the product.
After unpacking the air purifier, keep all packaging materials out of the reach of children.
- If a child places a bag over its head, it may suffocate.
Do not insert your fingers or a foreign substances into the air outlet while product is operating.
- Take special care that children do not injure themselves by inserting their fingers into the product.
Do not place an object near the product that makes it possible for children to climb onto the machine.
- The child could fall and injure themselves or the product may fall over and injure the child.
If water has entered the power supply module, unplug the power cable and dry the product completely before use.
- Failure to do so may result in electric shock or fire.
Do not put other foreign materials such as metal into the product.
- This may result in electric shock or injury.
Do not place heavy objects on the product.
- Failure to do so may result in a product malfunction or noise.

If a foreign substance such as water has entered the product, disconnect the power supply and contact the service center.
- Failure to do so may result in electric shock or fire.

Do not attempt to repair, disassemble, or modify the product yourself.
- Do not use a fuse (such as copper, steel wire, etc.) other than a standard fuse.
- Failure to do so may result in electric shock, fire, a product malfunction or injury.
■

CAUTION

Keep a distance of about 2 m from other electric appliances such as a TV, video or audio device etc.
- Failure to do so may result in reduced video quality or noise.
Leave enough space between the product and a wall.
- Space between both sides of the product and the wall: At least 60 cm or more, Space in front of the product: 25 cm or more
- This products is designed to take the room air from the front side of the product for purifying process. Therefore, make sure there is no obstacles in front of the product and near air intake and outlet.

Do not stand on top of the product or place objects (such as laundry, lighted candles, lighted cigarettes, dishes, chemicals, metal objects, etc.) on the product.
- This may result in electric shock, fire, a product malfunction or injury.
Do not tilt or turn the product upside down while the product is connected to the wall outlet.
- Failure to do so may result in a malfunction or fire.
Do not spray volatile material such as insecticide onto the product.
- As well as being harmful to humans, this may also result in electric shock, fire or a product malfunction.
Do not put the product into water.
- This may result in a product malfunction.
Do not operate the product with wet hands.
- This may result in electric shock.
This appliance is not intended for use by persons (including children) with reduced physical, sensory or mental capabilities, or lack of experience and knowledge, unless they have been given supervision or instruction concerning use of the appliance by a person responsible for their safety. Children should be supervised to ensure that they do not play with the appliance.
For cleaning

WARNING

Do not clean the product by spraying water directly onto it. Do not use benzene, thinner, acetone or alcohol to clean the product.
- This may result in discoloration, deformation, damage, electric shock or fire.
Disconnect the power supply and stop the fan operation before cleaning the product.
- Potential risk of electric shock or fire.

CAUTION

Unplug the power plug before cleaning the product.
Confirmations before use
Accessories
natural_image
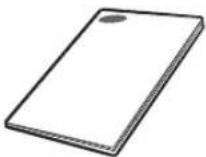
Pure electrical circuit lines without any symbolsPre filter 1EA

natural_image
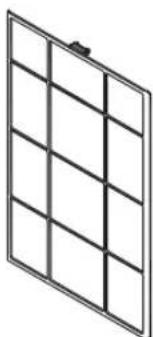
3D illustration of a rectangular block with a honeycomb pattern on top (no text or symbols)2-in-1 filter 1EA (Deodorization Filter+Dust Collecting Filter)
User manual 1 EA
Product specification
Dimension of the product is based on maximum value of the measurement. Measurement may vary depending on the side.
For product improvement purposes, design and specifications of the product are subject to change without prior notice.
| Model & Name | AX40T3030WM |
| Product dimension (W*H*D) | 350 mm*640 mm*350 mm |
| Effective area | 40 m^2^1) |
^1) The area coverage value is in accordance with the Korea Air Cleaning Association (KACA) standard.
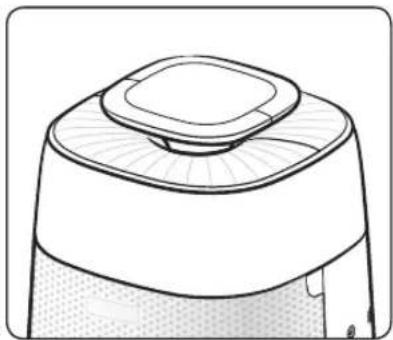
Checking the air purifier
Main body
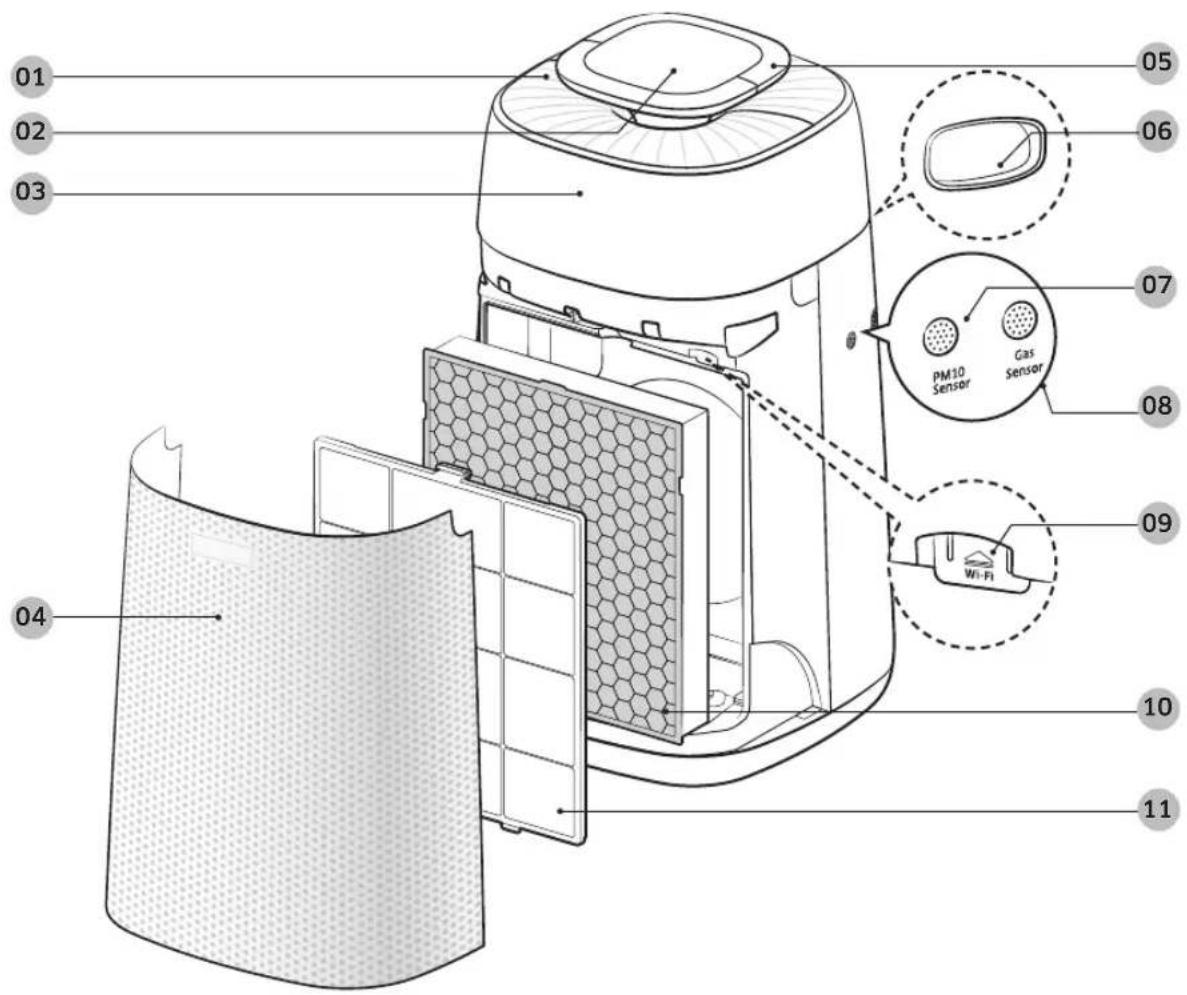
01 Air outlet
02 Display and buttons
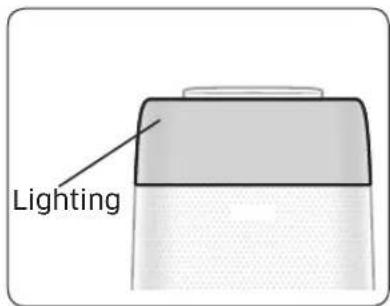
03 Lighting
04 Air inlet/ front panel
05 Handle (top)
06 Handle (at the rear side)
07 PM10 sensor
08 Gas sensor
09 Dongle
- This model does not support smart function. You cannot install a dongle to this model.
10 2-in-1 filter (Deodorization Filter+Dust Collecting Filter)
11 Pre filter
Display and buttons
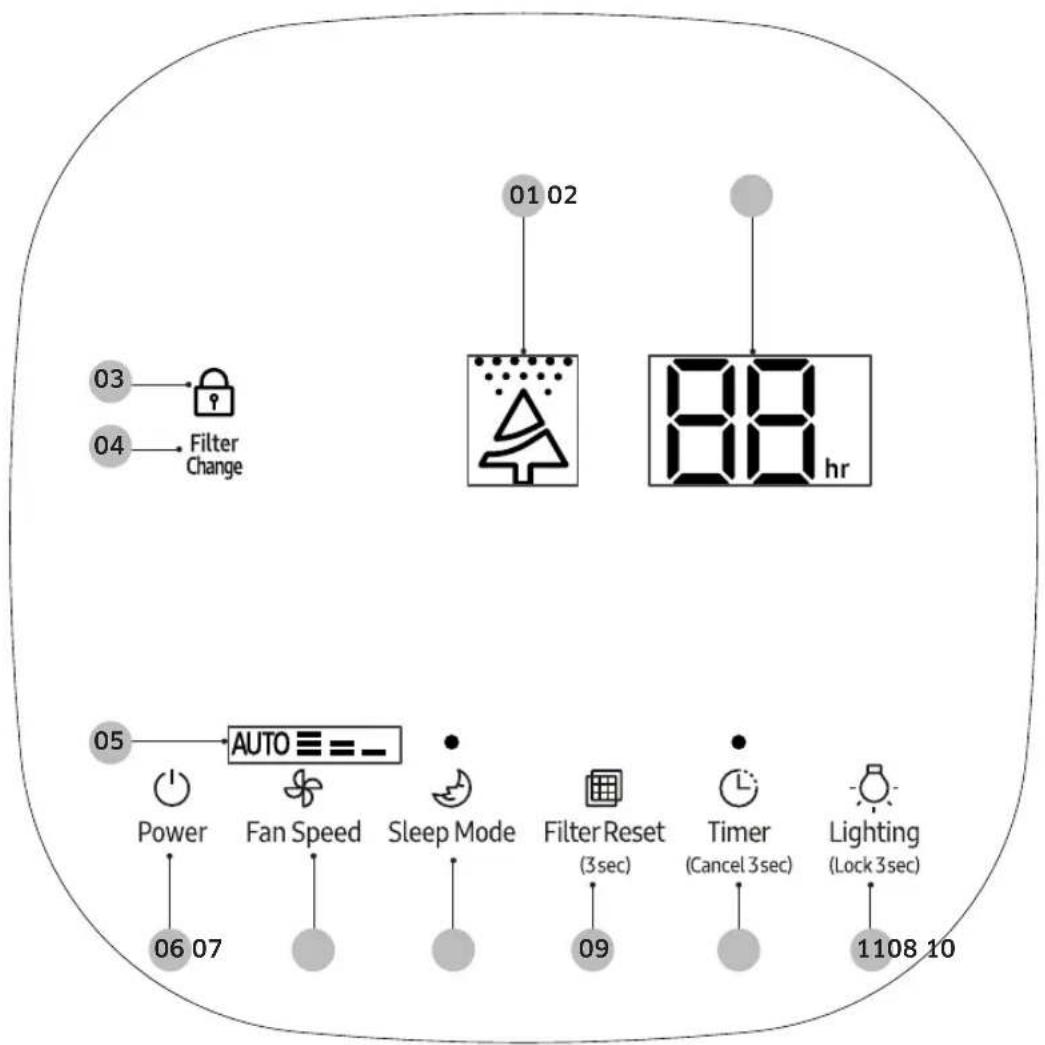
01 Comprehensive Air-quality indicator
02 Timer indicator
03 Child-Lock indicator
04 Filter replacement indicator
05 Fan speed indicator
06 Power button
07 Fan speed button
08 Sleep mode button
09 Filter reset button
10 Timer button
11 Lighting function/Child-Lock button
Checking the air purifier
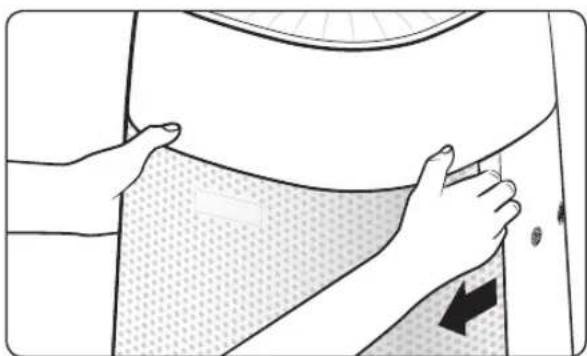
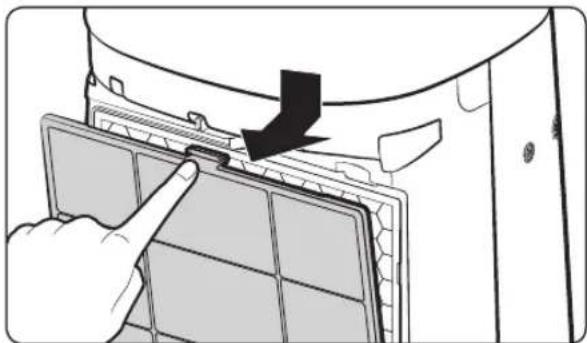
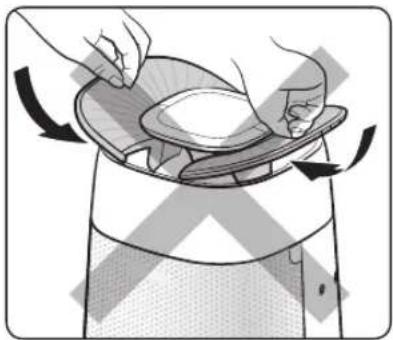
Disassembling the filter
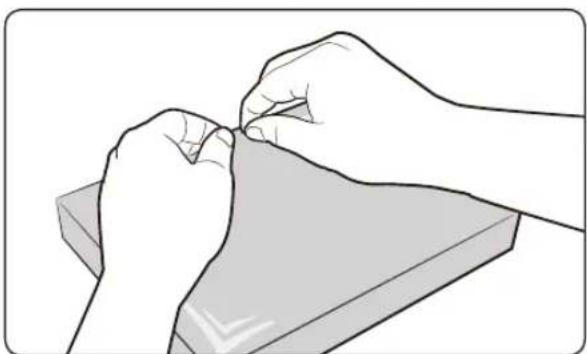
When using the 2-in-1 filter for the first time or replacing them with a new set, remove the vinyl packaging first.
natural_image
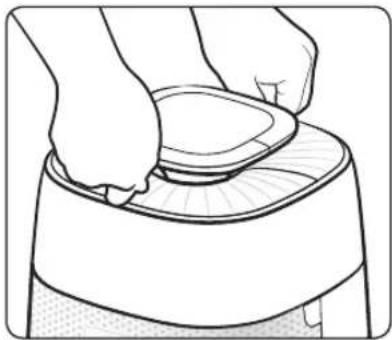
Illustration of hands adjusting a garment with a dotted pattern and arrow indicating direction (no text or symbols)STEP 1 Open the cover front
▶ Press the top part of the product with your thumb and pull the cover front with other fingers.
natural_image
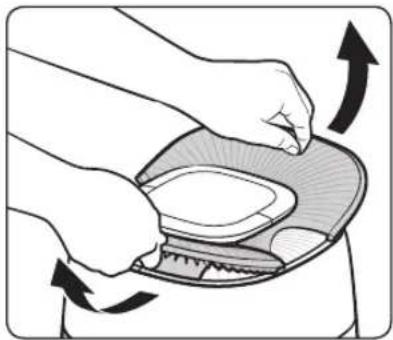
Illustration of a hand inserting a component into a device panel, with an arrow indicating the process (no text or symbols present)STEP 2 Disassemble the Pre filter
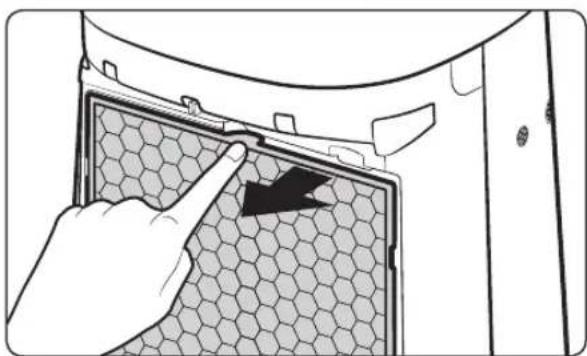
natural_image
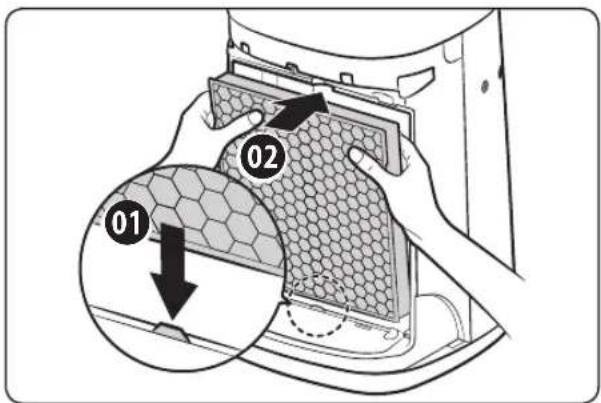
Hand pointing at a hexagonal mesh panel with an arrow indicating direction (no text or symbols)STEP 3 Disassemble the 2-in-1 filter
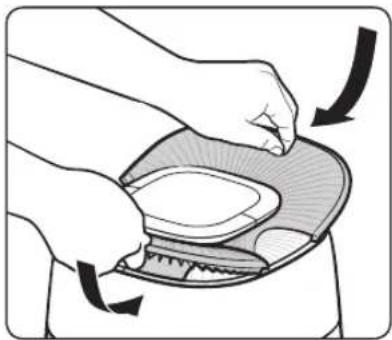
natural_image
Illustration of two hands performing a task on a flat surface, no text or symbols presentSTEP 4 Replace the 2-in-1 filter
▶ Remove the vinyl packaging of the new 2-in-1 filter.
Assembling the filter
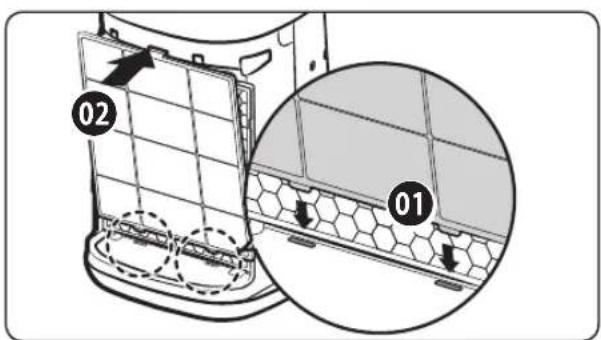
STEP 1 Put the 2-in-1 filter
▶ Insert the filter on the grooves at the bottom to fix the filter.
STEP 2 Put the Pre filter
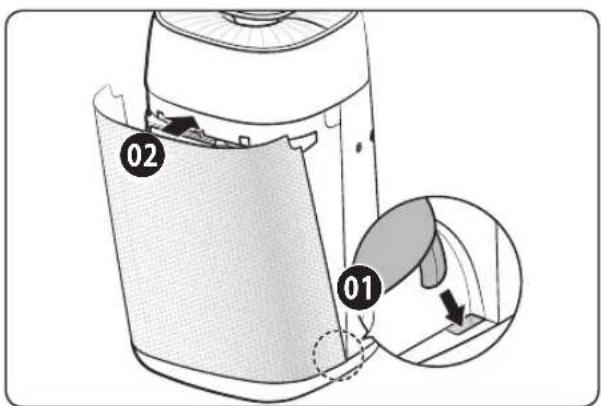
STEP 3 Close the cover front
▶ Insert the hooks on the grooves at the bottom first.
STEP 4 Insert the filter and reset the filter
▶ Press the[] button for more than 3 seconds.
Checking the air purifier
Using the filter
▶ If you operate the air purifier without the filters, air purification performance will decrease.
▶ New filter may smell strange when you operate the product for the first time after purchasing it.
- However, it will disappear naturally in few days.
▶ Please close the windows and doors when operating the product. However, concentration level of carbon dioxide may increase if you operate the product for a long time with windows closed. Therefore, ventilate the room regularly between use. When filter is saturated with just a weak odor, ventilating the room will help get rid of saturated odor.
▶ Carbon monoxide (CO) is a major harmful gas that cannot be filtered by the air purifier and it usually gets indoor from outside.
▶ Cleaning and replacement interval of the filter may vary depending on the operating environment.
▶ When using or replacing 2-in-1 filter, be sure to remove the plastic covered on the filter.
▶ If you operate the product without 2-in-1 filter, sound of the air flow can be abnormally loud. Make sure to insert the 2-in-1 filter before using the product.
▶ Deodorization function of the air purifier is effective when air is penetrates through the filter. Therefore when there's excessive odor in your room, ventilate the room first and use the air purifier afterwards to eliminate remaining odors for more effective deodorization.
▶ If you operate the air purifier during cooking a food that generates strong odor, lifetime of the Deodorization filter will be shortened significantly. Also if the odor is too strong, Deodorization filter may get saturated with the odor and you may smell that odor when you use the product after ventilating the room. Use the air purifier for eliminating the remaining odor after ventilating the room.
The filter replacement indicator will light up when the product has reached the maximum usages hours which was initially programmed. Therefore replacement cycle may vary depending on the operating environment.
▶ Do not wash the 2-in-1 filter with water. Always keep them away from moisture while the air purifier is in use.
▶ If you use the 2-in-1 filter for 24 hours per day, you can use it for six months to one year maximum. (If you use it less than that, the lifespan will be longer.) The lifespan is depended on the degree of air pollution. The more dust is accumulated, the shorter the lifespan of filter is.
▶ If the lifespan approaches to the end, the light is on. However, even before the light indicates the replacement timing, please replace it with new filter, if the filter is severely polluted, generates heavy odor or the wind is rapidly weakened.
The antibacterial ultra-fine filter is a high performance filter to remove fine dust and smoke particles in the air.
▶ The antibacterial ultra-fine filter is treated with anti-allergy process. It is effective to remove allergic materials.
▶ The charcoal deodorizing filter is high performance filter to effectively remove odor from toilet or cooking.
▶ If the 2-in-1 filter is saturated with odor and the air purifier stinks, please replace the new 2-in-1 filter.
▶ User needs to undertake filter replacement cost produced during the period of free maintenance.
▶ Replacement filters are available for sale from a Samsung retailer or a Samsung Service Centre.
Using the air purifier
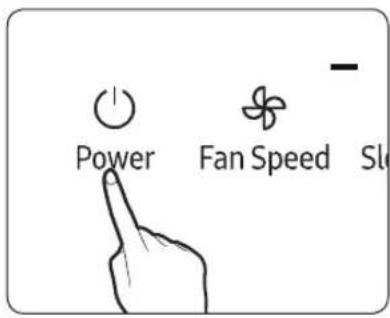
Turning the power on/off
The air purifier turns on with a ringing sound and begins purification. - When you turn on the air purifier, Sensor loading indication will be displayed for 30 seconds and then Comprehensive Air-quality indicator will be displayed.
※ Sensor loading indication
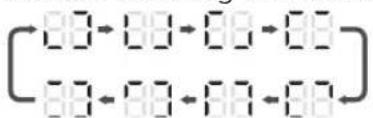
flowchart
graph LR
    A["8.9"] --> B["8.9"] --> C["8.9"] --> D["8.9"]
    E["8.9"] --> F["8.9"] --> G["8.9"] --> H["8.9"]
▶ If you turn off the power and turn it back on, the product will operate in the last fan speed you used.
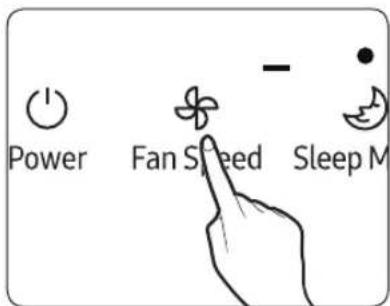
Fan speed
You can select desired fan speed when purifying the air.
▶ Press the [ ] button to select the desired fan speed. - Fan speed will be selected in following order repeatedly: Low→Auto→High→Medium→Low.
▶ If you select Auto, the air purifier will adjust the fan speed automatically according to dust and odor in the surrounding area to maintain clean indoor air quality.
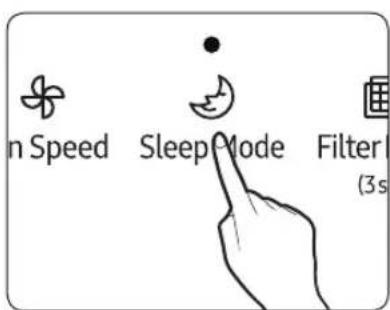
Sleep mode
You can sleep comfortably in a quiet and comfortable indoor environment with the sleep mode.
▶ When the sleep mode runs, the sleep mode indicator light is on at the display.
▶ If the sleep mode runs for 10 seconds or a longer time and other fan mode is selected, you will see the Sensor loading indication on the display. (Please refer to `Turning the power on/off` - `Sensor loading indication')
▶ When the sleep mode runs, the lock function will not work.
Cancel
▶ Press the [ ] button or [ ] button. Sleep Mode Fan Speed
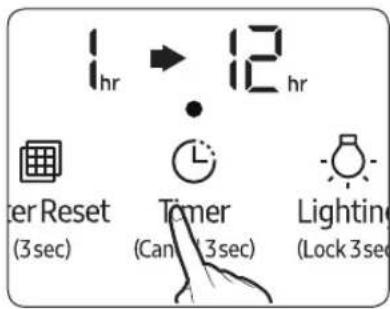
Timer function
You can set the Timer to turn off the purifier at desired time.

▶ Press the [Timer (Cancel 3sec) button you can select the time of the Timer from 1 hour to maximum 12 hours in 1 hour unit.
The Timer function will run after 3 seconds when you set it to turn off the purifier at desired time.
Cancel

▶ Press the [Timer] button for 3 seconds or set the time of the Timer to ☐
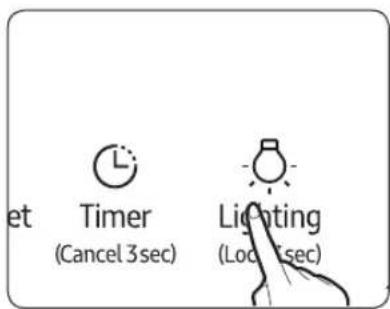
Lighting function
The mood lighting at the upper end of the product is divided into 4 colors according to the air quality.
▶ The air-quality indicator is not on during identification of the sensor preparation status on the display.
▶ The air-quality indicator function is off during operation of the sleep mode.
Cancel

▶ Press the [ ] button. (Lock 3 sec)
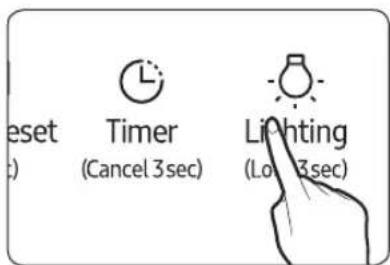
Lock function
You can lock the buttons to prevent the button from being pressed unwillingly, or by children.
▶ Press the [Lighting] button for over 3 seconds, you can hear 'Ding' and the buttons will be locked.
▶ When buttons are locked, the [ 🔊 will display.
▶ When buttons are locked, all the buttons will not work.
Cancel
▶ Press the [Lighting] button for over 3 seconds.

natural_image
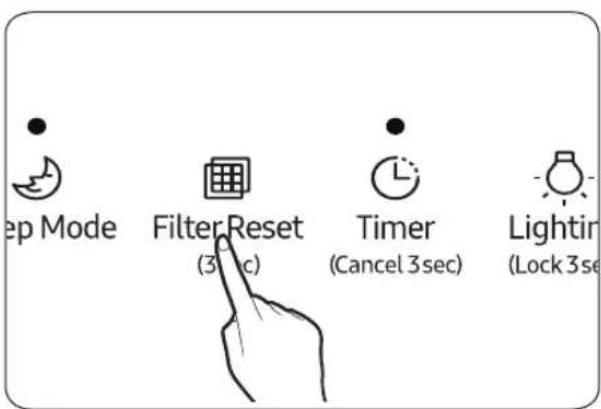
Simple line drawing of a Christmas tree with dots above it (no text or symbols)Filter reset function
This function let users know when to change the filter.
During operation of the air purifier, change with a new 2-in-1 filter if the [Filter] indicator is on and emits a beep; after change, long press the [Filter] button for more than 3 seconds to reset, during which the [Filter] indicator flashes twice while emitting the "Ringing" sound.
In case of changing the filter due to other reasons even if the [Filter indicator is not on, long press the [] button for more than 3 seconds to reset.
Checking the air cleanness
| Comprehensive air-quality confirmation | ►The comprehensive air-quality indicator identification will be divided into four levels according to the cleanness of dust and gaseous pollutants (smell) and performed with different colors.►Identification level of the comprehensive air-quality indicator:Blue → Green → Yellow → Red(Clean ⬇Polluted) |
Remark
- In case of using fragrance, smell-removal spray, cleaning agent and other volatile odor products, the comprehensive air-quality indicator identification may vary.
- The comprehensive air-quality indicator is judged comprehensively according to the concentration level of dust and gaseous pollutants.
- The comprehensive air-quality indicator identification is displayed in color corresponding to the worst level amongst the dust and gaseous pollutant concentration. That is, the indicator is displayed in red when the concentration of gaseous pollutants appears serious pollution with the dust concentration in good condition.
• Under the condition that the concentration of gaseous pollutants (smell) has been high, the comprehensive air-quality indicator identification displays in a fixed color.
- In the environment under the influence of electromagnetic wave, the comprehensive air-quality indicator identification may also be temporarily displayed in red.
Using the air purifier
Clean and dry pre filter
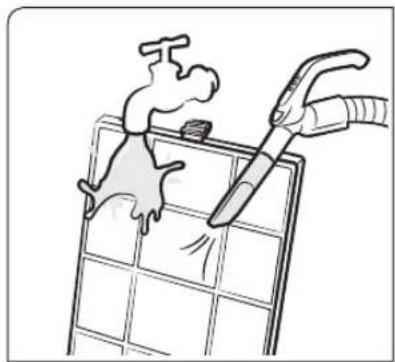
natural_image
Illustration of a hand using a tool to clean or remove a grid panel, with no text or symbols present.Clean pre filter
- Remove big dust through dust collector in case of serious dust pollution, and then softly wash through warm water with neutral washing agent. – Pre Filter (clean intervals: two weeks, 24 hours each day)
CAUTION
- Brush or similar tools may damage the pre filter.

natural_image
3D rendering of a rectangular solar panel with grid layout, placed on a plain wall (no text or symbols visible)Dry pre filter
· Dry completely in shade.
Cleaning the exterior of the air purifier

CAUTION
- Please make sure the air purifier is stopped, and pull out the plug from the power socket in the wall while cleaning.
▶ Dip a towel in warm water and wring it out before using it to clean the product.
▶ Use a cotton swab or exclusive cleaning (superfine fiber) cloth to clean the groove.
▶ If it's too hard to clean the dust on the cover front, remove the cover and wash it with water.

CAUTION
· Do not clean the air purifier with an alkali detergent.
- Do not clean the surface of the air purifier with sulfuric acid, hydrochloric acid or organic solvent (thinner, kerosene, acetone, etc.), or attach a sticker to the unit. This may damage the surface of the air purifier.
Cleaning the sensors
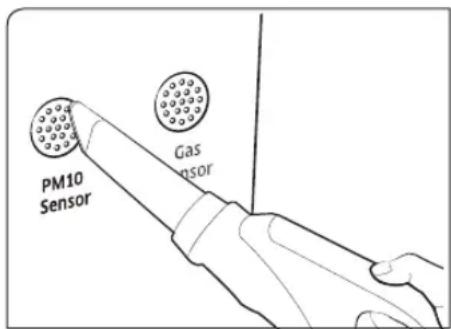
- If there's dust or foreign substances on the sensor, use a vacuum cleaner to clean the sensor and its surrounding.
- If there's any foreign substances on the sensor, it may not perform properly.

CAUTION
· Do not put any dust in the sensor parts.
Cleaning and maintenance
Cleaning the air outlet
- If the air outlet is dirty, re-assemble it after removal and cleaning of the grille. - If other matters fall into the air outlet, re-assemble it after removal of the air outlet grille.
Grille Removal and Assembling
Disassembling the grille
natural_image
Line drawing of hands holding a circular object on a mechanical component (no text or symbols)STEP 1 STEP 2 STEP 3
Grip the front and rear grille as shown.
natural_image
Illustration of hands performing a food or processing task with arrows indicating rotation (no text or symbols)Take the grille out to form the V type.
natural_image
Line drawing of a mechanical component with a square top and textured base (no text or symbols)Remove the grille completely.
Assembling the grille
natural_image
Illustration of hands performing a food or processing task on a bowl, with arrows indicating rotation (no text or symbols)STEP 1 STEP 2
Insert the grille in the front and rear direction of the display as shown.
natural_image
Line drawing of a microwave oven with lid and base (no text or symbols)Flatten the inserted grille.
natural_image
Illustration of hands performing a top hat maneuvering over a bag (no text or symbols)Remark
- Do not insert the grille in the left and right direction of the display.
Troubleshooting
Refer to the following chart if the air purifier operates abnormally. This may save time and unnecessary expenses.
| Problem Solution | |
| Product is not working | Check if the power is on and try to turn on the air purifier again.Check if the power plug is connected properly and turn on the air purifier again.If the product still don't work, try connecting the power plug to other power outlets. |
| Abnormal noise | You may hear abnormal noise if moving the running product, please power off before moving.You may hear sensor running sound while operating the air purifier, it is a normal phenomenon, you can use it reassurance. |
| There is a strange odor | Check the Pre filter and clean it if it's dirty.If the 2-in-1 filter is saturated with strange odor, please replace a new 2-in-1 filter. User needs to undertake filter replacement cost produced during the period of free maintenance. |
| The Comprehensive Air-quality indicator always is fixed on red.(Something is wrong with the Comprehensive Air-quality indicator) | Check the sensors for any foreign substances and clean them if necessary.In winter season if you operate the product immediately after product was delivered, dew may form on the sensor due to temperature difference (between outdoor and indoor). In this case, the comprehensive Air-quality indicator may turned red. In this case, indicator will become normal after 1~2 hours of operation.If you cook or if outside air gets indoor and affects changes in odor, gas sensor may detect odor and the Comprehensive Airquality indicator may become red. Ventilate the room for 1 ~ 2 hours.Disconnect the power plug and connect it back on after a minute and operate the product. (Reset the sensors)If you have followed all the solution indicated in this section and the Comprehensive Air-quality indicator is still red, there might be a problem with sensor or wires. Please contact the service center. |
Troubleshooting
| Problem Solution | |
| Fan speed is not changing according to the Comprehensive Air-quality. | ■ Set the fan speed to Auto. When the fan speed is set to High, Medium, Low, or Sleep, the fan speed will not change automatically. |
| Filter replacement indicator not turning off | ■ After replacing the 2-in-1 filter, press the [Filter Reset (3sec) over 3 seconds to reset the filter replacement alert. |
| Strange indication is displayed | ■ If you see C 103, 154, 163, contact the service center. |
| Air out only from the rear side | ■ The design is intended for purifying the air efficiently with the wind rising through whirling. As the wind flows in the clockwise direction, you may feel that the front side is weaker while the rear side is stronger for the wind flown out from the upper air outlet. |
QUESTIONS OR COMMENTS?
| COUNTRY CALL OR VISIT US ONLINE AT | ||
| AUSTRALIA | 1300 362 603 (Other)1300 425 299 (HHP) | www.samsung.com/au/support |
| NEW ZEALAND | 0800 726 786 (All Product)0800 6 726 786 (Support for Smart Mobile Devices) | www.samsung.com/nz/support |