
AX53A9370GE - Air purifier SAMSUNG - Free user manual and instructions
Find the device manual for free AX53A9370GE SAMSUNG in PDF.


| Product Type | Air Purifier |
| Brand | Samsung |
| Model | AX53A9370GE |
| Dimensions (W x H x D) | 380 mm x 438 mm x 406 mm |
| Effective Area | 53 m² |
| Air Flow Rate (High mode) | 7.02 m³/min (3 outlets) |
| Air Flow Rate (Smart mode, High fanspeed) | 6.88 m³/min |
| Filter System | Pre-filter, Electrostatic Discharger, Deodorization Filter, Hybrid Dust Collecting Filter |
| UV-C LED | Yes, wavelength 275 nm, effective irradiance 6.36 µW/cm² at 200 mm |
| Operation Modes | Smart, High, Wind-Free, Sleep |
| Smart Control | SmartThings app (Wi-Fi 2.4 GHz) |
| Display | PM10, PM2.5, PM1.0, GAS levels with color indicators |
| Air Outlet Settings | 1 outlet or 3 outlets (adjustable in Smart mode) |
| Lock Function | Yes, press and hold Mode button for 3 seconds |
| Filter Replacement Reminder | Yes, audible alarm and display message |
| Recommended Cleaning Interval | Pre-filter: every 2 weeks; Electrostatic discharger: every 2 months |
| Power Supply | External power adapter (low voltage, specific to model) |
| Safety Features | UV-C LED warning, polarized plug, child lock, automatic shut-off when panels open |
| Accessories Included | Pre-filter, Electrostatic discharger, Deodorization Filter, Hybrid Dust Collecting Filter, User Manual, Power adapter |
Frequently Asked Questions - AX53A9370GE SAMSUNG
User questions about AX53A9370GE SAMSUNG
0 question about this device. Answer the ones you know or ask your own.
Ask a new question about this device
Download the instructions for your Air purifier in PDF format for free! Find your manual AX53A9370GE - SAMSUNG and take your electronic device back in hand. On this page are published all the documents necessary for the use of your device. AX53A9370GE by SAMSUNG.
USER MANUAL AX53A9370GE SAMSUNG
Thank you for purchasing this Samsung Air Purifier. Before operating this unit, please read this manual carefully and retain it for future reference.
Safety Information 3
Safety Information 3
Package Contents 7
Accessories / Product specifications 7
Air Purifier Overview 8
Front of main unit / Rear of main unit 8
Button unit / Display 9
Connecting the power adapter / Removing the power adapter 10
Removing the filters 11
Attaching the filters 13
Using the Air Purifier 16
Turning on/off the air purifier / Changing the operation mode 16
Lock function / Filter replacement reminder 17
Air outlet setting / Checking air quality 18
Cleaning and Maintenance 20
Cleaning the air purifier exterior 20
Cleaning and drying the filters 22
Using the SmartThings App 23
SmartThings app 23
Appendix 26
Before Requesting Service 26

Correct Disposal of This Product (Waste Electrical & Electronic Equipment)
(Applicable in countries with separate collection systems)
This marking on the product, accessories or literature indicates that the product and its electronic accessories (e.g. charger, headset, USB cable) should not be disposed of with other household waste at the end of their working life. To prevent possible harm to the environment or human health from uncontrolled waste disposal, please separate these items from other types of waste and recycle them responsibly to promote the sustainable reuse of material resources.
Household users should contact either the retailer where they purchased this product, or their local government office, for details of where and how they can take these items for environmentally safe recycling. Business users should contact their supplier and check the terms and conditions of the purchase contract. This product and its electronic accessories should not be mixed with other commercial wastes for disposal.
Safety Information
These safety precautions are for owner's safety and prevention of property damage.
Therefore, please read this manual thoroughly before using your product.

WARNING
Hazards or unsafe practices that may result in severe personal injury or death.

CAUTION
Hazards or unsafe practices that may result in minor personal injury or property damage.

Follow directions.

Do NOT attempt.

Make sure the machine is grounded to prevent electric shock.

Disconnect from the power source.

Do NOT disassemble.
FOR INSTALLATION

WARNING

Only connect to a socket that can provide the rated power supply. Do not use the socket with other products. Do not extend the power cord.
- Using a multi-socket with other products or extending the power cord may cause electric shock or fire.
- Using a voltage converter may cause electric shock or fire.
- Failing to meet the exact voltage, frequency and/or rated current may cause electric shock or fire.

Do not install the air purifier near a heat source and flammable objects, or in areas that are highly humid or dusty. Avoid exposure to oil, gas, direct sunlight and water.
- Follow instructions to avoid electric shock or fire.

CAUTION

When installing the product, make sure that the power plug can be easily removed when needed.
- Follow instructions to avoid electric shock or fire due to electrical leakage.
Install the product on a solid flat ground.
- Follow instructions to avoid excessive vibration, noise and operational issues thereof.

This air purifier requires a special low voltage, safe from the power adapter that has been given from the manufacturer that matches the mark and label only on the air purifier.
Keep a safe distance from surrounding objects.
- Clear space from each side: at least 24 inches and the rear: at least 10 inches
- The space is necessary to ensure efficient air intake and proper purification.
- Make sure that the inlet and outlet are not covered. Make sure that the power cord is not pressed under the product.
- Follow instructions to avoid electric shock or fire.
FOR POWER SUPPLY
WARNING
Use a dry cloth to wipe the power plug and the contact area to keep them free from dust, water and other undesirable substances.
- Follow instructions to avoid electric shock or fire.
Check the position of the power plug when you connect it to a socket.
- Having the cord hanging from above the plug may damage the wires inside, which can lead to electric shock or fire.
Please contact your local Samsung Service Centre if the power plug or cord is damaged.
If the supply cord is damaged, it must be replaced by the manufacturer, its service agent or similarly qualified persons in order to avoid a hazard.
Make sure that the power plug is securely fitted in the socket. Do not use it when the plug or cord is damaged.
- Follow instructions to avoid electric shock or fire. When you disconnect the power cord, pull it by the plug. Do not pull the cord itself.
- Follow instructions to avoid electric shock or fire.
Do not forcibly bend, pull, twist or tie the power cord into a knot. Do not hang it on a metallic object or put a heavy object on it. Do not put the cord in a small gap between heavy objects, or forcibly push it behind the air purifier.
- Follow instructions to avoid electric shock or fire.
This appliance has a polarized plug (one blade is wider than the other). To reduce the risk of electric shock, this plug is intended to fit a polarized outlet only one way. If the plug does not fit fully in outlet, reverse the plug. If it still does not fit, contact a qualified electrician.
- Do not attempt to defeat this safety feature.
CAUTION
Remove the power plug of your air purifier when it is not used for a period of time and during a thunderstorm.
- Follow instructions to avoid electric shock or fire.
Product installation must be handled by official Samsung service personnel or a certified local technician to avoid power cord or plug damage, which can be dangerous.
Disconnect the air purifier from the power source before cleaning or repairing.
FOR USING

WARNING

If the product is exposed to water, immediately disconnect it from the power source and contact your local Samsung Service Centre.
- Follow instructions to avoid electric shock or fire.
If you notice a noise, burning smell or smoke from the product, immediately stop using it and contact your local Samsung Service Centre.
- Follow instructions to avoid electric shock or fire.
If there is gas leakage (e.g., city gas or propane gas) in the location where the product is used, do NOT touch the product or power cord. Immediately open the windows to ventilate the location, and then contact the gas service provider's agent or a qualified technical expert for assistance.
- Do not turn the ventilation fan on.
- A spark can cause an explosion or fire.
Do not pull out the power plug while operating the air purifier.
- This may cause a spark when reconnecting the plug, which can lead to an explosion or fire.
Please contact your local Samsung Service Centre when you require repair service.
- Follow instructions to avoid malfunction, water leakage, electric shock or fire.

Do not handle the power plug with wet hands.
- Follow instructions to avoid electric shock or fire.
Do not strike the product with excessive force or pull or press the front panel forcefully.
- Failure to do so may result in fire, a product malfunction, injury, noise or deformation.
Store the plastic package away from children or discard it according to the law.
- Follow instructions to protect children from a risk of suffocation.
Do not insert your finger or other objects into the air inlet or outlet.
• Take special care to protect children from injury.
- Take special care not to injure your fingers by putting them between the front panel and the product when the front panel is closing.
Do not place an object near the air purifier as children may use them to climb onto the product.
- Follow instructions to avoid injury from a tip-over or fall.
If the power plug area has contacted water, completely dry it before using the air purifier again.
- Follow instructions to avoid electric shock or fire.
Do not insert a metal object and similar items inside the air purifier.
- Follow instructions to avoid electric shock or injury.
Do not place a heavy object on the air purifier.
- Follow instructions to avoid malfunction or noise.
To reduce the risk of fire or electric shock, do not use this fan with any solid-state speed control device. Not suitable for use with solid-state speed controls.

If any of the electric components inside the air purifier has contacted liquid or water, disconnect the product from the power source and contact your local Samsung Service Centre.
- Follow instructions to avoid electric shock or fire.

Do NOT attempt to repair or modify the product.
- Use only the standard rated fuse.
- Follow instructions to avoid electric shock, fire, malfunction or injury.

CAUTION
Keep your air purifier at least 7 feet away from a TV or other audio/visual media.
• They can be affected by video or audio noise.
Operate the air purifier with no obstacles in the vicinity.
- At least 24 inches from both sides of the product, at least 10 inches from the product inlet, and at least 39 inches from the product outlet
- The product is designed to intake, purify, and discharge polluted air. If there is any obstacle in the vicinity, the purification capacity may decrease.

Do not step on the product or place other objects on it (laundry, candles, burning cigarettes, plates, medicine, metal items, air fresheners, etc.).
- Follow instructions to avoid electric shock, fire, malfunction or injury. Do not tilt or flip the air purifier while the power plug is connected to the socket.
- Follow instructions to avoid malfunction or fire. Do not use bug repellent or other spray products on the air purifier. They can be harmful and may cause electric shock, fire or malfunction. Do not submerge the air purifier.
- Follow instructions to avoid malfunction. Do not handle the product with wet hands.
- Follow instructions to avoid electric shock.
This appliance is not intended for use by persons (including children) with reduced physical, sensory or mental capabilities, or lack of experience and knowledge, unless they have been given supervision or instruction concerning use of the appliance by a person responsible for their safety. Children should be supervised to ensure that they do not play with the appliance.
FOR CLEANING

WARNING
Do not apply water, benzene, thinner, alcohol, acetone or similar substances directly on the product.
- Follow instructions to avoid product discoloration or deformation, electric shock or fire. Disconnect the product from the power source when cleaning. Wait for the fan to completely stop before cleaning.
- Follow instructions to avoid electric shock or fire.

CAUTION
Be sure to cut off all power sources before cleaning or any other maintenance work. Before connecting power after maintenance, be sure to confirm that the product is assembled completely.
Accessories


Pre-filter Electrostatic discharger Deodorization Filter 1)


Hybrid Dust Collecting Filter 1) User Manual Power adapter
1) The deodorization filter and hybrid dust collecting filter cannot be reused by washing them with water.

NOTE
- Do NOT use types of filters other than those originally supplied with the product.
- When purchasing a filter for replacement, be sure to confirm that it is the same type as the filter originally supplied with the product.
Product specifications
The product dimensions are based on the maximum dimensions. They may vary depending on the measurement position. The product design and specifications are subject to change without prior notice for quality improvement.
| Model | |||
| AX53A9370GE | |||
| Dimensions (W×H×D) | Effective Area | CADR | Air Flow Rate |
| 380 mm × 438 mm × 406 mm 53 m2 | 6.88 m3/min 7.02 m3/min | ||
Air Purifier Overview
This image is a representative image. The product design and specifications are subject to change without notice for the purpose of improving quality.
Front of main unit

01 Clip wire 02 Button unit 03 Air outlet / Bespoke panel 04 Display
05 Front mesh 06 Frame 07 Pull handle (both bottom sides)
Rear of main unit

01 Clip wire 02 Air inlet / Rear panel 03 Micro air sensor
04 Hybrid Dust Collecting Filter 05 Deodorization Filter 06 Electrostatic discharger 07 Pre-filter
Button unit

01 Mode button
- Short press: Changes the operation mode (Smart, High, Wind-Free, Sleep) • 3-second press: Resets the filters
- 5-second press: Activates/deactivates the AP
02 Power button
- Short press: Turns on/off the device
- 3-second press: Locks/unlocks the device (When the device is locked/unlocked, the button is shown for 5 seconds on the front display.) * Mode button + Power button
- 5-second press: Toggles between 1 outlet and 3 outlets (air outlet quantity)
03 Display
Display
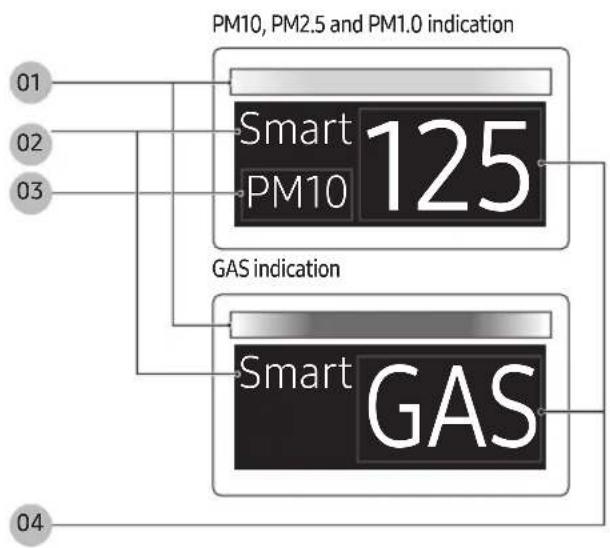
01 Shows the PM10, PM2.5, PM1.0 and GAS levels with colour indicators 02 Shows the operation mode 03 Shows the PM10, PM2.5 and PM1.0 status 04 Shows the concentrations of PM10, PM2.5 and PM1.0 and the GAS status
NOTE
- PM10: Dust in the air with a diameter of 10 µm or less – Fine particles about 1/5 of the diameter of a human hair
- PM2.5: Dust in the air with a diameter of 2.5 µm or less – Fine particles about 1/20 of the diameter of a human hair
- PM1.0: Dust in the air with a diameter of 1.0 μm or less – Fine particles about 1/50 of the diameter of a human hair * Diameter of a human hair: 50–70μm
Air Purifier Overview

CAUTION
• This product contains a UV-C LED. - UV radiation emitted by the UV-C LED may cause harm to your eyes and skin. - The UV-C LED in this product cannot be replaced by the consumer. Do NOT attempt to repair or modify the product. - Do NOT operate the UV-C LED from the outside of the product. - This product may generate ozone due to the ioniser. It is recommended to ventilate the room after using the product for a prolonged period of time.

WARNING
- UV-C rays are dangerous if touching or affecting the eyes and skin. May cause eye inflammation, retina, premature or blindness and cancer.
| Effective Irradiance in 200 mm. | Maximum effective operating time (L50, 50°C) | Installed distance | Wave length |
| 6.36 uW/cm2 30,000 hr | 21 mm 275 nm |
※ L50 means the time until the illuminance of the LED drops to 50% compared to the initial level.
Connecting the power adapter
To use the air purifier, first connect the power adapter to the main unit.

Check the top/bottom of the power adapter, and then connect it to the port on the rear bottom of the product.
- Push the power adapter all the way in until it clicks into place.

NOTE
- The product will not work if you do not push the power adapter all the way in.

CAUTION
- Exercise caution to ensure that the adapter is not damaged.
- Do NOT use a damaged adapter. It can cause electric shock or fire.
Removing the power adapter

Remove the device power adapter as shown in the figure.
To combine or separate devices, first be sure to remove the power adapters.
Removing the filters
Before using the consumable filters for the first time or a new filter for replacement, be sure to remove the plastic packaging from the filters.
To detach a filter, first be sure to remove the power plug.

STEP 1: Opening the rear panel
- Hold both upper sides of the rear panel. Gently lift and pull the panel towards yourself to remove it.
- Remove the clip wire from the rear of the main unit.

STEP 2: Remove the pre-filter

STEP 3: Remove Electrostatic discharger

STEP 4: Remove the deodorization filter

STEP 5: Remove the hybrid dust collecting filter.

STEP 6: Remove the plastic packaging from the deodorization filter and hybrid dust collecting filter.
Attaching the filters
When attaching the filters, refer to the order of inserting filters shown in the label attached to the inside of the filter unit.

STEP 1: Attaching the hybrid dust collecting filter
- Put the corner of the filter (②) behind the clip (①) at the bottom of the main unit to fasten the filter.
- Confirm that the filter attachment direction is correct before attaching it.

STEP 2: Attaching the deodorization filter

STEP 3: Attaching the electrostatic discharger

STEP 4: Attaching the pre-filter
Insert the tabs on the filter (②) into the slots (①) at the bottom of the main unit.

STEP 5: Closing the rear panel
- Attach the clip wire (①) to the rear of the main unit.
- Insert the tabs on the panel into the slots (②) at the bottom of the main unit, and then press the top center of the panel to fasten it.
STEP 6: Turning off the filter replacement reminder after replacing filters
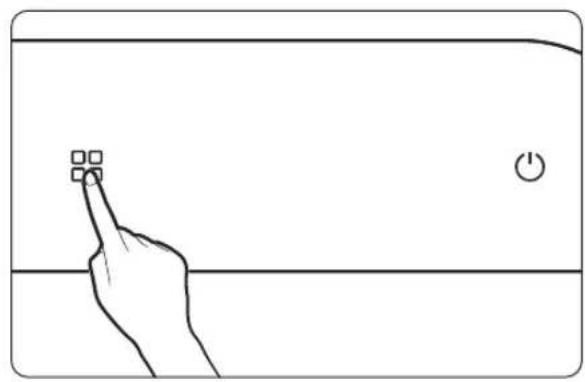
Press and hold the [ ] button for more than 3 seconds.
NOTE
- The filter replacement reminder displays "Filter Reset needed" on the front display and plays an audible alarm. If the filter replacement reminder is activated, replace with new filters and turn off the reminder.
- If the filters are saturated with surrounding odours and the room smells bad, replace the filters and turn off the filter replacement reminder.

NOTE
- Keep the doors and windows closed when the product is operating, if circumstances allow. Note that the concentration of carbon dioxide increases if the product is used with the doors and windows closed for an extended period of time. Ventilate the room regularly. Some subtle smells present in the filters can also be reduced by ventilating the room.
- Before removing the protective plastic covers attached to both sides of the front panel, first turn on the device and confirm that the front panel is fully opened.

Using the filters
- When using the device for the first time after purchase, you may experience some subtle odour from the unused filters.
- This will disappear naturally after using the device for a day or two.
- The replacement cycle of the filters can be between 6 months to 1 year, provided that the product operates 24 hours every day. If ignored, may be a breeding ground for germs. And before discarding it should be completely wrapped. (Filters can be used longer when the duration of product operation is shorter.) Filter life depends on the air quality. The life span of filters may shorten depending on the usage environment, the frequency of use, and the amount of contaminants absorbed.
- If the filters are contaminated severely, some unpleasant smell comes from the device or the fan speed is considerably lower than before, replace with new filters, even if the filter replacement reminder lamp does not illuminate.
- If the device has not been used for more than two weeks or some unpleasant smell comes from the device, operate the device in high fan speed mode in a well-ventilated location for more than 4 hours. Alternatively, dry the filters in the sun for at least 4 hours. This can help reduce odours present in the filters.
- If some unpleasant smell comes from the device during operation, it means that the filters are saturated with surrounding odours and it is time to replace them. Replace with new filters.
- The deodorization filter and hybrid dust collecting filter are consumables. You will be charged for replacing these filters regardless of the remaining warranty term.
- Filters for replacement can be purchased from the nearest Samsung Electronics website.
Deodorization filter
The deodorization filter is a high-performance filter that effectively removes daily odours including toilet and food smells.
- If the room has an excessively strong odour, first ventilate the room and then operate the device to remove residual odours. This can keep the device performance high.
- If you use the device when cooking food that has a strong odor, the deodorization filter may become saturated with the odor. As a result, the device may emit some unpleasant smell, or the deodorization filter lifespan may decrease and need to be replaced more frequently.
- If you use the device in a location with many pets or heavy odor, the deodorization filter lifespan may decrease. Install the device with an adequate distance from where pets defecate or pet food is stored.
- Carbon monoxide (CO) is a major harmful gas that cannot be removed by the deodorization filter. This gas usually flows in from the outdoors.
- Do NOT wash the deodorization filter with water. When using the product, exercise caution to ensure that it does not come in contact with water.
Hybrid Dust Collecting filter
This high-performance filter removes fine dust and cigarette smoke particles in the air.
- Do NOT wash the hybrid Dust Collecting Filter with water. When using the product, exercise caution to ensure that it does not come in contact with water.
Electrostatic discharger
In the electric sterilization system, the electric discharging cover imparts electric polarity to the bacteria, and the sterilization cover generates an electric field in the dust collecting filter, sterilizing the bacteria collected in the filter by 99%.
If you hear a chime sound when you connect the power plug, it means that the power is connected properly.


Turning on/off the air purifier
- The device turns on with a chime sound, and starts operation in Smart mode.
- Immediately after the device starts operation, a welcome message, app linkage reminder, disinfection information and 'sensor ready' indicator are displayed for 3 seconds each in sequential order. After that, the air quality colour, PM levels and operation mode are displayed. – Air quality is shown with colour indicators: PM10, PM2.5, PM1.0, GAS Concentrations of PM10, PM2.5 and PM1.0 are shown
- During operation of the device, the front panel is kept open about 10 to 30 mm. Note that the front panel opens about 40 mm and then closes by 25 mm before the device starts operation for the first time after the power plug is connected.
- The front display brightness changes depending on the ambient light intensity.
Changing the operation mode
Change the device operation mode as necessary.
- Press the [ ] button to select the operation mode to use.
– Each time you press the button, the mode changes in the following order: Smart → High → Wind-Free → Sleep → Smart.
- If you switch the device to Sleep mode, the front panel closes, the device operates at the lowest fan speed and the colour air quality indicator only illuminates.
- If you change the operation mode after using Sleep mode for more than 10 seconds, Sleep mode turns off and the 'sensor ready' indicator appears.
- In Smart mode, the fan speed is automatically adjusted (High → Medium → Low) depending on the surrounding dust and odour conditions to keep the room air clean.
- If the room air becomes clean after device operation in Smart mode for a certain period of time, the front panel closes and the device automatically switches to 'power saving mode'.
Power saving mode automatically turns off if the room air quality decreases. The mode can manually be turned off by changing the fan speed.
- While in Smart mode, use the SmartThings app to activate Sleep mode. When it becomes very dark around the device, the front panel will automatically close itself, the front display will turn off and the device will operate at the lowest fan speed.


Lock function
Use this function to lock all buttons to prevent the buttons from being pressed by mistake or by children during operation of the device.
- To lock all buttons, press and hold the [①] button for more than 3 seconds. A chime sound is played, the 'lock' icon is shown on the front display for 5 seconds and then all buttons are locked.
- When the Lock function is on, all buttons are disabled and cannot be selected.
Turning off the function
- Press and hold the [☐] button for more than 3 seconds. A 'ding' sound is played, the 'unlock' icon is shown on the front display for 5 seconds and then the function is turned off.
Filter replacement reminder
This function informs you when you need to replace the deodorization filter and hybrid Dust Collecting filter.
- If an audible alarm is played and 'Filter Reset needed' appears on the front display when using the device, replace the consumable filters, turn on the device and then press and hold the button for more than 3 seconds to reset the filter replacement time. A chime sound is played and the front display pops up a message asking you to confirm to reset the filter replacement time. To reset the filter replacement time, press the [1] button. If you do not want to reset, press the [2] button. If you press the [3] button, 'Filter is reset' appears on the display.
- You should also reset the filter replacement time by pressing and holding the [88] button for more than 3 seconds when the filters have been replaced for any reason although the front display did not display 'Filter Reset needed'.
CAUTION
- If the filters have not been replaced or installed in the device and you reset the filter replacement time, the filter replacement reminder may not work properly.
NOTE
- When the filters need to be replaced, 'Filter Reset needed' is shown on the display for 10 seconds as soon as the device is turned on.

| Fan speed\Mode | Smart | High fan speed |
| High | 1 outlet / 3 outlets | 3 outlets |
| Medium | 1 outlet | - |
| Low | 1 outlet | - |


Air outlet setting
While in Smart mode with high fan speed, change the number of air outlets if necessary.
- Press and hold the [88] and [1] buttons for more than 5 seconds. 'Blow air from 1 side' appears on the front display. When you change the fan speed to High while in Smart mode, the number of air outlets automatically changes from 3 to 1.
- If the number of air outlets is set to 1 and you press and hold the [☐] and [☐] buttons for more than 5 seconds, 'Blow air from 3 sides' appears on the front display. Subsequently when you change the fan speed to High while in Smart mode, the number of air outlets changes from 1 to 3.
- The changed setting is maintained even after the device is turned off and on again.
NOTE
- When the fan speed is Medium or Low while in Smart mode, the number of air outlets does not change automatically.
- In modes other than Smart mode, the setting is displayed and can be changed, but the number of air outlets does not change automatically.
Checking air quality
The concentrations of PM10, PM2.5 and PM1.0 are shown, and the air quality and GAS level are shown with colour indicators, depending on the PM10, PM2.5, PM1.0 and GAS levels.
- Among PM10, PM2.5, PM1.0 and GAS, the value with the worst air quality is displayed.
- If all items have low values, the concentrations of PM10, PM2.5 and PM1.0 are displayed in turn for 10 seconds each.
- Air quality levels
| Pollution level | PM10 concentration (μg/m3) | PM2.5 / PM1.0 concentration (μg/m3) | Gas pollution level | |
| Very poor | Red 151 and over 76 and over 4 | |||
| Poor | Yellow | 81 - 150 | 36 - 75 | 3 |
| Moderate | Green 31 | - 80 16 | - 35 2 | |
| Good | Blue | 30 and below | 15 and below | 1 |
- PM10, PM2.5 and PM1.0 measurement will be displayed in numbers 05-999.

NOTE
- PM concentrations can be affected by the environmental conditions in which the device is used (e.g., there is a construction site or road nearby, the device is used near a fabric sofa, a vacuum cleaner is used or bedding/clothes are arranged around the device).
- The PM concentration readings may increase if:
– The device is used in a carpeted room, a veterinary clinic or clothing store where there is a lot of fur, a highly humid location or a location with lots of smoke or insects, - A humidifier, electric pressure cooker or spray is used around the device, or – Yellow dust occurs and the device is used in an environment where there is inflow of outdoor air (due to the HVAC or ventilation system or draughty window frames)
- The gas level can be affected by odorous household items such as air fresheners, deodorants and detergents.
- If different types of air purifiers are used in the same room, the PM concentration readings may not match as air circulates. The PM concentration readings may vary depending on the product and PM meter.
- If the intensity of gas (odour) is constant with no change, the gas level reading may not change even if the odour you experience is strong.
- The PM concentration readings may not match official forecasts.
- In an environment affected by electromagnetic waves or electrical noise, the PM concentration readings may temporarily increase.
Cleaning and Maintenance

Be sure to disconnect the power plug from the socket before cleaning the product.
Cleaning the air purifier exterior
- Dampen a soft cloth with lukewarm water and wring it out, then wipe the product exterior with it.
- Use cotton swabs to wipe the grooves on the rear panel.
- If it is hard to remove dust on the front or rear panel, remove the panel and wash it with water.

CAUTION
- Do NOT wipe the product with an alkaline detergent or disinfectant.
- Do NOT wipe the product surface with sulphuric acid, hydrochloric acid, or organic solvent (e.g., thinner, kerosene, acetone). Do NOT attach a sticker to the surface. The product surface may become damaged.
Cleaning the sensor unit

- Use a vacuum cleaner to clean the area around the sensor. If the sensor is contaminated with dust or other foreign material, a high PM concentration may be detected.

CAUTION
- Do NOT put dust into the sensor inlet.
Cleaning and drying the front panel

STEP 1 Removing the front panel
- Hold both upper sides of the front panel and pull towards yourself.
- Remove the clip wire from the front of the main unit.

STEP 2 Removing the front mesh
- Turn the front panel over.
- Hold the pulls in the upper portion and remove the mesh.

STEP 3 Cleaning and drying the front mesh
- Use water or a soft cloth to remove dust and other foreign material on the front panel.
- If you cleaned the front mesh with water, dry it thoroughly before attaching it to the product.

CAUTION
- The frame incorporates the display PBA. Ensure that the frame does not come in contact with water. Contact with water causes device failure.


STEP 4 Attaching the front mesh
- Attach the front mesh to the front panel as follows: - Insert the tabs on the front mesh into the slots (①) at the bottom of the panel, and then push the areas numbered ② at the top of the mesh.
STEP 5 Attaching the front panel
- Attach the clip wire (①) to the front of the main unit. - Insert the tabs on the panel into the slots (②) at the bottom of the main unit, and then press the top center of the panel to fasten it.
Stand table model name (optional)
- Stand table: CFX-H900/GB
Cleaning and drying the filters

NOTE
- For details on how to detach/attach the filters, see pages 11 and 13.


Cleaning the pre-filter
- If accumulated dust is visually observed, first use a vacuum cleaner to remove the larger dust and then rinse the filter with lukewarm water. - Cleaning interval: 2 weeks (when the product is used 24 hours every day)

CAUTION
- When washing the pre-filters, do not rub with a brush or any other similar tool. The superfine fibres may become damaged.
Cleaning the Electrostatic discharger
- Soak the filter saver in lukewarm water with neutral detergent for 30 minutes, and then rinse with clean water.
- If the cover gets contaminated the performance may decline and it could make 'buzzing' sounds. If a static noise occurs, clean the filter saver immediately.
- Cleaning interval: 2 months (when the product is used 24 hours every day)

NOTE
- If you use the product in a place with a lot of dust, such as a place with carpets or pets and a clothes shop, we recommend that you wash the filter saver more frequently.

CAUTION
- Caution is required as the back side of the cover is sharp and may result in a cut hand.
Drying the filters
- Keep the filters in the shade until fully dry, avoiding exposure to direct sunlight.
To use the SmartThings app, connect the product to the network in the sequence described below.
The images shown may differ depending on your smartphone model, OS version and manufacturer.
You need to set up the Wi-Fi access point only when connecting the product to a Wi-Fi network. Once the product is connected, you can use the SmartThings app via Wi-Fi, 3G, LTE, 5G or more wireless networks.
If the WiFi disconnects, please follow the instructions on the Samsung SmartThings app via your mobile device or tablet.
You can easily install the SmartThings app or use the product with your smartphone by scanning the QR code on the attached label.
① Checking the power connections
Check if the power is connected to the product and the access point.
② Setting up and connecting to a Wi-Fi access point using your smartphone
1 To connect the product to a Wi-Fi network, turn on Wi-Fi at "Settings > Wi-Fi", and then select the access point to connect to
- Only alphanumeric characters are supported for wireless access point names (SSIDs). If an SSID has a special character, rename it before connecting to it. • This product supports only Wi-Fi 2.4 GHz.


2 Turning off "Switch to mobile data" at "Settings > Wi-Fi" on your Smartphone
- If "Switch to mobile data" or "Adaptive Wi-Fi" is turned on, you cannot connect to the network. Be sure to turn off these functions before connecting to the network.

![Advanced Adaptive Wi-Fi (This function is turned off. No.50d can't hold [non-matched] Off](/content/2026/06/1224139/images/929b933b40c26bb3a06cc4855156981914bac0572736a521ab7eef696ea901ed.jpg)

NOTE
- The setup may differ depending on your smartphone model, OS version and manufacturer.
3 Checking the Internet connectivity
- After connecting to Wi-Fi, check that your smartphone is connected to the Internet.

NOTE
- A firewall may prevent your smartphone from connecting to the Internet. Contact your Internet service provider for troubleshooting.
3 Downloading the SmartThings app and registering your Samsung account
1 Downloading the SmartThings app
- Search for "SmartThings" on Play Store or App Store, and download the SmartThings app to your smartphone.
- If the SmartThings app is already installed on your smartphone, update it to the latest version.

SmartThings (Samsung Connect) Samsung Electronics Co., Ltd.

- The SmartThings app supports Android OS 7.0 or later (with at least 2 GB RAM) and iOS 12.0 or later. The app is optimized for iPhone 6s or later and Samsung smartphones (Galaxy S and Note series). The updates of the SmartThings app or the functions supported by it may be discontinued for the previously supported OS versions due to reasons such as usability and security.
- The SmartThings app may change without prior notice to improve product usability and performance.
2 Registering your Samsung account
- A Samsung account is required to use the SmartThings app. To create your Samsung account and log in to your account, follow the instructions displayed on the SmartThings app. You do not need to install an additional app.

NOTE
- If you already have a Samsung account, log in to the account. If you have a smartphone that is a Samsung device and you have a Samsung account, your smartphone is automatically logged in to your account.
- If you log in from a smartphone produced for another country, you need to log in with its country code when you create your Samsung account, and the SmartThings app may not be used on some smartphones.

Connecting the SmartThings app to your product
1 Selecting the product to connect to
1) Start the SmartThings app about one minute after turning on the product to connect to. 2) After the SmartThings app is started, select 'ADD NOW' when a pop-up window saying that a product to connect to is found appears.

3) If the pop-up window does not appear, select "+", and then "Add Device."


You can add a product you want to connect to by selecting it manually or by selecting "Scan".
- Select manually: Air purifier > Samsung
- Scan: [Air purifier] Samsung


2 Connecting the SmartThings app to your product
- Follow the instructions displayed on the SmartThings app to connect to your product.
- For information on how to use the SmartThings app, select the How To menu on the app.

NOTE
- If any pop-up window appears on the top of the smartphone while connecting to your product, do not select it.
- If a pop-up window saying that the device is already registered appears during connecting to your product, get permission using "REQUEST PERMISSION" from a user already connected to the product, or create a new account using "REGISTER MY ACCOUNT" to independently connect to the product.
- If a Samsung account-related country error occurs during connecting to your product, log out of your current Samsung account, log in to your previous Samsung account, and then delete all devices that have been connected previously. Then, log in to your current Samsung account again, and then configure the settings.
- If a failure message appears while adding a device, see "Setting up and connecting to a Wi-Fi access point using your smartphone" on page 23. The connection may fail temporarily due to an installation location problem of the access point or other problems.
- If the word "AP" does not disappear from the display, unplug the power plug and plug it in again.

NOTE
- For the security protocols for wireless/wired access points, WPA-PSK and WPA2-PSK are recommended. For the authentication methods, AES is recommended. New Wi-Fi authentication specifications and Wi-Fi non-standard authentication methods are not supported.
- The product supports the IEEE802.11 b/g/n (2.4 GHz) communication protocol. (Samsung recommends IEEE802.11n.)
- If your Internet service provider permanently has registered the MAC address (a unique identification number) of your PC or modem, you may not be able to connect your product to the Internet. Contact your Internet service provider and ask how to connect devices other than your PC (such as an air conditioner and an air purifier) to the Internet.
Open Source Announcement
The software included in this product contains open source software. You may obtain the complete corresponding source code for a period of three years after the last shipment of this product by contacting our support team via http://opensource.samsung.com (Please use the "Inquiry" menu.)
It is also possible to obtain the complete corresponding source code in a physical medium such as a CD-ROM; a minimal charge will be required.
The following URL http://opensource.samsung.com/opensource/SMART_AT_051/seq/0 leads to the open source license information as related to this product. This offer is valid to anyone in receipt of this information.


Before Requesting Service
If an issue occurs in the product, check the following before you contact the Service Centre for assistance.
Operation issue

The device will not operate
- Check the power supply and turn on the air purifier again.
- Confirm that the power plug is plugged in properly, and then turn on the air purifier again. If it still does not operate, try a different power outlet.
- Confirm that the front panel is closed properly. If the panel is not closed properly, the product will not operate.
- Confirm that the rear panel is closed properly. If the panel is not closed properly, 'Close the back panel' will appear on the front display and the product will not operate.
Noise

I hear a strange noise from the device
- If you move the device when it is operating, noise may occur. Turn off the device before moving it.
- When the front panel is moved, a crackling or rattle sound can be heard depending on the environment in which the product is used. – These sounds are normal motor noises that may occur during zero point calibration when the front panel is moved.
- When the product is operating, a sensor operation sound, such as a hissing sound, can be audible.
- When you want to sleep or rest in a quiet environment, select the Sleep mode.
- When the product stops operation, a hissing sound can be audible as the fan operation stops.
Odours

Strange smell comes from the device
- Using an air freshener, diffuser, scented candle or cleaning agent, doing interior work or changing wallpaper before operating the air purifier may saturate the filters with odours, causing the air purifier to emit some unpleasant smell.
- Ventilate the room to completely remove the odours before using the air purifier.
Odours


- An air purifier sucks in and circulates indoor air. If you use it in a closed space for a prolonged period of time, odours generated in your home can saturate the filters.
- Remove the Pre-filter, Electrostatic discharger, Deodorization Filter and Hybrid Dust Collecting Filter, and smell them at close range to check whether they are saturated with odours. If saturated, wash or replace them.
You will be charged for replacing the filters regardless of the remaining warranty term.
- Operate the product for 3 to 4 hours with the doors and windows open.
- If you grill fish or meat or cook with oil, it is recommended to ventilate the room to remove the odours before operating the air purifier.
- The filters may emit odours if you operate the product continuously in a highly humid environment or an environment in which moisture from a humidifier is sucked in by the filters.
- If the filters emit odours due to moisture, dry them thoroughly in the sun before use.
Air quality

The air quality indicator stays red.
(The air quality indicator does not seem to work properly.)
- Check the sensor unit for foreign materials, and clean the unit if necessary.
- In winter season, during initial operation of the product shortly after delivery, condensation occurs inside the sensors due to temperature difference between the indoors and outdoors. As a result, the PM concentration readings may reach 999 µg/m3 and the air quality indicator may illuminate red. This is a temporary issue and will disappear after 1 to 2 hours of operation.
- If there is a change to the indoor odour due to cooking or temporary inflow of outdoor air, the gas sensor reacts to the change causing the indicator to illuminate red. If this occurs, ventilate the room for 1 to 2 hours.
- Disconnect the power plug, put it back after 1 minute and then operate the product. (The sensors are reset.)
- If the air quality indicator illuminates red for a prolonged period of time although you have used the suggested troubleshooting steps, it can be a sensor malfunction. In this case, please contact your local Samsung Service Centre for assistance.
- If you use a humidifier, electric pressure cooker or spray around the product, the air quality can be displayed as poor.
Air quality
The fan speed does not change when the air quality level changes
- Switch the product to Smart mode. While in High (fan speed), Sleep or Wind-Free mode, the fan speed does not change automatically. - The fan speed also does not change automatically when you switch the product to Smart Sleep mode after turning on Sleep mode using the SmartThings app while in Smart mode. Turn off Sleep mode.

The PM10, PM2.5, PM1.0 levels do not change from Good (05).
- This may happen if the room is closed and the air is clean. Tear paper near the micro-air sensor several times and/or rub the torn paper pieces together to create dust. If the PM concentration changes, the sensor is working properly. - Dusting off a blanket or cleaning may not necessarily cause sensor feedback if the dust particles are bigger than PM10, although the particles are filtered and removed from the air.
The PM10 and PM2.5 levels are different from the values provided by the Ministry of Environment
- The values provided by the Ministry of Environment are an average of atmospheric particulate matter readings measured for 1 or 24 hours. The PM10 and PM2.5 levels you see on the product are real-time measurements and may differ from the official values.
Display
The filter replacement indicator is kept lit up
- After replacing with new filters, press and hold the [☐] button for more than 3 seconds to turn off the filter replacement reminder.
The display output is strange.
If an indication that looks like '154,162,163' appears, contact your local Samsung Service Centre.
Update software?
Later
Update
An 'Update Software?' message appears.
- This message appears when update is required due to new functions added or improvements made in the product. Press the 'button in the controls area on the main unit of the air purifier. Update will automatically take place for a maximum of 30 minutes. If you press a button that is not the 'button, update will be postponed and the 'Update Software?' message will appear again later.
- Do NOT remove the power plug while update is in progress.
- The air purifier does not operate during update.
QUESTIONS OR COMMENTS?
| COUNTRY CALL OR VISIT US ONLINE AT | ||
| THAILAND | Hotline no : 12821800-29-3232 (Toll free for all product) | www.samsung.com/th/support |

- SAFETY INFORMATION
- PACKAGE CONTENTS
- AIR PURIFIER OVERVIEW
- USING THE AIR PURIFIER
- CLEANING AND MAINTENANCE
- (APPLICABLE IN COUNTRIES WITH SEPARATE COLLECTION SYSTEMS)
- WARNING
- CAUTION
- FOR INSTALLATION
- KEEP A SAFE DISTANCE FROM SURROUNDING OBJECTS
- FOR POWER SUPPLY
- USE A DRY CLOTH TO WIPE THE POWER PLUG AND THE CONTACT AREA TO KEEP THEM FREE FROM DUST, WATER AND OTHER UNDESIRABLE SUBSTANCES
- MAKE SURE THAT THE POWER PLUG IS SECURELY FITTED IN THE SOCKET. DO NOT USE IT WHEN THE PLUG OR CORD IS DAMAGED
- REMOVE THE POWER PLUG OF YOUR AIR PURIFIER WHEN IT IS NOT USED FOR A PERIOD OF TIME AND DURING A THUNDERSTORM
- FOR USING
- FOR CLEANING
- ACCESSORIES
- NOTE
- PRODUCT SPECIFICATIONS
- FRONT OF MAIN UNIT
- REAR OF MAIN UNIT
- BUTTON UNIT
- MODE BUTTON
- POWER BUTTON
- DISPLAY
- CONNECTING THE POWER ADAPTER
- REMOVING THE POWER ADAPTER
- REMOVING THE FILTERS
- STEP 1: OPENING THE REAR PANEL
- STEP 2: REMOVE THE PRE-FILTER
- STEP 3: REMOVE ELECTROSTATIC DISCHARGER
- STEP 4: REMOVE THE DEODORIZATION FILTER
- ATTACHING THE FILTERS
- STEP 5: CLOSING THE REAR PANEL
- STEP 6: TURNING OFF THE FILTER REPLACEMENT REMINDER AFTER REPLACING FILTERS
- USING THE FILTERS
- DEODORIZATION FILTER
- HYBRID DUST COLLECTING FILTER
- ELECTROSTATIC DISCHARGER
- TURNING ON/OFF THE AIR PURIFIER
- CHANGING THE OPERATION MODE
- LOCK FUNCTION
- TURNING OFF THE FUNCTION
- FILTER REPLACEMENT REMINDER
- AIR OUTLET SETTING
- CHECKING AIR QUALITY
- CLEANING THE AIR PURIFIER EXTERIOR
- CLEANING THE SENSOR UNIT
- CLEANING AND DRYING THE FRONT PANEL
- STEP 1 REMOVING THE FRONT PANEL
- STEP 2 REMOVING THE FRONT MESH
- STEP 3 CLEANING AND DRYING THE FRONT MESH
- STEP 4 ATTACHING THE FRONT MESH
- STEP 5 ATTACHING THE FRONT PANEL
- STAND TABLE MODEL NAME (OPTIONAL)
- CLEANING AND DRYING THE FILTERS
- CLEANING THE PRE-FILTER
- CLEANING THE ELECTROSTATIC DISCHARGER
- DRYING THE FILTERS
- ① CHECKING THE POWER CONNECTIONS
- ② SETTING UP AND CONNECTING TO A WI-FI ACCESS POINT USING YOUR SMARTPHONE
- TURNING OFF "SWITCH TO MOBILE DATA" AT "SETTINGS > WI-FI" ON YOUR SMARTPHONE
- CHECKING THE INTERNET CONNECTIVITY
- DOWNLOADING THE SMARTTHINGS APP AND REGISTERING YOUR SAMSUNG ACCOUNT
- DOWNLOADING THE SMARTTHINGS APP
- REGISTERING YOUR SAMSUNG ACCOUNT
- CONNECTING THE SMARTTHINGS APP TO YOUR PRODUCT
- SELECTING THE PRODUCT TO CONNECT TO
- OPEN SOURCE ANNOUNCEMENT
- BEFORE REQUESTING SERVICE
- OPERATION ISSUE
- THE DEVICE WILL NOT OPERATE
- NOISE
- I HEAR A STRANGE NOISE FROM THE DEVICE
- ODOURS
- STRANGE SMELL COMES FROM THE DEVICE
- AIR QUALITY
- THE AIR QUALITY INDICATOR STAYS RED
- (THE AIR QUALITY INDICATOR DOES NOT SEEM TO WORK PROPERLY.)
- THE FAN SPEED DOES NOT CHANGE WHEN THE AIR QUALITY LEVEL CHANGES
- THE PM10, PM2.5, PM1.0 LEVELS DO NOT CHANGE FROM GOOD (05)
- THE PM10 AND PM2.5 LEVELS ARE DIFFERENT FROM THE VALUES PROVIDED BY THE MINISTRY OF ENVIRONMENT
- THE FILTER REPLACEMENT INDICATOR IS KEPT LIT UP
- THE DISPLAY OUTPUT IS STRANGE
- AN 'UPDATE SOFTWARE?' MESSAGE APPEARS
Brand : SAMSUNG
Model : AX53A9370GE
Category : Air purifier