
ACW340F - Air purifier SAMSUNG - Free user manual and instructions
Find the device manual for free ACW340F SAMSUNG in PDF.


| Product Type | Air Purifier (Air Cleaner) |
| Model | ACW340F (also ACW340C, ACW340D, ACW340L, ACW340S) |
| Power Supply | 220-240V~, 50/60Hz |
| Operating Modes | Auto, Pollen, Sleep, Odor |
| Fan Speeds | Turbo (HH), High (H), Medium (M), Low (L) |
| Anion Generator | Bionizer – generates negative ions automatically or manually |
| Off Timer | 1 to 24 hours, adjustable via control panel |
| Air Flow Direction | Swing (auto in Pollen/Odor) or fixed (manual via remote) |
| Display Brightness | 3 levels (bright, dim, off) adjustable via remote |
| Contamination Level Indicator | Blue (clean) / Orange (contaminated), based on dust/odor sensors |
| Filter System | 11-Step: Pre-filter, Ionizer, Electrostatic, Bacterial, Nano Silver, Formaldehyde, VOCs, Allergen, HEPA, Anti-bacterial Fan, Bionizer |
| Washable Filters | Pre-filter, Ionizer, Electrostatic, Bacterial, Nano Silver, Formaldehyde, VOCs, Allergen, HEPA, Anti-bacterial Fan |
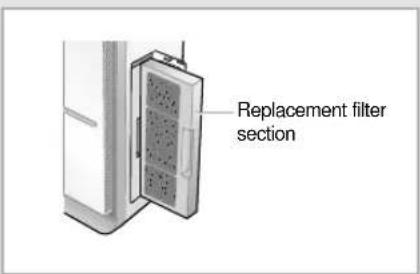
| Replacement Filters | HEPA, Allergen, VOCs, Formaldehyde (part of replacement filter section) |
| Wash Filter Indicator | Lights up when washable filters need cleaning (every 3 months or as needed) |
| Replace Filter Indicator | Lights up when replacement filters need changing (once every 3 years or as needed) |
| Remote Control | Included, with lithium battery; controls power, mode, fan speed, anion, air swing, dimmer |
| Safety Features | Auto shut-off if filter box opened; overheat protection; child safety (no finger insertion) |
| Recommended Cleaning | Dust sensor lens every 6 months; washable filters every 3 months; replace filters every 3 years |
| Noise Level | Quiet operation in Sleep mode (Low speed) |
| Manufacturer | Samsung Electronics |
Frequently Asked Questions - ACW340F SAMSUNG
User questions about ACW340F SAMSUNG
0 question about this device. Answer the ones you know or ask your own.
Ask a new question about this device
Download the instructions for your Air purifier in PDF format for free! Find your manual ACW340F - SAMSUNG and take your electronic device back in hand. On this page are published all the documents necessary for the use of your device. ACW340F by SAMSUNG.
USER MANUAL ACW340F SAMSUNG
OWNER'S INSTRUCTIONS
ACW340C
ACW340D
ACW340F
ACW340L
ACW340S
Air Cleaner

Safety Precautions
The following safety precautions must be taken into account when using this product.

WARNING
◆ Do not install this product in places where it will come into contact with combustible gases such as sulfuric gas, hydrogen gas, methane gas, etc. ◆ Do not install this product in places that are exposed to direct sunlight, near heating equipments and wet places. When installing the electric wires, do not bend the wire excessively or place a heavy object on it. The wires may be disconnected or damaged. ◆ Avoid using inflammable spray gases such as insecticides near this product. ◆ Prevent children from inserting their fingers or objects into the air inlet and outlet. ◆ Do not attempt to install or repair this product by yourself. If the product needs repairing, consult an authorized service personnel. ◆ Do not install this product on surfaces that are not even or slant. This may cause the product to malfunction or make a strange noise due to vibration. ◆ Make sure that the product is installed in a location that ensures enough space (at least 5 cm) in front of the air inlet. ◆ Make sure that there are no obstacles near the air inlet and outlet of the product. If a strange noise, burning smell or smoke come from the product, immediately disconnect the power supply and consult an authorized service personnel. ◆ Do not use this product for other purposes. ◆ Do not spill any kind of liquids into the product. ◆ Do not place containers containing liquid substances on top of the product. ◆ Do not apply excessive impact on the product. - When using this product in a closed area that combustible fuels are fired, make sure to ventilate the air occasionally. ◆ Do not use the product in places that have a high temperature and humidity level, such as a bathroom or a sauna. ◆ Before attempting to clean or repair the product, make sure that the power supply is disconnected and the fan has stopped rotating. ◆ Do not use substances such as benzene, thinner or alcohol to clean the surface of the product. ◆ Do not open the filter box when the product is in operation. When drying the washable filters, do not expose it to direct sunshine. The powerful sunshine may affect the transformation of the filter case. Do not touch the filter section with wet hands because the user may be electrocuted. This is especially true for the Washable Filter section where a high voltage current flows.
Contents
◆ PREPARING THE AIR CLEANER
■ Safety Precautions 2 ■ View of the Unit 4 ■ Remote Control-Buttons 6 - Getting Started 7 - Inserting the Battery into the Remote Control 8
SINGRECONTROL PANEL
OPERATING THE AIR CLEANER
Selecting the Automatic Mode ..... 10 Selecting the Pollen Mode 11 Selecting the Sleep Mode 12 Selecting the Odor Mode 13
OTHER FUNCTIONS
Generating Anions 14 Setting the Off Timer 15 Adjusting the Clean Level (Fan Speed) 16
OPERATING THE AIR CLEANER WITH A REMOTE CONTROL
Adjusting the Air Flow Direction 18 Adjusting the Display Brightness 19 Adjusting the Clean Level (Fan Speed) 20 Selecting the Operating Mode 21 Generating Anions 21
RECOMMENDATIONS FOR USE
Operating Recommendations 22 Cleaning the Air Cleaner 23 Solving Common Problems 26
TECHNICAL SPECIFICATIONS
Main Unit
11 Step Cleaning System![graph LR A["Pre-filter Ionizer Electrostatic filter"] --> B["bacterial"] B --> C["Nano silver"] C --> D["Formaldehyde filter"] D --> E["VOCs filter"] E --> F["Allergen filter"] F --> G["HEPA filter"] G --> H["Anti-bacterial fan"] H --> I["Bionizer Anti-"] subgraph Washable Filter Section A B C D E F…](/content/2026/06/1226555/images/8945e28c6201f87981d2aa9463c9b142a02ac63e46ab34c935468bf5a16a16c9.jpg)
The Anti-bacterial filter is coated with the Nano-silver particles.
Control Panel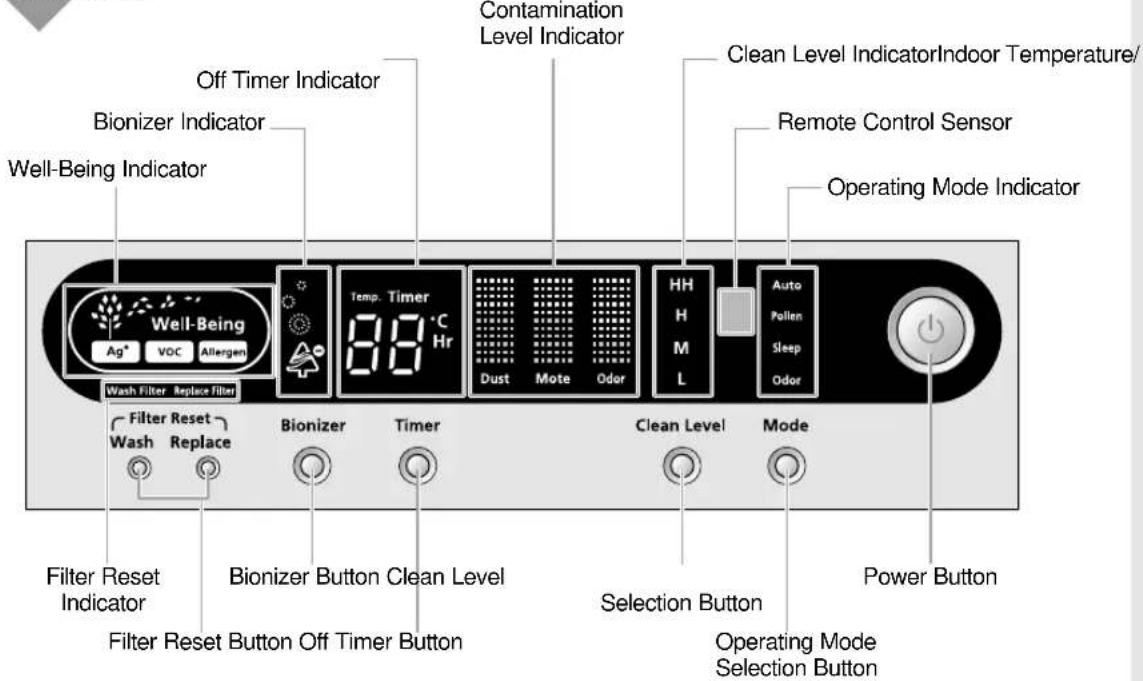

Contamination Level Indicator
- Classifies the contamination level based on the state of Dust, Mote and Odor with the Dust/Odor sensor.
- Blue indicates that the indoor air is clean. Orange means that the indoor air is contaminated.
- During the first 2 minutes after the air cleaner is turned on, the contamination
level will move up and down because the sensor will be in the process of analyzing the contamination level of the indoor air. So it is recommended that you check the contamination level after 2 minutes.

Remote Control - Buttons

Getting Started
You have just purchased an air cleaner and it has to be installed according to the safety precautions on page 2.
This Owner's Instructions booklet contains important information concerning the use of your air cleaner. Please take some time to read this booklet as it will help you take full advantage of the product's features.
The booklet is organized as follows.
◆ The following figures are shown from page 4 to 6:
- View of the Unit
- Remote control (buttons)
They will help you find the buttons and understand the symbols that are displayed.
◆ In the manual, you will find a series of step-by-step procedures for each function available.
Three types of symbols are used to help you understand the illustrations in the step-by-step procedures:

Inserting the Battery into the Remote Control
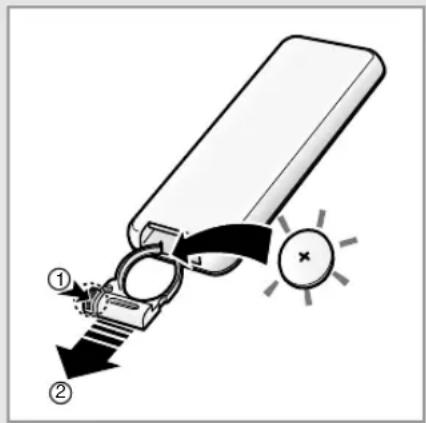
You must insert or replace the remote control battery when:
◆ You purchase the air cleaner. ◆ The remote control does not work properly.
Note
◆ Always direct the remote control towards the Remote Control Sensor on the air cleaner when operating it from a distance. When you press a button on the remote control and the air cleaner makes a ringing sound, it means the function has been chosen. ◆ If other electric appliances are affected by the remote control, consult an authorized service personnel.
1 Push the section marked with the dotted lines towards the direction of the arrow(①), and then pull out the battery case in the direction of the arrow(②).
2 Insert the battery(Lithium Ion), after confirming polarities of the battery :
◆ + side on the battery with the + side on the remote control. ◆ - side on the battery with the - side on the remote control.
3 Slide back the battery cover until it clicks.
USING
THEE
CONTROL
PANEL

This chapter indicates how to operate your air cleaner with the buttons on the control panel.
Selecting the Automatic Mode

In the Automatic Mode, the air cleaner automatically adjusts the clean level according to the signal of the more contaminated level after comparing the dusts and motes contamination level with the odor contamination level in the indoor air. Anions are generated into an air automatically and the air flow blade does not move.
1 If necessary, press the ⏻ (Power) button.
Result: ◆ The Power indicator on the display comes on.
◆ The air cleaner runs in the Auto Mode. ◆ The air cleaner makes a ringing sound.
2 If the Auto is not displayed on the display, select the Auto mode by pressing the Mode button until it is displayed on the display.
Result: ◆ The air cleaner beeps. ◆ The air cleaner operates in the Auto mode.
You can change modes at any time.
3 To control the direction of the air flow, refer to page 18. To adjust the clean level, refer to page 16. To adjust the generating anions, refer to page 14.
Selecting the Pollen Mode
The Pollen Mode can eliminate pollen and dust particles effectively in the indoor air. In this operating mode, the air cleaner automatically adjusts the clean level according to the dusts or motes contamination level without the odor contamination level in the indoor air. Anions are generated automatically and the air flow blade moves automatically.
1 If necessary, press the ⏻ (Power) button.
Result: ◆ The Power indicator on the display comes on.
◆ The air cleaner runs in the Auto Mode. ◆ The air cleaner makes a ringing sound.
2 If the Pollen is not displayed on the display, select the Pollen mode by pressing the Mode button until it is displayed on the display.
Result: ◆ The air cleaner beeps.
◆ The air cleaner operates in the Pollen mode.
You can change modes at any time.
3 To control the direction of the air flow, refer to page 18.
To adjust the clean level, refer to page 16.
To adjust the generating anions, refer to page 14.


Selecting the Sleep Mode


If you wish the air cleaner to clean the air in your room quietly, select the Sleep Mode. In this operating mode, the air cleaner runs in "Low Speed" which is the quietest clean level setting. Anions are generated into an air automatically and the air flow blade does not move.
1 If necessary, press the ⏻ (Power) button.
Result: ◆ The Power indicator on the display comes on.
◆ The air cleaner runs in the Auto Mode. ◆ The air cleaner makes a ringing sound.
2 If the Sleep is not displayed on the display, select the Sleep mode by pressing the Mode button until it is displayed on the display.
Result: ◆ The air cleaner beeps.
◆ The air cleaner operates in the Sleep mode.
Note: You can change modes at any time.
3 To control the direction of the air flow, refer to page 18.
To adjust the clean level, refer to page 16.
To adjust the generating anions, refer to page 14.
Note: The brightness of the display during the Sleep Mode
◆ In the Sleep Mode, the brightness of the display decreases so that it may not disturb your sleep. ◆ If you wish to turn off the display completely, press the Dimmer button on the remote control.
However, the 'Well-Being' indicator still keeps the dim light.
Selecting the Odor Mode
If you select the Odor Mode, the air cleaner can eliminate airborne contaminants and harmful smells effectively in the indoor air. In this operating mode, the air cleaner automatically adjusts the clean level according to the signal of the odor contamination level without the dusts and motes contamination level in the indoor air. Anions are generated automatically and the air flow blade moves automatically.
1 If necessary, press the ⏻ (Power) button.
Result: ◆ The Power indicator on the display comes on.
◆ The air cleaner runs in the Auto Mode. ◆ The air cleaner makes a ringing sound.
2 If the Odor is not displayed on the display, select the Odor mode by pressing the Mode button until it is displayed on the display.
Result: ◆ The air cleaner beeps.
◆ The air cleaner operates in the Odor mode.
Note: You can change modes at any time.
3 To control the direction of the air flow, refer to page 18.
To adjust the clean level, refer to page 16.
To adjust the generating anions, refer to page 14.
VOCs (Volatile Organic Compounds) are substances that evaporate easily at room temperature. Common sources that emit VOCs into indoor air include housekeeping products, building materials, and furnishings. In sufficient quantities, VOCs can have direct adverse effects on human health. Many VOCs have been classified as toxic and carcinogenic substances. Therefore, it is harmful to be exposed to these compounds for a long period.


Generating Anions


The Bionizer generates anions, which are beneficial to the human body. Use this function if you want to feel refreshed both physically and mentally, just as if you were in the midst of a forest. If the air cleaner is turned on, anions are generated automatically.
1. If necessary, press the ⏻ (Power) button.
Result: ◆ The Power indicator on the display comes on. ◆ The air cleaner runs in Auto Mode. ◆ The air cleaner makes a ringing sound.
2. If the Bionizer Indicator is not displayed on the display, select the Bionizer function by pressing the Bionizer button.
Result: ◆ The air cleaner beeps.
◆ The Bionizer Indicator lights up on the display. ◆ The air cleaner generates anions into the indoor air.
3. If you wish to turn off the Bionizer function, press the 📄 button again.
Result: ◆ The Bionizer Indicator disappears on the display. ◆ The air cleaner stops generating anions into the indoor air.

◆ Anions are ultra-fine particles charged negatively in the air. There are vast quantities of them in nature, for example near waterfalls or in the midst of a forest. When inhaled in sufficient quantities, anions can enhance the metabolism of your blood cells, help you recover from fatigue faster, and calm your nerves. Thus anions are beneficial to you both physically and mentally.
Setting the Off Timer
The air cleaner turns off automatically at the appointed time. You can set the time from 1 hour to 24 hours.
1 If necessary, press the ⏻ (Power) button.
Result: ◆ The Power indicator on the display comes on. ◆ The air cleaner runs in the Auto Mode. ◆ The air cleaner makes a ringing sound.
2 Press the 📄 button until the required time is displayed to set the Off Timer. You can set the time between 1 hour and 24 hours.
Result: ◆ Each time you press the 🔊 button, the time is adjusted by 1 hour or 6 hours.
NOTE ◆ You can set the Off Timer only when the air cleaner is turned on. ◆ You can set the Off Timer only on the control panel.
To cancel the Off Timer
Press the Timer button until the timer indicator disappears.
Result: ◆ The Off Timer you have set is canceled. ◆ The indoor temperature is displayed.


Adjusting the Clean Level (Fan Speed)


The air cleaner automatically adjusts the clean level according to the contamination levels of the indoor air. It is also possible for you to manually select the clean level.
1 If necessary, press the ⏻ (Power) button.
Result: ◆ The Power indicator on the display comes on. ◆ The air cleaner runs in the Auto Mode. ◆ The air cleaner makes a ringing sound.
2 If you wish to manually select the clean level, press the ○ button one or more times until the desired clean level is selected.
Result: ◆ The air cleaner beeps.
◆ The air cleaner operates in the clean level that was selected.
HH (Turbo)
H (High)
M (Medium)
L (Low)
3 If you wish the air cleaner to automatically adjust the clean level for you, press the Mode button until the Auto mode is selected.
Result: ◆ The clean level that was selected is canceled.
◆ The air cleaner operates in the Auto mode. ◆ The air cleaner automatically chooses the appropriate clean level according to the levels of contamination in the indoor air.
USING
THE
REMOTE
CONTROL

This chapter indicates how to operate your air cleaner with a remote control.
Adjusting the Air Flow Direction


The movement of the air flow blade changes according to the operating modes. The air flow blade swings automatically in the Pollen and Odor mode, but it is fixed in one position in the Auto and Sleep mode. The air flow blade can only be controlled with the remote control.
1 If necessary, press the Power (Power) button.
Result: The Power indicator on the display comes on.
The air cleaner runs in the Auto Mode. The air cleaner makes a ringing sound.
2 Press the Air Swing button on the remote control.
Result: The blade automatically begins to swing.
The air cleaner beeps.
IMPORTANT: When the air cleaner is turned on, the air blade automatically starts to move.
3 To stop the blade from swinging, press the Air Swing button again. To fix the blade in a certain position, press the Air Swing button again when the blade is in the required position.
Adjusting the Display Brightness
You can adjust the brightness of the display of the air cleaner according to your desire. The brightness can only be controlled with a remote control.
1 If necessary, press the ⏻ (Power) button.
Result: The Power indicator on the display comes on.
The air cleaner runs in the Auto Mode. The air cleaner makes a ringing sound.
2 Select the brightness level of the display by pressing the ○ button on the remote control one or more times until the desired brightness is displayed.
There are three brightness levels that you can choose from:
- Press the button once: The display becomes dim.
- Press the button twice: The display turns off.

The 'Well-Being' indicator still keeps the dim light although you press the Dimmer button twice.
- By simply pressing the Dimmer button, you can check the level of contamination in the room with your eye. This can be done even though the air cleaner is not in operation.


Adjusting the Clean Level (Fan Speed)


The air cleaner automatically adjusts the clean level according to the contamination levels of the indoor air. It is also possible for you to manually select the clean levels.
1 If necessary, press the Power (Power) button.
Result: ◆ The Power indicator on the display comes on.
◆ The air cleaner runs in the Auto Mode. ◆ The air cleaner makes a ringing sound.
2 If you wish to manually select the clean level, press the ○ button one or more times until the desired clean level is selected.
Result: ◆ The air cleaner beeps.
◆ The air cleaner operates in the clean level that was selected.
HH (Turbo)
H (High)
M (Medium)
L (Low)
Clean Level

button one or
3 If you wish the air cleaner to automatically adjust the clean level for you, press the Mode button on the remote control until the Auto mode is selected.
Result: ◆ The clean level that was selected is canceled.
◆ The air cleaner operates in the Auto mode. ◆ The air cleaner automatically chooses the appropriate clean level according to the levels of contamination in the indoor air.
Selecting the Operating Mode
You can select the operating mode with a remote control among the Auto, Pollen, Sleep and Odor mode.
1 If necessary, press the ⏻ (Power) button.
Result ◆ The Power indicator on the display comes on.
◆ The air cleaner runs in the Auto Mode. ◆ The air cleaner makes a ringing sound.
2 If the desired operating mode is not displayed on the display, select an operating mode by pressing the Mode button on the remote control until it is displayed on the display.
Result: ◆ The air cleaner beeps.
◆ The air cleaner operates in the desired operating mode.

You can change modes at any time.


Generating Anions
The Bionizer generates anions, which are beneficial to the human body. Use this function if you want to feel refreshed both physically and mentally, just as if you were in the midst of a forest. If the air cleaner is turned on, anions are generated automatically.
1 If necessary, press the ⏻ (Power) button.
Result: ◆ The Power indicator on the display comes on.
◆ The air cleaner runs in the Auto Mode. ◆ The air cleaner makes a ringing sound.
2 If the Bionizer Indicator is not displayed on the display, select the Bionizer function by pressing the Anion button on the remote control.
Result ◆ The air cleaner beeps.
◆ The Bionizer Indicator lights up on the display. ◆ The air cleaner generates anions into the indoor air.
3 If you wish to turn off the Bionizer function, press the 🔊 button again.
Result ◆ The Bionizer Indicator disappears on the display.
◆ The air cleaner stops generating anions into the indoor air.

Operating Recommendations
Here are a few recommendations that you should follow when using your air cleaner.
| Topic Recommendation | |
| Wash Filter Indicator | If the light on the "Wash Filter" indicator comes on, the washable filters must be cleaned. The washable filters must be cleaned more often in environments that include large amounts of dust in the air. |
| Replace Filter indicator | If the light on "Replace Filter" indicator comes on, the replacement filters must be replaced.If the replacement filters are not replaced,the product's air filtering function may decrease. |
| Closing the air flow blade | If you want to close the air flow blade, use the Power button on the control panel or the remote control.Do not close the air flow blade with your hands. |
Cleaning the Air Cleaner
Cleaning the Cover Sensor Section
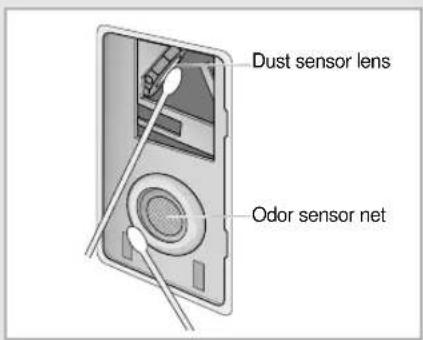
To get the best possible result from your air cleaner, you must clean the lens of the dust sensor regularly. The dust sensor is responsible for sensing the accumulation level of small and big dust particles in the air in your room.
1. Open the sensor section cover.

Use a tool that has a narrow end, such as a mini-screwdriver, when opening the sensor section cover.
2. Clean the lens of the dust sensor thoroughly and get rid of the dust around the odor sensor with a cotton stick.

If the lens of the dust sensor is cleaned with a volatile matter, the lens is damaged, so the dust sensor may not work properly.
3. After you have cleaned the lens of the dust sensor and the odor sensor, put the sensor section cover back into place.
Note
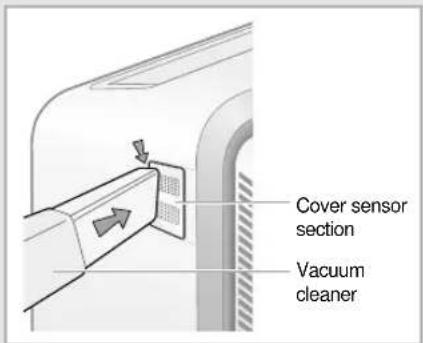
You must clean the lens of the dust sensor every 6 months. However, this may vary according to the time and place that the air cleaner was operated. So the air cleaner must be cleaned more often in environments that have a high level of dust accumulation. ◆ The odor sensor does not have a lens. So you do not need to clean the odor sensor net. ◆ You can clean the sensor section cover with the vacuum cleaner without opening it.


Cleaning the Air Cleaner (Continued)


Cleaning the Washable Filters
Washable Filters are responsible for eliminating fine particles of dust, molds, and mites in the air that are as small as 0.5 microns. They also have the function of sterilizing viruses or bacteria in the air in your room. You must clean the Washable Filters every 3 months or whenever the Wash Filter Indicator comes on. The cleaning frequency of the Washable Filters may vary according to the time and place that the air cleaner is operated.
1. Open the filter box and pull out the Washable Filter Section as seen in the picture.
2. Wash the Washable Filter Section under lukewarm tap water.

If the filter is too contaminated, leave it in warm water mixed with neutral detergent for 30 minutes, and brush the contaminants off with a soft brush.
◆ The Pre-Filter is easy to clean because it can be taken out of the Washable Filter Section and washed separately.
3 Leave the Washable Filter Section in the shade to dry for over 12 hours.

During this process, make sure that the filter is not exposed to direct sunlight because the sun's rays may affect the transformation of the filter case.
4 Put the Washable Filter Section back into the place and close the Filter box.
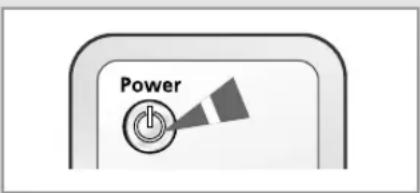
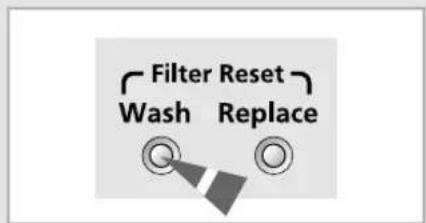
5 Press the control panel's button for 2 seconds.
Result: ◆ The Wash Filter Indicator on the control panel turns off. It will light up again when the time for the next filter washing comes.
◆ The air cleaner beeps.
IMPORTANT
Even though the Wash Filter Indicator does not light up, always press the Wash button for 2 seconds after washing the Washable Filter Section.
Replacing the Replacement Filters
The Replacement Filters eliminate finer particles of dust, molds and mites in the air in your room that are as small as 0.3 microns. It also has the function of removing harmful VOCs in the air of your home, such as benzene or formaldehyde.
1 Open the Filter box and pull out the Replacement Filter Section as seen in the picture.
2 Separate the HEPA Filter, Allergen Filter, VOCs Filter and Formaldehyde Filter from the Replacement Filter Section.
3 Replace the old Formaldehyde Filter, VOCs Filter, Allergen Filter and HEPA Filter with new one, and place it back into the Replacement Filter Section.
4 After pushing the Replacement Filter Section back into the place, close the Filter box.
5 Press the control panel's Replace button for 2 seconds.
Result: The Replace Filter indicator on the control panel turns off. It will light up again when the time for the next filter replacement comes. The air cleaner beeps.
IMPORTANT
Even though the Replace Filter indicator does not light up, always press the button for 2 seconds after replacing the filters in the Replacement Filter Section.

You only need to replace the Replacement Filters once in 3 years or when the Replace Filter indicator lights up. However, the replacing frequency of the Replacement Filters may vary according to the time and place that the air cleaner is operated. You can purchase new VOCs or HEPA Filters in an authorized service center.


Solving Common Problems
Before contacting the after-sales service, perform the following simple checks. This may prevent you from making an unnecessary call and wasting your time and money.
| Problem | Explanation/Solution |
| The air cleaner does not operate. | ◆ Check for a power failure.◆ Check that the power plug is plugged in tightly.◆ Check that the power outlet is not of a poor quality.◆ Check that the Filter box is closed properly. |
| The air cleaner stops its operation abruptly | ◆ Check whether the Filter box was opened during operation.Press the Power button if you wish to restart the air cleaner. |
| The air flow blade does not move. | ◆ Check that the air cleaner is in the Auto or Sleep Mode.- In the Auto or Sleep Mode, the air cleaner automatically does not move the air flow blade.◆ Make sure that you have pressed the Air Swing button.- Please press the Air Swing button on the remote control to move the air flow blade. |
| The air cleaner cannot be operated with the remote control. | ◆ Check the remote control battery and replace it if it has expired.◆ Check that there are no obstacles between the remote control and the control panel of the air cleaner.◆ Make sure that there are no strong sources of lighting near the air cleaner. The strong light of three way fluorescent lamps or neon signs can obstruct the transmission of data from the remote control to the control panel. |
| Unpleasant odors can be detected coming from the air cleaner. | ◆ Make sure that the air cleaner is used in places that have a high level of odor permeating contaminants in the air.The air cleaner cannot fully function in an environment where the level of contamination is too high.◆ Check whether the source of the unpleasant odor is the unclean filters in the Filter box. |
| The Display Brightness is too dim. | ◆ Check whether the air cleaner is operating in the Sleep Mode.In the Sleep Mode, the display automatically diminishes its brightness to ensure a comfortable sleeping setting.◆ Check that the brightness of the display has been adjusted.If so, press the Dimmer button and increase the brightness of the display. |
| The Wash Filter and Replace Filter indicators stay on. | ◆ Make sure that you have pressed the Filter Reset button after you have cleaned the Washable Filters or finished replacing the Replacement Filters. |
| The air flow blade does not close. | ◆ Close the air flow blade by using the Power button on the control panel or the remote control. Do not close the air flow blade with your hands. |
| Orange light turns on on the Contamination Level Indicator when you use a humidifier and an air cleaner at the same time. | ◆ Check if you use a humidifier near the air cleaner.- The steam from the humidifier may be attached to the Dust/Odor sensor.◆ Use the air cleaner away from the humidifier. |
| The error code E0 E1 E2 E3 EE is displayed. | ◆ Contact the service center. |
Technical Specifications
| Model | Power Supply |
| ACW340C | |
| ACW340D | |
| ACW340F | 220-240V~, 50/60Hz |
| ACW340L | |
| ACW340S |
THIS AIR CLEANER IS MANUFACTURED BY:

ELECTRONICS

- OWNER'S INSTRUCTIONS
- SAFETY PRECAUTIONS
- WARNING
- CONTENTS
- ◆ PREPARING THE AIR CLEANER
- OPERATING THE AIR CLEANER
- OTHER FUNCTIONS
- OPERATING THE AIR CLEANER WITH A REMOTE CONTROL
- RECOMMENDATIONS FOR USE
- TECHNICAL SPECIFICATIONS
- CONTAMINATION LEVEL INDICATOR
- REMOTE CONTROL - BUTTONS
- GETTING STARTED
- INSERTING THE BATTERY INTO THE REMOTE CONTROL
- USING
- THEE
- CONTROL
- PANEL
- SELECTING THE AUTOMATIC MODE
- SELECTING THE POLLEN MODE
- SELECTING THE SLEEP MODE
- SELECTING THE ODOR MODE
- GENERATING ANIONS
- SETTING THE OFF TIMER
- TO CANCEL THE OFF TIMER
- ADJUSTING THE CLEAN LEVEL (FAN SPEED)
- THE
- REMOTE
- ADJUSTING THE AIR FLOW DIRECTION
- ADJUSTING THE DISPLAY BRIGHTNESS
- SELECTING THE OPERATING MODE
- OPERATING RECOMMENDATIONS
- CLEANING THE AIR CLEANER
- CLEANING THE COVER SENSOR SECTION
- NOTE
- CLEANING THE AIR CLEANER (CONTINUED)
- CLEANING THE WASHABLE FILTERS
- IMPORTANT
- REPLACING THE REPLACEMENT FILTERS
- SOLVING COMMON PROBLEMS
Brand : SAMSUNG
Model : ACW340F
Category : Air purifier