Explorer 330 - Earphones PLANTRONICS - Free user manual and instructions
Find the device manual for free Explorer 330 PLANTRONICS in PDF.

User questions about Explorer 330 PLANTRONICS
0 question about this device. Answer the ones you know or ask your own.
Ask a new question about this device
Download the instructions for your Earphones in PDF format for free! Find your manual Explorer 330 - PLANTRONICS and take your electronic device back in hand. On this page are published all the documents necessary for the use of your device. Explorer 330 by PLANTRONICS.
USER MANUAL Explorer 330 PLANTRONICS
→ Ⓞ ● ● → USER GUIDE_
PLANTRONICS EXPLORER™ 300 Series
BLUETOOTH® HEADSET

natural_image
Illustration of a gray ergonomic handbar with a curved handle and control buttons (no text or symbols)Bluetooth®
Package Contents & Features 3
Charging & Powering 5
Pairing 6
Adjusting Fit 7
Using Your Headset 8
Indicator Lights 9
Accessories 10
Troubleshooting 12
Product Specifications 12
Technical Assistance 13
Warranty 13
Regulatory Notices
14
WELCOME
Thank you for purchasing a Plantronics headset.
Let us provide you with the best possible service and technical support. After you review this user guide, if you need additional assistance or have any product questions, please contact:
• Plantronics Technical Assistance Center at 866-363-BLUE (2583)
• www.plantronics.com/support
Before getting started, please review the safety booklet included in the package.
REGISTER YOUR PRODUCT ONLINE
Visit www.plantronics.com/productregistration to register your product online so we can provide you with the best possible service and technical support.
PLANTRONICS EXPLORER 330
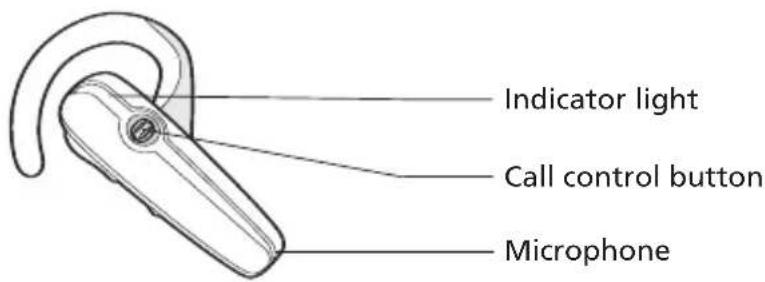
text_image
Indicator light Call control button Microphone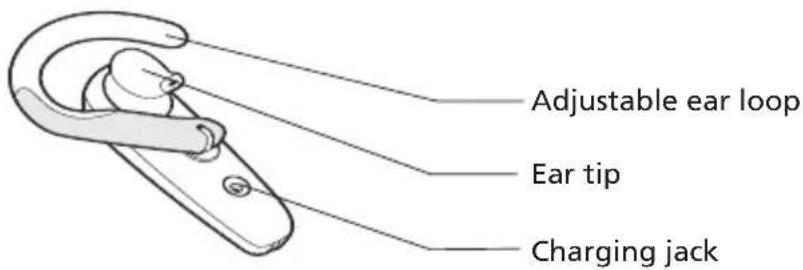
text_image
Adjustable ear loop Ear tip Charging jackPLANTRONICS EXPLORER 340 AND 350

text_image
Indicator light Call control button Microphone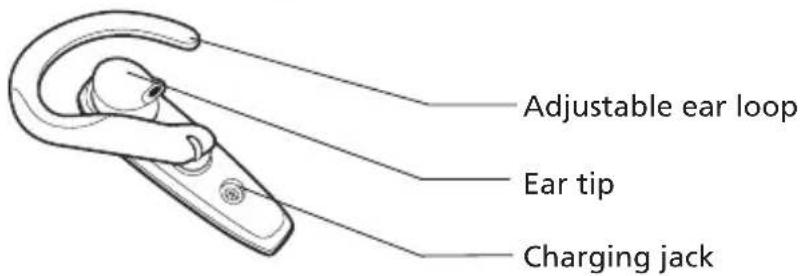
text_image
Adjustable ear loop Ear tip Charging jackPACKAGE CONTENTS & FEATURES
PLANTRONICS EXPLORER 330 & 340
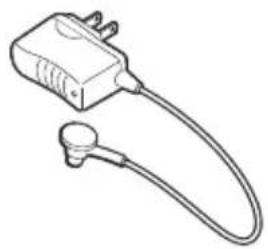
natural_image
Line drawing of a medical or electrical device with a bulb and connector (no text or symbols)AC power adapter
PLANTRONICS EXPLORER 350
Cradle Mount Options
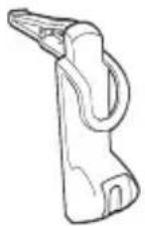
In-car charging cradle (shown with vent clip)
Dash mount

natural_image
Technical line drawing of a door handle assembly (no text or symbols)Vent clip

Vehicle
charging
adapter

USB headset charger
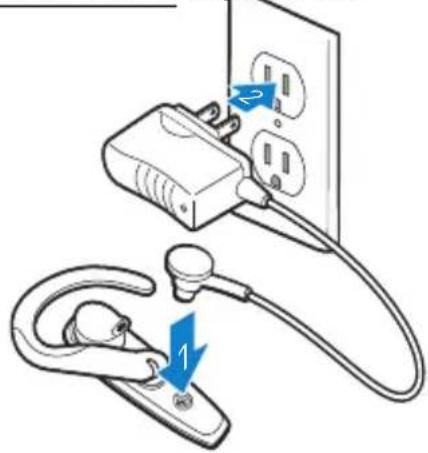
CHARGING
Explorer 330 & 340 Explorer 350
text_image
Diagram showing a plug inserted into an electrical outlet with a stethoscope inserted, labeled with blue arrows indicating direction of movement.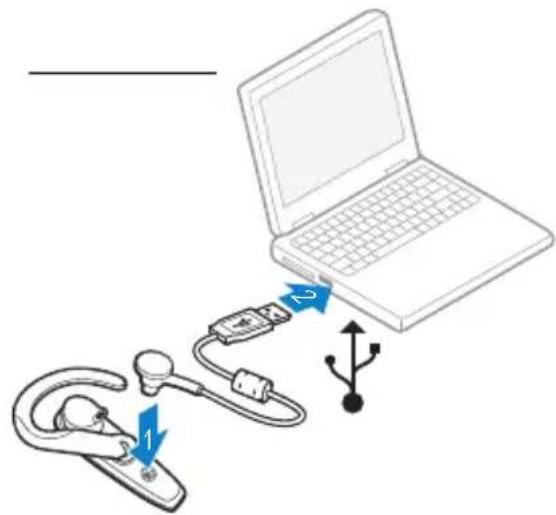
text_image
Diagram showing a laptop connected to a carabiner with labeled components and directional arrows indicating connection.Before using, you must first charge your headset.
20 minutes = minimum charge

2 hours = full charge
Light is solid red when battery is charging.
NOTE For the best user experience, keep your headset fully charged.
CAUTION Do not use headset while charging and do not connect the charger while the headset is in use.
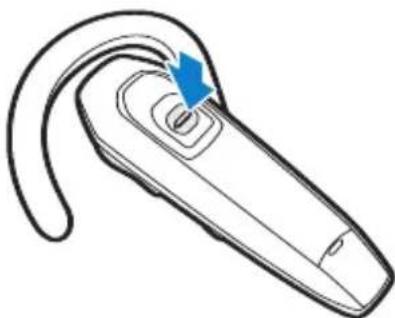
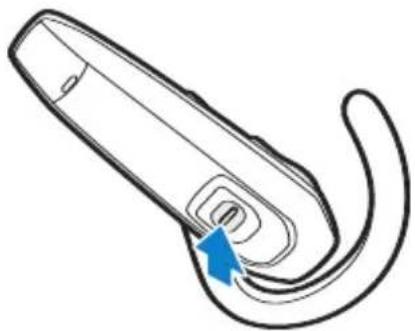
POWERING
natural_image
Line drawing of a wireless ear device with a blue arrow pointing to the handle (no text or symbols)Press the control button for 2 seconds to power on. Press the control button for 3 seconds to power off.
1.2.

natural_image
Line drawing of a wireless ear device with a blue arrow pointing to the handle (no text or symbols)
text_image
2500 PLANTROMICS 3XX PLANTROMICS 18000 PLANTROMICS 3. ENTER PASSKEY 0000Before using your headset for the first time, you must pair it with your Bluetooth® phone or device. Be sure the headset is fully charged. For set up and pairing instructions with Bluetooth devices other than mobile phones, please consult your Bluetooth device user guide.
Begin with headset turned off.
- Press call control button for 6 seconds. Release button when indicator light flashes blue and red. Headset is ready to pair with Bluetooth device.
NOTE The headset can pair to multiple Bluetooth devices, but will only connect to one device at a time. The headset will automatically connect to the last device to which it was connected.
-
While the headset is flashing red and blue, use the phone menu to search for Bluetooth devices and select "3XXPlantronics".
-
When prompted for passkey enter 0000. Headset will flash blue when paired successfully.
1.2.

natural_image
Illustration of a hand holding a device with a curved handle and a blue arrow indicating rotation (no text or symbols)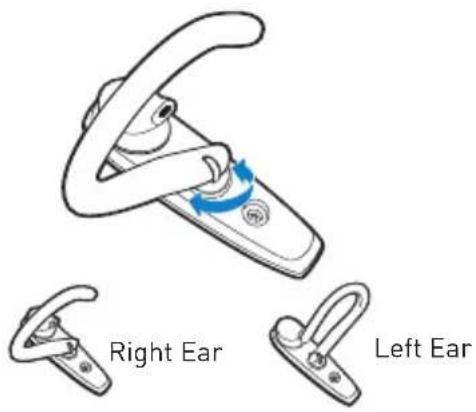
text_image
Right Ear Left EarLift ear loop. Swivel ear loop to the right or left for right or left ear wearing.
3.4.5.
natural_image
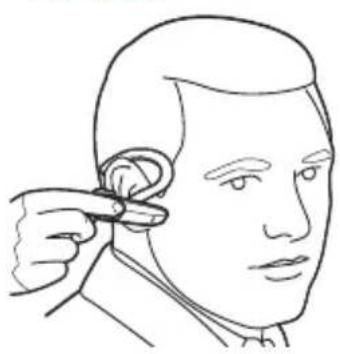
Line drawing of a person applying earphones to the ear (no text or symbols)Place ear loop behind ear.

natural_image
Anatomical illustration of a human ear with a blue arrow indicating a specific area (no text or labels present)Pivot headset to place speaker into ear.

natural_image
Line drawing of a human head with a dotted line indicating the ear area (no text or symbols)Position speaker and align microphone with mouth.
ANSWERING/ENDING/MAKING CALLS

natural_image
Line drawing of a hand holding a wireless ear adapter device (no text or symbols)For best performance, position your mobile phone on the same side of your body as the headset.
To answer or end a call, briefly press the call control button.
To make a call, enter number on your phone, press send, and the call is automatically transferred to headset; no need to press call control button.
ADJUSTING THE VOLUME

natural_image
Line drawing of a handheld device with blue arrows indicating direction (no text or symbols)Briefly push up or down on the call control button for incremental volume steps. You will hear two tones (high tone followed by low tone) at the volume limit.
WARNING For your comfort, health, and safety, do not exceed moderate listening levels.
ADDITIONAL FEATURES
Redialing Last Number
To activate last number redial, double press the call control button. You will hear a high tone after each double key press.
Rejecting a Call
When receiving an incoming call, press the call control button for 2 seconds to reject the call.
Using Voice Dialing
With the headset on, press the call control button for 2 seconds to activate the voice dialing.
Switching a Call From Phone to Headset
To switch an active call from your phone to your headset, press the call control button for 3 seconds.
NOTE To use voice activated dialing, the voice dialing feature must be enabled on your phone. See your Bluetooth phone manual for instructions.
Switching a Call From Headset to Phone
To switch an active call from your headset to your phone, press the call control button for 2 seconds.
INDICATOR LIGHTS
Headset Status Headset Indicator Light
Powering on Blue flashes. Repeat.
Powering off Red appears and goes off.
Charging battery Red solid light.
Low battery Red flashes.
Pairing mode Blue/red flashes for 120 seconds.
Missed call Purple flashes. Double press the call control button to cancel.
Ringing Purple flashes. Briefly press call control button to answer the call. Press call control button for 2 seconds to reject the call.
INCLUDED ACCESSORIES
natural_image
Technical line drawing of a door latch mechanism (no text or symbols)
natural_image
Diagram of a medical or electrical device with a blue arrow pointing to a circular component, shown in an inset view (no text or symbols present)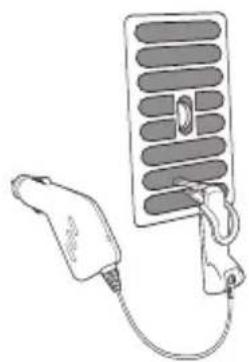
natural_image
Line drawing of a handheld device connected to a grid-like panel (no text or symbols)
natural_image
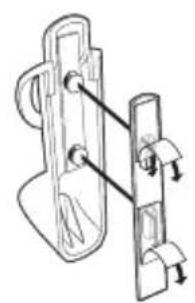
Illustration of a medical device with a blue cable inserted into a circular connector (no text or symbols)In-car charging cradle and in-vehicle charging adapter – for Explorer 350 only
-
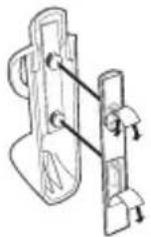
Select vent clip or dash mount option. Attach to rear of in-car charging cradle. NOTE Select the mounting option that allows the charging cradle to not interfere with car controls.
-
Insert charging plug into slot on bottom of charging cradle. Be sure to slide to top of slot.
-
Attach charging cradle to dash mount or vent. IMPORTANT Clip onto lowest vent slot. Be sure the headset is not directly in the vent air flow. If headset cannot be positioned out of air flow, use dash mount instead.
-
Place ear tip as shown in the top of the cradle. Gently press the bottom of the headset to plug the charging adapter into the charging jack. Then plug in-vehicle charging adapter into vehicle power.
AVAILABLE FOR PURCHASE

natural_image
Line drawing of a handheld medical or laboratory device with a coiled cable and connector (no text or symbols)69520-01 Vehicle charging adapter

natural_image
Line drawing of a USB cable with connector and terminal connector (no text or symbols)69519-01 USB headset charger
natural_image
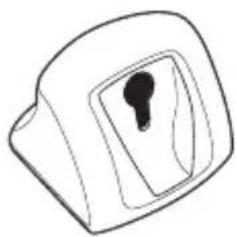
Simple line drawing of a door handle with a keyhole (no text or symbols)
natural_image
Line drawing of a handheld tool or device with handle and grip (no text or symbols)72321-01 Desktop charging cradle 72323-01 In-car charging cradle
(can be used with
Explorer 340)
To order, please contact your Plantronics supplier or go to www.plantronics.com.
PROBLEM SOLUTION
| My headset does not work with my phone. | Headset was not in pairing mode when mobile phone menu selections were made. See page 6 “Bluetooth Pairing”.Incorrect menu selections were made on your mobile phone.See page 6 “Bluetooth Pairing”. |
| I did not enter my passkey. | Your phone did not locate the headset.Repeat the pairing process on page 6.Incorrect menu selections were made on your mobile phone.Repeat the pairing process on page 6. |
| Callers cannot hear me, or I cannot hear caller/dialing tone. | The headset is not turned on. Press the call control button for 2 seconds until you hear a beep or see the indicator light glow blue to turn headset on.Your headset is out of range. Move the headset closer to the phone or Bluetooth device.Your headset battery is drained. Charge your battery using the AC power adapter supplied.The listening volume is too low. Press the volume key up (toward the ear loop) to increase the sound heard in the headset. |
PRODUCT SPECIFICATIONS
Talk Time* Up to 8 hours
Standby Time* Approximately 240 hours
Charge Time 2 hours
Range Bluetooth standard 33 feet (10 meters)
Power Requirements 5V DC - 300 mA
Battery Type Lithium Ion Polymer
Version
Works with Bluetooth 1.1 or higher
Storage and Usage Temperature 50F-104F (10C - 40C)
Supports Bluetooth hands-free and headset profiles.
*Performance may vary by device. Headset can last up to four days without charging, based on average talk time of 1.5 hours per day.
TECHNICAL ASSISTANCE
Visit our Web site at www.plantronics.com/support for technical support including frequently asked questions, compatibility and accessibility information. The Plantronics Technical Assistance Center (TAC) is also ready to assist you on 866-363-BLUE (2583).
WARRANTY
LIMITED WARRANTY
- This warranty covers defects in materials and workmanship of products manufactured, sold or certified by Plantronics which were purchased and used in the United States.
- The warranty lasts for one year from the date of purchase of the products.
- This warranty extends to you only if you are the end user with the original purchase receipt.
- We will at our option, repair or replace the products that do not conform to the warranty. We may use functionally equivalent reconditioned/refurbished/remanufactured/pre-owned or new products or parts.
• To obtain service in the U.S., contact Plantronics at (866) 363-BLUE (2583). - THIS IS PLANTRONICS' COMPLETE WARRANTY FOR THE PRODUCTS.
- This warranty gives you specific legal rights, and you may also have other rights that vary from state to state. Please contact your dealer or our service center for the full details of our limited warranty, including items not covered by this limited warranty.
US FCC REQUIREMENTS PART 15
This device complies with Part 15 of the FCC Rules. Operation is subject to the following two conditions:
- This device may not cause harmful interference, and
- This device must accept any interference received, including interference that may cause undesired operation.
This equipment has been tested and found to comply with the limits for a Class B digital device, pursuant to Part 15 of the FCC Rules. These limits are designed to provide reasonable protection against harmful interference in a residential installation. This equipment generates, uses, and can radiate radio frequency energy and, if not installed and used in accordance with the instructions, may cause harmful interference to radio communications.
However, there is no guarantee that interference will not occur in a particular installation. If this equipment does cause harmful interference to radio or television reception which can be determined by turning the radio or television off and on, the user is encouraged to try to correct interference by one or more of the following measures:
- Reorient or relocate the receiving antenna.
- Increase the separation between the equipment and receiver.
- Connect the equipment into an outlet on another circuit.
- Consult the dealer or an experienced radio/TV technician for help.
EXPOSURE TO RADIO FREQUENCY RADIATION
This device and its antenna must not be co-located or operated in conjunction with any other antenna or transmitter. To comply with FCC RF exposure requirements, only use supplied antenna. Any unauthorized modification to the antenna or device could void the user's authority to operate this device.
Plantronics, Inc.
345 Encinal Street
Santa Cruz, CA 95060 USA
Tel: (800) 544-4660
www.plantronics.com
© 2006 Plantronics, Inc. All rights reserved. Plantronics, the logo design, Plantronics Explorer and Sound Innovation are trademarks or registered trademarks of Plantronics, Inc. The Bluetooth word mark and logo are owned by Bluetooth SIG, Inc. and any use of such marks by Plantronics, Inc. is under license. All other trademarks are the property of their respective owners. Patents U.S. 5,210,791; EM 000392600-0003 and Patents Pending
Printed in USA
Impereso en EE.UU.
natural_image
Abstract gradient background with curved white lines on blue and white tones (no text or symbols)natural_image
Line drawing of a mechanical clip or bracket component (no text or symbols)auricular
natural_image
Simple line drawing of a door handle with a small dark object inside (no text or symbols)para el automovil
69520-01 Adapter de carga

natural_image
Line drawing of a cable with a connector and connector plug (no text or symbols)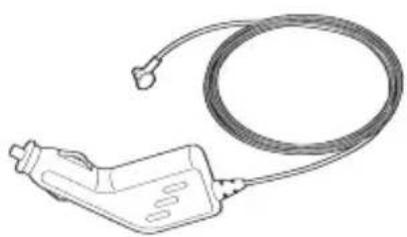
natural_image
Line drawing of a handheld electronic device with a coiled cable (no text or symbols)TAMILIEN DISPOSIBLES
text_image
Diagram of a handheld device with labeled buttons and directional arrows indicating movement or operationAUSTE DEI VOLUME
pressionar et boton de control de llamada.
natural_image
Line drawing of a hand holding a curved object with a circular opening (no text or symbols)LILAMADAS
natural_image
Line drawing of a medical procedure on a human head, showing a needle inserted into the jaw area (no text or symbols present)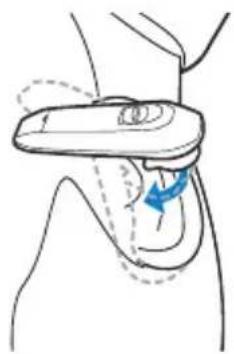
natural_image
Anatomical illustration of a human hip joint with a blue arrow indicating a specific area (no text or labels present)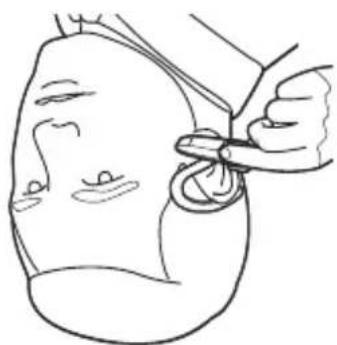
natural_image
Line drawing of a person using scissors to cut or adjust a small object on a surface (no text or symbols)3.4.5.
natural_image
Line drawing of a hook clamp mechanism with blue motion arrows indicating rotation (no text or symbols)1.2
natural_image
Line drawing of a handheld device with a blue arrow indicating a curved cable or connector (no text or symbols)2L
Presione et motin de control durante dos segundos para enceder et auricular. Presione et motin de control durante dos segundos para acqagar et auricular.
natural_image
Line drawing of a handheld device with a blue arrow pointing to the handle (no text or symbols)ENCIONEDN3
text_image
Diagram showing a laptop connected to a device with labeled components and directional arrows indicating connection or movement.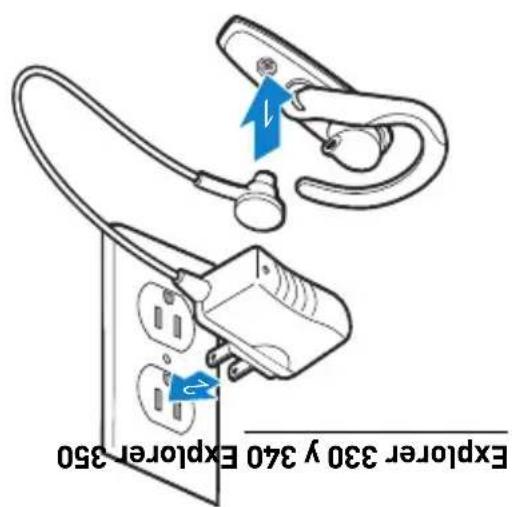
text_image
Explorer 330 y 340 Explorer 350CAPG6A
natural_image
Technical line drawing of a mechanical clamp or bracket assembly (no text or symbols)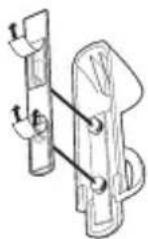
natural_image
Line drawing of a medical or laboratory device with a coiled tube and connector (no text or symbols)AUXICULAR EXPLORER 330 Y 340 DE PLANTRONICS
CONTENIDO DÉL PAAUETE Y CÁRACTESTICAS
text_image
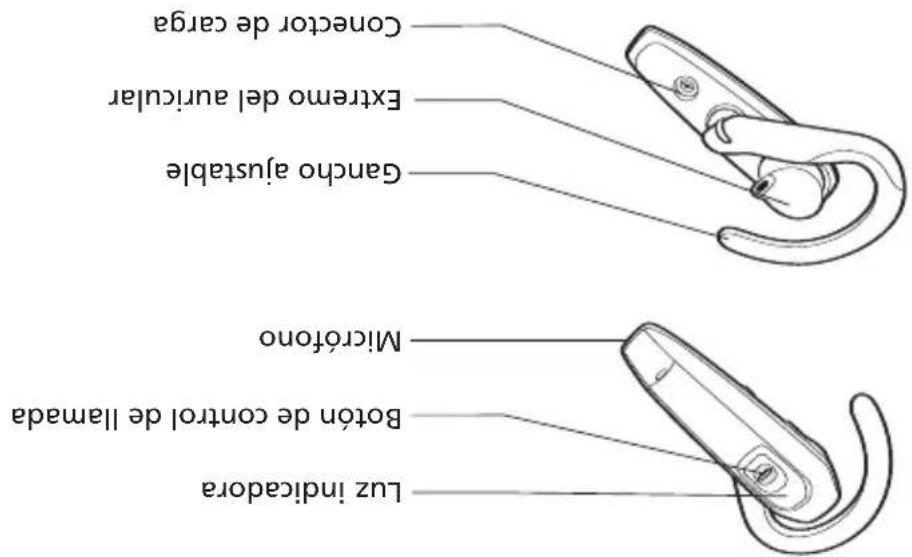
Luz indicadora Boto n de control de Ilamada Microfono Ganzho ajustable Extremo del auricular Connector de cargaAURICULAR EXPLORER 340 Y 350 DE PLANTRONICS

text_image
Luz indicadora Boto n de control de I lammad Microfono Ganzio ajustable Extremo del auricular Conctor de cargaAURICULAR EXPLORER 330 DE PLANTRONICS
CONTROLDO DÉL PAYOUTE Y CARACTERISTICS
- www.plantronics.com/support
natural_image
Illustration of a handheld device with a curved handle and circular button (no text or symbols)AURICULAR BLUETOOTH®
Serie Explorer 300 de Plantronics
PLANTROONICS EXPLORER™