
Transformer Pad TF502T - Tablet ASUS - Free user manual and instructions
Find the device manual for free Transformer Pad TF502T ASUS in PDF.

| Product Type | Tablet with optional mobile dock |
| Brand | ASUS |
| Model | Transformer Pad TF502T |
| Operating System | Android |
| Display | Touch screen panel |
| Rear Camera | Yes, with LED flash |
| Front Camera | Yes |
| Battery | Rechargeable, up to 17 hours with mobile dock |
| Charger | DC 15V, 1.2A adapter |
| Connectivity | Wi-Fi, Bluetooth, NFC |
| Ports | Micro HDMI, microSD card slot, 3.5mm headset port, 36-pin dock port |
| Sensors | Ambient light sensor, G-sensor, gyroscope |
| Mobile Dock | Optional, with QWERTY keyboard and touchpad |
| Storage Expansion | microSD, microSDHC, microSDXC support |
| Package Contents | ASUS Tablet, power adapter, USB Dock cable, user manual |
| Special Features | ASUS Task Manager, File Manager, App Locker, ASUS Battery widget |
| Safety | Do not leave connected to power after full charge; use only in 0-35°C ambient temperature |
Frequently Asked Questions - Transformer Pad TF502T ASUS
User questions about Transformer Pad TF502T ASUS
0 question about this device. Answer the ones you know or ask your own.
Ask a new question about this device
Download the instructions for your Tablet in PDF format for free! Find your manual Transformer Pad TF502T - ASUS and take your electronic device back in hand. On this page are published all the documents necessary for the use of your device. Transformer Pad TF502T by ASUS.
USER MANUAL Transformer Pad TF502T ASUS
IN SEARCH OF INCREDIBLE
USER MANUAL
E8672
First Edition
December 2013
COPYRIGHT INFORMATION
No part of this manual, including the products and software described in it, may be reproduced, transmitted, transcribed, stored in a retrieval system, or translated into any language in any form or by any means, except documentation kept by the purchaser for backup purposes, without the express written permission of ASUSTeK COMPUTER INC. ("ASUS").
ASUS PROVIDES THIS MANUAL "AS IS" WITHOUT WARRANTY OF ANY KIND, EITHER EXPRESS OR IMPLIED, INCLUDING BUT NOT LIMITED TO THE IMPLIED WARRANTIES OR CONDITIONS OF MERCHANTABILITY OR FITNESS FOR A PARTICULAR PURPOSE. IN NO EVENT SHALL ASUS, ITS DIRECTORS, OFFICERS, EMPLOYEES OR AGENTS BE LIABLE FOR ANY INDIRECT, SPECIAL, INCIDENTAL, OR CONSEQUENTIAL DAMAGES (INCLUDING DAMAGES FOR LOSS OF PROFITS, LOSS OF BUSINESS, LOSS OF USE OR DATA, INTERRUPTION OF BUSINESS AND THE LIKE), EVEN IF ASUS HAS BEEN ADVISED OF THE POSSIBILITY OF SUCH DAMAGES ARISING FROM ANY DEFECT OR ERROR IN THIS MANUAL OR PRODUCT.
Products and corporate names appearing in this manual may or may not be registered trademarks or copyrights of their respective companies, and are used only for identification or explanation and to the owners' benefit, without intent to infringe.
SPECIFICATIONS AND INFORMATION CONTAINED IN THIS MANUAL ARE FURNISHED FOR INFORMATIONAL USE ONLY, AND ARE SUBJECT TO CHANGE AT ANY TIME WITHOUT NOTICE, AND SHOULD NOT BE CONSTRUED AS A COMMITMENT BY ASUS. ASUS ASSUMES NO RESPONSIBILITY OR LIABILITY FOR ANY ERRORS OR INACCURACIES THAT MAY APPEAR IN THIS MANUAL, INCLUDING THE PRODUCTS AND SOFTWARE DESCRIBED IN IT.
Copyright © 2013 ASUSTeK COMPUTER INC. All Rights Reserved.
LIMITATION OF LIABILITY
Circumstances may arise where because of a default on ASUS' part or other liability, you are entitled to recover damages from ASUS. In each such instance, regardless of the basis on which you are entitled to claim damages from ASUS, ASUS is liable for no more than damages for bodily injury (including death) and damage to real property and tangible personal property; or any other actual and direct damages resulted from omission or failure of performing legal duties under this Warranty Statement, up to the listed contract price of each product.
ASUS will only be responsible for or indemnify you for loss, damages or claims based in contract, tort or infringement under this Warranty Statement.
This limit also applies to ASUS' suppliers and its reseller. It is the maximum for which ASUS, its suppliers, and your reseller are collectively responsible.
UNDER NO CIRCUMSTANCES IS ASUS LIABLE FOR ANY OF THE FOLLOWING: (1) THIRD-PARTY CLAIMS AGAINST YOU FOR DAMAGES; (2) LOSS OF, OR DAMAGE TO, YOUR RECORDS OR DATA; OR (3) SPECIAL, INCIDENTAL, OR INDIRECT DAMAGES OR FOR ANY ECONOMIC CONSEQUENTIAL DAMAGES (INCLUDING LOST PROFITS OR SAVINGS), EVEN IF ASUS, ITS SUPPLIERS OR YOUR RESELLER IS INFORMED OF THEIR POSSIBILITY.
SERVICE AND SUPPORT
Visit our multi-language web site at http://support.asus.com
Contents
About this manual....6
Conventions used in this manual 7
Typography 7
Safety Precautions....8
Charging your device 8
Using your ASUS Tablet 8
Airplane Precautions....8
Package contents....9
Chapter 1: Hardware Setup
Getting to know your ASUS Tablet 12
Front view....12
Rear view ....14
Chapter 2: Using your ASUS Tablet
Setting up your ASUS Tablet 18
Charging your ASUS Tablet 18
Turning your ASUS Tablet on 20
Gestures for the ASUS Tablet 21
Connecting an HDMI display 24
Using the ASUS mobile dock 25
Getting to know your ASUS mobile dock 25
Docking your ASUS Tablet 29
Charging your ASUS Tablet on the ASUS mobile dock 30
Function keys....32
Using the Touchpad ....34
Undocking your ASUS Tablet 36
Chapter 3: Working with Android™
Starting up for the first time ....38
Android™ lock screen....39
Unlocking your device....39
Adding a wallpaper on the lock screen ....40
Adding a widget on the lock screen ....40
Entering Google Now ....41
Home Screen 42
Screen views....43
Locking the screen orientation ....44
Connecting to the world 44
Connecting to Wi-Fi networks 44
Using Bluetooth....45
Managing Apps....47
Creating app shortcuts....47
Removing an app from the Home Screen 47
Viewing app info....48
Creating app folder....49
Viewing apps under the Recents screen ....50
Task Manager ....52
File Manager ....53
Accessing the internal storage ....53
Accessing the external storage device ....53
Settings....55
Turning your ASUS Tablet off 57
Putting your ASUS Tablet to sleep 57
Chapter 4: Pre-installed Apps
Featured pre-installed apps ....60
Play Music....60
Camera 61
Gallery 64
Email 69
Gmail 71
Play Store 72
Maps 73
App Locker....74
Widgets 77
ASUS Battery 78
Appendices
Federal Communications Commission Statement 80
RF Exposure Information (SAR) 81
IC Warning Statement....81
EC Declaration of Conformity 82
Power Safety Requirement 82
ASUS Recycling/Takeback Services 82
Coating notice....82
Green ASUS notice....82
Regional notice for Singapore 82
Proper disposal....83
About this manual
This manual provides information about the hardware and software features of your ASUS Tablet, organized through the following chapters:
Chapter 1: Hardware Setup
This chapter details the hardware components of your ASUS Tablet.
Chapter 2: Using your ASUS Tablet
This chapter shows you how to use the different parts of your ASUS Tablet.
Chapter 3: Working with Android™
This chapter provides an overview of using Android ^™ in your ASUS Tablet.
Chapter 4: Pre-installed Apps
This chapter features the pre-installed applications included with your ASUS Tablet.
Appendices
This section includes notices and safety statements for your ASUS Tablet.
Conventions used in this manual
To highlight key information in this manual, some texts are presented as follows:
IMPORTANT! This message contains vital information that must be followed to complete a task.
NOTE: This message contains additional information and tips that can help complete tasks.
WARNING! This message contains important information that must be followed to keep you safe while performing tasks and prevent damage to your ASUS Tablet's data and components.
Typography
Bold = This indicates a menu or an item that must be selected.
Italic = This indicates sections that you can refer to in this manual.
Safety Precautions
Charging your device
Ensure to fully charge your ASUS Tablet before using it in battery mode for extended periods. Remember that the power adapter charges the your ASUS Tablet as long as it is plugged into an AC power source. Be aware that it takes much longer to charge your ASUS Tablet when it is in use.
IMPORTANT! Do not leave the ASUS Tablet connected to the power supply once it is fully charged. ASUS Tablet is not designed to be left connected to the power supply for extended periods of time.
Using your ASUS Tablet
This ASUS Tablet should only be used in environments with ambient temperatures between 0^ C ( 32^ F) and 35^ C ( 95^ F).
Long time exposure to extremely high or low temperature may quickly deplete and shorten the battery life. To ensure the battery's optimal performance, ensure that it is exposed within the recommended environment temperature.
Airplane Precautions
Contact your airline provider to learn about related inflight services that can be used and restrictions that must be followed when using your ASUS Tablet in-flight.
IMPORTANT! You can send your ASUS Tablet through x-ray machines (used on items placed on conveyor belts), but do not expose them from magnetic detectors and wands.
Package contents
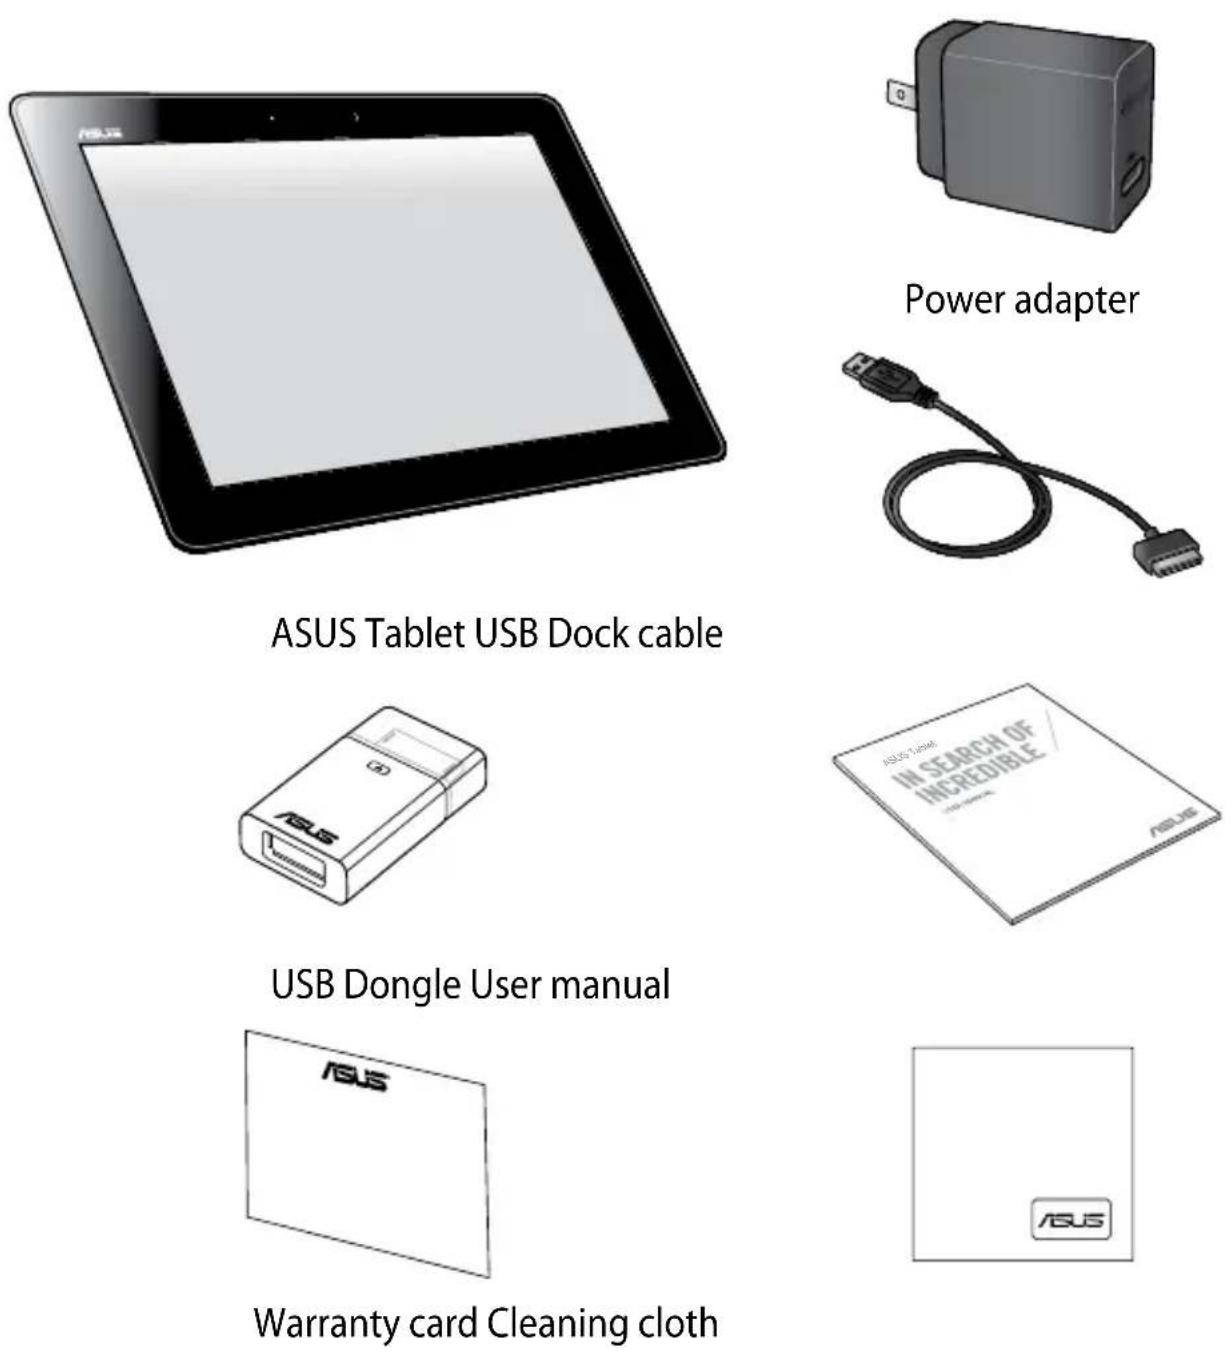
NOTES:
- If any of the items is damaged or missing, contact your retailer.
- The bundled power adapter varies with country or region.
Chapter 1:
Hardware Setup
Getting to know your ASUS Tablet
Front view
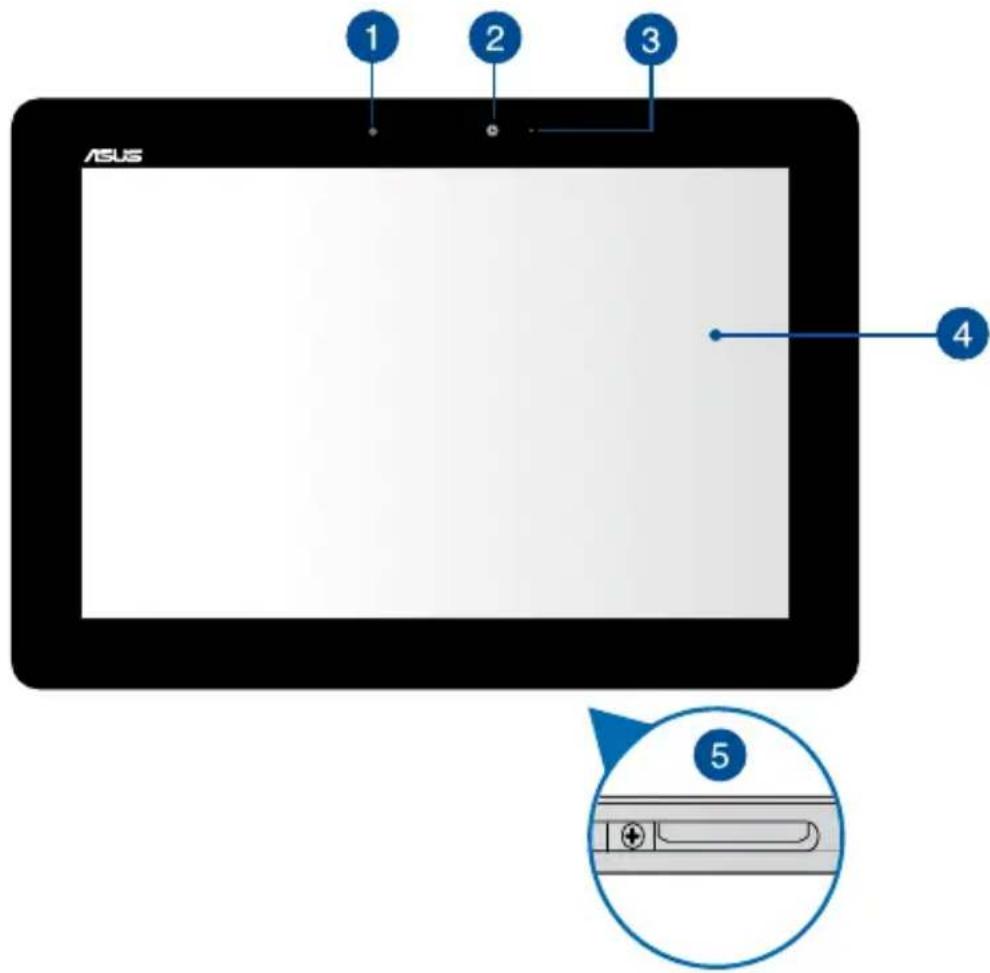
1 Ambient light sensor
The ambient light sensor detects the amount of light in your environment. It allows the system to automatically adjust the brightness of the display depending on the ambient light condition.
2 Front camera
This built-in front camera allows you to take pictures or record videos using your ASUS Tablet.
3 Camera indicator
The camera indicator lights up when the built-in rear camera is in use.
4 Touch screen panel
The touch screen panel allows you to operate your ASUS Tablet using touch gestures.
5 Dock port
Use the dock port to charge the battery pack or supply power to your ASUS Tablet.
If you purchased an optional ASUS mobile dock, you can connect it to the Dock port to support keyboard, touchpad, and USB 2.0 port functions.
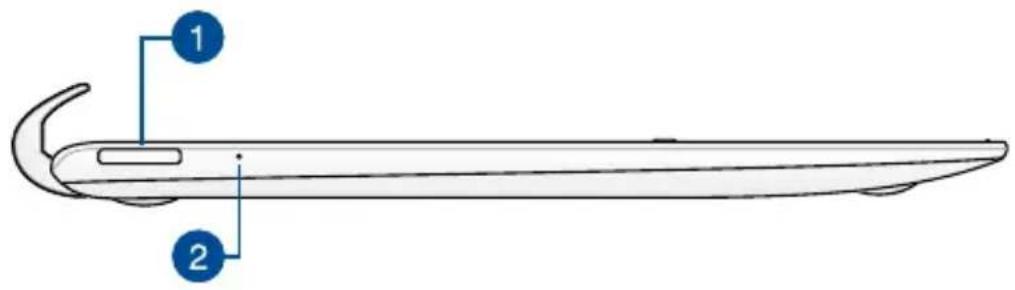
Rear view
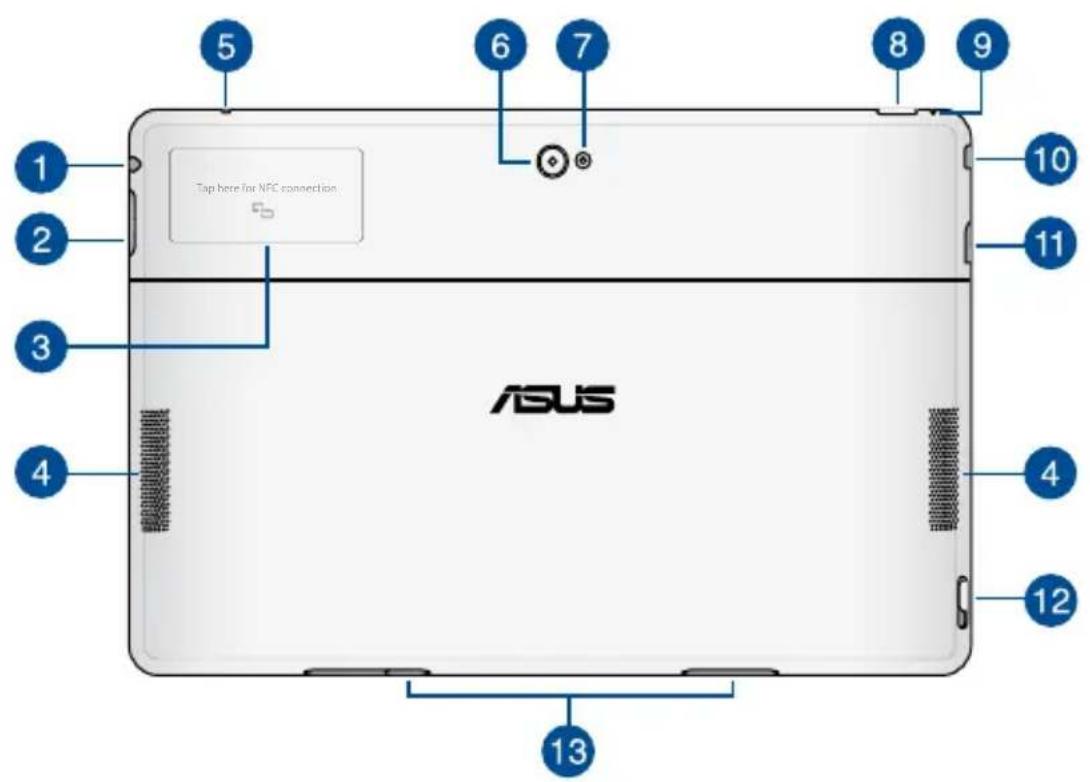
1 Speaker/Headset port
This port allows you to connect your ASUS Tablet to amplified speakers or a headset.
IMPORTANT! This port does not support an external microphone.
2 Volume button
The volume button allows you to increase or decrease the volume level of your ASUS Tablet.
3 Built-in NFC (Near Field Communication) tag
The built-in NFC tag allows you to conveniently share contacts, pictures, videos, business cards, and other files. To use the NFC tag, put your ASUS Tablet's NFC tag near another NFC-enabled device.
4 Audio speakers
The built-in audio speakers allow you to hear audios straight from your ASUS Tablet. Audio features are software controlled.
5 Microphone
The built-in microphone can be used for video conferencing, voice narrations, or simple audio recordings.
6 Rear camera
This built-in rear camera allows you to take high-definition pictures or high-definition videos using your ASUS Tablet.
7 Camera LED flash
Use the flash to take photos or record videos when lighting conditions are poor or when there is a backlight.
8 Power button
Press the power button for about two (2) seconds to turn your ASUS Tablet on or wake it up from standby mode.
To turn your ASUS Tablet off, press the power button for about (2) seconds and when prompted, tap Power Off then tap OK.
To lock your ASUS Tablet or put it to standby mode, press and quickly release the power button.
In the event that your ASUS Tablet becomes unresponsive, press and hold the power button for about five (5) seconds to force it to shut down.
IMPORTANT!
- When your ASUS Tablet is inactive for thirty (30) seconds, it will automatically go to standby mode.
- Forcing the system to restart may result to data loss. We strongly recommend that you back up your data regularly.
Battery charge indicator
This two-color LED provides a visual indication of the battery's charge status.
Refer to the table below for details:
Color Status
White Fully charged.
Orange Charging mode.
OFF The ASUS Tablet is not plugged to a power source.

Manual reset hole
If the system becomes unresponsive, push inside the manual reset hole using a straightened paper clip to force-restart your ASUS Tablet.
IMPORTANT!
- Forcing the system to restart may result to data loss. We strongly recommend that you back up your data regularly.
- Use only when the system becomes unresponsive.
Speaker/Headset port
This port allows you to connect your ASUS Tablet to amplified speakers or a headset.
IMPORTANT! This port does not support an external microphone.

Micro HDMI port
This port is for a micro HDMI (High-Definition Multimedia Interface) connector and is HDCP compliant for HD DVD, Blu-ray, and other protected content playback.

MicroSD card slot
The ASUS Tablet comes with a built-in memory card reader slot that supports microSD, microSDHC, and microSDXC card formats.

Mobile dock latch
Move down the mobile dock latch and hold it to detach your ASUS Tablet from the mobile dock.

Hinge holes
Align and insert the latch hooks into these holes to securely attach your ASUS Tablet to the ASUS mobile dock.
Chapter 2:
Using your ASUS Tablet
Setting up your ASUS Tablet
Charging your ASUS Tablet
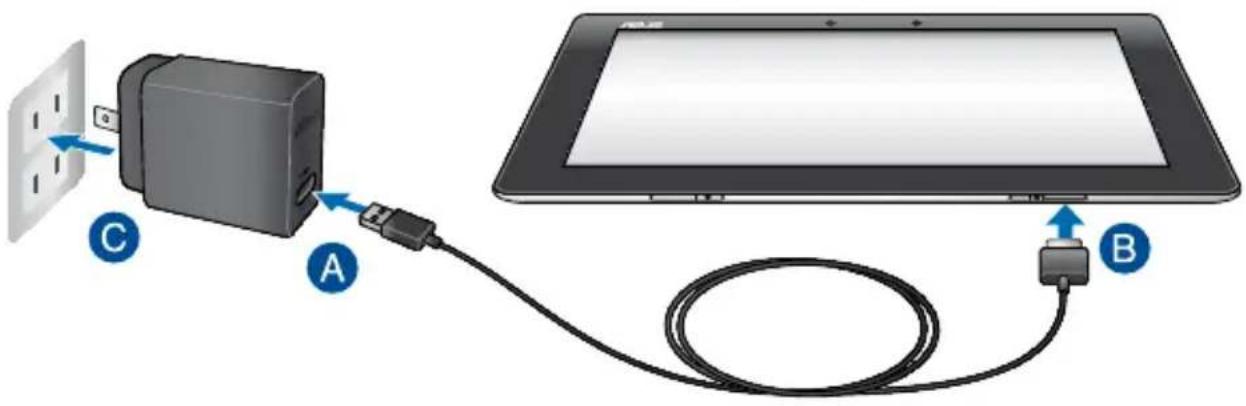
To charge your ASUS Tablet:
A Connect the USB Dock cable to the power adapter.
B Plug the 36-pin connector into your ASUS Tablet.
Plug the power adapter into a grounded power outlet.

Charge your ASUS Tablet for eight (8) hours before using it in battery mode for the first time.
IMPORTANT!
- Use only the bundled power adapter and USB Dock cable to charge your ASUS Tablet. Using a different power adapter may damage your ASUS Tablet.
- Peel the protective film off from the power adapter and micro USB cable before charging the ASUS Tablet to prevent risk or injury.
- Ensure that you plug the power adapter to the correct power outlet with the correct input rating. The output voltage of this adapter is DC 15V, 1.2A.
- Ensure that the 36-pin connector is fully inserted into your ASUS Tablet.
- When using your ASUS Tablet while plugged-in to a power outlet, the grounded power outlet must be near the unit and easily accessible.
- Do not place objects on top of your ASUS Tablet.
NOTES:
- Your ASUS Tablet can be charged via the USB port on a computer only when it is in sleep mode (screen off) or turned off.
- Charging through a USB port of a computer may take a longer time to complete.
- If your computer does not provide enough power for charging your ASUS Tablet, charge your ASUS Tablet via the grounded power outlet instead.
Turning your ASUS Tablet on
To turn your ASUS Tablet on, press the power button for about two (2) seconds.
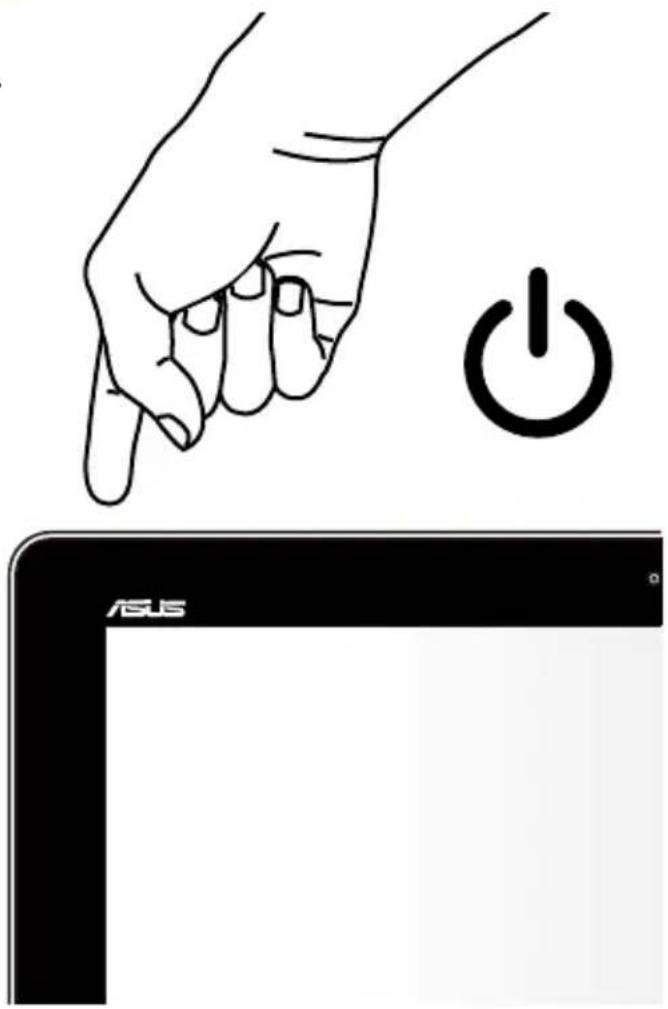
natural_image
Line drawing of a hand pressing a button with an 'Power' symbol, next to a laptop screen (no text or symbols on the diagram itself)Gestures for the ASUS Tablet
Using the touch screen panel, the following gestures can be done to navigate, interact with, and launch the exclusive features included with your ASUS Tablet.
Drag/Tap and hold/Long press
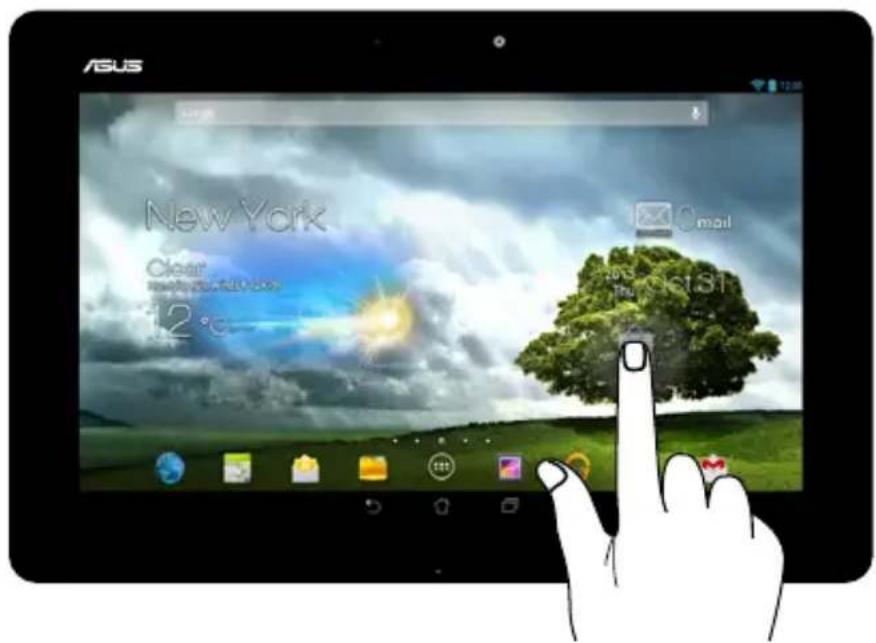
• To move an app, tap and hold the app and drag it to a new location.
- To delete an app from the main screen, tap and hold the app and drag it up to the top side of the screen.
• To capture a screen image, tap and hold

NOTE: To enable this setting, go to >ASUS Customized Setting then tick Capture screenshots by holding the Recent Apps Key.
Tap/touch
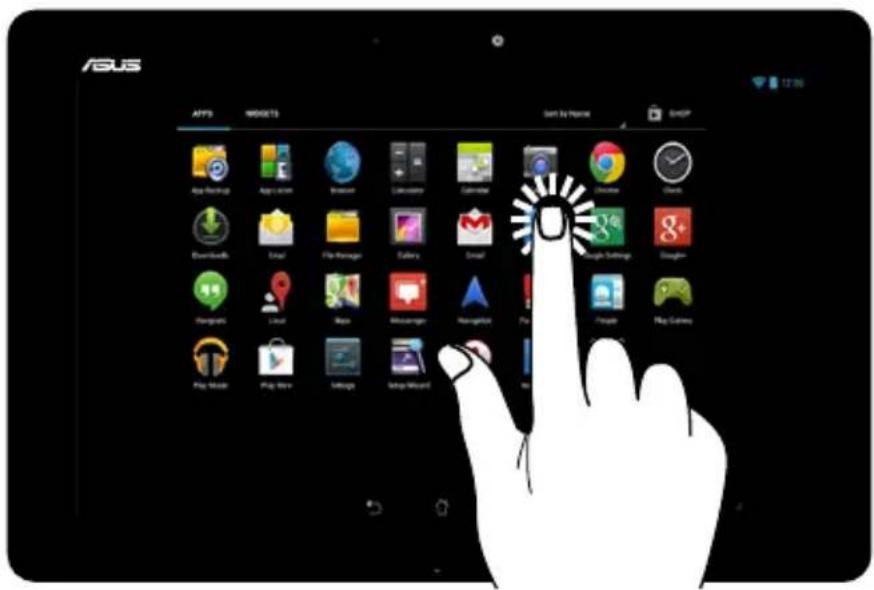
- Tap an app to launch it.
• In the File Manager app, tap to select and open a file.
Zoom out
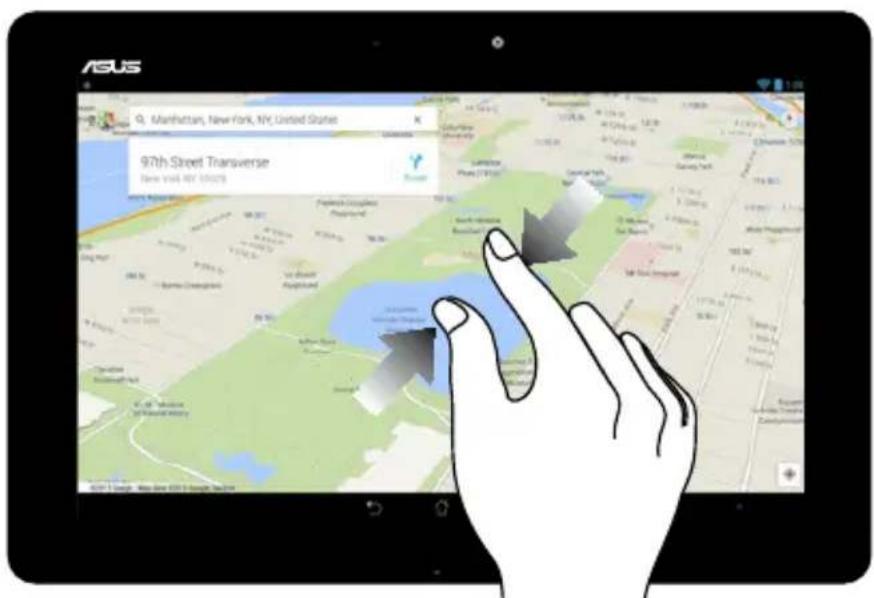
Bring together your two fingers on the touch panel to zoom out an image in Gallery, Maps or Places.
Zoom in
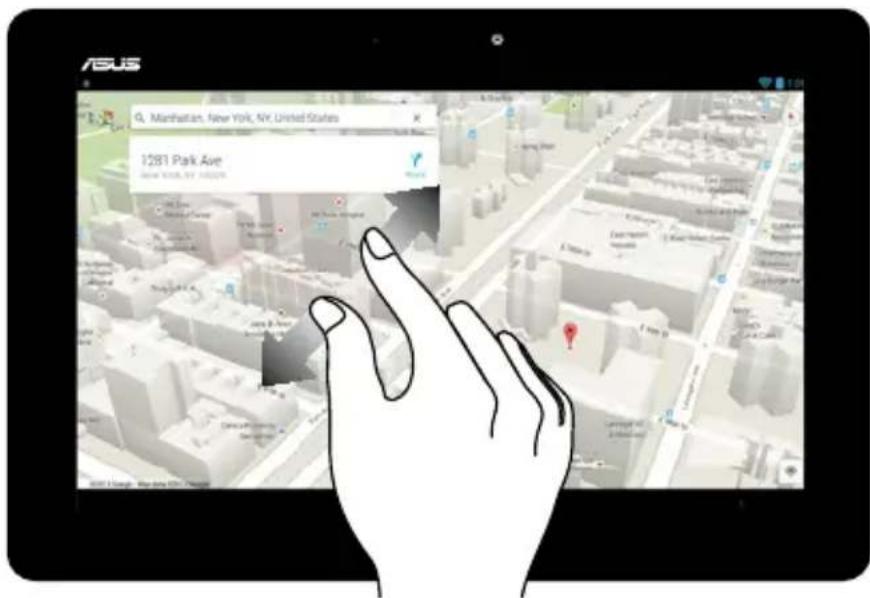
Spread apart your two fingers on the touch panel to zoom in an image in Gallery, Maps or Places.
Swipe
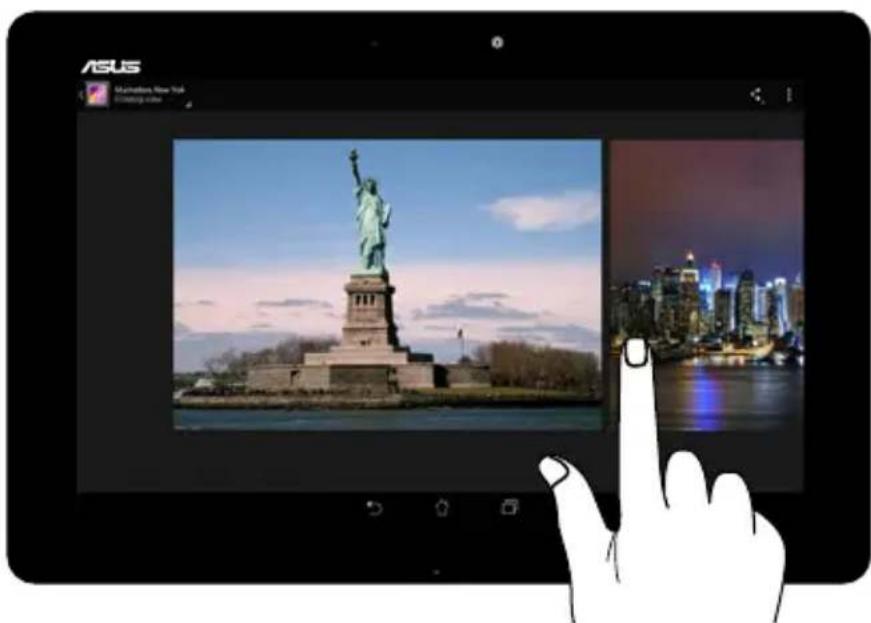
Swipe your finger to the left or to the right on the touch panel display to switch between screens or to flip through the pages of an e-book or a gallery of images.
Connecting an HDMI display
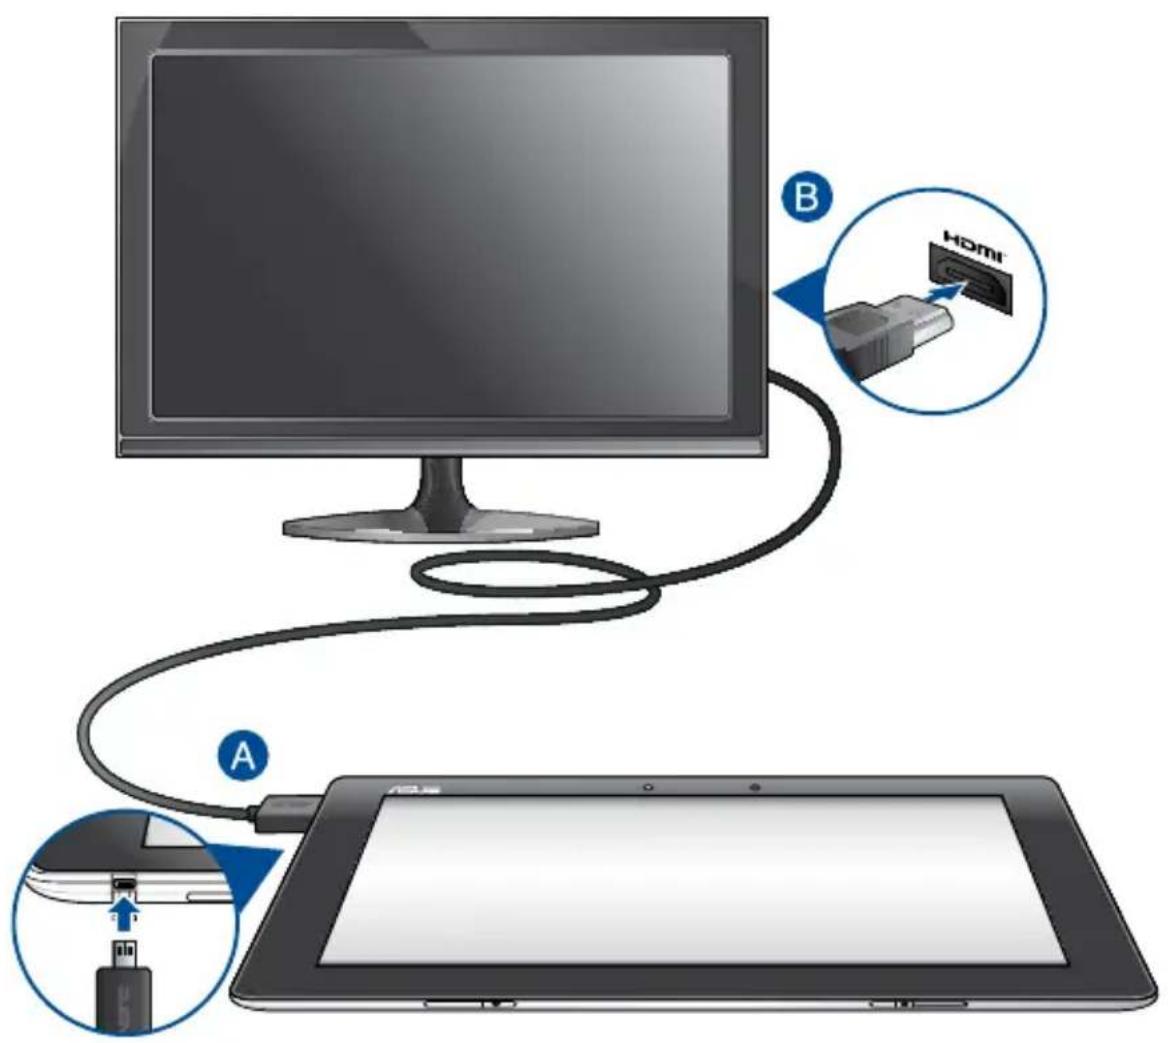
To connect an HDMI-compliant display:
A Connect the micro HDMI connector to the micro HDMI port of your ASUS Tablet.
B Plug the HDMI cable to the HDMI port of an HDMI-compliant display.
Using the ASUS mobile dock Getting to know your ASUS mobile dock
Top view
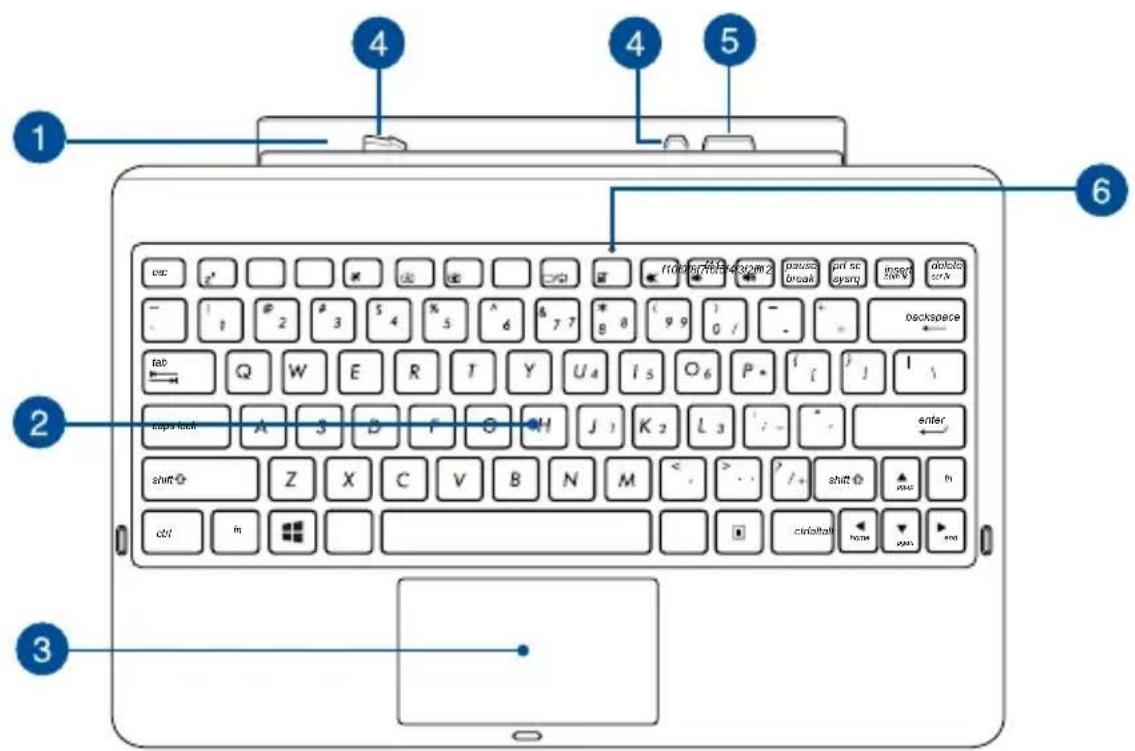
1 Hinge
This hinge supports your ASUS Tablet while it is connected to the ASUS mobile dock. It also holds your ASUS Tablet in place while you adjust it into different viewing angles.
2 Keyboard
The keyboard provides QWERTY keys with a comfortable travel depth for typing. It also enables you to use the function keys and controls other multimedia functions.
NOTE: The keyboard layout differs by territory.
3 Touchpad
The touchpad allows the use of multi-gestures to navigate onscreen, providing an intuitive user experience. It also simulates the functions of a regular mouse.
NOTE: For more details, refer to section Using the touchpad in this manual.
4 Latch hooks
The latch hooks allow you to securely attach your ASUS Tablet on the ASUS mobile dock.
5 Dock connector
The dock connector connects your ASUS Tablet to the ASUS mobile dock, transforming your ASUS Tablet into a traditional notebook. When connected, you can enjoy a standard QWERTY keyboard, USB 2.0 connectivity, and extended battery life up to seventeen (17) hours.
6 Touchpad indicator
This indicator lights up when you disable the ASUS mobile dock's touchpad.
Left view
1 USB Dock port
This 36-pin USB Dock port allows you to supply power to your ASUS mobile dock and charge the internal battery pack. You can also charge your ASUS Tablet and ASUS mobile dock assembly using this port.
2 Battery charge indicator
This two-color LED provides a visual indication of the battery's charge status.
Refer to the table below for details:
Color Status
White Fully charged.
Orange Charging mode.
OFF The ASUS mobile dock is not plugged to a power source.
Right view
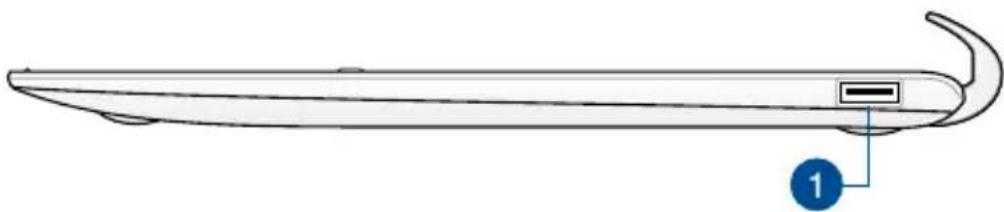
natural_image
Line drawing of a sleek, elongated object with a curved handle and labeled point 1 (no text or symbols on the object itself)1 USB 2.0 Port
The USB (Universal Serial Bus) port is compatible with USB 2.0 or USB 1.1 devices such as keyboards, pointing devices, flash disk drives, external HDDs, speakers, cameras, and printers.
Docking your ASUS Tablet
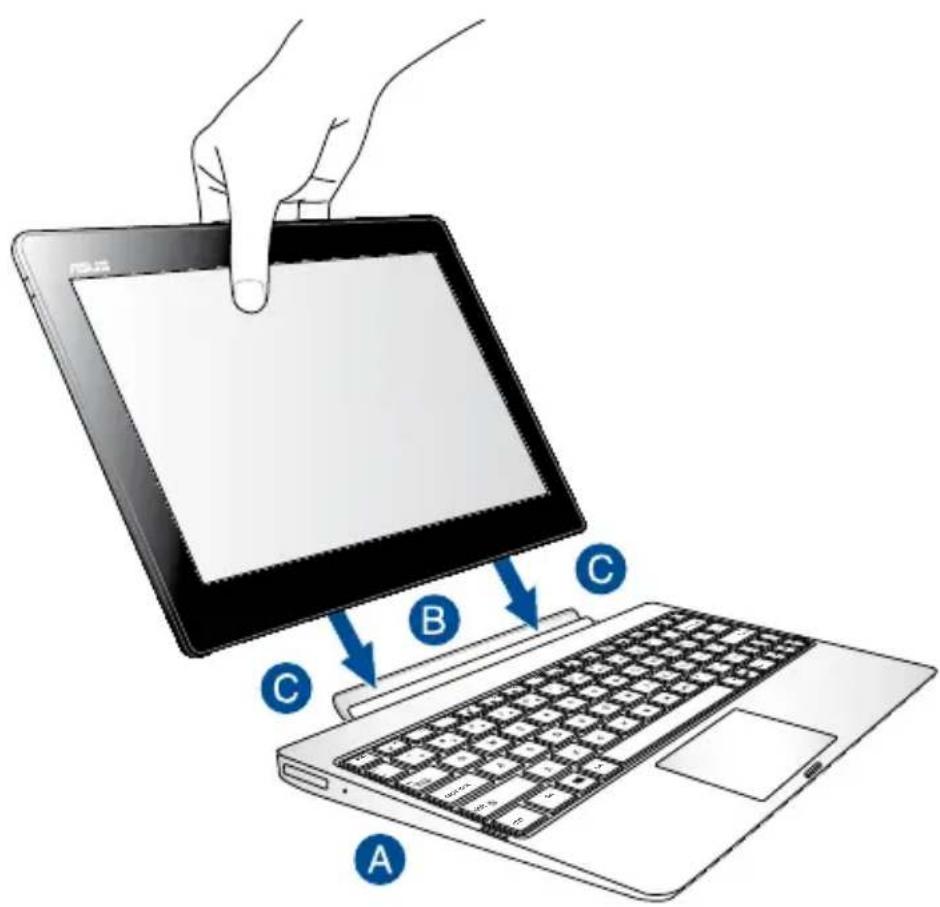
To dock your ASUS Tablet:
A Put the ASUS mobile dock on a flat and stable surface.
B Align the ASUS Tablet with the ASUS mobile dock.
C Firmly insert the ASUS Tablet into the hinge. Your ASUS Tablet vibrates when it is securely connected to the ASUS mobile dock.
IMPORTANT! Always pick up the entire assembly from the bottom when your ASUS Tablet is attached to the ASUS mobile dock.
Charging your ASUS Tablet on the ASUS mobile dock
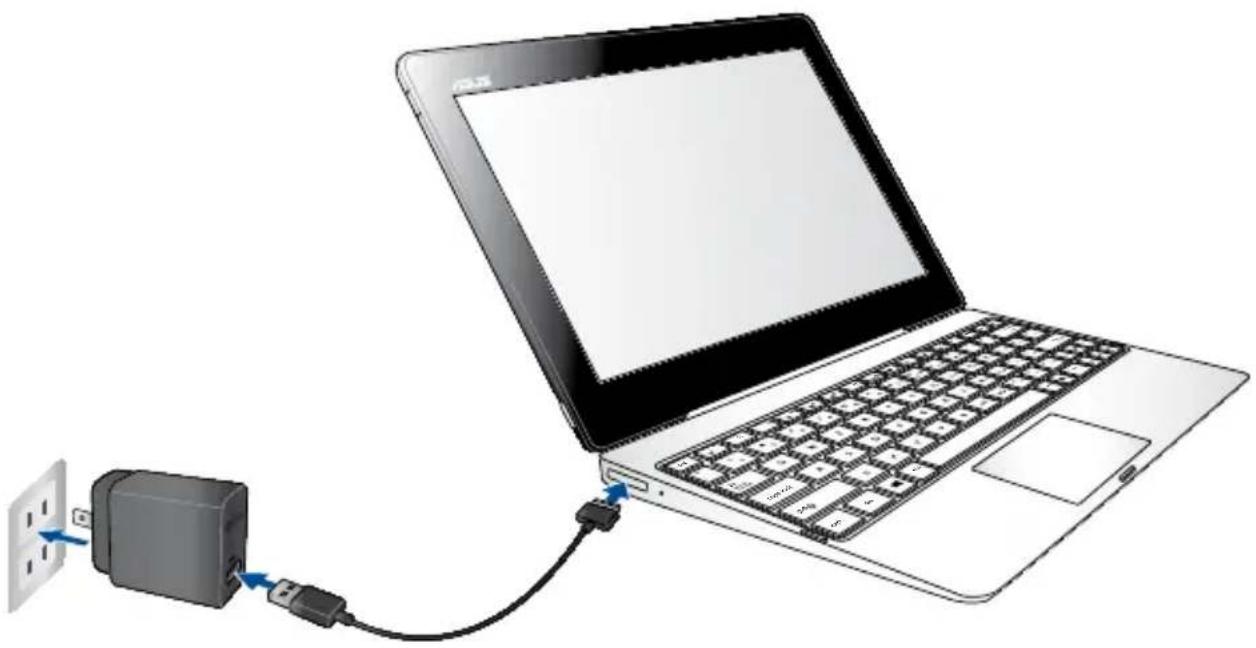
natural_image
Illustration of a laptop connected to a power adapter via cable (no text or symbols visible)To charge your ASUS Tablet on the ASUS mobile dock:
A Connect the USB Dock cable to the power adapter.
B Insert the 36-pin connector to the USB Dock port of your ASUS mobile dock.
C Plug the power adapter into a grounded power outlet.

Charge your ASUS mobile dock for eight (8) hours before using it in battery mode for the first time.
IMPORTANT!
- Use only the ASUS Tablet's bundled power adapter and USB Dock cable to charge your ASUS Tablet assembly or when charging the ASUS mobile dock only. Using a different power adapter may damage these devices.
- Ensure that you plug the power adapter to the correct power outlet with the correct input rating. The output voltage of this adapter is DC 15V, 1.2A.
- Do not leave the ASUS Tablet assembly or the ASUS mobile dock connected to the power supply once it is fully charged. Your ASUS Tablet assembly or the ASUS mobile dock is not designed to be left connected to the power supply for extended periods of time.
- When using your ASUS Tablet assembly while plugged-in to a power outlet, the grounded power outlet must be near the unit and easily accessible.
- Do not place objects on top of your ASUS Tablet.
Function keys
The function keys on your ASUS mobile dock can trigger the following commands:
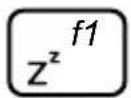
Puts the ASUS Tablet into Sleep mode.
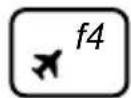
Turns Airplane mode on or off.
NOTE: When enabled, the Airplane mode disables all wireless connectivity.
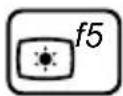
Decreases the display brightness.
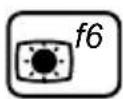
Increases the display brightness.
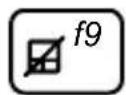
Enables or disables the touchpad.
NOTE: The touchpad indicator above this key lights up when you disable the touchpad.
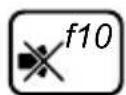
Turns the speaker on or off.
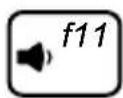
Turns the speaker volume down.
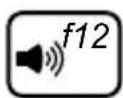
Turns the speaker volume up.
Activates the properties menu, which is equivalent to current app displayed on your screen.
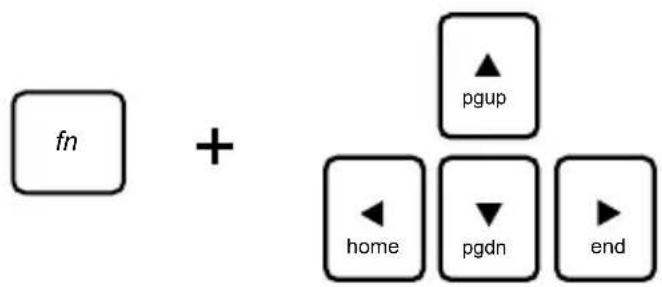
flowchart
graph TD
    A["fn"] --> B["pgup"]
    A --> C["home"]
    A --> D["pgdn"]
    A --> E["end"]
Press
Using the Touchpad
Finger slide
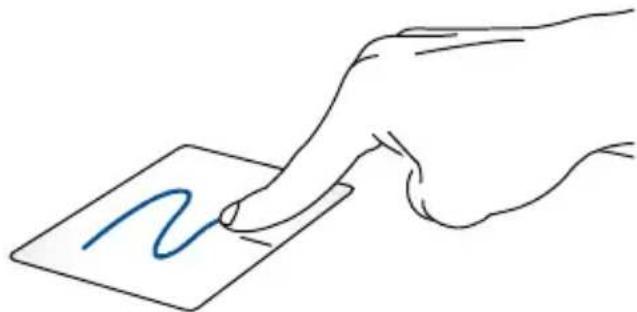
natural_image
Hand holding a blue wavy line on a white surface, no text or symbols presentSlide your finger across the touchpad to move the pointer.
Tap/Double tap
natural_image
Line drawing of a hand inserting a card into a card with a string (no text or symbols)Single tap to select an item. Double tap to launch an item.
Drag and drop
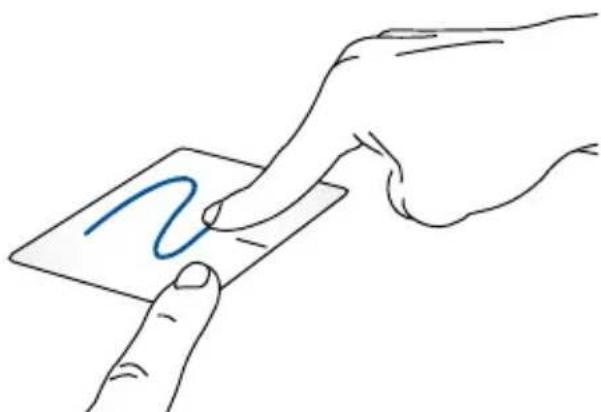
natural_image
Hand holding a blue wavy line drawing on a card, with no text or symbols presentSelect an item then press and hold the left-click button. Using your other finger, slide down the touchpad to drag and drop the item to a new location.
Two-finger scroll (up/down)
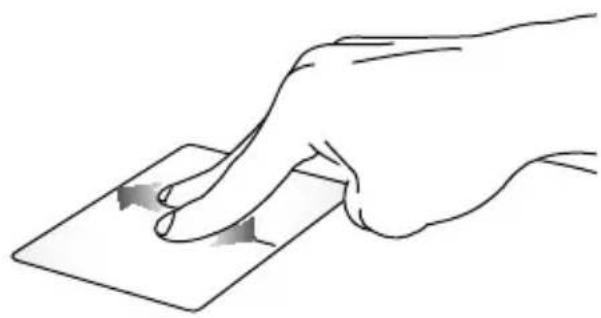
natural_image
Line drawing of a hand pressing down on a square object with arrows indicating motion (no text or symbols)Slide two fingers to scroll up or down.
Two-finger scroll (left/right)
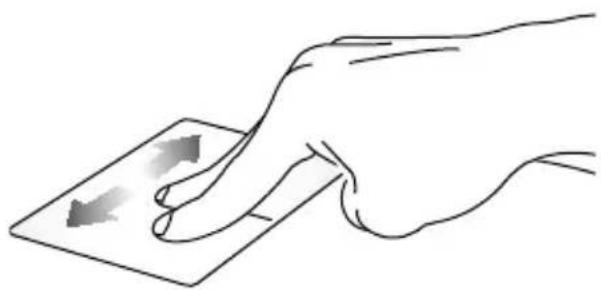
natural_image
Illustration of a hand pressing down on a card with two arrows indicating movement (no text or symbols)Slide two fingers to scroll left or right.
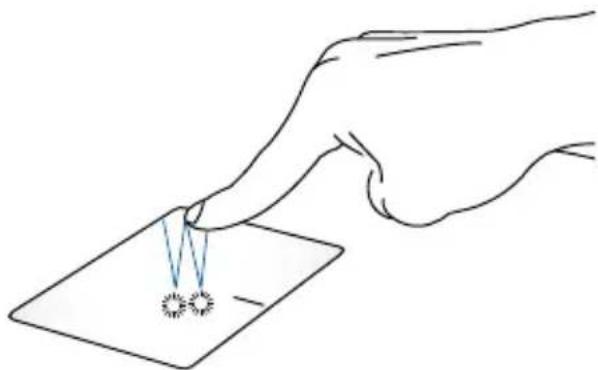
Two-finger tap and hold
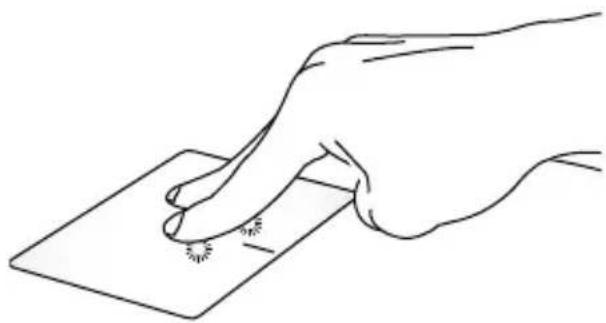
natural_image
Line drawing of a hand pressing down on a square surface with small dots (no text or symbols)Use two fingers to hold a selected item.
Undocking your ASUS Tablet
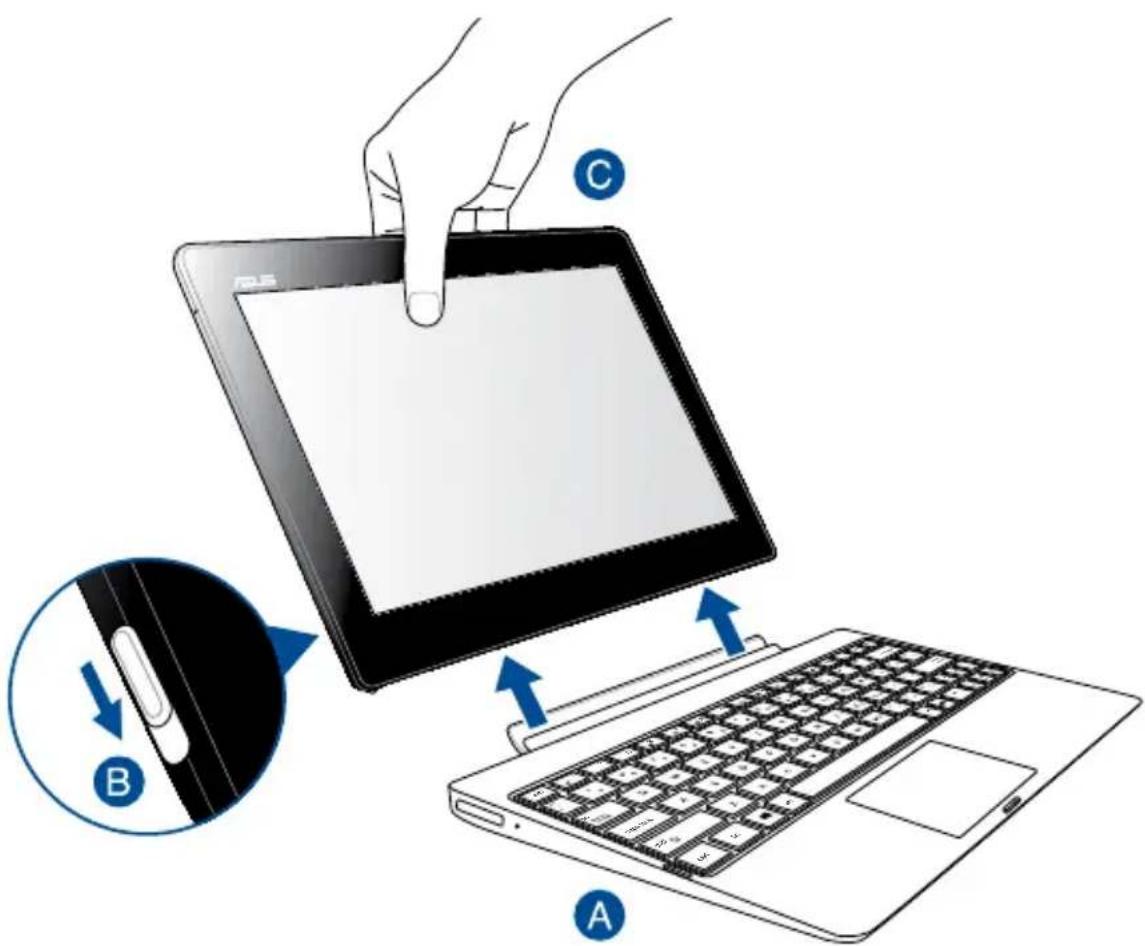
To undock your ASUS Tablet:
A Put the entire assembly on a flat and stable surface.
B Move the latch down to release the ASUS Tablet from the mobile dock.
C Lift the ASUS Tablet to detach it from the ASUS mobile dock.
Chapter 3:
Working with Android™
Starting up for the first time
When you turn on your ASUS Tablet for the first time, a series of steps appear to guide you in configuring the basic settings of your Android ^™ operating system.
To start your ASUS Tablet for the first time:
- Turn your ASUS Tablet on.
- Choose a language, then tap Next .
- Select an input method or keyboard format, then tap Next
- From the list of available Wi-Fi networks, tap a network name then tap
| Next | . To skip connecting to a network, tap | Next |
NOTE: Some Wi-Fi networks may prompt you to key in a passcode.
-
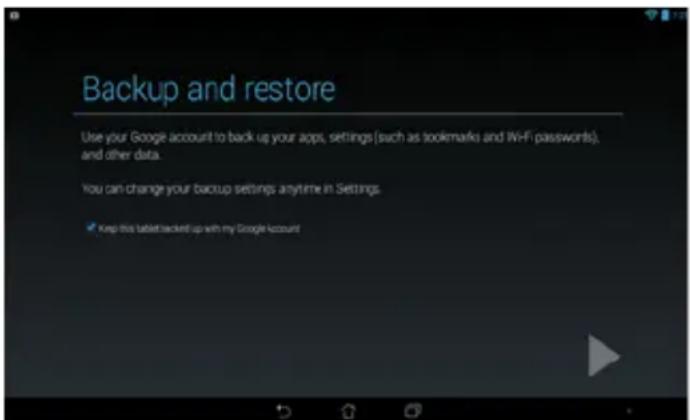
Select the type of data synchronization, then tap . Next
-
Follow the onscreen instructions to configure the following items:
-
Google Account
-
Google location and services
-
Set the local date and time, then tap Next .
-
Tap Finish to enter Home screen.
-
On the Home Screen, tap OK to start navigating your ASUS Tablet.
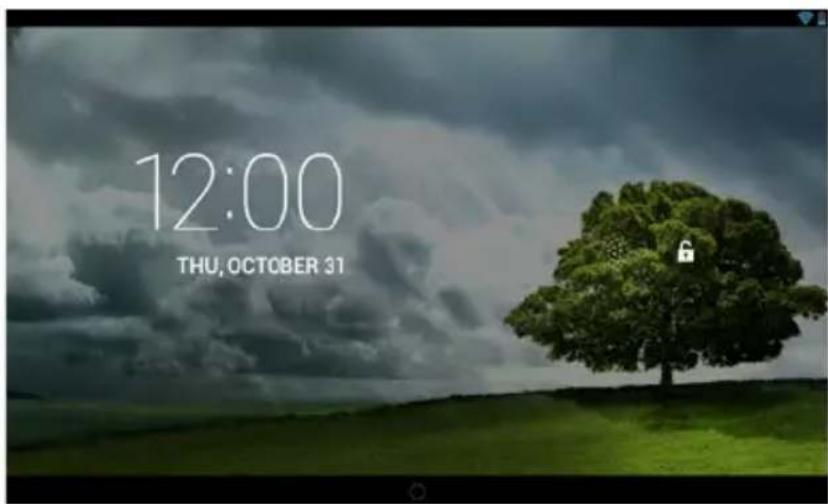
Android™ lock screen
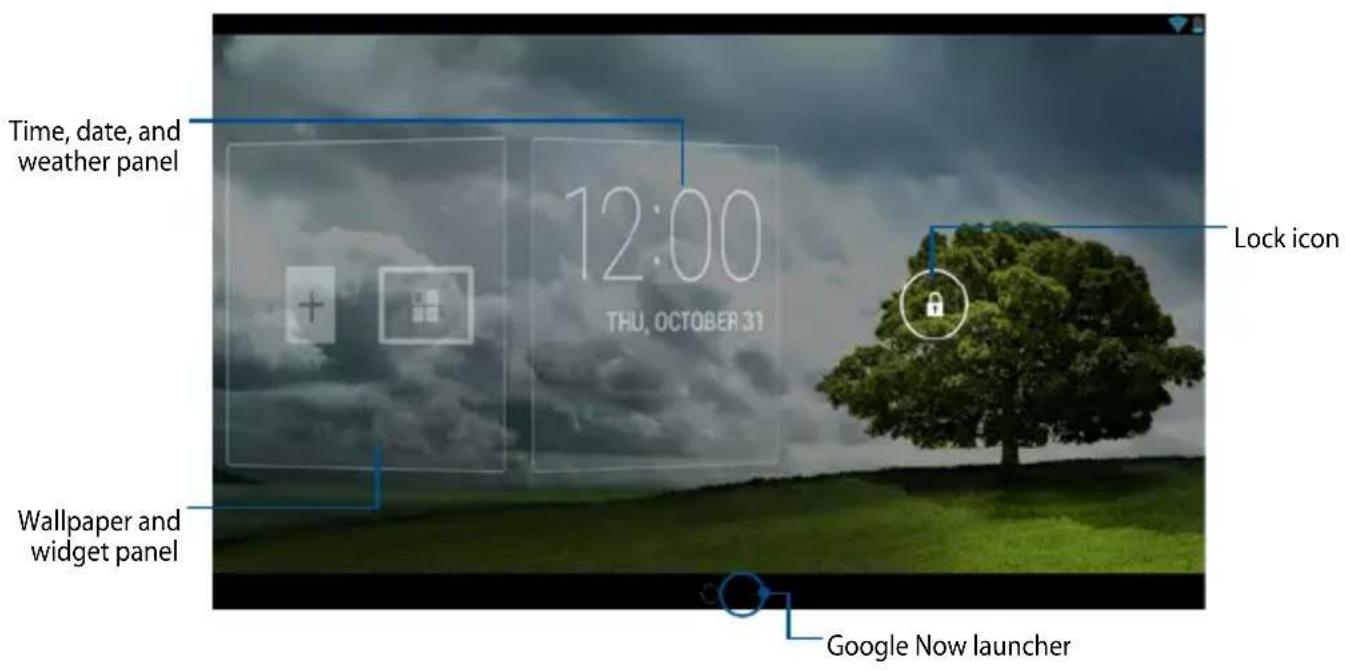
Unlocking your device
Tap and drag to .
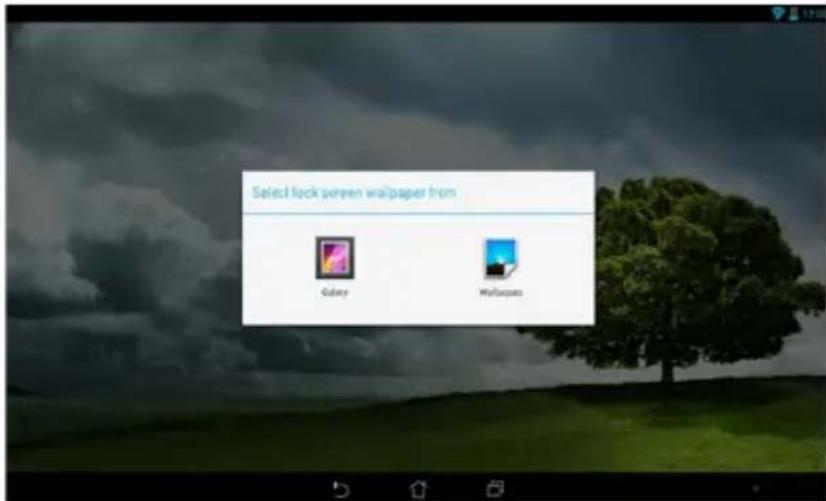
Adding a wallpaper on the lock screen
Swipe the time, date, and widget panel to the right to view the wallpaper and widget panel, then tap and select a wallpaper from Gallery or Wallpapers.
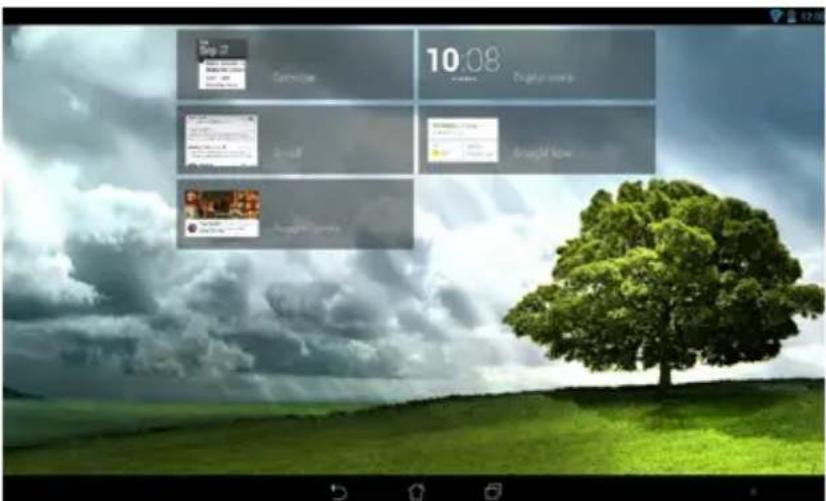
Adding a widget on the lock screen
Swipe the time, date, and widget panel to the right to view the wallpaper and widget panel, then tap and select a widget.
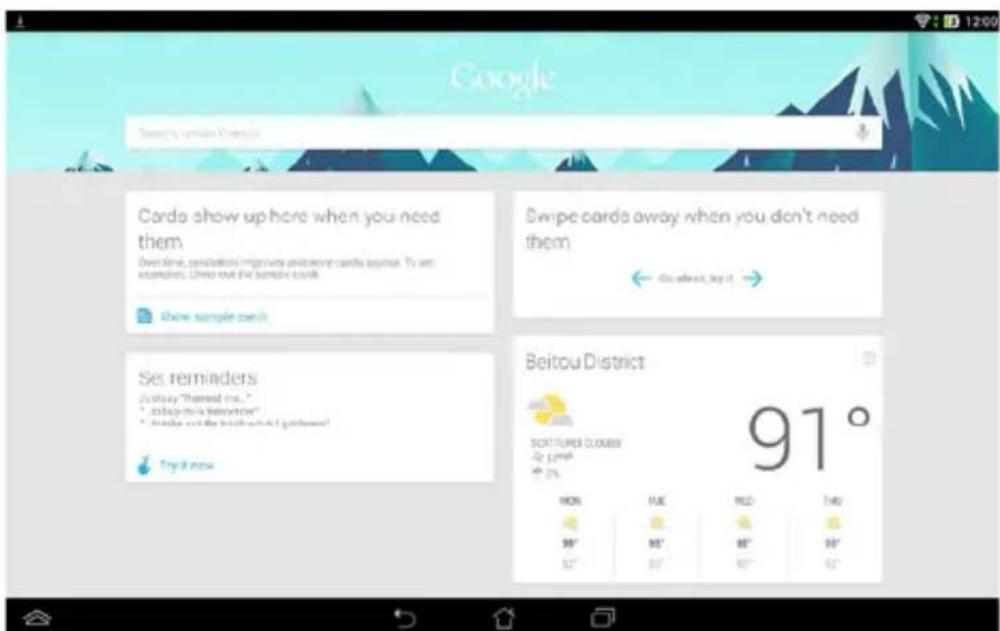
Entering Google Now
Tap the system bar then drag it to Google icon.

Google Now
Google Now is your ASUS Tablet's personal assistant, giving you instant updates on weather conditions, nearby restaurants, flight schedules, scheduled appointments, and other related information based from your web history, synced calendars and reminders.
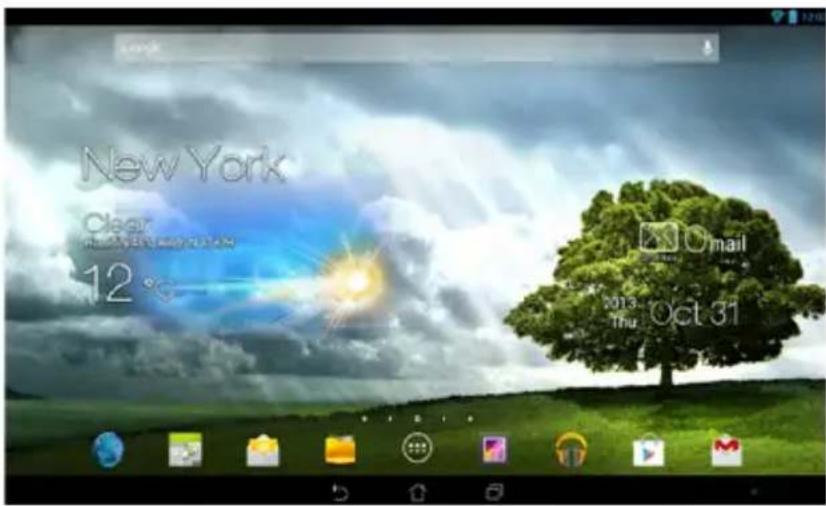
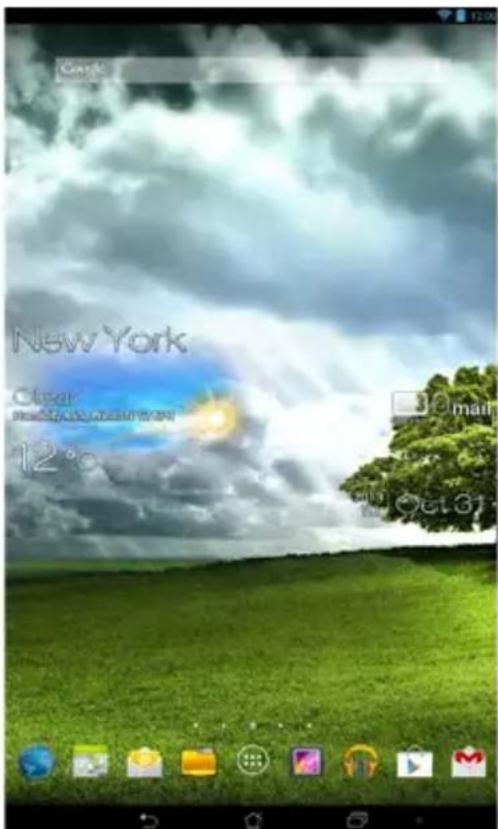
Home Screen
Tap to update location and weather settings
Open Google Text search
Notification bar
Open Google
Voice search
Read e-mails in
Email app
Displays local date
Open All Apps screen
Shortcuts
Display recent apps
Return to Home Screen
Return to the previous screen
Shortcuts
System bar
System bar lock
Screen views
The built-in gravity-sensor and gyroscope of your ASUS Tablet enable automatic screen rotations depending on how you hold it. You can quickly switch between a landscape or portrait view by steering your ASUS Tablet to the left or to the right.
Landscape view
Portrait view
Locking the screen orientation
By default, your ASUS Tablet screen automatically changes its orientation from portrait mode to landscape mode or vice-versa, depending on the way you hold your device.
You can disable the auto-rotate screen function by following these steps:
- Tap the Home Screen to open All Apps screen.
- Tap Settings > Accessibility then tap Auto-rotate screen to deselect.
NOTE: You can also enable or disable this function from the ASUS Quick Settings. Refer to section Settings for more details.
Connecting to the world
Connecting to Wi-Fi networks
Wi-Fi wireless networking technology allows you to exchange data wirelessly over a network. To use Wi-Fi, enable the Wi-Fi feature in your ASUS Tablet and connect to a wireless network. Some wireless networks are secured with a key or protected with digital certificates and requires additional steps to set up; others are open and you can easily connect to them.
NOTE: Turn Wi-Fi off when you are not using it to help save battery power.
To enable Wi-Fi and connect to a Wi-Fi network:
- Tap to go to the All Apps screen then tap

- Slide the Wi-Fi switch to ON. When enabled, your ASUS Tablet scans for available Wi-Fi networks.
- Tap a network name to connect to it. For a secured network, you may be prompted to key in a password or security credentials.
NOTE: If your ASUS Tablet finds a network that you have connected to previously, it automatically connects to it.
Using Bluetooth
Enabling or disabling Bluetooth in your device
Bluetooth is a wireless standard used for exchanging data over short distances. Bluetooth exists in many products, such as smartphones, computers, tablet devices, and headsets.
Bluetooth is very useful when transferring data between two or more devices that are near each other.
The first time you connect to a Bluetooth device, you must pair it with your ASUS Tablet.
NOTE: Turn Bluetooth off when you are not using it to help save battery power.
To enable or disable Bluetooth in your ASUS Tablet, tap to go to the All Apps screen then tap Settings. Slide the Bluetooth switch to ON
Pairing your ASUS Tablet with a Bluetooth device
Before you can connect to a Bluetooth device, you must first pair your ASUS Tablet to that device. The devices stay paired, unless you remove the paired connection between them.
To pair your ASUS Tablet to a device:
- Tap to go to the All Apps screen then tap to ON.

Slide the Bluetooth switch
- Tap Bluetooth to display all available Bluetooth devices within range.
NOTES:
- If the device you want to pair with is not in the list, ensure that its Bluetooth feature is turned ON and set as Discoverable.
-
See the technical documentation that came with the device to learn how to turn its Bluetooth ON and how to set it to discoverable.
-
If your ASUS Tablet has finished scanning before your Bluetooth device is ready, tap SEARCH FOR DEVICES.
- In the list of available devices, tap the Bluetooth device that you want to pair with. Follow the succeeding screen instructions to complete the pairing. If necessary, refer to the technical documentation that came with the device.
Connecting your ASUS Tablet to a Bluetooth device
After you have paired your ASUS Tablet to a Bluetooth device, you can easily reconnect to it manually, after it is back in range.
To connect to a Bluetooth device:
-
Tap 🔒 to go to the All Apps screen then tap Settings. Slide the Bluetooth switch to ON.
-
In the list of PAIRED DEVICES, tap the name of the paired device.
Unpairing and configuring a Bluetooth device
To unpair or configure a Bluetooth device:
-
Tap 🔵 to go to the All Apps screen then tap Settings. Slide the Bluetooth switch to ON.
-
Tap Bluetooth then tap beside the connected Bluetooth device that you want to unpair or configure.
-
From Paired Bluetooth device screen, you can do any of the following:
-
Tap Unpair to unpair the device.
• Tap Rename to rename the Bluetooth device. -
Tap any of the listed profiles to enable or disable a profile.
-
Tap on the system bar to go back to previous screen.
Managing Apps
Creating app shortcuts
Get easy access to some of your favorite applications by creating app shortcuts on your Home Screen.
To create app shortcuts:
-
Tap to go to the All Apps screen.
-
From the All Apps screen, tap and hold the app's icon then drag it to the Home Screen.
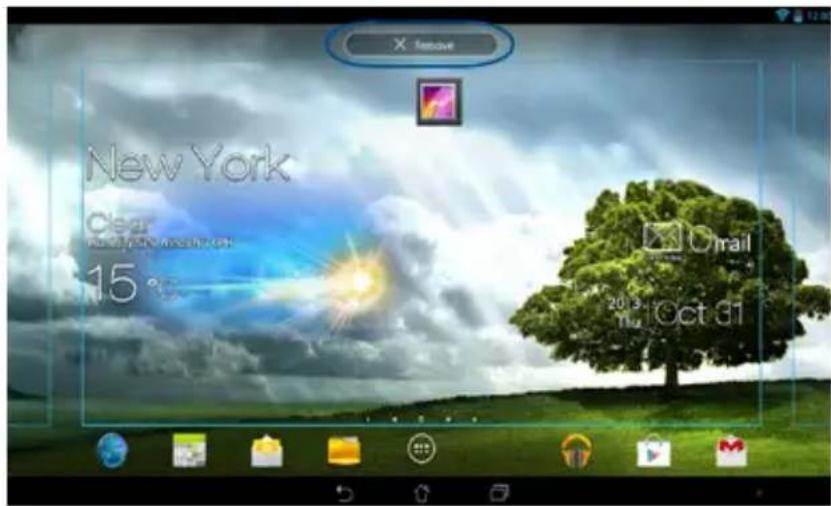
Removing an app from the Home Screen
Free up space for new app shortcuts by removing existing app shortcuts on your Home Screen.
To remove app shortcuts:
- Tap and hold an app until the X Remove appears on top of the screen.
- Drag the app to X Remove to remove it from the Home Screen.
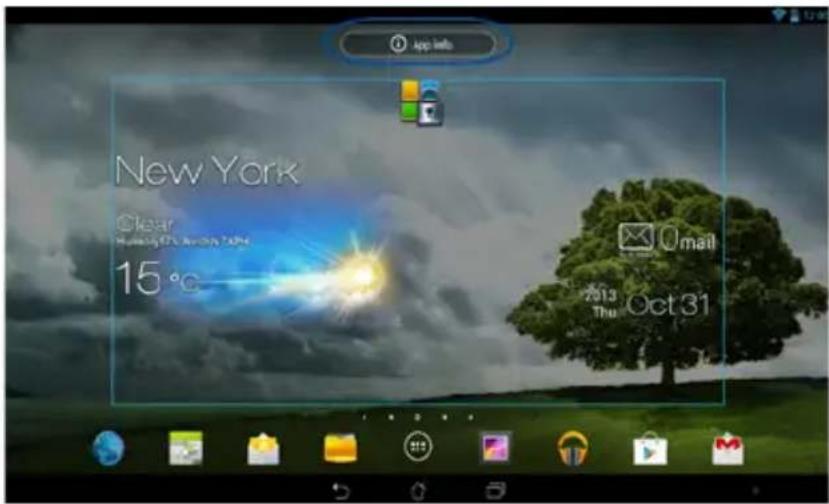
Viewing app info
You can view the detailed app information while creating a shortcut for the app. While holding an app on the All Apps screen, the display switches to Home Screen and the App info appears on the top of the Home Screen display. Drag the app to App info to display its detailed information.
Creating app folder
You can create folders to organize shortcuts on your Home Screen.
To create an app folder:
- On the Home Screen, tap and drag an app or shortcut onto another app until a black circle appears.
NOTES:
• The created folder is shown in a black circle.
- You can add multiple apps in your folder.
- Tap the folder and tap Unnamed Folder to rename the folder.
Viewing apps under the Recents screen
The Recents screen allows you to view a list of app shortcuts based from your recently launched apps. Using the Recents screen, you can easily go back to or switch between the apps you recently launched.
To access the Recents screen:
-
Tap the system bar.
-
A list shows up to display all of your recently launched apps. Tap on the app you want to launch.
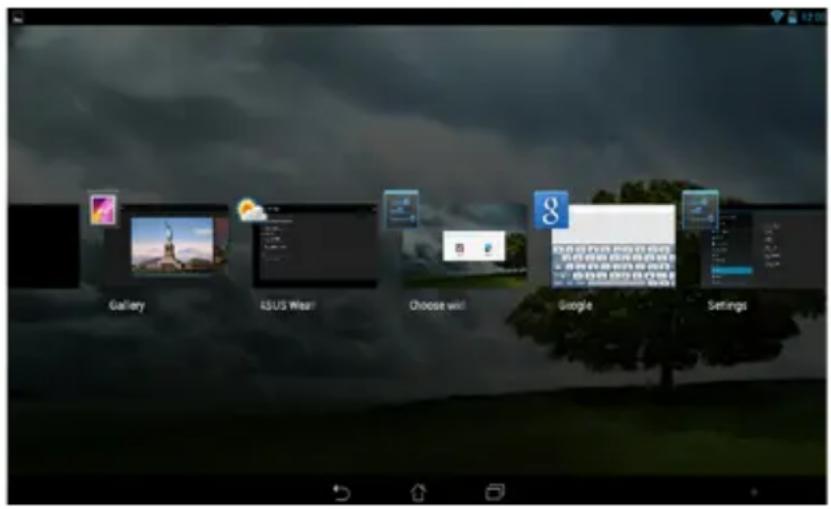
To view a recent app's menu:
- Tap and hold a recent app to display its menu.
- To remove the app from the list, select Remove from list. To view its information, select App info.
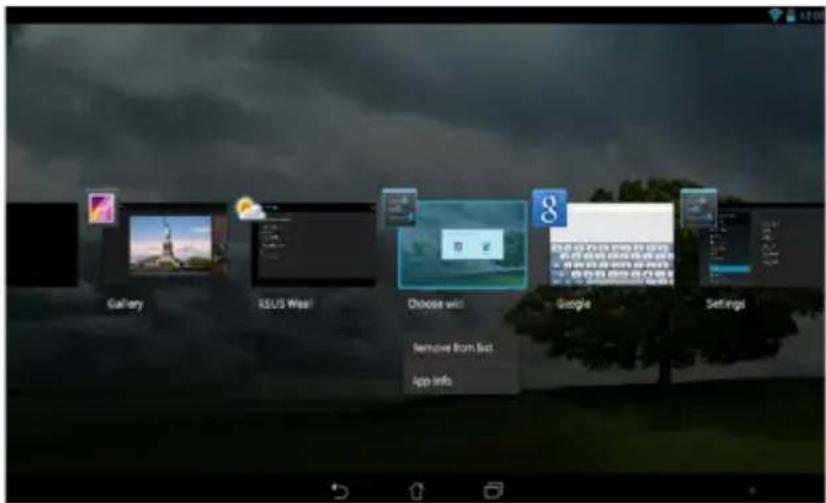
NOTE: You can also remove a recent app from the list by swiping it up or down.
Task Manager
ASUS Task Manager displays a list of currently running utilities and applications, including their usages in percentages, on your ASUS Tablet. You can also open and close the running apps individually or close all apps and utilities at once using the One-click Clean function.
To manage Task Manager:
-
Tap to go to the All Apps screen then tap WIDGETS to display the Widgets menu.
-
Tap and hold ASUS Task Manager to display the ASUS Task Manager box on the Home Screen.
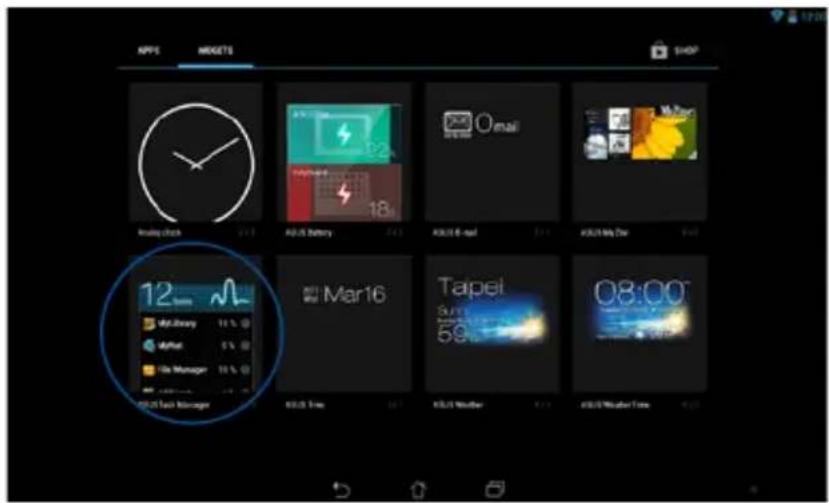
- Swipe the list up and down to view all launched apps.
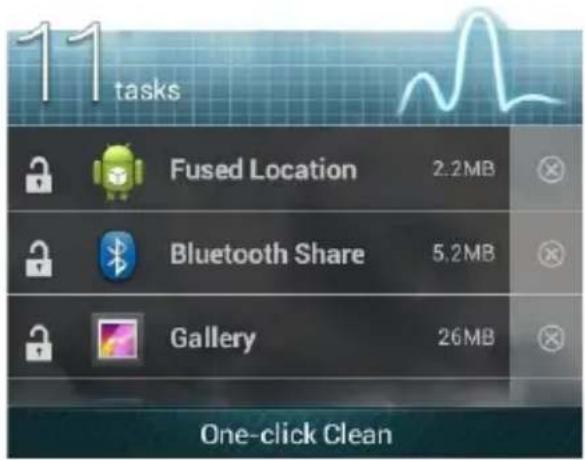
- Tap beside the running app to close it. Tap One-click Clean to close all running apps at once.
File Manager
File Manager allows you to easily locate and manage your data either on the internal storage or the connected external storage devices.
Accessing the internal storage
To access the internal storage:
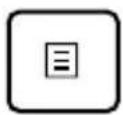
- Tap 📄 to go to the All Apps screen.
- Tap > Internal Storage on the left panel to view the contents of your ASUS Tablet then tap an item to select.
Accessing the external storage device
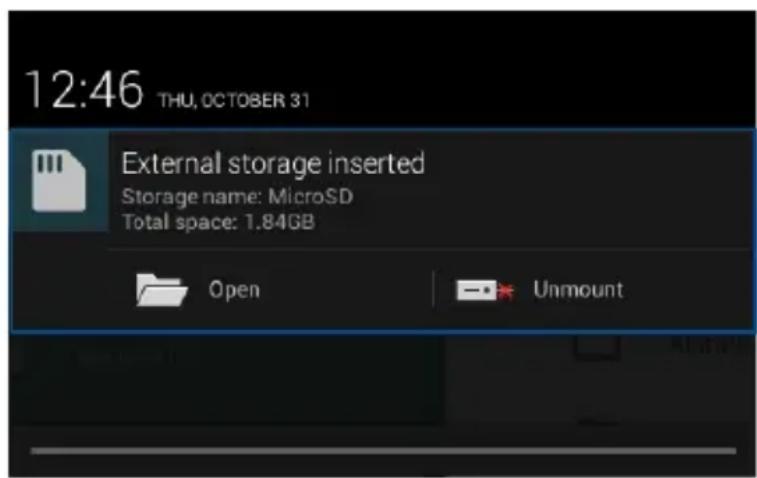
To access the external storage device:
- Swipe down the notification bar on top-right side of the screen to display the notification box.
- Tap Open to display the contents of your microSD card. To unmount the
microSD card from your ASUS Tablet, tap
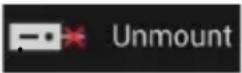
IMPORTANT! Ensure to save your data stored in your microSD card before unmounting the microSD card from your ASUS Tablet.
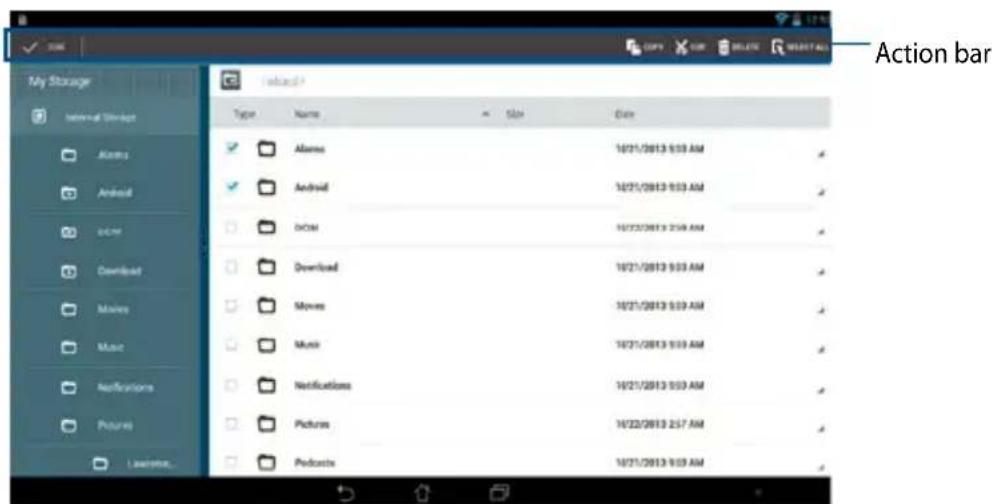
Customizing your contents
From File Manager, you can copy, cut, share and delete the contents of your device and the installed external storage device.
When you customize a file or folder, tick the box beside the file or folder and the action bar appears on the upper right corner of the screen.
NOTES:
- The SHARE action only appears if you customize a file or files inside the folder.
- You can also tick the file or folder then drag and drop it to your desired destination folder.
Settings
Settings screen allows you to configure the system settings of your ASUS Tablet. With this system app, you can configure your ASUS Tablet's wireless connectivity, hardware, personal, account and system settings.
There are two ways to launch the Settings screen.
-
From the All Apps screen, tap to display the menu.
-
On the top-right side of the notification bar, swipe down to display ASUS
Quick Settings panel then tap

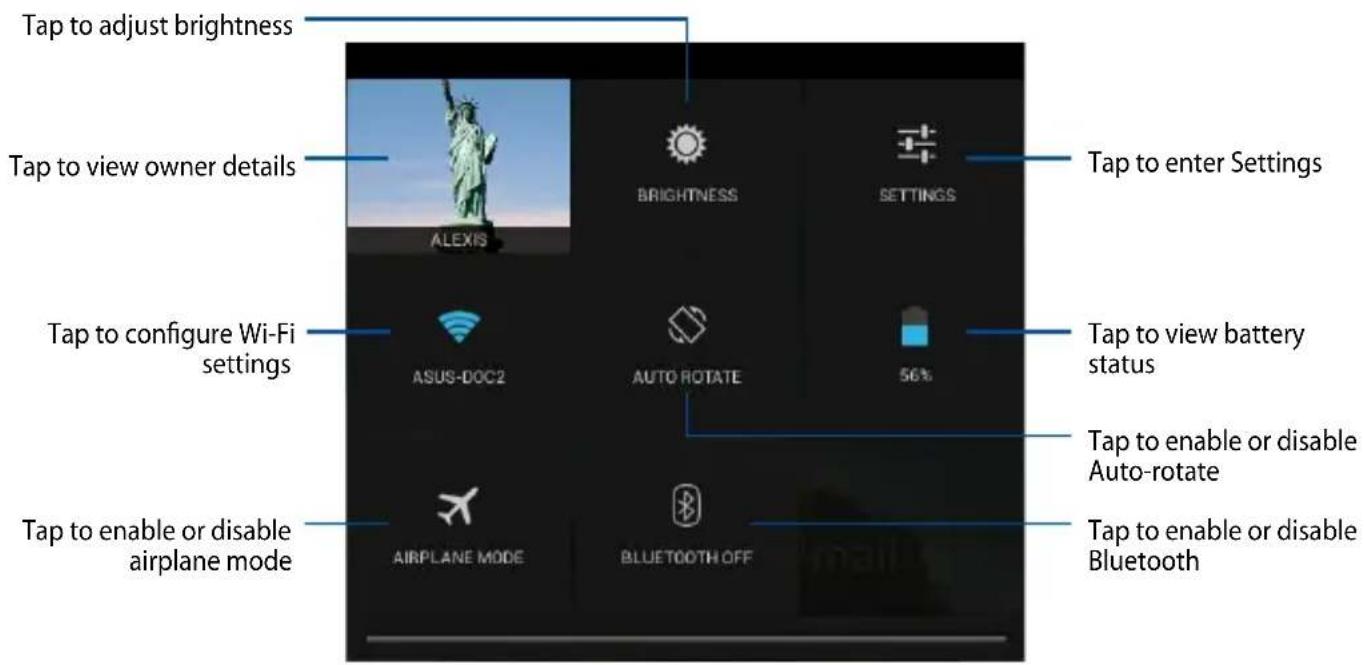
ASUS Quick Setting panel
Tap any of the following icons to configure the functions.
Notification panel
Notification panel alerts you of app updates, incoming emails, and utility status. To launch notification panel, swipe down the top-left side of the notification bar.

NOTE: Swipe the notification to the left or to the right to remove the item from the list.
Turning your ASUS Tablet off
You can shut down your ASUS Tablet by doing any of the following:
- Press the power button for about two (2) seconds and when prompted, tap Power Off then tap OK.
- If your ASUS Tablet is unresponsive, press and hold the power button for about five (5) seconds until your ASUS Tablet turns off.
IMPORTANT! Forcing the system to shut down may result to data loss. Ensure that you back up your data regularly.
Putting your ASUS Tablet to sleep
To put your ASUS Tablet to sleep, press the power button once.
Chapter 4:
Pre-installed Apps
Featured pre-installed apps
Play Music
Play Music app, an integrated interface for your music collection, allows you to play your saved music files stored internally or from an installed external storage device.
You can shuffle and play all music files randomly or flip to select an album for your listening pleasure.
To launch Play Music, tap 🎨 on the Home Screen.
Your ASUS Tablet supports the following audio and video codecs:
| Decoder | Audio codec | AAC LC/LTP, HE-AACv1(AAC+), HE-AACv2(enhanced AAC+), AMR-NB, AMR-WB, MP3, FLAC, MIDI, PCM/WAVE, Vorbis, WAV a-law/mu-law, WAV linear PCM, WMA 10, WMA Lossless, WMA Pro LBR |
| Video codec H.263, H.264, MPEG-4, VC-1/WMV, VP8 | ||
| Encoder | Audio codec AAC LC/LTP, AMR-NB, AMR-WB | |
| Video codec H.263, H.264, MPEG-4 | ||
Camera
The camera app allows you to take pictures, record videos, and capture panoramic images using your ASUS Tablet.
To launch the Camera app, tap 📄 on the Home Screen then tap

NOTE: The taken pictures and recorded videos can be viewed using the Gallery app.
Taking pictures
From the camera screen, tap to take pictures.
Recording videos
From the camera screen, tap to record videos.
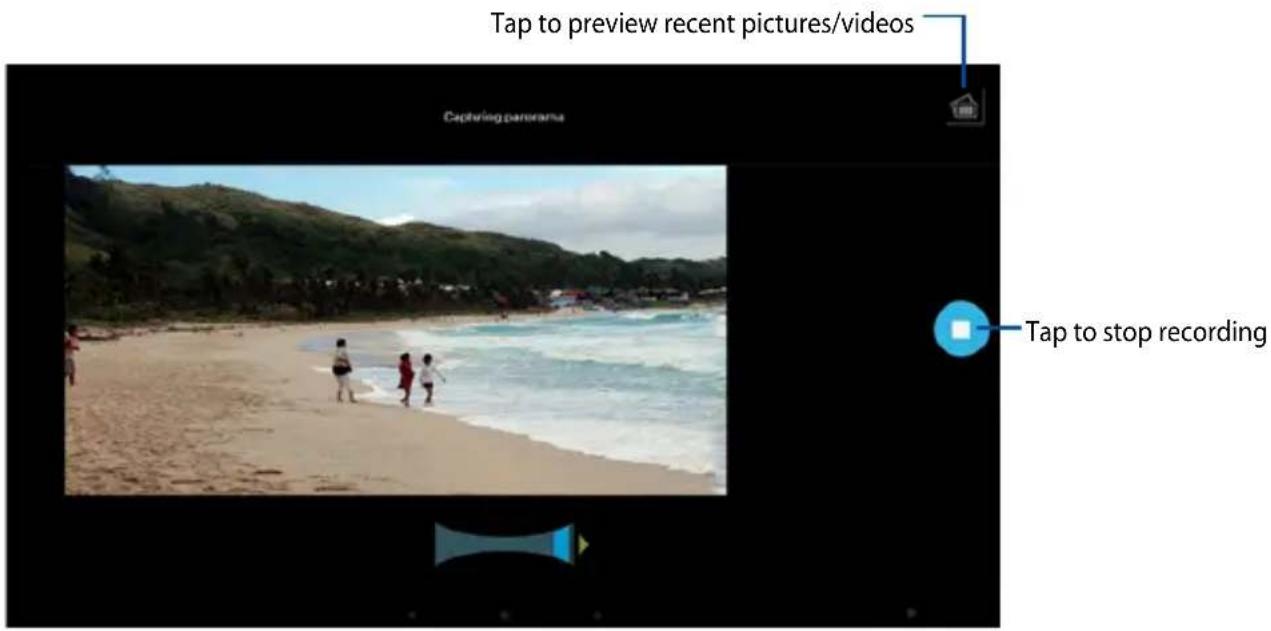
Capturing panoramas
From the camera screen, tap with the map to capture panoramas.
Configuring the camera settings
Adjust the camera settings of your ASUS Tablet to take or record high-definition pictures and videos.
Configuring the camera settings
To configure the camera settings:
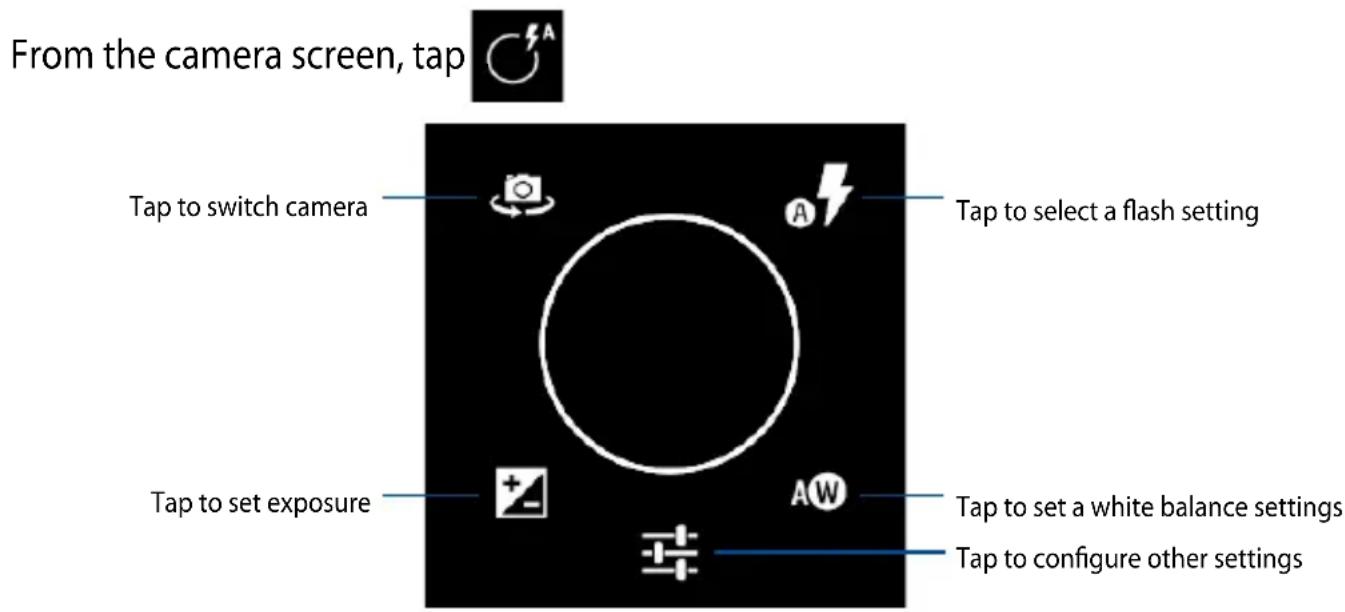
IMPORTANT! Apply the settings first before taking pictures or recording videos.
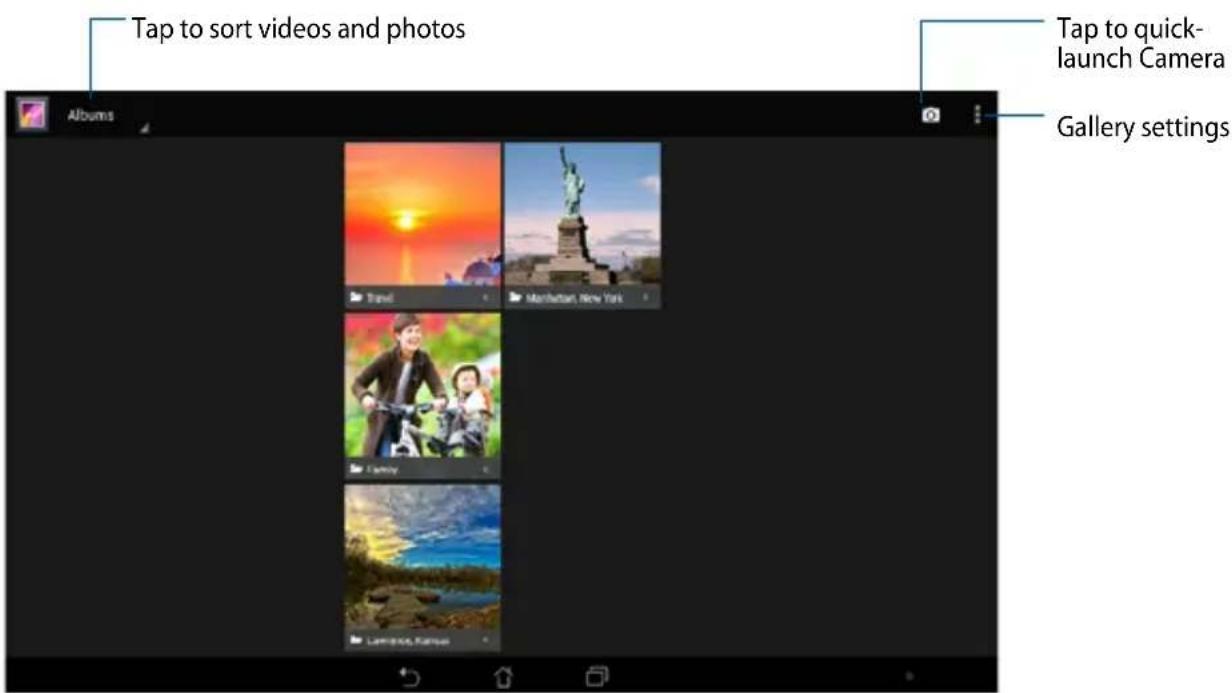
Gallery
View images and play videos on your ASUS Tablet using the Gallery app. This app also allows you to edit, share, or delete image and video files stored in your ASUS Tablet. From Gallery, you can display images in a slideshow or tap to view the selected image or video file.
To launch Gallery, tap on the Home Screen.
Gallery main screen
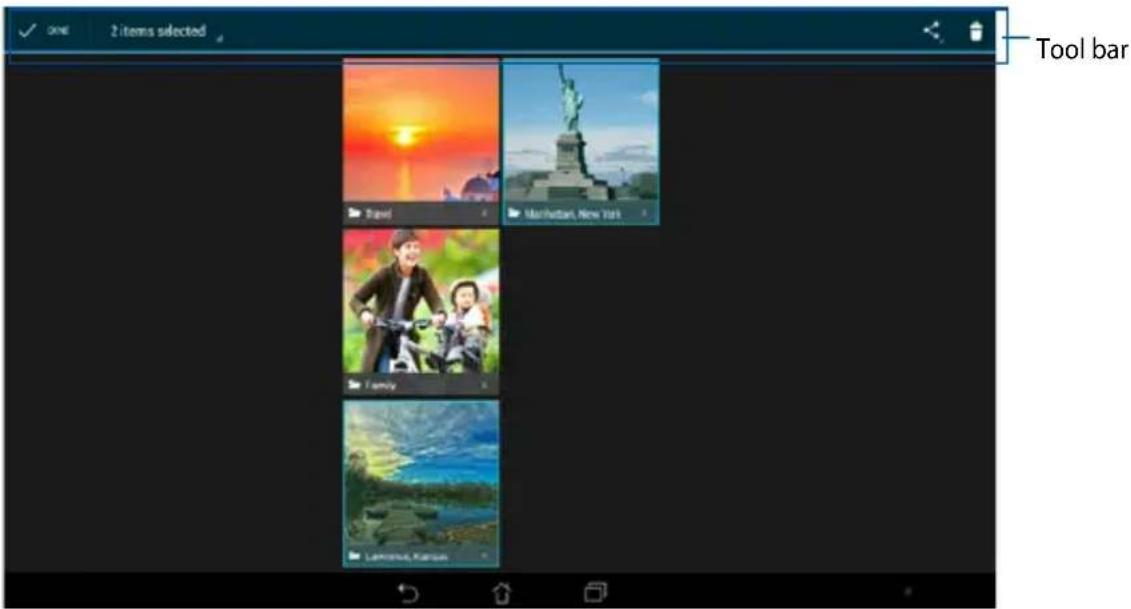
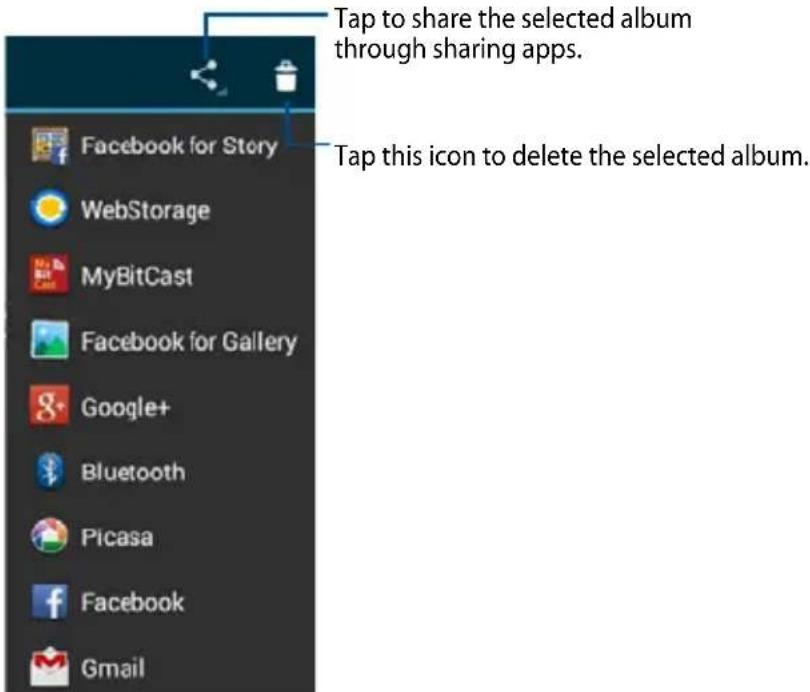
Sharing and deleting albums
To share the album, tap and hold an album until a tool bar appears on top of the screen. You can upload or share the selected albums online or delete them from your ASUS Tablet.
Sharing, editing and deleting images
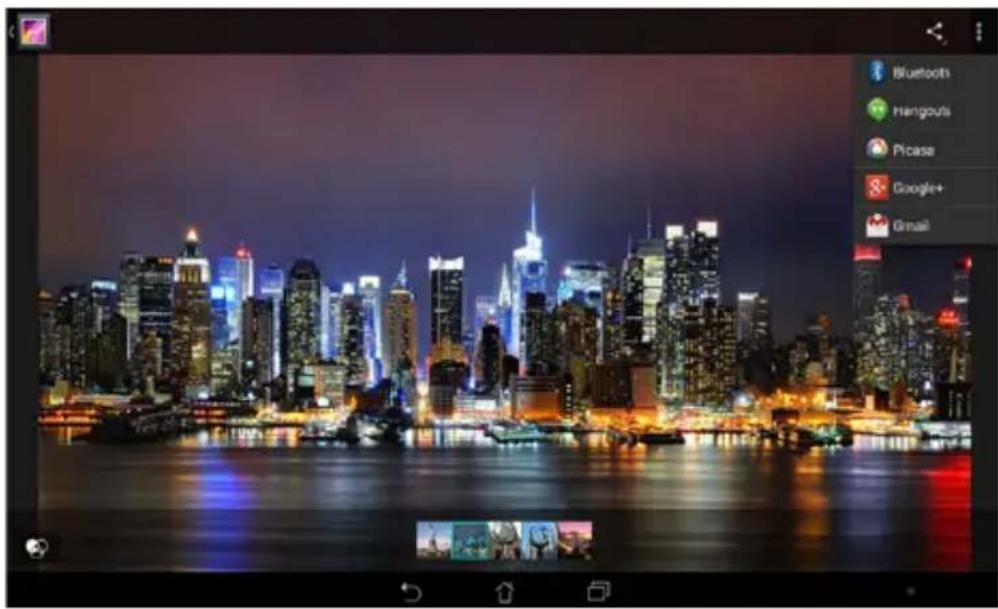
To share, edit or delete the image, tap to open the image then tap on the image to launch the tool bar on top of the screen.
Sharing images
To share the image:
-
From Gallery screen, open the album containing the image that you want to share.
-
Tap to select then tap and select from the list of sharing apps.
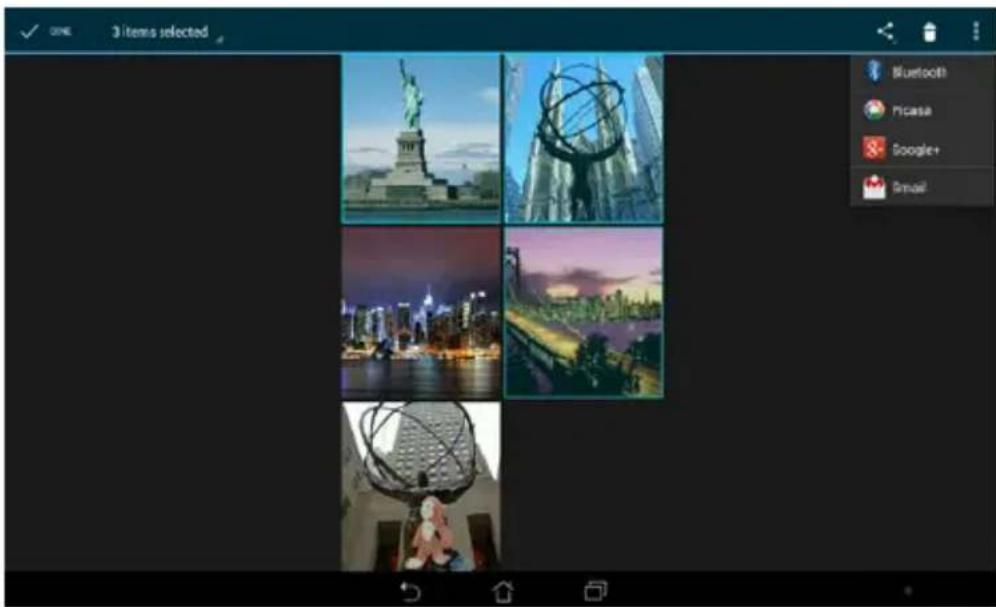
To share multiple images:
- From Gallery screen, open the album containing the images that you want to share.
- Tap and hold one image then tap the other images.
- Tap < then select from the list of sharing apps.
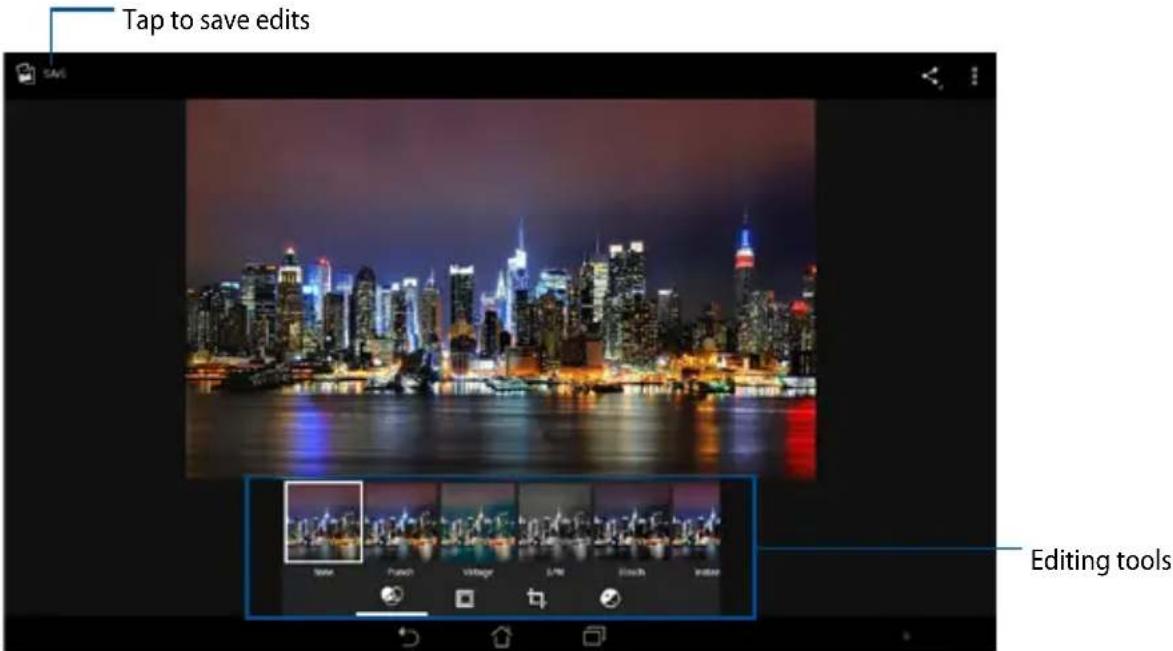
Editing an image
To edit the image:
- From Gallery screen, open the album containing the image that you want to edit.
- Tap the image to open then tap □ > Edit.
- Tap the editing tools to start editing.
Deleting images
To delete the image:
- From the Gallery screen, open the album containing the image that you want to delete.
- Tap the image to open then tap i > Delete.
- Tap OK.
To delete multiple images:
- From the Gallery screen, open the album containing the images that you want to delete.
- Tap and hold one image then tap the other images.
- Tap then tap OK.
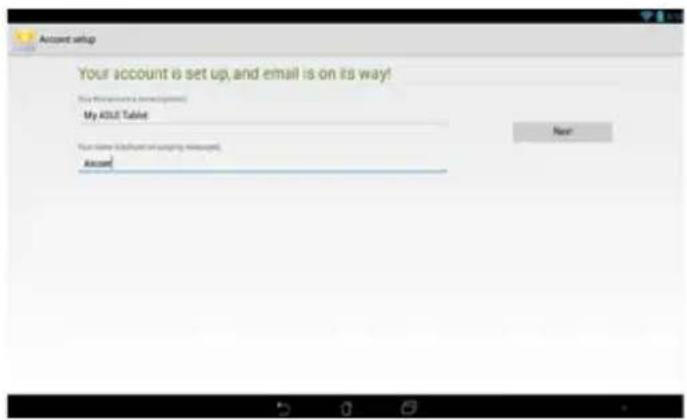
The Email app allows you to add POP3, IMAP, and Exchange accounts so you can receive, create, and browse e-mails right from your ASUS Tablet.
IMPORTANT! You must be connected to the Internet so you can add an e-mail account or send and receive e-mails from added accounts.
Setting up an e-mail account
To set up the e-mail account:
-
Tap on the Home Screen to launch the Email app.
-
From the Email app screen, key in your e-mail address and password then tap Next.
NOTE: Wait while your ASUS Tablet automatically checks your incoming and outgoing mail server settings.
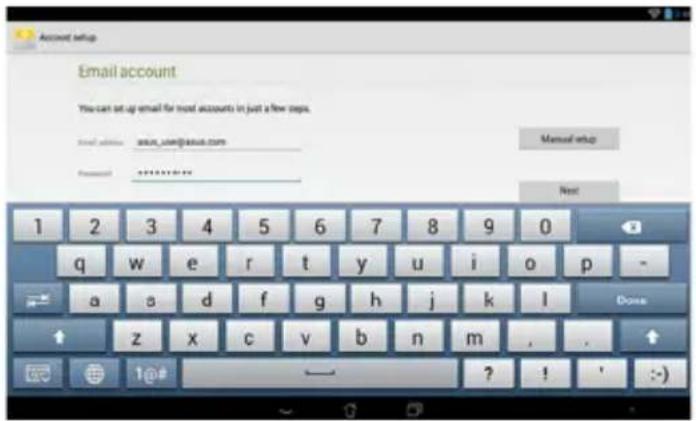
- Configure the Account settings and tap Next.
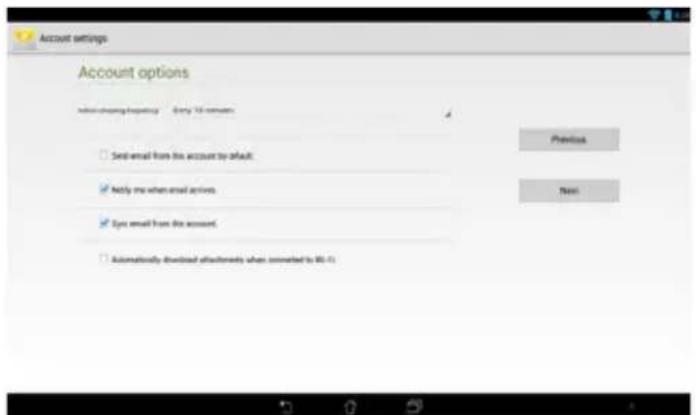
- Key in an account name that you want to be displayed in the outgoing messages, then tap Next to log into your inbox.
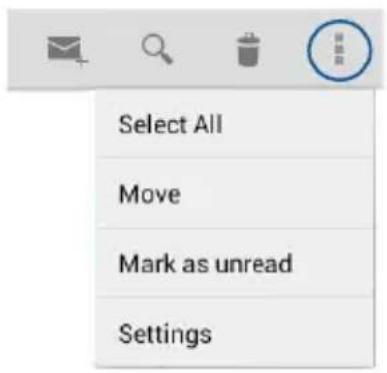
Adding e-mail accounts
To add e-mail accounts:
- Tap 📋 on the Home Screen to launch the Email app.
- Log-in using your account.
- Tap > Settings, then tap ADD ACCOUNT to add an e-mail account.
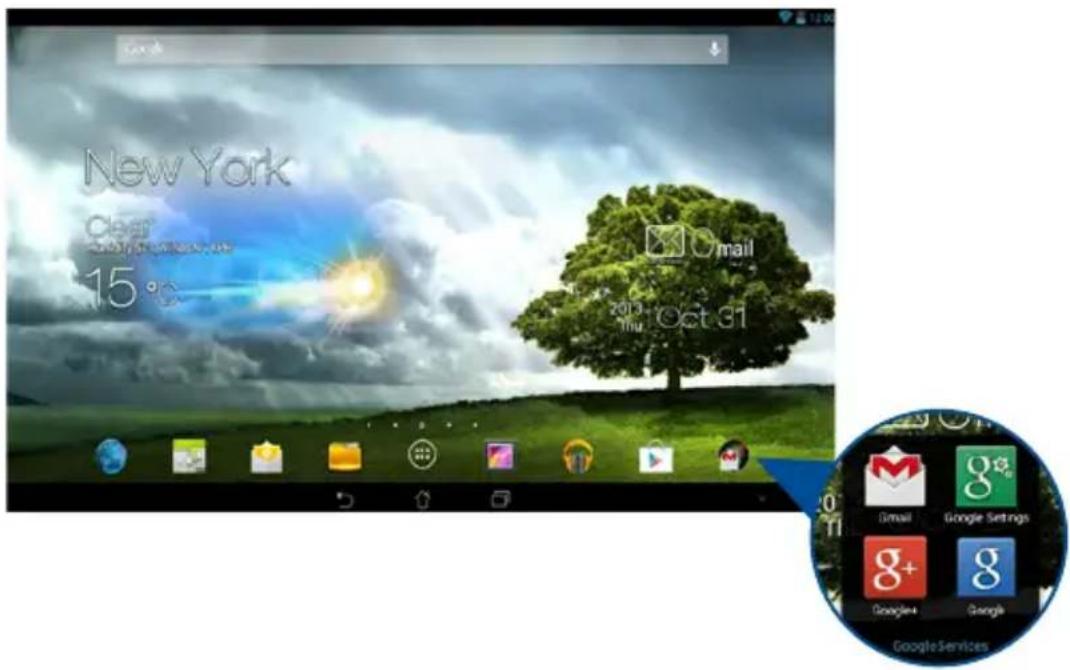
Gmail
Using the Gmail app, you can create a new Gmail account or synchronize your existing Gmail account so you can send, receive, and browse e-mails right from your ASUS Tablet. Enabling this app allows you to access other Google apps that may require a Google account, such as Play Store.
Setting up a Gmail account
To set up a Gmail account:
-
Tap Gmail on the Home Screen to launch Gmail.
-
Tap Existing and key in your existing Gmail account and password, then tap
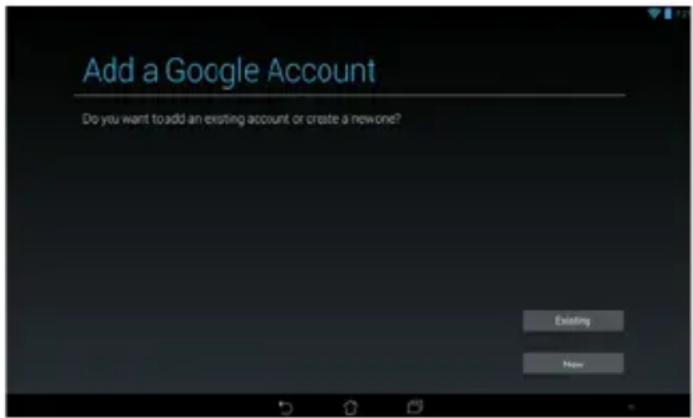
NOTES:
- Tap New if you do not own a Google account.
- When signing in, you have to wait while your ASUS Tablet communicates with Google servers to setup your account.
- Use your Google account to backup and restore your settings and data. Tap to sign in to your Gmail account.
IMPORTANT! If you have several e-mail accounts aside from Gmail, use Email app to set up and access all your e-mail accounts.
Play Store
Access lots of fun games and apps in the Play Store using your Google account.
IMPORTANT! You can only access Play Store by signing in to your Google account.
Accessing Play Store
- On the Home Screen, tap
-
If you already have an existing Google account, tap Existing and key in your e-mail account and password. If you do not have an account, tap New and follow the on-screen instructions to create an account.
-
After signing in, you can start downloading apps from Play Store and install them in your ASUS Tablet.
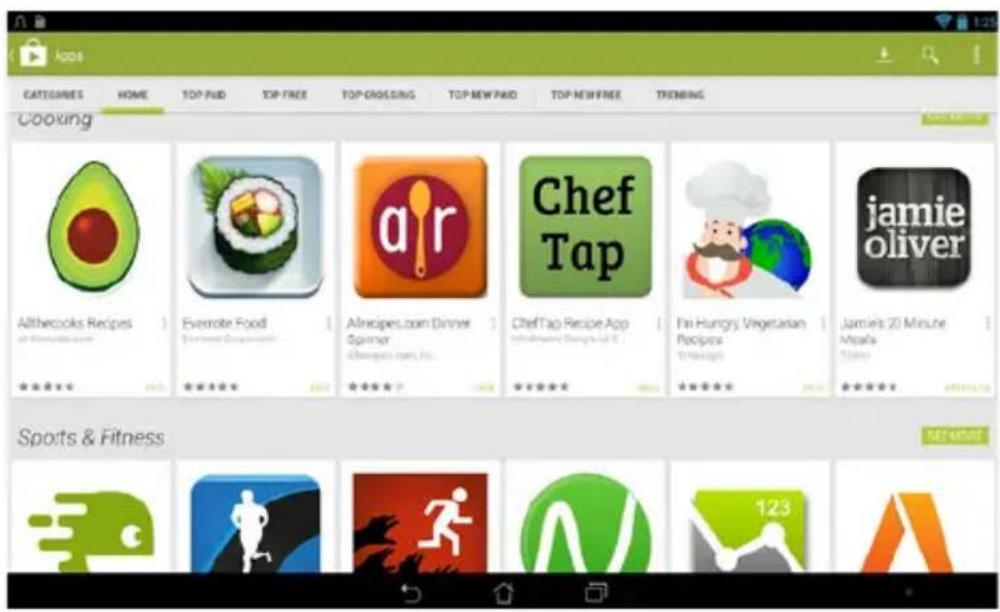
NOTE: Some apps are free and some might charge you through a credit card.
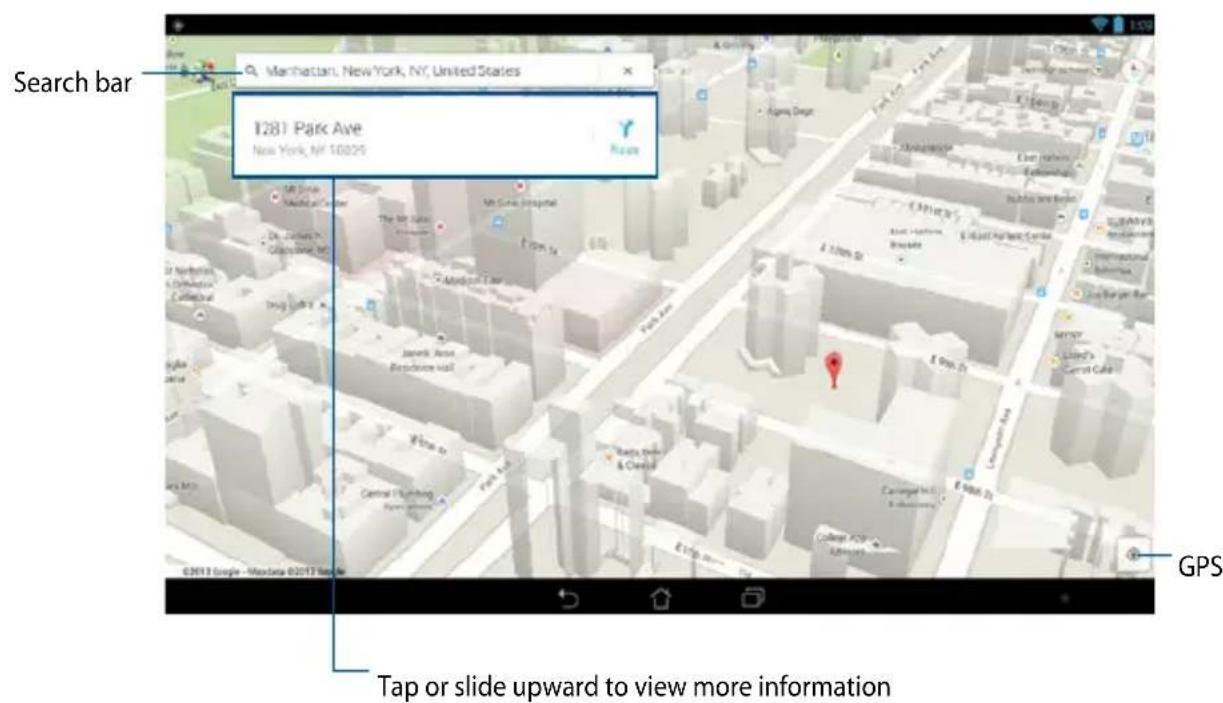
Maps
Google Maps allows you to view and find places, establishments and get directions. It also allows you to check your current location and share the information with others.
Using Google Maps
To use Google Maps:
-
Tap 🔵 to display the All apps screen, then tap Maps
-
Use the search bar on top of the screen to customize your search.
App Locker
App Locker is a security app that allows you to restrict and control access to selected apps and files.
Using App Locker
To use App Locker:
- On the Home Screen, tap
then tap - Tap Start, set up your password then tap OK.


Set the password
Create the password for App Locker.
New password:
...
Confirm new password:
...
Cancel
OK
App Locker screen
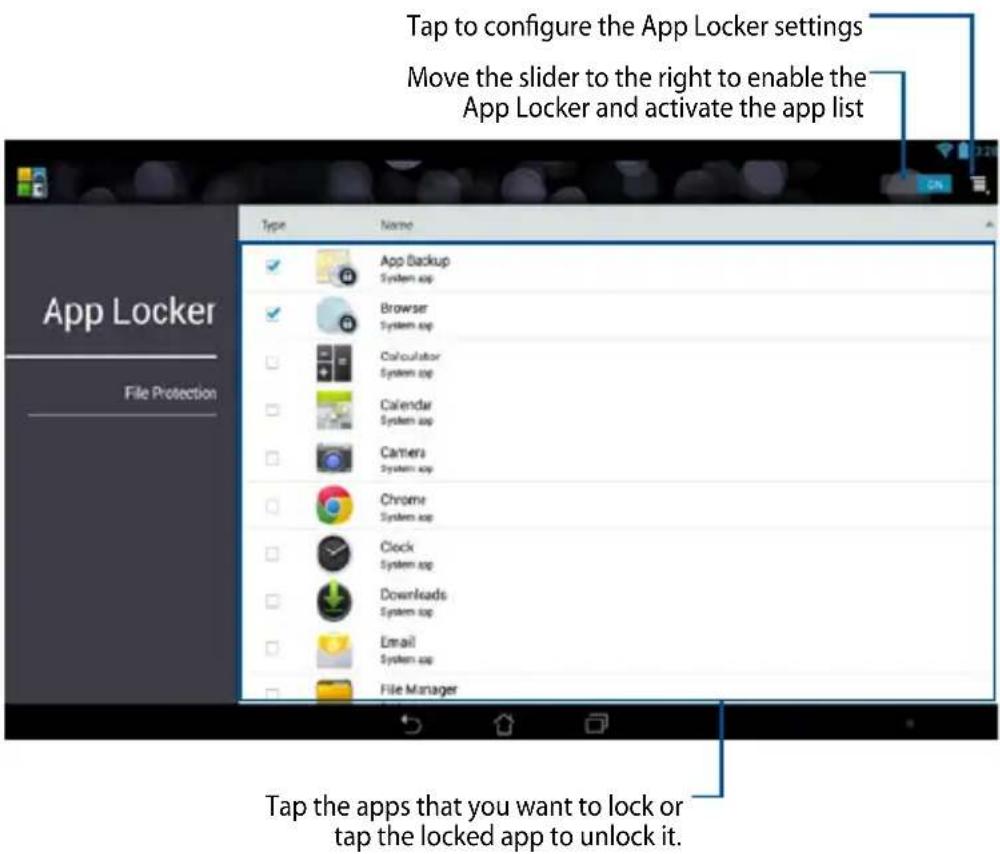
NOTES:
• The apps that you locked appear as locked icons on the Home Screen.
- App Locker prompts you to key in your password every time you launch a locked app.
File Protection screen
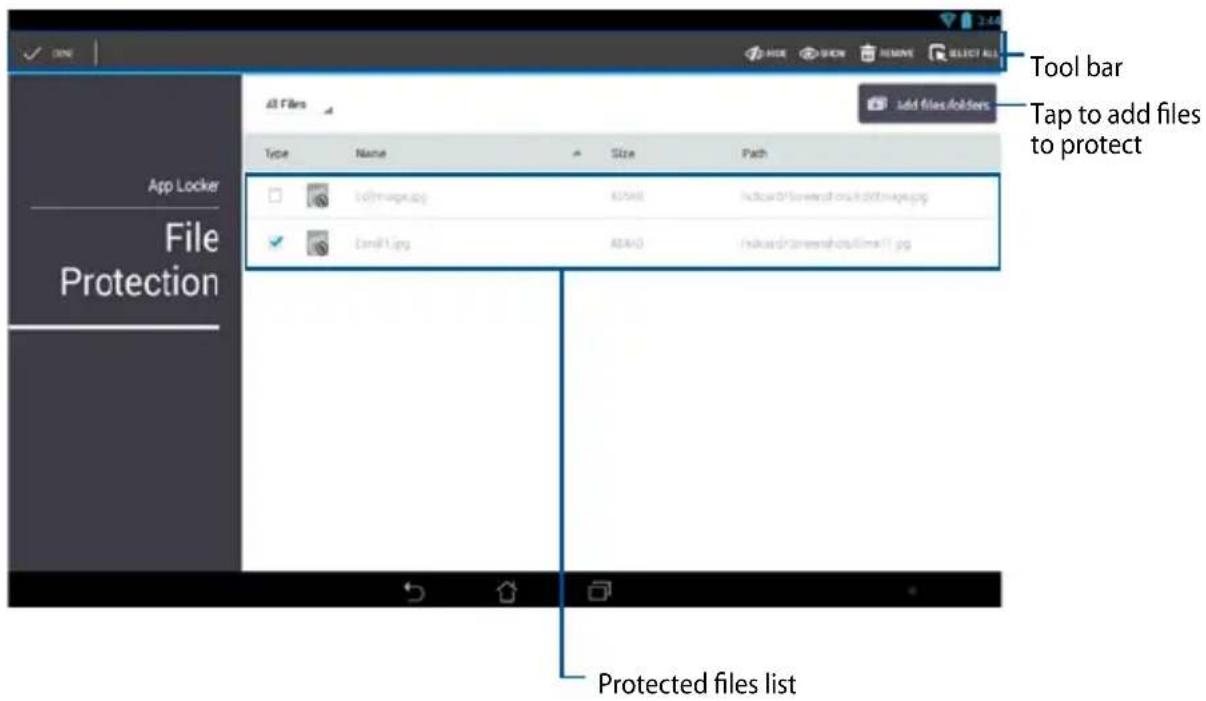
Using File Protection
To use File Protection:
- Tap File Protection then tap to open File Manager app.
- Tap to select the files that you want to protect, then tap APPLY. The files that you want to protect appear on the File Protection screen.
Widgets
Widgets are mini apps that allow you to conveniently access useful and fun applications on your ASUS Tablet's Home Screen.
To view widgets, tap 📄 the Home Screen then tap WIDGETS.
Displaying a widget on the Home Screen
From the Widgets screen, swipe your finger to the left or to the right to select a widget. Tap and hold the selected widget, then drag it to the Home Screen.
IMPORTANT!
- You may be prompted to perform additional tasks such as registration or activation before you can use a selected widget.
- If there is not enough space on the screen to place the widget, the widget will not be added to the screen.
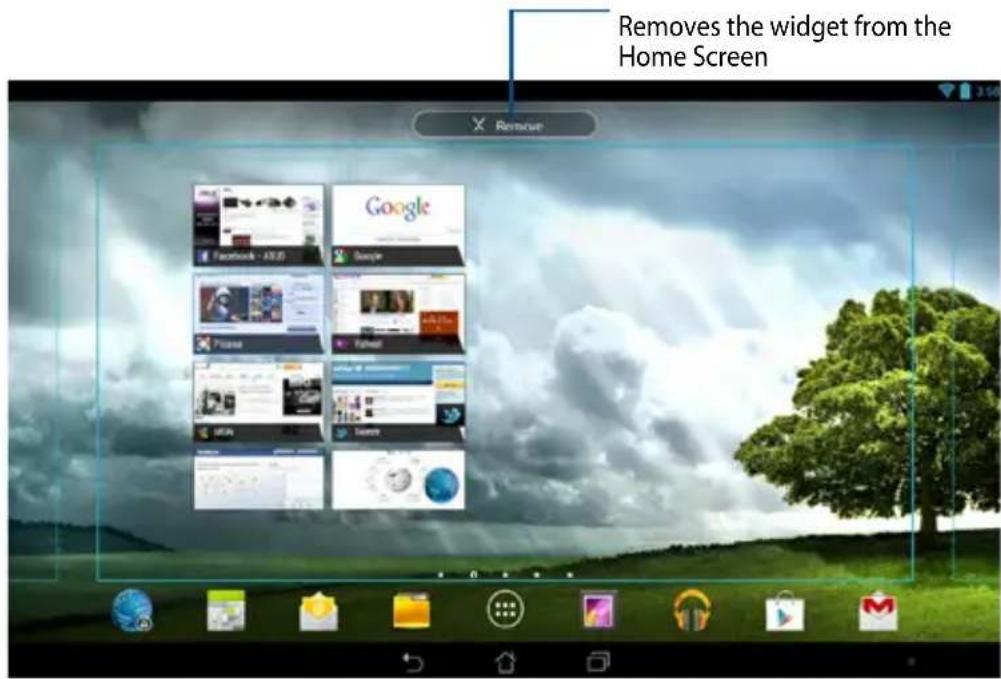
Removing a widget from the Home Screen
From the Home Screen, tap and hold the widget until X Remove appears. Without lifting your finger, drag the widget to X Remove to remove the widget from your Home Screen.
ASUS Battery
ASUS Battery is a special widget designed to show the battery status of your ASUS Tablet and its connected accessories by percentage and color.
To view ASUS Battery widget, tap 📄 the Home Screen then tap WIDGETS.
Displaying the ASUS Battery widget on the Home Screen
From the Widgets screen, swipe your finger to the left or to the right to look for ASUS Battery widget. Tap and hold the widget, then drag it to the Home Screen.
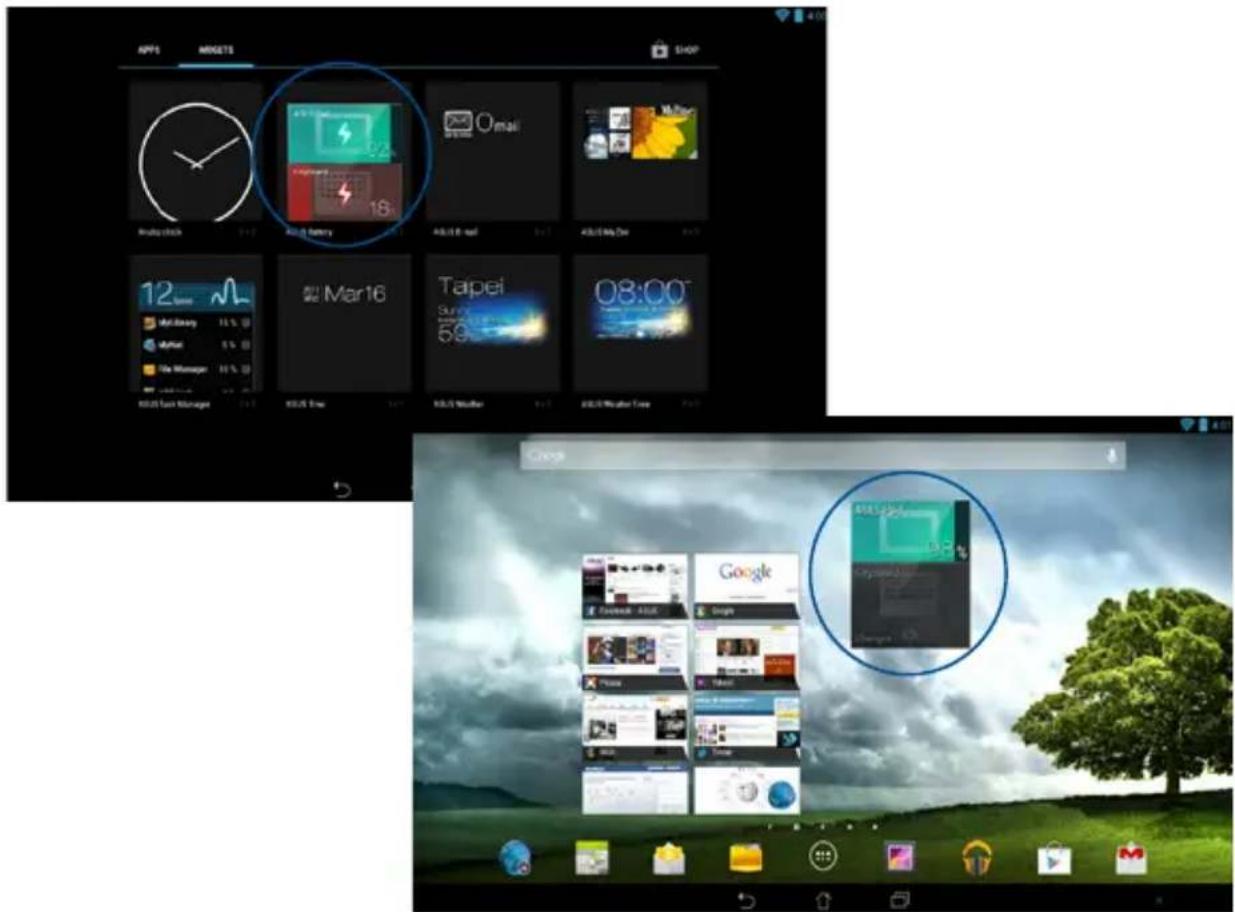
NOTE: You can also view your ASUS Tablet's battery status in ASUS Quick Setting and notification area. For more details, refer to sections ASUS Quick Setting panel and Notification panel.
Appendices
Federal Communications Commission Statement
This device complies with FCC Rules Part 15. Operation is subject to the following two conditions:
- This device may not cause harmful interference.
- This device must accept any interference received, including interference that may cause undesired operation.
This equipment has been tested and found to comply with the limits for a class B digital device, pursuant to Part 15 of the Federal Communications Commission (FCC) rules. These limits are designed to provide reasonable protection against harmful interference in a residential installation. This equipment generates, uses, and can radiate radio frequency energy and, if not installed and used in accordance with the instructions, may cause harmful interference to radio communications. However, there is no guarantee that interference will not occur in a particular installation. If this equipment causes harmful interference to radio or television reception, which can be determined by turning the equipment off and on, the user is encouraged to try to correct the interference by doing one or more of the following measures:
- Reorient or relocate the receiving antenna.
- Increase the separation between the equipment and receiver.
- Connect the equipment into an outlet on a circuit different from that to which the receiver is connected.
- Consult the dealer or an experienced radio/TV technician for help.
Changes or modifications not expressly approved by the party responsible for compliance could void the user's authority to operate the equipment.
The antenna(s) used for this transmitter must not be co-located or operating in conjunction with any other antenna or transmitter.
Operation on the 5.15-5.25 GHz frequency band is restricted for indoor use only. The FCC requires indoor use for the 5.15-5.25 GHz band to reduce the potential for harmful interference to co-channel Mobile Satellite Systems. It will only transmit on 5.25-5.35 GHz, 5.47-5.725 GHz and 5.725-5.850 GHz bands when associated with an access point (AP).
RF Exposure Information (SAR)
This device meets the government's requirements for exposure to radio waves. This device is designed and manufactured not to exceed the emission limits for exposure to radio frequency (RF) energy set by the Federal Communications Commission of the U.S. Government.
The exposure standard employs a unit of measurement known as the Specific Absorption Rate, or SAR. The SAR limit set by the FCC is 1.6 W/kg. Tests for SAR are conducted using standard operating positions accepted by the FCC with the EUT transmitting at the specified power level in different channels.
The highest SAR value for the device as reported to the FCC is 1.18 W/kg when placed next to the body.
The FCC has granted an Equipment Authorization for this device with all reported SAR levels evaluated as in compliance with the FCC RF exposure guidelines. SAR information on this device is on file with the FCC and can be found under the Display Grant section of www.fcc.gov/oet/ea/fccid after searching on FCC ID: MSQTF502T.
IC Warning Statement
The device could automatically discontinue transmission in case of absence of information to transmit, or operational failure. Note that this is not intended to prohibit transmission of control or signaling information or the use of repetitive codes where required by the technology.
The device for the band 5150-5250 MHz is only for indoor usage to reduce potential for harmful interference to co-channel mobile satellite systems; the maximum antenna gain permitted (for device in the bands 5250-5350 MHz and 5470-5725 MHz) to comply with the EIRP limit; and the maximum antenna gain permitted (for devices in the band 5275-5850 MHz) to comply with the EIRP limits specified for point-to-point and non point-to-point operation as appropriate, as stated in section A9.2(3). In addition, high-power radars are allocated as primary users (meaning they have priority) of the band 5250-5350 MHz and this radar could cause interference and/or damage to LE-LAN devices.
The Country Code Selection feature is disabled for products marketed in the US/Canada. For product available in the USA/Canada markets, only channel 1-11 can be operated. Selection of other channels is not possible.
EC Declaration of Conformity
This product is compliant with the regulations of the R&TTE Directive 1999/5/EC. The Declaration of Conformity can be downloaded from http://support.asus.com.
Power Safety Requirement
Products with electrical current ratings up to 6A and weighing more than 3Kg must use approved power cords greater than or equal to: H05VV-F, 3G, 0.75mm ^2 or H05VV-F, 2G, 0.75mm ^2 .
ASUS Recycling/Takeback Services
ASUS recycling and takeback programs come from our commitment to the highest standards for protecting our environment. We believe in providing solutions for you to be able to responsibly recycle our products, batteries, other components as well as the packaging materials. Please go to http://csr.asus.com/english/Takeback.htm for detailed recycling information in different regions.
Coating notice
IMPORTANT! To provide electrical insulation and maintain electrical safety, a coating is applied to insulate the device except on the areas where the I/O ports are located.
Green ASUS notice
ASUS is devoted to creating environment-friendly products and packaging to safeguard consumers' health while minimizing the impact on the environment. The reduction of the number of the manual pages complies with the reduction of carbon emission.
For the detailed user manual and related information, refer to the user manual included in the ASUS Tablet or visit the ASUS Support Site at http://support.asus.com/.
Regional notice for Singapore
Complies with IDA Standards DB103778
This ASUS product complies with IDA Standards.
Proper disposal
Risk of explosion if battery is replaced by an incorrect type. Dispose of used batteries according to the instructions.
DO NOT throw the battery in municipal waste. The symbol of the crossed out wheeled bin indicates that the battery should not be placed in municipal waste.
DO NOT throw the ASUS Tablet in municipal waste. This product has been designed to enable proper reuse of parts and recycling. The symbol of the crossed out wheeled bin indicates that the product (electrical, electronic equipment and mercury-containing button cell battery) should not be placed in municipal waste. Check local regulations for disposal of electronic products.
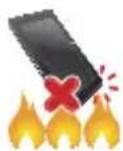
DO NOT throw the ASUS Tablet in fire. DO NOT short circuit the contacts. DO NOT disassemble the ASUS Tablet.
Model name: TF502T
| Manufacturer: ASUSTeK Computer Inc. | |
| Address: 4F, No.150, LI-TE RD., PEITOU, TAIPEI 112, TAIWAN | |
| Authorised represe ntative in Europe: | ASUS Computer GmbH |
| Address: HARKORT STR. 21-23, 40880 RATINGEN, GERMANY | |

support.asus.com
BC


HIGH-DEFINITION MULTIMEDIA INTERFACE
- IN SEARCH OF INCREDIBLE
- E8672
- First Edition
- December 2013
- COPYRIGHT INFORMATION
- LIMITATION OF LIABILITY
- SERVICE AND SUPPORT
- Contents
- Chapter 1: Hardware Setup
- Chapter 2: Using your ASUS Tablet
- Chapter 3: Working with Android™
- Chapter 4: Pre-installed Apps
- Featured pre-installed apps ....60
- Appendices
- About this manual
- Conventions used in this manual
- Typography
- Safety Precautions
- Charging your device
- Using your ASUS Tablet
- Airplane Precautions
- Package contents
- NOTES:
- Chapter 1:
- Hardware Setup
- Getting to know your ASUS Tablet
- Front view
- Ambient light sensor
- Front camera
- Camera indicator
- Touch screen panel
- Dock port
- Rear view
- Speaker/Headset port
- Volume button
- Built-in NFC (Near Field Communication) tag
- Audio speakers
- Microphone
- Rear camera
- Camera LED flash
- Power button
- IMPORTANT!
- Battery charge indicator
- Color Status
- Manual reset hole
- Speaker/Headset port
- Micro HDMI port
- MicroSD card slot
- Mobile dock latch
- Hinge holes
- Chapter 2:
- Setting up your ASUS Tablet
- Charging your ASUS Tablet
- Turning your ASUS Tablet on
- Gestures for the ASUS Tablet
- Drag/Tap and hold/Long press
- Tap/touch
- Zoom out
- Zoom in
- Swipe
- Connecting an HDMI display
- Using the ASUS mobile dock Getting to know your ASUS mobile dock
- Hinge
- Keyboard
- Touchpad
- Latch hooks
- Dock connector
- Touchpad indicator
- Left view
- USB Dock port
- Battery charge indicator
- Right view
- USB 2.0 Port
- Docking your ASUS Tablet
- Charging your ASUS Tablet on the ASUS mobile dock
- Function keys
- Using the Touchpad
- Finger slide
- Tap/Double tap
- Drag and drop
- Two-finger scroll (up/down)
- Two-finger scroll (left/right)
- Two-finger tap and hold
- Undocking your ASUS Tablet
- Chapter 3:
- Working with Android™
- Starting up for the first time
- Android™ lock screen
- Unlocking your device
- Adding a wallpaper on the lock screen
- Adding a widget on the lock screen
- Entering Google Now
- Google Now
- Home Screen
- Screen views
- Landscape view
- Portrait view
- Locking the screen orientation
- Connecting to the world
- Connecting to Wi-Fi networks
- Using Bluetooth
- Enabling or disabling Bluetooth in your device
- Pairing your ASUS Tablet with a Bluetooth device
- Connecting your ASUS Tablet to a Bluetooth device
- Unpairing and configuring a Bluetooth device
- Managing Apps
- Creating app shortcuts
- Removing an app from the Home Screen
- Viewing app info
- Creating app folder
- Viewing apps under the Recents screen
- Task Manager
- File Manager
- Accessing the internal storage
- Accessing the external storage device
- Customizing your contents
- Settings
- ASUS Quick Setting panel
- Notification panel
- Turning your ASUS Tablet off
- Putting your ASUS Tablet to sleep
- Chapter 4:
- Pre-installed Apps
- Featured pre-installed apps
- Play Music
- Camera
- Taking pictures
- Recording videos
- Capturing panoramas
- Configuring the camera settings
- Gallery
- Gallery main screen
- Sharing and deleting albums
- Sharing, editing and deleting images
- Sharing images
- Editing an image
- To edit the image:
- Deleting images
- To delete the image:
- To delete multiple images:
- Setting up an e-mail account
- Adding e-mail accounts
- Gmail
- Setting up a Gmail account
- Play Store
- Accessing Play Store
- Maps
- Using Google Maps
- App Locker
- Using App Locker
- Set the password
- App Locker screen
- File Protection screen
- Using File Protection
- Widgets
- Displaying a widget on the Home Screen
- Removing a widget from the Home Screen
- ASUS Battery
- Displaying the ASUS Battery widget on the Home Screen
- Federal Communications Commission Statement
- RF Exposure Information (SAR)
- IC Warning Statement
- EC Declaration of Conformity
- Power Safety Requirement
- ASUS Recycling/Takeback Services
- Coating notice
- Green ASUS notice
- Regional notice for Singapore
- Proper disposal
- Risk of explosion if battery is replaced by an incorrect type. Dispose of used batteries according to the instructions.
Brand : ASUS
Model : Transformer Pad TF502T
Category : Tablet