TS-774 - Microphone TOA - Free user manual and instructions
Find the device manual for free TS-774 TOA in PDF.

| Product Type | Gooseneck Condenser Microphone |
| Brand | TOA |
| Model | TS-774 |
| Dimensions | 400 mm (arm length) x 19 mm (diameter) |
| Weight | Approx. 150 g |
| Power Supply | 9 V battery (6F22) or 24–48 V phantom power |
| Polar Pattern | Unidirectional (cardioid) |
| Frequency Response | 100–15,000 Hz |
| Sensitivity | -72 dB ± 3 dB (1 kHz, 0 dB = 1 V/Pa) |
| Impedance | 600 Ω unbalanced |
| Cable Length | 1.5 m (integrated) |
| Connector | 3.5 mm mono mini jack (sometimes with XLR adapter) |
| Material | Metal gooseneck, plastic base |
| Operating Voltage | 9 V (battery) or 24–48 V (phantom) |
| Battery Life | Approx. 300 hours continuous use (with 9 V alkaline) |
| Application | Paging, public address, conference, lectures |
| Mounting | Desk stand or podium mount (with included base) |
| Color | Black (standard) |
| Accessories Included | Microphone, base, battery (if applicable), quick guide |
| Cleaning Instructions | Wipe with a soft, dry cloth; avoid liquids; do not use solvents |
| Storage Conditions | Temperature: -10°C to +50°C; relative humidity: <90% |
| Safety Precautions | Keep away from moisture; do not drop; if battery leaks, remove promptly |
| Repairability | Replacement parts available through TOA service centers |
Frequently Asked Questions - TS-774 TOA
User questions about TS-774 TOA
0 question about this device. Answer the ones you know or ask your own.
Ask a new question about this device
Download the instructions for your Microphone in PDF format for free! Find your manual TS-774 - TOA and take your electronic device back in hand. On this page are published all the documents necessary for the use of your device. TS-774 by TOA.
USER MANUAL TS-774 TOA
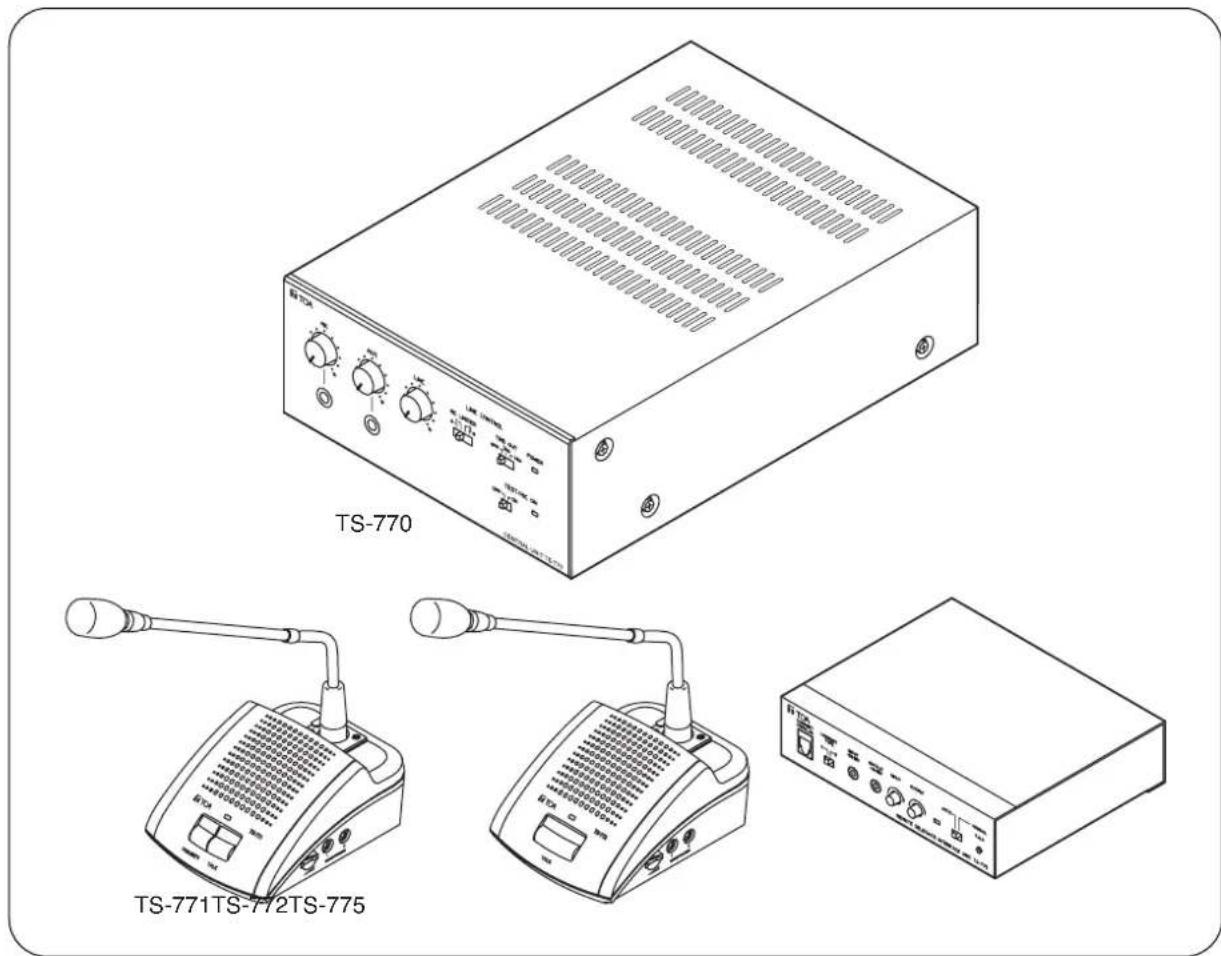
CONFERENCE SYSTEM TS-770 SERIES
TS-770 (CENTRAL UNIT)
TS-775 (REMOTE DELEGATE INTERFACE UNIT)
TS-771 (CHAIRMAN UNIT)
YR-770-2M (2 m EXTENSION CORD)
TS-772 (DELEGATE UNIT)
YR-770-10M (10 m EXTENSION CORD)
TS-773 (MICROPHONE)
TS-774 (MICROPHONE)
text_image
TS-770 TS-771TS-772TS-775Thank you for purchasing TOA's Conference system.
Please carefully follow the instructions in this manual to ensure long, trouble-free use of your equipment.
TABLE OF CONTENTS
- IMPORTANT SAFETY INSTRUCTIONS ...... 3
- SAFETY PRECAUTIONS .... 4
- GENERAL DESCRIPTION ...... 6
- FEATURES ...... 6
- NOMENCLATURE AND FUNCTIONS
5.1.TS-770 Central Unit 7
5.2. TS-771 Chairman Unit and TS-772 Delegate Unit 9
5.3.TS-775 Remote Delegate Interface Unit 11
- OPERATING CHAIRMAN AND DELEGATE UNITS
6.1. Making Speech 12
6.2. Making Priority Speech (Chairman Unit TS-771 Only) 13
- HOLDING REMOTE CONFERENCES
7.1. Remote Conference Procedures ...... 14
7.2. Speech Operation When the Remote Delegate Interface Unit Is Set to AUTO Mode 14
7.3. Speech Operation When the Remote Delegate Interface Unit Is Set to MANUAL Mode 15
7.4. Setting Examples ...... 15
- FUNCTION SETTINGS
8.1. Speaker Restriction Function
8.1.1. Setting procedure .... 16
8.1.2. Restricted number of simultaneously operable Delegate units and each conference unit's operation 16
8.2. Automatic Mic-Off Function 17
8.3 All Mic-On Function 17
- RECORDING
9.1. Recording with the Central Unit 18
9.2. Recording with the Chairman Unit or Delegate Unit 18
- INSTALLATION AND CONNECTION
10.1. Connection Example ...... 19
10.2. Installation Procedures ...... 20
10.3. Basic System Installation and Adjustment
10.3.1. Connecting the Chairman and Delegate units to the Central unit ..... 21
10.3.2. Setting functions and adjusting Chairman and Delegate units sound output volume 23
- IF USING MULTIPLE CENTRAL UNITS: 25
- WHEN HOLDING REMOTE CONFERENCES: 26
- BLOCK DIAGRAMS
13.1.TS-770 Central Unit 29
13.2.TS-771 Chairman Unit 29
13.3.TS-772 Delegate Unit 30
13.4. TS-775 Remote Delegate Interface Unit 30
- SPECIFICATIONS
14.1.TS-770 Central Unit 31
14.2. TS-771 Chairman Unit and TS-772 Delegate Unit 31
14.3. TS-773 and TS-774 Microphones 32
14.4. TS-775 Remote Delegate Interface Unit 32
14.5. YR-770-2M 2 m Extension Cord and YR-770-10M 10 m Extension Cord ..... 32
1. IMPORTANT SAFETY INSTRUCTIONS
- Read these instructions.
- Keep these instructions.
- Heed all warnings.
- Follow all instructions.
- Do not use this apparatus near water.
- Clean only with dry cloth.
- Do not block any ventilation openings. Install in accordance with the manufacturer's instructions.
- Do not install near any heat sources such as radiators, heat registers, stoves, or other apparatus (including amplifiers) that produce heat.
- Do not defeat the safety purpose of the polarized or grounding-type plug. A polarized plug has two blades with one wider than the other. A grounding type plug has two blades and a third grounding prong. The wide blade or the third prong is provided for your safety. If the provided plug does not fit into your outlet, consult an electrician for replacement of the obsolete outlet.
- Protect the power cord from being walked on or pinched particularly at plugs, convenience receptacles, and the point where they exit from the apparatus.
- Only use attachments/accessories specified by the manufacturer.
- Use only with the cart, stand, tripod, bracket, or table specified by the manufacturer, or sold with the apparatus. When a cart is used, use caution when moving the cart/apparatus combination to avoid injury from tip-over.

- Unplug this apparatus during lightning storms or when unused for long periods of time.
- Refer all servicing to qualified service personnel. Servicing is required when the apparatus has been damaged in any way, such as power-supply cord or plug is damaged, liquid has been spilled or objects have fallen into the apparatus, the apparatus has been exposed to rain or moisture, does not operate normally, or has been dropped.
2. SAFETY PRECAUTIONS
- Before installation or use, be sure to carefully read all the instructions in this section for correct and safe operation.
- Be sure to follow all the precautionary instructions in this section, which contain important warnings and/or cautions regarding safety.
• After reading, keep this manual handy for future reference.
Safety Symbol and Message Conventions
Safety symbols and messages described below are used in this manual to prevent bodily injury and property damage which could result from mishandling. Before operating your product, read this manual first and understand the safety symbols and messages so you are thoroughly aware of the potential safety hazards.

WARNING
Indicates a potentially hazardous situation which, if mishandled, could result in death or serious personal injury.

CAUTION
Indicates a potentially hazardous situation which, if mishandled, could result in moderate or minor personal injury, and/or property damage.

WARNING
When Installing the Unit
- Do not expose the unit to rain or an environment where it may be splashed by water or other liquids, as doing so may result in fire or electric shock.
- Use the unit only with the voltage specified on the unit. Using a voltage higher than that which is specified may result in fire or electric shock. (TS-770 only)
- Do not cut, kink, otherwise damage nor modify the power supply cord. In addition, avoid using the power cord in close proximity to heaters, and never place heavy objects -- including the unit itself -- on the power cord, as doing so may result in fire or electric shock. (TS-770 only)
- Avoid installing or mounting the unit in unstable locations, such as on a rickety table or a slanted surface. Doing so may result in the unit falling down and causing personal injury and/or property damage.
- Since the unit is designed for in-door use, do not install it outdoors. If installed outdoors, the aging of parts causes the unit to fall off, resulting in personal injury. Also, when it gets wet with rain, there is a danger of electric shock.
When the Unit is in Use
- Should the following irregularity be found during use, immediately switch off the power, disconnect the power supply plug from the AC outlet and contact your nearest TOA dealer. Make no further attempt to operate the unit in this condition as this may cause fire or electric shock.
- If you detect smoke or a strange smell coming from the unit.
- If water or any metallic object gets into the unit
· If the unit falls, or the unit case breaks - If the power supply cord is damaged (exposure of the core, disconnection, etc.) (TS-770 only)
· If it is malfunctioning (no tone sounds.)
- To prevent a fire or electric shock, never open nor remove the unit case as there are high voltage components inside the unit. Refer all servicing to qualified service personnel.
- Do not place cups, bowls, or other containers of liquid or metallic objects on top of the unit. If they accidentally spill into the unit, this may cause a fire or electric shock.
- Do not insert nor drop metallic objects or flammable materials in the ventilation slots of the unit's cover as this may result in fire or electric shock.
- Do not touch a power supply plug during thunder and lightning, as this may result in electric shock. (TS-770 only)
- The apparatus shall be connected to a mains socket outlet with a protective earthing connection. (TS-770 only)
- The socket-outlet shall be installed near the equipment and the plug (disconnecting device) shall be easily accessible. (TS-770 only)

CAUTION
When Installing the Unit
- Never plug in nor remove the power supply plug with wet hands, as doing so may cause electric shock. (TS-770 only)
- When unplugging the power supply cord, be sure to grasp the power supply plug; never pull on the cord itself. Operating the unit with a damaged power supply cord may cause a fire or electric shock. (TS-770 only)
- When moving the unit, be sure to remove its power supply cord from the wall outlet. Moving the unit with the power cord connected to the outlet may cause damage to the power cord, resulting in fire or electric shock. When removing the power cord, be sure to hold its plug to pull. (TS-770 only)
- Do not block the ventilation slots in the unit's cover. Doing so may cause heat to build up inside the unit and result in fire. Also, periodically clean the ventilation slots of dust. (TS-770 only)
- Avoid installing the unit in humid or dusty locations, in locations exposed to the direct sunlight, near the heaters, or in locations generating sooty smoke or steam as doing otherwise may result in fire or electric shock.
When the Unit is in Use
- Contact your TOA dealer as to the cleaning. If dust is allowed to accumulate in the unit over a long period of time, a fire or damage to the unit may result. (TS-770 only)
- If dust accumulates on the power supply plug or in the wall AC outlet, a fire may result. Clean it periodically. In addition, insert the plug in the wall outlet securely. (TS-770 only)
- Switch off the power, and unplug the power supply plug from the AC outlet for safety purposes when cleaning or leaving the unit unused for 10 days or more. Doing otherwise may cause a fire or electric shock. (TS-770 only)
The lighting flash with arrowhead symbol, within an equilateral triangle, is intended to alert the user to the presence of uninsulated "dangerous voltage" within the product's enclosure that may be of sufficient magnitude to constitute a risk of electric shock to persons.

The exclamation point within an equilateral triangle is intended to alert the user to the presence of important operation and maintenance (servicing) instruction in the literature accompanying the appliance.
3. GENERAL DESCRIPTION
The TS-770 Series conference system is designed for quick and easy installation and storage.
The system can be installed by merely connecting conference units* to the TS-770 Central unit.
The use of the Remote Delegate Interface unit permits a party in remote location to participate in the conference.
* Collective name of the following 3 models: TS-771 Chairman Unit, TS-772 Delegate Unit, and TS-775 Remote Delegate Interface Unit.
4. FEATURES
- Conference speech can be amplified by simply connecting the Chairman and Delegate units to the Central unit.
- Connecting the Remote Delegate Interface unit to the system allows conferences to be held between remote locations via telephone lines or PCs.
- Up to 70 conference units can be connected per Central unit. (35 units per line x 2 lines.)
- Up to 3 Central units and up to 210 conference units can be connected per system.
- Optional 2-meter and 10-meter extension cables allow wiring suitable to local installation conditions.
- Either the TS-773 or TS-774 Microphone can be used with the TS-771 Chairman unit and the TS-772 Delegate unit.
- Because the microphone for both the Chairman and Delegate units is detachable, both units can be stored without taking up much space.
- Test function allows easy confirmation of connections between conference units.
- The number of simultaneously operable Delegate units can be limited using the Speaker Restriction function. (Can be set to 0, 1, 3 or 6 units.)
- Even if the speaker forgets to turn off his or her microphone after speech completion, the Automatic Mic-Off function automatically switches off the microphone after a preset interval elapses. (Can be set to OFF, 20 or 40 seconds.)
- Conference contents can be recorded using a recording equipment.
- All Mic-On function allows conferences to be held without requiring talk key operation. (A dedicated function for conference recording.)
5. NOMENCLATURE AND FUNCTIONS
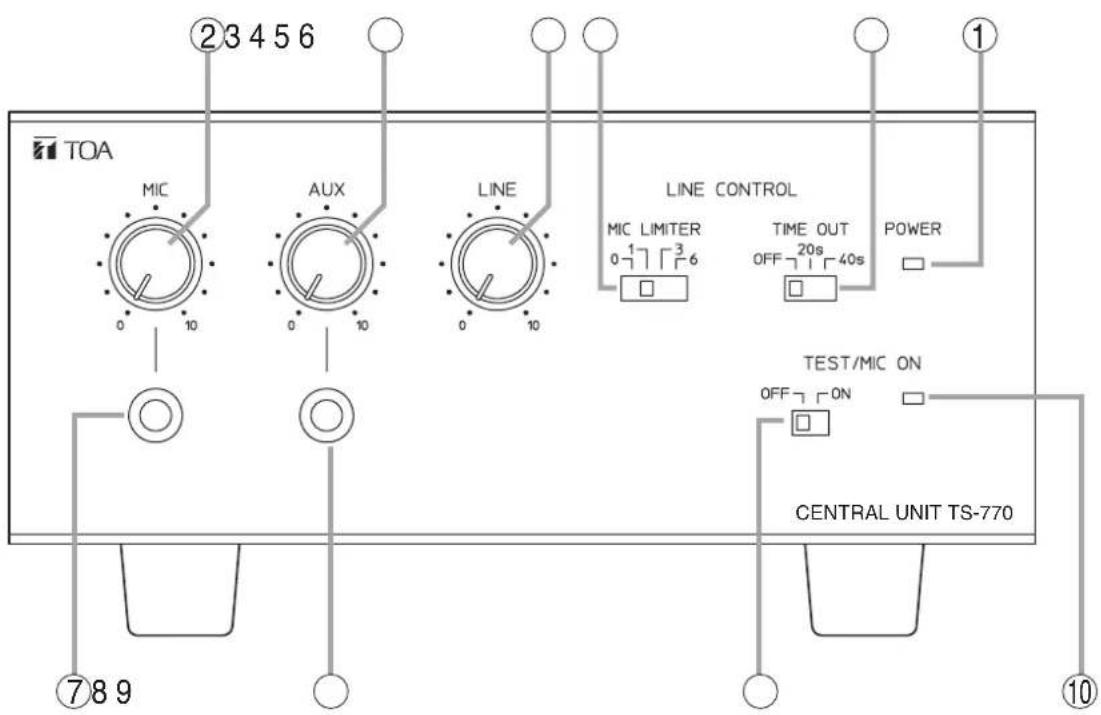
5.1. TS-770 Central Unit
[Front]
text_image
TOA ②3456 MIC AUX LINE LINE CONTROL MIC LIMITER 0 1 2 3 4 5 6 TIME OUT OFF 20s 40s POWER TEST/MIC ON OFF 7 ON CENTRAL UNIT TS-770 ⑦89 ⑩1. Power indicator [POWER]
Lights when the power switch (11) on the rear panel is set to the ON position.
2. Microphone volume control [MIC]
Adjusts the volume of the microphone connected to the microphone input jack (7).
3. AUX volume control [AUX]
Adjusts the volume of equipment connected to AUX input jack (8).
4. Line volume control [LINE]
Adjusts the volume of the conference unit's built-in speaker.
5. Speaker restriction switch [MIC LIMITER]
Sets the number of delegate units that can be used simultaneously.
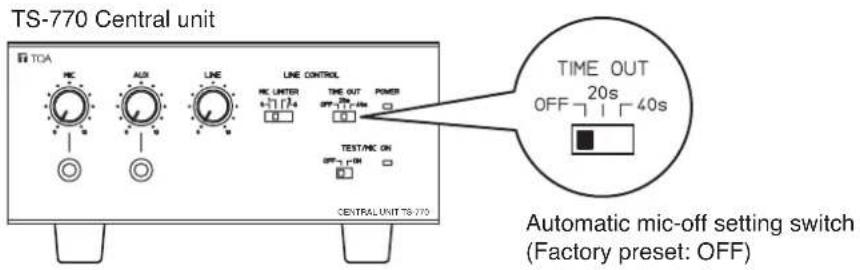
6. Automatic mic-off setting switch [TIME OUT]
It is possible to set the conference unit's microphone to be automatically turned off after speech completion.
7. Mic input jack [MIC]
Connects to a microphone. (600 Ω, -60 dB*, unbalanced)
8. AUX input jack [AUX]
Connects to a CD or cassette deck. (10 kΩ, -20 dB*, unbalanced)
9. Test/All Mic-On Switch [TEST/MIC ON]
Setting this switch to the ON position turns on the microphones of all conference units. This switch is intended for testing purposes during installation, as well as for open conferences in which speech can be made freely from any conference unit.
10. Test/All Mic-On Indicator
Lights when the Test/All Mic-On switch is set to the ON position.
$$ ^ {*} 0 \mathrm{dB} = 1 \mathrm{V} $$
[Rear]
![TOA TS-774 - [Rear] - 1](/content/2026/05/1054031/images/664f30f5c9efc5bc65d1561ed81ad24b67a54fede46be840eaec9362fb40e0a5.jpg)
text_image
⑫13 14 15 16 17 IN OUT CTRL LINE 1 LINE 2 REC OUT EXT1 EXT2 (EXPANSION) MAIN POWER ON OFF EQUALIZER IN OFF ON OUT ⑪18 19 20 2111. Power switch [POWER]
Power is switched on and off with each depression of this switch.
12. Expansion Switch [EXPANSION/MAIN]
Used when expanding the Central unit. (Equipped with a lock mechanism.) Set this switch to the EXPANSION position if expanded.
13. Expansion IN/OUT terminals [EXT 1/2]
Connect to the Central unit(s) to be expanded.
14. LINE 1 connection terminal [LINE 1]
Connects to the conference unit. Up to 35 conference units can be connected per line.
15. LINE 2 connection terminal [LINE 2]
Connects to the conference unit. Up to 35 conference units can be connected per line.
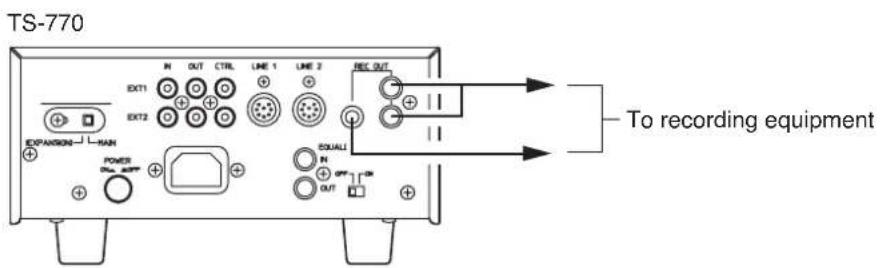
16. Recording output terminal [REC OUT] (Phone jack)
Connects to an Alternating cassette recorder, etc. (10 kΩ, -20 dB*, unbalanced)
17. Recording output terminals [REC OUT] (RCA jack)
Connect to a recording machine.
(10 kΩ, -20 dB*, unbalanced)
18. AC inlet
Connects to the supplied power cord.
19. Equalizer insertion input terminal [EQUALIZER IN]
Connects to the output terminal of equalizer. (10 kΩ, -20 dB*, unbalanced)
20. Equalizer insertion output terminal [EQUALIZER OUT]
Connects to the input terminal of equalizer. (10 kΩ, -20 dB*, unbalanced)
21. Equalizer insertion switch [EQUALIZER ON/OFF]
Set to the ON position when using the equalizer.
* 0 dB = 1 V
5.2. TS-771 Chairman Unit and TS-772 Delegate Unit
[TS-771 Top] [TS-772 Top]
![TOA TS-774 - [TS-771 Top] [TS-772 Top] - 1](/content/2026/05/1054031/images/d8609de3b6b083cad8ae5b07dd8ff5bd51bd5af404f77f9bf534336c1ed474b1.jpg)
text_image
① ② ③ ④ TOA IS-771 PRIORITY TALK ⑤ ⑥![TOA TS-774 - [TS-771 Top] [TS-772 Top] - 2](/content/2026/05/1054031/images/088cb7b251c6835eafc697410c7c2d4ae123a435a9eb946357095c9f7bcf3acf.jpg)
text_image
① ② ③ ④ TOA 15-772 TALK ⑥1. Line connection cord
Connect this cord to the Line Connection terminal of the Central unit or that of the next preceding linked conference unit.
2. Microphone connection connector
Connects to the TS-773 or TS-774 Microphone.
3. Speaker
Outputs other speakers' voices. Adjust the volume with the TS-770 Central unit's line volume control. The built-in speaker is temporarily disabled while speech is made using this unit.
4. Microphone in-use indicator
Lights when the microphone can be used.
5. Priority key [PRIORITY] (TS-771 only)
While this key is pressed, the microphone in-use indicator remains lit, allowing priority speech to go through. In this case, no other conference units can be used. Pressing this key causes a single tone chime to sound at the remaining conference units.
6. Talk key [TALK]
Press this key to speak. The microphone in-use indicator lights. Press this key again to turn off the microphone. The microphone in-use indicator extinguishes.
[TS-771/TS-772 Side]
![TOA TS-774 - Talk key [TALK] - 1](/content/2026/05/1054031/images/77a09b74fce8c28d30a2df77bed3a7ef49d3d49ba477daea405b9297ea153242.jpg)
text_image
HEADPHONES 1 2 7 87. Volume control
Adjusts the sound volume from the Recording/Headphone Output Terminal.
Note
Use the volume control of the TS-770 Central unit to adjust the sound output volume from the internal speaker (3).
8. Recording/Headphone output terminals [HEADPHONES]
Connect recording equipment or headphones to these terminals. No sound is output from the internal speaker (3) while this terminal is in use.
[TS-771/TS-772 Rear]
![TOA TS-774 - Recording/Headphone output terminals [HEADPHONES] - 1](/content/2026/05/1054031/images/97151eb668a9dc49071f294d27e14b0e533c2accef0a340b360c73d2e956ec49.jpg)
text_image
LINE CONTROL OUTPUT 10 ⑨ ⑩9. Line connection terminal [LINE]
Connect the following linked conference unit's line connection cord to this terminal.
10. Control output terminal [CONTROL OUTPUT]
This terminal is an open collector output interlocked with the Microphone in-use indicator, and is enabled when in speech mode.
(24 V DC, Max. 50 mA)
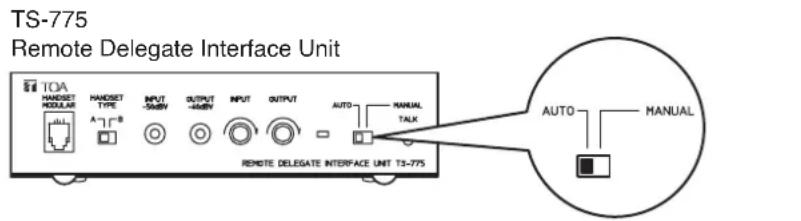
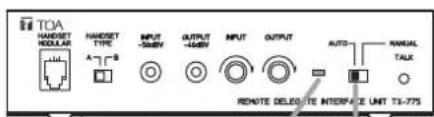
5.3. TS-775 Remote Delegate Interface Unit
[Front]
![TOA TS-774 - [Front] - 1](/content/2026/05/1054031/images/7b149aa7ba8526506cfadb866c6b4bf0b5c99f88a21104eedd765b4afca1b6fe.jpg)
text_image
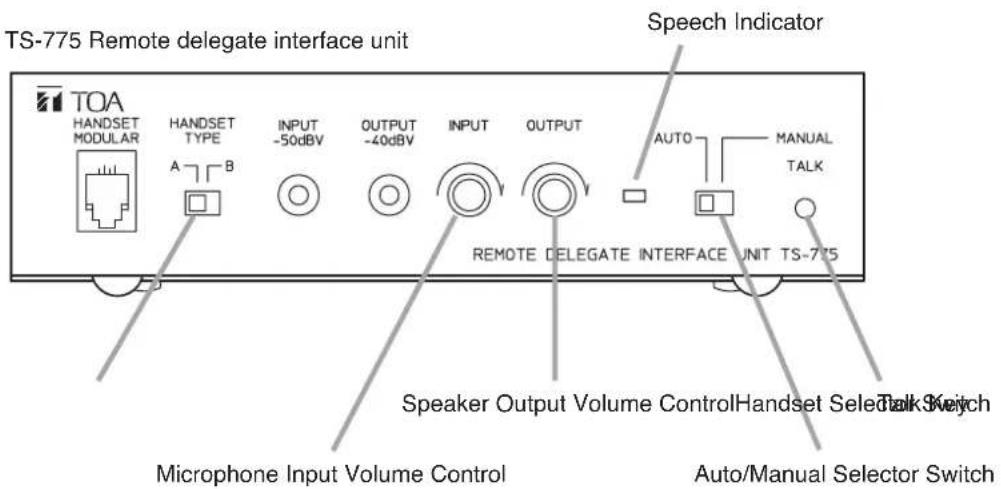
TOA HANDSET MODULAR HANDSET TYPE A B INPUT -50dBV OUTPUT -40dBV INPUT OUTPUT AUTO MANUAL TALK REMOTE DELEGATE INTERFACE UNIT TS-7751. Modular jack [HANDSET MODULAR]
Used to connect a telephone equipped with a handset using modular connectors.
* Detach the handset from the telephone and connect the Remote Delegate Interface unit to the telephone instead.
2. Handset selector switch [HANDSET TYPE]
Set this switch to either the A or B position depending on the type of telephone handset.
3. Microphone input terminal [INPUT -50 dBV]
Connect this terminal to the PC's headphone output.
4. Speaker output terminal [OUTPUT -40 dBV]
Connect this terminal to the PC's microphone input.
5. Microphone input volume control [INPUT]
Adjusts the microphone input volume.
6. Speaker output volume control [OUTPUT]
Adjusts the speaker output volume.
7. Speech Indicator
Lights when a remote party is allowed to speak.
8. Auto/Manual selector switch [AUTO/MANUAL]
Setting this switch to the AUTO position permits the remote party to speak without requiring Talk key operation.
The MANUAL position only permits the party to speak when the Talk key is pressed.
9. Talk key [TALK]
Used to enable speech when the Auto/Manual Selector switch is set to the MANUAL position. Speech is alternately enabled and disabled with each press of this key.
[Rear]
![TOA TS-774 - [Rear] - 1](/content/2026/05/1054031/images/53fed9eb7a22e5e0c75f1fee9c06e60abf1321644e93699d092d4c21ebbedca4.jpg)
text_image
10 11 12 LINE CONTROL OUTPUT H C 10. Line connection cord Connect this cord to the Cent next preceding linked conferenc 11. Line connection terminal [LIN] Connect this terminal to the conference unit. 12. Control output terminal [CONTROL OUTPUT] Output is closed ("make") when (24 V DC, Max. 50 mA)10. Line connection cord
Connect this cord to the Central unit or to the next preceding linked conference unit.
11. Line connection terminal [LINE]
Connect this terminal to the following linked conference unit.
12. Control output terminal [CONTROL OUTPUT]
Output is closed ("make") when in speech mode. (24 V DC, Max. 50 mA)
6. OPERATING CHAIRMAN AND DELEGATE UNITS
This section explains how to operate these units when the All Mic-On function is set to OFF (default setting). When this function is set to ON, speakers can talk anytime from any conference unit with no need to operate any switches or keys.
To enable or disable this function, use the Test/All Mic-On switch on the Central unit. (Refer to p. 17.)
6.1. Making Speech
Step 1. Press the TALK key once.
The microphone in-use indicator lights, and the microphone turns on.
Notes
- No sound is output from the internal speaker of the operated unit while the Microphone in-use indicator remains lit. However, audio signal is output from the Recording/Headphone output terminal.
- While the Chairman unit is in priority speech mode (see page 13), other unit's microphones do not turn on even if their Talk keys are pressed.
- The microphones of some Delegate units may not turn on even if their Talk keys are pressed, depending on the setting of the Speaker Restriction function (see page 16).
Step 2. Speak into the microphone.
[Example: TS-772 Delegate unit]
Microphone in-use indicator: Lights.
text_image
TDA TG-T72
Step 3. Press the Talk key again after speech completion. The Microphone in-use indicator extinguishes and sound is audible from the operated unit's speaker.
Microphone in-use indicator: Extinguishes.

text_image
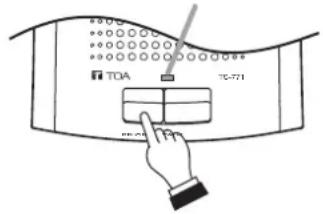
TDA TGA-772 TGA6.2. Making Priority Speech (Chairman Unit TS-771 Only)
Holding down the priority key on the Chairman unit gives that unit speech priority and allows it to interrupt other delegate units.
Step 1. Press the Priority key.
The microphone in-use indicator lights, and the microphone turns on. Pressing this key causes a single tone chime to sound at the remaining conference units.
Note
No sound is output from the internal speaker of the operated unit while the Microphone in-use indicator remains lit. However, audio signal is output from the Recording/Headphone output terminal.
Step 2. Speak while holding down the Priority key.
No delegate units can be used while the Priority key is pressed.
Step 3. The microphone in-use indicator extinguishes, turning on the built-in speaker.
Microphone in-use indicator: Lights.
text_image
TOA TC-721

Notes
- In the system employing 2 or 3 chairman units, even while 1 unit is making priority speech, other chairman unit(s) can also make priority speech by pressing the Priority key although a single-tone chime is not sounded.
- Any previous speech that has been interrupted by the priority speech is not restored even after priority speech completion. Press the Talk key again, and make a speech after microphone in-use indicator lights.
- When the Remote Delegate Interface unit is set to Auto mode, if the Chairman unit's priority key is pressed while a remote party is speaking, the Chairman unit can speak but cannot interrupt the remote party's speech in progress.
7. HOLDING REMOTE CONFERENCES
Using the TS-775 Remote Delegate Interface unit instead of the Delegate unit permits a remote party to participate in conferences via telephone or PC.
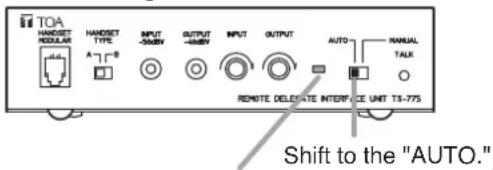
7.1. Remote Conference Procedures
Step 1. Set the telephones or PCs in both the conference room and remote locations to conversation mode, then connect the telephone or PC in the conference room to the Remote Delegate Interface unit. For details, refer to p. 26.
Step 2. Set the Remote Delegate unit's Auto/Manual Selector switch to "AUTO" or "MANUAL," whichever is suitable for the type of conference. Depending on the selected switch position, the method of enabling speech differs.
However, when the Central unit's All Mic-On function is set to ON, any conference unit can speak at any time without requiring any key operation.
text_image
TS-775 Remote Delegate Interface Unit IOA HANDSET MODULAR A~B HANDSET TYPE INPUT -50kW OUTPUT -45kW INPUT OUTPUT AUTO MANUAL TALK REMOTE DELEGATE INTERFACE UNIT TS-775 AUTO MANUALAuto/Manual Selector switch
(Factory default: AUTO)
7.2. Speech Operation When the Remote Delegate Interface Unit Is Set to AUTO Mode
[Conference room] [Remote location]
TS-775
Remote Delegate Interface Unit
text_image
TOA HANSEET MODULAR A~B HANDSET TYPE INPUT -50kW OUTPUT -40kW INPUT OUTPUT AUTO MANUAL TALK REMOTE DELETSATE INTERFACE UNIT TI-775 Shift to the "AUTO."The speech indicator lights.

Speak while nobody else is speaking.
If speech is initiated while nobody else is speaking, the Remote Delegate Interface unit detects the speaker's audio signal and automatically switches to speech mode (the unit's Speech indicator lights). After speech is completed, the speech mode is reset and the Speech indicator extinguishes.
Regardless of the setting of the Speaker Restriction function (see page 16), provided nobody else is speaking, the speaker's audio signal is detected and the speaker is allowed to speak.
Speech made through the Remote Delegate Interface unit is not interrupted even if the Chairman unit's priority key (see the next page) is pressed during the speech.
Note
This unit is disabled for speech if another party is already speaking.
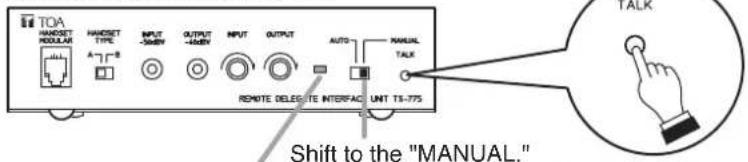
7.3. Speech Operation When the Remote Delegate Interface Unit Is Set to MANUAL Mode
[Conference room] [Remote location]
TS-775
Remote Delegate Interface Unit
text_image
TOA HANDSET MODULAR A-1-B HANDSET TYPE INPUT -500W OUTPUT -400W INPUT OUTPUT AUTO MANUAL TALE REMOTE DELETE INTERFACE UNT TS-775 Shift to the "MANUAL."The speech indicator lights.

Speak while the Talk key is turned on.
The remote party is permitted to speak when the Remote Delegate Interface unit's Talk key is pressed, and cannot speak when the key is pressed again.
Set the unit to MANUAL mode to enable the chairman or other parties in the conference room to prevent a remote party from freely speaking. In the MANUAL mode, the number of simultaneously operable Delegate units can be limited (Speaker Restriction function - see page 16).
7.4. Setting Examples
Step 1. Select MANUAL mode to extinguish the speech indicator when it is desirable to prohibit remote conference participants from speaking.
[Remote location][Conference room]
TS-775
Remote Delegate Interface Unit

text_image
TOA HANDSET MODULAR HANDSET TYPE INPUT -500V OUTPUT -400V INPUT OUTPUT AUTO MANUAL TALE REMOTE DELEGE INTERFACE UNIT T3-775Shift to the "MANUAL."
Speech indicator is extinguished.

Speaking is prohibited.
Step 2. When a remote participant requests permission to speak, press the Talk key to enable speech or shift the AUTO/MANUAL Selector switch to the AUTO position so that the participant may speak at any time. Select either position according to the circumstances.
[Conference room]
TS-775

text_image
TDA HANDSET MODULAR A~B HANDSET TYPE INPUT -300V OUTPUT -400V INPUT OUTPUT AUTO MANUAL TALE REMOTE DELETE INTERFACE UNT T3-775Shift to the "MANUAL."
[Remote location]
The speech indicator lights if the Talk key is pressed.

Make speech.
text_image
TOA HANDEKT NODULAR A~T~B HANDEKT TYPE INPUT -500V OUTPUT -450V INPUT OUTPUT AUTO RANUAL TALK REMOTE DELEGE THE INTERFACE UNIT TS-775Shift to the "AUTO."
The Speech indicator lights if a remote participant speaks.
8. FUNCTION SETTINGS
8.1. Speaker Restriction Function
8.1.1. Setting procedure
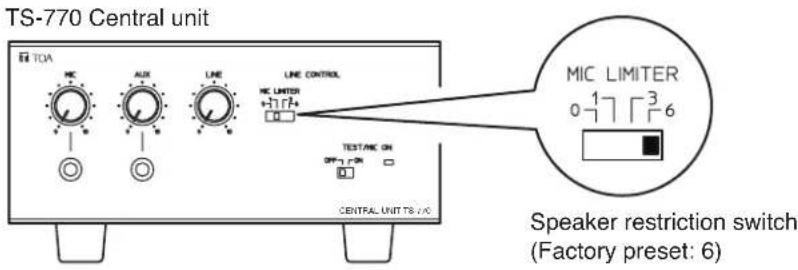
Using the TS-770 Central Unit's speaker restriction switch, set the number of simultaneously-usable delegate units (TS-772). Set the switch to 0, 1, 3, or 6 depending on the type of conference.
Delegate units cannot speak if the number is set to "0." (Chairman Priority mode)
TS-770 Central Unit

text_image
TOA MIC AUX LINE LINE CONTROL MIC LIMITER TIME OUT POWER 0-7 7 4 □ MIC LIMITER 0-7 7 3 6 TEST/MIC ON OFF □ ON □ □ CENTRAL UNIT TS-770 Speaker restriction switch (Factory default: 6)Note
When multiple Central units are connected, different settings cannot be applied for each unit. If settings differ among these Central units, only the setting of the unit with its Expansion switch set to MAIN takes effect.
8.1.2. Restricted number of simultaneously operable Delegate units and each conference unit's operation
Shown below is the relationship between the Speaker Restriction function and each conference unit's speech capability.
[Chairman unit]
Chairman units can speak at any time regardless of the setting of the Speaker Restriction function.
[Delegate unit]
Up to the set number of Delegate units can speak simultaneously.
When the full set number of Delegate units are in use (their microphones have been turned on), no microphones of other Delegate units can be turned on, even if their Talk keys are pressed.
[Remote Delegate Interface unit]
Speech capability differs depending on the Auto/Manual selector switch setting.
- Auto position: A remote party can speak regardless of the setting of the Speaker Restriction function, provided another conference unit is not currently in use.
- Manual position: The Remote Delegate Interface unit is also recognized as one of the Delegate units. Up to the set number of Delegate units, inclusive of the Remote Delegate Interface unit, can be simultaneously used.
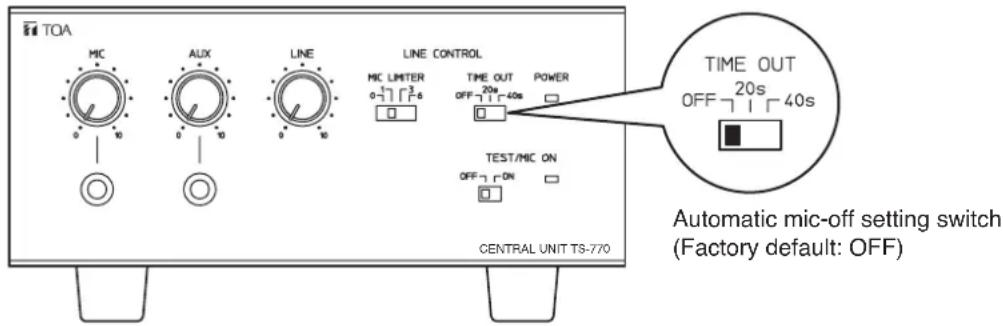
8.2. Automatic Mic-Off Function
Using the Automatic mic-off setting switch of the TS-770 Central Unit, the automatic mic-off function can be set. Whenever a break in speech exceeds a specified period of time, the Central unit presumes speech completion and automatically turns off the microphone. Delegate unit's microphone turns off after the preset period of time even if a speaker forgets to turn it off after use.
The break time can be set for either 20 (20s position) or 40 (40s position) seconds. Set the switch to OFF if this function is unnecessary.
TS-770 Central Unit
text_image
TOA MIC AUX LINE LINE CONTROL MIC LIMITER TIME OUT POWER OFF 20s OFF 140s TEST/MIC ON OFF ON □ □ □ □ CENTRAL UNIT TS-770 TIME OUT OFF 20s OFF 140s Automatic mic-off setting switch (Factory default: OFF)Notes
- When the automatic mic-off function is selected, any break in speech exceeding the preset time during speech will automatically turn off the microphone. Therefore, for conferences in which long breaks in speech are expected, set the automatic mic-off setting switch to the OFF position.
- In areas with high levels of background noise, the Central unit may mistake the noise to be speech and the automatic mic-off function will not operate correctly. In such cases, this function should be disabled by placing the switch in the OFF position.
- In the system employing 2 or 3 Central units, it is not possible to operate the units with each different setting. Perform the same setting for all connected Central units.
8.3 All Mic-On Function
It is possible to turn on the microphones of all connected conference units by setting the Central unit's All Mic-On switch to ON. In this event, no sound is output from Chairman and Delegate unit's internal speakers, however audio signals are output from their Recording/Headphone Output terminals.
All conference units can speak at any time without requiring Talk key operation, regardless of the Speaker Restriction function setting. The All Mic-On function is especially useful when wishing to record small conferences or broadcast conference contents to other areas.
Note
When the All Mic-On function is enabled and it is desirable to have a remote party speak by way of the Remote Delegate Interface unit, be sure to set the unit's Auto/Manual Selector switch to MANUAL. The party cannot speak if the switch is set to AUTO.
TS-770 Central Unit

text_image
TOA MIC AUX LINE LINE CONTROL MIC LIMITER 0 4 7 1 3 6 TIME OUT OFF 20s 40s POWER TEST/MIC ON OFF 7 1 ON CENTRAL UNIT TS-770 TEST/MIC ON OFF 7 1 ON All Mic-On indicator All Mic-On switch (Factory preset: OFF)9. RECORDING
The contents of the conference can be recorded by connecting an Alternate Cassette Recorder or other recording equipment to the TS-770 Central Unit, TS-771 Chairman Unit, or TS-772 Delegate Unit.
9.1. Recording with the Central Unit
Step 1. Connect the recording output on the rear panel of the TS-770 Central Unit to the recorder's recording input.
There are 2 types of recording output terminals: one is of a phone jack and the other is of RCA jacks. Select either type of jack according to equipment to be connected.
Note
Prepare the connection cables separately.
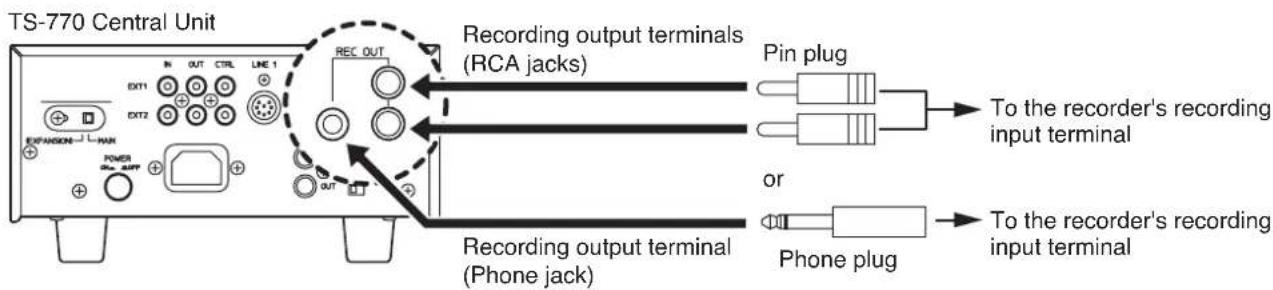
text_image
TS-770 Central Unit ENC OUT REC OUT Recording output terminals (RCA jacks) Pin plug To the recorder's recording input terminal EXPANSION - MAX OUT Power OR - AUF OUT or Recording output terminal (Phone jack) Phone plug Recording output terminal (Phone jack)Step 2. Connect a set of headphones into the recorder's monitor output to confirm that the contents of the conference are being recorded correctly.
If the recording device is equipped with a recording level control, adjust it to an appropriate recording level.
For use of recording device, refer to the instruction manual supplied with the device.
9.2. Recording with the Chairman Unit or Delegate Unit
Using the Recording/Headphone Output terminals on the side panel, recordings can be made in the same manner used for the Central unit.
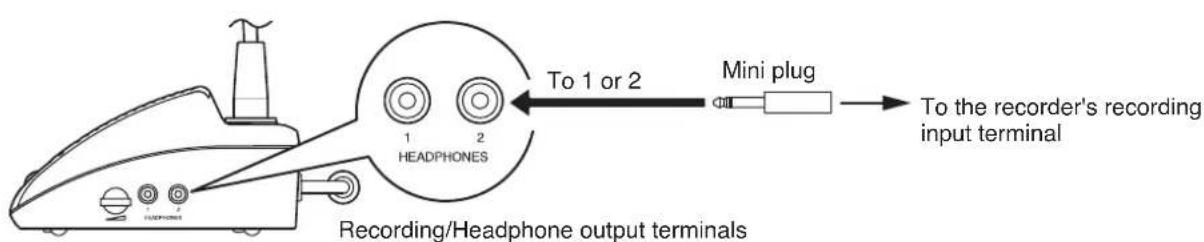
text_image
To 1 or 2 Mini plug To the recorder's recording input terminal 1 2 HEADPHONES Recording/Headphone output terminalsTS-771 Chairman unit or
TS-772 Delegate unit
Notes
- If either of Recording/Headphone jacks 1 and 2 is used, no sound is output from the unit's speaker.
- Sound volume from the recording output of the Chairman and Delegate units can be adjusted using the Central unit's Line Volume control. Setting the line volume control to the minimum position makes it impossible to record from the recording output of the Chairman and Delegate units. When wishing to record conference contents without amplifying the sound output from the Chairman and Delegate unit speakers, use the Central unit's Recording Output terminals.
10. INSTALLATION AND CONNECTION
10.1. Connection Example
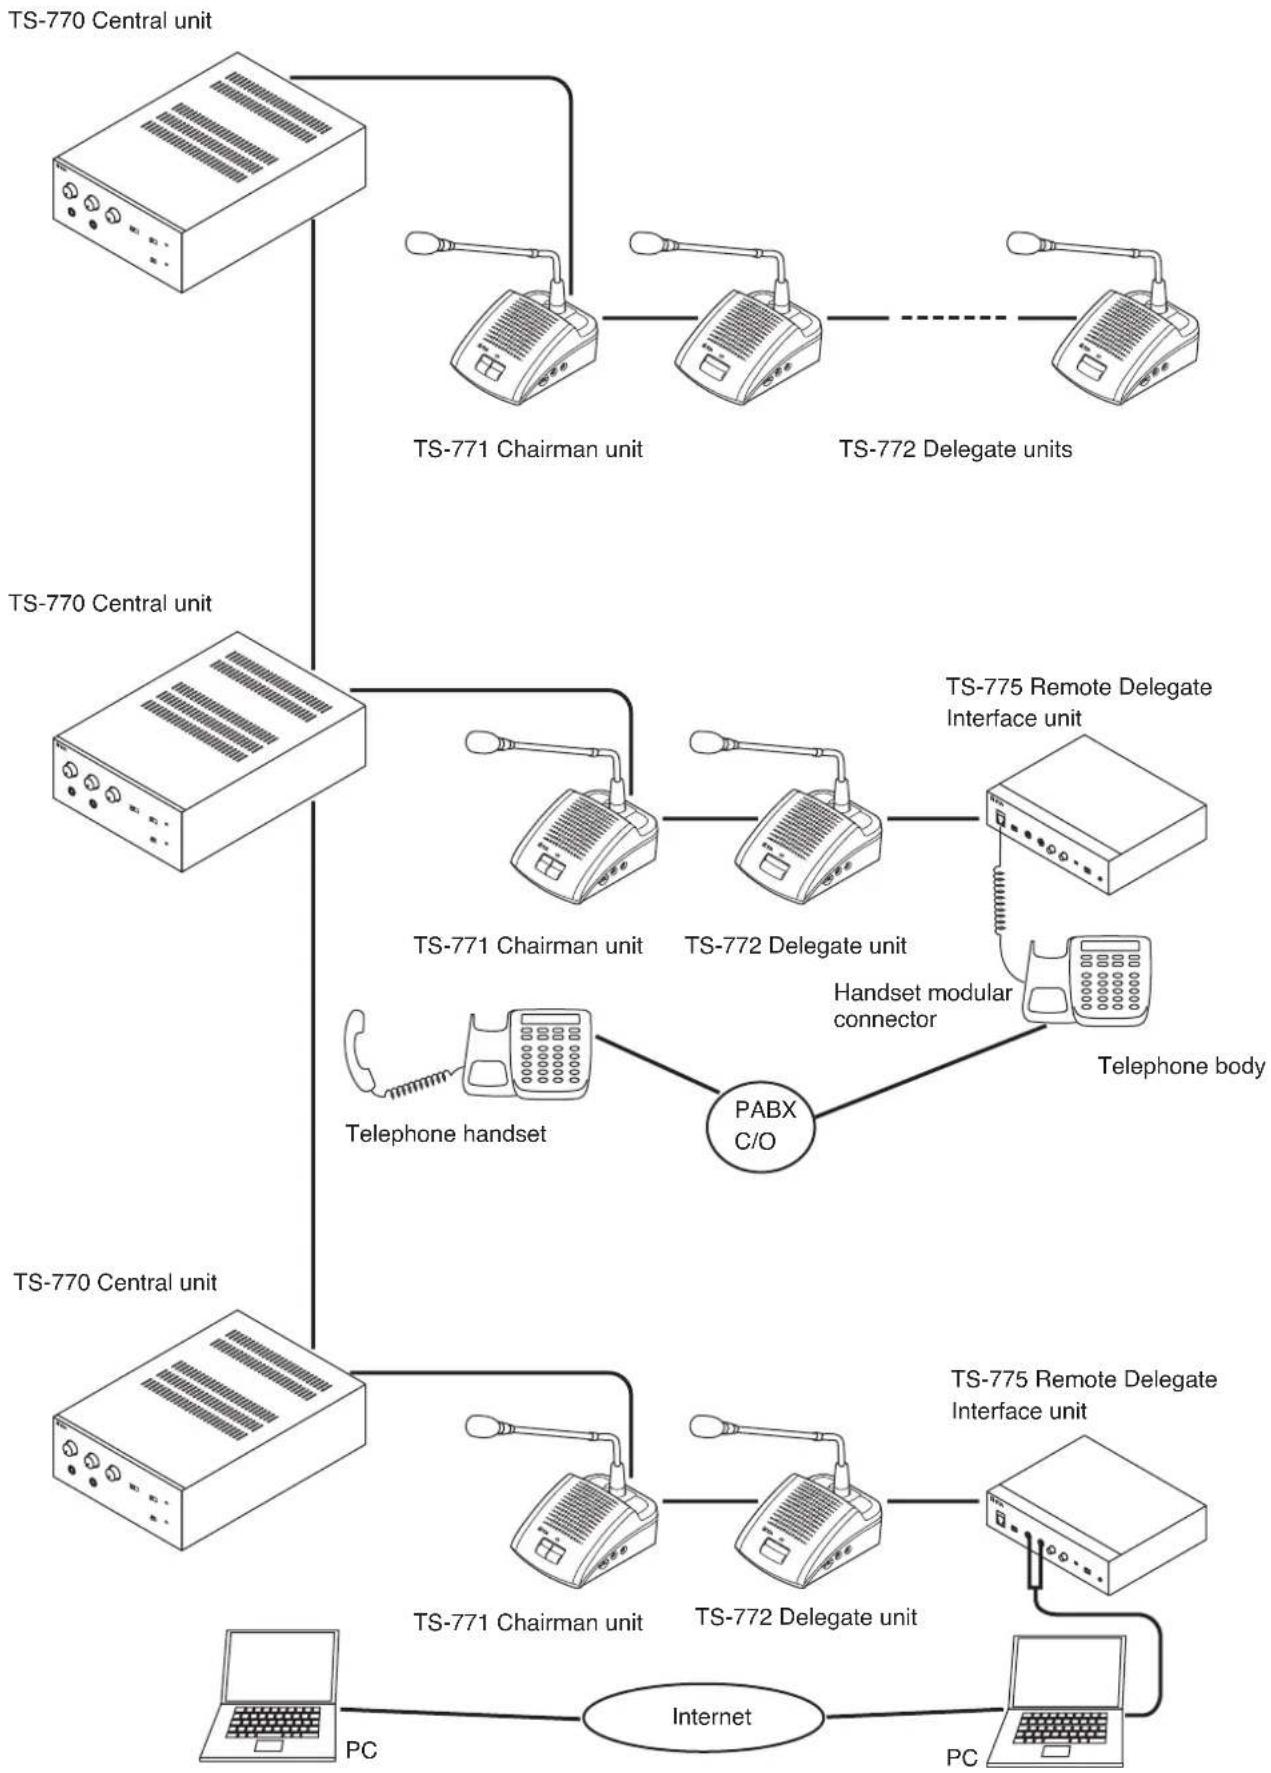
flowchart
graph TD
    A["TS-770 Central unit"] --> B["TS-771 Chairman unit"]
    A --> C["TS-772 Delegate units"]
    A --> D["TS-770 Central unit"]
    A --> E["TS-771 Chairman unit"]
    A --> F["TS-772 Delegate unit"]
    A --> G["Telephone handset"]
    G --> H["PABX C/O"]
    H --> I["Handset modular connector"]
    I --> J["TS-775 Remote Delegate Interface unit"]
    I --> K["Telephone body"]
    L["TS-771 Central unit"] --> M["TS-771 Chairman unit"]
    L --> N["TS-772 Delegate unit"]
    O["TS-775 Remote Delegate Interface unit"] --> P["TS-775 Remote Delegate Interface unit"]
    Q["Internet"] --> R["PC"]
    S["PC"] --> T["Internet"]
10.2. Installation Procedures
Basic System Installation
(1 Central unit and up to 70 Delegate units)
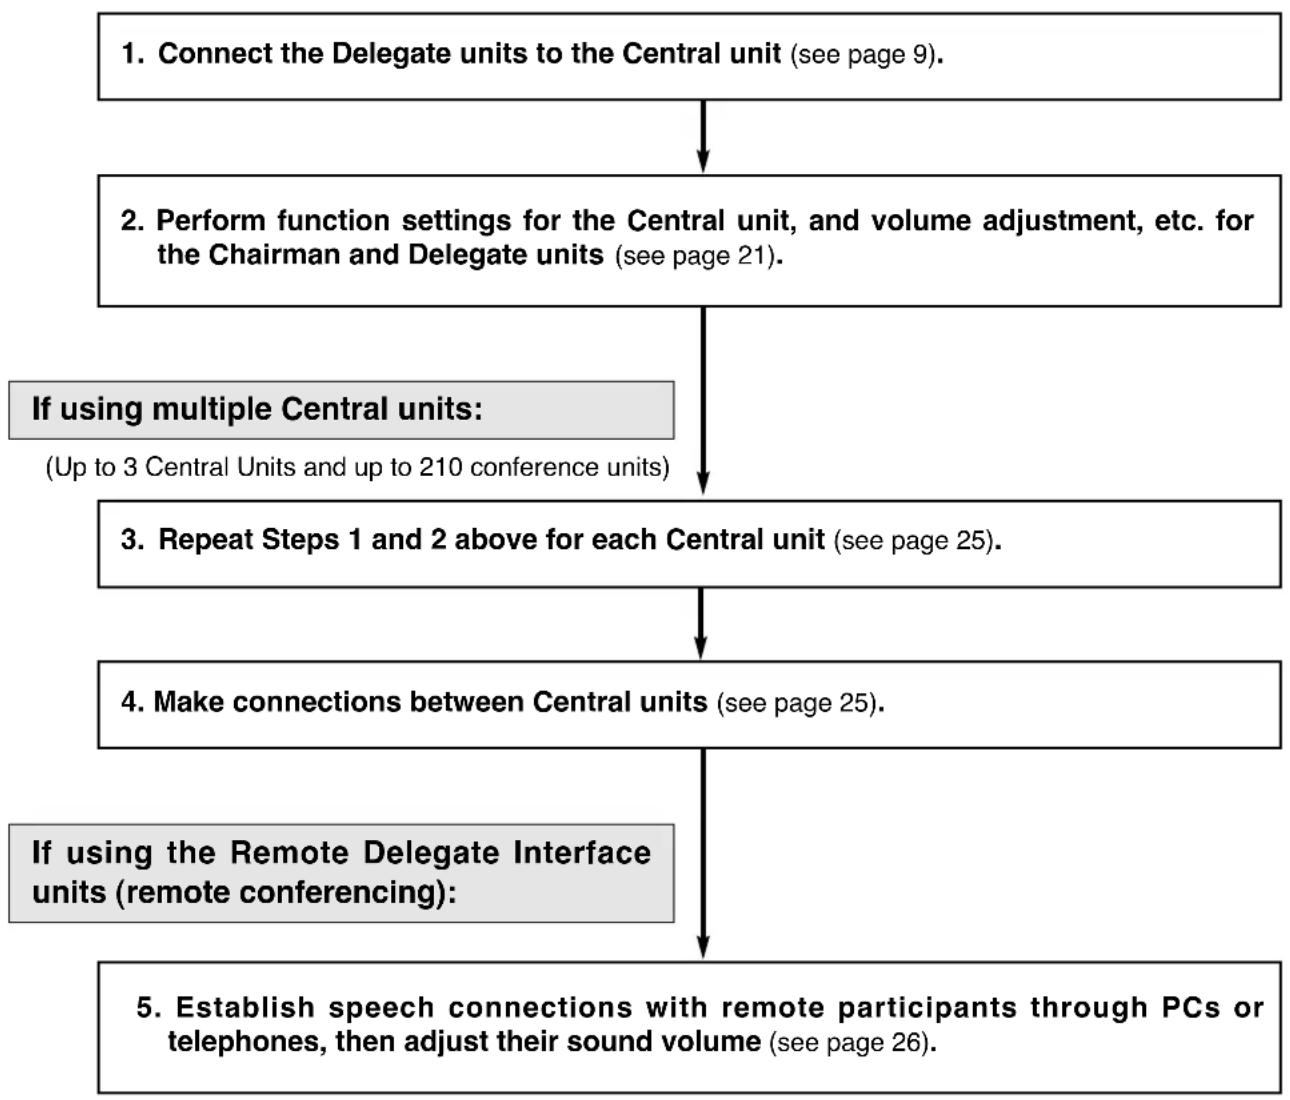
flowchart
graph TD
    A["1. Connect the Delegate units to the Central unit (see page 9)."] --> B["2. Perform function settings for the Central unit, and volume adjustment, etc. for the Chairman and Delegate units (see page 21)."]
    B --> C["3. Repeat Steps 1 and 2 above for each Central unit (see page 25)."]
    C --> D["4. Make connections between Central units (see page 25)."]
    D --> E["5. Establish speech connections with remote participants through PCs or telephones, then adjust their sound volume (see page 26)."]
    E --> F["If using multiple Central units: (Up to 3 Central Units and up to 210 conference units)"]
    F --> C
    D --> G["If using the Remote Delegate Interface units (remote conferencing):"]
10.3. Basic System Installation and Adjustment
This section explains how to install and adjust a basic system comprised of 1 Central Unit and Chairman and Delegate units.
10.3.1. Connecting the Chairman and Delegate units to the Central unit
Step 1. Connect either the TS-773 or TS-774 Microphone to the TS-771 Chairman unit and TS-772 Delegate unit.
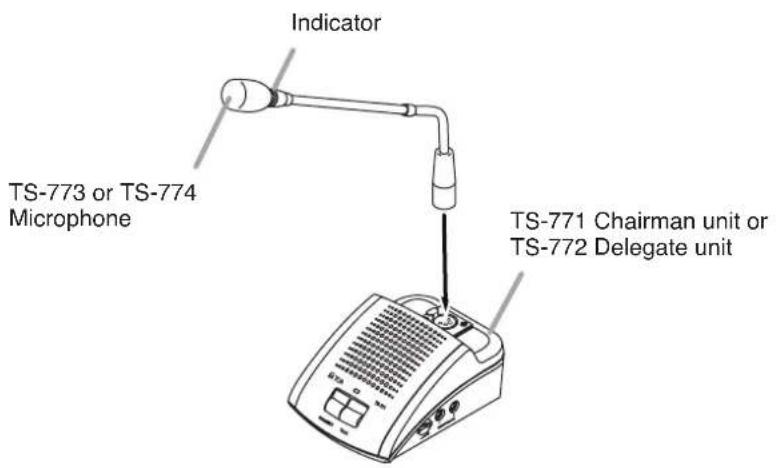
text_image
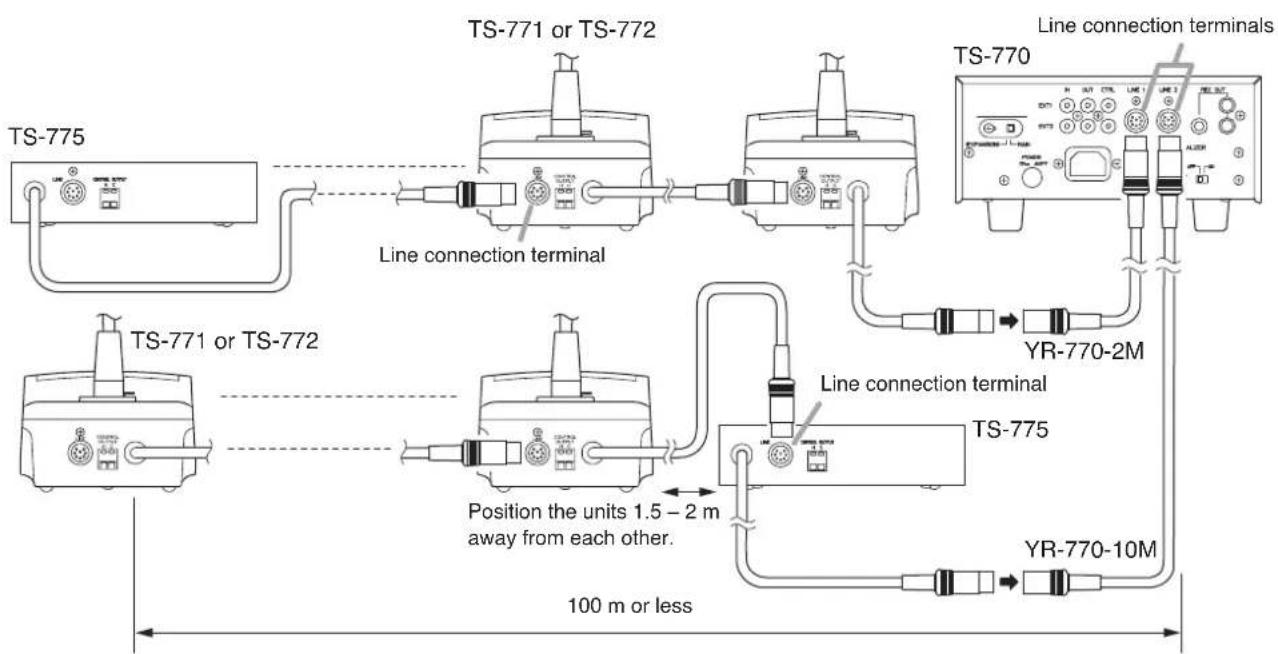
Indicator TS-773 or TS-774 Microphone TS-771 Chairman unit or TS-772 Delegate unitStep 2. Connect the TS-771 Chairman unit and TS-772 Delegate unit to the TS-770 Central unit.
When installing, keep conference units 1.5 – 2 m away from each other. If distances exceed 2 m, use YR-770-2M (2 m) or YR-770-10M (10 m) extension cables.
Up to 35 conference units can be connected per line (line 1 and 2) of the central unit.
Ensure that the total length of connection cables between the Central unit and the last conference unit is less than 100 m.

flowchart
graph TD
    A["TS-771 or TS-772 (Up to 35 units* per line)"] --> B["Line connection terminal"]
    B --> C["TS-770"]
    B --> D["YR-770-2M"]
    B --> E["YR-770-10M"]
    B --> F["100 m or less"]
    style A fill:#f9f,stroke:#333
    style B fill:#ccf,stroke:#333
    style C fill:#cfc,stroke:#333
    style D fill:#fcc,stroke:#333
    style E fill:#cff,stroke:#333
    style F fill:#ffc,stroke:#333
* If the TS-775 Remote Delegate Interface unit is used, up to 35 units can be connected per line, including the TS-775.
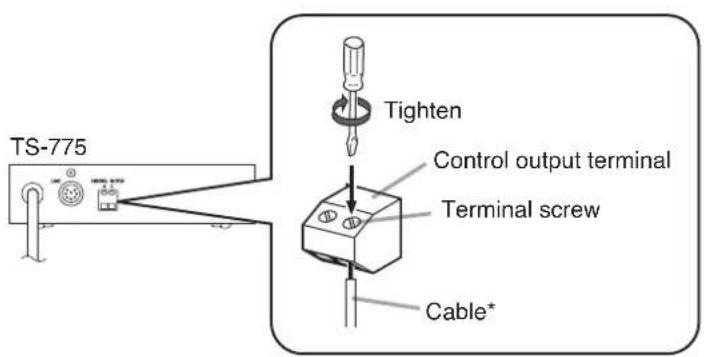
Step 3. Connect an indicator or other device to the TS-771 Chairman unit's or TS-772 Delegate unit's Control Output terminal as required.

text_image
TS-771/772 Control output terminal Tighten Terminal screw Cable*Note
This output terminal is closed ("make" contact) when the Remote Delegate Interface unit is set to Speech mode.
* Conductor diameter: ø0.4 – 1.3 mm (AWG 16 – 26), solid or stranded
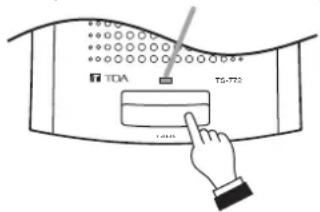
Step 4. Set the Test switch on the front panel of the Central unit to ON. (Test mode)
The Test indicator lights together with the conference unit's Microphone in-use indicator and the indicator on the microphone.
Note that as the number of connected conference units increases, several seconds may elapse before the indicators light.
When all indicators for the installed conference units light, this completes connection confirmation. In this event, if the indicators of a certain conference unit do not light, check the connections of the microphone and those between the Central unit and conference units.

text_image
TS-770 Central unit LINE CONTROL MIC LITER TIRE OUT POWER OFF ON TEST/MIC ON OFF ON CENTRAL UNIT TS 7/0 TEST/MIC ON OFF ON Test switch: ON Test indicator: Lights Indicator: Lights Microphone in-use indicator: Lights 50Hz 120Hz 50Hz 120HzTS-771 Chairman unit or TS-772 Delegate unit
Step 5. Shift the Central unit's Test switch back to the OFF position. (Test mode cancelled.)
Note that as the number of connected conference units increases, several seconds may elapse before the indicators extinguish.
10.3.2. Setting functions and adjusting Chairman and Delegate units sound output volume
Step 6. Set the number of simultaneously operable Delegate units using the Speaker Restriction switch on the front panel of the Central unit.
For details, refer to p. 16.
text_image
TS-770 Central unit MIC AUX LINE LINE CONTROL MIC LIMITER +7172+ TEST/MIC ON OFF 7 ON CENTRAL UNIT TS / NC MIC LIMITER 0 1 7 3 6 Speaker restriction switch (Factory preset: 6)Step 7. Adjust the sound volume of the Chairman and Delegate units.
Press the Talk key on both the Delegate unit in the number set in Step 4 and the Chairman unit to turn on their microphone. Speaking into the microphone, adjust the volume to an appropriate level using the Central unit's Line Volume control.

text_image
TS-770 Line volume control Indicator: Lights Indicator: Lights TS-771 or TS-772 Indicator: ExtinguishesStep 8. Confirm that no acoustic feedback is generated from any microphone to be used.
If acoustic feedback occurs, widen the distance between conference units or turn down the line volume in order to prevent feedback.
Use an equalizer to ensure that no acoustic feedback is caused even if the sound volume is increased. Connect the equalizer's input terminal to the Central unit's Equalizer Insertion Output terminal and the equalizer's output terminal to the Central unit's Equalizer Insertion Input terminal, then set the Central unit's Equalizer Insertion switch to ON. This allows all audio signals to be controlled by the equalizer.

text_image
TS-770 IN OUT CTRL LINE 1 LINE 2 REC OUT EXIT1 EXIT2 EXPANSION MAIN POWER ON SELL EQUALIZER OUT OFF ON Equalizer insertion switch Equalizer OutInStep 9. Set the Automatic Mic-Off function*, as required, using the Automatic Mic-Off setting switch on the front panel of the Central unit.
* This function automatically turns off the microphone if not used for a specified period of time (see page 17).

text_image
Microphone volume control AUX volume control TS-770 TOA KC AUX LINE LINE CONTROL MC LINTER +1177+ TIME OUT OFF 20s 40s POWER TEST/MIC ON OFF 20s CENTRAL UNIT TS-770 To a BGM player To a wired microphone 10 9 TIME OUT OFF 20s 40s Automatic mic-off setting switch (Factory preset: OFF)Step 10. When using a wired microphone and background music (BGM) equipment, connect these components to the Central unit and adjust their sound volume.
In the case of a wired microphone, connect it to the Central unit's front-mounted Mic Input jack and adjust the volume to an appropriate level using the microphone volume control.
In the case of BGM equipment such as CD decks and cassette decks, connect to the Central unit's front-mounted AUX Input jack and adjust the volume to an appropriate level using AUX input volume control.
Step 11. When recording conference contents, connect the recording equipment's recording input terminal to the Central unit's Recording Output terminal, or the chairman or Delegate unit's Recording/Headphone output terminals. For details, refer to p. 18.
text_image
TS-770 EXT1 OUT CTRL LINE 1 LINE 2 REC OUT EXT2 EXPANSIONS MAIN POWER OUT EQUALI To recording equipment11. IF USING MULTIPLE CENTRAL UNITS:
Up to 3 Central Units (up to 210 conference units) can be simultaneously used.
Note
The Speaker Restriction and Automatic Mic-Off functions will not be applied correctly if settings are performed differently for each Central unit.
Step 1. Perform connections and adjustments for each Central unit. Follow Steps 1 – 11 on pages 21 – 24 for each Central unit.
Step 2. Set the Central unit's rear-mounted Expansion switch.
Set the Expansion switch of one of the connected Central units to MAIN, and the remaining Central units to EXPANSION.
To shift the switch position, loosen the lock screw for the Expansion switch and retighten the screw after the position change has been completed.

text_image
Expansion switch Lock screw Lock screw (EXPANSION) MAIN When set to MAIN (Factory preset) (EXPANSION) MAIN When set to EXPANSION TS-770 Central unit IN OUT CTRL LINE 1 LINE 2 REC OUT EXT1 EXT2 EXPANSION MAIN POWER OUT EQUALIZER IN OFF ON OUTStep 3. Make connections between Central units.
Connect the Expansion IN-OUT terminals mutually between Central units, as shown below. Note that the CTRL terminal of the Main Central unit must be connected directly to each CTRL terminal of the Expansion Central unit(s) using a single line.

text_image
TS-770 (For the MAIN setting) TS-770 (For the EXPANSION setting) TS-770 (For the EXPANSION setting) (For the MAIN setting) Expansion IN/OUT terminals (For the EXPANSION setting) Expansion IN/OUT terminals (For the EXPANSION setting) Expansion IN/OUT terminals IN OUT CTRL EXT1 EXT2 IN OUT CTRL EXT1 EXT2 IN OUT CTRL EXT1 EXT2Note
Because no cables are supplied for connection between Central units, please prepare separately.
Step 4. Set the Central unit's functions as follows:
- Speaker Restriction Switch Only set the Speaker Restriction switch of the MAIN Central unit. (This setting takes effect regardless of the switch settings of the other EXPANSION Central Units.)
• Automatic Mic-Off Setting Switch Perform the same setting for all connected Central units.
12. WHEN HOLDING REMOTE CONFERENCES:
When holding a conference between remote locations, add the Remote Delegate Interface unit and use a telephone or PC.
Step 1. Connect the Remote Delegate Interface unit to the Central unit. Connections are the same as those used for other conference units (see page 21).
flowchart
graph TD
    A["TS-775"] --> B["TS-771 or TS-772"]
    B --> C["TS-771 or TS-772"]
    C --> D["TS-775"]
    D --> E["YR-770-2M"]
    D --> F["YR-770-10M"]
    D --> G["Line connection terminal"]
    D --> H["Position the units 1.5 - 2 m away from each other."]
    style A fill:#f9f,stroke:#333
    style B fill:#ccf,stroke:#333
    style C fill:#cfc,stroke:#333
    style D fill:#fcc,stroke:#333
    style E fill:#ffc,stroke:#333
    style F fill:#fcc,stroke:#333
    style G fill:#cff,stroke:#333
    style H fill:#ffc,stroke:#333
Note
A total of up to 35 Chairman, Delegate and Remote Delegate Interface units can be connected per Central unit line connection terminal.
Step 2. Connect an indicator or other device to the Remote Delegate Interface unit's Control Output terminal as required.
text_image
TS-775 Tighten Control output terminal Terminal screw Cable*Note
This output terminal is closed ("make" contact) when the Remote Delegate Interface is set to Speech mode.
* Conductor diameter: ø0.4 – 1.3 mm (AWG 16 – 26), solid or stranded
Step 3. Set the telephones or PCs in both the conference room and remote location to conversation mode and connect the conference room telephone or PC to the Remote Delegate Interface unit.
3-1. If using the telephone:
Use a telephone equipped with a handset using modular connectors.
1) Set the telephones in both the conference room and the remote location to conversation mode.
2) Detach the modular plug from the handset, then connect the plug to the Remote Delegate Interface unit.
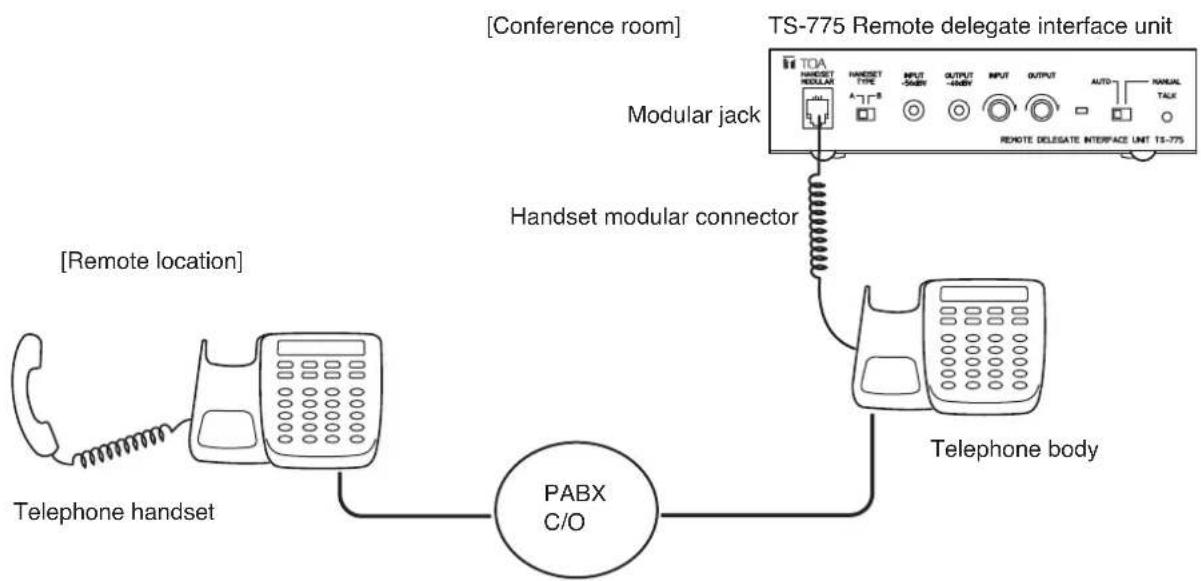
flowchart
graph TD
    A["Telephone handset"] --> B["PABX C/O"]
    B --> C["Handset modular connector"]
    C --> D["TOA HANSEST MODULAR"]
    D --> E["TS-775 Remote delegate interface unit"]
    E --> F["Remote delegate Interface Unit TS-775"]
    G["Telephone body"] --> B
    H["Remote location"] --> B
    I["Modular jack"] --> D
    J["Conference room"] --> D
3-2. If using the PC's microphone input and headphone output:
1) Using Skype* or other IP telephone software, set the PCs in both the conference room and the remote location to conversation mode.
2) Set the PC's microphone input and speaker output to allow conversations to be held between PCs at an appropriate level.
3) Connect the PC's headphone output terminal to the Remote Delegate Interface unit's Microphone Input terminal, and the Remote Delegate Interface unit's Speaker Output terminal to the PC's microphone input terminal.
* Skype is a trademark of Skype Limited.
Skype is a toll-free IP telephone software program which allows conversations via the Internet.
For details, refer to http://www.skype.com/helloagain.html.

flowchart
graph TD
    A["PC"] -->|Internet| B["Headset"]
    B --> C["PC"]
    C --> D["TQA Interface"]
    D --> E["Speaker output terminal"]
    D --> F["Microphone input terminal"]
    D --> G["Headphone output terminal"]
    D --> H["Microphone input terminal"]
    I["Remote location"] --> B
    J["Conference room"] --> K["TQA Interface"]
    style A fill:#f9f,stroke:#333
    style B fill:#ccf,stroke:#333
    style C fill:#cfc,stroke:#333
    style D fill:#fcc,stroke:#333
    style E fill:#cff,stroke:#333
    style F fill:#ffc,stroke:#333
    style G fill:#cfc,stroke:#333
    style H fill:#fcc,stroke:#333
Step 4. Set the Central unit's Automatic Mic-Off setting switch to the OFF position.
text_image
TS-770 Central unit TOA MIC AUX LINE LINE CONTROL MIC UTER TIME OUT POWER OFF 20s 40s TEST/MIC ON OFF 40s CENTRAL UNIT TS-770 TIME OUT OFF 20s 40s Automatic mic-off setting switch (Factory preset: OFF)Step 5. Set the Remote Delegate Interface unit's Auto/Manual Selector switch to the MANUAL position to disable speech through the unit (the speech indicator extinguishes).
text_image
TS-775 Remote delegate interface unit Speech Indicator TOA HANDSET MODULAR HANDSET TYPE INPUT -50dBV OUTPUT -40dBV INPUT OUTPUT AUTO MANUAL TALK REMOTE DELEGATE INTERFACE UNIT TS-775 Speaker Output Volume Control Handset Select Talk Switch Microphone Input Volume Control Auto/Manual Selector SwitchStep 6. Adjust the Speaker Output Volume control to enable the remote party to hear audio from the Chairman and Delegate units clearly at their telephones or PCs.
Note
When using a telephone, if sound is not audible at all, change the position of the Handset Selector switch (default position: A).
Step 7. Press the Talk key to enable the remote party to speak, then adjust the Microphone Input Volume control so that the remote party's voice can be heard clearly from the Chairman and Delegate units (the microphone indicator extinguishes).
Step 8. Set the Auto/Manual Selector switch to the AUTO position and perform fine adjustment of the Microphone Input Volume control to allow conversation flows to be reversed correctly between the conference room and the remote party.
13. BLOCK DIAGRAMS
13.1. TS-770 Central Unit

flowchart
graph TD
    A["MIC"] --> B["NOT"]
    C["AUX"] --> D["NOT"]
    B --> E["+"]
    D --> F["+"]
    E --> G["EQ switch"]
    F --> H["+"]
    G --> I["LINE"]
    H --> J["DIN"]
    I --> K["REC OUT"]
    J --> L["LINE 1 LINE 2"]
    K --> M["Line 1"]
    L --> N["Line 2"]
    M --> O["Number of speakers"]
    N --> P["Priority control"]
    O --> Q["Chime"]
    P --> R["EXT CTRL 1"]
    P --> S["EXT CTRL 2"]
    Q --> T["Speech duration"]
    R --> U["Test control"]
    S --> V["Test/Microphone indicator"]
    W["Fuse"] --> X["+24 V+35 V"]
    X --> Y["REG"]
    Y --> Z["Power indicator"]
    style A fill:#fff,stroke:#000
    style C fill:#fff,stroke:#000
    style W fill:#fff,stroke:#000
    style X fill:#fff,stroke:#000
    style Y fill:#fff,stroke:#000
    style Z fill:#fff,stroke:#000
    style Y fill:#fff,stroke:#000
    style X fill:#fff,stroke:#000
    style Z fill:#fff,stroke:#000
13.2. TS-771 Chairman Unit

flowchart
graph TD
    A["Microphone TS-773 or TS-774"] --> B["Bias"]
    B --> C["LED control"]
    C --> D["Microphone control Speaker control"]
    D --> E["Test control Speech duration control"]
    E --> F["Priority control"]
    F --> G["REC/PHONE 1"]
    F --> H["REC/PHONE 2"]
    I["CONTROL OUT"] --> J["+35 V"]
    K["Priority key Talk key"] --> D
    L["DC control"] --> F
    M["DC control"] --> F
    N["VR"] --> O["Speaker"]
    O --> P["DIN"]
    Q["Ground"] --> R["Feedback to Microphone"]
13.3. TS-772 Delegate Unit

flowchart
graph TD
    A["Microphone TS-773 or TS-774"] --> B["Bias"]
    B --> C["LED control"]
    C --> D["Microphone control Speaker control"]
    D --> E["Test control Speech duration control"]
    E --> F["Number of speakers"]
    F --> G["DIN"]
    G --> H["VR"]
    H --> I["REC/PHONE 1"]
    H --> J["REC/PHONE 2"]
    D --> K["Talk key"]
    K --> L["+35 V"]
    L --> M["CONTROL OUT"]
    M --> N["Ground"]
    style A fill:#f9f,stroke:#333
    style G fill:#ccf,stroke:#333
13.4. TS-775 Remote Delegate Interface Unit

flowchart
graph TD
    A["To PC's microphone input"] --> B["OUTPUT"]
    C["From PC's headphone output"] --> D["INPUT"]
    E["MODULAR"] --> F["+35 V"]
    F --> G["LED control"]
    G --> H["Microphone control Speaker control"]
    H --> I["Test control Speech duration control"]
    I --> J["Priority control"]
    J --> K["DIN"]
    L["CONTROL OUT"] --> M["Signal detection"]
    N["Talk key"] --> H
    O["OUTPUT VR"] --> P["Signal detection"]
    Q["+35 V"] --> R["MODULAR"]
    S["Time to telephone's handset modular connector"] --> T["MODULAR"]
    U["DC control"] --> I
    V["DC control"] --> J
14. SPECIFICATIONS
14.1. TS-770 Central Unit
| Power Source AC mains, | 50/60 Hz |
| Power Consumption 60 W | |
| Input Microphone: -60 dB*, 600 Ω, unbalanced, phone jackAUX: -20 dB*, 600 Ω, unbalanced, phone jack | |
| Output | Recording: -20 dB*, 10 kΩ, unbalanced, phone jack, RCA jack x 2 |
| Equalizer Insertion Input: Terminals Output: -20 dB*, 10 kΩ, RCA jack | |
| Expansion IN/OUT Input: Terminals Output: -20 dB*, 10 kΩ, unbalanced, RCA jack x 2Control: 10 kΩ, voltage output, RCA jack x 2 | |
| Control Priority Speech chime: A single-tone chime activated by TS-771's priority keySpeaker Restriction: Number of simultaneously-usable TS-772/775s can be set to 0, 1, 3, or 6Automatic Mic-off: Function OFF/20 s/40 s (selectable) | |
| Number of Connectable Conference Units | 70 units (max. 35 units per line), max. 210 units when 3 Central units connected |
| Operating Temperature | 0°C to 40°C (32°F to 104°F) |
| Operating Humidity Under | 90 % RH (no condensation) |
| Finish | Pre-coated steel plate, black (30% glossy) |
| Dimensions | 210 (w) x 107.1 (h) x 316 (d) mm (8.27" x 4.22" x 12.44") |
| Weight | 4 kg (8.82 lb) |
* 0 dB = 1 V
Note: The design and specifications are subject to change without notice for improvement.
- Accessories
Power cord (2 m) 1
14.2. TS-771 Chairman Unit and TS-772 Delegate Unit
| Power Source 35 V DC, under 30 mA (supplied from TS-770 Central unit) | |
| Output | Headphone/Recording: 32 (headphone)/ 10 k , -20 dB^* (recording),unbalanced, mini jack, equipped with a volume controlInternal Speaker: 130 , 200 mW Contact output: 24 V DC , Max. 50 mA |
| Control Speech: Microphone and speaker on-off control by Talk keyPriority speech (TS-771 only):Microphone and speaker on-off control, other microphone off, and single-tone chime activation by Priority key | |
| Operating Temperature | 0^ to 40^ ( 32^ to 104^ ) |
| Operating Humidity Under | 90 % RH (no condensation) |
| Finish | Case: ABS resin, blackPanel: ABS resin, gray metallic, 50 % glossy, paint |
| Dimensions | 114.5 (w) × 78.4 (h) × 152.9 (d) mm (4.51" x 3.09" x 6.02") |
| Weight | 560 g (1.23 lb) |
* 0 dB = 1 V
Note: The design and specifications are subject to change without notice for improvement.
14.3. TS-773 and TS-774 Microphones
| Model No. | TS-773 TS-774 | |
| Type | Electret condenser microphone | |
| Directivity | Unidirectional | |
| Rated Impedance | 1.8 kΩ | |
| Rated Sensitivity | -37 dB (1 kHz, 0 dB = 1 v/Pa) | |
| LED Indicator | Speech Indicator (ring type) | |
| Frequency Response | 100 – 13,000 Hz | |
| Output Connector | Equivalent to XLR-4-32 | |
| Finish | Gooseneck: Stainless steel, blackOther: ABS resin, black | |
| Length | 368 mm (14.49") 518 mm (20.39") | |
| Weight | 90 g (3.17 oz) 105 g (3.7 oz) | |
| Applicable Unit (Option) | TS-771 Chairman unit, TS-772 Delegate unit | |
Note: The design and specifications are subject to change without notice for improvement.
14.4. TS-775 Remote Delegate Interface Unit
| Power Source 35 V DC, under 30 mA (supplied from TS-770 Central unit) | |
| Input | -50 dB*, 200 Ω, balanced, mini jack, equipped with a volume control |
| Output -40 dB*, 22 Ω, balanced, mini jack, equipped with a volume control | |
| Speech Mode Auto: Voice-activated Automatic switchingManual: Talk key on-off switching | |
| Operating Temperature 0°C to 40°C (32°F to 104°F) | |
| Operating Humidity Under 90 % RH (no condensation) | |
| Finish Pre-coated steel plate, black | |
| Dimensions 160 (w) x 41.8 (h) x 100 (d) mm (6.3" x 1.65" x 3.94") (excluding projection) | |
| Weight 700 g (1.54 lb) | |
* 0 dB = 1 V
Note: The design and specifications are subject to change without notice for improvement.
14.5. YR-770-2M 2 m Extension Cord and YR-770-10M 10 m Extension Cord
| Model No. | YR-770-2M | YR-770-10M |
| Connector | DIN socket (8P, unit's rear-mounted connector side), DIN plug (8P, unit's cord connector side) | |
| Length | 2 m (78.74") | 10 m (393.7") |
Note: The design and specifications are subject to change without notice for improvement.