
Pro L30000UNL - Video projector EPSON - Free user manual and instructions
Find the device manual for free Pro L30000UNL EPSON in PDF.

| Product Type | Video Projector |
| Brand | Epson |
| Model | Pro L30000UNL |
| Display Technology | 3LCD |
| Native Resolution | WUXGA (1920 x 1200) |
| Brightness (Lumens) | 30,000 lumens (center) |
| Contrast Ratio | 2,500,000:1 (dynamic) |
| Lens Shift | Motorized, vertical and horizontal |
| Light Source | Laser phosphor (nominal life 20,000 hours) |
| Dimensions (W x D x H) | Approx. 22.4 x 26.8 x 10.6 in (570 x 680 x 270 mm) |
| Weight | Approx. 79.4 lb (36 kg) |
| Power Consumption | 100-240 VAC, 50/60 Hz, max 2,200 W |
| Input Signals | HDMI, DVI-D, VGA, HDBaseT, SDI (optional) |
| Key Features | 4K enhancement, edge blending, multi-projection, geometric correction |
| Maintenance | Filter cleaning every 1,000 hours; laser unit sealed |
| Safety | Class 1 laser product, overheat protection, Kensington lock slot |
| Spare Parts | Replacement air filter, remote control, optional lenses |
| General Information | Professional installation required, ceiling mount compatible |
Frequently Asked Questions - Pro L30000UNL EPSON
User questions about Pro L30000UNL EPSON
0 question about this device. Answer the ones you know or ask your own.
Ask a new question about this device
Download the instructions for your Video projector in PDF format for free! Find your manual Pro L30000UNL - EPSON and take your electronic device back in hand. On this page are published all the documents necessary for the use of your device. Pro L30000UNL by EPSON.
USER MANUAL Pro L30000UNL EPSON
ProL30000UNL/L30002UNL
User'sGuide
Contents
Pro L30000UNL/L30002UNL User's Guide 11
Introduction to Your Projector 12
Projector Features.... 12
Additional Components 13
Additional Projector Software and Manuals 14
Optional Equipment and Replacement Parts 15
Notations Used in the Documentation 16
Where to Go for Additional Information 17
Projector Part Locations.... 17
Projector Parts - Front/Top 18
Projector Parts - Side/Rear 19
Projector Parts - Base/Handle 20
Projector Parts - Interface Ports 22
Projector Parts - Control Panel 23
Projector Parts - Remote Control 25
Setting Up the Projector 28
Projector Placement.... 28
Projector Setup and Installation Options 30
Projection Distance.... 32
Projector Connections 55
Connecting to Video Sources 55
Connecting to an HDMI Video Source 56
ConnectingtoaComponent-to-BNCVideoSource....56
Connecting to a Component Video Source 57
Connecting to an SDI Video Source.... 57
Connecting to Computer Sources.... 58
Connecting to a Computer for VGA Video.... 58
Connecting to a Computer for HDMI Video 59
Connecting to a Computer for DVI-D Video 60
Connecting to a Computer for 5 BNC Video....60
Connecting to an HDBaseT Transmitter 61
Connecting to an External Computer Monitor 62
Attaching and Removing a Lens.... 62
Attaching a Lens 62
Removing a Lens 66
Securing the Power Cord 69
Attaching and Removing the HDMI Cable Clip 69
Installing Batteries in the Remote Control 70
Using the Projector on a Network 72
Wired Network Projection....72
Connecting to a Wired Network 73
Selecting Wired Network Settings 73
Wireless Network Projection 76
Installing the Wireless LAN Module 77
Using a QR Code to Connect a Mobile Device 79
Using Quick Wireless Connection (Windows).... 80
Selecting Wireless Network Settings Manually 82
Wireless LAN Menu Settings 85
Selecting Wireless Network Settings in Windows 87
Selecting Wireless Network Settings on Mac 88
Setting Up Wireless Network Security 88
Setting Up Projector Network E-Mail Alerts 90
Network Projector E-mail Alert Messages 92
Selecting Other Network Settings....92
Setting a Static IP Address on the LCD Screen.... 93
Controlling a Networked Projector Using a Web Browser 95
Web Control Options 97
ViewinganImageCaptureoftheDisplayedImagefromaRemoteLocation....104
Using Crestron Connected 107
Setting Up Crestron Connected 108
ControllingaNetworkedProjectorUsingCrestronConnected....109
Art-Net Channel Definitions.... 111
Registering a Digital Certificate on the Projector 117
ImportingaWebServerCertificateUsingtheProjectorMenus....117
Registering Digital Certificates from a Web Browser 119
Digital Certificate Types.... 120
Using Basic Projector Features 122
Turning On the Projector 122
Turning Off the Projector 124
Selecting the Language for the Projector Menus.... 126
Resizing the Image with the Zoom Button 126
Focusing the Image Using the Focus Buttons 127
FocusingtheImageWhenUsinganOptionalShortThrowLens....128
Setting the Screen Type 130
Adjusting the Image Position Using Lens Shift 130
Adjusting the Image Position Using Screen Position.... 134
Displaying a Test Pattern 134
Image Shape 135
Correcting Image Shape with H/V Keystone 136
Correcting Image Shape with Quick Corner 138
Correcting Image Shape with Curved Surface 140
Correcting Image Shape with Corner Wall.... 145
Correcting Image Shape with Point Correction.... 151
Selecting an Image Source 153
Remote Control Operation 154
Projection Modes 157
ChangingtheProjectionModeUsingtheRemoteControl....157
Changing the Projection Mode Using the Menus.... 157
Image Aspect Ratio 158
Changing the Image Aspect Ratio 159
Available Image Aspect Ratios 159
Color Mode 160
Changing the Color Mode.... 161
Available Color Modes.... 161
Adjusting the Brightness.... 162
Constant Brightness Usage Hours 164
Adjusting Luminance Controls.... 166
Adjusting Gamma.... 168
Setting the Date and Time.... 170
Date and Time Settings 171
Adjusting Projector Features 172
Shutting Off the Picture Temporarily 172
Stopping Video Action Temporarily 173
Projector Security Features.... 174
Password Security Types 174
Setting a Password 175
Selecting Password Security Types 176
Entering a Password to Use the Projector.... 177
Saving a User's Logo Image to Display.... 178
Locking the Projector's Lens Settings and Buttons.... 180
Unlocking the Projector's Buttons 181
Locking the Remote Control Buttons 181
Installing a Security Cable 183
Projecting Two Images Simultaneously.... 184
Input Sources for Split Screen Projection 186
Using Advanced Image Adjustment Features 186
Using 4K Enhancement.... 187
Using Frame Interpolation 188
Creating Image Presets.... 190
Using MPEG Noise Reduction.... 192
AdjustingScaledResolutionImages(Super-resolution)....193
Adjusting Detail Enhancement 194
AdjustingtheColorConvergence(PanelAlignment)....196
Adjusting the Color Tone (Color Uniformity) 197
Running Light Source Calibration 199
Using Multiple Projectors 201
Multiple Projector Adjustment Overview 201
Projector Identification System for Multiple Projector Control 203
Setting the Projector ID 203
Setting the Remote Control ID 204
Tiling Images into One Image 205
Configuring Tiling Automatically.... 206
Configuring Tiling Manually.... 208
Blending the Image Edges 210
Adjusting the Black Level 213
Matching Tint and Brightness (Screen Matching) 217
Matching the Screens Automatically 218
Matching the Screens Manually 219
Scaling an Image 221
Tiling Images Using Geometry Correction Assist 223
StackingImagesUsingGeometryCorrectionAssist....224
Simple Stacking for One Bright Image 225
Simple Stacking Conditions 225
Setting Up Simple Stacking.... 226
Saving Settings to Memory and Using Saved Settings 227
Saving a Scheduled Event 230
Viewing Scheduled Events 231
Editing a Scheduled Event.... 232
Copying Menu Settings Between Projectors 233
Saving Settings to a USB Flash Drive 234
Transferring Settings from a USB Flash Drive 236
Saving Settings to a Computer 237
Transferring Settings from a Computer 239
Adjusting the Menu Settings 242
Using the Projector's Menus.... 242
Image Quality Settings - Image Menu 244
Input Signal Settings - Signal Menu 248
Projector Feature Settings - Settings Menu 252
Projector Setup Settings - Extended Menu 256
Projector Network and Camera Settings - Network Menu 264
Projector Information Display - Info Menu 266
Event ID Code List 268
Projector Reset Options - Reset Menu 270
Maintaining and Transporting the Projector 273
Projector Maintenance 273
Cleaning the Lens 273
Cleaning the Projector Case 274
Air Filter and Vent Maintenance 274
Cleaning the Air Filters 275
Cleaning the Air Vents 281
Replacing the Air Filters 281
Replacing the Remote Control Batteries 285
Transporting the Projector 287
Solving Problems 292
Projection Problem Tips 292
Projector Light Status 293
Viewing Projector Status Information 297
Projector Status Display Messages 298
Using the Projector Help Displays 303
Solving Image Problems 304
Solutions When No Image Appears 304
Solutions When "No Signal" Message Appears 305
Displaying From a PC Laptop 306
Displaying From a Mac Laptop 306
Solutions When "Not Supported" Message Appears 307
Solutions When Only a Partial Image Appears 307
Solutions When the Image is Not Rectangular 308
Solutions When the Image Contains Noise or Static 308
Solutions When the Image is Fuzzy or Blurry 309
SolutionsWhentheImageBrightnessorColorsareIncorrect....309
SolutionsWhenAutomaticAdjustmentsarenotAppliedCorrectly....310
SolutionsWhenanAfterimageRemainsOntheProjectedImage....311
Solving Projector or Remote Control Operation Problems 311
Solutions to Projector Power or Shut-Off Problems 312
Solutions to Remote Control Problems 312
Solutions to Password Problems 313
Solving Network Problems 314
Solutions When Wireless Authentication Fails 314
SolutionsWhenYouCannotAccesstheProjectorThroughtheWeb....315
SolutionsWhentheImageContainsStaticDuringNetworkProjection....316
SolutionsWhenNetworkAlertE-MailsareNotReceived....316
Where to Get Help (U.S. and Canada) 316
Technical Specifications 318
General Projector Specifications 318
Projector Light Source Specifications.... 319
Remote Control Specifications 320
Projector Dimension Specifications 320
Projector Electrical Specifications 320
Projector Environmental Specifications.... 321
Projector Safety and Approvals Specifications.... 322
Supported Video Display Formats 322
Notices 326
Recycling (U.S. and Canada) 326
Important Safety Information 326
Important Safety Instructions.... 326
Laser Safety Information 330
Laser Safety Labels 331
Hazard Distance (HD) 332
Typical Setup Configurations (U.S. Only) 334
List of Safety Symbols (corresponding to IEC60950-1 A2).... 337
Manufacturer and Importer Address.... 341
FCC Compliance Statement.... 342
Binding Arbitration and Class Waiver 342
Trademarks 345
Copyright Notice.... 346
ANoteConcerningResponsibleUseofCopyrightedMaterials....347
Copyright Attribution 347
ProL30000UNL/L30002UNLUser'sGuide
Welcome to the Pro L30000UNL/L30002UNL User's Guide.
For a printable PDF copy of this guide, click here.
IntroductiontoYourProjector
Refertothesesectionstolearnmoreaboutyourprojectorandthismanual.
ProjectorFeatures
NotationsUsedintheDocumentation
Where to Gofor Additional Information
ProjectorPartLocations
ProjectorFeatures
TheProL30000UNLandProL30002UNL projectors includethesespecialfeatures:
Bright, high-resolution projection system
• Upto30000lumensofbrightness(whitelightoutputandcolorlightoutput)
Note: Color brightness (color light output) and white brightness (white light output) will vary depending on usage conditions. Colorlight output measured in accordance with IDMS15.4; whitelight output measured in accordance with ISO21118.
•Nativeresolutionof1920×1200pixels(WUXGA)
Flexibleconnectivity
- Wiredandwireless(optional)networksupportforprojection,monitoring,andcontrolviaremote networkcomputer
- Variety of connection methods for a computer or video device including HDMI, BNC, DVI-D, SDI, and HDBaseT
- Portsforconnectinganexternalmonitor
Easy-to-usesetupandoperationfeatures
- Interchangeable bayonetlensoptions available
- Projectimagessidebysidefromtwoseparateinputsources
- CreateonelargeseamlessdisplaywhenprojectingfrommultipleprojectorsusingEdgeBlending
- Epson'sInstantOffandDirectPowerOnfeaturesforquicksetupandshutdown
•SupportforCrestronConnectedandArt-Netnetworkmonitoringsystems
- Networkmessagebroadcastsystemtoprojecttimelymessagestoallnetworkedprojectors(Windows only)
AdditionalComponents
AdditionalProjectorSoftwareandManuals
OptionalEquipmentandReplacementParts
Parenttopic: Introduction to Your Projector
Relatedconcepts
ProjectorPartLocations
ProjectorConnections
UsingMultipleProjectors
UsingCrestronConnected
Relatedtopics
UsingtheProjectoronaNetwork
AdditionalComponents
Dependingonhowyouplantousetheprojector,youmayneedtoobtainadditionalcomponents.
Note: To connect a Mac that does not include a compatible video output port, you need to obtain an adapter that allows you to connect to an input port on the projector. Contact Apple for compatible adapter options. To connect a smartphone or tablet, you may need to obtain an adapter that allows you to connect the projector. This allows you to mirror your smartphone or tablet screens, watch movies, and more. Contact your device manufacturer for compatible adapter options.
Unlesslisted as available from Epsonin thistable, see your local computerorelectronics dealer for purchase information.
| Signalorconnection type | Additionalcomponentnecessary |
| ComponentvideoComponent-to-BNCorD-sub,15-pin,component-to-VGAvideocableor adapterAvailableforpurchasefromEpsonoranauthorizedEpsonreseller. | |
| HDMIHDMlcable | AvailableforpurchasefromEpsonoranauthorizedEpsonreseller.YoualsoneedasplitterthatsupportsHDMlsignals(commerically available). |
| VGAVGAcomputercable | AvailableforpurchasefromEpsonoranauthorizedEpsonreseller.Ifyouwanttoconnecttheprojectorusingasplitter,youalsoneedasplitter thatsupportsVGAsignals(commerciallyavailable)andasecondVGA computercable. |
| BNCVGA-to-5-BNCcableor | adapterAvailableforpurchasefromEpsonoranauthorizedEpsonreseller. |
| DVI-DCompatibleDVI-Dcable | |
| HDBaseTCompatible100Base-TXLANcable | |
| SDICompatibleBNCvideocable | |
Parenttopic:ProjectorFeatures
Relatedconcepts
ProjectorConnections
Relatedreferences
OptionalEquipmentandReplacementParts
AdditionalProjectorSoftwareandManuals
Afterconnectingandsettinguptheprojector,installtheprojectorsoftwareasnecessary.Youmayneed toinstallitfromasoftwareCD,ifincluded,ordownloadthesoftwareandmanualsasnecessary.
Youcaninstalltheprojectorsoftwareprogramslistedhereandviewtheirmanualsforinstructionson usingthem.
Note: If you still need help after checking this manual and the sources listed here, you can use the EpsonPrivateLineSupportservicetogethelpfast.Fordetails,see"WhereToGetHelp."
| ProjectorsoftwareManual | Description | |
| EpsonProjector Management(Windows only) | EpsonProjector ManagementOperation Guide | Letsyoumonitorandcontrolyourprojector throughthenetwork.Youcandownloadthelatestsoftwareand documentationfromtheEpsonwebsite.Goto epson.com/support(U.S.)orepson.ca/support (Canada)andselectyourprojector. |
| EpsoniProjection (Windows/Mac) | EpsoniProjection OperationGuide (Windows/Mac) | Letsyouprojectthecomputerscreensof usersoveranetwork.Youcandownloadthelatestsoftwareand documentationfromtheEpsonwebsite. |
| EpsoniProjectionappInstructionsareincluded withtheapp | Visitformoreinformation. | |
| EpsonProjector ProfessionalTool (Windows/Mac) | EpsonProjector ProfessionalTool OperationGuide | LetsyoumanagemultipleEpsonprojectors simultaneouslyYoucandownloadthelatestsoftwareand documentationfromtheEpsonwebsite. |
| —OpenSourceSoftware | License | Youcandownloadthisdocumentfromthe Epsonwebsite. |
Note: EpsoniProjectionisnotrecommendedforusewithstreamingvideo.
Parenttopic:ProjectorFeatures
OptionalEquipmentandReplacementParts
Youcanpurchasescreens,otheroptionalaccessories,andreplacementpartsfromanEpsonauthorizedreseller.Tofindthenarestreseller,call800-GO-EPSON(800-463-7766)intheU.S.or800-807-7766inCanada. Or you can purchase online at epsonstore.com (U.S. sales) or epsonstore.ca (Canadian sales).
Epsonoffersthefollowingoptionalaccessoriesandreplacementpartsforyourprojector:
| OptionorpartPartnumber | |
| Airfilter(ELPAF52)V13H134A52 | |
| WirelessLANmodule(ELPAP10)V12H731P02 | |
| HDBaseTTransmitter(ELPHD01)V12H547020 | |
| PixAlignCamera(ELPEC01)*V12HA46010 | |
| Remotecontrolcableset(ELPKC28)V12H005C28 | |
| EpsonDC-07documentcamera(ELPDC07)V12H759020 | |
| EpsonDC-13documentcamera(ELPDC13)V12H757020 | |
| EpsonDC-21documentcamera(ELPDC21)V12H758020 | |
| Rear-throwzoomlens(ELPLR05)V12H004R05 | |
| UltraShort-throwzoomlens(ELPLX03)V12H004X03 | |
| Short-throwzoomlens(ELPLU05)V12H004U05 | |
| Wide-throwzoomlens(ELPLW07)V12H004W07 | |
| Middle-throwzoomlens#1(ELPLM12)V12H004M0C | |
| Middle-throwzoomlens#2(ELPLM13)V12H004M0D | |
| Middle-throwzoomlens#3(ELPLM14)V12H004M0E | |
| Long-throwzoomlens#1(ELPLL09)V12H004L09 | |
| Long-throwzoomlens#2(ELPLL10)V12H004L0A | |
| MountingHandle(ELPMB56)V12H003A01 |
*Requiresfirmwareversion4.00orlater.
Parenttopic:ProjectorFeatures
NotationsUsedintheDocumentation
Followtheguidelinesinthesenotationsasyoureadyourdocumentation:
- Warningsmustbefollowedcarefullytoavoidbodilyinjury .
- Cautionsmustbeobservedtoavoiddamagetoyourequirement.
- Notes contain important information about your projector.
- Tipscontainadditionalprojectioninformation.
Parenttopic: Introduction to Your Projector
WheretoGoforAdditionallInformation
Needquickhelponusingyourproject?Here'swheretolookforhelp:
•Built-inhelpsystem
PresstheUserbuttonontheremotecontrolthatisassignedtothehelpsystemtogetquicksolutions tocommonproblems.
Note: You must assign the help function to a User button. Follow the link below for more information.
- epson.com/support (U.S.), epson.ca/support (Canada), or latin.epson.com/support (Caribbean)
ViewFAQs(frequentlyaskedquestions)ande-mailyourquestionstoEpsontechnicalsupport24 hoursaday.
- If you still need help after checking this manual and any others sources listed here, you can use the Epson Private Line Support services to get help fast. Ford details, see "Where to Get Help."
Parenttopic: Introduction to Your Projector
Relatedreferences
WheretoGetHelp(U.S.andCanada)
ProjectorFeatureSettings-SettingsMenu
Relatedtopics
SolvingProblems
ProjectorPartLocations
Check the projector part illustration to learn about the part's your projector.
ProjectorParts-Front/Top
ProjectorParts-Side/Rear
ProjectorParts-Base/Handle
ProjectorParts-InterfacePorts
ProjectorParts-ControlPanel
ProjectorParts-RemoteControl
Parenttopic: Introduction to Your Projector
ProjectorParts-Front/Top
1Carryinghandles
2Capforlenscover
3Lenscover
4Projectionlens
5Built-incamera
6Remotereceiver
7Airfiltercovers
8Airintakevent
9Holesforoptionalmounting
10Statuslights
Parenttopic:ProjectorPartLocations
Relatedtopics
AttachingandRemovingaLens
ProjectorParts-Side/Rear
1 Exhaustvent
2USB-Aportcover(foroptionalwirelessLANunit)
3Kensingtonsecurityslot
4Interfaceports
5Controlpanel
6Powercordholder
7ACinlet
8Powerswitch
9Remotereceiver
Parenttopic:ProjectorPartLocations
ProjectorParts-Base/Handle
Base
flowchart
graph TD
    A["1"] --> B["2"]
    B --> C["3"]
    C --> D["4"]
    D --> E["5"]
    E --> F["6"]
    F --> G["7"]
    G --> H["8"]
    H --> I["9"]
    I --> J["10"]
    J --> K["11"]
    K --> L["12"]
    L --> M["13"]
    M --> N["14"]
    N --> O["15"]
    O --> P["16"]
    P --> Q["17"]
    Q --> R["18"]
    R --> S["19"]
    S --> T["20"]
    T --> U["21"]
    U --> V["22"]
    V --> W["23"]
    W --> X["24"]
    X --> Y["25"]
    Y --> Z["26"]
    Z --> A["1"]
1Handlemountingpoints(6)
2Feet
Youcanremovethefeetandattachthemtothehandle.Youcanextendthefeetapproximately 0.5inch(16mm)beforetheydetach.
Handle
flowchart
graph TD
    A["1"] --> B["2"]
    A --> C["3"]
    A --> D["4"]
    A --> E["5"]
    A --> F["6"]
    A --> G["7"]
    A --> H["8"]
    A --> I["9"]
    A --> J["10"]
    A --> K["11"]
    A --> L["12"]
    A --> M["13"]
    A --> N["14"]
    A --> O["15"]
    A --> P["16"]
    A --> Q["17"]
    A --> R["18"]
    A --> S["19"]
    A --> T["20"]
1Projectorattachmentscrewholes
2Eye-boltscrewholes(usedfortransportation)
Parenttopic:ProjectorPartLocations
Relatedtasks
TransportingtheProjector
InstallingaSecurityCable
ProjectorParts-InterfacePorts
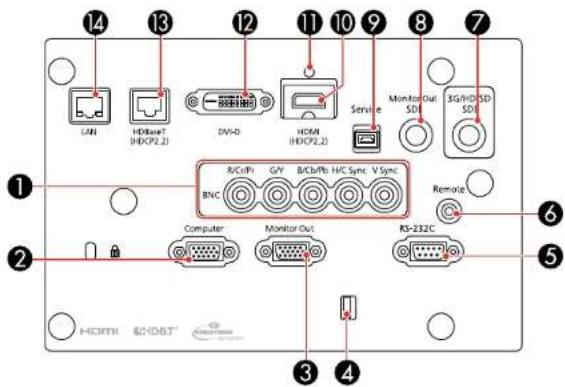
1BNCports
2Computerport
3MonitorOutport
4Cableholder
5RS-232Cport
6Remoteport
73G/HD/SDSDIport
8MonitorOutSDIport
9Serviceport
10HDMIport
11 Cableclipslot
12DVI-Dport
13HDBaseTport
14NetworkLANport
Parenttopic:ProjectorPartLocations
Relatedreferences
OptionalEquipmentandReplacementParts
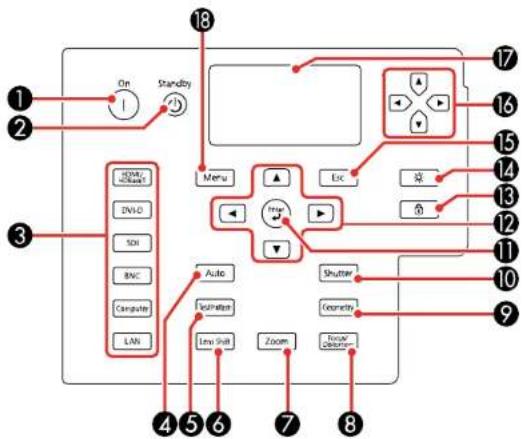
ProjectorParts-ControlPanel
flowchart
graph TD
    A["Startbox"] --> B["Standby"]
    B --> C["Menu"]
    C --> D["Esc"]
    D --> E["Shutter"]
    E --> F["Geometry"]
    F --> G["Focus Detector"]
    H["Computer"] --> I["Auto"]
    I --> J["Environment"]
    J --> K["Lew Shift"]
    K --> L["Zoom"]
    L --> M["Shutter"]
    N["ON"] --> O["On"]
    P["18"] --> Q["17"]
    R["2"] --> S["2"]
    T["3"] --> U["3"]
    V["4"] --> W["4"]
    X["5"] --> Y["5"]
    Z["6"] --> AA["6"]
    AB["7"] --> AC["7"]
    AD["8"] --> AE["8"]
1Onbutton(turnsontheprojector)
2 Standbybutton(turnsofftheprojector)
3Sourcebuttons(selectanimagesource)
4Autobutton(automaticallyadjustscomputerimages)
5TestPatternbutton(displaysatestpattern)
6LensShiftbutton(adjuststheimageposition)
7Zoombutton(changestheimagesize)
8Focus/Distortionbutton(adjuststheimagefocus/distortion)
9Geometrybutton(adjuststheimageshape)
10Shutterbutton(turnsinputsignalonorofftemporarily)
11 Enterbutton(selectsoptions)
12Arrowbuttons(movethroughon-screenoptions;adjustthefocus,zoom,andlensshift)
13Lockbutton(displaytheControlPanelLockscreen)
14Lightbutton(lightsupthecontrolpanelbuttonsandscreentemporarily)
15Escbutton(cancels/exitsfunctions)
16Arrowbuttons(selectstatusinformationsettings)
17Statusdisplay(displaysprojectorstatusinformation)
18Menubutton(accessesprojectormenusystem)
Parenttopic:ProjectorPartLocations
ProjectorParts-RemoteControl
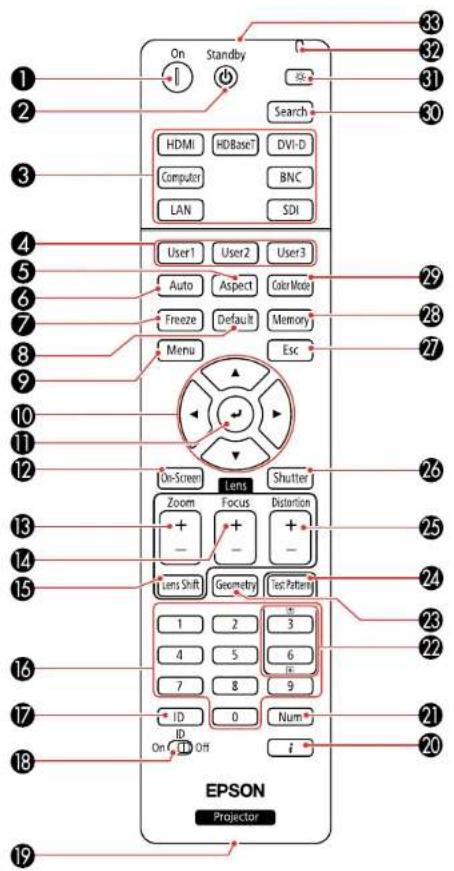
1Onbutton(turnsontheprojector)
2 Standbybutton(turnsofftheprojector)
3Sourcebuttons(selectanimagesource)
4 User1, User2, and User3 buttons (open menu assigned by user)
5Aspectbutton(selectstheimageaspectratio)
6 Autobutton(automatically adjusts computer images)
7Freezebutton(stopsvideoaction)
8Defaultbutton(resetssettingstotheirdefaultvaluesintheprojectormenusystem)
9Menubutton(accessesprojectormenusystem)
10Arrowbuttons(movethroughon-screenoptionsandmovepointer)
11 Enterbutton(selectsoptionsandleftmousebutton)
12On-Screenbutton(displaysorhidestheon-screenmenusormessages)
13Zoombutton(changestheimagesize)
14Focusbutton(adjuststheimagefocus)
15LensShiftbutton(adjuststheimageposition)
16Numericbuttons(enternumbers)
17IDbutton(holddownandusenumerickeystoselectprojectortocontrol)
18IDswitch(selectscontrolofoneorallprojectors)
19Remoteport(connectstoaremotecontrolcable)
20ibutton(displaysthelnfomenu)
21 Numbutton(holddownandusenumerickeystoenternumbers)
22Pageupanddownbuttons(changethedisplayedtestpattern;scrollthroughimagefileswhen projectingfromacomputeroveranetworkconnection)
23Geometrybutton(correctsimageshape)
24TestPatternbutton(displaysatestpattern)
25Distortionbutton(correctsimagedistortion)
26Shutterbutton(turnssignalonorofftemporarily)
27Escbutton(cancels/exitsfunctions)
28Memorybutton(savesandappliespresets)
29ColorModebutton(selectsdisplaymodes)
30Searchbutton(searchesforconnectedsources)
31Lightbutton(lightsuptheremotecontrolbuttonstemporarily)
32Indicatorlight(lightsupwhentheremotecontrolisinuse)
33Remotecontrolsignalemitter(emitsremotecontrolsignals)
Parenttopic:ProjectorPartLocations
SettingUptheProjector
Followtheinstructionsinthesesectionstosetupyourprojectorforuse.
ProjectorPlacement
ProjectorConnections
AttachingandRemovingaLens
SecuringthePowerCord
AttachingandRemovingtheHDMICableClip
Installing Batteries in the Remote Control
ProjectorPlacement
Youcanplacetheprojectoronalmostanyflatsurfacetoprojectanimation.
Youcanalsoinstalltheprojectorinaceilingmountifyouwanttouseitinafixedlocation.
Warning: Note the following points when installing on a ceiling with a ceiling mount or in a high location. If installation work is not carried out correctly, the projector could falldown. This may result in injury or accidents.
- Sincespecialtechniquesarerequiredtoinstalltheprojectoronaceilingandtohandletheceilingmount,makesureyoucontactaprofessional.
- Securethemountwithboltsusingthehandlesecuringsection(6points)onthetoporbaseofthe projector.
- Toprevent the projector from falling, threads sufficiently strong wirerope and soon through the ceiling mount and secure to the ceiling.
Keeptheseconsiderationsinmindasyouselectaprojectorlocation:
- Placetheprojectoronasturdy, levelsurfaceorinstallitusingacompatiblemount.
• Install the projector at any angle. There is no vertical or horizontal limit to how the projector can be installed.
- Leaveplentyofspacearoundandundertheprojectorforventilationasdescribedhere,anddonot placeitontopoformextoanythingthatcouldblockthevents.
- Placetheprojectorparalleltothescreen.
- Position the projector within reach of foregrounded electrical outlet to extension cord.
Caution: Be sure to leave at least 20 inches (50 cm) of space in front of the air exhaust and intake vents.
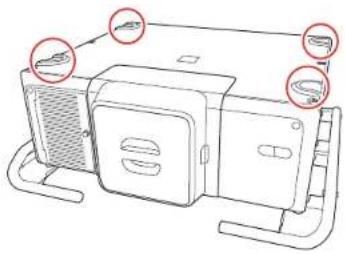
Youcanplacetheprojectoronitssidetoprojectaportraitimagebyattachingtheoptionalmounting handletothetopoftheprojector.Youcanalsoremovethefeetfromtheprojectorandattachthemtothe handlesasshownhere.
Caution: If you are setting up the projector with the intake vent on the bottom, be sure to leave the following amount of space around the projector.
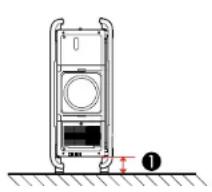
natural_image
Technical line drawing of a vertical mechanical device with internal components and a base, showing no text or symbols.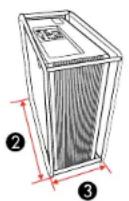
13.9inches(10cm)
231.5inches(80cm)
313.78 inches(35cm)
If you are installing multiple projectors next to each other, besure to leave at least 20 inches (50 cm) of space between the projectors. Also, makes sure heated air from an exhaust vent does not go into the air intake vent of another projector.
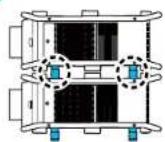
If you are stacking two projectors on top of one another, follow these guidelines:
- Donotstackmorethantwoprojectors
•Thebottomprojectormusthavethecarryinghandlesinstalledonthetopoftheprojector
- Alignthetopprojectorsothatitsfeetareintheindentationsonthebottomprojectorshownhere.
natural_image
Line drawing of a microwave oven with two sensors and ventilation slots (no text or symbols)- Donotremovethefeetonthebottomoftheprojector


ProjectorSetupandInstallationOptions
ProjectionDistance
Parenttopic: SettingUptheProjector
ProjectorSetupandInstallationOptions
Youcansetuporinstallyourprojectorinthefollowingways:
Front

Rear
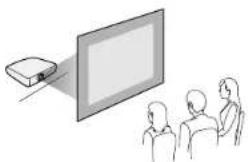
natural_image
Illustration of a projector projecting onto a screen to three people (no text or symbols present)Frontceiling
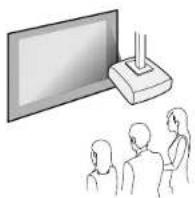
Rearceiling
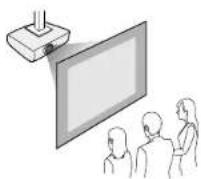
If you project from the ceiling or from the rear, select the correct Projection setting and, if necessary, adjusttheOSDRotationsetting.
You can switch the Projection setting between Front and Front/Ceiling or Rear and Rear/Ceiling by holdingtheShutterbuttonontheremotecontrolforapproximately5seconds.
Parenttopic:ProjectorPlacement
Relatedreferences
ProjectorSetupSettings-ExtendedMenu
ProjectionDistance
The distance at which you place the projector from the screen, but can vary depending on the zoom factor, aspect ratio, and other settings.
Use the tables heretodetermine approximately how fartoplacethe projector from the screen based on the sizeof the projected image. (Conversion figures may have been rounded up or down.)
YoucanalsousetheprojectorThrowDistanceCalculatoratepson.com/support(U.S.)orepson.ca/support(Canada).
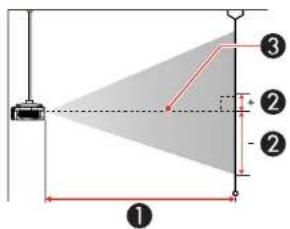

1Projectiondistance
2Distancefromthecenterofthelenstothebaseoftheimage(variesdependingonverticallens shift)
3Centeroflens
Rear-throwZoomLens(ELPLR05)
| 16:10AspectRatioImageorScreen | ||
| ScreenorimagesizeProjection | distance(1) WidetoTele(Minimumto Maximum) | Verticalensshift(2) Toptobottom |
| 100inches49to49inches | (125to125cm) | -35.6to-17.4inches (-90to-44cm) |
| 120inches60to60inches | (152to152cm) | -42.7to-20.9inches (-109to-53cm) |
| 150inches76to76inches | (193to193cm) | -53.4to-26.1inches (-136to-66cm) |
| 200inches102to102inches | (260to260cm) | -71.2to-34.8inches (-181to-88cm) |
| 250inches129to129inches | (328to328cm) | -89to-43.3inches (-226to-110cm) |
| 1000inches528to528inches | (1342to1342cm) | -356.1to-173.9inches (-904to-442cm) |
| 16:9AspectRatioImageorScreen | ||
| ScreenorimagesizeProjection | distance(1) WidetoTele(Minimumto Maximum) | Verticalensshift(2) Toptobottom |
| 100inches51to51inches | (129to129cm) | -33.9to-15.2inches (-86to-38cm) |
| 120inches62to62inches | (157to157cm) | -40.7to-18.2inches (-103to-46cm) |
| 150inches78to78inches | (198to198cm) | -50.8to-22.7inches (-129to-58cm) |
| 200inches105to105inches | (268to268cm) | -67.8to-30.3inches (-172to-77cm) |
| 250inches133to133inches | (337to337cm) | -84.6to-37.8inches (-215to-96cm) |
| 972inches528to528inches | (1341to1341cm) | -329.3to-147.3inches (-836to-374cm) |
| 4:3AspectRatiolmageorScreen | ||
| ScreenorimagesizeProjection | distance(1) WidetoTele(Minimumto Maximum) | Verticalensshift(2) Toptobottom |
| 90inches50to50inches | (128to128cm) | -36.3to-17.7inches (-92to-45cm) |
| 100inches56to56inches | (143to143cm) | -40.3to-19.7inches (-102to-50cm) |
| 120inches68to68inches | (174to174cm) | -48.4to-23.6inches (-123to-60cm) |
| 150inches86to86inches | (219to219cm) | -60.5to-29.5inches (-154to-75cm) |
| 200inches117to117inches | (296to296cm) | -80.6to-39.4inches (-205to-100cm) |
| 250inches147to147inches | (373to373cm) | -100.8to-49.2inches (-256to-125cm) |
| 883inches528to528inches | (1342to1342cm) | -356to-173.8inches (-904to-442cm) |
UltraShort-throwZoomLens(ELPLX03)
| 16:10AspectRatioImageorScreen | ||
| ScreenorImagesizeProjection | distance(1)(Wide)Vertical lens shift(2) | Toptobottom |
| 120inches35inches | (89cm) | -3.2to12.7inches(-8to32cm) |
| 150inches44inches | (112cm) | -4to15.9inches(-10to40cm) |
| 200inches59inches | (151cm) | -5.3to21.2inches(-13to54cm) |
| 300inches90inches | (228cm) | -7.9to31.8inches(-20to81cm) |
| 400inches120inches | (306cm) | -10.6to42.4inches(-27to108cm) |
| 500inches151inches | (384cm) | -13.2to53inches(-34to135cm) |
| 600inches182inches | (461cm) | -15.9to63.6inches(-40to162cm) |
| 700inches212inches | (539cm) | -18.5to74.2inches(-47to188cm) |
| ScreenorimagesizeProjection | distance(1)(Wide)Vertical lensshift(2) | Toptobottom |
| 800inches243inches | (616cm) | -21.2to84.8inches(-54to215cm) |
| 1000inches304inches | (771cm) | -26.5to106inches(-67to269cm) |
| 16:9AspectRatioImageorScreen | ||
| ScreenorImagesizeProjection | distance(1)(Wide)Verticalensshift(2) | Toptobottom |
| 117inches35inches | (89cm) | 0to15.9inches(0to40cm) |
| 120inches36inches | (91cm) | 0to16.3inches(0to42cm) |
| 130inches39inches | (99cm) | 0to17.7inches(0to45cm) |
| 150inches45inches | (115cm) | 0to20.4inches(0to52cm) |
| 200inches61inches | (155cm) | 0to27.2inches(0to69cm) |
| 300inches92inches | (235cm) | 0to40.9inches(0to104cm) |
| 400inches124inches | (315cm) | 0to54.5inches(0to138cm) |
| 500inches155inches | (394cm) | 0to68.1inches(0to173cm) |
| 16:9AspectRatiolmageorScreen | ||
| ScreenorimagesizeProjection | distance(1)(Wide)Verticalensshift(2) | Toptobottom |
| 600inches187inches | (474cm) | 0to81.7inches(0to208cm) |
| 800inches249inches | (633cm) | 0to108.9inches(0to277cm) |
| 972inches303inches | (771cm) | 0to132.4inches(0to336cm) |
| 4:3AspectRatiolmageorScreen | ||
| ScreenorImagesizeProjection | distance(1) WidetoTele(Minimumto Maximum) | Verticalensshift(2) Toptobottom |
| 106inches35inches | (89cm) | -3.2to12.7inches (-8to32cm) |
| 110inches36inches | (91cm) | -3.3to13.2inches (-8to34cm) |
| 120inches40inches | (101cm) | -3.6to14.4inches (-9to37cm) |
| 150inches50inches | (127cm) | -4.5to18inches (-11to46cm) |
| 200inches67inches | (171cm) | -6to24inches (-15to61cm) |
| 300inches102inches | (259cm) | -9to36inches (-23to91cm) |
| 400inches137inches | (347cm) | -12to48inches (-30to122cm) |
| ScreenorimagesizeProjection | distance(1) WidetoTele(Minimumto Maximum) | Verticalensshift(2) Toptobottom |
| 500inches171inches | (394cm) | -15to60inches (-38to152cm) |
| 600inches187inches | (474cm) | -18to72inches (-46to183cm) |
| 800inches249inches | (633cm) | -24to96inches (-61to244cm) |
| 883inches303inches | (771cm) | -26.5to106inches (-67to269cm) |
Short-throwZoomLens(ELPLU05)
| 16:10AspectRatiolmageorScreen | ||
| ScreenorimagesizeProjection | distance(1) WidetoTele(Minimumto Maximum) | Vertical lens shift(2) Toptobottom |
| 100inches75to91inches | (191to232cm) | -55.8to2.8inches (-142to7cm) |
| 120inches91to110inches | (231to280cm) | -66.9to3.3inches (-170to8cm) |
| 150inches114to139inches | (290to352cm) | -83.6to4.1inches (-212to11cm) |
| 200inches153to186inches | (389to472cm) | -111.5to5.5inches (-283to14cm) |
| 250inches192to233inches | (488to591cm) | -139.4to7.1inches (-354to18cm) |
| 16:10AspectRatioImageorScreen | ||
| ScreenorimagesizeProjection | distance(1) WidetoTele(Minimumto Maximum) | Verticalensshift(2) Toptobottom |
| 1000inches778to940inches | (1977to2387cm) | -557.6to27.6inches (-1416to70cm) |
| 16:9AspectRatioImageorScreen | ||
| ScreenorimagesizeProjection | distance(1) WidetoTele(Minimumto Maximum) | Verticalensshift(2) Toptobottom |
| 100inches77to94inches | (196to239cm) | -54.6to5.6inches (-139to14cm) |
| 120inches93to113inches | (237to288cm) | -65.5to6.7inches (-166to17cm) |
| 150inches117to142inches | (298to362cm) | -81.9to8.3inches (-208to21cm) |
| 200inches158to191inches | (400to485cm) | -109.2to11.1inches (-277to28cm) |
| 250inches197to239inches | (502to608cm) | -136.6to13.8inches (-347to35cm) |
| 972inches777to939inches | (1975to2385cm) | -530.6to54.1inches (-1348to137cm) |
| 4:3AspectRatiolmageorScreen | ||
| ScreenorimagesizeProjection | distance(1) WidetoTele(Minimumto Maximum) | Verticalensshift(2) Toptobottom |
| 90inches77to93inches | (195to237cm) | -56.8to2.8inches (-144to7cm) |
| 100inches85to104inches | (217to264cm) | -63.1to3.1inches (-160to8cm) |
| 120inches103to125inches | (262to318cm) | -75.8to3.8inches (-192to10cm) |
| 150inches130to157inches | (329to399cm) | -94.7to4.7inches (-214to12cm) |
| 200inches174to211inches | (442to535cm) | -126.3to6.3inches (-321to16cm) |
| 250inches218.1to264inches | (554to670cm) | -157.9to7.9inches (-401to20cm) |
| 883inches778to939inches | (1976to2386cm) | -557.4to27.6inches (-1416to70cm) |
Wide-throwZoomLens(ELPLW07)
| 16:10AspectRatiolmageorScreen | ||
| ScreenorimagesizeProjection | distance(1) WidetoTele(Minimumto Maximum) | Verticalensshift(2) Toptobottom |
| 100inches106to147inches | (272to375cm) | -61to8inches (-155to20cm) |
| 120inches129to177inches | (328to452cm) | -73.2to9.6inches (-186to24cm) |
| 16:10AspectRatioImageorScreen | ||
| ScreenorimagesizeProjection | distance(1) WidetoTele(Minimumto Maximum) | Verticalensshift(2) Toptobottom |
| 150inches162to222inches | (413to567cm) | -91.5to12inches (-232to30cm) |
| 200inches218to298inches | (554to760cm) | -122to16inches (-310to41cm) |
| 250inches273to374inches | (695to952cm) | -152.4to20.1inches (-387to51cm) |
| 1000inches1107to1509inches | (2812to3840cm) | -610.1to80.1inches (-1550to203cm) |
| 16:9AspectRatioImageorScreen | ||
| ScreenorimagesizeProjection | distance(1) WidetoTele(Minimumto Maximum) | Verticalensshift(2) Toptobottom |
| 100inches110to151inches | (280to385cm) | -60to11inches (-152to28cm) |
| 120inches132to182inches | (338to464cm) | -72to13.1inches (-183to33cm) |
| 150inches167to229inches | (425to583cm) | -90to16.4inches (-229to42cm) |
| 200inches224to307inches | (570to781cm) | -120to21.9inches (-305to56cm) |
| 250inches281to385inches | (715to979cm) | -150to27.6inches (-381to70cm) |
| 972inches1106to1507inches | (2809to3836cm) | -583to106.4inches (-1481to270cm) |
| 4:3AspectRatioImageorScreen | ||
| ScreenorimagesizeProjection | distance(1) WidetoTele(Minimumto Maximum) | Verticalensshift(2) Toptobottom |
| 90inches109to150inches | (277to382cm) | -62.2to8.2inches (-158to21cm) |
| 100inches121to167inches | (309to425cm) | -69.1to9.1inches (-175to23cm) |
| 120inches146to201inches | (373to513cm) | -82.9to10.9inches (-211to28cm) |
| 150inches184to252inches | (469to643cm) | -103.6to13.6inches (-263to35cm) |
| 200inches247to338inches | (629to861cm) | -138.1to18.1inches (-351to46cm) |
| 250inches310to425inches | (788to1079cm) | -172.8to22.8inches (-439to58cm) |
| 883inches1106to1508inches | (2811to3838cm) | -609.8to80inches (-1549to203cm) |
Middle-throwZoomLens#1(ELPLM12)
| 16:10AspectRatioImageorScreen | ||
| ScreenorimagesizeProjection | distance(1) WidetoTele(Minimumto Maximum) | Verticalensshift(2) Toptobottom |
| 100inches145to197inches | (386to500cm) | -61to8inches (-155to20cm) |
| 120inches175to237inches | (444to602cm) | -73.2to9.6inches (-186to24cm) |
| 150inches220to297inches | (558to755cm) | -91.5to12inches (-232to30cm) |
| 200inches295to398inches | (749to1011cm) | -122to16inches (-310to41cm) |
| 250inches369to499inches | (939to1267cm) | -152.4to20.1inches (-387to51cm) |
| 1000inches1493to2009inches | (3794to5103cm) | -610.1to80.1inches (-1550to203cm) |
| 16:9AspectRatioImageorScreen | ||
| ScreenorimagesizeProjection | distance(1) WidetoTele(Minimumto Maximum) | Verticalensshift(2) Toptobottom |
| 100inches149to202inches | (379to514cm) | -60to11inches (-152to28cm) |
| 120inches180to244inches | (457to619cm) | -72to13.1inches (-183to33cm) |
| 150inches226to306inches | (574to777cm) | -90to16.4inches (-229to42cm) |
| 200inches303to409inches | (770to1040cm) | -120to21.9inches (-305to56cm) |
| 250inches380to513inches | (965to1302cm) | -150to27.6inches (-381to70cm) |
| 972inches1492to2007inches | (3791to5099cm) | -583to106.4inches (-1481to270cm) |
| 4:3AspectRatiolmageorScreen | ||
| ScreenorimagesizeProjection | distance(1) WidetoTele(Minimumto Maximum) | Verticalensshift(2) Toptobottom |
| 90inches148to200inches | (375to509cm) | -62.2to8.2inches (-158to21cm) |
| 100inches165to223inches | (418to567cm) | -69.1to9.1inches (-175to23cm) |
| 120inches198to269inches | (504to683cm) | -82.9to10.9inches (-211to28cm) |
| 150inches249to337inches | (634to857cm) | -103.6to13.6inches (-263to35cm) |
| 200inches334to451inches | (849to1146cm) | -138.1to18.1inches (-351to46cm) |
| 250inches419to565inches | (1065to1436cm) | -172.8to22.8inches (-439to58cm) |
| ScreenorimagesizeProjection | distance(1) WidetoTele(Minimumto Maximum) | Vertical lens shift(2) Toptobottom |
| 883 inches 1492 to 2008 inches | (3793 to 5102 cm) | -609.8 to 80 inches (-1549 to 203 cm) |
Middle-throwZoomLens#2(ELPLM13)
| 16:10AspectRatioImageorScreen | ||
| ScreenorImagesizeProjection | distance(1) WidetoTele(Minimumto Maximum) | Verticalensshift(2) Toptobottom |
| 100inches195to293inches | (482to738cm) | -61to8inches (-155to20cm) |
| 120inches234to352inches | (582to889cm) | -73.2to9.6inches (-186to24cm) |
| 150inches292to440inches | (731to1115cm) | -91.5to12inches (-232to30cm) |
| 200inches390to587inches | (981to1492cm) | -122to16inches (-310to41cm) |
| 250inches485to736inches | (1231to1869cm) | -152.4to20.1inches (-387to51cm) |
| 1000inches1949to2933inches | (4975to7526cm) | -610.1to80.1inches (-1550to203cm) |
| 16:9AspectRatioImageorScreen | ||
| ScreenorimagesizeProjection | distance(1) WidetoTele(Minimumto Maximum) | Verticalensshift(2) Toptobottom |
| 100inches200to301inches | (496to759cm) | -60to11inches (-152to28cm) |
| 120inches240to362inches | (598to914cm) | -72to13.1inches (-183to33cm) |
| 150inches300to452inches | (752to1147cm) | -90to16.4inches (-229to42cm) |
| 200inches401to603inches | (1009to1534cm) | -120to21.9inches (-305to56cm) |
| 250inches1498to757inches | (1265to1922cm) | -150to27.6inches (-381to70cm) |
| 972inches1947to2930inches | (4970to7519cm) | -583to106.4inches (-1481to270cm) |
| 4:3AspectRatlolmageorScreen | ||
| ScreenorimagesizeProjection | distance(1) WidetoTele(Minimumto Maximum) | Verticalensshift(2) Toptobottom |
| 90inches199to299inches | (491to752cm) | -62.2to8.2inches (-158to21cm) |
| 100inches221to332inches | (548to838cm) | -69.1to9.1inches (-175to23cm) |
| 120inches265to398inches | (661to1009cm) | -82.9to10.9inches (-211to28cm) |
| 4:3AspectRatiolmageorScreen | ||
| ScreenorimagesizeProjection | distance(1) WidetoTele(Minimumto Maximum) | Verticalensshift(2) Toptobottom |
| 150inches331to498inches | (830to1265cm) | -103.6to13.6inches (-263to35cm) |
| 200inches441to664inches | (1113to1692cm) | -138.1to18.1inches (-351to46cm) |
| 250inches550to833.9inches | (1396to2118cm) | -172.8to22.8inches (-439to58cm) |
| 883inches1948to2932inches | (4973to7523cm) | -609.8to80inches (-1549to203cm) |
Middle-throwZoomLens#3(ELPLM14)
| 16:10AspectRatiolmageorScreen | ||
| ScreenorimagesizeProjection | distance(1) WidetoTele(Minimumto Maximum) | Vertical lens shift(2) Toptobottom |
| 100inches289to433inches | (735to1100cm) | -61to8inches (-155to20cm) |
| 120inches347to520inches | (882to1320cm) | -73.2to99.6inches (-186to24cm) |
| 150inches434to650inches | (1103to1650cm) | -91.5to12inches (-232to30cm) |
| 200inches579to866inches | (1470to2200cm) | -122to16inches (-310to41cm) |
| 250inches724to1083inches | (1838to2750cm) | -152.4to20.1inches (-387to51cm) |
| 16:10AspectRatioImageorScreen | ||
| ScreenorimagesizeProjection | distance(1) WidetoTele(Minimumto Maximum) | Verticalensshift(2) Toptobottom |
| 1000inches2894to4331inches | (7350to11000cm) | -610.1to80.1inches (-1550to203cm) |
| 16:9AspectRatioImageorScreen | ||
| ScreenorimagesizeProjection | distance(1) WidetoTele(Minimumto Maximum) | Verticalensshift(2) Toptobottom |
| 100inches297to445inches | (755to1131cm) | -60to11inches (-152to28cm) |
| 120inches357to534inches | (907to1357cm) | -72to13.1inches (-183to33cm) |
| 150inches446to668inches | (1133to1696cm) | -90to16.4inches (-229to42cm) |
| 200inches595to890inches | (1511to2261cm) | -120to21.9inches (-305to56cm) |
| 250inches743to112.6inches | (1889to2826cm) | -150to27.6inches (-381to70cm) |
| 972inches2891to4326inches | (7343to10989cm) | -583to106.4inches (-1481to270cm) |
| 4:3AspectRatiolmageorScreen | ||
| ScreenorimagesizeProjection | distance(1) WidetoTele(Minimumto Maximum) | Verticalensshift(2) Toptobottom |
| 90inches295to441inches | (749to1121cm) | -62.2to8.2inches (-158to21cm) |
| 100inches328to490inches | (832to1245cm) | -69.1to9.1inches (-175to23cm) |
| 120inches393to588inches | (998to1494cm) | -82.9to10.9inches (-211to28cm) |
| 150inches491to735inches | (1248to1868cm) | -103.6to13.6inches (-263to35cm) |
| 200inches655to981inches | (1664to2491cm) | -138.1to18.1inches (-351to46cm) |
| 250inches819to1226inches | (2080to3113cm) | -172.8to22.8inches (-439to58cm) |
| 883inches2893to4329inches | (7347to10996cm) | -609.8to80inches (-1549to203cm) |
Long-throwZoomLens#1(ELPLL09)
| 16:10AspectRatioImageorScreen | ||
| ScreenorimagesizeProjection | distance(1) WidetoTele(Minimumto Maximum) | Verticalensshift(2) Toptobottom |
| 100inches415to619inches | (1054to1574cm) | -55.8to2.8inches (-142to7cm) |
| 120inches494to740inches | (1256to1879cm) | -66.9to3.3inches (-170to8cm) |
| 150inches614to921inches | (1559to2338cm) | -83.6to4.1inches (-212to11cm) |
| 200inches812to1222inches | (2064to3103cm) | -111.5to5.5inches (-283to14cm) |
| 250inches1011to1523inches | (2569to3868cm) | -139.4to7.1inches (-354to18cm) |
| 1000inches3993to6040inches | (10142to15342cm) | -557.6to27.6inches (-1416to70cm) |
| 16:9AspectRatioImageorScreen | ||
| ScreenorimagesizeProjection | distance(1) WidetoTele(Minimumto Maximum) | Vertical lens shift(2) Toptobottom |
| 100inches426to636inches | (1082to1616cm) | -54.6to5.6inches (-139to14cm) |
| 120inches508to760inches | (1289to1931cm) | -65.5to6.7inches (-166to17cm) |
| 150inches630to946inches | (1601to2402cm) | -81.9to8.3inches (-208to21cm) |
| 200inches835to1255inches | (2120to3188cm) | -109.2to11.1inches (-277to28cm) |
| 250inches1038to1565inches | (2639to3975cm) | -136.6to13.8inches (-347to35cm) |
| ScreenorimagesizeProjection | distance(1) WidetoTele(Minimumto Maximum) | Verticalensshift(2) Toptobottom |
| 1000inches3989to6034inches | (10133to15327cm) | -530.6to54.1inches (-1348to137cm) |
| 4:3AspectRatioImageorScreen | ||
| ScreenorimagesizeProjection | distance(1) WidetoTele(Minimumto Maximum) | Verticalensshift(2) Toptobottom |
| 90inches422to631inches | (1073to1602cm) | -56.8to2.8inches (-144to7cm) |
| 100inches467to699inches | (1187to1776cm) | -63.1to3.1inches (-160to8cm) |
| 120inches557to835inches | (1416to2122cm) | -75.8to3.8inches (-192to10cm) |
| 150inches692to1040inches | (1759to2642cm) | -94.7to4.7inches (-241to12cm) |
| 200inches917to1381inches | (2330to3508cm) | -126.3to6.3inches (-321to16cm) |
| 250inches1143to1722inches | (2902to4373cm) | -158to7.9inches (-401to20cm) |
| 883inches3992to6038inches | (10139to15337cm) | -557.4to27.6inches (-1416to70cm) |
Long-throwZoomLens#2(ELPLL10)
| 16:10AspectRatioImageorScreen | ||
| ScreenorimagesizeProjection | distance(1) WidetoTele(Minimumto Maximum) | Verticalensshift(2) Toptobottom |
| 100inches604to899inches | (1533to2284cm) | -55.8to2.8inches (-142to7cm) |
| 120inches719to1074inches | (1826to2727cm) | -66.9to3.3inches (-170to8cm) |
| 150inches892to1336inches | (2265to3392cm) | -83.6to4.1inches (-212to11cm) |
| 200inches1180to1772inches | (2997to4500cm) | -111.5to5.5inches (-283to14cm) |
| 250inches1468to2208inches | (3728to5608cm) | -139.4to7.1inches (-354to18cm) |
| 1000inches5788to8750inches | (14701to22225cm) | -557.6to27.6inches (-1416to70cm) |
| 16:9AspectRatioImageorScreen | ||
| ScreenorimagesizeProjection | distance(1) WidetoTele(Minimumto Maximum) | Verticalensshift(2) Toptobottom |
| 100inches620to924inches | (1574to2346cm) | -54.6to5.6inches (-139to14cm) |
| 120inches738to1103inches | (1875to2801cm) | -65.5to6.7inches (-166to17cm) |
| 150inches916to1372inches | (2326to3485cm) | -81.9to8.3inches (-208to21cm) |
| 16:9AspectRatiolmageorScreen | ||
| ScreenorimagesizeProjection | distance(1) WidetoTele(Minimumto Maximum) | Verticalensshift(2) Toptobottom |
| 200inches1212to1820inches | (3078to4623cm) | -109.2to11.1inches (-277to28cm) |
| 250inches1508to2269inches | (3830to5762cm) | -136.6to13.8inches (-347to35cm) |
| 972inches5782to8742inches | (14687to22204cm) | -530.6to54.1inches (-1348to137cm) |
| 4:3AspectRatiolmageorScreen | ||
| ScreenorimagesizeProjection | distance(1) WidetoTele(Minimumto Maximum) | Verticalensshift(2) Toptobottom |
| 90inches615to916inches | (1561to2326cm) | -56.8to2.8inches (-144to7cm) |
| 100inches680to1015inches | (1727to2577cm) | -63.1to3.1inches (-160to8cm) |
| 120inches810to1212inches | (2058to3079cm) | -75.8to3.8inches (-192to10cm) |
| 150inches1006to1508inches | (2555to3831cm) | -94.7to4.7inches (-241to12cm) |
| 200inches1332to2002inches | (3383to5085cm) | -126.3to6.3inches (-321to16cm) |
| 250inches1658to2496inches | (4211to6339cm) | -157.9to7.9inches (-401to20cm) |
| ScreenorimagesizeProjection | distance(1) WidetoTele(Minimumto Maximum) | Vertical lens shift(2) Toptobottom |
| 883inches5786to8747inches | (14695to22217cm) | -557.4to27.6inches (-1416to70cm) |
Parenttopic:ProjectorPlacement
Relatedreferences
OptionalEquipmentandReplacementParts
ProjectorConnections
Seethesectionstoconnecttheprojectortoavarietyofprojectionsources.
Caution: If you will use the projector at altitudes above 4921 feet (1500 m), turn on High Altitude Mode to ensure the projector's internal temperature is regulated properly.
ConnectingtoVideoSources
ConnectingtoComputerSources
ConnectingtoanHDBaseTTransmitter
ConnectingtoanExternalComputerMonitor
Parenttopic:SettingUptheProjector
Relatedreferences
ProjectorSetupSettings-ExtendedMenu
ConnectingtoVideoSources
Followtheinstructionsinthesesectionstoconnectvideovicestotheprojector.
ConnectingtoanHDMIVideoSource
ConnectingtoaComponent-to-BNCVideoSource
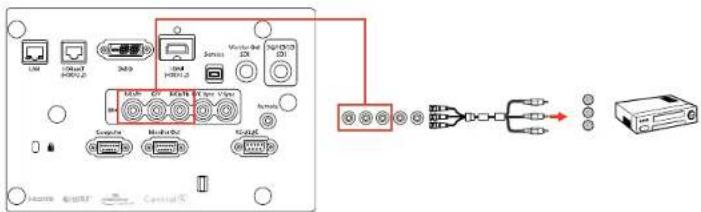
ConnectingtoaComponentVideoSource
ConnectingtoanSDIVideoSource
Parenttopic:ProjectorConnections
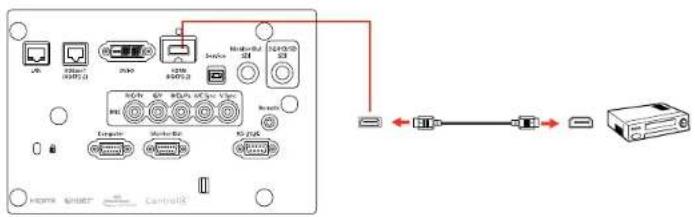
ConnectingtoanHDMIVideoSource
If your videosourcehas an HDMI port, you can connect it to the projector using an optional HDMI cable. The HDMI connection provides the best image equality.
- Connect the HDMI cable to your videosource's HDMI output port.
- Connecttheotherendtotheprojector'sHDMIport.
Parenttopic: ConnectingtoVideoSources
ConnectingtoaComponent-to-BNCVideoSource
If your videosource has component videoports, you can connect it to the projector using an optional component-to-BNC videocable. Depending on your component ports, you may need to use an adapter cable along with a component videocable.
- Connect the component connector to your video source's color-coded component video output ports, usually labeled Y, Pb, Pr or Y, Cb, Cr. If you are using an adapter, connect these connectors to your component videocable.
- Connect the BNC connectors to the projector's R/Cr/Pr, G/Y, B/Cb/Pb ports.
Parenttopic: ConnectingtoVideoSources
ConnectingtoaComponentVideoSource
If your videosourcehas component videoports, you can connect it to the projector using an optional component-to-VGA videocable. Depending on your component ports, you may need to use an adapter cable along with a component videocable.
- Connect the component connector to your video source's color-coded component video output ports, usually labeled Y, Pb, Pr or Y, Cb, Cr. If you are using an adapter, connect these connectors to your component videocable.
- ConnecttheVGAconnectortotheComputerportontheprojector.
flowchart
graph TD
    A["User"] --> B["Internet (HOMA)"]
    B --> C["3x32"]
    C --> D["3x34 (HOMA)"]
    D --> E["Service"]
    E --> F["Multi-Net (S2H05)"]
    F --> G["Internet"]
    G --> H["ACU"]
    H --> I["Server"]
    I --> J["MACPU"]
    J --> K["Internet"]
    K --> L["Internet"]
    L --> M["Internet"]
    M --> N["Internet"]
    N --> O["Internet"]
    O --> P["Internet"]
    P --> Q["Internet"]
    Q --> R["Internet"]
    R --> S["Internet"]
    S --> T["Internet"]
    T --> U["Internet"]
    U --> V["Internet"]
    V --> W["Internet"]
    W --> X["Internet"]
    X --> Y["Internet"]
    Y --> Z["Internet"]
    Z --> AA["Internet"]
    AA --> AB["Internet"]
    AB --> AC["Internet"]
    AC --> AD["Internet"]
    AD --> AE["Internet"]
    AE --> AF["Internet"]
    AF --> AG["Internet"]
    AG --> AH["Internet"]
    AH --> AI["Internet"]
    AI --> AJ["Internet"]
    AJ --> AK["Internet"]
    AK --> AL["Internet"]
    AL --> AM["Internet"]
    AM --> AN["Internet"]
    AN --> AO["Internet"]
    AO --> AP["Internet"]
    AP --> AQ["Internet"]
    AQ --> AR["Internet"]
    AR --> AS["Internet"]
    AS --> AT["Internet"]
    AT --> AU["Internet"]
    AU --> AV["Internet"]
    AV --> AW["Internet"]
    AW --> AX["Internet"]
    AX --> AY["Internet"]
- TightenthescrewsontheVGAconnector.
If your image colors appear incorrect, you may need to change the Input Signal setting in the projector's Signalmenu.
Parenttopic: ConnectingtoVideoSources
Relatedreferences
InputSignalSettings-SignalMenu
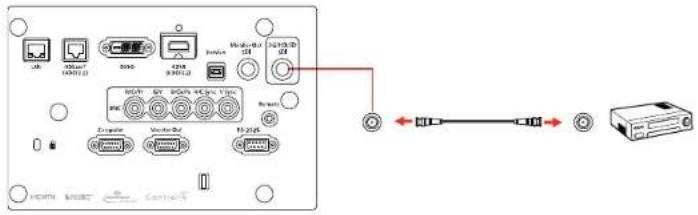
ConnectingtoanSDIVideoSource
If your videosourcehasanSDIport, you can connect it to the projector using an optional BNC video cable.
-
ConnecttheBNCvideocabletoyourvideosource'sSDloutputport.
-
Connecttheotherendtotheprojector's3G/HD/SDSDIport.
Parenttopic: ConnectingtoVideoSources
Relatedreferences
ProjectorSetupSettings-ExtendedMenu
ConnectingtoComputerSources
Followtheinstructionsinthesesectionstoconnectacomputertotheprojector.
ConnectingtoaComputerforVGAVideo
ConnectingtoaComputerforHDMIVideo
ConnectingtoaComputerforDVI-DVideo
ConnectingtoaComputerfor5BNCVideo
Parenttopic:ProjectorConnections
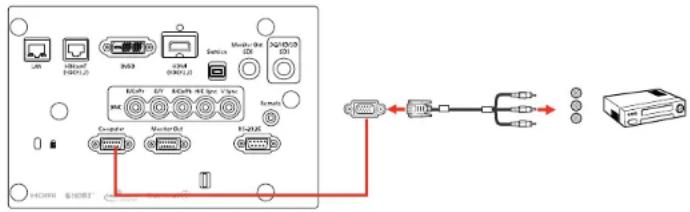
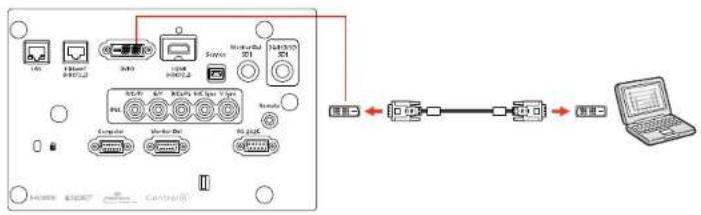
ConnectingtoaComputerforVGAVideo
YoucanconnecttheprojectortoyourcomputerusingaVGAcomputercable.
Note: To connect a Mac that includes only a Mini DisplayPort, Thunderbolt port, or Mini-DVI port for videooutput,youneedtoobtainanadapterthatallowsyoutoconnecttotheprojector'sVGAvideoport.ContactAppleforcompatibleadapteroptions.
-
If necessary, disconnect your computer's monitorable.
-
ConnecttheVGAcomputercabletoyourcomputer'smonitorport.
-
ConnecttheotherendtotheComputerportontheprojector.
flowchart
graph TD
    A["Port 1"] --> B["Router"]
    B --> C["Switch"]
    C --> D["Router"]
    D --> E["Switch"]
    E --> F["Laptop"]
    G["Port 2"] --> H["Switch"]
    H --> I["Router"]
    I --> J["Laptop"]
    K["Port 3"] --> L["Switch"]
    L --> M["Laptop"]
    N["Port 4"] --> O["Switch"]
    O --> P["Laptop"]
    Q["Port 5"] --> R["Switch"]
    R --> S["Laptop"]
    T["Port 6"] --> U["Switch"]
    U --> V["Laptop"]
    W["Port 7"] --> X["Switch"]
    X --> Y["Laptop"]
- TightenthescrewsontheVGAconnector.
Parenttopic: ConnectingtoComputerSources
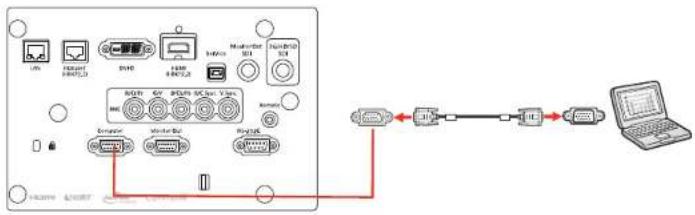
ConnectingtoaComputerforHDMIVideo
If your computer has an HDMI port, you can connect it to the projector using an optional HDMI cable.
Note: To connect a Mac that includes only a Mini DisplayPort, Thunderbolt port, or Mini-DVI port for video output, you need to obtain an adapter that allows you to connect to the projector's HDMI port. ContactAppleforcompatibleadapteroptions.
- ConnecttheHDMIcabletoyourcomputer'sHDMIoutputport.
- Connecttheotherendtotheprojector'sHDMIport.
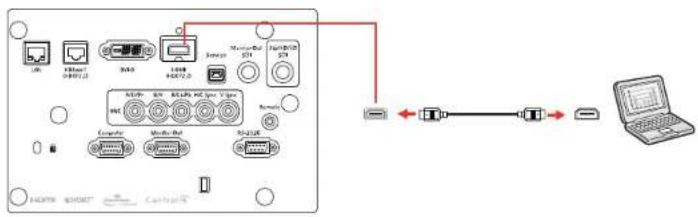
Parenttopic: ConnectingtoComputerSources
ConnectingtoaComputerforDVI-DVideo
If your computer has a DVI-D connector, you can connect it to the projector using an optional DVI-D cable.
- ConnecttheDVI-Dcabletoyourcomputer'sDVI-Dconnector.
- Connecttheotherendtotheprojector'sDVI-Dconnector.
flowchart
graph LR
    A["User"] --> B["USB"]
    B --> C["Server"]
    C --> D["Microcontroller"]
    D --> E["USB Cable"]
    E --> F["Computer"]
    F --> G["Router-Del"]
    G --> H["USB Cable"]
    H --> I["Laptop"]
Parenttopic: ConnectingtoComputerSources
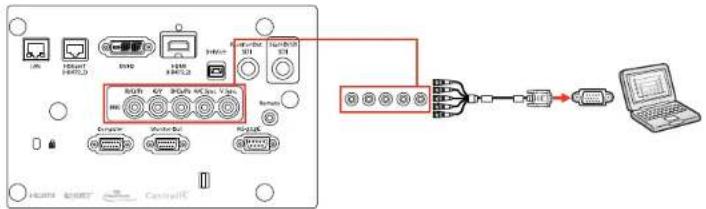
ConnectingtoaComputerfor5BNCVideo
YoucanconnecttheprojectortoyourcomputerusinganoptionalVGA-to-5-BNCable.
- ConnecttheVGAconnectortoyourcomputer'smonitorport.
- Connectthe5BNCconnectorstotheprojector'sBNCports.
flowchart
graph LR
    A["Router"] --> B["Switch"]
    B --> C["Router"]
    C --> D["Laptop"]
    style A fill:#f9f,stroke:#333
    style B fill:#ccf,stroke:#333
    style C fill:#cfc,stroke:#333
    style D fill:#fcc,stroke:#333
Parenttopic: ConnectingtoComputerSources
ConnectingtoanHDBaseTTransmitter
TosendanHDMlorRS-232Csignaloveralongdistance,youcanconnecttheprojectortoanoptional HDBaseTtransmitterusinga100Base-TXnetworkcable. Thisisusefulwhenyouwanttosendasignal toorcontroltheprojectorfromaremotelocation,suchasinahalloreventsite,sinceyoucanusea networkcableupto328feet(100m)inlength.Toensureproperdatatransmission,useaCategory6 STPcableorbetter.
- Turnoff the projector and HDBase T transmitter.
Note: Makesure the projector and HDBase T transmitter are turned off when connecting or disconnecting an network cable between the two devices.
-
ConnectoneendofthenetworkcabletotheHDBaseTportonthetransmitter.
-
Connecttheotherendtotheprojector'sHDBaseTport.
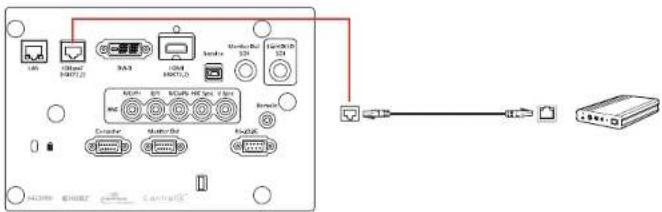
Note: See the documentation that came with the HDBaseT transmitter for instructions on connecting ittoyourvideodeviceorcomputer.
- Turnon the projector and HDBase T transmitter.
Note: To enable communication from the Ethernet and serial ports on the transmitter, select On as the Control Communications setting in the projector's Extended menu. Turning on this setting disables the projector's LAN, RS-232C, and Remote ports. If you connected an Extron XTP transmitter or switcher to the projector's HDBaseT port, select On as the Extron XTP setting in the projector's Extended menu.
Parenttopic:ProjectorConnections
Relatedreferences
ProjectorSetupSettings-ExtendedMenu
ConnectingtoanExternalComputerMonitor
If you connected a computer to the projector's Computer or BNC port, or a video source to the projector's 3G/HD/SD SDI port, you can also connect an external monitor to the projector. This lets you see your presentation on the external monitoreven when the projected image is not visible.
If you want to output image to an external monitor when the projector is turned off, you need to select Communication On as the Standby Mode setting and Always On as the A/V Output setting in the projector's Extended menu.
Note: Monitors that use a refresh rate less than 60 Hz may not be able to display images correctly.
- Make sure your computer or video source is connected to the projector's Computer, BNC, or 3G/HD/SDSDIport.
- Connect the external monitor's cable to your projector's Monitor Out (for computer or BNC sources) orMonitorOutSDI(forSDIsources)port.
Note: If you donot see an image on the external monitor when projecting from a computer or BNC source, you may need to change the Monitor Outsetting in the Extended menu.
Parenttopic:ProjectorConnections
Relatedreferences
ProjectorSetupSettings-ExtendedMenu
AttachingandRemovingaLens
Followtheinstructionsinthesesectionstoattachorremoveacompatablelens.
Warning: Make sure you turn off the projector and unplug the power cord before attaching or removing a lens. Otherwise, you may receive an electric shock.
AttachingaLens
RemovingaLens
Parenttopic: SettingUptheProjector
AttachingaLens
Youcanattachacompatiblelenstotheprojector.
- Turnoff the projector and unplug the power cord.
Caution: Unplugthepowercordfromtheprojectorbeforeattachingthelens. Avoidtouchingthe lenswithyourbarehandstoppreventfingerprintsonordamagetothelenssurface.
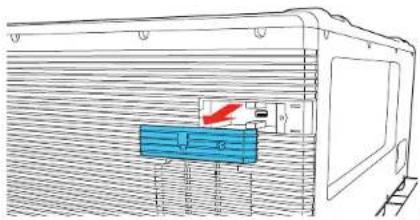
- Loosenthelenscoverscrewsbyhand.
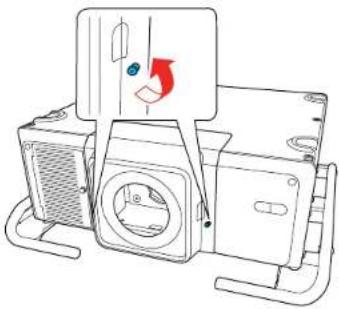
natural_image
Line drawing of a washing machine with fan and door (no text or symbols)- Pressthetabsonbothsidesofthelenscoverandpullthelenscoverofftheprojector.
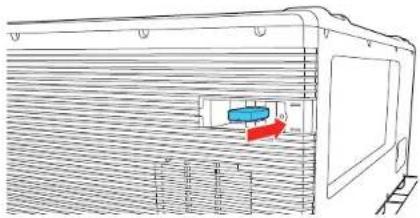
natural_image
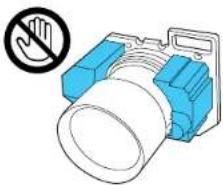
Illustration of hands operating a blue industrial machine component with a red arrow indicating rotation (no text or symbols)4.Slidethelocklevertotheleft.
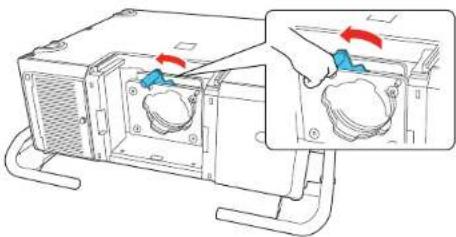
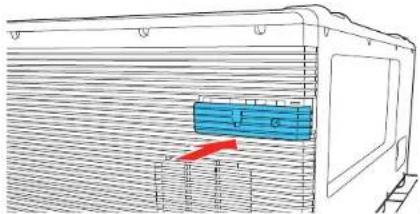
natural_image
Diagram showing a device with a lid and a hand inserting a component into a rack (no text or symbols present)- Insertthelensunit straight into the projector's lens socket. Makes sure the two protruding points in the lens socket fit into the holes on the lens unit.
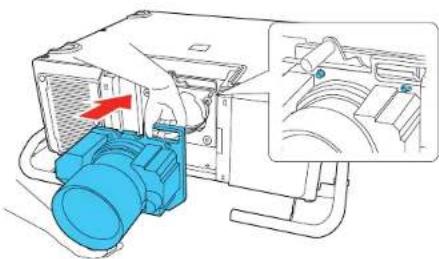
natural_image
Diagram of a blue industrial device with a red arrow indicating a component, showing internal components and a magnified inset (no text or symbols)Caution: Avoidtouchingtheareasshownhereoryoumaydamagethelensunit.
natural_image
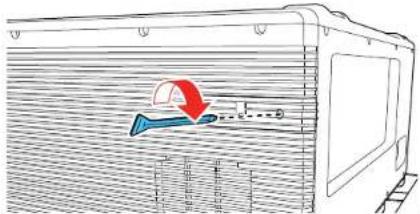
Illustration of a blue and white mechanical component with a no-smoking symbol (no text or labels)6.Holdthelensunitfirmlyandslidethelocklevertotherightuntilitclicks,indicatingthatitislocked.

natural_image
Diagram of a mechanical device with a blue tool inserted, showing internal components and a close-up view of the next component (no text or symbols present)Note: You cantightenthescrewbyhandtosecurethelever.
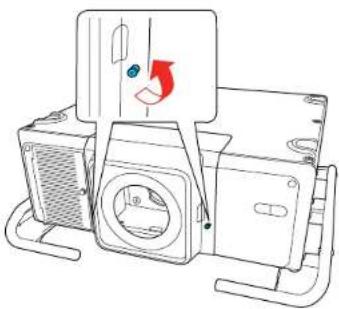
- Replacethelenscover.
natural_image
Technical illustration of a mechanical assembly with a blue component and red arrow indicating direction (no text or symbols)8.Dooneofthefollowing:
- If you attach alenst hatis different from the previous lens, you see a message to calibrate the lens then next time you turn on the projector. Select Yes calibrate the lens.
- If you remove and attach the same lens, press and hold the Default button or select Lens CalibrationintheExtendedmenutocalibratethelens.
Lenscalibrationtakesupto3minutestocomplete. Whencalibrationisfinished, thelensreturnsto itspreviousposition.
Caution: If you see a message that lens calibration failed, remove the lens and reinstall it. If the messagestillappears, turnofftheprojector, unplugthepowercord, and contact Epson.
If the projector cannot determin the model number of your lens, you cannot perform lens calibration.
Parenttopic: Attaching and RemovingaLens
Relatedreferences
ProjectorSetupSettings-ExtendedMenu
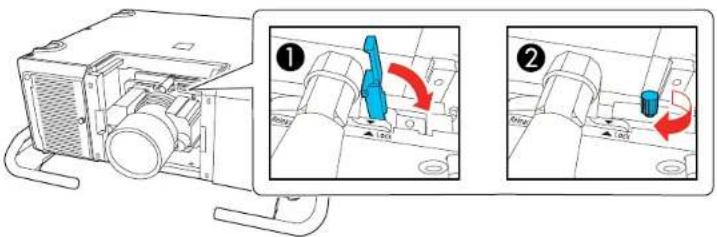
RemovingaLens
Youcanremovealenstoreplaceitwithadifferentlens.
Caution: Remove the lens only when necessary and make sure the front of the projector is not facing up when you remove the lens. This prevents dirtordust from entering the projector and lowering the projection quality. Avoid touching the lens with your bare hand stop prevent fingerprint on or damage to the lens surface.
- CenterthelensusingtheLensShiftbutton.
- Turnoff the projector and unplug the power cord.
Warning: Wait approximately 30 minutes after turning off the projector before removing the lens. Touchingthelensimmediatelyafterprojectingorturningofftheprojectormaycauseburns.
- Loosenthelenscoverscrewsbyhand.
natural_image
Line drawing of a mechanical device with a fan and housing, showing a blue circular component and red directional arrow (no text or symbols)- Pressthetabsonbothsidesofthelenscoverandpullthelenscoverofftheprojector.
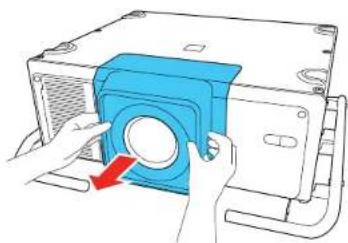
natural_image
Illustration of hands installing a blue circular component on a whiteboard (no text or symbols)5.Holdthelensunitfirmlyasyouslidethelocklevertotheleft.
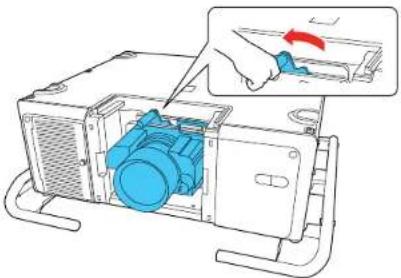
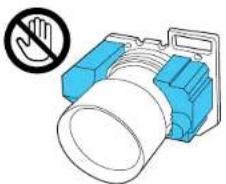
natural_image
Diagram of a device with blue internal components and a hand holding a tool, showing no text or symbols.Caution: Avoidtouchingtheareasshownhereoryoumaydamagethelensunit.
natural_image
Illustration of a blue and white handheld device with a no-smoking symbol (no text or labels)Note: If youightened the lockingscrew, loosenthescrew first.
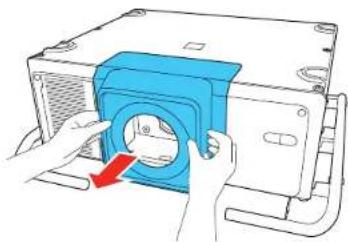
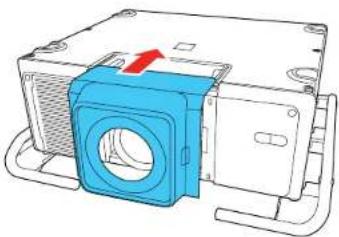
- Gentlypullthelensstraightoutoftheprojector.
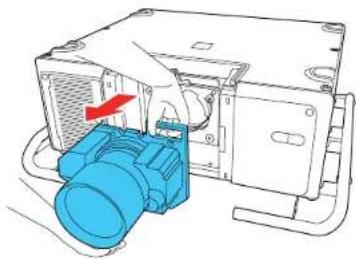
natural_image
Technical line drawing of a mechanical device with a blue component and red arrow indicating direction (no text or symbols)Parenttopic: Attaching and RemovingaLens
Relatedtasks
AdjustingtheImagePositionUsingLensShift
SecuringthePowerCord
Youcanprovideadditionalsupporttothepowercordbysecuringitwiththepowercordholder.
- Pluginthepowercord.
2.Flipthepowercordholderoverthepowercordasshown.
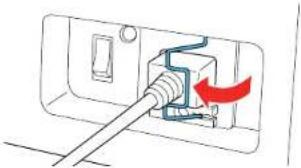
natural_image
Diagram of a plug inserted into a socket with a red arrow indicating direction (no text or symbols)Parenttopic: SettingUptheProjector
AttachingandRemovingtheHDMICableClip
YoucaninstalltheHDMlcableclipthatcamewithyourprojectortoprovideadditionalsupporttotheHDMlcable.
- PlugintheHDMIcable.
- Insert the end of the cable clip anchor into the cable clip slot near the HDMI port.
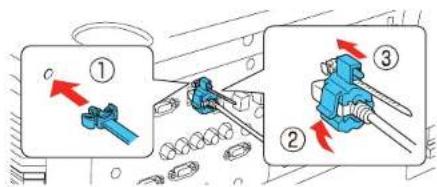
- PlacetheopencablecliparoundtheHDMIcable, but don'tlockitintoplace.
4.SlidethecableclipontotheanchorandlocktheclipontotheHDMIconnector.
Toremovethecableclip,opentheclipanddisconnecttheHDMIcable.Thenpinchthesidesofthe cableclipanchorandcarefullypullitoutofthecableclipslot.
Parenttopic:SettingUptheProjector
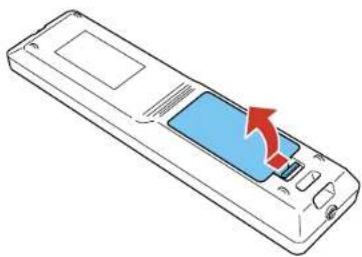
Installing Batteries in the Remote Control
TheremotecontrolusesthettwoAAbatteriesthatcamewiththeprojector.
Caution: Use only the type of batteries specified in this manual. Do not install batteries of different types, ormixnewandoldbatteries.
- Removethebatterycover.
natural_image
Line drawing of a mobile phone with a blue screen and red arrow indicating a loading or update action (no text or symbols)- Insert the batteries with the + and - ends facing as shown.
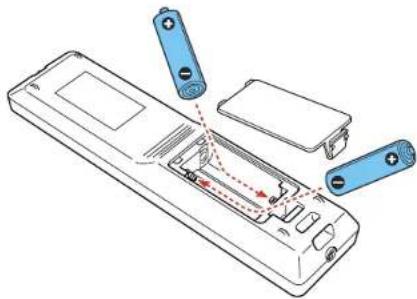
natural_image
Line drawing of a remote control panel with battery terminals and internal components (no text or symbols)Warning: Make sure the batteries are inserted in the correct positions. If the batteries are not inserted correctly, they could explode or leak, causing a fire, injury, ordamageto the product.
- Replacethebatterycoverandpressitdownuntilclicksintoplace.

natural_image
Line drawing of a remote control device with a blue internal component and a red arrow indicating rotation (no text or symbols)Warning: Dispose of used batteries according to local regulations. Do not expose batteries to heat or flame. Keep batteries out of thereachofchildren; they are choking hazards and are very dangerous if swallowed.
Parenttopic: SettingUptheProjector
UsingtheProjectoronaNetwork
Followtheinstructionsinthesesectionstosetupyourprojectorforuseonanetwork.
Note: EpsoniProjectionisnotrecommendedforusewithstreamingvideo.
WiredNetworkProjection
WirelessNetworkProjection
SettingUpProjectorNetworkE-MailAlerts
SelectingOtherNetworkSettings
SettingaStaticIPAddressontheLCDScreen
ControllingaNetworkedProjectorUsingaWebBrowser
UsingCrestronConnected
Art-NetChannelDefinitions
RegisteringaDigitalCertificateontheProjector
WiredNetworkProjection
Youcanprojectthroughawirednetwork.Todothis,youconnecttheprojectortoyournetworkwithan Ethernetcable,andthenetupyourprojectorandcomputerfornetworkprojection.
YoucanuseEpsoniProjectiontoprojectstaticimagesandpresentationsoverawirednetwork.
Note: EpsoniProjectionisnotrecommendedforusewithstreamingvideo.
Afterconnectingandsettinguptheprojector, installtheprojectorsoftware.Youmayneedtoinstallit fromasoftwareCD, ifincluded, ordownloadthesoftwareandmanualsasnecessary.
Note: If your projector is connected via a LAN (Ethernet) cable to a network that includes a wireless accesspoint, you can connect to the projector wirelessly through the accesspoint using the Epson network software.
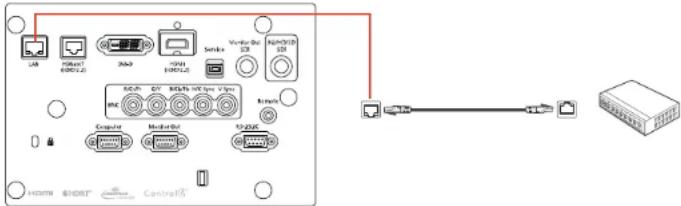
ConnectingtoaWiredNetwork
SelectingWiredNetworkSettings
Parenttopic: Using the Projectorona Network
Relatedreferences
AdditionalProjectorSoftwareandManuals
ConnectingtoaWiredNetwork
Toconnecttheprojectortoawiredlocalareanetwork(LAN), usea100Base-TXor10Base-Tnetwork cable. Toensureproperdatatransmission, useaCategory5shieldedcableorhigher.
- Connectoneendofthenetworkcabletoyournetworkhub, switch, orrouter.
- Connecttheotherendofthecabletotheprojector'sLANport.
Parenttopic: WiredNetworkProjection
SelectingWiredNetworkSettings
Before you can project from computerson your network, you must select then network settings for the projector using its menusystem.
Note: Make sure you already connected the projector to your wired network using the LAN port.
-
Turnon the projector.
2.PresstheMenubutton. -
SelecttheNetworkmenuandpressEnter.

-
SelectNetworkConfigurationandpressEnter.
-
SelecttheBasicmenuandpressEnter.
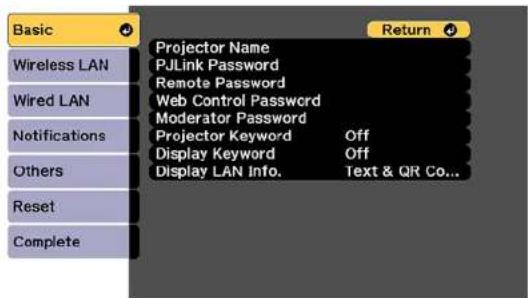
- Select the following basic options as necessary:
-ProjectorNameletsyouenteranameupto16alphanumericcharacterslongtoidentifytheprojectoroverthenetwork.
- PJLinkPasswordletyouenterapasswordupto32alphanumericcharacterslongforusingthe PJLinkprotocolforprojectorcontrol.
- RemotePasswordletsouenterapasswordupto8alphanumericcharacterslongforaccessing theRemoteorBasicControlscreeninEpsonWebControl.(Defaultusernameis EPSONREMOTE;defaultpasswordsguest.)
-WebControlPasswordletsouenterapasswordupto8alphanumericcharacterslongfor accessing Epson Web Control. (Default user name is EPSONWEB; default password is admin.)
•ModeratorPasswordletyouenterapasswordupto4numberslongforaccessingtheprojector asamoderatorwiththeEpsoniProjection(Windows/Mac)softwareortheEpsoniProjectionapp.
-ProjectorKeywordletsyouturnonasecuritypasswordtopreventaccesstotheprojectorbyanyonenotintheroomwithit.TheprojectordisplaysarandomkeywordthatyoumustenterfromacomputerusingtheEpsoniProjection(Windows/Mac)softwareoraniOSorAndroiddeviceusingtheEpsoniProjectionapp.
- DisplayKeywordletsyoudisplayakewordontheprojectedimagewhenaccessingthe projectorfromacomputerusingtheEpsoniProjection(Windows/Mac)softwareoraniOSorAndroiddeviceusingtheEpsoniProjectionapp.
- Display LAN Info lets you select how the projector displays network information. You can select anoptiontodisplayaQRcodethatletssyouquicklyconnectyouriOSorAndroiddevicesusingtheEpsoniProjectionapp.
Note: Usethedisplayedkeyboardtoenterthename, passwords, and keyword. Pressthearrow buttons on the remote control to highlight characters and press Enter to select them. Press Finish whenyouaredone.
7. SelecttheWiredLANmenuandpressEnter.
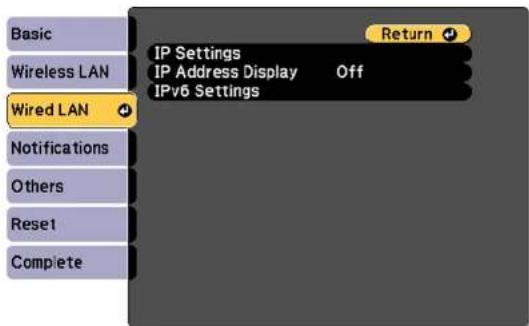
-
Select your IP Settings as necessary:
-
If your network assigns addresses automatically, turn the DHCP setting.
- If you must set addresses manually, turn off DHCP and enter the projector's IP Address, Subnet Mask, and GatewayAddressasneeded.
Note: To highlight the numbers you want from the displayed keyboard, press the arrow button on the remote control. To select a highlighted number, press Enter. Press Finish when you are done.
-
TopreventdisplayofthelPaddressonthestandbyscreen,turnoffIPAddressDisplay.
-
To connect the projector to the network using IPv6, select On as the IPv6 Settings option. Then select the Auto Configuration and Use Temporary Address settings as necessary.
- When you finish selecting settings, select Complete and follow the on-screen instructions to save yoursettingsandexithemenus.
Parenttopic: WiredNetworkProjection
WirelessNetworkProjection
Youcanprojectoverawirelessnetwork.Todothis,youmustsetupyourprojectorandcomputerfor wirelessprojection.
Note: The Epson 802.11b/g/n wireless LAN module is not included with your projector and is optional.
Afterconnectingandsettinguptheprojector,installtheprojectorsoftware.Youmayneedtoinstallit fromasoftwareCD,ifincluded,ordownloadthesoftwareandmanualsasnecessary.
YoucanuseEpsoniProjectiontoprojectstaticimagesandpresentationsoverawirelessnetwork.
Note: Makesuretosetthedateandtimebeforeusingtheprojector'sNetworkmenus.
InstallingtheWirelessLANModule
UsingaQRCodetoConnectaMobileDevice
UsingQuickWirelessConnection(Windows)
SelectingWirelessNetworkSettingsManually
SelectingWirelessNetworkSettingsinWindows
SelectingWirelessNetworkSettingsMac
SettingUpWirelessNetworkSecurity
Parenttopic: UsingtheProjectoronaNetwork
Relatedreferences
AdditionalProjectorSoftwareandManuals
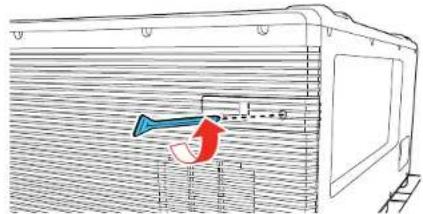
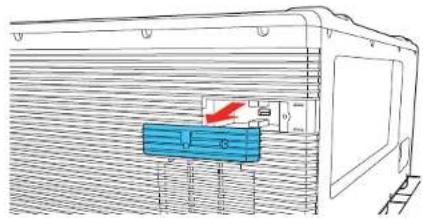
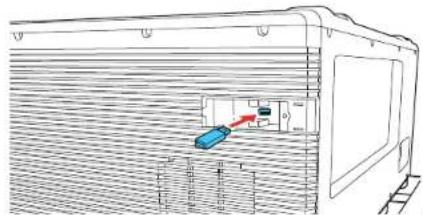
InstallingtheWirelessLANModule
Tousetheprojectoroverawirelessnetwork, installtheoptionalEpson802.11b/g/nwirelessLAN module.DonotinstallanyothertypeofwirelessLANmodule.
Caution: Never remove the module while its indicator light is green or flashing, or while you are projectingwirelessly. You may damage themoduleorlosedata.
- RemovethescrewsecuringthewirelessLANmoduleportcover.
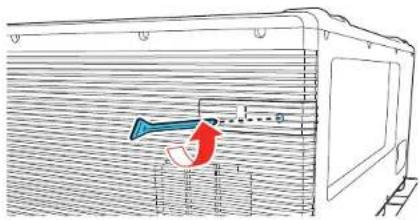
- Removethewireless LAN moduleportcover.
natural_image
Technical line drawing of a train hood with a blue internal component and a red directional arrow indicating motion (no text or symbols)- Insert the wireless LAN module into the port.
natural_image
Diagram of a train interior with a blue container and red directional arrow, no text or symbols present- Replacethewireless LAN moduleportcover.
- Secure the wireless LAN module port cover using the screw you removed.
Parenttopic: Wireless Network Projection
Relatedreferences
OptionalEquipmentandReplacementParts
UsingaQRCodetoConnectaMobileDevice
Afteryouselectthewirelessnetworksettingsforyourprojector,youcandisplayaQRcodeonthe screenanduseittoconnectamobiledeviceusingtheEpsoniProjectionapp.
Note: Make sure you have installed the latest version of Epson iProjection on your device. Visit epson.com/iprojection (U.S.), epson.ca/iprojection (Canada), or latin.epson.com/iprojection (Caribbean) formoreinformation.
1.PresstheMenubutton.
2. SelecttheNetworkmenuandpressEnter.
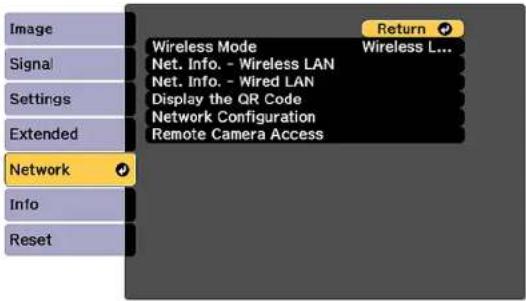
- SelectNetworkConfigurationandpressEnter.
- SelecttheBasicmenuandpressEnter.
5.SettheDisplayLANInfosettingtoText&QRCode. - Select Complete and follow the on-screen instructions to save your settings and exit the menus.
7.Dooneofthefollowing:
- PresstheLANbuttonontheremotecontrol.
- SelectDisplaytheQRCodeintheprojector'sNetworkmenu.
YourprojectordisplaystheQRcodeontheprojectionsurface.
Note: If you do not see the QR code after pressing the LAN button, press Enter to display it.
8.StartEpsoniProjectiononyourmobiledevice.
9. Use the QR codereader feature to read the QR code and connect your device to the projector. Visit epsilon.com/iprojection (U.S.), epsilon.ca/iprojection (Canada), or latin.epson.com/iprojection (Caribbean) for instructions.
Parenttopic: Wireless Network Projection
Relatedreferences
AdditionalProjectorSoftwareandManuals
UsingQuickWirelessConnection(Windows)
YoucancreateaQuickWirelessConnectionUSBKeytoquicklyconnecttheprojectortoaWindows computerwirelessly. Thenyoucanprojectyourpresentationandremovethekeywhenyouaredone.
Note:AUSBflashdriveisnotincludedwithyourprojector.
- CreateaQuickWirelessConnectionUSBKeywithaUSBflashdriveandtheEpsoniProjection (Windows)software.
Note: See the online Epson iProjection Operation Guide for instructions.
- RemovethescrewsecuringthewirelessLANmoduleportcover.
- Removethewireless LAN moduleportcover.
- MakesurethewirelessLANmoduleisinstalledinyourprojector.
- Turnon the projector.
6.PresstheLANbuttonontheremotecontrol.
TheLANstandbyscreenisdisplayed.
- VerifytheSSIDandIPaddress.
- Insert the Quick Wireless Connection USB key into the same port used for the wireless LAN module.
Youseeaprojectedmessagethatthenetworkinformationupdateiscomplete.
- RemovetheUSBkey.
- Reinsertthewireless LAN module into the projector.
- Replacethewireless LAN module port cover.
- Insert the USB key into a USB port on your computer.
13.Followtheon-screeninstructionstoinstalltheEpsoniProjectionsoftware.
Note: If you see a Windows Firewall message, click Yes to disable the firewall. You need administratorauthoritytoinstallthesoftware.Ifitisnotinstalledautomatically,double-click MPPLaunch.exeintheUSBkey.
Afterafewminutes, your computer image is displayed by the projector. If it does not appear, press the LAN or Source Search button on your remote control or restart your computer.
-
Run your presentation as necessary.
-
When you finish projecting wirelessly, select the Safely Remove Hardware option in the Windows taskbar, then remove the USB key from your computer.
Note: You can share the USB key with other computers without disconnecting your computer. You may need to start your computer to activate your wireless LAN connection.
Parenttopic: Wireless Network Projection
Relatedreferences
AdditionalProjectorSoftwareandManuals
ProjectorParts-InterfacePorts
SelectingWirelessNetworkSettingsManually
Before you can project from your wireless network, you must select then network settings for the projector using its menusystem.
- Turnon the projector.
2.PresstheMenubutton.
- SelecttheNetworkmenuandpressEnter.

- MakesuretheWirelessModesettingissettoWirelessLANOn.
- SelectNetworkConfigurationandpressEnter.
- SelecttheBasicmenuandpressEnter.
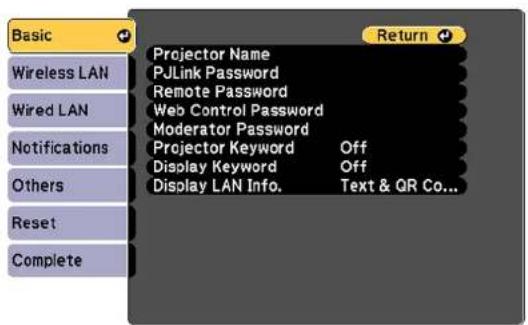
- Select the following basic options as necessary:
-ProjectorNameletsyouenteranameupto16alphanumericcharacterslongtoidentifytheprojectoverthenetwork.
- PJLinkPasswordletyouenterapasswordupto32alphanumericcharacterslongforusingthe PJLinkprotocolforprojectorcontrol.
- RemotePasswordletsyouenterapasswordupto8alphanumericcharacterslongforaccessing theRemoteorBasicControlscreenintheEpsonWebControl.(Defaultusernameis EPSONREMOTE;defaultpasswordsguest.)
- WebControlPasswordletyouenterapasswordupto8alphanumericcharacterslongfor accessingtheprojectorovertheweb. (DefaultusernameisEPSONWEB;defaultpasswordis admin.)
- ModeratorPasswordletyouenterapasswordupto4numberslongforaccessingtheprojector asamoderatorwiththeEpsoniProjection(Windows/Mac)softwareortheEpsoniProjectionapp.
-ProjectorKeywordletysyouturnonasecuritypasswordtopreventaccesstotheprojectorbyanyonenotintheroomwithit.TheprojectordisplaysarandomkeywordthatyoumustenterfromacomputerusingtheEpsoniProjection(Windows/Mac)softwareoraniOSorAndroiddeviceusingtheEpsoniProjectionapp. - DisplayKeywordletsyoudisplayakewordontheprojectedimagewhenaccessingthe projectorfromacomputerusingtheEpsoniProjection(Windows/Mac)softwareoraniOSor AndroiddeviceusingtheEpsoniProjectionapp.
- Display LAN Info lets you select how the projector displays network information. You can select anoptiontodisplayaQRcodethatletsyouquicklyconnectyouriOSorAndroiddeviceswiththe EpsoniProjectionapp.
Note: Usethedisplayedkeyboardtoenterthename, passwordsandkeyword.Pressthearrow buttons on the remote control to highlight characters and press Enter to select them. Press Finish whenyouaredone.
- SelecttheWirelessLANmenuandpressEnter.
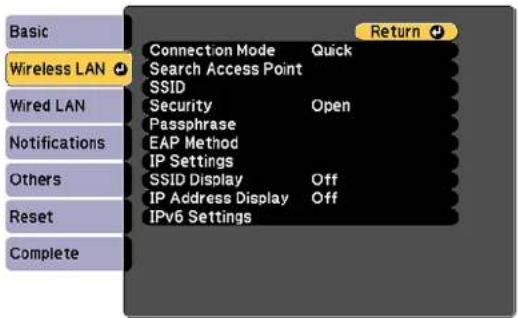
- Select these settings on the Wireless LAN menu as necessary for your network.
- When you finish selecting settings, select Complete and follow the on-screen instructions to save yoursettingsandexithemenus.
Afteryoucompletethewirelesssettingsforyourprojector,youneedtoselectthewirelessnetworkon yourcomputer,oriOSorAndroiddevice.
WirelessLANMenuSettings
Parenttopic: Wireless Network Projection
WirelessLANMenuSettings
| SettingOptionsDescription | ||
| ConnectionModeQuick | Advanced | Selectsthetypeofwireless connection:Quick:letsyouconnecttoa smartphone,tablet,orcomputer directlyAdvanced:letsyouconnectto multiplesmartphones,tablets,or computersviaawirelessnetwork accesspoint |
| SearchAccessPointToSearchView | wSearchforavailablewireless | networkaccesspointsinAdvancedconnectionmode |
| SSIDUp32alphanumericcharacters | SetstheSSID(networkname)of | thewirelessLANsystemtheprojectorisconnectingto |
| SecurityOpen | WPA2-PSKWPA/WPA2-PSKWPA2-EAPWPA/WPA2-EAP | Selectsthetypeofwirelesssecurityusedinthewirelessnetwork(someoptionsareonlyavailablewhentheConnectionModesettingissettoAdvanced) |
| PassphraseBetween8to63alphanumericcharacters | Enteraparaphraseforthewirelessnetwork | |
| EAPMethodEAPType | UsernamePasswordClientCertificateVerifyServerCert.CAcertificateRADIUSServ.Name | SetstheEAPsettingsforWPA2-EAPandWPA/WPA2-EAPsecurity |
| Channel1ch | 6ch11ch | InQuickconnectionmode,selectsthefrequencyband(channel)usedbythewirelessLAN |
| IPSettingsDHCP | IPAddressSubnetMaskGatewayAddress | TurnsonDHCPifyournetwork assignsaddressesautomatically; settoOfftomanuallyenterthe network'sIPAddress,Subnet Mask,andGatewayAddress (someoptionsareonlyavailable whentheConnectionMode settingissettoAdvanced) |
| SSIDDisplayOn | Off | Selectswhethertodisplaythe SSIDonthenetworkstandby screen |
| IPAddressDisplayOn | Off | SelectswhethertodisplaytheIP addressonthenetworkstandby screen |
| IPv6SettingsIPv6 | AutoConfigurationUseTemporaryAddress | SelectstheIPv6settingswhen youconnecttheprojectortothe networkusingIPv6TheEpsonWebControland PJLinkfunctionssupportIPv6. |
Parenttopic: SelectingWirelessNetworkSettingsManually
SelectingWirelessNetworkSettingsinWindows
Beforeconnectingtotheprojector, select the correct wireless network on your computer.
- To access your wireless utility software, access the Desktop and double-click then network icon on the Window task bar.
2.Dooneofthefollowing:
- If your projector is set upon an existing network (Advanced mode), select thenetworkname (SSID).
- If your projector is configured for Quickmode, select the projector's SSID.
3.ClickConnect.
Parenttopic: Wireless Network Projection
SelectingWirelessNetworkSettingsMac
Beforeconnectingtotheprojector, select the correct wireless network on your Mac.
- ClicktheAirPorticononthemenubaratthetopofthescreen.
- MakesureAirPortisturnedon, thendooneofthefollowing:
- If your projector is set upon an existing network (Advanced mode), select thenetworkname (SSID).
- If your projector is configured for Quickmode, select the projector's SSID.
Parenttopic: Wireless Network Projection
SettingUpWirelessNetworkSecurity
Youcansetupsecurityforyourprojectortouseonawirelessnetwork.Setuponeofthefollowing securityoptionstomatchthesettingsusedonyournetwork:
•WPA2-PSK(AdvancedandQuickconnectionmode)
•WPA2-EAP(Advancedmode)
•WPA/WPA2-PSK(Advancedconnectionmode)
•WPA/WPA2-EAP(Advancedconnectionmode)
Note: Contact your network administrator forguidance on entering the correct information.
-
If you want to setup WPA2-EAP or WAP/WAP2-EAP security, makes sure your digital certificate file is compatible with projector registration and placed directly on a USB storage device.
2.PresstheMenubutton. -
SelecttheNetworkmenuandpressEnter.
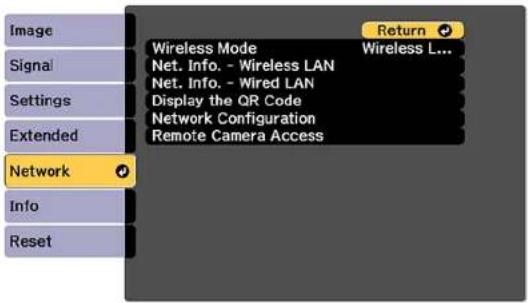
- SelectNetworkConfigurationandpressEnter.
- SelecttheWirelessLANmenuandpressEnter.
- SettheSecuritysettingtomatchyournetworksettings.
-
Dooneofthefollowingdependingonthenetworksecuritysettingyouselected:
-
WPA2-PSK or WPA/WPA2-PSK: Select Complete and follow the on-screen instructions to save yoursettingsandexithemenus.Skiptheremainingsteps.
- WPA2-EAP or WPA/WPA2-EAP: Select EAP Method and press Enter.
![[EAP Method] Basic Wireless LAN Wired LAN Notifications Others Reset Complete EAP Type PEAP User name Password Client Certificate Verify Server Cert. Off CA certificate RADIUS Serv.Name Return](/content/2026/05/1053940/images/7312ff93cd633f9f1a662b10a8203ce5bdb23d59591a31ef4134e7889b4d2462.jpg)
-
Select your authentication protocol last the EAPTypesetting.
-
To import your certification, select the certificate type (either Client Certificate or CA certificate) and press Enter.
Note: You can also register a digital certificate from your web browser. Make sure to register just onceorthecertificatemaynotinstallcorrectly.
-
SelectRegisterandpressEnter.
-
Follow the on-screen instructions to connect a USB storage device to the projector's USB-A port.
-
PressEntertodisplaythecertificatelist.
-
Selectthecertificatetoimportfromthedisplayedlist.
Youseeamessagetoenterthecertificatepassword.
14.EnterapasswordandpressEnter.
Youseeacompletionmessageafterthecertificateisimported.
- SetthefollowingEAPsettingsasnecessary:
- User name lets you enter a user name up to 64 alphanumeric characters long. To enter more than 32 characters, use your web browser.
- Passwordletsyouenterapasswordupto64alphanumericcharacterslongwhenusingthe PEAP,EAP-FAST,orLEAPprotocols.Toentermorethan32characters,useyourwebbrowser.
- VerifyServerCert. let you select whether or not to verify the server certificate when a CA certificate has been set.
•RADIUSServ.Nameletsoyouentertheservernametobeverified.
- When you finish selecting settings, select Complete and follow the on-screen instructions to save yoursettingsandexithemenus.
Parenttopic: Wireless Network Projection
Relatedreferences
WirelessLANMenuSettings
SettingUpProjectorNetworkE-MailAlerts
Youcansetuptheprojectortosendyouane-mailalertoverthenetworkifthereisaproblemwiththe projector.
-
PresstheMenubutton.
-
SelecttheNetworkmenuandpressEnter.
- SelectNetworkConfigurationandpressEnter.
- SelecttheNotificationsmenuandpressEnter.
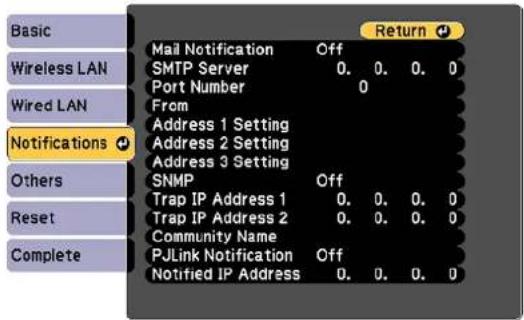
5.TurnonMailNotification.
6.EnterthelPaddressfortheSMTPServersetting.
Note: Donotusetheseaddresses: 127.x.x.xor224.0.0.0 through 255.255.255.255 (wherexisa number from 0 to 255).
- SelectanumberfortheSMTPserverPortNumbersetting, from 1 to 65535 (defaultis25).
8.Enterthesender'semailaddressastheFromsetting.
-
Choose an Address Setting field, enter the e-mail address, and select or deselect the alerts you wanttoreceivethere.Youre-mailaddresscanbeupto32alphanumericcharacterslong.Repeat foruptothreeaddresses.
-
If you are using the PJLink protocol for projector control, turn on the PJLink Notification setting and entertheIPaddresswhereyouwanttoreceivePJLinknotificationsastheNotifiedIPAddress setting.
-
When you finish selecting settings, select Complete and follow the on-screen instructions to save yoursettingsandexithemenus.
Note: If a critical problem causes a projector to shut down, you may not receive an e-mail alert.
NetworkProjectorE-mailAlertMessages
Parenttopic: UsingtheProjectoronaNetwork
NetworkProjectorE-mailAlertMessages
When a problem occurs with an networked projector, and you selected to receive email alerts, you receive an email containing the following information:
•TheemailaddressenteredastheFromsetting
•EpsonProjectoronthesubjectline
- Thenameoftheprojectorexperiencingaproblem
•TheIPaddressoftheaffectedprojector
•Detailedinformationabouttheproblem
Note: If a critical problem causes a projector to shut down, you may not receive an e-mail alert.
Parenttopic: SettingUpProjectorNetworkE-MailAlerts
SelectingOtherNetworkSettings
YoucanselectoptionalnetworksettingstheOthersmenu.
- PresstheMenubutton.
- SelecttheNetworkmenuandpressEnter.
- SelectNetworkConfigurationandpressEnter.
- SelecttheOthersmenuandpressEnter.
- If you want to select the authentication method for command communication, select Command Communication. Select Protected to perform Digest Authentication using the Web Control Password setting. Select Compatible to perform plain text authentication using the Monitor Password.
- If you want to set the Secure HTTP protocol to encrypt communication when using Web Control, turn on the Secure HTTP setting and import the web server certificate using the Web Server Cert. setting.
-
If you want to operate the projector using Web API, turn on the Web API setting. The username for API authentication is EPSONWEB; use the password that is set for the Web Control Password.
-
SelectthePriorityGatewaysettingforyournetwork.
- If you want to monitor the projector using PJLink, turn on the PJLink setting.
- If your network environment uses an AMX controller, turn on the AMX Device Discovery setting to allow the projectortobedetected.
- If your network environment uses a Crestron Connected controller, turn on the Crestron Connected setting to allow the project to be detected.
Note: Enabling Crestron Connected disable the Message Broadcasting feature in the Epson Projector Management software (Windowsonly).
- If you want to control the projector using Art-Net (an Ethernet communication protocol based on TCP/IP), turn on the Art-Net setting.
- If you want this projector to receive broadcast messages over the network, turn on the Message Broadcasting setting. Administrators can broadcast messages over thenetwork using the Epson Projector Management software (Windowsonly).
- When you finish selecting settings, select Complete and follow the on-screen instructions to save yoursettingsandexithemenus.
Parenttopic: Using the Projectorona Network
Relatedconcepts
UsingCrestronConnected
Relatedreferences
Art-NetChannelDefinitions
AdditionalProjectorSoftwareandManuals
SettingaStaticIPAddressontheLCDScreen
YoucansetastaticIPaddressontheprojector'sLCDscreenwhiletheprojectorisinstandbymode.
Thisletsyousettheaddresswithoutneedingtoprojectanything.
-
PresstheMenubuttonontheprojectororremotecontrol.
-
SelecttheExtendedmenuandpressEnter.
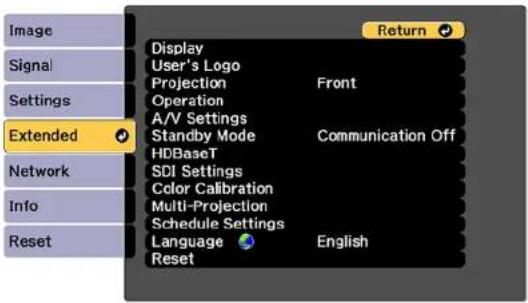
- Select the A/V Settings > A/V Output, select Always On, and press Enter.
- Select Standby Mode, select Communication On, and press Enter.
5.PresstheMenubuttontoexitthemenusystem. - Turnoff the projector, connect it to a wired LAN, and turn on the power using the powers switch.
- HolddowntheLANbuttonontheprojectorcontrolpanelforatleastthreeseconds.
YouseethestaticIPsettingmenu:
Start IP Setting
-
Press the Enter button on the projector control panel, press the down arrow button to select OFF as the DHCP setting, and press Enter again.
-
UsetheupanddownarrowbuttonsasnecessarytochangetheIPaddressvalues. Usetheleftand rightarrowbuttonstomovethecursortothenextorpreviousnumberposition. When you finish, pressEnter.
IP Address
-
-
- 100
-
Note: You can also enter the numbers using the numeric button on theremote control.
- Repeat the last step to enter the subnet mask and gateway address, if necessary, and press Enter.
- Press Enter to select Finish and return to the status information screen.
Parenttopic: UsingtheProjectoronaNetwork
Relatedreferences
ProjectorParts-ControlPanel
Relatedtasks
SelectingWiredNetworkSettings
ControllingaNetworkedProjectorUsingaWebBrowser
Once you have connected your project to your own network, you can select projector settings and control projection using a compatible web browser. This lets you access the projector remotely.
Note: The web setup and control features support Microsoft Internet Explorer 11.0 or later, Microsoft Edge, GoogleChrome, and Safarionnetworksthatdonotuseaproxyserverforconnection. You cannotselectalloftheprojectormenusettingsorcontrolallprojectorfunctionsusingawebbrowser.
Note: If you set Standby Mode to Communication On, you can use a web browser to select settings and control projection even if the projector is in standby mode.
-
Makesuretheprojectoristurnedon.
2.Startyourwebbrowseronacomputerordeviceconnectedtothenetwork. -
Type the projector's IP address into the browser's address box and press the computer's Enter key.
Note: You may need to log in to access some of the options on the Web Control screen. If you see a loginwindow, entry your username and password. (The default username is EPSONWEB and the default password is admin.)
YouseetheEpsonWebControlscreen.
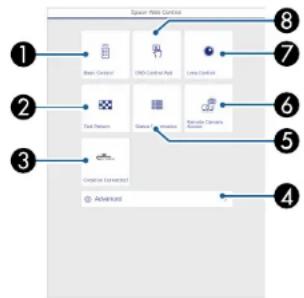
flowchart
graph TD
    A["Basic Control"] --> B["DNO Control Red"]
    B --> C["Linux Control"]
    D["Data Network"] --> E["Security Server Active"]
    F["Advanced"] --> G["Advanced"]
    style A fill:#f9f,stroke:#333
    style B fill:#ccf,stroke:#333
    style C fill:#cfc,stroke:#333
    style D fill:#fcc,stroke:#333
    style E fill:#cff,stroke:#333
    style F fill:#ffc,stroke:#333
    style G fill:#fcc,stroke:#333
1SelectBasicControltocontroltheprojectorremotely.
2SelectTestPatterntodisplayatestpattern
3SelectCrestronConnectedtoopenthemenu(ifyouenabledCrestronConnectedinthe Network > Network Configuration > Others menu)
4SelectAdvancedtoopentheadadvancedmenuscreen.
5SelectStatusInformationtoviewtheprojector'sstatus.
6SelectRemoteCameraAccesstotakeanimagecaptureofthedisplayedimagefroma remotelocation
7SelectLensControltoadjustthelens(focus,zoom,andlensshift).
8SelectOSDControlPadtochangetheprojector'smenusettings.
- Select the option corresponding to the projector function you want to control.
WebControlOptions
ViewinganImageCaptureoftheDisplayedImagefromaRemoteLocation
Parenttopic: UsingtheProjectoronaNetwork
Relatedtasks
SelectingOtherNetworkSettings
WebControlOptions
BasicControl
Note: If the Remote Password is set to On, you need to enter your user name and password. (The defaultusernameisEPSONREMOTEandthedefaultpassworddisguest).
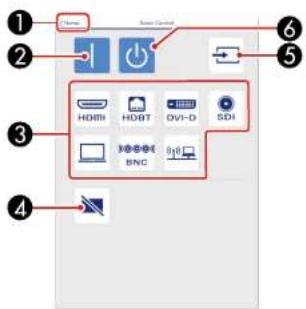
1ReturnstotheHomescreen
2Turnsontheprojector
3Inputsourceselectioncontrols
4Turnstheimageonorofftemporarily
5Searchesforsources
6Turnsofftheprojector
OSDControlPad
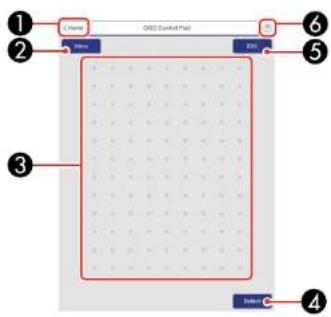
1ReturnstotheEpsonWebControlscreen
2Displaystheprojector'ssettingmenus
3Useyourfingerormousetonavigatethemenus
4Returnsprojectortodefaultsettings
5Returnstothepreviousmenu
6Displayshelptopics
Note: You cannot changesomesettings using EpsonWebControl.
LensControl
Focus/Distortionscreen
1ReturnstotheHomescreen
2Displaysorentersthefocusvalue
3Focusadjustmentbuttons
4Focusadjustmentslider
5Displaysorentersthedistortionvalue
6Distortionadjustmentbuttons(onlyavailableforELPLR05andELPLU05)
7Distortionadjustmentslider(onlyavailableforELPLR05andELPLU05)
8DisplaytheFocus/Distortionscreen
9DisplaystheZoomscreen
1Zoomadjustmentslider
2Zoomadjustmentbuttons
LensShiftscreen
1 Thebluesquaredisplaysthecurrentimagepositionandtheredsquaredisplaysthenewimage position
2Displaystheverticalimageposition;selecttochangethevalue
3Movestheimagepositionup,down,left,orright
4Movesthelenstothehomeposition
5Displaysthehorizontalimageposition;selecttochangethevalue
TestPatternscreen
1Displaysavailabletestpatterns;selecttoprojectatestpattern
2Turnsofftestpatternndisplay
Memoryscreen
1 Overwrites your current settings with saved settings
2Savesyourcurrentsettingstomemory
3Displaysalistofsavedmemories
4Erasesasavedmemory
5Renamesasavedmemory
StatusInformationscreen
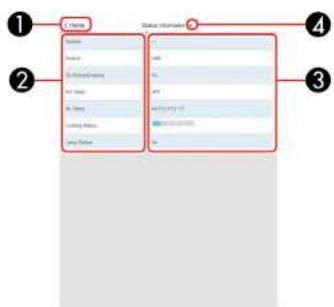
1ReturnstotheHomescreen
2Displaysalistofmonitoredsettings
3Displaysthesettingstatus
4Selecttoviewdifferentstatusinformation
RemoteCameraAccessscreen
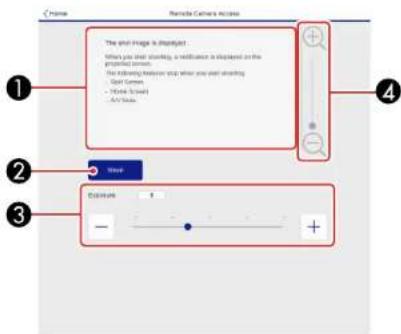
1DisplaystheimageyoucapturedusingtheShootbutton
2Takesapictureoftheprojectedimageusingthecameraonthefrontoftheprojector
3Adjuststheimageexposure
4Zoomsinoroutontheimageyoucaptured
Parenttopic: ControllingaNetworkedProjectorUsingaWebBrowser
Relatedreferences
ProjectorSetupSettings-ExtendedMenu
Relatedtasks
ViewinganImageCaptureoftheDisplayedImagefromaRemoteLocation
ViewinganImageCaptureoftheDisplayedImagefromaRemoteLocation
Youcantakeanimagecaptureoftheprojectedimageandviewitfromaremotelocationusingthe projector'scamera.
Notethefollowingwhenusingthisfeature:
•ThisfeatureisnotsupportedwiththeELPLR05lens.
- Thisfeatureisnotsupportedwhenperformingthefollowingfunctions:Tiling,TilingAssist,stacking assisttool,ScreenMatching,ColorCalibration,LensCalibration,MessageBroadcastingintheEpson ProjectorManagementsoftware.
- Using this feature cancel the following functions: SplitScreen, Shutter, on-screen display (when the message is hidden).
- Hold down the Freeze button on the remote control for about five seconds or until you see this menu.
![[Password Protection] Power On Protection Off User's Logo Protection Off Network Protection Off Schedule Protection Off Remote Camera Access Off Password](/content/2026/05/1053940/images/f1f718feb0a7f34cc3b7b0519a8373eba470ef838e3425f3967b276159726bd4.jpg)
- Make sure the Remote Camera Access setting is set to Off, then exit the menu.
3.PresstheMenubutton.
- SelecttheNetworkmenuandpressEnter.

-
SelectNetworkConfigurationandselecttheOthersmenu.
-
MakesuretheSecureHTTPsettingisenabledandreturntotheNetworkmenu.
-
SelectRemoteCameraAccessandpressEnter.
Youseeascreenlikethis:
![[Remote Camera Access] Return Signal Remote Camera Access Off Settings Password Extended Network Info Reset](/content/2026/05/1053940/images/52a65232ca3e234c990cd496911a2461f2dcd5aad36e8d23046cf468bb4856f8.jpg)
- Select the Password setting and enter a password up to 32 alphanumeric characters long.
Note: Do not use these characters in the password: * (asterisk), : (colon), or a space character.
- SelectOnastheRemoteCameraAccesssetting.
10.Openawebbrowseronacomputerormobiledeviceconnectedtotheprojectoroveranetwork connection.
11.Entertheprojector'sIPaddressinyourbrowser'saddressboxtoconnecttoEpsonWebControl. Youseeascreenlikethis:
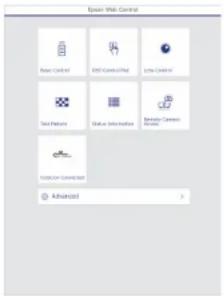
Note: You can view the projector's IP address by selecting Net. Info. - Wireless LAN or Net. Info. - WiredLANontheNetworkmenu.
- SelectRemoteCameraAccess.
Note: YoumayneedtologintoaccesssomeoftheoptionsontheEpsonWebControlscreen.If youseealoginwindow,enteryourusernameandpassword.(Thedefaultusernameis EPSONWEBandthedefaultpassworddisadmin.)
- Click Shoot to take a capture of the projected image. (You cannot capture warning or caution messages.)
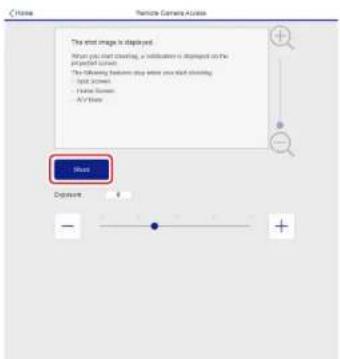
Note: If you see a password screen, enter the password you selected for remote camera access. You cannot perform any projector operations during shooting other than turning off the projector.
Theprojectordisplaysamessageontheprojectionscreenforseveralsecndswhileittakesan image capture. When finished, the captured image is displayed in the area above the Shoot button.
Parenttopic: ControllingaNetworkedProjectorUsingaWebBrowser
UsingCrestronConnected
If you are using the Crestron Connected network monitoring and control system, you can setup your projector for use on the system. Crestron Connected lets you control and monitor your projector using a web browser.
Note: You cannot use the Message Broadcasting feature in the Epson Projector Management software when you use Crestron Connected.
ForadditionalinformationonCrestronConnected,contactCrestron.
SettingUpCrestronConnected
ControllingaNetworkedProjectorUsingCrestronConnected
Parenttopic: UsingtheProjectoronaNetwork
Relatedreferences
AdditionalProjectorSoftwareandManuals
SettingUpCrestronConnected
TosetupyourprojectorfonitoringandcontrolusingaCrestronConnectedsystem,makesureyour computerandprojectorareconnectedtothenetwork.
Note: If you want to use the Crestron Connected system when the projector is turned off, you need to adjust the Standby Mode setting in the Operation menu. The Standby Mode setting is displayed only if the A/V Output setting in the Signal I/O menu is set to While Projecting.
1.PresstheMenubutton.
2. SelecttheNetworkmenuandpressEnter.
3. SelectNetworkConfigurationandpressEnter.
4. SelecttheOthersmenuandpressEnter.
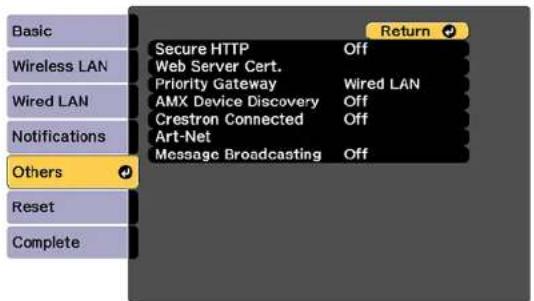
- Set the Crestron Connected setting to On to allow the projector to be detected.
Note: Enabling Crestron Connected disable the Message Broadcasting feature in the Epson Projector Management software.
- Turnoff the projector, thenturnitonagain to enable these setting.
Parenttopic: UsingCrestronConnected
Relatedreferences
ProjectorSetupSettings-ExtendedMenu
ControllingaNetworkedProjectorUsingCrestronConnected
OnceyouhavesetupyourprojectortouseCrestronConnected,youcancontrolandmonitorprojection usingacompatiblewebbrowser.
1.Startyourwebbrowseronacomputerconnectedtothenetwork.
- Type the projector's IP address into the browser's address box and press the computer's Enter key. YouseetheEpsonWebControlscreen:

Note: You may need to log in to access some of the options on the Web Control screen. If you see a loginwindow, entry your username and password.
- SelectCrestronConnected.
Youseeascreenlikethis:
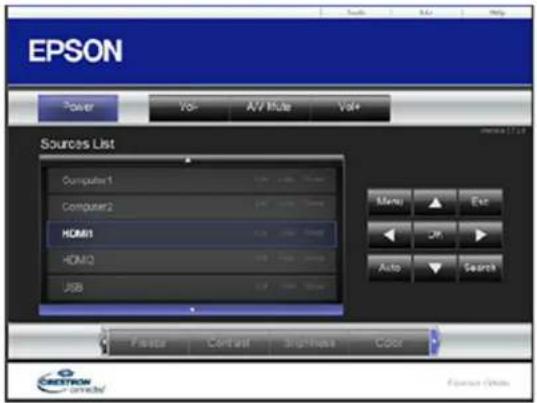
Note: Sources in the image above vary depending on ports available by your product.
- Select the input source that you want to control in the Sources List box. You can scroll through available sources using the up and down narrows in the box.
- To control projection remotely, click the on-screen button that corresponds to the projector's remote control buttons. You can scroll through button options at the bottom of the screen.
Note: These on-screen buttons do not directly correspond to the projector's remote control buttons:
-
OKactsastheEnterbutton
•Menudisplaystheprojector'smenu -
Toviewinformationabouttheprojector, clicktheInfotab.
- To change projector, Crestron, and password settings, click the Tools tab, select settings on the displayedscreen, and click Send.
- When you finish selecting settings, click Exit to exit the program.
Parenttopic: UsingCrestronConnected
Art-NetChannelDefinitions
Art-NetisanEthernetcommunicationprotocolbasedontheTCP/IPprotocol.YoucancontroltheprojectorbyusingaDMXcontrolleroranapplicationsystem.
The following table lists the channel definitions used to control the projector in Art-Net.
Beginbysettingchannel13toCancontrol.
Note: When controlling the projector using Art-Net and performing operations from the remote control or controlpanel,settingsmadebytheDMXcontrollerorapplicationsoftwaremaynotbeappliedtothe projectorcorrectlyormaydifferfromtheprojector'sactualstatus.Ifyouwanttoapplycontrolformultiple channels to the projector, set Channel 13 to Cannot control before you make any other settings. Then set Channel 13 to Can control after setting multiple channels. You can then control the projector without changingthesettingforChannel13.
| Channel/FunctionOperationParametersDescription | |||
| 1Adjustinglight (dimming) | 0%to100%0to255Adjuststheim | age | brightness(defaultis 0) |
| 2ShuttercontrolShutterclosedNon-operationalShutteropen | 0to6364to191192to255 | Closesandopens theshutter(defaultis 128) | |
| 3SwitchsourceNon-operational0to7,16to23,40to47, | 64to71,88to255 | Switchestothespecifiedsource (defaultis0) | |
| 4Lensposition | NonoperationalMovetohomeposition | 0to31,64to25532to63 | Shiftsthelenstothehomeposition (defaultis0) |
| 5Horizontallens shift | (+)LensadjustmentMovement- | arge:0to31 Movement-medium:32to 63 Movement-small:64to 95 | Shiftsthelens horizontallybythe amountofshift specified(defaultis 128) |
| Non-operational96to159 | |||
| (-)LensadjustmentMovement- | small:160to 191 Movement-medium:192 to223 Movement-large:224to 255 | ||
| 6Vertical lensshift(+)L | LensadjustmentMovement-large | 0to31 Movement-medium:32to 63 Movement-small:64to 95 | Shiftsthelens verticallybythe amountofshift specified(defaultis 128) |
| Non-operational96to159 | |||
| (-)LensadjustmentMovement- | small:160to 191 Movement-medium:192 to223 Movement-large:224to 255 | ||
| Channel/FunctionO | OperationParametersDescription | ||
| 7Electroniczoom(+)L | LensadjustmentMovement-large | 0to31Movement-medium:32to63Movement-small:64to95 | Zoomsusingthespecifiedamountofmovement(defaultis 128) |
| Non-operational96to159 | |||
| (-)LensadjustmentMovement- | small:160to191Movement-medium:192 to223Movement-large:224to255 | ||
| 8Electronicfocus(+)L | LensadjustmentMovement-large | 0to31Movement-medium:32to63Movement-small:64to95 | Performselectronic focususingthespecifiedamountof movement(defaultis 128) |
| Non-operational96to159 | |||
| (-)LensadjustmentMovement- | small:160to191Movement-medium:192 to223Movement-large:224to255 | ||
| Channel/FunctionOperationParametersDescription | |||
| 9Electronic distortion | (+)LensadjustmentMovement- | arge:0to31Movement-medium:32to 63Movement-small:64to 95 | Correctsdistortion usingthespecified amountofmovement (defaultis128) |
| Non-operational96to159 | |||
| (-)LensadjustmentMovement- | small:160to 191Movement-medium:192 to223Movement-large:224to 255 | ||
| 10Loadlens memory | Non-operational0to15,176to25 | 5Loadsthespecified | lensmemory(default is0) |
| Loadlensmemory116to31 | |||
| Loadlensmemory232to47 | |||
| Loadlensmemory348to63 | |||
| Loadlensmemory464to79 | |||
| Loadlensmemory580to95 | |||
| Loadlensmemory696to111 | |||
| Loadlensmemory7112to127 | |||
| Loadlensmemory8128to143 | |||
| Loadlensmemory9144to159 | |||
| Loadlensmemory10160to175 | |||
| 11PowercontrolPoweroff | 0to63 | Turnstheprojector poweronoroff (defaultis128) | |
| Non-operational | 64to191 | ||
| Poweron | 192to255 | ||
| 12Geometry correction | Off0to15Performsgeometry | correction(defaultis 255) | |
| H/V-Keystone16to31 | |||
| QuickCorner32to47 | |||
| PointCorrection48to63 | |||
| CurvedSurface64to79 | |||
| CornerWall80to95 | |||
| Loadgeometrycorrection memory1 | 96to111Loadsageometry | correctionmemory (defaultis255) | |
| Loadgeometrycorrection memory2 | 112to127 | ||
| Loadgeometrycorrection memory3 | 128to143 | ||
| Non-operational144to175 | |||
| 13LockCannotcontrol | Cancontrol | 0to127128to255 | Enables/disablesArt-Netoperations (defaultis0) |
| 14FadeinNon-operational192to255Fadeintimesetting | whentheshutterisreleased(defaultis 255) | ||
| 14FadeoutNon-operational192to255Fadeouttimesetting | whentheshutterisreleased(defaultis 255) | ||
| 0.0seconds0to15 | |||
| 0.5seconds16to31 | |||
| 1.0seconds32to47 | |||
| 1.5seconds48to63 | |||
| 2.0seconds64to79 | |||
| 2.5seconds80to95 | |||
| 3.0seconds96to111 | |||
| 3.5seconds112to127 | |||
| 4.0seconds128to143 | |||
| 5.0seconds144to159 | |||
| 7.0seconds160to175 | |||
| 10.0seconds176to191 | |||
Parenttopic: UsingtheProjectoronaNetwork
Relatedtasks
SelectingOtherNetworkSettings
RegisteringaDigitalCertificateontheProjector
Followtheinstructionshereifyouneedtoinstalladigitalcertificateontheprojectortoprovidesecurityforyourpresentationfiles.
Note: You can register a digital certificate over a network or from a connected USB device. However, be suretoregisterjustoncefromeitheraUSBdeviceornetwork,orthecertificatemaynotinstallcorrectly.
ImportingaWebServerCertificateUsingtheProjectorMenus
RegisteringDigitalCertificatesfromaWebBrowser
DigitalCertificateTypes
Parenttopic: UsingtheProjectoronaNetwork
ImportingaWebServerCertificateUsingtheProjectorMenus
You can create your web server certificate and import it using the projectormenus and USB flash drive.
Note: You can also register digital certificates from your web browser. Make sure to only register once, orthecertificatemaynotinstallcorrectly.
- Makesureyourdigitalcertificatefileiscompatiblewithprojectorregistrationandsavedintheroot directoryoftheUSBflashdrive.
- Pressthe Menubuttonontheremotecontrol.
- SelecttheNetworkmenuandpressEnter.
-
SelecttheNetworkConfigurationsettingandpressEnter.
-
SelecttheOthersmenuandpressEnter.
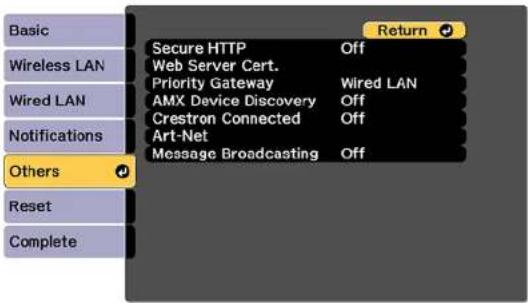
-
SelectOnastheSecureHTTPsetting.
-
SelecttheWebServerCert.settingandpressEnter.
-
SelectRegisterandpressEnter.
-
RemovethescrewsecuringthewirelessLANmoduleportcover, thenremovetheportcover.
-
Insert a USB flash drive into the projector's USB-A port. If the wireless LAN module is installed, removeitbeforeinsertingtheUSBflashdrive.
-
PressEntertodisplaythecertificatelist.
-
Selectthecertificateyouwanttoimportfromthedisplayedlist.
Amessageisdisplayedpromptingyoutoenterthepasswordforthecertificate.
13.EnterthepasswordandpressEnter.
The certificate is imported and a completion message appears.
- RemovetheUSBflashdrive, thenre-insertthewirelessLANmoduleifnecessaryandsecurethe portcover.
Parenttopic: RegisteringaDigitalCertificateontheProjector
Relatedreferences
DigitalCertificateTypes
RegisteringDigitalCertificatesfromaWebBrowser
YoucanregisterthedigitalcertificatesontheprojectorforwirelessLANauthentication.
-
Makesureyourdigitalcertificatefileiscompatiblewithprojectorregistration.
-
Makesuretheprojectoristurnedon.
3.Startyourwebbrowseronacomputerormobiledeviceconnectedtothenetwork.
- Type the projector's IP address into the browser's address box and press the computer's Enter key. YouseetheWebControlscreen:
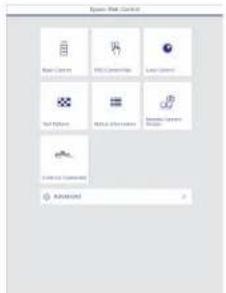
5. SelectAdvanced.
Note: You may need to log in to access some of the options on the Web Control screen. If you see a loginwindow,enteryourusernameandpassword.(ThedefaultusernameisEPSONWEBandthe defaultpassworddisadmin.)
6.UnderNetwork,selectCertificate.
- Click the Choose File button, select the certificate file, and click Open.
8.EnterapasswordinthePasswordboxandclickSend. - When you finish registering the certificate, click Apply to finalize your changes and complete the registration.
Parenttopic: RegisteringaDigitalCertificateontheProjector
Relatedreferences
DigitalCertificateTypes
DigitalCertificateTypes
Youcanregisterthesetypesofdigitalcertificates.
ClientCertificate(PEAP-TLS/EAP-TLS)
| SpecificationDescription | |
| FormatPKCS#12 | |
| ExtensionPFX,P12 | |
| EncryptionRSA | |
| HashesMD5/SHA-1/SHA-256/SHA-384/SHA-512 | |
| Keylength512/1024/2048/4096bit | |
| PasswordUpto32alphanumericcharacters;required | |
CACertificate(PEAP/PEAP-TLS/EAP-TLS/EAP-FAST)
| SpecificationDescription | |
| FormatX509v3 | |
| ExtensionDER/CER/PEM | |
| EncryptionRSA | |
| HashesMD5/SHA-1/SHA-256/SHA-384/SHA-512 | |
| Keylength512/1024/2048/4096bit | |
| EncodingBASE64/Binary |
WebServerCertificate(SecureHTTP)
| SpecificationDescription | |
| FormatPKCS#12 | |
| ExtensionPFX,P12 | |
| EncryptionRSA | |
| HashesMD5/SHA-1/SHA-256/SHA-384/SHA | A-512 |
| Keylength512/1024/2048/4096bit | |
| CommonnameNetworkhostname | |
| OrganizationOptional | |
| PasswordUpto32alphanumericcharacters;required | |
Note: You can set up password of up to 64 characters if you use a web browser to enter the text.
Parenttopic: RegisteringaDigitalCertificateontheProjector
UsingBasicProjectorFeatures
Followtheinstructionsinthesesectionstouseyourprojector'sbasicfeatures.
TurningOntheProjector
TurningOfftheProjector
SelectingtheLanguagefortheProjectorMenus
ResizingthelmagewiththeZoomButton
FocusingtheImageUsingtheFocusButtons
SettingtheScreenType
AdjustingtheImagePositionUsingLensShift
AdjustingtheImagePositionUsingScreenPosition
DisplayingaTestPattern
ImageShape
SelectinganImageSource
RemoteControlOperation
ProjectionModes
ImageAspectRatio
ColorMode
AdjustingtheBrightness
AdjustingLuminanceControls
AdjustingGamma
SettingtheDateandTime
TurningOntheProjector
Turnonthecomputerorvideoequipmentyouwanttousebeforeyouturnontheprojectorsoitcan displaytheimagesource.
Note: Install a circuit breaker for 13 A to 20 A to the wiring that supplies power to the projector and do notconnectanyotherdevicestothatwiring.
- Connect the power cord to the projector's power inlet.
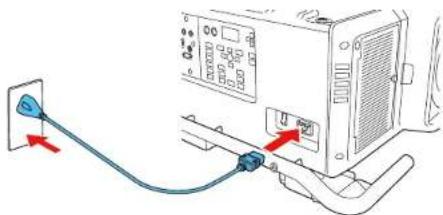
natural_image
Diagram showing connection between a computer monitor and cable, with a red arrow indicating cable direction (no text or symbols present)Note: If you connected the projector using the 120 V power cord, the image brightness is reduced to approximately 30% of the brightness achievable with the 220V power cord and the laser light flashes orange. For optimal performance, connect the 220V power cord that can be with the projector. You cannot use the Light Source Mode, Estimated Remains, Refresh Mode, or Light Source Calibration functions when connected using the 120V power cord.
2.Plugthepowercordintoanelectricaloutlet.
- Turnonthepowerswitchonthesideoftheprojector.
Theprojector's On/Standbylightturnsblue. This indicates that the projector is receiving power.
Note: With Direct Power On turned on, the projector turns on as soon as you plug it in.
4.PresstheOnbuttonontheprojectororremotecontroltoturnontheprojector.
TheprojectorbeepsandtheStatuslightflashesblueastheprojectorwarmsup.Afterabout30 seconds,theStatuslightstopsflashingandturnsblue.
Warning: Never look into the projector lens when the laser is on. This can damage your eyes and is especially dangerous for children and pets.
Caution: Make sure no objects are blocking the light from the projector lens. Objects blocking the lensforanextendedtimecanmeltandlightthatisreflectedbackintothelenscancausethe projectortomalfunction.
If you donot see a projected imagerightaway, try the following:
•Makesurethelenscapisoff.
• Turnontheconnectedcomputerorvideodevice.
- InsertaDVDorothervideomediaandpresstheplaybutton,ifnecessary.
- Press the Search button on the remote control to detect the video source, or press one of the source buttonsontheremotecontrolorprojector.
Parenttopic: UsingBasicProjectorFeatures
Relatedreferences
ProjectorSetupSettings-ExtendedMenu
Relatedtasks
TurningOfftheProjector
TurningOfftheProjector
Before turning off the projector, shutdown any computer connected to it so you can see the computer display during shutdown.
Note: Turn off this product when not in use to prolong the life of the projector. Laser life will vary depending upon modeselected, environmental conditions, and usage. Brightness decreases over time.
Note: When using the Shutter function, the laser is still on. To turn off the laser, turn off the projector.
- PresstheStandbybuttonontheprojectororremotecontrol.
Theprojectordisplaysashutdownconfirmationscreen.
Power Off?
Yes: Press ⏻ button
No : Press any other button
Note: If Standby Confirmation is disabled and you press the power button on the remote control, the confirmationscreenisnotshownandtheprojectorshutsoff.
- Pressthepowerbuttonagain.(Toleaveiton, pressanyotherbutton.)
Theprojectorbeepstwice, the laserturnsoff, and the Statuslightturnsoff.
Note: If the Light Source Calibration setting is set to Run Periodically in the projector's Managementmenu, lightsourcecalibrationstartsautomaticallyifyouturnofftheprojectorandthe followingconditionsarepresent:
•100hourshavepassedsincethelastlightsourcecalibration.
- Youhaveusedtheprojectorcontinuouslyforatleast20minutes.
- Turnoff the power using the powers switch on the side of the projector.
TheOn/Standbylightturnsoff.
- Totransportorstoretheprojector, makesuretheStatuslightisoff, thenunplugthepowercord. (If necessary, flipopenthepowercableholderfirst.)
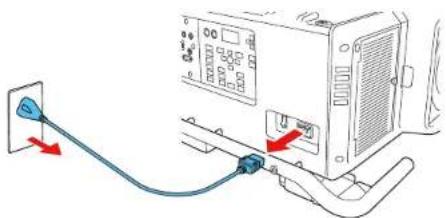
natural_image
Diagram showing connection between a power outlet and a server unit with cable (no text or symbols)Note: If you use the projector continuously for more than 24 hours, or regularly turn it off by shutting off the power outlet, schedule periodic Light Source Calibration events in the Extended menu schedule settings.
Parenttopic: UsingBasicProjectorFeatures
Relatedreferences
ProjectorSetupSettings-ExtendedMenu
Relatedtasks
TurningOntheProjector
SavingaScheduledEvent
SelectingtheLanguagefortheProjectorMenus
If you want to view the projector's menus and messages in another language, you can change the Languagesetting.
- Turnontheprojector.
2.PresstheMenubutton. - SelecttheExtendedmenuandpressEnter.
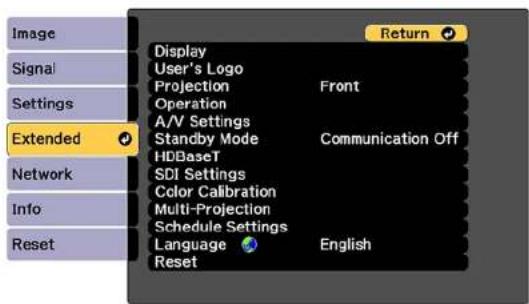
- SelecttheLanguagesettingandpressEnter.
- SelectthelanguageyouwanttouseandpressEnter.
- PressMenuorEsctoexitthemenus.
Parenttopic: UsingBasicProjectorFeatures
ResizingthelmagewiththeZoomButton
Youcanadjustthesizeoftheimageusingthezoombuttons.ZoomisnotavailablefortheELPLR05 lens.
Note: Wait 20 minutes after turning on the projector before setting the focus, zoom, and lens shift for maximum accuracy.
-
Turnontheprojectoranddisplayanimation.
-
PresstheZoombuttononthecontrolpanel.
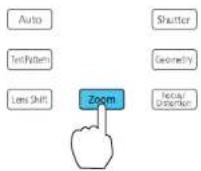
- Presstheleftorrightarrowbuttonstoresizetheimage.
4.PresstheEscbuttonwhenfinished.
Note: You can also press the Zoom + or - buttons on the remote control to adjust the size of the image.
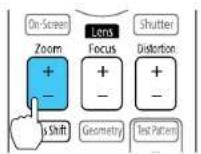
Parenttopic: UsingBasicProjectorFeatures
FocusingtheImageUsingtheFocusButtons
You can adjust the sharpness of the projected image using the focus buttons.
Note: Wait 20 minutes after turning on the projector before setting the focus, zoom, and lens shift for maximum accuracy. If you installed any of the following lenses, seethelink below on focusing with a shortthrow lens instead: ELPLR05, ELPLX03, or ELPLU05.
-
Turnon the projector and display an image.
-
PresstheFocus/Distortionbuttononthecontrolpanel.

3.PresstheEscbuttonwhenfinished.
Note: You can also press the Focus + or - buttons on the remote control to adjust the focus.
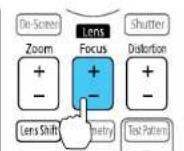
FocusingtheImageWhenUsinganOptionalShortThrowLens
Parenttopic: UsingBasicProjectorFeatures
Relatedtasks
DisplayingaTestPattern
FocusingtheImageWhenUsinganOptionalShortThrowLens
If you installed an optional short throw lens (ELPLR05, ELPLX03, or ELPLU05), you may need to first focus on the center of your screen and then correct any distortion in the surrounding area.
- Turnontheprojectoranddisplayanimation.
2.PresstheFocus/Distortionbuttononthecontrolpanel.
3.Presstheleftorrightarrowbuttonsuntilthecenteroftheimageisfocused.
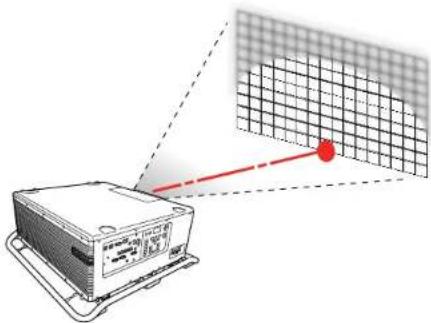
natural_image
Diagram showing a device with a grid pattern and a red pointer, no text or symbols present- PresstheFocus/Distortionbuttonagain.
5.Presstheleftorrightarrowbuttonsuntiltheedgesoftheimagearealsofocused.

natural_image
Diagram showing a device with a grid overlay and red pointer, no readable text or symbols present.Note: You can also press the Focus + or - button on the remote control to focus the center of your image. Then use the Distortion + or - button to adjust the edges of the image.
Parenttopic: Focusing theImageUsingtheFocusButtons
SettingtheScreenType
YoucanusetheScreenTypesettingtomatchtheaspectratioofthedisplayedimagetothescreenyou areusing.
Note: The Screen Typesetting is not supported by the Message Broadcasting feature in the Epson Projector Management software.
- Turnon the projector and display an image.
2.PresstheMenubutton. - SelecttheExtendedmenuandpressEnter.
- Select Display > Screen > Screen Type.
Youseethisscreen:
![[Screen Type] 14:3 16:9 16:10 Return 🔒](/content/2026/05/1053940/images/61ef98380c94d534cf4e38e0390ff42e2b9a7768baa31d31094e74bb3cd72f5e.jpg)
- Select your screen's aspect ratio and press Enter.
6.PresstheMenubuttontoexit. - Adjust the aspect ratio for the projected image, if necessary.
Parenttopic: UsingBasicProjectorFeatures
Relatedconcepts
ImageAspectRatio
AdjustingtheImagePositionUsingLensShift
If you cannot install the projectordirectly in front of the screen, you can adjust the position of the projected image using the lens shift feature.
Note: Wait 20 minutes after turning on the projector before setting the focus, zoom, and lens shift for maximum accuracy.
-
Turnon the projector and display an image.
-
Pressthearrowbuttonsontheremotecontrolorthecontrolpaneltoadjustthepositionofthe projectedimageasnecessary.
ELPLR05
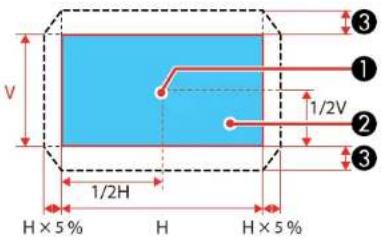
1Centeroflens
2Projectedimagewhenlensshiftissettothehomeposition
3Maximumrange:V×15%
ELPLX03lens
1Centeroflens
2Projectedimagewhenlensshiftissettothehomeposition
3Maximumrange:V×5%
4Maximumrange:V×20%
Note: You cannot move the image upward when the lens is shifted horizontally all the way.
ELPLU05/ELPLL09/ELPLL10
1Centeroflens
2Projectedimagewhenlensshiftissettothehomeposition
3Maximumrange:V×55%
Note: You cannot move the image vertically when the lens is shifted horizontally all the way.
- When you are finished, press the Escbutton on the control panel or remote control.
Note: When adjusting the image height, position the image lower than where you want it to be and then moveitup. This will help prevent the image from moving down after adjustment. The image is clearest when the lens is at the home position. To move the lens to the home position, press and hold the Lens Shift button on theremote control or control panel for at least three seconds.
Parenttopic: UsingBasicProjectorFeatures
Relatedreferences
ProjectorSetupSettings-ExtendedMenu
AdjustingtheImagePositionUsingScreenPosition
You can adjust the image position if there are margins between the edge of the image and the projected screenframe.
Note: You cannot adjust the screen position if the Screen Type setting is set to 16:10.
- Turnon the projector and display an image.
2.PresstheMenubutton. - SelecttheExtendedmenuandpressEnter.
- Select Display > Screen > Screen Position.
- Usethearbuttonsontheremotecontrolorprojectortoadjustthepositionoftheimage.
![[Screen Position] Shift Direction : Top 0](/content/2026/05/1053940/images/a6dfc7777a9b8b37980d3caf55b6207ca5e1ee1ee6ca67db3eaea73f0f7fcecd.jpg)
- When you are finished, press the Menubutton.
Parenttopic: UsingBasicProjectorFeatures
Relatedtasks
SettingtheScreenType
DisplayingaTestPattern
Youcandisplayatestpatterntoadjusttheprojectedimagewithoutconnectingacomputerorvideo device.
Note: The test pattern's shape is determined by the Screen Type setting. Be sure to set the correct screentypebeforeadjustingwiththetestpattern.
- Turnontheprojector.
- PresstheTestPatternbuttonontheremotecontrolorcontrolpanel.
Note: You can also display a pattern from the Settings menu using theremote control.
- Press the up or down arrow button on the remote control, or press Enter on the control panel to cyclethroughtheavailabletestpatterns.
- Adjust the image as necessary.
Note: Some settings may not be available while displaying a test pattern. To adjust these settings, projectanimagefromaconnecteddevice.
- PresstheEscbuttontoclearthetestpattern.
Parenttopic: UsingBasicProjectorFeatures
Relatedtasks
SettingtheScreenType
ImageShape
Youcanprojectanevenlyrectangularimagebyplacingtheprojectordirectlyinfrontofthecenterofthe screenandkeepingitlevel. Ifyouplacetheprojectoratanangletothescreen,ortiltedupordown,oroff totheside,youmayneedtocorrecttheimageshapeforthebestdisplayquality.
CorrectingImageShapewithH/VKeystone
CorrectingImageShapewithQuickCorner
CorrectingImageShapewithCurvedSurface
CorrectingImageShapewithCornerWall
CorrectingImageShapewithPointCorrection
Parenttopic: UsingBasicProjectorFeatures
CorrectingImageShapewithH/VKeystone
You can use the projector's H/V Keystone setting to correct the shape of an image that is unevenly rectangularonthesides.
Note: You cannot combine H/V Keystone correction with other imageshapecorrection methods.
- Turnon the projector and display an image.
- PresstheGeometrybuttonontheprojectorcontrolpanelorremotecontrol.
- Select the H/V-Keystone setting and press Enter. Then press Enter again.
YouseetheH/V-Keystoneadjustmentscreen:
![[H/V-Keystone] V-Keystone 0 V-Balance 0 H-Keystone 0 H-Balance 0 Return](/content/2026/05/1053940/images/7d45e1fcecea266d954983d4cf8ec5d5af4bb2d69a84c523ed5cc9f44b177440.jpg)
Note: You can also access the H/V Keystone setting by pressing the Menu button and selecting GeometryCorrectionontheSettingsmenu.
- Usethearrowbuttonsontheprojectorotheremotecontroltoselectbetweenverticaland horizontalkeystoneorbalancecorrectionandtoadjusttheimageshapeasnecessary.
V-Keystone
flowchart
graph LR
    A["Blue Block"] --> B["Blue Block"]
    B --> C["Blue Block"]
V-Balance
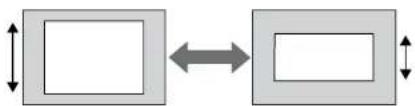
flowchart
graph LR
    A[" "] <--> B[" "]
H-Keystone

flowchart
graph LR
    A["Step 1"] --> B["Step 2"]
    B --> C["Step 3"]
H-Balance
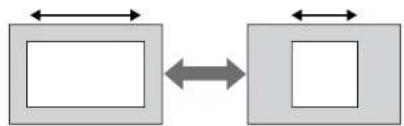
flowchart
graph LR
    A[" "] <--> B[" "]
    C[" "] <--> D[" "]
- When you are finished, press the Menubutton.
Aftercorrection, yourimagemaybeslightlysmaller.
Parenttopic:ImageShape
Relatedreferences
ProjectorFeatureSettings-SettingsMenu
CorrectingImageShapewithQuickCorner
Youcanusetheprojector'sQuickCornersettingtocorrecttheshapeandsizeofanimagethatis unevenlyrectangularonallsides.
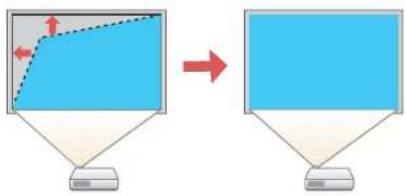
flowchart
graph TD
    A["Computer monitor"] --> B["Desktop computer"]
    style A fill:#f9f,stroke:#333
    style B fill:#bbf,stroke:#333
- Turnon the projector and display an image.
- PresstheGeometrybuttonontheprojectorcontrolpanelorremotecontrol.
- SelectQuickCornerandpressEnter.
YouseetheQuickCorneradjustmentscreen:
![[Quick Corner] Select the area.](/content/2026/05/1053940/images/7c59494fc052c959715d6ad61ef4f9ec79d78d07c0b1e93a710167737cdd82b9.jpg)
Note: You can also access the Quick Corner setting by pressing the Menu button and selecting GeometryCorrectionontheSettingsmenu.
- Use the arrow buttons on the projector or remote control to select the corner of the image you want to adjust. Then press Enter.
5.Pressthearowbuttonstoadjusttheimageshapeasnecessary.
Note: To reset your adjustments, press and hold the Esc button for at least 2 seconds to display a resetscreen. Then select Yes and press Enter.
- When you are finished, press the Menubutton.
Parenttopic:ImageShape
Relatedreferences
ProjectorFeatureSettings-SettingsMenu
CorrectingImageShapewithCurvedSurface
Youcanusetheprojector'sCurvedSurfacesettingtoadjusttheshapeofanimageprojectedona curvesurface.
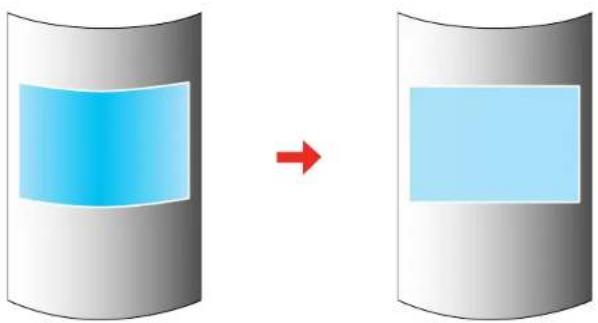
natural_image
Diagram showing a blue rectangular block on a gray cylinder with a red arrow indicating transformation (no text or symbols)Note: For the best results, project from the front of the screen onto a surface with a uniform arc radius and withthelensinthehomeposition.
- Turnon the projector and display an image.
- PresstheGeometrybuttonontheprojectorcontrolpanelorremotecontrol.
- Select the Curved Surface setting and press Enter. If you see a confirmation message, press Enter again.
Youseethisscreen:
![[Curved Surface] Quick Corner Curved Surface Point Correction Reset](/content/2026/05/1053940/images/ce5533c8b399d8f168adf72f3554c2de5f55d365460f43d358134e09a611b99b.jpg)
Note: You can also access the Curved Surface setting by pressing the Menu button and selecting GeometryCorrectionontheSettingsmenu.
- SelectCurvedSurfaceagainandpressEnter.
- SelecttheCorrectShapesettingandpressEnter.
Youseeascreenlikethis:
![[Correct Shape] Select the area.](/content/2026/05/1053940/images/da6b052d6253602775c189a0d376628e42da0301c556cbc47f5c6b98188a7bf0.jpg)
- Usethearrowbuttonsontheprojectorotheremotecontroltoselecttheareayouwanttoadjust. ThenpressEnter.
- Usethearbuttonsontheprojectorcontrolpanelorremotecontroltoadjusttheimageshape.
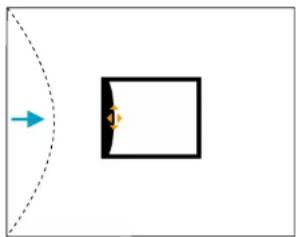
natural_image
Simple diagram showing a dashed arc with an arrow pointing to a rectangular box containing an orange diamond shape (no text or symbols)Note: If the adjustment triangle turns gray, you cannot adjust the shape any further in that direction.
8.PresstheEscbuttontoreturntotheCurvedSurfacemenuscreen.
9. Repeat the previous three steps as necessary to adjust other image areas.
If the image expands or contracts, continue with then next step to adjust the linearity.
Note: To reset your adjustments, press and hold the Esc button for at least 2 seconds to display a resetscreen. Then select Yes and press Enter.
10.PresstheEscbutton.
Youseethisscreen:
![[Curved Surface] Return Correct Shape Horizontal Linearity Vertical Linearity Maintain Aspect Ratio Off](/content/2026/05/1053940/images/3428d380f1ed50c064401206123255709e8853fc49279c3fb6506c27b2a811c2.jpg)
- Tocompensateforexpansionorcontractionwhilemaintainingtheimageaspectratio,select MaintainAspectRatioandsetittoOn.
- Selectoneofthefollowingtoadjustthelinearity:
•HorizontalLinearity:Adjustshorizontalexpansionorcontraction.
•VerticalLinearity:Adjustsverticalexpansionorcontraction.
- UsethearrowbuttonstoselectadisplayedlinetouseasabaselineandpressEnter.
Theselectedbaselineflashesorangeandwhite.
- Adjustthelinearity by doing one of the following:
- Presstheleftarrowbuttontocontractthedistancebetweenthelinesclosesttothebaseline.

natural_image
Abstract blue vertical pattern with two white arrowheads and a central orange line (no text or symbols)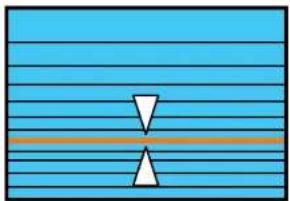
natural_image
Abstract diagram with horizontal blue lines and two white triangular shapes, no text or symbols present- Presstherightarrowbuttontoexpandthedistancebetweenethelinesclosesttothebaseline.
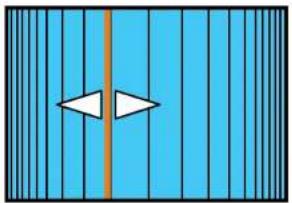
natural_image
Blue vertical striped pattern with two white arrowheads pointing left and right, intersected by a central orange line (no text or symbols)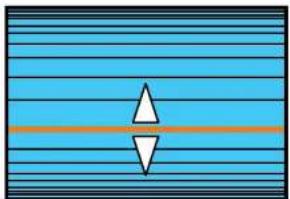
natural_image
Abstract geometric pattern with blue horizontal stripes and two white triangles centered on a horizontal orange line (no text or symbols)- When you are finished, press the Menubutton.
Note: If necessary, you can adjust the image tilt using the Quick Corner setting, then fine-tune your adjustmentsusingthePointCorrectionsetting.
Parenttopic:ImageShape
Relatedreferences
ProjectorFeatureSettings-SettingsMenu
Relatedtasks
CorrectingImageShapewithQuickCorner
CorrectingImageShapewithPointCorrection
CorrectingImageShapewithCornerWall
Youcanusetheprojector'sCornerWallsettingtoadjusttheshapeofanimageprojectedonasurface withrightangles,suchasarectangularpillarothecornerofaroom.
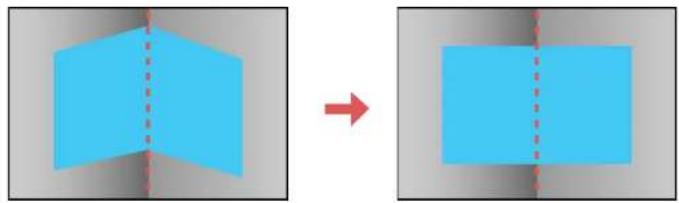
natural_image
Two blue geometric shapes with dashed vertical lines, one rotated by a red arrow (no text or symbols)Note: For the best results, project from the front of the screen onto a right-angled surface. The image may not be evenly focused throughout even after performing the step there.
Note: If 4K Enhancement is enabled, a message is displayed. Select Yes to disable 4K Enhancement.
- Turnon the projector and display an image.
- Press the Geometry button on the projector control panel or remote control.
- SelecttheCornerWallsettingandpressEnter.
Note: If you see a confirmation message, press Enter.
Youseethisscreen:
![[Corner Wall] Quick Corner Corner Wall Point Correction Reset](/content/2026/05/1053940/images/6362af78ca4b3b58a08e46a968fa293b87ddb0d821a611bd8e34356eefe05e44.jpg)
-
SelectCornerWallagainandpressEnter.
-
SelecttheCornerTypesettingandpressEnter.
- Selectoneofthefollowing:
•HorizontalCornerwhenthesurfaceslineuphorizontally
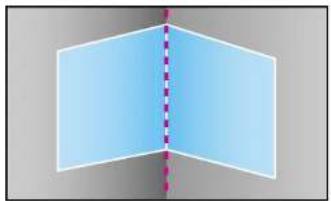
natural_image
Abstract geometric diagram showing two blue planes intersected by a dashed vertical line (no text or symbols)•VerticalCornerwhenthesurfaceslineupvertically
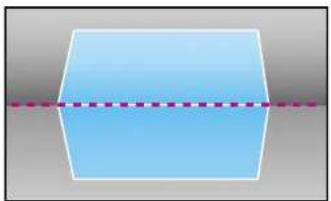
natural_image
Simple geometric shape with a dashed line passing through it, no text or symbols present.- PresstheEscbuttontoreturntotheCornerWallmenuscreen.
-
SelecttheCorrectShapesettingandpressEnter.
-
Adjust the projector's position and duselens shift to center the image over the point where two surfaces meet. (Therestof these step show Horizontal Corner astheselected Corner Type but the steps are these same for Vertical Corner.)
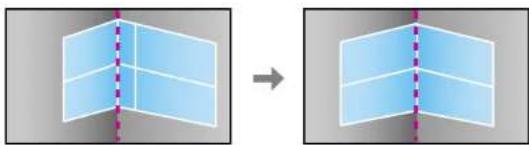
natural_image
Two 3D geometric shapes with dashed vertical lines, one solid and one dashed, both without any text or symbols.Note: You can press Enter to show or hide the image and grid to check the results.
10.Pressthearowbuttonsontheprojectorotheremotecontroltoselecttheareayouwanttoadjust. ThenpressEnter.
![[Correct Shape] Select the area.](/content/2026/05/1053940/images/ddacd40639002dfd900326a5fbbca9ac26149fbd243e4a1782d16f746c78e3a1.jpg)
- For horizontal corners, adjust the top area using the lowest point (1) as your reference. Adjust the lower area using the highest point (2) as your reference.
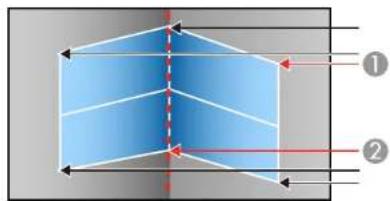
- For vertical corners, adjust the left and right areas using the points nearest the center of the image as your reference points.
11.Pressthearbuttonsontheprojectororremotecontroltoadjusttheimageshape.
Note: To reset your adjustments, press and hold the Esc button for at least 2 seconds to display a resetscreen.ThenselectYes.
-
Repeat the previous wosteps as necessary to adjust other image areas.
-
If the image expands or contracts, press the Esc button to return to the Corner Wall screen so you can adjust the linearity.
-
Selectoneofthefollowingtoadjustthelinearity:
•HorizontalCorner:Adjustshorizontalexpansionorcontraction.
•VerticalCorner:Adjustsverticalexpansionorcontraction.
- Adjustthelinearity so that allofthelines are the same distance apart by doing one of the following:
- Presstheleftarrowbuttontocontractthedistancebetweenthelinesclosesttothebaseline.
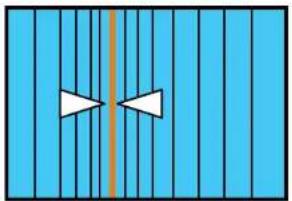
natural_image
Abstract geometric pattern with vertical blue stripes and two white arrow shapes (no text or symbols)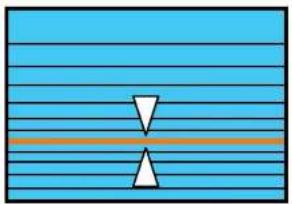
natural_image
Abstract diagram with horizontal blue lines and two white triangular shapes, no text or symbols present- Presstherightarrowbuttontoexpandthedistancebetweenthelinesclosesttothebaseline.

natural_image
Blue vertical striped pattern with two white arrowheads pointing left and right, intersected by a central orange line (no text or symbols)
natural_image
Abstract geometric pattern with blue horizontal stripes and two white triangles centered on a horizontal orange line (no text or symbols)- When you are finished, press the Menubutton.
Note: If necessary, you can adjust the image tilt using the Quick Corner setting, then fine-tune your adjustmentsusingthePointCorrectionsetting.
Parenttopic:ImageShape
Relatedtasks
CorrectingImageShapewithQuickCorner
CorrectingImageShapewithPointCorrection
CorrectingImageShapewithPointCorrection
Youcanusetheprojector'sPointCorrectionfeaturetofine-tunetheimageshapeusingpointsonagrid. Thisisusefulforadjustingoverlappingareasinmultipleprojectedimagesthatdonotlineupcorrectly.

natural_image
Diagram showing a grid transformation from cloud-like to aircraft on a flat surface (no text or symbols)Note: You can move the points on the grid between 0.5 to 600 pixels in any direction. Coordinates for pixelsthatextendbeyondtheedgeoftheprojectedscreenaredisplayedasnegativenumbers.
- Turnon the projector and display an image.
- PresstheGeometrybuttonontheprojectorcontrolpanelorremotecontrol.
- SelectthePointCorrectionsettingandpressEnter.
Note: If you see a confirmation message, press Enter.
- SelectthePointCorrectionsettingagainandpressEnter.
Youseethisscreen:
![[Point Correction] Return Point Correction Points (Vert.) 0 Points (Horiz.) 0 Pattern Color White Interpolation Line Reset](/content/2026/05/1053940/images/eed5dd6eb73b479f07df674c9d3ecc7c1f0158db054c4dc7a0bd6729b389c491.jpg)
- Select the following settings:
- To set the number of vertical or horizontal grid lines, select the Points (Vert.) or Points (Horiz.) setting and select a value.
-
If you are displaying on a flat surface, select Line as the Interpolation setting. If you are displaying on acurved surface, select Curve.
• To change the color of the grid lines, select the Pattern Color setting and select a suitable color. -
SelectthePointCorrectionsettingandpressEnter.
-
Pressthearowbuttonsontheprojectororremotecontrolltomovetothepointonthegridthatyou wanttoadjust.ThenpressEnter.
![[Point Correction] V-Pos: 4 V-Pos: 4 [◆•]:Select (Esc) -Return (○):Enter](/content/2026/05/1053940/images/9015f3ae209595b183d403a345c7be62b08ed34367818a9b5a903395c43e2a10.jpg)
8.Pressthearowbuttonstocorrecttheimageshapeinallnecessarydirections.
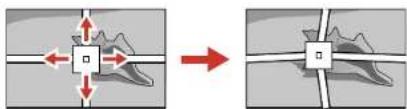
Note: You can press Enter to show or hide the image and grid to check the results.
-
Press Esc to return to the previous screen and select another point to correct, if necessary.
-
When you are finished, press the Menubutton.
Note: If necessary, you can fine-tune your image adjustments using the Quick Corner setting.
Parenttopic:ImageShape
Relatedtasks
CorrectingImageShapewithQuickCorner
SelectinganImageSource
If you connected multiple images our cestotheprojector, such as a computer and DVD player, you may want to switch from one images our ceto the other.
- Makesuretheconnectedimagesourceyouwanttouseisturnedon.
- For videoimagesources, insert a DVD or other videomedia and press its play button, if necessary.
3.Dooneofthefollowing:
- Press the Search button on the remote control until you see the image from the source you want.
- Pressthebuttonforthesourceyouwantontheremotecontrol. If thereismorethanoneportfor thatsource, pressthebuttonagaintocyclethroughthesources.
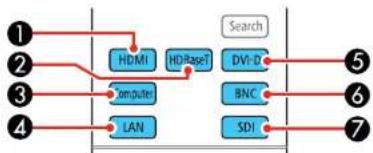
flowchart
graph TD
    A["①"] --> B["HDMI"]
    C["②"] --> B
    D["③"] --> E["Compute"]
    F["④"] --> G["LAN"]
    B --> H["HD-RaseT"]
    E --> H
    G --> H
    H --> I["Search"]
    I --> J["⑤"]
    H --> K["DVI-D"]
    H --> L["BNC"]
    H --> M["SDI"]
1HDMIportsource
2HDBaseTportsource
3Computerportsource
4Networkportsource
5DVI-Dportsource
6BNCportsource
7SDIportsource
- Pressthebuttonforthesourceyouwantontheprojector. If thereismorethanoneportforthat source, pressthebuttonagaintcyclethroughthesources.

1HDMIandHDBaseTportsources
2DVI-Dportsource
3SDIportsource
4BNCportsource
5Computerportsource
6Networkportsource
Parenttopic: UsingBasicProjectorFeatures
RemoteControlOperation
Theremotecontrolledyoucontroltheprojectorfromalmostanywhereintheroom,upto98.4feet (30m)away.Youcanpointitatthefrontorrareoftheprojector.
Makesurethatyouaimtheremotecontrolattheprojector'sreceiverswithintheangleslistedhere.
Angleswithhandlemountedonbottomofprojector:
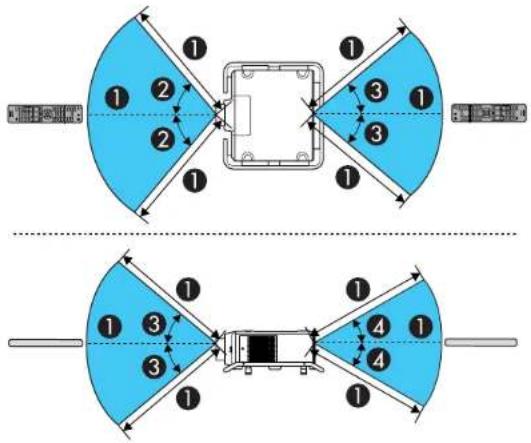
Angleswithhandlemountedontopofprojector:
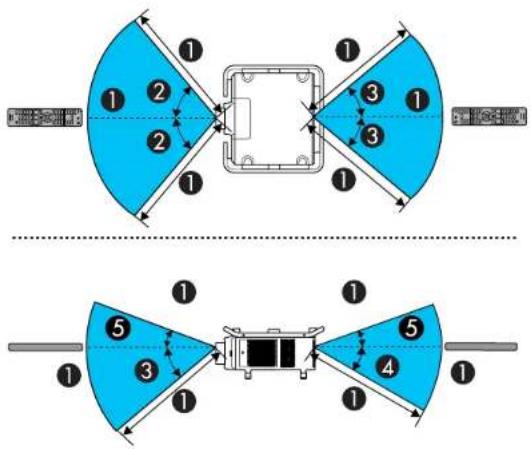
198.4 feet (30m)
2 ± 50^
3 ± 40^
4 ± 30^
520°
Note: Avoid using the remote control in conditions with bright fluorescent lights or in direct sunlight, or theprojectormaynotrespondtocommands. If you will not use theremote control for long time, removethe batteries.
Parenttopic: UsingBasicProjectorFeatures
Relatedtasks
ReplacingtheRemoteControlBatteries
ProjectionModes
Dependingonhowyoupositionedtheprojector,youmayneedtochangetheprojectionmodesoyour imagesprojectcorrectly.
- Front(defaultsetting)letsyouprojectfromatableinfrontofthescreen.
- Front/Ceiling flips the image over top-to-bottom to project upside-down from a ceiling or wall mount.
- Rearflipstheimagehorizontallytoprojectfrombehindattransluentscreen.
- Rear/Ceiling flips the image over top-to-bottom and horizontally to project from the ceiling and behind atranslucentscreen.
ChangingtheProjectionModeUsingtheRemoteControl
ChangingtheProjectionModeUsingtheMenus
Parenttopic: UsingBasicProjectorFeatures
ChangingtheProjectionModeUsingtheRemoteControl
Youcanchangetheprojectionmodetofliptheimageovertop-to-bottom.
- Turnon the projector and display an image.
- HolddowntheShutterbuttonontheremotecontrolfor5to10seconds.
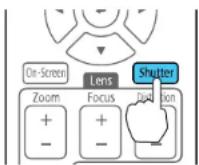
Theimagedisappearsbrieflyandreappearsflippedtop-to-bottom.
- To change projection back to the original mode, hold down the Shutter button for 5 to 10 seconds again.
Parenttopic: ProjectionModes
ChangingtheProjectionModeUsingtheMenus
You can change the projection model to flip the image over top-to-bottom and or left-to-right using the projectormenus.
- Turnon the projector and display an image.
2.PresstheMenubutton. - SelecttheExtendedmenuandpressEnter.
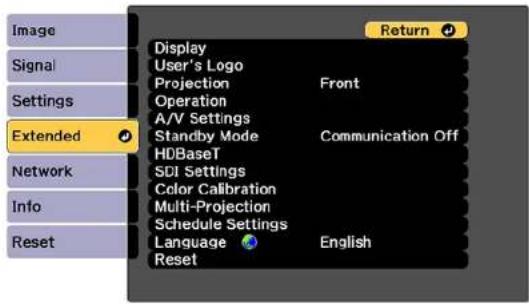
- SelecttheProjectionsettingandpressEnter.
- SelectaprojectionmodeandpressEnter.
- PressMenuorEsctoexitthemenus.
Parenttopic:ProjectionModes
ImageAspectRatio
Theprojectorcandisplayimagesindifferentwidth-to-heightratioscalledaspectratios.Normallythe inputsignalfromyourvideosourcedeterminestheimage'saspectratio.However,forcertainimages youcanchangetheaspectratiotofityourscreenbypassingabuttonontheremotecontrol.
If you always want to use a particular aspect ratio for certain video inputs, you can select using the projector's menus.
ChangingtheImageAspectRatio
AvailableImageAspectRatio
Parenttopic: UsingBasicProjectorFeatures
Relatedreferences
InputSignalSettings-SignalMenu
ChangingthelmageAspectRatio
Youcanchangetheaspectratioofthedisplayedimagetoresizeit.
Note: Set the Screen Type setting in the projector's Extended menu before changing the aspect ratio.
- Turnon the projector and switch to the images source you want to use.
- PresstheAspectbuttonontheremotecontrol.
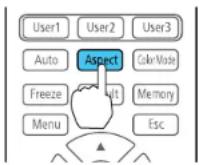
Theshapeandsizeofthedisplayedimagechanges,andthenameoftheaspectratioappears brieflyonthescreen.
- Tocyclethroughtheavailableaspectratiosforyourinputsignal, press the Aspectbutton repeatedly.
Note: If you are projecting from a computer and parts of the image are cut off, set the Resolution setting toWideorNormalintheSignalmenu.
Parenttopic:ImageAspectRatio
Relatedreferences
AvailableImageAspectRatio
InputSignalSettings-SignalMenu
Relatedtasks
SettingtheScreenType
AvailableImageAspectRatio
You can select the following image as spectratios, depending on these selected Screen Types setting and the input signal from your images source.
Note: Black bands and cropped or stretched images may project in certain aspect ratios, depending on theaspectratioandresolutionofyourinputsignal.
| AspectratiosettingDescription | |
| AutoAutomaticallysetstheaspectratio | ioaccordingtotheinputsignal. |
| NormalDisplaysimagesinthesame | aspectratiooftheinputsignal. |
| 4:3Displaysimagesata4:3aspectratio. | |
| 16:9Displaysimagesata16:9aspectratio. | |
| FullDisplaysimagesusingthefullsize | oftheprojectionarea,butdoes notmaintaintheaspectratio. |
| H-ZoomV-Zoom | Displaysimagesusingthefullwidth(H-Zoom)orfullheight(V-Zoom)oftheprojectionareaandmaintainstheaspectratioofthe image.Areasthatexceedtheedgesoftheprojectedscreenarenot projected. |
| NativeDisplaysimagesasis(aspectratioandresolutionaremaintained).Areasthatexceedtheedgesoftheprojectedscreenarenot projected. | |
Parenttopic:ImageAspectRatio
Relatedtasks
SettingtheScreenType
ColorMode
TheprojectoroffersdifferentColorModestoprovideoptimumbrightness,contrast,andcolorfora varietyofviewingenvironmentsandimagetypes.Youcanselectamodedesignedtomatchyourimage andenvironment,orexperimentwiththeavailablemodes.
If you always want to use a particular color mode for certain video inputs, you can select it using the projectormenus.
ChangingtheColorMode
AvailableColorModes
Parenttopic: UsingBasicProjectorFeatures
Relatedreferences
ImageQualitySettings-ImageMenu
ChangingtheColorMode
Youcanchangetheprojector'sColorModeusingtheremotecontroltooptimizetheimageforyourviewingenvironment.
- Turnon the projector and switch to the images source you want to use.
- If you are projecting from a DVD player or other videos source, insert ad disc or other video media and press the play button, if necessary.
3.PresstheColorModebuttonontheremotecontroltochangetheColorMode.
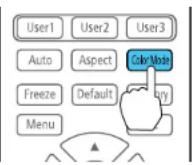
The image appearance changes and then a name of the Color Mode appears briefly on the screen.
- To cycle through all the available Color Modes for your input signal, press the Color Mode button repeatedly.
Parenttopic:ColorMode
Relatedreferences
AvailableColorModes
AvailableColorModes
YoucansettheprojectortousetheseColorModes,dependingontheinputsourceyouareusing:
| ColorModeDescription | |
| DynamicBestforprojectinginabrightroom | |
| PresentationBestforcolorpresentationsinabrightroom | |
| NaturalBestforprojectingstillpicturessuchasphotos | |
| CinemaBestformoviesprojectedinadarkroom | |
| BT.709BestforwatchingdigitalTVorB | lu-raydiscs;producesimagesthatconformtothelTU-RBT.709standard |
| DICOMSIM*BestforprojectingX-rayphotographsandothermedicalimages | |
| Multi-ProjectionBestforprojectingfrommultipleprojectors(reducesthecolortonedifferencebetweenimages) | |
*AvailableonlywheninputtingRGBsignals
Note: The DICOM SIM Color Mode is for reference purposes only and should not be used to make medical diagnoses.
Parenttopic:ColorMode
AdjustingtheBrightness
You can adjust the brightness of your projector's light source.
- Turnon the projector and switch to the images source you want to use.
2.PresstheMenubutton. - SelecttheSettingsmenuandpressEnter.

4. SelecttheBrightnessSettingssettingandpressEnter.
![[Brightness Settings] Return Light Source Mode Quiet Brightness Level 0 % Constant Brightness Off Estimated Remains 0 H or Less Settings Extended Network Info Reset](/content/2026/05/1053940/images/c1ecb9cb686bbcb41b7a9fda4666b2566b46448ef7a5d85c2c8bd871accb6786.jpg)
5. Select the Light Source Modesetting and press Enter.
6. Selectoneofthefollowingoptions:
•Normal: Setsbrightnesstothemaximumlevel(idealforconferencerooms, auditoriums, and lecturehalls)
- Quiet: Sets brightness to 70% and reduces fan noise (ideal for libraries, theaters, museums, and artgalleries)
- Extended: Sets brightness to 70% and extends the life expectancy of the light source (ideal for darkerenvironmentswithambientlight,suchasmuseumsandartgalleries,whereareduced maintenancecycleisdesired)
- Custom: Allowsyoutoselectacustombrightnesslevelbetween30to100%
-
If you selected Custom, select Brightness Level from the Brightness Settings screen and use the leftandrightarrowbuttonstoselectthebrightness.
-
If you selected Custom and want to maintain consistent brightness, turn on the Constant Brightnesssetting.
Note: If you turn on Constant Brightness, you cannot change the Light Source Mode and Brightness Level settings. If you turn off Constant Brightness, the Brightness Level setting changes according to the status of the light source.
- PressMenuorEsctoexitthemenus.
Note: If you use the projector continuously for more than 24 hours, or regularly turn it off by shutting off the power outlet, schedule periodic Light Source Calibration events from the Extended menu. Otherwise, the Constant Brightness setting may not work properly.
ConstantBrightnessUsageHours
Parenttopic: UsingBasicProjectorFeatures
Relatedreferences
ProjectorSetupSettings-ExtendedMenu
Relatedtasks
SavingaScheduledEvent
ConstantBrightnessUsageHours
If you turn on the Constant Brightness setting, the number of hours the projector can maintain constant brightnessisdisplayedastheEstimatedRemainssetting.
![[Brightness Settings] Return Light Source Mode Quiet Brightness Level 0 % Settings Constant Brightness On Estimated Remains 0 H or Less Extended Network Info Reset [Esc] :Return [◆]:Select [●]:Enter [Menu]:Exit](/content/2026/05/1053940/images/f26cda7eee71c05c6ebaa991471b83a156749a2b7923e6ce8fe1a225780069b7.jpg)
| DisplaylevelEstimatedremaininghours | |
| 10000ormorehours | |
| 8000to9999hours | |
| 6000to7999hours | |
| 4000to5999hours | |
| 2000to3999hours | |
| 0to1999hours | |
Lightsourcelifespan
The estimated life span of the light source varies depending on the Brightness Level setting and whether the ConstantBrightnesssettingisonoroff.
ConstantBrightnessoff
| BrightnessLevelsettingHours | |
| 100%20000hours | |
| 90%36000hours | |
| 80%41000hours | |
| 70%43000hours | |
| 60%46000hours | |
| 50%57000hours | |
| 40%75000hours | |
| 30%103000hours |
ConstantBrightnesson
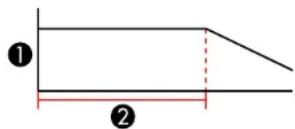
1Brightnesslevel
2Timetheprojectorcanmaintainconstantbrightness(approximate)
| BrightnessLevelsettingHours | |
| 85%7000hours | |
| 80%15000hours | |
| 70%25000hours | |
| 60%35000hours | |
| 50%47000hours | |
| 40%66000hours | |
| 30%95000hours |
Note: The lightsourceusage hours vary depending upon environmental conditions and usage. The hours listed here are an approximate and are not guaranteed. You may need to replace parts in the projector sooner than the estimated light source operation time. If Constant Brightness is turned on, and you have exceeded the usage hours listed here, you may not be able to select a high Brightness Level setting.
Parenttopic:AdjustingtheBrightness
AdjustingLuminanceControls
You can turn on the Dynamic Contrast setting to automatically optimize the image luminance. This improves the image contrast based on the brightness of the content you project. You can also set the light source to turn off automatically after a certain time period while projecting at specific brightness level.
- Turnon the projector and switch to the images source you want to use.
2.PresstheMenubutton.
3. Select theImagemenuandpressEnter.

4. Select the Light Source Control setting and press Enter.
Youseethisscreen:
![Image Signal Settings Extended Network Info Reset [Light Source Control] Return Light Source Control Off Dynamic Contrast Lights-Out Control](/content/2026/05/1053940/images/3df66a8e786dec656852090e56bdcc20c87388acf59a5fbc87b038d344c75710.jpg)
5. Select the Light Source Control setting, choose one of the following options, and press Enter:
-Off:Turnsofflightsourcecontrol.
- Dynamic Contrast: Automatically adjusts the amount of light according to the brightness of the image.
- Lights-OutControl: Automatically turn soff the light after acer taintime has elapsed while projecting at the specified videolevel.
6.PresstheEscbutton.
-
If you selected Dynamic Contrast as the Light Source Control setting, select the Dynamic Contrast setting, choose one of the following options, and press Enter:
-
Select the Response Speed setting and select either Normal (to adjust brightness at the standardspeed) or HighSpeed (to adjust brightness as soon as the escene changes).
-
Select the Black Level setting and select the black level you want to project when the brightness leveloftheimagesignaliszero.(Ifyouselect0%,thelightsourceturnsoff.)
-
If you selected Lights-Out Control as the Light Source Control setting, select the Lights-Out Control setting, choose one of the following options, and press Enter:
-
Select the Light-Out Signal Level setting and select the brightness level for the current video signal. If the brightness level exceeds this level, the light source return soft automatically and then turns back on immediately.
-
SelecttheLights-OutTimersettingandselecttheamountoftimebeforethelightsource automaticallyturnsoff.
-
Press Menutoexitthemenus.
Parenttopic: UsingBasicProjectorFeatures
AdjustingGamma
You can adjust the gammato improved differences in half-tone brightness that vary depending on the connected device.
Note: Project a still image to adjust the gamma; you cannot adjust it properly when projecting a movie or othermovingvideo.Medicalimagesmanynotreproducecorrectlydependingonyouroperating environmentandscreen.
- Turnon the projector and switch to the images source you want to use.
2.PresstheMenubutton. - Select theImagemenuandpressEnter.
- Select Advanced, select the Gamma setting, and press Enter.
Youseeascreenlikethis:
![[Gamma] Return Gamma Custom Reset](/content/2026/05/1053940/images/c823f308e6798d29d05cd2562154c39036edfa3ec8c68c5fb6f83aab70a7af7c.jpg)
-
UsethearbuttonstoadjustthevalueoftheGammasettingasfollows:
-
Tobrightendarkerareasoftheimage,selecthighergammavalues.(Colorsaturationinthelighter areasmaybecomeweaker.)
• Toreduceoverallimagebrightnessandsharpentheimage,selectlowergammavalues. -
If you are projecting using DICOM SIM as the Color Mode setting, adjust the gamma according to the projection width. If it is less than 300 inches (7.62m) wide, select a small value; if it is wider, select a large value.
-
To adjust specific tones in the gamma using a graph, select the Custom setting and press Enter.
Youseeascreenlikethis:
![[Gamma] Color Tone 0 : 0](/content/2026/05/1053940/images/977dc397cc874e33fa66ea6e6d75f5ada9cc25ede897dc2418b240b06f66ee9e.jpg)
7.Presstheleftorrightarrowbuttontoselectthetoneyouwanttochange,thenpresstheupordown arrowbuttontoadjustthetoneandpressEnter.
8. Press Menutoexitthemenus.
Parenttopic: UsingBasicProjectorFeatures
SettingtheDateandTime
Youcansetthedateandtimefortheprojector.
1.PresstheMenubutton.
2. SelecttheExtendedmenuandpressEnter.
3. SelecttheOperationsettingandpressEnter.
4. SelecttheDate&TimesettingandpressEnter.
Youseeascreenlikethis:
![[Date & Time] Return Date & Time Daylight Saving Time Daylight Saving Time Off DST Start DST End DST Adjustment (min) 0 Internet Time](/content/2026/05/1053940/images/f879ede3c5975297de60d6f61806260266944a5eca834eb629aab96270faa848.jpg)
- Select your date and time settings. Then select Set and press Enter to confirm your changes.
- When you are finished, press the Menubuttonto exit.
DateandTimeSettings
Parenttopic: UsingBasicProjectorFeatures
Relatedconcepts
PasswordSecurityTypes
DateandTimeSettings
| SettingsOptionsDescription | ||
| Date&TimeDate | TimeTimeDifference(UTC) | Adjuststheprojector'sdateandtime settingsDateandTime:setsthedateandtimeTimeDifference(UTC):setsthetime differencefromCoordinatedUniversal Time |
| DaylightSavingTimeDaylight | savingsTimeDSTStartDSTEndDSTAdjustment(min) | Adjuststhedaylightsavingtime settingsDaylightSavingTime:enablesor disablesdaylightsavingtimeDSTStartandDSTEnd:setsthedate andtimetostartorenddaylightsaving timeDSTAdjustment(min):setsthedifferencebetweenstandardand daylightsavingtime |
| InternetTimeInternetTime | InternetTimeServer | Automaticallyadjuststhetimethrough anInternetconnectionInternetTime:turnonthissettingto updatethedateandtimeautomatically throughanInternettimeserverInternetTimeServer:setsthelP addressfortheInternettimeserver |
Parenttopic: SettingtheDateandTime
AdjustingProjectorFeatures
Followtheinstructionsinthesesectionstouseyourprojector'sfeatureadjustments.
ShuttingOffthePictureTemporarily
StoppingVideoActionTemporarily
ProjectorSecurityFeatures
ProjectingTwoImagesSimultaneously
UsingAdvancedImageAdjustmentFeatures
UsingMultipleProjectors
SavingSettingstoMemoryandUsingSavedSettings
SavingaScheduledEvent
CopyingMenuSettingsBetweenProjectors
ShuttingOffthePictureTemporarily
Youcantemporarilyturnofftheprojectedpictureifyouwanttoredirectyouraudience'sattentionduring apresentation.Anyvideoactioncontinuestorun,however,soyoucannotresumeprojectionatthepoint thatyoustoppedit.
Note: If the picture is off for more than 2 hours, the power automatically turns off. You can disable the ShutterTimersettingintheExtendedMenutoturnoffthisfeature.
- Press the Shutter button on the projector's control panel or remote control to temporarily stop projection.
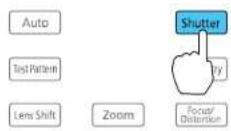
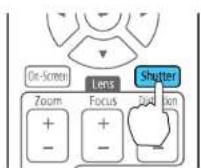
- Toturnthepicturebackon, presstheShutterbuttonagain.
Note: To fade the image in and out when you press the Shutter button, turn on the Fade-out and Fade-in settings in the Extended menu. If you selected Shutter as the Shutter Release setting in the Extendedmenu,youcanstillcontroltheprojectorwhiletheshutterfeatureisactive.
Parenttopic: AdjustingProjectorFeatures
Relatedreferences
ProjectorSetupSettings-ExtendedMenu
StoppingVideoActionTemporarily
Youcantemporarilystoptheactioninavideoorcomputerpresentationandkeepthecurrentimageon thescreen.Anyvideoactioncontinuestorun,however,soyoucannotresumeprojectionatthepoint thatyoustoppedit.
- PresstheFreezebuttonontheremotecontroltostopthevideoaction.
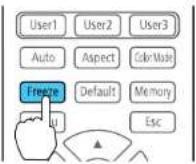
- Torestartthevideoactioninprogress, pressFreezeagain.
Parenttopic:AdjustingProjectorFeatures
ProjectorSecurityFeatures
You can secure your project to do better theft or prevent unintended use by setting up the following security features:
- Passwordsecuritytopreventtheprojectorfrombeingturnedon,andpreventchangestothestartup screenandothersettings.
- Buttonlocksecuritytoblockoperationoftheprojectorusingthebuttonsonthecontrolpanelorremote control.
• Securitycablingtophysicallycabletheprojectorinplace.
PasswordSecurityTypes
LockingtheProjector'sLensSettingsandButtons
LockingtheRemoteControlButtons
InstallingaSecurityCable
Parenttopic:AdjustingProjectorFeatures
PasswordSecurityTypes
Youcansetupthesetypesofpasswordsecurityusingonesharedpassword:
- Power On Protection password prevents anyone from using the projector without first entering a password.
-
User's Logo Protection password prevents anyone from changing the custom screen the projector candisplaywhenitturnson. The presenceofthecustomscreendiscouragestheftbyidentifyingthe projector'sowner.
-
Network Protection password prevents anyone from changing the network settings in the projector menus.
- Schedule Protection password prevents anyone from changing the projector's time or schedule settings.
- Remote Camera Access password prevents anyone from changing the projector's Remote Camera AccesssettingsintheNetworkmenu.
Note: Additional security measures are available for the Remote Camera Access feature. Contact Epsonford details.
SettingaPassword
SelectingPasswordSecurityTypes
EnteringaPasswordtoUsetheProjector
SavingaUser'sLogolmagetoDisplay
Parenttopic:ProjectorSecurityFeatures
SettingaPassword
Tousepasswordsecurity,youmustsetapassword.
Note: Thedefaultpasswordissetto0000.
- Hold down the Freeze button on the remote control for about 5 seconds or until you see this menu.
![[Password Protection] Power On Protection Off User's Logo Protection Off Network Protection Off Schedule Protection Off Remote Camera Access Off Password](/content/2026/05/1053940/images/8e97fe50d70bc92c192dbef16e8d6a552815b36230de1937d90b64fe6874fad7.jpg)
- PressthedownarrowtoselectPasswordandpressEnter.
Youseetheprompt"Changethepassword?".
-
SelectYesandpressEnter.
-
Press and hold down the Num button on the remote control and use the numeric buttons to set a four-digit password.
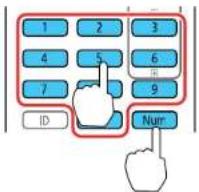
Thepassworddisplaysas****asyouenterit. Thenyouseetheconfirmationprompt.
5.Enterthepasswordagain.
Youseethemessage"Passwordaccepted."
-
PressEsctoreturntothemenu.
-
Make anote of the password and keep it in as a safe place in case you forget it.
Parenttopic:PasswordSecurityTypes
SelectingPasswordSecurityTypes
Aftersettingapassword,youseethismenu,allowingyoutoselectthepasswordsecuritytypesyouwanttouse.
![[Password Protection] Power On Protection Off User's Logo Protection Off Network Protection Off Schedule Protection Off Remote Camera Access Off Password](/content/2026/05/1053940/images/52e5779caea9bb762215fb11307448a6929819f9414b215b1efd994f4078a8ef.jpg)
If you do not see this menu, hold down the Freeze button on the remote control for about 5 seconds or until themenuappears.
- To prevent unauthorized use of the projector, select Power On Protection, press Enter, select On, pressEnteragain,andpressEsc.
- To prevent changes to the User's Logo screen or related display settings, select User's Logo Protection, press Enter, select On, press Enter again, and press Esc.
- To prevent changes to network settings, select Network Protection, press Enter, select On, press Enteragain,andpressEsc.
- To prevent changes to the projector's time or schedule settings, select Schedule Protection, press Enter, select On, press Enter again, and press Esc.
- To prevent changes to the projector's Remote Camera Access settings in the Network menu, select Remote Camera Access, press Enter, select On, press Enter again, and press Esc.
Note: Be sure to keep the remote control in a safe place; if you lose it, you will not be able to enter the passwordrequiredtousetheprojector.
Parenttopic: PasswordSecurityTypes
EnteringaPasswordtoUsetheProjector
If a password is set up and a Power On Protection password is enabled, you see a prompt to enter a passwordwheneveryouturnontheprojector.
Youmustenterthecorrectpasswordtousetheprojector.
- Press and hold down the Num button on the remote control while you enter the password using the numericbuttons.
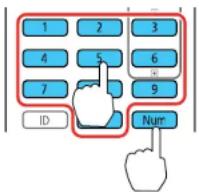
Note: The default password is 0000.
Thepasswordscreencloses.
-
If the password is incorrect, the following may happen:
-
Youseea"wrongpassword"messageandaprompttotryagain.Enterthecorrectpasswordto proceed.
- If you have forgotten the password, make note of the Request Code: xxxx number that appears on the screen and contact Epson Support.
- If you enter an incorrect password three times in succession, you see a message getting you that the projector is locked. After the message is displayed for 5 minutes, the projectorenters standby mode. Unplug the projector, plugin the power cord, and turn the projector. You see a prompt to enter the password.
- If you continueto enter an incorrect password many times in succession, the projector displays a requestcode and messages a contact Epson Support. Donot attempt to enter the password again. When you contact Epson Support, provided displayed requestcode and proof of ownership for assistance in unlocking the projector.
Parenttopic: PasswordSecurityTypes
Relatedreferences
WheretoGetHelp(U.S.andCanada)
SavingaUser'sLogolmagetoDisplay
Youcantransferanimagetotheprojectorandthendisplayitwhenevertheprojectorturnson. Youcan alsodisplaytheimagewhentheprojectorisnotreceivinganinputsignalorwhenyoutemporarilystop projection(usingtheShutterfeature). ThistransferredimageiscalledtheUser'sLogoscreen.
The imageyouselectastheUser'sLogocanbeaphoto,graphic,orcompanylogo,whichisusefulin identifyingtheprojector'sownertohelpdetertheft.YoucanpreventchangestotheUser'sLogoby settinguppasswordprotectionforit.
Note: When you copy the menu settings from one projector to another using the batch setup feature, the userlogoisalsocopied.Donotincludeanyinformationintheuserlogothatyoudonotwanttoshare betweenmultipleprojectors.
-
Display the image you want to project the User's Logo.
-
Press the Menu button, select the Extended menu, and press Enter.

- SelecttheUser'sLogosettingandpressEnter.
- SelectStartSettingandpressEnter.
- A prompt appears asking if you want to use the displayed image as the user's logo. Select Yes and pressEnter.
- A prompt appears again asking if you want to use the displayed image as the user's logo. Select Yes andpressEnter.
Youseeacompletionmessage.
- PressEsctoreturntotheExtendedmenu.
- SelectDisplayandpressEnter.
- SelectwhenyouwanttodisplaytheUser'sLogoscreen:
• To display it whenever there is no input signal, select Display Background and set it to Logo.
• To display it whenever you turn the projector on, select Startup Screen and set it to On.
TopreventanyonefromchangingtheUser'sLogosettingswithoutfirstenteringapassword,seta passwordandenableUser'sLogosecurity.
Parenttopic:PasswordSecurityTypes
Relatedtasks
SavingSettingstoMemoryandUsingSavedSettings
LockingtheProjector'sLensSettingsandButtons
Youcanlockthebuttonsontheprojector'scontrolpaneltopreventanyonefromusingtheprojector.You canalsolockthezoom, focus, and lensshiftsettingstopreventthemfrombeingadjusted.
Note: You can use the remote control to control the projector when the control panel buttons are locked.
1.PresstheMenubutton.
2. SelecttheSettingsmenuandpressEnter.
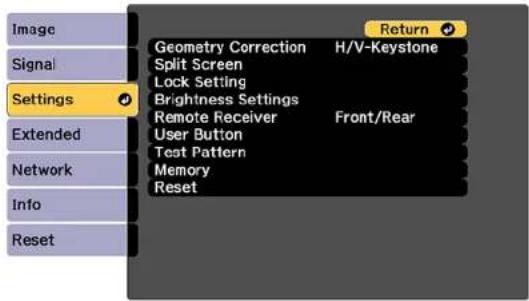
- SelecttheLockSettingsettingandpressEnter.
Note: YoucanalsopressthelockbuttononthecontrolpaneltodisplaytheControlPanelLock screen.
-
SelectoneoftheselocktypesandpressEnter:
-
Tolockthezoom, focus, and lensshiftsettings, selectLensLock.
- Tolockallbuttons,selectControlPanelLock>FullLock.
- To lock all buttons except the power button, select Control Panel Lock > Partial Lock.
Note: A message is displayed on the screen if any control panel buttons are pressed while this setting is enabled.
Youseeaconfirmationprompt.
- SelectYesandpressEnter.
6.Restarttheprojectorforthelocksettingstotakeeffect.
UnlockingtheProjector'sButtons
Parenttopic: ProjectorSecurityFeatures
Relatedtasks
LockingtheRemoteControlButtons
UnlockingtheProjector'sButtons
If the projector's control panel buttons have been locked, hold the Enter or lock button on the projector's control panel for seven second stounlock them. You can also set theremote control to set the Control Panel Lock setting to Off in the Settings menu.
If the remote control buttons have been locked, hold the I button on the remote control for 5 seconds to unlock them.
Parenttopic:LockingtheProjector'sLensSettingsandButtons
Relatedreferences
ProjectorFeatureSettings-SettingsMenu
ProjectorParts-RemoteControl
Relatedtasks
LockingtheRemoteControlButtons
LockingtheRemoteControlButtons
Youcanlocksomeofthebuttonsontheremotecontrol.
To lock the remote control buttons related to lens operation, turn on the Lens Lock setting in the Settingsmenu.
To lock the remote control buttons shown here, press and hold the i button on the remote control for approximately 5 seconds. (To unlock the buttons, press and hold the i button again for approximately 5 seconds.)
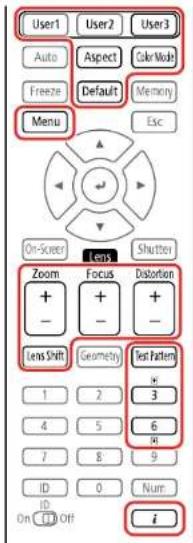
Note: If you lock the remote control buttons, you can still reset the Remote Receiver setting in the Settingsmenutothedefaultsettings.
Parenttopic:ProjectorSecurityFeatures
Relatedreferences
ProjectorFeatureSettings-SettingsMenu
Relatedtasks
LockingtheProjector'sLensSettingsandButtons
InstallingaSecurityCable
Youcaninstalltwotypesofsecuritycablesontheprojectortodetertheft.
- Use the security slot on the project to attack a Kensington lock. See your local computer or electronics dealer for purchase information.
- Use the handles on the project to attach a wire cable and secure it to a room fixture or heavy furniture.
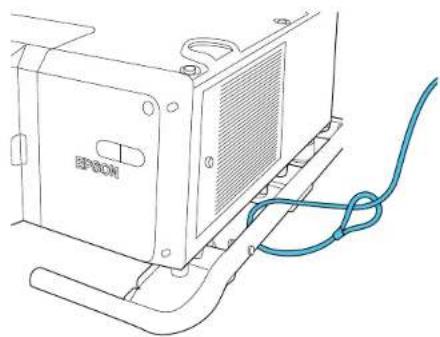
natural_image
Line drawing of an electronic device with a blue cable and ventilation grille (no text or symbols)Parenttopic:ProjectorSecurityFeatures
Relatedreferences
ProjectorParts-Side/Rear
ProjectorParts-Base/Handle
ProjectingTwolmagesSimultaneously
Youcanusethesplitscreenfeature to simultaneously project two images from different images sources next to each other. You can control the splitscreen feature using the projectormenus.
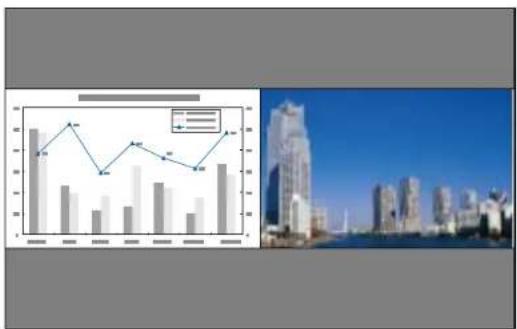
bar_line
| Category | Bar Value | Line Value | |---|---|---| | 1 | 80 | 75 | | 2 | 60 | 85 | | 3 | 50 | 65 | | 4 | 65 | 70 | | 5 | 70 | 75 | | 6 | 55 | 70 |Note: While you use the split screen feature, other projector features may not be available and some settingsmaybeautomaticallyappliedtobothimages.Youcannotprojectfromthesameinputsource ontobothsides(leftandright)ofthescreen.Youalsocannotusesplitscreenwithcertaininputsource combinations.
-
PresstheMenubutton.
-
SelecttheSettingsmenuandpressEnter.
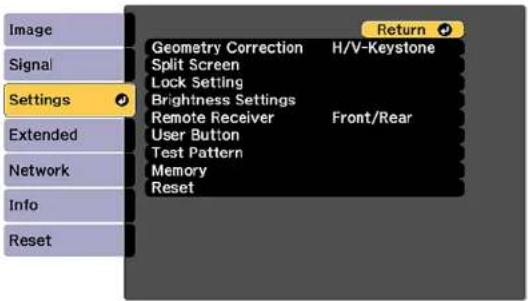
- SelectSplitScreenandpressEnter.
4.PresstheMenubutton.
Youseethisscreen:
![[Split Screen Setup] Screen Size Equal Source Swap Screens [Network] Display the QR Code Exit Split Screen](/content/2026/05/1053940/images/008992086e09027d1869178eceba2c3e48f01c6e6391b56e483d4e2047d2c866.jpg)
-
To select an input source for the other image, select the Source setting, press Enter, select the input source, select Execute, and press Enter. (You can also change image sources, if necessary.)
-
To switch the images, select the Swap Screens setting and press Enter.
-
To change the image sizes, select the Screen Size setting, press Enter, select a sizing option, pressEnter, and pressMenutoexit.
Note: Depending on the video input signals, the images may not appear at the same size even if you choose the Equal setting.
- To exit the split screen feature, select Exit Split Screen or press the Esc button.
InputSourcesforSplitScreenProjection
Parenttopic: AdjustingProjectorFeatures
InputSourcesforSplitScreenProjection
You can choose from the input source combinations listed here for splitscreen projection.
Note: InputsignalsexceedingWUXGAarenotsupported.Ifyouseea4KEnhancementmessage, selectYestodisablethe4KEnhancementfeature.
| LeftScreenRightScreen | |||||||
| HDMIHDB | aseTDVI-D | SDIComputerBNCLAN | |||||
| HDMI— | ✓ | ✓ | ✓ | ✓ | ✓ | ✓ | |
| HDBaseT— | ✓ | ✓ | ✓ | ✓ | ✓ | ✓ | |
| DVI-D— | ✓ | ✓ | ✓ | ✓ | ✓ | ✓ | |
| SDI—— — | ✓ | ✓ | ✓ | ||||
| Computer | ✓ | ✓ | ✓ | —— | — | ||
| BNC | ✓ | ✓ | ✓ | —— | — | ||
| LAN | ✓ | ✓ | ✓ | —— | — | ||
Parenttopic: Projecting TwoImages Simultaneously
Relatedreferences
ProjectorParts-InterfacePorts
Using Advanced Image Adjustment Features
Followtheinstructionsinthesesectionstouseyourprojector'sadvancedimageadjustments.
Using4KEnhancement
UsingFrameInterpolation
CreatingImagePresets
UsingMPEGNoiseReduction
AdjustingScaledResolutionImages(Super-resolution)
AdjustingDetailEnhancement
AdjustingtheColorConvergence(PanelAlignment)
AdjustingtheColorTone(ColorUniformity)
RunningLightSourceCalibration
Parenttopic:AdjustingProjectorFeatures
Using4KEnhancement
Using the projector's 4K Enhancement Technology, you can receive 4K (3840×2160 pixel) signals and project ultrahigh-definition images. This technology shift each pixel diagonally by 0.5 pixel to double the imager resolution.
Note: 4K Enhancement is not available if the Aspect setting is set to Native.
1.PresstheMenubutton.
Youseeascreenlikethis:
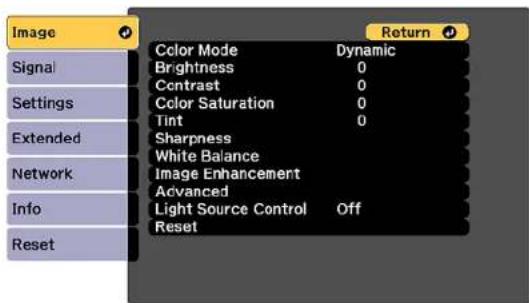
-
Select the Image Enhancement setting and press Enter.
-
Selectthe4KEnhancementsettingandpressEnter.
![[4K Enhancement] Off Full HD WUXGA+ Return](/content/2026/05/1053940/images/ad98e9e849a5f5bd9b1ac510318ff7bd9e011b0a0f6ff9e5ceac93ac05f56617.jpg)
-
SelectoneofthefollowingoptionsandpressEnter:
-
Offtodisable4Kenhancementwhenprojectingfromcomputersormultipleprojectors
•FullHDtoenhanceasignalwitharesolutionof1080i/1080p/WUXGAorhigher
-WUXGA+toenhanceasignalwitharesolutionexceedingWUXGA;whenprojectingahigh-resolution movie, select WUXGA+ along with an appropriate Image Preset Mode setting
Note: If you select Full HD or WUXGA+, the following adjustment settings are canceled: Edge Blending, Scale, Curved Surface, Point Correction, and Corner Wall.
- PressMenuorEsctoexitthemenus.
Parenttopic: Using Advanced Image Adjustment Features
Relatedreferences
ProjectorFeatureSettings-SettingsMenu
ProjectorSetupSettings-ExtendedMenu
UsingFrameInterpolation
Youcanusetheprojector'sFrameInterpolationfeature to smoothfast-movingvideobycomparing consecutiveimageframes and inserting an intermediate imageframe between them.
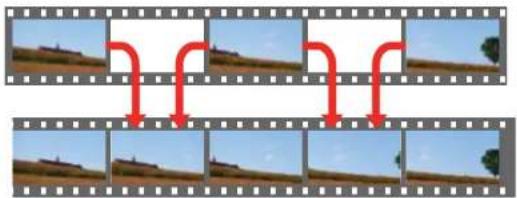
flowchart
graph TD
    A["1"] --> B["2"]
    B --> C["3"]
    C --> D["4"]
    D --> E["5"]
    E --> F["6"]
    F --> G["7"]
    G --> H["8"]
    H --> I["9"]
    I --> J["10"]
You cannot us this feature in any of the following conditions:
•YouareusingtheE-Zoomfeature
•TheimagesignalexceedsWUXGA
- You turned on the 4K Enhancement, Edge Blending, or Scale settings
You cannot us this feature in any of the following conditions:
•Theinputsignalexceeds1920inhorizontalresolution
- YouselectedV-ZoomastheAspectsetting
- You turned on the 4K Enhancement, Edge Blending or Scale settings
- YouselectedOffastheImagePresetModesetting
1.PresstheMenubutton.
Youseeascreenlikethis:

-
Select the Image Enhancement setting and press Enter.
-
SelecttheFrameInterpolationsettingandpressEnter.
Youseeascreenlikethis:
![[Frame Interpolation] Off Low Normal High Return](/content/2026/05/1053940/images/af696c1f2e695b4fec4423f28e832de0ab69e78518355b1c58a7dcf91b01e467.jpg)
-
SelectthelevelofinterpolationandpressEnter.
-
When you are finished, press the Menubutton.
Note: If your resulting images contain noise, turn off the Frame Interpolation setting. You can also selecttheNoiseReductionsettingfromtheImageEnhancementmenu.
Parenttopic: Using Advanced Image Adjustment Features
Relatedreferences
ImageQualitySettings-ImageMenu
ProjectorFeatureSettings-SettingsMenu
ProjectorSetupSettings-ExtendedMenu
CreatingImagePresets
Youcanquicklyoptimizeyourprojectedimagebyselectingimageadjustmentsettingsandsavingthem asapresetyoucanreuselater.
Youcansavethefollowingsettingsinapreset:
•FrameInterpolation
- Deinterlacing
- NoiseReduction
•MPEGNoiseReduction
•Super-resolution
•DetailEnhancement
- PresstheMenubutton.
Youseeascreenlikethis:

- SelecttheImagemenuandpressEnter.
- Select the Image Enhancement setting and press Enter.
- Select theImagePresetModesettingandpressEnter.
![[Image Preset Mode] Off Preset 1 Preset 2 Preset 3 Preset 4 Preset 5 Return](/content/2026/05/1053940/images/a0f9c485b707c84a165f0c2b872fde985726d0c4361ee8f2fdd3ab876763ccb2.jpg)
- SelectoneofthepresetsandpressEnter.
Note: If you select previously used preset, your new adjustment so over writ the old ones.
- PressEsctoreturntothelmageEnhancementmenu.
7.Fine-tunethefollowingsettings:
•FrameInterpolation
- Deinterlacing
- NoiseReduction
•MPEGNoiseReduction
•Super-resolution
•DetailEnhancement
8. PressMenuorEsctoexitthemenus.
ThecurrentlyselectedImagePresetModewillbeupdatedwiththecurrentsettings.
Parenttopic: Using Advanced Image Adjustment Features
Relatedreferences
ImageQualitySettings-ImageMenu
UsingMPEGNoiseReduction
If you are projecting MPEG movies, you can reduce dots and block noise by adjusting the MPEG Noise Reductionsetting.
You cannot usethisfeatureinanyofthefollowingconditions:
•TheimagesignalexceedsWUXGA
•Youturnedonthe4KEnhancementsetting
•YouturnedofftheImagePresetModesetting
1.PresstheMenubutton.
Youseeascreenlikethis:
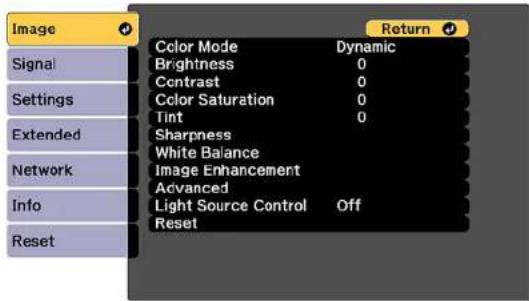
- Select the Image Enhancement setting and press Enter.
- Select the MPEGNoiseReductionsettingandpressEnter.
- Select the level of no isereduction and press Enter.
- PressMenuorEsctoexitthemenus.
Parenttopic: Using Advanced Image Adjustment Features
Relatedtasks
Using4KEnhancement
AdjustingScaledResolutionImages(Super-resolution)
Youcansharpenblurry, low-resolutionimagesthathadtheirresolutionscaledupforprojectionusingthe Super-resolutionsetting.
- Turnon the projector and switch to the images source you want to use.
2.PresstheMenubutton.
Youseeascreenlikethis:
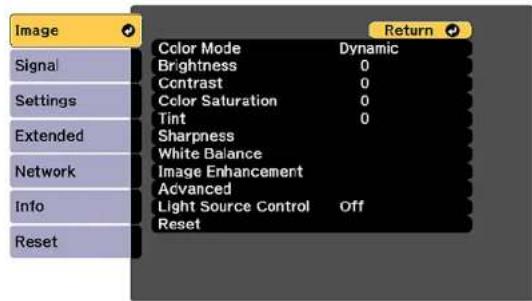
-
Select the Image Enhancement setting and press Enter.
-
SelecttheSuper-resolutionsettingandpressEnter.
![[Super-resolution] Fine Line Adjust 0 Soft Focus Detail 0 Return](/content/2026/05/1053940/images/4408772c32be8e77127ff42f82045392d61dbf8e2b6430fdbaf7cc4ba3b57079.jpg)
- Adjusteachofthefollowingoptionsasnecessary:
•FineLineAdjusttoenhancefinedetailssuchashairandfabricpatterns
- SoftFocusDetailtoenhancetheoutline,background,andmainpartsofanimation
Note: Highervalues increase the intensity of the effect.
- PressMenuorEsctoexitthemenus.
Parenttopic: Using Advanced Image Adjustment Features
AdjustingDetailEnhancement
Youcanenhancethecontrastindetailedareasofanimagetocreateamoretexturedlook.
Note: This feature is not available if the Image Preset Mode setting is set to Off.
- Turnon the projector and switch to the images source you want to use.
2.PresstheMenubutton.
Youseeascreenlikethis:
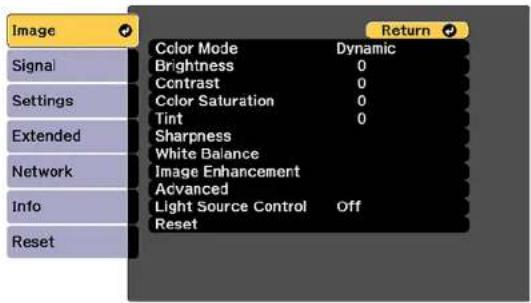
- Select the Imagemenuandpress Enter.
- Select the Image Enhancement setting and press Enter.
- SelecttheDetailEnhancementsettingandpressEnter.
![[Detail Enhancement] Strength 0 Return Range 0](/content/2026/05/1053940/images/b3af850d7a7e175f817053b5cf07da6b484b6617aa70d929b1a6331f33e71879.jpg)
- Adjusteachofthefollowingoptionsasnecessary:
•Strengthtoadjusttheimagecontrast
• Rangetoadjusttheenhancedareaoftheimage
Note: Higher values increase the intensity of the effect. Depending on the image, you may notice a highlightattheborderbetweencolors;ifso,selectlowervalues.
- PressMenuorEsctoexitthemenus.
Parenttopic: Using Advanced Image Adjustment Features
AdjustingtheColorConvergence(PanelAlignment)
YoucanusethePanelAlignmentfeaturetomanuallyadjustthecolorconvergence(thealignmentofthe redandbluecolors)intheprojectedimage.
Note: You can adjust only the red or blue color convergence. Green is the standard color panel and cannotbeadjusted.Youcanadjustthepixelsupto±3pixelsin0.125pixelincrements.
- Turnon the projector.
2.PresstheMenubutton. - SelecttheExtendedmenuandpressEnter.
- SelecttheDisplaysettingandpressEnter.
![[Display] Return Menu Position Message Position Top Messages Off Display Background Black Startup Screen Off Standby Confirmation Off Air Filter Notice Off Screen Panel Alignment Color Uniformity OSD Rotation Off Settings Extended](/content/2026/05/1053940/images/39ab97626b6e67e71d103f222b1998d23cb47ed31032c15af8f6a681e392f3e0.jpg)
- SelectthePanelAlignmentsettingandpressEnter.
- SelectthePanelAlignmentsettingagainandpressEnter.
7.SelectOnandpressEnter. - PressEsctoreturntothepreviousscreen.
- SelecttheSelectColorsettingandchooseoneofthefollowing:
•Rtoadjusttheredcolorconvergence.
•Btoadjustthebluecolorconvergence. -
PressEsctoreturntothepreviousscreen.
-
SelectthePatternColorsettingandpressEnter.
- Select the pattern you want to use and press Enter.
- PressEsctoreturntotheprevioussscreen.
- SelectStartAdjustmentsandpressEnter.
Youseethisscreen:
![[Panel Alignment] Starting adjustments. Shift the whole panel Adjust the four corners](/content/2026/05/1053940/images/7998a7ed0ce21127659c980b2741d9a8efd96c22e249fd3944cd15c033d312dd.jpg)
- First, select Shift the whole panel to adjust the entire panel and press Enter.
- UsethearbuttonsontheremotecontroltoadjustthewholepanelandpressEnter.
- Next, select Adjust the four corners to make finer adjustments and press Enter.
- Use the arrow button on theremote control to adjust the color alignment of the color you selected for the Select Color setting and press Enter.
- When you are finished adjusting each corner of the screen, press Enter.
20.Dooneofthefollowing:
- If your projector needs additional panel alignment, select Select intersection and adjust and press Enterto continuemaking adjustments.
- If your projector's panel alignment is now correct, select Exit and press Enter to return to the PanelAlignmentmenu.
Parenttopic: Using Advanced Image Adjustment Features
AdjustingtheColorTone(ColorUniformity)
YoucanusetheColorUniformityfeaturetomanuallyadjustthecolortonebalanceintheprojected image.
1.PresstheMenubutton.
- SelecttheExtendedmenuandpressEnter.

- SelecttheDisplaysettingandpressEnter.
- SelecttheColorUniformitysettingandpressEnter.
Youseethisscreen:
![[Color Uniformity] Return Signal Settings Extended Network Info Reset Color Uniformity Off Adjustment Level Start Adjustments Reset](/content/2026/05/1053940/images/9cfe57b258ec8c6dc1de92712066ebf9e0c545399f231e82b1921b4ee0ac1c76.jpg)
- PressEnterandselectOn.
-
PressEsc.
-
SelecttheAdjustmentLevelsettingandpressEnter.
8.Presstherightandleftarrowbuttonstoadjustthelevel,andpressEsc. - SelecttheStartAdjustmentssettingandpressEnter.
![[Color Uniformity] Top Left Top Top Right Right Bottom Right Bottom Bottom Left Left All Return](/content/2026/05/1053940/images/193da22e1e1d82710cc84b1d78fb085f0d500e1e5b5be8dc59ce52c304791f0e.jpg)
- Select the area of the screen that you want to adjust and press Enter.
Note: Adjusttheouterareasfirst, thenadjusttheentirescreen.
- Select the color (Red, Green, or Blue) you want to adjust, and use the left arrow button to weaken thecolortoneandtherightarrowbuttontostrengthenthecolortone.
- PressEsc.
13.Repeatsteps10and11foreachareayouwanttoadjust.
14.Repeatsteps7to11foreachadjustmentlevel. - When you are finished, press the Menubutton.
Parenttopic: Using Advanced Image Adjustment Features
RunningLightSourceCalibration
Lightsourcecalibrationautomaticallyadjustsanydifferencebetweenthewhitebalanceandthe brightnesslevelofthelightsource.Youshouldperformlightsourcecalibrationevery100hoursof projectorusage.Youcanalsoscheduleautomaticcalibrationorrunthelightsourcecalibrationmanually usingthemenus.
Automatic lightsourcecalibration may not start in the following conditions:
•Within20minutesofturningontheprojector.
- When using the Shutter feature or within 20 minutes of releasing the shutter.
- When using direct powers shutdown.
- When you have used the projector continuously for over 24 hours.
Note: To perform a light source calibration, the projector must have been on for at least 20 minutes and the projector brightness must not be automatically dimmed duetohight temperatures.
1.PresstheMenubutton.
- SelecttheResetmenuandpressEnter.
Youseeascreenlikethis:
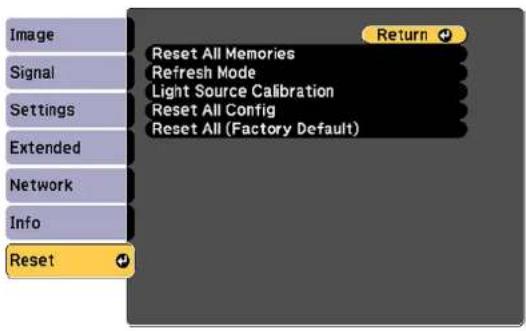
-
SelectLightSourceCalibrationandpressEnter.
-
Selectanyofthefollowing:
- Torunthelightsourcecalibrationnow,selectRunNow.
- To automatically run the light source calibration every 100 hours of projector usage, select Run Periodically.
- Toscheduleautomaticcalibration, selectScheduleSettings.
- Toseethelasttimetheprojectorperformedacalibration,selectLastRun.
Note: If you use the projector continuously for more than 24 hours or use direct shutdown regularly, selectScheduleSettingstoschedulecalibrationofthelightsourceperiodically.
- When you are finished, select Return and press the Enter button to return to the Reset menu.
Parenttopic: Using Advanced Image Adjustment Features
Relatedtasks
TurningOntheProjector
TurningOfftheProjector
StoppingVideoActionTemporarily
UsingMultipleProjectors
Youcancombinetheprojectedimagesfromtwoormoreprojectorstocreateonelargeimage.Follow theinstructionsinthesesectionstosetupandprojectfrommultipleprojectors.
MultipleProjectorAdjustmentOverview
ProjectorIdentificationSystemforMultipleProjectorControl
TilingImagesintoOneImage
BlendingthelmageEdges
AdjustingtheBlackLevel
MatchingTintandBrightness(ScreenMatching)
ScalinganImage
TilingImagesUsingGeometryCorrectionAssist
StackingImagesUsingGeometryCorrectionAssist
SimpleStackingforOneBrightImage
Parenttopic: AdjustingProjectorFeatures
MultipleProjectorAdjustmentOverview
If you are combining images from multiple projector son an network (upto15), you can assign none projector as the "master" and automatically adjust all the images to match the "master" image. If the projectors are not connected to an network, you can match each projector's images manually.
Youcanautomaticallycorrectdistortionandoverlappingareasinmultipleprojectedimagesbyusingthe tilingassistfunctionandautomaticallycorrectstackedimagesusingthestackingassistfunctioninthe EpsonProjectorProfessionalTool.
Note: Make sure all networked projectors are connected using LAN cables, have their DHCP setting turnedon, and have been assigned an IP address. Also disable SleepMode one each projector so they do not turn off during adjustment.
- Turnonalltheprojectors.
-
To select a master projector for automatic adjustment, select Custom for the Light Source Mode setting and set the Brightness Level setting to the maximum value for all projectors. The projector withthedarkestprojectedimageisthemasterprojector.
3.Dooneofthefollowing: -
Forautomaticadjustment, setanIDforthemasterprojectorandtheremotecontrol.
-Formanualadjustment,setanIDforeachprojectorandtheremotecontrol. -
Adjust each projector's physical position and angle to the screen.
5.Dooneofthefollowing:
-
Forautomaticadjustment,configuretilingautomatically.
-Formanualadjustment,configuretilingmanually. -
Adjust the image aspect ratio of each projector.
-
Adjust the position of the image for each projector using lens shift.
- Adjust the zoom and focus for each projector.
- AdjustsmalldifferencesintheimagesusingthePointCorrectionsetting.
- Adjust the edges of the images using the Edge Blending and Black Level settings.
- Adjust the brightness and tint of the images using the Screen Matching setting.
- SelectsectionsoftheimagesusingtheScalesetting.
Parenttopic: Using Multiple Projectors
Relatedconcepts
WiredNetworkProjection
ProjectorIdentificationSystemforMultipleProjectorControl
Relatedreferences
ProjectorFeatureSettings-SettingsMenu
Relatedtasks
ChangingtheImageAspectRatio
AdjustingtheImagePositionUsingLensShift
ResizingthelmagewiththeZoomButton
FocusingtheImageUsingtheFocusButtons
CorrectingImageShapewithPointCorrection
BlendingthelmageEdges
AdjustingtheBlackLevel
MatchingtheScreensAutomatically
ScalinganImage
Relatedtopics
TilingImagesintoOneImage
MatchingTintandBrightness(ScreenMatching)
ProjectorIdentificationSystemforMultipleProjectorControl
Youcanoperatemultipleprojectorsusingoneremotecontrolformoreelaboratepresentations. Todo this, youassignanidentificationnumbertoeachprojectorandtotheremotecontrol. Thenyoucan operatealltheprojectorsatonceorindividually.
SettingtheProjectorID
SettingtheRemoteControlID
Parenttopic: Using Multiple Projectors
SettingtheProjectorID
If you want to control multiple projectors from a remote control, give each projector a unique ID.
- PresstheMenubutton.
- SelecttheExtendedmenuandpressEnter.
- SelecttheMulti-ProjectionsettingandpressEnter.
- SelectProjectorIDandpressEnter.
![[Multi-Projection] Projector ID 1 Return Set](/content/2026/05/1053940/images/2da23fdb6e2334ed0d2f4b49ba073479d41dcb686394344958d7c7f5646cbce6.jpg)
5.Presstheleftorightarrowbuttonsontheremotecontroltoselecttheidentificationnumberyou wanttousefortheprojector.ThenselectSetandpressEnter.
Repeat these steps for all the other projectors you want to operate from one remote control.
Note: If you don't know the projector's ID, hold down the ID button and press the i button to temporarily display the projector's ID on the screen.
Parenttopic:ProjectorIdentificationSystemforMultipleProjectorControl
SettingtheRemoteControlID
The remote control's ID is set to 0 by default so it can operate any compatible projector. If you want to set theremotecontroltooperateonlyaparticularprojector,youneedtosettheremotecontrol'sIDtomatch theprojector'sID.
- Turnontheprojectoryouwanttheremotecontroltooperatewithexclusively.
- SettheremotecontrolIDswitchtoOn.
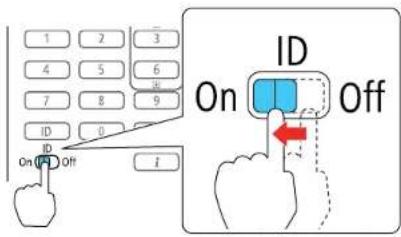
- Hold down the ID button on the remote control while you press the numeric button that matches the projector's ID. (Enter a two-digit number, such as 01 for projector ID 1.) Then release the buttons.
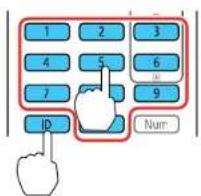
Note: If you don't know the projector's ID, hold down the ID button and press the I button to temporarily display the projector's Donthescreen. If the batteries are left out of theremote control for an extended period, theremote control is return to its default setting.
Parenttopic: ProjectorIdentificationSystemforMultipleProjectorControl
Relatedconcepts
ImageShape
Relatedreferences
AdditionalProjectorSoftwareandManuals
TilingImagesintoOneImage
YoucanprojectthesameimagefromuptonineprojectorstorecreateonelargeimageusingtheTiling feature.
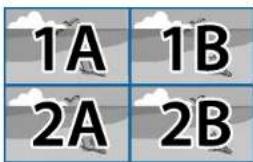
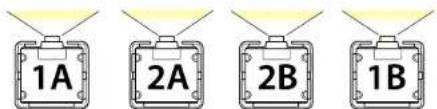
Note: Before tiling, make sure the displayed images from your projectors are rectangular, correctly sized, and focused.
Note: You can automatically adjust the tiling using the Tiling Assist feature in the Epson Projector ProfessionalToolsoftwareavailablefordownloadfromtheEpsonwebsite.
ConfiguringTilingAutomatically
ConfiguringTilingManually
Parenttopic: UsingMultipleProjectors
ConfiguringTilingAutomatically
If your projectors are on an network and you have identified a master projector, you can configure tiling automatically.
- Turnon the projector.
Note: Makesurenothingisblockingthebuilt-incameraonthefrontoftheprojector.
2.PresstheMenubutton.
3. SelecttheExtendedmenuandpressEnter.
4. SelectMulti-ProjectionandpressEnter.
Youseethisscreen:
![[Multi-Projection] Return Image Signal Settings Extended Network Info Reset Projector ID Off Projector Grouping Tiling Geometry Correction H/V-Keystone Edge Blending Black Level Scale Reset Screen Matching](/content/2026/05/1053940/images/92c87246b5e4e24a1151709d8aab6862a9e535b42b355e5bf2958426c277dbad.jpg)
- SelectProjectorGroupingandpressEnter.
Youseeascreenlikethis:
![[Projector Grouping] Return Projector Name IP Address-model EBXXXXXX XXX.XXX.XXX.XXX XXXXXXXXX ✓ EBXXXXXX XXX.XXX.XXX.XXX ●XXXXXXXXX □ EBXXXXXX XXX.XXX.XXX.XXX XXXXXXXXX □ EBXXXXXX XXX.XXX.XXX.XXX XXXXXXXXX □ EBXXXXXX XXX.XXX.XXX.XXX XXXXXXXXX □ EBXXXXXX XXX.XXX.XXX.XXX XXXXXXXXX □ EBXXXXXX XXX.XXX.XXX.XXX XXXXXXXXX □ EBXXXXXX XXX.XXX.XXX.XXX XXXXXXXXX Sort Refresh Set](/content/2026/05/1053940/images/35335d88f7ec5ac3c4304990261070c0175b000fa0cfa5e92df0510db4935efb.jpg)
- Press the up or down arrow buttons to highlight a projector and press Enter to place a checkmark next to each projector you want to use for tiling. Then select Set and press Enter.
- SelectTilingandpressEnter.
- SelectTilingagainandpressEnter.
![[Tiling] Auto Manual Return](/content/2026/05/1053940/images/0739e5bbb4b886fecd8c505e72f5f411db6d29a9c60edf3a4545c8f384fa130e.jpg)
- SelectAutoandpressEsc.
- SelectLocationSetupandpressEnter.
The projected images are positioned automatically.
- When you seethem messageto assign projector IDs, select Yes.
Whensetupiscomplete,youseeascreenlikethis:
![[Location Info] EBXXXXXX XXXXXXXXX ID: XX EBXXXXXX XXXXXXXXX ID: XX EBXXXXXX XXXXXXXXX ID: XX EBXXXXXX XXXXXXXXX ID: XX EBXXXXXX XXXXXXXXX ID: XX](/content/2026/05/1053940/images/de0108a4f51993a37dda805ef1a8eb902d55c1e0c432196749a6946c0c8d150c.jpg)
Note: If any of the images are not positioned correctly, setupilling manually instead.
- Select the input signal to display an image.
Afterperformingthestepshere,adjusttheimagesforanygapsanddifferencesincolor.
Note: Do not change any of the projector names or IP addresses, or the images will not be adjusted automatically.
Parenttopic: TilingImagesintoOneImage
Relatedtasks
ConfiguringTilingManually
ConfiguringTilingManually
Youcanprojectthesameimagefrommultipleprojectstocreateonelargeimage.Ifyourprojectorsare notonanetworkoryouwereunsuccessfultilingtheimagesautomatically,youcanconfiguretiling manually.
-
Turnontheprojector.
2.PresstheMenubutton. -
Select Multi-Projection > Tiling > Layout.
![[Layout] Row Column Set Return The Location Setup is reset when you change the Layout.](/content/2026/05/1053940/images/e466c5a35a108c9b088191fd072d6012909bc462f2a6b71432e6349a56e25f3d.jpg)
-
Select the number of rows and columns you are setting up as the Row and Column settings. Then selectSetandpressEnter.
-
Repeat the previous steps with each project you are setting up before continuing with then next step.
6.SelectLocationSetupandpressEnter.
![[Location Setup] Row Order Column Order Set Return](/content/2026/05/1053940/images/b177fe236f56d1f424369c8c640319e1391f2b2419e1c4d4dd49d39895d7ca95.jpg)
- Select the position of each projected image as follows:
- Row Order to layout the screens from top to bottom in sequential order, starting with 1 at the top
- Column Order to layout the screens from left to right, starting with A on the left
| 1A | 1B |
| 2A | 2B |
8.Repeatthepreviousstepwitheachprojectoryouaresettingupbeforecontinuingwiththenextstep.
9. Select the input signal to display an image.
Afterperformingthestepshere,adjusttheimagesforanygapsanddifferencesincolor.
Parenttopic: TilingImagesintoOneImage
Relatedtasks
ConfiguringTilingAutomatically
BlendingthelmageEdges
Youcanusetheprojector'sEdgeBlendingfeaturetocreateaseamlessimagefrommultipleprojectors.
Note: Before performing Edge Blending, set the Color Mode setting to Multi-Projection to make more precise adjustments.
1.PresstheMenubutton.
2. SelecttheExtendedmenuandpressEnter.
3. SelecttheMulti-ProjectionsettingandpressEnter.
4. SelecttheEdgeBlendingsettingandpressEnter.
Youseethisscreen:
![[Edge Blending] Return Edge Blending Off Top Edge Off Bottom Edge Off Left Edge Off Right Edge Off Line Guide Off Pattern Guide Off Guide Color Red](/content/2026/05/1053940/images/673430f4b34fd18e8a726b5e628675d69a44e4ad4975f8a27f2bf0ff03196090.jpg)
- Turn on the Edge Blending, Line Guide, and Pattern Guide settings.
- Select the edge you want to blend on each projector and press Enter. For the projector on the left, select the Right Edge and for the projector on the right, select Left Edge.
Youseeascreenlikethis:
![[Top Edge] Blending Off Blend Start Position 0 Blend Range 0 Blend Curve 0](/content/2026/05/1053940/images/6929f6b3485555fe36fc58d0bebb192386e741f5eb5843959f6717db5cbd62b6.jpg)
- SelecttheBlendingsettingandselectOn.
- PressEsctoreturntotheprevioussscreen.
-
SelecttheBlendStartPositionsettingandadjustthepointwhereedgeblendingbegins.
-
Select the Blend Range setting and use the arrow buttons to select the width of the blended area so that the displayed guides are at the edges of the overlapping area between the two images.
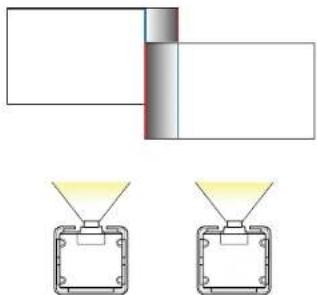
natural_image
Diagram showing two identical rectangular components with yellow light reflections, connected by a vertical line and a gray rectangle (no text or symbols)- PressEsctogobacktothepreviousscreen.
- SelecttheBlendCurvesettingandselectagradientfortheshadedareaontheprojectors.
- When the edges are blended, turn off the Line Guide and Pattern Guide settings on each projector to check the final settings.
- When you are finished, press the Menubutton.
Parenttopic: Using Multiple Projectors
Relatedtasks
ChangingtheColorMode
AdjustingtheBlackLevel
Whentwoimagesoverlap, the overlapping area can appear differently from the area that donot overlap. You can use the projector's Black Level setting to make the difference less noticeable.
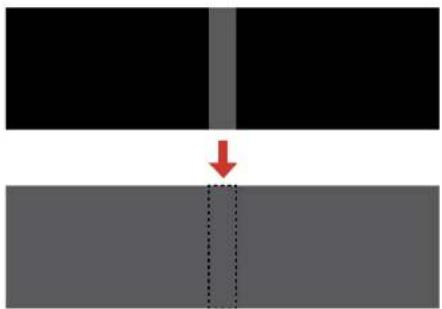
natural_image
Diagram showing a red arrow pointing to a vertical gray line between two black rectangular blocks, with no text or symbols present.You cannot adjust the Black Level setting if you are displaying a test pattern, if the Edge Blending settingissettoOff,ornoedgepositionisselected.
Note: You may not be able to adjust the black levels correctly if the Geometry Correction settings are settoohigh. The brightness and tone of the overlapping areas may differ from the rest of the image even after adjusting the black level.
1.PresstheMenubutton.
2. SelecttheExtendedmenuandpressEnter.
3. SelecttheMulti-ProjectionsettingandpressEnter.
4. SelecttheBlackLevelsettingandpressEnter.
Youseethisscreen:
![[Black Level] Return Color Adjustment Area Correction Reset Image Signal Settings Extended Network Info Reset](/content/2026/05/1053940/images/59403ccd42765e1f378809639cb77b27333f9fdb19226ab365e5bc69f21dcc57.jpg)
- Select the Color Adjustment setting and press Enter.
You see a screen based on the Top Edge, Bottom Edge, Right Edge, and Left Edge settings you selected for the Edge Blending setting.
Note: The Color Adjustment setting is automatically adjusted when selecting Start Auto Adjustment in the Screen Matchingscreen.
- Select the area you want to adjust and press Enter.
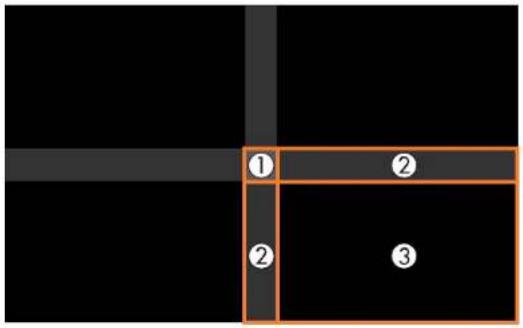
Note: The areayou selected disdisplayed in orange. Adjust overlapping area as starting with the brightest areas first. Forexample, adjust area 2 to match area 1, then adjust area 3 to match area 2.
- Adjust the brightness and tone of the area that donot overlaptomatch the area that overlap using the displayed adjustments sliders.
![[Color Adjustment] Red 0 Return Green 0 Blue 0 Brightness](/content/2026/05/1053940/images/57ae5aaa7d0d6c8faaff7cf89288e4ec73108e7b1659e277b5b3b4c563238bc3.jpg)
- Repeat the previous wostepsas needed until all areas match.
- If the tone of some areas do not match, you can adjust them using the Area Correction setting. Continue with then next step. Otherwise, press the Menubutton to exit.
10.PresstheEscbuttontoreturntotheBlackLevelscreen. - SelecttheAreaCorrectionsettingandpressEnter.
- SelecttheStartAdjustmentssettingandpressEnter
Youseeascreenwithboundarylinesindicatingareasthatareoverlapping.Theboundarylinesare based on the Top Edge, Bottom Edge, Right Edge, and Left Edge settings you selected for the EdgeBlendingsetting.
- Use the arrow buttons to select a boundary line of the area you want to adjust and press Enter. Theselectedlineisdisplayedinorange.

natural_image
Abstract geometric shape with a black triangle on a dark gray background, no text or symbols present.- UsethearbuttonstoadjusttheboundarylinepositionandpressEnter.
- UsethearbuttonstoselectanadjustmentpointandpressEnter.
Theselectedpointturnsorange.
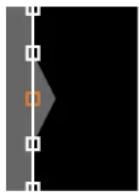
- Usethearowbuttonstomovethepoint.
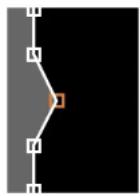
- Tomoveanotherpoint, presstheEscbuttonandrepeattheprevioustwosteps.
- To move another boundary line, press the Esc button repeatedly until you can select a boundary line.
- When you are finished, press the Menubutton.
Note: Changing the Top Edge, Bottom Edge, Right Edge, or Left Edge settings resets the Black Level setting to its default value. You can also select the Reset setting from the Black Level menu to returntheBlackLevelsettingstotheirdefaultvalue.
Parenttopic: UsingMultipleProjectors
Relatedreferences
ProjectorFeatureSettings-SettingsMenu
Relatedtopics
MatchingTintandBrightness(ScreenMatching)
MatchingTintandBrightness(ScreenMatching)
Youcanadjustthetintandbrightnessofmultipleprojectorssotheymatchbetter.Youcanalsoschedule automaticadjustmentstothetintandbrightness.
Note: Wait 20 minutes after turning on the projector before using the Screen Matching feature and darkentheroomformaximumaccuracy.Brightnessdecreasesovertime,soyoumayneedtoperform ScreenMatchingagaintocorrectlargedifferencesinbrightness.
MatchingtheScreensAutomatically
MatchingtheScreensManually
Parenttopic: Using Multiple Projectors
Relatedtasks
SavingaScheduledEvent
MatchingtheScreensAutomatically
Youcanautomaticallycorrectthebrightnessandtintformultipleprojectorsbasedonthebrightnessand tintsettingsyouselectedforthemasterprojector.Youcanscheduleautomaticscreenmatchingusing theschedulingfunctionoftheprojector.
Beforeyoustart,makesureofthefollowing:
- Select Multi-Projection for the Color Mode setting and adjust the Brightness, Contrast, Color Saturation, Tint, White Balance, and Advanced settings in the Image menu, as necessary, on the masterprojector.
- You are projecting on amattewhited diffusions screen that is flat and even.
• The projected image is between 100 to 300 inches (254 to 762 cm) and is rectangular after tiling. - All the projectors are connected to a network and the Location Setup setting has been configured.
- Nothingisblockingthebuilt-incameraonthefrontofeachprojector.
• The projected images donotoverlapor have gaps between them.
• The projectors are installed parallel to the screen.
•TheBlendRangesettingissetbetween15to45%.
•TheBrightnessLevelissettothemaximumforallprojectors. - ThemodelnumberofallprojectorsisProL30000UNLorProL30002UNL.
Note: Auto adjustment is not available for the following lenses: ELPLR05, ELPLL09, or ELPLL10. After autoadjustment, themovementrangeforlensshiftisreduced.
1.PresstheMenubutton.
2. SelecttheExtendedmenuandpressEnter.
3. SelecttheMulti-ProjectionsettingandpressEnter
4. SelecttheScreenMatchingsettingandpressEnter.
![[Screen Matching] Return Start Auto Adjustment Undo Redo Schedule Settings Extended Color Mode Photo Brightness Settings Color Matching Color Uniformity Black Level Reset](/content/2026/05/1053940/images/91d3393bcbac26fa711a4e56cab96b76ebd951beaf02f66f48327cf020172688.jpg)
5. SelectStartAutoAdjustmentpressEnter.
Whenadjustmentstarts,youseeanadjustmentepattern.Adjustmentiscompletewhenyouseea displayedimage.
After automatic adjustment, the Color Uniformity and Color Matching settings are returned to their defaultvalues. The LightSourceControlsettingissettoOff.
Parenttopic: MatchingTintandBrightness(ScreenMatching)
Relatedreferences
ImageQualitySettings-ImageMenu
ProjectorParts-Front/Top
Relatedtasks
ChangingtheColorMode
ConfiguringTilingAutomatically
BlendingtheImageEdges
MatchingtheScreensManually
Youcanmanuallycorrectthebrightnessandtintformultipleprojectors.
Note: We recommend that you reset the following settings on the Image menu before beginning manual screen matching: Brightness, Contrast, Color Saturation, Tint, White Balance (all settings), Gamma, and RGBCMY.
1.PresstheMenubutton.
2. SelecttheExtendedmenuandpressEnter.
3. SelecttheMulti-ProjectionsettingandpressEnter.
4. SelecttheScreenMatchingsettingandpressEnter
Youseeascreenlikethis:
![[Screen Matching] Return Start Auto Adjustment Undo Redo Schedule Settings Extended Color Mode Photo Brightness Settings Color Matching Color Uniformity Black Level Reset](/content/2026/05/1053940/images/d42e01b29ae8ad591e41c8223a6b7a0a0a803dd3f21ddf1c74c9977289af2c11.jpg)
- Select the Color Matching setting and press Enter.
Youseethisscreen:
![[Color Matching] Adjustment Level 0 Red 0 Green 0 Blue 0 Brightness - / +](/content/2026/05/1053940/images/90027f45e065fea49f52ad845f6acb0c3ac8953d67d4c38e889c1d54f033680b.jpg)
6.PresstheleftorrightarrowbuttonstoselectavaluefortheAdjustmentLevelsetting.
Note: There are eight adjustment levels ranging from white to black and you can adjust each level individually.
- Press the left or right arrow buttons to adjust the color tone for the Red, Green, and Blue settings.
8.PresstheleftorrightarrowbuttonstoadjusttheBrightnesssetting. - Repeat the previous three steps as necessary to adjust each adjustment level.
10.PresstheEscbuttontoreturntothepreviousscreen.
Parenttopic: MatchingTintandBrightness(ScreenMatching)
ScalinganImage
YoucanprojectthesameimagefrommultipleprojectorsandusetheScalefeaturetocropandcombine themintoonelargeimage.

flowchart
graph TD
    A["Image Processing"] --> B["Output Module 1"]
    A --> C["Output Module 2"]
    A --> D["Output Module 3"]
    B --> E["Final Output"]
    C --> E
    D --> E
1.PresstheMenubutton.
2. SelecttheExtendedmenuandpressEnter.
3. SelecttheMulti-ProjectionsettingandpressEnter.
4. SelecttheScalesettingandpressEnter.
Youseethisscreen:
![[Scale] Scale Off Scale Mode Zoom Display Scale Vertically x 0.00 Scale Horizontally x 0.00 Clip Adjustment Clip Range Return](/content/2026/05/1053940/images/ee7a5b8cf94490d91d915c1abb3b6cd880ffceb90e07b6a578db07a4d119a087.jpg)
-
SelectoneofthefollowingastheScalesetting:
-
Auto to automatically adjust the clipped areas according to the Edge Blending and Tiling settingsyouselected
•Manualtoadjusttheclippedareasmanually -
Select the Scale Modesetting and select one of these options:
- ZoomDisplaytomaintaintheimageaspectratioasyouscaletheimage
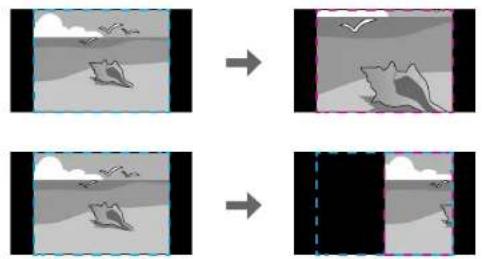
natural_image
Four-panel diagram showing a transition from a landscape with birds to a beach scene, no text or symbols present.•FullDisplaytoadjusttheimagetotheprojector'sscreensizeasyouscaletheimage
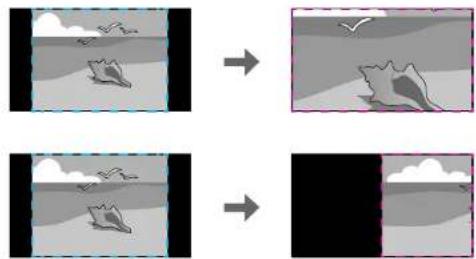
natural_image
Four-panel diagram showing a diver in water with fish and rocks, before and after transformation (no text or symbols)- If you selected Auto as the Scale setting, you can skip the remaining steps. If you selected Manual, adjust each of the following options as necessary:
- Select – or + to scale the image horizontally and vertically at the same time
- SelectScaleVerticallytoscaletheimageverticallyonly
-
SelectScaleHorizontallytoscaletheimagehorizontallyonly
-
Select the Clip Adjustment setting and use the arrow buttons to adjust the coordinates and size of each imageasyouviewthescreen.
-
Select the Clip Rangesetting to preview the area you just selected.
10.PresstheMenubuttontoexit.
Parenttopic: Using Multiple Projectors
Relatedtasks
BlendingthelmageEdges
Relatedtopics
TilingImagesintoOneImage
TilingImagesUsingGeometryCorrectionAssist
Using the projector's built-incamera and the Edge Blending feature, you can create a seamless image by automatically adjusting the pixel position in overlapping areas of the image.
YoucanrunGeometryCorrectionAssistfromtheEpsonProjectorProfessionalTool(version1.20or later).YoucandownloadthetoolfromtheEpsonsupportwebsiteatepson.com/support(U.S.),epson.ca/support(Canada),orepson.com.jm/support(Caribbean).
Werecommendperformingautoadjustmentinadarkenedroomandatleast20minutesafterturningon theprojectorcancelingtheshutterfunction. Thetimenecessaryforautoadjustmentvariesdepending onthelocationandnumberofprojectorsandcantakeuptosixminutestoperform.
Note: Autoadjustment is not available for the following lenses: ELPLR05, ELPLL09, or ELPLL10.
Beforeyoustart, makesureofthefollowing:
- AlltheprojectorsareconnectedtoanetworkandconfiguredinEpsonProjectionProfessionalTool.
- Youareprojectingonamattewhitediffusionscreenthatisflatandeven.
• The illuminanceratioofthescreenwhenprojectinganall-whitescreenandwhenprojectinganall-blackscreenis8:1ormore. - The projectionsizeforeachprojectorisbetween 100to500inches(254to1270cm)andis rectangularaftertiling(whenprojectingontoascreensurfacewithanilluminanceof40luxorlower withtheLightSourceModesettoNormal).
- Nothingisblockingthebuilt-incameraonthefrontofeachprojector.
• Partsofallprojectedimagesareoverlapping.
• The projectors are installed parallel to the screen.
•TheBlendRangesettingforedgeblendingissetbetween15to43%.
- All the projectors support the tiling function of Geometry Correction Assistance havethesame panel resolution.
- All projectors Projection settings are set to Front or Front/Ceiling.
- You are not using the stacking function of Geometry Correction Assist.
Parenttopic: Using Multiple Projectors
Relatedreferences
ProjectorSetupSettings-ExtendedMenu
AdditionalProjectorSoftwareandManuals
StackingImagesUsingGeometryCorrectionAssist
Using the projector's built-incamera, you can overlap images from uptosix projector stop projectone, brightimage. Point Correction is performed automatically.
YoucanrunGeometryCorrectionAssistfromtheEpsonProjectorProfessionalTool(version1.31or later).YoucandownloadthetoolfromtheEpsonsupportwebsiteatepson.com/support(U.S.),epson.ca/support(Canada),orepson.com.jm/support(Caribbean).
Werecommendperformingautoadjustmentinadarkenedroomandatleast20minutesafterturningon theprojectorcancelingtheshutterfunction. Thetimenecessaryforautoadjustmentvariesdepending onthelocationandnumberofprojectorsandcantakeupto10minutestoperform.
Note: Autoadjustmentisnotavailableforthefollowinglenses: ELPLR05, ELPLL09, or ELPLL10.
Beforeyoustart, makesureofthefollowing:
- AlltheprojectorsareconnectedtoanetworkandconfiguredinEpsonProjectionProfessionalTool.
- You are projecting on amattewhited diffusions screen that is flat and even.
•Theilluminanceratioofthescreenwhenprojectinganall-whitescreenandwhenprojectinganall-blackscreenis8:1ormore. - The projectionsizeforeachprojectorisbetween100to500inches(254to1270cm)andis rectangularafterstacking(whenprojectingontoascreensurfacewithanilluminanceof40luxor lowerwiththeLightSourceModesettoNormal).
• Thescreengainis0.9to1.1.
- Nothingisblockingthebuilt-incameraonthefrontofeachprojector.
• Partsofallprojectedimagesareoverlapping.
• The projectors are installed parallel to the screen.
•TheBlendRangesettingforedgeblendingissetbetween15to43%.
- All the projectors support the stacking function of Geometry Correction Assistance has the same panel resolution.
- All projectors Projection settings are set to Front or Front/Ceiling.
• The projectionsize for all of the projectors is larger than the projectionsize after stacking.
- You are not using the tiling function of Geometry Correction Assist.
Parenttopic: Using Multiple Projectors
Relatedreferences
ProjectorSetupSettings-ExtendedMenu
AdditionalProjectorSoftwareandManuals
SimpleStackingforOneBrightImage
YoucancreateabrightprojectedImagebyoverlappingtheimagesofuptosixprojectors.Youcanstack twoprojectorsusingtheprojectormenus,oruptosixprojectorsusingtheEpsonProjectorProfessional Tool.
Note: You can also set up stacking using the Epson Projector Professional Tool (version 1.31 or later). YoucandownloadthesoftwarefromtheEpsonsupportwebsiteatepson.com/support(U.S.), epson.ca/support(Canada),orlatin.epson.com/support(Caribbean).
SimpleStackingConditions
SettingUpSimpleStacking
Parenttopic: Using Multiple Projectors
SimpleStackingConditions
Youcanusethesimplestackingfeatureunderthefollowingconditions:
- Alloftheprojectorsarethesamemodelandabuilt-inoroptionalcameraisinstalledoneach projector.
- Waitfor2minutesafterturningonalloftheprojectorsbeforestartingthesimplestackingprocess.
- You are projecting on amattewhited diffusions screen that is flat and even.
- Alloftheprojectorsareinstalledparalleltothescreen.
Caution: Donotstackprojectorsdirectlyontopofeachother.
- Nothingisblockingtheoptionalcameraandtheprojectedimage.
• The projectionsizeiswithinthefollowingrangeaccordingtothebrightnessofthelightsource(when thescreenluminanceis40luxorless):
•Upto9.9Klm:50to200inches(127to508cm)
•10Klm:60to300inches(152to762cm)
•15KImto19.9KIm:70to350inches(178to889cm)
•20Klmto24.9Klm:80to400inches(203to1016cm)
•25Klmto29.9Klm:90to450inches(229to1143cm)
•30Klmormore:100to500inches(254to1270cm)
- Alloftheprojectorsareprojectingimagesatthesameresolution.
- Theluminanceratioonthescreensurfacewhenprojectingonanall-whitescreenandwhenprojecting onanall-blackscreenis8:1ormore.
- The Projection setting for all projectors is set to Front or Front/Ceiling.
Parenttopic:SimpleStackingforOneBrightImage
SettingUpSimpleStacking
YoucancreateabrightprojectedImagebyoverlappingtheimagesoftwoprojectorsusingtheprojector menus. YoucanoverlaptheimagesofuptosixprojectorswhenusingtheEpsonProjectorProfessionalToolsoftwareandabuilt-inoroptionalcamera.
-
ConnecttwoprojectorsusingaLANcable.
-
Turnontheprojectors.
-
MakesuretheDHCPsettingisturnedonintheNetworkConfigurationmenuonallprojectors.
-
Adjust the image position, shape, and focus on one of the projectors (this projector becomes the "master" projector).
5.PresstheMenubutton.
-
SelecttheExtendedmenuandpressEnter.
-
SelecttheMulti-ProjectionsettingandpressEnter.
-
Select the SimpleStacking setting and press Enter.
9.Dooneofthefollowing:
- Select Point Correction to divide the projected image into a grid and correct the distortion in increments. You can move the points on the grid between 0.5 to 600 pixels in any direction, including outside the projection range.
- SelectStartAutoAdjustmenttoautomaticallyadjusttheprojectedimageusingthecamera assistfunctions.
Note: This setting is only available if a built-inor optional camera is installed.
If there are any gaps in the pixels of the projected images, adjust the Point Correction setting manually.
- If your project orders not have been built-in camera, you haven't installed an optional camera, adjust the Focus, Zoom, Lens Shift, and Geometry Correction settings manually.
11.PresstheMenubuttontoexit.
Parenttopic: SimpleStackingforOneBrightImage
SavingSettingstoMemoryandUsingSavedSettings
Youcansavecustomizedsettingsandthenselectthesavedsettingswheneveryouwanttousethem.
- Turnon the projector and display an image.
2.PresstheMenubutton.
Note: You can also press the Memory button on the remote control. Skip to step 5.
3. SelecttheSettingsmenuandpressEnter.
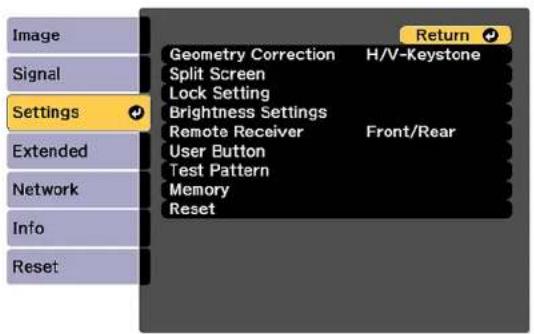
4. Select the Memory setting and press Enter.
![[Memory] Return Settings Memory Lens Position Geometry Correction Extended Network Info Reset](/content/2026/05/1053940/images/d248b0a2b35427bf3d3d2e89b783c60aeb8efa23adefcd5c1bd095eb51b8ac5d.jpg)
Note: You can also access this screen by pressing the Memory button on the remote control.
5. Selectoneofthefollowingoptions:
- Memory: Savesorloadsvarioussettings; you cansaveupto10 differentmemories
Note: The following settings are saved: all settings from the Image menu, the Scale, Overscan, and Video Range settings from the Signal menu, and the Edge Blending, Black Level, and ColorMatchingsettingsfromtheExtendedmenu.
- Lens Position: Saves or loads settings related to the lens such as the lens shift, focus, zoom, and distortionadjustmentsettings;youcansaveupto10differentmemories
- Geometry Correction: Saves or loads any adjustments made in the Geometry Correction settingintheSettingsmenu;youcansaveupto3differentmemories
Youseethisscreen:
![[Memory] Return Load Memory Save Memory Erase Memory Rename Memory Reset Memory Settings Extended Network Info Reset](/content/2026/05/1053940/images/ad1839f8f969b3a05cca6a3f73bf623956548d27b0d33622a5f0af3caefcb69f.jpg)
-
Selectoneofthefollowingoptions:
-
LoadMemory: Overwritesyourcurrentsettingswithsavedsettings
- SaveMemory: Savesyourcurrentsettingstomemory
Note: Amemorynamethathasalreadybeenusedisindicatedbyamark. Savingovera previously saved memory over writes the settings with your current settings.
- EraseMemory: Erasestheselectedmemorysettings
•RenameMemory: Renamesasavedmemory - ResetMemory: Resetsthenameandsettingsofasavedmemory
Note: To reset all saved memories of all types, select Reset All Memories in the Reset menu.
7. PressMenuorEsctoexit.
Parenttopic: AdjustingProjectorFeatures
SavingaScheduledEvent
Youcanselectprojectorcommandsyouwanttoperformandschedulethemasanevent.
Youcannotscheduleaneventtooccuratthefollowingtimes:
•FiveminutesbeforeorafteraColorCalibrationevent
•Fiveminutesbeforeor30minutesafteraScreenMatchingevent
Note: Light Source Calibration events do not start if the projector is used continuously for more than 24 hours, or regularly turned off by shutting off the power outlet. Set Light Source Calibration events to occur only after 100 hours of projector usage.
Note: MakesuretoperformScreenMatchingafterexecutingLightSourceCalibration.
Note: When you have set Light Source Calibration or Screen Matching events and you want to apply this schedule to other projectors with tiling settings, set Sync Schedule to On.
- PresstheMenubutton.
- SelecttheExtendedmenuandpressEnter.
- SelecttheScheduleSettingssettingandpressEnter.
Youseeascreenlikethis:
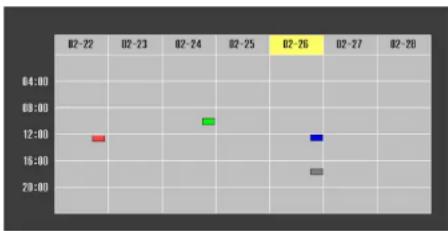
- Select the Schedule or Extended Schedule menu and press Enter.
- SelectAddNewandpressEnter.
- In the Event Settings section, select the events you want to have occur. (Select No Change for eventsthatyoudonotwanttooccur.)
Note: In the Extended Schedule menu, you can schedule only one event for Color Calibration or ScreenMatching.
- In the Date/Time Settings section, set the date and time for the scheduled event to occur.
- When you are finished, select Save and press Enter.
- Toschedulemoreevents, repeat the previous steps as necessary.
- SelectSetupcompleteandselectYestosaveyourchanges.
ViewingScheduledEvents
EditingaScheduledEvent
Parenttopic: AdjustingProjectorFeatures
Relatedtasks
RunningLightSourceCalibration
Relatedtopics
MatchingTintandBrightness(ScreenMatching)
ViewingScheduledEvents
Youcanviewanycurrentlyscheduledevents.
- PresstheMenubutton.
- SelecttheExtendedmenuandpressEnter.
- Select the Schedule Settings setting and press Enter.
Youseeascreenlikethis:

scatter
| Time | Value | |---|---| | 02-72 | 17 | | 02-73 | 18 | | 02-74 | 19 | | 02-75 | 18 | | 02-76 | 17 | | 02-77 | 16 | | 02-78 | 15 |The colored boxes in the calendar indicate the following about the scheduled events:
One-timeevent
Recurringevent
Communicationison/off
Eventisinvalid
Parenttopic: SavingaScheduledEvent
EditingaScheduledEvent
Youcaneditanycurrentlyscheduledevent.
1.PresstheMenubutton.
2. SelecttheExtendedmenuandpressEnter.
3. SelecttheScheduleSettingssettingandpressEnter.
Youseeascreenlikethis:
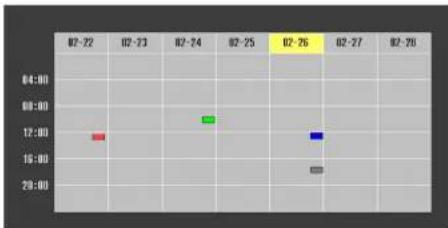
4.Presstheleftorightarrowbuttonstohighlightthedateonthecalendarcontainingthescheduled eventyouwanttoedit.
5.Presstheupordownarrowbuttonstohighlightheeventyouwanttoedit,andpressEsc.
6. Selectoneofthefollowing:
- On/Offtoenableordisabletheselectedevent.
- Edittoeditthesettingsfortheselectedevent.
- Cleartodeletetheselectedevent.
-
AddNewtoaddanewscheduledevent.
-
When you are finished, select Return and press Enter.
-
SelectSetupcompleteandselectYestosaveyourchanges.
Note: To delete all scheduled events, select Schedule Reset and select Yes.
Parenttopic: SavingaScheduledEvent
CopyingMenuSettingsBetweenProjectors
Afteryouselectmenusettingsforyourprojector,youcantransferthemtoanotherprojectorofthesame model.
Note: Copy the projector's settings before you adjust the projected image using the projector's Geometry Correctionsettings.AnysavedUser'sLogosettingontheprojectorwilltransfertotheotherprojector.
Caution: If the copy process fails due to a power failure, communication error, or for any other reason, Epsonwillnotberesponsibleforanyrepaircostsincurred.
The following settings will not transfer between projectors:
- NetworkmenusettingsotherthanthoseintheNotificationsandOthersmenus(whentheBatch SetupRangesettingissettoLimited)
• EDID settings in the Signal menu (when the Batch Setup Range setting is set to Limited)
•LightSourceInfointheInfomenu
•StatusInformationinthelnfomenu
- Password-protecteditems
Note: In addition to the methods covered in this section, you can also copy and transfer settings to multiple projector over an network using the Epson Projector Management software. See the online Epson Projector Management Operation Guide for instructions. You can download the latest software and documentation from the Epson website.
SavingSettingstoaUSBFlashDrive
TransferringSettingsfromaUSBFlashDrive
SavingSettingstoaComputer
TransferringSettingsfromaComputer
Parenttopic: AdjustingProjectorFeatures
Relatedconcepts
PasswordSecurityTypes
Relatedreferences
ProjectorFeatureSettings-SettingsMenu
ProjectorNetworkandCameraSettings-NetworkMenu
InputSignalSettings-SignalMenu
ProjectorInformationDisplay-InfoMenu
AdditionalProjectorSoftwareandManuals
SavingSettingstoaUSBFlashDrive
YoucansavetheprojectorsettingsyouwanttotransfertoaUSBflashdrive.
Note: Use an empty flash drive. If the drive contains other files, the transfer may not complete correctly. TheflashdrivemustusetheFATformatandcannothaveanysecurityfeatures.
-
Turnoff the projector using the powers switch.
-
Insert the flash drive into the wireless LAN module port.
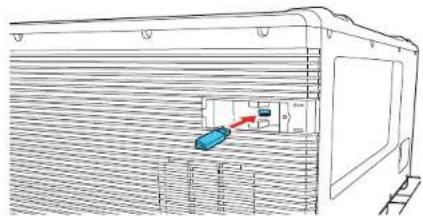
natural_image
Technical line drawing of a train hood with a blue sensor and red indicator light (no text or symbols)Note: Connect the flash drive directly to the projector. Do not use a hub or your settings may not be saved correctly.
- Press and hold the Esc button on the control panel or remote control as you turn on the power switch.
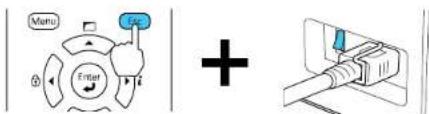
- When the On/Standby and Status lights are blue, and the Laser and Templights are orange, release the Esc button.
Thelightsflashtoindicatethatsettingsaretransferringtotheflashdrive.Whenthelightsstop flashing,theOn/Standbylightturnsblueandtheprojectorentersstandbymode.
Caution: Do not unplug the power cord, turn off the power switch, or remove the flash drive while the lightsareflashing. This could damage the projector.
- Oncetheprojectorentersstandbymode, removetheflashdrive.
Note: If the projector does not enter standby mode and the lights continue flashing, see the link belowforasolution.
Parenttopic: CopyingMenuSettingsBetweenProjectors
Relatedreferences
ProjectorLightStatus
TransferringSettingsfromaUSBFlashDrive
AftersavingprojectorsettingstoaUSBflashdrive,youcantransferthemtoanotherprojectorofthe samemodel.
Note: Make sure the USB flash drive contains only a single settings transfer from another projector of the same model. The settings are contained in a file called pjconfdata.bin. If the drive contains other files, the transfer may not complete correctly.
Donotadjustimagesettingsonaprojectoruntilafteryoutransfersettingstoit. Otherwise, you may have to repeat your adjustments.
- Turnoff the projector using the powers switch.
- Insert the flash drive into the wireless LAN module port.
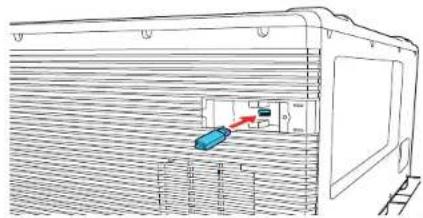
Note: Connect the flash drive directly to the projector. Do not use a hub or your settings may not be saved correctly.
- Press and hold the Menu button on the control panel or remote control as you turn on the power switch.
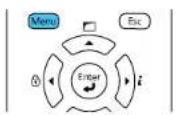
- When the On/Standby and Status lights are blue, and the Laser and Templights are orange, release the Menubutton.
Thelightsflashtoindicatethatsettingsaretransferringtotheprojector. Whenthelightsstop flashing, theOn/Standbylightturnsblueandtheprojectorentersstandbymode.
Caution: Do not unplug the power cord, turn off the power switch, or remove the flash drive while the lightsareflashing. This could damage the projector.
- Oncetheprojectorentersstandbymode, removetheflashdrive.
Note: If the projector does not enter standby mode and the lights continue flashing, see the link belowforasolution.
Parenttopic: CopyingMenuSettingsBetweenProjectors
Relatedreferences
ProjectorLightStatus
SavingSettingstoaComputer
Youcansavetheprojectorsettingsyouwanttotransfertoacomputer.
Yourcomputermustberunningoneofthefollowingoperatingsystems:
- WindowsVista
- Windows7
- Windows8.x
- Windows10
-OSX10.7.x
-OSX10.8.x
-OSX10.9.x
-OSX10.10.x
-OSX10.11.x
•macOS10.12.x
•macOS10.13.x
•macOS10.14.x
•macOS10.15.x
-
Turnoff the projector using the powerswitch.
-
ConnectaUSBcabletoyourproject'sServiceport.
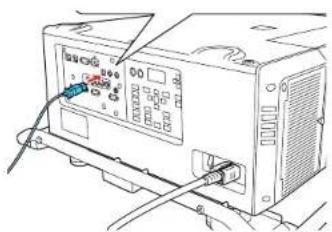
natural_image
Line drawing of a computer power supply unit with cables and connectors (no text or symbols visible)-
ConnecttheotherendtoanyavailableUSBportonyourcomputer.
-
Press and hold the Esc button on the control panel or remote control as you turn on the power switch.
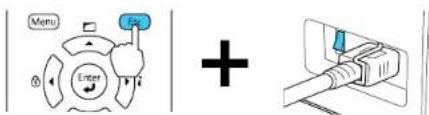
- When the On/Standby and Status lights are blue, and the Laser and Templights are orange, release the Escbutton.
Theprojectorshowsupasaremovablediskonyourcomputer.
-
Opentheremovablediskandcopythepjconfdata.binfiletoyourcomputer.
-
Oncethefilehascopied, dooneofthefollowing:
- Windows: Open the My Computer, Computer, Windows Explorer, or File Explorer utility. Right-clickthenameofyourprojector(listedasaremovabledisk)andselectEject.
•Mac:Dragtheremovablediskiconforyourprojectorfromthedesktopintothetrash.
TheprojectorentersstandbymodewhenyoudisconnecttheUSBcable.
Parenttopic: CopyingMenuSettingsBetweenProjectors
Relatedreferences
ProjectorLightStatus
TransferringSettingsfromaComputer
Aftersavingprojectorsettingstoacomputer,youcantransferthemtoanotherprojectorofthesame model.
Yourcomputermustberunningoneofthefollowingoperatingsystems:
- WindowsVista
- Windows7
- Windows8.x
•Windows10
-OSX10.7.x
-OSX10.8.x
-OSX10.9.x
- OSX10.10.x
-OSX10.11.x
•macOS10.12.x
•macOS10.13.x
•macOS10.14.x
•macOS10.15.x
Donotadjustimagesettingsonaprojectoruntilafteryoutransfersettingstoit. Otherwise, you may have to repeat your adjustments.
- Turnoff the projector using the powers switch.
- ConnectaUSBcabletoyourprojector'sServiceport.

-
ConnecttheotherendtoanyavailableUSBportonyourcomputer.
-
Press and hold the Menu button on the control panel or remote control as you turn on the power switch.
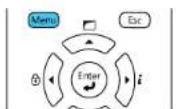
- When the On/Standby and Status lights are blue, and the Laser and Templights are orange, release the Menubutton.
Theprojectorshowsupasaremovablediskonyourcomputer.
6.Copythepjconfdata.blnfilefromyourcomputertotheremovabledisk.
Note: Donotcopyanyotherfilestotheremovabledisk.
-
Oncethefilehascopied, dooneofthefollowing:
-
Windows: Open the My Computer, Computer, Windows Explorer, or File Explorer utility. Right-clickthenameofyourprojector(listedasaremovabledisk)andselectEject.
•Mac:Dragtheremovablediskiconforyourprojectorfromthedesktopintothetrash.
Whenthelightsstopflashing, theOn/Standbylightturnsblueandtheprojectorentersstandby mode.
Caution: Do not turn off the power switch or unplug the power cord while the lights are flashing. This could damage the projector.
Note: If the projector does not enter standby mode and the lights continue flashing, see the link belowforasolution.
Parenttopic: CopyingMenuSettingsBetweenProjectors
Relatedreferences
ProjectorLightStatus
AdjustingtheMenuSettings
Followtheinstructionsinthesesectionstoaccesstheprojectormenusystemandchangeprojector settings.
UsingtheProjector'sMenus
ImageQualitySettings-ImageMenu
InputSignalSettings-SignalMenu
ProjectorFeatureSettings-SettingsMenu
ProjectorSetupSettings-ExtendedMenu
ProjectorNetworkandCameraSettings-NetworkMenu
ProjectorInformationDisplay-InfoMenu
ProjectorResetOptions-ResetMenu
UsingtheProjector'sMenus
Youcanusetheprojector'smenustoadjustthesettingsthatcontrolhowyourprojectorworks. The projectordisplaysthemenusonthescreen.
- Pressthe Menubutton on the control panel or remote control.
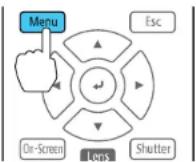
Youseethemenuscreen.

2.Presstheupordownarrowbuttontomovethroughthemenuslistedontheleft. Thesettingsfor eachmenuaredisplayedontheright.
Note: The available settings depend on the current input source, resolution, or other menu settings.
- Tochangesettingsinthedisplayedmenu, pressEnter.
- Presstheupordownarrowbuttontomovethroughthesettings.
- Changethesettings using the buttons listed on the bottom of themenuscreens.
- Toreturnallthemenusettingstotheirdefaultvalues, selecttheResetmenu.
- When you finish changing settings on an amino, press Esc.
- PressMenuorEsctoexitthemenus.
Parenttopic:AdjustingtheMenuSettings
ImageQualitySettings-ImageMenu
SettingsonthImagemenuletyouadjustthequalityofyourimagefortheinputsourceyouarecurrently using. Theavailablesettingsdependonthecurrentlyselectedinputsource.
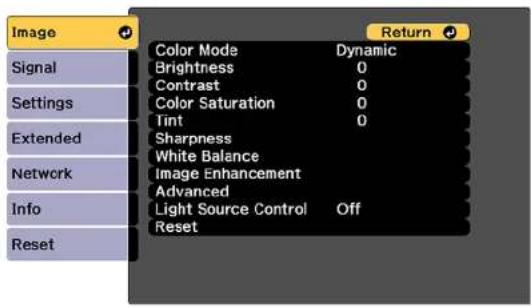
Tochangesettingsforaninputsource,makesurethesourceisconnectedandselectthatsource.
| SettingOptionsDescription | |
| ColorModeSeethelistofa | availableColor Modes |
| BrightnessVaryinglevels | availableLightensordarkenstheoverallimage |
| ContrastVaryinglevelsav | availableAdjuststhedifferencebetweenlight anddarkareasoftheimage |
| ColorSaturationVarying | evelsavailableAdjuststheintensityoftheimage colors |
| TintVaryinglevelsavailab | eAdjuststhebalanceofgreento |
| SettingOptionsDescription | ||
| SharpnessStandard | ThinLineEnhancementThickLineEnhancement | AdjuststhesharpnessofimagedetailsStandard:adjuststheoverallimage sharpnessThinLineEnhancement:enhances finedetailssuchashairandfabric patternsThickLineEnhancement:enhances theoutline,background,andmainparts ofanimagetomakethemmoreclear |
| WhiteBalanceColorTemp. | G-MCorrectionOffsetROffsetGOffsetBGainRGainGGainB | AdjuststheoveralltintoftheimageColorTemp::setsthecolortonebased oncolortemperatureG-MCorrection:highervaluestintthe imageblueandlowervaluestintthe imageredOthersettings:letyouadjusttheoffset andgainofeachcolorR(red),G (green),andB(blue)individually |
| ImageEnhancement4KE | EnhancementAccepts4Ksignalsandenhancestheoutputof1080psignals | |
| ImagePresetModeSelectstheimageenhancementsettingssavedinadvance | ||
| FrameInterpolationSmoothsfastmovingvideobycomparingconsecutiveframesandinsertinganintermediateframebetweenthem | ||
| DeinterlacingSetswhethertoconvertinterlaced-to-progressivesignalsforcertainvideoimagetypesOff:forfast-movingvideoimagesVideo:formostvideoimagesFilm/Auto:formovies,computergraphics,andanimation | ||
| NoiseReductionReducesflickeringinanalogimages | ||
| MPEGNoiseReductionReducesthenoiseorartifactsseeninMPEGvideo | ||
| SuperresolutionSharpensblurredimagesresultingfromincreasingresolution | ||
| DetallenhancementEnhancesdetailstocreateclearoutlinesRange:highersettingsincreasetheaffectedareaaroundtheoutlineStrength:highersettingscreateastrongereffect | ||
| AdvancedGammaAdjust | sthegammalevelsoftheimage. | SelectCustomizedtoadjustthegammawhileviewingtheimageoragraph. |
| RGBCMYAdjuststhehue,saturation,andbrightnessforeachcolor | ||
| DynamicContrastOff | ResponseSpeedBlackLevel | AdjuststheluminanceoftheimagetoimprovecontrastbytrackingchangesinimagebrightnessResponseSpeed:selecteitherNormaltoadjustbrightnessatthestandardspeedorHighSpeedtoadjustbrightnessassoonasthescenechangesBlackLevel:selecttheblacklevelyouwanttoprojectwhenthebrightnessleveloftheimagesignaliszero;ifyouselect0%,thelightsourceturnsoff |
| LightSourceControlLight | ntSourceControlSelectsthelightsourdecontrolmethod | |
| DynamicContrastAutomaticallyadjuststheamountoflightaccordingtothebrightnessoftheimage.ResponseSpeed:Selectshowquicklytheamountoflightischangedwhentheimagechanges.SelectHighSpeedtochangetheamountoflightassoonastheimagechanges.BlackLevel:Setstheblacklevelwhenthebrightnessoftheimageiszero.Selecting0%turnsthelightsourceoff. | ||
| Lights-OutControlAutomaticallyturnsoffthelightafteracertaintimehaselapsedwhileprojectingatthespecifiedvideolevel.Lights-OutSignalLevel:selectthebrightnesslevelforthecurrentvideosignalLights-OutTimer:selecttheamountoftimebeforethlightsourcautomaticallyturnsoff | ||
Note: The Brightness setting does not affect laser brightness. To change the laser brightness, use the BrightnessSettingsintheSettingsmenu.
Parenttopic:AdjustingtheMenuSettings
Relatedconcepts
UsingAdvancedImageAdjustmentFeatures
Relatedreferences
AvailableColorModes
ProjectorFeatureSettings-SettingsMenu
Relatedtasks
AdjustingLuminanceControls
InputSignalSettings-SignalMenu
Normally the project detects and optimizes the input signal settings automatically. If you need to customize these settings, you can use the Signal menu. The available settings depend on the currently selected inputs source.
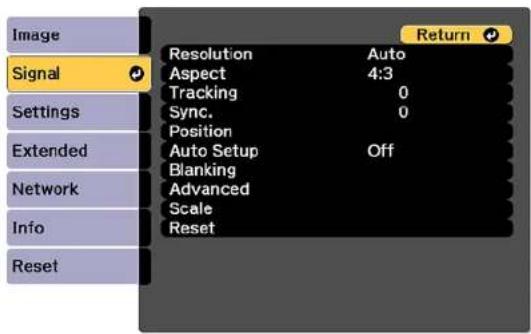
Note: You can restore the default settings of the Position, Tracking, and Sync settings by pressing the Autobuttonontheremotecontrol.
Tochangesettingsforaninputsource,makesurethesourceisconnectedandselectthatsource.
| SettingOptionsDescription | ||
| ResolutionAuto | NormalWideManual | SetstheinputsignalresolutionfromananalogRGBcomputerconnectionAuto:detectstheresolutionautomaticallyNormal:for4:3or5:4screensWide:forwidescreenManual:letsyouspecifyaresolution |
| AspectSeethelistofavailableaspect | ratios | Setstheaspectratio(width-to-heightratio)fortheselectedinputsource |
| TrackingVaryinglevelsavailableAdjust | justssignaltoeliminate | verticalstripesinimagesfromananalogRGBcomputerconnection |
| Sync.VaryinglevelsavailableAdjust | signaltoeliminate | fuzzinessorflickeringinimagesfromananalogRGBcomputerconnection |
| PositionUp,down,left,rightAdjuststhe | imagelocationonthe | screen |
| AutoSetupOn | Off | AutomaticallyoptimizesimagequalityfromananalogRGBcomputerconnection(whenOn) |
| OverscanAuto | Off4%8% | Changestheprojectedimageratiotomaketheedgesvisiblebyaselectablepercentageorautomatically |
| BlankingTop | BottomLeftRight | Hidesanareaoftheprojected imagethatyouselectusingthe arrowbuttons |
| ColorSpaceAuto | BT.709BT.2020 | Setstheconversionsystemfor thecolorspaceSelectingtheincorrectcolor spacefortheinputsourcemay adverselyaffecttheimage colors;therecommendedsetting inmostcasesisAuto. |
| DynamicRangeDynamicRange | HDR10SettingHLGSetting | DynamicRange:setstherange ofdarkandbrightareasin images;choosefromAuto (recommended),SDR,HDR10, orHLGHDR10Setting:adjuststhe curveforthePQ(Perceptual Quantizer)signalHLGSetting:adjuststhecurve fortheHDRHLG(HybridLog Gamma)signal |
| AdvancedVideoRangeSetsthevide | orangetomatch | thesettingofthedevice connectedtotheHDMI,DVI-D, HDBaseT,or3D/HD/SDSDI inputports |
| InputSignalSpecifiesthesignalty | pefrom inputsourcesconnectedto computerportsAuto:detectssignals automaticallyRGB:correctscolorfor computer/RGBvideoinputsComponent:correctscolorfor componentvideoinputs | |
| BNCSyncTerminationSetsthet | terminationforthesignal fromtheBNCport(settoOff unlessyouneedanalog termination,suchasfor switchers) | |
| EDIDDescribestheprojector'sdis | play capabilitiestodevicesconnected totheHDMI,HDBaseT,orDVI-D inputportssoyoucanunify multipledisplays | |
| DDCBufferIfyouareprojectingusing | HDMIorDVlextensioncableand theimageisnotdisplayed correctly,enablingthissetting mayimproveimagequality | |
| ScaleVariousscaleoptionsWhenusing | gmultipleprojectorsto | projectoneimage,adjuststhe scaleoftheimagedisplayedby eachprojector |
Parenttopic: Adjusting theMenu Settings
Relatedreferences
AvailableImageAspectRatio
Relatedtasks
ScalinganImage
ProjectorFeatureSettings-SettingsMenu
Options on the Settings menu let you customize various projector features.
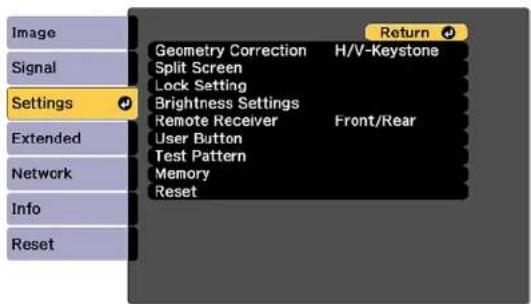
| SettingOptionsDescription | ||
| GeometryCorrectionH/V-Keystone | QuickCornerCurvedSurfaceCornerWallPointCorrectionMemory | Adjuststheprojectedimage shapeH/VKeystone:letsoumanually correcttheanglesofthe horizontalandverticalsidesQuickCorner:selecttoadjust thepositionofthefourcornersCurvedSurface:selecttoadjust theimagewhenprojectingona curvesurfaceCornerWall:selecttoadjustthe imagewhenprojectingona surfacewitharightanglePointCorrection:selectto displayagridandfinelyadjust theimagepositionMemory:selecttosave adjustmentvalueofthe geometriccorrectionandloadit whenneeded |
| SplitScreen—Dividestheviewingarea | horizontallyanddisplaytwo imagesside-by-side | |
| LockSettingControlPanelLock | LensLock | Controlsprojectorbuttonlocking tosecuretheprojectorControlPanelLock:FullLock:locksallbuttonsPartialLock:locksallbuttons exceptthepowerbuttonOff:nobuttonslockedLensLock:locksthefocus, zoom,lensshift,anddistortion settings |
| BrightnessSettingsLightSource | ModeBrightnessLevelConstantBrightnessEstimatedRemains | Selectsthebrightnessmodeof theprojectorLightSourceMode:setsthe brightnessforthelightsourceNormal:maximumbrightnessQuiet:70%brightnesswith reducedfannoiseExtended:70%brightness andextendsthelife expectancyofthelightsourceCustom:selectacustom brightnesslevelandenable useofnextthreesettingsBrightnessLevel:selecttheCustombrightnesslevelyou wantConstantBrightness:maintains aconstantbrightness(cannot changetheLightSourceMode andBrightnessLevelsettings)EstimatedRemains:displays howlongtheprojectorcan maintainconstantbrightness(if thatsettingisselected) |
| RemoteReceiverFront/Rear | FrontRearOff | Limitsreceptionofremotecontrol signalsbytheselectedreceiver; Offturnsoffallreceivers |
| UserButtonUser1 | User2User3 | Assignsamenuoptiontothe User1,User2,andUser3 buttonsontheremotecontrolfor one-touchaccess |
| TestPattern—Displaysatestpatterntoassistin | adjustingtheimage;selectfrom avarietyofpatterns | |
| MemoryMemory | LensPositionGeometryCorrection | Savecustomizedsetsofsettings tomemoryMemory:loads,saves,erases, orresetsspecificmenusettingsLensPosition:savesthe positionoftheadjustedlensGeometryCorrection:savesthe geometrycorrectionadjustments. |
Parenttopic:AdjustingtheMenuSettings
Relatedconcepts
ImageShape
Relatedtasks
ProjectingTwoImagesSimultaneously
LockingtheProjector'sLensSettingsandButtons
SavingSettingstoMemoryandUsingSavedSettings
ProjectorSetupSettings-ExtendedMenu
SettingstheExtendedmenuletyoucustomizevariousprojectorsetupfeaturesthatcontrolits operation.
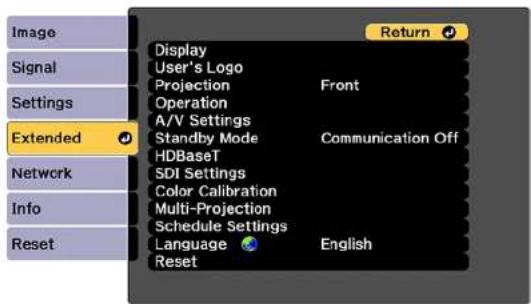
| SettingOptionsDescription | ||
| Display—SeetheDisplaysettings | ablein | thistopic |
| User'sLogo—Createsascreenthata | the | projectordisplaystoidentifyitself andenhancesecurity |
| ProjectionFront | Front/CeilingRearRearCeiling | Selectsthewaytheprojector facesthescreensotheimageis orientedcorrectly |
| Operation—SeetheOperationsetting | ingstable | inthistopic |
| A/VSettingsA/VOutput | MonitorOut | A/VOutput:SelectAlwaysOn tooutputimagestoanexternal deviceevenwhentheprojectoris instandbymode(theStandby Modesettingmustbesetto CommunicationOn)MonitorOut:Outputstheimage sourcetoanexternalmonitor connectedtotheMonitorOut portwhentheprojectorisin standbymode. |
| StandbyModeCommunicationOn | CommunicationOff | Enablethissettingtoallowthe followingoperationstooccur whentheprojectorisinstandby mode:•Monitorandcontrolthe projectoroveranetwork•Outputvideotoanexternal device(A/VOutputmustbe settoAlwaysOn)•Communicationfromthe HDBaseTport(Control Communicationsmustbeset toOnintheHDBaseT settings)•SetthelPaddressontheLCD display |
| HDBaseTControlCommunications | ExtronXTP | SelectsthecommunicationsettingsforconnectionstoanHDBasetransmitterorswitcherControlCommunications:enablesordisablescommunicationfromtheEthernetandserialportsonthetransmitter;turningonthissettingdisablestheprojector'sLAN,RS-232C,andRemoteports(ExtronXTPmustbeturnedofftousethissetting)ExtronXTP:settoOnwhenyouconnectanExtronXTPtransmitterorswitchertotheHDBaseTportThefanmayrotatewhenthissettingissettoOn. |
| SDISettingsLinkType | ManualSettings | SelectthesignalsettingsfortheSDIportLinkType:selectSingle(Auto)tolettheprojectorreadthepayloadIDfortheinputsignalandautomaticallydisplaytheimage,orselectSingle(Manual)whenyouknowthetypeofinputsignalandwanttoselectthesamesignalintheManualSettingsoptionsManualSettings:setvariousSDIsettingsmanuallyorresetthemtotheirdefaultvalues |
| ColorCalibrationStartAutoAdjustmentUndoRedoColorUniformity | Automaticallydetectscolor deteriorationandadjuststhe colortoneStartAutoAdjustment: automaticallyadjuststhecolortoneforthewholeimageUndoandRedo:undoesor redoestheautoadjustmentColorUniformity:adjuststhe colortonebalanceforthewhole image | |
| Multi-ProjectionProjectorID | ProjectorGroupingTilingGeometryCorrectionEdgeBlendingBlackLevelScaleScreenMatchingSimpleStacking | Selectvariousoptionswhen projectingfrommultiple projectorsProjectorID:setstheprojector toaparticularIDnumberwhich allowsyoutousearemote controltoindividuallycontrol projectorsProjectorGrouping:letsoyou selecttheprojectorsbeingused toprojectoneimageTiling:setsthenumberofsplit screensandthepositionofeach imageGeometryCorrection:corrects imagedistortionEdgeBlending:blendsthe borderbetweenmultipleimages tocreateaseamlessscreenBlackLevel:adjuststhe brightnessandtonedifferences inoverlappingimagesScale:adjuststhescaleofthe imagesScreenMatching:adjuststhe tintandbrightnessoftheimagesSimpleStacking:adjusts settingswhenusingmultiple projectorswithoverlapping images;usePointCorrectiononto adjusttheimagemanually;or selectStartAutoAdjustmentto usethebuilt-incamera |
| ScheduleSettingsVariousschedulingoptionsLetsyouschedulevarious | projectortasks | |
| LanguageVariouslanguagesavailable | Selectsthelanguagefor | projectormenuandmessage displays(notchangedbyReset option) |
Displaysettings
| SettingDescription | |
| MenuPositionSelectsthepositionofthe | projectormenudisplayedonthescreen |
| MessagePositionSelectsthepositionof | messagesdisplayedonthescreen |
| MessagesControlswhethermessages | redisplayedonthescreen |
| DisplayBackgroundSelectsthescreen | colororlogotodisplaywhennosignalisreceived |
| StartupScreenControlswhetheraspecial | alscreenappearswhentheprojectorstartsup |
| StandbyConfirmationDisplaysaconfirmationmessageafterpressingthe | Standbybuttonontheremotecontrol |
| AirFilterNoticeDisplaysamessagewhen | naclogintheairfilterisdetected |
| ScreenSetstheaspectratioandpositionof | theprojectedimageaccordingtothetypeofscreenbeingused |
| PanelAlignment | Correctscolormisalignmentintheprojectedimage |
| ColorUniformity | Adjuststhecolortonebalance |
| OSDRotation | Rotatesthemenudisplay90° |
Operationsettings
| SettingDescription | |
| DirectPowerOn | Turnsontheprojectorwhenyouplugitin |
| SleepModeAutomaticallyplacestheprojectorinstandbymodeafteran intervalofinactivity | |
| SleepModeTimerSetsthetimebeforetheprojectorautomaticallyturnsoff(Sleep Modemustbeturnedon) | |
| HighAltitudeModeRegulatestheprojector'soperatingtemperatureataltitudes above4921feet(1500m) | |
| StartupSourceSearchAutomaticallydetectstheimagesignalbeinginputwhenthe projectoristurnedon | |
| ShutterSettingsAdjuststheshuttersettingsFade-in:setsthenumberofsecondsforafade-intransition effectwhendisplayinganimationFade-out:setsthenumberofsecondsforafade-outtransition effectwhenhidinganimationShutterTimer:turnsofftheprojectorautomaticallyafterusing theshutterand2hoursofinactivityhaspassedShutterRelease:selectShutterifyouwanttouseonlythe Shutterbuttontoturnofftheshutter,orselectAnyButtonto useanybuttontoturnitoffStartup:selecttheshutterstatusforwhenyouturnonthe projectorStandby:selecttheshutterstatusforwhentheprojectorisin standbymodeorselectLastUsedtomaintainthecurrent shutterstatuswhenyouturnofftheprojector | |
| AdvancedSeethenexttableinhistopic | |
| Date&TimeAdjuststheprojector'stimeanddatesettings | |
| LensCalibrationDisplaysinformationaboutthelenscurrentlyinuseandlets youstartlenscalibration | |
Advancedsettings
| SettingDescription | |
| BeepControlsthebeepthatsoundswhen | youturntheprojectoronoroff |
| Indicators | Select Off to turn off projector lights, except warning lights |
| LogSaveDestinationSelectwhereyou | wanttosaveprojectoroperationlogfiles |
| BatchSetupRangeSelectwhichproject | ormenusettingstocopyusingthebatchsetup feature; select All or select Limited to not copy the EDIDsettingsorallNetworkmenusettings(excepttheNotificationsandOthersmenusettings) |
| AC Voltage Monitoring | Select Off to regularly use the direct shutdown feature; if youselectOnforthissettigandtheprojectoristurnedoffbyanymethodotherthanpressingthepowerbutton,apowersupplyvoltagewarningmessageisdisplayedthenexttimetheprojectoristurnedon |
Parenttopic: Adjusting theMenu Settings
Relatedconcepts
UsingMultipleProjectors
Relatedtasks
SavingaUser'sLogoImagetoDisplay
RunningLightSourceCalibration
SavingaScheduledEvent
ShuttingOffthePictureTemporarily
TurningOfftheProjector
Relatedtopics
CopyingMenuSettingsBetweenProjectors
AttachingandRemovingaLens
ProjectorNetworkandCameraSettings-NetworkMenu
SettingstheNetworkmenuletyouviewnetworkinformationandsetuptheprojectorformonitoring andcontroloveranetwork.Youcanalsocontrolaccesstoaremotecamera.
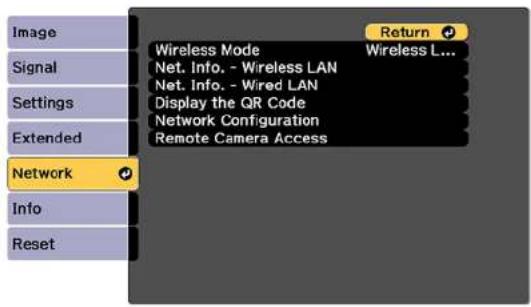
| SettingOptionsDescription | ||
| WirelessModeWirelessLANOn | Off | Enableordisablewireless communication |
| Net.Info-WirelessLANConnection | modeWirelessLANSys.AntennalevelProjectorNameSSIDDHCPIPAddressSubnetMaskGatewayAddressMACAddressRegionCodeIPv6 | Displayswirelessnetworkstatusanddetails |
| Net.Info-WiredLANProjectorName | DHCPIPAddressSubnetMaskGatewayAddressMACAddressIPv6Address(Manual)IPv6Address(Auto) | Displayswirednetworkstatusanddetails |
| DisplaytheQRCode—DisplaystheQRCode | ||
| NetworkConfigurationAccessesad | ditionalnetworkmenus | Configuresyournetworksettings |
| RemoteCameraAccessRemoteCameraAccessPassword | EnablesordisabletheremotecameraandletsyousetapasswordtolimitaccesstochangingtheremotecamerasettingorcapturingtheprojectedimageusingWebControl | |
Parenttopic: Adjusting theMenu Settings
Relatedconcepts
WiredNetworkProjection
WirelessNetworkProjection
Relatedtasks
UsingaQRCodetoConnectaMobileDevice
ViewinganImageCaptureoftheDisplayedImagefromaRemoteLocation
ProjectorInformationDisplay-InfoMenu
YoucandisplayinformationabouttheprojectorandinputsourcesbyviewingtheInfomenu.However, youcannotchangeanysettingsinthemenu.
| SettingOptionsDescription | ||
| ProjectorInfoOperationHoursDis | displaysthenumberofhoursthe | projectorhasbeenusedsinceitwas turnedon |
| SourceDisplaysthenameofthe | reporttowhich thecurrentinputsourceisconnected | |
| InputSignalDisplaystheinputs | signalsettingofthe currentinputsource | |
| ResolutionDisplaystheresolu | tionofthecurrent inputsource | |
| RefreshRateDisplaystherefre | shrateofthecurrent inputsource | |
| SyncInfoDisplaysinformation | thatmaybe neededbyaservicetechnician | |
| ColorFormatDisplaysinformation | ationaboutthecolor spaceanddynamicrange | |
| StatusDisplaysinformationab | outprojector problemsthatmaybeneededbya servicetechnician | |
| SerialNumberDisplaystheproj | jector'sserialnumber | |
| LensTypeDisplaysthemodeln | numberofthe installedlens | |
| EventIDDisplaystheEventIDn | number correspondingtoaspecificprojector problem;seethelistofEventID codes | |
| HDBaseTSignalLevelDisplaystheimagesignalinformation fromtheHDBaseTport | ||
| LightSourceInfoLightSourceHours | ursDisplaysthenumberofoperatinghoursforeachoftheprojector'sLight SourceModesettings | |
| EstimatedRemainsIftheConstantBrightnesssettingis enabled,displaytheremaining numberofhourstheprojectorcan maintainconstantbrightness | ||
| VersionMain | Video2SubSub2HDBaseTHDBaseT2SDIStatusMonitorACMonitor | Displaystheprojector'sfirmware information |
| StatusInformation—Displaysbasicstatusinformation | ||
| VoltageWarningInfo—Displayspowervoltagewarning | information | |
| TempWarningInfo—Displaysvarioushighttemperature | warninginformation | |
| PowerOn/OffHistory—Displaystheprojector'spoweronand | poweroffhistory | |
EventIDCodeList
Parenttopic: Adjusting theMenu Settings
EventIDCodeList
If the Event ID option on the Info menu displays a code number, check this list of Event ID codes for the solution to the projector problem associated with the code.
| EventIDcodeCause | seandsolution |
| 0432Turntheprojectoroffandthenonagain. | |
| 0435 | |
| 0434Unstablenetworkcommunication.Checkthenetworkcommunicationstatus,waitafewmoments,andtryconnectingtothenetworkagain. | |
| 0481 | |
| 0482 | |
| 0485 | |
| 0433Cannotdisplaythetransferredimages.Restartthenetworksoftware. | |
| 0484Communicatonwithcomputerwasdisconnected.Restartthenetworksoftware. | |
| 048304FE | Thenetworksoftwarequitunexpectedly.Checkthenetworkcommunicationstatus,thenturntheprojectoroffandthenonagain. |
| 047904FF | Aprojectorsystemerrorhasoccurred.Turntheprojectoroffandthenonagain. |
| 0891CannotfindanaccesspointwiththesameSSID.Setyourcomputer,accesspoint,andprojectortothesameSSID. | |
| 0892TheWPA/WPA2authenticationtypedoesnotmatch.Makesurethewirelessnetworksecuritysettingsarecorrect. | |
| 0893TheTKIP/AESencryptiontypedoesnotmatch.Makesurethewirelessnetworksecuritysettingsarecorrect. | |
| 0894Communicatonwithunauthorizedaccesspointwasdisconnected.Contactyournetworkadministrator. | |
| 0898FailedtoacquireDHCP.MakesuretheDHCPserverisoperatingcorrectly.IfyouarenotusingDHCP,turnofftheDHCPsettingintheNetworkmenus. | |
| 0899Communicatonerror.Turntheprojectoroffandthenonagain. | |
| 089A089B089C089D | EAPauthenticationerror.Makesurethewirelessnetworksecuritysettingsarecorrect. |
| 0920Theinternalpowersupplyisrunninglow.ContactEpsonsupport. | |
Parenttopic:ProjectorInformationDisplay-InfoMenu
ProjectorResetOptions-ResetMenu
You can reset most of the projector settings to their default values using the Reset All Config option on theResetmenu.
You can also reset the saved names and settings in the Save Memory list using the Reset All Memories option.
You can set the default settings for the following settings using the User Default Setting option:
•LightSourceMode
•BrightnessLevel
- ConstantBrightness
•A/VOutput
- StandbyMode
•StandbyConfirmation
- Messages
•Beep
- SleepMode
- ShutterTimer
- ShutterRelease
•ColorMode
•WirelessMode
•WiredLANDHCP
To reset all settings to the selected User Default Setting, select the Reset All (User Default) option. Youneedtoenterapasswordtoresetthesettings. Thedefaultpasswordis0000,whichyoushould changetoyourownpassword.
To reset all settings to the factory default (except for password protected settings), select the Reset All (Factory Default) option. You need to enter a password to reset the settings. The default password is 0000, which you should change your own password.

You cannot reset the following settings using the ResetAllConfiguration:
- InputSignal
•Memory
-User'sLogo
•Networkmenuitems
•Language
- Date&Time
-PanelAlignment
•ColorUniformity
• LensCalibration
•ColorCalibration
-ProjectorGrouping
•ScreenMatching
•ColorMatching
•OperationHours
•LightSourceInfo
-UserDefaultSetting
Parenttopic: Adjusting theMenu Settings
Relatedreferences
ProjectorNetworkandCameraSettings-NetworkMenu
Relatedtasks
SavingSettingstoMemoryandUsingSavedSettings
RunningLightSourceCalibration
MaintainingandTransportingtheProjector
Followtheinstructionsinthesesectionstomaintainyourprojectorandtransportitfromplacetoplace.
ProjectorMaintenance
TransportingtheProjector
ProjectorMaintenance
Yourprojectorneedslittlemaintenancetokeepworkingatitsbest.
Youmayneedtocleanthelensperiodically, andcleantheairfilterandairventstoppreventtheprojector fromoverheatingduetoblockedventilation.
Epson recommends cleaning the interior of the projector once a year. Otherwise, dust build up could cause a fire electrical shock.
Theonlypartsyoushouldreplacearetheairfilterandremotecontrolbatteries.Ifanyotherpartneeds replacing,contactEpsonoranauthorizedEpsonservicer.
Thisprojectorusesasealedlaserlightsourcewhichdoesnotneedservicingandcannotbereplaced.
Warning: Before cleaning any part of the projector, turn it off, unplug the power cord, and let it cool down. Never open any cover on the projector, except as specifically explained in this manual.
Dangerouselectricalvoltagesintheprojectorcaninjureyouseverely.
Warning: Do not try to service this product yourself, except as specifically explained in this manual. ReferallotherservicingtoEpsonqualifiedservicers.
CleaningtheLens
CleaningtheProjectorCase
AirFilterandVentMaintenance
ReplacingtheRemoteControlBatteries
Parenttopic: Maintaining and Transporting the Projector
Relatedtasks
TurningOfftheProjector
CleaningtheLens
Cleantheprojector'slensperiodically,orwheneveryounoticedustorsmudgesonthesurface.
• Toremovedustorsmudges, gentlywipethelenswithasoft, lint-freecloth.
• Toremovestubbornsmudges, moistenasoft, lint-freeclothwithlenscleanerandgentlywipethelens. Donotsprayanyliquiddirectlyonthelens.
Warning: Donotusealenscleanerthatcontainsflammablegas. The high heat generated by the projectormaycause fire. Use vacuum cleaner or hand-held air blow to remove any dust and lintonthelens.
Caution: Do not use glass cleaner or any harsh materials to clean the lens and do not subject the lens toanyimpacts; you may damage it. Donot use canned air, orthegases may leave a residue. Avoid touching the lens with your bare hand stop prevent fingerprint onordamage to the lens surface.
Parenttopic: Projector Maintenance
CleaningtheProjectorCase
Beforecleaningtheprojectorcase,turnofftheprojectorandunplugthepowercord.
• Toremovedustordirt, useasoft, dry, lint-freecloth.
- Toremovestubborndirt, useasoftclothmoistenedwithwaterandmildsoap.Donotsprayliquid directlyontheprojector.
Caution: Do not use wax, alcohol, benzine, paint thinner, or other chemicals to clean the projector case. Thesecandamagethecase.Donotusecannedair,orthegasesmayleaveaflammable residue.
Parenttopic: Projector Maintenance
Relatedtasks
TurningOfftheProjector
AirFilterandVentMaintenance
Regularfiltermaintenanceisimportanttomaintainingyourprojector.YourEpsonprojectorisdesigned withaneasilyaccessible,user-replaceablefiltertoprotectyourprojectorandmakeregularmaintenance simple.Filtermaintenanceintervalswilldependontheenvironment.
Ifregularmaintenanceisnotperformed,yourEpsonprojectorwillnotifyyouwhenthetemperature insidetheprojectorhasreachedahighlevel.Donotwaituntilthiswarningappearstomaintainyour projectorfilterasprolongedexposuretohightemperaturesmayreducethelifeofyourprojectororlaser.
Damageduetothefailuretoproperlymaintaintheprojectororitsfiltermaynotbecoveredbythe projector'sLimitedWarranty.
CleaningtheAirFilters
CleaningtheAirVents
ReplacingtheAirFilters
Parenttopic: Projector Maintenance
Relatedreferences
ProjectorLightStatus
CleaningtheAirFilters
Youneedtocleantheprojector'sairfiltersinthefollowingsituations:
•Thefilterorventsgetdusty.
- Youseeamessagetellingyoutocleanit.
• The projector's Filterlightflashesorange.
Caution: When using the projector in smoky environments, make sure you replace the air filter after approximately 240 hours of fuse. (This is a guideline when using the projector in an environment within atmospheric concentration of nondinaol of approximately 0.00000013%. The air filter replacement time may be shorter depending on the operating environment.) Using the projector in an smoky environment may cause the filter's dust collection function to decline and dust may adhere to the inside of the projector or the powers supply; this may cause a malfunction to occur.
Note: If the projector is installed with an air filter facing the ceiling, you will need to clean the air filters more frequently. If you see a message to clean the air filter even though you have cleaned it frequently, replace the air filter.
Note: The projector has one air filter on the front and two on the sides. The illustrations here show cleaningtheairfilteronthefront,butthestepsarethesametocleanthefiltersontheside.
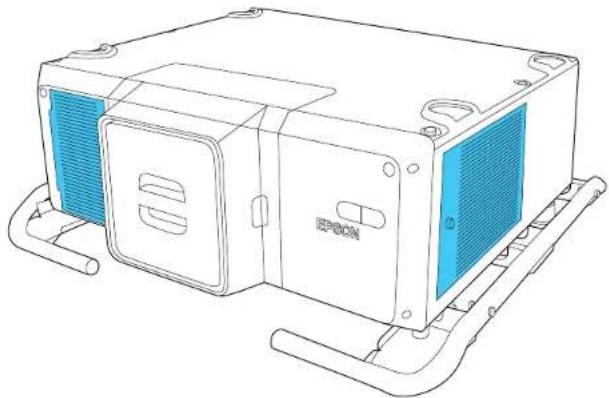
natural_image
Line drawing of an electronic device with a blue heat sink and EPDCON label (no text or symbols on the device itself)- Turnoff the projector, wait for the project to beep, and unplug the power cord.
- Loosenthescrewsecuringtheairfiltercover.

natural_image
Line drawing of a microwave oven with a red circular button indicating a location, no text or symbols present- Opentheairfiltercover.
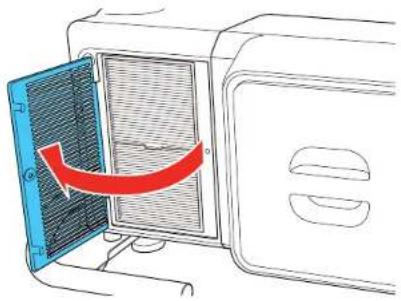
natural_image
Diagram of a microwave oven with a blue door opening and a red arrow indicating airflow direction (no text or symbols)- Pulltheairfilteroutoftheprojector.

natural_image
Illustration of a hand inserting a blue plastic tray into a microwave oven (no text or symbols)- Tapeachsideoftheairfilter4to5timestoshakeoffanyexcessdust.
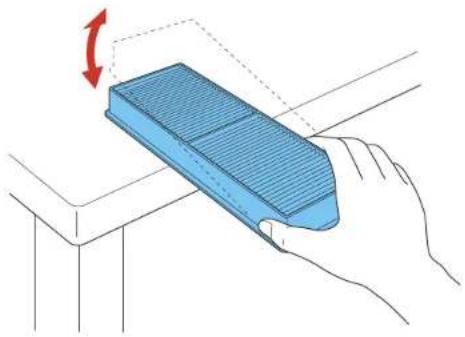
natural_image
Illustration of a hand holding a blue corrugated object with a red rotation arrow indicating rotational motion (no text or symbols)Caution: Donotuse excessive force when tapping the air filter, or it may crack and become unusable. Donotinset the air filter in water, or use any detergent or solvent to clean it. Donotuse can beidair; the gases may leave a residue, or push dust and debris into the projector's optics or others sensitive areas.
- Vacuum the front of the air filter (thesidewith the tabs) to remove any remaining dust.
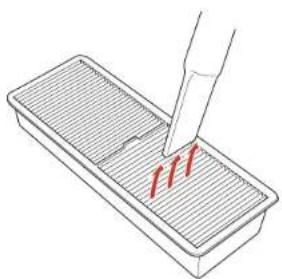
natural_image
Illustration of a pipette dispensing red liquid into a rectangular container (no text or symbols)Note: If dust is difficult to remove the air filter is damaged, replace the air filter.
- Placetheairfilterbackintheprojectorasshownandpushgentlyuntilitclicksintoplace.

natural_image
Illustration of a hand inserting a blue plastic component into a microwave oven (no text or symbols)- Closetheairfiltercover.
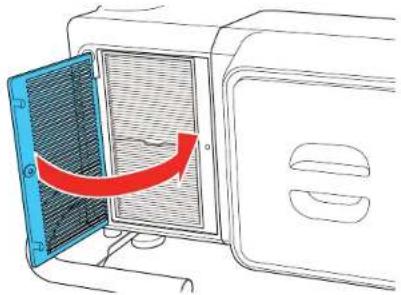
natural_image
Diagram of a microwave oven with a blue door opening and a red arrow indicating airflow or heat transfer (no text or symbols)- Tightenthescrewtosecuretheairfiltercover.
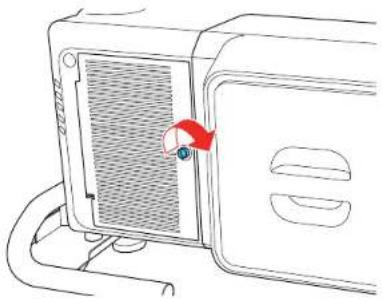
natural_image
Line drawing of a microwave oven with a red tag and blue lens on the door (no text or symbols)10.Repeatthesestepstocleantheotherairfilters.
Note: The air filter cover on the side of the projector is attached to a cord to prevent it from falling.
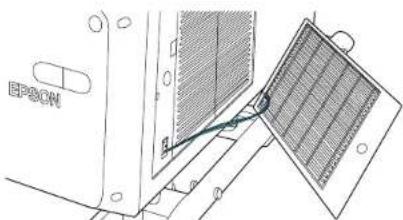
Parenttopic: AirFilterandVentMaintenance
Relatedreferences
ProjectorLightStatus
ProjectorSetupSettings-ExtendedMenu
Relatedtasks
ReplacingtheAirFilters
CleaningtheAirVents
Cleantheprojector'sairventsiftheygetdusty,orifyouseeamessagetellingyoutocleanthem.
- Turnoff the projector, wait for the project to beep, and unplug the power cord.
- Carefullyremovethedustusingavacuumcleanerorabrush.
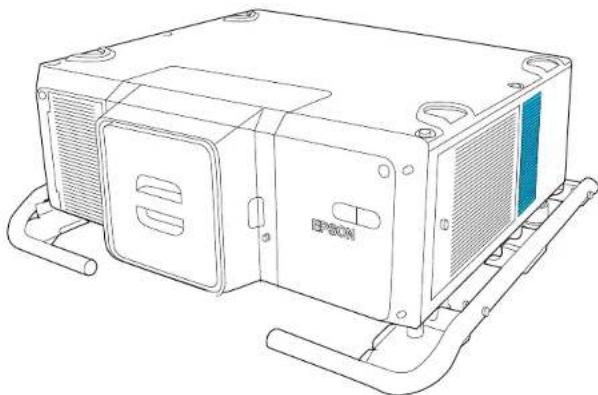
natural_image
Line drawing of a computer chassis with ventilation slots and cooling fins (no text or symbols)Caution: Donotusecannedair. Thegasesmayleaveaflammableresidueorpushdustanddebris into the projector'sopticsorothersensitive areas.
Parenttopic: AirFilterandVentMaintenance
ReplacingtheAirFilters
Youneedtoreplacetheairfiltersinthefollowingsituations:
• Aftercleaninganairfilter, youseeamessagetellingyoutocleanorreplaceit.
•Anairfilteristornordamaged.
Youcanreplaceanairfilterwhiletheprojectorismountedtotheceilingorplacedonatable.
Note: The projector has one air filter on the front and two on the sides. The illustrations here show replacing the air filter on the front, but the steps are the same to replace the filter on the side.
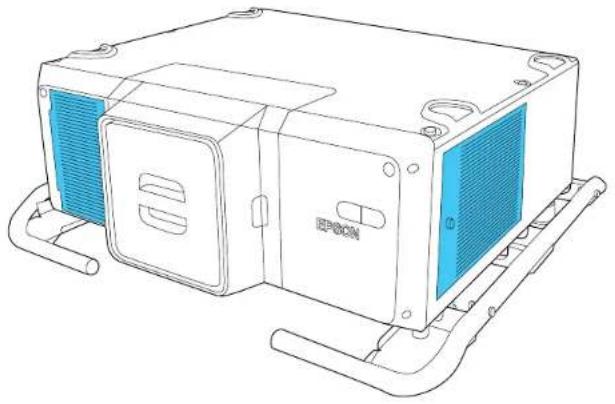
natural_image
Line drawing of an electronic device with blue heat exchanger and EPDCN label (no text or symbols beyond branding)-
Turnoff the projector, wait for the project to beep, and unplug the power cord.
-
Loosenthescrewsecuringtheairfiltercover.
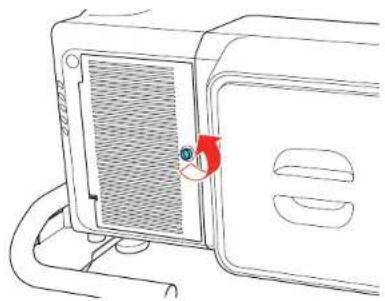
natural_image
Line drawing of a microwave oven with a red arrow indicating the lid (no text or symbols)- Opentheairfiltercover.

natural_image
Diagram of a microwave oven with a blue door opening and a red arrow indicating airflow direction (no text or symbols)- Pulltheairfilteroutoftheprojector.

natural_image
Illustration of a hand inserting a blue plastic component into a microwave oven (no text or symbols)Note: Air filters contain polypropylene. Dispose of used air filters according to local regulations.
- Placethenewairfilterintheprojectorasshownandpushgentlyuntilitclicksintoplace.
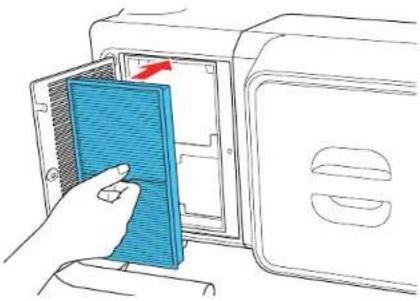
natural_image
Illustration of a hand inserting a blue plastic component into a microwave oven (no text or symbols)6.Closetheairfiltercover.
- Tightenthescrewsecuringtheairfiltercover.
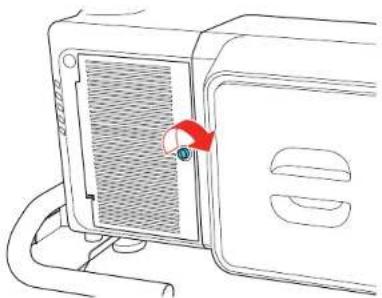
natural_image
Line drawing of a microwave oven with a red arrow pointing to the lid (no text or symbols)8.Repeatthesestepstoreplacetheotherairfilters.
Note: The air filter cover on the side of the projector is attached to a cord to prevent it from falling.
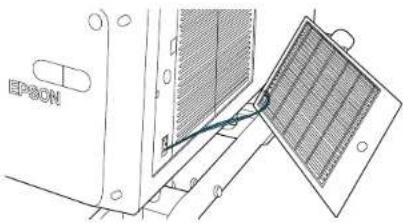
natural_image
Technical line drawing of a panel installation with a grid-patterned panel and labeled component (no readable text or symbols)Parenttopic: AirFilterandVentMaintenance
Relatedreferences
ProjectorSetupSettings-ExtendedMenu
ReplacingtheRemoteControlBatteries
TheremotecontrolusestwoAAmanganeseoralkalinebatteries. Replacethebatteriesassoonasthey runout.
Caution: Use only the type of batteries specified in this manual. Do not install batteries of different types, ormixnewandoldbatteries.
- Removethebatterycoverasshown.
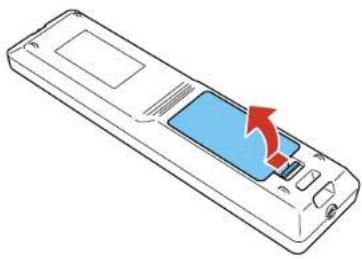
natural_image
Line drawing of a mobile phone with a red arrow pointing to the screen (no text or symbols)- Removetheoldbatteries.
Warning: If the battery fluid has leaked, wipe it away with a soft cloth and avoid getting the fluid on yourhands. If it gets on your hands, wash them immediately to avoid injury.
- Insert the batteries with the + and - ends facing as shown.
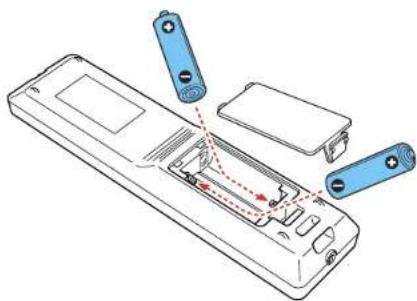
natural_image
Diagram of a remote control panel with battery and indicator lights, showing internal components and wiring (no text or symbols)Warning: Make sure the batteries are inserted in the correct positions. If the batteries are not inserted correctly, they could explode or leak, causing a fire, injury, ordamageto the product.
- Replacethebatterycoverandpressitdownuntilclicksintoplace.
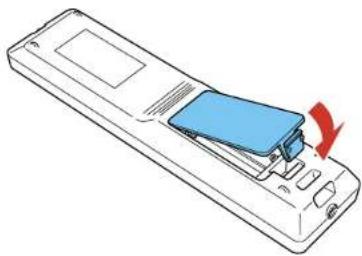
natural_image
Line drawing of a remote control device with a blue cover and red arrow indicating rotation (no text or symbols)Warning: Dispose of used batteries according to local regulations. Do not expose batteries to heat or flame. Keep batteries out of thereachofchildren; they are choking hazards and are very dangerous if swallowed.
Parenttopic: ProjectorMaintenance
TransportingtheProjector
Theprojectorcontainsprecisionparts, someofwhichareglass.Followtheguidelinesheretotransport, ship, orstoretheprojectorsafely.
Caution: Use four or more people to unpack or lift the projector. Hold the carrying handles to lift the projector.
Warning: When moving the projector, do not hold the lens replacement cover. It may come off and the projectormayfall, which could cause an injury.
- Turn the projector off, wait for it to beep, and remove any equipment connected to the projector.
2.Dooneofthefollowing:
- If you are moving the projectorashortdistance, attach the lens cap to the lens unit.
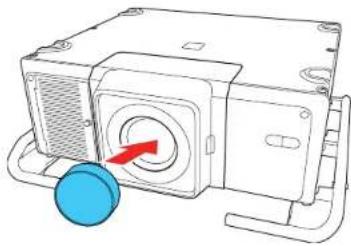
natural_image
Technical line drawing of a mechanical device with a blue circular component and red arrow indicating rotation (no text or symbols)- If you are packing the project to transport it along distance, remove the lens unit and attach the cap forthelenscover.
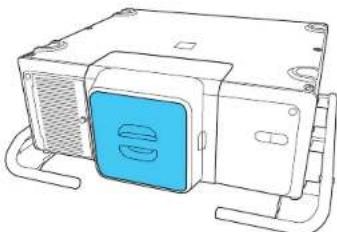
natural_image
Line drawing of a mechanical device with a blue button and ventilation slots (no text or symbols)- Toliftorlowertheprojector, install four commercially available eyeboltscrewstothescrewthread holesineachcorneroftheprojectorortothehandle. Attachstrapsorchainstothescrewsand makesuretheangleofthestrapis60degreesormorewhenliftingorloweringtheprojector.
- If you are attaching the eyebolt to the projector, use four commercially available M8 eyebolts (shank length 0.4 to 0.6 inches [11 to 16 mm]) and attach them to the four screws forey bolts.
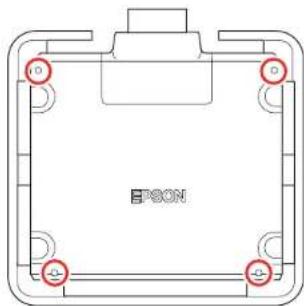
natural_image
Pure technical diagram of a rectangular frame with corner holes and a central label (no text or symbols beyond the label)- If you are attaching the eyebolt to the handle, use four commercially available M10 eyebolts (shanklength 0.4 inches [11 mm] or more) and attach them to the four screws rewholes foreyebolts.
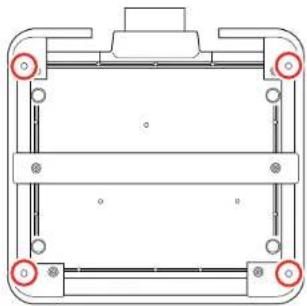
natural_image
Pure technical diagram of a mechanical assembly with no text, numbers, or symbolsCaution: Donotlifttheprojectorwiththefront, back, orsideoftheprojectorfacingup.
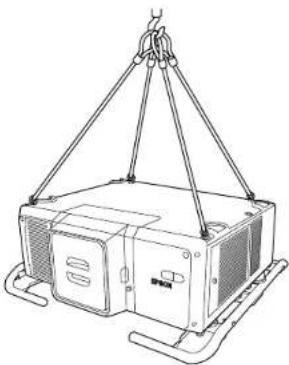
natural_image
Line drawing of a crane lifting a rectangular device (no text or symbols)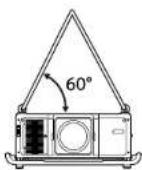
Caution: Donotusetheeyeboltscrewsforpermanentinstallationasthiscancausedamage.
Caution: When using a forklift to lift the projector, do not insert the forks from the front of the projector(thesidewiththelens), asthiscoulddamagethelensunitortheprojector. Inserttheforks fromtherearorsideoftheprojector.
- Enclosetheprojectorsecurelyinpackagingmaterialtoprotectitfromshock, and placeitintoa strongcontainer. Besuretonotifythecarriercompanythatitisprecisionequipmentandthatitneedstobekepthorizontallyduringtransportation.
Note: Epson shall not believe for any damages incurred during transportation.
Parenttopic: Maintaining and Transporting the Projector
Relatedtasks
TurningOfftheProjector
RemovingaLens
SolvingProblems
Checkthesolutionsinthesesectionsifyouhaveanyproblemsusingtheprojector.
ProjectionProblemTips
ProjectorLightStatus
ViewingProjectorStatusInformation
UsingtheProjectorHelpDisplays
SolvingImageProblems
SolvingProjectororRemoteControlOperationProblems
SolvingNetworkProblems
WheretoGetHelp(U.S.andCanada)
ProjectionProblemTips
If the projector is not working properly, try turning it off and unplugging it. Then plug it back in and turn it on.
If this does not solve the problem, check the following:
• Thelightsontheprojectormayindicatewhattheproblemis.
- Theprojector's Helpsystemcandisplayinformationaboutcommonproblems,iftheprojectoris operating.
- Thesolutionsinthismanualcanhelpyousolvemanyproblems.
If noneofthesesolutionshelp, you can contact Epsonfortechnical support.
Parenttopic: Solving Problems
Relatedreferences
ProjectorLightStatus
WheretoGetHelp(U.S.andCanada)
Relatedtasks
UsingtheProjectorHelpDisplays
ViewingProjectorStatusInformation
ProjectorLightStatus
Thelightsontheprojectorindicate the projectorstatusandletyouknowwhenaproblemoccurs. Check the status and color of the lights and look for a solution in the table here.
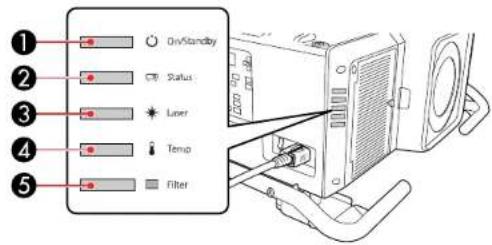
1On/Standbylight
2Statuslight
3Laserlight
4Temp(temperature)light
5Filterlight
| On/Standby(power)light | Status light | Laser light | TemplightFilter light | Statusandsolution |
| BlueOffOffOff | OffProjector | sinstandbymodeor | networkmonitoringandcontrolisin progress. | |
| BlueFlashing | blue | VariesOffOffWarmingup.Waitforanimageto appear. | ||
| BlueBlueVaries | OffOffNormaloperation. | |||
| BlueFlashing | blue | OffOffOffCoolingdown.Allbuttonsare | disabled. | |
| FlashingblueOff | OffOffOff | Preparingnet | workmonitoring. (Wait | forthelighttoremainorangebeforeunpluggingtheprojector.) |
| BlueBlueFlashing | ng | blue | OffOffTheshutterfeatureisenabled. | |
| VariesFlashing | blue | Flashing orange | VariesVariesRefreshmodeisenabled | |
| OffFlashing | blue | Flashing orange | OffOffInternalerror.Turnofftheprojector,unplugthepowercord,andcontactEpsonforhelp. | |
| OffFlashing | blue | OffFlashing | OffAfanorsensorhasaproblem.Turnofftheprojector,unplugthepower cord,andcontactEpsonforhelp. | |
| OffFlashing | blue | OffOrange | OffProjectoristophot. | •Makesurethattheventsandair filterarenotcloggedwithdustor obstructedbynearbyobjects.•Cleanorreplacetheairfilter.•Makesuretheenvironmental temperatureisnottoohot.•Ifoperatingtheprojectorathigh altitude,turnonHighAltitude Mode.•Iftheproblempersists,unplugthe projectorandcontactEpsonfor help. |
| OffFlashing | blue | OrangeOff | OffThelaserhasaproblem.T | Turnofftheprojector,unplugthepowercord,and contactEpsonforhelp. |
| On/Standby(power)light | Status light | Laser light | TemplightFilter | light | Statusandsolution |
| OffFlashing | blue | OffOffOrange | Lowairflowth | roughtheprojector. | •Makesurethattheventsandair filterarenotcloggedwithdustor obstructedbynearbyobjects.•Cleanorreplacetheairfilter.•Iftheproblempersists,unplugthe projectorandcontactEpsonfor help. |
| OffFlashing | blue | Orange | OffLensShifterror.Turnoffthe projector,unplugthepowercord,and contactEpsonforhelp. | ||
| OffFlashing | blue | Orange | OffLenserrorornolens. | installthelensunit.Ifthelensunitisalready installed,removeitandthenreinstall it.Iftheproblempersists,unplugthe projectorandcontactEpsonforhelp. | |
| OffFlashing | blue | Flashing orange | Flashing orange | OffShuttererror.Turnofftheprojector,unplugthepowercord,andcontact Epsonforhelp. | |
| FlashingblueVariesVaries | VariesFlashing | Flashing | orange | VariesHightemperaturewarning.Ifthe temperaturegetstoohigh,projection willautomaticallystop.•Makesurethattheventsandair filterarenotcloggedwithdustor obstructedbynearbyobjects.•Cleanorreplacetheairfilter. | |
| VariesVariesVaries | VariesVariesFlashing | orange | Cleantheairfilter. | ||
| FlashingblueVaries | Flashingorange | VariesVariesThelaserhasa | Thelaserhasa | problem.Turnoffthe projector,unplugthepowercord,and contactEpsonforhelp. |
| On/Standby(power)light | Statuslight | Laserlight | TemplightFilter | Statusandsolution |
| FlashingblueVaries | VariesFlashing | orange | VariesVariesAn | unsupportedlensisattached.Attachonlyasupportedlens. |
| FlashingblueVaries | VariesFlashing | orange | VariesVariesPowerwarning | Thepowervoltagewasnotmeasuredcorrectly,sothe brightnesssofthelightsourcehas beendimmed.ContactEpsonfor help. |
| FlashingblueVaries | VariesFlashing | orange | Flashingorange | VariesShutterwarning.Afterthewarningis displayed,anerroroccursand projectionstops.Turnoffthe projector,unplugthepowercord,and contactEpsonforhelp. |
| FlashingblueVaries | VariesVaries | VariesOrange | Lowairflowthroughtheairfilter. | •Makesurethattheventsandair filterarenotcloggedwithdustor obstructedbynearbyobjects.•Cleanorreplacetheairfilter.•Iftheproblempersists,unplugthe projectorandcontactEpsonfor help. |
| VariesVariesFlashing | orange | VariesVariesTheConstant | Brightnesssetting hasexpired. | |
Note: If the lights display a pattern not listed in the table above, turn the projector off, unplug it, and contactEpsonforhelp.
Parenttopic: Solving Problems
Relatedconcepts
AirFilterandVentMaintenance
WiredNetworkProjection
WirelessNetworkProjection
Relatedreferences
ProjectorSetupSettings-ExtendedMenu
OptionalEquipmentandReplacementParts
ProjectorFeatureSettings-SettingsMenu
WheretoGetHelp(U.S.andCanada)
Relatedtasks
TurningOntheProjector
ShuttingOffthePictureTemporarily
TurningOfftheProjector
Relatedtopics
AttachingandRemovingaLens
CopyingMenuSettingsBetweenProjectors
ViewingProjectorStatusInformation
Youcanmonitortheprojector'sstatusandviewerrorinformationontheLCDscreen.
Note: You can also view the projector's status in the Info menu. Press the i button on the remote control and selectStatusInformation.
- Turnon the projector.
- Pressthelightbuttononthecontrolpanel.
3.Presstheleftorrightarrowbuttontoviewdifferentcategoriesofinformation.
-StatusInformation: theprojector'soperatingstatus
•Source:inputsignalinformation
•SignallInformation:inputdigitalsignalinformation
•NetworkWired:wiredLANsettings
•NetworkWireless:wirelessLANsettings
- Maintenance:operatingtimefortheprojectorandlightsource
- Version:projector'sfirmwareversion
- Setting: lets you adjust the LCD screen contrast and the length of time the screen remains lit when you press the light button
- Presstheupordownarrowbuttontoscrollthroughtheinformationonthescreen.
ToviewtheLCDwhentheprojectorisinstandbymode,settheStandbyModesettingto
CommunicationOn.
ProjectorStatusDisplayMessages
Parenttopic: Solving Problems
Relatedreferences
ProjectorInformationDisplay-InfoMenu
ProjectorStatusDisplayMessages
Categoriesonthestatusdisplayscreensletyouviewinformationabouttheprojectoranditsoperation.
StatusInformationcategory
| InformationDescription | |
| SystemSeetheSystemstatusinformationtableattheendofthistopic | |
| LastWarn/ErrDisplaysthemostrecentwarningsanderrorsdisplayedbytheprojector | |
| SourceDisplaysthesourcecurrentlybeingused | |
| On-ScreenDisplayDisplaysthesettingsforon-screendisplays.Whenturnedoff,menusormessagesarenotdisplayedontheprojectedimages | |
| ShutterDisplaystheshutterstatus | |
| ShutterStartupDisplaystheshutterStartupsettings | |
| ShutterStandbyDisplaystheshutterStandbysettings | |
| IntakeAirTempDisplaystheairintaketemperature | |
| InternalTempLvDisplaystheprojector'sinternaltemperature | perature |
| ACVoltageDisplayswarningsanderrorsthathaveoccurredwhentheACVoltageMonitoringsettingisturnedon | |
| LaserStatusDisplaystheoperatingstatusofthelightsource | |
Sourcecategory
| InformationDescription | |
| SourceDisplaysthesourcecurrentlybeingused | |
| ResolutionDisplaystheresolutionofthecurrentinputsignal | |
| ColorSpaceDisplaysthecolorspaceofthecurrentinputsignal | |
| H-FrequencyDisplaysthehorizontalfrequencyofthecurrentinputsignal | |
| V-FrequencyDisplaystheverticalfrequencyofthecurrentinputsignal | |
| SyncPolarityDisplaysthesyncpolarity | |
| SyncModeDisplaysthesynctype | |
| DetectedModeDisplaysthedetectedmodeofthecurrentinputsignal | |
| TransportDisplaysthescanningmethod | |
| VideoRangeDisplaysthevideorangeoftheprojector |
SignallInformationcategory
| InformationDescription | |
| 5VDetectDisplaysthedetectionresultsof5Vsignals | |
| TMDSClockDisplaystheTMDSfrequencyofthecurrentinputsignal | inputsignal |
| H-FrequencyDisplaysthehorizontalfrequencyofthecurrentinputsignal | currentinputsignal |
| V-FrequencyDisplaystheverticalfrequencyofthecurrentinputsignal | inputsignal |
| DetChg5CFHMP123Displaysthefactorsofsignalchanges | changes |
| StableTimeDisplaystheamountofoperatingtimesincetheinputsourcewasdetermined | theinputsourcewasdetermined |
| HDCPStatusDisplaystheHDCPstatus | |
| HDCPRiDisplaystheHDCPtype | |
| HDCPAKSV | |
| HDCPAn | |
| HDCPVerDisplaystheHDCPversion | |
| AVIVICDisplaystheVICinformation(AVI)ofthecurrent | inputsignal |
| AVIChecksumDisplaysthechecksumresultforAVI | |
| AVISamplingStrDisplaysthecolorsamplingforAVI | |
| SignalModeDisplaysthesignalmode | |
| ColorSpaceDisplaysthecolorspaceconversionmethod | |
| HDRModeDisplaystheHDRmode | |
| EDIDModeDisplaystheEDIDmode | |
| HDBaseTLevelDisplaystheimagesignalfromtheHDBaseTport | |
| SDILinkModeDisplaysthelinkingtypeforSDI | |
| SyncDetectDisplaystheresultsofsignaldetectionforeachSDIport | |
| PayloadIDDetectDisplaystheresultsofSDIpayloadIDdetection | |
| ResolutionDisplaystheresolution | |
| RefreshRate | DisplaystherefreshrateforSDI |
| ColorSampling | Displaysthecolorsampling |
| PixelDepth | DisplaysthecolordepthforSDI |
| SDIType | DisplaysthetypeforSDI |
| DivisionType | DisplaysthesplittransmissionmethodforSDI |
| 3GMappingLevel | Displaysthemappinglevelfor3G-SDI |
NetworkWiredcategory
| InformationDescription | |
| ProjectorNameDisplaysthenameusedtoidentifythe | projectorwhenconnectedtoanetwork |
| ConnectionModeDisplaystheconnectionpathforthe | LAN |
| DHCPDisplaystheDHCPdisplaysettings | |
| IPDisplayDisplaystheIPaddressdisplaydisplaysettings | |
| IPAddressDisplaystheIPaddress | |
| MACAddressDisplaystheMACaddress |
NetworkWirelesscategory
| InformationDescription | |
| ProjectorNameDisplaysthenameusedtoidentifythe | projectorwhenconnectedtoanetwork |
| ConnectionModeDisplaystheconnectionmodetouse | ewhenconnectingtheprojectorandacomputeroverawirelessLAN |
| SSIDDisplayDisplaystheSSIDdisplaysettings | |
| IPDisplayDisplaystheIPaddressdisplaysettings | |
| SSIDDisplaystheSSID | |
| IPAddressDisplaystheIPaddress | |
| DHCPDisplaystheDHCPsettings | |
| MACAddressDisplaystheMACaddress | |
| SecurityDisplaysthesecuritysettings | |
| AntennaLevelDisplaysthereceptionstatusforWi-Fi |
Maintenancecategory
| InformationDescription | |
| OperationTimeDisplaystheprojector'stotaloperationtime | |
| LaserOp.TimeDisplaysthelaseroperatingtimeforeach | LightSourceModesetting |
Versioncategory
| InformationDescription | |
| SerialNo.Displaystheprojector'sserialnumber | |
| MainDisplaytheprojector'sfirmwareversion | information |
| Video2 | |
| Sub | |
| Sub2 | |
| HDBaseT | |
| StatusMonitor |
Systemstatusinformation
| StatusDescription | |
| OKTheprojectorisinnormaloperatingmode | |
| Warm-upTheprojectoriswarmingup | |
| StandbyTheprojectorisinstandbymode | |
| CoolDownTheprojectoriscoolingdown | |
| TempErrorAhightemperatureerroroccurred | |
| FanErrorAfanerroroccurred | |
| SensorErrorAsensorerroroccurred | |
| InternalErrorAninternalerroroccurred | |
| AirflowErrorAfilterairflowererroroccurred | |
| ShutterErrorAshuttererroroccurred | |
| PumpErrorApumperoroccurred | |
| TempWarning | Ahightemperaturewarningoccurred |
| InternalWarningAwarningregardingtheinternalsystemoccurred | |
| ShutterWarningAshutterwarningoccurred | |
| AirflowDeclineAlowairflowererroroccurred | |
| CleanFilterAnairfilternoticeoccurred;cleantheairfilter | |
| LensShiftErrAlensshifterorhasoccurred | |
| LensErrorAlenserrorhasoccurred | |
| PowerErrorAsupplyvoltageerrorhasoccurred | |
| LaserErrorAlasererrorhasoccurred | |
| RetardationErr | |
| LaserWarningAlaserwarninghasoccurred | |
| TempErrorFEAlasererrorhasoccurredbecausethelasertemperatureistoohigh | |
| TempWarningFEAlaserwarninghasoccurredbecausethelasertemperatureistoohigh | |
Parenttopic: ViewingProjectorStatusInformation
UsingtheProjectorHelpDisplays
Youcandisplayinformationtohelpyousolvecommonproblemsusingtheprojector'sHelpsystem.
Note: Before using the Help system, assign Help to one of the User buttons.
- Turnon the projector.
- PresstheUserbuttonassignedtoHelp.
YouseetheHelpmenu. - Usetheupanddownarrowbuttonstohighlghttheproblemyouwanttosolve.
- PressEntertoviewthesolutions.
- When you are finished, do one of the following:
• Toselectanotherproblemtosolve, pressEsc.
• Toexitthehelpsystem, presstheMenubutton.
Parenttopic: Solving Problems
Relatedreferences
ProjectorFeatureSettings-SettingsMenu
SolvingImageProblems
Checkthesolutionsinthesesectionsifyouhaveanyproblemswithprojectedimages.
SolutionsWhenNoImageAppears
SolutionsWhen"NoSignal"MessageAppears
SolutionsWhen"NotSupported"MessageAppears
SolutionsWhenOnlyaPartialImageAppears
SolutionsWhentheImageisNotRectangular
SolutionsWhentheImageContainsNoiseorStatic
SolutionsWhentheImageisFuzzyorBlurry
SolutionsWhentheImageBrightnessorColorsareIncorrect
SolutionsWhenAutomaticAdjustmentsarenotAppliedCorrectly
SolutionsWhenanAfterimageRemainsOntheProjectedImage
Parenttopic: Solving Problems
SolutionsWhenNoImageAppears
Ifnoimageappears, try the following solutions:
- Press the Shutter button on the remote control to see if the image was temporarily turned off.
- Makesureallnecessarycablesaresecurelyconnectedandthepowerisonfortheprojectorand connectedvideosources.
- Makesuretheimagebeingprojectedisnotcompletelyblack(onlywhenprojectingcomputerimages).
- Presstheprojector'spowerbuttontowakeitfromstandbyorsleepmode. Alsoseeifyourconnected computerisinsleepmodeordisplayingablankscreensaver.
- ForimagesprojectedwithWindowsMediaCenter,reducethescreensizefromfullscreenmode.
- ForimagesprojectedfromapplicationsusingWindowsDirectX,turnoffDirectXfunctions.
• If you are projecting from a computer, makes sure it setup to display an external monitor. If the computer's display is set to an extended dormitory mode, trying to external output only.
• The projectormay not be able to project copyrighted video that you playback on a computer. For details, seethemanuals supplied with your computer.
- If you are using other display equipment with the projector, make sure the EDID settings are set correctly on the Signalmenu. You may need to disconnect the other equipment and select EDID settings again.
- If you connected an external monitor to the projector and nothing appear on it, makes sure the projector is not in standby mode. Also makes sure you connected the external monitor to the correct portfory our videos source.
- If the others solutions donotsolvethe problem, reset all of the projector settings using the option on the Reset menu.
Parenttopic: SolvingImageProblems
Relatedconcepts
ProjectorConnections
Relatedreferences
InputSignalSettings-SignalMenu
ProjectorSetupSettings-ExtendedMenu
ProjectorResetOptions-ResetMenu
Relatedtasks
ShuttingOffthePictureTemporarily
ConnectingtoanExternalComputerMonitor
SolutionsWhen"NoSignal"MessageAppears
If the "NoSignal" message appears, try the following solutions:
- PresstheSearchbuttonontheremotecontrolandwaitafewsecondsforanimagetoappear.
- Turnontheclockedcomputerorvideosource,andpressitsplaybuttontobeginyourpresentation, ifnecessary.
- Checktheconnectionfromtheprojectortoyourvideosources.
- If you are projecting from alaptop computer, makes sure it is setup to display on an external monitor.
- If necessary, turn the projector and the connected computer or video source off and then on again.
•Tryadifferentvideocable. - If the others solutions donotsolvethe problem, reset all of the projector settings using the option on the Reset menu.
DisplayingFromaPCLaptop
DisplayingFromaMacLaptop
Parenttopic: SolvingImageProblems
Relatedconcepts
ProjectorConnections
Relatedreferences
ProjectorResetOptions-ResetMenu
Relatedtasks
SelectinganImageSource
DisplayingFromaPCLaptop
If you see the "No Signal" message when you display from a PC laptop, you need to setup the laptop to display on an external monitor.
- Hold down the laptop's Fn key and press the key labeled with a monitor icon or CRT/LCD. (See your laptopmanualfordetails.) Waitafewsecondsforanimagetoappear. Todisplayonboththe laptop'smonitorandtheprojector, trypressingthesamekeysagain.
Note: On Windows 7 or later, hold down the Windows key and press P at the same time, then click Duplicate.
-
If the same image is not displayed by the laptop and projector, check the Windows Display utility to make sure the external monitor portisenabled and extended desktop mode is disabled. (Seeyour computer or Windows manual for instructions.)
-
If necessary, check your video card settings and set the multiple display option to Clone, Mirror, or Duplicate.
Parenttopic: SolutionsWhen"NoSignal"MessageAppears
DisplayingFromaMacLaptop
If you see the "No Signal" message when you display from a Mac laptop, you need to setup the laptop form or reddisplay. (Se your laptop manual for details.)
-
Open the System Preferences utility and select Displays, Display, or Color LCD.
-
ClicktheArrangeorArrangementtab.
-
SelecttheMirrorDisplayscheckbox.
Parenttopic: SolutionsWhen"NoSignal"MessageAppears
SolutionsWhen"NotSupported"MessageAppears
If the "Not Supported" message appears, try the following solutions:
- Makesurethecomputer'sdisplayresolutiondoesnotexceedtheprojector'sresolutionandfrequency limit.Ifnecessary,selectadifferentdisplayresolutionforyourcomputer.(Seeyourcomputermanual fordetails.)
Parenttopic: SolvingImageProblems
Relatedreferences
InputSignalSettings-SignalMenu
SupportedVideoDisplayFormats
ProjectorInformationDisplay-InfoMenu
SolutionsWhenOnlyaPartialImageAppears
Ifonlyapartialcomputerimageappears, trythefollowingsolutions:
- For VGA connections, press the Auto button on the remote control to optimize the image signal.
- MakesureyouselectedthecorrectScreenTypesettingforthescreenyouareusing.
- MakesuretheScalesettingintheSignalmenuisturnedoff.
- MakesuretheResolutionsettingintheSignalmenuissetcorrectlyfortheinputsignal.
- TryadjustingtheimagepositionusingthePositionsettingintheSignalmenu.
- PresstheAspectbuttonontheremotecontroltoselectadifferentimageaspectratio.
- ChecktheBlankingsettingintheSignalmenu.
- Checkyourcomputerdisplaysettingstodisabledualdisplayandsettheresolutionwithinthe projector'slimits.(Seeyourcomputermanualfordetails.)
- Checktheresolutionassignedtoyourpresentationfilestoreeiftheyarecreatedforadifferentresolutionthanyouareprojectingin.(Seeyoursoftwarehelpfordetails.)
Parenttopic: SolvingImageProblems
Relatedconcepts
ProjectorConnections
Relatedreferences
InputSignalSettings-SignalMenu
ProjectorResetOptions-ResetMenu
ProjectorSetupSettings-ExtendedMenu
Relatedtasks
SettingtheScreenType
ScalinganImage
AdjustingtheImagePositionUsingScreenPosition
ChangingtheImageAspectRatio
SolutionsWhenthelmageisNotRectangular
If the projected image is not evenly rectangular, try the following solutions:
- Placetheprojectordirectlyinfrontofthecenterofthescreen, facingitsquarely, if possible.
- AdjusttheimageshapeusingtheGeometryCorrectionmenusettings.
Parenttopic: SolvingImageProblems
Relatedreferences
ProjectorFeatureSettings-SettingsMenu
SolutionsWhentheImageContainsNoiseorStatic
If the projected images seem to contain electronic interference (noise) or static, try the following solutions:
- Checkthecablesconnectingyourcomputerorvideosourcetotheprojector. Theyshouldbe:
- Separated from the power cord to prevent interference
•Securelyconnectedatbothends
- Notconnectedtoanextensioncable
- Ifavailableforyourvideosource,selectAutoastheResolutionsettingintheSignalmenu.
- Selectacomputervideoresolutionandrefreshratethatarecompatiblewiththeprojector.
- If you are projecting from a computer, press the Auto button on the remote control to automatically adjust the tracking and sync. If the problem remains, display a uniformly patterned image on the screen and manually adjust the Tracking and Sync settings.
- TryadjustingtheImageEnhancementsettingsonthelmagemenu.
Parenttopic: SolvingImageProblems
Relatedreferences
SupportedVideoDisplayFormats
ImageQualitySettings-ImageMenu
SolutionsWhenthelmageisFuzzyorBlurry
If the projected image is fuzzy or blurry, try the following solutions:
- Adjusttheimagefocus.Makesuretheprojectorhasbeenonforleast20minutesbeforeadjusting thefocus.
•Cleantheprojectorlens.
Note: To avoid condensation on the lens after bringing the projector in from a cold environment, let the projectorwarmuptoroomtemperaturebeforeusingit.
- Position the projector closeenoughtothescreen.
- AdjusttheSharpnesssettingtoimproveimagequality.
• If you are projecting from a computer, try using a lower resolution or try to match the projector's native resolution.
Parenttopic: SolvingImageProblems
Relatedreferences
ImageQualitySettings-ImageMenu
GeneralProjectorSpecifications
SupportedVideoDisplayFormats
Relatedtasks
FocusingtheImageUsingtheFocusButtons
CleaningtheLens
SolutionsWhenthelmageBrightnessorColorsareIncorrect
If the projected image is stood dark or light, or the colors are incorrect, try the following solutions:
- Checkyourvideosourcesettings.
- Adjust the available settings on the Image menu for the current input source, such as Brightness, Contrast, Tint, Advanced, and Color Saturation.
- Make sure you selected the correct Input Signal, Video Range, HDR 10 Setting, and HLG Setting options on the Signal menu.
- Make sure you selected the correct Gamma or RGBCMY setting in the Image menu.
- Makesureallthecablesaresecurelyconnectedtotheprojectorandyourvideodevice.Ifyou connectedlongcables,tryconnectingshortercables.
- MakesuretheBrightnessSettingsoptionsintheSettingsmenuaresetcorrectly.
- Position the projector close enough to the screen.
- When using multiple projectors, makes sure Light Source Calibration in the Reset menuisset correctly in allof the projectors. If lightsource calibration is performed only in some of the projectors, the white balance and the brightness level of the projected image may differ between the projectors.
Parenttopic: SolvingImageProblems
Relatedreferences
InputSignalSettings-SignalMenu
ImageQualitySettings-ImageMenu
ProjectorFeatureSettings-SettingsMenu
ProjectorResetOptions-ResetMenu
Relatedtasks
ChangingtheColorMode
RunningLightSourceCalibration
SolutionsWhenAutomaticAdjustmentsarenotAppliedCorrectly
If you have problems with automatic adjustments not being applied correctly, try the following solutions:
- Be sure to wait at least 20 minutes after turning on the projector or turning off the Shutter setting before performing automatic adjustments. This gives the projector's temperature anchancetostabilize.
- Check that the protective plate is not installed on the built-incamera and that the camera area is clean.
- Dependingonthelensyouinstalled,automaticadjustmentsmaynotbeavailable.Automatic adjustmentisnotavailableforthefollowinglenses:ELPLR05,ELPLL09,ELPLL10.
• If you are projecting from an analog input source, the changing color and brightness of the image may cause automatic adjustment on not be applied correctly.
- Makesurethatapowerfulspotlightsourceofstrongnaturallightisnotshiningintotheprojection environmentandinterferingwithautomaticadjustments.
- Check that your image correction and image blending settings are within reasonable ranges. If the projection angle is very large, try turning off the Geometry Correction setting or reduce the projection angle. If you are using the Edge Blending setting, make sure the blending width is between 15 to 43% .
- If you see an error message during automatic adjustments, make an error codes and contact Epson for support.
Parenttopic: SolvingImageProblems
Relatedreferences
ProjectorParts-Front/Top
ProjectorParts-Side/Rear
AdditionalProjectorSoftwareandManuals
OptionalEquipmentandReplacementParts
ProjectorFeatureSettings-SettingsMenu
WheretoGetHelp(U.S.andCanada)
Relatedtasks
ShuttingOffthePictureTemporarily
CleaningtheProjectorCase
RunningLightSourceCalibration
BlendingthelmageEdges
Relatedtopics
MatchingTintandBrightness(ScreenMatching)
SolutionsWhenanAfterimageRemainsOntheProjectedImage
If you see an afterimage in the projected image, select Refresh Mode > Start in the Reset menu.
Parenttopic: SolvingImageProblems
Relatedreferences
ProjectorResetOptions-ResetMenu
SolvingProjectororRemoteControlOperationProblems
Checkthesolutionsinthesesectionsifyuhaveproblemsoperatingtheprojectororremotecontrol.
SolutionstoProjectorPowerorShut-OffProblems
SolutionstoRemoteControlProblems
SolutionstoPasswordProblems
Parenttopic: Solving Problems
SolutionstoProjectorPowerorShut-OffProblems
If the project orders not come on when you press the power button or it should you expectedly, try the followingsolutions:
- Makesurethepowercordissecurelyconnectedtotheprojectorandtoaworkingelectricaloutlet.
- Theprojector'sbuttonsmaybelockedforsecurity.Unlockthebuttonsorusetheremotecontrolto turnontheprojector.
- Makesurethepowerswitchisturnedon.
- If the power button on theremote control does not turn on the projector, check its batteries and make sure the Remote Receiversetting is turned on the projector's menu, if available.
- If you have set the remote control to operating only a projector with a matching ID, set the ID switch to Off.
- Thepowercordmaybedefective.Tryanotherpowercord.Ifthatdoesn'twork,disconnectthecord andcontactEpson.
Parenttopic: SolvingProjectororRemoteControlOperationProblems
Relatedreferences
ProjectorSetupSettings-ExtendedMenu
WheretoGetHelp(U.S.andCanada)
Relatedtasks
TurningOntheProjector
TurningOfftheProjector
UnlockingtheProjector'sButtons
ReplacingtheRemoteControlBatteries
SettingtheRemoteControlID
SolutionstoRemoteControlProblems
If the projectordoesnotrespondtoremotecontrolcommands, try the followingsolutions:
- Check that theremote control batteries are installed correctly and have power. If necessary, replace the batteries.
- Makesureyouareoperatingtheremotecontrolwithinthereceptionangleandrangeoftheprojector.
- Makesuretheprojectorisnotwarminguporshuttingdown.
- Checktoseeifabuttonontheremotecontrolisstuckdown,causingittoentersleepmode.Release thebuttontowaketheremotecontrolup.
- If you enabled the remote control button lock, press and hold the I button for about 5 seconds to turn it off.
- Strongfluorescentlighting, directsunlight, orinfrareddevicesignals maybeinterfering with the projector'sremotereceivers. Dimthelightsormovetheprojectorawayfromthesunorinterfering equipment.
- Make sure the optional remote control cable set is not attached to the projector's Remote port. If you leavethecableconnectedtotheport,theremotecontrolcannotcontroltheprojector.
• If available, turnononeoftheremotereceiversintheprojector'smenusystem, orcheckifallthe remotereceiverswereturnedoff. - Make sure the Control Communications or Extron XTP setting in the Extended menu is set to Off if you are using the optional remote control cable set.
- Ifyoulosetheremotecontrol,youcanpurchaseanotherfromanEpsonpartsdistributor.
Parenttopic: SolvingProjectorRemoteControlOperationProblems
Relatedreferences
ProjectorParts-InterfacePorts
RemoteControlOperation
ProjectorFeatureSettings-SettingsMenu
ProjectorSetupSettings-ExtendedMenu
Relatedtasks
ReplacingtheRemoteControlBatteries
LockingtheRemoteControlButtons
UnlockingtheProjector'sButtons
SettingtheRemoteControlID
SolutionstoPasswordProblems
If you cannot enter or remember a password, try the following solutions:
- You may have turned on password protection without first setting a password. Try entering 0000 using theremotecontrol.Ifyoulosetheremotecontrol,youcannotenterapassword.Orderanewonefrom Epson.
• If you have entered an incorrect password to many times and see a message displayed are request code, writed down the code and contact Epson. Donot attempt to enter the password again. Provide therequest code and proof of ownership for assistance in unlocking the projector.
- IfyousetaEpsonWebControlpasswordandforgottheuserIDorpassword,tryenteringthe following:
- UserID:EPSONWEB
- Defaultpassword:admin
- IfyousetaRemotepassword(inEpsonWebControl)andforgottheuserIDorpassword,tryentering thefollowing:
- UserID:EPSONREMOTE
- Defaultpassword:guest
Parenttopic: SolvingProjectororRemoteControlOperationProblems
Relatedconcepts
PasswordSecurityTypes
SolvingNetworkProblems
Checkthesolutionsinthesesectionsifyouhaveproblemsusingtheprojectoronanetwork.
SolutionsWhenWirelessAuthenticationFails
SolutionsWhenYouCannotAccesstheProjectorThroughtheWeb
SolutionsWhentheImageContainsStaticDuringNetworkProjection
SolutionsWhenNetworkAlertE-MailsareNotReceived
Parenttopic: Solving Problems
SolutionsWhenWirelessAuthenticationFails
If you cannot authenticate wireless connection, try the following solutions:
- If the wireless settings are correct, but authentication fails, you may need to update the Date & Time settingsintheExtendedmenu,ifavailable.
- MakesuretheWirelessModesettingissettoWirelessLANOn.
- ChecktheSecuritysettingsandpassphraseintheNetworkConfigurationmenu.
- ChecktheEventIDnumberdisplayedintheInfomenuandcheckthelinkbelowtoidentifythe problem.
- Makesuretheconnecteddeviceisonandoperatingproperly.
- MakesureyouareusingthecorrectEpsonwirelessLANmodule.
Parenttopic: SolvingNetworkProblems
Relatedreferences
ProjectorSetupSettings-ExtendedMenu
ProjectorNetworkandCameraSettings-NetworkMenu
EventIDCodeList
Relatedtasks
SelectingWirelessNetworkSettingsManually
SettingUpWirelessNetworkSecurity
SolutionsWhenYouCannotAccesstheProjectorThroughtheWeb
If you are unable to access the project through haweb browser, makes sure you are using the correct ID and password, which are cases sensitive.
- FortheuserID,enterEPSONWEB.(YoucannotchangetheuserID.)
- Forthepassword, enter the password set in the projector's Network menu. The default password is admin.
- Makesureyouhaveaccesstothenetworktheprojectorison.
- Makesureyouentertheprojector'sIPaddressinthewebbrowseraddressbar.
- If your Web browser is set up to connect via a proxy server, the Epson Web Control screen cannot be displayed. Makesettingsforaconconnectionwithoutusingaproxyserver.
- If you have problems while controlling the projector using Art-Net, any operations you perform using the projector remote control or control panel may cause your software operation to be applied incorrectly. To apply channel controls to the projector, set Channel 13 to Cannot control, then set it back to Can control.
Note: The userIDandpasswordarecasesensitive.
Parenttopic: SolvingNetworkProblems
Relatedconcepts
PasswordSecurityTypes
Relatedreferences
Art-NetChannelDefinitions
Relatedtasks
ControllingaNetworkedProjectorUsingaWebBrowser
SolutionsWhenthelmageContainsStaticDuringNetworkProjection
If the projected image contains static during network projection, try the following solutions:
- Checkforanyobstaclesbetweenheaccesspoint, thecomputer, themobiledevice, and theprojector. If necessary, changetheirpositionstoimprovecommunication. Alsomakesurethattheyarenotto farapart; movethemclosertogetherandtrytoconnectagain.
- If the wireless connection is slow your projected image contains noise, check for interference from other equipment, such as Bluetooth device or microwave. Movethe interfering device farther away or expand your wireless bandwidth.
- If the connections speed declines, reduce the number of connected devices.
- If you are using Epson iProjection, you can try adjusting the iProjection settings. See the Epson iProjectionOperationGuideformoreinformation.
Parenttopic: SolvingNetworkProblems
SolutionsWhenNetworkAlertE-MailsareNotReceived
If you donot receive an e-mail alerting y out o problems with a projector over then network, try the followingsolutions:
- Makesuretheprojectoristurnedonandconnectedtothenetworkcorrectly.(Ifanerrorshutdownthe projector, itcannotsendane-mail.)
- Makesureyourelectricaloutletorpowersourceisfunctioningproperly.
- Makesureyousetuptheprojectore-mailalertsettingscorrectlyontheprojector'sNetwork Notificationsmenuorinthenetworksoftware.
- Set the Standby Mode setting to Communication On so the network software can monitor the projectorinstandbymode.
Parenttopic: SolvingNetworkProblems
Relatedreferences
ProjectorSetupSettings-ExtendedMenu
Relatedtasks
SettingUpProjectorNetworkE-MailAlerts
WheretoGetHelp(U.S.andCanada)
If you need to contact Epson for technical supports services, use the following support options.
InternetSupport
Visit Epson's support website at epson.com/support (U.S.), epson.ca/support (Canada), or latin.epson.com/support (Caribbean) and select your product for solutions to common problems with your projector. Youcandownloadutilitiesanddocumentation,getFAQsandtroubleshootingadvice,or e-mailEpsonwithyourquestions.
SpeaktoaSupportRepresentative
TousetheEpsonPrivateLineSupportservice, call(800)637-7661. This service is available for the duration of your warranty period. You may also speak with a projectorsupport specialist by dialing(562) 276-4394(U.S.) or (905)709-3839(Canada).
Supporthoursare6AMto8PM, PacificTime, MondaythroughFridayand7AMto4PM, PacificTime, Saturday.
Daysandhoursofsupportaresubjecttochangewithoutnotice. Tollerlongdistancechargesmay apply.
Beforeyoucall,havethefollowinginformationready:
•Productname
- Productserialnumber(locatedonthebottomorrearoftheprojector,orinthemenusystem)
•Proofofpurchase(suchasastorereceipt)anddateofpurchase
•Computerorvideoconfiguration
•Descriptionoftheproblem
PurchaseSuppliesandAccessories
Youcanpurchasescreens,otheroptionalaccessories,andreplacementpartsfromanEpsonauthorizedreseller.Tofindthenarestreseller,call800-GO-EPSON(800-463-7766)intheU.S.or800-807-7766inCanada. Or you can purchase online at epsonstore.com (U.S. sales) or epsonstore.ca (Canadian sales).
Topurchaseareplacementremotecontrol, call(562)276-4394(U.S.) or (905)709-3839(fordealerreferralinCanada).
Parenttopic: Solving Problems
TechnicalSpecifications
Thesesectionslistthetechnicalspecificationsofyourprojector.
GeneralProjectorSpecifications
ProjectorLightSourceSpecifications
RemoteControlSpecifications
ProjectorDimensionSpecifications
ProjectorElectricalSpecifications
ProjectorEnvironmentalSpecifications
ProjectorSafetyandApprovalsSpecifications
SupportedVideoDisplayFormats
GeneralProjectorSpecifications
TypeofdisplayPoly-siliconTFTactivematrix
Resolution1920×1200pixels(WUXGA)
LensF=1.9to2.1
Focallength:54.7to73.0mm
ColorreproductionUpto1.07billioncolors
BrightnessNormalPowerConsumptionmode:
Whitelightoutput30000lumens(ISO21118standard)
Colorlightoutput30000lumens
Quiet/ExtendedPowerConsumptionmode:
Whitelightoutput21000lumens(ISO21118standard)
Note: Colorbrightness(colorlightoutput)andwhitebrightness (whitelightoutput)will vary depending on usage conditions. Color light output measured in accordance with IDMS 15.4; whitelight output measured in accordance with ISO 21118.
ContrastratioOver2,500,000:1(dynamicon),3500:1(native)
| Imagesize | 100inches(2.54m)to1000inches(25.4m) |
| (innativeaspectratio) | |
| Projectiondistance | 144.9inches(3.68m)to2009.1inches(51.03m) |
| (innativeaspectratio) | |
| Projectionmethods360°free | |
| Opticalaspectratio | 16:10 |
| (width-to-height) | |
| FocusadjustmentPowered | |
| ZoomadjustmentPowered | |
| Zoomratio | 1:1.35 |
| (Tele-to-Wide) | |
| Noiselevel49dB(NormalPowerConsumptionmode) | |
| 41dB(QuietPowerConsumptionmode) | |
| Keystonecorrectionangle | Vertical: ± 15^ to 65^ ,dependingonthelenstypeHorizontal: ± 5^ to 30^ ,dependingonthelenstype |
| USBTypeBportcompatibilityUSB1.1and2.0compliantforfirmwareupdateorcopyingmenu settings | |
| USBTypeAportcompatibilityOneUSB1.1and2.0compliantportforfirmwareupdateorcopying menusettings,orforoptionalWirelessLANmodule | |
Parenttopic: Technical Specifications
ProjectorLightSourceSpecifications
TypeLaserdiodebank
LightsourceoutputpowerUpto812W
Wavelength450to460nm
Lightsourcelife (approximate)
Normal/QuietLightSourceMode:
Uptoabout20000hours
ExtendedLightSourceMode:
Uptoabout30000hours
Note: Turn off this product when not in use to prolong the life of the projector. Laser life will vary depending upon modeselected, environmental conditions, and usage. Brightness decreases over time.
Parenttopic: Technical Specifications
RemoteControlSpecifications
Receptionrange98.4feet(30m)
Batteries TwoalkalineormanganeseAA
Parenttopic: Technical Specifications
ProjectorDimensionSpecifications
Note: These specifications exclude the projector's feet, projection lens, and carrying handles.
Height11.8inches(299mm)
Width31.2inches(790mm)
Depth28inches(710mm)
Weight(approximate)ProL30000UNL:141.5lb(64.2kg)
ProL30002UNL:140.7lb(63.8kg)
Parenttopic: Technical Specifications
ProjectorElectricalSpecifications
Ratedfrequency50/60Hz
Powersupply100to120VAC±10%:
| 9.2A | |
| 200to240VAC±10%: | |
| 12.0A | |
| Note:110to120VACpowerisforservicepurposes;use220to240VACpowerfornormaloperation. | |
| Powerconsumption(110to120V) | Operating: |
| NormalPowerConsumptionmode:895W | |
| Standby: | |
| 0.5W(CommunicationOff),2.5W(CommunicationOn) | |
| Note:110to120VACpowerisforservicepurposes;use220to240VACpowerfornormaloperation. | |
| Powerconsumption(220to240V) | Operating: |
| NormalPowerConsumptionmode:2325W | |
| Standby: | |
| 0.5W(CommunicationOff),2.5W(CommunicationOn) |
Parenttopic: Technical Specifications
ProjectorEnvironmentalSpecifications
TemperatureOperating:
Upto7500feet(2286m):32to122°F(0to50°C)
From7500to10000feet(2286to3048m):32to113°F(0to45°C)
Storage:14to140°F(-10to60°C)
Note: If the temperature is too high (approximately 113°F [45°C] up to 7500 feet [2286m] or 95°F [35°C] above 7500 feet [2286m]), the brightness of the light source may dim gradually depending on the surroundings and other factors. If the maximum temperature is exceeded, the projectorm may turn off automatically.
Humidity(relative, non-condensing)
Operating:20to80%
Storage:10to90%
OperatingaltitudeUpto4921feet(1500m)
Upto10000feet(3048m)withHighAltitudeModeenabled
Parenttopic: Technical Specifications
Relatedreferences
ProjectorSetupSettings-ExtendedMenu
ProjectorSafetyandApprovalsSpecifications
UnitedStatesFCCPart15BClassA(DoC)
UL60950-12ndedition/UL62368-12ndedition(cTUVusMark)
CanadalCES-003ClassA
CSAC22.2No.60950-1-07/CSAC22.2No.62368-1-14(cTUVus Mark)
Parenttopic: Technical Specifications
SupportedVideoDisplayFormats
Forbestresults, your computer's monitor port or video card resolutions should be set to display in the projector's nativer resolution. However, your projector includes Epson's Size Wise chip that supports other computer display resolutions, so your image will be resized to automatically.
Yourcomputer'smonitorportorvideocardrefreshrate(verticalfrequency)mustbecompatiblewiththe projector.(Seeyourcomputerorvideocardmanualfordetails.)
Thetablehereliststhecompatiblerefreshrateandresolutionforeachcompatiblevideodisplayformat.
| DisplayformatRefreshrate(inHz) | Resolution(inpixels) | |
| Computersignals(analogRGB) | ||
| VGA60/72/75/85640×480 | ||
| SVGA60/72/75/85800×600 | ||
| XGA60/70/75/851024×768 | ||
| WXGA601280×768 | ||
| 60/75/851280×800 | ||
| 601366×768 | ||
| WXGA+60/75/851440×900 | ||
| WXGA++601600×900 | ||
| SXGA70/75/851152×864 | ||
| 60/75/851280×960 | ||
| 60/75/851280×1024 | ||
| SXGA+60/751400×1050 | ||
| WSXGA+ ^1 | 601680×1050 | |
| UXGA601600×1200 | ||
| 1920×108050/601920×1080 | ||
| WUXGA ^2 | 601920×1200 | |
| SDTV(480p)59.94720×480 | ||
| SDTV(576p)50720×576 | ||
| HDTV(720p)50/59.94/601280×720 | ||
| HDTV(1080p) | 50/59.94/601920×1080 | |
| Componentvideo | ||
| SDTV(480i/480p) | 59.94720×480 | |
| SDTV(576i/576p) | 50720×576 | |
| HDTV(720p)50/59.94/601280×720 | ||
| HDTV(1080i) | 50/59.94/601920×1080 | |
| DVI-D,HDMI,andHDBaseTinputsignals | ||
| VGA | 60640×480 | |
| SVGA60800×600 | ||
| XGA | 601024×768 | |
| WXGA601280×800 | ||
| 601366×768 | ||
| WXGA+601440×900 | ||
| WXGA++601600×900 | ||
| WSXGA+601680×1050 | ||
| SXGA601280×960 | ||
| 601280×1024 | ||
| SXGA+601400×1050 | ||
| UXGA601600×1200 | ||
| 1920×108050/601920×1080 | ||
| WUXGA ^2 | 601920×1200 | |
| QXGA ^3 | 602048×1536 | |
| WQHD ^3 | 602560×1440 | |
| WQXGA ^2,3 | 602560×1600 | |
| SDTV(480i/480p)59.94720×480 | ||
| SDTV(576i/576p)50720×576 | ||
| HDTV(720p)50/59.94/601280×720 | ||
| HDTV(1080i) | 50/59.94/601920×1080 | |
| HDTV(1080p) ^3 | 23.98/24/29.97/30/50/59.94/60 | 1920×1080 |
| 4K×2K ^2,3 | 23.98/24/25/29.97/30 | 3840×2160 |
| 4K×2K ^3 | 50/59.94/603840×2160 | |
| 4K×2K (SMPTE) ^2,3 | 23.98/24 | 4096×2160 |
| 4K×2K(SMPTE) ^3 | 50/59.94/604096×2160 | |
| SDlinputsignals(all10bit) | ||
| SDTV(480i) | 59.94(SD-SDImode ^4 ) | 720×480 |
| SDTV(576i) | 50(SD-SDImode ^4 ) | 720×576 |
| HDTV(720p)50/59.94/60(HD-SDImode ^4 )1280×720 | ||
| HDTV(1080i)50/59.94/60(HD-SDImode ^4 )1920×1080 | ||
| HDTV(1080p)23.98/24/25/29.97/30(HD-SDImode ^4 ) | 1920×1080 | |
| HDTV(1080p) ^6 | 50/59.94/60(3G-SDImode;LevelA ^4 ) | 1920×1080 |
| HDTV(1080p) ^6 | 23.98/24/25/29.97/30(3G-SDImode;LevelA ^5 ) | 1920×1080 |
| HDTV(1080i)50/59.94/60(3G-SDImode;LevelA ^5 ) | 1920×1080 | |
^1 CompatibleonlywhenWideisselectedastheResolutionsetting
^2 CompatibleonlywithVESACVT-RB(ReducedBlanking)inputsignal
^3 HDMIorHDBaseTinputonly
^4 CompatiblewithYPbPr4:2:2inputsignals
^5 CompatiblewithRGB4:4:4inputsignals
^6 SupportsHDR(HDR10andHLG)
Parenttopic: Technical Specifications
Relatedreferences
InputSignalSettings-SignalMenu
Notices
Checkthesesectionsforimportantnoticesaboutyourprojector. Recycling(U.S.andCanada) ImportantSafetyInformation ImportantSafetyInstructions ListofSafetySymbols(correspondingtoIEC60950-1A2) ManufacturerandImporterAddress FCCComplianceStatement BindingArbitrationandClassWaiver Trademarks CopyrightNotice
Recycling(U.S.andCanada)
Epson offers a recycling program for end of life products. Please go to this site for information on how to return your products for proper disposal.
Parenttopic:Notices
ImportantSafetyInformation
Caution: Never look into the projector lens when the laser is turned on; the bright light can damage your eyes. Neverletchildrenlookintothelenswhenitison. Neveropenanycoverontheprojector, except thefiltercovers. Dangerousselectricalvoltagesinsidetheprojectorcanseverelyinjureyou. Exceptas specifically explained in this User's Guide, do not attempt to service this product yourself. Refer all servicingtoqualifiedservicepersonnel.
Warning: The projector and its accessories come packaged in plastic bags. Keep plastic bags away from small childrento avoid any risk of suffocation.
Parenttopic:Notices
ImportantSafetyInstructions
Followthesesafetyinstructionstoavoiddamagetotheproductandseriousorfatalbodilyinjury:
Setupandoperation
•Ifanerroroccursintheprojector,turnoffthepowerandunplugtheprojectorimmediately.Continuing tousetheprojectorcouldresultinanelectricshock,fire,orvisualimpairment.ContactEpsonsupport.
- Useofcontrolsoradjustmentsorperformanceofproceduresotherthanthosespecifiedhereinmay resultinhazardousradiationexposure.
- The projector and its accessories come packaged in plastic bags. Keep plastic bags away from small children to avoid any risk of suffocation.
- Donotlookintothelenswhentheprojectorison.Thebrightlightcandamageyoureyes.Avoid standinginfrontoftheprojectorsothebrightlightdoesnotshineintoyoureyes.
- Possiblyhazardousopticalradiationemittedfromthisproduct.Donotdirectorreflectthelaserlight towardpeopleorreflectiveobjects.Donotlookatheoperatinglightsourceoreposeyourskintoit. Eyeand/orskininjurymayresultiftheseinstructionsarenotfollowed.
- Donotlookintothelensusingopticaldevices,suchasamagnifyingglassortelescope. Thiscould causevisualimpairment.
- Donotapplyopticaldevices, such as amagnifying glassor reflector, to the projected image. Using the projector in this way may result in physical harm, fire, or an accident.
- Whenturningontheprojectoratadistanceusingtheremotecontrol,makesurenooneislookingintothelens.
- Donotplacetheprojectorwherethecordcanbewalkedon. Thismayresultinfrayingordamageto theplug.
- Donotoperatetheprojectorinaclosed-incabinetunlessproperventilationisprovided.
- Donotblocktheslotsandopeningsintheprojectorcase. Theyprovideventilationandpreventthe projectorfromoverheating.Donotoperatetheprojectoronasofa,rug,orthersoftsurface,orsetit ontopofloosepapers.Donotcovertheprojectorwithabblanket,curtain,ortablecloth.Ifyouare settinguptheprojectornearawall,leaveatleast7.9inches(20cm)ofspacebetweenthewalland theprojector.
- Donotallowsmallchildrentooperatetheprojector.Childrenmustbeaccompaniedbyanadult.
- Beforeusingtheprojector, makesurethereisnothingintheareathatcouldreflecttheprojected image.
- Wheninstallingtheprojectorinanenvironmentinwhichahigh-poweredlaserbeamisbeingused, makesureitisinstalledsothatthelaserbeamdoesnothitthesurfaceoftheprojector'sprojection lensorthebuilt-incamera. Ifthelaserbeamsthroughthesurfaceoftheprojectionlensorthebuilt-in camera, blockthelaserbeamwithnon-permeableorincombustiblealuminumfoilormetalplatessuch
asirontoprotecttheprojectionlensandthebuilt-incamera. Youcanalsousetheprojector'sShutter functiontopreventtheLCDpanelfrombeingdamagedbylaserlight.
- If the projector is mounted on aceiling or wall, it should be installed by qualified technicians using mounting hardware designed for use with this projector.
- Wheninstallingoradjustingaceilingorwallmount,donotuseadhesivestopreventthescrewsfrom looseninganddonotuseoilssorlubricants.Thismaycausetheprojectorcasetocrackandthe projectortofallfromitsceilingmount.Thiscouldcauseseriousinjurytoanyoneunderthemountand coulddamagetheprojector.
- Donotusetheprojectornearwater, sourcesofheat, high-voltageelectricalwires, orsourcesof magneticfields.
- Use the type of powersource indicated on the projector. Use of different powers our current fire electric shock. If you are not sure of the power available, consult your dealer or power company.
- Placetheprojectornearawalloutletwheretheplugcanbeeasilyunplugged.
•Takethefollowingprecautionswhenhandlingtheplug:Donotholdtheplugwithwethands.Donot inserttheplugintoadustyoutlet.Inserttheplugfirmlyintotheoutlet.Donotpullthepowercordwhen disconnectingtheplug;alwaysbesuretoholdtheplugwhendisconnectingit.Donotoverloadwall outlets,extensioncords,orpowerstrips.Failuretocomplywiththeseprecautionscouldresultinfireor electricshock. - Neverallowobjectsofanykindtoenteranyopeningsintheprojector.Donotleaveobjects,especially flammableobjects,neartheprojector.Neverspilliquidofanykindintotheprojector.
- Neveropenany covers on the projectore except a specifically explained in this manual. Never attempt to disassemble or modify the projector. Refer all repair to qualified service personnel.
- Unplugtheprojectorfromthewalloutletandreferservicingtoqualifiedservicepersonnelunderthe followingconditions:ifitdoesnotoperatenormallywhenyoufollowtheoperatinginstructions,or exhibitsadistinctchangeinperformance;ifsmoke,strangeodors,orstrangenoisescomefromthe projector;ifthepowercordorplugisdamagedorfrayed;ifliquidorforeignobjectsgetinsidethe projector,orifithasbeenexposedtorainorwater;ifithasbeendroppedorthehousinghasbeen damaged.
- Placetheprojectornearawalloutletwheretheplugcanbeeasilyunplugged.
- Donotinstalltheprojectorinanairtightlocation.
- Donottouchtheplugduringanelectricalstorm. Otherwise, you may receive an electric shock.
- Donotusetheprojectorwhereitmaybeexposedtorain,water,orexcessivehumidity.
- Donotusetheprojectorwhereflammableorexplosivegasesmaybepresent.
- Donotuseorstoretheprojectororremotecontrolinahotlocation,suchasnearaheater,indirect sunlight,orinaclosedvehicle.
- Donotplacethesourceofanopenflame, suchasalitcandle, onorneartheprojector.
- Donotblockthelensduringprojectionusingabookoranyotherobject. Thiscoulddamagethe projectororcauseafire.
- Donotmodifythepowercord. Donotplaceheavyobjectsontopofthepowercordorbend, twist, or pullitexcessively. Keepthepowercordawayfromhotelectricalappliances.
•Alwaysattachthelenscovertothelenswhennotusingtheprojectortopreventthelensfrom becomingdirtyordamaged.
- If you use the projector in a country other than where you purchase it, use the correct power cord for that country.
- Donotstandontheprojectorplaceheavyobjectsonit.
- Donotusetheprojectoroutsideoftherequiredtemperaturerangebelow: 32to122°F(0to50°C)atanaltitudeof7500feet(2286m)orless,and32to113°F(0to45°C)atanaltitudeof7500to10000feet(2287to3048m)
Doingsomaycauseanunstabledisplayandcouldleadtoprojectordamage.Donotuseorstorethe projectorwhereitmaybeexposedtosuddenchangesintemperature.
- Donotplaceanythingthatcanbecomewarpedordamagedbyheatneartheexhaustvents.Donot bringyourhandsorfaceclosetotheventswhileprojectionisinprogress.Donotbringyourfaceclose totheprojectorwhileitisinuse.
- Donotplacetheprojectoronanunstablecart,stand,ortable.
Maintenance, storage, and transportation
- Unplugtheprojectorfromthewalloutletandallowtocoolbeforecleaning. Useadrycloth(or, for stubborndirtorstains, amoistcloththathasbeenwrungdry)forcleaning. Donotuseliquidoraerosol cleaners, anysprayscontainingflammablegas, orsolventssuchasalcohol, paintthinner, orbenzine.
- Donotopentheprojector'scase. The projector contains a high-powered laser.
- Donotattempttodisassembleormodifytheprojector. Theprojectorcontainsahigh-powerlaser component.Seriousinjurycouldresult.
- Youmayneedtocleantheairfilterandvent.Acloggedairfilterorventcanblockventilationneeded tocooltheprojector.Donotusecannedair,orthegasesmayleavearesidue.
- Whenusingtheprojectorinsmokyenvironments, makesureyoureplacetheairfilterafter approximately 240 hour so fuse. (Thisisaguidelinewhenusingtheprojectorinanenvironmentwith
anatmospheric concentration of nondinaoilof approximately 0.00000013%. The airfilter replacement timemaybeshorter depending on the operating environment.)
- Donotstoretheprojectoroutdoorsforanextendedlengthoftime.
- Donotuseorstoretheprojectorwhereitmaybeexposedtosmoke,steam,corrosivegases, excessivedust,vibration,orshock.
-
Unplugtheprojectorwhenitwillnotbeusedforextendedperiods.
-
Do not store the projector outside of the required temperature range of 14 to 140^ (-10 to 60^) or indirectsunlightforlongperiodsoftime.Doingsomaycausedamagetothecase.
• Before you mov the projector, makes sure its power is turned off, the plug is disconnected from the outlet, and all cables are disconnected. - When disposing of the projector, donot disassemble it. Dispose of the projector in accordance with your local or national laws and regulations.
LaserSafetyInformation
LaserSafetyLabels
HazardDistance(HD)
TypicalSetupConfigurations(U.S.Only)
Parenttopic:Notices
LaserSafetyInformation
ThisprojectorisaClass1/RG3laserproductthatcomplieswiththeIEC60825-1internationalstandard forlasers. Thisprojectorcontainsahigh-poweredlasercomponentandthefollowingprecautionsshould betakenwhenoperatingtheprojectortoavoidinjuryordamage:
- DonotentertheexclusionzonethatisdeterminedbythelightbeamHazardDistance(HD).Seethe linkbelowforhazarddistanceinformation.
- Neveropenany covers on the projectorexceptassspecificallyexplained in this manual. Never attempt to disassemble or modify the projector.
- Allinstallationsandrepairsofthisprojectormustbedonebyalicensedservicepersonnel.
- Theprojectorgenerateshighamountsofheat.Donotplaceflammableorcombustibleobjectsaround theprojector,especiallyinfrontofthelens.
Note: See the link below for additional safety laser cautions and other general safety instructions.
Parenttopic: Important Safety Instructions
Relatedreferences
LaserSafetyLabels
HazardDistance(HD)
TypicalSetupConfigurations(U.S.Only)
LaserSafetyLabels
Labels are attached to the project to indicate the level of risk when operating or servicing the projector.
Thisproductisinconformitywithperformancestandardsforlaserproductsunder21CFR1040,except withrespecttothosecharacteristicsauthorizedbyVarianceNumber2020-V-0351effectiveonMarch4, 2020.
Certificationlabels(locatedonsideofprojector)
Not for household use.
This product is in conformity with performance standards for laser products under 21 CFR 1040, except with respect to those characteristics authorized by Variance Number 2020-V-0351 effective on March 4,2020.
Notforhouseholduse.
Thisproductisinconformitywith
performancestandardsforlaserproducts
under21CFR1040, exceptwithrespectto
thosecharacteristicsauthorizedby
VarianceNumber2020-V-0351
effectiveonMarch4,2020.
WARNING:
Donotlookintothebeam.
Nodirecteyeexposuretothebeamispermitted.
RG3IEC/EN62471-5:2015,
CLASS1LASERPRODUCTIEC/EN60825-1:2014
HazardDistance:Refertothemanual.
Parenttopic: Important Safety Instructions
HazardDistance(HD)
HazardDistance(HD)isthedistancemeasuredfromtheprojectionlensatwhichtheintensityofthe energypersurfaceunitbecomeslowerthantheapplicableexposurelimitonthecorneaorontheskin. Topreventriskofeyeorskinexposure,nopersonshouldentertheareawithintheHDoftheprojector duringoperation.
TheHDdependsonthenumberoflumensproducedbytheprojector,thesizeofthepanel(s)used,and thetypeoflensinstalled.HDvaluesareprovidedinthetablebelow.
line
| Throw Ratio | ELPLR05 | ELPLU05 | ELPLW07 | ELPLM12 | ELPLM13 | ELPLM14 | ELPLL09 | ELPLL10 | | ----------- | ------- | ------- | ------- | ------- | ------- | ------- | ------- | ------- | | 0 | 0.5 | 0.5 | 0.5 | 0.5 | 0.5 | 0.5 | 0.5 | 0.5 | | 2 | 1.5 | 1.5 | 1.5 | 1.5 | 1.5 | 1.5 | 1.5 | 1.5 | | 4 | 2.5 | 2.5 | 2.5 | 2.5 | 2.5 | 2.5 | 2.5 | 2.5 | | 6 | 3.5 | 3.5 | 3.5 | 3.5 | 3.5 | 3.5 | 3.5 | 3.5 | | 8 | 4.5 | 4.5 | 4.5 | 4.5 | 4.5 | 4.5 | 4.5 | 4.5 | | 10 | 5.5 | 5.5 | 5.5 | 5.5 | 5.5 | 5.5 | 5.5 | 5.5 | | 12 | 6.0 | 6.0 | 6.0 | 6.0 | 6.0 | 6.0 | 6.0 | 6.0 |Toprotectuntrainedendusers(suchascinemavisitorsinspectators),theinstallationshallcomplywith thefollowinginstallationrequirements:Operatorsshallcontrolaccesstothebeamwithinthehazard distanceorinstalltheproductattheheightthatwillpreventspectatorsfrombeinginthehazarddistance. Radiationlevelsinexcessofthelimitswillnotbepermittedatanypointlessthan2.0meters(SH)above anysurfaceuponwhichpersonsotherthanoperators,performers,oremployeesarepermittedtostand orlessthan1.0meter(SH)lateralseparationfromanyplacewheresuchpersonsarepermittedtobe.In environmentswhereunrestrainedbehaviorisreasonablyforeseeable,themminimumseparationheight shouldbegreaterthanorequalto3.0meterstopreventpotentialexposure,forexamplebyanindividual sittingonanotherindividual'sshoulders,withintheHD.
These values are minimum values and are based on the guidance provided in IEC 62471-5:2015 section 6.6.5.
The installermustunderstandtheriskandapplyprotectivemeasuresbaseduponthehazarddistance asindicatedonthelabelandintheuserinformation.Installationmethod,separationheight,barriers,detectionsystemsorotherapplicablecontrolmeasuresshallpreventspectatoraccesstotheprojected lightwithinthehazarddistance.
Forexample,projectorsthathaveaHDgreaterthan1meterandemitlightintoanuncontrolledarea wherepersonsmaybepresentshouldbepositionedinaccordancewith"thefixedprojectorinstallation" parameters,resultinginaHDthatdoesnotextendintotheaudienceareaunlessthebeamisatleast2.0 metersabovethefloorlevel.Inenvironmentswhereunrestrainedbehaviorisreasonablyforeseeable, theminimumseparationheightshouldbegreaterthanorequalto3.0meterstopreventpotential exposure,forexamplebyanindividualsittingonanotherindividual'sshoulders,withintheHD.
Sufficientlylargeseparationheightmaybeachievedbymountingtheimageprojectorontheceilingor throughtheuseofphysicalbarriers.
U.S.A. Market Only:
ThisprojectorisaClass1/RG3laserproductthatcomplieswithFDATitle21CFR1040. Thisprojector canonlybeinstalledbyqualifiedservicepersonnelwithanapprovedlaserlightshowvariance. Only traineduserswithavalidlaserlightshowvarianceareallowedaccesstotheareawheretheprojectoris installed. Theareashouldbesecuredandaccesstoitcontrolledbytheownerofthelocation.Installers musthaveavalidvarianceforproductionofClassIIIbandIVlaserlightshowsand/orforincorporationof theRG3LIPsintotheirshows.Dealers,distributors,andend-usersarealsorequiredtoobtainavalid laserlightshowvariance.
If you are renting out this projector, it should only be delivered to partiest that demonstrates that they have a valid variance in effect at the time of delivery that permits them to produce laser light shows incorporating this projector.
Foralaser-illuminatedprojector(LIP)installedintheU.S.A.market, the following limits apply. For installationsotherthanincinematheaters, an LIP shall be installed data height vertically abovethefloor such that the bottom plane of the hazard zones shall be lower than 3 meters above the floor. Horizontal clear ancto the hazard zones shall be 2.5 meters. Any human access horizontally to the hazard zone, if applicable, shall be restricted by barriers. If human access is possible in an unsupervised environment, the horizontal or vertical clearances shall be increased to prevent exposure to the RG3 hazard zone.
InstalloneormorereadilyaccessiblecontrolstoimmediatelyterminateLIPprojectionlight. Thepower inputattheprojectorsideisconsideredasareliabledisconnectdevice.Whenrequiredtoswitchoffthe projector,disconnectthepowercordattheprojectorside.Incasethepowerinputattheprojectorsideis notaccessible(suchasinatrussmount),thesocketoutletsupplyingtheprojectorshallbeinstalled nearbytheprojectorandbeeasilyaccessible,orareadilyaccessiblegeneraldisconnectdevicheshallbe incorporatedinthefixedwiring.Additionally,theprojectionlightcanbeturnedoffbypassingthe Shutterbuttonontheprojectorscontrolpanelorremotecontrol.
Parenttopic: Important Safety Instructions
TypicalSetupConfigurations(U.S.Only)
Show-ElevationView
- Projectormountedfromtheceiling.
- 9.8ft(3m)minimumverticalclearancefromaccessiblefloortobottomplaneofHazardZone.
•Hazardzoneeffectivelyisolatedfromhumanaccesswithphysicalbarriersandwarningsignage.
Note: Typicallayoutconcept; not necessarily to scale.
Show-ElevationView-TypicalTemporaryCinemaApplication
•Projectorpositionedatrearofvenue.
- Frontprojectionoveraudienceontoprojectionsurface.
- 8.2ft(2.5m)minimumlateraldistancefromaccessibleareatoHazardZone.
-9.8ft(3m)minimumverticalclearancefromanyaccessiblefloortobottomplaneofHazardZone.
- ControlledArea**preventshumanaccesswithphysicalbarriersandwarningsignageexcept authorizedpersonnel.
• Audienceallowedonlyoutsidethecontrolledarea.
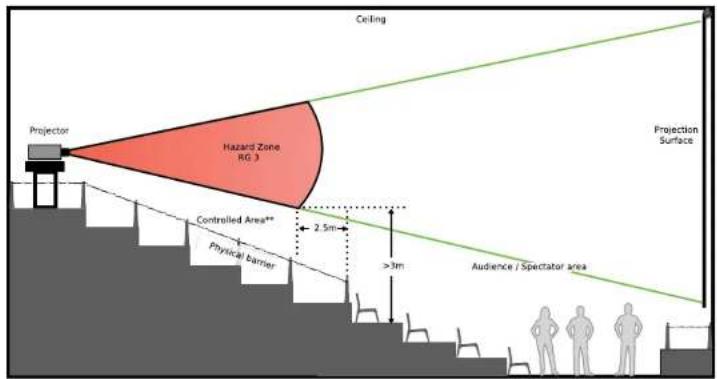
Note: Typicallayoutconcept; not necessarily to scale.
Show-PlanView-TypicalTemporaryCinemaApplication
•Projectorpositionedatrearofvenue.
- Frontprojectionoveraudienceontoprojectionsurface.
- 8.2ft(2.5m)minimumlateraldistancefromaccessibleareatoHazardZone.
- ControlledArea**preventshumanaccesswithphysicalbarriersandwarningsignageexcept authorizedpersonnel.
• Audienceallowedonlyoutsidethecontrolledarea.
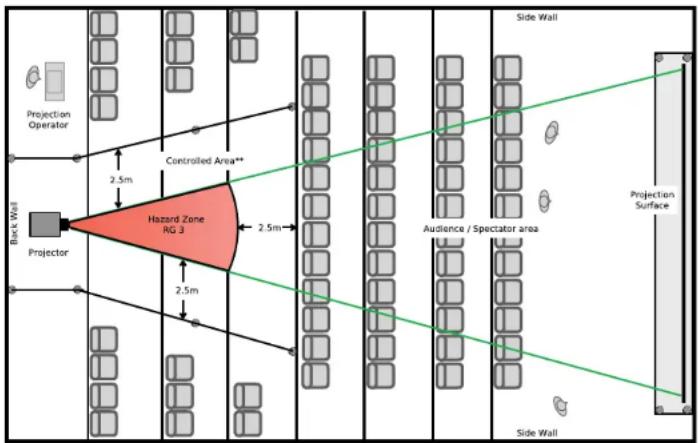
Note: Typicallayoutconcept; not necessarily to scale.
Parenttopic: Important Safety Instructions
ListofSafetySymbols(correspondingtoIEC60950-1A2)
The following table lists the meaning of the safety symbols labeled on the equipment.
| No.Symbol | ApprovedStandards | Description | |
| 1IEC60417 | No.5007 | "ON"(power)Toindicateconnectiontothemains. | |
| 2IEC60417 |  | No.5008 | "OFF"(power)Toindicatedisconnectionfromthe mains. |
| 3IEC60417 |  | No.5009 | Stand-byToidentifytheswitchorswitchposition bymeansofwhichpartoftheequipment isswitchedoninordertobringitintothe stand-bycondition. |
| 4ISO7000 |  | No.0434BIEC3864-B3.1 | CautionToidentifygeneralcautionwhenusing theproduct. |
| 5IEC60417 |  | No.5041 | Caution,hotsurfaceToindicatethathemarkeditemcanbe hotandshouldnotbetouchedwithout takingcare. |
| 6IEC60417 |  | No.6042ISO3864-B3.6 | Caution,riskofelectricshockToidentifyequipmentthathasriskof electricshock. |
| 7IEC60417 |  | No.5957 | ForindooruseonlyToidentifyelectricalequipmentdesigned primarilyforindooruse. |
| 8IEC60417 |  | No.5926 | PolarityofDCpowerconnectorToidentifythepositiveandnegative connections(thepolarity)onapieceof equipmenttowhichaDCpowersupply maybeconnected. |
| 9—Sameas | sNo 8 | ||
| 10IEC604 | 7 | No.5001B | Battery,generalOnbatterypoweredequipment.To identifyadeviceforinstanceacoverfor thebatterycompartment,orthe connectorterminals. |
| 11IEC604 | 7 | No.5002 | PositioningofcellToidentifythebatteryholderitselfandto identifythepositioningofthecell(s) insidethebatteryholder. |
| 12—Sameas | asNo 11 | ||
| 13IEC604 | 7 | No.5019 | ProtectiveearthToidentifyanyterminalwhichisintended forconnectiontoanexternalconductor forprotectionagainstelectricshockin caseofafault,ortheterminalofa protectiveearthelectrode. |
| 14IEC604 | 7 | No.5017 | EarthToidentifyanearth(ground)terminalin caseswhereneitherthesymbolNo.13is explicitlyrequired. |
| 15IEC604 | 7 | No.5032 | AlternatingcurrentToindicateontheratingplatethatthe equipmentissuitableforalternating currently;toidentifyrelevant terminals. |
| 16IEC604 | 7 | No.5031 | DirectcurrentToindicateontheratingplatethathequipmentissuitablefordirectcurrentonly;toidentifyrelevantterminals. |
| 17IEC604 | 7 | No.5172 | ClassIequipmentToidentifyequipmentmeetingthesafetyrequirementsspecifiedforClassIequipmentaccordingtoIEC61140. |
| 18ISO3864 | Generalprohibition | Toidentifyactionsoroperationsthatareprohibited. | |
| 19ISO3864 | Contactprohibition | Toindicateinjurythatcouldoccurduetotouchingaspecificpartoftheequipment. | |
| 20—Never | lookintotheopticallensw whilethe whilethe | projectorison. | |
| 21—Toind | catethathemarkeditem don't don't | placeanythingonprojector. | |
| 22ISO3864 |  | IEC60825-1 | Caution,laserradiationToindicatetheequipmenthasalaserradiationpart. |
| 23ISO3864 | Disassemblyprohibition | Toindicateariskofinjury,suchaselectricshock,iftheequipmentisdisassembled. | |
| 24IEC604 | 7 | No.5266 | Standby, partial standbyToindicate that part of the equipment is in thereadystatus. |
| 25ISO3864 |  | IEC60417No.5057 | Caution, movable partsToindicate that you must keep away from movable parts according to protection standards. |
| 26IEC604 | 7-6056Caution (Moving  | Fan Blades) | Toindicate that you must keep away from moving fan blades. |
| 27IEC604 | 7-6043Caution (Sharp  | Corners) | Toindicate that you must not touch sharp corners. |
| 28-Toind | catethat looking into the  | ens | while projecting is prohibited. |
| 29ISO7010 |  | No.W027ISO3864 | Warning, light emission (UV, visible light, IR, etc.)When you are closetothelight emissions, be careful not to injure your eyesorskin. |
| 30IEC604 |  . . | No.5109 | Usage prohibition in residential areasToindicate that this is an electrical device or a device that is not suitable for use in residential areas. |
Parenttopic:Notices
ManufacturerandImporterAddress
Manufacturer
Name:SeikoEpsonCorporation
Address:3-5,Owa3-chome,Suwa-shi,Nagano-ken392-8502Japan
Telephone:81-266-52-3131
Importer
Name: EpsonAmerica, Inc.
Address:3131KatellaAvenue, Los Alamitos 90720 U.S.A.
Telephone:(562)981-3840
Parenttopic:Notices
FCCComplianceStatement
ForUnitedStatesUsers
This equipment has been tested and found to comply with the limits for a Class Adigital device, pursuant to Part 15 of the FCC Rules. These limits are designed to provide reasonable protection against harmful interference when the equipment is operated in a commercial environment. This equipment generates, uses, and can radiate radio frequency energy and, if not installed and used in accordance with the instructions, may cause harmful interferencetoradiocommunications. Operation of this equipment in residential areas likely to cause harmful interference in which case the user will berequired to correct the interference at this own expense.
ForCanadianUsers
CANICES-3(A)/NMB-3(A)
Parenttopic:Notices
BindingArbitrationandClassWaiver
1. DISPUTES, BINDING INDIVIDUAL ARBITRATION, AND WAIVER OF CLASSACTIONS AND CLASSAR BITRATIONS
1.1 Disputes. The terms of this Section 1 shall apply to all Disputes between you and Epson. The term "Dispute" is meant to have the broadest meaning permissible underlaw and includes any dispute, claim, controversy or action between you and Epson arising out for relating to this Agreement, Epson branded products (hardware and including any related software), other transaction involving you and Epson, whether in contract, warranty, misrepresentation, fraud, tort, intentionaltort, statute, regulation, ordinance, or any other legal or equitable basis. "DISPUTE" DOES NOT INCLUDE IP CLAIMS, or more specifically, a claimor cause of action for (a) trademark infringement or dilution, (b) patent infringement, (c) copyright infringement or (d) trades secret misappropriation (an "IPClaim"). You and Epson
alsoagree, notwithstandingSection1.6, thatacourt, notanarbitrator, may decide ifaclaimor cause of action is for an | PClaim.
1.2 Binding Arbitration. You and Epson agree that all Disputes shall be resolved by binding arbitration according to this Agreement. ARBITRATION MEANSTHAT YOUWAIVE YOUR RIGHT TO AJUDGE OR JURYINACOURTPROCEEDING AND YOUR GROUNDS FOR APPEAL ARE LIMITED. Pursuant to this Agreement, binding arbitrations shall be administered by JAMS, anationally recognized arbitration authority, pursuant to its code of procedure then ineffect for consumer related disputes, but excluding any rule that permit joinder or class actions in arbitration (formoredetail on procedure, see Section 1.6 below). You and Epson understand and agree that (a) the Federal Arbitration Act (9U.S.C. §1, et seq.) governsthe interpretation and enforcement of this Section 1, (b) this Agreement memorializes at transaction in interstate commerce, and (c) this Section 1 shall survivetermination of this Agreement.
1.3 Pre-Arbitration Steps and Notice. Before submitting a claim for arbitration, you and Epson agree to try, for sixty (60) days, to resolve any Dispute informally. If Epson and you donot reach an agreement to resolv the Disputewithin the sixty (60) days), you or Epson may commence an arbitration. Noticeto Epson must be addressed to: Epson America, Inc., ATTN: Legal Department, 3131 Katella Ave., Los Alamitos, CA90720 (the "Epson Address"). The Dispute Noticeto you will besent to them most recent address Epson has in its records for you. For this reason, it is important to notify us if your address changes by emailing us at EALegal@ea.epson.com or writing us at the Epson Address above. Notice of the Disputeshall includethesender's name, address and contact information, the fact giving riseto the Dispute, and therelief requested (the "Dispute Notice"). Following receipt of the Dispute Notice, Epson and you agree to acting good faith to resolv the Dispute before commencing arbitration.
1.4 Small Claims Court. Notwithstanding the foregoing, you may bring an individual action in the small claimscourtofyourstateormunicipalityiftheactioniswithinthatcourt'sjurisdictionandspendingonlyinthatcourt.
1.5WAIVEROFCLASSACTIONSANDCLASSARBITRATIONS.YOUANDEPSONAGREETHAT EACHPARTYMAYBRINGDISPUTESAGAINSTTHEOTHERPARTYONLYINANINDIVIDUAL CAPACITY,ANDNOTASAPLANTIFFORCLASSMEMBERINANYCLASSOR REPRESENTATIVEPROCEEDING,INCLUDINGWITHOUTLIMITATIONFEDERALORSTATE CLASSACTIONS,ORCLASSARBITRATIONS.CLASSACTIONLAWSUITS,CLASS-WIDE ARBITRATIONS,PRIVATEATTORNEY-GENERALACTIONS,ANDANYOTHERPROCEEDING WHERESOMEONEACTSINAREPRESENTATIVECAPACITYARENOTALLOWED. ACCORDINGLY,UNDERTHEARBITRATIONPROCEDUREOUTLINEDINTHISSECTION,AN ARBITRATORSHALLNOTCOMBINEORCONSOLIDATEMORETHANONEPARTY'SCLAIMS WITHOUTTHEWRITTENCONSENTOFALLAFFECTEDPARTIESTOANARBITRATION PROCEEDING.
1.6 Arbitration Procedure. If you or Epson commences arbitration, the arbitration shall be governed by therules of JAMS that are ineffect when the arbitration is filed, excluding any rule that permit arbitration on a class or representative basis (the "JAMS Rules"), available at http://www.jamsadr.com or by calling
1-800-352-5267 (U.S. or Canada), or https://www.jamsadr.com/about/ or by calling +1-949-224-1810 (LatinAmerica), and undertherulessetforthinthisAgreement. All Disputesshallberesolvedbya singlneutralarbitrator, and both parties shall have reasonable opportunity to participate in the selection of the arbitrator. The arbitrator is bound by the terms of this Agreement. The arbitrator, and not any federal, state or local courtor agency, shall have exclusive authority to resolve all disputes arising out of correlating to the interpretation, applicability, enforceability or formation of this Agreement, including any claim that all or any part of this Agreement is void or voidable. Not withstanding this broad delegation of authority to the arbitrator, acourt may determinethelimited question of whether a claimor cause of action is for an PClaim, which is excluded from the definition of "Disputes" in Section 1.1 above. The arbitrator shall be empowered to grant whatever relief would be available in a court under law or inequity. The arbitrator may award you the same damages as a court could, and may award declaratory or junctiver relief only in favor of the individual party seeking relief and only to the extent necessary to provide relief warranted by that party's individual claim. In some instances, the cost of arbitration can exceed the cost of litigation and theright to discover may be more limited in arbitration than in court. The arbitrator's award binding and maybe entered as a judgment in any court of competent jurisdiction.
You may choose to engage in arbitration hearings by telephone. Arbitration hearings not conducted by telephones shall take place in allocation reasonably accessible from your primary residence, or in Orange County, California, at your option.
a) Initiation of Arbitration Proceeding. If either you or Epson decide to arbitrate a Dispute, both parties agree to the following procedure:
(i) WriteaDemandforArbitration. The demand must include a description of the dispute and the amount of damages sought to be recovered. You can find a copy of a Demand for Arbitration at http://www.jamsadr.com ("DemandforArbitration").
(ii) Send three copies of the Demand for Arbitration, plus the appropriate filing fee, to: JAMS, 500 North State College Blvd., Suite 600 Orange, CA92868, U.S.A.
(iii) Sendonecopy of the Demand for Arbitration to the other party (same address as the Dispute Notice), or as otherwise agreed by the parties.
b) HearingFormat. During the arbitration, the amount of any settlement to offer mades shall not be disclosed to the arbitrator until after the arbitrator determines the amount, if any, to which your Epson is entitled. The discovery of exchange of non-privileged information relevant to the Disputation may be allowed during the arbitration.
c) Arbitration Fees. Epson shall pay, or (if applicable) reimburse you for all JAMS filings and arbitrator fees for any arbitration commenced (by you or Epson) pursuant to provision of this Agreement.
d) Awardin Your Favor. For Disputes in which you or Epson seeks \75,000 or less indamages exclusive of attorney's fees and costs, if the arbitrator's decision results in an award to you in an amount greater than Epson's last written offer, if any, to settle the Dispute, Epson will: (i) pay you \1,000 or the amount
oftheaward,whicheverisgreater;(ii)payyoutwicetheamountofyourreasonableattorney'sfees,if any;and(iii)reimburseyouforanyexpenses(includingexpertwitnessfeesandcosts)thatyourattorney reasonablyaccruesforinvestigating,preparing,andpursuingtheDisputeinarbitration.Exceptas agreeduponbyyouandEpsoninwriting,thearbitratorshalldeterminetheamountoffees,costs,and expensestobepaidbyEpsonpursuanttothisSection1.6d).
e) Attorney's Fees. Epson will not seek its attorney's fees and expenses for any arbitration commenced involving a dispute under this Agreement. Your right to attorney's fees and expenses under Section 1.6d) aboved does not limit your right to attorney's fees and expenses under applicable law; notwithstanding the foregoing, the arbitrator may not award duplicative awards of attorney's fees and expenses.
1.7Opt-out.Youmayelecttoopt-out(excludeyourself)fromthefinal,binding,individual arbitrationprocedureandwaiverofclassandrepresentativeproceedingsspecifiedinthis AgreementbysendingawrittenlettertotheEpsonAddresswithinthirty(30)daysofyourassent tothisAgreement(includingwithoutlimitationthepurchase,download,installationofthe SoftwareorotherapplicableuseofEpsonHardware,productsandservices)thatspecifies(i)yourname,(ii)yourmailingaddress,and(iii)yourrequesttobeexcludedfromthefinal,binding individualarbitrationprocedureandwaiverofclassandrepresentativeproceedingsspecifiedin thisSection1.Intheeventthatyouopt-outconsistentwiththeproceduresetforthabove,all othertermsshallcontinuetoapply,includingtherequirementtoprovidenoticepriortolitigation.
1.8 Amendments to Section 1. Notwithstanding any provision in this Agreement to the contrary, you and Epsonagreethatif Epsonmakesanyfutureamendmentstothedisputeresolutionprocedureand classactionwaiverprovisions(otherthanachangetoEpson'saddress)inthisAgreement,Epsonwill obtainyouraffirmativeassenttotheapplicableamendment.Ifyoudonotaffirmativelyassenttothe applicableamendment,youareagreeingthatyouwillarbitrateanyDisputebetweenthepartiesin accordancewiththelanguageofthisSection1(orresolvedisputesasprovidedforinSection1.7,ifyou timelyelectedtoopt-outwhenyoufirstassentedtothisAgreement).
1.9 Severability. If any provision in this Section 1 is found to be unenforceable, that provision shall be severed with the remainder of this Agreement remaining in full force and effect. The foregoing shall not applytothep prohibitionagainstclassorrepresentativeactionsasprovidedinSection1.5.This meansthatifSection1.5isfoundtobeunenforceable,theentireSection1(butonlySection1) shallbenullandvoid.
Parenttopic:Notices
Trademarks
EPSON®, InstantOff ®, and QuickCorner ® areregistered trademarks, EPSONExceedYourVisionisa registeredlogomark, and EpsoniProjectionisatrademarkofSeikoEpsonCorporation.
PrivateLine ^® isaregisteredtrademark;SizeWise ^TM isatrademark;andExtraCare ^SM isaservicemarkofEpsonAmerica,Inc.
WindowsisaregisteredtrademarkofMicrosoftCorporationintheUnitedStatesand/orothercountries.
Mac,macOS,andOSXaretrademarksofAppleInc.,registeredintheU.S.andothercountries.
AppStore ^SM isaservicemarkofAppleInc.
Google ^® isaregisteredtrademarkandAndroid ^TM ,Chromebook ^TM ,GooglePlay ^TM ,andGoogle Chrome ^TM aretrademarksofGoogleLLC.
HDBaseT™ and the HDBaseTAlliancelogoaretrademarksoftheHDBaseTAlliance.
PJLinktrademarkisattrademarkappliedforregistrationorisalreadyregisteredinJapan,theUnited StatesofAmericaandothercountriesandareas.
Art-Net™ DesignedbyandCopyrightArtisticLicenceHoldingsLtd.
ExtronandXTPSystemaretrademarksorregisteredtrademarksofRGBSystems, Inc. in the United States and other countries.
CrestronandCrestronConnectedareregisteredtrademarksofCrestronElectronics, Inc.
"QRCode"isaregisteredtrademarkofDENSOWAVEINCORPORATED.
GeneralNotice: Otherproductnamesusedhereinareforidentificationpurposesonlyandmaybe trademarksoftheirrespectiveowners.Epsondisclaimsanyandallrightsinthosemarks.
EPSON®
EXCEED YOUR VISION
Parenttopic:Notices
CopyrightNotice
Allrightsreserved.Nopartofthispublicationmaybereproduced,storedinaretrievalsystem,or transmittedinanyformorbyanymeans,electronic,mechanical,photocopying,recording,orotherwise, withoutthepriorwrittenpermissionofSeikoEpsonCorporation.Theinformationcontainedhereinis designedonlyforusewiththisEpsonproduct.Epsonisnotresponsibleforanyuseofthisinformationas appliedtootherproducts.
Neither Seiko Epson Corporation nor its affiliates shall be liable to the purchaser of this product or third parties for damages, losses, costs, or expenses incurred by purchaser or third parties as a result of: accident, misuse, or abuse of this product or unauthorized modifications, repairs, alteration to this
product,or(excludingtheU.S.)failurestostrictlycomplywithSeikoEpsonCorporation'soperatingandmaintenanceinstructions.
SeikoEpsonCorporationshallnotbeliableforanydamagesorproblemsarisingfromtheuseofany optionsoranyconsumableproductsotherthanthosedesignatedasOriginalEpsonProductsorEpson ApprovedProductsbySeikoEpsonCorporation.
Thisinformationissubjecttochangewithoutnotice.
ANoteConcerningResponsibleUseofCopyrightedMaterials
CopyrightAttribution
Parenttopic:Notices
ANoteConcerningResponsibleUseofCopyrightedMaterials
Epsonencourageseachusertoberesponsibleandrespectfulofthecopyrightlawswhenusingany Epsonproduct.Whilesomecountries'lawspermitlimitedcopyingorreuseofcopyrightedmaterialin certaincircumstances,thosecircumstancesmaynotbeasbroadassomepeopleassume.Contactyour legaladvisorforanyquestionsregardingcopyrightlaw.
Parenttopic: CopyrightNotice
CopyrightAttribution
©2022EpsonAmerica,Inc.
7/22
CPD-59255R2
Parenttopic: CopyrightNotice
- ProL30000UNL/L30002UNL
- User'sGuide
- Contents
- Using Basic Projector Features 122
- Maintaining and Transporting the Projector 273
- Solving Problems 292
- ProL30000UNL/L30002UNLUser'sGuide
- IntroductiontoYourProjector
- ProjectorFeatures
- Bright, high-resolution projection system
- Flexibleconnectivity
- Easy-to-usesetupandoperationfeatures
- AdditionalComponents
- AdditionalProjectorSoftwareandManuals
- OptionalEquipmentandReplacementParts
- NotationsUsedintheDocumentation
- WheretoGoforAdditionallInformation
- Relatedreferences
- Relatedtopics
- ProjectorPartLocations
- ProjectorParts-Base/Handle
- Relatedtasks
- SettingUptheProjector
- ProjectorPlacement
- ProjectorSetupandInstallationOptions
- ProjectionDistance
- ProjectorConnections
- ConnectingtoVideoSources
- ConnectingtoanHDMIVideoSource
- ConnectingtoaComponent-to-BNCVideoSource
- ConnectingtoaComponentVideoSource
- ConnectingtoanSDIVideoSource
- ConnectingtoComputerSources
- ConnectingtoaComputerforVGAVideo
- ConnectingtoaComputerforHDMIVideo
- ConnectingtoaComputerforDVI-DVideo
- ConnectingtoaComputerfor5BNCVideo
- ConnectingtoanHDBaseTTransmitter
- ConnectingtoanExternalComputerMonitor
- AttachingandRemovingaLens
- AttachingaLens
- 8.Dooneofthefollowing:
- RemovingaLens
- SecuringthePowerCord
- AttachingandRemovingtheHDMICableClip
- Installing Batteries in the Remote Control
- UsingtheProjectoronaNetwork
- WiredNetworkProjection
- ConnectingtoaWiredNetwork
- SelectingWiredNetworkSettings
- SelecttheWiredLANmenuandpressEnter.
- WirelessNetworkProjection
- InstallingtheWirelessLANModule
- UsingaQRCodetoConnectaMobileDevice
- UsingQuickWirelessConnection(Windows)
- SelectingWirelessNetworkSettingsManually
- SelectingWirelessNetworkSettingsinWindows
- SelectingWirelessNetworkSettingsMac
- SettingUpWirelessNetworkSecurity
- SettingUpProjectorNetworkE-MailAlerts
- 5.TurnonMailNotification.
- NetworkProjectorE-mailAlertMessages
- SelectingOtherNetworkSettings
- SettingaStaticIPAddressontheLCDScreen
- ControllingaNetworkedProjectorUsingaWebBrowser
- WebControlOptions
- BasicControl
- LensControl
- Focus/Distortionscreen
- ViewinganImageCaptureoftheDisplayedImagefromaRemoteLocation
- UsingCrestronConnected
- SettingUpCrestronConnected
- ControllingaNetworkedProjectorUsingCrestronConnected
- Art-NetChannelDefinitions
- RegisteringaDigitalCertificateontheProjector
- ImportingaWebServerCertificateUsingtheProjectorMenus
- RegisteringDigitalCertificatesfromaWebBrowser
- SelectAdvanced.
- 6.UnderNetwork,selectCertificate.
- DigitalCertificateTypes
- UsingBasicProjectorFeatures
- TurningOntheProjector
- TurningOfftheProjector
- SelectingtheLanguagefortheProjectorMenus
- ResizingthelmagewiththeZoomButton
- FocusingtheImageUsingtheFocusButtons
- FocusingtheImageWhenUsinganOptionalShortThrowLens
- SettingtheScreenType
- AdjustingtheImagePositionUsingLensShift
- AdjustingtheImagePositionUsingScreenPosition
- DisplayingaTestPattern
- ImageShape
- CorrectingImageShapewithH/VKeystone
- CorrectingImageShapewithQuickCorner
- CorrectingImageShapewithCurvedSurface
- CorrectingImageShapewithCornerWall
- CorrectingImageShapewithPointCorrection
- SelectinganImageSource
- RemoteControlOperation
- ProjectionModes
- ChangingtheProjectionModeUsingtheRemoteControl
- ChangingtheProjectionModeUsingtheMenus
- ImageAspectRatio
- ChangingthelmageAspectRatio
- AvailableImageAspectRatio
- ColorMode
- ChangingtheColorMode
- AvailableColorModes
- AdjustingtheBrightness
- SelecttheBrightnessSettingssettingandpressEnter.
- Select the Light Source Modesetting and press Enter.
- Selectoneofthefollowingoptions:
- ConstantBrightnessUsageHours
- Lightsourcelifespan
- AdjustingLuminanceControls
- Select theImagemenuandpressEnter.
- Select the Light Source Control setting and press Enter.
- Select the Light Source Control setting, choose one of the following options, and press Enter:
- 6.PresstheEscbutton.
- AdjustingGamma
- SettingtheDateandTime
- AdjustingProjectorFeatures
- ShuttingOffthePictureTemporarily
- StoppingVideoActionTemporarily
- ProjectorSecurityFeatures
- PasswordSecurityTypes
- SettingaPassword
- SelectingPasswordSecurityTypes
- EnteringaPasswordtoUsetheProjector
- SavingaUser'sLogolmagetoDisplay
- LockingtheProjector'sLensSettingsandButtons
- UnlockingtheProjector'sButtons
- LockingtheRemoteControlButtons
- InstallingaSecurityCable
- ProjectingTwolmagesSimultaneously
- InputSourcesforSplitScreenProjection
- Using Advanced Image Adjustment Features
- Using4KEnhancement
- 1.PresstheMenubutton.
- UsingFrameInterpolation
- CreatingImagePresets
- PressMenuorEsctoexitthemenus.
- UsingMPEGNoiseReduction
- AdjustingScaledResolutionImages(Super-resolution)
- AdjustingDetailEnhancement
- AdjustingtheColorConvergence(PanelAlignment)
- AdjustingtheColorTone(ColorUniformity)
- RunningLightSourceCalibration
- UsingMultipleProjectors
- MultipleProjectorAdjustmentOverview
- Relatedconcepts
- ProjectorIdentificationSystemforMultipleProjectorControl
- SettingtheProjectorID
- SettingtheRemoteControlID
- TilingImagesintoOneImage
- ConfiguringTilingAutomatically
- ConfiguringTilingManually
- BlendingthelmageEdges
- AdjustingtheBlackLevel
- MatchingTintandBrightness(ScreenMatching)
- MatchingtheScreensAutomatically
- SelecttheScreenMatchingsettingandpressEnter.
- SelectStartAutoAdjustmentpressEnter.
- MatchingtheScreensManually
- ScalinganImage
- TilingImagesUsingGeometryCorrectionAssist
- StackingImagesUsingGeometryCorrectionAssist
- SimpleStackingforOneBrightImage
- SimpleStackingConditions
- SettingUpSimpleStacking
- SavingSettingstoMemoryandUsingSavedSettings
- SelecttheSettingsmenuandpressEnter.
- Select the Memory setting and press Enter.
- Selectoneofthefollowingoptions:
- PressMenuorEsctoexit.
- SavingaScheduledEvent
- ViewingScheduledEvents
- EditingaScheduledEvent
- CopyingMenuSettingsBetweenProjectors
- SavingSettingstoaUSBFlashDrive
- TransferringSettingsfromaUSBFlashDrive
- SavingSettingstoaComputer
- TransferringSettingsfromaComputer
- AdjustingtheMenuSettings
- UsingtheProjector'sMenus
- ImageQualitySettings-ImageMenu
- InputSignalSettings-SignalMenu
- ProjectorFeatureSettings-SettingsMenu
- ProjectorSetupSettings-ExtendedMenu
- ProjectorNetworkandCameraSettings-NetworkMenu
- ProjectorInformationDisplay-InfoMenu
- EventIDCodeList
- ProjectorResetOptions-ResetMenu
- MaintainingandTransportingtheProjector
- ProjectorMaintenance
- CleaningtheLens
- CleaningtheProjectorCase
- AirFilterandVentMaintenance
- CleaningtheAirFilters
- CleaningtheAirVents
- ReplacingtheAirFilters
- ReplacingtheRemoteControlBatteries
- TransportingtheProjector
- SolvingProblems
- ProjectionProblemTips
- ProjectorLightStatus
- ViewingProjectorStatusInformation
- ProjectorStatusDisplayMessages
- UsingtheProjectorHelpDisplays
- SolvingImageProblems
- SolutionsWhenNoImageAppears
- SolutionsWhen"NoSignal"MessageAppears
- DisplayingFromaPCLaptop
- DisplayingFromaMacLaptop
- SolutionsWhen"NotSupported"MessageAppears
- SolutionsWhenOnlyaPartialImageAppears
- SolutionsWhenthelmageisNotRectangular
- SolutionsWhentheImageContainsNoiseorStatic
- SolutionsWhenthelmageisFuzzyorBlurry
- SolutionsWhenthelmageBrightnessorColorsareIncorrect
- SolutionsWhenAutomaticAdjustmentsarenotAppliedCorrectly
- SolutionsWhenanAfterimageRemainsOntheProjectedImage
- SolvingProjectororRemoteControlOperationProblems
- SolutionstoProjectorPowerorShut-OffProblems
- SolutionstoRemoteControlProblems
- SolutionstoPasswordProblems
- SolvingNetworkProblems
- SolutionsWhenWirelessAuthenticationFails
- SolutionsWhenYouCannotAccesstheProjectorThroughtheWeb
- SolutionsWhenthelmageContainsStaticDuringNetworkProjection
- SolutionsWhenNetworkAlertE-MailsareNotReceived
- WheretoGetHelp(U.S.andCanada)
- InternetSupport
- SpeaktoaSupportRepresentative
- PurchaseSuppliesandAccessories
- TechnicalSpecifications
- GeneralProjectorSpecifications
- ProjectorLightSourceSpecifications
- RemoteControlSpecifications
- ProjectorDimensionSpecifications
- ProjectorElectricalSpecifications
- ProjectorEnvironmentalSpecifications
- ProjectorSafetyandApprovalsSpecifications
- SupportedVideoDisplayFormats
- Notices
- Recycling(U.S.andCanada)
- ImportantSafetyInformation
- ImportantSafetyInstructions
- Setupandoperation
- Maintenance, storage, and transportation
- LaserSafetyInformation
- LaserSafetyLabels
- WARNING:
- HazardDistance(HD)
- U.S.A. Market Only:
- TypicalSetupConfigurations(U.S.Only)
- Show-ElevationView
- Show-ElevationView-TypicalTemporaryCinemaApplication
- Show-PlanView-TypicalTemporaryCinemaApplication
- ListofSafetySymbols(correspondingtoIEC60950-1A2)
- ManufacturerandImporterAddress
- Importer
- FCCComplianceStatement
- ForUnitedStatesUsers
- ForCanadianUsers
- BindingArbitrationandClassWaiver
- DISPUTES, BINDING INDIVIDUAL ARBITRATION, AND WAIVER OF CLASSACTIONS AND CLASSAR BITRATIONS
- Trademarks
- EPSON®
- Parenttopic:Notices
- CopyrightNotice
- ANoteConcerningResponsibleUseofCopyrightedMaterials
- CopyrightAttribution
Brand : EPSON
Model : Pro L30000UNL
Category : Video projector