
Home Cinema 760HD - Video projector EPSON - Free user manual and instructions
Find the device manual for free Home Cinema 760HD EPSON in PDF.


| Product Type | Video Projector |
| Brand | Epson |
| Model | Home Cinema 760HD |
| Display Technology | 3LCD |
| Resolution | 1920 x 1080 (Full HD) |
| Brightness | 3600 lumens |
| Contrast Ratio | 15000:1 |
| Lamp Life (Normal / Eco) | 4500 hours / 6000 hours |
| Keystone Correction | Vertical ±30° |
| Zoom | Manual 1.2x |
| Projection Size | 30" – 300" |
| Dimensions (W x H x D) | 12.2 x 4.5 x 10.2 inches |
| Weight | 6.6 lb (3.0 kg) |
| Power Consumption | 300 W (Normal), 0.5 W (Standby) |
| Noise Level | 31 dB (Eco mode) |
| Inputs | HDMI, VGA, USB-A, Composite, Audio |
| Built-in Speaker | 1 x 2W |
| Care and Cleaning | Clean lens with a soft, lint-free cloth. Replace air filter every 5000 hours. |
| Safety Warnings | Do not look directly into the lens. Ensure adequate ventilation around the projector. |
| Spare Parts and Repairability | Replacement lamp (ELPLP96), remote control, air filter. Serviceable by authorized technicians. |
Frequently Asked Questions - Home Cinema 760HD EPSON
User questions about Home Cinema 760HD EPSON
0 question about this device. Answer the ones you know or ask your own.
Ask a new question about this device
Download the instructions for your Video projector in PDF format for free! Find your manual Home Cinema 760HD - EPSON and take your electronic device back in hand. On this page are published all the documents necessary for the use of your device. Home Cinema 760HD by EPSON.
USER MANUAL Home Cinema 760HD EPSON
HomeCinema660/760HD/1060
User'sGuide
Contents
Home Cinema 660/760HD/1060 User's Guide....9
Introduction to Your Projector 10
Projector Features.... 10
Product Box Contents.... 11
Additional Components 12
Additional Projector Software and Manuals.... 13
Optional Equipment and Replacement Parts 14
Warranty and Registration Information 15
Notations Used in the Documentation 15
Where to Go for Additional Information 16
Projector Part Locations 16
Projector Parts - Front/Top 17
Projector Parts - Rear 18
Projector Parts - Base 19
Projector Parts - Control Panel 20
Projector Parts - Remote Control 23
Setting Up the Projector 26
Projector Placement.... 26
Projector Setup and Installation Options 26
Projection Distance.... 28
Projector Connections 31
Connecting to Computer Sources.... 31
ConnectingtoaComputerforUSBVideoandAudio....32
Connecting to a Computer for VGA Video.... 33
ConnectingtoaComputerforHDMIVideoandAudio 34
ConnectingtoaComputerforUSBMouseControl....36
Connecting to a Computer for Sound.... 37
Connecting to Video Sources 38
Connecting to an HDMI Video Source 38
ConnectingtoanMHL-CompatibleDevice....39
ConnectingtoaComponentVideoSource....40
Connecting to a Composite Video Source 41
Connecting to a Video Source for Sound 42
Connecting to External USB Devices 43
USB Device Projection 44
ConnectingaUSBDeviceorCameratotheProjector....44
Selecting the Connected USB Source 45
DisconnectingaUSBDeviceorCameraFromtheProjector....46
Installing Batteries in the Remote Control 46
Opening the Lens Cover 48
Using the Projector on a Network 49
Wireless Network Projection 49
Installing the Wireless LAN Module 49
Using a QR Code to Connect a Mobile Device 50
Using Quick Wireless Connection (Windows).... 53
Selecting Wireless Network Settings Manually.... 55
Wireless LAN Menu Settings 58
Selecting Wireless Network Settings in Windows.... 59
Selecting Wireless Network Settings on Mac 59
Setting Up Wireless Network Security 60
Setting Up Projector Network E-Mail Alerts 61
Network Projector E-mail Alert Messages 62
Setting Up Monitoring Using SNMP 62
Controlling a Networked Projector Using a Web Browser 63
Using Basic Projector Features 67
Turning On the Projector 67
Using the Home Screen.... 69
Turning Off the Projector 70
Selecting the Language for the Projector Menus....72
Adjusting the Image Height 73
Image Shape 74
CorrectingImageShapewiththeHorizontalKeystoneSlider....74
Correcting Image Shape with the Keystone Buttons.... 75
Correcting Image Shape with Quick Corner 78
Resizing the Image with the Zoom Ring 80
Focusing the Image Using the Focus Ring.... 80
Remote Control Operation 81
Using the Remote Control as a Wireless Mouse 82
Using the Remote Control as a Pointer....83
Selecting an Image Source 84
Projection Modes 86
ChangingtheProjectionModeUsingtheRemoteControl 87
Changing the Projection Mode Using the Menus.... 87
Image Aspect Ratio 88
Changing the Image Aspect Ratio 88
Available Image Aspect Ratios 89
Color Mode 90
Changing the Color Mode.... 91
Available Color Modes....91
Turning On Auto Iris.... 92
Controlling the Volume with the Volume Buttons....93
Projecting a PC Free Presentation 93
Supported PC Free File Types 93
Starting a Slide Show from an External Device 94
Starting a Movie from an External Device 96
PC Free Display Options 97
Adjusting Projector Features 99
Shutting Off the Picture and Sound Temporarily 99
Stopping Video Action Temporarily 100
Zooming Into and Out of Images 101
Projector Security Features.... 102
Password Security Types 102
Setting a Password 102
Selecting Password Security Types.... 104
Entering a Password to Use the Projector.... 105
Saving a User's Logo Image to Display 106
Locking the Projector's Buttons 108
Unlocking the Projector's Buttons 109
Installing a Security Cable 109
Projector Identification System for Multiple Projector Control.... 110
Setting the Projector ID.... 110
Setting the Remote Control ID 111
Matching Multiple-Projector Display Quality 112
Projecting Two Images Simultaneously.... 114
Copying Menu Settings Between Projectors 116
Saving Settings to a USB Flash Drive.... 116
Transferring Settings from a USB Flash Drive 118
Saving Settings to a Computer 120
Transferring Settings from a Computer 122
Adjusting the Menu Settings 126
Using the Projector's Menus.... 126
Image Quality Settings - Image Menu 128
Input Signal Settings - Signal Menu.... 131
Projector Feature Settings - Settings Menu.... 133
Projector Setup Settings - Extended Menu.... 136
Projector Network Settings - Network Menu 139
Projector Setup Settings - ECO Menu 141
Projector Information Display - Info Menu 143
Event ID Code List.... 144
Projector Reset Options - Reset Menu 145
Maintaining and Transporting the Projector 147
Projector Maintenance 147
Cleaning the Lens.... 147
Cleaning the Projector Case.... 148
Air Filter and Vent Maintenance 148
Cleaning the Air Filter and Vents 149
Replacing the Air Filter.... 149
Projector Lamp Maintenance.... 151
Replacing the Lamp 152
Resetting the Lamp Timer.... 156
Replacing the Remote Control Batteries 157
Transporting the Projector.... 159
Solving Problems 160
Projection Problem Tips 160
Projector Light Status 161
Using the Projector Help Displays 164
Solving Image or Sound Problems 165
Solutions When No Image Appears.... 165
SolutionsWhenImageisIncorrectUsingtheUSBDisplayFunction....166
Solutions When "No Signal" Message Appears 167
Displaying From a PC Laptop 167
Displaying From a Mac Laptop 168
Solutions When "Not Supported" Message Appears 168
Solutions When Only a Partial Image Appears 169
Solutions When the Image is Not Rectangular 169
Solutions When the Image Contains Noise or Static 170
Solutions When the Image is Fuzzy or Blurry 171
SolutionsWhentheImageBrightnessorColorsareIncorrect....172
Solutions to Sound Problems 172
Solving Projector or Remote Control Operation Problems 173
Solutions to Projector Power or Shut-Off Problems 173
Solutions to Problems with the Remote Control.... 174
Solutions to Password Problems 175
Solving Network Problems 175
Solutions When Wireless Authentication Fails 176
SolutionsWhenYouCannotAccesstheProjectorThroughtheWeb....176
SolutionsWhenNetworkAlertE-MailsareNotReceived....177
Where to Get Help.... 177
Technical Specifications 179
General Projector Specifications 179
Projector Lamp Specifications.... 182
Remote Control Specifications.... 182
Projector Dimension Specifications.... 183
Projector Electrical Specifications 183
Projector Environmental Specifications.... 184
Projector Safety and Approvals Specifications.... 185
Supported Video Display Formats.... 185
USB Display System Requirements.... 189
Notices 191
Recycling.... 191
Important Safety Information.... 191
Important Safety Instructions.... 192
Restriction of Use 195
List of Safety Symbols (corresponding to IEC60950-1 A2).... 195
FCC Compliance Statement.... 199
Binding Arbitration and Class Waiver 199
Trademarks 203
Copyright Notice 203
ANoteConcerningResponsibleUseofCopyrightedMaterials....204
Copyright Attribution 204
HomeCinema660/760HD/1060User'sGuide
Welcome to the Home Cinema 660/760HD/1060 User's Guide.
For a printable PDF copy of this guide, click here.
IntroductiontoYourProjector
Refertothesesectionstolearnmoreaboutyourprojectorandthismanual.
ProjectorFeatures
NotationsUsedintheDocumentation
WheretoGoforAdditionalInformation
ProjectorPartLocations
ProjectorFeatures
Yourprojectorincludesthesespecialfeatures:
Bright, high-resolution projectionsystem
•HomeCinema660/760HD:Upto3300lumensofcolorbrightness(colorlightoutput)and3300lumensofwhitebrightness(whitelightoutput)
•HomeCinema1060:Upto3100lumensofcolorbrightness(colorlightoutput)and3100lumensof whitebrightness(whitelightoutput)
Note: Color brightness (color light output) and white brightness (white light output) will vary depending on usage conditions. Colorlight output measured in accordance with IDMS15.4; whitelight output measured in accordance with ISO21118.
•HomeCinema660:Nativeresolutionof800×600pixels(SVGA)
•HomeCinema760HD:Nativeresolutionof1280×800pixels(WXGA)
•HomeCinema1060:Nativeresolutionof1920×1080(1080p)
Flexibleconnectivity
- Plug-and-play3-in-1USBprojection,audio,andmousecontrolforinstantsetup
- Wirelessnetworksupportforprojection,monitoring,andcontrolviaremote(HomeCinema 660/760HDrequiretheoptionalwirelessLANmodule)
- Projection from iOS or Android devices and free Epson iProjection app; visit epson.com/projection (U.S.)orepson.ca/projection(Canada)formoreinformation(HomeCinema660/760HDrequirethe optionalwirelessLANmodule)
•PCFreephotoslideshowsviaconnectedUSBmemorydevices
- TwoHDMIportsformultiplehigh-definitionAVdevices,includingMHLsupport(HomeCinema1060)
•HDMIportforcomputerorvideodeviceconnection(HomeCinema660/760HD)
Easy-to-usesetupandoperationfeatures
- Epson'squick-connecton-screenQRcodefeatureforeasywirelesssetup
• Lowtotalcostofownershipwithlongerlamplife
- Automatic vertical keystone correction and innovative horizontal keystone corrections slider for flexible projector placement
- Epson'sInstantOffandDirectPowerOnfeaturesforquicksetupandshutdown
•Built-inclosed captioning decoder(composite NTSC inputsignal only)
Note: The Home Cinema 1060 is shown in most illustrations in this manual, unless noted otherwise.
ProductBoxContents
AdditionalComponents
AdditionalProjectorSoftwareandManuals
OptionalEquipmentandReplacementParts
Warranty and Registration Information
Parenttopic: Introduction to Your Projector
ProductBoxContents
Saveallthepackagingincaseyouneedtoshiptheprojector.Alwaysusetheoriginalpackaging(or equivalent)whenshipping.
Makesureyourprojectorboxesincludedalloftheseparts:
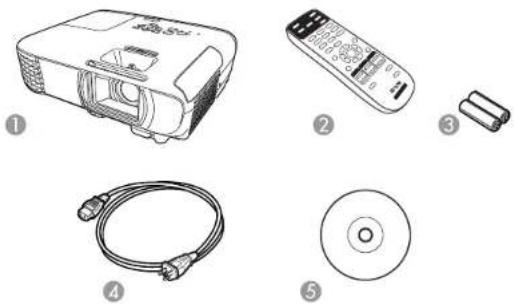
1Projector
2Remotecontrol
3Remotecontrolbatteries(twoAAalkaline)
4Powercord
5ProjectordocumentationCD
Parenttopic:ProjectorFeatures
Relatedconcepts
ProjectorConnections
AdditionalComponents
Dependingonhowyouplantousetheprojector,youmayneedtoobtainadditionalcomponents.
Note: To connect a Mac that does not include a compatible video output port, you need to obtain an adapter that allows you to connect to an input port on the projector. Contact Apple for compatible adapter options. To connect a smartphone ortablet, you may need to obtain an adapter that allows you to connect the projector. This allows you to mirror your smartphone ortabletscreens, watch movies, and more. Contact your device manufacturer for compatible adapter options.
Unlesslisted as available from Epsonin thistable, see your local computerorelectronics dealer for purchase information.
| Signalorconnection type | Additionalcomponentnecessary |
| CompositevideoRCA-style | ideoorA/Vcable |
| ComponentvideoD-sub,15- | pin,component-to-VGAvideocableoradapterAvailableforpurchasefromEpsonoranauthorizedEpsonreseller. |
| HDMICompatibleHDMlcable | AvailableforpurchasefromEpsonoranauthorizedEpsonreseller.Note:OlderMaccomputers(2009andearlier)maynotsupportHDMI audio. |
| MHL(HomeCinema 1060) | MHL-compatibledeviceordevicewithanintegratedMHLconnector,MHL cable,orHDMlcableandMHLadaptercompatiblewithyourdeviceAvailableforpurchasefromEpsonoranauthorizedEpsonreseller. |
| AudiofromcertainportsCom | merciallyavailableaudiocablecompatiblewithyourdevice |
| VGAToconnectacomputerth | roughitsVGAporttotheprojector'sVGAvideo port,youneedaVGAcomputercable. |
Parenttopic:ProjectorFeatures
AdditionalProjectorSoftwareandManuals
Afterconnectingandsettinguptheprojector, installtheprojectorsoftwarefromtheincludedsoftware CD,ordownloadthesoftwareandmanualsasnecessary.
Youcaninstalltheprojectorsoftwareprogramslistedhereandviewtheirmanualsforinstructionson usingthem.
Note: If you still need help after checking this manual and the sources listed here, you can use the EpsonPrivateLineSupportservicetogethelpfast.Fordetails,see"WhereToGetHelp".
| ProjectorsoftwareManual | Description | |
| EpsonProjector Management(Windows only) | EpsonProjector ManagementGuide | Letsyoumonitorandcontrolyourprojector throughthenetwork.Youcandownloadthelatestsoftwareand documentationfromtheEpsonwebsite.Gotoepson.com/support(U.S.)orepson.ca/support(Canada)andselectyourprojector. |
| EpsoniProjection (Windows/Mac) | EpsoniProjection OperationGuide | Letsyouholdinteractivemeetingsby projectingthecomputerscreensofusersover anetwork.Youcandownloadthelatestsoftwareand documentationfromtheEpsonwebsite.Gotoepson.com/support(U.S.)orepson.ca/support(Canada)andselectyourprojector. |
| EpsoniProjectionappInstructionsareincluded withtheapp | LetsyouprojectfromaniOSdevice,Android device,orChromebookifyourprojectoris connectedtoanetworkthatincludesa wirelessaccesspoint.Visitepson.com/iprojection(U.S.)orepson.ca/iprojection(Canada)formore information. | |
| —OpenSourceSoftware | License | Youcandownloadthisdocumentfromthe Epsonwebsite.Gotoepson.com/support(U.S.)orepson.ca/support(Canada)and selectyourprojector. |
Parenttopic:ProjectorFeatures
OptionalEquipmentandReplacementParts
Youcanpurchasescreens,otheroptionalaccessories,andreplacementpartsfromanEpsonauthorizedreseller.Tofindthenarestreseller,call800-GO-EPSON(800-463-7766)intheU.S.or800-807-7766inCanada. Or you can purchase online at epsonstore.com (U.S. sales) or epsonstore.ca (Canadian sales). Epsonoffersthefollowingoptionalaccessoriesandreplacementpartsforyourprojector:
| OptionorpartPartnumber | |
| GenuineEpsonreplacementlamp(ELPLP96)V13H010L96 | |
| Replacementairfilter(ELPAF32)V13H134A32 | |
| WirelessLANmodule(ELPAP10;HomeCinema660/760HD)V12H731P02 | |
| Universalprojectormount(ELPMBPJG)V12H808001 | |
| Softcarryingcase(ELPKS69)V12H001K69 | |
| AccoladeDuetportableprojectorscreenELPSC80 | |
| HDMlaudiovideocable3feet(0.9m)lengthAV22300-03 | |
| HDMlaudiovideocable6feet(1.8m)lengthAV22300-06 | |
| 1-YearExtendedExchangeServicePlanEPPEXPA1 | |
| 2-YearExtendedExchangeServicePlanEPPEXPA2 |
Parenttopic:ProjectorFeatures
Warranty and Registration Information
Yourprojectorcomeswithabasicwarrantythatletsyouprojectwithconfidence.Fordetails,seethe warrantybrochurethatcamewithyourprojector.
Inaddition, EpsonoffersfreeExtraCareHomeService. In the unlikely event of an equipment failure, you won't havetowait for your unit to be repaired. Instead, Epson will ship you are replacement unit anywhere in the United States, Canada, or Puerto Rico. See the ExtraCare Home Service brochure for details.
RegistryyourproductonlineusingtheprojectorCDoratthissite:epson.com/webreg
Registeringalsoletsyoureceivespecialupdatesonnewaccessories,products,andservices.
Parenttopic:ProjectorFeatures
NotationsUsedintheDocumentation
Followtheguidelinesinthesenotationsasyoureadyourdocumentation:
- Warningsmustbefollowedcarefullytoavoidbodilyinjury .
- Cautionsmustbeobservedtoavoiddamagetoyourequirement.
- Notes contain important information about your projector.
- Tipscontainadditionalprojectioninformation.
Parenttopic: Introduction to Your Projector
WheretoGoforAdditionallInformation
Needquickhelponusingyourproject?Here'swheretolookforhelp:
•Built-inhelpsystem
Press the Home button on the remote control or projector, select Help, and press Enter to get quick solutionstocommonproblems.
•epson.com/support(U.S.)orepson.ca/support(Canada)
ViewFAQs(frequentlyaskedquestions)ande-mailyourquestionstoEpsontechnicalsupport24 hoursaday.
• If you still need help after checking this manual and any others sources listed here, you can use the Epson Private Line Supports serviceto get help fast. Ford details, see "Where to Get Help".
Parenttopic: Introduction to Your Projector
Relatedreferences
WheretoGetHelp
ProjectorPartLocations
Check the projector part illustration to learn about the part's your projector.
ProjectorParts-Front/Top
ProjectorParts-Rear
ProjectorParts-Base
ProjectorParts-ControlPanel
ProjectorParts-RemoteControl
Parenttopic: Introduction to Your Projector
ProjectorParts-Front/Top
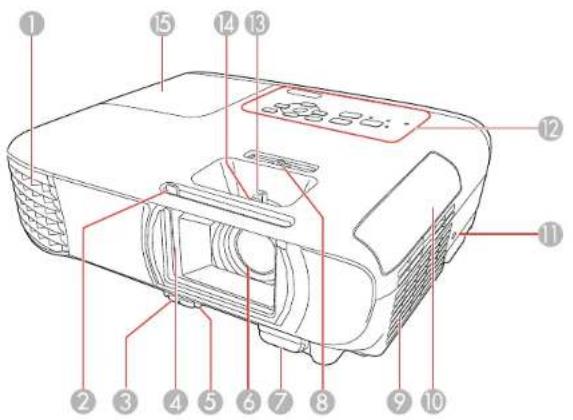
1 Exhaustvent
2A/VMuteslidelever
3Footreleaselever
4Lenscover
5Frontadjustablefoot
6Lens
7Remotecontrolreceiver
8Horizontalkeystoneslider
9Airfilter/intakevent
10Airfiltercover
11Kensingtonsecuritylockslot
12Controlpanel
13Zoomring(HomeCinema760HD/1060)
14 Focusring
15Lampcover
Parenttopic:ProjectorPartLocations
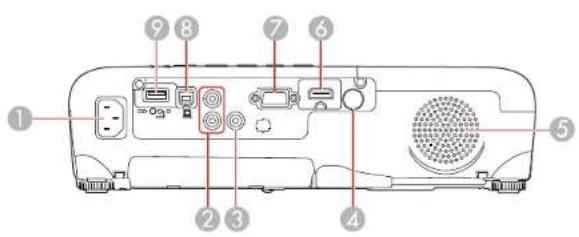
ProjectorParts-Rear
HomeCinema660/760HD
HomeCinema1060
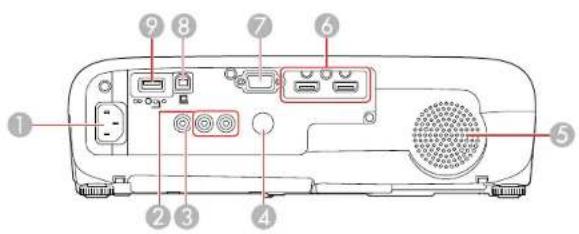
1ACinput
2Audiports
3Videoport
4Remotereceiver
5Speaker
6 HDMI port (Home Cinema 660/760HD); HDMI1 and HDMI2/MHL ports (Home Cinema 1060)
7Computerport
8USB-Bport
9USB-Aport
Parenttopic:ProjectorPartLocations
ProjectorParts-Base
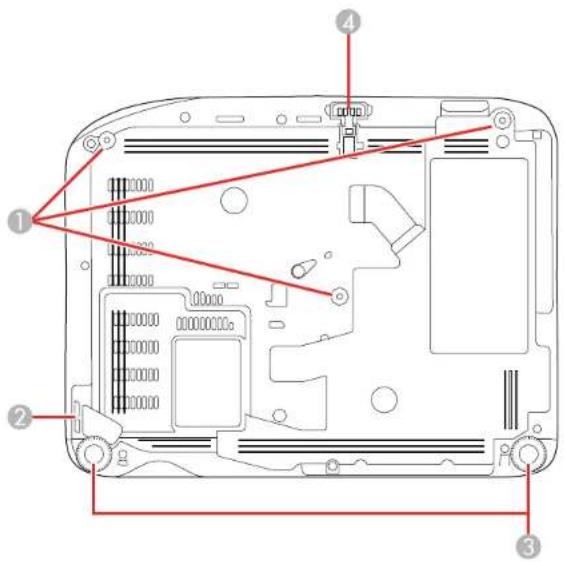
1Ceilingmountholes(3)
2Securitycableattachmentpoint
3Rearfeet
4Frontadjustablefoot
Parenttopic:ProjectorPartLocations
ProjectorParts-ControlPanel
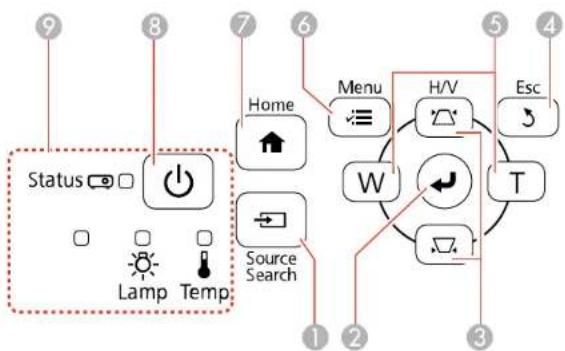
HomeCinema660
flowchart
graph TD
    A["9 Status"] --> B["8 Lamp"]
    B --> C["7 Temp"]
    C --> D["6 Home"]
    D --> E["5 Esc"]
    E --> F["3 T"]
    F --> G["2 Source Search"]
    G --> H["1 Menu"]
    H --> I["Menu Icon"]
    I --> J["H/V Icon"]
    J --> K["Esc Icon"]
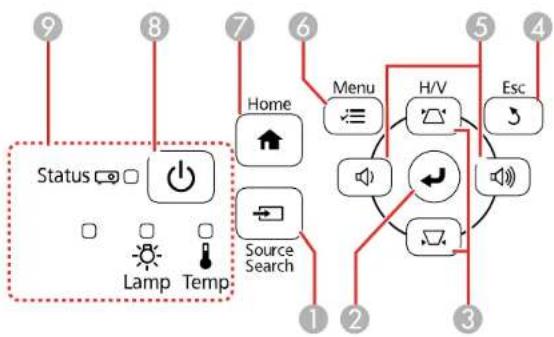
HomeCinema760HD
flowchart
graph TD
    A["9 Status"] --> B["Home"]
    C["Lamp"] --> D["Source Search"]
    E["8 Temp"] --> F["Home"]
    G["7"] --> H["Menu"]
    I["6"] --> J["H/V"]
    K["5"] --> L["Esc"]
    M["4"] --> N["Esc"]
    style A fill:#f9f,stroke:#333
    style C fill:#f9f,stroke:#333
    style E fill:#f9f,stroke:#333
    style G fill:#f9f,stroke:#333
    style I fill:#f9f,stroke:#333
    style K fill:#f9f,stroke:#333
    style M fill:#f9f,stroke:#333
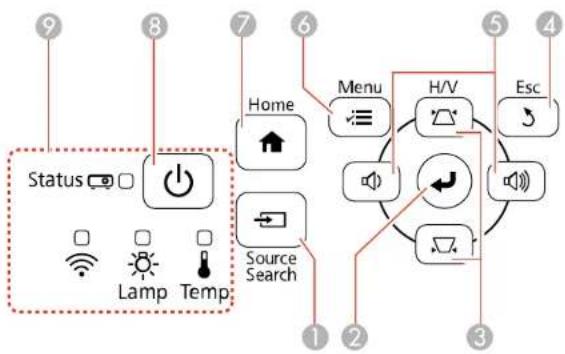
HomeCinema1060
flowchart
graph TD
    A["9 Status"] --> B["8 Lamp"]
    B --> C["7 Source Search"]
    C --> D["6 Home"]
    D --> E["5 Esc"]
    E --> F["3 H/V"]
    F --> G["2 Menu"]
    G --> H["1"]
    style A fill:#f9f,stroke:#333
    style B fill:#ccf,stroke:#333
    style C fill:#cfc,stroke:#333
    style D fill:#fcc,stroke:#333
    style E fill:#cff,stroke:#333
    style F fill:#ffc,stroke:#333
    style G fill:#fcf,stroke:#333
    style H fill:#cff,stroke:#333
1SourceSearchbutton(searchesforconnectedvideosources)
2Enterbutton(selectsoptions)
3Verticalkeystoneadjustmentbuttons(displaytheadjustmentscreenandadjustsscreenshape) andarrowbuttons
4Escbutton(cancels/exitsfunctions)
5Volumebuttons(adjustspeakervolume;HomeCinema760HD/1060),horizontalkeystone adjustmentbuttons,andarrowbuttons
6Menubutton(accessesprojectormenusystem)
7Homebutton(displaysHomescreen)
8Powerbutton
9Statuslights
Parenttopic:ProjectorPartLocations
Relatedreferences
ProjectorLightStatus
Relatedtasks
UsingtheProjectorHelpDisplays
ProjectorParts-RemoteControl
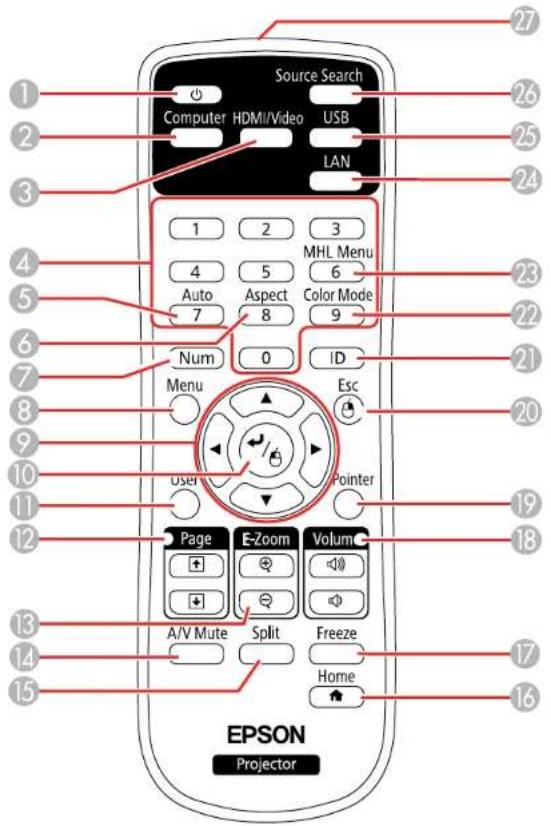
1Powerbutton
2Computerbutton(cyclesthroughconnectedcomputersources)
3HDMI/Videobutton(cyclesthroughconnectedHDMI/videosources)
4Numericbuttons(enternumbers)
5 Auto button (automatically adjusts position, tracking, and sync settings when projecting from a computerusingaVGAcable)
6Aspectbutton(selectstheimageaspectratio)
7Numbutton(whenhelddown, switchesnumericbuttonstonumberfunction)
8Menubutton(accessesprojectormenusystem)
9Arrowbuttons(movethroughon-screenoptionsandcontrolwirelessmousefunctions)
10Enterbutton(selectsoptionsandcontrolswirelessmousefunctions)
11Userbutton(customizablefordifferentfunctions)
12Pageup/downbuttons(controlpresentationslides)
13E-Zoom+/-buttons(zoomintoandoutoftheimage)
14A/VMutebutton(turnsoffpictureandsound)
15Splitbutton(splitsthescreenbetweentwoimagesources;HomeCinema760HD/1060)
16Homebutton(accessessourceselection,projectorhelpinformation,andotherfeatures)
17Freezebutton(stopsvideoaction)
18Volumeup/downbuttons(adjustspeakervolume)
19Pointerbutton(activateson-screenpointer)
20Escbutton(cancels/exitsfunctionsandcontrolswirelessmousefunctions)
21IDbutton(selectswhichprojectyouwanttocontrol)
22ColorModebutton(selectsdisplaymodes)
23MHLMenubutton(displaysettingsorperformsfunctionsfortheMHLdevice;HomeCinema 1060)
24LANbutton(cyclesthroughconnectednetworksources)
25USBbutton(cyclesthroughconnectedUSBsources)
26SourceSearchbutton(searchesforconnectedsources)
27Remotecontrolsignalemitter(emitsremotecontrolsignals)
Parenttopic:ProjectorPartLocations
SettingUptheProjector
Followtheinstructionsinthesesectionstosetupyourprojectorforuse.
ProjectorPlacement
ProjectorConnections
Installing Batteries in the Remote Control
OpeningtheLensCover
ProjectorPlacement
Youcanplacetheprojectoronalmostanyflatsurfacetoprojectanimation.
Youcanalsoinstalltheprojectorinaceilingmountifyouwanttouseitinafixedlocation.
Keeptheseconsiderationsinmindasyouselectaprojectorlocation:
- Placetheprojectoronasturdy, levelsurfaceorinstallitusingacompatiblemount.
- Leaveplentyofspacearoundandundertheprojectorforventilation, anddonotplaceitontopofor nexttoanythingthatcouldblockthevents.
- Position the projector within reach of foreground electrical outlet to extension cord.
ProjectorSetupandInstallationOptions
ProjectionDistance
Parenttopic:SettingUptheProjector
Relatedreferences
ProjectorSetupSettings-ExtendedMenu
ProjectorSetupandInstallationOptions
Youcansetuporinstallyourprojectorinthefollowingways:
Front
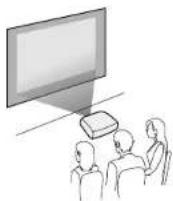
Rear
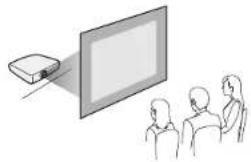
natural_image
Illustration of people watching a projector screen (no text or symbols visible)FrontCeiling
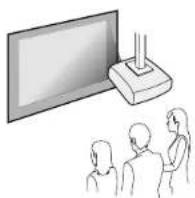
RearCeiling
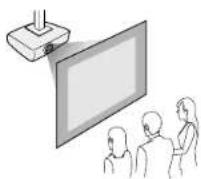
Whereveryousetuptheprojector, makesuretopositionitsquarelyinfrontofthecenterofthescreen, notatanangle, if possible.
If you project from the ceiling or from the rear, be sure to select the correct Projection option in the projector's menusystem.
Parenttopic:ProjectorPlacement
ProjectionDistance
The distance at which you place the projector from the screen, but can vary depending on the zoom factor, aspect ratio, and other settings.
Usethetablesheretodetermineapproximatelyhowfartoplacetheprojectorfromthescreenbasedon thesizeoftheprojectedimage.(Conversionfiguresmayhavebeenroundedupordown.)Youcanalso use the Projection Distance Calculator here (U.S.), here (Canada), or here (Caribbean).
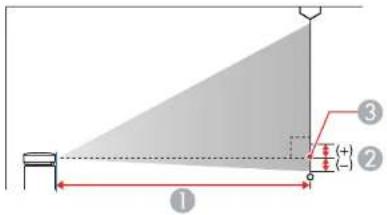
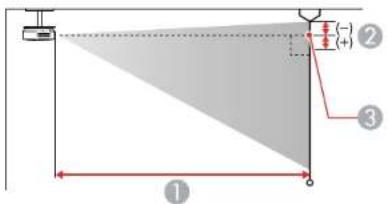
1 Projectiondistance
2Distancefromthecenterofthelenstothebaseoftheimage
3Centeroflens
HomeCinema660
| 4:3AspectRatioImageorScreen | ||
| ScreenorimagesizeProjectiondi | stance(1) WidetoTele | Offsetfromlenscenter(2) |
| 50inches58to79inches | (147to200cm) | -3.3inches(-8cm) |
| 4:3AspectRatiolmageorScreen | ||
| ScreenorimagesizeProjectiondi | stance(1) WidetoTele | Offsetfromlenscenter(2) |
| 80inches93to126inches | (237to321cm) | -5.2inches(-13cm) |
| 100inches117to158inches | (297to401cm) | -6.5inches(-17cm) |
| 150inches176to237inches | (446to603cm) | -9.8inches(-25cm) |
HomeCinema760HD
| 16:10AspectRatioImageorScreen | ||
| ScreenorimagesizeProjectiondi | stance(1) WidetoTele | Offsetfromlenscenter(2) |
| 50inches55to66inches | (139to168cm) | -2.4inch(-6cm) |
| 80inches88to106inches | (225to270cm) | -3.8inches(-10cm) |
| 100inches111to133inches | (281to338cm) | -4.7inches(-12cm) |
| 150inches167to200inches | (424to509cm) | -7.1inches(-18cm) |
HomeCinema1060
| 16:9AspectRatioImageorScreen | ||
| ScreenorImagesizeProjectiondistance(1) WidetoTele | Offsetfromlenscenter(2) | |
| 50inches44to54inches | (113to136cm) | -1.6inch(-4cm) |
| 80inches71to86inches | (181to219cm) | -2.6inches(-7cm) |
| 100inches89to108inches | (227to275cm) | -3.3inches(-8cm) |
| 150inches135to163inches | (342to413cm) | -4.9inches(-13cm) |
Parenttopic:ProjectorPlacement
ProjectorConnections
Seethesectionstoconnecttheprojectortoavarietyofprojectionsources.
Caution: If you will use the projector at altitudes above 4921 feet (1500 m), turn on High Altitude Mode to ensure the projector's internal temperature is regulated properly.
ConnectingtoComputerSources
ConnectingtoVideoSources
ConnectingtoExternalUSBDevices
Parenttopic:SettingUptheProjector
Relatedreferences
ProjectorSetupSettings-ExtendedMenu
ConnectingtoComputerSources
Followtheinstructionsinthesesectionstoconnectacomputertotheprojector.
ConnectingtoaComputerforUSBVideoandAudio
ConnectingtoaComputerforVGAVideo
ConnectingtoaComputerforHDMIVideoandAudio
ConnectingtoaComputerforUSBMouseControl
ConnectingtoaComputerforSound
Parenttopic:ProjectorConnections
ConnectingtoaComputerforUSBVideoandAudio
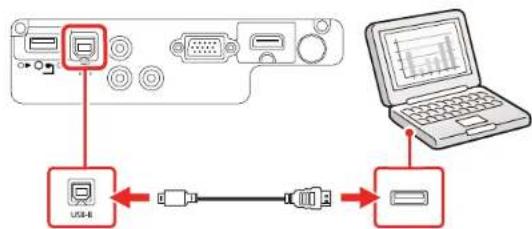
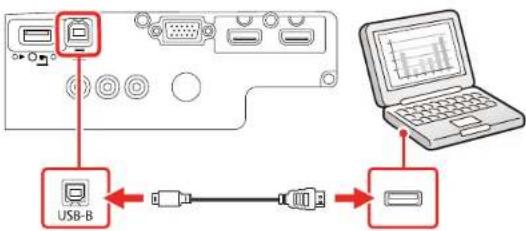
If your computer meet the system requirements, you can send video and audio output to the projector through the computer's USB port (preferably USB2.0). Connect the project to your computer using a USB cable.
Note: A USB connection may cause a delay for content requiring high bandwidth, such as movies. An HDMI connection is recommended for projecting movies, videogames, and other home entertainment content.
-
Turnonyourcomputer.
-
Connectthecabletoyourprojector's USB-Bport.
HomeCinema660/760HD
flowchart
graph TD
    A["USB Port"] -->|Data Flow| B["USB Cable"]
    B --> C["Laptop Interface"]
HomeCinema1060
flowchart
graph TD
    A["USB-B"] -->|USB cable| B["USB Port"]
    B --> C["Laptop with chart icon"]
-
Connect the other end to any available USB port on your computer.
4.Dooneofthefollowing: -
Windows 10/Windows 8.x: Click EPSON_PJ_UD when it appears on the desktop, then select RunEMP_UDSE.EXEinthedialogboxthatappearstoinstalltheEpsonUSBDisplaysoftware.
- Windows 7/Windows Vista: Select Run EMP_UDSE.EXE in the dialog box that appears to installtheEpsonUSBDisplaysoftware.
- Mac: The USB Display setup folder appears on your screen. Select USB Display Installer and followtheon-screeninstructionstoinstalltheEpsonUSBDisplaysoftware.
Followanyon-screeninstructions.Youneedtoinstallthissoftwareonlythefirsttimeyouconnect theprojectortothecomputer.
Theprojectordisplaystheimagefromyourcomputer'sdesktopandoutputssound,ifyourpresentation containsaudio.
Parenttopic: ConnectingtoComputerSources
ConnectingtoaComputerforVGAVideo
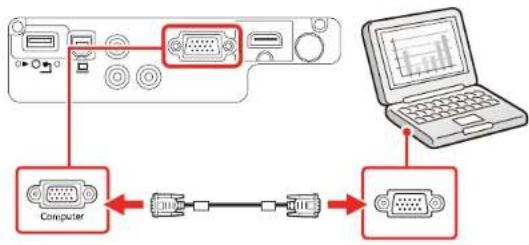
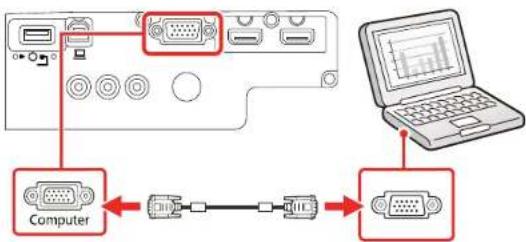
YoucanconnecttheprojectortoyourcomputerusingaVGAcomputercable.
Note: To connect a Mac that includes only a Mini DisplayPort, Thunderbolt port, or Mini-DVI port for videooutput,youneedtoobtainanadapterthatallowsyoutoconnecttotheprojector'sVGAvideoport.ContactAppleforcompatibleadapteroptions.
- If necessary, disconnect your computer's monitorable.
-
Connectthe VGAcomputercabletoyourcomputer'smonitorport.
-
ConnecttheotherendtoaComputerportontheprojector.
HomeCinema660/760HD
flowchart
graph TD
    A["Computer"] --> B["Switch"]
    B --> C["Diode"]
    C --> D["Switch"]
    D --> E["Laptop"]
HomeCinema1060
flowchart
graph TD
    A["Computer"] --> B["Analog VGA"]
    B --> C["Analog VGA"]
    C --> D["Laptop"]
- TightenthescrewsontheVGAconnector.
Parenttopic: ConnectingtoComputerSources
Relatedtasks
ConnectingtoaComputerforSound
ConnectingtoaComputerforHDMIVideoandAudio
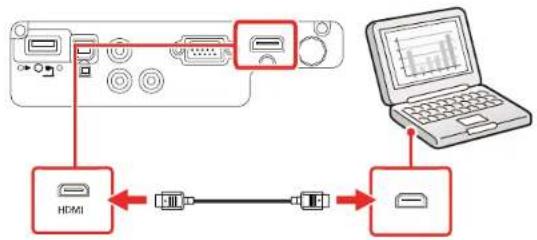
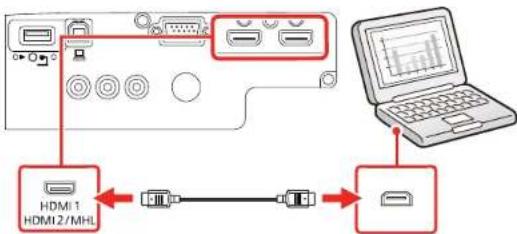
If your computer has an HDMI port, you can connect the projector using an optional HDMI cable.
Note: To connect a Mac that includes only a Mini DisplayPort, Thunderbolt port, or Mini-DVI port for video output, you need to obtain an adapter that allows you to connect to the projector's HDMI port.
ContactAppleforcompatibleadapteroptions.OlderMaccomputers(2009andearlier)maynotsupportaudiothroughtheHDMIport.
- ConnecttheHDMIcabletoyourcomputer'sHDMIoutputport.
- Connecttheotherendtotheprojector'sHDMIport.
HomeCinema660/760HD
flowchart
graph TD
    A["Device"] --> B["HDMI"]
    B --> C["Switch"]
    C --> D["Laptop"]
    style A fill:#f9f,stroke:#333
    style D fill:#bbf,stroke:#333
HomeCinema1060
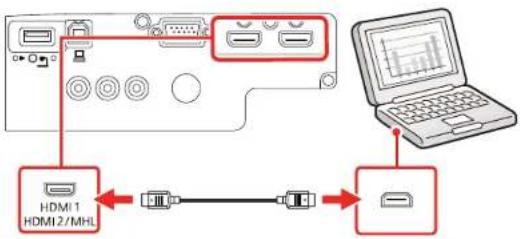
flowchart
graph TD
    A["Device"] --> B["HDMI 1"]
    A --> C["HDMI 2/MHL"]
    B <--> D["USB Cable"]
    C <--> D
    D --> E["Laptop"]
Note: The projector converts the digital audio signal sent from your computer into a mono analog signal fortheinternalspeaker.
Parenttopic: ConnectingtoComputerSources
ConnectingtoaComputerforUSBMouseControl
If you connected your computer to a Computer, USB-B, or HDMI port on the projector, you can set up theremotecontroltoactasawirelessmouse. This lets you control projection at distance from your computer. Todo this, connect the project to your computer using a USB cable, if it is not connected already.
- ConnecttheUSBcabletoyourprojector'sUSB-Bport.
HomeCinema660/760HD
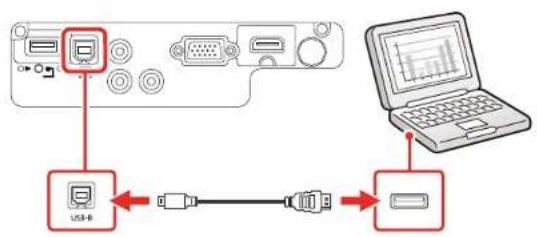
flowchart
graph TD
    A["USB-R"] -->|USB cable| B["USB Port"]
    B --> C["Laptop with Line Chart"]
HomeCinema1060
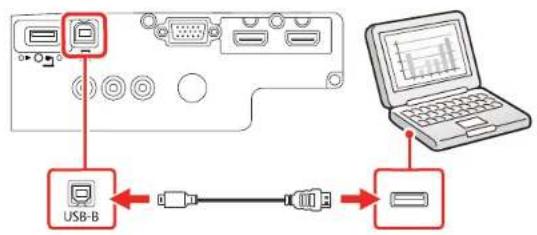
flowchart
graph TD
    A["USB-B"] --> B["USB"]
    B --> C["Laptop"]
- ConnecttheotherendtoanyavailableUSBportonyourcomputer.
- If necessary, configure your computer to work with an external USB mouse. See your computer documentation for details.
Parenttopic: ConnectingtoComputerSources
Relatedtasks
UsingtheRemoteControlasaWirelessMouse
ConnectingtoaComputerforSound
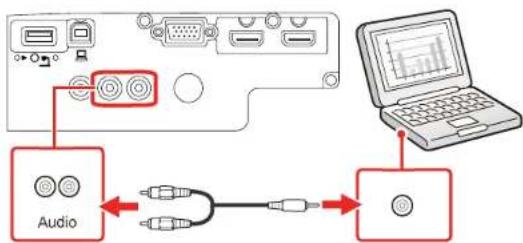
If your computer presentation includes sound and you did not connect it using the projector's USB-B or HDMI port, you can still play sound through the projector's speaker system. Connect an optional stereo mini-jackadaptercable(withone3.5mmmini-plugandtwoRCAplugs).
- Connect the audiocable to your laptop's headphone or audio-out jack, or your desktop's speaker or audio-out port.
- Connect the other end to the projector's Audiports.
HomeCinema660/760HD
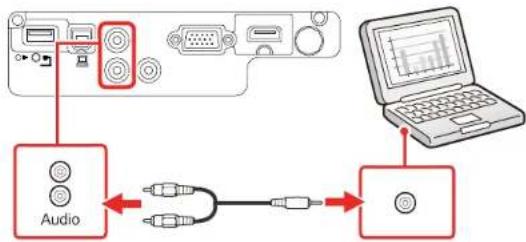
flowchart
graph TD
    A["Audio"] --> B["USB"]
    B --> C["CD"]
    D["Laptop"] --> E["Data Chart"]
HomeCinema1060
flowchart
graph TD
    A["Audio"] --> B["USB Cable"]
    B --> C["Laptop"]
    C --> D["Output"]
Parenttopic: ConnectingtoComputerSources
ConnectingtoVideoSources
Followtheinstructionsinthesesectionstoconnectvideodevicestotheprojector.
ConnectingtoanHDMIVideoSource
ConnectingtoanMHL-CompatibleDevice
ConnectingtoaComponentVideoSource
ConnectingtoaCompositeVideoSource
ConnectingtoaVideoSourceforSound
Parenttopic:ProjectorConnections
ConnectingtoanHDMIVideoSource
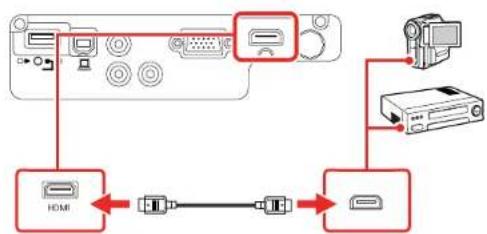
If your videosourcehasan HDMI port, you can connect it to the projector using an optional HDMI cable. The HDMI connection provides the best image equality.
-
ConnecttheHDMIcabletoyourvideosource'sHDMIoutputport.
-
Connecttheotherendtotheprojector'sHDMIport.
HomeCinema660/760HD
flowchart
graph TD
    A["Device 1"] -->|USB| B["Device 2"]
    C["Device 3"] -->|USB| D["Device 4"]
    E["Device 5"] -->|USB| F["Device 6"]
    B <--> G["USB"]
    D <--> H["USB"]
    F <--> I["USB"]
HomeCinema1060
flowchart
graph TD
    A["Device 1"] -->|USB cable| B["Device 2"]
    C["Device 3"] -->|USB cable| D["Device 4"]
    E["Computer"] -->|USB cable| F["Device 5"]
Note: The projector converts the digital audio signal sent from your video source into a mono analog signalfortheinternalspeaker.
Note: If you connected a game console, it may take a few seconds for your image to appear when you switchtothegameconsole'sinputsource.Toreducethepotentiallaginresponsetimetogame commands,setyourgameconsole'soutputformatoaprogressivesignalof480p,720p,orhigher.See yourgameconsoledocumentationforinstructions.
Parenttopic: ConnectingtoVideoSources
ConnectingtoanMHL-CompatibleDevice
If you have an MHL-compatible smartphone ortablet, you can connect it to the projector using either an MHL cable or an HDMI cable with a device-compatible MHL adapter. If you have a device with a built-in MHL connector, plug it directly into the HDMI2/MHL port Home Cinema 1060.
Note: Some connected devices may not chargewhen using an MHL adapter.
-
ConnecttheMHLcableoradaptertoyourdevice'sMicro-USBport.
-
If you are using an MHL adapter, connect it to an MHL-compatible HDMI cable.
-
Connect the other end of the cable to the projector's HDMI2/MHL port.
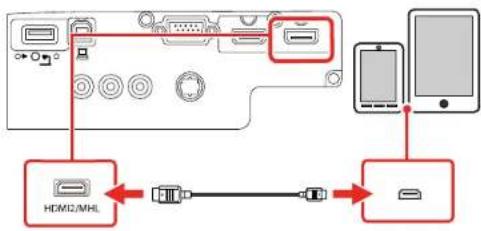
flowchart
graph TD
    A["Device"] -->|USB cable| B["HD/MSL"]
    B <--> C["USB cable"]
    C --> D["Device"]
    D -->|USB cable| E["Smartphone"]
Note: The projector converts the digital audio signal sent from your video source into a mono analog signal for the internal speaker.
Parenttopic: ConnectingtoVideoSources
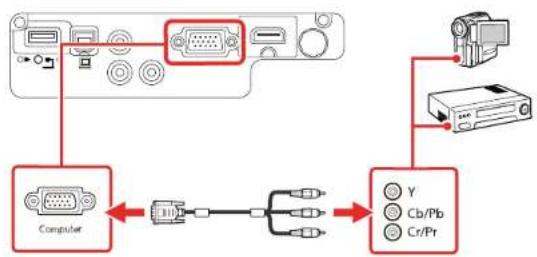
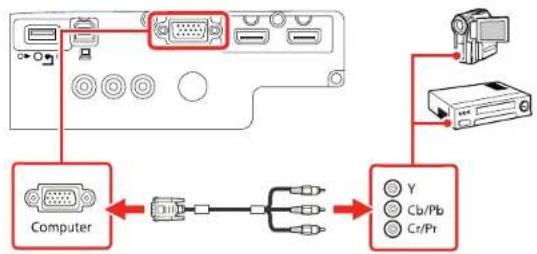
ConnectingtoaComponentVideoSource
If your videosourcehas component videoports, you can connect it to the projector using an optional component-to-VGA videocable. Depending on your component ports, you may need to use an adapter cable along with a component videocable.
-
Connect the component connector to your video source's color-coded component video output ports, usually labeled Y, Pb, Pr or Y, Cb, Cr. If you are using an adapter, connect these connectors to your component videocable.
-
ConnecttheVGAconnectortotheComputerportontheprojector.
HomeCinema660/760HD
flowchart
graph TD
    A["Computer"] --> B["USB Cable"]
    B --> C["USB Drive"]
    C --> D["Video Camera"]
    D --> E["Computer"]
    style A fill:#f9f,stroke:#333
    style B fill:#ccf,stroke:#333
    style C fill:#cfc,stroke:#333
    style D fill:#fcc,stroke:#333
    style E fill:#ffc,stroke:#333
HomeCinema1060
flowchart
graph TD
    A["Computer"] --> B["USB Cable"]
    B --> C["Switch"]
    C --> D["USB Cable"]
    D --> E["Monitor"]
    E --> F["USB Cable"]
    style A fill:#f9f,stroke:#333
    style B fill:#ccf,stroke:#333
    style C fill:#cfc,stroke:#333
    style D fill:#fcc,stroke:#333
    style E fill:#ffc,stroke:#333
- TightenthescrewsontheVGAconnector.
If your image colors appear incorrect, you may need to change the Input Signal setting in the projector's Signalmenu.
Parenttopic: ConnectingtoVideoSources
Relatedreferences
InputSignalSettings-SignalMenu
Relatedtasks
ConnectingtoaVideoSourceforSound
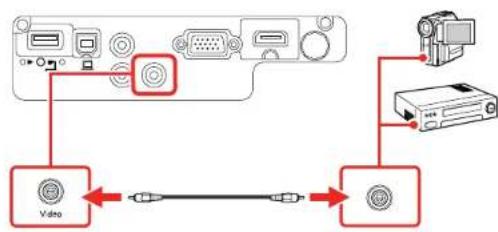
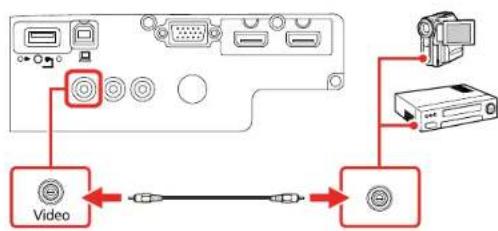
ConnectingtoaCompositeVideoSource
If your videosource has a composite video port, you can connect it to the projector using an optional RCA-style video or A/V cable.
-
Connect the cable with they yellow connect to your video source's yellow video output port.
-
Connecttheotherendtotheprojector'sVideoport.
HomeCinema660/760HD
flowchart
graph TD
    A["Video"] --> B["USB Cable"]
    B --> C["Audio"]
    C --> D["Computer"]
HomeCinema1060
flowchart
graph TD
    A["Video"] --> B["Image"]
    B --> C["Video"]
    style A fill:#f9f,stroke:#333
    style C fill:#bbf,stroke:#333
Note: If you connected a game console, it may take a few seconds for your image to appear when you switchtothegameconsole'sinputsource.Toreducethepotentiallaginresponsetimetogame commands, setyourgameconsole'soutputformatoaprogressivesignalof480p,720p,orhigher.See yourgameconsoledocumentationforinstructions.
Parenttopic: ConnectingtoVideoSources
Relatedtasks
ConnectingtoaVideoSourceforSound
ConnectingtoaVideoSourceforSound
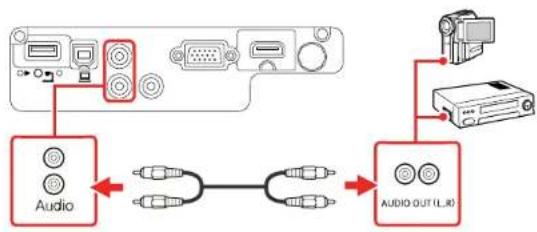
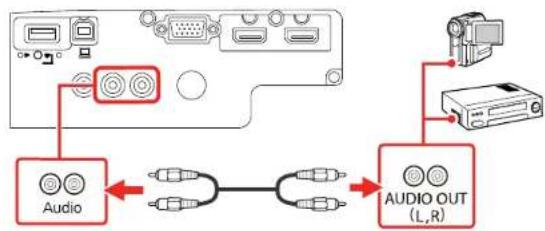
Youcanplaysoundthroughtheprojector'sspeakersystemifyourvideosourcehasaudiooutputports. ConnecttheprojectortothevideosourceusinganRCAudiocable.
- Connect the audiocable to your videosource's audio-outports.
- Connecttheotherendofthecabletotheprojector'sAudioportorports.
HomeCinema660/760HD
flowchart
graph TD
    A["Audio"] --> B["Audio OUT (LR)"]
    B --> C["Device"]
    style A fill:#f9f,stroke:#333
    style B fill:#ccf,stroke:#333
    style C fill:#cfc,stroke:#333
HomeCinema1060
flowchart
graph TD
    A["Audio"] --> B["Audio OUT (L,R)"]
    B --> C["Device"]
    D["Radio"] --> B
    E["Camera"] --> B
Note: To add additional sound, connect your video source and speakers to an audio video receiver, thenconnectthereceivertotheprojectorusingoneofthereceiver'scompatiblevideooutputs(an HDMIconnectionprovidesthebestimagequality,ifavailable).Youcanalsoconnectspeakersto anyvideosourcethathasitsownspeakerconnections.
Parenttopic: ConnectingtoVideoSources
ConnectingtoExternalUSBDevices
FollowtheinstructionsinthesesectionstoconnectexternalUSBdevicestotheprojector.
USBDeviceProjection
ConnectingaUSBDeviceorCameratotheProjector
SelectingtheConnectedUSBSource
DisconnectingaUSBDeviceorCameraFromtheProjector
Parenttopic:ProjectorConnections
Relatedtopics
ProjectingaPCFreePresentation
USBDeviceProjection
Youcanprojectimagesandothercontentwithoutusingacomputerorvideovidebyconnectinganyofthesedevicestoyourprojector:
- USBflashdrive
•Digitalcameraorsmartphone
•USBharddrive
•Multimediastorageviewer
Note: Digital cameras, smartphones must be USB-mounted devices, not TWAIN-compliant devices, and must be USB Mass Storage Class-compliant.
Note: USBharddrivesmustmeettheserequirements:
- USBMassStorageClass-compliant(notallUSBMassStorageClassdevicesaresupported)
•FormattedinFATorFAT32
- Self-poweredbytheirownACpowersupplies(bus-poweredharddrivesarenotrecommended)
- Doesnothavemultiplepartitions
YoucanprojectslideshowsfromimagefilesonaconnectedUSBdevice.
Parenttopic: ConnectingtoExternalUSBDevices
ConnectingaUSBDeviceorCameratotheProjector
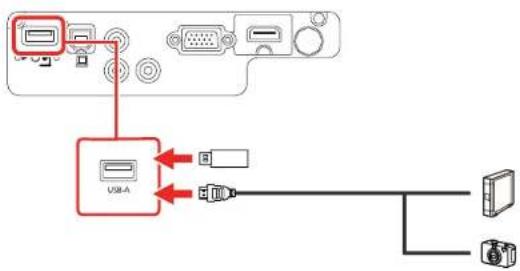
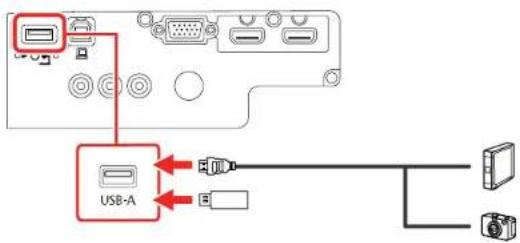
You can connect your USB device or camera to the projector's USB-A port and use it to project images and other content.
-
If your USB device camewith a power adapter, plug the device into an electrical outlet.
-
ConnecttheUSBcable(orUSBflashdrive)totheprojector'sUSB-Aport.
HomeCinema660/760HD
flowchart
graph TD
    A["Port 1"] --> B["USB-A"]
    B --> C["USB Cable"]
    B --> D["USB Cable Connector"]
    B --> E["Device"]
    B --> F["Camera"]
HomeCinema1060
Note: DonotconnectaUSBhuboraUSBcablelongerthan10feet(3m), orthedevicemaynot operatecorrectly.
- Connect the other end of the cable (if applicable) to your device.
Parenttopic: ConnectingtoExternalUSBDevices
SelectingtheConnectedUSBSource
Youcanswitchtheprojector'sdisplaytothesourceyouconnectedtotheUSB-Aport.
-
MakesuretheconnectedUSBsourceisturnedon, if necessary.
-
PresstheUSBbuttonontheremotecontrol.
Parenttopic: ConnectingtoExternalUSBDevices
DisconnectingaUSBDeviceorCameraFromtheProjector
When you finish presenting with a connected USB device or camera, you must prepare to disconnect the device from the projector.
-
If the device has a power button, turn off and un plug the device.
-
Disconnect the USB device or camera from the projector.
Parenttopic: ConnectingtoExternalUSBDevices
Installing Batteries in the Remote Control
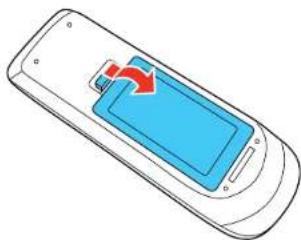
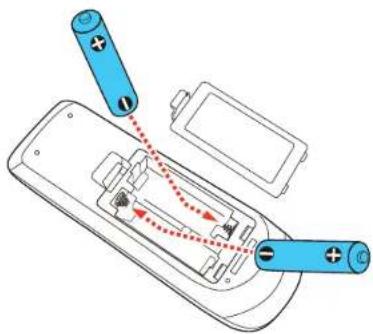
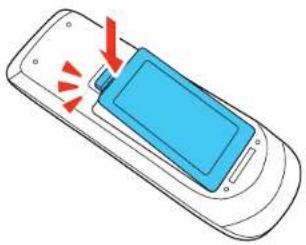
TheremotecontrolusesthetwoAAbatteriesthatcamewiththeprojector.
Caution: Use only the type of batteries specified in this manual. Do not install batteries of different types, ormixnewandoldbatteries.
- Removethebatterycover.
natural_image
Illustration of a mobile phone with a blue screen and red arrow indicating a change (no text or symbols)- Insert the batteries with the + and - ends facing as shown.
- Replacethebatterycoverandpressitdownuntilclicksintoplace.
natural_image
Illustration of a mobile phone with a blue screen and red arrows indicating action or notification (no text or symbols)Warning: Dispose of used batteries according to local regulations. Do not expose batteries to heat or flame. Keep batteries out of thereachofchildren; they are choking hazards and are every dangerous if swallowed.
Parenttopic:SettingUptheProjector
OpeningtheLensCover
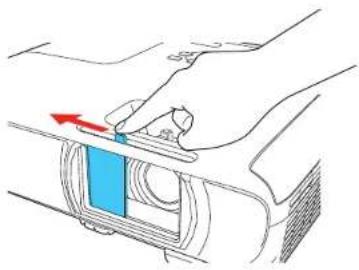
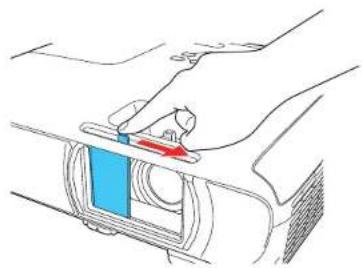
To open the projector's lens cover, slide the A/V Mute slide lever until it clicks into the open position.
natural_image
Diagram of a hand holding a device with a blue highlighted section and red arrow indicating motion (no text or symbols)Parenttopic:SettingUptheProjector
UsingtheProjectoronaNetwork
Followtheinstructionsinthesesectionstosetupyourprojectorforuseonanetwork.
WirelessNetworkProjection
SettingUpProjectorNetworkE-MailAlerts
SettingUpMonitoringUsingSNMP
ControllingaNetworkedProjectorUsingaWebBrowser
WirelessNetworkProjection
Youcanprojectoverawirelessnetwork. Todothis, you must setup your projector and computer for wireless projection.
Aftersettinguptheprojectorasdescribedhere,installthenetworksoftwarefromtheincludedCDor downloadthesoftwareandmanualsasnecessary.
Note: If your projector is connected via a LAN cable to a network that includes a wireless access point, youcanconnecttotheprojectorwirelesslythroughtheaccesspointusingtheEpsonnetworksoftware.
InstallingtheWirelessLANModule
UsingaQRCodetoConnectaMobileDevice
UsingQuickWirelessConnection(Windows)
SelectingWirelessNetworkSettingsManually
SelectingWirelessNetworkSettingsinWindows
SelectingWirelessNetworkSettingsMac
SettingUpWirelessNetworkSecurity
Parenttopic: Using the Projectorona Network
Relatedreferences
AdditionalProjectorSoftwareandManuals
OptionalEquipmentandReplacementParts
InstallingtheWirelessLANModule
Tousetheprojectoroverawirelessnetwork, installtheEpson802.11b/g/nwirelessLANmoduleinthe projector(HomeCinema660/760HD). Donotinstallanyothertypeofwirelessmodule.
Note: The wireless LAN module is not included with your projector and is optional.
Note: You donotneedthewireless LAN module for the Home Cinema 1060 sincethewireless functionality is built-in.
- Turnoff the projector and unplug the power cord.
- Insert the wireless LAN module into the USB-Aport.
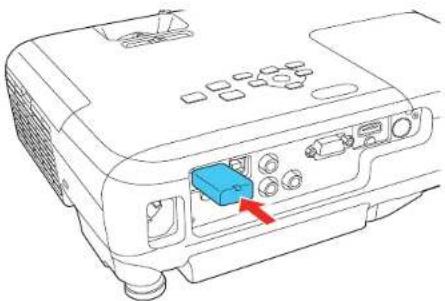
natural_image
Line drawing of a projector with a blue internal component and a red arrow pointing to it (no text or symbols)- Pluginandturnontheprojector.
ThelightonthewirelessLANmoduleturnsonwhenthemoduleisinstalledandoperating. Thelight flasheswhenthemoduleiscommunicatingoverthenetwork.
Parenttopic: Wireless Network Projection
UsingaQRCodetoConnectaMobileDevice
Afteryouselectthewirelessnetworksettingsforyourprojector,youcandisplayaQRcodeonthe screenanduseittoconnectamobiledeviceusingtheEpsoniProjectionapp.
Note: Make sure you have installed the latest version of Epson iProjection on your device. Visit epson.com/iprojection (U.S.) or epson.ca/iprojection (Canada) for more information.
-
PresstheMenubutton.
-
SelecttheNetworkmenuandpressEnter.
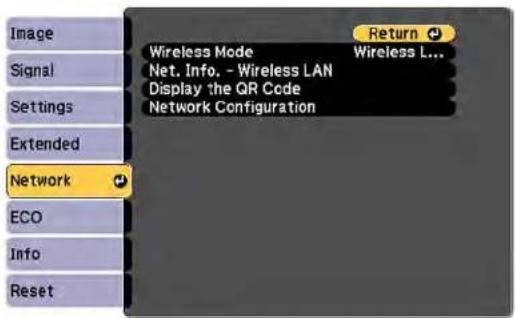
-
SelectNetworkConfigurationandpressEnter.
-
SelecttheBasicmenuandpressEnter.
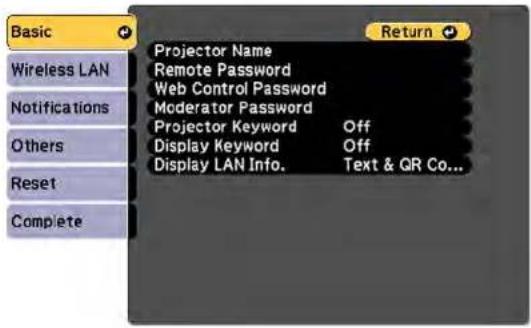
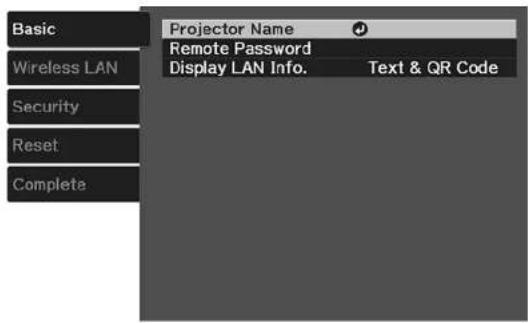
- SettheDisplayLANInfosettingtoText&QRCode.
- Select Complete and follow the on-screen instructions to save your settings and exit the menus.
7.Dooneofthefollowing:
- PresstheLANbuttonontheremotecontrol.
- SelectDisplaytheQRCodeintheprojector'sNetworkmenu.
YourprojectordisplaystheQRcodeontheprojectionsurface.
Note: If you do not see the QR code after pressing the LAN button, press Enter to display it.
8.StartEpsoniProjectiononyourmobiledevice.
9. Use the QR codereader feature to read the QR code and connect your device to the projector. Visit epsilon.com/iprojection (U.S.) or epsilon.ca/iprojection (Canada) for instructions.
Parenttopic: Wireless Network Projection
UsingQuickWirelessConnection(Windows)
YoucancreateaQuickWirelessConnectionUSBKeytoquicklyconnecttheprojectortoaWindows computerwirelessly. Thenyoucanprojectyourpresentationandremovethekeywhenyouaredone.
Note:AUSBflashdriveisnotincludedwithyourprojector.
- CreateaQuickWirelessConnectionUSBKeywithaUSBflashdriveandtheEpsoniProjection (Windows/Mac)software.
Note: Seethe Epsoni Projection Operation Guide for instructions.
- Turnon the projector.
- Removethewireless LAN module from the USB-Aport (Home Cinema 660/760HD).
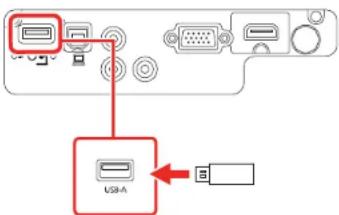
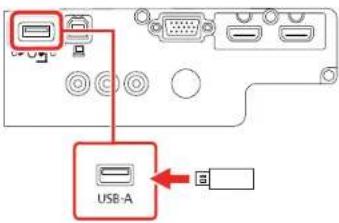
- Insert the USB key into the projector's USB-Aport.
HomeCinema660/760HD
HomeCinema1060
Youseeaprojectedmessagethatthenetworkinformationupdateiscomplete.
-
RemovetheUSBkey.
-
ReinsertthewirelessLANmoduleintotheprojector(HomeCinema660/760HD).
-
Insert the USB key into a USB port on your computer.
Note: In Windows Vista, if you see the AutoPlay window, select Run MPPLaunch.exe, then select Allowonthenextscreen.
- Followtheon-screen instruction to install the Epsoni Projection (Windows/Mac) software.
Note: If you see a Windows Firewall message, click Yes to disable the firewall. You need administratorauthoritytoinstallthesoftware.Ifitisnotinstalledautomatically,double-click MPPLaunch.exeintheUSBkey.
Afterafewminutes, yourcomputerimageisdisplayedbytheprojector. If it does not appear, press the LAN or Source Search button on your remote control or restart your computer.
-
Run your presentation as necessary.
-
When you finish projecting wirelessly, select the Safely Remove Hardware option in the Windows taskbar, then removetheUSBkey from your computer.
Note: You can share the USB key with other computers without disconnecting your computer. You may need to start your computer to activate your wireless LAN connection.
Parenttopic: Wireless Network Projection
SelectingWirelessNetworkSettingsManually
Before you can project from your wireless network, you must select thenetworksettings for the projector using its menusystem.
- Turnontheprojector.
2.PresstheMenubutton. - SelecttheNetworkmenuandpressEnter.
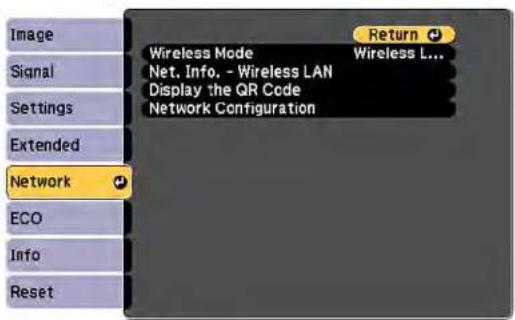
- MakesuretheWirelessModesettingissettoWirelessLANOn.
-
SelectNetworkConfigurationandpressEnter.
-
SelecttheBasicmenuandpressEnter.
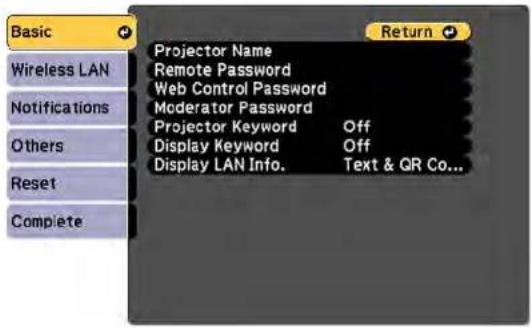
- Select the following basic options as necessary:
-ProjectorNameletsyouenteranameupto16alphanumericcharacterslongtoidentifytheprojectoroverthenetwork.
- RemotePasswordletsouenterapasswordupto8alphanumericcharacterslongforaccessing theRemoteorBasicControlscreenintheEpsonWebControl.(Defaultusernameis EPSONREMOTE;defaultpasswordsguest.)
-WebControlPasswordletsyouenterapasswordupto8alphanumericcharacterslongfor accessingtheprojectorovertheweb.(DefaultusernameisEPSONWEB;defaultpasswordis admin.)
- ModeratorPasswordletyouenterapasswordupto4numberslongforaccessingtheprojector asamoderatorwithEpsoniProjection.
-ProjectorKeywordletysyouturnonasecuritypasswordtopreventaccesstotheprojectorbyanyonenotintheroomwithit.TheprojectordisplaysarandomkeywordthatyoumustenterusingtheEpsoniProjectionapp.
- DisplayKeywordletsyoudisplayakewordontheprojectedimagewhenaccessingthe projectorusingEpsoniProjection.
- Display LAN Info lets you select how the projector displays network information. You can select anoptiontodisplayaQRcodethatletssyouquicklyconnectyouriOSorAndroiddevicesusingthe EpsoniProjectionapp.
Note: Usethedisplayedkeyboardtoenterthename, passwordsandkeyword.Pressthearrow buttonsontheremotecontroltohighlightcharactersandpressEntertoselectthem.
- Select the Wireless LAN menu and press Enter.
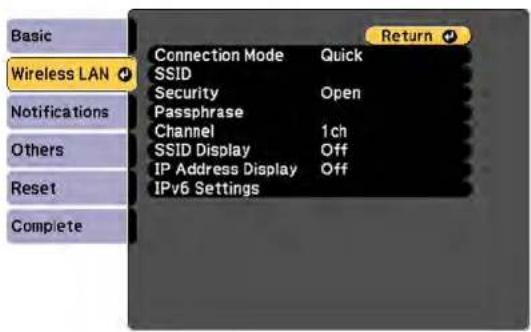
- Select these settings on the Wireless LAN menu as necessary for your network.
- When you finish selecting settings, select Complete and follow the on-screen instructions to save yoursettingsandexithemenus.
Afteryoucompletethewirelesssettingsforyourprojector,youneedtoselectthewirelessnetworkon yourcomputer,oriOSorAndroiddevice.
WirelessLANMenuSettings
Parenttopic: Wireless Network Projection
WirelessLANMenuSettings
| SettingOptionsDescription | ||
| ConnectionModeQuick | Advanced | Selectsthetypeofwireless connection:Quick:letsyouconnectto multiplesmartphones,tablets,or computersdirectlyAdvanced:letsyouconnectto multiplesmartphones,tablets,or computersviaawirelessnetwork accesspoint |
| SearchAccessPointToSearchView | Searchforavailablewireless | networkaccesspointsinAdvancedconnectionmode |
| SSIDUp32alphanumericcharacters | SetstheSSID(networkname)of | thewirelessLANsystemthe projectorisconnectingto |
| SecurityOpen | WPA2-PSKWPA/WPA2-PSK | Selectsthetypeofwireless securityusedinthewireless network(someoptionsareonly availablewhentheConnection Modesettingissetto Advanced) |
| PassphraseBetween8to63alphanumericcharacters | meric characters | Enteraparaphraseforthe wirelessnetwork |
| Channel1ch | 6ch11ch | InQuickconnectionmode, selectsthefrequencyband (channel)usedbythewireless LAN |
| IPSettingsDHCP | IPAddressSubnetMaskGatewayAddress | TurnsonDHCPifyournetwork assignsaddressesautomatically; settoOfftomanuallyenterthe network'sIPAddress,Subnet Mask,andGatewayAddress |
| SSIDDisplayOn | Off | Selectswhethertodisplaythe SSIDonthenetworkstandby screen |
| IPAddressDisplayOn | Off | SelectswhethertodisplaytheIP addressonthenetworkstandby screen |
| IPv6SettingsIPv6 | AutoConfiguration UseTemporaryAddress | SelectstheIPv6settingswhen youconnecttheprojectortothe networkusingIPv6 |
Parenttopic: Selecting Wireless Network Settings Manually
SelectingWirelessNetworkSettingsinWindows
Beforeconnectingtotheprojector, select the correct wireless network on your computer.
-
To access your wireless utility software, access the Desktop and double-click then network icon on the Window stask bar.
2.Dooneofthefollowing: -
If your projector is set upon an existing network (Advanced mode), select thenetworkname (SSID).
- IfyourprojectorisconfiguredforQuickmode,selecttheprojector'sSSID.
3.ClickConnect.
Parenttopic: Wireless Network Projection
SelectingWirelessNetworkSettingsonMac
Beforeconnectingtotheprojector,selectthecorrectwirelessnetworkonyourMac.
- ClicktheAirPorticononthemenubaratthetopofthescreen.
-
MakesureAirPortisturnedon, thendooneofthefollowing:
-
If your projector is set upon an existing network (Advanced mode), select thenetworkname (SSID).
- IfyourprojectorisconfiguredforQuickmode,selecttheprojector'sSSID.
Parenttopic: Wireless Network Projection
SettingUpWirelessNetworkSecurity
Youcansetupsecurityforyourprojectortouseonthewirelessnetwork.Setuponeofthefollowing securityoptionstomatchthesettingsusedonyournetwork:
•WPA/WPA2-PSKsecurity(Advancedconnectionmode)
•WPA2-PSKsecurity(AdvancedandQuickconnectionmode)
Checkwithyournetworkadministratorforguidanceonenteringthecorrectinformation.
- PresstheMenubutton.
- SelecttheNetworkmenuandpressEnter.
- SelectNetworkConfigurationandpressEnter.
- SelecttheWirelessLANmenuandpressEnter.
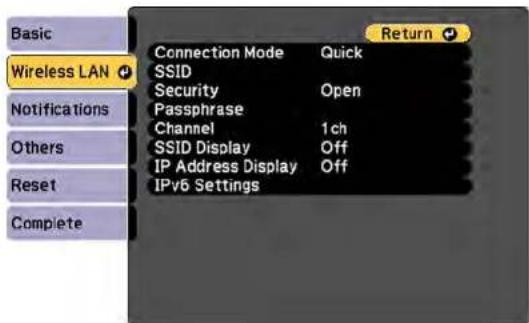
- SelecttheSecuritysettingandpressEnter.
- Select these security settings for your network.
- When you finish selecting settings, select Complete and follow the on-screen instructions to save yoursettingsandexithemenus.
Parenttopic: Wireless Network Projection
SettingUpProjectorNetworkE-MailAlerts
Youcansetuptheprojectortosendyouane-mailalertoverthenetworkifthereisaproblemwiththe projector.
- PresstheMenubutton.
- SelecttheNetworkmenuandpressEnter.
-
SelectNetworkConfigurationandpressEnter.
-
SelecttheNotificationsmenuandpressEnter.
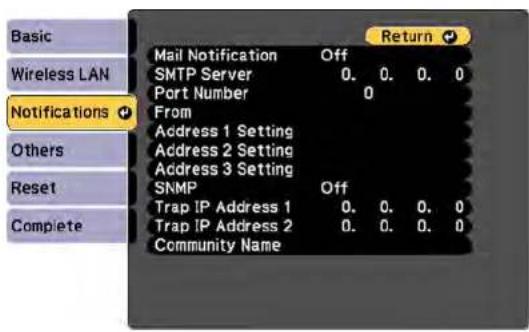
5.TurnonMailNotification.
6.EntertheIPaddressfortheSMTPServersetting.
Note: ToentertheIPaddressusingthenumerickeysontheremotecontrol,pressandholdthe Numbutton.Donotusetheseaddresses:127.x.x.xor224.0.0.0through255.255.255.255(wherex isanumberfrom0to255).
- SelectanumberfortheSMTPserverPortNumbersetting, from1 to 65535 (defaultis25).
8.Enterthesender'semailaddressastheFromsetting. -
Choose an Address field, enter the e-mail address, and select the alerts you want to receive there. Repeatforuptothreeaddresses.Youre-mailaddresscanbeupto32alphanumericcharacters long.
-
When you finish selecting settings, select Complete and follow the on-screen instructions to save yoursettingsandexithemenus.
Note: If a critical problem causes a projector to shut down, you may not receive an e-mail alert.
NetworkProjectorE-mailAlertMessages
Parenttopic: Using the Projectorona Network
NetworkProjectorE-mailAlertMessages
When a problem occurs with an networked projector, and you selected to receive email alerts, you receive an email containing the following information:
•TheemailaddressenteredastheFromsetting
•EpsonProjectoronthesubjectline
- Thenameoftheprojectorexperiencingaproblem
•TheIPaddressoftheaffectedprojector
•Detailedinformationabouttheproblem
Note: If a critical problem causes a projector to shut down, you may not receive an e-mail alert.
Parenttopic: SettingUpProjectorNetworkE-MailAlerts
SettingUpMonitoringUsingSNMP
NetworkadministratorscaninstallSNMP(SimpleNetworkManagementProtocol)softwareonnetworkcomputerssotheycanmonitorprojectors.Ifyournetworkusesthissoftware,youcansetuptheprojectorforSNMPmonitoring.
-
PresstheMenubutton.
-
SelecttheNetworkmenuandpressEnter.
-
SelectNetworkConfigurationandpressEnter.
-
Select the Notifications menu and press Enter.
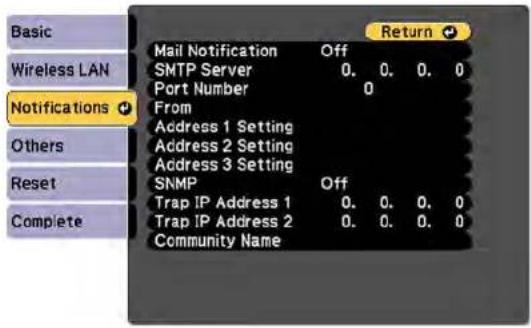
- TurnontheSNMPsetting.
6.EnteruptotwoIPaddressestoreceiveSNMPnotifications,using0to255foreachaddressfield.
Note: To enter the IP address using the numeric key son theremote control, press and hold the Numbutton. Donot us these addresses: 127.x.x.xor224.0.0 through 255.255.255.255 (where is anumber from 0 to 255).
-
If you want this projector to receive broadcasted messages over the network, select the Others menuandturnontheMessageBroadcastingsetting.Administratorscanbroadcastmessagesover thenetworkusingEpsonProjectorManagement(Windowsonly).
-
When you finish selecting settings, select Complete and follow the on-screen instructions to save yoursettingsandexithemenus.
Parenttopic: Using the Projectorona Network
ControllingaNetworkedProjectorUsingaWebBrowser
Once you have connected your project to your own network, you can select projector settings and control projection using a compatible web browser. This lets you access the projector remotely.
Note: The web setup and control features support Microsoft Internet Explorer 9.0 or later, and Safari on networksthatdonotuseaproxyserverforconnection.Youcannotselectalloftheprojectormenu settingsorcontrolallprojectorfunctionsusingawebbrowser.
Note: If you set Standby Mode to Communication On in the ECO menu, you can use a web browser to selectsettingsandcontrolprojectioneveniftheprojectorisinstandbymode.
- Makesuretheprojectoristurnedon.
2.Startyourwebbrowseronacomputerordeviceconnectedtothenetwork. - Type the projector's IP address into the browser's address box and press the computer's Enter key. YouseetheWebControlscreen.
Epson Web Control
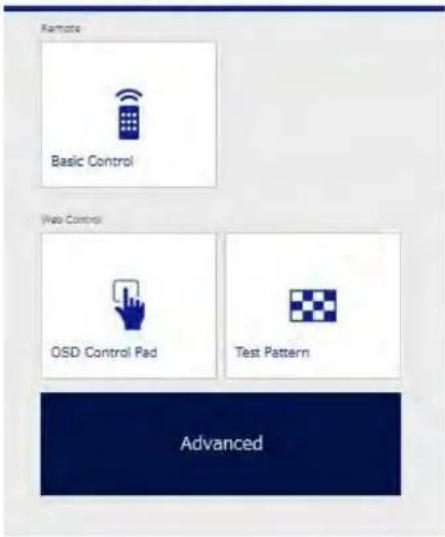
- Toselectprojectormenusettings, selectAdvancedtobringupalistofoptions.
Note: You may need to log in to access some of the options on the Web Control screen. If you see a loginwindow,enteryourusernameandpassword.(ThedefaultusernameisEPSONWEBandthe defaultpasswordisadmin.)
- To control projection remotely, select the Basic Control option from the Web Controlscreen.
Note: If you see a login window, entry your username and password. (The default username is EPSON REMOTE and the default password disgust.)
Youseeascreenlikethis:
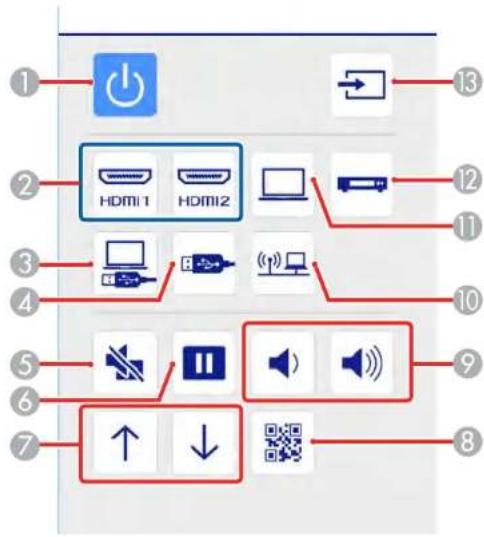
1 Powerbuttoncontrol
2SelectsanHDMIportsource
3SelectstheUSBDisplaysource
4SelectstheUSBdevicesource
5A/VMutebuttoncontrol
6Freezebuttoncontrol
7PageUpandPageDownbuttoncontrols
8DisplaysaQRcode
9Volumebuttoncontrols
10Selectsthenetworksource
11 SelectstheComputerportsource
12SelectsaVideoportsource
13 Searchesforconnectedsources
- Select the icon corresponding to the projector function you want to control.
Parenttopic: Using the Projectorona Network
Relatedreferences
ProjectorSetupSettings-ECOMenu
UsingBasicProjectorFeatures
Followtheinstructionsinthesesectionstouseyourprojector'sbasicfeatures.
TurningOntheProjector
TurningOfftheProjector
SelectingtheLanguagefortheProjectorMenus
AdjustingtheImageHeight
ImageShape
ResizingthelmagewiththeZoomRing
FocusingtheImageUsingtheFocusRing
RemoteControlOperation
SelectinganImageSource
ProjectionModes
ImageAspectRatio
ColorMode
ControllingtheVolumewiththeVolumeButtons
ProjectingaPCFreePresentation
TurningOntheProjector
Turnonthecomputerorvideoequipmentyouwanttousebeforeyouturnontheprojectorsoitcan displaytheimagesource.
- Opentheprojector'slenscover.
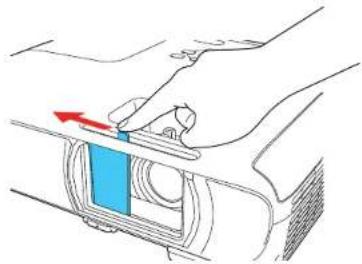
natural_image
Diagram of a hand holding a blue object with a red arrow, no text or symbols present- Connect the power cord to the projector's power inlet.
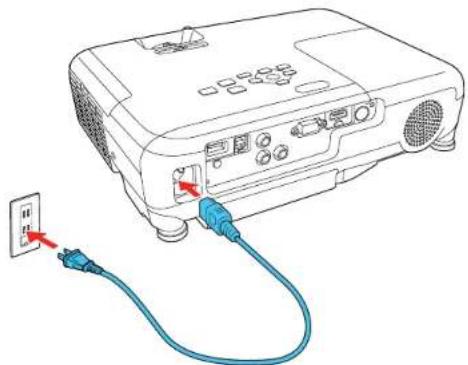
natural_image
Line drawing of a projector with blue cables and a small screen connected to the front panel (no text or symbols)- Plugthepowercordintoanelectricaloutlet.
Note: With Direct Power On turned on, the projector turns on as soon as you plug it in.
4.Pressthepowerbuttonontheprojectorotheremotecontroltoturnontheprojector.
TheprojectorbeepsandtheStatuslightflashesblueastheprojectorwarmsup.Oncetheprojector iswarmedup,theStatuslightstopsflashingandturnsblue.
Warning: Never look into the projector lens when the lamp is on. This can damage your eyes and is especially dangerous for children.
If you donot see a projected imagerightaway, try the following:
- Verifythelenscoverisopenalltheway.
•Turnontheconnectedcomputerorvideodevice.
- InsertaDVDorothervideomediaandpresstheplaybutton,ifnecessary.
- Changethescreenoutputfromthecomputerwhenusingalaptop.
- PresstheSourceSearchbuttonontheprojectororremotecontroltodetectthevideosource.
- Pressthebuttonforthevideosourceontheremotecontrol.
- IftheHomescreenisdisplayed,selectthesourceyouwanttoproject.
UsingtheHomeScreen
Parenttopic: UsingBasicProjectorFeatures
Relatedtasks
SelectinganImageSource
UsingtheHomeScreen
YoucanselectinputsourcesandotherfrequentlyusedoptionsfromtheHomescreen.
-
TodisplaytheHomescreen,dooneofthefollowing:
-
PresstheHomebuttononthecontrolpanelorremotecontrol.
- TurnontheprojectorwiththeHomeScreenAutoDispsettingenabled.
-
Turnontheprojectorwhennosignalisreceivedfromtheselectedinputsource.
-
Pressthearrowbuttonsontheremotecontrolorcontrolpaneltonavigatethescreen, and press Entertoselectanoption.
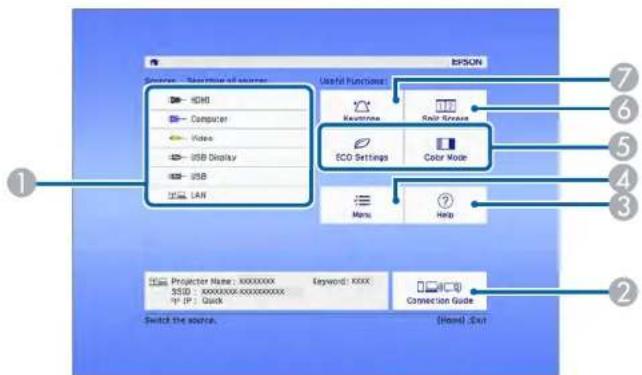
1 Selectthevideosourceyouwanttoproject
2DisplaytheConnectionGuide
3DisplaytheHelpscreen
4Displaytheprojector'smenus
5Selectcustomizablemenuoptions
6Dependingontheprojector,selecttoprojecttwoimagesfromdifferentimagesources simultaneouslyorchangethePowerConsumptionsetting
7Correcttheimageshape
Note:YourHomescreenmaylookdifferentfromtheillustrationshownhere.Youcanselectthe customizable menu options using the Custom Function 1 and Custom Function 2 settings in the Extendedmenu.
- PresstheHomebuttontohidetheHomescreen.
Parenttopic: TurningOntheProjector
Relatedreferences
ProjectorSetupSettings-ExtendedMenu
TurningOfftheProjector
Before turning off the projector, shutdown any computer connected to it so you can see the computer display during shutdown.
Note: Turn off this product when not in use to prolong the life of the projector. Lamp life will vary depending upon modeselected, environmental conditions, and usage. Brightness decreases over time.
Note: When using the A/V Mute feature, the projector lamp is still on. To turn off the lamp, turn off the projector.
- Pressthepowerbuttonontheprojectorotheremotecontrol.
Theprojectordisplaysashutdownconfirmationscreen.
Power Off?
Yes: Press ⏻ button No : Press any other button
- Pressthepowerbuttonagain.(Toleaveiton, pressanyotherbutton.)
Theprojectorbeepstwice,thelampturnsoff,andtheStatuslightturnsoff.
Note: With Epson's Instant Off technology, there is no cool-down period so you can pack up the projector for transport right away (if necessary).
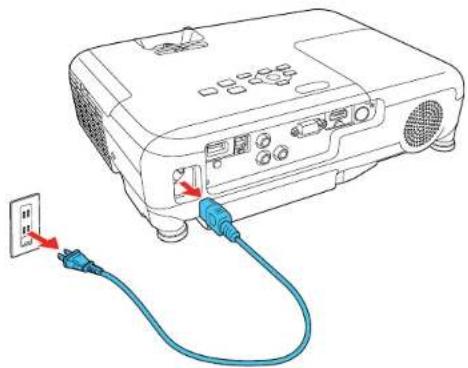
- Totransportorstoretheprojector, makesureStatuslightisoff, thenunplugthepowercord.
natural_image
Line drawing of a projector with two connected cables, one showing a cable and the other a plug inserted into a socket (no text or symbols)Caution: To avoid damaging the projector or lamp, never unplug the power cord when the status light is on or flashing.
- Closetheprojector'slenscover.
natural_image
Line drawing of a hand holding a blue object with a red arrow, partially enclosed in a vehicle frame (no text or symbols)Parenttopic: UsingBasicProjectorFeatures
Relatedreferences
ProjectorLightStatus
SelectingtheLanguagefortheProjectorMenus
If you want to view the projector's menus and messages in another language, you can change the Languagesetting.
- Turnon the projector.
2.PresstheMenubutton.
- SelecttheExtendedmenuandpressEnter.
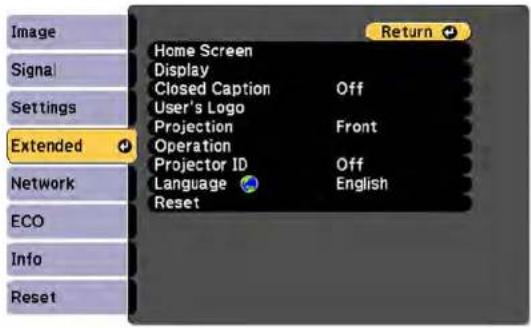
- Select the Languagesetting and press Enter.
- Select the language you want to use and press Enter.
- PressMenuorEsctoexitthemenus.
Parenttopic: UsingBasicProjectorFeatures
AdjustingthelmageHeight
If you are projecting from a table or other flats surface, and the image is too high or low, you can adjust the image height using the projector's adjustable feet.
- Turnon the projector and display an image.
- Toadjustthefrontfoot, pulluponthefootreleaseleverandliftthefrontoftheprojector.
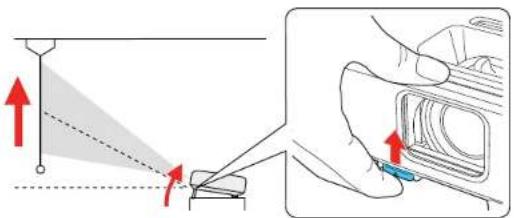
Thefootextendsfromtheprojector.
-
Releasethevertolockthefoot.
-
If the image is tilted, rotate there near feet to adjust their height.
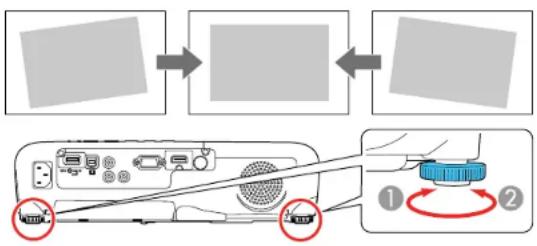
flowchart
graph TD
    A["Image Input"] --> B["Image Output"]
    B --> C["Device ①"]
    B --> D["Device ②"]
If the projected image is unevenly rectangular, you need to adjust the imageshape.
Parenttopic: UsingBasicProjectorFeatures
ImageShape
Youcanprojectanevenlyrectangularimagebyplacingtheprojectordirectlyinfrontofthecenterofthe screenandkeepingitlevel. Ifyouplacetheprojectoratanangletothescreen,ortiltedupordown,oroff totheside,youmayneedtocorrecttheimageshapeforthebestdisplayquality.
Whenyouturnonautomatickeystonecorrectioninyourprojector'sSettingsmenu,yourprojector automaticallycorrectsverticalkeystoneeffectswhenyourepositiontheprojector.
CorrectingImageShapewiththeHorizontalKeystoneSlider
CorrectingImageShapewiththeKeystoneButtons
CorrectingImageShapewithQuickCorner
Parenttopic: UsingBasicProjectorFeatures
CorrectingImageShapewiththeHorizontalKeystoneSlider
Youcanusetheprojector's horizontal keystones slidertocorrect the shape of an imagethatis unevenly rectangular horizontally, such as when the projector is placed to these side of the projection area.
Note: To provide the best possible image quality, adjust the projector's position to correct the image shape. If this isn't possible, use the horizontal keystones slider on the project to correct the image shape.
- Turnon the projector and display an image.
Note: You can display a pattern to aid in adjusting the projected image using the Settings menu.
Note: You can also display the pattern by pressing the User button on the remote control (if the test patternisassignedtothisbutton).
- Adjust the slider until the image is evenly rectangular.
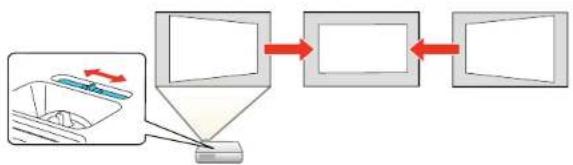
flowchart
graph TD
    A["Receipt"] --> B["Packaging"]
    B --> C["Arrow to Paper Box"]
    C --> D["Arrow to Panel Box"]
    D --> E["Arrow to Panel Box"]
Aftercorrection, your image is slightly smaller.
Parenttopic:ImageShape
CorrectingImageShapewiththeKeystoneButtons
Youcanusetheprojector'skeystonecorrectionbuttonstocorrecttheshapeofanimagethatis unevenlyrectangularonthesides.
Note: To provide the best possible image quality, adjust the projector's position to correct the image shape. If this isn't possible, use the keystone correction button on the project to correct the image shape.
- Turnon the projector and display an image.
Note: You can display a pattern to aid in adjusting the projected image using the Settings menu.
Note: You can also display the pattern by pressing the User button on the remote control (if the test patternisassignedtothisbutton).
- PressoneofthesekeystonebuttonsonthecontrolpaneltodisplaytheKeystoneadjustment screen.
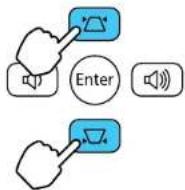
- Pressakeystonebuttonontheprojector'scontrolpaneltoadjusttheimageshape.
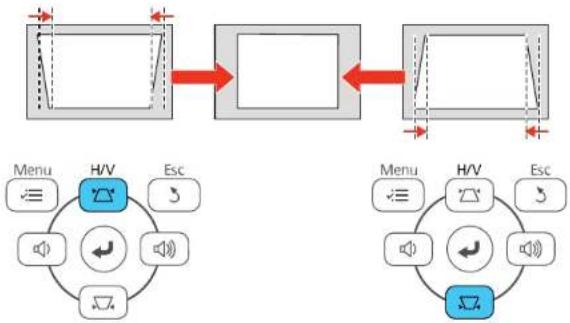
flowchart
graph LR
    A["Input Data"] --> B["Data Flow"]
    B --> C["Output Data"]
    subgraph Left
        D["Menu"] --> E["H/V"]
        E --> F["Esc"]
        G["Audio Icon"] --> H["Radio Icon"]
        I["Audio Icon"] --> J["Radio Icon"]
        K["Audio Icon"] --> L["Radio Icon"]
        M["Audio Icon"] --> N["Radio Icon"]
    end
    subgraph Right
        O["Menu"] --> P["H/V"]
        P --> Q["Esc"]
        R["Audio Icon"] --> S["Radio Icon"]
        T["Audio Icon"] --> U["Radio Icon"]
        V["Audio Icon"] --> W["Radio Icon"]
        X["Audio Icon"] --> Y["Radio Icon"]
    end
HomeCinema660
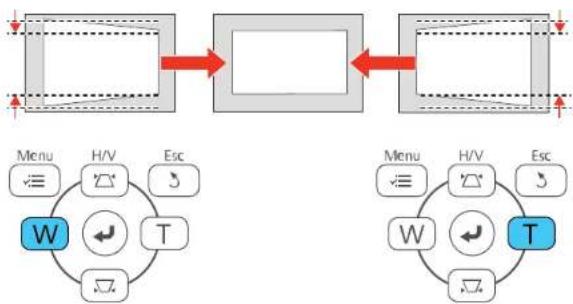
flowchart
graph LR
    A["Input"] --> B["Process Step"]
    B --> C["Output"]
    subgraph Left
        D["Menu"] --> E["H/V"] --> F["Esc"]
        G["W"] --> H["T"] --> I["Esc"]
        J["Esc"] --> K["Esc"]
    end
    subgraph Right
        L["Menu"] --> M["H/V"] --> N["Esc"]
        O["W"] --> P["T"] --> Q["Esc"]
        R["Esc"] --> S["Esc"]
    end
HomeCinema760HD/1060
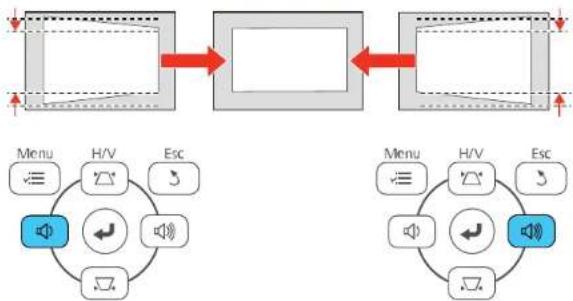
flowchart
graph LR
    A["Module 1"] --> B["Module 2"]
    B --> C["Module 3"]
    C --> D["Menu H/V Esc"]
    D --> E["Menu H/V Esc"]
    style A fill:#f9f,stroke:#333
    style B fill:#ccf,stroke:#333
    style C fill:#cfc,stroke:#333
    style D fill:#fcc,stroke:#333
Note: The horizontal keystone adjustment buttons are labeled Wide and Tele on the Home Cinema 660.
Aftercorrection, your image is slightly smaller.
Note: If the projector is installed out of reach, you can also correct the image shape with the remote controlling the H/V-Keystonesettingsintheprojectormenus.
Parenttopic:ImageShape
Relatedreferences
ProjectorFeatureSettings-SettingsMenu
CorrectingImageShapewithQuickCorner
Youcanusetheprojector'sQuickCornersettingtocorrecttheshapeandsizeofanimagethatis unevenlyrectangularonallsides.
Note: To provide the best possible image quality, adjust the projector's position to correct the image shape. If this isn't possible, use the Quick Cornersetting to correct the imageshape.
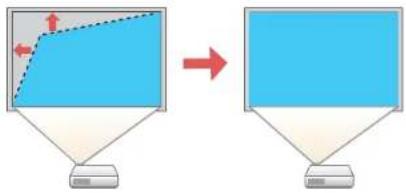
flowchart
graph TD
    A["Blue Shape"] --> B["Computer"]
    C["Arrow"] --> D["Computer"]
- Turnon the projector and display an image.
Note: You can display a pattern to aid in adjusting the projected image using the Settings menu.
Note: You can also display the pattern by pressing the User button on the remote control (if the test patternisassignedtothisbutton).
2.PresstheMenubutton.
- SelecttheSettingsmenuandpressEnter.
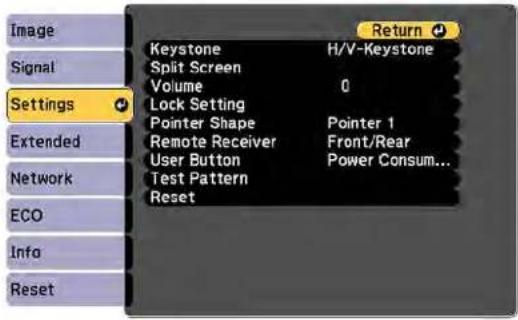
-
SelecttheKeystonesettingandpressEnter.
-
Select the Quick Corner setting and press Enter. Then press Enter again.
YouseetheQuickCorneradjustmentscreen:
![[Quick Corner] Select the area:](/content/2026/05/1074350/images/9dfccdfc6c8c5b22120b6b89778d100269a3d9977f3b29d64bd094475f892f93.jpg)
-
Usethearowbuttonsontheprojectorotheremotecontroltoselectthecorneroftheimageyou wanttoadjust.ThenpressEnter.
-
Pressthearrowbuttonstoadjusttheimageshapeasnecessary.
- When you are finished, press Esc.
Parenttopic:ImageShape
ResizingthelmagewiththeZoomRing
- Turnon the projector and display an image.
- Toenlargeorreducetheimagesize, rotatetheprojector'szoomring.
Parenttopic: UsingBasicProjectorFeatures
FocusingtheImageUsingtheFocusRing
Youcancorrectthefocususingthefocusing.
- Turnon the projector and display an image.
Note: You can display a pattern to aid in adjusting the projected image using the Settings menu.
Note: You can also display the pattern by pressing the User button on the remote control (if the test patternisassignedtothisbutton).
- Tosharpentheimagefocus, rotatetheprojector's focus ring.
HomeCinema660
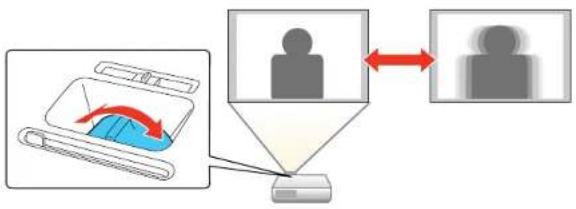
flowchart
graph TD
    A["Download"] --> B["User Interaction"]
    B --> C["Device"]
    D["User Interaction"] --> B
    E["User Interaction"] --> B
    F["User Interaction"] --> B
    G["User Interaction"] --> B
    H["User Interaction"] --> B
    I["User Interaction"] --> B
    J["User Interaction"] --> B
    K["User Interaction"] --> B
    L["User Interaction"] --> B
    M["User Interaction"] --> B
    N["User Interaction"] --> B
    O["User Interaction"] --> B
    P["User Interaction"] --> B
    Q["User Interaction"] --> B
    R["User Interaction"] --> B
    S["User Interaction"] --> B
    T["User Interaction"] --> B
    U["User Interaction"] --> B
    V["User Interaction"] --> B
    W["User Interaction"] --> B
    X["User Interaction"] --> B
    Y["User Interaction"] --> B
    Z["User Interaction"] --> B
HomeCinema760HD/1060
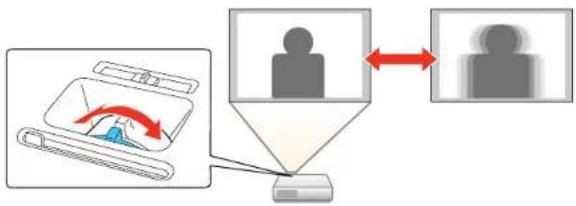
flowchart
graph TD
    A["Download"] -->|Red Arrow| B["User Interaction"]
    B --> C["Identity Transfer"]
    C --> D["User Identity"]
Parenttopic: UsingBasicProjectorFeatures
RemoteControlOperation
Theremotecontrolletsyoucontroltheprojectorfromalmostanywhereintheroom.Youcanpointitat thescreen,orthefrontorbackoftheprojector.
Makesurethatyouaimtheremotecontrolattheprojector'sreceiverswithinthedistanceandangles listedhere.
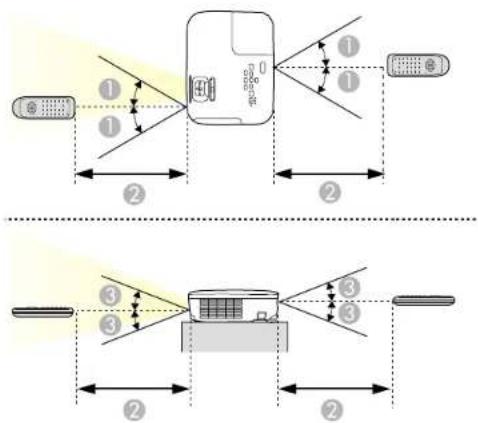
130°
219.7 feet(6m)
315°
Note: Avoid using the remote control in conditions with bright fluorescent lights or in direct sunlight, or theprojectormaynotrespondtocommands. If you will not use theremotecontrol for alongtime, removethebatteries.
UsingtheRemoteControlasaWirelessMouse
UsingtheRemoteControlasaPointer
Parenttopic: UsingBasicProjectorFeatures
UsingtheRemoteControlasaWirelessMouse
Youcanusetheprojector'sremotecontrolasawirelessmousesoyoucancontrolprojectionata distancefromthecomputer.
Note: This function does not work when you project from a device connected using an MHL cable (Home Cinema 1060).
- Connect the projector to a computer using the projector's USB-B, Computer, or HDMI port to display video.
-
If you connected your computer to a port other than the projector's USB-B port, also connect a USB cabletotheprojector's USB-B port and toaUSBportonyourcomputer(forwirelessmouse support).
3.Startyourpresentation. -
Usethefollowingbuttonsontheremotecontroltocontrolyourpresentation:
- Tomovethroughslidesorpages, presstheupordownPagebuttons.
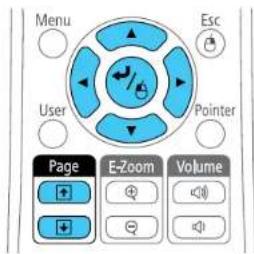
- Tomovethecursoronthescreen, usethearrowbuttons.
-Toleft-click, press the button once (press it twicetodouble-click).
•Toright-click,presstheEscbutton. - Todrag-and-drop, hold the button, as you mov the cursor with the arrow buttons, then release at the destination.
Parenttopic: RemoteControlOperation
Relatedtasks
ConnectingtoaComputerforUSBMouseControl
UsingtheRemoteControlasaPointer
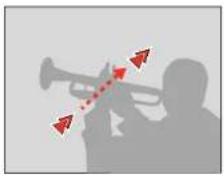
Youcanusetheprojector'sremotecontrolasapointertohelpyoucalloutimportantinformationonthe screen. Thedefaulpointershapeisanarrow, butyoucanselectanalternativeshapeusingtheSettings menu.
- PressthePointerbuttonontheremotecontrol.
- Usethearbuttonsontheremotecontroltomovethepointeronthescreen.
natural_image
Silhouette of a person playing a trumpet with red arrows indicating motion or pressure (no text or symbols)- PressEsctoclearthepointerfromthescreen.
Parenttopic:RemoteControlOperation
Relatedreferences
ProjectorFeatureSettings-SettingsMenu
SelectinganImageSource
If you connected multiple images our cestotheprojector, such as a computer and DVD player, you may want to switch from one images our ceto the other.
Note: If you turned on the Auto Source Search setting in the Extended menu, the projector automatically switch the most another detected imagesource if the signal to the current imagesource is lost.
- Makesuretheconnectedimagesourceyouwanttouseisturnedon.
- For video images sources, insert a DVD or other video media and press its play button, if necessary.
3.Dooneofthefollowing:
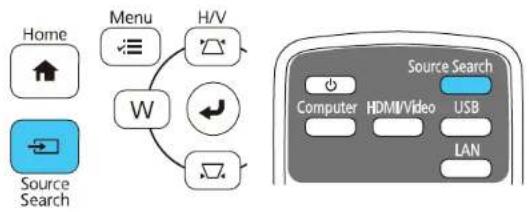
- Press the Source Search button on the projector or remote control until you see the image from the source you want.
flowchart
graph TD
    A["Home"] --> B["Menu"]
    B --> C["H/V"]
    D["Source Search"] --> E["W"]
    E --> F["Switch Icon"]
    F --> G["Diagonal Button"]
    G --> H["Diagonal Arrow"]
- Pressthebuttonforthesourceyouwantontheremotecontrol.
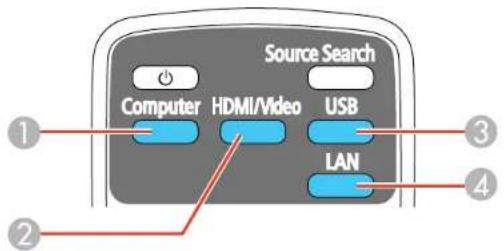
1 Computerportsources
2Video,HDMI,andMHL(HomeCinema1060)sources
3USBportsources(computerdisplayandexternaldevices)
4Networksource(LAN)
- PresstheHomebuttonontheremotecontrolorprojectorandselectyourimagesource.
![EPSON Sources : Searching all sources... HDN Computer Video USB Display USE LAN Useful Functions: Keystone Split Screen ECO Settings Color Mode Menu Help Projector Name: xxxxxx 2000 + xxxxxx+xxxxxxx IP IP : Quick Keyword: xxxxx Connection Guide Search the source. [How] .Fact](/content/2026/05/1074350/images/95215f5ad9c0eb5ffdf170a21ec6763ad150704c71e4d4e18efbeb65b10359bb.jpg)
Note: Your Homescreen may look different from the illustrations shown here.
Parenttopic: UsingBasicProjectorFeatures
ProjectionModes
Dependingonhowyoupositionedtheprojector,youmayneedtochangetheprojectionmodesoyour imagesprojectcorrectly.
- Front(defaultsetting)letsyouprojectfromatableinfrontofthescreen.
- Front/Ceiling flips the image over top-to-bottom to project upside-down from a ceiling or wall mount.
•Rearflipstheimagehorizontallytoprojectfrombehindatransluentscreen. - Rear/Ceiling flips the image over top-to-bottom and horizontally to project from the ceiling and behind atranslucentscreen.
ChangingtheProjectionModeUsingtheRemoteControl
ChangingtheProjectionModeUsingtheMenus
Parenttopic: UsingBasicProjectorFeatures
ChangingtheProjectionModeUsingtheRemoteControl
Youcanchangetheprojectionmodetofliptheimageovertop-to-bottom.
- Turnon the projector and display an image.
- HolddowntheA/VMutebuttonontheremotecontrolforfiveseconds.
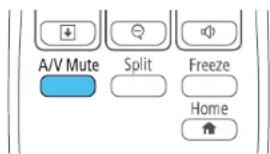
Theimagedisappearsbrieflyandreappearsflippedtop-to-bottom.
- To change projection back to the original mode, hold down the A/V Mute button for five seconds again.
Parenttopic: ProjectionModes
ChangingtheProjectionModeUsingtheMenus
Youcanchangetheprojectionmodetofliptheimageovertop-to-bottomand/orleft-to-rightusingtheprojectormenus.
- Turnon the projector and display an image.
-
PresstheMenubutton.
-
SelecttheExtendedmenuandpressEnter.
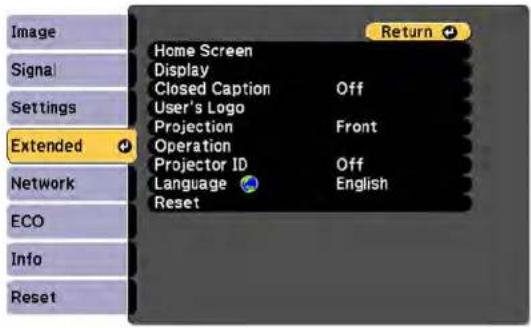
- SelecttheProjectionsettingandpressEnter.
- SelectaprojectionmodeandpressEnter.
- PressMenuorEsctoexitthemenus.
Parenttopic: ProjectionModes
ImageAspectRatio
Theprojectorcandisplayimagesindifferentwidth-to-heighttratioscalledaspectratios.Normallythe inputsignalfromyourvideosourcedeterminestheimage'saspectratio.However,forcertainimages youcanchangetheaspectratiotofityourscreenbypassingabuttonontheremotecontrol.
If you always want to use particular aspects for a certain video input source, you can select using the projector's menus.
ChangingtheImageAspectRatio
AvailableImageAspectRatio
Parenttopic: UsingBasicProjectorFeatures
ChangingtheImageAspectRatio
Youcanchangetheaspectratioofthedisplayedimagetoresizeit.
-
Turnon the projector and switch to the images source you want to use.
-
PresstheAspectbuttonontheremotecontrol.
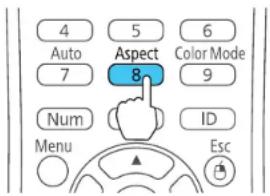
Theshapeandsizeofthedisplayedimagechanges,andthenameoftheaspectratioappears brieflyonthescreen.
- Tocyclethroughtheavailableaspectratiosforyourinputsignal, press the Aspectbutton repeatedly.
Note: If you are projecting from a computer and parts of the image are cut off, set the Resolution settingtoWideorNormalintheSignalmenu.
Parenttopic:ImageAspectRatio
Relatedreferences
InputSignalSettings-SignalMenu
AvailableImageAspectRatio
You can select the following image aspect ratios, depending on the input signal from your images source.
Note: Black bands and cropped images may project in certain aspect ratios, depending on the aspect ratio and resolution of your input signal.
HomeCinema760HD/1060
| AspectratiosettingDescription | |
| AutoAutomaticallysetstheaspectratio | ioaccordingtotheinputsignaland theResolutionsetting. |
| NormalDisplaysimagesusingthefull | projectionareaandmaintainsthe aspectratiooftheimage. |
| 16:9(HomeCinema760HD) | Convertstheaspectratiooftheimageto16:9. |
| FullDisplaysimagesusingthefullwidthoftheprojectionarea,butdoes notmaintaintheaspectratio. | |
| ZoomDisplaysimagesusingthefullwidthoftheprojectionareaand maintainstheaspectratiooftheimage. | |
| NativeDisplaysimagesasis(aspect ratioandresolutionaremaintained). | |
HomeCinema660
| AspectratiosettingDescription | |
| AutoAutomaticallysetstheaspectratio | ioaccordingtotheinputsignaland theResolutionsetting. |
| NormalDisplaysimagesusingthefullprojectionareaandmaintainsthe aspectratiooftheimage. | |
| 4:3Displaysimagesusingthefullprojectionareaat4:3aspectratio. | |
| 16:9Convertstheaspectratiooftheimageto16:9. | |
Note: The Auto aspect ratio setting is available only for HDMI image sources.
Parenttopic:ImageAspectRatio
ColorMode
TheprojectoroffersdifferentColorModestoprovideoptimumbrightness,contrast,andcolorfora varietyofviewingenvironmentsandimagetypes.Youcanselectamodedesignedtomatchyourimage andenvironment,orexperimentwiththeavailablemodes.
If you always want to use a particular color mode for certain video inputs, you can select it using the projectormenus.
ChangingtheColorMode
AvailableColorModes
TurningOnAutolris
Parenttopic: UsingBasicProjectorFeatures
ChangingtheColorMode
Youcanchangetheprojector'sColorModeusingtheremotecontroltooptimizetheimageforyourviewingenvironment.
- Turnon the projector and switch to the images source you want to use.
- If you are projecting from a DVD player or other videos source, insert ad disc or other video media and press the play button, if necessary.
- PresstheColorModebuttonontheremotecontroltochangetheColorMode.
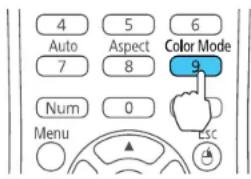
The image appearance changes and then a name of the Color Mode appears briefly on the screen.
- To cycle through all the available Color Modes for your input signal, press the Color Mode button repeatedly.
Parenttopic:ColorMode
AvailableColorModes
YoucansettheprojectortousetheseColorModes,dependingontheinputsourceyouareusing:
| ColorModeDescription | |
| DynamicBestforprojectinginabrightroom | |
| BrightCinemaBestforprojectinginaroomwithclosedcurtains | |
| CinemaBestformoviesprojectedinadarkroom | |
| GameBestforgamesprojectedinabrightroom | |
Parenttopic:ColorMode
TurningOnAutolris
Incertaincolormodes,youcanturnontheAutoIrissettingtoautomaticallyoptimizetheimagebasedon thebrightnessofthecontentyouproject.
- Turnon the projector and switch to the images source you want to use.
2.PresstheMenubutton. - Select theImagemenuandpressEnter.
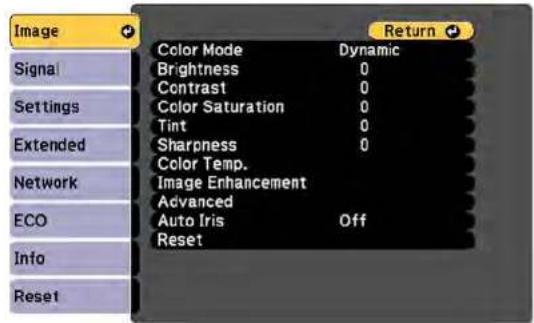
- SelecttheAutolrissettingandchooseoneofthefollowing:
•HighSpeedtoadjustbrightnessassoonasthescenechanges.
• Normalforstandardbrightnessadjustment.
Note: You can set Auto Irls for each Color Mode that supports the feature. You cannot change the AutolrissettngwhenyouareusingaClosedCaptionsetting.
- PressMenuorEsctoexitthemenus.
Parenttopic:ColorMode
Relatedreferences
ProjectorSetupSettings-ExtendedMenu
ControllingtheVolumewiththeVolumeButtons
YoucanusetheVolumebuttonsontheremotecontroltoadjustthevolumeeasyouprojecta presentationwithaudio.Youcanalsousethevolumebuttonsontheprojector'scontrolpanel(Home Cinema760HD/1060).
Thevolumebuttonscontroltheprojector'sinternalspeakersystem.Youmustadjustthevolume separatelyforeachconnectedinputsource.
- Turnon the projector and start apresentation that includes audio.
- PresstheVolumebuttonsasnecessarytolowerorraisethevolume.
Avolumegaugeappearsonthescreen. - Tosetthevolumetoaspecificlevelforaninputsource, usetheprojectormenus.
Parenttopic: UsingBasicProjectorFeatures
ProjectingaPCFreePresentation
Youcanuseyourprojector'sPCFreefeaturewheneveryouconnectaUSBdevicethatcontains compatiblefiles. Thisletysyouquicklyandeasilydisplaythecontentsofthefilesandcontroltheirdisplay usingtheprojector'sremotecontrol.
SupportedPCFreeFileTypes
StartingaSlideShowfromanExternalDevice
StartingaMoviefromanExternalDevice
PCFreeDisplayOptions
Parenttopic: UsingBasicProjectorFeatures
SupportedPCFreeFileTypes
Youcanprojectthesetypesoffilesusingtheprojector'sPCFreefeature.
Note: For best results, place your files on media that is formatted in FAT16/32. If you have trouble projectingfrommediaformattedfornon-Windowsfilesystems,tryformattingthemediaforWindows instead.YoumaynotbeabletousethesecurityfeaturesoncertainUSBstoragedeviceswithPCFree features.WhenconnectingaUSB-compatibleharddrive,connecttheACadaptersuppliedwiththe drive.
| Filetypeand extension | Details |
| Image(.jpg)Makes | urethefileisnot:•CMYKformat•Progressiveformat•Highlycompressed•Above8192×8192resolution |
| Image(.bmp)Makes | surethefileresolutionisnotabove1280×800 |
| Image(.gif)Makes | urethefileisnot:•Above1280×800resolution•Animated•Interlaced |
| Image(.png)Makes | surethefileresolutionisnotabove1280×800 |
| MotionJPEG movie(.avi) | SupportsonlyAVI1.0Makesurethefileisnot:•SavedwithanaudiocodeotherthanPCMorADPCM•Above1280×720resolution•Largerthan2GB |
Parenttopic: ProjectingaPCFreePresentation
StartingaSlideShowfromanExternalDevice
AfterconnectingaUSBdeviceordigitalcameratotheprojector,youcanswitchtotheUSBinputsource andstartyourslideshow.
Note: You can change the PC Free operation options or add special effects by highlighting Option at the bottomofthescreenandpressingEnter.
- PresstheUSBbuttonontheprojectorremotecontrol.
ThePCFreescreenappears.
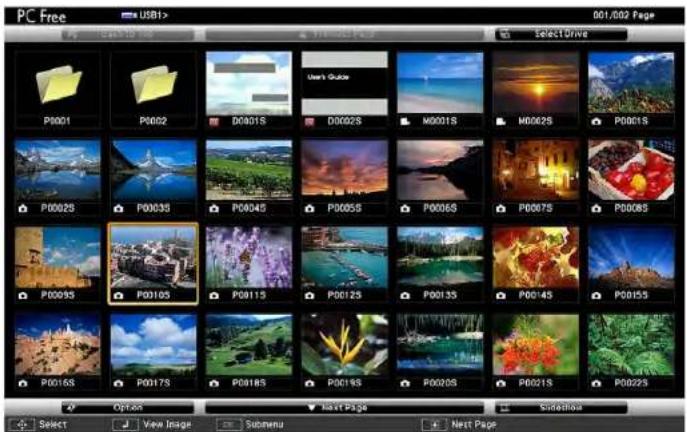
-
Dothefollowingasnecessarytolocateyourfiles:
-
If you need to display files inside as subfolder your device, press the arrow button to highlight the folder and press the Enter button.
• To move back up a folder level on your device, highlight Back to Top and press Enter. - To view additional files in a folder, highlight Next page or Previous page and press Enter. (You canalsopressthePageupordownbuttonsontheremotecontrol.)
3.Dooneofthefollowing:
- To display an individual image, press the arrow buttons to highlight the image and press Enter. (PresstheEscbuttontoreturntothefilelistscreen.)
- Todisplayaslideshowofalltheimagesinafolder,pressthearowbuttonstohighlghtthe SlideshowoptionatthebottomofthescreenandpressEnter.
Note: If any file names are longer than 8 characters or include unsupported symbols, the file names may be shortened or changed only in the screendisplay.
-
Whileprojecting, usethefollowingcommandstocontrolthedisplayasnecessary:
-
Torotateadisplayedimage, presstheupordownarrowbutton.
-
Tomovetothenextorpreviousimage, presstheleftorrightarrowbutton.
-
Tostopthedisplay, followtheon-screeninstructionsorpresstheEscbutton.
Parenttopic: ProjectingaPCFreePresentation
StartingaMoviefromanExternalDevice
AfterconnectingaUSBdeviceordigitalcameratotheprojector,youcanswitchtotheUSBinputsource andstartyourmovie.
Note: You can change the PC Free operation options by highlighting Option at the bottom of the screen andpressingEnter.
- PresstheUSBbuttonontheprojectorremotecontrol.
ThePCFreescreenappears.
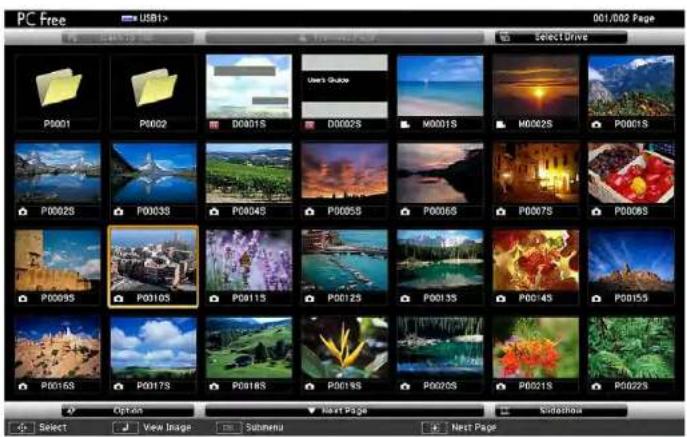
-
Dothefollowingasnecessarytolocateyourfiles:
-
If you need to display files inside as subfolder your device, press the arrow button to highlight the folder and press the Enter button.
- To move back up a folder level on your device, highlight Back to Top and press Enter.
-
To view additional files in a folder, highlight Next page or Previous page and press Enter. (You canalsopressthePageupordownbuttonsontheremotecontrol.)
-
Toplaybackamovie, pressthearbuttonstohighlghtthefileandpressEnter.
Note: If any file names are longer than 8 characters or include unsupported symbols, the file names may beshortenedorchangedonlyinthescreendisplay.Ifyouwanttoplaybackallthemoviesina folderinsequence,selecttheSlideshowoptionatthebottomofthescreen.
- To stop movie playback, press the Esc button, highlight Exit, and press Enter.
Parenttopic: ProjectingaPCFreePresentation
PCFreeDisplayOptions
Youcanselectthesedisplayoptionswhenusingtheprojector'sPCFreefeature.
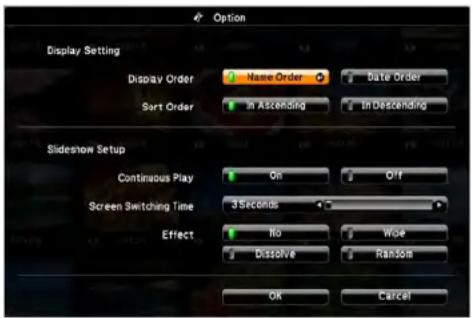
| SettingOptionsDescription | ||
| DisplayOrderNameOrder | erDisplaysfilesinnameorder | |
| DateOrderDisplaysfilesindateorder | ||
| SortOrderInAscending | Sortsfilesinfirst-to-lastorder | |
| InDescendingSortsfilesinlast-to-firstorder | ||
| ContinuousPlayOnDis | playsaslideshowcontinuously | |
| OffDisplaysaslideshowonetimethrough | ||
| ScreenSwitching Time | NoDoesnotdisplaythenextfileautomatically | |
| 1Secondto60SecondsDisplaysfilesfortheselectedtimeandswitchestothenextfileautomatically;highresolutionimagesmayswitchataslightlyslowerrate | ||
| EffectWipeTransitionsbetweenimageswithawipeeffect | ||
| DissolveTransitionsbetweenimageswithadissolve effect | ||
| RandomTransitionsbetweenimagesusingarandomvarietyofeffects | ||
Parenttopic: ProjectingaPCFreePresentation
AdjustingProjectorFeatures
Followtheinstructionsinthesesectionstouseyourprojector'sfeatureadjustments.
ShuttingOffthePictureandSoundTemporarily
StoppingVideoActionTemporarily
ZoomingIntoandOutofImages
ProjectorSecurityFeatures
ProjectorIdentificationSystemforMultipleProjectorControl
ProjectingTwoImagesSimultaneously
CopyingMenuSettingsBetweenProjectors
ShuttingOffthePictureandSoundTemporarily
Youcantemporarilyturnofftheprojectedpictureandsoundifyouwanttoredirectyouraudience's attentionduringapresentation.Anysoundorvideoactioncontinuestorun,however,soyoucannot resumeprojectionatthepointthatyoustoppededit.
If you want to display an images such as a company logo or picture when the presentation is stopped, you can setup this feature using the projector's menus.
Note: If the picture and sound are off for more than 30 minutes, the power automatically turns off. You canturnthissettingonandoffusingtheprojector'sECOmenu.
Note: The lamp is still lit while using A/V Mute and the lamp hours will continue to accumulate.
- Press the A/V Mute button on the remote control to temporarily stop projection and mute any sound.
- Toturnthepictureandsoundbackon, presstheA/VMutebuttonagain.
Note: You can also stop projection using the A/V Mute slide lever on the projector.
Parenttopic: AdjustingProjectorFeatures
Relatedreferences
ProjectorSetupSettings-ECOMenu
Relatedtasks
SavingaUser'sLogoImagetoDisplay
StoppingVideoActionTemporarily
Youcantemporarilystoptheactioninavideoorcomputerpresentationandkeepthecurrentimageon thescreen.Anysoundorvideoactioncontinuestorun,however,soyoucannotresumeprojectionatthe pointthatyoustoppedit.
- PresstheFreezebuttonontheremotecontroltostopthevideoaction.
- Torestartthevideoactioninprogress, pressFreezeagain.
Parenttopic: AdjustingProjectorFeatures
ZoomingIntoandOutofImages
Youcandrawattentiontopartsofapresentationbyzoomingintoapportionoftheimageandenlargingit onthescreen.
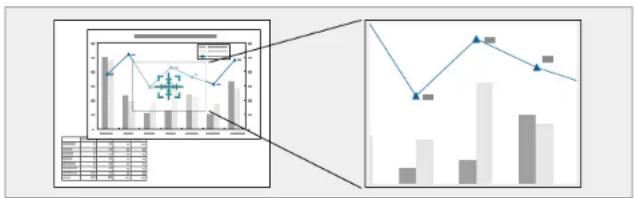
- PresstheE-Zoom+buttonontheremotecontrol.
Youseeacrosshaironthescreenindicatingthecenterofthezoomarea.
-
Usethefollowingbuttonsontheremotecontroltoadjustthezoomedimage:
-
Usethearrowbuttonstopositionthecrosshairintheimageareayouwanttozoominto.
- PresstheE-Zoom+buttonrepeatedlytozoomintotheimagearea,enlargingitasnecessary. PressandholdtheE-Zoom+buttontozoominmorequickly.
- Topanaroundthezoomedimagearea, usethearrowbuttons.
- Tozoomoutoftheimage, press the E-Zoom-button as necessary.
•Toreturntotheoriginalimagesize,pressEsc.
Parenttopic: AdjustingProjectorFeatures
ProjectorSecurityFeatures
You can secure your project to do better theft or prevent unintended use by setting up the following security features:
- Passwordsecuritytopreventtheprojectorfrombeingturnedon,andpreventchangestothestartup screenandothersettings.
- Buttonlocksecuritytoblockoperationoftheprojectorusingthebuttonsonthecontrolpanel.
•Securitycablingtophysicallycabletheprojectorinplace.
PasswordSecurityTypes
LockingtheProjector'sButtons
InstallingaSecurityCable
Parenttopic: Adjusting Projector Features
PasswordSecurityTypes
Youcansetupthesetypesofpasswordsecurityusingonesharedpassword:
- Power On Protection password prevents anyone from using the projector without first entering a password.
- User's Logo Protection password prevents anyone from changing the custom screen the projector candisplaywhenitturnsonorwhenyouusetheA/VMutefeature.Thepresenceofthecustom screendiscouragestheftbyidentifyingtheprojector'sowner.
- Network Protection password prevents anyone from changing the network settings in the projector menus.
SettingaPassword
SelectingPasswordSecurityTypes
EnteringaPasswordtoUsetheProjector
SavingaUser'sLogoImagetoDisplay
Parenttopic:ProjectorSecurityFeatures
SettingaPassword
Tousepasswordsecurity,youmustsetapassword.
- Hold down the Freeze button on the remote control for about five seconds or until you see this menu.
![[Password Protection] Power On Protection Off User's Logo Protection Off Network Protection Off Password](/content/2026/05/1074350/images/45f860497956ab121050e9da1fb02322e8e13b90d92dd7b042eaba95a6ace968.jpg)
- PressthedownarrowtoselectPasswordandpressEnter.
Youseetheprompt"Changethepassword?".
-
SelectYesandpressEnter.
-
Press and hold down the Num button on the remote control and use the numeric buttons to set a four-digit password.
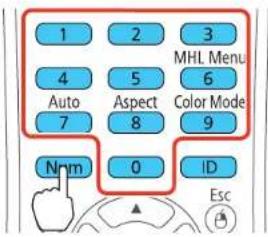
Thepassworddisplaysas****asyouenterit. Thenyouseetheconfirmationprompt.
5.Enterthepasswordagain.
Youseethemessage"Passwordaccepted."
-
PressEsctoreturntothemenu.
-
Make anote of the password and keep it in as a safe place in case you forget it.
Parenttopic:PasswordSecurityTypes
Relatedtasks
SelectingPasswordSecurityTypes
SelectingPasswordSecurityTypes
Aftersettingapassword,youseethismenu,allowingyoutoselectthepasswordsecuritytypesyouwant touse.
![[Password Protection] Power On Protection Off User's Logo Protection Off Network Protection Off Password](/content/2026/05/1074350/images/eb65c30faa8366826ad9dc90a0766eff147a96cdb3f7cbefdbd5be93bdc9f5da.jpg)
If you do not see this menu, hold down the Freeze button on the remote control for about five seconds or untilthemenuappears.
- To prevent unauthorized use of the projector, select Power On Protection, press Enter, select On, pressEnteragain,andpressEsc.
- To prevent changes to the User's Logo screen or related display settings, select User's Logo Protection, press Enter, select On, press Enter again, and press Esc.
- To prevent changes to network settings, select Network Protection, press Enter, select On, press Enteragain, and press Esc.
Note: Be sure to keep the remote control in a safe place; if you lose it, you will not be able to enter the passwordrequiredtousetheprojector.
Parenttopic: PasswordSecurityTypes
Relatedtasks
SettingaPassword
EnteringaPasswordtoUsetheProjector
If a password is set up and a Power On Protection password is enabled, you see a prompt to enter a passwordwheneveryouturnontheprojector.
![[Password] Enter the password. See your documentation for more information.](/content/2026/05/1074350/images/7faef2069fd65cf9fa6d9b19f30a1aae683b46790649badbb42f1571eff1b1c6.jpg)
Youmustenterthecorrectpasswordtousetheprojector.
- Press and hold down the Num button on the remote control while you enter the password using the numericbuttons.
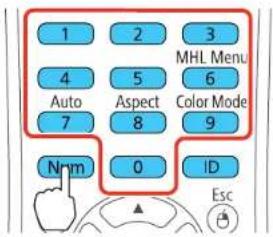
Note: Thedefaultpasswordis0000.
Thepasswordscreencloses.
-
If the password is incorrect, the following may happen:
-
Youseea"wrongpassword"messageandaprompttotryagain.Enterthecorrectpasswordto proceed.
- If you enter an incorrect password three times in succession, you see a message getting you that the projector is locked. After the message is displayed for 5 minutes, the projectorenters standby mode. Unplug the projector, plugin the power cord, and turn the projector. You see a prompt to enter the password.
- If you continueto enter an incorrect password many times in succession, the projector displays a request code and messages a contact Epson Support. Donot attempt to enter the password again. When you contact Epson Support, provided displayed request code and proof of ownership for assistance in unlocking the projector.
Parenttopic: PasswordSecurityTypes
Relatedreferences
WheretoGetHelp
SavingaUser'sLogolmagetoDisplay
Youcantransferanimagetotheprojectorandthendisplayitwhenevertheprojectorturnson. Youcan alsodisplaytheimagewhentheprojectorisnotreceivinganinputsignalorwhenyoutemporarilystop projection(usingtheA/VMutefeature). ThistransferredimageiscalledtheUser'sLogoscreen.
TheimageyouselectastheUser'sLogocanbeaphoto,graphic,orcompanylogo,whichisusefulin identifyingtheprojector'sownertohelpdetertheft.YoucanpreventchangestotheUser'sLogoby settinguppasswordprotectionforit.
Note: When you copy the menu settings from one projector to another using the batch setup feature, the userlogoisalsocopied.Donotincludeanyinformationintheuserlogothatyoudonotwanttoshare betweenmultipleprojectors.
-
Display the image you want to project the User's logo.
-
Press the Menu button, select the Extended menu, and press Enter.
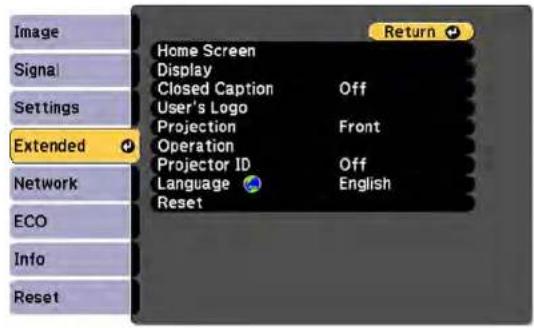
- Select the User's Logosetting and press Enter.
Youseeapromptaskingifyouwanttousethedisplayedimageasauser'slogo.
- SelectYesandpressEnter.
Youseeaselectionboxoverlayingyourimage.
- Usethearrowbuttonsontheremotecontroltosurroundtheimageareayouwanttouseasthe User'sLogoandpressEnter.
Youseeapromptaskingifyouwanttoselectthisimagearea.
- Select Yes and press Enter. (If you want to change the selected area, select No, press Enter, and repeatthelaststep.)
YouseetheUser'sLogozoomfactormenu.
![[User's Logo] Set the zoom factor. Zoom factor: 100% 200% 300%](/content/2026/05/1074350/images/c3a9c4dec0944b65f22a56ff42af0571c41520d3d257f5619f4f54a8bc6d695e.jpg)
- SelectazoompercentageandpressEnter.
YouseeapromptaskingifyuwanttosavetheimageastheUser'sLogo.
- Select Yes and press Enter.
Youseeacompletionmessage.
- PressEsctoexitthemessagescreen.
- SelecttheExtendedmenuandpressEnter.
- SelectDisplayandpressEnter.
-
SelectwhenyouwanttodisplaytheUser'sLogoscreen:
-
To display it whenever there is no input signal, select Display Background and set it to Logo.
• To display it whenever you turn the projector on, select Startup Screen and set it to On.
• To display it whenever you press the A/V Mute button, select A/V Mute and set it to Logo.
TopreventanyonefromchangingtheUser'sLogosettingswithoutfirstenteringapassword,seta passwordandenableUser'sLogosecurity.
Parenttopic:PasswordSecurityTypes
LockingtheProjector'sButtons
Youcanlockthebuttonsontheprojector'scontrolpaneltopreventanyonefromusingtheprojector.You canlockallthebuttonsonallthebuttonsexceptthepowerbutton.
-
PresstheMenubutton.
-
SelecttheSettingsmenuandpressEnter.
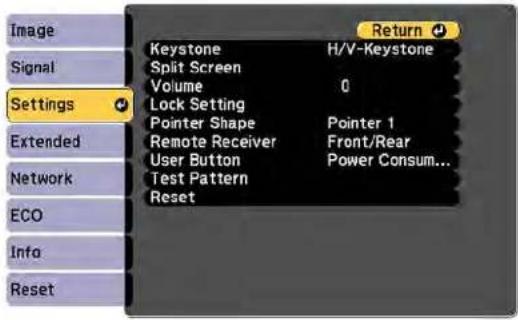
- SelectLockSettingandpressEnter.
- SelecttheControlPanelLocksettingandpressEnter.
-
SelectoneoftheselocktypesandpressEnter:
-
Tolockalloftheprojector'sbuttons,selectFullLock.
- Tolockallbuttonsexceptthepowerbutton,selectPartialLock.
Youseeaconfirmationprompt.
- SelectYesandpressEnter.
UnlockingtheProjector'sButtons
Parenttopic: ProjectorSecurityFeatures
UnlockingtheProjector'sButtons
If the projector's buttons have been locked, hold the Enter button on the projector's control panel for seven seconds to unlock them. You can also set the Control Panel Lock setting to Off in the Settings menu.
Parenttopic:LockingtheProjector'sButtons
InstallingaSecurityCable
Youcaninstalltwotypesofsecuritycablesontheprojectortodetertheft.
- Use the security slot on the project to attach a Kensington lock. See your local computer or electronics dealer for purchase information.
- Use the security cable attachment point on the project to attach a wire cable and secure it to a room fixture or heavy furniture.
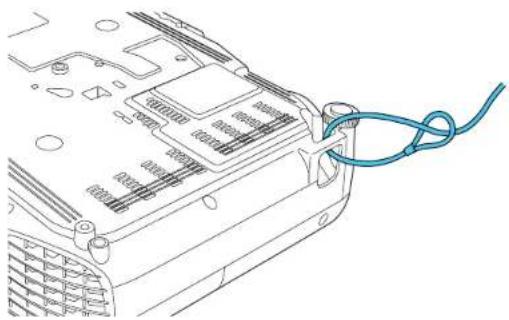
natural_image
Line drawing of an electronic device with a blue cable inserted into the connector (no text or symbols)Note: Do not pass drop-prevention cables through the security cable attachment point when mounting the projectoronawallorceiling.
Parenttopic: ProjectorSecurityFeatures
ProjectorIdentificationSystemforMultipleProjectorControl
Youcanoperatemultipleprojectorsusingoneremotecontrolformoreelaboratepresentations. Todo this, youassignanidentificationnumbertoeachprojectorandtotheremotecontrol. Thenyoucan operatealltheprojectorsatonceorindividually.
SettingtheProjectorID
SettingtheRemoteControlID
MatchingMultiple-ProjectorDisplayQuality
Parenttopic: AdjustingProjectorFeatures
SettingtheProjectorID
If you want to control multiple projectors from a remote control, give each projector a unique ID.
-
PresstheMenubutton.
-
SelecttheExtendedmenuandpressEnter.
- SelectProjectorIDandpressEnter.
![[Projector ID] Off 1 2 3 4 5 6 7 8 9 Return](/content/2026/05/1074350/images/886fccff2fd6ce8e9c999edbef10e1e10fb293d341036705bf62c604973fc72c.jpg)
4.Pressthearrowbuttonsontheremotecontroltoselecttheidentificationnumberyouwanttousefor theprojector.ThenpressEnter.
Repeat the seven steps for all the other projectors you want to operate from one remote control.
Note: If you don't know the projector's ID, aim the remote control at the projector and press the ID button to temporarily display the projector's ID on the screen.
Parenttopic:ProjectorIdentificationSystemforMultipleProjectorControl
SettingtheRemoteControlID
Theremotecontrol'sIDissettozerobydefaultsoitcanoperateanycompatibleproject. If you want to settheremotecontroltooperateonlyaparticularproject, you need to settheremotecontrol'sID to match the projector's ID.
Note: You must set the remote control ID to match the projector ID each time you turn on the projector youhavesetittocontrol.
-
Turnon theprojectoryouwanttheremotecontroltooperatewithexclusively.
-
Make sure you know the projector's ID number as set in the Extended menu Projector ID setting.
Note: If you have forgotten the projector's ID, aim the remote control at the projector and press the ID button to temporarily display the projector's ID on the screen. If you turn off the Projector ID setting, theremotecontrolwilloperatetheprojectorregardlessoftheIDselectedontheremote.
3.Aimtheremotecontrolatthatprojector.
- Hold down the ID button on the remote control while you press the numeric button that matches the projector'sID.Thenreleasethebuttons.
5.PresstheIDbuttonontheremotecontroltocheckiftheID-settingprocessworked.
Youseeamessagedisplayedbytheprojector.
- If the remote control is listed as On, the remote control ID is set to operate only the listed projector.
- If the remote control is listed as Off, the remote control ID is not set properly. Repeat the steps abovetosethelDtomatchtheprojectoryouwanttocontrol.
Parenttopic: ProjectorIdentificationSystemforMultipleProjectorControl
MatchingMultiple-ProjectorDisplayQuality
You can match the display quality of multiple projector that will project next to each other.
- Turnonalltheprojectorsonwhichyouwanttomatchthedisplayquality.
- SetIDnumbersoneachprojector.
-
SettheremotecontrolIDtomatchthefirstprojector.
-
Press the Menu button, select the Image menu, and press Enter.
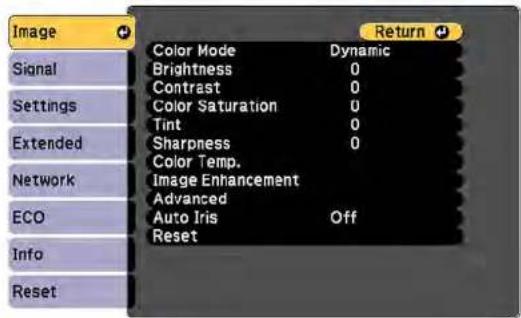
- Selectsettingsasnecessary.
- SettheremotecontrolIDtomatchthenextprojector, thenselectImagemenuadjustmentsas necessarytomatchtheprojectors'displays.
Note: The brightness and tint may not match exactly even after adjustments. If brightness and tint differencesbecomemorenoticeableovertime,repeatheadjustments.
Parenttopic:ProjectorIdentificationSystemforMultipleProjectorControl
ProjectingTwolmagesSimultaneously
Youcanusethesplitscreenfeaturetosimultaneouslyprojecttwoimagesfromdifferentimagesources nexttoeachother(HomeCinema760HD/1060). Youcancontrolthesplitscreenfeatureusingthe remotecontrolortheprojectormenus.
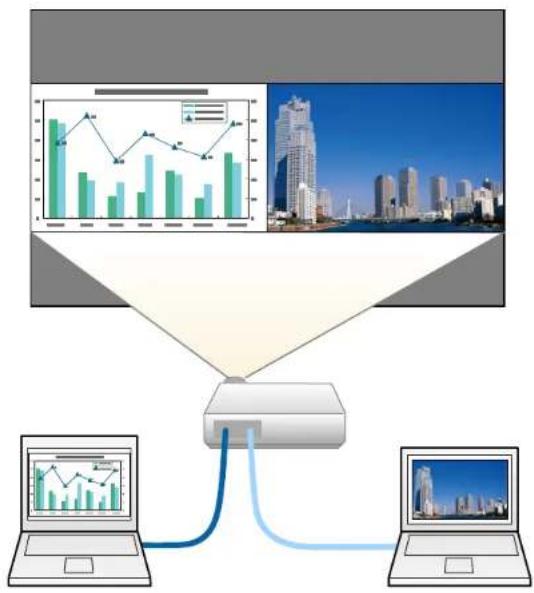
flowchart
graph TD
    A["Server"] --> B["Laptop 1"]
    A --> C["Laptop 2"]
    A --> D["Laptop 3"]
    style A fill:#f9f,stroke:#333
    style B fill:#ccf,stroke:#333
    style C fill:#ccf,stroke:#333
    style D fill:#ccf,stroke:#333
Note: You cannot uses splitscreen with certain inputs source combinations.
- PresstheSplitbuttonontheremotecontrol.
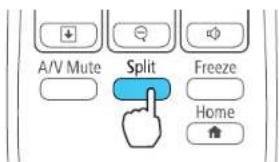
The currently selected inputs our current source of the left side of the screen.
2.PresstheMenubutton.
Youseethisscreen:
![[Split Screen Setup] Screen Size Equal Source Swap Screens Audio Source Auto Align Top [Network] Display the QR Code Exit Split Screen](/content/2026/05/1074350/images/20dd405ad7f76f60427705e24f0f83c1de62017a1f989b5a2b4e035ae0a9eeb3.jpg)
- To select an input source for the other image, select the Source setting, press Enter, select the input source, select Execute, and press Enter. (You can also change image sources, if necessary.)
- To switch the images, select the Swap Screens setting and press Enter.
- To change the image sizes, select the Screen Size setting, press Enter, select a sizing option, pressEnter,andpressMenutoexit.
Note: Depending on the video input signals, the images may not appear at the same size even if you choose the Equal setting.
- To choose the audio you want to hear, select the Audio Source setting, press Enter, select an audiooption, press Enter, and press Menutoexit.
- Toexitthesplitscreenfeature, presstheSplitorEscbutton.
Parenttopic: AdjustingProjectorFeatures
CopyingMenuSettingsBetweenProjectors
Afteryouselectmenusettingsforyourprojector,youcantransferthemtoanotherprojectorofthesame model.
Note: Copy the projector's settings before you adjust the projected image using the projector's settings. AnysavedUser'sLogosettingontheprojectorwilltransfertotheotherprojector.
Caution: If the copy process fails due to a power failure, communication error, or for any other reason, Epsonwillnotberesponsibleforanyrepaircostsincurred.
The following settings will not transfer between projectors:
• Infomenuitems
• Network menusettingsotherthanthoseintheNotificationsandOthersmenus
SavingSettingstoaUSBFlashDrive
TransferringSettingsfromaUSBFlashDrive
SavingSettingstoaComputer
TransferringSettingsfromaComputer
Parenttopic:AdjustingProjectorFeatures
SavingSettingstoaUSBFlashDrive
YoucansavetheprojectorsettingsyouwanttotransfertoaUSBflashdrive.
Note: Use an empty flash drive. If the drive contains other files, the transfer may not complete correctly. TheflashdrivemustusetheFATformatandcannothaveanysecurityfeatures.
-
Turnoff the projector and unplug the power cord from the projector's power inlet.
-
Insert the flash drive into the USB-Aport.
HomeCinema660/760HD
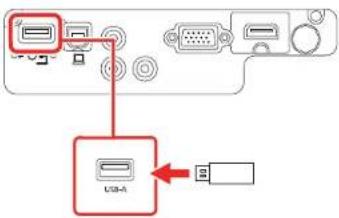
HomeCinema1060
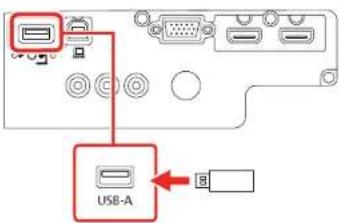
Note: Connect the flash drive directly to the projector. Do not use a hub or your settings may not be saved correctly.
- Press and hold the Esc button on the control panel or remote control as you connect the power cord totheprojector'spowerinlet.
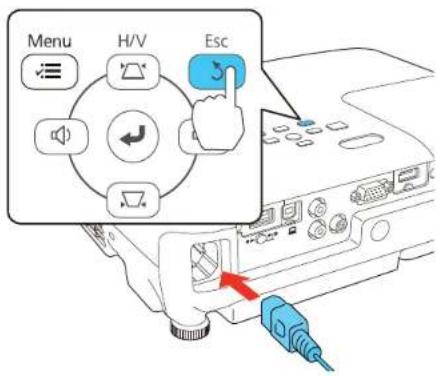
- When allof the projector lightsturnon, releasethe Escbutton.
Thelightsflashtoindicatethatsettingsaretransferringtotheflashdrive. Whenthelightsstop flashing, thepowerlightturnsblueandtheprojectorentersstandbymode.
Caution: Do not unplug the power cord or remove the flash drive while the lights are flashing. This could damage the projector.
- Oncetheprojectorentersstandbymode, removetheflashdrive.
Parenttopic: CopyingMenuSettingsBetweenProjectors
TransferringSettingsfromaUSBFlashDrive
AftersavingprojectorsettingstoaUSBflashdrive,youcantransferthemtoanotherprojectorofthe samemodel.
Note: Make sure the USB flash drive contains only a single settings transfer from another projector of the same model. The settings are contained in a file called pjconfdata.bin. If the drive contains other files, the transfer may not complete correctly.
Donotadjustimagesettingsonaprojectoruntilafteryoutransfersettingstoit. Otherwise, you may have to repeat your adjustments.
-
Turnoff the projector and unplug the power cord from the projector's power inlet.
-
Insert the flash drive into the USB-Aport.
HomeCinema660/760HD
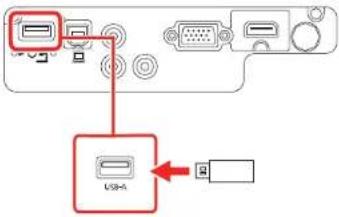
HomeCinema1060
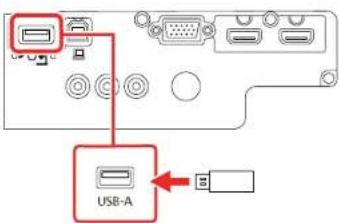
Note: Connect the flash drive directly to the projector. Do not use a hub or your settings may not be saved correctly.
- Press and hold the Menu button on the control panel or remote control as you connect the power cordtotheprojector'spowerinlet.
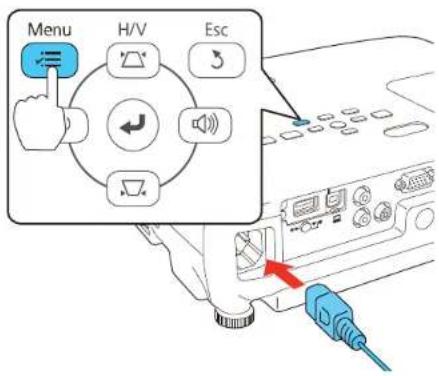
- When allof the projector lightsturnon, releasethe Menubutton.
Thelightsflashtoindicatethatsettingsaretransferringtotheprojector. Whenthelightsstop flashing, thepowerlightturnsblueandtheprojectorentersstandbymode.
Caution: Do not unplug the power cord or remove the flash drive while the lights are flashing. This could damage the projector.
- Oncetheprojectorentersstandbymode, removetheflashdrive.
Parenttopic: CopyingMenuSettingsBetweenProjectors
SavingSettingstoaComputer
Youcansavetheprojectorsettingsyouwanttotransfertoacomputer.
Yourcomputermustberunningoneofthefollowingoperatingsystems:
•WindowsVista
- Windows7
- Windows8.x
- Windows10
-OSX10.7.x
-OSX10.8.x
-OSX10.9.x
-OSX10.10.x
-OSX10.11.x
•macOS10.12.x
-
Turnoff the projector and unplug the power cord from the projector's power inlet.
-
ConnectaUSBcabletoyourprojector's USB-Bport.
HomeCinema660/760HD
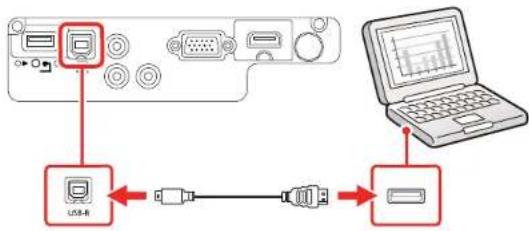
flowchart
graph TD
    A["USB-R"] --> B["USB Cable"]
    B --> C["USB Port"]
    C --> D["Laptop"]
HomeCinema1060
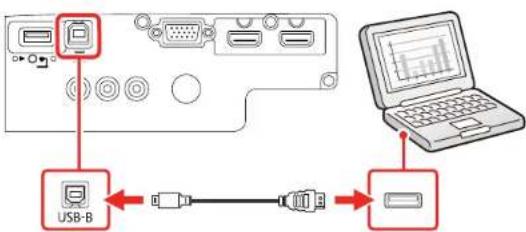
-
Connect the other end to any available USB port on your computer.
-
Press and hold the Esc button on the control panel or remote control as you connect the power cord to the projector's power inlet.
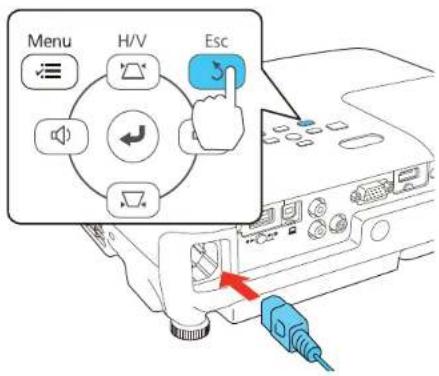
- When allof the projector lightsturnon, releasethe Escbutton.
Theprojectorshowsupasaremovablediskonyourcomputer.
-
Opentheremovablediskandcopythepjconfdata.binfiletoyourcomputer.
-
Oncethefilehascopied,dooneofthefollowing:
- Windows:Open the My Computer, Computer, Windows Explorer, or File Explorer utility. Right-clickthenameofyourprojector(listedasaremovabledisk)andselectEject.
•Mac:Dragtheremovablediskiconforyourprojectorfromthedesktopintothetrash.
Theprojectorentersstandbymode.
Parenttopic: CopyingMenuSettingsBetweenProjectors
TransferringSettingsfromaComputer
Aftersavingprojectorsettingstoacomputer,youcantransferthemtoanotherprojectorofthesame model.
Yourcomputermustberunningoneofthefollowingoperatingsystems:
- WindowsVista
- Windows7
- Windows8.x
- Windows10
-OSX10.7.x
-OSX10.8.x
-OSX10.9.x
- OSX10.10.x
-OSX10.11.x
•macOS10.12.x
Donotadjustimagesettingsonaprojectoruntilafteryoutransfersettingstoit. Otherwise, you may have to repeat your adjustments.
-
Turnoff the projector and unplug the power cord from the projector's power inlet.
-
ConnectaUSBcabletoyourprojector'sUSB-Bport.
HomeCinema660/760HD
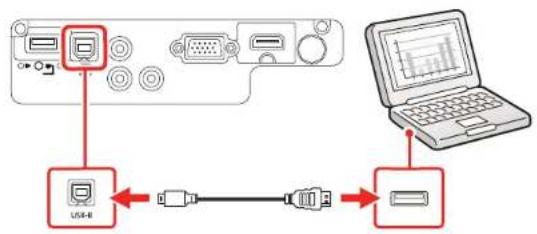
flowchart
graph TD
    A["USB-8"] --> B["USB cable"]
    B --> C["Switch"]
    C --> D["Laptop screen"]
HomeCinema1060
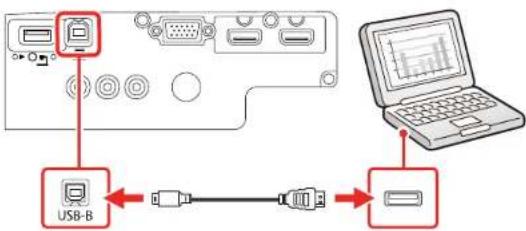
flowchart
graph TD
    A["USB-B"] -->|USB cable| B["USB Port"]
    B --> C["Laptop with chart icon"]
- ConnecttheotherendtoanyavailableUSBportonyourcomputer.
- Press and hold the Menu button on the control panel or remote control as you connect the power cordtotheprojector'spowerinlet.
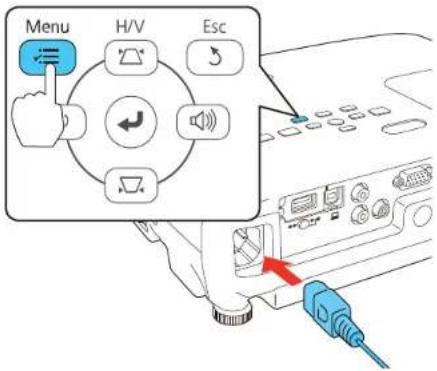
- When allof the projector lightsturnon, releasethe Menubutton.
Theprojectorshowsupasaremovablediskonyourcomputer.
- Copy the pjconf data.bin file from your computer to other removable disk.
Note: Donotcopyanyotherfilestotheremovabledisk.
-
Oncethefilehascopied,dooneofthefollowing:
-
Windows:Open the My Computer, Computer, Windows Explorer, or File Explorer utility. Right-clickthenameofyourprojector(listedasaremovabledisk)andselectEject.
•Mac:Dragtheremovablediskiconforyourprojectorfromthedesktopintothetrash.
Allthelightsstartflashingtoindicatethatheprojector'ssettingsarebeingupdated.Whenthelights stopflashing,thepowerlightturnsblueandtheprojectorentersstandbymode.
Caution: Donotunplugthepowercordwhilethelightsareflashing. This could damage the projector.
Parenttopic: CopyingMenuSettingsBetweenProjectors
AdjustingtheMenuSettings
Followtheinstructionsinthesesectionstoaccesstheprojectormenusystemandchangeprojector settings.
UsingtheProjector'sMenus
ImageQualitySettings-ImageMenu
InputSignalSettings-SignalMenu
ProjectorFeatureSettings-SettingsMenu
ProjectorSetupSettings-ExtendedMenu
ProjectorNetworkSettings-NetworkMenu
ProjectorSetupSettings-ECOMenu
ProjectorInformationDisplay-InfoMenu
ProjectorResetOptions-ResetMenu
UsingtheProjector'sMenus
Youcanusetheprojector'smenustoadjustthesettingsthatcontrolhowyourprojectorworks.The projectordisplaysthemenusonthescreen.
- PresstheMenubuttononthecontrolpanelorremotecontrol.
flowchart
graph TD
    A["Menu"] --> B["Hand Click Icon"]
    B --> C["H/V Icon"]
    C --> D["Esc Icon"]
    D --> E["Audio Signal"]
    E --> F["Arrow Down"]
    F --> G["Arrow Up"]
    G --> H["Arrow Left"]
    H --> I["Arrow Right"]
Youseethemenuscreendisplayingthelmagemenusettings.
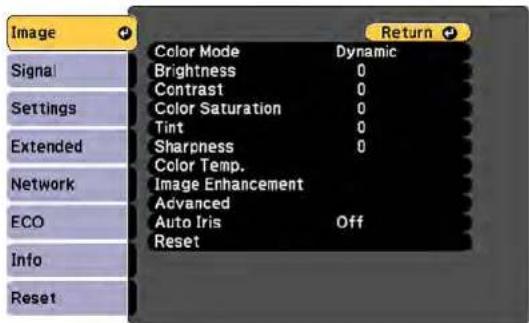
- Presstheupordownarrowbuttontomovethroughthemenuslistedontheleft. Thesettingsfor eachmenuaredisplayedontheright.
Note: The available settings depend on the current input source.
- Tochangesettingsinthedisplayedmenu, pressEnter.
4.Presstheupordownarrowbuttontomovethroughthesettings. - Changethesettingsusingthebuttonslistedonthebottomofthemenuscreens.
- Toreturnallthemenusettingstotheirdefaultvalues, selectReset.
- When you finish changing settings on an amino acid, press Esc.
- PressMenuorEsctoexitthemenus.
Parenttopic:AdjustingtheMenuSettings
ImageQualitySettings-ImageMenu
Settings the Imagemenuletyou adjust the equality of your image for the input source you are currently using. The available settings depend on the currently selected input source.
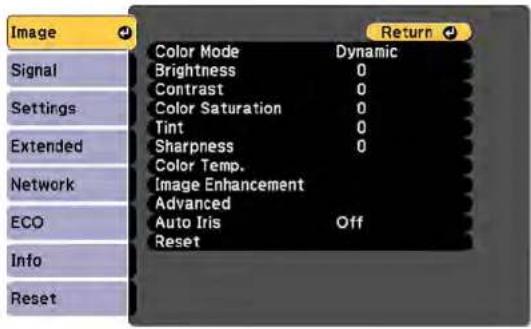
Tochangesettingsforaninputsource,makesurethesourceisconnectedandselectthatsource.
| SettingOptionsDescription | ||
| ColorModeSeethelistofavailableColorModes | Adjuststhevividnessofimage colorsforvariousimagetypes andenvironments | |
| BrightnessVaryinglevelsavailableLightensordarkenstheoverall | image | |
| ContrastVaryinglevelsavailableAdjuststhedifferencebetween | lightanddarkareasoftheimage | |
| ColorSaturationVaryinglevelsavailableAdjuststheintensityofthe | imagecolors | |
| TintVaryinglevelsavailableAdjuststhebalanceofgreento | magentatonesintheimage | |
| SharpnessVaryinglevelsavailableAdjuststhesharpnessor | softnessofimagedetails | |
| ColorTemp.(colortemperature)ColorTemp.Customized | Setstheoverallcolortone;high valuestinttheimageblue(cool) andlowvaluestinttheimagered (warm)ColorTemp.:Setsthecolor toneinarangeof0to10Customized:Adjuststhe intensityofindividualhuesinthe image;providesRGB-offsetand gaincontrolsforprofessional levelcolorcalibration | |
| ImageEnhancementNoiseReduction | Images | |
| Enhancesdetailstocreateclear outlines | ||
| AdvancedDeinterlacingSetswhethertoconvert | interlacedtoprogressivesignals forcertainvideoimagetypesOff:forfast-movingvideo imagesVideo:formostvideoimagesFilm/Auto:formovies,computer graphics,andanimation | |
| AutolrisOff | NormalHighSpeed | Adjuststheprojectedluminance basedontheimagebrightness whentheDynamicorCinema ColorModesareselected;High Speedsetsfasterluminance correctionforfast-moving images |
Note: The Brightness setting does not affect lamp brightness. To change the lamp brightness mode, usethePowerConsumptionsettingintheECOmenu
Note: The Noise Reduction setting is not available if you have set the Deinterlacing setting to Off or selectedadigitalRGBorinterlaced(480i/576i/1080i)inputsignal.
Parenttopic:AdjustingtheMenuSettings
Relatedreferences
AvailableColorModes
ProjectorSetupSettings-ECOMenu
InputSignalSettings-SignalMenu
Normally the projector detects and optimizes the input signal settings automatically. If you need to customize these settings, you can use the Signal menu. The available settings depend on the currently selected inputs source.
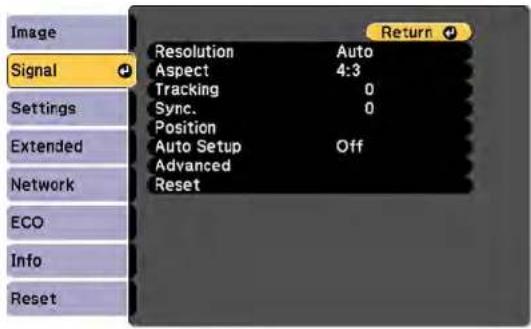
Note: You can restore the default settings of the Position, Tracking, and Sync settings by pressing the Autobuttonontheremotecontrol.
Tochangesettingsforaninputsource,makesurethesourceisconnectedandselectthatsource.
| SettingOptionsDescription | ||
| ResolutionAuto | Wide Normal | Setstheinputsignalresolutionif notdetectedautomaticallyusing theAutooption |
| AspectSeethelistofavailableaspect ratios | Setstheaspectratio(width-to-heightratio)fortheselectedinput source | |
| TrackingVaryinglevelsavailableA | adjustssignaltoeliminatevertical | stripesincomputerimages |
| Sync.VaryinglevelsavailableAdjust | tssignaltoeliminate | fuzzinessorflickeringin computerimages |
| PositionUp,down,left,rightAdjust | stheimagelocationonthe | screen |
| AutoSetupOn | Off | Automatically optimizescomputer imagequality(whenOn) |
| OverscanAuto | Off4%8% | Changestheprojectedimage ratiotomaketheedgesvisibleby aselectablepercentageor automaticallywhenusingan HDMIinputsource |
| Advanced—SeetheAdvanced | settingstable | inthistopic |
Advancedsettings
| SettingOptionsDescription | ||
| HDMIVideoRangeAuto | NormalExpanded | Setsthevideorangetomatchthe settingofthedeviceconnectedto theHDMinputportAuto:detectsthevideorange automaticallyNormal:forimagesfromadevice otherthanacomputer;selectif theblackareasoftheimageare toobrightExpanded:forimagesfroma computer;selectiftheimageis toodark |
| InputSignalAuto | RGBComponent | Specifiesthesignaltypefrom inputsourcesconnectedto computerportsAuto:detectssignals automaticallyRGB:correctscolorfor computer/RGBvideoinputsComponent:correctscolorfor componentvideoinputs |
| VideoSignalAuto | Variousvideostandards | Specifiesthesignaltypefromthe inputsourcesconnectedtothe videoportsAuto:detectssignals automatically |
Parenttopic:AdjustingtheMenuSettings
ProjectorFeatureSettings-SettingsMenu
Options on the Settings menu let you customize various projector features. The available settings depend on the currently selected inputs source.
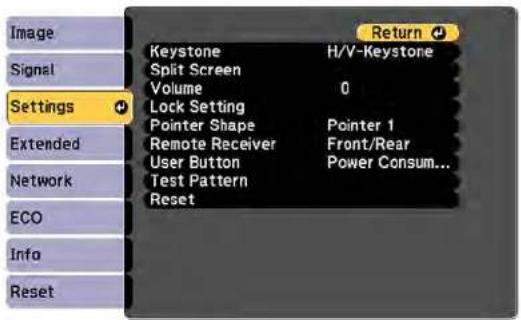
| SettingOptionsDescription | ||
| KeystoneH/VKeystone | QuickCorner | Adjustsimageshapeto rectangular(horizontallyand vertically)H/VKeystone:letsoumanually correcthorizontalandvertical sides;turnonoroffAutoV-KeystoneandtheH-Keystone AdjustersettingQuickCorner:selecttocorrect imageshapeandalignment usinganon-screendisplay |
| SplitScreen(HomeCinema760HD/1060) | ScreenSizeSourceSwapScreensAudioSourceAlignDisplaytheQRCode | Dividestheviewingarea horizontallyanddisplaytwo imagesside-by-side(pressEsc tocancelsplitscreendisplay) |
| Zoom(HomeCinema660) | VaryinglevelsavailableAdjuststhesizeoftheprojected image | |
| VolumeVaryinglevelsavailableAdjuststhevolumeofthe | projector'sspeakersystem;you cansetthevolumelevelforeach inputsourceseparately | |
| LockSettingControlPanelLockControlsprojectorbuttonlocking | tosecuretheprojectorFullLock:locksallbuttonsPartialLock:locksallbuttons exceptthepowerbuttonOff:nobuttonslocked | |
| PointerShapeThreeshapesavailableChangestheshapeoftheremote | controlpointerfeature | |
| RemoteReceiverFront/Rear | FrontRearOff | Limitsreceptionofremotecontrolsignalsbytheselectedreceiver; Offturnsoffallreceivers |
| UserButtonPowerConsumption | InfoDeinterlacingClosedCaptionTestPatternResolutionDisplaytheQRCode | AssignsamenuoptiontotheUserbuttonontheremote controlforone-touchaccess |
| TestPattern—Displaysatestpattern | ntoassistin | focusingandzoomingtheimage andcorrectingimageshape (pressEsctocancelpattern display) |
Parenttopic:AdjustingtheMenuSettings
Projector Setup Settings - Extended Menu
SettingstheExtendedmenuletyoucustomizevariousprojectorsetupfeaturesthatcontrolits operation.
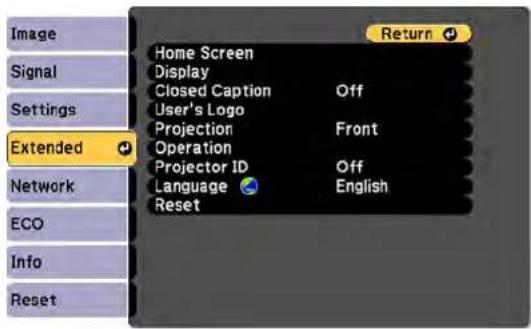
| Setting Options Description | ||
| Home Screen Home Screen | Custom Function 1Custom Function 2 | Selectvariousoptionsfortheprojector'sHome screenHome Screen Auto Disp.:controlswhether theHomeScreendisplaysautomaticallywhen theprojectoristurnedonCustom Function 1/Custom Function 2:lets youcustomizetheoptionsdisplayedonthe HomeScreenandsaveyoursettingsasa preset |
| SettingOptionsDescription | ||
| DisplayMessages | DisplayBackgroundStartupScreenA/VMute | SelectsvariousdisplayoptionsMessages:controlswhethermessagesaredisplayedonthescreenDisplayBackground:selectsthescreencolororlogotodisplaywhennosignalisreceivedStartupScreen:controlswhetheraspecialscreenappearswhentheprojectorstartsupA/VMute:selectsthescreencolororlogotodisplaywhenA/VMuteisturnedon |
| ClosedCaptionOff | CC1CC2 | Controlsuseofclosedcaptionsandselectstheclosedcaptiontype(closedcaptionsarevisibleonlyforNTSCsignalsconnectedthroughtheVideoport) |
| User'sLogo—Creates | ascreenthatheprojectordisplaysto | identifyitselfandenhancesecurity |
| ProjectionFront | Front/CeilingRearRear/Ceiling | Selectsthewaytheprojectorfacesthescreensotheimageisorientedcorrectly |
| OperationDirectPowerOnHighAltitudeModeAutoSourceSearchAutoPowerOnHDMIEQSetting | SelectsvariousoperationoptionsDirectPowerOn:turnsontheprojectorwhenyouplugitinHighAltitudeMode:regulatestheprojector'soperatingtemperatureataltitudesabove4921feet(1500m)AutoSourceSearch:automaticallydetectstheimagesignalbeinginputwhentheprojectoristurnedonAutoPowerOn:automaticallyturnsontheprojectorwhenitreceivesanimagesignal(availableonlywhenStandbyModeissettoCommunicationOn)HDMIEQSetting:adjuststheHDMlinputsignalleveldependingontheconnecteddevice | |
| ProjectorIDOff | 1through9 | SetstheprojectortoaparticularIDnumberwhichallowsyoutousearemotecontroltoindividuallycontrolprojectors |
| LanguageVariouslanguages | uagesavailableSelectsthelanguage | geforprojectormenuandmessagedisplays(notchangedbyResetoption) |
Parenttopic:AdjustingtheMenuSettings
ProjectorNetworkSettings-NetworkMenu
SettingstheNetworkmenuletyouviewnetworkinformationandsetuptheprojectorformonitoring andcontroloveranetwork.
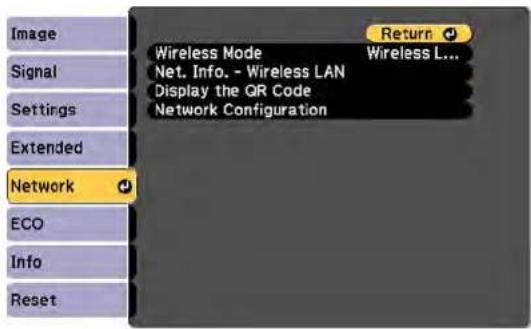
| SettingOptionsDescription | ||
| WirelessModeWirelessLANOn | Off | TurnsonwirelessLANmode |
| Net.Info-WirelessLANConnection | nmodeWirelessLANSystemAntennalevelProjectorNameSSIDDHCPIPAddressSubnetMaskGatewayAddressMACAddressRegionCodeIPv6 | Displayswirelessnetworkstatusanddetails |
| DisplaytheQRCode—DisplaysaQRcodefor | connectingwithiOSorAndroiddevicesusingtheEpsoniProjectionapp | |
| NetworkConfigurationAccesses | additionalnetworkmenus | Configuresyournetworksettings |
Parenttopic:AdjustingtheMenuSettings
ProjectorSetupSettings-ECOMenu
SettingsontheECOmenuletyoucustomizeprojectorfunctionstosavepower.Whenyouselecta power-savingsetting,aleaficonappearsnexttothemenuitem.
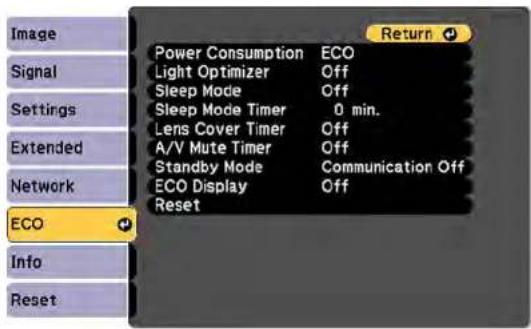
| SettingOptionsDescription | ||
| PowerConsumptionNormal | ECO | Selectsthebrightnessmodeof theprojectorlampNormal:setmaximumlamp brightnessECO:reduceslampbrightness andfannoise,andsavespower andlamplife |
| LightOptimizerOn | Off | WhenPowerConsumptionis settoNormalandAutolrisis turnedoff,thelampbrightnessis adjustedbasedontheprojected image:youcansetthisoptionfor eachcolormode |
| SleepModeOn | Off | Automaticallyplacesthe projectorinstandbymodeafter anintervalofinactivity |
| SleepModeTimer1to30minutesSetstheintervalforSleepMode | ||
| LensCoverTimerOn | Off | Automaticallyturnsofftheprojectorafter30minutesifthelenscoverisclosed |
| A/VMuteTimerOn | Off | Automaticallyturnsofftheprojectorafter30minutesifA/VMuteisenabled |
| StandbyModeCommunicationOn | CommunicationOff | CommunicationOnindicates thatheprojectorcanbe monitoredandcontrolledoveranetworkwhentheprojectorisinstandbymode |
| ECODisplayOn | Off | Displaysaleaficoninthebottom leftcorneroftheprojectedscreen toindicatethepower-saving statuswhenthelampbrightness changes |
Parenttopic:AdjustingtheMenuSettings
ProjectorInformationDisplay-InfoMenu
YoucandisplayinformationabouttheprojectorandinputsourcesbyviewingtheInfomenu.However, youcannotchangeanysettingsinthemenu.
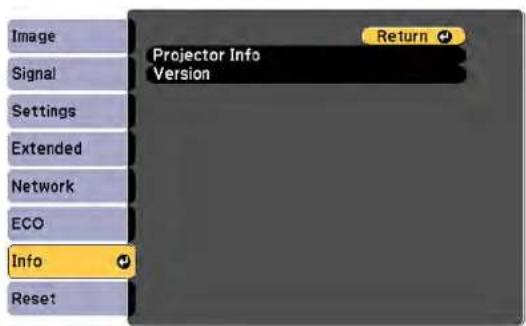
Select Version to display the projector's firmware version. Select Projector Info to display the settings described below.
Note: Available settings depend on the current input source. The lamp usage timer does not register any hours until you have used the lamp for at least 10 hours.
| InformationitemDescription | |
| LampHoursDisplaysthenumberofh | hours(H)thelamphasbeenusedinNormalandECOPowerConsumptionmodes;iftheinformationisdisplayedinyellow,obtainagenuineEpsonreplacementlampsoon |
| SourceDisplaysthenameoftheport | lowwhichthecurrentinputsourceisconnected |
| InputSignalDisplaystheinputsigna | settingofthecurrentinputsource |
| ResolutionDisplaystheresolutionof | thecurrentinputsource |
| VideoSignalDisplaysthevideosignal | formatofthecurrentinputsource |
| RefreshRateDisplaystherefreshrate | eofthecurrentinputsource |
| SyncInfoDisplaysinformationthatmaybeneededbyaservicetechnician | |
| StatusDisplaysinformationaboutprojectorproblemsthatmaybeneededbyaservicetechnician | |
| SerialNumberDisplaystheprojector | 'sserialnumber |
| EventIDDisplaystheEventIDnumber | correspondingtoaspecificprojectorproblem;seethelistofEventIDcodes |
EventIDCodeList
Parenttopic:AdjustingtheMenuSettings
EventIDCodeList
If the Event ID option on the Info menu displays a code number, check this list of Event ID codes for the solution to the projector problem associated with the code.
| EventIDcodeCause | seandsolution |
| 0041Connectionfailed. | Deletetherecordedprojectorinformationonyourcomputerandtryconnectingagain. |
| 00432Thenetworksoftwaredidnotstart.Turntheprojectoroffandthenonagain. | |
| 00435 | |
| 0433Cannotdisplay | ythetransferredimages.Restartthenetworksoftware. |
| 0434Unstablenetworkcommunication.Checkthenetworkcommunicationstatus,waitafewmoments,andtryconnectingtothenetworkagain. | |
| 0481 | |
| 0482 | |
| 0485 | |
| 0483Thenetworks | softwarequitunexpectedly.Checkthenetworkcommunicationstatus,thenturntheprojectoroffandthenonagain. |
| 04FE | |
| 0484Communicat | onwithcomputerwasdisconnected.Restartthenetworksoftware. |
| 0479Aprojectorsystemerrorhasoccurred.Turntheprojectoroffandthenonagain. | |
| 04FF | |
| 0891CannotfindanaccesspointwiththesameSSID.Setyourcomputer,accesspoint,andprojectortothesameSSID. | |
| 0892TheWPA/WPA2authenticationtypedoesnotmatch.Makesurethewirelessnetworksecuritysettingsarecorrect. | |
| 0893TheTKIP/AESencryptiontypedoesnotmatch.Makesurethewirelessnetworksecuritysettingsarecorrect. | |
| 0894Communicatonwithunauthorizedaccesspointwasdisconnected.Contactyournetworkadministrator. | |
| 0898FailedtoacquireDHCPaddress.MakesuretheDHCPserverisoperatingcorrectly.IfyouarenotusingDHCP,turnofftheDHCPsettingintheNetworkmenus. | |
| 0899Acommunicationerrorhasoccurred. | |
Parenttopic:ProjectorInformationDisplay-InfoMenu
ProjectorResetOptions-ResetMenu
You can reset most of the projector settings to their default values using the Reset All Config option on the Resetmenu.
You can also reset the projector's lamp usage timer to zero when you replace the lamp using the Reset LampHoursoption.
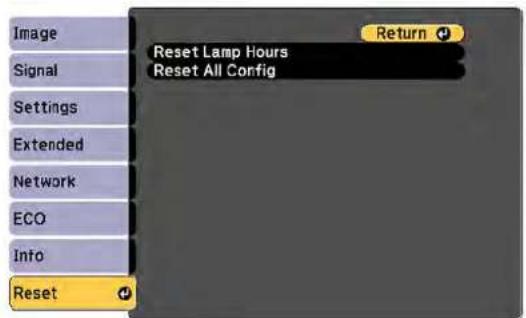
You cannot reset the following settings using the ResetAllConfiguration:
-InputSignal
-User'sLogo
•Language
•Networkmenuitems
•LampHours
- Password
•Zoom(HomeCinema660)
- DisplayBackground
- StartupScreen
•A/VMute
Parenttopic:AdjustingtheMenuSettings
MaintainingandTransportingtheProjector
Followtheinstructionsinthesesectionstomaintainyourprojectorandtransportitfromplacetoplace.
ProjectorMaintenance
TransportingtheProjector
ProjectorMaintenance
Yourprojectorneedslittlemaintenancetokeepworkingatitsbest.
Youmayneedtocleanthelensperiodically, andcleantheairfilterandairventstoppreventtheprojector fromoverheatingduetoblockedventilation.
Theonlypartsyoushouldreplacearethelamp,airfilter,andremotecontrolbatteries.Ifanyotherpart needsreplacing,contactEpsonoranauthorizedEpsonservicer.
Warning: Before cleaning any part of the projector, turn it off and unplug the power cord. Never open any cover on the projector, except a specifically explained in this manual. Dangerous electrical voltages in the projector can injure you severely.
Warning: Do not try to service this product yourself, except as specifically explained in this manual. Referallotherservicingtoqualifiedservicers.
CleaningtheLens
CleaningtheProjectorCase
AirFilterandVentMaintenance
ProjectorLampMaintenance
ReplacingtheRemoteControlBatteries
Parenttopic: Maintaining and Transporting the Projector
CleaningtheLens
Cleantheprojector'slensperiodically,orwheneveryounoticedustorsmudgesonthesurface.
• Toremovedustorsmudges, gentlywipethelenswithlens-cleaningpaper.
- Toremovestubbornsmudges, moistenasoft, lint-freeclothwithlenscleanerandgentlywipethelens. Donotsprayanyliquiddirectlyonthelens.
Warning: Donotusealenscleaner that contains flammable gas. The high heat generated by the projector lamp may cause a fire.
Caution: Do not use glass cleaner or any harsh materials to clean the lens and do not subject the lens toanyimpacts;youmaydamageit.Donotusecannedair,orthegasesmaybearesidue.Avoid touchingthelenswithyourbarehandstopreventfingerprintsonordamagetothelenssurface.
Parenttopic: Projector Maintenance
CleaningtheProjectorCase
Beforecleaningtheprojectorcase,turnofftheprojectorandunplugthepowercord.
• Toremovedustordirt, useasoft, dry, lint-freecloth.
- Toremovestubborndirt, useasoftclothmoistenedwithwaterandmildsoap. Donotsprayliquid directlyontheprojector.
Caution: Do not use wax, alcohol, benzine, paint thinner, or other chemicals to clean the projector case. These can damage the case. Donot use can be aair, or the gases may leave a residue.
Parenttopic: Projector Maintenance
AirFilterandVentMaintenance
Regularfiltermaintenanceisimportanttomaintainingyourprojector.YourEpsonprojectorisdesigned withaneasilyaccessible,user-replaceablefiltertoprotectyourprojectorandmakeregularmaintenance simple.Filtermaintenanceintervalswilldependontheenvironment.
Ifregularmaintenanceisnotperformed,yourEpsonprojectorwillnotifyyouwhenthetemperature insidetheprojectorhasreachedahighlevel.Donotwaituntilthiswarningappearstomaintainyour projectorfilterasprolongedexposuretohightemperaturesmayreducethelifeofyourprojectorlamp.
DamageduetothefailuretoproperlymaintaintheprojectororitsfiltermaynotbecoveredbytheprojectorlampLimitedWarranties.
CleaningtheAirFilterandVents
ReplacingtheAirFilter
Parenttopic: Projector Maintenance
Relatedreferences
ProjectorLightStatus
CleaningtheAirFilterandVents
Cleantheprojector'sairfilterorventsiftheygetdusty,orifyouseeamessagetellingyoutocleanthem.
- Turnoff the projector and unplug the power cord.
- Gentlyremovethedustusingasmallvacuumdesignedforcomputersoraverysoftbrush(suchas apaintbrush).
- If dust is difficult to remove the air filter is damaged, replace the air filter.
Parenttopic: AirFilterandVentMaintenance
ReplacingtheAirFilter
Youneedtoreplacetheairfilterinthefollowingsituations:
• Aftercleaningtheairfilter,youseeamessagetellingyoutocleanorreplaceit
•Theairfilteristornordamaged
Youcanreplacetheairfilterwhiletheprojectorismountedtotheceilingorplacedonatable.
- Turnoff the projector and unplug the power cord.
- Carefully open the air filter cover.
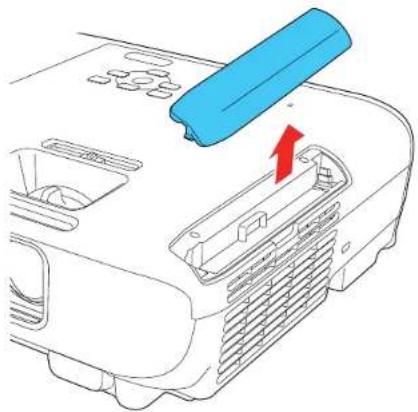
natural_image
Diagram of a car air conditioner unit with a blue plastic clip and red arrow indicating airflow direction (no text or symbols)- Pulltheairfilteroutoftheprojector.
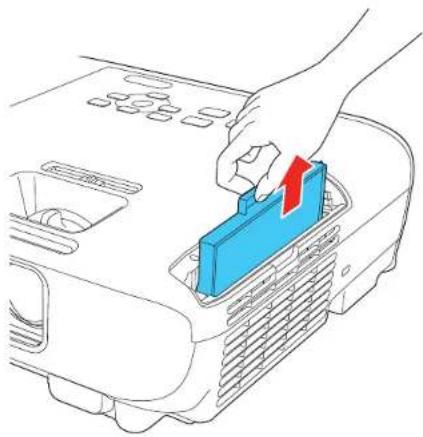
natural_image
Illustration of a hand placing a blue component into a car air vent with a red arrow indicating the action (no text or symbols present)Note: Air filters contain ABS resin and polyurethane foam. Dispose of used air filters according to localregulations.
- Placethenewairfilterintheprojectorasshownandpushgentlyuntilitclicksintoplace.
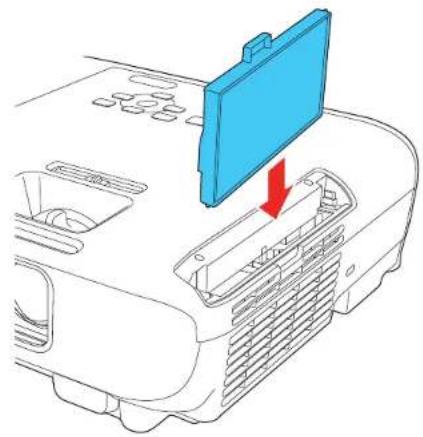
natural_image
Diagram of a printer internal structure with a blue cover and red arrow indicating a loading or movement (no text or symbols present)- Closetheairfiltercover.
Parenttopic: AirFilterandVentMaintenance
Relatedreferences
OptionalEquipmentandReplacementParts
ProjectorLampMaintenance
The projector keep a stack of the number of hours the lamp is used and display this information in the projector's menusystem.
Replacethelampassoonaspossiblewhenthefollowingoccurs:
• The projected image gets darker or start stodeteriorate
- Amessageappearswhenyouturnontheprojectortellingyoutoreplacethelamp
• The projector's Lamplightisflashingorangeanditspowerlightisflashingblue
ReplacingtheLamp
ResettingtheLampTimer
Parenttopic:ProjectorMaintenance
Relatedreferences
ProjectorLightStatus
ProjectorInformationDisplay-InfoMenu
ReplacingtheLamp
Beforeyoureplacethelamp,lettheprojectorcooldownforatleastonehoursothelampwillnotbehot.
Warning: Letthelampfullycoolbeforereplacingittoavoidinjury.
Youcanreplacethelampwhiletheprojectorismountedtotheceiling,ifnecessary.
- Turnoff the projector and unplug the power cord.
- Allow the projector lamptocooldown for at least one hour.
- Use the crew driver included with the replacement lamptoloosenthescrewsecuring the lamp cover.
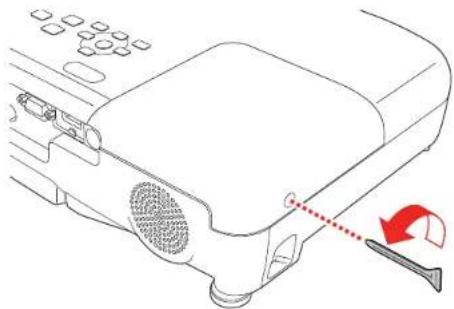
natural_image
Diagram of a device rear panel with a red arrow indicating rotation or change (no text or symbols present)Warning: If the lamp is broken, glass fragments may be loose inside the lamp chamber. Be careful removing any brokenglassto avoid injury. If the projector is installed on the ceiling, stand to these side of the lamp cover and not underneath; pieces of glass could fall into you by yes or mouth when you open the lamp cover.
4.Slidethelampcoveroutandliftitoff.
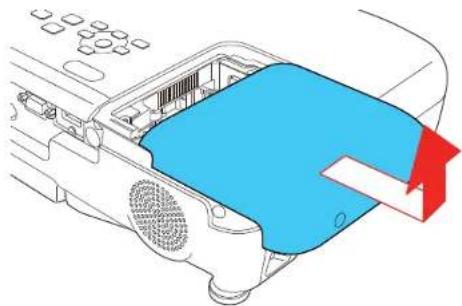
natural_image
Diagram of a computer monitor with a blue cover and red arrow indicating a loading or movement (no text or symbols present)- Loosenthescrewssecuringthelamptotheprojector. Thescrewsdonotcomeallthewayout.
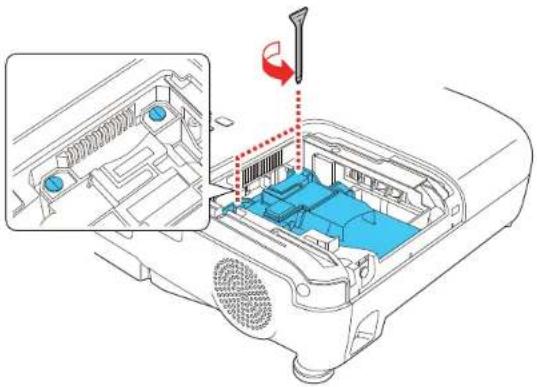
natural_image
Technical diagram of a car interior showing internal components and a wrench tool (no text or symbols present)- Grasptheraised section of the lamp and gently pull the lamp out of the projector.
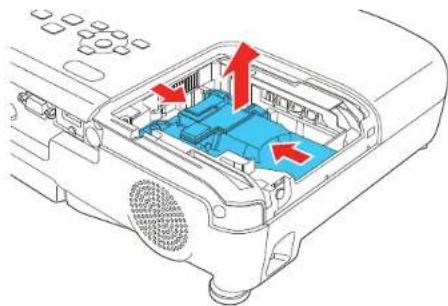
natural_image
Diagram of a computer interior showing a blue internal component with red arrows indicating flow or movement (no text or symbols present)Note: The lamp(s) in this product contain mercury. Please consult your state and local regulations regarding disposal or recycling. Donotputin the trash.
- Gently insert the new lamp into the projector. If it does not fit easily, makes sure it is facing the right way.
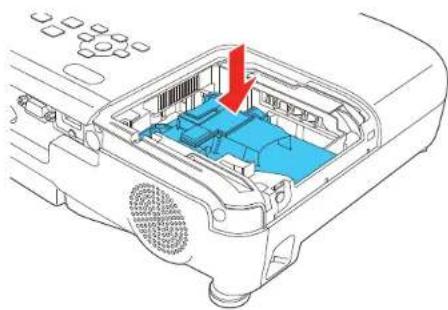
natural_image
Diagram of a computer monitor internal structure with a red arrow indicating a component (no text or symbols present)Caution: Donottouchanyglassonthelampassemblytoavoidprematurelampfailure.
- Pushinthelampfirmly and tightenthescrewstosecureit.
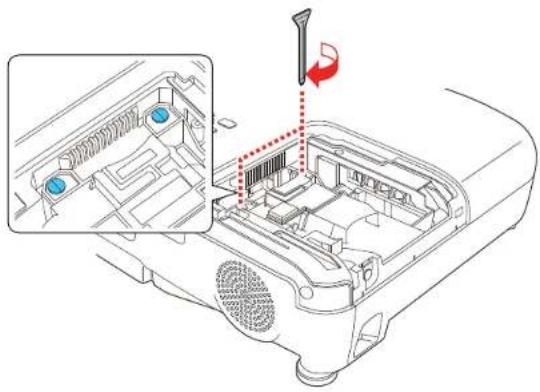
natural_image
Technical diagram of a vehicle interior showing internal components and a red-handled tool (no text or symbols)Caution: Donotover-tightenthescrews.
- Replacethelampcoverandtightenthescrewtosecureit.
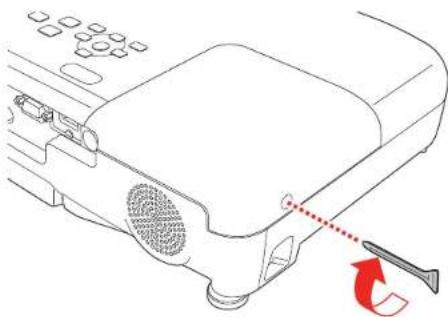
natural_image
Diagram of a device with a screwdriver inserted, showing a red arrow indicating rotation (no text or symbols present)Note: Besurethelampcoverissecurely installedorthelampwillnotcomeon.
Resetthelamptimertozerotokeeptrackofthenewlamp'susage.
Parenttopic: Projector Lamp Maintenance
Relatedreferences
OptionalEquipmentandReplacementParts
Relatedtasks
ResettingtheLampTimer
ResettingtheLampTimer
Youmustresetthelamptimerafterreplacingtheprojector'slamptoclearthelampreplacement messageandtokeeptrackoflampusagecorrectly.
Note: Do not reset the lamp timer if you have not replaced the lamp to avoid inaccurate lamp usage information.
- Turnon the projector.
2.PresstheMenubutton. - SelecttheResetmenuandpressEnter.
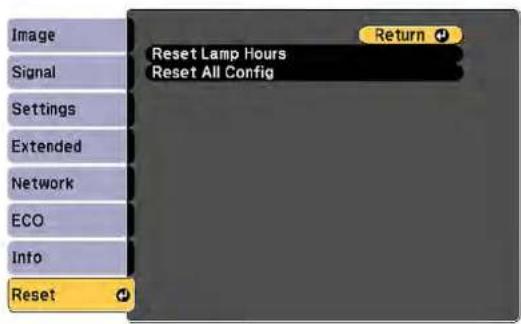
- SelectResetLampHoursandpressEnter.
Youseeapromptaskingifyouwanttoresetthelamphours.
-
SelectYesandpressEnter.
-
PressMenuorEsctoexitthemenus.
Parenttopic:ProjectorLampMaintenance
Relatedtasks
ReplacingtheLamp
ReplacingtheRemoteControlBatteries
TheremotecontrolusestwoAAmanganeseoralkalinebatteries. Replacethebatteriesassoonasthey runout.
Caution: Use only the type of batteries specified in this manual. Do not install batteries of different types, ormixnewandoldbatteries.
- Removethebatterycoverasshown.
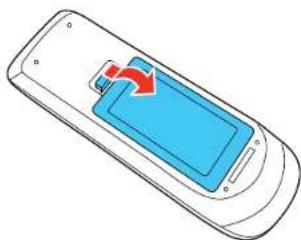
natural_image
Illustration of a mobile phone with a blue screen and red arrow indicating a change (no text or symbols)- Removetheoldbatteries.
Warning: If the battery fluid has leaked, wipe it away with a soft cloth and avoid getting the fluid on yourhands. Ifitgetsonyourhands, washthemimmediately to avoid injury.
- Insert the batteries with the + and - ends facing as shown.
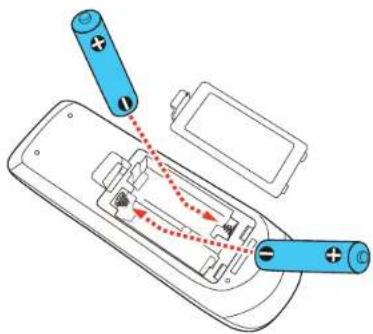
- Replacethebatterycoverandpressitdownuntilclicksintoplace.
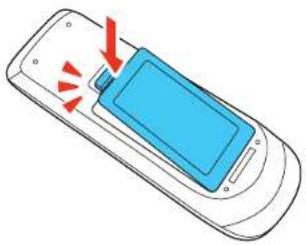
natural_image
Illustration of a mobile phone with a blue screen and red arrows indicating action or notification (no text or symbols)Warning: Dispose of used batteries according to local regulations. Do not expose batteries to heat or flame. Keep batteries out of thereachofchildren; they are choking hazards and are every dangerous if swallowed.
Parenttopic: Projector Maintenance
TransportingtheProjector
The projector contains precision parts, some of which are glass. Follow these guidelines to transport, ship, or store the projectors safely:
•Closethelenscovertoprotectthelens.
- Removeanyequipmentconnectedtotheprojector.
- Useacarryingcasetohand-carrytheprojector.
- Whentransportingtheprojectoralongdistanceorascheckedluggage,placeitinacarryingcase. Thenpackthecaseinafirmboxwithcushioningarounditandmarkthebox"Fragile."
- Whenshippingtheprojectorforrepairs, placeitinitsoriginalpackingmaterials, if possible, or use equivalent materials with cushioning around the projector. Markthebox "Fragile."
Note: Epson shall not believe for any damages incurred during transportation.
Parenttopic: Maintaining and Transporting the Projector
SolvingProblems
Checkthesolutionsinthesesectionsifyouhaveanyproblemsusingtheprojector.
ProjectionProblemTips
ProjectorLightStatus
UsingtheProjectorHelpDisplays
SolvingImageorSoundProblems
SolvingProjectororRemoteControlOperationProblems
SolvingNetworkProblems
WheretoGetHelp
ProjectionProblemTips
If the projector is not working properly, try turning it off and unplugging it. Then plug it back in and turn it on.
If this does not solve the problem, check the following:
•Thelightsontheprojectormayindicatewhattheproblemis.
•The Helpoption on the Homescreencand display information about common problems, if the projector is operating.
• Thesolutionsinthismanualcanhelpyousolvemanyproblems.
If noneofthesesolutionshelp, you can contact Epsonfortechnical support.
Parenttopic: Solving Problems
Relatedreferences
ProjectorLightStatus
WheretoGetHelp
Relatedtasks
Using the Projector Help Displays
ProjectorLightStatus
Thelightsontheprojectorindicatetheprojectorstatusandletyouknowwhenaproblemoccurs.Check thestatusandcolorofthelightsandlookforasolutioninthetablehere.
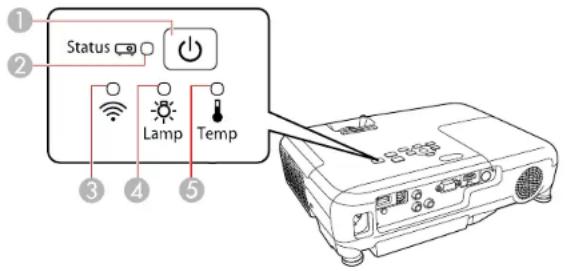
1Powerlight
2Statuslight
3WirelessLANlight(HomeCinema1060;lightisnon-functionalforothermodels)
4Lamplight
5Temp(temperature)light
Projectorstatus
| PowerlightStatus | uslightLamplight | TemplightStatus | sandsolution | |
| BlueBlueOffOff | Normaloperation | |||
| BlueFlashingblue | OffOffWarming | uporcoolingdown | ||
| BlueOffOffOff | Standbyorsleepmode | |||
| FlashingblueOff | OffOffPreparing | fornetworkmonitoring | ||
| PowerlightStat | uslightLamplight | TemplightStatus | sandsolution | |
| FlashingblueLig | htstatusvaries | Lightstatusvaries | Flashingorange | Projectoristoohot•Makesurethattheventsandairfilterarenotcloggedwithdustorobstructedbynearbyobjects•Cleanorreplacetheairfilter•Makesuretheenvironmentaltemperatureisnottoohot |
| OffFlashingblue | OffOrangeProjector | hasoverheated | and | turnedoff;leaveitturnedofftocoldownforaboutfiveminutes,thendothefollowing:•Makesurethattheventsandairfilterarenotcloggedwithdustorobstructedbynearbyobjects•Cleanorreplacetheairfilter•Ifoperatingtheprojectorathighaltitude,turnonHighAltitudeMode•Iftheproblempersists,unplugtheprojectorandcontactEpsonforhelp |
| PowerlightStatus | uslightLamplight | TemplightStatus | usandsolution | |
| OffFlashingblue | Orange | lampcoverhasa | problem | •Checktoseeifthelampis burnedout,broken,orinstalled incorrectly;reseatorreplacethe lampasnecessary•Cleanorreplacetheairfilter•Ifoperatingtheprojectorathigh altitude,turnonHighAltitude Mode•Iftheproblempersists,unplug theprojectorandcontactEpson forhelp•Checkthatthelampcoveris installedcorrectly |
| FlashingblueLig | htstatus varies | Flashing orange | Lightstatus varies | Replacethelampsoontoavoid damage;donotcontinueusingthe projector |
| OffFlashingblue | OffFlashing | orange | Afanorsensorhasaproblem;turn theprojectoroff,unplugit,and contactEpsonforhelp | |
| OffFlashingblue | Flashing | orange | OffInternalprojec | torerror;turnthe projectoroff,unplugit,andcontact Epsonforhelp |
| OffFlashingblue | Flashing | orange | Flashing orange | Autoiriserror;turntheprojectoroff, unplugit,andcontactEpsonfor help |
| OffFlashingblue | OrangeOrangeP | powererror;turnthe | projectoroff, | unplugit,andcontactEpsonfor help |
WirelessLANstatus(HomeCinema1060)
| WirelessLANlightStatusandsolution | |
| BlueWirelessLANisavailable | |
| FlashingbluequicklyConnectingtoadevice | |
| FlashingblueslowlyAnerrorhasoccurred;turnofftheprojector,thenturnitbackon | |
| OffWirelessLANisnotavailable;makesurethewirelessLANsettingsarecorrect | |
Note: If the lights display a pattern not listed in the table above, turn the projector off, unplug it, and contactEpsonforhelp.
Parenttopic: Solving Problems
Relatedconcepts
AirFilterandVentMaintenance
ProjectorLampMaintenance
Relatedreferences
ProjectorSetupSettings-ExtendedMenu
WheretoGetHelp
Relatedtasks
TurningOfftheProjector
UsingtheProjectorHelpDisplays
Youcandisplayinformationtohelpyousolvecommonproblemsusingtheprojector'sHelpsystem.
- Turnon the projector.
- PresstheHomebuttonontheprojectorotheremotecontrol.
- PressthearowbuttonstoselectHelp.
- PressEnter.
YouseetheHelpmenu.
5.Presstheupanddownarrowbuttonstohighltheproblemyouwanttosolve.
6. PressEntertoviewthesolutions.
- When you are finished, do one of the following:
• Toselectanotherproblemtosolve, pressEsc.
• Toexitthehelpsystem, pressHome.
Parenttopic: Solving Problems
SolvingImageorSoundProblems
Checkthesolutionsinthesesectionsifyouhaveanyproblemswithprojectedimagesorsound.
SolutionsWhenNoImageAppears
SolutionsWhenImageisIncorrectUsingtheUSBDisplayFunction
SolutionsWhen"NoSignal"MessageAppears
SolutionsWhen"NotSupported"MessageAppears
SolutionsWhenOnlyaPartialImageAppears
SolutionsWhentheImageisNotRectangular
SolutionsWhentheImageContainsNoiseorStatic
SolutionsWhentheImageisFuzzyorBlurry
SolutionsWhentheImageBrightnessorColorsareIncorrect
SolutionstoSoundProblems
Parenttopic:SolvingProblems
SolutionsWhenNoImageAppears
Ifnoimageappears, try the following solutions:
• Makesurethelenscoverisopenallthewayoroff.
- Press the A/V Mute button on the remote control to see if the image was temporarily turned off.
- Makesureallnecessarycablesaresecurelyconnectedandthepowerisonfortheprojectorand connectedvideosources.
- Presstheprojector'spowerbuttontowakeitfromstandbyorsleepmode. Alsoseeifyourconnected computerisinsleepmodeordisplayingablankscreensaver.
- Press the Menu button. If the projector menu is able to display, there may be a problem with the connectedvideosource,cableconnection,orport.
- CheckthesettingsontheSignalmenutomakesuretheyarecorrectforthecurrentvideosource.
- Adjust the Brightness setting or select the Normal Power Consumption setting.
- Check the Display setting to make sure Messages is set to On.
- If the projectordoesnotrespondwhenyoupressthecontrolpanelbuttons, the buttonsmaybe locked. Unlockthebuttons.
- If the projectordoesnotrespond when you press buttons on theremote control, makes sure theremote receivers are returned.
- ForimagesprojectedwithWindowsMediaCenter,reducethescreensizefromfullscreenmode.
- ForimagesprojectedfromapplicationsusingWindowsDirectX,turnoffDirectXfunctions.
- If the others solutions donotsolvethe problem, reset all of the projector settings using the option on the Reset menu.
• Theprojectormaynotbeabletoprojectcopyrightedvideosthatyouplaybackonacomputer. For details, seethemanualsuppliedwithyourcomputer.
Parenttopic: SolvingImageorSoundProblems
Relatedreferences
ImageQualitySettings-ImageMenu
InputSignalSettings-SignalMenu
ProjectorSetupSettings-ExtendedMenu
ProjectorResetOptions-ResetMenu
Relatedtasks
UnlockingtheProjector'sButtons
SolutionsWhenImageisIncorrectUsingtheUSBDisplayFunction
IfnoimageappearsoriftheimageappearsincorrectlyusingtheUSBDisplayfunction,trythefollowing solutions:
- PresstheUSBbuttonontheremotecontrol.
- MakesuretheUSBDisplaysoftwarehasinstalledcorrectly.Installitmanuallyifnecessary.
- On a Mac, select the USB Display icon in the Dock or from the Applications folder.
- ForimagesprojectedwithWindowsMediaCenter, reduce the screensize from fullscreen mode.
- ForimagesprojectedfromapplicationsusingWindowsDirectX,turnoffDirectXfunctions.
- If the mouse cursor flickers, select Make the movement of the mouse pointer smooth in the Epson USBDisplaySettingsprogramonyourcomputer.
-
Turn off the Transfer layered window setting in the Epson USB Display Settings program on your computer.
-
If you are projecting using the 1080p video format and change the computer resolution during projection, the video quality and performance may decline.
- MakesureyouareusingthemostrecentversionoftheUSBDisplaysoftware.Youcandownloadthe latest version from the Epson web site. Go to epson.com/support (U.S.) or epson.ca/support (Canada) andselectyourprojector.
Parenttopic: SolvingImageorSoundProblems
Relatedtasks
ConnectingtoaComputerforUSBVideoandAudio
SolutionsWhen"NoSignal"MessageAppears
If the "NoSignal" message appears, try the following solutions:
- PresstheSourceSearchbuttonandwaitafewsecondsforanimagetoappear.
- Press the Home button on the remote control to select from a list of available sources (shown in black text).
- Turnontheconnectedcomputerorvideosource,andpressitsplaybuttontobeginyourpresentation, ifnecessary.
- Checktheconnectionfromtheprojectortoyourvideosources.
- If you are projecting from alaptop computer, makes sure it setup to display on an external monitor.
- If necessary, turn the projector and the connected computer or video source off and then on again.
- If you are projecting from an HDMI source, replace the HDMI cable with a shorter one.
- If the others solutions donotsolvethe problem, reset all of the projector settings using the options on the Reset menu.
DisplayingFromaPCLaptop
DisplayingFromaMacLaptop
Parenttopic: SolvingImageorSoundProblems
Relatedreferences
ProjectorResetOptions-ResetMenu
DisplayingFromaPCLaptop
If you see the "No Signal" message when you display from a PC laptop, you need to setup the laptop to display on an external monitor.
- Hold down the laptop's Fn key and press the key labeled with a monitor icon or CRT/LCD. (See your laptopmanualfordetails.) Waitafewsecondsforanimagetoappear. Todisplayonboththe laptop'smonitorandtheprojector, trypressingthesamekeysagain.
Note: On Windows 7 or later, hold down the Windows key and press P at the same time, then click Duplicate. - If the same image is not displayed by the laptop and projector, check the Windows Display utility to make sure the external monitor portisenabled and extended desktop mode is disabled. (Seeyour computer or Windows manual for instructions.)
- If necessary, check your video card settings and set the multiple display option to Mirror or Duplicate.
Parenttopic: SolutionsWhen"NoSignal"MessageAppears
Relatedreferences
ProjectorResetOptions-ResetMenu
DisplayingFromaMacLaptop
If you se the "No Signal" message when you display from a Mac laptop, you need to setup the laptop form mirrored display. (Se your laptop manual for details.)
- Open the System Preferences utility and select Displays, Display, or Color LCD.
- ClicktheArrangeorArrangementtab.
- Select the Mirror Displays checkbox.
Parenttopic: SolutionsWhen"NoSignal"MessageAppears
SolutionsWhen"NotSupported"MessageAppears
If the "Not Supported" message appears, try the following solutions:
- MakesurethecorrectinputsignalisselectedontheSignalmenu.
- Makesurethecomputer'sdisplayresolutiondoesnotexceedtheprojector'sresolutionandfrequency limit.Ifnecessary,selectadifferentdisplayresolutionforyourcomputer.(Seeyourcomputermanual fordetails.)
- Asatest, try setting the computer's display resolution to the lowest possible setting, and then gradually increase it as necessary.
Parenttopic: Solving Imageor Sound Problems
Relatedreferences
InputSignalSettings-SignalMenu
SupportedVideoDisplayFormats
SolutionsWhenOnlyaPartialImageAppears
Ifonlyapartialcomputerimageappears, trythefollowingsolutions:
- PresstheAutobuttonontheremotecontroltooptimizetheimagesignal.
- MakesuretheResolutionsettingintheSignalmenuissetcorrectlytofortheinputsignal.
- TryadjustingtheimagepositionusingthePositionmenusetting.
-
PresstheAspectbuttonontheremotecontroltoselectadifferentimageaspectratio.
-
If you zoomed into or out of the image using the E-Zoom buttons, press the Esc button until the projectorreturnstoafulldisplay.
- Checkthecablesconnectingthecomputerorvideosourcetotheprojector.Tryconnectingdifferent cables.
- Checkyourcomputerdisplaysettingstodisabledualdisplayandsettheresolutionwithinthe projector'slimits.(Seeyourcomputermanualfordetails.)
- Checktheresolutionassignedtoyourpresentationfilestoreeiftheyarecreatedforadifferentresolutionthanyouareprojectingin.(Seeyoursoftwarehelpfordetails.)
- MakesureyouselectedthecorrectProjectionsetting.
Parenttopic: SolvingImageorSoundProblems
Relatedreferences
InputSignalSettings-SignalMenu
SupportedVideoDisplayFormats
SolutionsWhenthelmageisNotRectangular
If the projected image is not evenly rectangular, try the following solutions:
- Turnonautomatickeystoneadjustmentsusingtheprojector'smenus.
- Placetheprojectordirectlyinfrontofthecenterofthescreen, facingitsquarely, ifpossible.
- If you adjusted the projector height using the projector feet, press the keystone button on the project to adjust the imageshape.
- Adjustthepositionoftheprojector'shorizontalkeystoneslider.
- AdjusttheQuickCornersettingtocorrecttheimageshape.
Parenttopic: SolvingImageorSoundProblems
Relatedconcepts
ImageShape
Relatedreferences
ProjectorFeatureSettings-SettingsMenu
SolutionsWhentheImageContainsNoiseorStatic
If the projected images seem to contain electronic interference (noise) or static, try the following solutions:
- Checkthecablesconnectingyourcomputerorvideosourcetotheprojector. Theyshouldbe:
• Separated from the powercord to prevent interference
- Securelyconnectedatbothends
• Notconnectedtoanextensioncable
•Nolongerthan10feet(3m)forVGA/computercablesor24feet(7.3m)forHDMIcables
- Checkthesettingsontheprojector'sSignalmenutomakesuretheymatchthevideosource.If available for your video source, adjust the Deinterlacing and Noise Reduction settings.
- Ifavailableforyourvideosource,selectAutoastheResolutionsettingintheSignalmenu.
- Selectacomputervideoresolutionandrefreshratethatarecompatiblewiththeprojector.
- If you are projecting from a computer using a VGA cable, press the Auto button on the remote control to automatically adjust the tracking and sync. If the problem remains, display a uniformly patterned image on the screen and manually adjust the Tracking and Sync settings.
- If you connected an extension powerable, try projecting without it to see if it caused interference in the signal.
- If you are using the USB Display function, turn off the Transfer layered window setting in the Epson USBDisplaySettingsprogramonyourcomputer.
- Tryadifferentcable.
Parenttopic: SolvingImageorSoundProblems
Relatedreferences
ImageQualitySettings-ImageMenu
InputSignalSettings-SignalMenu
SupportedVideoDisplayFormats
SolutionsWhenthelmageisFuzzyorBlurry
If the projected image is fuzzy or blurry, try the following solutions:
- Adjusttheimagefocus.
•Cleantheprojectorlens.
Note: To avoid condensation on the lens after bringing the projector in from a cold environment, let the projectorwarmuptoroomtemperaturebeforeusingit.
- Position the projector closeenoughtothescreen.
- Position the projector so the keystone adjustment angle is not sowidethatit distortsthe image.
- Turnonautomatickeystoneadjustmentintheprojector'smenus.
- AdjusttheSharpnesssettingtoimproveimagequality.
- If you are projecting from a computer, press the Auto button on the remote control to automatically adjust the tracking and sync. If any bands or overall blurriness remain, display a uniformly patterned image on the screen and manually adjust the Tracking and Sync settings.
- If you are projecting from a computer, try using a lower resolution or try to match the projector's native resolution.
Parenttopic: Solving Imageor Sound Problems
Relatedconcepts
ProjectorPlacement
Relatedreferences
ImageQualitySettings-ImageMenu
GeneralProjectorSpecifications
Relatedtasks
FocusingtheImageUsingtheFocusRing
CleaningtheLens
SolutionsWhenthelImageBrightnessorColorsareIncorrect
If the projected image is stood dark or light, orthecolors are incorrect, try the following solutions:
- Press the Color Mode button on the remote control to try different color modes for the image and environment.
- Checkyourvideosourcesettings.
- Adjust the available settings on the Image menu for the current input source, such as Brightness, Contrast, Tint, Color Temp., and/or Color Saturation.
- Make sure you selected the correct Input Signal or Video Signal setting on the Signal menu, if available for your imagesource.
- Makesureallthecablesaresecurelyconnectedtotheprojectorandyourvideodevice.Ifyou connectedlongcables,tryconnectingshortercables.
- If you are using the ECO Power Consumption setting, try selecting Normal in the projector's menus.
- Position the projector closeenoughtothescreen.
- If the image has been progressively darkening, you may need to replace the projector lamp soon.
Parenttopic: Solving Imageor Sound Problems
Relatedconcepts
ColorMode
ProjectorPlacement
Relatedreferences
ImageQualitySettings-ImageMenu
InputSignalSettings-SignalMenu
ProjectorSetupSettings-ECOMenu
SolutionstoSoundProblems
If there is nosound when you expect it the volume is too low or high, try the following solutions:
- Adjust the projector's volumesettings.
- Press the A/V Mute button on the remote control to resume video and audio if they were temporarily stopped.
-
Checkyourcomputerorvideosourcetomakesurethevolumeisturnedupandtheaudiooutputisset forthecorrectsource.
• Try disconnecting and reconnecting the audiocable. -
Checktheaudiocableconnectionsbetween the projector and your videosource.
- If you dono the earsound from an HDMI source, set the connected device to PCM output.
-
Makesureanyconnectedaudiocablesarelabeled"NoResistance".
-
If you are using the USB Display function, turn on the Output audio from the projector setting in the EpsonUSBDisplaySettingsprogramonyourcomputer.
- If you are using a Mac and you don't have sound from an HDMI source, makes sure your Mac supports audio through the HDMI port. If not, you need to connect an audioable.
- If the volume for the computer is set to the minimum while the projector's volume is set to maximum, then is may be mixed. Turn up the computer's volume and decrease the projector's volume.
- Ifyouturntheprojectoronimmediatelyafterturningitoff,thecoolingfansmayrunathighspeed momentarilyandcauseanunexpectednoise.Thisisnormal.
Parenttopic: SolvingImageorSoundProblems
Relatedreferences
ProjectorSetupSettings-ExtendedMenu
ProjectorSetupSettings-ECOMenu
SolvingProjectororRemoteControlOperationProblems
Checkthesolutionsinthesesectionsifyouhaveproblemsoperatingtheprojectororremotecontrol.
SolutionstoProjectorPowerorShut-OffProblems
SolutionstoProblemswiththeRemoteControl
SolutionstoPasswordProblems
Parenttopic: Solving Problems
SolutionstoProjectorPowerorShut-OffProblems
If the project orders not come on when you press the power button or it should you expectedly, try the followingsolutions:
• Makesurethepowercordissecurelyconnectedtotheprojectorandtoaworkingelectricaloutlet.
- Theprojector'sbuttonsmaybelockedforsecurity.Unlockthebuttonsorusetheremotecontrolto turnontheprojector.
- If the projector's lampshut soffun unexpectedly, it may have entered standby mode after a period of inactivity. Press the power button to wake the projector and adjust the Sleep Mode Timer setting to changethesleepinterval.
- If the projector's lampshutsoff, the Statuslightis flashingblue, and the Templightisorange, the projector has overheated and shutoff. Check the solutions for this light status.
- If the power button on theremote control does not turn on the projector, checks batteries and make sure the Remote Receiversetting is turned on the projector's menu, if available.
- Thepowercordmaybedefective. Tryanotherpowercord. If that doesn't work, disconnect the cord and contact Epson.
Parenttopic: Solving Projector or Remote Control Operation Problems
Relatedreferences
ProjectorLightStatus
ProjectorSetupSettings-ExtendedMenu
ProjectorSetupSettings-ECOMenu
Relatedtasks
UnlockingtheProjector'sButtons
SolutionstoProblemswiththeRemoteControl
If the projectordoesnotrespondtoremotecontrolcommands, try the followingsolutions:
- Check that theremote control batteries are installed correctly and have power. If necessary, replace the batteries.
- Makesureyouareoperatingtheremotecontrolwithinthereceptionangleandrangeoftheprojector.
- Makesuretheprojectorisnotwarminguporshuttingdown.
- Checktoseeifabuttonontheremotecontrolisstuckdown,causingittoentersleepmode.Release thebuttontowaketheremotecontrolup.
• Strongfluorescentlighting, directsunlight, or infrared devices signals may be interfering with the projector's remotereceivers. Dimthelightsormovetheprojectorawayfromthesunorinterfering equipment.
• If available, turnoffoneoftheremotereceiversintheprojector'smenusystem, orcheckifallthe remotereceiverswereturnedoff.
• If you assigned an ID number to other remote control to operate multiple projectors, you may need to check or change the ID setting (feature not available with all projectors). - If you los etheremote control, you can purchase another from an authorized Epsonreseller.
Parenttopic: Solving Projector or Remote Control Operation Problems
Relatedreferences
RemoteControlOperation
ProjectorFeatureSettings-SettingsMenu
Relatedtasks
ReplacingtheRemoteControlBatteries
SolutionstoPasswordProblems
If you cannot enter or remember a password, try the following solutions:
- You may have turned on password protection without first setting a password. Try entering 0000 using theremotecontrol.
- If you have entered an incorrect password to many times and see a message displaying a request code, writed down the code and contact Epson. Donot attempt to enter the password again. Provide therequest code and proof of ownership for assistance in unlocking the projector.
- IfyousetaWebControlpasswordandforgottheuserIDorpassword,tryenteringthefollowing:
-UserID:EPSONWEB
- Defaultpassword:admin
- IfyousetaRemotepassword(inEpsonWebControl)andforgottheuserIDorpassword,tryentering thefollowing:
•UserID:EPSONREMOTE
- Defaultpassword:guest
- If you lose theremote control, you cannot enter a password. Order anewone from Epson.
Parenttopic: SolvingProjector or RemoteControlOperationProblems
Relatedconcepts
PasswordSecurityTypes
SolvingNetworkProblems
Checkthesolutionsinthesesectionsifyouhaveproblemsusingtheprojectoronanetwork.
SolutionsWhenWirelessAuthenticationFails
SolutionsWhenYouCannotAccesstheProjectorThroughtheWeb
SolutionsWhenNetworkAlertE-MailsareNotReceived
Parenttopic: Solving Problems
SolutionsWhenWirelessAuthenticationFails
If you cannot authenticate a wireless connection, try the following solutions:
- MakesuretheWirelessModesettingissettoWirelessLanOn.
- ChecktheSecuritysettingsandpassphraseintheNetworkConfigurationmenu.
- ChecktheEventIDnumberdisplayedintheInfomenuandcheckthelinkbelowtoidentifythe problem.
Parenttopic: Solving Network Problems
Relatedreferences
ProjectorNetworkSettings-NetworkMenu
Relatedtasks
SelectingWirelessNetworkSettingsManually
SolutionsWhenYouCannotAccesstheProjectorThroughtheWeb
If you are unable to access the project through haweb browser, makes sure you are using the correct ID and password, which are cases sensitive.
Note: You cannot change the user ID.
- YoumayneedtologintoaccesssomeoptionsontheWebControlscreen.Ifyouseealoginwindow, enter EPSONWEB as the user ID, and enter the password set in the projector's Network menu as the password. Thedefaultpassworddisadmin.
- TodisplaytheWebRemotescreen,enterEPSONREMOTEastheuserIDandenterthepassword setintheprojector'sNetworkmenuasthepassword. Thedefaultpasswordisguest.
- Makesureyouhaveaccesstothenetworktheprojectorison.
Note: The userIDandpasswordarecasesensitive.
Parenttopic: Solving Network Problems
Relatedtasks
ControllingaNetworkedProjectorUsingaWebBrowser
SolutionsWhenNetworkAlertE-MailsareNotReceived
If you donot receive an e-mail alerting y out o problems with a projector over then network, try the followingsolutions:
- Makesuretheprojectoristurnedonandconnectedtothenetworkcorrectly.(Ifanerrorshutdownthe projector, itcannotsendane-mail.)
- Makesureyousetuptheprojectore-mailalertsettingscorrectlyontheprojector'snetwork Notificationsmenuorinthenetworksoftware.
- Set the Standby Mode setting to Communication On so the network software can monitor the projectorinstandbymode.
Parenttopic: Solving Network Problems
Relatedreferences
ProjectorSetupSettings-ECOMenu
Relatedtasks
SettingUpProjectorNetworkE-MailAlerts
WheretoGetHelp
If you need to contact Epson for technical supports, use the following support options.
InternetSupport
Visit Epson's support website at epson.com/support (U.S.), epson.ca/support (Canada), or epson.com.jm/support (Caribbean) and select your product for solutions to common problems with your projector. Youcandownloadutilitiesanddocumentation, getFAQsandtroubleshootingadvice, ore-mail Epsonwithyourquestions.
SpeaktoaSupportRepresentative
TousetheEpsonPrivateLineSupportservice, call(800)637-7661. This service is available for the duration of your warranty period. You may also speak with a projectorsupport specialist by dialing (562) 276-4394 (U.S.) or (905) 709-3839 (Canada).
Supporthoursare6AMto8PM, PacificTime, MondaythroughFridayand7AMto4PM, PacificTime, Saturday.
Daysandhoursofsupportaresubjecttochangewithoutnotice.Tollorlongdistancechargesmay apply.
Beforeyoucall,havethefollowinginformationready:
- Productname
•Productserialnumber(locatedonthebottomorrearoftheprojector,orinthemenusystem)
•Proofofpurchase(suchasastorereceipt)anddateofpurchase
•Computerorvideoconfiguration
•Descriptionoftheproblem
PurchaseSuppliesandAccessories
You can purchases screens, other optional accessories, and replacement parts from an Epson authorized reseller. To find the arestreseller, call 800-GO-EPSON (800-463-7766) in the U.S. or 800-807-7766 in Canada. Or you can purchase online at epsonstore.com (U.S. sales) or epsonstore.ca (Canadian sales).
Topurchase are placement remote control, call(562)276-4394(U.S.) or (905)709-3839(for dealer referral in Canada).
Parenttopic: Solving Problems
TechnicalSpecifications
Thesesectionslistthetechnicalspecificationsofyourprojector.
GeneralProjectorSpecifications
ProjectorLampSpecifications
RemoteControlSpecifications
ProjectorDimensionSpecifications
ProjectorElectricalSpecifications
ProjectorEnvironmentalSpecifications
ProjectorSafetyandApprovalsSpecifications
SupportedVideoDisplayFormats
USBDisplaySystemRequirements
GeneralProjectorSpecifications
TypeofdisplayPoly-siliconTFTactivematrix
ResolutionHomeCinema660:
800×600pixels(SVGA)
HomeCinema760HD:
1280×800pixels(WXGA)
HomeCinema1060:
1920×1080pixels(1080p)
LensHomeCinema660:
F=1.44
Focallength:16.7mm
HomeCinema760HD:
F=1.49to1.72
Focallength:16.9to20.28mm
HomeCinema1060:
F=1.58to1.70
Focallength:18.2to29.2mm
ColorreproductionUpto1billion
BrightnessHomeCinema660/760HD:
NormalPowerConsumptionmode:
Whitelightoutput3300lumens(ISO21118standard)
Colorlightoutput3300lumens
ECOPowerConsumptionmode:
Whitelightoutput2050lumens(ISO21118standard)
HomeCinema1060:
NormalPowerConsumptionmode:
Whitelightoutput3100lumens(ISO21118standard)
Colorlightoutput3100lumens
ECOPowerConsumptionmode:
Whitelightoutput1925lumens(ISO21118standard)
Note: Colorbrightness(colorlightoutput)andwhitebrightness (whitelightoutput)will vary depending on usage conditions. Color light output measured in accordance with IDMS15.4; whitelight output measured in accordance with ISO21118.
Contrastratio15000:1withAutolrison,Dynamiccolormode,NormalPower
Consumptionmode, and WideZoommode
| Imagesize(innativeaspect ratio) | HomeCinema660:23inches(0.58m)to350inches(8.89m)HomeCinema760HD:33inches(0.84m)to320inches(8.13m)HomeCinema1060:30inches(0.76m)to300inches(7.62m) |
| Projectiondistance(innativeaspect ratio) | HomeCinema660:34.6inches(0.88m)to411inches(10.44m)HomeCinema760HD:35.8inches(0.91m)to428.7inches(10.89m)HomeCinema1060:26.4inches(0.67m)to326inches(8.28m) |
ProjectionmethodsFront, rear, ceiling-mounted
Opticalaspectratio HomeCinema660:
(width-to-height) 4:3
HomeCinema760HD:
16:10
HomeCinema1060:
16:9
FocusadjustmentManual
ZoomadjustmentHomeCinema660:
Digitalzoom
HomeCinema760HD/1060:
Manualopticalzoom
Zoomratio HomeCinema660:
(Tele-to-Wide) 1.0to1.35
HomeCinema760HD/1060:
1.0to1.2
Internalsoundsystem2Wmonaural
Noiselevel37dB(NormalPowerConsumptionmode)
28dB(ECOPowerConsumptionmode)
KeystonecorrectionangleVertical:±30°(manual);±30°(usingAutoKeystone)
Horizontal:±30°(manual)
USBTypeBportcompatibilityUSB2.0compliantforUSBdisplayorexternalmouse
USBTypeAportcompatibilityOneUSB1.1 and 2.0 compliant port for USB device input
Parenttopic: Technical Specifications
ProjectorLampSpecifications
TypeUHE(UltraHighEfficiency)
Powerconsumption210W
LamplifeNormalPowerConsumptionmode:
Uptoabout6000hours
ECOPowerConsumptionmode:
Uptoabout10000hours
Note: Turn off this product when not in use to prolong the life of the projector. Lamp life will vary depending upon modeselected, environmental conditions, and usage. Brightness decreases over time.
Parenttopic: Technical Specifications
RemoteControlSpecifications
Receptionrange19.7feet(6m)
Batteries TwoalkalineormanganeseAA
Parenttopic: Technical Specifications
ProjectorDimensionSpecifications
Height(excludingfeet)HomeCinema660/760HD:
3.0inches(77mm)
HomeCinema1060:
3.4inches(87mm)
Width11.9inches(302mm)
DepthHomeCinema660/760HD
9.2inches(234mm)
HomeCinema1060:
9.8inches(249mm)
WeightHomeCinema660:
5.29lb(2.4kg)
HomeCinema760HD:
5.51lb(2.5kg)
HomeCinema1060:
5.95lb(2.7kg)
Parenttopic: Technical Specifications
ProjectorElectricalSpecifications
Ratedfrequency50/60Hz
Powersupply100to240VAC±10%
HomeCinema660/760HD:
3.1to1.3A
HomeCinema1060:
3.3to1.4A
| Powerconsumption(100to120V) | Operating:HomeCinema660/760HD:NormalPowerConsumptionmode:296WECOPowerConsumptionmode:211WStandby:2.0W(CommunicationOn),0.2W(CommunicationOff)HomeCinema1060:NormalPowerConsumptionmode:315WECOPowerConsumptionmode:228WStandby:2.0W(CommunicationOn),0.2W(CommunicationOff) |
| Powerconsumption(220to240V) | Operating:HomeCinema660/760HD:NormalPowerConsumptionmode:282WECOPowerConsumptionmode:203WStandby:2.0W(CommunicationOn),0.2W(CommunicationOff)HomeCinema1060:NormalPowerConsumptionmode:298WECOPowerConsumptionmode:219WStandby:2.0W(CommunicationOn),0.2W(CommunicationOff) |
Parenttopic: Technical Specifications
ProjectorEnvironmentalSpecifications
TemperatureOperating:
Upto7500ft(2286m):41to95°F(5to35°C)
7500ft(2286m)to9843ft(3000m):41to86°F(5to30°C)
Storage:14to140°F(-10to60°C)
Humidity(relative, non-condensing)
Operating:20to80%
Storage:10to90%
OperatingaltitudeUpto4921feet(1500m)
4921 feet(1500m) to 9843 feet(3000m) with High Altitude Mode enabled
Parenttopic: Technical Specifications
ProjectorSafetyandApprovalsSpecifications
UnitedStatesFCCPart15ClassB(DoC)
UL60950-12ndedition(cTUVusMark)
CanadalCES-003ClassB
CSAC22.2No.60950-1
Parenttopic: Technical Specifications
SupportedVideoDisplayFormats
Forbestresults, your computer's monitor port or video card resolutions should be set to display in the projector's nativer resolution. However, your projector includes Epson's Size Wise chip that supports other computer display resolutions, so your image will be resized to automatically.
Yourcomputer'smonitorportorvideocardrefreshrate(verticalfrequency)mustbecompatiblewiththe projector.(Seeyourcomputerorvideocardmanualfordetails.)
Thetablehereliststhecompatiblerefreshrateandresolutionforeachcompatiblevideodisplayformat.
HomeCinema660
| DisplayformatRefreshrate(inHz) | Resolution(inpixels) | |
| Computersignals(analogRGB) | ||
| VGA60/72/75/85640×480 | ||
| SVGA60/72/75/85800×600 | ||
| XGA60/70/75/851024×768 | ||
| WXGA601280×768 | ||
| 601366×768 | ||
| 60/751280×800 | ||
| WXGA+601440×900 | ||
| SXGA70/751152×864 | ||
| 601280×960 | ||
| 601280×1024 | ||
| SXGA+601400×1050 | ||
| Compositevideo | ||
| TV(NTSC)60720×480 | ||
| TV(SECAM)50720×576 | ||
| TV(PAL)50/60720×576 | ||
| Componentvideo | ||
| SDTV(480i/480p)60720×480 | ||
| SDTV(576i/576p)50720×576 | ||
| HDTV(720p)50/601280×720 | ||
| HDTV(1080i)50/601920×1080 | ||
| HDMIinputsignals | ||
| VGA60640×480 | ||
| SVGA60800×600 | ||
| XGA601024×768 | ||
| WXGA601280×800 | ||
| 601366×768 | ||
| WXGA+601440×900 | ||
| SXGA601280×960 | ||
| 601280×1024 | ||
| SXGA+601400×1050 | ||
| SDTV(480i/480p)60720×480 | ||
| SDTV(576i/576p)50720×576 | ||
| HDTV(720p)50/601280×720 | ||
| HDTV(1080i)50/601920×1080 | ||
| HDTV(1080p)24/30/50/601920×1080 | ||
HomeCinema760HD/1060
| DisplayformatRefreshrate(inHz) | Resolution(inpixels) | |
| Computersignals(analogRGB) | ||
| VGA60/72/75/85640×480 | ||
| SVGA60/72/75/85800×600 | ||
| XGA60/70/75/851024×768 | ||
| WXGA601280×768 | ||
| 601366×768 | ||
| 60/75/851280×800 | ||
| WXGA+60/75/851440×900 | ||
| WXGA++601600×900 | ||
| SXGA70/75/851152×864 | ||
| 60/75/851280×1024 | ||
| 60/75/851280×960 | ||
| SXGA+60/751400×1050 | ||
| WSXGA+ ^1 | 601680×1050 | |
| UXGA | 601600×1200 | |
| WUXGA(ReducedBlanking) ^2 | 601920×1200 | |
| Compositevideo | ||
| TV(NTSC) | 60720×480 | |
| TV(SECAM) | 50720×576 | |
| TV(PAL) | 50/60720×576 | |
| Componentvideo | ||
| SDTV(480i/480p)60720×480 | ||
| SDTV(576i/576p)50720×576 | ||
| HDTV(720p)50/601280×720 | ||
| HDTV(1080i)50/601920×1080 | ||
| HDMinputsignals | ||
| VGA60640×480 | ||
| SVGA60800×600 | ||
| XGA601024×768 | ||
| WXGA601280×800 | ||
| 601366×768 | ||
| WXGA+601440×900 | ||
| WXGA++601600×900 | ||
| UXGA601600×1200 | ||
| WSXGA+601680×1050 | ||
| SXGA601280×960 | ||
| 601280×1024 | ||
| SXGA+601400×1050 | ||
| WUXGA(ReducedBlanking) ^2 | 601920×1200 | |
| SDTV(480i/480p)60720×480 | ||
| SDTV(576i/576p)50720×576 | ||
| HDTV(720p)50/601280×720 | ||
| HDTV(1080i)50/6019120×1080 | ||
| HDTV(1080p) | 24/30/50/60 | 1920×1080 |
| MHLinputsignals(HomeCinema1060) | ||
| VGA60640×480 | ||
| SDTV(480i/480p)60720×480 | ||
| SDTV(576i/576p)50720×576 | ||
| HDTV(720p)50/601280×720 | ||
| HDTV(1080i)50/601920×1080 | ||
| HDTV(1080p)24/301920×1080 | ||
^1 Wideresolutiononly
^2 HomeCinema1060only
Parenttopic: Technical Specifications
USBDisplaySystemRequirements
Yourcomputersystemmustmeetthesystemrequirementsheretousetheprojector'sUSBDisplay software.
| RequirementWindows | Mac | |
| OperatingsystemWindows | VistaUltimate,Enterprise,Business,HomePremium,andHomeBasic(32-bit) | OSX10.7.x(32-and64-bit),10.8.x(64-bit),10.9.x(64-bit),10.10.x(64-bit),10.11.x(64-bit) |
| Windows7Ultimate,Enterprise,Professional,andHomePremium(32-and64-bit);HomeBasicandStarter(32-bit) | macOS10.12.x(64-bit) | |
| Windows8.x,Pro,andEnterprise(32-and64-bit) | ||
| Windows10Home,Pro,andEnterprise(32-and64-bit) | ||
| USBversionUSB2.0 | ||
| CPUIntelCore2Duorfa | ster(IntelCorei3orfasterrecommended) | IntelCore2Duorfaster(IntelCorei5orfasterrecommended) |
| Memory2GBormore(4G | Bormorerecommended) | |
| Harddiskspace | 20MBormore | |
| RequirementWindowsMac | ||
| DisplayResolutionbetween640×480and1920×1200,16-bitcolororgreater | ||
Parenttopic: Technical Specifications
Notices
Checkthesesectionsforimportantnoticesaboutyourprojector.
Recycling
ImportantSafetyInformation
ImportantSafetyInstructions
ListofSafetySymbols(correspondingtoIEC60950-1A2)
FCCComplianceStatement
BindingArbitrationandClassWaiver
Trademarks
CopyrightNotice
Recycling
Epson offers a recycling program for end of life products. Please go to this site for information on how to return your products for proper disposal.
Parenttopic:Notices
ImportantSafetyInformation
Caution: Never look into the projector lens when the lamp is turned on; the bright light can damage your eyes. Neverletchildrenlookintothelenswhenitison. Neveropenanycoverontheprojector, except thelampandfiltercovers. Dangerous electrical voltagesinsidetheprojectorcanseverelyinjureyou.
Except as specifically explained in this User's Guide, do not attempt to service this product yourself. Referallservicingtoqualifiedservicepersonnel.
Warning: The projector and its accessories come packaged in plastic bags. Keep plastic bags away from small childrento avoid any risk of suffocation.
Caution: When you replace the lamp, never touch the new lamp with your bare hands; the invisible residue left by the oil they your handsmay short enthe lamplife. Use cloth glovet to handle thenew lamp.
Parenttopic:Notices
ImportantSafetyInstructions
Followthesesafetyinstructionswhensettingupandusingtheprojector:
- Donotlookintothelenswhentheprojectorison.Thebrightlightcandamageyoureyes.Avoid standinginfrontoftheprojectorsothebrightlightdoesnotshineintoyoureyes.
- Donotplacetheprojectoronanunstablecart,stand,ortable.
- Donotoperatetheprojectoronitsside,orwhiletiltedtooneside.Donottilttheprojectormorethan 30^ forwardorback.
• If the projector is mounted on aceiling or wall, it should be installed by qualified technicians using mounting hardware designed for use with this projector.
- Wheninstallingoradjustingaceilingorwallmount,donotuseadhesivestopreventthescrewsfrom looseninganddonotuseoilsorlubricants.Thismaycausetheprojectorcasetocrackandthe projectortofallfromitsceilingmount.Thiscouldcauseseriousinjurytoanyoneunderthemountand coulddamagetheprojector.
- Donotusetheprojectornearwater, sourcesofheat, high-voltageelectricalwires, orsourcesof magneticfields.
- Usethetypeofpowersourceindicatedontheprojector. Useofadifferentpowersourcemayresultin fireorelectricshock. If you are not sure of the power available, consult your dealer or power company.
- Placetheprojectornearawalloutletwheretheplugcanbeeasilyunplugged.
•Takethefollowingprecautionswhenhandlingtheplug:Donotholdtheplugwithwethands.Donot inserttheplugintoadustyoutlet.Inserttheplugfirmlyintotheoutlet.Donotpullthepowercordwhen disconnectingtheplug;alwaysbesuretoholdtheplugwhendisconnectingit.Donotoverloadwall outlets,extensioncords,orpowerstrips.Failuretocomplywiththeseprecautionscouldresultinfireor electricshock.
- Donotplacetheprojectorwherethecordcanbewalkedon. This may result in refrayingordamageto the plug.
- Unplugtheprojectorfromthewalloutletandallowtocoolbeforecleaning. Useadrycloth (or, for stubborndirtorstains, amoistcloththathasbeenwrungdry) forcleaning. Donotuseliquidoraerosol cleaners, anysprayscontainingflammablegas, orsolventssuchasalcohol, paintthinner, orbenzine.
- Donotblocktheslotsandopeningsintheprojectorcase. Theyprovideventilationandpreventthe projectorfromoverheating. Donotoperatetheprojectoronasofa, rug, orthersoftsurface, orsetit ontopofloosepapers. Donotcovertheprojectorwithabblanket, curtain, ortablecloth. If you are settinguptheprojectornearawall, leaveatleast7.9inches(20cm)ofspacebetweenthewalland theprojector.
- Donotoperatetheprojectorinaclosed-incabinetunlessproperventilationisprovided.
- Neverallowobjectsofanykindtoenteranyopeningsintheprojector.Donotleaveobjects,especially flammableobjects,neartheprojector.Neverspilliquidofanykindintotheprojector.
- If you are using two or more projector side-by-side, leave at least 2 feet (60 cm) of space between the projector to allow for proper ventilation.
- Youmayneedtocleantheairfilterandvent.Acloggedairfilterorventcanblockventilationneeded tocooltheprojector.Donotusecannedair,orthegasesmaybeare residue.
- Donotstoretheprojectoroutdoorsforanextendedlengthoftime.
- Exceptasspecificallyexplainedinthismanual,donotattempttoservicethisproductyourself.Refer allservicingtoqualifiedpersonnel.Openingorremovingcoversmayexposeyoutodangerous voltagesandotherhazards.
- Neveropenany covers on the projectore except a specifically explained in this manual. Never attempt to disassemble or modify the projector. Refer all repair to qualified service personnel.
- Unplugtheprojectorfromthewalloutletandreferservicingtoqualifiedservicepersonnelunderthe followingconditions:ifitdoesnotoperatenormallywhenyoufollowtheoperatinginstructions,or exhibitsadistinctchangeinperformance;ifsmoke,strangeodors,orstrangenoisescomefromthe projector;ifthepowercordorplugisdamagedorfrayed;ifliquidorforeignobjectsgetinsidethe projector,orifithasbeenexposedtorainorwater;ifithasbeendroppedorthehousinghasbeen damaged.
- Donottouchtheplugduringanelectricalstorm. Otherwise, you may receive an electric shock.
- Unplugtheprojectorwhenitwillnotbeusedforextendedperiods.
- Donotusetheprojectorwhereitmaybeexposedtorain,water,orexcessivehumidity.
- Donotuseorstoretheprojectorwhereitmaybeexposedtosmoke,steam,corrosivegases, excessivedust,vibration,orshock.
- Donotusetheprojectorwhereflammableorexplosivegasesmaybepresent.
- Donotuseorstoretheprojectororremotecontrolinahotlocation,suchasnearaheater,indirect sunlight,orinaclosedvehicle.
- If you use the projector in a country other than where you purchase it, use the correct power cord for that country.
- Donotstandontheprojectorplaceheavyobjectsonit.
- Donotusetheprojectoroutsideoftherequiredtemperaturerangebelow: 41to95°F(5to35°C)atanaltitudeof7500feet(2286m)orless,or41to86°F(5to30°C)ata higheraltitude
Doingsomaycauseanunstabledisplayandcouldleadtoprojectordamage.Donotuseorstorethe projectorwhereitmaybeexposedtosuddenchangesintemperature.
- Do not store the projector outside of the required temperature range of 14 to 140^ (-10 to 60^) or indirectsunlightforlongperiodsoftime.Doingsomaycausedamagetothecase.
- Donotplaceanythingthatcanbecomewarpedordamagedbyheatneartheexhaustvents.Donot bringyourhandsorfaceclosetotheventswhileprojectionisinprogress.Donotbringyourfaceclose totheprojectorwhileitisinuse.
• Before you mov the projector, makes sure its power is turned off, the plug is disconnected from the outlet, and all cables are disconnected. - Nevertrytoremovethelampimmediatelyafterusebecauseitwillbeextremelyhot.Beforeeremoving thelamp,turnoffthepowerandwaitatleastanhourtoallowthelamptocoolcompletely.
- Donotdisassemblethelamporsubjectittoimpacts.
- Donotplacethesourceofanopenflame, such as alitcandle, onorneatheprojector.
- Donotblockthelensduringprojectionusingabookoranyobjectotherthanthelenscover. Thiscould damagetheprojectorcauseafire.
- Donotmodifythepowercord. Donotplaceheavyobjectsontopofthepowercordorbend,twist,or pullitexcessively. Keepthepowercordawayfromhotelectricalappliances.
- Ifthelampbreaks, ventilatetheroomtopreventgasescontainedinthelampfrombeinginhaledor comingincontactwithyoueyesormouth. If youdoinhalegasesorgasescomeincontactwithyour eyesormouth, seekmedicaladviceimmediately.
- If the projector is mounted overhead and the lamp breaks, be careful to prevent pieces of glass from falling into you are a mouth when you open the lamp cover. If pieces of glass do get into you are a mouth, seek medical advice immediately.
•Alwayslowerthevolumebeforeturningofftheprojector.Turningontheprojectorwiththevolumetoo highcandamageyourears.
Note: Hg The lamp(s) in this product contain mercury. Please consult your state and local regulations regarding disposolorrecycling.Donotputinthetrash.
RestrictionofUse
Parenttopic:Notices
RestrictionofUse
Whenthisproductisusedforapplicationsrequiringhighreliability/safetysuchastransportationdevices relatedtoaviation,rail,marine,automotive;disasterpreventiondevices;varioussafetydevices;or functional/precisiondevices,youshouldusethisproductonlyaftergivingconsiderationtoincludingfail-safesandredundanciesintoyourdesigntomaintainsafetyandtotalsystemreliability.
Because this product was not intended for use in applications requiring extremely high reliability/safety such as aerospace equipment, main communication equipment, nuclear power control equipment, or medicalequipment related to direct medical care, please make your own judgment on this product's suitability after a full evaluation.
Parenttopic: Important Safety Instructions
ListofSafetySymbols(correspondingtoIEC60950-1A2)
The following table lists the meaning of the safety symbols labeled on the equipment.
| No. | Symbol | ApprovedStandards | Description | |
| 1IEC604 | 17[32A0] | No.5007 | "ON"(power)Toindicateconnectiontothemains. | |
| 2IEC604 | 17 | No.5008 | "OFF"(power)Toindicatedisconnectionfromthe mains. | |
| 3IEC604 | 17 | No.5009 | Stand-byToidentifytheswitchorswitchposition bymeansofwhichpartoftheequipment isswitchedoninordertobringitintothe stand-bycondition. | |
| 4ISO700 | 0 | No.0434B,IEC3864-B3.1 | CautionToidentifygeneralcautionwhenusing theproduct. | |
| 5IEC604 | 17 |  | No.5041 | Caution,hotsurfaceToindicatethathemarkeditemcanbe hotandshouldnotbetouchedwithout takingcare. |
| 6IEC604 | 17 |  | No.6042ISO3864-B3.6 | Caution,riskofelectricshockToidentifyequipmentthathasriskof electricshock. |
| 7IEC604 | 17 |  | No.5957 | ForindooruseonlyToidentifyelectricalequipmentdesigned primarilyforindooruse. |
| 8IEC604 | 17 |  | No.5926 | PolarityofDCpowerconnectorToidentifythepositiveandnegative connections(thepolarity)onapieceof equipmenttowhichaDCpowersupply maybeconnected. |
| 9-Polar | 17 |  | Toidentifythepositiveandnegative connections(thepolarity)onapieceof equipmenttowhichaDC.powersupply maybeconnected. | |
| 10IEC60 | 417 |  | No.5001B | Battery,generalOnbatterypoweredequipment.To identifyadeviceforinstanceacoverfor thebatterycompartment,orthe connectorterminals. |
| 11IEC60 | 417 |  | No.5002 | PositioningofcellToidentifythebatteryholderitselfandto identifythepositioningofthecell(s) insidethebatteryholder. |
12—Positioningofcell  | Toidentifythebatteryholderitselfandto identifythepositioningofthecell(s) insidethebatteryholder. | |||
| 13IEC60 | 417  | No.5019 | Protectiveearth Toidentifyanyterminalwhichisintended forconnectiontoanexternalconductor forprotectionagainstelectricshockin caseofafault,ortheterminalofa protectiveearthelectrode. | |
| 14IEC60 | 417  | No.5017 | Earth Toidentifyanearth(ground)terminalin caseswhereneitherthesymbolNo.13is explicitlyrequired. | |
| 15IEC60 | 417  | No.5032 | Alternatingcurrent Toindicateontheratingplatethatthe equipmentissuitableforalternating currently;toidentifyrelevant terminals. | |
| 16IEC60 |  | No.5031 | Directcurrent Toindicateontheratingplatethatthe equipmentissuitablefordirectcurrent only;toidentifyrelevantterminals. | |
| 17IEC60 | 417  | No.5172 | ClassIIequipment Toidentifyequipmentmeetingthesafety requirementsspecifiedforClassII equipmentaccordingtoIEC61140. | |
| 18ISO38 | 64Generalprohibition  | Toidentifyactionsoroperationsthatare prohibited. | ||
| 19ISO38 | 64 | Contactprohibition | Toindicateinjurythatcouldoccurdueto touchingaspecificpartoftheequipment. | |
| 20—Never | verlookintotheopticallensw  | whilethe | projectorison. | |
21—Toindicatethathemarkeditem  | don't | placeanythingonprojector. | ||
| 22ISO38 | 64 | IEC60825-1 | Caution,laserradiationToindicatetheequipmenthasalaser radiationpart. | |
| 23ISO38 | 64Disassemblyprohibition | Toindicateariskofinjury,suchas electricshock,iftheequipmentis disassembled. | ||
| 24IEC60 | 417 | No.5266 | Standby,partialstandbyToindicatethatpartoftheequipmentis inthereadystatus. | |
| 25ISO38 | 64 | IEC60417No.5057 | Caution,movablepartsToindicatethyoumustkeepaway frommovablepartsaccordingto protectionstandards. | |
Parenttopic:Notices
FCCComplianceStatement
ForUnitedStatesUsers
This equipment has been tested and found to comply with the limits for a Class B digital device, pursuant to Part 15 of the FCC Rules. These limits are designed to provide reasonable protection against harmful interference in a residential installation. This equipment generates, uses, and can radiater radio frequency energy and if not installed and used in accordance with the instructions, may cause harmful interference or radiocommunication. However, there is no guarantee that interference will not occur in particular installation. If this equipment does cause interference or radio and television reception, which can be determined by turning the equipment off and, the user is encouraged to try to correct the interference by one or more of the following measures:
• Reorientorrelocatethereceivingantenna.
- Increase these separation between the equipment and receiver.
- Connecttheequipmentintoanoutletonacircuitdifferentfromthattowhichthereceiverisconnected.
- Consultthedealeroranexperiencedradio/TVtechnicianforhelp.
WARNING
The connection of an on-shielded equipment interface cable to this equipment will invalidate the FCC Certification or Declaration of this device and may cause interference levels which exceed the limits established by the FCC forthisequipment. It is therefore the responsibility of the user to obtain and use a shielded equipment interface cable with this device. If this equipment has more than one interface connector, do not leave cables connected to unused interfaces. Changes from modifications not expressly approved by the manufacturer could void the user's authority to operate the equipment.
ForCanadianUsers
CANICES-3(B)/NMB-3(B)
Parenttopic:Notices
BindingArbitrationandClassWaiver
1. DISPUTES, BINDING INDIVIDUAL ARBITRATION, AND WAIVER OF CLASSACTIONS AND CLASSAR BITRATIONS
1.1 Disputes The terms of this Section 1 shall apply to all Disputes between you and Epson. The term "Dispute" is meant to have the broadest meaning permissible underlaw and includes any dispute, claim, controversy or action between you and Epson arising out for relating to this Agreement, Epson branded products (hardware and including any related software), or other transaction involving you and
Epson,whetherincontract,warranty,misrepresentation,fraud,tort,intentionaltort,statute,regulation,ordinance,oranyotherlegalorequitablebasis."DISPUTE"DOESNOTINCLUDEIPCLAIMS,ormorespecifically,aclaimorcauseofactionfor(a)trademarkinfringementordilution,(b)patentinfringement,(c)copyrightinfringementormisuse,or(d)tradesecretmisappropriation(an"IPClaim").YouandEpsonalsoagree,notwithstandingSection1.6,thatacourt,notanarbitrator,maydecideifaclaimorcauseofactionisforanIPClaim.
1.2 Binding Arbitration. You and Epson agree that all Disputes shall be resolved by binding arbitration according to this Agreement. ARBITRATION MEANSTHAT YOU WAIVE YOUR RIGHT TO AJUDGE OR JURYINACOURTPROCEEDING AND YOUR GROUNDS FOR APPEAL ARE LIMITED.
PursuanttothisAgreement, bindingarbitrationshallbeadministered by JAMS, anationally recognized arbitration authority, pursuant to its code of procedure then ineffect for consumer related disputes, but excluding any rule that permit joinder or class actions in arbitration (formoredetail on procedure, see Section 1.6 below). You and Epson understand and agree that (a) the Federal Arbitration Act (9U.S.C. §1, et seq.) govern the interpretation and enforcement of this Section 1, (b) this Agreement memorializes at transaction in interstate commerce, and (c) this Section 1 shall survivvetermination of this Agreement.
1.3 Pre-Arbitration Steps and Notice. Before submitting a claim for arbitration, you and Epson agree to try, for sixty (60) days, to resolve any Dispute informally. If Epson and you donot reach an agreement to resolv the Disputewithin the sixty (60) days), you or Epson may commence an arbitration. Noticeto Epson must be addressed to: Epson America, Inc., ATTN: Legal Department, 3840 Kilroy Airport Way, Long Beach, CA90806 (the "Epson Address"). The Dispute Noticeto you will besent to them most recent address Epson has in its records for you. For this reason, it is important to notify us if your address changes by emailing us at EAILegal@ea.epson.com or writing us at the Epson Address above. Notice of the Disputeshall includethesender's name, address and contact information, the fact giving riseto the Dispute, and therelief requested (the "Dispute Notice"). Following receipt of the Dispute Notice, Epson and you agree to acting good faith to resolv the Dispute before recommencing arbitration.
1.4 Small Claims Court. Notwithstanding the foregoing, you may bring an individual action in the small claimscourtofyourstateormunicipalityiftheactioniswithinthatcourt'sjurisdictionandspendingonlyinthatcourt.
1.5WAIVEROFCLASSACTIONSANDCLASSARBITRATIONS.YOUANDEPSONAGREETHAT EACHPARTYMAYBRINGDISPUTESAGAINSTTHEOTHERPARTYONLYINANINDIVIDUAL CAPACITY,ANDNOTASAPLAINTIFFORCLASSMEMBERINANYCLASSOR REPRESENTATIVEPROCEEDING,INCLUDINGWITHOUTLIMITATIONFEDERALORSTATE CLASSACTIONS,ORCLASSARBITRATIONS.CLASSACTIONLAWSUITS,CLASS-WIDE ARBITRATIONS,PRIVATEATTORNEY-GENERALACTIONS,ANDANYOTHERPROCEEDING WHERESOMEONEACTSINAREPRESENTATIVECAPACITYARENOTALLOWED. ACCORDINGLY,UNDERTHEARBITRATIONPROCEDUREOUTLINEDINTHISSECTION,AN ARBITRATORSHALLNOTCOMBINEORCONSOLIDATEMORETHANONEPARTY'SCLAIMS
WITHOUTTHEWRITTENCONSENTOFALLAFFECTEDPARTIESTOANARBITRATION PROCEEDING.
1.6 Arbitration Procedure. If you or Epson commences arbitration, the arbitration shall be governed by therulesofJAMStatareineffectwhenthearbitrationisfiled,excludinganyrulesthatpermitarbitration on a class or representative basis (the "JAMS Rules"), available at http://www.jamsadr.com or by calling 1-800-352-5267,andundertherulessetforthinthisAgreement.AllDisputesshallberesolvedbya singleneutralarbitrator,andbothpartiesshallhaveareasonableopportunitytoparticipateinthe selectionofthearbitrator.ThearbitratorisboundbythetermsofthisAgreement.Thearbitrator,andnot anyfederal,stateorlocalcourtoragency,shallhaveexclusiveauthoritytoresolvealldisputesarising outoforrelatingtotheinterpretation,applicability,enforceabilityorformationofthisAgreement, includinganyclaimthatalloranypartofthisAgreementisvoidorvoidable.Notwithstandingthisbroad delegationofauthoritytothearbitrator,acourtmaydeterminethelimitedquestionofwhetheraclaimor causeofactionisforanlPClaim,whichisexcludedfromthedefinitionof"Disputes"inSection1.1 above.Thearbitratorshallbeempoweredtograntwhateverreliefwouldbeavailableinacourtunder laworinequity.Thearbitratormayawardyouthesamedamagesasacourtcould,andmayaward declaratoryorinjunctivereliefonlyinfavoroftheindividualpartyseekingreliefandonlytotheextent necessarytoprovidereliefwarrantedbythatparty'sindividualclaim.Insomeinstances,thecostsof arbitrationcanexceedthecostsoflitigationandtherighttodiscoverymaybemorelimitedinarbitration thanincourt.Thearbitrator'sawardisbindingandmaybeenteredasajudgmentinanycourtof competentjurisdiction.
You may choose to engage in arbitration hearings by telephone. Arbitration hearings not conducted by telephones shall take place in allocation reasonably accessible from your primary residence, or in Orange County, California, at your option.
a) Initiation of Arbitration Proceeding. If either you or Epson decide to arbitrate a Dispute, both parties agree to the following procedure:
(i) WriteaDemandforArbitration. The demand must include a description of the Dispute and the amount of damage sought to be recovered. You can find a copy of a Demand for Arbitration at http://www.jamsadr.com ("DemandforArbitration").
(ii) Send three copies of the Demand for Arbitration, plus the appropriate filing fee, to: JAMS, 500 North State College Blvd., Suite 600 Orange, CA 92868, U.S.A.
(iii) Sendonecopy of the Demand for Arbitration to the other party (same address as the Dispute Notice), or as otherwise agreed by the parties.
b) Hearing Format. During the arbitration, the amount of any settlement to offer mades shall not be disclosed to the arbitrator until after the arbitrator determines the amount, if any, to which your Epson is entitled. The discovery of exchange of non-privileged information relevant to the Disputation may be allowed during the arbitration.
c) Arbitration Fees. Epson shall pay, or (if applicable) reimburse you for all JAMS filings and arbitrator fees for any arbitration commenced (by you or Epson) pursuant to provision of this Agreement.
d) Awardin Your Favor. For Disputes in which you or Epson seeks \75,000 or less indamages exclusive of attorney's fees and costs, if the arbitrator's decision results in an award to you in an amount greater than Epson's last written offer, if any, to settle the Dispute, Epson will: (i) pay you \1,000 or the amount of the award, whichever is greater; (ii) pay outwicethe amount of your reasonable attorney's fees, if any; and (iii) reimburse you for any expenses (including expert witness fees and costs) that your attorney reasonably accrues for investigating, preparing, and pursuing the Dispute in arbitration. Except as agreed upon by you and Epson in writing, the arbitrator shall determin the amount of fees, costs, and expensestobepaid by Epson pursuant to this Section 1.6d).
e) Attorney's Fees. Epson will not seek its attorney's fees and expenses for any arbitration commenced involving a Dispute under this Agreement. Your right to attorney's fees and expenses under Section 1.6d) aboved does not limit your right to attorney's fees and expenses under applicable law; notwithstanding the foregoing, the arbitrator may not award duplicative award sof attorney's fees and expenses.
1.7Opt-out.Youmayelecttoopt-out(excludeyourself)fromthefinal,binding,individual arbitrationprocedureandwaiverofclassandrepresentativeproceedingsspecifiedinthis AgreementbysendingawrittenlettertotheEpsonAddresswithinthirty(30)daysofyourassent tothisAgreement(includingwithoutlimitationthepurchase,download,installationofthe SoftwareorotherapplicableuseofEpsonHardware,productsandservices)thatspecifies(i)yourname,(II)yourmallingaddress,and(III)yourrequesttobeexcludedfromthefinal,binding individualarbitrationprocedureandwaiverofclassandrepresentativeproceedingsspecifiedin thisSection1.Intheeventthatyouopt-outconsistentwiththeproceduresetforthabove,all othertermsshallcontinuetoapply,includingtherequirementtoprovidenoticepriortolitigation.
1.8 Amendments to Section 1. Notwithstanding any provision in this Agreement to the contrary, you and Epsonagreethatif Epsonmakesanyfutureamendmentstothedisputeresolutionprocedureand classactionwaiverprovisions(otherthanachangetoEpson'saddress)inthisAgreement, Epsonwill obtainyouraffirmativeassenttotheapplicableamendment. Ifyoudonotaffirmativelyassenttothe applicableamendment, youareagreeingthatyouwillarbitrateanyDisputebetweenthepartiesin accordancewiththelanguageofthisSection1 (orresolvedisputesasprovidedforinSection1.7, ifyou timelyelectedtoopt-outwhenyoufirstassentedtothisAgreement).
1.9 Severability. If any provision in this Section 1 is found to be unenforceable, that provision shall be severed with the remainder of this Agreement remaining in full force and effect. The foregoing shall not apply to the prohibition against class or representative actions as provided in Section 1.5. This mean that if Section 1.5 is found to be unenforceable, the entire Section 1 (but only Section 1) shall be null and void.
Parenttopic:Notices
Trademarks
EPSON ^® , InstantOff ^® , and QuickCorner ^® areregistered trademarks, EpsoniProjection ^™ isatrademark, and EPSON Exceed Your Vision is a registered logomark of Seiko Epson Corporation.
Accolade ^® and PrivateLine ^® areregistered trademarks; Duet ^TM and SizeWise ^TM are trademarks; and EpsonStore ^SM and ExtraCare ^SM areservicemarksof EpsonAmerica, Inc.
MacandOSXaretrademarksofAppleInc., registeredintheU.S.andothercountries.
Android ^TM andChromebook ^TM aretrademarksofGoogleInc.
HDMI and High-Definition Multimedial Interface are the trademark or registered trademark of HDMI Licensing LLC.
GeneralNotice: Other product names used herein are for identification purposes only and maybe trademark of their respective owners. Epson disclaims any and all rights in those marks.

EXCEED YOUR VISION
Parenttopic:Notices
CopyrightNotice
Allrightsreserved. Nopartofthispublicationmaybereproduced, storedinaretrievalsystem, or transmittedinanyformorbyanymeans, electronic, mechanical, photocopying, recording, or otherwise, without the prior written permission of Seiko Epson Corporation. The information contained herein is designed only for use with this Epson product. Epson is not responsible for any use of this information as applied to other products.
Neither Seiko Epson Corporation nor its affiliates shall be liable to the purchaser of this product or third parties for damages, losses, costs, expenses incurred by purchaser third parties as a result of: accident, misuse, or abuse of this product or unauthorized modifications, repairs, or alteration to this product, or (excluding the U.S.) failure to strictly comply with Seiko Epson Corporation's operating and maintenance instructions.
SeikoEpsonCorporationshallNotbeliableforanydamagesorproblemsarisingfromtheuseofany optionsoranyconsumableproductsotherthanthosedesignatedasOriginalEpsonProductsorEpson ApprovedProductsbySeikoEpsonCorporation.
Thisinformationissubjecttochangewithoutnotice.
ANoteConcerningResponsibleUseofCopyrightedMaterials
CopyrightAttribution
Parenttopic:Notices
ANoteConcerningResponsibleUseofCopyrightedMaterials
Epsonencourageseachusertoberesponsibleandrespectfulofthecopyrightlawswhenusingany Epsonproduct.Whilesomecountries'lawspermitlimitedcopyingorreuseofcopyrightedmaterialin certaincircumstances,thosecircumstancesmaynotbeasbroadassomepeopleassume.Contactyour legaladvisorforanyquestionsregardingcopyrightlaw.
Parenttopic: CopyrightNotice
CopyrightAttribution
©2017EpsonAmerica,Inc.
7/17
CPD-53633
Parenttopic: CopyrightNotice
- HomeCinema660/760HD/1060
- User'sGuide
- Contents
- Solving Problems 160
- Technical Specifications 179
- HomeCinema660/760HD/1060User'sGuide
- IntroductiontoYourProjector
- ProjectorFeatures
- Bright, high-resolution projectionsystem
- Flexibleconnectivity
- Easy-to-usesetupandoperationfeatures
- ProductBoxContents
- AdditionalComponents
- AdditionalProjectorSoftwareandManuals
- OptionalEquipmentandReplacementParts
- Warranty and Registration Information
- NotationsUsedintheDocumentation
- WheretoGoforAdditionallInformation
- ProjectorPartLocations
- ProjectorParts-Rear
- ProjectorParts-ControlPanel
- SettingUptheProjector
- ProjectorPlacement
- ProjectorSetupandInstallationOptions
- ProjectionDistance
- ProjectorConnections
- ConnectingtoComputerSources
- ConnectingtoaComputerforUSBVideoandAudio
- ConnectingtoaComputerforVGAVideo
- Relatedtasks
- ConnectingtoaComputerforHDMIVideoandAudio
- ConnectingtoaComputerforUSBMouseControl
- ConnectingtoaComputerforSound
- ConnectingtoVideoSources
- ConnectingtoanHDMIVideoSource
- ConnectingtoanMHL-CompatibleDevice
- ConnectingtoaComponentVideoSource
- Relatedreferences
- ConnectingtoaCompositeVideoSource
- ConnectingtoaVideoSourceforSound
- ConnectingtoExternalUSBDevices
- USBDeviceProjection
- ConnectingaUSBDeviceorCameratotheProjector
- SelectingtheConnectedUSBSource
- DisconnectingaUSBDeviceorCameraFromtheProjector
- Installing Batteries in the Remote Control
- OpeningtheLensCover
- UsingtheProjectoronaNetwork
- WirelessNetworkProjection
- InstallingtheWirelessLANModule
- UsingaQRCodetoConnectaMobileDevice
- UsingQuickWirelessConnection(Windows)
- SelectingWirelessNetworkSettingsManually
- SelectingWirelessNetworkSettingsinWindows
- SelectingWirelessNetworkSettingsonMac
- SettingUpWirelessNetworkSecurity
- SettingUpProjectorNetworkE-MailAlerts
- NetworkProjectorE-mailAlertMessages
- SettingUpMonitoringUsingSNMP
- ControllingaNetworkedProjectorUsingaWebBrowser
- UsingBasicProjectorFeatures
- TurningOntheProjector
- UsingtheHomeScreen
- TurningOfftheProjector
- SelectingtheLanguagefortheProjectorMenus
- AdjustingthelmageHeight
- ImageShape
- CorrectingImageShapewiththeHorizontalKeystoneSlider
- CorrectingImageShapewiththeKeystoneButtons
- CorrectingImageShapewithQuickCorner
- ResizingthelmagewiththeZoomRing
- FocusingtheImageUsingtheFocusRing
- RemoteControlOperation
- UsingtheRemoteControlasaWirelessMouse
- UsingtheRemoteControlasaPointer
- SelectinganImageSource
- 3.Dooneofthefollowing:
- ProjectionModes
- ChangingtheProjectionModeUsingtheRemoteControl
- ChangingtheProjectionModeUsingtheMenus
- ImageAspectRatio
- ChangingtheImageAspectRatio
- AvailableImageAspectRatio
- ColorMode
- ChangingtheColorMode
- AvailableColorModes
- TurningOnAutolris
- ControllingtheVolumewiththeVolumeButtons
- ProjectingaPCFreePresentation
- SupportedPCFreeFileTypes
- StartingaSlideShowfromanExternalDevice
- StartingaMoviefromanExternalDevice
- PCFreeDisplayOptions
- AdjustingProjectorFeatures
- ShuttingOffthePictureandSoundTemporarily
- StoppingVideoActionTemporarily
- ZoomingIntoandOutofImages
- ProjectorSecurityFeatures
- PasswordSecurityTypes
- SettingaPassword
- SelectingPasswordSecurityTypes
- EnteringaPasswordtoUsetheProjector
- SavingaUser'sLogolmagetoDisplay
- LockingtheProjector'sButtons
- UnlockingtheProjector'sButtons
- InstallingaSecurityCable
- ProjectorIdentificationSystemforMultipleProjectorControl
- SettingtheProjectorID
- SettingtheRemoteControlID
- MatchingMultiple-ProjectorDisplayQuality
- ProjectingTwolmagesSimultaneously
- CopyingMenuSettingsBetweenProjectors
- SavingSettingstoaUSBFlashDrive
- TransferringSettingsfromaUSBFlashDrive
- SavingSettingstoaComputer
- TransferringSettingsfromaComputer
- AdjustingtheMenuSettings
- UsingtheProjector'sMenus
- ImageQualitySettings-ImageMenu
- InputSignalSettings-SignalMenu
- ProjectorFeatureSettings-SettingsMenu
- Projector Setup Settings - Extended Menu
- ProjectorNetworkSettings-NetworkMenu
- ProjectorSetupSettings-ECOMenu
- ProjectorInformationDisplay-InfoMenu
- EventIDCodeList
- ProjectorResetOptions-ResetMenu
- MaintainingandTransportingtheProjector
- ProjectorMaintenance
- CleaningtheLens
- CleaningtheProjectorCase
- AirFilterandVentMaintenance
- ProjectorLightStatus
- CleaningtheAirFilterandVents
- Parenttopic: AirFilterandVentMaintenance
- ReplacingtheAirFilter
- ProjectorLampMaintenance
- ReplacingtheLamp
- ResettingtheLampTimer
- ReplacingtheRemoteControlBatteries
- TransportingtheProjector
- SolvingProblems
- ProjectionProblemTips
- UsingtheProjectorHelpDisplays
- SolvingImageorSoundProblems
- SolutionsWhenNoImageAppears
- SolutionsWhenImageisIncorrectUsingtheUSBDisplayFunction
- SolutionsWhen"NoSignal"MessageAppears
- DisplayingFromaPCLaptop
- DisplayingFromaMacLaptop
- SolutionsWhen"NotSupported"MessageAppears
- SolutionsWhenOnlyaPartialImageAppears
- SolutionsWhenthelmageisNotRectangular
- Relatedconcepts
- SolutionsWhentheImageContainsNoiseorStatic
- SolutionsWhenthelmageisFuzzyorBlurry
- SolutionsWhenthelImageBrightnessorColorsareIncorrect
- SolutionstoSoundProblems
- SolvingProjectororRemoteControlOperationProblems
- SolutionstoProjectorPowerorShut-OffProblems
- SolutionstoProblemswiththeRemoteControl
- SolutionstoPasswordProblems
- SolvingNetworkProblems
- SolutionsWhenWirelessAuthenticationFails
- SolutionsWhenYouCannotAccesstheProjectorThroughtheWeb
- SolutionsWhenNetworkAlertE-MailsareNotReceived
- WheretoGetHelp
- InternetSupport
- SpeaktoaSupportRepresentative
- PurchaseSuppliesandAccessories
- TechnicalSpecifications
- GeneralProjectorSpecifications
- LensHomeCinema660:
- HomeCinema760HD:
- HomeCinema1060:
- BrightnessHomeCinema660/760HD:
- ProjectorLampSpecifications
- RemoteControlSpecifications
- ProjectorDimensionSpecifications
- ProjectorElectricalSpecifications
- ProjectorEnvironmentalSpecifications
- ProjectorSafetyandApprovalsSpecifications
- SupportedVideoDisplayFormats
- USBDisplaySystemRequirements
- Notices
- Recycling
- ImportantSafetyInformation
- ImportantSafetyInstructions
- RestrictionofUse
- ListofSafetySymbols(correspondingtoIEC60950-1A2)
- FCCComplianceStatement
- ForUnitedStatesUsers
- WARNING
- ForCanadianUsers
- BindingArbitrationandClassWaiver
- DISPUTES, BINDING INDIVIDUAL ARBITRATION, AND WAIVER OF CLASSACTIONS AND CLASSAR BITRATIONS
- WITHOUTTHEWRITTENCONSENTOFALLAFFECTEDPARTIESTOANARBITRATION PROCEEDING.
- Trademarks
- CopyrightNotice
- ANoteConcerningResponsibleUseofCopyrightedMaterials
- CopyrightAttribution
Brand : EPSON
Model : Home Cinema 760HD
Category : Video projector