DVD-HD0020 - Blu-ray player Laser - Free user manual and instructions
Find the device manual for free DVD-HD0020 Laser in PDF.

| Product Type | Blu-ray player |
| Model | DVD-HD0020 |
| Brand | Laser |
| Color | Black |
| Dimensions (W x H x D) | 430 x 45 x 250 mm |
| Weight | 2.5 kg |
| Power Supply | AC 100-240 V, 50/60 Hz |
| Power Consumption | 25 W |
| Disc Compatibility | Blu-ray, DVD, CD |
| Video Output | HDMI, Composite |
| Audio Output | HDMI, Optical, Coaxial |
| USB Port | Yes (for media playback) |
| Network Connectivity | None |
| Region Code | Region B |
| Max Video Resolution | 1080p |
| Supported Audio Formats | Dolby Digital, DTS |
| Remote Control Included | Yes |
| Manual Availability | Free PDF download |
| Maintenance | Clean lens with a soft, dry cloth |
| Safety Precautions | Do not disassemble; keep away from moisture |
| Spare Parts & Repairability | Contact Laser customer service |
Frequently Asked Questions - DVD-HD0020 Laser
User questions about DVD-HD0020 Laser
0 question about this device. Answer the ones you know or ask your own.
Ask a new question about this device
Download the instructions for your Blu-ray player in PDF format for free! Find your manual DVD-HD0020 - Laser and take your electronic device back in hand. On this page are published all the documents necessary for the use of your device. DVD-HD0020 by Laser.
USER MANUAL DVD-HD0020 Laser
natural_image
Exterior view of a black DVD remote control unit with Laser antenna (no visible text or symbols on device body)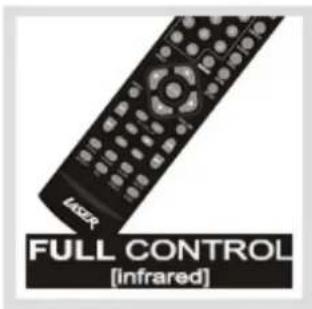
text_image
LASER FULL CONTROL [infrared]


text_image
USB PORT [MP3 / Pendrive]
flowchart
graph TD
    A["Super SLIM"] --> B["VIDEO CD"]
PROGRESSIVE SCAN


5.1 Channel


IMPORTANT: READ THIS MANUAL BEFORE USE AND KEEP IT FOR FUTURE REFERENCES.
LASER
W
IMPORTANT SAFEGUARDS
For your protection, please read these safety instructions completely before operating this appliance, and file for future reference.
INSTALLATION
Water and Moisture - Do not use near water

natural_image
Simple line drawing of a skull and jaw with a tool, no text or symbols presentHeat - Do not place the appliance where it can be exposed to direct sunlight or excessive heat.
natural_image
Simple line drawing of a rectangular electronic component with no text or symbolsVentilation - The slots and openings in the cabinet are provided for necessary ventilation.
- Never cover the slots and openings with a cloth or other materials.
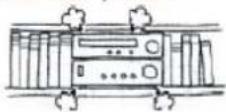
- Never place the appliance in a confined space, such as a bookcase, or built-in cabinet, unless proper ventilation is provided.
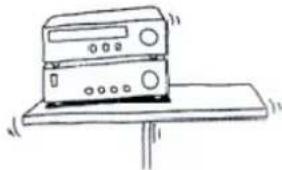
Accessories - Do not place the appliance on an unstable surface.
natural_image
Simple line drawing of a desktop computer with monitor and keyboard (no text or symbols)
USE
Power Source - This appliance should be operated only from the type of powersource indicated on the marking label.

text_image
AC ? v IDOverloading- Do not overload wall outlets, extension cords or convenience receptacles beyond their capacity, since this can result in fire or electric shock.
When not in use - Unplug the power cord of the appliance from the outlet when left unused for a long period of time.
To disconnect the cord, pull it out by grasping the plug. Never pull the plug out by the cord.

natural_image
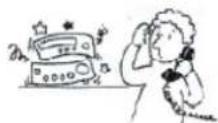
Simple line drawing of a person standing next to a door with a plug, next to a plug emerging from a pipe (no text or symbols)LASER
Lightening-For added protection forth this appliance during a lightning storm, or when it is left unattended and unused for long periods of time, unplug it from the wall outlet and disconnect the antenna or cable system. This will prevent damage to the appliance due to lightning and powerline surges.
Cleaning - Unplug the appliance from the wall outlet before cleaning or polishing it. Do not use liquid cleaners or aerosol cleaners. Use a cloth lightly dampened with water for cleaning the exterior of the appliance.

text_image
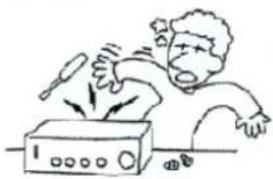
UNPLUGObject and Liquid Entry- Never push objects of any kind into the appliance through openings as they may touch dangerous voltage points or short out parts that could result in a fire or electric shock. Never spill liquid of any kind on the appliance.
natural_image
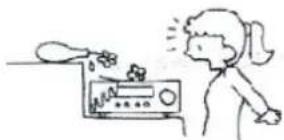
Simple line drawing of a hand pressing down on a device with stars around (no text or symbols)SERVICE
Damage Requiring Service-Unplug the appliance from the walbutlet and refer servicing to qualified servicepersonnel under the following conditions:
- When the power cord or plug is damaged or frayed.

- If liquid has been spilled or objects have fallen into the appliance.
natural_image
Simple line drawing of a person reacting to a device with a droplet above (no text or symbols)- If the appliance has been exposed to rain or water.
- The appliance does not appear to operate normally or exhibits a marked change in performance. This indicates a need for service.
- If the appliance does not operate normally when following the operating instructions, adjust only those controls that are specified in the operating instructions, improper adjustment of other controls may result in damage and will often require extensive work by a qualified technician to restore the appliance to normal operation.
- If the appliance has been subject to excessive shock by being dropped, or the cabinet has been damaged.

Servicing - Do not attempt to service the appliance yourself as opening or removing covers may expose you to dangerous voltage or other hazards. Hafer all servicing to qualified service personnel.
natural_image
Cartoon illustration of a person using a portable radio with arrows indicating sound or vibration (no text or symbols)DISCLAIMER
Images(and(information(in(th s(manual(are(for(reference(only.(We(nerve(the(right(to(make changes(to(this(product(without(notification
(
LASER
FRONT PANEL AND REAR PANEL ILLUSTRATION
FRONT PANEL
The Front of the DVD player
TOP

text_image
LASERFRONT

text_image
1 2 3 4 5 6 DVD HDMI 7 8 9 DVD DVD JN VPEGI Divx1 Open/Close
4 Previous
7 Display
2 Play/Pause 3 Stop
5 Next 6 Power
8 Remote Sensor 9 USB 2.
0 Host Port
The Rear of the DVD player
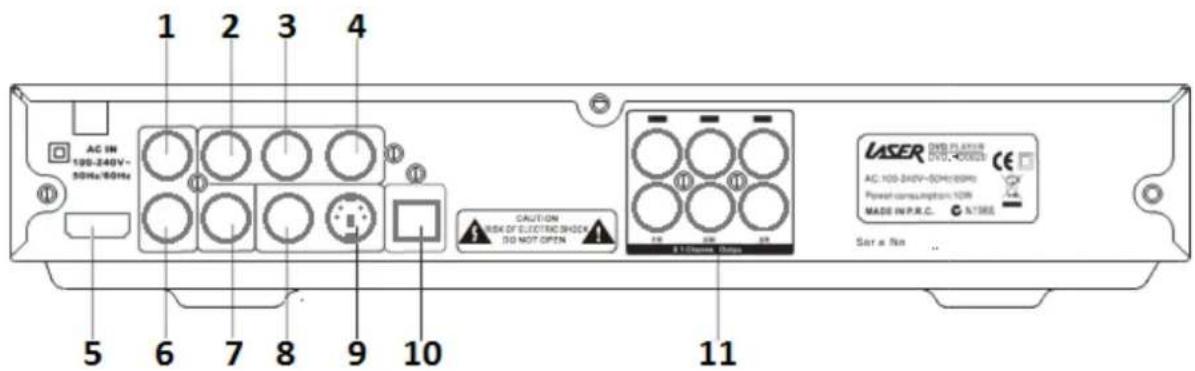
text_image
1 2 3 4 AC IN 100-240V- 50Hz/60Hz ① ② ③ ④ ⑤ ⑥ ⑦ ⑧ ⑨ ⑩ CAUTION RISK OF ELECTRON SHOCK DO NOT OPEN A 1 Chassis Status UASER DVB PLANTIR NVD-00025 AC: 100-240V-SOHC/SPMC Power consumption: 100W MADE IN P.R.C. N/TIRE Sare No ..1 Audio Out (<eft)
4 Component Out(Cr)
7 Coaxial Digital Audio
10 Optical(Toslink) Audio
2 Component Out (Y) 3
5 HDMI 6
8 Composite Video Out 9
11 5.1 Channel Audio == C,
Component Out (Cb)
Audio Out (Right)
S/Video Out
SUB, ±R, ±<, RR, R<
LASER
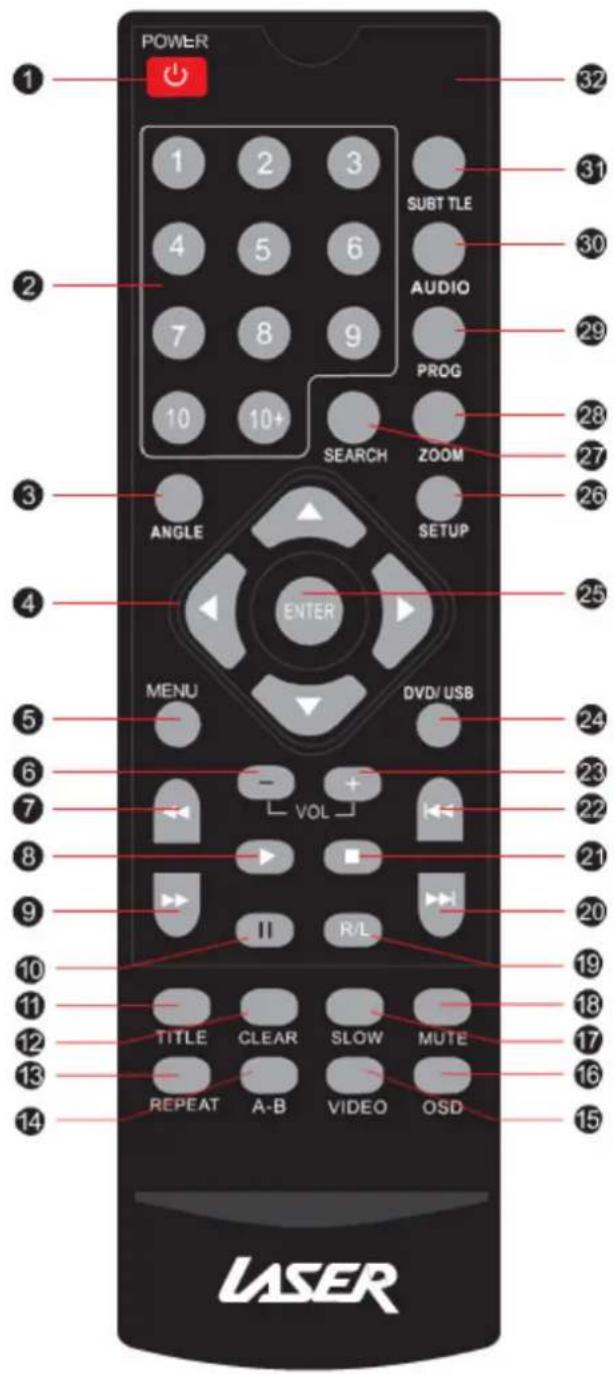
REMOTE CONTROL
1 POWER
2 NUMERIC KEYPAD
3 ANGLE
4 NAVIGATION
5 MENU
6 VOL -
7 REV
8 PLAY
9 FAST FWD
10 PAUSE
11 TITLE
12 CLEAR
13 REPEAT
14 A-B REPEAT
15 VIDEO
16 OSD
17 SLOW
text_image
POWER 1 2 3 4 5 6 7 8 9 10 10+ SUBT TLE AUDIO PROG SEARCH ZOOM ANGLE SETUP ENTER MENU DVD/USB VOL TITLE CLEAR SLOW MUTE REPEAT A-B VIDEO OSD LASER32 OPEN/CLOSE
31 SUBTITLE
30 AUDIO
29 PROG
28 ZOOM
27 SEARCH
26 SETUP
25 ENTER
24 DVD/USB
23 VOL+
22 PREV
21 STOP
20 NEXT
19 R/L
18 MUTE
- Do NOT mix new and old or different brand batteries in this remote.
• To ensure best performance, please replace batteries regularly.
Main setup menu
( This(chapter(allows(you(to(customise(the Uzbek(acording(to(your(person al(preference

flowchart
graph TD
    A["Setup Menu"] --> B["General"]
    A --> C["Audio"]
    A --> D["Dolby"]
    A --> E["Video"]
    A --> F["Preference"]
( Press(the(Setup(-utton(on)(tl e(remote(control(to(enter.(Use(the(Naviga n(button(on) remote(control(to(select(the(Setup(Group,(Option(and(Option(settings.(P ess(the(Ent button(to(select(the(option setting ( ( Press(the(Setup(-utton(again to(exit(and(return(to(main(viewing(scre( (
General Setup:
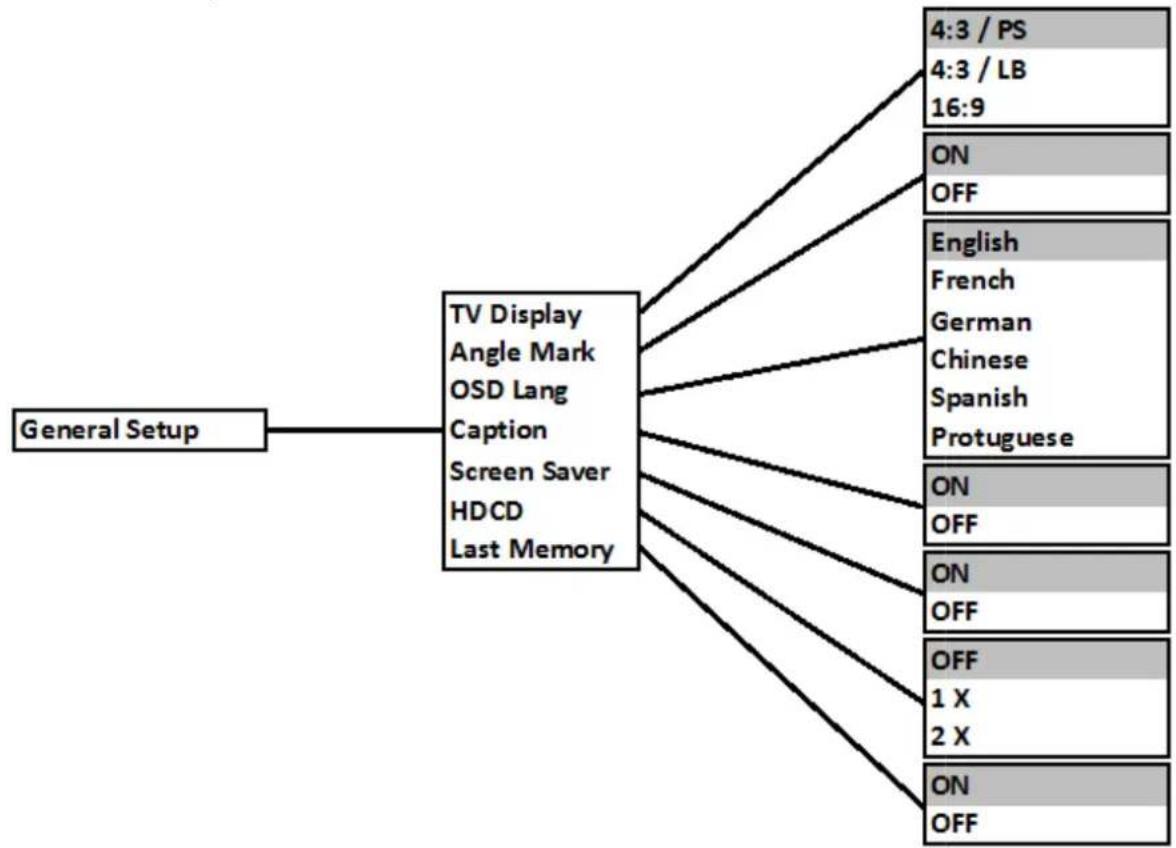
flowchart
graph TD
    A["General Setup"] --> B["TV Display\nAngle Mark\nOSD Lang\nCaption\nScreen Saver\nHDCD\nLast Memory"]
    B --> C["4:3 / PS\n4:3 / LB\n16:9"]
    B --> D["ON\nOFF"]
    B --> E["English\nFrench\nGerman\nChinese\nSpanish\nProtuguese"]
    B --> F["ON\nOFF"]
    B --> G["ON\nOFF"]
    B --> H["OFF\n1 X\n2 X"]
    B --> I["ON\nOFF"]
Note: Option settings highlighted in this manual are the factory default.
Main setup menu
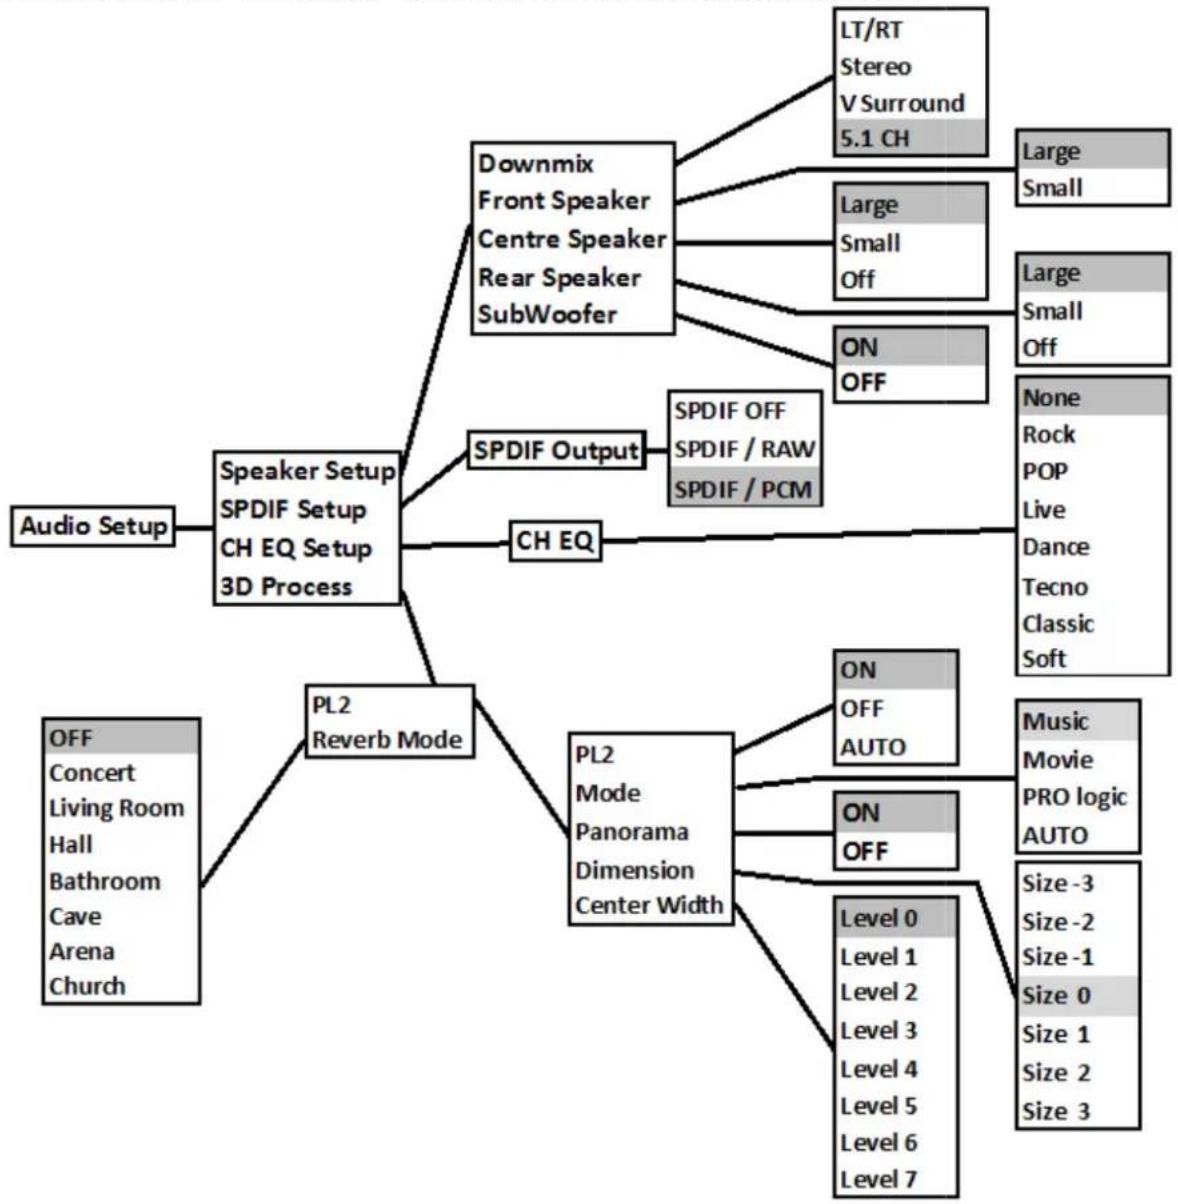
Audio Setup:
Use(the(Navigation(button(or (the/remoe(control(to(select(the(Setup(Group, (Option(and Option(settings.(Press(the(Enter(button(to(select(the(option(settin(
Press(the(Setup—utton(again to(exit(and(return(to(main(viewing(scre
flowchart
graph TD
    A["Audio Setup"] --> B["Speaker Setup"]
    B --> C["SPDIF Setup"]
    C --> D["CH EQ Setup 3D Process"]
    D --> E["PL2 Reverb Mode"]
    E --> F["OFF Concert Living Room Hall Bathroom Cave Arena Church"]
    E --> G["Off"]
    B --> H["Downmix Front Speaker Centre Speaker Rear Speaker SubWoofer"]
    H --> I["LT/RT Stereo V Surround 5.1 CH"]
    H --> J["Large Small Off"]
    H --> K["ON OFF"]
    H --> L["Large Small Off"]
    H --> M["None Rock POP Live Dance Tecno Classic Soft"]
    H --> N["ON OFF AUTO"]
    H --> O["ON OFF"]
    H --> P["ON OFF"]
    H --> Q["Level 0 Level 1 Level 2 Level 3 Level 4 Level 5 Level 6 Level 7"]
    style A fill:#f9f,stroke:#333
    style B fill:#ccf,stroke:#333
    style C fill:#cfc,stroke:#333
    style D fill:#fcc,stroke:#333
    style E fill:#cff,stroke:#333
    style F fill:#ffc,stroke:#333
    style G fill:#ffc,stroke:#333
    style H fill:#cfc,stroke:#333
    style I fill:#ffc,stroke:#333
    style J fill:#cfc,stroke:#333
    style K fill:#ffc,stroke:#333
    style L fill:#cfc,stroke:#333
    style M fill:#ffc,stroke:#333
    style N fill:#cfc,stroke:#333
    style O fill:#ffc,stroke:#333
    style P fill:#cfc,stroke:#333
    style Q fill:#cfc,stroke:#333
    style R fill:#ffc,stroke:#333
    style S fill:#cfc,stroke:#333
    style T fill:#ffc,stroke:#333
    style U fill:#cfc,stroke:#333
    style V fill:#cfc,stroke:#333
    style W fill:#cfc,stroke:#333
    style X fill:#cfc,stroke:#333
    style Y fill:#cfc,stroke:#333
    style Z fill:#cfc,stroke:#333
    style AA fill:#cfc,stroke:#333
    style AB fill:#cfc,stroke:#333
    style AC fill:#cfc,stroke:#333
    style AD fill:#cfc,stroke:#333
    style AE fill:#cfc,stroke:#333
    style AF fill:#cfc,stroke:#333
    style AG fill:#cfc,stroke:#333
    style AH fill:#cfc,stroke:#333
Note: PL2 = Pro Logic II
Incorrect settings in the Audio Setup page may result in no sound being heard during playback. Please make chances carefully.
Main setup menu
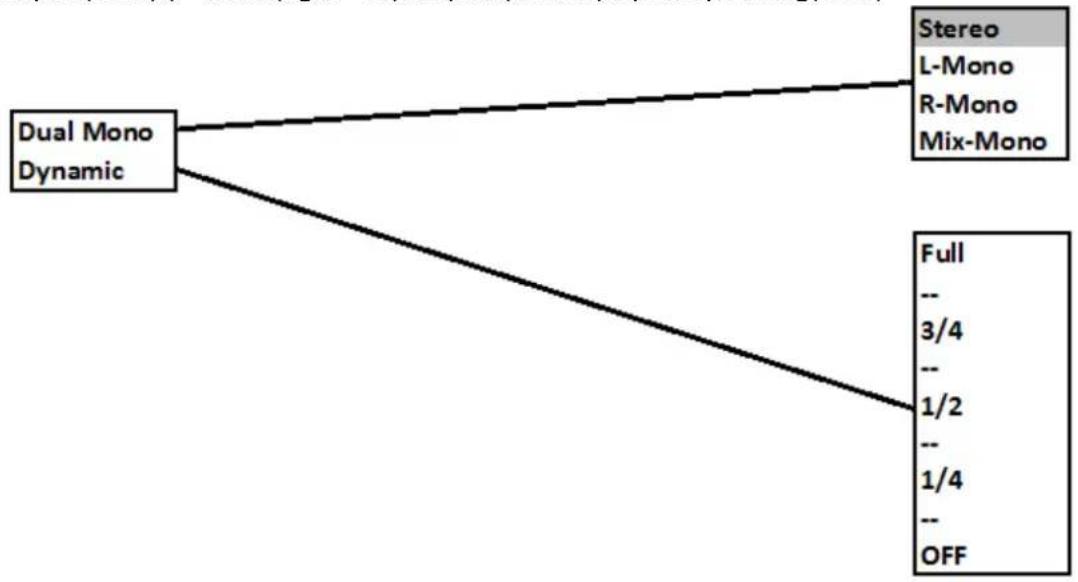
Dolby Digital Setup:
Use(the(Navigation(button)or (the(remote)control(to(select(the(Setup(Group),(Option(ar Option(settings.(Press(the(Enter(button)to(select(the(ctionCitning.
Press(the(Setup)—utton(again to(exit)(and(return(to(main(viewing(scre))
flowchart
graph TD
    A["Dual Mono Dynamic"] --> B["Stereo\nL-Mono\nR-Mono\nMix-Mono"]
    A --> C["Full\n--\n3/4\n--\n1/2\n--\n1/4\n--\nOFF"]
Video Setup:
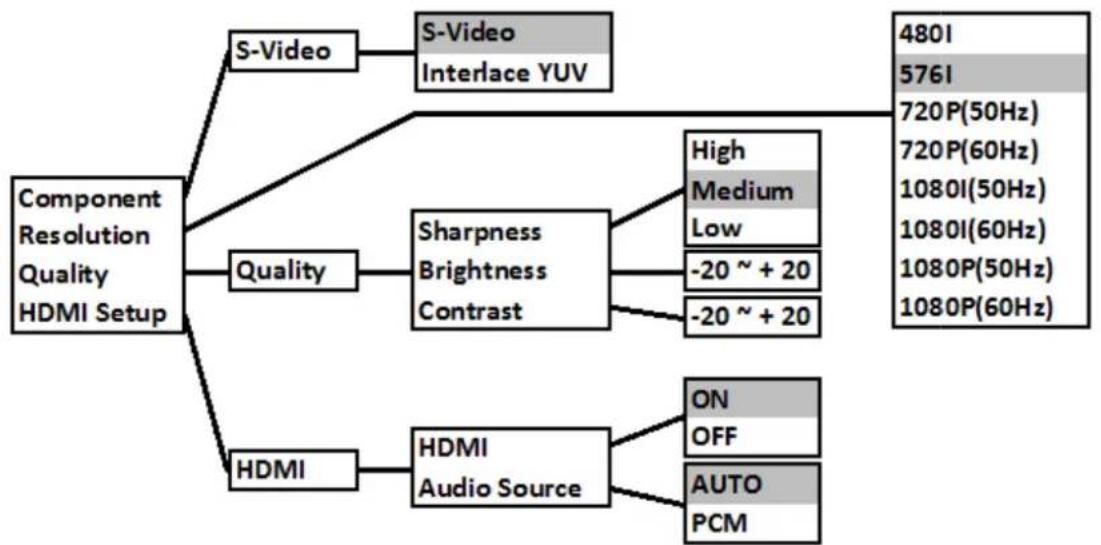
flowchart
graph TD
    A["Component Resolution Quality HDMI Setup"] --> B["S-Video"]
    A --> C["Quality"]
    A --> D["HDMI"]
    B --> E["S-Video Interface YUV"]
    C --> F["Sharpness Brightness Contrast"]
    D --> G["HDMI Audio Source"]
    E --> H["480I 576I 720P(50Hz) 720P(60Hz) 1080I(50Hz) 1080I(60Hz) 1080P(50Hz) 1080P(60Hz)"]
    F --> I["High Medium Low -20 ~ +20 -20 ~ +20"]
    G --> J["ON OFF AUTO PCM"]
Note: To adjust Brightness or Contrast. Select Option to change and then use the Left & Right navigation buttons on the remote control to adjust. When the correct adjustment has been made, press the Enter button to return to the setup menu.
Please ensure that the TV is compatible with resolution before selecting. Incorrect resolution selection can result in loss of picture.
Main setup menu
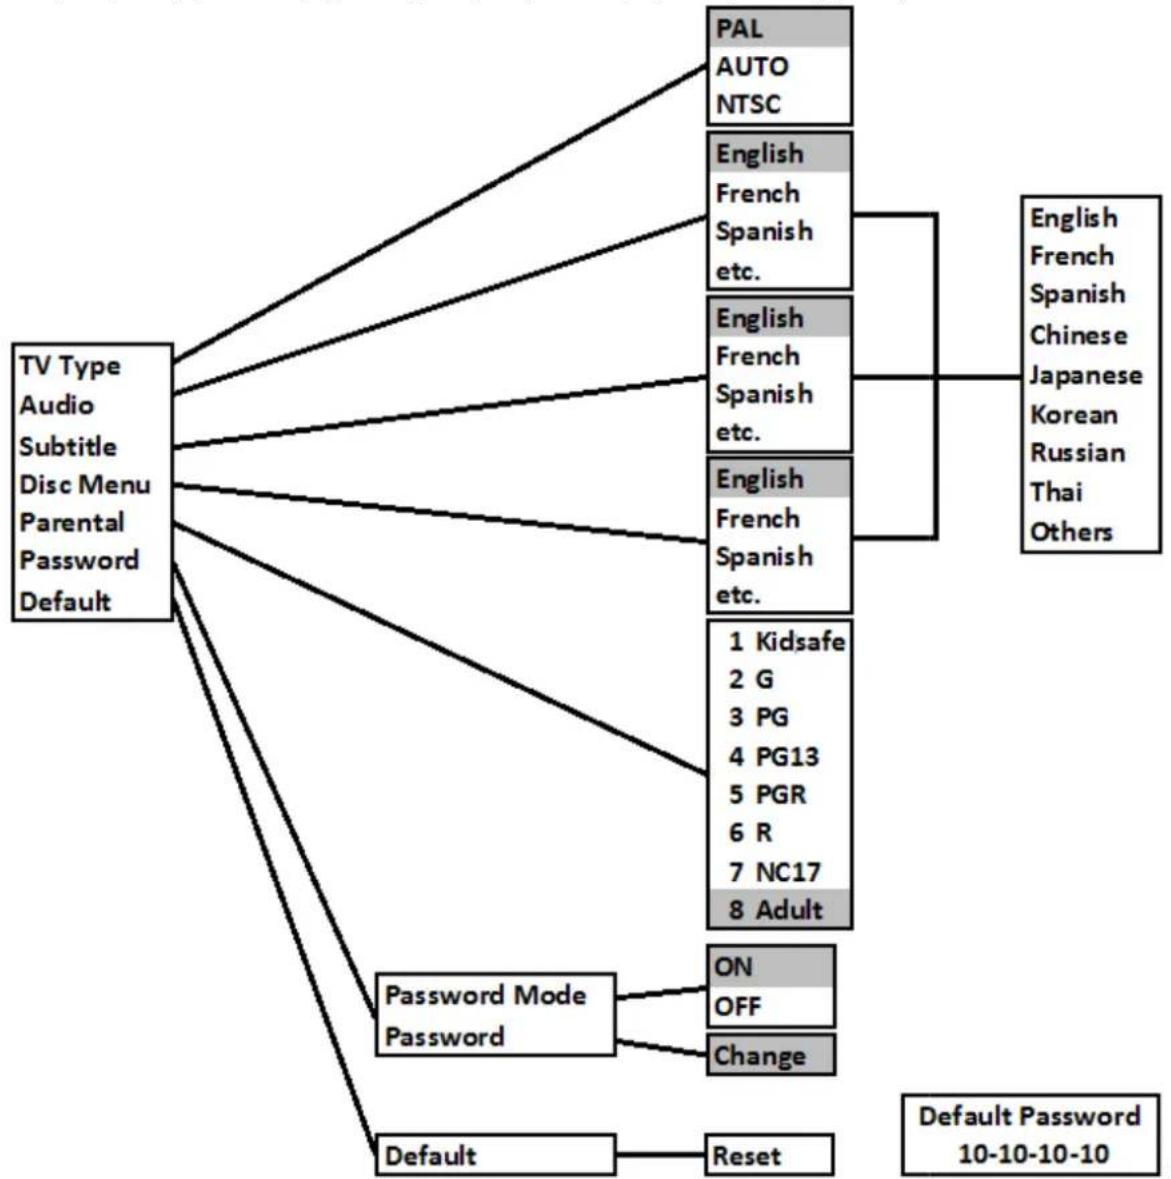
Preferences:
Use(the(Navigation(button(on(the(remote(control(to(select(the(Setup(Group p,(Option(ar Option(settings.Press(the(Enter(button(to(select(the(option(settin(
Press(the(Setup)—utton(again to(exit)(and(return(to(main)(viewing(scre))
flowchart
graph TD
    A["TV Type\nAudio\nSubtitle\nDisc Menu\nParental\nPassword\nDefault"] --> B["PAL AUTO NTSC"]
    A --> C["English French Spanish etc."]
    A --> D["English French Spanish etc."]
    A --> E["English French Spanish etc."]
    A --> F["1 Kidsafe 2 G 3 PG 4 PG13 5 PGR 6 R 7 NC17 8 Adult"]
    A --> G["Password Mode Password"]
    G --> H["ON OFF Change"]
    G --> I["Default"]
    I --> J["Reset"]
    K["English French Spanish Chinese Japanese Korean Russian Thai Others"] --> L["Default Password 10-10-10-10"]
Note: The Password is required to change Parental Control settings. You will need to enter the password before changing the settings. Resetting the default will reset player setup only. It will NOT reset the parental control or the password.
Please record a new password here
LASER
| # | Title | Function |
| 1 | POWER | During Playback press the Power button to stop playback and enter standby mode. Press the Power button again to resume playback. |
| 2 | NUMERIC | Numeric buttons used in Search and program fields |
| 3 | ANGChange the camera angle if available | Change the camera angle if available |
| 4 | NAVIGATION | Use the UP/DOWN/Change the camera angle if available |
| 5 | MENU | Plays the main DVD menu |
| 6 | VO<- | Decreases the Volume level |
| 7 | ±AST REV | Rewinds Playback in =, 4, 8 & =0 times normal speed |
| 8 | PBegins playback and resumes playback | Begins playback and resumes playback |
| 9 | ±AST ±WD | ±orwards Playback in =, 4, 8 & =0 times normal speed |
| 10 | PAUSE | Pauses playback (press play to resume) |
| 11 | TITPlays the main DVD menu | Plays the main DVD menu |
| 12 | CClears entries made in program and search fields | Clears entries made in program and search fields |
| 13 | REPEAT | Repeats Chapter, Title or A<< |
| 14 | A-B REPEAT | Press once to mark start of loop; press again to mark end of loop; Press again to return to normal playback. |
| 15 | VIDEO Not Used | |
| 16 | OSD | Displays On Screen Display. Press to cycle |
| 17 | SSlows playback to 1/---1/4--1/8—1/16—1/3= of normal speed. | Slows playback to 1/---1/4--1/8—1/16—1/3= of normal speed. |
| 18 | MUTE | Mutes audio. Press again or volume buttons normal volume |
| 19 | R/< | SelectSelect(Only available with some DVDs or files) |
| 20 | NEXT | Skips to Next Chapter/±ile |
| 21 | STOP | Stops playback |
| 22 | PREVIOUS | Skips to Previous Chapter/±ile |
| 23 | VO<+ | Increases the Volume level |
| 24 | DVD/USB | Changes source between DISC and USB device |
| 25 | ENTER | Makes Selections |
| 26 | SETUP | Enter the main Setup Menu |
| 27 | SEARCH | Search the Chapter & time to play from specific point. |
| 28 | ZOOM | Zooms picture in or out =,3,4, 1/=, 1/3 , & 1/4 |
| 29 | PROG | Program the Title and Chapter order of playback |
| 30 | AUDIO | Changes the Audio track During DVD playback |
| 31 | SUBTITSelects or turns off the Subtitle Displayed during DVD playback | Selects or turns off the Subtitle Displayed during DVD playback |
| 32 | OPEN/CEjects and loads disc tray | Ejects and loads disc tray |
Trouble Shooting
No Video displayed on TV
• %ake sure TV is turned on.
- 6heck the cable connections.
- 6check the input selection on the TV is correct.
- 6check output selection is correct for the Input on the TV (connect via component).
Player does not respond to remote
- 6lear any obstacle between the remote and the player.
- Try moving closer or reduce the angle to the player.
- 6check the condition of the batteries and replace if necessary.
- 6lean the sensor panel on the player.
No audio during DVD/file playback
- 6check the audio output of the player is set correctly.
- If using external amplifier/speakers, ensure connections are correct and amp is turned on.
- 6check input on TV/%onitor /Amplifier.
- 6heck files audio track is supported by this player.
Disc playback is jerky
- 6heck the condition of the disc. If surface is damaged or scratched repair or replace if necessary.
Video file playback is jerky and stops
- 6check the file is compatible with player.
- 6check resolution of file. 7igh Definition files may cause intermittent playback issues. Reduce resolution and bit rate of file to improve playback.
Abnormal Player operations
- Turn the player off and unplug the player from wall. Wait for 1 or = minutes and plug back in. Player should now function normally.
Disc is locked in player
- If the player will not eject disc. Turn the power O±± and then ON again. Immediately press the OPEN/6<OSE button (3=) to open the tray.
Technical specifications
| Type of Disc | DVD/VCD/HDCD/CD/DVD±R/RW Kodak Picture CD. |
| Video Format | DIVX 3.0, 4.0, 5.0, MPEG 4 (AVI Container) |
| Audio Format | MP3 , WMA (DRM Not Supported) |
| Signal output | |
| Colour System: | PAL/NTSC/MULTI |
| Audio System: | AC-3 Digital output, Audio DAC 16bit/48KHZ |
| Video Output: | 1 Vpp (at 75 ohm) |
| Audio Output: | 2 Vpp |
| Frequency Response | |
| CD: | 4Hz 20KHz (EIAT) |
| DVD: | 4Hz 22KHz (48K)4Hz 44KHz (96K) |
| Signal to Noise Ratio (SNR) | >92dB |
| THD | <0.04% |
| Output Terminals | |
| Video: | HDMI, Component (Y,Ca,Cb), Composite/S-Video |
| Audio Analogue: | 2.0ch Stereo (L / R) 5.1 FR-FL-Centre-Sub-RR-RL |
| Analogue Digital: | S/PDIF (Coaxial), S/PDIF (Optical) |
| Input | USB 2.0 Host port. (FAT, FAT32 Single Partition drives only) |
| Power input | 110-240VAC 50Hz-60Hz |
| Power Consumption | 10W |
| Dimensions (Player only) | 260mm(w) X 235mm(D) X 45mm(H) |
| Weight (Player only) | 1.3KG |
We reserve the right to make changes to this document and the product without notification.
For More information and technical support please visit HTTP://WWW.LASERCO.NET