
BLU-BD3000 - Blu-ray player Laser - Free user manual and instructions
Find the device manual for free BLU-BD3000 Laser in PDF.


| Product Type | Blu-ray Player |
| Brand | Laser |
| Model | BLU-BD3000 |
| Supported Discs | Blu-ray, DVD, CD |
| Playback Formats | MPEG-2, MPEG-4, AVC, VC-1, MP3, JPEG |
| Resolution | 1080p Full HD |
| Video Upscaling | Up to 1080p |
| HDMI Output | 1x HDMI 1.4 |
| Audio Outputs | HDMI, Coaxial, Stereo RCA |
| USB Port | 1x USB 2.0 |
| Dimensions (W x D x H) | 430 mm x 260 mm x 40 mm |
| Weight | 2.5 kg |
| Power Consumption | 20 W (Standby: <0.5 W) |
| Power Supply | AC 100-240 V, 50/60 Hz |
| Remote Control | Included |
| Region Code | Region B (Blu-ray), Region 2 (DVD) |
| Languages (Menu) | English, French, Spanish, etc. |
| Maintenance | Clean with soft dry cloth; avoid liquids |
| Safety Precautions | Use in dry location; do not block vents |
| Spare Parts Available | Remote control, power cord |
| Repairability | Designed for professional service only |
| Manual | Free PDF download (48 pages) |
Frequently Asked Questions - BLU-BD3000 Laser
User questions about BLU-BD3000 Laser
0 question about this device. Answer the ones you know or ask your own.
Ask a new question about this device
Download the instructions for your Blu-ray player in PDF format for free! Find your manual BLU-BD3000 - Laser and take your electronic device back in hand. On this page are published all the documents necessary for the use of your device. BLU-BD3000 by Laser.
USER MANUAL BLU-BD3000 Laser
natural_image
Exterior view of a black BLU-RAY DISC/DVD PLAYER console with a black LASER remote control (no text or symbols on the device itself)
Read This Manual Carefully before Operation
Contents
Safety Notice and Important Information 2
Media Compatibility 4
Incompatible Media 5
Region Information 5
Player & Disk Case 6
Getting to know your BLU-BD3000 player 7
What's in the box 7
The Front and Rear panels 7
Using the Remote Control 8
Connection your BLU-BD3000 Player 11
Internet/Network connection 15
Connecting a USB Device 16
Playing a Disk 17
On Screen Control (OSC Button) 18
BD-Live 21
DLNA Network Media Player 25
Setup & Settings 27
General 27
Display 33
Audio 36
System Information 38
Programming a Disc 39
Media Centre – USB Playback 39
FAQ 43
Specifications 46
Safety Notice and Important Information
Please read the instructions carefully before using this product
Observe all warnings and cautions when using this product.
Retain all manuals and documentation for future referral.
Only use this product in the manner described in this manual.
Do not use this device in extremely hot, cold, humid, dusty or sandy environments.
Do not use this device in electrical storms or other conditions if the likely hood of lightning is possible.
Do not attempt to clean this product using liquid cleaners or aerosol cleaners. Use only a damp soft cloth to clean the surface of this device.
This device may become hot during use. Do not cover vent holes and place in a well-ventilated area.
This device is not waterproof. Do not use this device in the open if there is a high level of moisture in the air.
Only place the device on a stable surface and ensure that cables attached to the device can not cause the device to fall.
There are no serviceable parts in this device. Attempts to open this device by un-authorized personnel may cause further damage and void the warranty.
Images of the product and accessories are indicative only and may vary slightly from actual the product.
We reserve the right to make changes to this document and the product without notification.
Trademarks
“Blu-ray Disc”, “BONUS VIEW” and “BD-Live” are trademarks of the Blu-ray Disc Association.
Java and all Java-based trademarks and logos are trademarks or registered trademarks of Sun Microsystems, Inc. in the United States and other countries.
DVD Logo is a trademark of DVD Format/Logo Licensing Corp., registered in the U.S., Japan and other countries.
"AVCHD" and the "AVCHD" logo are trademarks of Panasonic Corporation and Sony Corporation.
Designed for Windows Media, Microsoft, HDCD, and the HDCD logo are trademarks or registered trademarks of Microsoft Corporation in the United States and/or other countries.
DTS is a registered trademark and the DTS logos, Symbol, DTS-HD and DTS-HD Master Audio | Essential are trademarks of DTS, Inc. © 1996-2008 DTS, Inc. All Rights Reserved.
Manufactured under license from Dolby Laboratories. "Dolby" and the double-D symbol are trademarks of Dolby Laboratories.
HDMI, the HDMI logo and High-Definition Multimedia Interface are trademarks or registered trademarks of HDMI Licensing LLC.
All other trademarks are the properties of their respective owners.
User Manual
Media Compatibility
Since the Blu-ray Disc specifications are new and evolving, some discs may not play properly depending on the disc type, version and encoding. It is possible that a Blu-ray disc manufactured after the player was manufactured uses certain new features of the Blu-ray Disc specifications. To ensure the best possible viewing experience, the player may need a firmware or software update from time to time.
Blu-ray
| Media Type | Compatibility | Limitations |
| Blu-Ray Disk | BD-ROM (SL/DL) | Supports high bit rate audio (Dolby Digital Plus, Dolby TrueHD, DTS-HD High Resolution Audio and DTS-HD Master Audio) adopted in BD-Video. |
DVD
| Media Type | Compatibility | Limitations |
| DVD | DVD-ROM, DVD+R(SL/DL), DVD-R (SL/DL), DVD-RW (SL/DL). | Recordable DVD media must be finalisec by a recorder before playback on the BLU-BD3000. |
CD
| Media Type | Compatibility | Limitations |
| CD | CD-Audio, CD-R. CD-RW | Recordable CD media must be finalised by a recorder before playback on the BLU-BD3000. |
USB
| Media Type | Compatibility | Limitations |
| USB | Flash Drives | Formatted in FAT or FAT32 only up to 32GB |
| Hard drives | NTFS drives read only. FAT32 for use as BD-LIVETM storage. |
Please note: USB hard drives connect to the BLU-BD3000 should be powered by another source as well as the USB port. A secondary power source may be required for some Notebook style USB hard drives.
Incompatible Media
The following media may not be playable or produce erratic or substandard playback.
- DVD-RAM
- DVD- Audio
- BDs With cartridge
• Data files on CD-Extra discs - BD-Video discs recorded at a rate of 50 fields (frames) per second.
- Super Audio CD
- WMA discs
• DVDs with cartridge -
CD Audio with DRM
-
Photo CD
- DivX discs
- HD DVD
• Non-finalised media
NOTE: It may not be possible to play the above media in some cases due to the type of media, the condition of the recording, the recording method and how the files were created.
The producers of the disc can control how discs are played, so you may not always be able to control play as described in this User Manual. Read the disc's instructions carefully.
Region Information
Blu-ray
This player is designed and manufactured to respond to the region management information.
The BLU-BD3000 is preset to play discs meant for region B.
Due to restrictions on Blu-Ray region coding, not all regions can be enabled at once.

natural_image
Three hexagonal icons with letters A, B, and C, each enclosed in a stylized globe or network symbol (no text or numbers present)Region Code

Region Country
North America, Central America, South America, Korea, Japan, Taiwan, Hong Kong, South East Asia
Europe, Greenland, French territories, Middle East, Africa, Australia, and New Zealand
India, China, Russia, Central Asia, and South Asia
DVD
This player is designed to play DVDs from all regions.
User Manual
Player & Disk Care
Cleaning the BLU-BD3000 Player
- Always turn the player off and unplug the power cord before cleaning.
- Never use alcohol, paint thinner or benzene to clean this unit.
- Before using chemically treated cloth, carefully read the instructions that came with the cloth.
- Please use a damp soft cloth. Wring out any excess liquid and gently wipe the external case of the player. Let the player dry before using again.
Lens Cleaning
Use a commercially available CD/DVD/BD lens cleaner (not supplied) to periodically clean the lens in this player. Please read the instructions supplied with the lens cleaner carefully before use.
Handling Discs
- Handle discs by the edges to avoid inadvertent scratches or fingerprints on the disc.
- Do not attach labels or stickers to discs.
- Do not use record cleaning sprays, benzene, thinner, static electricity prevention liquids or any other solvent.
- Do not use the following discs; discs with exposed adhesive from removed stickers or Labels (rented discs etc) that are lifting or torn; discs that are warped or cracked; irregularly shaped discs, such as heart shapes.
Cleaning Discs
DO Don't
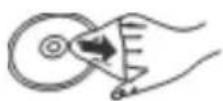
(Inside to the outside)

(Side to side)
Wipe discs with a soft damp cloth and allow to dry before placing disc in the players tray. Never use alcohol, paint thinner or benzene to clean discs.
Getting to know BLU-BD3000 Blu-Ray & DVD Player
What's in the box
- BLU-BD3000 Blu-ray disc player
- Remote control
-2 x AAA Batteries - User Manual (This Document)
Note: Please make yourself familiar with the layout of the BLU-BD3000 and the remote control before use.
The Front and Rear panels
Front panel

| 1 | Disc tray | 4 | Play / Pause |
| 2 | USB interface(Connect USB device to this interface) | 5 | Power (Standby) |
| 3 | Eject/Insert | 6 | Remote control receiver |
Rear panel
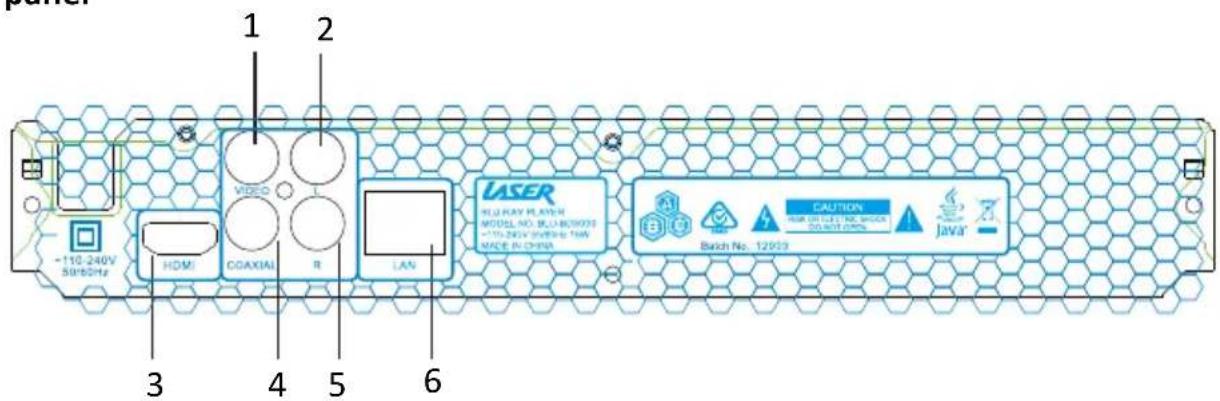
| 1 | video output | 4 | Digital audio output (coaxial) |
| 2 | Audio output (L) | 5 | Audio output (R) |
| 3 | HDMI output | 6 | LAN input |
Using the Remote Control
Installing the battery
1. Open the battery cover
-
Insert the battery (R03, AAA). Note: Align the +/- polarity of the battery to the sign in the slot.
-
Put on the battery cover.

natural_image
Simple line drawing of a rectangular object with a curved arrow and a small circular mark, no text or symbols present.

natural_image
Simple line drawing of a smartphone with a screen and antenna (no text or symbols)Aiming the remote
Aim the remote control at the BLU-BD3000 and then operate.



Note: When using the remote control, the remote control should be pointed to the BLU-BD3000 within an angle of ±30^ and a range of about 4.5 meters.
The Remote control
While playing, press the following buttons to operate.
*Please note: Some features on this remote control require the feature to be available and supported by the disc/media being played.

Button Functions
| 1 | Power (standby): Turn on/offOSC (On Screen Control):Access more options during playback | 15 | Eject: Open/Close the disc tray |
| 2 | 16 | Display: Display the Information while playing such as play time, Chapter, etc. | |
| 3 | Subtitle: Select subtitle language | 17 | Top Menu: Access the Main menu of the video disc. |
| 4 | Mute: Mute/Unmute | 18 | Title Popup :DVD: Return to title/beginningBD: Enter or exit Title popup menu |
| 5 | Audio: Select audio language or channel. | 19 | Home: Return to home screen |
| 6 | Clear: Clear error | 20 | Repeat: Repeat playing title, chapter, track or disc |
| 7 | OK: Confirm | 21 | Direction: Directional keys |
| 8 | Setup: Setup menu | 22 | Return: Return/BackHDMI: The HDMI Button function: To switch the resolution of the video output, you may press it to switch into 576I/P, 720P,1080I,1080P. |
| 9 | 0-9: select and enter numbers | 23 | |
| 10 | Play/ Pause: Press to Play. While playing video, press the pause. | 24 | GOTO: Select the search time, chapter, etc. |
| 11 | Stop: Stop playing | 25 | VOL+: turn up volumeVOL-: turn down volume |
| 12 | Fast rewind: fast rewind by 1×, 2×, 3×, 4×, 5×Fast forward: fast forward by 1×, 2×, 3×, 4×, 5×Program/ red button:program playing desired tracks. | 26 | Prev: go to previous chapter/trackNext: go to next chapter/track |
| 13 | 27 | Zoom/ Blue button: has the function of blue button (not available for BD) | |
| 14 | Bookmark/ green button: Press to set position, long press to edit. | 28 | A-B Repeat: Repeat a selected scene (Not available for BD) |
Connection your BLU-BD3000 player
Connection Power
Connect the power plug from the player to a mains power outlet and then turn the switch on.
Check the power LED on the front panel of the player. It should now be RED.

natural_image
White electrical outlet wall with three outlets and a black plug attached (no text or symbols visible)Video and component input
Audio from the BLU-BD3000 can be played through a connected television or through a 2.1 or 5.1 channel speaker system or even a full home theatre surround sound system.
GOOD: Connecting RCA Stereo and Video
Requires RCA Stereo Audio and video cable
Standard colours for RCA stereo is WHITE=LEFT channel, RED=RIGHT channel, YELLOW=VIDEO signal.

- Plug the RCA audio/video cable into the AUDIO and COMPOSITE VIDEO OUTPUT on the player and a AUDIO and COMPOSITE VIDEO INPUT on the television.
- Select the AV Channel on the TV which corresponds to the video input. E.g. AV1, AV2 etc.
- This will allow video from the player to show on the connected television.
NOTE: The STEREO AUDIO OUT terminals will always provide a down-mixed stereo signal from multi-channel sources. The “Down Mix” and other speaker settings in the Audio Setup do not affect the STEREO AUDIO OUT.
Connecting two-channel analog input amplifier

After completing the connect, enter into Setting -> Audio setting -> Speaker setting -> Configuration -> 2.x
Coaxial and fiber connection
BETTER: Connecting Coaxial Digital Audio
Requires a Coaxial Digital Audio Cable (75 ohm RCA) (not included)
Standard colour for coaxial digital audio ports is ORANGE.

Plug the COAXIAL DIGITAL AUDIO Cable in to the COAXIAL DIGITAL AUDIO OUTPUT on the player and plug the other end in to the COAXIAL DIGITAL AUDIO Cable input on the television or Home Theatre system.
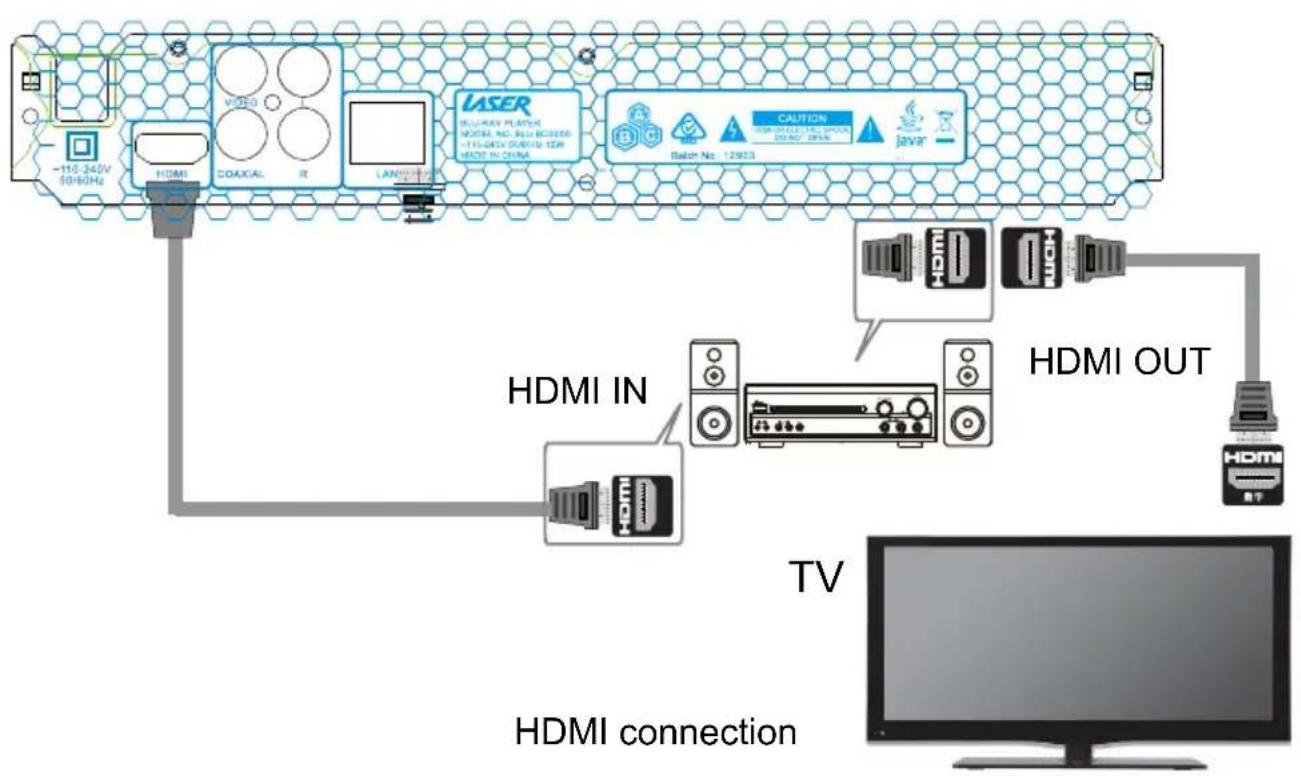
BEST: Connecting the HDMI cable to a Home Theatre system
Requires 2 x HDMI V1.3 cables (not included)
Plug the first HDMI cable (A) into the HDMI OUTPUT on the player and into the HDMI input on the Home Theatre System.
Plug the second HDMI cable (B) into the HDMI OUTPUT on the Home Theatre System and into the HDMI input on the television.
flowchart
graph TD
    A["110.340V 50Hz"] --> B["HDMI"]
    B --> C["VIDEO"]
    C --> D["COAXIAL"]
    D --> E["LAND"]
    E --> F["LANO"]
    F --> G["Laser"]
    G --> H["BLU-NAV PLATICS MODEA No. BLU-BCSSED -175-GNDI GARDOL 12W MODE IN CHINA"]
    H --> I["CAUTION"]
    I --> J["Baton No. 12803"]
    J --> K["Java"]
    K --> L["HDMI OUT"]
    L --> M["TV"]
    N["HDMI IN"] --> O["HDMI"]
    P["HDMI connection"] --> Q["HDMI"]
NOTE: If you have connected the BLU-BD3000 to a Home Theatre System using the Coaxial Digital Audio cable or the 5.1 Audio Cables you may need to also connect the RCA Stereo Connection to your TV to allow Audio to be heard through the TV when it is not convenient to have the Home Theatre System turned on.
Combinations of Audio and Video Connections are possible depending on the equipment the player is to be connected to. Please refer to the equipment user manual to determine the method or combination that best suits your needs.
Note:
HDMI can transmit both audio and video signals over a single cable. If you have an HDMI capable receiver that can support HDMI audio, you can simply run an HDMI cable from the player to your receiver and enable HDMI audio on the receiver (see your receiver's owners' manual for more information). The receiver usually has an HDMI output that you can connect to your TV to pass the video signal.
HDMI is a wonderful thing. A single cable can transport both audio AND video from your player to your display. Be aware, however, that HDMI is an evolving standard, and there could be compatibility issues. A receiver that supports audio input over HDMI is required.
Some receivers offer HDMI ports solely for video switching. If your receiver does not have audio input capability, please read the following sections regarding other connection methods.
In order to play multi-channel audio for all formats, the receiver must support HDMI v1.1 or later. For Blu-ray Disc, a receiver that supports HDMI v1.3 with decoding capability for Dolby TrueHD and DTS-HD Master Audio is preferred. Please check the specifications of your receiver to ensure that it meets the requirements.
Due to bandwidth limitations, high resolution audio formats such as Dolby Digital Plus, Dolby TrueHD, DTS-HD High Resolution and DTS-HD Master Audio cannot be sent through the coaxial digital audio output. A reduced resolution version of the same audio track will be output instead. To listen to high resolution audio formats in their best quality, please use the HDMI connection if you have a receiver that handles HDMI audio.
Due to copyright restrictions and bandwidth limitations, full resolution audio from DVDAudio discs cannot be sent through the coaxial or optical digital audio output. To listen to DVD-Audio in full resolution, please use the HDMI or analogue audio connections.
Internet/Network connection
Connecting by Ethernet
Requires an Ethernet cable (not included)
The BLU-BD3000 Blu-Ray Disc Player supports the BD-Live™ feature offered on some Blu-ray Disc titles. BD-Live™ offers extra downloadable content and additional online interactive programs. The available BD-Live™ contents vary by discs and studios, and may include additional subtitles, commentaries, movie trailers, games, and/or online chat.
Connecting the player to the Internet will also allow the player to obtain firmware updates via the Internet. In order to utilize the BD-Live™ feature or update firmware via the Internet, the player needs to be connected to a broadband Internet connection. You must have access to a working broadband Internet service connection. It is not necessary to connect to the Internet if you do not intend to use BD-Live™.

Broadband Router/Modem
Plug an Ethernet cable (Category 5/5E straight Ethernet cable) into the ETHERNET PORT on the rear of the player and plug the other end in to a spare port on a router, switch or modem with an internet connection.
For most home network setups the BLU-BD3000 will connect automatically. Please check the settings as shown in the main menu described later in this manual.
Refer to the operating instructions supplied with the broadband router or modem, or contact your Internet service provider for questions related to setting up the router or modem.
NOTE: Only connect the LAN port of the player to an Ethernet port that supports 10BASE-T or 100BASE-TX. Connecting to any other ports or jacks, such as a phone jack, can damage the player.
Connecting a USB device
Requires a USB Flash drive or an external USB HDD (not included).
Insert the USB drive (or cable) into the USB port on the front of the player.
If the drive is to be used for BD-Live™ content it is accessed through the main menu of the Blu-ray discs when played.
To access the content of the USB device for playback please see the Media Center section later in this manual (See page 39)
NOTE: The USB ports are rated to provide a maximum of 5V, 500mA power to the USB drive. It is sufficient for all USB thumb drives and flash memory card readers, but may not be sufficient for USB hard disks. It is recommended that you use a USB hard disk with an external power supply.
This unit supports “USB Mass Storage Class Bulk-Only Transport” devices only. Most USB thumbs drives, portable hard disk drives and card readers conform to this device class. Other USB devices such as MP3 players, digital cameras, and mobile phones may not be compatible.
Supported USB drives must be formatted with the FAT (File Allocation Table) or FAT32 file system. Drives formatted with NTFS file system supported as read only and cannot be used for BD-Live.
In some cases, an incompatible USB device may cause the player to stop responding. If this occurs simply turn off the power, remove the USB device, and turn the player back on.
The player accesses the USB drive in read and write mode. In order to minimize the risk of data corruption, it is recommended that you only unplug the USB device when playback is completely stopped.
Playing a Disk
With the player setup it is time to play a disc in the BLU-BD3000 player.
Press the STANDBY button to turn the play on
Press the OPEN/ CLOSE button on the remote or the player to open the DISC TRAY
Place the disc in to the centre of the tray with the label facing up.
Press the OPEN/ CLOSE button on the remote or the player to close the DISC TRAY

- If the Disc does not begin playback automatically press the PLAY button on the remote or the remote controller or on the player.
- Use the LEFT, RIGHT, UP and DOWN navigation buttons on the remote to navigate the Disc menu and press the Enter button to confirm the selection.
- Please refer to the Remote control details for available options during disc playback.
Note: Not all options on the remote control will be available on all discs. Some options require the content of information to be available on the disc itself to work. Please refer to the Disc case to determine available features or options on the disc.
On Screen Control (OSC Button)

natural_image
Pure electrical circuit lines without any symbolsYou can set and select certain playing status. In the playing state, press [OSC] key and show the screen control menu on the screen, as shown below.
Press any direction key to select an item, and then press [OK] to select and set. The screen control menu contains the following items: Title [BD-V DVD-V]: display current title and total titles. Press the RIGHT direction key to open title selection bar, select desired title, and press [OK] to play from the selected title.
Chapter [BD-V DVD-V]
Display current chapter and total chapters. Press the RIGHT direction key to open chapter selection bar, select desired chapter, and press [OK] to play from the selected chapter.
File [VIDEO AUDIO PHOTO]
Display current file and total files in current folder. Press the RIGHT direction key to open the selection bar, select desired file, and press [OK] to play from the selected file.
Time [BD-V DVD-V CD VIDEO AUDIO]
Display the playing time of current title, chapter, disc, track, and file. Press the RIGHT direction key to open the time bar, and press UP and DOWN to switch between playing time and remaining time.
Playing mode [CD VIDEO AUDIO PHOTO]
Display current playing mode. Press the RIGHT direction key to open the selection bar, and switch the playing mode among “Normal”, “Random” and “Shuffle”.
Audio [BD-V DVD-V]
display the language and audio signal decoding mode of the audio output.
Press the RIGHT direction key to open the audio bar, and press UP and DOWN to switch the audio.
Angle [BD-V DVD-V]
display current playing angle. Press the direction key RIGHT to open the angle bar, and press UP or DOWN to switch the playing angle.
Subtitle [BD-V DVD-V]
display current caption state. Press the RIGHT direction key to open the caption bar, and press UP and DOWN to switch the caption language.
Subtitle Style [VIDEO]
Only available for video playing; display current caption state. Press the RIGHT direction key
to open the caption bar, and press UP and DOWN to switch the Style.
Secondary video [BD-V]
Display secondary video state. Press the direction key RIGHT to open the selection bar, and press UP and DOWN to switch to full screen video output, and show secondary video window simultaneously (PIP).
Secondary audio [BD-V]
Display secondary audio state. Press the RIGHT direction key to open the selection bar, and press UP and DOWN to enable/disable the output of secondary audio.
Bit rate [BD-V DVD-V CD VIDEO AUDIO]
Display the bit rate of audio and video signal.
Instant search [BD-V DVD-V CD VIDEO AUDIO]
Go to 30sec after current point and play.
Instant replay [BD-V DVD-V CD VIDEO AUDIO]
Go to 10sec before current point and play.
Lantern slide [PHOTO]
Display the switching speed of photo playing. Press [OK] to switch among fast, medium and slow.
Switch [PHOTO]
Display the switching effect of photo playing. Press [OK] to switch the effect, including None, slide left, slide up, slide down, slide right, rectangular shrinking, rectangular enlarging, mixing, dissolving, horizontal interleaving, vertical interleaving, horizontal separation, vertical separation, horizontal division and vertical division.
Note: In screen control menu, press the [OSC] key to hide the screen control menu.
Using Display menu (Display Button)
You can check the current playing state. In playing state, press the [DISPLAY] key to
show the Display menu on the screen. When playing BD-V DVD-V disc, the menu is shown below:
Display menu contains the following information:
1) Playing state
2) Disc type
3) Chapter: display current chapter and total chapters in current title
4) Time: display the playing time
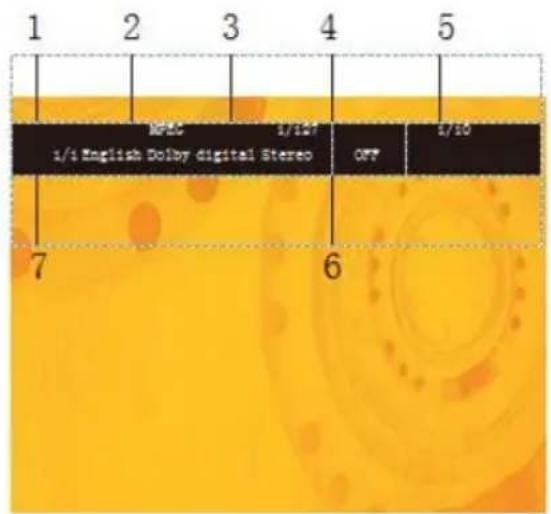
5) Audio: display the language and audio signal decoding mode of audio output When playing CD, the menu is shown below:

decoding mode of audio output
Display menu contains the following information:
1) Playing state
2) Disc type
3) Title: display current title and total titles
4) Time: display the playing time of current title
5) Audio: display the language and audio signal
1) Playing state
2 Disc type
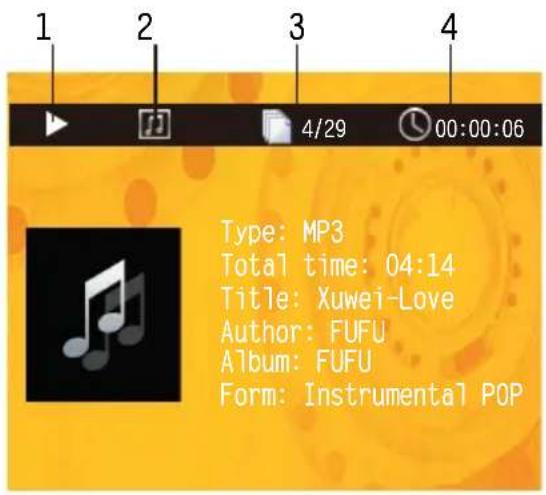
3) File: display current file and the total files in current folder
4) Time: display the playing time of current track
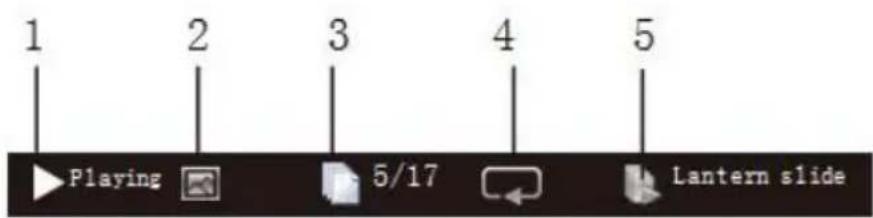
When playing audio and video files, the menu is shown below:
The Display menu contains the following information:
1) Playing state
2) Data file type
3) File: display current file and the total files in current folder
4) Repeat mode: display current repeat mode
5) Lantern slide: effect and switching speed
Note: In OSD menu, press the [DISPLAY] key to hide the OSD menu.
BD-Live
For discs that support BD-LIVE, access the Internet with this player to download the trailer, special features and interactive games.
- Connect to the network
- Connect to USB disk
- Play the discs that support BD-LIVE; in playing state, press the [
Title Popup ] key to pop up the menu, press the RIGHT or LEFT direction key to select BD-LIVE, and then press [OK] to open BD-LIVE.

The popup menu is shown on the screen (image on the right)
In BD-LIVE menu, press direction keys ↔▼, and number keys to select, download the trailer, special features and interactive games, or play downloaded content.
Note: This function is only available when the player is connected to the network successfully. When connected to the network, it is also limited by the network speed. The available content depends on the BD-LIVE service provider.
Advanced Playing Operation
The downloaded content is saved in BUDA specified memory. If the specified memory doesn't have sufficient space, please select "Format" in "BUDA Info" item to release the storage space, but the downloaded content may be lost. When use BD-LIVE function, the user shall connect external USB disk, make sure the available space is at least 1GB, and select External device in System – BUDA – BUDA Setup.
Media Player – USB Media playback
Note: With media player, you can play the photos, music and video saved in USB devices (including HDD).
Selecting and playing data file
Connect to USB device (e.g. USB disk, digital camera, card reader, MP3 player or mobile hard disk) with USB cable.
Note: Before disconnect the USB device, also set the player to standby state first, or else the files in the memory may be damaged. For certain mobile hard disk, without independent power supply, the data may not be read.
After reading the USB device (including HDD), it will appear listed in the media center section. From the main menu, select the Media Center option to open the Media Center menu, (see image to the right).
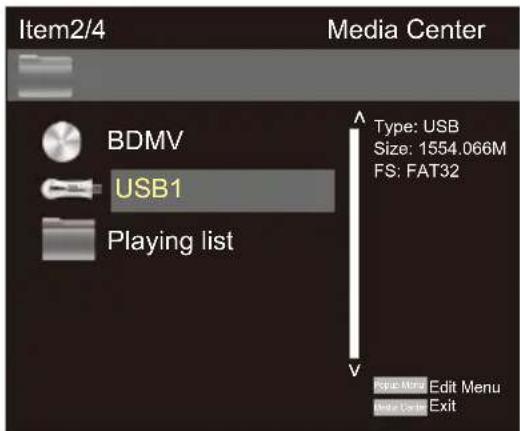

Press the direction key to select the type of the data file to be played (e.g. picture, music or movie), and then press OK to select the file directory of selected type (see image right)
Press the UP and DOWN direction keys to select the media of the data files to be played (e.g. USB disk or HDD), and then press OK to enter data type selection (See image left)
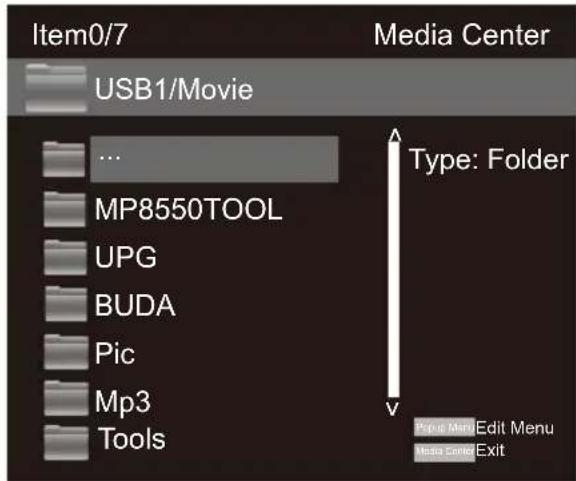
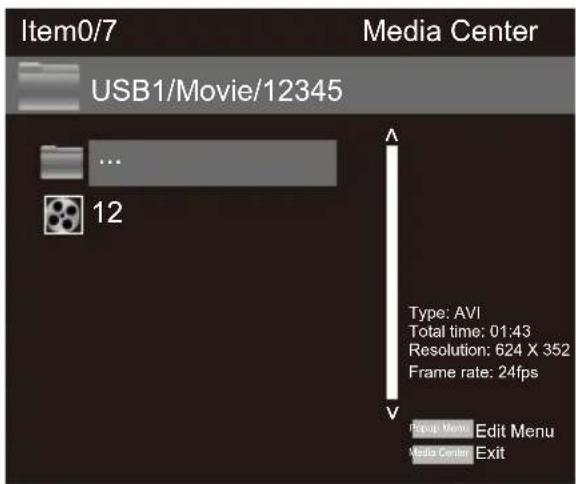
Note: To return to previous menu: Press direction key Press direction key to select Return, and then press [OK] to show the files of the selected type in the menu.
Press the UP and DOWN direction keys to select the folder of the data files to be played, and then press OK open the folder; in the folder, press the UP and DOWN direction keys to select the data files to be played, and press OK to play.
BLU-BD3000
User Manual
Playing picture files
Operations while playing:
[Stop]: stop playing and return to media center;
[Pause]: pause playing of lantern slide;
[Play]: start playing lantern slide;
[Next]: go to next picture;
[Previous]: go to previous picture;
UP button: pause playing and convert the picture;
DOWN button: pause playing and mirror the picture;
LEFT button: pause playing and rotate the picture counterclockwise;
RIGHT button: pause playing and rotate the picture clockwise
Using playing list
You can favorite files to the playing list, and play the selected files with the playing list.
Editing playing list
Follow the instructions of “Selecting and playing data files” in previous page to select files, and press [Title Popup] to pop up a dialog box, select accordingly and then press [OK].
Add to playing list
Select all
Clear all
Cancel
Add to playing list: add the selected files to the playing list; (selected files are marked with red check marks) Select all: select all the files in current folder, and then add all the files to the playing list; Clear all: clear all the options in current folder; Cancel: cancel the operation and close the dialog box.
Note: The edited playing list will be cleared after the player is turned off. When the disc is taken out or the USB disk is disconnected, the selected files in these media will also disappear from the playing list. The maximum file number of picture, music and movie in the playing list is 100.
Playing the list
After the playing list is edited, press the LEFT direction key to return to the root directory of the media center, press the UP or DOWN direction key to select “Playing list”, and then press OK to open data type selection menu.
Press the UP or DOWN direction key to select data type, and then press [OK] to open the
BLU-BD3000
User Manual
playing list of selected type.
In the opened playing list, press the UP or DOWN direction key to select data files, and then press [OK] to play all the files in the playing list.
In the playing list, press [Popup Menu] to pop up a dialog box, select accordingly and press [OK].
Clearing from the playing list:
Clear the selected file from the playing list;
Select all: select all the files in current playing list, and then delete the files from the list;
Clear all: Clear all selected files;
Cancel: cancel the operation and close the dialog box.
Note: While playing, press the Stop key to stop playing and return to the playing list. At this moment, press the LEFT direction key to exit current playing list.
DLNA Network Media Player
Visit the file share server and DLNA server in the Internet connected by the player.
This player can play videos, music and pictures in devices connecting to the same Internet of the player remotely. You only need hardware, like computer or NAS server, with software acting as DLNA, SMB or CIFS.
In some cases, you maybe need to disable the firewall of the hardware so that the player can access the server.
Note: LAN connection is required.
The player can share Internet through one of these three ways:
- As digital media player (DMP): the player can search, visit, extract resource from local media server subjectively, which equals to DLNA.
- As digital media renderer(DMR): the player plays resource pushed from digital media controller(DMC). In this case, media server with DMC function is required. For more information of settings and manipulation, please check the instruction books of relevant servers.
- Visiting SMB/CIFS client side: the player can read files shared by client side directly through Internet, just like visiting external USB storage device. Most computers, especially those installed WINDOWS system, have got SMBclient side already.
Note:* NAS is a kind of network equipment, which provides file-based data store services for other network equipment's. This product is widely sold in market now.
*SMB(Server Message Block) or SIFS(Common Internet File Systems) are usually named as Microsoft Windows network. Without connecting extra media server and performing any media format conversion to reduce the processing load, it can maintain original content quality.
*This media player had implemented the compatibility with local network shared hardware and software well. However, because the diversity of NAS network, media server and its configuration, we can't 100% guarantee the media player will be compatible perfectly.
Take Ark MC Lite for example to explain how touse DMP and DMR:
Firstly, you need to make sure that Ark MC Lite is installed in the mobile phone before opening the software, and then connect the mobile phone and the player to the same router.
DMP:
Enter into the settings page from home page of blue-ray player → General Settings → Internet → DLNA → Turn On (See picture 2) → press "home" key (DLNA default setting is on.)

Press "Home" key to go back to home page.(DMR default setting is off)

After getting in Internet Neighborhood from home page, DLNA devices searched by the layer will show. (See picture 3) You can play the pictures, videos or music in the devices.
DMR:
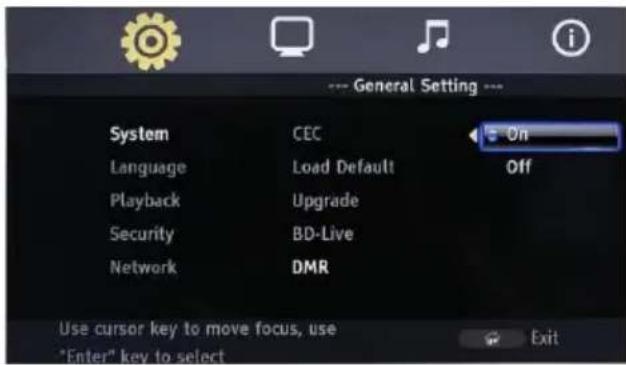
Turn on DLNA, Home page → General Settings → System → DMR → Turn on
Enable software on the mobile phone, then access to the device when servers search DMS device. Choose files that you want to play and press the PLAY / PAUSE button. Window will pop out as it is shown on picture 5. You can play it on mobile phone or other devices. If you choose Blue-ray Player, you can play files pushed by mobile phone on it.
Setup & Settings
Press the setup button on the remote or go to the settings option on the Main menu to access these settings.
| Menu | Submenu | Item | Setting and Description |
General | System | Screen saver(prevent screen aging) | ONEnable screensaver. If there is nooperation in Fifteenminutes whileplaying, the screensaver will beactivatedautomatically, andenters standbymode if there is nooperation in Fifteenminutes.OFFDisable this function |
| Disc Auto Playback | ONEnable auto-play.When a disc isinserted, the playerwill read and playautomatically.OFF | ||
| CEC | ONOFF | ||
General | System | Load Default (restore fault settings) | Select this option and press [OK], and the following dialog box appears:  Press or to select [OK], and press to restore all the settings to default, or select [Cancel] to exit the dialog box. Press or to select [OK], and press to restore all the settings to default, or select [Cancel] to exit the dialog box. |
| Upgrade (software update) | DiscThe upgrade program is saved in the disc. You will need to select the upgrade option manually after inserting the disc.USBThe upgrade program is saved in USB disk.NetworkConnect the network cable to the LAN interface and make sure that the network connection is Good . | ||
| BUDA (for BD-J disc playing) | BUDA info (release the storage space of BUDA info)When playing BD-LIVE disc, if the storage space is insufficient, please select [Format] and press [OK] to clear the BUDA info in the USB.BUDA setup (setting the storage media of BUDA info)- External for use with USB Disk- OnBoard (Not Recommended)USB: USB disk is used as storage media, and USB disk is required (please note that HDD can't be used as the storage media of BUDA info: the USB disk for BUDA info must be in FAT 32 format) | ||
General | Language | OSD(set OSD language) | English, Spanish, Dutch, French, Portuguese and More |
| Menu(set menu language) | English, French, Chinese, Thai and more | ||
| Audio(set audio language) | English, French, Chinese, Thai and more | ||
| Subtitle(set subtitle language) | English, French, Chinese, Thai, MORE, OFF. If the desired language isn't in the list, select "More" to get more options. | ||
| Playback | PIP MARK | ONEnable PIP function.The PIP function of certain BD discs allows the player plays primary screen and secondary screen simultaneously. Generally, the primary video is displayed in full screen, and the secondary video is displayed in window. When the PIP is enabled, the player will recognize whether the disc contains secondary video and notifying the user by showing this sign. Secondary screenPrimary screenOFFDisable this function. | |
General | Playback | Secondary audio mark | ONEnable secondary audio.The secondary audio function of certain BD discs allows playing the primary and secondary audio simultaneously. When the sign of secondary audio is enabled, the player will automatically check whether the disc contains secondary audio and notify the user by showing this sign.OFFDisable this function. |
| Last Memory | Select this function to memorize the playing of disc.(The realizing of this function depends on disc. Certain discs may be incompatible.)ONEnable memory playing. When this function is enabled, the player can memorize the playing progress of six discs. When the discs are inserted next time, a dialog box will pop up and ask you whether press [Return] to play from the start of the disc, or press [OK] to resume playing from the point stopped last time, and the memorized points will be cleared automatically after power off.OFF. Disable this function. | ||
| Closed Caption | Turn Sub titles On or Off | ||
| Security | Change password | Press [0]-[9] to enter current password, and the following 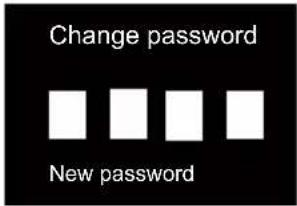 dialog box appears if the password is valid:Press [0]-[9] to enter a new password (twice) and then exit above dialog box automatically. The Default password is 0000. dialog box appears if the password is valid:Press [0]-[9] to enter a new password (twice) and then exit above dialog box automatically. The Default password is 0000. | |
General | Security | Parental control(allowselectingplayingcontentaccording todisc ratingand filteringthe contentimproper forchildren) | Select this function andpress [OK], the screen showsthe dialog box below andasks you to enter thepassword. The DefaultPassword is 0000. Press [0]-[9] to enter currentpassword.Off DescriptionKidSuitable for childrensafeG Suitable forall agesPG Watch under parent guidePG-13 Children younger than 13 watch underparente guidPGRParent guide is requiredRWatch under parent guide if younger than 17NC-17 Prohibit watching if younger than 17AdultFor adults only Press [0]-[9] to enter currentpassword.Off DescriptionKidSuitable for childrensafeG Suitable forall agesPG Watch under parent guidePG-13 Children younger than 13 watch underparente guidPGRParent guide is requiredRWatch under parent guide if younger than 17NC-17 Prohibit watching if younger than 17AdultFor adults only |
| Network | Interface | * If connected via Ethernet,select Ethernet | |
| Information | Display the networkinformation, such asinterface, IP address, etc. | ||
| Connection test | Test whether the networkis connected successfully. | ||
General | Network | IP setting | Set the IP address accordingly in either modes belowAuto (obtain IP address automatically)Manual (set IP address manually, and open the dialog box below) Network Press the LEFT or RIGHT direction keys to select the setting item, press DOWN to clear original settings, and then pressnumber keys to input the network information; after that, press [OK] to save the settings, which will take effect immediately; while setting, press [Return] to exit the dialog box.Address type: Press the Left or RIGHT direction key to select the setting item, press DOWN to clear original settings, and then pressnumber keys to input the network information; after that, press [OK] to save the settings, which will take effect immediately; while setting, press [Return] to exit the dialog box. Network Press the LEFT or RIGHT direction keys to select the setting item, press DOWN to clear original settings, and then pressnumber keys to input the network information; after that, press [OK] to save the settings, which will take effect immediately; while setting, press [Return] to exit the dialog box.Address type: Press the Left or RIGHT direction key to select the setting item, press DOWN to clear original settings, and then pressnumber keys to input the network information; after that, press [OK] to save the settings, which will take effect immediately; while setting, press [Return] to exit the dialog box. |
| Wireless setting | * Not Available | ||
General | Network | BD-LIVE connection | Permitted (allow all BD-Live discs connecting to network)Partial Permitted (only register BD-Live discs are allowed to connect to network)Prohibited (forbid all BD-Live discs connecting to network) |
| DLNA | EnableEnable PC browsing function, and play video, music and pictures via DLNA.Disable | ||
| Proxy setting | Select the proxy server to connect to networkDisable (do not use proxy server to connect to the network)Enable (connect to the network with proxy server)Proxy host (set the host of the proxy server) Proxy port (set the port of the proxy server) | ||
Display | TV | TV Screen(set the aspect ratio matching the connected TV set) | When connected to 16:9 TV, select:16:9 full screenIn this mode, if the aspect ratio of the disc is 4:3, the output signal of the player will be stretched to 16:9 full screen.16:9 normalIn this mode, if the aspect ratio of the disc is 4:3, |
| TV Screen(set the aspect ratio matching the connected TV set) | The horizontal direction of the output signal will remain unchanged, and the vertical direction will be compressed to 9/16 of the horizontal width. When connected to 4:3 TV, select:4:3 Pan & ScanThe 16:9 image will be cut to fit the 4:3 screen, the image quality remains unchanged, but the left and right edges are cut off. 4:3 letterboxThe top and bottom of 16:9 image are black to fit the 4:3 screen, but the image quality reduces because the scanning lines are reduced. | ||
Display | TV | Resolution(set the video output resolution) | Set the resolution of display device. Number 480 and 720 indicate the resolution lines of video output, I (interlaced) or P (progressive) indicate the scanning mode of video output.AutoThe player checks and selects optimized resolution automatically.480I/576I480P/576P720P 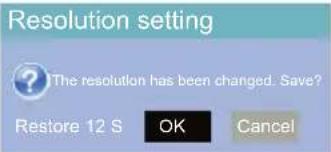 1080I1080PAfter the resolution is adjusted, above dialog box pops up; if you are satisfied with the adjusted resolution, select [OK], or else select [Cancel]; if you don't select in 12s, the player resumes original setting.According to the selected video output terminal, the appropriate resolution is also different; please set according to video output instructions. 1080I1080PAfter the resolution is adjusted, above dialog box pops up; if you are satisfied with the adjusted resolution, select [OK], or else select [Cancel]; if you don't select in 12s, the player resumes original setting.According to the selected video output terminal, the appropriate resolution is also different; please set according to video output instructions. |
| TV system | Set the system of output TV signalNTSCPAL (Def au lt)MULTI (Select for use with 24Hz (24FPS)) | ||
| Color space | Set color space:RGBYcbCrYcbCr422Full RGB | ||
| Menu | Submenu | Item Setting and Description | |
Display | TV | HDMI deep color | 36 Bits – Uses the 36-bit per pixel Deep Colour mode.30 Bits – Uses the 30-bit per pixel Deep Colour mode.48-bit – Uses the 48-bit per pixel Deep Colour mode.Off (default) – Does not use Deep Colour. |
| HDMI 1080P 24HZ | Enable/disable the output of HDMI 1080P 24HZ. ON OFF | ||
| Video processing | Video adjust | Press to adjust the brightness, contrast, Hue and saturation of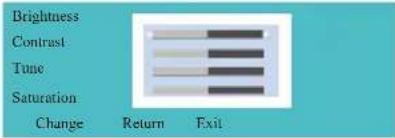 output image. output image. | |
| Sharpness | (Not available on this model) | ||
| Motion video process | Video mode | (Not available on this model) | |
| Noise reduction | (Not available on this model) | ||
Audio  | Audio Output | S/ PDIF (Sony/Philips Digital Interface Format) | Bit stream: the digital audio signal will output in the original format. Select when connected device can decode.PCM: Select “PCM” when the connected device can’t decode. When this option is selected, output pulse code modulation (PCM)Re-encode: Recode PCM to DTS bitstream formatOFF: Turn S/PDIF output off |
| HDMI (High-Definition Multimedia Interface) | Bit stream: Bit stream FormatPCM AUTO: Multi-Channel Linear PCM format (Auto detect)PCM 7.x: 7.1PCM 5.x: 5.1PCM 2.x: 2.1Re-encode: Recode PCM to DTS bitstream formatOFF: Turn HDMI output off | ||
| Down Sampling (select the down-sampling frequency of digital audio signal PCM code) | 48KIf the input audio is higher than 48KHZ, the original audio will be down-sampled to 48KHZ or lower.96KIf the input audio is higher than 96KHZ, the original audio will be down-sampled to 96KHZ or lower.192KIf the input audio is higher than 192KHZ, the original audio will be down-sampled to 192KHZ or lower. | ||
| Dolby DRC (Dolby Dynamic Range Compression) | ON (enable dynamic output compression OFF (disable dynamic output compression) AutoDynamic range is the difference between the minimum audio strength higher than device noise and the maximum audio strength before distortion. | ||
| Menu | Submenu | Item | Setting and Description |
 | Audio output | DRC(Dymanic Range Compression) | OFFMODE-1MODE-2 |
| Speaker setup | Configuration (Select according to connected speaker and power amplifier) | 2X (configuration when seven channels are connected)First step: select the audio channel mode L/R: select this option if your power amplifier is compatible with Dolby Pro Logic;Stereo: select this option if the player is connected to stereo power amplifier.Second step: set the selected speaker as follows: Size: set according to speaker size, select large if the cross section area is larger than or equals to 16cm , or else select small;Tuning: adjust the audio output strength of the speaker in the range -10~10dB.Delay: set the distance between the speaker and the listener by 5cm in the range 0~1000cm. | |
| Testtone | MoreSends a Test tone to the current speaker setup | ||
| EQ(Equaliser) | OFFRockPopLiveDanceClassicalSoft | ||
System Information
The System Information screen shows the current software version as well as the player MAC (Media Access Control) address.
Press the SETUP/HOME button to exit the SetUp menu and return the normal playback screen.

Programming a Disc
(DVD & CD audio only)
While the disc is playing, press the PROGRAM button on the remote control. A program menu will appear on the television.
Press the ENTER button.

Use the ARROW buttons to select a title and chapter. Press the ENTER button. Press the PLAY button to begin playing the programmed disc.
Cancelling a Program
(DVD & CD only)
While the disc is playing, press the PROGRAM button on the remote control. Press the RETURN button on the remote control to clear the set program
MEDIA CENTRE
The media centre allows some multimedia files to be played on the BLU-BDBD3000 Blu-ray player.
The files can be stored on compatible CD, DVD, USB flash drive or USB hard drive. Load the disc containing the files in the tray or Plug the device containing the files in to the USB port on the front of the Player as described earlier in this manual. Allow a few second for the USB device to be detected correctly and then press the Media Center Button on the remote control.
. The left hand panel of the Media Center Screen shows the type of media in the tray or USB port.
. The right hand panel show the Type, size and file system of the current selected item.
Use the UP & Down navigation buttons on the remote to select the media to open.
The Playlist folder will show all files that are currently added to the Playlist.
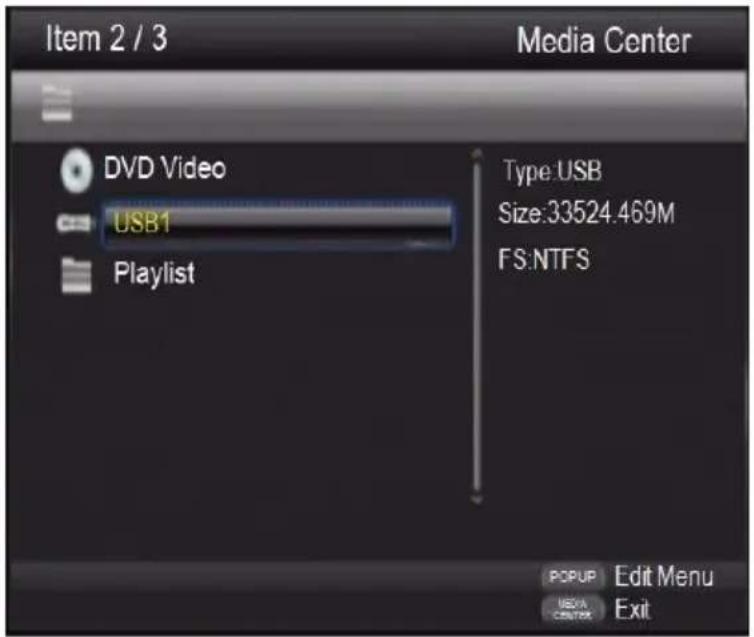
Playing a file
Once the device that contains the media files has been selected use the UP & DOWN navigation buttons to select the type of files to be viewed.
Photo: Will only display compatible image files.
Music: Will only display compatible Music files.
Video: Will only display compatible Video files.
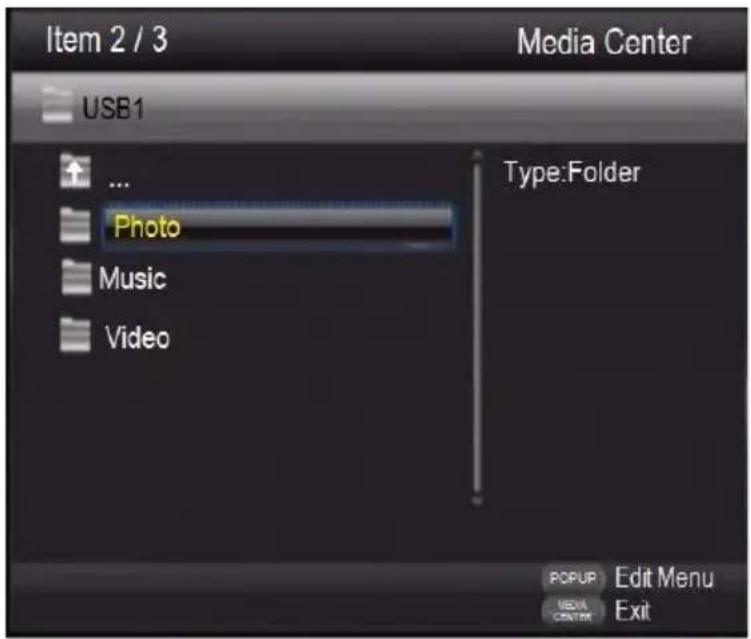
Press ENTER when media type has been selected or use the 🔊... icon to go back a screen.
Use the UP, DOWN and ENTER buttons to navigate your way to find the file that you wish to play.
The Path is listed in the top bar
The File names are list in the left panel
The file type is shown in the right panel.
When the correct file to be played is found press the ENTER button to begin playback.

Press ENTER when media type has been selected or use the 📊... icon to go back a screen.
Creating a Playlist
Individual files or the contents of a folder can be added to a playlist. Once the playlist has been created it can be used to playback files one after the other.
Files can be added by selecting the file to be added and pressing the Right navigation button. The file will be marked with a
Repeat until you have several files to add to the playlist.
Press the POPUP/TITLE button to show the Play list options.
Add To Playlist: Adds the selected file(s) to the Playlist.
Select All: Selects all files and folders in the current folder and adds to the Playlist.
Clear All: Clears all tagged files from the Playlist.
Cancel: Cancels Menu.
Use the UP and Down navigation buttons to make the selection and then press the ENTER button to confirm.
Note: Playlists are created per file type. Mixed playlists cannot be created.
Playing a Playlist
Press the Media Center button on the remote control to launch the Media Center. Use the UP and Down navigation buttons to select the Playlist option and press the ENTER button.
Use UP and Down navigation button to select the file to start playing from and then press the ENTER button.
During playback use the PREVIOUS/ NEXT buttons to skip to the previous or next file in the playlist.
The playlist can be edited by selecting the file to be removed and pressing the Right navigation button. The file will be marked with a
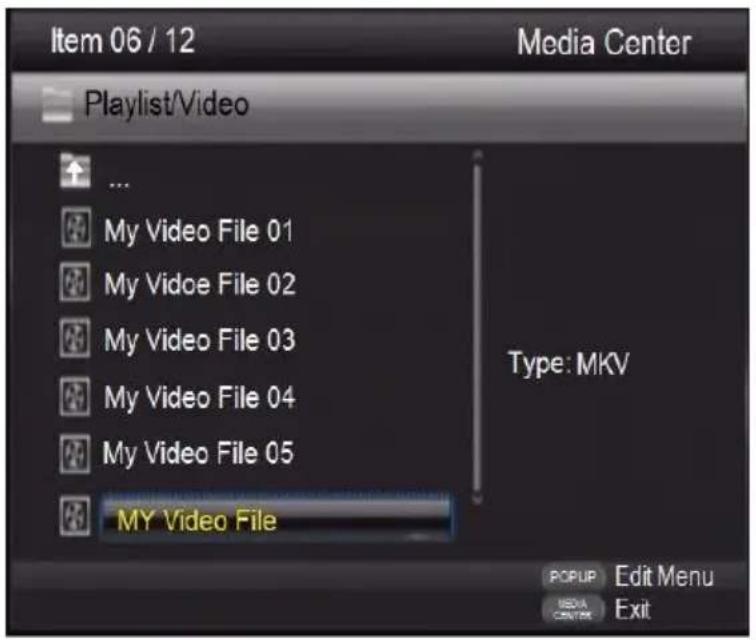
Press the POPUP/TITLE button to display the options menu for the playlist.
Remove From Playlist: Removes the selected file(s) from the Playlist.
Select All: Selects all files in the Playlist.
Clear All: Clears all marked files.
Cancel: Cancels Menu.
Use the UP and Down navigation buttons to make the selection and then press to the ENTER button to confirm.
NOTE: USB devices connected to the BLU-BD3000 must be formatted in the FAT32 or NTFS file system only.
FAQ
In order to prolong the service life of your player, it is recommended to wait at least 30 seconds before you turn it on again after switching it off. Remove disc and turn power off after operation. Some functions of the player may not be applicable to certain discs.
Some discs with special features may not be fully supported by the player. This is not a malfunction of the unit. In case of player malfunction, please turn it off, wait for 30 seconds and turn it back on.
Use the 2 charts below to resolve general operational problems. If there are any problems that you cannot resolve, please contact Laser technical Support
| Failure | Reason and solution |
| No power supply | Please make sure that the AC outlet has electricity. Insert the AC power line firmly. Press the Power key on the front panel to turn on the player. |
| Image is frozen and operation is invalid | Cut off the power supply and connect again, and then press the Power key on the remote control to restart |
| Auto standby | The default setting of the player: in stopped state, if there is no operation in 5 minutes, the player enables screen saver automatically; if there is no operation in 10 minutes in screen saver, the player enters standby automatically. You can press the Power key on the remote control to restart the player, or select “OFF” in “Main menu – General – System – Screen saver”. |
| Remote control can’t work normally | The remote control isn’t aimed at the receiver. Please aim the remote control at the receiver on the front panel. There is obstacle between the remote control and the player. Please remove it. Battery is too low. Please replace with new batteries. Please refer to the instruction of “Using remote control”. |
| Can’t play discs | Please make sure that the label of the disc is upwards. If the disc is dirty, please clean first. The disc is empty or can’t be played. Please check whether the area code of the disc matches the player |
| Red key appears on the screen | Selected function or operation is unavailable in current state.The reason may be:1. Software function limit of certain BD/DVD discs.2. Certain BD/DVD discs don’t support selected function.3. The selected function is invalid in current mode. |
| Playing mode is different from the setting | For certain discs, the settings in the menu are invalid.Please operate according to the disc menu. |
| No HDMI output | Check whether the HDMI connection between the player and external device is loose, and insert properly if yes.Check whether your TV supports720p/1080i/1080p/1080p24 HDMI output resolution, and adjust the output resolution of the player according to the specification of the TV.HDMI always has output, and CVBS only has output at 720P. Therefore, certain user can’t watch BD images in CVBS, because the output resolution in the setting menu is too high; please set the resolution in HDMI state to lower than 720P. |
| TV has no image | Please make sure that the TV has been connected to the player through VIDEO OUT terminal or HDMI terminal.Please make sure that the AV selection of the TV is |
| Video output resolution is too low | Please reset the resolution in “Main menu – Display – TV”, and set according to the video output signal format of different terminals. |
| Aspect ratio can’t be changed | The aspect ratio of certainDV/DVD is fixed.Please refer to the TV manual to adjust the aspect ratio. |
| No audio | Check whether the audio signal connection between the player and external device is loose, and insert properly if yes. Please make sure that the audio output is set properly in “Main menu – Audio”.If a power amplifier is connected, please check whether the input mode of the power amplifier is set properly. |
| Can’t hear desired audio effect | In “Mainmenu – Audio– Speaker”, set the speaker properly according to the connected device. |
| Can't switch audio | Due to the difference in disc production, certain discs can't switch audio. |
| Forget the password of parent lock | The default password of parent lock is 0000. |
| Blu-ray discs can't play PIP | Please check whether the disc supports PIP. Not all Blu-ray discs support this function.PIP and secondary audio need disc support. In the setting menu, select ON, and press "Screen control" while playing; this function is set in screen control |
| Can't select audio channel and caption | The disc doesn't contain the language.Certain discs can't be changed, and only can be selected in disc menu.The disc doesn't contain caption information, or caption isn't enabled; press the [Caption] key to enable. |
| Support BD-J discs | Certain keys on theremote control are invalid for certain BD-J discs, e.g. select with numbers, program, repeat, return, zoom in and A-B. These discs contain playing navigation, integrate java, and the program can't process these discs; however, common DVD is valid. |
| BD-LIVE function | First, the disc must be marked with BD-LIVE, and ensure that the network is connected normally, insert USB disk, Then, make sure that the BUDA in system setting is set to "External". |
| Lyrics display of MP3 | The MP3 file and lyrics must have the same name, and the lyrics must be in LRC format. |
| Support WIFI dongle | Support WIFI with IC MT7601 or Ralink 307X. |
| How to adjust area code | Press [Setup] to enter main menu interface, and press number "8520" to enter area code page.Blu-ray code: adjust the area code of Blu-ray discs, and enter "1", "2" or "4" directly to select A, B or C. |
Specifications
Note: The specification is subject to change without prior notice.
Area code
The player supports the following area code.
| DVD | Blu-ray | Country/ Region |
 |  | Australia |
Compatible media
BD-Video DVD-Video, DVD+R/+RW, DVD-R/-RW, DVD+R/-R DL (double-layer) VCD/SVCD Audio CD, CD-R-/CD-RW, MP3, JPEG MKV USB device
Video
Signal system: PAL/NTSC Composite video output: 1 Vp-p (75Ω) HDMI output 480p, 576p, 720p, 1080i, 1080p, 1080p24
Audio
2 channel analog output Front left/right channel: 2Vrms (>1000Ω) Digital output: 0.5 Vp-p (75Ω) Coaxial cable Optical cable HDMI output Sampling frequency: MP3: 32KHZ, 44.1KHZ, 48KHZ Fixed bit rate: MP3: 112kbps-320kbps
USB
Compatibility: high speed USB (2.0) Category support: USB mass storage File system: FAT16, FAT32, NTFS Support HDD (portable hard disk): may require external power supply.
Master device
Rated power: AC 110V-240V, 50Hz-60Hz Power consumption: 15W Size (L*W*H): : 360x201x40mm Net weight: 1.3kg
* Compatibility with user-encoded contents or user-created discs is on a best effort basis with no guarantee due to the variation of media, software and techniques used.
Contact Information
For more information on this product and technical support please visit WWW.LASERCO.COM.AU
FOR OTHER ACCESSORIES AND PRODUCTS
http://www.laserco.com.au
Warranty Against Defects
Laser Corporation Pty Ltd ("Laser") warrants your new product to be free from defects in materials and workmanship for 36 months, from the date of purchase, provided that the product is used in accordance with accompanying recommendations or instructions where provided. The benefit of this warranty is in addition to your rights under the Australian Consumer Law and to other rights and remedies of the consumer under a law in relation to the goods or services to which the warranty relates.
Through a network of retailers and resellers, Laser will provide you with your choice of a repair, exchange (where possible) or refund (within Dead on Arrival period) for this product if it becomes defective within the warranty period.
This warranty will no longer apply where the defect is a result of alteration, accident, misuse, abuse, normal wear and tear, neglect or improper storage. Please retain your receipt as proof of purchase How to make a product warranty claim:
Step 1: Find your receipt which proves the date of purchase. Where the date of purchase cannot be verified, your place of purchase or Laser will make an assessment based on the date of manufacture, the condition of the Laser Product and the type of defect.
Step 2a): Contact your place of purchase. They will assess the nature of the fault and repair, replace or fund the product as per their store refund or warranty policy.
Step 2b): If your place of purchase cannot be contacted, then you can contact Laser. Customer Service with details of your defective Laser Product: Phone: (02) 9870 3388; or Email: support@laserco.com.au or online www.laserco.com.au/warranty (click on "Consumers (End Users)"). Our business address is at 1/6-8 Byfield Street, North Ryde, NSW 2113
Step 3: Laser will issue you with a Return Authorisation (RA) number within 48 hours. When requested, send us the defective Product and a copy of your receipt. Laser will cover the cost of the return delivery.
Step 4: Wait for us to contact you. Once we have received your defective Laser Product for inspection, we will inform you of our assessment of your claim within 7 days. When we contact you, we will firstly let you know whether you have a valid claim under this Warranty, and if so, we will inform you whether your defective Laser Product will be replaced or repaired, together with the number of days you can expect to wait to receive your replaced or repaired Laser Product.
Step 5: For further details on warranty cover and returns, please check Terms and Conditions for Warranty Returns section on http://www.laserco.com.au/warranty
Our goods come with guarantees that cannot be excluded under the Australian Consumer Law. You are entitled to a replacement or refund for a major failure and compensation for any other reasonably foreseeable loss or damage. You are also entitled to have the goods repaired or replaced if the goods fail to be of acceptable quality and the failure does not amount to a major failure.

NAVIG[8]R
PRECISION
gaming accessories
CONNECT
naum8 GPS ESSENTIALS
iRange!


- Contents
- Safety Notice and Important Information
- Trademarks
- User Manual
- Media Compatibility
- Incompatible Media
- Region Information
- Blu-ray
- Region Code
- Region Country
- DVD
- Player & Disk Care
- Cleaning the BLU-BD3000 Player
- Lens Cleaning
- Handling Discs
- Cleaning Discs
- DO Don't
- Getting to know BLU-BD3000 Blu-Ray & DVD Player
- What's in the box
- The Front and Rear panels
- Using the Remote Control
- Installing the battery
- Open the battery cover
- Aiming the remote
- The Remote control
- Connection your BLU-BD3000 player
- Connection Power
- Video and component input
- GOOD: Connecting RCA Stereo and Video
- Coaxial and fiber connection
- BEST: Connecting the HDMI cable to a Home Theatre system
- Note:
- Internet/Network connection
- Connecting by Ethernet
- Broadband Router/Modem
- Connecting a USB device
- Playing a Disk
- On Screen Control (OSC Button)
- Chapter [BD-V DVD-V]
- File [VIDEO AUDIO PHOTO]
- Time [BD-V DVD-V CD VIDEO AUDIO]
- Playing mode [CD VIDEO AUDIO PHOTO]
- Audio [BD-V DVD-V]
- Angle [BD-V DVD-V]
- Subtitle [BD-V DVD-V]
- Subtitle Style [VIDEO]
- Secondary video [BD-V]
- Secondary audio [BD-V]
- Bit rate [BD-V DVD-V CD VIDEO AUDIO]
- Instant search [BD-V DVD-V CD VIDEO AUDIO]
- Instant replay [BD-V DVD-V CD VIDEO AUDIO]
- Lantern slide [PHOTO]
- Switch [PHOTO]
- Using Display menu (Display Button)
- BD-Live
- Advanced Playing Operation
- Media Player – USB Media playback
- Selecting and playing data file
- BLU-BD3000
- Playing picture files
- Using playing list
- Editing playing list
- Add to playing list
- Playing the list
- DLNA Network Media Player
- The player can share Internet through one of these three ways:
- DMP:
- DMR:
- Setup & Settings
- System Information
- Programming a Disc
- Cancelling a Program
- MEDIA CENTRE
- Playing a file
- Creating a Playlist
- Playing a Playlist
- FAQ
- Specifications
- Contact Information
- FOR OTHER ACCESSORIES AND PRODUCTS
- Warranty Against Defects
Brand : Laser
Model : BLU-BD3000
Category : Blu-ray player