Chill Premier CCF06A10A - Air-conditioner Friedrich - Free user manual and instructions
Find the device manual for free Chill Premier CCF06A10A Friedrich in PDF.

| Product Type | Window Air Conditioner |
| Model | Chill Premier CCF06A10A |
| Cooling Capacity (BTU) | 6,000 BTU |
| Recommended Room Size | Up to 250 sq ft |
| Voltage / Frequency | 115V / 60Hz |
| Power Consumption (Cooling) | 5.5 Amps, 550 Watts |
| Dimensions (W x H x D) | 18.5 x 12.5 x 15.5 inches |
| Weight | 48 lbs |
| Energy Efficiency Ratio (EER) | 11.0 |
| Dehumidification Capacity | 1.1 pints/hour |
| Fan Speeds | 3 (Low, Medium, High) |
| Air Direction Control | Vertical & horizontal louvers |
| Filter Type | Washable, reusable |
| Remote Control | Yes, included |
| Timer | 24-hour on/off timer |
| Noise Level (dB) | 52 dB (Low), 56 dB (High) |
| Installation Type | Window mount (requires window kit) |
| Refrigerant Type | R-32 |
| Safety Features | Auto restart, child lock, anti-bacterial filter |
| Warranty | 1 year parts & labor, 5 years compressor |
Frequently Asked Questions - Chill Premier CCF06A10A Friedrich
User questions about Chill Premier CCF06A10A Friedrich
0 question about this device. Answer the ones you know or ask your own.
Ask a new question about this device
Download the instructions for your Air-conditioner in PDF format for free! Find your manual Chill Premier CCF06A10A - Friedrich and take your electronic device back in hand. On this page are published all the documents necessary for the use of your device. Chill Premier CCF06A10A by Friedrich.
USER MANUAL Chill Premier CCF06A10A Friedrich
Operating Instructions

natural_image
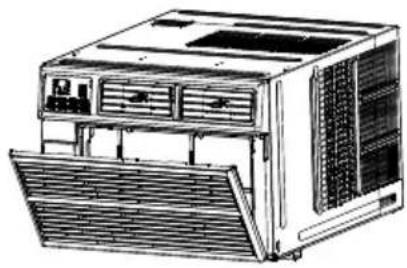
Front view of a Siemens air conditioner unit with control panel and ventilation grilles (no readable text or symbols)INTRODUCTION
IMPORTANT SAFETY INSTRUCTION ....1
ELECTRICAL REQUIREMENTS....2
PACKING LIST ....3
INSTALLATION&ASSEMBLY INSTRUCTIONS ....4
THROUGH-THE-WALL INSTALLATION INSTRUCTIONS....10
USING YOUR AIR CONDITIONER ....11
OPERATING YOUR AIR CONDITIONER....13
CARE AND CLEANING ....14
TROUBLESHOOTING 15
IMPORTANT SAFETY INSTRUCTIONS
Before installing and using your air conditioner, please read this owner's manual carefully. Store this manual in a safe place for future reference. Your safety and the safety of others is very important to us. Please pay attention to all safety messages outlined in this owner's manual.
WARNING: To reduce the risk of fire, electrical shock or injury when using your air conditioner, follow the following basic precautions:
• Plug into a grounded 3 prong outlet.
• Do not remove the ground prong.
• Do not use a plug adapter.
• Do not use an extension cord.
• Unplug the air conditioner before servicing
- Use two or more people to move and install the air conditioner

This is a safety alert symbol.
This symbol alerts you to potential hazards that can harm you or others or even cause death.
All safety messages will directly follow the safety alert symbol and/or the words
"DANGER" or "WARNING".
! DANGER
WARNING
Failure to immediately follow these instructions may cause serious injury or even death.
All Safety messages alert you of potential hazards, how to reduce the chance of injury, and what can happen if instructions are not followed correctly.
ELECTRICAL REQUIREMENTS
WARNING

Electrical Shock Hazard
Plug into a grounded 3 prong outlet.
Do not remove the ground prong.
Do not use an adapter
Do not use an extension cord.
Failure to follow these instructions can result in death, fire, or electrical shock
The electrical ratings for your air conditioner are listed on the model and serial number label located on the front left side of the unit (when facing the front).
Specific electrical requirements are listed in the chart below. Follow the requirements below for the type of plug on the power supply cord.
| Wiring Requirements | Power Supply Cord | |
| 115 volt (103 min.—127 max)(6K cooling) 10A time-delay fuse or circuit breaker(8K-12K cooling & 8K heating) 15A time-delay fuse or circuit breaker(12K heating) 20A time-delay fuse or circuit breakerUse on single outlet circuit only | 6K/8K/10K/12K Cooling8K Heating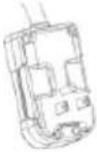 | 12K Heating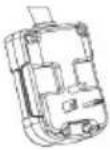 |
Recommended Ground Method
For your personal safety, this air conditioner must be grounded. This air conditioner is equipped with a 3 prong power supply cord with a grounded plug. To minimize the possibility of electrical shock, the cord must be plugged into a 3 prong outlet and grounded in accordance with all local codes and ordinances. If a 3 prong outlet is not available, it is the customer's responsibility to have a properly grounded 3 prong outlet installed by a qualified electrician.
It is the customer's responsibility:
• To contact a qualified electrician
- To assure that the electrical installation is adequate and in conformance with the National Electrical Code, ANSI/NFPA 70 - latest edition, and all local codes and ordinances.
Copies of the standards listed may be obtained from:
National Fire Protection Association
One Batterymarch Park
Quincy, Massachusetts 02269
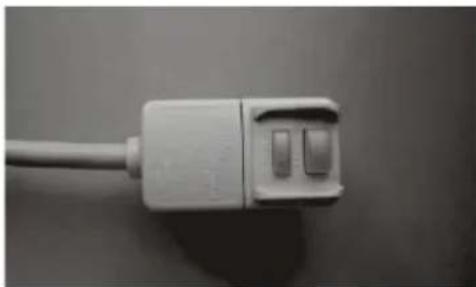
LCDI Power Cord and Plug
This air conditioner is equipped with an LCDI (Leakage Current Detection and Interruption) power cord that is required by UL. This power supply cord contains state-of-the-art electronics that sense leakage current. If the cord is damaged and leakage occurs, power will be disconnected from the unit.
The test and reset buttons on the LCDI Plug are used to check if the plug is functioning properly. To test the plug:
- Plug power cord into a grounded 3 prong outlet
- Press RESET (on some units a green light will turn on).
- Press the TEST Button, the circuit should trip and cut all power to the air conditioner (on some units a green light may turn off.
- Press the RESET button for use. You will hear a click and the A/C is not ready for use.
NOTES:
• The RESET button must be engaged for proper use.
- The power supply cord must be replaced if it fails to trip when the TEST button is pressed and the unit fails to reset.
- Do not use the power supply cord as an ON/OFF switch. The power supply cord is designed as a protection device.
- A damaged power supply cord must be replaced with a new power supply cord.
- The power supply cord contains new user serviceable parts. Opening the tamper-resistant case voids all warranty and performance claims.
NOTE: Your units power cord and plug may differ from the one shown.
natural_image
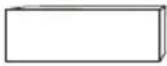
Close-up of a white cable with two connector slots, no visible text or symbolsPACKING LIST
| IMAGE | PART | QUANTITY |
 | Window Air Conditioner | 1 |
 | Remote Control | 1 |
 | Top Mounting Rail(With sponge) | 1 |
 | Filler Panels(With "Left" & "Right" remark on the front face) | 2 |
 | Sash Lock(Two holes) | 1 |
 | Window Sash Seal(Sponge) | 1 |
 | 3/8" Short Screws | 5 |
 | 1/2" Length Screws | 4 |
 | 3/4" Long Screws | 3 |
 | 5/8" Big Flat Head Bolt and Locknut | 2 |
 | Sill Angel Bracket | 2 |
 | 1/2" Small Flat Head Bolt and Locknut | 4 |
| [AWTS] | Chassis Lock | 1 |
 | Foam Top Window Gasket(Thin sponge for back-up using) | 1 |
 | Insulation strip(Sponge) | 2 |
 | Support Bracket(with R and L remark) | 2 |
 | Battery | 2 |
DISCLAIMER
ALL INFORMATION AND THE TECHNICAL SPECIFICATIONS PRESENTED IN THIS USER'S MANUAL ARE THE PRESENTATION OF THE MANUFACTURE. PLEASE READ AND FOLLOW THESE INSTRUCTIONS CAREFULLY.
INSTALLATION & ASSEMBLY INSTRUCTIONS
Window preparation
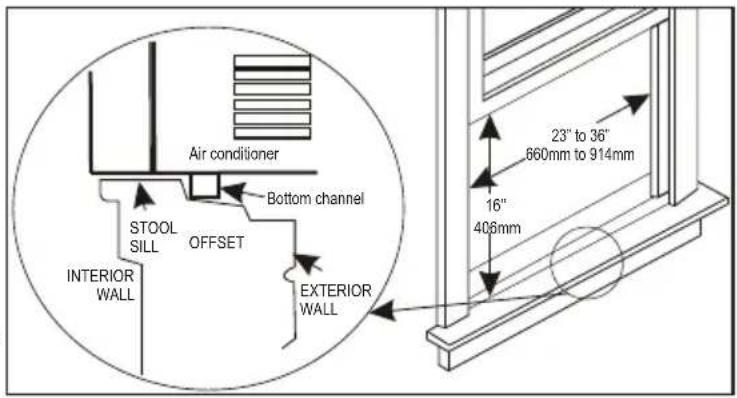
- This air conditioner is designed to be installed in a standard double-hung window with a window width between 23" and 36" (660mm-914mm).
- The air conditioner can be installed without the accordion panels fit in a narrow window opening.
- The lower sash (the lower part of the window that moves up and down) must allow for 16" of vertical clearance when open.
- All supporting parts must be secured to firm wood, masonry, or metal.
- The electrical outlet must be within reach of the power cord.
NOTE: Save the product packaging and installation instructions for future reference. Store the air conditioner in the product box when not in use for an extended period of time.
TOOLS NEEDED:
• Phillips Screw Driver
• Drill (If pilot holes are needed)
CAUTION
When handling unit, be careful to avoid cuts from sharp metal edges and aluminum fins on front and rear coils.
How to Install
NOTE: This is necessary for proper condensed water utilization and drainage. If you are not using the Side Panels for any reason, this pitch to the rear muse be maintained!
Remove the air conditioner from the box and place on a hard flat surface, as floor, a bench or a table. There is a Left and Right Window Filler Panel - be sure to use the proper panel for each side. When installed the flange for securing the panel in place to the window sill will be facing into the room.
INSTALLATION & ASSEMBLY INSTRUCTIONS - WINDOW MOUNTING
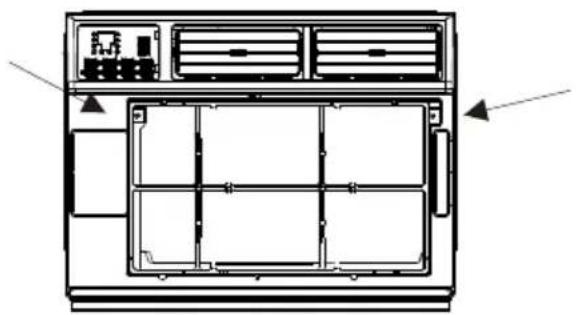
REMOVE FRONT PANEL AND CHASSIS
- Pull down the front panel and remove the filter.
- Lift the front panel upwards to remove and place to the side.
natural_image
Line drawing of a desktop computer tower with ventilation grilles and ventilation ducts (no text or labels)- Locate the two faceplate screws and remove. These screws will need to be re-installed prior to mounting the air conditioner.
natural_image
Technical line drawing of a front-mounted air conditioner unit with internal compartments and ventilation slots (no text or labels)- After removing the screws, gently pull away the faceplate from the air conditioner cabinet.
natural_image
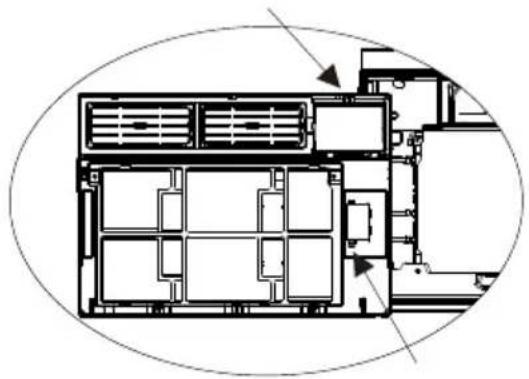
Line drawing of a portable air conditioner unit with ventilation grilles and a hand holding a clip (no text or symbols)- Remove the control panel screw and WI-FI module screw (if available) from the front panel.
natural_image
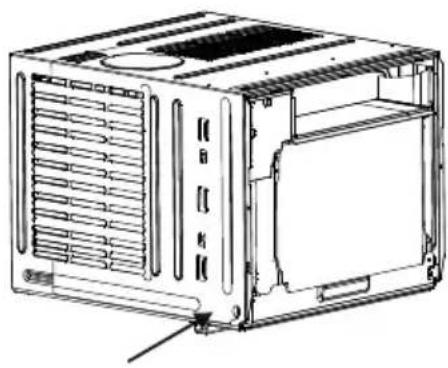
Architectural floor plan showing room layouts and structural elements (no text or labels)- Remove the screws from the cabinet.
natural_image
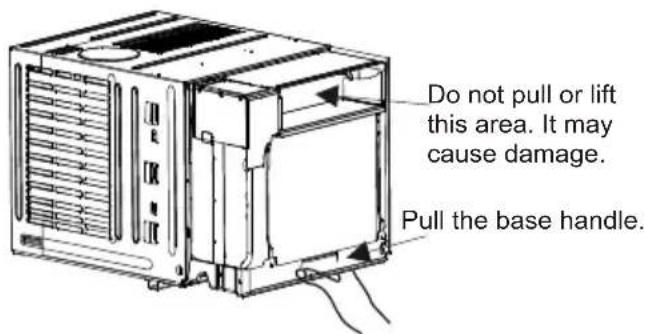
Technical line drawing of a modular air conditioner unit with ventilation grilles and mounting holes (no text or labels)- Hold the cabinet while pulling on the base handle to carefully remove the unit. Do not pull or lift near the top of the unit.
INSTALLATION & ASSEMBLY INSTRUCTIONS - WINDOW MOUNTING
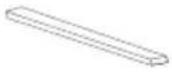
Top Rail Assembly
The top rail must be assembled prior to installing the air conditioner in the window Tools Needed: Phillips Screw Driver
| Top Rail Hardware | QTY | |
 | 3/8"Screw | 4 |
 | TopRail | 1 |
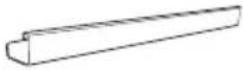
Attaching the Top Rail to the Air Conditioner
- Place the cabinet on a hard flat surface.
- Remove top rail from the top form of the packaging material as shown in FIG. A.
- Align the hole in the top rail with those on the top of the unit as shown in FIG. B.
- Secure the top rail to the unit with the 3/8" screws as shown in FIG. C.

NOTE: For safety reasons, all 4 screws must be used to attach the top rail.
CAUTION
When handling the unit, be careful to avoid cuts from the sharp metal edges and aluminum fins on the front and rear coils.
INSTALLATION & ASSEMBLY INSTRUCTIONS - WINDOW MOUNTING
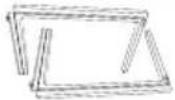
Accordion Panel and cabinet Assembly
- Hold the Accordion Panel in one hand and gently pull the center to free the open end.
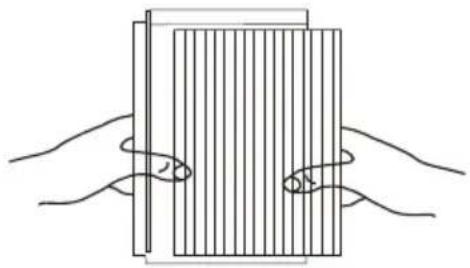
natural_image
Illustration of two hands holding a rectangular object with vertical lines, no text or symbols present- Slide the free end of the panel into the cabinet as shown. Be sure to leave enough space to slip the top and bottom of the frame into the rails on the cabinet.
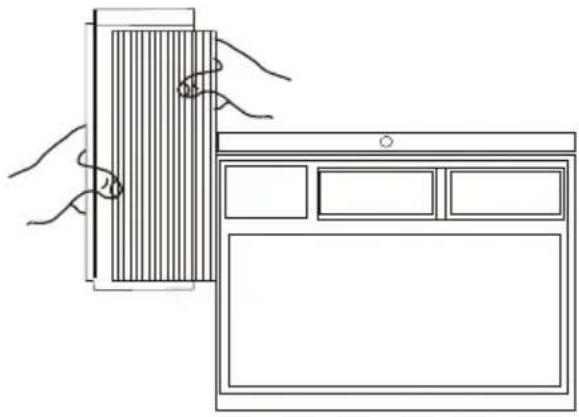
natural_image
Line drawing showing hands interacting with a wall-mounted device and a tablet (no text or symbols)- Once the panel has been installed on the side of the cabinet, make sure it sits securely inside the frame channel by making slight adjustments. Slide the top and bottom ends of the frame into the top and bottom rails of the cabinet. Slide the panel all the way for both sides.
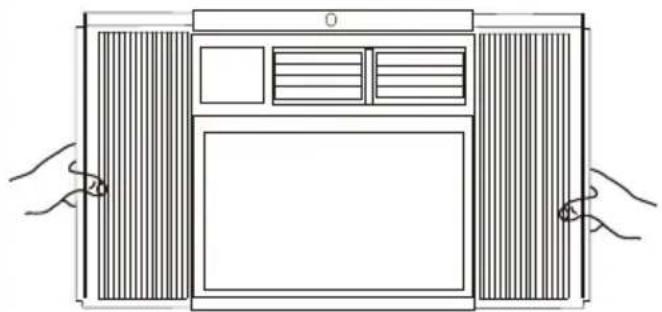
natural_image
Line drawing of a front view of a double door with ventilation grilles and a blank screen, held by two hands (no text or symbols)- Use two or more people, place the air conditioner into the window opening so the bottom of the air conditioner frame is against the window sill. Tilt the back of the unit slightly download to allow accumulated rain water to drain out.
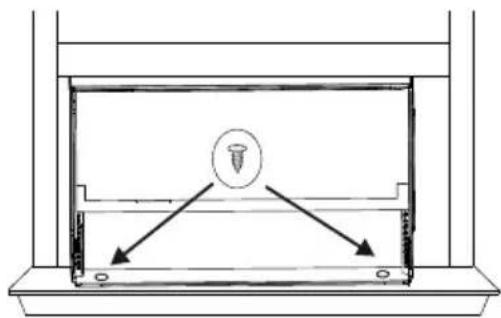
- Fasten cabinet bottom to window sill using two 1/2" screws. Pre-drill holes if needed.
natural_image
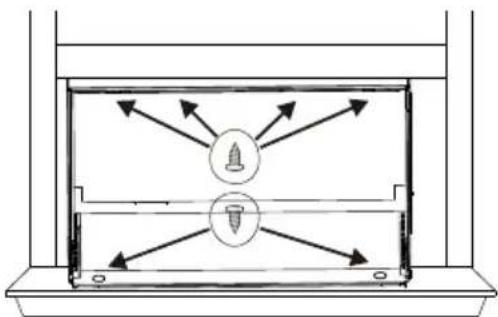
Simple line drawing of a mechanical assembly with a central screw and two directional arrows (no text or symbols)INSTALLATION & ASSEMBLY INSTRUCTIONS - WINDOW MOUNTING
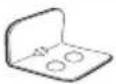
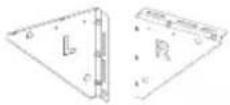
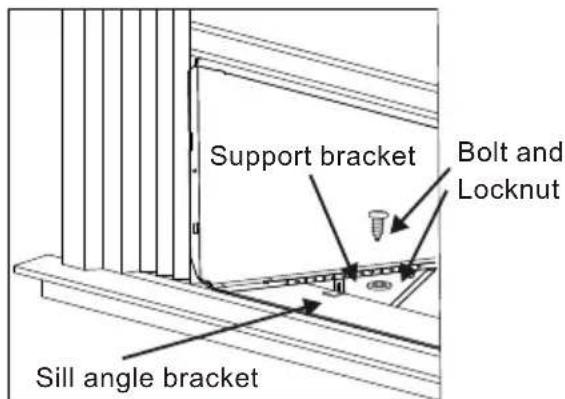
Install Support Brackets
- Hold each support bracket flush against the outside of the window sill. Tighten each bracket to the bottom of the cabinet as shown. Mark the brackets at top lever of the window sill and then remove.
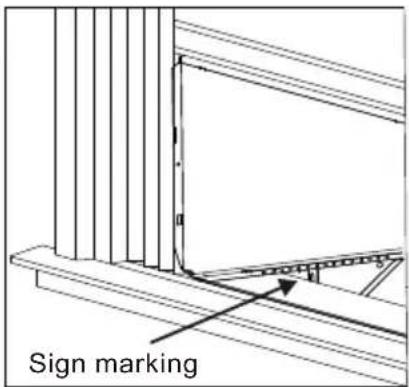
- Assemble the sill angle brackets to the support brackets at the marked position with long bolt and locknut as shown. Hand tighten, but not all the way for any changes that may need to be made later during installation.
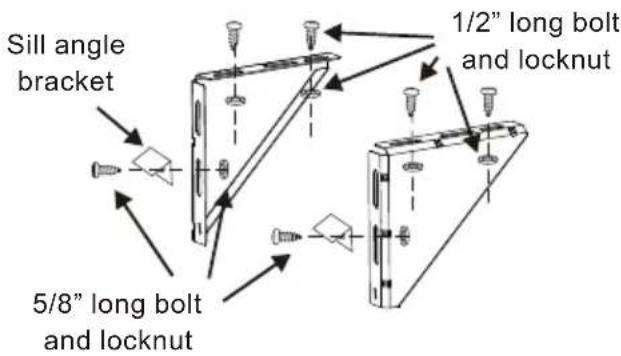
- Install the support brackets (with sill angle brackets) to the bottom of the cabinet as shown.
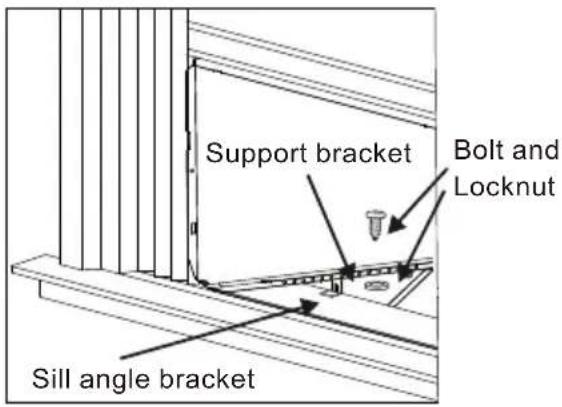
- Tighten all the bolts with locknuts securely.
Installing the Chassis into the Cabinet
-
Team lift (two people or more) the air conditioner chassis and carefully slide it into the cabinet. Let the front of the air conditioner hang out approximately 6".
-
CAUTION: DO NOT PUSH ON THE CONTROLS OR FINNED COILS.
-
Be sure the chassis is firmly seated in the back of the cabinet.
-
Insert all screws removed during window installation and fasten, then reattach the front face plate, front panel, and the air filter.
-
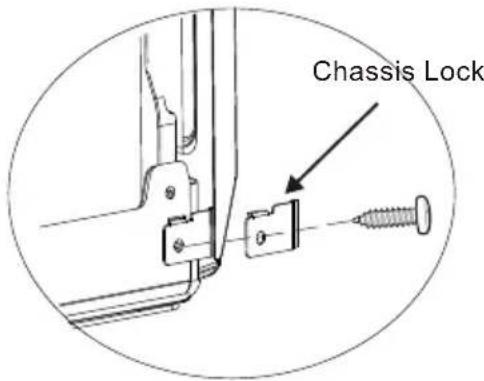
If the wall is too near to effect driving the cabinet screw back, you can assemble the chassis lock at the right bottom corner of chassis with 3/8" screw as shown, before assemble the front panel.
- Extend the side accordion panels out against the window frame as shown.
natural_image
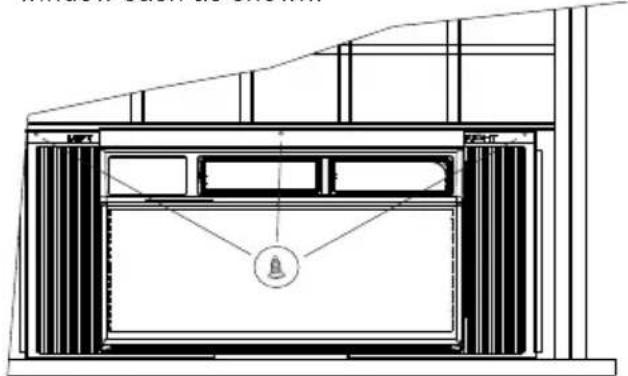
Architectural cross-section diagram of a building facade with ventilation grilles and doorways (no text or labels)- Drive 1/2" locking screws through frame holes, and drive one 3/4" screw through top rail into window sash as shown.
natural_image
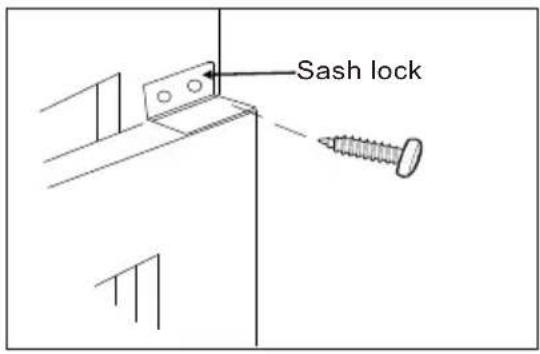
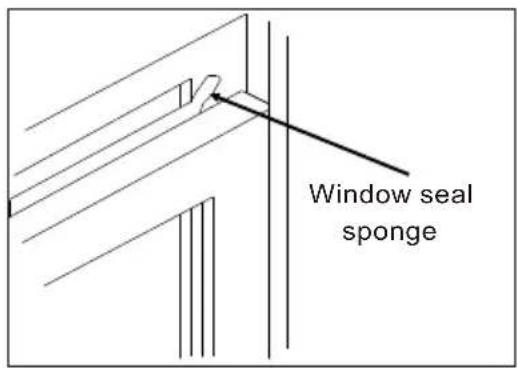
Architectural cross-section diagram of a building facade with ventilation grilles and a bell symbol (no text or labels)- To secure lower sash in place, attach right angle sash lock with 3/4" screws as shown.
- Cut foam seal and insert in the space between the upper and lower sashes as shown.
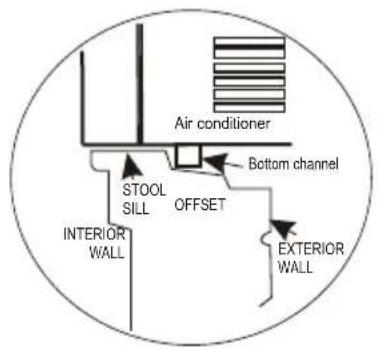
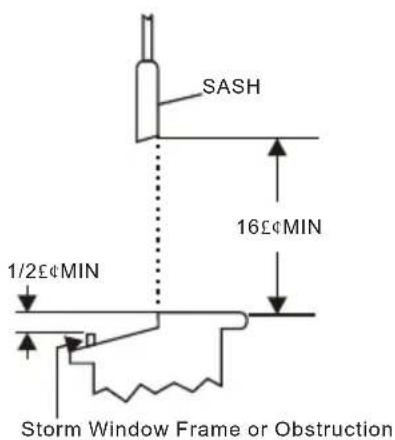
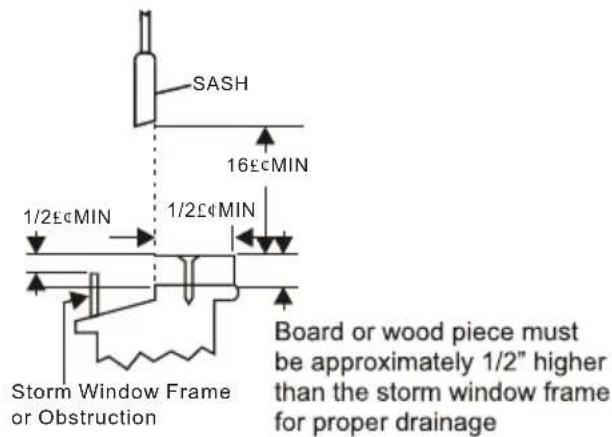
Storm Window Requirements
A storm window frame will not allow the air conditioner to tilt properly which in turn will keep it from draining properly. To adjust for this, attach a board or piece of wood to the sill. The board or wood piece should have a depth of at least 1/2". Make sure the board or piece of wood is approximately 1/2" higher than the storm window frame. This will allow the air conditioner to tilt enough for proper drainage.
THROUGH-THE-WALL INSTALLATION INSTRUCTIONS - OPTIONAL
The case may be installed through-the-wall as optional.
Read completely, then follow step-by-step.
NOTE: Obtain all materials locally for mounting the air conditioner through-the-wall.
IMPORTANT
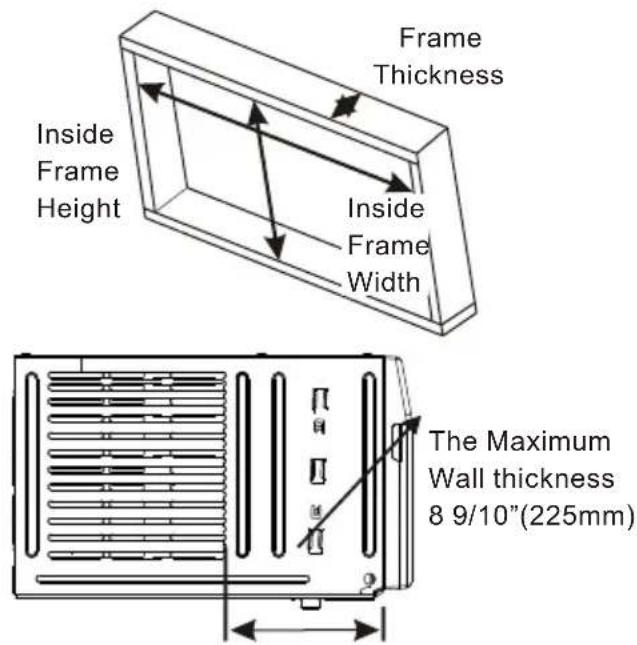
Building a wooden frame is required when install the case through-the-wall. The opening and dimension of wooden frame is required as below.
| Frame Max. Thickness | 8 9/10"(225 mm) |
| Inside Frame Width | 20"(508 mm) |
| Inside Frame Height | 15-1/5"(385 mm) |
Through-the-wall installation is not appropriate, if any of the side or top louvers of case is obstructed by the wall.
All side and top louvers in the case must project on the outdoor side of the wall.
The room side of the case must project into the room far enough to maximize the balance of the unit.
The case must be installed level from side to side and with a slight tilt from front to rear. Use a level, no more than a 1/2 bubble will be correct slant to the outside.
Lintel angle is required to support bricks or blocks above opening.
Flashing is required and should extend the length of the opening to ensure no inside cavity leakage occurs.
NOTE: The allowed maximum wall thickness is less than 8 9/10". Otherwise, the wall will block the air inlet of outdoor side, it will effect the normally operation of unit.
- Build a wooden frame into the wall opening and make sure fasten securely, which is suitable to the WALL OPENING REQUIREMENT.
- Remove the air conditioner from the carton box and take off the chassis as window mounting installation.
- Place the cabinet into the wooden frame, and lock the cabinet by the top rail hole and bottom chassis hole with 1" long wood screws as shown, from inside to outside.
natural_image
Diagram of a room with two screwdrivers and directional arrows indicating movement or force (no text or symbols)- Assemble the two Support Bracket with Sill Angle Bracket to the cabinet against to the wooden frame as window mounting installation instructions.
- Assemble the chassis into the cabinet and fasten or lock it, as window mounting installation instructions.
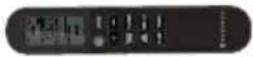
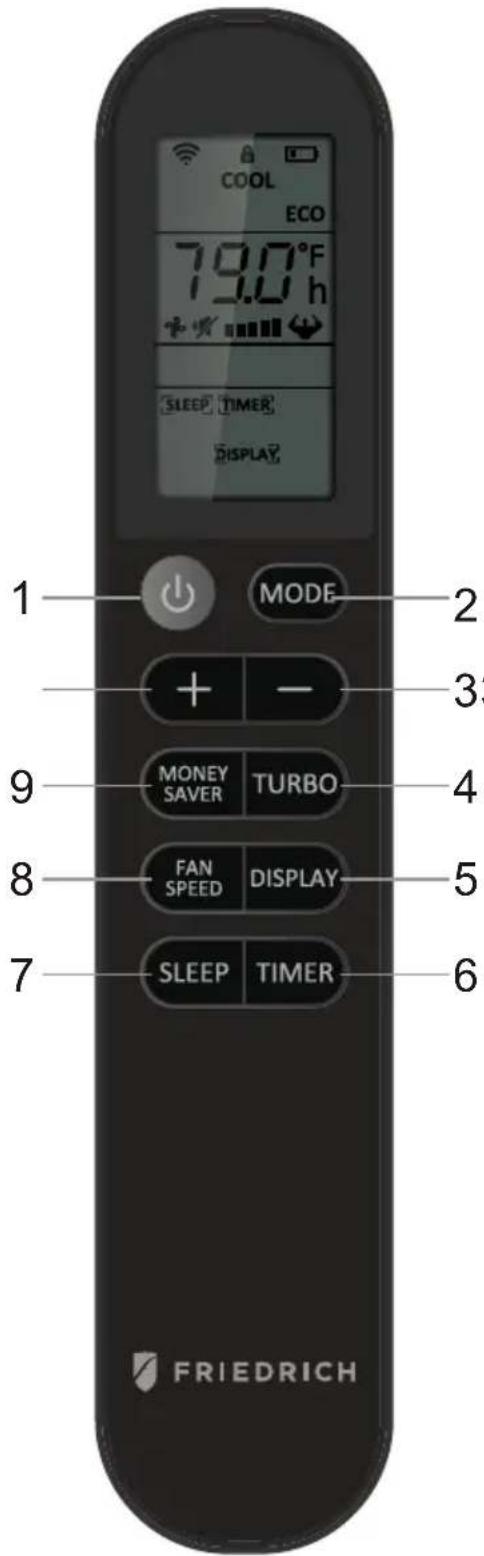
USING YOUR AIR CONDITIONER Electronic Control Panel & Remote Control
NOTE: This display always shows the room temperature in Fan Mode except when setting the Timer.
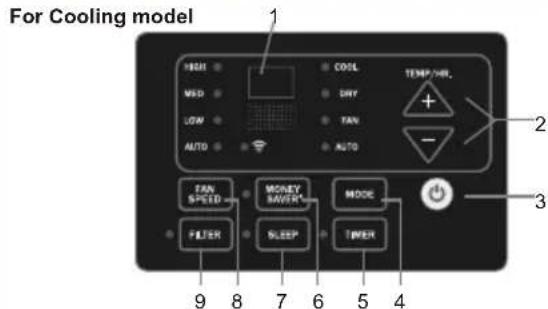
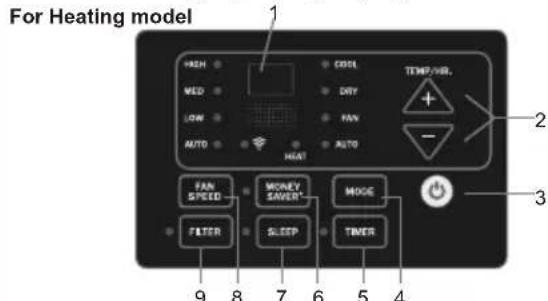
Air Conditioner Controls
Normal Operating Sounds
- You may hear a pinging noise caused by water hitting the condenser on rainy days, or when the humidity is high. This design feature helps remove moisture and improve efficiency.
- You may hear the thermostat click when the compressor cycles on and off.
- Water will collect in the base pan during rain or days of high humidity. The water may overflow and drip from the outside part of the unit.
-
The fan may run even when the compressor is not on.
-
Digital Display: Without timer setting, the set temperature will be displayed.
Time will be displayed under timer setting. the
-
- and - Button: Use these buttons on the control panel and remote to increase or decrease the Set Temperature or Timer.
Temperature range: 61\~88 or 16\~34. ℃
-
Button: Turn the air conditioner on and off.
-
Mode Button: Press the mode button to cycle through the various modes: Cool, Dry, Fan and Auto, or Heat.
Cool Mode: The cooling function allows the air conditioner to cool the room and at the same time reduces air humidity. Press the MODE button to activate the cooling function. To optimize the function of the air conditioner, adjust the temperature and the speed by pressing the button indicated.
Dry Mode: This function reduces the humidity of the air to make the room more comfortable. Press MODE button to set the DRY mode. An automatic function of alternating cooling cycles and air fan is activated.
Fan Mode: The conditioner works in only ventilation. Press MODE button to set the FAN mode. With pressing the FAN SPEED button the speed changes in the following sequence: Hi, Med and Lo in FAN mode.
Auto Mode: In AUTO mode the unit automatically chooses the fan speed and the mode of operation (COOL,HEAT,DRY or FAN). In this mode the temperature are set automatically according to the room temperature (tested by the temperature sensor which is incorporated in the indoor unit.).
Heat Mode: The heating function allows the air conditioner to heat the room. Press the MODE button to activate the heating function. To optimize the function of the air conditioner, adjust the temperature and the speed by pressing the button indicated.
- Timer Button: Use these buttons on the control panel and remote to set the Timer.
Timer Off: The timed stop is programmed by pressing TIMER button. Set the rest time by pressing the button “+” or “-” until the rest time displayed is to your likelihood press the TIMER button again.
Timer On: When the unit is off, press TIMER button at the first time, set the temperature with pressing the button “+” or “-”. Press TIMER button at the second time, set the rest time with pressing the button “+” or “-”. Press TIMER button at the third time, confirm the setting, then the rest time to next automatical switching-on could be read on the display of the machine.
Note: It can be set to automatically turn off or on in 0.5-24 hours. Each press of the “+” - “” buttons will increase or decrease the timer. The Timer can be set in 0.5 hours increment below 10 hours and 1 hour increment for 10 hours or above. The SET light will turn on while setting. To cancel the set function, press the TIMER button again.
USING YOUR AIR CONDITIONER Electronic Control Panel & Remote Control
- Money Saver Button: When the unit is in Money Saver mode, the light will turn on. In Money Saver mode, the unit will turn-off once the room is cooled to the user set temperature. The unit will turn back on when the room temperature rises above the user set temperature. Before the compressor, the fan motor will run for a while, starts then stop for a while., It will repeat to provide a much more comfortable feeling and save energy.
- Sleep Button: Press the SLEEP button, all the display lights will turn off after a while, but the SLEEP light is always on. In SLEEP mode, the air conditioner will automatically adjust the temperature and fan speed to make the room more comfortable during the night. The set temperature will automatically change every 30-60 minutes and at most change six times until the setting temperature is 81°F or 82°F for cooling mode and 75°F or 76°F for heating mode.
- Fan Speed Button: Press the FAN SPEED button to choose the fan speed options. You can choose Hi, Med, Lo or auto speed in COOL or HEAT mode and choose Hi, Med, Lo in FAN mode.
-
Filter Button: When the Filter Check light is off, it is useless to press the Filter Check button. When the Filter Check light is on, it can turn off the light by pressing the Filter Check button. After the fan motor works for 500 total hours, the Filter Check light will turn on to remind the user to clean the filter.
-
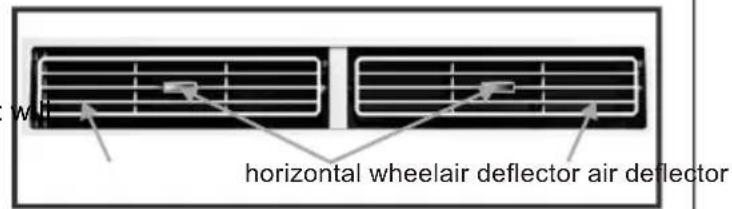
Directional Louvers: To direct the airflow, horizontal wheel to control the horizontal direction, air deflector to control the vertical direction.
OPERATING YOUR AIR CONDITIONER
REMOTE CONTROL
-
Power: Turn the air conditioner on and off. This button will clear the TIMER setting.
-
MODE: Press the button to select the mode of operation, AUTO, COOL, DRY, FAN ONLY, HEAT.
Note: The HEAT mode is only for some heating models. If you do not need it, press the MODE button for more than 5 seconds to delete the HEAT function, and the COOL mode will be selected automatically. Press the MODE again for more than 5 seconds to add the HEAT function, and the HEAT mode will be selected automatically.
-
- And - : Use these buttons to increase or decrease the setting Temperature or Timer. Setting temperature range: 61 \~88 For 16 \~31 . °C Note: When the remote controller is turn-off, press + and - buttons can pre-set the temperature. After the setting, the remote temperature display will be off after a while.
-
TURBO: When the remote is ON, press the button to active the TURBO function, under AUTO/COOL/FAN ONLY mode. Press again to cancel the TURBO function, and the fan speed will change to pre-setting before. Note: T and change: After insert the batteries, in the off state within 3 minutes, press the TURBO button for more than 5 seconds to switch the Fahrenheit (For Celsius () degree display.
-
DISPLAY: When the unit is ON, press the button, to switch off/on all lights or LED display. And this function will be canceled when changing mode.
-
TIMER: Use the button to set the TIMER, or cancel the TIMER. TIMER OFF: When the unit is ON, the timed OFF is programmed by pressing TIMER button, the remote will display 6 hours pre-setting at first. Set the rest time by pressing the button + or - until the needed rest time display, then press TIMER button again to confirm.
TIMER ON: When the unit is OFF, the timed ON is programmed by pressing TIMER button, the remote will display 6 hours pre-setting at first. Set the rest time by pressing the button + or - until the needed rest time display, then press TIMER button again to confirm. Later, the remote screen will keep display [TIMER] icon.
Note: When TIMER ON, it cannot select Sleep mode, but can pre-set Mode, temperature, fan speed, MONEY SAVER.
-
SLEEP: Press the SLEEP button, all of the display lights will turn off after a while, but the Sleep light is always on. In SLEEP mode, the air conditioner will automatically adjust the temperature and fan speed to make the room more comfortable. The set temperature will automatically change every 30-60 minutes and at most change six times until the setting temperature is 81 or 82 for cooling mode and 75 or 76 for heating mode..
-
FAN SPEED: Press the FAN SPEED button to choose the fan speed options. You can choose Hi, Med, Lo or Auto speed in COOL or HEAT mode and choose Hi, Med, Lo in FAN mode. When DRY mode, it is only Low fan speed.
-
MONEY SAVER: When the unit is in COOL mode, press the button to MONEY SAVER function. In MONEY SAVER mode, the unit will turn off once the room is cooled to the user set temperature. The unit will turn back on when the room temperature rises above the user set temperature. Before the compressor starts, the fan motor will run for a while, then it will stop for a while, and will repeat to provide a much more comfortable feeling and save energy.
-
Child Lock: pressing the button + or - for more than 2 seconds to lock or unlock the remote controller. When locked, each function button is no useful, and the lock icon will flash when press any button.
Battery Size: AAA - NOTE: Do not mix old and new batteries or different types of AAA batteries.
CARE AND CLEANING
Clean your air conditioner to keep it looking new and to minimize dust build up.
Air Filter Cleaning
The air filter should be checked at least once every month to see if it needs cleaning. Trapped particles and dust can build up in the filter and may decrease airflow as well as cause the cooling coils to accumulate frost. To clean the air filter:
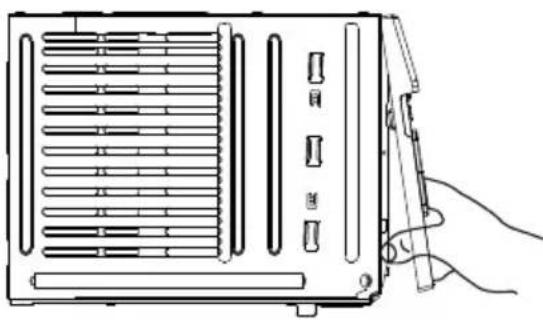
- Remove the filter by pulling down on the indents of the filter door on the front of the unit. (See FIG. 15)
- Wash the filter using liquid dish soap and warm water. Rinse the filter thoroughly. Gently shake the filter to remove excess water.
- Let the filter dry completely before placing it into the air conditioner.
- If you do not wish to wash the filter, you may vacuum the filter to remove the dust and other particles.

Wear and Tear
To minimize wear and tear on the air conditioner, always wait at least 3 minutes before changing modes. This will help prevent the compressor from overheating and the circuit breaker from tripping.
Cabinet Cleaning
To clean the air conditioner cabinet:
- Unplug the air conditioner to prevent shock or a fire hazard. The cabinet and front panel of the air conditioner may be dusted with an oil-free cloth or washed with a cloth dampened in a solution of warm water and mild liquid soap. Rinse thoroughly with a damp cloth and wipe dry.
- Never use harsh cleaners, wax or polish on the cabinet front.
- Be sure to wring excess water from the cloth before wiping around the controls. Excess water in or around the controls may cause damage to the air conditioner.
Winter Storage
To store the air conditioner when it is not in use for an extended period of time, remove it carefully from the window according to the installation instructions and cover it with plastic or place it in the original box.
TROUBLESHOOTING
| PROBLEM | POSSIBLE CAUSES | SOLUTIONS |
| The Air Conditioner will not start | The air conditioner is unplugged | Make sure the air conditioner plug is pushed completely into the outlet |
| The fuse is blown/circuit breaker is tripped. | Check the house fuse/circuit breaker box and replace the fuse or reset the breaker. | |
| Power failure | The unit will automatically re-start when power is restored.There is a protective time delay (approx. 3 minutes) to prevent tripping of the compressor overload. For this reason, the unit may not start normal cooling for 3 minutes after it is turned back on. | |
| The current interrupter device is tripped. | Press the RESET button located on the power cord plug.If the RESET button will not stay engaged, discontinue use of the air conditioner and contact a qualified service technician. | |
| The Air Conditioner does not cool as it should | Airflow is restricted | Make sure there are no curtains, blinds, or furniture blocking the front of the air conditioner |
| The temperature control may not be set correctly. | Lower the set thermostat temperature | |
| The air filter is dirty | Clean the filter. See the Cleaning and Care Section of the manual. | |
| The room may be too warm | Please allow time for the room to cool down after turning on the air conditioner. | |
| Cold air is escaping | Check for open furnace registers and cold air returns | |
| The cooling coils are frozen | See “Air Conditioner Freezing Up” below. | |
| The Air Conditioner is freezing up | Ice blocks the air flow and stops the air conditioner from cooling the room | Set the MODE dial to HIGH FAN or HIGH COOL and set the thermostat to a higher temperature |
| The Remote Control is not working | The batteries are inserted incorrectlyThe batteries may be dead | Check the position of the batteries.Replace the batteries |
| Water is dripping outside | Hot and humid weather. | This is normal |
| Water is dripping inside the room | The air conditioner is not correctly tilted outside. | For proper water drainage, make sure the air conditioner is slightly tilted downward from the front of the unit to the rear. |
| Water collects in the base pan | Moisture removed from the air is draining into the base pan. | This is normal for a short period in areas with low humidity and normal for a longer period in areas with high humidity. |
Friedrich Air Conditioning Company
10001 Reunion Place, Suite 500
San Antonio, TX 78216
800.541.6645
www.friedrich.com
CHILL® PREMIER ROOM AIR CONDITIONERS LIMITED WARRANTY
FIRST YEAR
ANY PART: If any part supplied by FRIEDRICH fails because of a defect in workmanship or material within twelve months from date of original purchase, FRIEDRICH will repair the product at no charge, provided room air conditioner is reasonably accessible for service. Any additional labor cost for removing inaccessible units and/or charges for mileage related to travel by a Service Agency that exceeds 25 miles one way will be the responsibility of the owner. This remedy is expressly agreed to be the exclusive remedy within twelve months from the date of the original purchase.
SECOND THROUGH FIFTH YEAR
SEALED REFRIGERANT SYSTEM: If the Sealed Refrigeration System (defined for this purpose as the compressor, condenser coil, evaporator coil, reversing valve, check valve, capillary, filter drier, and all interconnecting tubing) supplied by FRIEDRICH in your Room Air Conditioner fails because of a defect in workmanship or material within sixty months from date of purchase, FRIEDRICH will pay a labor allowance and parts necessary to repair the Sealed Refrigeration System; PROVIDED FRIEDRICH will not pay the cost of diagnosis of the problem, removal, freight charges, and transportation of the air conditioner to and from the Service Agency, and the reinstallation charges associated with repair of the Sealed Refrigeration System. All such cost will be the sole responsibility of the owner. This remedy is expressly agreed to be the exclusive remedy within sixty months from the date of the original purchase.
APPLICABILITY AND LIMITATIONS: This warranty is applicable only to units retained within the Fifty States of the U.S.A., District of Columbia, and Canada. This warranty is not applicable to:
- Air filters, fuses, batteries and the front grille removal tool.
- Products on which the model and serial numbers have been removed.
- Products which have defects or damage which results from improper installation, wiring, electrical current characteristics, or maintenance; or caused by accident, misuse or abuse, fire, flood, alterations and/or misapplication of the product and/or units installed in a corrosive atmosphere, and/or operation of the unit during construction, default or delay in performance caused by war, government restrictions or restraints, strikes, material shortages beyond the control of FRIEDRICH, or acts of God.
OBTAINING WARRANTY PERFORMANCE: Service will be provided by the FRIEDRICH Authorized Dealer or Service Organization in your area. They are listed in the Yellow Pages. If assistance is required in obtaining warranty performance, write to: Room Air Conditioner Service Manager (the Friedrich address is at the top of this warranty) or email tac@friedrich.com.
LIMITATIONS: THIS WARRANTY IS GIVEN IN LIEU OF ALL OTHER WARRANTIES. Anything in the warranty notwithstanding, ANY IMPLIED WARRANTIES OF FITNESS FOR PARTICULAR PURPOSE AND/OR MERCHANTABILITY SHALL BE LIMITED TO THE DURATION OF THIS EXPRESS WARRANTY. MANUFACTURER EXPRESSLY DISCLAIMS AND EXCLUDES ANY LIABILITY FOR CONSEQUENTIAL OR INCIDENTAL DAMAGE FOR BREACH OF ANY EXPRESSED OR IMPLIED WARRANTY.
Performance of Friedrich's Warranty obligation is limited to one of the following methods:
- Repair of the unit
- A refund to the customer for the prorated value of the unit based upon the remaining warranty period of the unit.
- Providing a replacement unit of equal value
The method of fulfillment of the warranty obligation is at the sole discretion of Friedrich Air Conditioning.
NOTE: Some states do not allow limitations on how long an implied warranty lasts, or do not allow the limitation or exclusion of consequential or incidental damages, so the foregoing exclusions and limitations may not apply to you.
OTHER: This warranty gives you specific legal rights, and you may also have other rights which vary from state to state.
PROOF OF PURCHASE: Owner must provide proof of purchase in order to receive any warranty related services.
All service calls for explaining the operation of this product will be the sole responsibility of the consumer.
All warranty service must be provided by an Authorized FRIEDRICH Service Agency, unless authorized by FRIEDRICH prior to repairs being made.
(11-2019)

FRIEDRICH
You can also view this manual online from our website:
www.friedrich.com