GDDEK16 - Dehumidifier DIMPLEX - Free user manual and instructions
Find the device manual for free GDDEK16 DIMPLEX in PDF.

| Product Type | Compressor dehumidifier |
| Model | GDDEK16 |
| Brand | Dimplex |
| Dehumidification Capacity (30°C, 80% RH) | Up to 16 L/day |
| Water Tank Capacity | 4 L |
| Airflow Rate | 180 m³/h |
| Power Consumption | 280 W |
| Power Supply | 220-240 V ~ 50 Hz |
| Refrigerant | R290 |
| Dimensions (W x D x H) | 250 x 250 x 500 mm |
| Weight | 10.5 kg |
| Noise Level | 42 dB(A) |
| Operating Temperature Range | 5°C – 35°C |
| Humidity Control | Adjustable hygrostat (30% – 80% RH) |
| Defrost Function | Automatic defrost |
| Continuous Drainage | Yes, via hose connection |
| Air Filter | Washable pre-filter |
| Control Panel | Electronic with LED display |
| Safety Features | Overheat protection, auto shut-off when tank full |
| Energy Efficiency Class | A |
Frequently Asked Questions - GDDEK16 DIMPLEX
User questions about GDDEK16 DIMPLEX
0 question about this device. Answer the ones you know or ask your own.
Ask a new question about this device
Download the instructions for your Dehumidifier in PDF format for free! Find your manual GDDEK16 - DIMPLEX and take your electronic device back in hand. On this page are published all the documents necessary for the use of your device. GDDEK16 by DIMPLEX.
USER MANUAL GDDEK16 DIMPLEX
GDDEK series (GDDEK16 and GDDEK20)
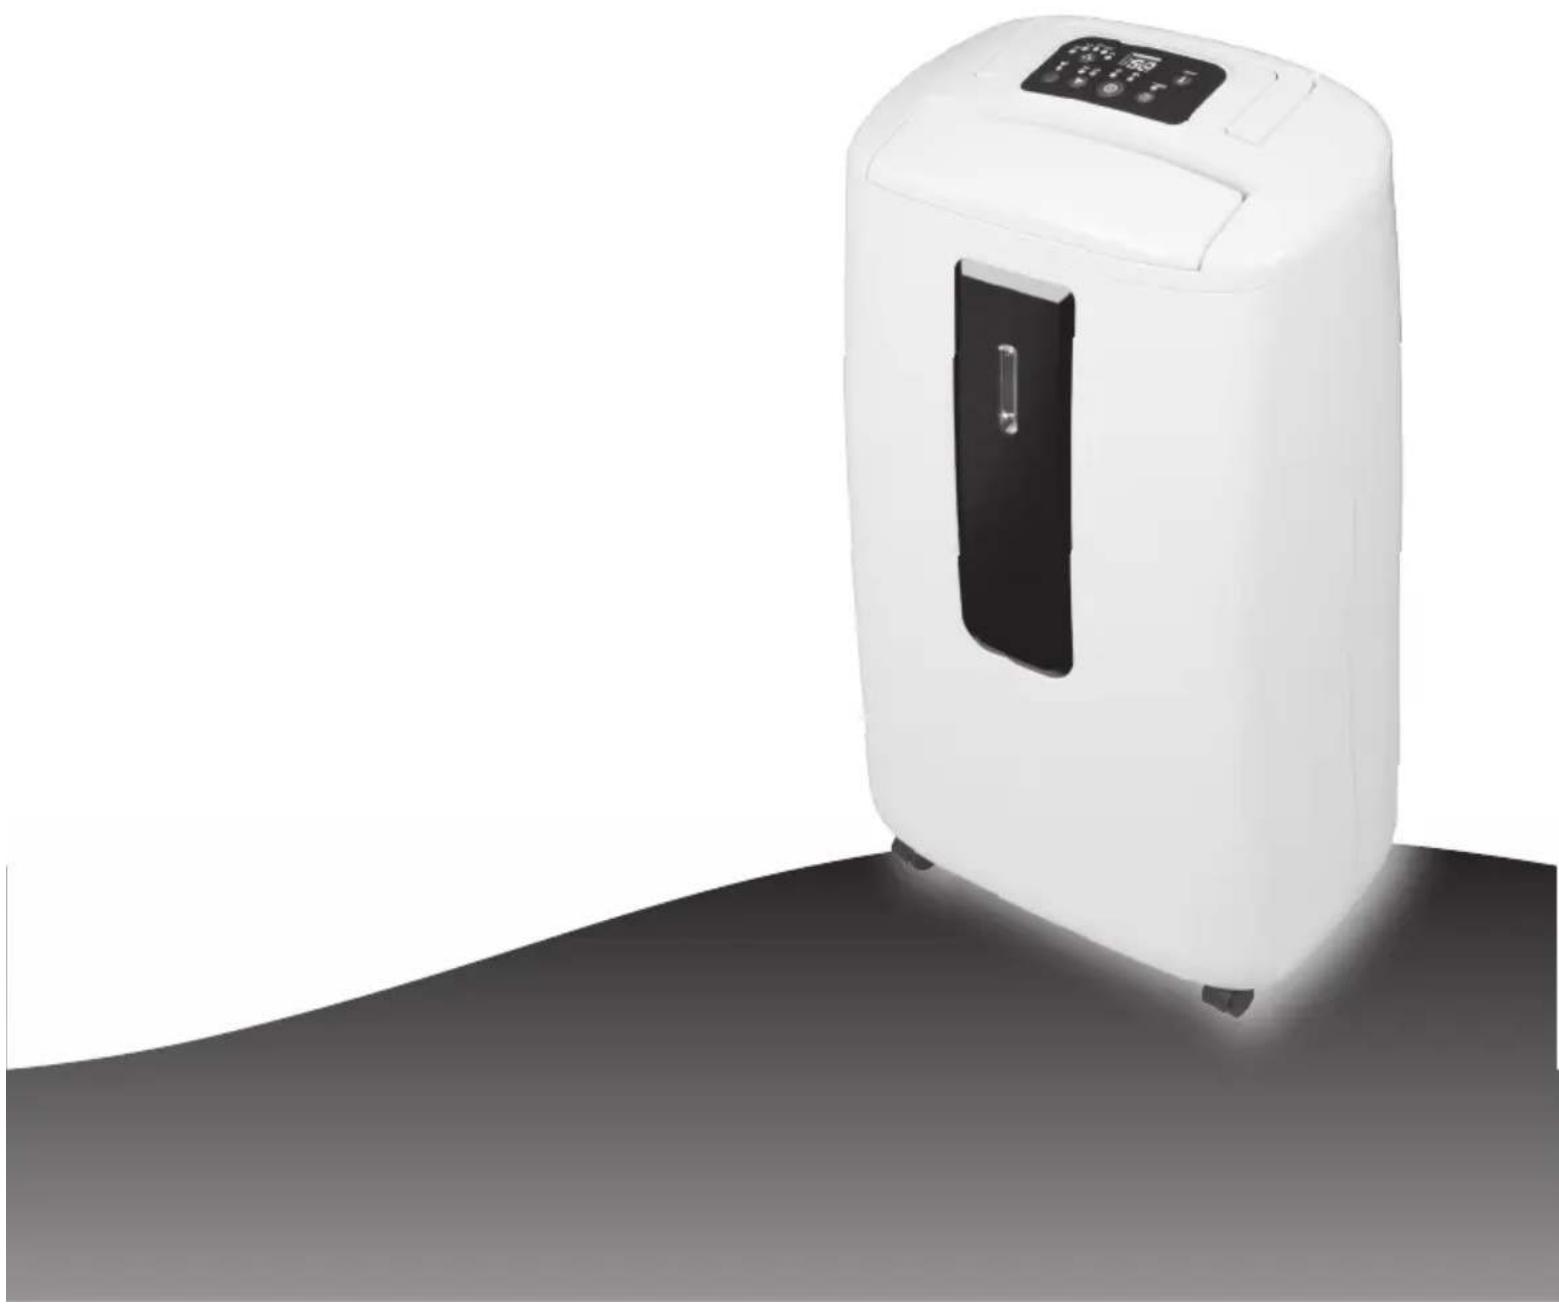
natural_image
White portable air purifier with digital display and black vent, standing on a dark surface (no text or symbols visible)Please take time to read this manual carefully before use and save it for future reference.
CONTENTS
| Specifications | 2 |
| Before use 3 | |
| Control Panel 4 | |
| Operation | 5 |
| Where to position 6 | |
| Parts | 7 |
| How it works 8 | |
| Drainage | 9 |
| Maintenance | 10 |
| Trouble shooting 11 |
SPECIFICATIONS
| Model no. GDDEK16 GDDEK20 | |||
| Power supply 220-240V~, 50Hz | |||
| Dehumidification capacity 30 | °C, 80% 16 L/day 20L/day | ||
| Power / Ampere consumption* | 30°C, 80% 240W / 1.1A 370W / 1.7A | ||
| 32°C, 80% 260W / 1.2A 390W / 1.8A | |||
| Air volume (max.) 150M3/h 150M3/h | |||
| Compressor | Rotary | ||
| Refrigerant | R134a | ||
| Working range | 5 ~ 32°C | ||
| Water tank | 5L | ||
| Size (WxDxH) | With castors - 336 x 210 x 569 mmWithout castors - 336 x 210 x 547 mm | ||
| N.W. | 10.4 kg | 11 kg | |
- *please refer to the rating label placed on the product.
• Test condition for data in our rating label is as per safety regulation: EN 60335-2-40
BEFORE USE

CAUTION!
• Always keep the unit in vertical position.
- Leave the unit to stand for one hour before connecting to the mains supply after transport or when it has been tilted (e.g. during cleaning).
- Keep all foreign objects away from the air intake or output openings.
- The mains supply must conform to the specification shown on the rating plate at the back of the unit.
- If the supply cord is damaged, it must be replaced by an approved service representative or a similar qualified person.
- Never use the plug to start and stop the unit. Always use the button on the control panel.
• Before moving the unit, first switch off, then unplug and empty the water tank.
- Don't use bug sprays or other flammable cleaners on the unit.
- This appliance is not intended for use by persons (including children) with reduced physical, sensory or mental capabilities, or lack of experience and knowledge, unless they have been given supervision or instruction concerning use of the appliance by a person responsible for their safety. Children should be supervised to ensure that they do not play with the appliance.
IMPORTANT!
Do not use this unit at ambient temperatures below 5^ C, to prevent the possibility of a heavily iced up evaporating coil.
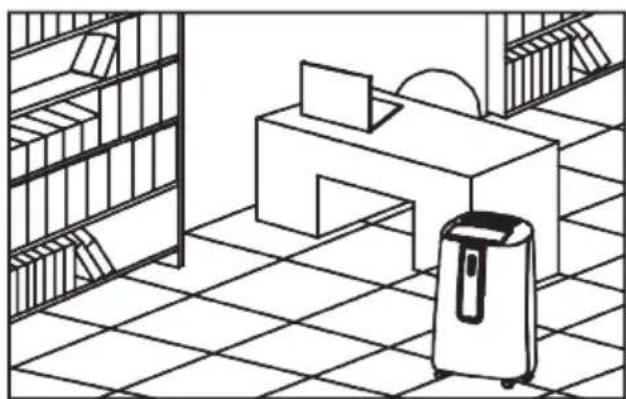
natural_image
Line drawing of an office interior with bookshelves, a desk, and a portable air purifier (no text or symbols)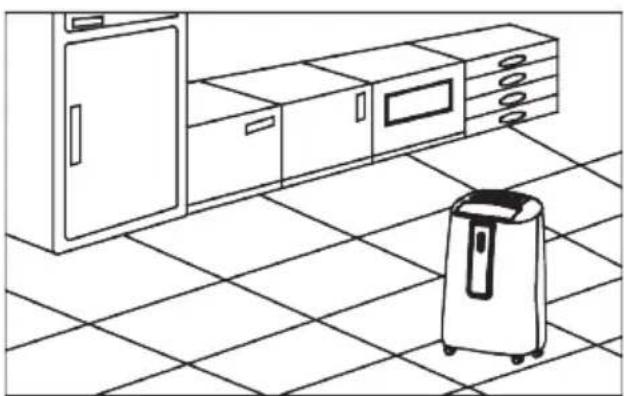
natural_image
Line drawing of a kitchen interior with a coat rack and cabinet, no text or symbols presentCONTROL PANEL
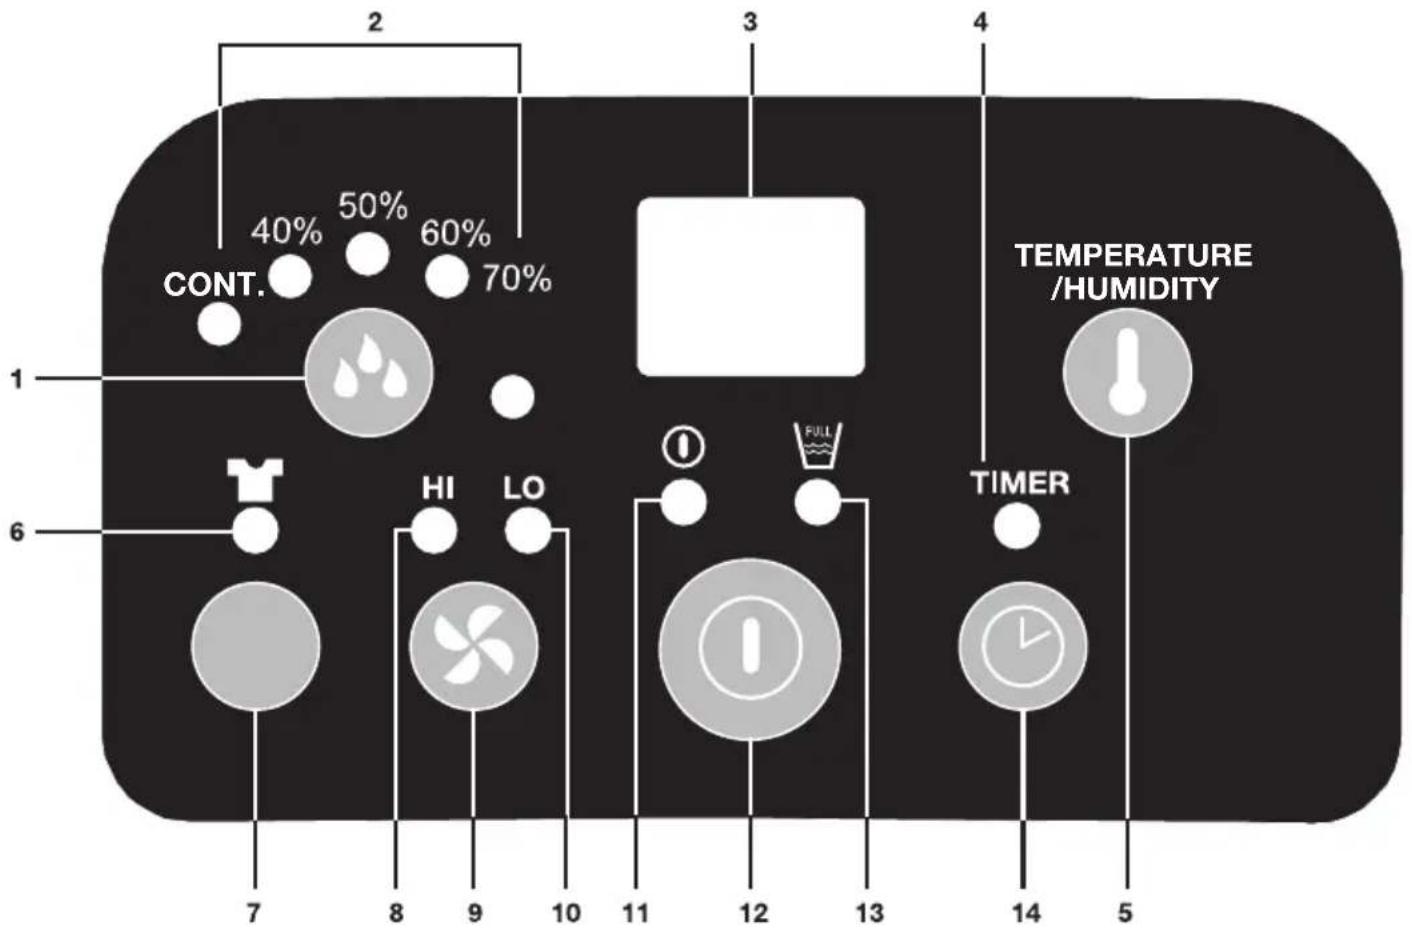
- Humidity setting button
- Working mode indicator (continuous dehumidifying, humidity 40%, 50%, 60%, 70%). Ideal room humidity is 50%-60%.
- Humidity/Temperature/Timer display
- Timer operation indicator
- Show temperature/ humidity display button
-
Clothes drying mode indicator
-
Clothes drying button
- High ventilation speed indicator
- Ventilation speed button
- Low ventilation speed indicator
- Power indicator
- ON/OFF (power) button
- "Full Water Tank" indicator
- TIMER set button
OPERATION
- Plug the unit into a correct mains socket. (Please refer to the rating label at the rear of the unit for correct voltage/frequency.)
-
Press "ON/OFF" button. The dehumidifier will turn on.
-
Press (humidity setting button) to set the dehumidification level you need. The different levels are: continuous dehumidification, 40% relative humidity, 50%, relative humidity, 60% relative humidity or 70% relative humidity. The appropriate indicator light will turn on. The ideal room humidity is 50% to 70%
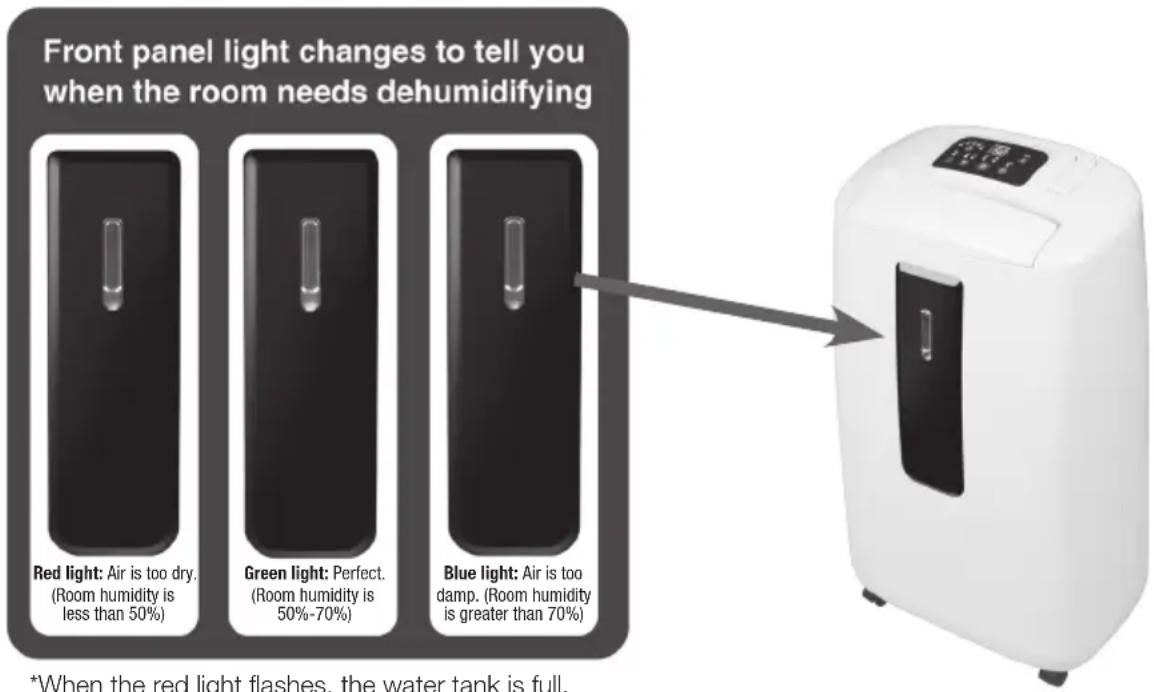
*When the red light flashes, the water tank is full.
- Press (ventilation speed button) to set the wind speed to high or low. The "HI" or "LO" indicator lights will show the speed.
- Pre-setting timer function. You can programme the unit to turn on after a set amount of time. Without turning on the other functions (including ON/OFF button), press the "TIMER" button and select the number of hours until you want the dehumidifier to turn on. For example, if you press the timer to '2' (see "Humidity/ Temperature/Timer" display), the unit will automatically turn on after 2 hours.
- To set a time for when the unit will turn off, while the unit is running press the "TIMER" button for the number of hours you want the unit to run (see "Humidity/Temperature/Timer" display). For example, if you select "2" on the Timer display, the unit will turn off after 2 hours of operation. After 8 seconds the display will revert back to showing the current room humidity.
- By pressing the "SHOW TEMPERATURE/HUMIDITY" button, the "Humidity/ Temperature/Timer" display will show the current room temperature. After 8 seconds, the display window will return to showing the room humidity.
- The "DRYER" function provides turbo ventilation to rapidly and continuously dehumidify the moisture in the air – perfect for drying laundry indoors.
- To turn off the unit, press the "ON/OFF" button
WHERE TO POSITION
When positioning the dehumidifier, ensure that it is placed on a level surface and that there is a minimum of 10cm (4") of space on either side of the unit to allow for efficient airflow.
This dehumidifier is fitted with castors for extra mobility, if you move the unit, it should first be switched off and the water tank emptied. We do not recommend the use of an extension lead, instead ensure that the unit is sufficiently close to a fixed mains socket.
When the dehumidifier is in operation, outside doors and windows should be closed when necessary for most efficient use.
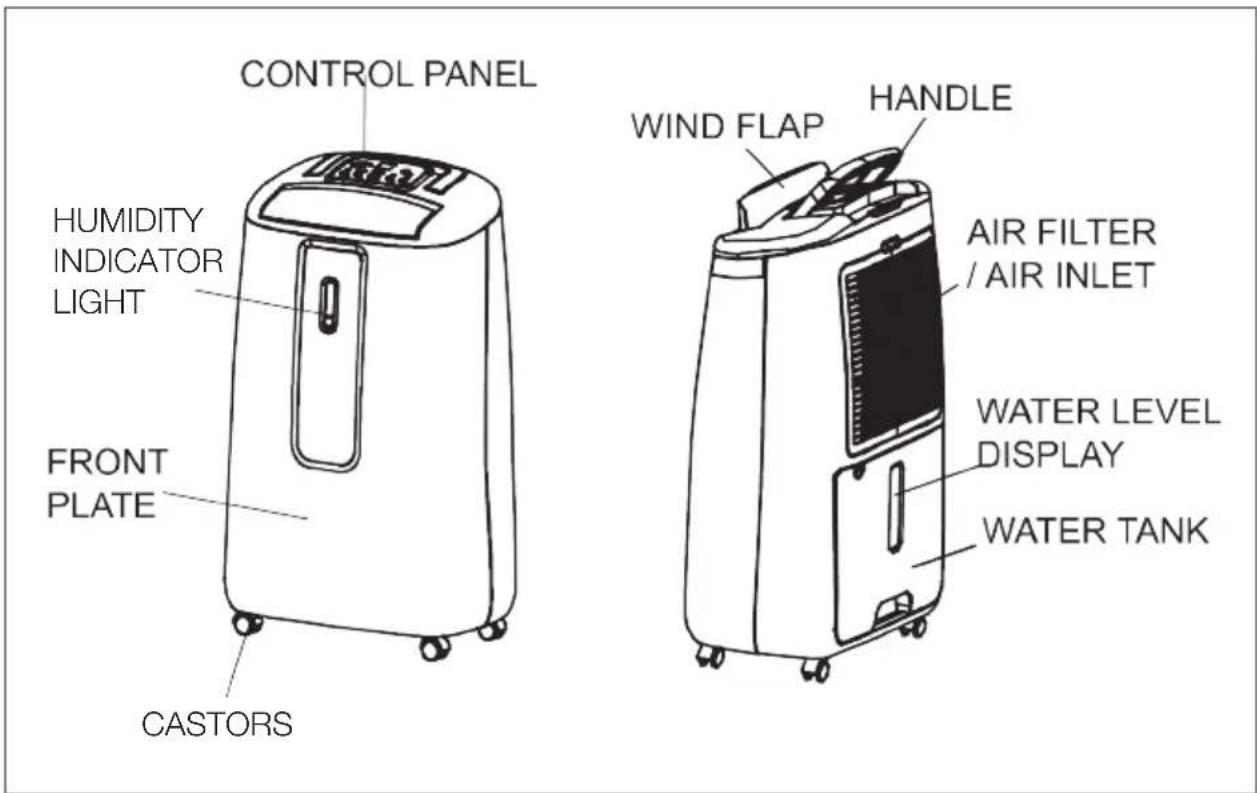
PARTS
ACCESSORIES
ACTIVE CARBON FILTER TO CLEAN AIR TOXINS
natural_image
Pure geometric pattern of a diamond shape filled with a grid, no text or symbols presentHOW IT WORKS
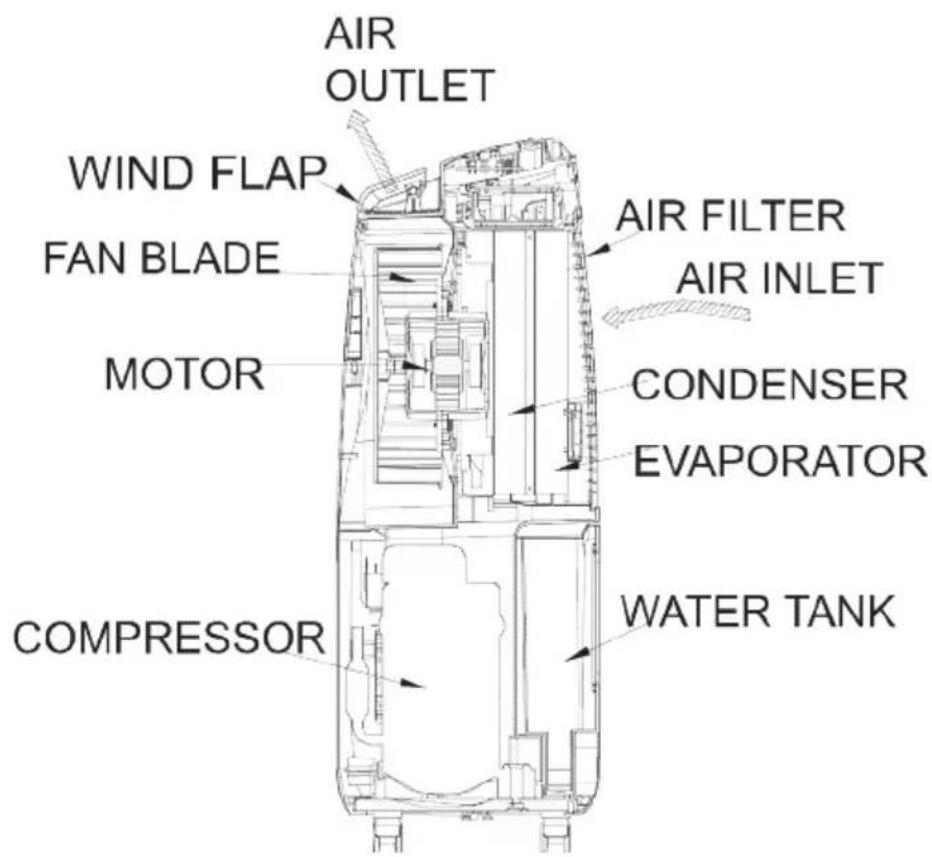
Your dehumidifier controls relative humidity by passing air through the unit, forcing the excess moisture to condensate over the cooling elements. Contact with this cold surface causes the moisture in the air to condense. This condensed water then drains safely into the anti-bacterial water tank. The dried air then passes through the condenser where it is slightly warmed and re-enters the room.
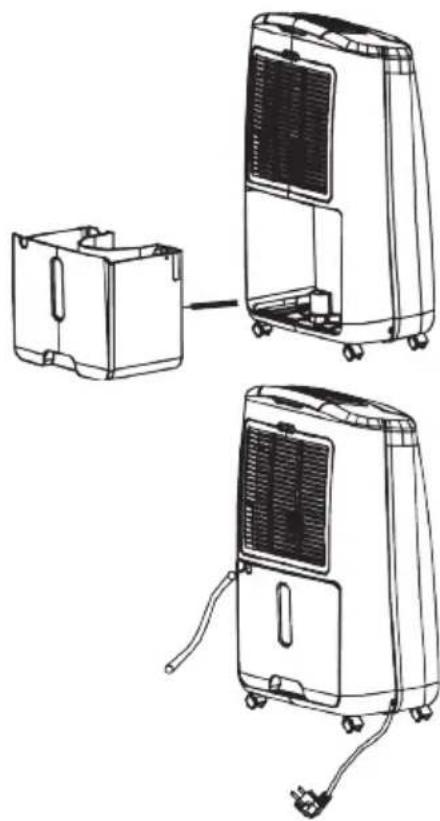
DRAINAGE
When the water tank is full, the dehumidifier will stop and the "Full Water Tank" indicator will light up. To remove the water tank, carefully pull it out squarely from the unit.
After emptying the water tank, slide the water tank back into place. Make sure it is properly positioned, in order for the "Full Water Tank" indicator light to turn off and your dehumidifier to resume operation.
Please note, if the water tank is not positioned correctly the light will stay red and operation will cease.
Continuous drainage
In situations where the water tank will require more frequent drainage (for example when humidity is high), it may be more convenient to set the unit up for continuous drainage.
natural_image
Line drawings of a portable air conditioner unit with attached circuit board and power plug (no text or symbols)-
Pull out the water tank.
-
Connect the drain hole with a drainage hose of 11mm internal diameter. Please note, this drainage hose is not supplied with the unit.
-
Ensure the water drains away freely and the tube is secure. In very cold weather conditions, precautions should be taken to prevent the drainage hose from freezing.
-
Put the water tank back to its position.
MAINTENANCE
Always unplug the unit from the mains before carrying out any maintenance or cleaning of the unit.
CLEANING THE BODY
Use a soft cloth to wipe the unit clean.
Do not use volatile chemicals, gasoline, harsh detergents, or abrasive cleaning solutions, as these may damage the external body of the unit
CLEANING THE FILTER
This dehumidifier is equipped with 2 filters :

flowchart
graph LR
    A["washable plastic filter"] --> B["active carbon filter"]
    B --> C["Commercial air conditioner unit"]
1. WASHABLE PLASTIC FILTER
- Remove the washable plastic filter and take off the active carbon filter.
- Use a vacuum cleaner to remove dust caught in the washable plastic filter or tap the filter lightly to dislodge any other particles. If the filter is particularly dirty, use warm soapy water to clean it.
- Make sure the filter is completely dry before replacing.
- Do not expose the filter to sunlight.
2. ACTIVE CARBON FILTER (for capturing fine particles, bacteria prevention and certain toxic chemicals from the air and moisture in your room.)
The active carbon filter, located under the anti-dust filter is not washable.
The filter should be checked periodically and replaced if necessary (around once per season).
STORAGE
If unit is not to be used for an extended period of time store by
- Turning the unit off, unplugging and tidily storing the cord.
- Completely emptying the water tank and wiping it clean.
• Covering the unit and storing away from direct sunlight
TROUBLE SHOOTING
THE UNIT DOES NOT OPERATE:
• Is the unit plugged in?
- Is the room temperature below 5 °C or above 32°C? If so, then it is out of the working range of the unit.
- Ensure the ON/OFF switch is turned on.
- Check the water tank is positioned properly in the unit and it is not full.
- Make sure the air inlet and outlet are not obstructed.
- Check the filters are not clogged, if they are, refer to CLEANING THE FILTER in this guide
THE UNIT IS NOT OPERATING FULLY:
- Are too many windows or doors open?
- Is there something in the room producing lots of humidity?
THE UNIT IS TOO NOISY:
- Check whether the unit is sitting on a level surface.
THE UNIT IS LEAKING:
- Check there are not cracks in the unit
• Is the continuous drainage hose secure? - Check the water tank position and condition
DCimplex®
Glen Dimplex New Zealand Ltd
38 Harris Road, East Tamaki
Auckland, New Zealand
P.O. Box 58473, Botany
Manukau 2163, New Zealand
Phone: 09 274 8265
Fax: 09 274 8472
Email: sales@glendimplex.co.nz
Web: www.dimplex.co.nz