JDA5750S - Range hood JUNO - Free user manual and instructions
Find the device manual for free JDA5750S JUNO in PDF.


| Product Type | Range hood |
| Brand | Juno |
| Model | JDA5750S |
| Mounting Type | Built-in / Under-cabinet |
| Dimensions (W x D x H) | 90 cm x 50 cm x 15 cm (approx.) |
| Weight | 12 kg (approx.) |
| Power Supply | 220-240 V, 50 Hz |
| Motor Power | 200 W |
| Number of Speeds | 3 |
| Exhaust Connection Diameter | 150 mm |
| Max Airflow | 650 m³/h |
| Noise Level (max speed) | 65 dB(A) |
| Lighting | 2 x 1.5 W LED |
| Filter Type | Aluminum grease filter (washable) |
| Extraction Mode | Ducted or recirculating (recirculation kit optional) |
| Controls | Push-button, slider or electronic (depending on model) |
| Energy Class | A (approx.) |
| Annual Energy Consumption | 50 kWh/year (approx.) |
| Maintenance | Clean grease filter monthly; replace charcoal filter when needed |
| Safety Features | Overheat protection, automatic shut-off (if applicable) |
| Spare Parts Availability | Filters, lamps, motor available from service centers |
| Repairability Index | 7.5/10 (approx.) |
| Warranty | 2 years (standard) |
Frequently Asked Questions - JDA5750S JUNO
User questions about JDA5750S JUNO
0 question about this device. Answer the ones you know or ask your own.
Ask a new question about this device
Download the instructions for your Range hood in PDF format for free! Find your manual JDA5750S - JUNO and take your electronic device back in hand. On this page are published all the documents necessary for the use of your device. JDA5750S by JUNO.
USER MANUAL JDA5750S JUNO
Instruction on mounting and use of the cooker hood
JDA 5750
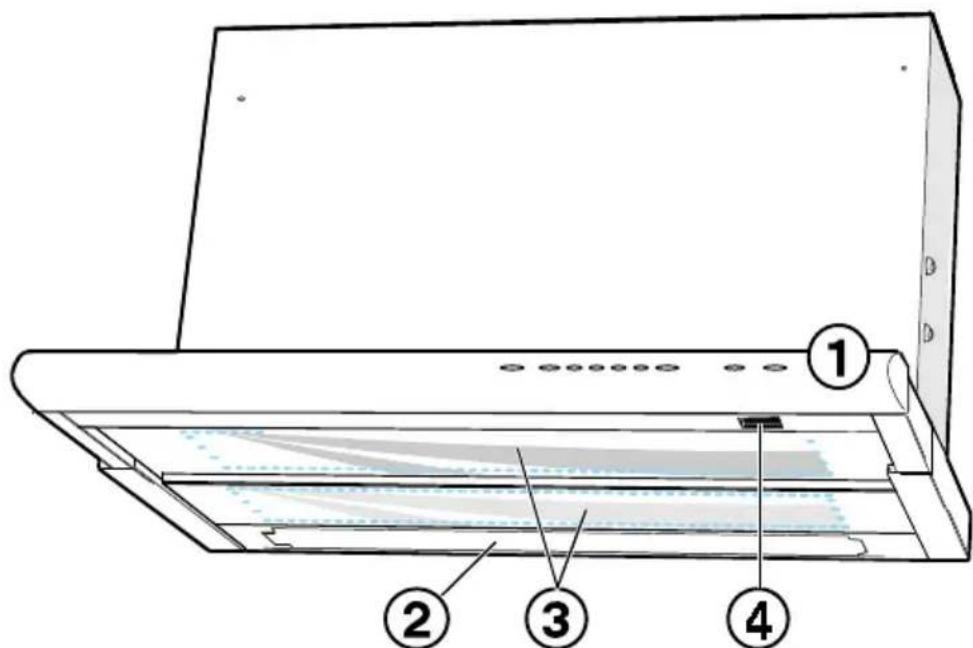

Fig. 1

Fig. 2
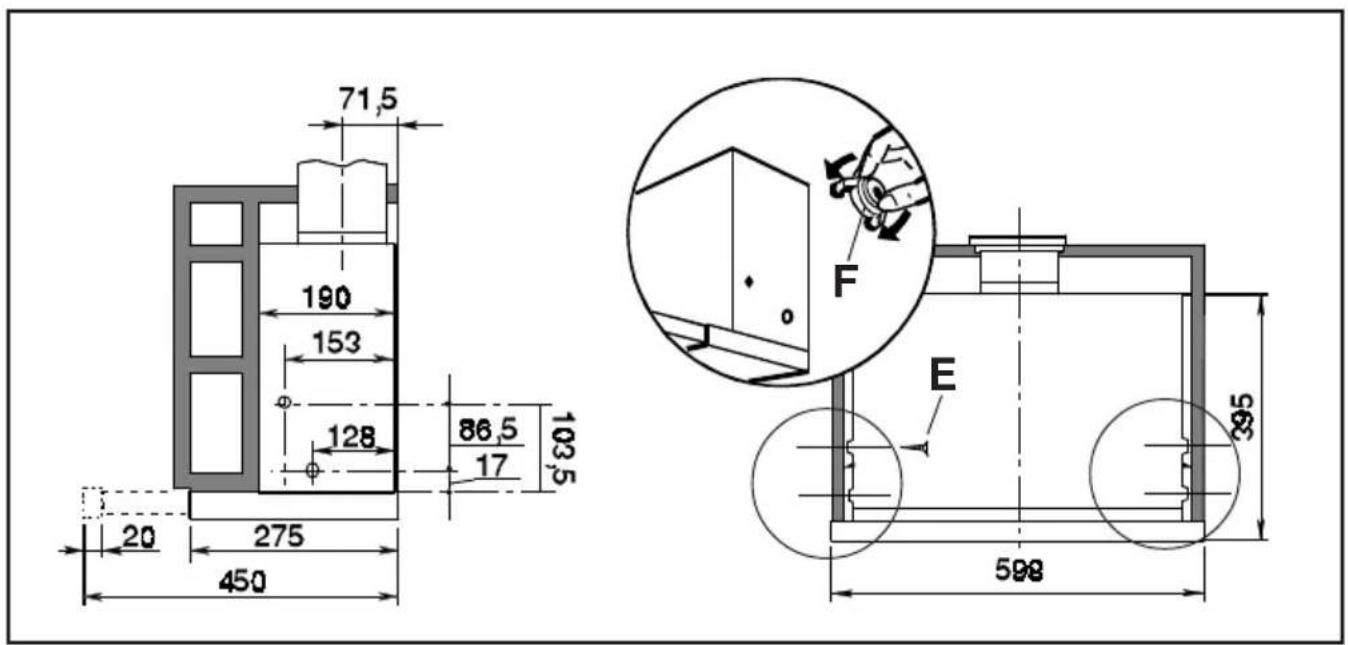
Fig. 3

Fig. 4


Fig. 6
Geräteansicht
A - Ausschalter
The hood may be used in 2 ways:
— external exhausting version
— internal recycle version
External exhausting system
The air is expelled outside by means of a pipe to be connected to the coupling flange A (fig 1).
Connecting the exhausting pipe
The coupling ring A has a diameter of 120mm.
We suggest to use ∅ 120 mm exhausting pipe.
Recycling version (filtering)
The air is purified by means of a carbon filter and then returned to the room.
The active carbon filter can be ordered from the supplier.
To install the filter, proceed as follow: fit the filter into its seat and fix with the two hooks C (fig. 2).
The filtered air is discharged above the top cabinet.
The baffle plate D (fig. 1) can be fitted to the outlet hole using the screws supplied.
Installation
When installed, the hood must be not less than 42 cm. above electric burners or 65 cm. above gas or mixed-fuel burners.
Warning!
— The hood cannot be connected to flues of other appliances that run on energy sources other than electricity.
— When the hood is used at the same time of other appliances that run on energy sources other than electricity, provision must be made for an adequate supply of air.
— No food must be cooked flambé underneath the hood.
The use of an unprotected flame is dangerous for the filters and could cause fires.
Therefore, never use an open flame under the hood. When frying foods, never leave the pan alone because the cooking oil could flare up.
— Please, keep to the provisions of official directives regarding the question of fume discharge.
— The manufacturers refuse to accept any responsibility for damage to the hood or its catching on fire because of failure to observe the above instructions.
Suggestions for the installation and use of the hood
— The horizontal sections of the pipe must be slanted slightly downwards (about 10%) to ensure the condensed vapour not to come back on the motor of the hood.
— The best performance of the unit is obtained in the exhaust mode, therefore in the limits of the possibilities it is advised to use the external exhaust (suction) type.
— The best performances are obtained with short pipes (max. 4 m) and with few curves.
Electric connection
Before completing any connection, make sure the house voltage corresponds with the voltage indicated on the label affixed inside the hood.
The hood is supplied with a standard plug; connect it to a correspondingly standard socket.
In the case is intended to connect the appliance permanently to the mains after having removed the plug supplied, must be fitted a two-pole switch conforming to regulations with an opening distance between contacts of not less than 3mm.
The manufacturers are not liable for any problems caused by the user's failure to observe the above instructions.
Fixing the hood
Apply the scheme supplied (N° 49A) on the right of the cabinet so that the lines marked by the arrows match the cabinet ensuring that they meet at the back and under.
Make two ∅ 2 mm holes at points 1 and 2 (fig. 3).
Carry out the same operation on the left. Fix the hood to the cabinet using screws E (4,5x16) supplied with the appliance (fig. 3). Use the shim F supplied with the hood for 16 mm cupboard side panels.
Fit the shim F to the left and to the right of the fixing curves of the hood and hook them in the holes.
Adjusting the removable drawer
The hood may be mounted in cabinets with different depths.
The back of the drawer can be adjusted so that the front of the removable drawer is the same depth as the cabinet.
Proceed as follows: unscrew the screws G, move the square plates H as required and tighten the screw G (fig. 4).
Operation
The hood has one variable speed motor. For the best performance, we recommend using the low speeds in normal conditions and the high speeds in particular cases of strong odour and vapour concentration.
We recommend starting up the hood a few minutes before cooking and keeping it running until all the odours have been eliminated.
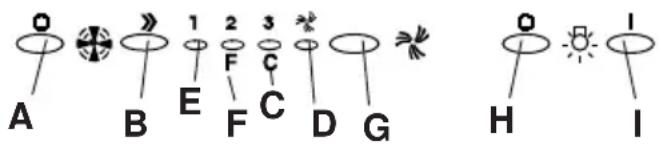
A - Motor OFF button B - ON button and motor speed selection button 1 - 2 - 3 - 1 - 2 - . . . E - Speed 1 LED F - Speed 2 LED and grease filter saturation LED (flashes) C - Speed 3 LED and carbon filter saturation LED (flashes) D - Intensive speed indicator LED G - Intensive speed ON switch This speed should be used when the concentration of cooking fumes or odours is particularly strong (for example when frying, cooking fish etc.). The fast speed will run for about 5 minutes and then return to the speed previously set automatically (1, 2 or 3), or switch off if no speed was selected. To turn off the fast speed, before the end of the 5 minutes, press button A or button B.
H - OFF lamp button
I - ON lamp button
If the hood fails to operate correctly, briefly disconnect it from the mains power supply for almost 5 sec. by pulling out the plug. Then plug it in again and try once more before contacting the Technical Assistance Service.
Filter saturation control devices for grease filters
This hood is supplied with a device that notifies the user when the grease filter must be cleaned or the charcoal filter replaced (if installed).
Upon installation, the saturation control device for the charcoal filter is not activated (the hood is ready for use in vent mode). In the event, you would like to install a charcoal filter, activate the saturation control device by pressing the B and G buttons at the same time for 3 seconds.

at the start of this procedure, only the F Led will blink, after 3 seconds have passed, the C Led will begin to blink, as well to indicate that the saturation control device for the charcoal filter has been activated.
Grease filter saturation Led

The Led marked F flashes to warn you when the grease filter needs to be cleaned.
Carbon filter saturation Led

The Led marked C flashes to indicate carbon filter needs to be replaced.
Reset for the saturation control devices for grease and charcoal filters
Once the grease filters have been cleaned or the charcoal filter replaced, press the A button for approximately 3 seconds until you hear the (beep):

The F led and C led (if active) will stop blinking.
The hood has an ON/OFF button.
Switch OFF the hood using this switch if the hood is not to be used for a long period of time.
In the case of failure, switch OFF the hood using this button and wait for about 5 seconds; now turn ON the hood using the same button.
Before using this button, use the
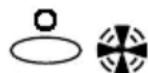
switch to switch off the motors or push in the drawer in order to prevent the filter saturation device from operating inefficiently.
Important! When carrying out maintenance or repairs, this appliance must be unplugged from the mains and not simply turned off with this switch.
Maintenance
Before performing any maintenance operation, disconnect the hood from the electricity.
Metal grease filter
Wash the filter, in a dishwasher or with detergent and water, periodically according to how often the appliance is used, but at least once every 4 weeks.
Attention! When washed in a dishwasher, the metal grease filter may discolour.
Before refitting the filter ensure that it is perfectly dry.
To remove this filter push simultaneously the two handle Q towards the centre of the cooker hood then extract them (fig. 5).
Grill and metal filter are a unique indivisible component and they cannot be divided, to avoid any damage to it.
Active Carbon Filter
This filter eliminates the odours and vapours which form during cooking.
When used in normal conditions it should be replaced at intervals of 6-8 months.
These filter can be ordered from the supplier. The carbon filter cannot be washed or regenerated.
To dismount the filter proceed as follows: Press the two buttons C (fig. 2), pull the filter slightly forwards and remove it.
Attention
Failure to observe the rules for cleaning the appliance and changing and cleaning the filters may cause fires.
Therefore, we recommend observing these instructions.
Replacing the lamps
— Disconnect the hood from the electricity.
— Remove the lamp cover R by pushing simultaneously two unlocking button S (Fig. 6) 'till having it completely removed.
— Always replace burnt-out lamps with PL-lamp 11 Watt max. (Fig. 6).
— Re-close the grate or the lamp cover.
—Before calling for Repair Service because the hood fails to light up, make sure the lamp is well-inserted.
Cleaning
To clean the outside of the hood use a cloth moistened with denatured alcohol or neutral liquid detergents.
Never use products containing abrasive.
Wipe brushed stainless steel in the same direction as the brushing to avoid scratching.
- Geräteansicht
- External exhausting system
- Connecting the exhausting pipe
- Recycling version (filtering)
- Installation
- Warning!
- Suggestions for the installation and use of the hood
- Electric connection
- Fixing the hood
- Adjusting the removable drawer
- Operation
- Filter saturation control devices for grease filters
- Grease filter saturation Led
- Carbon filter saturation Led
- Reset for the saturation control devices for grease and charcoal filters
- Maintenance
- Metal grease filter
- Attention! When washed in a dishwasher, the metal grease filter may discolour.
- Active Carbon Filter
- Attention
- Replacing the lamps
- Cleaning
Brand : JUNO
Model : JDA5750S
Category : Range hood