
WR203 - Radio OREGON SCIENTIFIC - Free user manual and instructions
Find the device manual for free WR203 OREGON SCIENTIFIC in PDF.


| Product type | AM/FM Radio |
| Brand | Oregon Scientific |
| Model | WR203 |
| Dimensions (L x H x D) | 200 x 120 x 60 mm |
| Weight | 350 g |
| Power supply | 4 AA batteries or AC adapter (not included) |
| Power consumption | 3 W max |
| Display type | Digital LCD screen |
| Main functions | AM/FM radio, clock, alarm, radio alarm, time display, night light |
| Frequency ranges | FM: 87.5–108 MHz / AM: 520–1710 kHz |
| Station memory | 20 presets (10 FM + 10 AM) |
| Built-in speaker | Yes, 8 cm |
| Headphone jack | 3.5 mm jack |
| Maintenance and cleaning | Clean with a soft, dry cloth. Do not use solvents. |
| Safety | Do not expose to moisture or heat sources. Keep out of reach of children under 3 years. |
| Spare parts and repairability | No spare parts available. Contact customer service for repair. |
| Included accessories | User manual, warranty |
| Warranty | 2 years |
Frequently Asked Questions - WR203 OREGON SCIENTIFIC
User questions about WR203 OREGON SCIENTIFIC
0 question about this device. Answer the ones you know or ask your own.
Ask a new question about this device
Download the instructions for your Radio in PDF format for free! Find your manual WR203 - OREGON SCIENTIFIC and take your electronic device back in hand. On this page are published all the documents necessary for the use of your device. WR203 by OREGON SCIENTIFIC.
USER MANUAL WR203 OREGON SCIENTIFIC
Multi-Powered Emergency Radio + Area Specific Hazard Alerts Model:WR203
USER MANUAL
CONTENTS
Introduction ......2
About the National Weather Radio System ......2
Consumer Electronics Assoc. (CEA) 2
Overview ....3
Front view ....3
Back view 4
LCD Display 4
Power source ....5
Back-up power 5
Rechargeable battery 5
Navigating through settings / displays ....5
NOAA weather radio 6
Finding local channels and SAME codes ....6
Setting the radio channel 6
Setting the location / SAME code 7
NOAA reception 8
Reception signal status 8
Reception test 9
Receiving NOAA alert messages ....9
General settings ......10
Clock 10
Alarm 10
Music from external audio device ....11
AM/FM 11
Recharging 11
Solar power 11
Crank 12
Electricity from adapter 13
Emergency siren 13
Flashlight 13
Backlight 13
Key Lock 13
Reset 13
Specifications ....13
Precautions ....14
About Oregon Scientific ....14
FCC Statement ......14
Declaration of conformity 15
Appendix 16
Same Code - What each digit means 16
List of NOAA messages 17
INTRODUCTION
Listen to broadcasts and receive alerts issued by the National Weather Service in real-time. Using the built-in area specific technology (SAME), customize the alerts for your specific county or region.
Enjoy listening to your personal music collection by simply plugging-in or alternatively tune into your favorite radio station.
With clock and alarm, keep track of time and wake up bright and ready for a new day of exploring and enjoying the natural surroundings. With the addition of an emergency siren, flashlight and ability to charge your mobile phone, this Multi-Powered Emergency Radio is a must-have item for your outdoor adventures.
Keep this manual handy as you use your new product. It contains practical step-by-step instructions as well as technical specifications and warnings you should know about.
ABOUT THE NATIONAL WEATHER RADIO SYSTEM
The National Weather Service (NWS) is an agency within the National Oceanic & Atmospheric Administration (NOAA) that operates a nationwide network of radio stations known as the NOAA Weather Radio (NWR). The NWR radio system broadcasts warning information for all types of hazards, both natural and technological.
Working in conjunction with the Emergency Alert System (EAS), NWR is an all-in-one hazards radio network and is considered to be the single source of all comprehensive weather and emergency information.
A nationwide network, the NWR consists of more than 1000 stations in the United States, Puerto Rico, the US Virgin Islands and US Pacific Territories. Broadcasts are designed to meet local needs. Routine programming is repeated every few minutes and consists of local forecast, regional conditions and marine forecasts.
Additional information, including river stages and climatic data, is also provided. During emergencies, these routine broadcasts are interrupted to report specific warnings.
CONSUMER ELECTRONICS ASSOC. (CEA)
This product complies with the Consumer Electronics Association (CEA) standards.
OVERVIEW
FRONT VIEW

- VOL knob: adjust volume (1-7) for AM/FM radio
- *turn emergency alarm on/off
- : turn radio on/off and toggle between AM/FM
-
- / + : auto search / adjust AM/FM radio frequency
- .exit setting mode; return to default clock display
- : toggle between clock / calendar / alarm 1 and 2 displays; set clock; confirm clock setting
-
√/∧ : decrease / increase value of the setting; adjust volume (1-7) for NOAA radio
-
NOAA : activate / deactivate NOAA function (turn off NOAA display); toggle between NOAA On / Standby / Mute / Off; switch NOAA ON (from mute mode) if SAME message received
- S.A.M.E.: toggle between SAME messages; lock / unlock keypad
- Public Alert indicator: green light to indicate NOAA broadcasts are being received (NOAA On / Standby / Mute mode); red to indicate Watch / Warning message received
- Crank: wind to charge battery or mobile phone
- LED indicator : continuous red light to indicate unit / mobile phone is charging; flashing red light to indicate rechargeable battery is low; green light to indicate radio is on
BACK VIEW

- Solar panel
- SNOOZE : activate snooze alarm / backlight
- Antenna
- turn flashlight on/off
- Light
- Headphone jack
- Audio line-in jack
- DC adapter jack
- Mobile phone charger jack and charger switch
- Battery compartment
- RESET : return unit to default settings
LCD DISPLAY
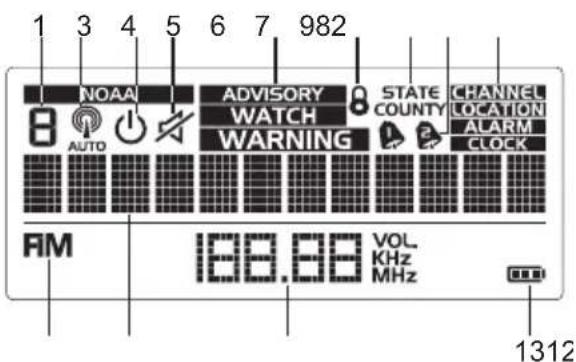
- Weather radio channel (1-7 or Auto)
- : NOAA radio On; NOAA radio reception status
- ⏻ : NOAA Standby
- : NOAA Mute (only messages will be displayed)
- Indicates the type of message displayed
- 8: keypad is locked
- STATE / COUNTY: Name or Code of State / County
- alarm 1/2 is enabled or setting is displayed
- CHANNEL / LOCATION / ALARM / CLOCK: indicates type of information displayed
- FM : radio is on and AM/FM is selected
- Clock / calendar / message
- Radio frequency / volume
- : back-up battery level indicator
POWER SOURCE
BACK-UP POWER
In cases where rechargeable battery power is low or has no power, the unit will source its energy from the back-up batteries.
Insert 3 AAA batteries:
- Slide open battery compartment.
- Insert the batteries matching the polarities.
■indicates there is no back-up battery or back-up battery is low.
It is recommended to insert back-up batteries in case of power shortage during emergencies. If battery is low and NOAA radio is playing, unit will automatically switch off.
RECHARGEABLE BATTERY
This radio has a built-in rechargeable battery that can store energy from different sources: a solar panel, a manual hand crank or electricity via an adapter (not included in package).
When rechargeable battery level is low, red LED indicator light will flash. NOAA as well as AM/FM radio cannot be switched on.
- Remove battery compartment cover.
- Insert battery pack.
- Align holes in the connector with the pins, then push connector in.
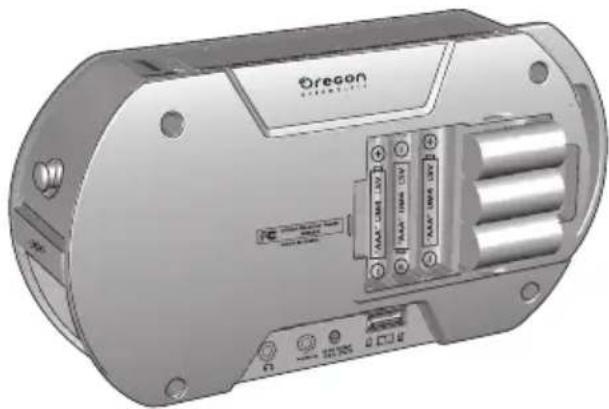
natural_image
3D rendering of a mechanical device with labeled ports and components (no readable text or symbols)- Tuck wires in and ensure they are within the battery compartment area.
- Close battery compartment cover.
NAVIGATING THROUGH SETTINGS / DISPLAYS
After inserting batteries, the unit will automatically prompt you to set the clock. (Go directly to 'Clock' section, step 4).
There are 4 settings that need to be set: Alarm / Clock / Channel / Location.
- Press 📁 to enter setting mode.
- Press √/∧ to navigate to desired setting.
To quick exit, press

To toggle between displays: Press

Display options: clock / calendar / alarm 1 and 2.
NOAA WEATHER RADIO
With this unit, you can listen to weather broadcasts and view alert messages issued by the National Weather Service. First, find your local channel and SAME code and using this information set the channel and location on the unit.
FINDING LOCAL CHANNELS AND SAME COD
National Weather Service uses one of 7 preset radio frequencies for their NOAA Weather Radio transmitters across the country. Please refer to the below phone number and website link to find the right channel and SAME* code for your local county:
* For more information about SAME code, refer to appendix 1.
To contact the NWS by telephone:
- Phone 1-888-NWR-SAME (1-888-697-7263).
- Follow prompts through a simple voice menu.
To obtain NWS radio channels on the internet:
- Locate www.nws.noaa.gov/nwr/indexnw.htm
- Click the State for which information is needed.
For example, clicking on “Montana” will give a list of information relevant to the State of Montana including the names of counties, SAME codes, NWR transmitter locations, the frequency of the transmitter, the strength of the signal in WATTS, and any remarks as applicable.
Example of the first 10 county radio channels and SAME codes:
| COUNTY TRANS-MITTER | SAME# N MHZ | WR FREQ CHANNEL | CALL CH | HOOSE RADIO | |
| Beaverhead | 030001 | Butte,MT | 162.550 | WXL79 | 7 |
| Beaverhead | 030001 | Dillon,MT | 162.475 | WNG638 | 4 |
| Big Horn 03 | 00003 Billings,MT | 162.550 | WXL27 | 7 | |
| Blaine | 030005 | Havre, MT | 162.400 | WXL53 | 1 |
| Blaine | 030005 | Billings MT | 162.475 | WWG85 | 4 |
| Broadwater | 030007 | Helena, MT | 162.400 | WXK66 1 | |
| Carbon | 030009 | Billings MT | 162.550 | WXL27 | 7 |
| Carter | 030011 | Baker, MT | 162.550 | WXK57 7 | |
| Cascade MT | 030013 | Great Falls, | 162.550 | WXJ43 | 7 |
| Chouteau | 030015 | Miles Hill, MT | 162.500 | WWG84 | 5 |
SETTING THE RADIO CHANNEL
After identifying the frequency of your local NOAA Weather Radio transmitter, refer to below table to find the corresponding channel (1-7).
- Press and hold 📄 to enter setting mode.
- Press / to navigate to Set Channel.
- Press 📄 to enter.
- Press √/∧ to select channel (Auto, 1-7).
Examples of which radio to choose for a particular location is given in the far right column in above chart.
| CHANNEL CORRESPONDING RADIO FREQUENCY | |
| 1 | 162.400 MHz |
| 2 | 162.425 MHz |
| 3 | 162.450 MHz |
| 4 | 162.475 MHz |
| 5 | 162.500 MHz |
| 6 | 162.525 MHz |
| 7 | 162.550 MHz |
SETTING THE LOCATION / SAME CODE
This unit can store up to 9 locations (1-9).
NOTE If you do not set a location, the radio will use the default setting "CO:All" for all counties.
NOTE If you select "CO:All" (step 3 below) you will receive all warnings within the unit's reception range. This may result in giving you information for regions that are not relevant. The regions can be as large as 5,000 square miles (13 sq km). If you select "CO:--" you will disable the ALL option and will only receive warnings from specified local areas.
- Press and hold to enter setting mode.
- Press to navigate to Set Location.
- Press 📄 to enter.
- "CO:ALL" or "CO:--" will be displayed. Press , characters on the right will flash. Press / / to select "ALL" (receive all warnings) or "--" (disable
the ALL option), press to confirm selection.
Continue setting the other storage locations:
- Digit next to C will flash. Press to select where you want to store the location, e.g., C1. Press to confirm. The 6 digits will flash.
- Press 📄, NAME / FIPS will flash. (Select either option a or b below)
a. To program by State / County name:
i. Press 📁 to enter setting options.
ii. Press to navigate to state and press to confirm. Repeat for county
iii. Press to navigate to next storage location (e.g., C2) and press to confirm. Repeat steps i-iii.
b. To program by SAME code from the NWS:
i. Press ▲ to navigate to FIPS and press to enter setting options.
ii. Press 🖼/∧ repeatedly to select number and press 📆 to confirm and move to the next digit.
iii. Repeat step ii for all digits.
iv. After all digits have been confirmed, storage location (e.g., C1) will flash. Press to navigate to next storage location and press to confirm. Repeat steps ii - iv.
NOTE Once the location name is selected, the corresponding FIPS code will be set into the memory. You cannot convert the code back to the location name. (FIPS is the Federal Information Processing System number assigned to each State, or open waters in or around the US. The SAME code comprises of numbers generated by the FIPS system).
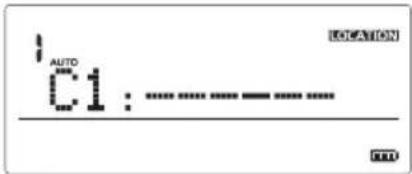
Activate / deactivate location:
You can activate / deactivate 1, some, or all of your stored locations.
When a location is activated, the 6-digit SAME code can be viewed in your stored locations display.

When a location is deactivated, “---” can be viewed in your stored locations display.
-
Press and hold to enter setting mode.
-
Press to navigate to Set Location.
-
Press to enter.
- Press to navigate to a stored location, e.g., C4 and press.
- When 6 digit SAME code or “---” is blinking, press to activate or deactivate it and press to confirm the setting.
NOAA RECEPTION
RECEPTION SIGNAL STATUS
Press NOAA to enter radio mode.
Green light indicates radio is on.
To change volume: Press √/∧
Reception signal status:
ICON DESCRIPTION

rrently selected channel nal is strong
Currently sele signal is weak
No NOAA alert message has been received for 10 days.
Currently selected channel signal is weak
No NOAA alert message has
been received for 10 days. Currently selected channel signal is strong
NOTE If NOAA radio is on, whether it be NOAA On, Standby or Mute, unit will continually search for a NOAA signal.
NOTE If NOAA function has been deactivated (top display is blank), press and hold NOAA to reactivate NOAA radio.
RECEPTION TEST
The fact that you can get clear voice reception does not guarantee that an emergency alert will trigger your unit's alert tone. To test actual reception, your unit must receive a test or emergency alert signal broadcast. Try positioning the radio in different locations to find a place where it can receive a clear signal to ensure its effectiveness.
The National Weather Service (NWS) broadcasts a test alert every week on Wednesday between 10AM and 12PM (noon). To receive the test message make sure that your radio is set to NOAA ON or NOAA Standby and that a Channel has been selected.
To find out the specific test schedule in your area, contact your local National Oceanic and Atmospheric Administration (NOAA) or National Weather Service (NWS) office. These offices are usually listed in the
telephone book under "US Government".
If you have any questions regarding alarm tests or to verify if a test was conducted, contact the programming office of your local NOAA Weather Radio station.
RECEIVING NOAA ALERT MESSAGES
This product is equipped to receive all required NOAA and Emergency Alert System (EAS) events. When an EAS event is sent by the NWS, any 1 of the following NOAA alert messages will be displayed on your radio: "WARNING", "WATCH", or "ADVISORY". The unit can store up to 8 NOAA alert messages.
The red public alert indicator will light up if a 'WATCH' or 'WARNING' message has been received. It will continue flashing until NWS withdraws the alert message.
If NWS issues an emergency warning, the siren will sound for 8 seconds to alert users.
To receive NOAA broadcasts / alert message, press NOAA to set the radio to one of the following modes:
| MODE ICON LED FUNCTIONALITY NOTE | ||||
| ON Flashing green Continuous AM/FM radio broadcasting /audible broadcasts turned oncan be heard | cannot be | |||
| STANDBY automatically turnson upon receivingNOAA alertmessage(AM/FM radio willbe interrupted) | ||||
| MUTE | Flashing green NOAA radio is on PressStandby but with to switchsound turned off. NOAA radioNOAA alert ON to hearmessages can be messagesviewed but not heard Power saving | NOAA | ||
| OFF | OFF | Radio off Will respond to NOAAmessag Power saving | note | |
When not listening to NOAA radio broadcasts, turning the radio to Standby, Mute or OFF will help to save power.
To view NOAA alert messages: Press S.A.M.E..
For a list of alert messages, please refer to the appendix.
GENERAL SETTINGS
CLOCK
- Press and hold 📁 to enter setting mode.
- Press / to navigate to Set Clock.
- Press 📄 to enter.
- Continue to set the following by repeating steps 2-3: hour format, hour, minute, calendar format (M-D / D-M), year, month, day and language (E, F, S).
NOTE The language selected will also be used for the NOAA alert messages.
Hold to speed through the settings.
ALARM
The unit has 2 alarms (alarm 1 and 2). They can be used together or independently. Alarms 1 and 2 have different sounds so that you can differentiate them. The alarm will sound for 1 minute unless it is disabled.
To set the alarm(s):
- Press and hold 📄 to enter setting mode. Set Alarm will appear.
- Press 📄 to enter.
- Press √/∧ to select alarm 1 or 2.
- Press 📄 to confirm selection.
- Continue with setting the hour / minute by repeating steps 3-4.
The alarm icon is enabled.

will appear
when alarm
To enable / disable alarm:
- Press 📄 to toggle screen display until screen shows alarm 1 / alarm 2 information.
- Press to enable / disable.
- Press 📄 to confirm.
-:- means alarm is disabled.
To silence the alarm:
- Press SNOOZE to silence it for 8 minutes OR
- Press any key (except , ) to turn the + alarm off and activate it again after 24 hours.
MUSIC FROM EXTERNAL AUDIO DEVICE
NOTE NOAA weather radio has to be first turned off. Using a cable, plug one end to your music storage device and one end to audio line-in socket located at the back of the unit.
AM/FM
To turn radio on / off:
Press
Green light indicates radio is on.
To select frequency:
- Press again to select AM or FM.
- Press and hold - / + to auto search or press - / + to manually select frequency.
To change volume: Turn VOL knob.
If NOAA radio is On, upon turning on the AM/FM radio NOAA radio will switch to Standby mode.
NOTE When charging, even if radio is on, indicator will be red.
NOTE To listen to the radio, ensure line-in cable is not connected.
TIP Reception quality may vary; try positioning in various locations. If using the unit indoors, reception will improve as you get closer to windows or upper rooms of your residence or location. Be sure to extend the antenna to improve reception as well.
RECHARGING
SOLAR POWER
Expose the solar panel directly to sunlight.
TIPS
- For best results when charging the battery, place the solar panel directly with view to sunlight.
- Direct solar panel as follows:
| Solar panel facing: if you reside in the: | |
| North Southern Hemisphere | |
| South Northern Hemisphere |
- It takes approximately 30 hours to fully charge the battery by solar power (under strong light conditions).
- Do not scratch the solar panel's surface or wipe it with strong detergent.
- Do not expose the solar panel to rain, snow or moisture.
- The duration of the rechargeable battery's charging or operating time is determined by either the intensity of sunlight or the position of the solar panel towards the sun.
- Do not overcharge the batteries.
NOTE Solar panel cannot be used to charge mobile phone.
CRANK
IMPORTANT Wind crank at a steady rate of at least 2 revolutions per second. To indicate the phone is receiving enough power to charge, a red LED will light up. Continue cranking at this rate until you feel your mobile phone has been adequately charged. The red LED will be lit for the duration of the charging process. If for any reason cranking was stopped, wait at least 5 seconds before beginning to crank again.
Damages to your mobile phone and/or battery may result from not following these instructions for which Oregon Scientific disclaims any liability. Oregon Scientific will not be held liable for any actual or consequential damages arising from this.
Mobile phones can only be charged by cranking or by adapter (separate purchase required).
To charge unit:
- Slide charger switch to
- Lift crank and wind clockwise.
To charge mobile phone:
- Using USB cable (not included) connect one end to the mobile phone and the other end to mobile phone charger jack.
- Slide charger switch to select
- Lift crank and wind clockwise.
NOTE 1 minute of winding can power the radio for approx. 5 minutes. It would take approximately 85 minutes of continuous winding (2 turns per second) to fully charge the battery.
NOTE Some smartphone models may not charge using the crank and the USB slot in this product. Please test this function using your phone to ensure that it works with your product. You may also want to consider charging an external battery pack as a backup for emergencies.
ELECTRICITY FROM ADAPTER
To use this feature, purchase a 5V adapter.
- Lift the soft plastic cover located on the back of the unit.
- Plug adapter into the unit and the other end to wall outlet.
- Slide charger switch accordingly.

charge mobile

arge unit
NOTE It takes 7 hours to fully charge the battery by using an adapter, which is not included.
EMERGENCY SIREN
Push ← switch outward to turn emergency alarm on.
To turn alarm off, push ▶ SWREN back to its original position.
FLASHLIGHT
Press to turn flashlight on/off.
BACKLIGHT
Press SNOOZE to activate backlight for 5 seconds.
KEY LOCK
Press and hold S.A.M.E.

will appear when keypad is locked.
RESET
Press RESET (located in the back-up battery compartment) to return to default settings.
SPECIFICATIONS
| TYPE DESCRIPTION | |
| Dimensions(L x W x H) | 7.5 x 2.1 x 3.9 in(191 x 54 x 98 mm) |
| Weight | 14.3 oz (404 g) |
| AM radio 520 – 1710 KHz | |
| FM radio 88 – 108 MHz | |
| Battery 3 x UM-4 AAA | batteries(for back-up, not included)600mAh 3.6V Ni-MH rechargeable battery |
| DC adapter | DC5V 500mA (not included) |
PRECAUTIONS
- Do not subject the unit to excessive force, shock, dust, temperature or humidity.
- Do not cover the ventilation holes with any items such as newspapers, curtains etc.
- Do not immerse the unit in water. If you spill liquid over it, dry it immediately with a soft, lint-free cloth.
- Do not clean the unit with abrasive or corrosive materials.
- Do not tamper with the unit's internal components. This invalidates the warranty.
- Only use fresh batteries. Do not mix new and old batteries.
- Images shown in this manual may differ from the actual display.
- When disposing of this product, ensure it is collected separately for special treatment and not as household waste.
- Placement of this product on certain types of wood may result in damage to its finish for which Oregon Scientific will not be responsible. Consult the furniture manufacturer's care instructions for information.
- The contents of this manual may not be reproduced without the permission of the manufacturer.
- Do not dispose old batteries as unsorted municipal waste. Collection of such waste separately for special treatment is necessary.
- Please note that some units are equipped with a
battery safety strip. Remove the strip from the battery compartment before first use.
- Should there be any discrepancies between the English and other language versions, the English version shall apply and prevail.
NOTE The technical specifications for this product and the contents of the user manual are subject to change without notice.
NOTE Features and accessories will not be available in all countries. For more information, please contact your local retailer.
ABOUT OREGON SCIENTIFIC
Visit our website (www.oregonscientific.com) to learn more about Oregon Scientific products.
For any enquiry, please contact our Customer Services at info@oregonscientific.com.
FCC STATEMENT
This device complies with Part 15 of the FCC Rules. Operation is subject to the following two conditions: (1) This device may not cause harmful interference, and (2) This device must accept any interference received, including interference that may cause undesired operation.
WARNING Changes or modifications not expressly approved by the party responsible for compliance could void the user's authority to operate the equipment.
NOTE This equipment has been tested and found to comply with the limits for a Class B digital device, pursuant to Part 15 of the FCC Rules. These limits are designed to provide reasonable protection against harmful interference in a residential installation.
This equipment generates, uses and can radiate radio frequency energy and, if not installed and used in accordance with the instructions, may cause harmful interference to radio communications. However, there is no guarantee that interference will not occur in a particular installation. If this equipment does cause harmful interference to radio or television reception, which can be determined by turning the equipment off and on, the user is encouraged to try to correct the interference by one or more of the following measures:
- Reorient or relocate the receiving antenna.
- Increase the separation between the equipment and receiver.
- Connect the equipment into an outlet on a circuit different from that to which the receiver is connected.
- Consult the dealer or an experienced radio / TV technician for help.
DECLARATION OF CONFORMITY
The following information is not to be used as contact for support or sales. Please visit our website at www.oregonscientific.com for all enquiries.
We
Name: Oregon Scientific, Inc.
Address: 19861 SW 95 ^th Ave., Tualatin,
Oregon 97062 USA
Telephone No.: 1-800-853-8883
declare that the product
Product No.: WR203
Product Name: Multi-Powered Emergency Radio
+ Area Specific Hazard Alerts
Manufacturer: IDT Technology Limited
Address: Block C, 9/F, Kaiser Estate,
Phase 1, 41 Man Yue St.,
Hung Hom, Kowloon,
Hong Kong
is in conformity with Part 15 of the FCC Rules. Operation is subject to the following two conditions: 1) This device may not cause harmful interference, and 2) This device must accept any interference received, including interference that may cause undesired operation.
APPENDIX
SAME CODE - WHAT EACH DIGIT MEANS
A SAME code is broken into 6 fields of numbers.
| 3 | 04 | 003 |
County code for Cochise County, Arizona
State-county coding:
The 3 digits on the far right refer to the state county coding. Each county within a state will have an independent 3-digit code.
NOTE To receive all of the alerts for a given state, insert 000 into the county section.
State codes:
Moving towards the left, the next 2 digits are for state coding.
Each of the 50 U.S. States has their own 2-digit code.
County sub-section code:
The last digit on the far left is the county subsection. A county may be sub-divided into nine sub-sections; each number between (1-9) represents a specific county sub-section.
NOTE If the county sub-section code is stated as 0, then that county is not sub-divided and all alerts for that county will be received. To receive all of the alerts for a given county, insert 0 into the county sub-section.
| A county can be subdivided as follows: | |
| 1 Northwest | |
| 2 North Central | |
| 3 Northeast | |
| 4 West Central | |
| 5 Central | |
| 6 East Central | |
| 7 Southwest | |
| 8 South Central | |
| 9 Southeast | |

LIST OF NOAA MESSAGES
| NATURE OF ACTIVATION SPANISH FRENCH MESSAGE | |||
| Administrative Message Mensaje administrativo Message administratif ADVISORY | |||
| Avalanche Watch Vigilancia de avalancha Veille d'avalanche WATCH | |||
| Avalanche Warning Aviso de avalanche Alerte d'avalanche WARNING | |||
| Biological Hazard Warning | Aviso de riesgo biológico Alerte risque biologique WARNING | ||
| Boil Water Warning | Aviso de hervir agua | Alerte d'ébullition de l'eau | WARNING |
| Blizzard Warning | Aviso de ventisca | Alerte de blizzard WARNING | |
| Child Abduction Emergency | Emergencia de secuestro de menores | Alerte de rapt d'enfant | ADVISORY |
| Civil Danger Warning | Aviso de peligro civil | Alerte de danger civil | WARNING |
| Civil Emergency Message | Mensaje de emergencia civil | Message d'urgence civile | WARNING |
| Coastal Flood Watch | Vigilancia de inundaciones costeras | Veille d'inondation côtière | WATCH |
| Coastal Flood Warning | Aviso de inundaciones costeras | Alerte d'inondation côtière | WARNING |
| Chemical Hazard Warning | Aviso de riesgo químico | Alerte de risque chimique | WARNING |
| Contaminated Water Warning | Alerta de Agua Contaminada | Alerte de contamination de l'eau | WARNING |
| Dam Watch | Vigilancia de represa | Veille de barrage | WATCH |
| Dam Break Warning | Aviso de rompimiento de represa | Alerte de rupture de barrage | WARNING |
| Contagious Disease Warning | Aviso de enfermedad contagiosa | Alerte de maladie contagieuse | WARNING |
| Practice / Demo | Práctica/Demostración | Exercice/demonstration | ADVISORY |
| Dust Storm Warning | Aviso de vendaval de polvo | Alerte de tempête de poussière | WARNING |
| Emergency Action Notification | Anuncio de acción urgente | Notification d'action urgente | WARNING |
| Emergency Action Termination | Fin de acción urgente | Fin d'action urgente | ADVISORY |
| Earthquake Warning | Aviso de terremoto | Alerte de tremblement de terre | WARNING |
| Immediate Evacuation | Evacuación inmediata | Évacuation immediate | WARNING |
| Evacuation Watch | Vigilancia de evacuación | Veille d'évacuation WATCH | |
| Food Contamination Warning | Aviso de contaminación de alimentos | Alerte de contamination d'aliments | WARNING |
| Flash Flood Watch | Vigilancia de inundaciones relámpago | Veille de crue subite | WATCH |
| NATURE OF ACTIVATION | SPANISH | FRENCH | MESSAGE |
| Flash Flood Statement | Advertencia de inundaciones relámpago | Bulletin spécial de crue subite ADVISORY | |
| Flash Flood Warning Aviso de inundaciones relámpago | Alerte de crue subite | WARNIN | G |
| Flood Watch Vigilancia de inundación | Veille d'inondation W | ATCH | |
| Flood Statement Advertencia de inundación | n | Bulletin spécial de risque d'inondation | ADVISORY |
| Flood Warning Aviso de inundación | Alerte d'inondation WARNING | ||
| Fire Warning Aviso de incendio | Alerte de feu WARNING | ||
| Flash Freeze Warning | Aviso de helada repentina | Alerte de gel soudain | WARNING |
| Freeze Warning | Aviso de helada | Alerte de gel WARNING | |
| Hurricane Statement Advertencia de huracán | Avis d'ouragan | ADVISORY | |
| Hazardous Materials Warning | Aviso de materiales peligrosos | Alerte de matières dangereuses | WARNING |
| Hurricane Watch | Vigilancia de huracán | Veille d'ouragan | WATCH |
| Hurricane Warning | Aviso de huracán | Alerte d'ouragan WARNING | |
| High Wind Watch | Vigilancia de vientos fuertes | Veille de coup vent | WATCH |
| High Wind Warning | Aviso de vientos fuertes | Alerte de coup vent | WARNING |
| Iceberg Warning | Aviso de témpano de hielo | Alerte d'iceberg | WARNING |
| Industrial Fire Warning | Aviso de incendio industrial | Alerte de feu industriel | WARNING |
| Local Area Emergency | Emergencia de área local | Urgence locale | ADVISORY |
| Law Enforcement Warning | Aviso de las autoridades de la ley | Alerte des forces de l'ordre | WARNING |
| Land Slide Warning | Aviso de deslizamiento de tierra | Alerte de glissement de terrain | WARNING |
| National Audible Test | Prueba nacional de audibilidad | Essai Audible National | ADVISORY |
| National Information Center | Mensaje del National Information Center | Message du centre national d'information | ADVISORY |
| Network Notification | Anuncio de mensaje en red | Notification de message réseau | ADVISORY |
| National Periodic Test | Prueba periódica nacional Essai periódique national | ADVISORY | |
| National Silent Test | Prueba nacional de silencio | Essai national de silence | ADVISORY |
| Nuclear Power Plant Warning | Aviso de riesgo nuclear | Alerte de centrale nucléaire | WARNING |
| Power Outage Advisory | Notificación de interrupción eléctrica | Avis d'une panne d'électricité | ADVISORY |
云
| NATURE OF ACTIVATION SPANISH | FRENCH | MESSAGE | |
| Radiological Hazard Warning Aviso de peligro radiológico Alerte de risque radiologique WARNING | |||
| Required Monthly Test | Prueba mensual obligatoria Test men | suel obligatoire ADVISOR | Y |
| Required Weekly Test | Prueba semanal obligatoria Test heb | domadaire obligatoire ADVISOR | Y |
| Special Marine Warning | Aviso especial de la Marina Alerte mar | time spécial WARNING | |
| Special Weather Statement | Advertencia especial del estado del tiempo | Bulletin météorologique spécial ADVISOR | Y |
| Shelter In-Place Warning | Aviso de refugio Alerte d'abri sur plade | WARNING | |
| Severe Thunderstorm Watch | Vigilancia de tormenta electrica severa | Veille d'orage violent WATCH | |
| Severe Thunderstorm Warning | Aviso de tormenta electrica severa Alerte d'orage violent WARNING | ||
| Severe Weather Statement | Advertencia de tiempo severo | Bulletin météorologique violent | ADVISORY |
| Tornado Watch | Vigilancia de tornado Veille de tornade | WATCH | |
| 911 Telephone Outage Emergency | Interrupción telefónica 911 | Interruption d'urgence service 911 | ADVISORY |
| Tornado Warning | Aviso de tornado | Alerte de tornade | WARNING |
| Tropical Storm Watch | Vigilancia de tormenta tropical | Veille de tempête tropicale | WATCH |
| Tropical Storm Warning | Aviso de tormenta tropical | Alerte de tempête tropicale | WARNING |
| Tsunami Watch | Vigilancia de tsunami | Veille de tsunami | WATCH |
| Tsunami Warning | Aviso de tsunami | Alerte de tsunami | WARNING |
| Volcano Warning | Aviso de actividad volcánica | Alerte d'éruption volcanique | WARNING |
| Wild Fire Watch | Vigilancia de incendio destructivo | Veille de feu hors contrôle | WATCH |
| Wild Fire Warning | Aviso de incendio destructivo | Alerte de feu hors contrôle | WARNING |
| Winter Storm Watch | Vigilancia de tormenta de nieve | Veille de tempête de neige | WATCH |
| Winter Storm Warning | Aviso de tormenta de nieve | Alerte de tempête de neige | WARNING |
| Unrecognized Watch | Vigilancia desconocida | Veille inconnue | WATCH |
| Unrecognized Emergency | Emergencia desconocida | Urgence inconnue | ADVISORY |
| Unrecognized Statement | Advertencia desconocida | Risque inconnu | ADVISORY |
| Unrecognized Warning | Aviso desconocido | Alerte inconnu | WARNING |
NOTE The 4 “Unrecognized” messages above will appear when a new NOAA alert message is created and broadcasted. The unit will not be able to recognize the message as it is not in the software database.
natural_image
3D rendering of a device casing with internal components and mounting holes (no visible text or symbols)Para ajustar la(s) alarma(s):
Batterie rechargeable 5
SOURCE D'ALIMENTATION
ALIMENTATION DE SECOURS
natural_image
3D rendering of a mechanical device with labeled ports and components (no readable text or symbols)RÉCEPTION DES MESSAGES D'ALERTE NOA

- Multi-Powered Emergency Radio + Area Specific Hazard Alerts Model:WR203
- CONTENTS
- INTRODUCTION
- ABOUT THE NATIONAL WEATHER RADIO SYSTEM
- CONSUMER ELECTRONICS ASSOC. (CEA)
- OVERVIEW
- FRONT VIEW
- BACK VIEW
- LCD DISPLAY
- POWER SOURCE
- BACK-UP POWER
- Insert 3 AAA batteries:
- RECHARGEABLE BATTERY
- NAVIGATING THROUGH SETTINGS / DISPLAYS
- To toggle between displays: Press
- NOAA WEATHER RADIO
- FINDING LOCAL CHANNELS AND SAME COD
- To contact the NWS by telephone:
- To obtain NWS radio channels on the internet:
- SETTING THE RADIO CHANNEL
- SETTING THE LOCATION / SAME CODE
- Continue setting the other storage locations:
- Activate / deactivate location:
- NOAA RECEPTION
- RECEPTION SIGNAL STATUS
- ICON DESCRIPTION
- RECEPTION TEST
- RECEIVING NOAA ALERT MESSAGES
- GENERAL SETTINGS
- CLOCK
- ALARM
- To set the alarm(s):
- To enable / disable alarm:
- To silence the alarm:
- MUSIC FROM EXTERNAL AUDIO DEVICE
- AM/FM
- To turn radio on / off:
- To select frequency:
- To change volume: Turn VOL knob.
- RECHARGING
- SOLAR POWER
- TIPS
- CRANK
- Mobile phones can only be charged by cranking or by adapter (separate purchase required).
- To charge unit:
- To charge mobile phone:
- ELECTRICITY FROM ADAPTER
- EMERGENCY SIREN
- FLASHLIGHT
- BACKLIGHT
- KEY LOCK
- RESET
- PRECAUTIONS
- ABOUT OREGON SCIENTIFIC
- FCC STATEMENT
- DECLARATION OF CONFORMITY
- We
- declare that the product
- APPENDIX
- SAME CODE - WHAT EACH DIGIT MEANS
- State-county coding:
- State codes:
- County sub-section code:
- Para ajustar la(s) alarma(s):
- SOURCE D'ALIMENTATION
- ALIMENTATION DE SECOURS
- RÉCEPTION DES MESSAGES D'ALERTE NOA
Brand : OREGON SCIENTIFIC
Model : WR203
Category : Radio