PRJD903 - Video projector Pyle - Free user manual and instructions
Find the device manual for free PRJD903 Pyle in PDF.


| Product Type | Multimedia LCD Projector |
| Model | PRJD903 |
| Brand | Pyle |
| Native Resolution | 800 x 480 pixels (480p) |
| Maximum Resolution | 1920 x 1080 pixels (1080p) |
| Brightness | 2400 ANSI Lumens (estimated) |
| Contrast Ratio | 2000:1 (estimated) |
| Light Source | LED |
| Lamp Life | 30,000 hours |
| Projection Size | 32 - 170 inches |
| Throw Ratio | 1.5:1 (estimated) |
| Connectivity | HDMI, VGA, USB, AV, Audio Out |
| Built-in Speaker | Yes, 4Ω 3W |
| Dimensions (L x W x H) | 8.5 x 6.5 x 3.5 inches |
| Weight | 2.5 lbs |
| Power Supply | AC 100-240V, 50/60Hz |
| Power Consumption | 65W (estimated) |
| Keystone Correction | ±15° (manual) |
| Focus | Manual |
| Supported Media | JPEG, MP3, MP4, AVI, RMVB |
| Features | Multimedia playback, portable design |
Frequently Asked Questions - PRJD903 Pyle
User questions about PRJD903 Pyle
0 question about this device. Answer the ones you know or ask your own.
Ask a new question about this device
Download the instructions for your Video projector in PDF format for free! Find your manual PRJD903 - Pyle and take your electronic device back in hand. On this page are published all the documents necessary for the use of your device. PRJD903 by Pyle.
USER MANUAL PRJD903 Pyle
natural_image
Line drawing of a projector with lens and ventilation slots (no text or symbols)User Manual
MODEL: PRJD903
182version:01(Android&2USB)
Warranty card |
Contents
Maintenance record
| Return Date: | Test Date: |
| Cause of Malfunction: | |
| Repair Record: | |
| Service Station: | Signature: |
| Return Date: | Test Date: |
| Cause of Malfunction: | |
| Repair Record: | |
| Service Station: | Signature: |
| Return Date: | Test Date: |
| Cause of Malfunction: | |
| Repair Record: | |
| Service Station: | Signature: |
| Return Date: | Test Date: |
| Cause of Malfunction: | |
| Repair record: | |
| Service Station: | Signature: |
Warning 1
Safety Precautions....2
Caution 3
Introductions 4
Installation....7
full setting....7
standard setting(front projection)8
installation method 9
input terminals 10
Remote control 12
Panel instruction 14
Turn on/shut down 15
turn on 15
shut down 15
Image adjustment....16
focus adjustment....16
keystone adjustment 16
Menu settings 17
-
Menu setting method ......17
-
Parameter adjustment 17
-
Picture 18
-
Sound 18
-
Time....18
-
Menu setting method 19
-
Multimedia 19
Trouble shooting....21
Specification 23
Packing list&Accessories 24
Warning
Warning:
Please remember the model and series
number of the projector in case of lost.
Please carefully check all accessories
with the pack list before throwing the package away.
When you use this projector, please carefully read user manual.
Warning:

High brightness lamp!
Avoid staring or look directly at the light.
specially for children.
Warning: Avoid to place the projector in wet condition in case of the electric shock danger.


It indicates there is a instruction
for important operation
It indicates there is a dangerous
Voltage inside that may cause shock
Warning: As an A-class product, the projector may cause radio interference Users shall take effective measures to deal with it.
About the remote control battery
• The remote control battery should be fixed correctly
Otherwise it will be damaged for overheat
• Make sure the remote control out of children reach
Warranty clause
Safety precautions
1, warranty range
All projector is purchased by our distributor or agent, we offer the warranty service during valid warranty time.
2, warranty time
From the date of production in the projector label, we offer 12 months warranty period for projector. But the halogen lamp only have 6 months warranty, the LED lamp have 24 months warranty
3, warranty condition(except for following status)
1) warranty card or purchased invoice are lost.
2) alter or dilacerate the date of production in the projector lable
3) user do not operate the projector according to use manual and damage the projector
4) projector is out of warranty time
5) Flood fire as natural disasters and all the factors of force majeure damage
4, warranty service
if your projector is broken during the warranty period, please contact the distributor where you bought. They will offer you the repairment service.
Warning;
when use this projector, please read this manual carefully.
If wrong operation, it will cause electric shock or fire. so when use and repair this projector, please comply with the following points.
1,Read manual
Before use this projector, please read full manual carefully and operate according to this manual instruction
2, Clear
when clear this projector, please pull out the power cable. Use the wet cloth to clear, not the cleanser
- Accessory
please use our recommended accessory. Or it will damage the projector.
4, Use environment
Donot place the projector in wet environment 5, installation and fix please place this projector in stable table.
6, Ventilation
the ventilation in the projector are best for projector work stably. Donot let the dust wall up the filter. Or it will cause the projector high-temperature protected. So please use the water to clear the filter per month.
7, Power
please make sure the power same as your projector inquiry specification. (220 V or 110V)
8, Earthing wire
this projector has earthing wire. It is three pin plug.
9,protect the power cable
Please confirm the power cable are perfect when connect the projector.
10, Thunder
when the thunder happen or long time no use, please pull the power cable out of projector.
11,Repairment
As the high voltage inside ,please donot open or try to repair the projector by yourself. . Please ask a professional technician to repair the projector.
12, Far away Heat device please make sure this projector far away other heat device. It will damage the projector service life
Caution
Packing list &Accessories
About the installation
- In order to improve the projector service life,● About Open and close the projector. It should not place in a wet and ventilation condition. - when close the projector, press the
- Donot put the projector under the sunshine directly.
- Projector working temperature: 0°C\~+35°C. - Projector store temperature : -20°C\~+70°C.
- Donot block the ventilation-window of projector
If the projector interior temperature are too hot, the machine will be shut off automatically. This is hot - protected system.
So please clean the filter of projector per month. It is very important. Donot let the dust cover the filter.
- when close the projector, press the power key again. And then the lamp shut off. But the fans still work until 5minutes later. When close the projector, donot pull out the power cable directly. After 5minutes, the projector will shut off automatically.
Warning:
Fans will adjust the temperature. It is controlled by system, when the projector work, the fans turn slowly or quickly, so the fans noise are different. But it is normal. when the projector work, donot pull out the pwer cable. If the fans stop to work, it will cause the projector interior temperature very high, so it may damage the projector.
Please confirm the following after you open the package
Packing list:
Projector----1 Lens lid----1 Remote control----1 Power cable----1 AV cable----1 User manual----1 Extra fuse----1 Len cleaner----1
Optional accessories:
- Projector screen (Matt White, Electric)
- Ceiling Mounts
Specification
Introductions
| LCD Type 5.8*TFT | Matrix RGB | |
| Input signal video | Audio Stereo | Component video(Ypbpr),VGA,HDMI USB, |
| Output signal Audio | 2W*2 Speaker | |
| LCD Native resolution | 1280X800 support 1080P Contrast ratio 2000 : 1 | |
| Lens Aperture 3.8 | Focus 190mm | |
| Lamp LED 180W | Color-temperature 9300K Life > 20000hours Continuous working time | < 24hours |
| Image Size 60~120inch | Brightness 3000 Lumens Keystone ±15 degree | |
| Power Voltage 110~220V~ 50~60Hz Power consumption | 200W | |
| Working condition | Temperature Humidity 10%~65% | +5°C~+35°C |
| Store condition | Temperature Humidity 10%~90% | -10°C~+60°C |
| Remote control Frequency 38KHz | ||
| Machine | Size Weight 3Kg | 325*245*140mm |
(Any changes on the parameter will not be noted)
Projector Description
The projector is able to connect signals: HDMI,Y/Pb/Pr,VGA and TV(optional),as well as stereo audio input. Please connect in reference to the following diagrams
Front

Focus lens
② Hight-feet adjustment
3 Cool winds input Ventilation
Back

4 IR receiver
5 8 Input terminals
Details at page 10,11
6 Power switch
7 Keystone adjustment Details at page 16
Instructions
FAQ
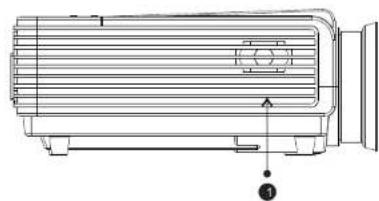
Right
natural_image
Technical line drawing of an industrial machine component (no text or symbols)① Right channel speaker
Left
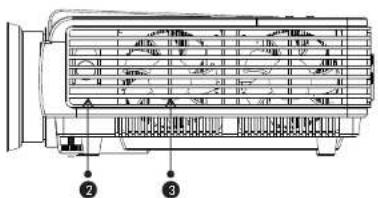
② Cool wind input ventilation
③ Left channel speaker
FAQ:
① Q: Blue screen, no picture, no sound
A: Input cables connected right?
② Q: Picture right, no sound
A: Input cables connected right?
Volume at min. Or on Mute
③ Q: Audio right, no picture
A: Input signal connected right?
In VGA mode, The PC refresh rate >75Hz
In VGA mode, The PC contrast ratio is >1024*768
④ Q: Can't find devices when plugged with hard drive or fresh drive
A: Re-plug the device
Check if the device is broken
⑤ Q: Can't play the movies
A: The format of the video is right?
Files is broken?
Device is broken?
⑥ Q: There is picture, no sound?
A: The decode system doesn't match
VGA with notebook
When connect the projector with the note book, you may need to press the Fn+F*(with□□ on the button)
| VGA output function key | |
| NEC | Fn + F3 |
| SOTEC | |
| Panasonic | |
| LENOVO | |
| HP | Fn + F4 |
| Samsung | |
| Toshiba | Fn + F5 |
| Acer | |
| SONY | Fn + F7 |
| ThinkPad | |
| DELL | Fn + F8 |
| Asus | Fn + F10 |
| Fujitsu | |
Trouble shooting
Introductions
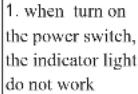
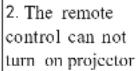
The projector is so easy to use as the TV. While some problems my occur because of the environment and voltage. Please try to recognize the fake malfunction before refer to the technicians
| Problem | The possibility reason |
 |    |
 |     |
 |      |
 |    |
TOP

natural_image
Technical line drawing of a mechanical device with no visible text or symbols1 Control panel Details at page 14
Bottom
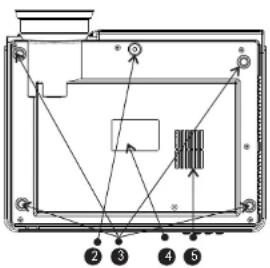
② Hight-feet adjustment
③ Projector mount hole (4holes)
Fix with M4×8mm.
4 Label
5 Cold wind input ventilation system
Installation
Projector Installation
Please install in reference to the instruction below

flowchart
graph TD
    A["Speaker L"] --> B["Screen"]
    C["Speaker R"] --> B
    D["Subwoofer"] --> B
    E["Speaker C"] --> B
    F["Projector"] --> B
    G["DVD Amplifier"] --> H["Amplifier"]
    I["Appreciate seats"] --> H
    J["Speaker LS Speaker RS"] --> H
In order to get a good image quality, do not expose the projector to the sunshine or other strong light, close the curtain if you use the projector in daytime
Menu setting
Projector Installation
6. Menu setting method

| Menu setting | |
| Language | Pycekni/Arabic/CN |
| Restore default | YES/NO |
| HDMI CFC | OFF/ON |
| Blending | OFF/LOW/MID/TIIGH |
| OsdDuration | OFF/5S/10S/15S |
| Upgrade (USB) | Software update |
7, multimedia menu

| Multimedia Menu | |
| Picture | View the photos in gallery |
| Music | Play an album |
| Movie | Watch a movie |
| TXT | Read the book |
Note: The signal source multimedia 1 made, you can operate on USB1 interface disk. The signal source multimedia 2 made, you can operate on USD2 interface disk;
CAUTIONS:
1) The usb interface support USB1.1 USB2.0, including hard drive and fresh drives
2) The max. Storage supported is 400Gb
3) The system format supported: FAT16, FAT32, NTFS
4) The usb interface can support most drives but is not universal, any unknown device problem is caused by the device drive
5) The total voltage of the connected devices shall not be over 1200mAh, the problems caused by the wrong operation will not be warranted
Multimedia Format
| Task | Format | Video Decode | Audio Decode |
| MONIT | a vi | Di vX, Xv id MP68 -4 | MP 3.1MA .A AG |
| .m pr | MP LG 1, MP LG 2 | ||
| .d st | MP LG-1 | ||
| .mV rmb | Re allied is .vide o | ||
| .m ov/m.v | II. 264 | ||
| MUSIC | .in p3 | -- | Va3 |
| .w na | -- | AVA | |
| .n da/a ac | -- | AAC | |
| PICTURE | .j pg/jp ag | Pro ogres si va JPEG Ba celin e JP EG | -- |
| .b np | BNP | -- | |
| .p ng | No n-int er laced In tari ca d | -- |
Standard setting (Front projection)
Please refer to the below sheet, install the projector in distance according to the screen size. Please make sure the projector is placed on stable mount, Take care of the ventilation condition (nothing near 30cm blocking)
| Distance | 16:94:3 | |
| 60" | 2.16m2.5m | |
| 84" | 2.97m3.43m | |
| 100" | 3.5m4.05m | |
| 120" | 4.77m | 4.15m |
The data may have 3% error, due to the image size according to the projector and screen. If the distance is less than 2M or more than 5M, the image may appears unclear
Warning:
Please check the following pictures for the trapezoid adjustment

Projector Installation
Menu Setting
Installation method
Contact a professional service man to mount this projector to a ceiling. Follow the instruction below for the correct projector positions:

Warning:
1) This projector might damage beyond repair when it is incorrectly mounted on a ceiling or when it is in correctly installed on a surface or installed on a incorrect surface. It may also inflict damage to people nearby
2) This projector can only be used in an environment with a temperature not exceeding the range of 0-35 degree. The projector may malfunction if temperatures vary outside the normal operating rage
3) The sharpness of the screen might be interrupted when the projector is being used in a dusty, wet, moist or smoke filled environment.
The projector might malfunction in a moist or wet environment
4) Take care of the sufficient ventilation around the projector. Otherwise this projector might overheat and cause life threatening situations
5) The first operation of the projector may cause a unclear image, Please refer to the image adjustment for help
3. Picture Menu
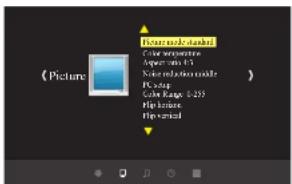
| Picture Menu | |
| Picture Mode | Standard/warm/user (Appendix 1)/Dynamic |
| Color temperature | Standard/warm/cool |
| Aspect | Auto/4:3/16:9 ·s (Appendix 2) |
| Noise reduction | OFF/LOW/MID/IIIGII |
| Color Range | 0-255/16-235 |
| Flip horizon | OFF/ON |
| Flip vertical | OFF/ON |
☆ Appendix I
| Picture | ||
| Contrast | 0~100 | Image contrast adjustment |
| Brightness | 0~100 | Image brightness adjustment |
| HUE | 0~100 | Image hue adjustment |
| Sharpness | 0~100 | Image sharpness adjustment |
☆ Appendix II
| The setting of Light-width is different under different modes, zoom is not valid in picture mode |
4. Sound Menu

| Sound Mcnu | |
| Sound mode | Music/Movie/Sport/User/Standard |
| Balance | (-50~50) |
| Auto-volume | OFF/On |
| Surround Sound | OFF/Surround |
| Balance | (120/500/1.5K/5K/10K) Hz 60 |
5. Time Menu
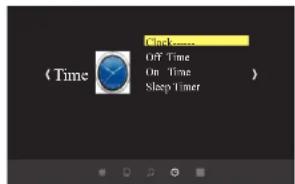
| Time Menu | |
| Clock — — — | Date--/Month--/Year--/Ir--/Min- |
| OFF Time | OFF/Once/Everyday/Monday~/Sunday |
| On Time | OFF/Once/Everyday/Monday~/Sunday |
| Sleep Timer | OFF/10Mins/20Mins/30Mins/60Mins/90Mins |
Menu Setting
Input terminals
1. Menu setting method
- Using the projector, press "menu". The picture display on screen to adjust menu(picture I)
- Press “◀/▶” key, the menu in turn circle into “picture” > “sound” > “time” > “system”
- Select the adjust interface, use "▲/▼" key to choose the wanted item (picture II)
- Press "OK" or "◀/▶" to adjust the item parameter.
- Finished the elected item parameter, press the "menu" key again, exit the page
- Repeat operating step 2\~5, till you finished all the parameters, press "exit" exit the menu page, otherwise, the menu page will auto exit after a period time

Picture1
2. Parameter adjustment
A. Press "menu" key, until display the above picture of the menu;
b. Press “▲/▼” key, elect the option that need to adjust
c. Press "OK" key, use "◀/▶" button to adjust the certain parameters
d. Press the "menu" key again exit the menu page parameter adjust station.

Picture2

Signal terminals description


| Name | Description |
| Y/Pb/Pr | Component video input |
| Video | AV input |
| Lout、Rout | Audio output |
| Lin、Rin | Audio input |
| PC-RGB IN | VGA input |
| HDMI 1、HDMI 2 | HDMI Signal input |
| USB1、USB2 | USB signal input |
CAUTION
☆Turn off the power of projector and the device before connecting. Either on may cause a break down of machine
☆Check the shape of the plug.DO NOT try the wrong plug
Image adjustment
When you use the projector for the first time .It normally will appear image faintness or the image is trapezoid. This is caused by the wrong lens focus or trapezoid correction Please follow the below steps to correct:
Focus adjustment
- Rotate the lens into projector, the rotate it out slowly. At the same time, looking at the resolution point carefully. When the image is clear, it is the best situation of the lens

natural_image
Technical line drawing of two identical views of a projector unit (no text or symbols)Keystone
- If a projected picture has keystone distortion, correct image with Keystone adjustment. The image becomes trapezoid shape when the screen or projector is not leveled. Please reposition the projector to improve its angle to the screen. However, the circumference of the image may not be focused


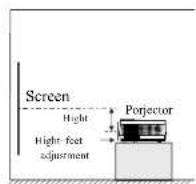
(4) (5)
Turn on/shut down
Remote control
If the projector is a new one, please read the "projector install chapter, place the projector and connect the cables, follow the below steps to turn on/off
Turn on
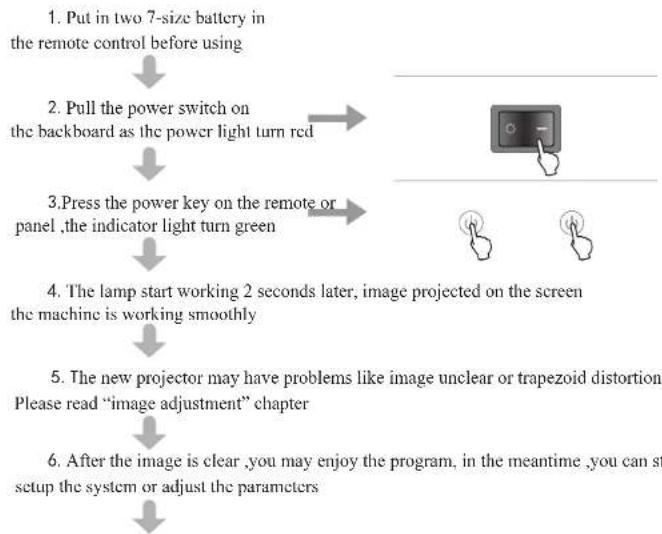
flowchart
graph TD
    A["1. Put in two 7-size battery in the remote control before using"] --> B["2. Pull the power switch on the backboard as the power light turn red"]
    B --> C["3. Press the power key on the remote or panel, the indicator light turn green"]
    C --> D["4. The lamp start working 2 seconds later, image projected on the screen the machine is working smoothly"]
    D --> E["5. The new projector may have problems like image unclear or trapezoid distortion, Please read “image adjustment” chapter"]
    E --> F["6. After the image is clear, you may enjoy the program, in the meantime, you can start setup the system or adjust the parameters"]
Turn off
-
Press the power button during using will lead the projector to standby mode
-
when the projector switch into standby mode, the light will turn green from red
Remote control instruction
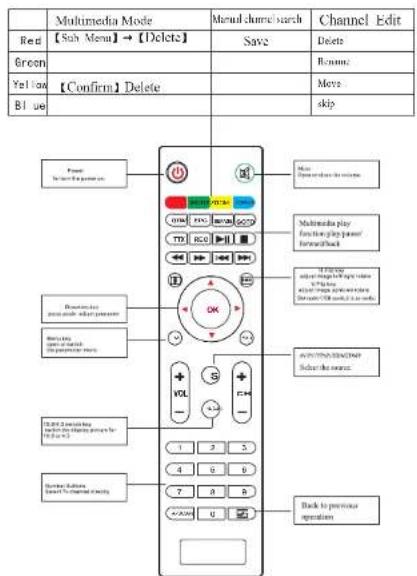
Cautions:
☆DO NOT mix-use the new and old battery
☆Make sure nothing stands in the middle of remote and IR
☆ Avoid the light shine on the IR directly
☆Point the remote right to IR within 6m, and 30 degrees
☆Pull out the battery if you are not going to use it for a long time
☆Please change new battery when the remote malfunctions.
☆Do not place the remote in wet or heat condition
Panel instruction

① Indicator light
Red: Standby mode
Green: Working mode
3 Menu
open or close the Menu
5 SOU-KEY
Source key (VGA,HDMI,etc.)
2 Power KEY
This button can lead the projector to working/standby mode
4 Direction key
Adjust with parameters, the same function with the remote control
6 OK KEY Confirm

- Warranty card |
- Contents
- Warning
- Warning:
- About the remote control battery
- Warranty clause
- Safety precautions
- Caution
- Packing list &Accessories
- About the installation
- Packing list:
- Optional accessories:
- Specification
- Introductions
- Projector Description
- Instructions
- FAQ
- FAQ:
- VGA with notebook
- Trouble shooting
- Installation
- Projector Installation
- Menu setting
- Menu setting method
- 7, multimedia menu
- CAUTIONS:
- Multimedia Format
- Standard setting (Front projection)
- Installation method
- Picture Menu
- Sound Menu
- Time Menu
- Input terminals
- Menu setting method
- Parameter adjustment
- Signal terminals description
- Image adjustment
- Focus adjustment
- Keystone
- Turn on/shut down
- Remote control
- Turn on
- Turn off
- Remote control instruction
- Panel instruction
Brand : Pyle
Model : PRJD903
Category : Video projector